1. University of Nottingham
Department of Mechanical, Materials & Manufacturing
Engineering
Group 27 Design Project MM4GDM
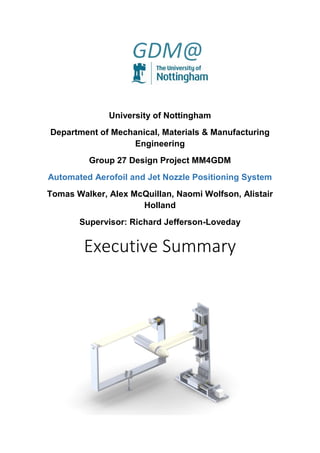
Automated Aerofoil and Jet Nozzle Positioning System
Tomas Walker, Alex McQuillan, Naomi Wolfson, Alistair
Holland
Supervisor: Richard Jefferson-Loveday
Executive Summary
2. Overview of the Project
Airframe manufacturers are currently researching how the location of an engine relative to an
aerofoil wing changes the flow of air that exits the exhaust of a gas turbine engine and the
aerodynamic forces on the aerofoil itself. The configuration of these two components affects the
engines performance and noise. Currently, Computational Fluid Dynamics (CFD) is being used to
analyse and predict how the turbulent flow of air leaving the jet interacts with the aerofoil. These
tests, however, need to be conducted in practice to investigate the correlation between the CFD and
experimental results. The results will also indicate the optimum position of an engine in relation to
the aerofoil in addition to the effects of noise.
The objective of the project is to design, build and commission a test rig that can be used to explore
the effect of the jet flow on the aerofoil. The rig will then be used to conduct various experiments.
These include analysing the velocity field from the jet, completing flow visualisation such as PIV to
analyse the interaction between the nozzle jet flow and the free stream air. All of the experimental
tests will be used to verify the CFD of the experimental set ups and the fundamental modelling of
large eddie simulation (LES).
Key Design Features
The traverse system is a modular build which can be easily separated for ease of maintenance and
replacement of parts.
Stepper motors are used to provide the torque to generate the motion for the rig. To ensure that
stepper motor aligned with the threaded bar, CNC Misalignment Motor couplings were used to
account for any misalignment.
A key design parameter from the control perspective was to minimise the mechanical friction on the
moving parts. This was to ensure that the stepper motor torque would rotate the bar and move the
platforms as desired. Components such as oilite plain bushings, precision ground guide rods and a
threaded nylon insert were used to mitigate this issue.
The customer required the flow chamber to be as streamline as possible. To do this, the flow
chamber had a constant outer diameter along its whole length. Additionally, a 3D printed bullet was
attached to the rear of the chamber to ensure the flow remains attached. A final 3D printed part, the
streamlined cover, was added to the design to remove large wake regions from the mounting rods
A requirement from the customer was that the flow exiting the nozzle must be conditioned. An
insert was designed which has a honeycomb and perforated plate cross-section. This component can
be easily removed and replaced with other geometry so the customer can adapt the velocity profile
from the exit of the nozzle.
The worm gear was implemented on the aerofoil drive shaft to lock the aerofoil into position if there
were to be a loss of power.
The aerofoil can be interchangeable with other geometries by easily removing the existing aerofoil
using the threaded fasteners connected to the aerofoil drive and driven shafts.
3. Team Structure and Roles
Before commencing our project, it was important for us, as a team, to recognise and evaluate our
own and each other’s best attributes which would later contribute to the success of our project. We
sat down as a team and discussed the importance of communication and how organisation from the
very beginning would increase our efficiency and prevent unnecessary stress. This was especially
important due to the scale and complexity of our project.
The methods of organisation included writing documents at all stages through the project, instead of
leaving them until days before the submissions. Additionally, taking minutes and recordings of
meetings helped to consolidate what was discussed and ensured all information was accurate,
possibly to be used at a later date.
A good working relationship with our customer, Dr Richard Jefferson-Loveday, was critical. We built
this relationship by attending weekly meetings, without fail, to discuss our progress that week and
also with regular email communication. An important aspect of this relationship was having the
confidence in our own abilities and, sometimes, having to compromise in order to have realistic
goals and expectations, completing the work to the highest standard given our capabilities, budget
and time constraints. No decisions were made without consulting Dr Loveday and ensuring their
viability.
Although it is important to note that every team member was directly involved in every stage of
the project, including research, design, manufacture and documentation, assuming certain
responsibilities in their respective areas of expertise guaranteed that all aspects of the project were
well-managed. Alistair’s knowledge of electronics and computer programming enabled the
construction of the motor control software which was developed simultaneously during the
manufacturing stage. Tomas used his Creo Parametric modelling and CFD knowledge to take charge
of the embodiment of the design and carry it all the way through to manufacture, providing
solutions to any design issues encountered along the way. Alex’s FE and manufacturing expertise
ensured that the embodied design retained structural integrity and the group was able to actually
manufacture and assemble the system. Naomi used her communication and organisation skills to
ensure all deliverables, including budget, were updated regularly and acted as liaison with the
relevant personnel at the University.
Overall, we are delighted with the result of our project. We are all in agreement that the work that
we did in the initial stages of the project gave us the motivation to see it succeed. Teamwork was a
vital part of our success and equally sharing the workload made it an enjoyable and educational
experience for us all.
4. Key Event Project Timeline
Initial discussions with
customer to establish
requirements
(September - October 2014)
RPR
(10th October 2014)
Research of possible
mechanisms
(October - November 2014)
Refinement of numerous
potential designs for each
Mechanism
(November 2014)
PDR
(8th December 2014)
Embodiment of a single, final
design
(January - February 2015)
CDR
(2nd March 2015)
Planning for
manufacture/developing
controls system
(March 2015)
Manufacture/
Purchasing
(March - April 2015)
Assembly
(April 2015)
* Please refer to Gantt Chart
(Folder 9.1) for full project
breakdown
5. Difficulties Faced & Troubleshooting
Budget
An initial cost analysis, before design finalisation, revealed that we were over our designated budget. Not only
was this in violation of the project requirements, it also left us with no contingency money for inevitable errors
that would occur during the manufacturing phase. A thorough review of this analysis allowed us to identify
components of particular high cost, leading us to find alternative suppliers and redesign certain parts.
Matching Customer Requirements and Our Capabilities
Throughout the design process, as a group we thought of features that could be introduced to enhance our
existing design, as did our customer. We strived to incorporate as many of these ideas as possible and were able
to successfully integrate a number of them into the final embodied design. However, due to the complexity of
some of these additional feature ideas, redesigning parts of the system would have been required, increasing
the likelihood of the project falling behind schedule.
Manufacture
As our project was heavily focused on manufactured deliverables, we had to find a balance between how many
parts there were to manufacture and how little time there was to do so. We, therefore, started manufacture a
couple of days after the CDR to ensure we would finish with enough time.
We soon discovered that certain components had characteristics that meant we were not able to manufacture
them in the EA Workshop, with the machines and equipment available. We were able to make use of the central
workshop and our technician Andy Plummer. Our limited technician time forced us to choose between the parts
that were essential and the parts that could be re-designed to be manufactured within our capabilities.
A small number of parts were incorrectly manufactured in the workshop. Due to this, new stock material had to
be purchased, the cost of which was covered with the contingency budget. A foam-based streamlined cover, to
prevent flow distortion, was manufactured as a light and cheap alternative to 3D printing an aerofoil-like
component. Due to the poor surface finish, geometry misalignment and lack of connection capability with other
components, it was deemed unsuitable by our customer, resulting in a 3D model having to be printed.
Towards the end of our manufacturing time, the MakerBot was temporarily out of use, resulting in a delay in
our remaining 3D printed parts. After carefully weighing up our options, we decided the most appropriate
solution was to use the high quality 3D printer which was more expensive, which again made use of our
remaining contingency budget.
Controls
The FPGA was chosen to be the target platform for the motion control software due to its parallel capabilities
and high clock speed. Parallel execution would allow for the simultaneous control of all three motors in the
system, and the high clock speed enables precise pulse timing and therefore greater control of motor speed.
Problems with the LabVIEW FPGA compiler led to a significant delay in the deployment, and therefore testing, of
the code. ‘Prototype’ software with limited functionality was therefore developed for the real time processor, to
allow rapid testing of the motors while the FPGA compiler issue was being resolved. The issue was finally
resolved by speaking to an Applications Engineer at National Instruments, who provided technical support.
We were able to resolve the issue without increasing the project lead time by carrying out all the necessary
testing as outlined the project plan with the real time processor, and seeking professional advice.
6. Cost Analysis
*Note:
- Our customer is funding £70 for the 3D printed Aerofoil
- ‘Total Cost’ and ‘Our Cost’ both include contingency
Sub-System Cost %
Traverse Rig £296.59 57%
Aerofoil Rig £164.20 32%
Flow Conditioning Chamber £55.66 11%
Total Cost £516.45
Divisions Cost %
3D Printed Parts £81.31 14%
Rework £26.83 5%
Bought Out Parts (Mechanical) £181.18 32%
Bought Out Parts (Controls) £76.36 13%
Fasteners £6.75 1%
Stock Material (University Stores) £74.02 13%
Customer-Bought Parts £70.00 12%
Contingency £53.55 9%
Total Cost £570.00
Our Cost £500.00*
7. Key Outcomes
The connection between the aerofoil structure and the force balance (built into the floor of the wind
tunnel) fitted together correctly with the right orientation. The aerofoil leading edge was required to be
perpendicular to the flow direction.
The force balance connection needed to retain its structural rigidity whilst the wind tunnel was in
operation and hold the weight of the structure itself. It support did not move, vibrate or deform in any
direction.
Figure 1: Overall set up inside the wind tunnel before any tests were conducted.
The stepper motors all operated successfully whilst the wind tunnel was in operation.
The flow conditioning chamber connected to the mounting rods did not vibrate or move whilst the wind
tunnel was running.
A test was conducted to see if the chamber could withstand the 6 bar pressure required. The flow
conditioning insert inside the chamber, the nozzle and the aluminium chamber withstood the pressure.
The aerodynamic features such as the bullet situated on the back of the chamber helped to streamline
the flow around the chamber as it travelled down the wind tunnel, further enhancing the quality of air
passing over the aerofoil.
8. Figure 2: Smoke flow around aerofoil without compressed air through chamber
The PIV viewing window is positioned directly above aerofoil which meets the requirements of PIV
capabilities of the system.
The position of the traverse rig is the correct distance away from the centre of the wind tunnel and far
enough from the aerofoil. This allows the nozzle to move 75mm above, below, forward and backwards
from the centre of the leading edge.
The test proved that the entire system could be operated via a controls system, externally from the
wind tunnel.
It was essential that our customer Dr Richard Jefferson-Loveday was able to operate the software
himself. This was also achieved with the help of a user manual.
The entire software package and all of its features function correctly.
Figure 3: Smoke flow around angled aerofoil with compressed air through chamber
9. The Future of Our Project
Dr Richard Jefferson-Loveday will be using our device to investigate the structure of a jet in close proximity to an
aerofoil.
The traversing mechanism will allow the position of the jet relative to the aerofoil to be changed (in the x-y
directions) in addition to the ability to alter the aerofoil angle of attack.
Experiments will be conducted, using the device, with a variety of methods. These will include PIV (Particle
Image Velocimetry), hotwire anemometry and flow visualisation.
Through the experiments, a detailed understanding of the flow structure will be obtained and the effect of the
aerofoil location (and angle) will be examined.
The experimental measurements will be used to validate high fidelity CFD calculations and will provide
confidence in turbulence modelling techniques for this type of flow.
Flow configurations such as this are found in gas turbine installations on aircraft where the jet exhaust air
interacts with surfaces such as wings and flaps. The level of turbulence generation in these flows will have a
direct impact on noise generation.
The rig will initially be used for a final year project although it is expected a wide range of students and staff will
benefit from its use.
The present rig was required to be adaptable and disassembled with ease for multifunctional use.
For the jet experiments the rig has been designed to allow interchangeability of nozzles, allowing different
configurations and nozzle exit diameters to be tested. The use of 3D printing to produce different nozzle types
allows for rapid manufacture at a low cost.
The aerofoil rig section has been designed to be mountable on a force balance for additional experimentation
of, for example, drag.
The whole rig has been designed to fit into an existing wind tunnel which will further add to its
functionality. For the current application, it allows experiments with a co-flow to be performed.
Where possible, parts have been 3D printed for ease of replacement.
A user manual has been created to allow a university technician to set-up and use the control system, as
required.