JTC Event 2012 - Microsoft Office 365 Implementation Handout
•Download as DOCX, PDF•
0 likes•419 views


Recommended
More Related Content
What's hot
What's hot (14)
Viewers also liked
Viewers also liked (8)
Similar to JTC Event 2012 - Microsoft Office 365 Implementation Handout
Similar to JTC Event 2012 - Microsoft Office 365 Implementation Handout (20)
More from Alberta Education
More from Alberta Education (18)
JTC Event 2012 - Microsoft Office 365 Implementation Handout
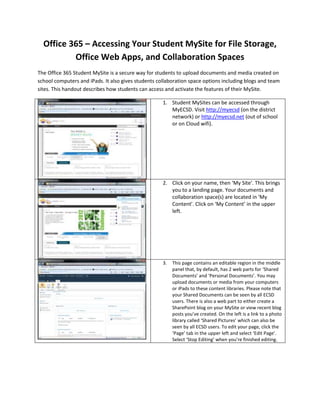
- 1. Office 365 – Accessing Your Student MySite for File Storage, Office Web Apps, and Collaboration Spaces The Office 365 Student MySite is a secure way for students to upload documents and media created on school computers and iPads. It also gives students collaboration space options including blogs and team sites. This handout describes how students can access and activate the features of their MySite. 1. Student MySites can be accessed through MyECSD. Visit http://myecsd (on the district network) or http://myecsd.net (out of school or on Cloud wifi). 2. Click on your name, then ‘My Site’. This brings you to a landing page. Your documents and collaboration space(s) are located in ‘My Content’. Click on ‘My Content’ in the upper left. 3. This page contains an editable region in the middle panel that, by default, has 2 web parts for ‘Shared Documents’ and ‘Personal Documents’. You may upload documents or media from your computers or iPads to these content libraries. Please note that your Shared Documents can be seen by all ECSD users. There is also a web part to either create a SharePoint blog on your MySite or view recent blog posts you’ve created. On the left is a link to a photo library called ‘Shared Pictures’ which can also be seen by all ECSD users. To edit your page, click the ‘Page’ tab in the upper left and select ‘Edit Page’. Select ‘Stop Editing’ when you’re finished editing.
- 2. 4. To create a document using the Office Web Apps (Microsoft Word, Excel, PowerPoint, OneNote), select one of your document libraries – either Personal Documents or Shared Documents. Select the ‘Documents’ tab alone the top left and then the drop-down arrow next to ‘New Document’. *Note – The first time you try this, you may only see ‘Word Document’ from your choices. This is because, as you’ve created your site, all of the web app features are being created and activated on our server. Wait approximately 3 minutes, ‘Refresh’ or ‘Reload’ your page, and all 4 options for Office Web Apps should be there. 5. If you have Microsoft Office installed, the installed application will launch. Upon saving your work , the document will appear in your MySite document library that you started working in. If you do not have Microsoft Office installed, the Office Web App will launch, ask you for a file name, and will allow you to work on your file. In the future when you have documents in a MySite document library, you can select the drop down arrow to the right of the file to ‘Edit in Browser’ (with the Office Web App) or, if you have the application installed, to edit in that application. 6. To transfer multiple files between a MySite document library and a PC, select the ‘Library’ tab in the upper left area, then look for the ‘Open with Explorer’ icon. This will launch Windows Explorer (PC only) which will allow you to copy/paste files from your network or home PC to/from the MySite document library you’re working with. 7. To edit the color theme of your MySite, choose ‘Site Actions’ (upper left), then ‘Site Settings’ (bottom choice – yellow gears). In the centre column, select ‘Site Theme’ from the ‘Look and Feel’ category in the top centre. Try out some color themes and select ‘Apply’. It’s quite easy to switch back to the default (no theme) if you wish to.