Mixin Classes in Odoo 17 How to Extend Models Using Mixin Classes
PFM
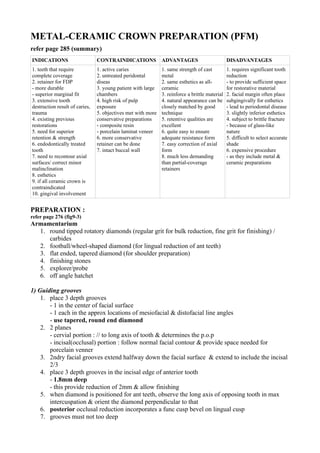
1. METAL-CERAMIC CROWN PREPARATION (PFM)
refer page 285 (summary)
INDICATIONS
CONTRAINDICATIONS
ADVANTAGES
DISADVANTAGES
1. teeth that require
complete coverage
2. retainer for FDP
- more durable
- superior marginal fit
3. extensive tooth
destruction result of caries,
trauma
4. existing previous
restorations
5. need for superior
retention & strength
6. endodontically treated
tooth
7. need to recontour axial
surfaces/ correct minor
malinclination
8. esthetics
9. if all ceramic crown is
contraindicated
10. gingival involvement
1. active caries
2. untreated peridontal
diseas
3. young patient with large
chambers
4. high risk of pulp
exposure
5. objectives met with more
conservative preparations
- composite resin
- porcelain laminat veneer
6. more conservative
retainer can be done
7. intact buccal wall
1. same strength of cast
metal
2. same esthetics as allceramic
3. reinforce a brittle material
4. natural appearance can be
closely matched by good
technique
5. retentive qualities are
excellent
6. quite easy to ensure
adequate resistance form
7. easy correction of axial
form
8. much less demanding
than partial-coverage
retainers
1. requires significant tooth
reduction
- to provide sufficient space
for restorative material
2. facial margin often place
subgingivally for esthetics
- lead to periodontal disease
3. slightly inferior esthetics
4. subject to brittle fracture
- because of glass-like
nature
5. difficult to select accurate
shade
6. expensive procedure
- as they include metal &
ceramic preparations
PREPARATION :
refer page 276 (fig9-3)
Armamentarium
1. round tipped rotatory diamonds (regular grit for bulk reduction, fine grit for finishing) /
carbides
2. football/wheel-shaped diamond (for lingual reduction of ant teeth)
3. flat ended, tapered diamond (for shoulder preparation)
4. finishing stones
5. explorer/probe
6. off angle hatchet
1) Guiding grooves
1. place 3 depth grooves
- 1 in the center of facial surface
- 1 each in the approx locations of mesiofacial & distofacial line angles
- use tapered, round end diamond
2. 2 planes
- cervial portion : // to long axis of tooth & determines the p.o.p
- incisal(occlusal) portion : follow normal facial contour & provide space needed for
porcelain venner
3. 2ndry facial grooves extend halfway down the facial surface & extend to include the incisal
2/3
4. place 3 depth grooves in the incisal edge of anterior tooth
- 1.8mm deep
- this provide reduction of 2mm & allow finishing
5. when diamond is positioned for ant teeth, observe the long axis of opposing tooth in max
intercuspation & orient the diamond perpendicular to that
6. posterior occlusal reduction incorporates a func cusp bevel on lingual cusp
7. grooves must not too deep
2. - will overreduced & undulating surface results
8. verify grooves depth with probe
2) Incisal/occlusal reduction
1. incisal reduction should allow 2mm
- for adequate material thickness in the restoration
- most of retention is derived from proximal walls
2. occlusal reduction require less reduction (1.5mm)
- esthetics is not critical
- excessive reduction shortens the axial walls → reduce retention & resistance form
3. for anterior teeth
- access is usually unrestricted
- thickest portion of diamond can be used to max cutting eificiency
4. on posterior teeth same as complete cast preparation
- func cusp bevel : 1.5m
- non func cusp bevel : 1mm
5. use tapered, round end diamond
3) Labial/buccal reduction
1. use tapered, round end diamond
2. min 1.2mm
- ceramic : 1mm
- metal copping : 0.2mm
3. 2 planes
- cervial 1/3 : // to long axis of tooth & determines p.o.p
- incisal 2/3 : follow normal contour
- prefer reduction start with cervical 1/3
4. if use subgingival finish line
- make shoulder with bevel
- careful to avoid permanent gingival recession
5. if use supragingival finish line (most preferred)
- make shoulder margin (1mm wide)
- extend well into proximal embrasures
- porcelain labial margin (PLM) is preferred
- to avoid metal display
6. preferred to establish shoulder finish line from proximal to facial wall
- minimize placement of initial shoulder preparation too close to epithelial attachment
7. if shoulder finish line is established from facial to proximal
- tends to bury the instrument & enroach on the epithelial attachment
4) Axial reduction of proximal & lingual surfaces
1. reduced the proximoaxial & linguoaxial surfaces
- diamond held // to p.o.p
- 6' convergence from cervical to incisal/occlusal
2. for anterior teeth, place one groove only
3. for post teeth, place 3 grooves similar to complete cast preparation
4. on anterior teeth, lingual concavity is prepared for adequate clearance for restorative
material
- for metal : 1mm
- for ceramic : 1.2-1.5mm
5. carry axial reduction from groove along the lingual surface into proximal
6. lingual chamfer is developed
3. 7. extend chamfer bucally into proximal to blend with interproximal shoulder
8. interproximal margin should not inadvertently placed too far gingivally
- will infringe on attactment apparatus
9. on posterior teeth
- lingual wall reduction blends into func cusp bevel
10. on anterior teeth, after preparation of cingulum wall place one or more grooves in lingual
surface
- 1mm deep
- use football shaped diamond
- reduce ½ first and the other half as a reference
5) Finishing
1. margin must provide distinct resistance to vertical displacement of the explorer/probe
2. proper finish and continuous margin (like smooth glas slab)
3. round all the line angles
- to facilitate impression making & die-pouring steps
- use fine-grit diamond in low speed
4. use diamonds/hand instruments such as off angle hatchets or carbide
5. porcelain labial margin require proper support for the porcelain
6. shoulder with 90' cavosurface angle is recommended
- can be used for a criwn with conventional metal collar
- allow the collar to be kept narrow
- risk of leaving unsupported enamel
- margin os often beveled/sloped to create more obtuse cavosurface angle
- use flat end diamond in low speed
7. remove any unsupported enamel
8. avoid any undercut
9. for subgingival finish line, shoulder with bevel is most efficient
- use flame-shaped carbide bur/hand instrument
10. blend all surfaces together, remove any sharp transitions
6) Evaluation
1. areas often missed during finishing
- incisal edges of anterior preparations
- transition from occlusal to axial wall of posterior preparations
2. completed chamfer should provide 0.5mm space
3. chamfer must smooth & continuous
4. distinct resistance to vertical displacement of tip of probe
5. chamfer should continuous with interproximal shoulder/beveled shoulder
6. 90' cavosurface angle or slighty obtuse
7. should be no any unsupported tooth struc especially at facial margin
8. no undercut
9. avoid excessive convergence
- lead to pulpal exposure
10. remove all residual debris