
Recommended
More Related Content
Similar to 19.Advanced Visual Basic Lab.pdf
Similar to 19.Advanced Visual Basic Lab.pdf (20)
Recently uploaded
Recently uploaded (20)
19.Advanced Visual Basic Lab.pdf
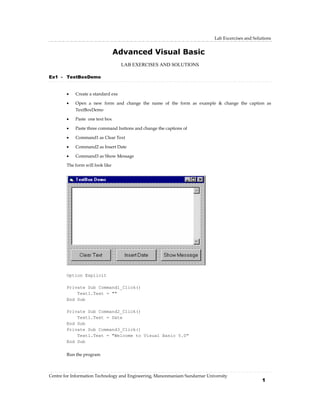
- 1. Lab Excercises and Solutions Centre for Information Technology and Engineering, Manonmaniam Sundarnar University 1 LAB EXERCISES AND SOLUTIONS Ex1 - TextBoxDemo • Create a standard exe • Open a new form and change the name of the form as example & change the caption as TextBoxDemo • Paste one text box • Paste three command buttons and change the captions of • Command1 as Clear Text • Command2 as Insert Date • Command3 as Show Message The form will look like Option Explicit Private Sub Command1_Click() Text1.Text = "" End Sub Private Sub Command2_Click() Text1.Text = Date End Sub Private Sub Command3_Click() Text1.Text = "Welcome to Visual Basic 5.0" End Sub Run the program Advanced Visual Basic
- 2. Advanced Visual Basic Centre for Information Technology and Engineering, Manonmaniam Sundarnar University 2 Ex2 - LabelBoxDemo • create a standard exe • Paste 3 forms • In the form1 change the caption as form loader • In form1 paste two command buttons • And change the caption of command1 as show form2 & command2 as show form3 • Paste two label box and change the caption of label1 as Initializing and label2 as please wait (open the property window of the label boxes and change the font property and font size property and height,width of the label boxes) The first form will look like
- 3. Lab Excercises and Solutions Centre for Information Technology and Engineering, Manonmaniam Sundarnar University 3 • In form 2 paste a label box and change the caption as form2 • Change the font type and font size in the property window • The second form will look like o open the third form and past one label box o change the caption of the label box as FORM3 o change the font size and font type in the property window of the label box. Now the third form will look like
- 4. Advanced Visual Basic Centre for Information Technology and Engineering, Manonmaniam Sundarnar University 4 Write the following code in form1’s corresponding control’s event. Option Explicit Private Sub Command1_Click() Form2.Show End Sub Private Sub Command2_Click() Form3.Show End Sub Private Sub Form_Load() Form1.Show Form1.MousePointer = vbHourglass DoEvents Form1.Caption = "Loading Form2..." Load Form2 Form1.Caption = "Loading Form3..." Load Form3 Form1.Caption = "Form Loader" Command1.Visible = True Command2.Visible = True Label1.Caption = "Application Loaded" Label2.Caption = "Click on the buttons to load a Form" Form1.MousePointer = vbDefault DoEvents End Sub Write the following code in form2 Private Sub Form_Load() Dim LTime LTime = Timer While Timer - LTime < 5 Wend End Sub Write the following code in form3 Private Sub Form_Load() Dim LTime LTime = Timer While Timer - LTime < 5 Wend End Sub Run the program
- 5. Lab Excercises and Solutions Centre for Information Technology and Engineering, Manonmaniam Sundarnar University 5 Ex3 - Timer Program o Open a new standard EXE project o Design your form as shown below o Current Time should be displayed on the Text1 o Current Date should be displayed on the Text2 o Change the Caption properties of the Form to Timer Program o Right Click the Timer control, click Properties
- 6. Advanced Visual Basic Centre for Information Technology and Engineering, Manonmaniam Sundarnar University 6 o Set the Interval property of the Timer Control to 1000 which implies that the Timer is activated every one second Enter the code in the Form_Load( ) procedure. Private Sub Form_Load( ) Text1.Text = Time$ Text2.Text = Date$ End Sub Private Sub Timer1_Timer() Text1.Text = Time$ End Sub Execute the Program Ex4 - Application with Command Button o Open a standard EXE project with four text boxes, two command button, with two lable boxes o In the Text1 Box enter a date o In the Text3 Box enter a text o If you click the Command Button1, Day of the Date should be displayed in the Text2 Box o If you click the Command Button2, UpperCase of the text should be displayed in the Text4 Box o Design your form as shown below Private Sub Command1_Click() Dim MYDATE As Date
- 7. Lab Excercises and Solutions Centre for Information Technology and Engineering, Manonmaniam Sundarnar University 7 MYDATE = Format(Text1.Text, "D-MMM-YY") Text3.Text = Format(MYDATE, "dddd") End Sub Private Sub Command2_Click() Text4.Text = Format(Text2.Text, ">") End Sub Execute the program Ex 5 : List Box Controls 1. Open a new standard EXE project. 2. Paste one combo box, one list box, one label box , two command button and write the following code in the corresponding controls. 3. If we Click Command1, the item is entered in the inputbox and added to the List1. 4. If we Click Command2, the selected item of the listbox will be removed. 5. Design your form as shown below.
- 8. Advanced Visual Basic Centre for Information Technology and Engineering, Manonmaniam Sundarnar University 8 When we select the item in the List1, that item will be added in the Combo1 & displayed in the Text1. Private Sub Command1_Click() Dim a As String a = InputBox("Enter the name") List1.AddItem a End Sub Private Sub Command2_Click() Dim a As Integer a = List1.ListIndex Combo1.AddItem (List1.List(a)) Text1.text = list1.list(a) List1.RemoveItem (a) End Sub Private Sub List1_Click() Text1.Text = List1.SelCount End Sub 3. Run the program by pressing Ex6 - Calculator Program o Open a new Standard EXE project o Paste 5 command buttons and create one control array for 0 to 9 numbers, another control array for four operators, one for decimal point, one for cancel, one for cancel entry. o Design your form as shown below and perform a Calculator Project, which can able to work as like as Windows Calculator Use Control Arrays)
- 9. Lab Excercises and Solutions Centre for Information Technology and Engineering, Manonmaniam Sundarnar University 9 o Write the following code in the corresponding control events. Option Explicit Dim Op1, Op2 Dim DecimalFlag As Integer Dim NumOps As Integer Dim LastInput Dim OpFlag Dim TempReadout Private Sub Cancel_Click() Readout = Format(0, "0.") Op1 = 0 Op2 = 0 Form_Load End Sub Private Sub CancelEntry_Click() Readout = Format(0, "0.") DecimalFlag = False LastInput = "CE" End Sub Private Sub Decimal_Click() If LastInput = "NEG" Then Readout = Format(0, "-0.") ElseIf LastInput <> "NUMS" Then Readout = Format(0, "0.") End If DecimalFlag = True LastInput = "NUMS" End Sub Private Sub Form_Load() DecimalFlag = False NumOps = 0 LastInput = "NONE" OpFlag = " " Readout = Format(0, "0.") End Sub
- 10. Advanced Visual Basic Centre for Information Technology and Engineering, Manonmaniam Sundarnar University 10 Private Sub Number_Click(Index As Integer) If LastInput <> "NUMS" Then Readout = Format(0, ".") DecimalFlag = False End If If DecimalFlag Then Readout = Readout + Number(Index).Caption Else Readout = Left(Readout, InStr(Readout, Format(0, ".")) - 1) + Number(Index).Caption + Format(0, ".") End If If LastInput = "NEG" Then Readout = "-" & Readout LastInput = "NUMS" End Sub Private Sub Operator_Click(Index As Integer) TempReadout = Readout If LastInput = "NUMS" Then NumOps = NumOps + 1 End If Select Case NumOps Case 0 If Operator(Index).Caption = "-" And LastInput <> "NEG" Then Readout = "-" & Readout LastInput = "NEG" End If Case 1 Op1 = Readou If Operator(Index).Caption = "-" And LastInput <> "NUMS" And OpFlag <> "=" Then Readout = "-" LastInput = "NEG" End If Case 2 Op2 = TempReadout Select Case OpFlag Case "+" Op1 = CDbl(Op1) + CDbl(Op2) Case "-" Op1 = CDbl(Op1) - CDbl(Op2) Case "X" Op1 = CDbl(Op1) * CDbl(Op2) Case "/" If Op2 = 0 Then MsgBox "Can't divide by zero", 48, "Calculator" Else Op1 = CDbl(Op1) / CDbl(Op2) End If Case "=" Op1 = CDbl(Op2) Case "%" Op1 = CDbl(Op1) * CDbl(Op2)
- 11. Lab Excercises and Solutions Centre for Information Technology and Engineering, Manonmaniam Sundarnar University 11 End Select Readout = Op1 NumOps = 1 End Select If LastInput <> "NEG" Then LastInput = "OPS" OpFlag = Operator(Index).Caption End If End Sub Private Sub Percent_Click() Readout = Readout / 100 LastInput = "Ops" OpFlag = "%" NumOps = NumOps + 1 DecimalFlag = True End Sub Run the Program by press F5. Ex7 - String Operations Program 1. Create a new standard EXE project. 2. Design your form as shown below.
- 12. Advanced Visual Basic Centre for Information Technology and Engineering, Manonmaniam Sundarnar University 12 3. We have to Create CSting Class, follow this Steps. 4. In the Menu Project->Add Class Module in the Form1 5. We write the code in the Class Module (NumStr.cls) Private BinaryDigits(16) As String Private NDigits(20) As String Private NTens(10) As String Private Sub Class_Initialize() BinaryDigits(0) = "0000" BinaryDigits(1) = "0001" BinaryDigits(2) = "0010" BinaryDigits(3) = "0011" BinaryDigits(4) = "0100" BinaryDigits(5) = "0101" BinaryDigits(6) = "0110" BinaryDigits(7) = "0111" BinaryDigits(8) = "1000" BinaryDigits(9) = "1001" BinaryDigits(10) = "1010" BinaryDigits(11) = "1011" BinaryDigits(12) = "1100" BinaryDigits(13) = "1101" BinaryDigits(14) = "1110" BinaryDigits(15) = "1111" NDigits(1) = "one" NDigits(2) = "two" NDigits(3) = "three" NDigits(4) = "four" NDigits(5) = "five" NDigits(6) = "six" NDigits(7) = "seven" NDigits(8) = "eight" NDigits(9) = "nine" NDigits(10) = "ten" NDigits(11) = "eleven" NDigits(12) = "twelve" NDigits(13) = "thirteen" NDigits(14) = "fourteen" NDigits(15) = "fifteen" NDigits(16) = "sixteen" NDigits(17) = "seventeen" NDigits(18) = "eighteen" NDigits(19) = "nineteen" NTens(2) = "twenty" NTens(3) = "thirty" NTens(4) = "forty" NTens(5) = "fifty" NTens(6) = "sixty" NTens(7) = "seventy" NTens(8) = "eighty" NTens(9) = "ninety"
- 13. Lab Excercises and Solutions Centre for Information Technology and Engineering, Manonmaniam Sundarnar University 13 End Sub Private Function ReadSingle(Number) As String If Number > 0 And Number < 20 Then ReadSingle = NDigits(Number) Else ReadSingle = "*****" End If End Function Private Function ReadTenths(Number) tnumber = Int(Number / 10) If tnumber > 1 And tnumber < 10 Then ReadTenths = NTens(tnumber) Else ReadTenths = "*****" End If End Function Public Function Number2String(Number) Dim tenth As Long Dim leftover As Long Dim hundred As Long Dim thousand As Long If Number < 20 Then NumString = ReadSingle(Number) ElseIf Number < 100 Then tenth = Fix(Number / 10) NumString = ReadTenths(tenth * 10) leftover = Number - (tenth * 10) If leftover > 0 Then NumString = NumString & " " & ReadSingle(leftover) End If ElseIf Number < 1000 Then hundred = Fix(Number / 100) NumString = ReadSingle(hundred) & " hundred" leftover = Number - (hundred * 100) If leftover > 0 Then tenth = Fix(leftover / 10) If tenth >0 Then NumString = NumString & " " & ReadTenths(tenth * 10) leftover = Number - (hundred * 100) - (tenth * 10) If leftover > 0 Then NumString = NumString & " " & ReadSingle(leftover) End If End If Else thousand = Fix(Number / 1000) NumString = ReadSingle(thousand) & " thousand" leftover = Number - (thousand * 1000) If leftover > 0 Then hundred = Fix(leftover / 100)
- 14. Advanced Visual Basic Centre for Information Technology and Engineering, Manonmaniam Sundarnar University 14 If hundred > 0 Then NumString = NumString & " " & ReadSingle(hundred) & " hundred" End If leftover = Number - (thousand * 1000) - (hundred * 100) If leftover > 0 Then tenth = Fix(leftover / 10) If tenth > 0 Then NumString = NumString & " " & ReadTenths(tenth * 10) End If leftover =Number-(thousand*1000) - (hundred * 100) - (tenth * 10) If leftover > 0 Then NumString = NumString & " " & ReadSingle(leftover) End If End If End If End If Number2String = NumString End Function Public Function LowerCaps(str As String) As String Dim newWord As String, newStr As String Dim tempStr As String Dim WDelimiter As Integer tempStr = Trim(str) WDelimiter = InStr(tempStr, " ") While WDelimiter > 0 newWord = Left(tempStr, WDelimiter) tempStr = Right(tempStr, Len(tempStr) - WDelimiter) newStr = newStr & UCase(Left(newWord, 1)) & Mid(newWord, 2, Len(newWord) - 1) WDelimiter = InStr(tempStr, " ") Wend newWord = tempStr newStr = newStr & UCase(Left(newWord, 1)) & Mid(newWord, 2, Len(newWord) - 1) LowerCaps = newStr End Function Public Function Integer2Binary(ByVal Number As Long) As String HexNum = Hex(Number) For i = 1 To Len(HexNum) BinNum = BinNum & BinaryDigits("&H" & Mid(HexNum, i, 1)) Next Integer2Binary = BinNum End Function 6. We have to create the Instance of Class Module . Dim NS As New NumStrings.StringClass 7. When we select the CmdString Button, the value of Text1 is converted to the String in the Text2.
- 15. Lab Excercises and Solutions Centre for Information Technology and Engineering, Manonmaniam Sundarnar University 15 Private Sub Cmdstring_Click() Text2.Text = NS.Number2String(Text1.Text) End Sub 8. When we select the CmdLcaps Button, the value of Text1 is converted to the Capital of the first Word. Private Sub CmdLcaps_Click() Dim NStr As String NStr = NS.Number2String(Text1.Text) Text3.Text = NS.LowerCaps(NStr) End Sub 9. When we select the CmdBinary Button, the value of Text1 is converted to the Binary in the Text2. Private Sub Cmdbinary_Click() Text4.Text = NS.Integer2Binary(Text1.Text) End Sub 10. Run the Program. Ex8 - PicutreBoxDemo o Create a standard exe o Create a new form o Paste two picture box in the form o Paste 3 lable box in the first picture box and change caption of lable1 as Red = 128 lable2 as Green =128 lable3 as Blue = 128 o Paste again 3 label box in the second picture box and change caption of label4as Red =128 & label 5 as Green = 128 &label 6 as Blue = 128.
- 16. Advanced Visual Basic Centre for Information Technology and Engineering, Manonmaniam Sundarnar University 16 o Paste 3 hrscroll bar and change its value property as 128 o Paste 3 more labels and change the captions of label 7 as Red component & label8 as Green Component & label9 as Blue component The form will look like Write the following code in corresponding controls event like shown below Private Sub HScroll1_Change() Label4.Caption = "Red = " & HScroll1.Value Picture2.BackColor = RGB(HScroll1.Value, HScroll2.Value, HScroll3.Value) End Sub Private Sub HScroll1_Scroll() Label1.Caption = "Red = " & HScroll1.Value Picture1.BackColor = RGB(HScroll1.Value, HScroll2.Value, HScroll3.Value) End Sub Private Sub HScroll2_Change() Label5.Caption = "Green = " & HScroll2.Value Picture2.BackColor = RGB(HScroll1.Value, HScroll2.Value, HScroll3.Value) End Sub Private Sub HScroll2_Scroll() Label2.Caption = "Green = " & HScroll2.Value Picture1.BackColor = RGB(HScroll1.Value, HScroll2.Value, HScroll3.Value) End Sub Private Sub HScroll3_Change() Label6.Caption = "Blue = " & HScroll3.Value Picture2.BackColor = RGB(HScroll1.Value, HScroll2.Value, HScroll3.Value) End Sub Private Sub HScroll3_Scroll()
- 17. Lab Excercises and Solutions Centre for Information Technology and Engineering, Manonmaniam Sundarnar University 17 Label3.Caption = "Blue = " & HScroll3.Value Picture1.BackColor = RGB(HScroll1.Value, HScroll2.Value, HScroll3.Value) End Sub Run the above program Out put is : Ex 9 - Multiple File Selection • Create a standard exe • Add a form and change its name as multiple files & change its caption as multiple file selection with file open the common dialog box. • Paste two label box and change the caption of label 1 as empty & label 2 as selection path • Paste one common dialog box • Paste a command button and change its caption as select multiple files • Paste one list control The form will look like
- 18. Advanced Visual Basic Centre for Information Technology and Engineering, Manonmaniam Sundarnar University 18 Write the following code in the command buttons click event Private Sub Command1_Click() CommonDialog1.Flags = cdlOFNAllowMultiselect Label1.Caption = "" List1.Clear CommonDialog1.Filter = "All Files|*.*" CommonDialog1.ShowOpen filenames = CommonDialog1.FileName If Len(filenames) = 0 Then MsgBox "No files selected" Exit Sub End If ' Extract path name: ' IF FILETITLE IS NOT EMPTY, THEN A SINGLE FILE ' HAS BEEN SELECTED. DISPLAY IT AND EXIT If CommonDialog1.FileTitle <> "" Then List1.AddItem CommonDialog1.FileTitle Exit Sub End If ' FILETITLE IS NOT EMPTY, THEN MANY FILES WERE SELECTED ' AND WE MUST EXTRACT THEM FROM THE FILENAME PROPERTY spPosition = InStr(filenames, " ") pathName = Left(filenames, spPosition - 1) Label1.Caption = pathName filenames = Mid(filenames, spPosition + 1) ' then extract each space delimited file name If Len(filenames) = 0 Then List1.AddItem "No files selected" Exit Sub Else spPosition = InStr(filenames, " ") While spPosition > 0 List1.AddItem Left(filenames, spPosition - 1) filenames = Mid(filenames, spPosition + 1) spPosition = InStr(filenames, " ") Wend ' Add the last file's name to the list ' (the last file name isn't followed by a space) List1.AddItem filenames End If End Sub Run the above program The output is
- 19. Lab Excercises and Solutions Centre for Information Technology and Engineering, Manonmaniam Sundarnar University 19
- 20. Advanced Visual Basic Centre for Information Technology and Engineering, Manonmaniam Sundarnar University 20 Ex 10 - for If statement • Create a standard exe • Change the form caption as IF-ELSE-ENDIF- DEMO • Paste three text boxes and clear its text property • Paste two label boxes and change label1 caption as “Enter A value” & caption of label2 as “Enter B value” • Paste a command button and change its caption as “Result” The form will look like Write the following code in the command button click event Private Sub Command1_Click() If Val(Text1.Text) > Val(Text2.Text) Then Text3.Text = "THE VALUE OF A IS BIGGEST" Else Text3.Text = "THE VALUE OF B IS BIGGEST" End If End Sub
- 21. Lab Excercises and Solutions Centre for Information Technology and Engineering, Manonmaniam Sundarnar University 21 Run the above program The out put is Ex 11 - for loop • Open Standard exe • Add a form and change its caption as FOR.. NEXT LOOP - DEMO • Paste 9 command button • Change the caption of command1 as FORLOOP1 • Command2 as FORLOOP2 • Command3 as FORLOOP3 • Command4 as FORLOOP4 • Command5 as FORLOOP5 • Command6 as FORLOOP6 • Command7 as FORLOOP7 • Command8 as POLYNDROM • Command9 as EXIT The form will look like Write the following code in the command buttons click events Private Sub COMMAND1_Click()
- 22. Advanced Visual Basic Centre for Information Technology and Engineering, Manonmaniam Sundarnar University 22 Me.Cls For I = 1 To 10 Print I Next I End Sub Private Sub Command2_Click() Me.Cls For I = 1 To 10 Step 2 Print I Next I End Sub Private Sub Command3_Click() Me.Cls For I = 10 To 1 Step -2 Print I Next I End Sub Private Sub Command4_Click() Me.Cls Dim STR As String Dim I As Integer Dim A, B STR = InputBox("ENTER A STRING") A = Len(STR) For I = 1 To A Step 1 B = Mid(STR, I, 1) Print B Next I End Sub Private Sub Command5_Click() Me.Cls Dim STR As String Dim I As Integer Dim A, B STR = InputBox("ENTER A STRING") A = Len(STR) For I = A To 1 Step -1 B = Mid(STR, I, 1) Print B Next I End Sub Private Sub Command6_Click() Me.Cls Dim STR As String Dim I As Integer Dim A, B STR = InputBox("ENTER A STRING") A = Len(STR) Print "THE GIVEN STRING IS --> " & STR For I = 1 To A Step 1
- 23. Lab Excercises and Solutions Centre for Information Technology and Engineering, Manonmaniam Sundarnar University 23 B = Mid(STR, 1, I) Print B Next End Sub Private Sub Command7_Click() Me.Cls Dim STR As String Dim I As Integer Dim A, B, C STR = InputBox("ENTER A STRING") A = Len(STR) Print "THE GIVEN STRING IS --> " & STR For I = 1 To A Step 1 B = Mid(STR, 1, I) Print B Next C = A - 1 For I = C To 1 Step -1 B = Mid(STR, 1, I) Print B Next End Sub Private Sub Command8_Click() Me.Cls Dim STR As String Dim I, J As Integer Dim A, B, C STR = InputBox("ENTER A STRING") A = Len(STR) Print "THE GIVEN STRING IS --> " & STR For I = 1 To A For J = A To 1 Step -1 If Mid(STR, I, 1) = Mid(STR, J, 1) Then Print "THE GIVEN STRING IS PALINDROME" Exit Sub Else Print " THE GIVEN STRING IS NOT PALINDROME" Exit Sub End If Next J Next I End Sub Private Sub Command9_Click()
- 24. Advanced Visual Basic Centre for Information Technology and Engineering, Manonmaniam Sundarnar University 24 End End Sub Run the above program Out put for the first forloop1 button is shown below Output for the FORLOOP2 button is Out put for the FORLOOP3 button is
- 25. Lab Excercises and Solutions Centre for Information Technology and Engineering, Manonmaniam Sundarnar University 25 OUTPUT for FORLOOP4 is Output for FORLOOP5 is
- 26. Advanced Visual Basic Centre for Information Technology and Engineering, Manonmaniam Sundarnar University 26 Output for FORLOOP6 is
- 27. Lab Excercises and Solutions Centre for Information Technology and Engineering, Manonmaniam Sundarnar University 27 output for FORLOOP 7 is Output for the PALINDROME is
- 28. Advanced Visual Basic Centre for Information Technology and Engineering, Manonmaniam Sundarnar University 28 Ex 12 - Select Case • Create a standard exe • Change the caption of the form as SELECT_CASE_STATEMENT form • Add two text boxes and clear its caption property • Add one label box and change its caption as “Enter a number between 1 and 10” • Add one command button and change its caption property as “&Print” The form will look like
- 29. Lab Excercises and Solutions Centre for Information Technology and Engineering, Manonmaniam Sundarnar University 29 Write the following code in the corresponding control events. Private Sub Command1_Click() Dim NUM Text2.Enabled = True NUM = Val(Text1.Text) Select Case NUM Case 1 To 5 Text2.Text = "Between 1 and 5" Case 6, 7, 8 Text2.Text = "Between 6 and 8" Case 9 To 10 Text2.Text = "Greater than 8" Case Else Text2.Text = "Not between 1 and 10" End Select End Sub Private Sub Form_Load() Command1.Enabled = False Text2.Enabled = False End Sub Private Sub Text1_CHANGE() Command1.Enabled = True End Sub Run the program Out put is
- 30. Advanced Visual Basic Centre for Information Technology and Engineering, Manonmaniam Sundarnar University 30 Ex 13 – Switch statement using function • Create a standard exe • add a form • Paste two label boxes in the form and change label1 caption as “City name” & label2 caption as “Language” • Add one list box and its property window input the city name Landon, Rome, Paris one by one in the list property. • Add one text box and clear its caption • Add one command button and change its caption as “&Print” The form will look like z Choose the TOOL menu bar z Select Add Procedure option z The following window will be displayed z Give the function name as MATCH
- 31. Lab Excercises and Solutions Centre for Information Technology and Engineering, Manonmaniam Sundarnar University 31 Click ok button In the code window write the following code Public Function MATCH(CITYNAME As String) MATCH = Switch(CITYNAME = "London", "English", CITYNAME _ = "Rome", "Italian", CITYNAME = "Paris", "French") End Function Private Sub Command1_Click() Dim I As String I = MATCH(List1.Text) Text1.Text = I End Sub Run the above program The output for the program is
- 32. Advanced Visual Basic Centre for Information Technology and Engineering, Manonmaniam Sundarnar University 32 Ex 14 - Using Option box • Open a standard exe • Paste 3 label boxes change label1 caption as Number , label2 caption as Name & label3 caption as Subjects. • Paste a Frame control and change its caption as Subjects • Paste 3 option controls in the frame control and change option1 label as tamil, Option2 Caption as English , Option3 caption as French • Paste 3 text boxes and clear its caption property • Paste 2 Command buttons and change command1 caption as Click me & command2 caption as Exit. Now your form will look like Write the following code in the corresponding control events Option Explicit
- 33. Lab Excercises and Solutions Centre for Information Technology and Engineering, Manonmaniam Sundarnar University 33 Private Sub Command1_Click() Option1.Enabled = True Option2.Enabled = True Option3.Enabled = True Text1.Text = InputBox("Enter the Register numebr") Text2.Text = InputBox("Enter the name ") MsgBox ("Please select any two optional subjects from the Subject box") End Sub Private Sub Command2_Click() End End Sub Private Sub Form_Load() Form1.WindowState = 2 Option1.Enabled = False Option2.Enabled = False Option3.Enabled = False End Sub Private Sub Option1_Click() If Option1.CausesValidation = True Then Text3.Text = Text3.Text + " Tamil" End If End Sub Private Sub Option2_Click() If Option2.CausesValidation = True Then Text3.Text = Text3.Text + " English" End If End Sub Private Sub Option3_Click() If Option3.CausesValidation = True Then Text3.Text = Text3.Text + " French" End If End Sub Run the above program The output is
- 34. Advanced Visual Basic Centre for Information Technology and Engineering, Manonmaniam Sundarnar University 34
- 35. Lab Excercises and Solutions Centre for Information Technology and Engineering, Manonmaniam Sundarnar University 35 Ex 15 - Using Check box • Open a standard exe • Paste 3 label boxes change label1 caption as Number , label2 caption as Name & label3 caption as Sex. • Paste a Frame control and change its caption as Sex • Paste 2 Check box controls in the frame control and change check1 caption as “Male”, Check2 Caption as “Female”. • Paste 3 text boxes and clear its caption property • Paste 2 Command buttons and change command1 caption as Click me & command2 caption as Exit. Now your form will look like Write the following code in the corresponding control events Option Explicit Private Sub Check1_Click() 101 Sankar
- 36. Advanced Visual Basic Centre for Information Technology and Engineering, Manonmaniam Sundarnar University 36 If Check1.CausesValidation = True Then Text3.Text = "Male" End If End Sub Private Sub Check2_Click() If Check2.CausesValidation = True Then Text3.Text = "Female" End If End Sub Private Sub Command1_Click() Check1.Enabled = True Text1.Text = InputBox("Enter the Register numebr") Text2.Text = InputBox("Enter the name ") MsgBox ("Please select Sex from the Sex box") End Sub Private Sub Command2_Click() End End Sub Private Sub Form_Load() Form1.WindowState = 2 End Sub Run the program
- 37. Lab Excercises and Solutions Centre for Information Technology and Engineering, Manonmaniam Sundarnar University 37 Ex 16 - Example for Creation of Menu o Ceate a Standard Exe o Right click the form and Select the option « Menu Editor » o In the Menu Editor Window type the following
- 38. Advanced Visual Basic Centre for Information Technology and Engineering, Manonmaniam Sundarnar University 38 Write the following code in the code window’s corresponding menu events Option Explicit Private Sub Copy_Click() Label1.Caption = " Copy option is selected" End Sub Private Sub Cut_Click() Label1.Caption = " Cut option is selected" End Sub Private Sub Form_Load() Label1.FontSize = 16 Label1.FontBold = False End Sub Private Sub New_Click() Label1.Caption = " New option is selected" End Sub Private Sub Open_Click() Label1.Caption = " Open option is selected" End Sub Private Sub Paste_Click() Label1.Caption = " Paste option is selected" End Sub Private Sub Quit_Click() Label1.Caption = " Quit option is selected" MsgBox ("The program will be Terminated") End End Sub Private Sub Save_Click() Label1.Caption = " Save option is selected" End Sub Run the program Click the file menu and select the Option option The output will be
- 39. Lab Excercises and Solutions Centre for Information Technology and Engineering, Manonmaniam Sundarnar University 39 When select the Exit menus Quit option the output will be Ex 17 Multiple Document Interface o Open a New standard EXE project o Design your form as shown below o On clicking the Picture & Application button another form should be loaded o Change the Caption property of the form. o On the Tool menu click Menu Editor. o Add the following Menu items. Caption Name &Picture mnmaster &Application mntrans 1. Enter the code in the declaration section of the form
- 40. Advanced Visual Basic Centre for Information Technology and Engineering, Manonmaniam Sundarnar University 40 Private Sub mnmaster_Click() Form3.Show End Sub Private Sub mntrans_Click() Form1.Show End Sub Execute the program Ex18 - Using List Controls • Open a standard exe • Paste 2 list controls boxes change list1 list as empty , list2 list as empty • Paste a label control and change its caption as “Position of your Selected item is “ • Paste 3 command controls in the form and change command1 option1 as “Click me”, Command2 Caption as “Copy” , Command3 caption as “Exit”. • Paste 1 text box and clear its caption property Now your form will look like
- 41. Lab Excercises and Solutions Centre for Information Technology and Engineering, Manonmaniam Sundarnar University 41 Write the following code in the command button events Option Explicit Private Sub Command1_Click() Dim a As String a = InputBox("Enter a name") List1.AddItem a End Sub Private Sub Command2_Click() Text1.Text = List1.ListIndex + 1 List2.AddItem (List1.Text) End Sub Private Sub Command3_Click() End End Sub Run the program o Click the ‘Click Me ‘ Button o Enter the name and Click ‘OK’ Button
- 42. Advanced Visual Basic Centre for Information Technology and Engineering, Manonmaniam Sundarnar University 42 o Select a particular name and Click ‘Copy’ Button. Ex 19 - Creating a Table Using Visual Data Manager • Create a Standard Exe • Selecte the Add_ins command in the menu bar • Select Visual data manager
- 43. Lab Excercises and Solutions Centre for Information Technology and Engineering, Manonmaniam Sundarnar University 43 o select Filemenu -> New ->Ms Access -> version 7.0 o Give a data base name (ie. MSIT)
- 44. Advanced Visual Basic Centre for Information Technology and Engineering, Manonmaniam Sundarnar University 44 Click properties and Select new table now Table structure will be displayed o Give the table in the Table name text box o Click ‘Add field’ button o Enter the fileld name, field type & field wideth in the appropriate text Boxes of the add field window. Give the table name and click Add field
- 45. Lab Excercises and Solutions Centre for Information Technology and Engineering, Manonmaniam Sundarnar University 45 Ex20 - To Ceate DLL o Open New project and select ActiveX DLL
- 46. Advanced Visual Basic Centre for Information Technology and Engineering, Manonmaniam Sundarnar University 46 o Select the Tool in the menu bar and click the Add procedure option . o A window will be displayed like given below o Give one name for the procedure o Select Function and click ok button o Write the following code in the windows
- 47. Lab Excercises and Solutions Centre for Information Technology and Engineering, Manonmaniam Sundarnar University 47 • Save the class module and the project • Open the class module property window and change the name as SIM • From the file menu select the option make project dll • Save the dll name
- 48. Advanced Visual Basic Centre for Information Technology and Engineering, Manonmaniam Sundarnar University 48 Open a new Standard Exe and write the following code in the load event. o Select project in the Munu bar o Select Reference option in the project menu o Now you can see your dll in the Reference o Select your dll o Write the following code in the form load event Dim A As New PRJSIM.SIM Private Sub Form_Load() MsgBox A.SIMINT(10000, 2, 2) End Sub Run the program THE OUT PUT IS Ex 21 - Using Data Control • Create a form with the following controls ie. 2 label boxes and 2 text boxes with one data control. • Change the caption of label 1 as Author_id • Change the caption of label2 as Author name • Clear the text boxes text property
- 49. Lab Excercises and Solutions Centre for Information Technology and Engineering, Manonmaniam Sundarnar University 49 • Change the data field and data source in the property box of the text box • Open the property window of the Data1 and change its caption as Data1 & change the Databasename as given below ow. o Open the text boxs property window and change this ‘Data source’ nand ‘Data filed’ property
- 50. Advanced Visual Basic Centre for Information Technology and Engineering, Manonmaniam Sundarnar University 50 Run the above program The output is Ex22 - Using RDO • Click the start button • Click the setting • Open the control panel and select the ODBC Data Source
- 51. Lab Excercises and Solutions Centre for Information Technology and Engineering, Manonmaniam Sundarnar University 51
- 52. Advanced Visual Basic Centre for Information Technology and Engineering, Manonmaniam Sundarnar University 52 The DSN RDOACC can be seen in the ODBC Data source administrator.
- 53. Lab Excercises and Solutions Centre for Information Technology and Engineering, Manonmaniam Sundarnar University 53 Create a standard exe with following controls ie., two text boxes and two label boxes And paste a MSRDC control in the form. Open the property window of the text box and change its Datafield and Datasource property like shown in the following windows.
- 54. Advanced Visual Basic Centre for Information Technology and Engineering, Manonmaniam Sundarnar University 54 Select the property window of the MSRDC1 and change the following properties ie., DataSourceName RDOACC SQL Select * from authors Run the program The out put is Ex 23 - Using ADO • Open a Standard exe form • Open a new form and paste two label boxes and two text boxes • Clear the captions of the two text boxes • Change the caption of lable1 as Author id • Change the caption of label2 as Author name • Open the property menu and click the Component option • select the Microsoft ADO Data control 6.0
- 55. Lab Excercises and Solutions Centre for Information Technology and Engineering, Manonmaniam Sundarnar University 55 o Paste one ADODC ie., ADO Data Control in the form and select the Connectionstring
- 56. Advanced Visual Basic Centre for Information Technology and Engineering, Manonmaniam Sundarnar University 56 Click build button Select Microsoft jet 351 OLE DB Provider Select the table
- 57. Lab Excercises and Solutions Centre for Information Technology and Engineering, Manonmaniam Sundarnar University 57 Click text connection Click ok Once again click apply in the property pages then theproperty box will be changed like the following format.
- 58. Advanced Visual Basic Centre for Information Technology and Engineering, Manonmaniam Sundarnar University 58 Give the command type and table name in the dropdown list box and click apply in the window. Run the program
- 59. Lab Excercises and Solutions Centre for Information Technology and Engineering, Manonmaniam Sundarnar University 59 Ex 24 - Using ADO • Open a form and paste 10 command buttons, two label box and two text boxes • Change the caption label1as Employee number • Change the caption label2 as Employee name • Change the name of the command1 as first and caption as first • Change the name of the command2 as next and caption as next • Change the name of the command3 as previous and caption as previous • Change the name of the command4 as last and caption as last • Change the name of the command5 as add and caption as add • Change the name of the command6 as modify and caption as modify • Change the name of the command7 as save and caption as save • Change the name of the command8 as delete and caption as delete • Change the name of the command9 as clear and caption as clear • Change the name of the command10 as exit and caption as exit Write the following code Dim DB As Database Dim RS As Recordset Private Sub Add_Click() RS.AddNew CLEA End Sub Private Sub Clear_Click() CLEA End Sub Private Sub Delete_Click() RS.Delete CLEA
- 60. Advanced Visual Basic Centre for Information Technology and Engineering, Manonmaniam Sundarnar University 60 End Sub Private Sub Exit_Click() End End Sub Private Sub First_Click() RS.MoveFirst SCROLL End Sub Private Sub Form_Load() Set DB = OpenDatabase("d:PROGRAM FILESMICROSOFT VISUAL STUDIOVB98biblio.MDB") Set RS = DB.OpenRecordset("authors", dbOpenDynaset) End Sub Public Sub CLEA() Text1.Text = "" Text2.Text = "" End Sub Public Sub SCROLL() Text1.Text = RS(0) Text2.Text = RS(1) End Sub Private Sub Last_Click() RS.MoveLast SCROLL End Sub Private Sub Modify_Click() RS.Edit RS(0) = Text1.Text RS(1) = Text2.Text RS.Update End Sub Private Sub Next_Click() RS.MoveNext If RS.EOF Then RS.MoveFirst End If SCROLL End Sub Private Sub Previous_Click() RS.MovePrevious If RS.BOF Then RS.MoveLast End If SCROLL End Sub Private Sub Save_Click() RS(0) = Text1.Text
- 61. Lab Excercises and Solutions Centre for Information Technology and Engineering, Manonmaniam Sundarnar University 61 RS(1) = Text2.Text RS.Update End Sub Run the program The out put is Ex 25 - Creating a Data Report o Create a standard EXE o Place a command button on the form o Select project1 and right click it o Select “Add “ -> “ More ActiveX Designer “ -> “Data Environment” The following window will be displayed o Open property of Connection1 and select “MicroSoft Jet 3.51 OLE DB provider” o Click OK o Then select the Database name for displayed window
- 62. Advanced Visual Basic Centre for Information Technology and Engineering, Manonmaniam Sundarnar University 62 Click the Test Connectio button The following window will be displayed click OK Now select the Connection1 and select the option Add Command
- 63. Lab Excercises and Solutions Centre for Information Technology and Engineering, Manonmaniam Sundarnar University 63 o Select Command1 and click its property o In the property window of the Command1 o Enter the Database name in Database Object box & o Enter the Table name in Object Name Box o Click OK o Now Select the Project1 ->Add->DataReport o Now Open the property box of the DataReport1 and Enter o Command1 in DataMember o DataEnvironment1 in DataSource o Now Drag Command1 from the DataEnvironment1 and paste it in DataReport1 o Now the window will look like Now Open the form1 command button Click Event and write the following code in it. Private Sub Command1_Click()
- 64. Advanced Visual Basic Centre for Information Technology and Engineering, Manonmaniam Sundarnar University 64 DataReport1.show End Sub Now Run the project YZ
- 65. Lab Exercises Centre for Information Technology and Engineering, Manonmaniam Sundaranar University 1 Lab Unit – 1 (1 Real Time Hrs) Ex 1: Pre-Requisite:- You are suggested to take this lab session only after completion of Lecture 3. (Use If..Then..Else statement ) 1. Open a new standard EXE project 2. Place a text box and a command button in the form 3. Enter a number in the text box 4. On clicking the command button, a message box is to be displayed 5. The message box should display whether the number in the text box is a Single, Two, Three digit numbers Ex 2: 1. Add Standard Exe project 2. In this form add one text box and three command buttons. 3. The form is designed as per the following Specifications. Object Property Setting Form Caption Display
- 66. Object Oriented Programming with Java Centre for Information Technology and Engineering, Manonmaniam Sundaranar University 2 Command Text Name Caption Name Name Text Form1 Display Command1 TxtResult Clear the Property 4. When we click the display button “welcome” message is printed in the text box 5. When we click the clear button the message is cleared 6. When we click the Exit button the form will be closed. Ex 3: ( Use Select ...Case statement ) Open a new standard EXE project Place a text box , label and a command button in the form # Enter a number ( 0 or 1 or 2 )in the text box # On clicking the command button, the messages given below should be displayed. # God’s delays are not denials ( for 0) # A Single drop makes an Ocean ( for 1) # Hardwork and success go hand-in-hand ( for 2) Lab - 2 ( 1 Real Time Hrs) Ex1: Pre-Requisite:- You are suggested to take this lab session only after completion of Lecture 4. 1. Create a new Standard EXE project
- 67. Lab Exercises Centre for Information Technology and Engineering, Manonmaniam Sundaranar University 3 2. Enter the Code in the Form Load event procedure 3. During run time the caption , mouse pointer, Window State, Height and Width properties should be changed EX 2: 1. Add a new standard EXE project. 2. Design your form as shown below 3. The form is designed as per the following Specifications. Object Property Setting Form1 Command1 Command2 Text1 Text2 Caption Caption Caption Text Text Convert the Date Click Exit Clear the Property Clear the Property 4. When we click the ‘click ‘ button it will clear the date in text1 and it will converts the date to text2. 5. When we click the exit button it will close the form. Lab - 3 Pre-Requisite:- You are suggested to take this lab session only after completion of Lecture4 1. Add a new standard EXE project.
- 68. Object Oriented Programming with Java Centre for Information Technology and Engineering, Manonmaniam Sundaranar University 4 2. Design your form as shown below Object Property Setting Form Text1 Text2 Text3 Text4 Text5 Text6 Text7 Label1 Label2 Label3 Label4 Label5 Label6 Label7 Command1 Command2 Caption Name Text Text Text Text Text Text Text Caption Caption Caption Caption Caption Caption Caption Caption Caption Employees Salary Form1 Clear the Property Clear the Property Clear the Property Clear the Property Clear the Property Clear the Property Clear the Property Employee No Employee Name Basic pay HRAllowance Provident Fund Gross Pay Net Pay Click Exit 3. We enter the Employee no, Employee Name and Basicpay. 4. When we click the ‘Click’ button the HRA, PF, GrossPay and NetPay are calculated.
- 69. Lab Exercises Centre for Information Technology and Engineering, Manonmaniam Sundaranar University 5 HRA is 20% of Basic pay. PF is 10% of Basic pay. GrossPay is addition of Basicpay and HRA. NetPay is GrossPay-PF. 5. When we click the exit button the form is closed. Lab – 4 ( 2 Real Time Hrs) Ex 1: Pre-Requisite:- You are suggested to take this lab Unit only after completion of Lecture 4. 1. Add a new standard EXE project. 2. Design your form as shown below 3. The form is designed as per the following Specifications. Object Property Setting Form1 Text1 Text2 Text3 Text4 Frame1 Frame2 Option1 Option2 CheckBox1 CheckBox2 CheckBox3 Command1 Caption Caption Caption Text Text Caption Caption Caption Caption Caption Caption Caption Caption Bio-Data Click Exit Clear the Property Clear the Property Sex Qualification Male Female Hsc Undergraduate postgraduate Exit
- 70. Object Oriented Programming with Java Centre for Information Technology and Engineering, Manonmaniam Sundaranar University 6 4. When we enter the date of birth of the candidate automatically it will display age of that particular person. (For using Lost Focus Event). 5. When the control transfer to sex frame control there is only one option will be selected. 6. After selecting the option the control will transfer to Qualification 7. In this Qualification frame we also select more then one options. 8. When we click the exit button for closing the form. Ex 2: (Declaring Variable) 1. Open a new standard EXE project 2. Add four text boxes and a command button to the form 3. Open the code window of the form 4. Place the code Option Explicit as the first line of the declarations section of the form. This forces the variables to be declared before they are used. 5. Open the event procedure for the Click event of the command button. You can do this by selecting the name of the command button from the object list on the left of the code window. Use the following statements to create the variables for calculating area and perimeter. These statements should be place at the top of the event procedure. 6. Run the program Lab – 5 ( 1 Real Time Hrs) Ex1: Pre-Requisite:- You are suggested to take this lab Unit only after completion of Lecture 4. 1. Add a new standard EXE project.
- 71. Lab Exercises Centre for Information Technology and Engineering, Manonmaniam Sundaranar University 7 2. Design your form as shown below. 3. The form is designed as per the following Specifications. Object Property Setting Form1 Text1 Text2 Text3 Text4 Label1 Label2 Command1 Command2 Caption Text Text Text Text Caption Caption Caption Caption Reverse the Text Clear the Property Clear the Property Clear the Property Clear the Property Enter the Date Enter the Text Day to Year Reverse the Text 4. When we click the ‘reverse the text’ button it will display reverse content of text3 in text4. 5. When we click the ‘day to year’ button it will display the year of the text1 content in text2. 6. When we click the exit button the form will close. Ex2: 1. Open a new standard EXE project 2. Design your form as shown below
- 72. Object Oriented Programming with Java Centre for Information Technology and Engineering, Manonmaniam Sundaranar University 8 3. Current Time should be displayed on the Text1 4. Current Date should be displayed on the Text2 Ex 3: 1. Open a new standard EXE project 2. Design your form as shown below 3. In the Text1 Box enter a date 4. In the Text3Box enter a text 5. If you click the Command Button1, Day of the Date should be displayed in the Text2 Box 6. If you click the Command Button2, UpperCase of the text should be displayed in the Text4 Box Lab - 6 ( 2 Real Time Hrs) Ex 1: Pre-Requisite:- You are suggested to take this lab Unit only after completion of Lecture 6. 1. Add a new standard EXE project. 2. Design your form as shown below. 3. The form is designed as per the following Specifications. Object Property Setting Form Caption Name Recursive Factorial Calculation
- 73. Lab Exercises Centre for Information Technology and Engineering, Manonmaniam Sundaranar University 9 Command Text Text Caption Text Text Form1 Factorial Clear Property Clear Property 4. When we Click the Commad1 Button, the factorial Value of Text1 will be Displayed in the Text2.(Using Recursive Fn.) Ex 2: 1. Open a new Standard EXE project 2. Design your form as shown below 3. Whenever the Textbox "TEXT1" gets the focus it must be cleared. 4. The Textbox "TEXT1" should accept only numbers. 5. The user must not be allowed to go out of the Text box "TEXT1" when it is empty 6. The Textbox "TEXT2" must accept only alphabets (Upper case) 7. The Textbox "TEXT3" should accept only a maximum of 8 digits and only numbers. 8. "TEXT4" is to input a special allowance to the female candidates. So the user must be allowed to enter values in it only if the candidate is a female candidate
- 74. Object Oriented Programming with Java Centre for Information Technology and Engineering, Manonmaniam Sundaranar University 10 9. If any of the allowances is applicable to the candidate it must be displayed in the respective label boxes. HRA – 2500.00 DA - 3000.00 10. When the user clicks the "OK" button a confirmation message must be displayed in the label box "Label" 11. When the user clicks the "Cancel" button a cancellation message must be displayed in the above mentioned label control and all the textboxes must be cleared. 12. When the user clicks the "Exit" button stop the execution of the program. Lab – 7 ( 2 Real Time Hrs ) Ex 1: Pre-Requisite:- You are suggested to take this lab Unit only after completion of Lecture 6. 1. Open a new standard EXE project. 2. Design your form as shown below. 3. The form is Designed as per the following Specifications. Object Property Setting Form1 Label1 List1 Caption Name Caption Name Name List Box Controls Form1 Total No.of Selected Item Label1 List1
- 75. Lab Exercises Centre for Information Technology and Engineering, Manonmaniam Sundaranar University 11 Combo1 Command1 Command2 Text1 Name Caption Caption Name Combo1 Add Remove Text1 4. If we Click Command1, the item is entered in the inputbox and added to the List1. 5. If we Click Command2, the selected item of the listbox will be removed. 6. When we select the item in the List1, that item will be added in the Combo1 & displayed in the Text1. Ex 2: 1. Open a new Standard EXE project 2. Design your form as shown below and perform a Calculator Project , which can able to work as like as Windows Calculator (Use Control Arrays) Lab – 8 ( 2 Real Time Hrs ) . Ex 1: Pre-Requisite:- You are suggested to take this lab Unit only after completion of Lecture 6. 1. Open a new standard EXE project.
- 76. Object Oriented Programming with Java Centre for Information Technology and Engineering, Manonmaniam Sundaranar University 12 2. Design your form as shown below. 3. The form is Designed as per the following Specifications. Object Property Setting Form Frame Frame Label Label Label Label Label Label Label Text Text Text Text Combo Combo Combo Command Command Caption Name Name Name Caption Name Caption Name Caption Name Caption Name Caption Name Caption Name Caption Name Name Name Name Name Name Name Name Caption Name Caption Name List Search Form1 Frame1 Frame2 Name Label1 SSN Label2 American Express Label3 Visa Label4 Search By SSN Label5 Search By American # Label6 Search By Visa Label7 TxtName TxtSSN TxtAmericn Txtvisa CmbSSN CmbAmerican CmbVisa Add New Cmdadd Cancel CmdCancel
- 77. Lab Exercises Centre for Information Technology and Engineering, Manonmaniam Sundaranar University 13 4. If we select the CmdAdd ,we have to enter the values in the TxtName, TxtSSN, TxtAmerican, TxtVisa .Then it contents is added to the corresponding Combo box (CmbSSN,cmbAmerican,cmbVisa) 5. If we select the SSN name in the CmbSSN, the corrsponding values is displayed in the Text box. Lab - 9 ( 2 Real Time Hrs) Ex 1: Pre-Requisite:- You are suggested to take this lab Unit only after completion of Lecture 6. 1. Open a new standard EXE project. 2. Design Your form As shown in below. 3. The form is Designed as per the following Specifications. Object Property Setting Form1 Label1 Label2 List1 List2 Command1 Command2 Command3 Command4 Command5 Command6 Caption Name Caption Name Caption Name Caption Name Caption Name Caption Name Caption Name Caption Name Caption Name Caption Name Caption Move List Control Form1 All Items lblall Selected Items LblSelected lstAll list1 lstSelected list2 > CmdRightOne >> CmdRightAll < CmdLeftOne << CmdLeftAll CmdUp
- 78. Object Oriented Programming with Java Centre for Information Technology and Engineering, Manonmaniam Sundaranar University 14 Name CmdDown 4. Add the list of item to the list1. 5. When Click CmdRightOne Button, the Selected item of List1 is Moved to List2 6. When Click CmdRightAll Button, the All item of List1 is Moved to List2 7. When Click CmdLeftOne Button, the Selected item of List2 is Moved to List1 8. When Click CmdLeftAll Button, the All item of List2 is Moved to List1. 9. When Click CmdUp Button, the Selected item of List2 is Moved to Up 10. When Click CmdDown Button, the Selected iem of List2 is Moved to Down. Ex 2 : Pre-Requisite:- You are suggested to take this lab session only after completion of Lecture 6. 1. Open a new standard EXE project 2. Design your form as shown below 3. Result should be displayed depending upon the button pressed Hint: Make Use Of User Defined Sub Routines for Arithmetic Operation. Lab - 10 ( 2 Real Time Hrs) Ex 1:
- 79. Lab Exercises Centre for Information Technology and Engineering, Manonmaniam Sundaranar University 15 Pre-Requisite:- You are suggested to take this lab Unit only after completion of Lecture 6. 1. Create a new standard EXE project 2. Paste one directory listbox, one drive list box, file list box, combo box, two label box, two command box.(like given below). 3. If We Click Command1 button, Find the files corresponding text box type, it will display the file1. 4. If we Click Command Button2,stop the Searching Files. 5. Total number of files is displayed in the Label4. Ex 2: Pre-Requisite:- You are suggested to take this lab session only after completion of Lecture 6. 1. Create a standard EXE file. 2. Paste one common dialogue box and picture box.
- 80. Object Oriented Programming with Java Centre for Information Technology and Engineering, Manonmaniam Sundaranar University 16 3. Create a menu using the label box like given below. Hint : It Should Be Similar to Paint Brush Line Drawing Method. Use Mouse Down and Lab - 11 ( 2 Real Time Hrs) Ex 1: Pre-Requisite:- You are suggested to take this lab Unit only after completion of Lecture 6. 1. Create a new standard EXE project. 2. Design your form as shown below.
- 81. Lab Exercises Centre for Information Technology and Engineering, Manonmaniam Sundaranar University 17 3. The form is Designed as per the following Specifications. Object Property Setting Form Picture Hscroll Picutre Vsroll Caption Name Name Picture Name Name Name Form1 Form1 Picture1 C:lake.jpg HScroll1 Picture2 VScroll1 4. When we move the Hscroll1 values,the corresponding Width of picture changed. 5. When we move the Vscroll1 values,the corresponding Hight of picture changed. Lab – 12 ( 2 Real Time Hrs) Ex 1 : Pre-Requisite:- You are suggested to take this lab Unit only after completion of Lecture 6 1. Create a new standard EXE project. 2. Design your form as shown below. 3. The form is Designed as per the following Specifications. Object Property Setting Form Picture Hscroll Caption Name Name Name Max Min Colors Form1 Picture1 HScroll1 255 0
- 82. Object Oriented Programming with Java Centre for Information Technology and Engineering, Manonmaniam Sundaranar University 18 Hscroll Hscroll Label Label Label Label Label Label Name Max Min Name Max Min Caption Name Caption Name Caption Name Caption Name Caption Name Caption Name Hscroll2 255 0 Hscroll3 255 0 Red Label1 Green Lalbel2 Blue Label3 Red Component Label4 Green Component Label5 Blue Component Label6 4. When we Scroll_Change in the Hscroll1, the background color of Picture1 is Changed regarding red. 5. When we Scroll_Change in the Hscroll2, the background color of Picture1 is Changed regarding green. 6. When we Scroll_Change in the Hscroll3, the background color of Picture1 is Changed regarding Blue. 7. When we Change in the Hscroll, the Value of Label is Changed.
- 83. Lab Exercises Centre for Information Technology and Engineering, Manonmaniam Sundaranar University 19 Ex 2: Pre-Requisite:-You are suggested to take this lab session only after completion of Lecture 8. 1. Write a suitable program that displays all possible run time error user giving a data input and validating the data input. Hint : Undefined Variable Declaration , Overflow Lab - 13 ( 2 Real Time Hrs ) Ex 1 Pre-Requisite:- You are suggested to take this lab Unit only after completion of Lecture 8. 1. Create a new standard EXE project. 2. Design your form as shown below. 3. The form is Designed as per the following Specifications. Object Property Setting Form Picture Text Label Caption Name Name Name Name Drag &Drop Demo Form1 Picture1 Text1 Label1 4. Enter the Name of the Image file in the Text1 , then drag the Picture Box, the corresponding Picture will be displayed. 5. Enter the Name of the Image file in the Text1 , then drag the Label Box .
- 84. Object Oriented Programming with Java Centre for Information Technology and Engineering, Manonmaniam Sundaranar University 20 Lab - 14 ( 2 Real Time Hrs ) Ex 1: Pre-Requisite:- You are suggested to take this lab Unit only after completion of Lecture 8. 1. Create a new standard EXE project. 2. Design your form as shown below. 3. The form is Designed as per the following Specifications. Object Property Setting Form Frame Frame Picture Picture CommonDia log Command Caption Name Caption Name Caption Name Name Name Name Caption Name Copy Image Form1 Original Picture Frame1 Copy Image Frame2 Picture1 Picture2 Text1 CommonDialog 1 Copy Image CmdCopy
- 85. Lab Exercises Centre for Information Technology and Engineering, Manonmaniam Sundaranar University 21 4. When we click the CmdCopy Button, the Open Dialog Box will be Displayed. then select the Picture file, that picture will be dispalyed in the Picture1 &copied to the picture2. Lab - 15 ( 2 Real Time Hrs ) Ex 1: Pre-Requisite:- You are suggested to take this lab Unit only after completion of Lecture 8. 1. Create a new standard EXE project. 2. Design your form as shown below. 3. The form is Designed as per the following Specifications. Object Property Setting Form Grid Command Command Command Command Frame Caption Name Name Rows Cols Caption Name Caption Name Caption Name Caption Name Caption Name Form1 Form1 MSFlexGrid1 7 7 Addition Cmdadd Subtraction Cmdsubtract Multiplication Cmdmultiply Division Cmddivide Table Frame1
- 86. Object Oriented Programming with Java Centre for Information Technology and Engineering, Manonmaniam Sundaranar University 22 4. The Caption Property of the form is changed ,according to the Command Button Caption. 5. When we Click the Cmdadd ,the addition of row & column value will be displayed in the Grid1. 6. When we Click the Cmsubtract ,the Subtraction of row & column value will be displayed in the Grid1. 7. When we Click the Cmdmultiply,the Multiplication of row & column value will be displayed in the Grid1. 8. When we Click the Cmddivide ,the division of row & column value will be displayed in the Grid1. Ex 2: Pre-Requisite:- You are suggested to take this lab session only after completion of Lecture10. 1. Open a new project and add a form to it 2. Select ÆProjectÆReferencesÆ Microsoft Data Access Objects 3.5 library 3. Create a menu with the following items and sub items: • File Open database Open recordset Open qryrecset • Manipulation Addnew Edit Update Delete Design your form as shown below:
- 87. Lab Exercises Centre for Information Technology and Engineering, Manonmaniam Sundaranar University 23 4. Write code for each of the above mentioned sub menus to perform its corresponding task accordingly with the below given details: • Create a database by name “Sample.mdb” in Visual Data Manager in your Folder • Create a table under “Sample.mdb” as “Emp” with the following fields of mention datatypes: Field Name Data type Eno Integer Ename Text (30) Deptno Integer Doj Date • Index on “Deptno” (Primary) field • Open recordset for “emp” table with dynaset as its type • After completing the above said task, try entering records, deleting records, editing records to the emp table • Use the Find methods to find the records for a given employee name • Use Move methods to navigate through the records 5. In the Command Button named “View”, Open a record set to fetch only the “Eno” and add it on to “Combo 1”. Once when an “Eno” is selected from the Combo1, the corresponding Eno’s information should be shown in the text boxes. Lab units 16 ( 2 Real Time Hrs) Ex 1 : Pre-Requisite:- You are suggested to take this lab Unit only after completion of Lecture 10. 1. Create a new standard EXE project.
- 88. Object Oriented Programming with Java Centre for Information Technology and Engineering, Manonmaniam Sundaranar University 24 2. Design your form as shown below. 3. The form is Designed as per the following Specifications. Object Property Setting Form Picture Command Command Command Caption Name Name Caption Name Caption Name Caption Name Function Graphs Form1 Picture1 Draw first Function Cmdfirst Draw Second Function Cmdsecond Draw Both Function Cmdboth 4. When we click Cmdfirst Button, the one graph will be displayed in the Picture1 5. When we click CmdSecond Button, the another graph will be displayed in the Picture1 6. When we click Cmdboth Button, the both graph will be displayed in the Picture1 Note: Using Sin, Cos Function. Ex 2 : 1. Create a new standard EXE project.
- 89. Lab Exercises Centre for Information Technology and Engineering, Manonmaniam Sundaranar University 25 2. Design your form as shown below. 3. The form is Designed as per the following Specifications. Object Property Setting Form Check Check Command Caption Name Caption Name Caption Name Caption Name Pie Chart Demo Form1 Fill With Pattern Chkpattern Fill With Color Chkcolor Draw Pie Chart Cmdpie 4. When we click the CmdPie Button, pie chart will be displayed in the Form1. 5. When we click the Chkpattern ,Chkcolor ,the pattern & color of the pie chart is displayed. Lab units 17 ( 2 Real Time Hrs ) Ex 1: Pre-Requisite:-You are suggested to take this lab Unit only after completion of Lecture 7. 1. Create a new standard EXE project. 2. Design your form as shown below.
- 90. Object Oriented Programming with Java Centre for Information Technology and Engineering, Manonmaniam Sundaranar University 26 3. The form is Designed as per the following Specifications. Object Property Setting Form Command Command Command Caption Name Caption Name Caption Name Caption Name Ctimer Class Test Form Form1 Start Timing CmdStart Show Interval CmdShow EXIT Cmdexit 4. We have to Create CTimer Class, follow this Steps. In the Menu Project- >Add Class Module in the Form1 5. When we select the CmdStart Button, the Caption of this button is Changed to “Stop Timing”,then start the Time . 6. When we select the CmdStart Button, the Caption of this button is Changed to “Start Timing”,then stop the Time. 7. When we select the CmdShow Button, the Elapsed time will be displayed in the MessageBox. 8. When we select the CmdExit Button, to exit of the Program. Note : (Using ClassModule) Ex 2: 1. Create a new standard EXE project.
- 91. Lab Exercises Centre for Information Technology and Engineering, Manonmaniam Sundaranar University 27 2. Design your form as shown below. 3. The form is Designed as per the following Specifications. Object Property Setting Form Command Command Command Text Text Text Text Caption Name Caption Name Caption Name Caption Name Name Name Name Name String Operation Test Form1 Convert to String CmdString Convert to Lcaps CmdLcaps Convet to Binary CmdBinary Text1 Text2 Text3 Text4 4. We have to Create CSting Class, follow this Steps In the Menu Project- >Add Class Module in the Form1 5. We have to enter the Number From 1 to 9999 in the Text1 6. When we select the CmdString Button, the value of Text1 is converted to the String in the Text2. 7. When we select the CmdLcaps Button, the String of Text2 is converted to the Lcaps in the Text3. 8. When we select the CmdBinary Button, the value of Text1 is converted to the Binary in the Text4. Lab units 18 (2 Real Time Hrs ) Ex 1: Pre-Requisite:- You are suggested to take this lab session only after completion of Lecture 11. 1. Open a New standard EXE project 2. Design your form as shown below
- 92. Object Oriented Programming with Java Centre for Information Technology and Engineering, Manonmaniam Sundaranar University 28 3. Create a Data Source named Trading Company 4. Link the data source( Trading Company) to this form. The data source can be got from the file Nwind.mdb in your VB folder Ex 2 : Pre-Requisite:- You are suggested to take this lab Unit only after completion of Lecture 11 1. Create a new standard EXE project. 2. Design your form as shown below.
- 93. Lab Exercises Centre for Information Technology and Engineering, Manonmaniam Sundaranar University 29 3. The form1 is Designed as per the following Specifications. Object Property Setting Form Command List List List List Label Label Label Label CommonDialo g Text Caption Name Caption Name Name Name Name Name Caption Caption Caption Caption Name Name DataBase Structure Form1 OpenDataBase CmdOpen List1 List2 List3 List4 Tabels Selected Table’s Fields Queries Selected Queries definition CommonDialog1 Text1 4. When we select the CmdOpen Button, the Open dialog box will be displayed. Then we select the MDB file, that file will be Displayed in the Text1 and corresponding tables, queries will be displayed in the list1,list3 5. If we select the tables in the List1, the corresponding fields in the table will be displayed in the List3. 6. If we select the tables in the List3, the corresponding queries will be displayed in the List4. Ex3: Pre-Requisite:- You are suggested to take this lab session only after completion of Lecture 12. 1. Create a new form and name it as RDO form. 2. Design the form as given below: 3. Refer the Microsoft Remote Data Objects 2.0 from Project/References. 4. Declare the variables RDO Environment, RDOConnection, RDO Resultset, RDO query. 5. Register a Data Source Name (DSN).
- 94. Object Oriented Programming with Java Centre for Information Technology and Engineering, Manonmaniam Sundaranar University 30 6. To Register the DSN follow the steps as mentioned below : 7. Start/Settings/ControlPanel/32bitODBC & select the Microsoft ODBC Driver for Oracle. 8. Using the Create Environment, Open Connection methods create the environment & open the connection respectively. 9. Use the Open Resultset method to display the records from the respective table in the textboxes. 10. Perform the manipulations such as addnew, edit & update with the respective coding addnew, update & edit methods. 11. Using the Create RDOQuery method try to insert a value. 12. Find a record based on the Empno using the RDO Query. 13. Write a code segment to call a procedure (Remote Procedure) that returns the summation of two numbers. Lab units 19 ( 2 Real Time Hrs ) Ex 1: Pre-Requisite:- You are suggested to take this lab session only after completion of Lecture 13.
- 95. Lab Exercises Centre for Information Technology and Engineering, Manonmaniam Sundaranar University 31 1. Add a New Project 2. Design the Form as shown below 3. Invoke ActiveX Data Object Library File Project Æ References Æ MS ActiveX Data Object 2.0 Establish Connection 4. Open Recordset and display records in the Text boxes Perform Data Manipulations like Addition, Deletion, Modification Perform Navigation methods 5. Try using Action Queries with the help of Command Object Using Command Object, try executing a Remote Procedure that gives the sum of two numbers 6. Add a Form 7. Choose Microsoft ADO Data Control Project Æ Components Æ Microsoft ADO Data Control 6.0 (OLE DB) 8. Design your Form as shown above
- 96. Object Oriented Programming with Java Centre for Information Technology and Engineering, Manonmaniam Sundaranar University 32 9. Set the following properties of ADODC1 Connect String User Name Password Record Source 10. Set the following properties for your Text boxes to display the fields Data Source Data field Invoke MS DataGrid Control 6.0 (OLEDB) 11. Set the following property of MS Data Grid Record Source 12. Now try data manipulations through the MS Data Grid, by setting the Design time properties Ex 2: Pre-Requisite:- You are suggested to take this lab session only after completion of Lecture 14. 1. Consider a Railway database in SQL Server with three tables namely Passenger_details,Train_Details and Train_Pass_Details with fields given below Passenger Details Passenger Id, Passenger Name,Age,Sex,Train name, Class booked Train Details Train name, Train no, I class fare, II class fare, Unreserved fare, I seats, II seats Traiin Pass Details Passenger id, Coach No, seat no, Date of journey 2. Create a project to list the passenger ids in the combobox and to list the details of the passenger ( Train number, seat number and ticket fare) 3. Design your form as shown below.
- 97. Lab Exercises Centre for Information Technology and Engineering, Manonmaniam Sundaranar University 33 Lab units 20 ( 2 Real Time Hrs ) Ex 1: Pre-Requisite:- ` You are suggested to take this lab Unit only after completion of Lecture 14. 1. Create a new standard EXE project. 2. Design your form as shown below. 3. The form is Designed as per the following Specifications.
- 98. Object Oriented Programming with Java Centre for Information Technology and Engineering, Manonmaniam Sundaranar University 34 Object Property Setting Form List Grid Command Command Caption Name Name Name Rows Cols Caption Name Caption Name ADO Examples Form1 List1 Msflexgrid1 20 4 Connection.Execute Cmdconnection Command.Execute Cmdcommand 4. When we select the Cmdconnecion Button, the CategoryName from the Category table is Displayed in the List1. (Connect ODBC ,Table at Runtime using ADO Objects). 5. When we select the Cmdcommand Button, the CustomerName,Invoice,Date & subtotal of invoice is Displayed in the Grid1.(Connect ODBC ,Table at Runtime using ADO Objects). Ex 2: Pre-Requisite:- You are suggested to take this lab Unit only after completion of Lecture 14. 1. Create a new standard EXE project. 2. Design your form as shown below. 3. The form is Designed as per the following Specifications. Object Property Setting Form ADO Caption Name Name Connection Form1 Form1 ADOBIBLIO Bulid->provider tab->MS Jet
- 99. Lab Exercises Centre for Information Technology and Engineering, Manonmaniam Sundaranar University 35 DataList String Record Source Name DataResource RowSource 3.51 OLEDB Connection tab->biblo.mdb Publisher’s Dbbiblio ADOBIBLIO Company 4. Create a database table using Visual data manager Which contain Publisher id, company name, Authur and address. Using the ADO control view the detail of the table. Note :It is similar to DBList Control Ex 3: Pre-Requisite:-You are suggested to take this lab Unit only after completion of Lecture 14. 1. Create a new standard EXE project. 2. Design your form as shown below. 3. The form is Designed as per the following Specifications. Object Property Setting Form ADO DataGrid Caption Name Name Connection String Record Source Name Form1 Form1 ADOBIBLIO Bulid->provider tab->MS Jet 3.51 OLEDB Connection tab->biblo.mdb Publisher’s Dbgrid1
- 100. Object Oriented Programming with Java Centre for Information Technology and Engineering, Manonmaniam Sundaranar University 36 DataResource ADOBIBLIO 4. Create a database table using Visual data manager Which contain Publisher id, company name, Author and address. Using the ADO control view the detail of the table. Note :It is similar to DBGrid Control Lab units 21 ( 2 Real Time Hrs ) Ex 1: Pre-Requisite:-You are suggested to take this lab session only after completion of Lecture 15 1. Open a New standard EXE project 2. Design your form as shown below 3. On clicking the Picture & Application button another form should be loaded Ex 2 Pre-Requisite:- You are suggested to take this lab session only after completion of Lecture 16 1. Open a new standard EXE project
- 101. Lab Exercises Centre for Information Technology and Engineering, Manonmaniam Sundaranar University 37 2. Design your form as shown below 3. On clicking the ADD button Item should be added on the file menu. 4. On clicking the Item button Msgbox should be displayed. Lab - 22 ( 2 Real Time Hrs ) Ex 1: Pre-Requisite:- You are suggested to take this lab Unit only after completion of Lecture 16. 1. Open a New standard EXE project 2. Create the pop-up menu with the following menu items Bold, Italic, Underline, Blue, Green, Red, Black, Exit 3. Place a text box in the form On selecting an item in the pop-up menu the corresponding effect should be displayed EX 2 : Pre-Requisite:- You are suggested to take this lab Unit only after completion of Lecture 16. 1. Create a new standard EXE project.
- 102. Object Oriented Programming with Java Centre for Information Technology and Engineering, Manonmaniam Sundaranar University 38 2. Design your form as shown below. 3. In this Form, we have to create a menu as above form. 4. File Menu ->It has 5 Sub Menus ie, New, Open, Save, SaveAs, Exit. 5. If we Select the Open &Save Sub Menu, the Corresponding Open ,Save Dialog Box is Displayed. 6. If we Select the Exit Sub Menu, the form will be closed. 7. Edit -> It has 5 Sub Menus ie, Cut, Copy,Paste,Select All,Find. 8. Process -> It has 3 Sub Menus ie, Upper Case,Lower Case,Line No. 9. Customize -> It has 3 Sub Menus ie, Font,Text Color,Pen Color. Note :It is Similar like as Notepad bold. Lab - 23 ( 2 Real Time Hrs ) Pre-Requisite:- You are suggested to take this lab session only after completion of Lecture 17 1. MDI FORM Open a new project. Add a MDI form along with two forms. Set the child Property of forms and provide a way (MENU) to access the two forms from the MDI form. 2. Ole Drag Drop Property
- 103. Lab Exercises Centre for Information Technology and Engineering, Manonmaniam Sundaranar University 39 Define two controls that support OLEdragdrop. Set OLEdrag/drop mode to automatic, drag and drop data from one textbox to another. 3. Drag and drop Property Define two containers (picture box, frame) and three controls (command button, Checkbox, picture box). Set the drag drop mode to automatic. Drag and drop the controls to different containers. Provide drag icons. Set the dragover Effect when a control is dragged over a container. 4. Imagelist: Place a imagelist on the form and insert some pictures to the imagelist Control. Give appropriate key value from the pictures. 5. StaturBar Place a status bar control in the MDI FORM. Add panels to the statusbar. The statusbar should display the time, date in separate panels. Also display the message in any of the panels whenever a text is dragged from one text box and Dropped into another text box. When a new form is opened display its name in any one of the panels of the status bar. 6. ToolBar: • Place a toolbar control on the form2. Add buttons to the toolbar as shown below. Set the Image index for each and every button. • When the first button is pressed the text in the “Text1” must be displayed in Bold format • When the second button is pressed the text in the “Text1” must be displayed in “Italic” format • When the third button is pressed the text in the “Text1” must be Underlined
- 104. Object Oriented Programming with Java Centre for Information Technology and Engineering, Manonmaniam Sundaranar University 40 • When a number is selected from the combo1 the font size of the text box must changed according to the value selected • When the last button is selected, the form “Form1” must be closed. Ex 2: Pre-Requisite:- You are suggested to take this lab Unit only after completion of Lecture 17 1. Create a new standard EXE project. 2. Design your form as shown below. 3. The form1 is Designed as per the following Specifications. Object Property Setting Form Command Command Text Caption Name Caption Name Command Name Name Textstream object Demo Form1 Create CmdCreate Read CmdRead Text1 4. When we select the Cmdcreate Button, to create the file is stored in the Filename. 5. When we select the Cmdread Button, to read the file from the existing File is displayed in the text1.
- 105. Lab Exercises Centre for Information Technology and Engineering, Manonmaniam Sundaranar University 41 Ex 3 Pre-Requisite:- You are suggested to take this lab Unit only after completion of Lecture 17 1. Create a new standard EXE project. 2. In this project contains 2 forms as form1, form2 3. Design your form as shown below. 4. The form2 is Designed as per the following Specifications. Object Property Setting Form Command Command Command Command Command CommonDialo g Text Caption Name Caption Name Caption Name Caption Name Caption Name Caption Name Name Name OLE Container Demo Form1 Insert Object CmdInsert Object Info Cmdobject Close CmdCloseText1 Open File CmdOpen Save File CmdSave CommonDialog1 Text1 5. When we Select the CmdInsert Button, the form2 is Displayed.
- 106. Object Oriented Programming with Java Centre for Information Technology and Engineering, Manonmaniam Sundaranar University 42 6. In the Form2, if we click the OptEmbedded or OptLinking Box , the Collection of Object will be Displayed in the dialog box. 7. The form2 is Designed as per the following Specifications. Object Property Setting Form Command Command Frame Frame Option Option Option Option Caption Name Caption Name Caption Name Caption Name Caption Name Caption Name Caption Name Caption Name Caption Name Object Type Form1 Ok CmdOk Canel CmdCancel Size Mode Frame1 Object Type Frame2 Stretch Object OptStretch Stretch Container Control OptContainer Embedded OptEmbedded Linking OptLinking 8. When we select CmdOk Button, the corresponding Selected Embedded, Linking Object list dialog is Displayed. then the selected object is inserted into the Text Box. 9. When we select the Cancel Button, to cancel the Current operation. Lab Units 24(2 hrs Real Time) Ex 1: Pre-Requisite:- You are suggested to take this lab session only after completion of Lecture 18 1. Open a new project in Visual Basic and select the ActiveX documentEXE 2. Click the UserDocument1 in the Project window and name it as travreq 3. Design the form as shown below 4. On Clicking the Print button this form must be printed
- 107. Lab Exercises Centre for Information Technology and Engineering, Manonmaniam Sundaranar University 43 Ex 2: 1. Create a ActiveX documents which has three command button with caption i. students personal detail, ii. students course detail, iii. exit 2. When students personal detail is clicked, it should take the user to the document which accept student name,address1,address2,city , state, pin code and the result should be saved in the text file called personal.txt. 3. When students course detail is clicked, it should take the user to the document which accept student name, register number, subject, college and the result should be saved in the text file called course.txt. 4. The following properties of user document1 are Controls Property Setting Form Command Name Caption Name MainuserDoc Student Personal Details
- 108. Object Oriented Programming with Java Centre for Information Technology and Engineering, Manonmaniam Sundaranar University 44 Command Command Caption Name Caption Name Command1 Student Course Details Command2 Exit Command3 5. When we select the Command1, the personal details AciveX User Doc is Displayed in below. 6. When we select the Command2 ,the course details AcitceX User Document is displayed in below. Ex 3: Pre-Requisite:- You are suggested to take this lab session only after completion of Lecture 19 Create a Data Project using NWIND (which is in the VB98 folder) database Ex 4: Pre-Requisite:- You are suggested to take this lab Unit only after completion of Lecture 20. 1. Create a new standard EXE project. 2. Design your form as shown below.
- 109. Lab Exercises Centre for Information Technology and Engineering, Manonmaniam Sundaranar University 45 3. The form is Designed as per the following Specifications. Object Property Setting Form Picture Frame Frame Frame Frame Option() Option() Option() Check() Check() Check() Label Label Label Caption Name Name Caption Name Caption Name Caption Name Caption Name Caption Name Caption Caption Caption Caption Caption Caption Name Caption Name Caption Name Fonts Form1 Picture1 Font Name Frame1 Font Style Frame2 Font Color Frame3 Font Attributes Frame4 Arial Option1 Times New Roman Courier New Italic Underline Strikeout Weight Lblweight Height Lblheight Width Lblwidth
- 110. Object Oriented Programming with Java Centre for Information Technology and Engineering, Manonmaniam Sundaranar University 46 Label Label Text Text Text Text Hscroll Caption Name Caption Name Name Name Name Name Name Max Min Caption Lblcaption Rotation Lblrotation TxtWeight Txtheight Txtwidth Txtcaption Hscroll1 360 0 4. When we click the Option buttons, then the Fonttype of the txtCaption value will be displayed in the Picture1. 5. When we click the Check Box, then the Fontstyle of the txtCaption value will be displayed in the Picture1. 6. Enter the value of Weight ,Height & Width to the Text Box, then the value will be displayed in the Picture1. 7. When we Scrolling the Hscroll1, the Text value is rotated in the Picture1. Ex 5: 1. Create a new standard EXE project. 2. Design your form as shown below. 3. The form is Designed as per the following Specifications. Object Property Setting
- 111. Lab Exercises Centre for Information Technology and Engineering, Manonmaniam Sundaranar University 47 Form Frame Label Label Label Label Label Label Command CommonDialo g Caption Name Caption Name Caption Name Caption Name Caption Name Name Name Name Caption Name Name File Information Form1 File Attributes Frame1 File Label1 File Attributes Label2 File Size Label3 Lblfile Lblattribute Lblsize Get File Info Cmdinfo CommonDialog1 4. When we Click the Cmdinfo Button, the OpenDialog will be displayed. 5. Then select filename, it will display the filesize, Attributes & Size will be Displayed in the labels. Lab - 25(2 hrs Real Time) Ex1: Pre-Requisite:- You are suggested to take this lab session only after completion of Lecture 20 Create a DLL which have to reverse a string . Ex 2: Pre-Requisite:- You are suggested to take this lab Unit only after completion of Lecture 23. 1. Create a new standard EXE project.
- 112. Object Oriented Programming with Java Centre for Information Technology and Engineering, Manonmaniam Sundaranar University 48 2. Design your form as shown below. 3. The form is Designed as per the following Specifications. Object Property Setting Form Combo Command Command Command Command Caption Name Name Text Caption Name Caption Name Caption Name Caption Name Web Browser Demo Form1 Combo1 Combo1 Show URL CmdURL Open HTML Files CmdHTML Stop Browsing CmdStop EXIT Cmdexit 4. In the Combo Box, we add the URL name. 5. When we select the CmdURL Button, the selected URL of Combo Will be Displayed in the WebBrowser1. 6. When we select the CmdHtml Button, the Open Dialog will be Displayed.,then we select the particular HTML files will be diaplayed in the WebBrowser1. 7. When we select the CmdStop Button, Stop the current URL . 8. When we select the CmdExit Button, to quit of the Program. Ex 3:
- 113. Lab Exercises Centre for Information Technology and Engineering, Manonmaniam Sundaranar University 49 Pre-Requisite:- You are suggested to take this lab session only after completion of Lecture 23 1. Create an Internet Explore project and make it online 2. Design your form as shown below Ex 4: Pre-Requisite:- You are suggested to take this lab session only after completion of Lecture 24. 1. Create a new DHTML application from the New Project and change the Name Property of the project to Personal. 2. Double-click the Designer for DHTMLPage1 in the Project Explorer to open it in the Form Designer.The ID property of DHTMLPage1 is set as HTMLFORM. 3. Place the control in the Designer as shown in below
- 114. Object Oriented Programming with Java Centre for Information Technology and Engineering, Manonmaniam Sundaranar University 50 4. The details of controls to be included and their properties are given in the following Table Objects Property Setting TextField TextArea TextField TextField TextField SubmitButton Name TabIndex Name TabIndex Name TabIndex Name TabIndex Name TabIndex Caption TxtName 0 txtAddr 1 txtCity 2 txtState 3 txtpin 4 Close Ex 5: Pre-Requisite:- You are suggested to take this lab session only after completion of Lecture 24. 1. Create a new DHTML application from the New Project and change the Name Property of the project to Personal. 2. Double-click the Designer for DHTMLPage1 in the Project Explorer to open it in the Form Designer.The ID property of DHTMLPage1 is set as DHTMLFORM.
- 115. Lab Exercises Centre for Information Technology and Engineering, Manonmaniam Sundaranar University 51 3. Place the control in the Designer as shown in below 4. The details of controls to be included and their properties are given in the following Table Objects Property Setting TextField TextField Option Option Check Check List SubmitButton Name Name Name Name Name Name Name Caption Ecode Ename Sales Accounts Daily Life Details Store 5. When we click the StoreButton, the Employee details will be stored in the Details List. Lab - 26(2 hrs Real Time) Ex 1: Pre-Requisite:- You are suggested to take this lab session only after completion of Lecture 25
- 116. Object Oriented Programming with Java Centre for Information Technology and Engineering, Manonmaniam Sundaranar University 52 1. Create the following tables • EMP Eno Ename Basic HRA DA PF Dno • DEPT Dno Dname • Add records to both the tables • Open Data Report • Fetch the tables to the Command of Data Environment • Create a report, which shows all the above listed fields grouped by their Dno • Calculate the Net Salary of individuals and display it • Calculate Department-wise Total, Grant Total and display it • Display the page number at the right bottom of the page • Display the title of the report as ‘XYZ COMPANY’ and a Logo to the left of it • The Date of preparation should be displayed in the top right corner of the report • After completion of your report, Place a Command Button on to your Form. • When Command Button is clicked, the Report should be displayed. Ex 2: Pre-Requisite:- You are suggested to take this lab session only after completion of Lecture 25
- 117. Lab Exercises Centre for Information Technology and Engineering, Manonmaniam Sundaranar University 53 Microsoft Transaction Sercer: Design a database structure for “Sales Order Processing” with minimum of three tables like product, ordermaster, orderdetails and etc. in SQL Server7. Create a server component (*.DDL) by using ACTIVE X DLL in Visual Basic to establish connection with SWL Server 7, retrieve data from server and other data manipulations in server with appropriate properties and methods. Deploy that component in Microsoft Transaction Server and use the components with your ASP Application. Note: Set and change transaction state property to feel MTS performance. Ex3: Internet Information Server: 1. Create a virtual directory in default web site and map with your application directory. 2. Go through all property tabs of virtual directory. 3. Design home.htm file to describe about your application. 4. Set your home.htm as default web page. 5. Test your virtual directory with sample.asp. 6. Go to Default site properties and select your log time period. 7. Set your web site connection timeout to 50 seconds. 8. Add your name as web site operator. 9. Go to directory securities tab. set the system IP address which is not supposed to access the site. 10. Set the HTTP headers content expiration to 25 minutes. 11. Set the Content Rating of Violence to level-3 12. Set the Content Rating of nudity to 3/3/2000 13. Create a new Key in KeyManager and add it to the Key List. 14. Select Performance Monitor icon and add the required information for the performance chart. Lab – 27 ( 1 Real Time Hrs)
- 118. Object Oriented Programming with Java Centre for Information Technology and Engineering, Manonmaniam Sundaranar University 54 Ex 1: Pre-Requisite:- You are suggested to take this lab session only after completion of Lecture 27 Active server pages: (Using RESPONSE Objects) 1. Create a Simple Asp page Operation..asp, which is to calcualte the Arithematic mean and geometric mean. 2. The operation.asp assigns the Input as item1 ,item2. Ex 2: (Using REQUEST & RESPONSE Objects) 1. Create a Simple Asp page home.asp, which is the home page for PLEASANT BREEZE PERFUMES, Which displays the details like Product List, Company Profile, price list etc. Which Are Hyper Links to display the corresponding Web Pages. 2. The Home.asp gets the Input from the user like Name, Organization, and Designation, country. 3. On filling the input details the user selects the Hyperlink to navigate. 4. For example if the user is JOHN from RADSOFT, INDIA clicking COMPANY PROFILE Hyperlink Will see the compprofile.asp displaying information like: Note: Use ServerVariables, also use a FOR... EACH LOOP for seeing all the server variables. Ex 3: THANK YOU MR.JOHN FOR VISITING PLEASANT BREEZE PERFUMES HOME PAGE. Organization: RADSOFT Country : INDIA < -------- Details of pleasant breeze perfumes ltd. ---- > Browse Details : Mozilla/4.0 (compatible; MSIE 4.01; Windows 98) Server Software: Microsoft-IIS/4.0 Name of Server : RADSERVER ADDRRESS 10 0 0 27
- 119. Lab Exercises Centre for Information Technology and Engineering, Manonmaniam Sundaranar University 55 (Using Global.asa, Application, Session Objects.) 1. Write Global.asa file with a application variable “AppStartTime” then add three session variables “UserName” , “PassWord” and “SessionStartTime” 2. Write login.htm file to accept user name and password., validate user name as “Administator”” and password as “SYSTEM” and display Username in the Logindetails.asp page along with other information. 3. Design LoginDetails.asp with all information about Radiant Software Ltd. (Training Division) and two hyperlinks one to know about Application status and another one about user status. Selecting an Hyperlink display the next page (Use QueryString for Navigating). 4. Write ASP application file (AppSession.asp) to list all of your Session and Application variables? Application Status: Published Date: 1/2/99 Session Status : Session is openned by : <--UserName -- > Session Id How long Mr./Mrs <NAME > working with the application Note: Try passing a string value using querystring object. Ex 4: (Using COOKIES) 1. Create a new ASP page input.asp, which has text boxes to accept user name and password. Have a check box save to cookies, and a submit button. 2. When the submit button is selected then navigate to the next page data.asp 3. Create Data.asp page which gets the personal details of the user like Address, Age, DOB, City etc… 4. Then after entering the input when O.K. button is clicked it displays the final page Message.asp is displayed. 5. Create Message.asp, which displays various messages for the user.
- 120. Object Oriented Programming with Java Centre for Information Technology and Engineering, Manonmaniam Sundaranar University 56 6. After entering the data in Input.asp if the user had selected the check box then the input value is stored in a cookie, otherwise it is not stored anywhere. In either case it takes to the next page Data.asp. 7. When the user reenters a username again after saving it to cookies then it directly displays the Message.asp instead of Data.asp 8. Create an ASP Page Favourite.asp which gets users requirement like font type, fontsize, color etc…stores it to a cookie and when another page Test.asp is opened it should set the properties according to the specification mentioned earlier. 9. When the user opens the Test.asp next time the properties should get effect automatically if the cookie is present. Try this after deleting the cookies. Ex 5: (Using Server Object and its methods) 1. Create an ASP page, which will use Server CreateObject method to create an instance of the Dictionary object as follows. 2. Set mydict=server.createobject(“Scription.dictionary”) Now use the mydict instance to add entries in it. Mydict.add “CH”, “CHENNAI” Mydict.add “BG”, “BANGALORE” Mydict.add “MI”, “MUMBAI” 3. Now try to display the total count of the dictionary entries. 4. Try to display the first entry in the dictionary object. Like mydict.item(“CH”) 5. Create two ASP Page FIRST.ASP where a sentence is passed as string value from the first page to the next page SECOND.ASP. 6. Use the server Object’s URLENCODE Method. Also try using HTMLENCODE method of server object. Ex 6: 1. Create a table Emp Information with the following columns :- Email Id Name
- 121. Lab Exercises Centre for Information Technology and Engineering, Manonmaniam Sundaranar University 57 DOB Occupation City Country 2. Design a page to accept values for the above fields VALIDATIONS 3. Add a primary constraint to the Email Id column. 4. The user input must be validated before moving to the next field For ex. Name should not allow numbers, etc.. 5. Email Id field should have the Domain name like abcd@yahoo.com 6. Add a Submit button to the page. When clicked, the data should be sent to the Server and stored in the database. 7. Add a Search button to the Asp page to accept Email Id and view the rest of the details from the database. 8. Add a Delete button, which gets a name and deletes the information from the database pertaining to the name in the server. 9. Design an Asp page to invoke an External Stored procedure residing in SQL-Server. [ Hint : Use the Command Object in ADO model ]. Ex 7: 1. Open a new ASP page and follow the specifications 2. Define a header as –Working with ADO [<h2><center>] 3. Create a connection object using a session variable. 4. Establish connection with a SQL-database and define a recordset object using a session variable and associate a table with the recordset object and save the ASP page. 5. Now open a new ASP page and try using the session level conn object and recordset object and try to display the values from the recordset into a table. 6. Open an ASP page and try to access the session level conn object and recordset object defined earlier. Now define a two dimensional array based on the number of fields specified in the recordset dynamically. Now
- 122. Object Oriented Programming with Java Centre for Information Technology and Engineering, Manonmaniam Sundaranar University 58 try to swap the data from the recordset to the array and now read the values from the array to the user in a tabular format. 7. Create a small application with the following specifications. 8. Create the following tables in SQL-server. CUSTOMER ORDERS PRODUCT Ocode Pcode Ccode Oval UnitCost Cname Odate Stock 9. Design an ASP page with the intention of creating a Sales order processing system at a smaller level with just three tables mentioned above. 10. Design a front page of your own choice and design this application With a main page and provide navigation facilities to the user to the main page from anywhere he intends to. Perform validations according to the field requirements. 11. At any point the above mentioned specification can be enhanced according to your Choice. 12. Create an ASP page to accept customer details and post the data into the database. 13. No two customers should have a same customer code. 14. Create a page to edit, delete and view the customer information at any point of time. 15. Create an ASP page to accept product details and post the data into the database. 16. No two products should have a same product code. 17. Create a page to Edit, Delete and View the product information at any point of time. 18. Design an ASP page to generate an order for a customer. VALIDATIONS
- 123. Lab Exercises Centre for Information Technology and Engineering, Manonmaniam Sundaranar University 59 • Order code should be unique and auto generated. • Accept the ccode from the user and check for its existence in the appropriate table and • Only then start processing the order else flash an appropriate message. • Accept a product from the user and quantity. • Display the ucst of the product as soon as the pcode is entered. Display the total value. • Reduce the stoc in the product table with the qty entered by the user. • Provide facilities to accept more than one order, when the transaction is closed try to display a receipt. YZ
- 124. Lab Solutions Centre for Information Technology and Engineering, Manonmaniam Sundaranar University 1 Lab – 1 (1 hrs real Time) Ex .1: Pre-Requisite:- You are suggested to take this lab session only after completion of Lecture 4. 1. Change the caption property of the CommandButton to Click 2. Enter the code in the Command1_Click ( ) procedure Private Sub Command1_Click ( ) If Val ( Text1.text) < 10 Then MsgBox “ It is a Single Digit Number” ElseIf Val ( Text1.Text) <100 Then MsgBox “ It is a Two Digit Number” ElseIf Val ( Text1.Text) <1000 Then MsgBox “It is a Three Digit Number” Else MsgBox “ The Value is More than three digit” End If End Sub 3. Press F5 to run the program Ex 2: 1. Add Standard Exe project and add one text box and three command buttons. 2. Write the Code in Command1_Click () Private Sub Command1_Click() Text1.text=”Welcome” End Sub 3. Write the Code in Command2_Click () Private Sub Command2_Click () Text1.text=” ” End Sub 4. Write the code in command3_click Private Sub command3_click Exit . End sub 5. Press F5 to run the program.