1. Materials found on the Internet are used in the card
Virtual LTTA – Bulgaria 25-29 January 2021
Interactive Art With Scratch and Makey Makey
When is art most fun? When it's interactive! Make artworks that sing, talk, or play sound
effects when they're touched. Makey Makey allows you to control your computer using
simple circuits you complete with your body. With Scratch, you can program your computer
to make any sound on command.
Materials:
1. Makey Makey
2. Computer with internet access and USB port
3. paper
4. drawing materials
5. aluminium foil
6. scissors or X-acto knife
7. tape
Step 1: Prepare Drawing
Draw something. When your drawing is complete, cut out the sections you want to be
interactive.
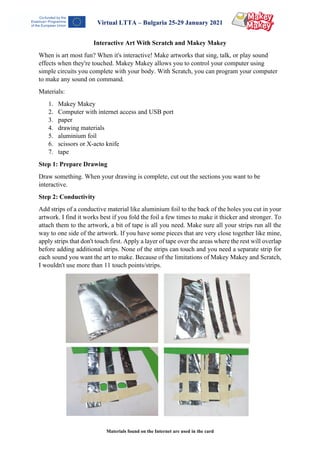
Step 2: Conductivity
Add strips of a conductive material like aluminium foil to the back of the holes you cut in your
artwork. I find it works best if you fold the foil a few times to make it thicker and stronger. To
attach them to the artwork, a bit of tape is all you need. Make sure all your strips run all the
way to one side of the artwork. If you have some pieces that are very close together like mine,
apply strips that don't touch first. Apply a layer of tape over the areas where the rest will overlap
before adding additional strips. None of the strips can touch and you need a separate strip for
each sound you want the art to make. Because of the limitations of Makey Makey and Scratch,
I wouldn't use more than 11 touch points/strips.
2. Materials found on the Internet are used in the card
Virtual LTTA – Bulgaria 25-29 January 2021
Step 3: Trim to Frame
Cut a paper frame for your artwork, and cut or fold your artwork to fit within it.
Step 4: Grounding the Frame
Cut a hole in the frame to act as your ground. Add foil just like you did with the artwork.
Step 5: Connecting the Makey Makey
Connect an alligator clip to the end of each foil strip.
Connect the clip you attached to the ground on the frame to the "earth" section of the Makey
Makey.
Connect the others to the arrow and space keys on the front of the Makey Makey.
If you have more than 5 foils, use the white wires included with your Makey Makey kit to
connect the other alligator clips to the letter keys on the back of the Makey Makey.
Step 6: Programming With Scratch
Go to https://scratch.mit.edu/ and click "create" in the top left corner.
The Makey Makey tells your computer to press certain buttons, so Scratch is what you use to
tell the computer what to do when those buttons are pushed.
In the block library/down click on the button “add blocks” . Select
My artwork has 5 interactive teeth, so I have 5 of
3. Materials found on the Internet are used in the card
Virtual LTTA – Bulgaria 25-29 January 2021
Next, select the sound block and connect a "play sound …… until done"
to each of your event blocks.
Step 7: Adding Sounds
To add more than the "meow"/”beat box1” sound effect, click on the
"sounds" tab next to the "scripts" and "costumes" tabs. Above the
"meow"/”beat box1” sound effect, there are three buttons that allow you to
add a sound effect from their library, record your own, or upload a sound
file.
If you're adding sounds from the library, double click on the sound's icon to add it to your
project.
Step 8: Assigning Sounds to Buttons
Now that you have all your sounds in your project, you can use the drop down menus in the
even and sound scripts to assign a sound to a button. Look at your alligator clips to see which
button on the Makey Makey goes to which part of your artwork in order to assign the proper
sound to the proper key.
Step 9: Connect
Plug the USB cable into the Makey Makey and your computer. If a keyboard setup window
comes up, close it. In my experience, you don't need it, and it usually won't setup properly. The
Makey Makey is designed to work with no setup.
Step 10: Have Fun
Touch one hand to the ground
button on the frame and the other
hand on your interactive touch
points and the sounds will come
from your computer.
Troubleshooting: When you
successfully complete the circuit and send a signal to the Makey Makey, a light next to the
button it's connected to will come on. If that light doesn't
come on, something is wrong with the art or Makey
Makey. Check to see that your alligator clips are firmly
attached and you're touching both the ground and one of
the other touch points. If the light comes on, check your
volume and your Scratch programming.