Motorola MotoTRBO XPR5550 HandHeld Control Head (HCH) Installation Guide PMLN7131
•
1 like•3,652 views

This document provides installation instructions for a professional digital two-way radio handheld control head. It outlines the steps to disassemble the control head from the radio, assemble the control head transceiver adapter onto the radio, connect the control head to the adapter, install the control head, and install the mobile radio. Replacement parts that may be needed are also listed.

Recommended
Recommended
More Related Content
Viewers also liked
Viewers also liked (14)
Similar to Motorola MotoTRBO XPR5550 HandHeld Control Head (HCH) Installation Guide PMLN7131
Similar to Motorola MotoTRBO XPR5550 HandHeld Control Head (HCH) Installation Guide PMLN7131 (20)
More from TwoWayDigitalRadio.com
More from TwoWayDigitalRadio.com (13)
Recently uploaded
Recently uploaded (20)
Motorola MotoTRBO XPR5550 HandHeld Control Head (HCH) Installation Guide PMLN7131
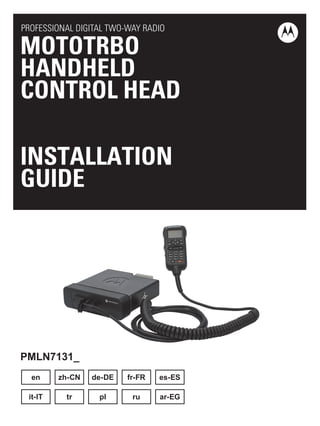
- 1. PROFESSIONAL DIGITAL TWO-WAY RADIO MOTOTRBO HANDHELD CONTROL HEAD INSTALLATION GUIDE PMLN7131_ en zh-CN de-DE fr-FR es-ES it-IT tr pl ru ar-EG
- 3. 1 English Handheld Control Head Installation The radio must be disconnected from the power supply before commencing any disassembly. The Radio Installation Manual should be referred to for more detailed information on warning and safety. If the mobile radio is equipped with Bluetooth, depending on where the transceiver is mounted, the range of the Bluetooth connected devices can be reduced. Remounting the transceiver in another location may be necessary to improve the coverage. Avoid placing large metal objects directly in front of the transceiver as this can also reduce range. Note: For proper operation, the firmware version in the radio must match the firmware version in the handheld control head. The red LED blinks when there is a firmware version mismatch between the handheld control head and the radio. When this happens, the firmware version in the handheld control head can be matched to the firmware version in the radio by using the CPS to upgrade the radio firmware to the latest release with the handheld control head attached. If the radio already contains the latest firmware release, then the Recovery option will have to be used instead. Note: When using the Recovery option, save a copy of the codeplug first, then reprogram the radio after the Recovery is completed. To Disassemble the Control Head from the Radio 1. Insert the dismantling tool in the groove between the control head and the radio assembly. 2. Press the dismantling tool under the control head to release the snap features. 3. Separate the control head and the radio by removing flex cable from radio assembly.
- 4. English 2 Figure 1. Control Head Removal Flex cable Figure 2. Flexible Connection Removal Dismantling Tool To Assemble the Handheld Control Head Transceiver Adapter on the Radio 1. Verify that the flex cable is fully seated in the connector on the handheld control head transceiver adapter. (See Figure 3.) 2. Assemble the flex cable to the flex connector in the radio assembly, making sure it is fully seated. (See Figure 3.) 3. Press the handheld control head transceiver adapter housing onto the radio chassis until ALL the tabs snap into place.
- 5. 3 English To Connect the Handheld Control Head to the Transceiver Adapter 1. Connect the cable to the transceiver adapter and fasten the two jack screws clockwise. (See Figure 3.) 2. Connect the other end of the cable to the handheld control head and turn the cable by the collar clockwise. (See Figure 3.) To Install the Handheld Control Head 1. Position the hang-up clip in the desired location for the handheld control head, and mark the positions of the holes on the mounting surface. 2. Center punch the marked spots and realign the hang-up clip in position. 3. Secure the hang-up clip with the self-drilling screws provided. 4. Attach the handheld control head to the hang-up clip. To Install the Mobile Radio The Radio Installation Manual should be referred to for detailed radio installation steps. Figure 3. Handheld Control Head Assembly 5 4 3 2 1
- 6. English 4 Table 1: Replacement Components Item Part Number Description 1 PMLN7033_ Handheld Control Head Transceiver Adapter 2 PMKN4174_* 5-Meter Straight Extension Cable 3 CB000130A01 3-Meter Main Coiled Cable 4 PMLN7032_ Handheld Control Head 5 HLN9073_ Hang-Up Clip 6 6686119B01 Dismantling Tool *Cable kits to be ordered separately. Note: Specifications are subject to change without notice. Contact Motorola Solutions dealer for the latest specifications.
- 8. Motorola Solutions, Inc. 1303 East Algonquin Road Schaumburg, Illinois 60196 U.S.A. MOTOROLA, MOTO, MOTOROLA SOLUTIONS and the Stylized M logo are trademarks or registered trademarks of Motorola Trademark Holdings, LLC and are used under license. All other trademarks are the property of their respective owners. © 2014 Motorola Solutions, Inc. All rights reserved. October 2014 *MN000929A01* MN000929A01-AA