
Recommended
More Related Content
Viewers also liked
Similar to Task 6
Similar to Task 6 (20)
More from terry96
More from terry96 (18)
Recently uploaded
Recently uploaded (20)
Task 6
- 1. Salford City College Eccles Sixth Form Centre BTec Level 3 Extended Diploma in Creative Media Production Games Design Unit 66 – 3D Modelling HA5 – Sidekick Task 6 – Production Name Terence Byrne Date: 10/3/14 Today I started the very first part of the task which was the design pack. I used the internet to research up on various robots in which I could then use to gather ideas. I researched very sophisticated robots such as the robots from the film “I ROBOT” and even Transformers from the film “Transformers” I realised these robots were very different and decided to get even more different style robots so I could then get a better understanding of different robots jobs. I then researched up on robots from games. I researched up on the EYEBOT from the game Fallout 3. This style robot really intrigued me and it seemed to remind me of a Sputnik. Therefore I then researched up a Sputnik. From this I then had the idea of manipulating the Sputnik with the EYEBOT to create my style robot. I realised I could maybe mix the two robots together and then change various things on them. However, I have many different style robots in mind and this is just one idea. After this I planned what I should do next and that was Job roles for robots. Today I feel as if the research has gave me a boost and I have many ideas for a sidekick for second life in mind.
- 2. Date: 13/3/14 Today I got to work on job roles in which I could have for my sidekick. Even though my sidekick wasn’t designed or figured out, I realised I still need to look at jobs for robots and what the sidekick could do in the world of second life. Firstly I gathered up jobs for my sidekick without looking at the world of second life. Here is what I came up with. After that I realised I should have looked up on second life first as maybe the jobs I have already may not be suitable in the world of second life e.g. a soldier sidekick may be looked at as a threat and this may not suit the second life community. Therefore, I then looked up second life on YouTube and came across many videos to help me. I was shocked with the second life world as it held many different things for a sidekick to do e.g. in second life you can visit many locations such as the cinema; This gave me an idea of a guidance sidekick who helped new comers travel around easier in second life. Another thing I saw in second life was that you can do photography in the game. I then realised a sidekick I could develop could maybe help take pictures for players e.g. it guides you. After watching many second life videos I came up with many jobs for a sidekick such as a sidekick which tells you how to breed animals - a sidekick which is a bouncer at one of the second life nightclubs – a sidekick which helps you build a house- and even a sidekick which helps you to meditate. Today I feel impressed as I know much more about second life and from this new information; I now have many ideas for a sidekick for the world of second life. I now look to find a suitable job for a sidekick and then get to work on designing the sidekick. Date: 17/3/14 Today, I managed to come up with a job for my sidekick for the world of second life. In addition, I began drawing up my very first design of the sidekick to. The name of the sidekick is called “guidance bot”; and the job I came up with was a sidekick in which gives advice to players on what you should do and what you can
- 3. do on second life. Also the sidekick tells the players literally everything you can do second life such as how to enter beauty competitions, tells you where different locations are; and the sidekick also can give advice on how and why you should do certain things as a player. Basically the sidekick is a guidance bot in which has all the information in which people can get from it simply by asking it. Furthermore every player gets a guidance bot and you can either keep it meaning it will follow you everywhere in case you need help; or you can simply fire it meaning it will disappear and not come back again. I am happy with my process for the sidekick, and believe this job will work extremely well as from reviews on second life; people seem to find it hard to play and so hopefully a guidance bot (my sidekick) should help players and be looked at as a big helpful impact. After this I then began drawing up the guidance bot. The first design looked pretty good and I was impressed with it. However I felt like I could improve it. For the first design I drew a front view, a back view, and a side view. The Sketches however were far easier to do as our tutor gave us gridded paper. This paper made it easier to draw up my sidekick with the same size scale for each sketch e.g. front view, back view, and side view. I managed to take pictures of my first design at home, but my camera ran out of battery meaning I couldn’t take pictures of my secondary designs. After this, I then proceeded to draw up my second style robot. Yet again I drew up a front view and side view and
- 4. also a back view. This time the sidekick looked very different, but I seemed to prefer this one. In addition, the gridded Paper helped me to keep the robot the same size and this helped me make a quicker decision. I made the decision to go through with my second style robot as it seemed more reliable to create and also it looked better in my opinion. Today I feel as if I have made good progress, as now I have chose the final design of my sidekick and also its job role in the world of second life.
- 5. Date: 20/3/14 Today was very productive as I managed to scan my secondary (final) designs and set the images up on modeller. By putting the images on modeller, I could use my sketches as a guideline like the technique we used earlier with the bat.
- 6. As I was scanning with another pupil, my tutor then told me to change the background colour of the image (sketch) into a dark blue colour as this way when I put the images on modeller, they will be easier to see. Basically this meant the guidelines would be more trustworthy. Therefore, after the scanning, I edited the images of my sketches on Photoshop, and changed the colour of the whole image to a dark blue. The tutor was right as this made the image stand out more which meant more accurate guidelines. However, then I needed to go on modeller and then pout these images in as my guidelines. To do this I pressed the D key on modeller and then went across over to the backdrop menu. After this I then then clicked on the different views e.g. bottom right, top left and then placed in the images in which matched the view…. E.g. the bottom right view held the side view of my sidekick and the top left view held the top of my sidekick…… I have planned on changing the viewpoints later in order to help me with different parts of the sidekick. Date: 24/3/14 Today I began the development of my sidekick, I had the guidelines ready e.g. my sketches and now I could begin aiming progress. The first thing I did was set up the guidelines and then created a ball. This ball would be the body of my sidekick. I then sized the ball down to the same size ball as the guidelines. My next step was to add more things to the body (ball) such as Ariel signals. The first Ariel I began with was the main one which was the signal Ariel for the bot. This Ariel had to go right on the top of its body. In order to do this I used the zoom tool to place
- 7. the Ariel in accurately as I could just line it up with the marking on the top of the ball. However, now I had to do more complicated stuff to the bot. My next step was to start on creating one of the main features of the bot which was its eye. To do this I used a mixture of the bevel tool and multisite tool. By using a mixture of these two tools, I made quick progress with the eye. Also I needed to add another ball in which I manipulated with those 2 tools. I found it hard to align the eye; used the guidelines to help me. Up to now the guidelines were working very well and it was worth manipulating them into the colour blue on Photoshop the other day. I also changed the colour around the top part of the body when creating the eye as this strip would be another part of the eye. Today I made good progress and did more on my sidekick than expected. Now I could plan on how and when I will add other parts
- 8. to the sidekick. Date:27/3/14 Today I yet again carried on with my sidekick whilst doing other tasks such as
- 9. task 1. In the lesson, I quickly placed the guidelines on modeller again and then began on the process of the sidekick. I decided to first test out a few colours. I took a liking to the colours red and white when I placed these on the bot. To do this I pressed q and this gave me options on how changes the colours of different parts of the bot e.g. I could change the body colour red and then change the eye strip white. After changing the colours. I then improved the Ariel on the top of its head by adding another ball and placing it on the top of the Ariel pole using the drag tool. In opinion, the main signal Ariel was nearly complete which meant I now could move on to other parts of the sidekick. The next step I went on to today was to start creating the other 2 Ariel’s on the back of the sidekick. These 2 Ariel’s would be the sidekicks hearing signal. I began by placing in a capsule shape, I then duplicated it by pressing “ctrl c – ctrl v” This meant I now had 2 capsules. The next thing I then done was size them down using the size tool “shift H” Now the capsules were the correct size I moved them by pressing the T key; to the location in which they both needed to be. The guidelines really worked when it came to lining the capsules up into the correct places. To get the capsules all the more accurate, I Used a mixture of the move tool “T” and the rotation toll “Y” By using these tools I managed to get the back Ariel poles into place. By this time it was the end of the lesson. Today I feel as I have made good progress as I have now added colour and new aerials to the sidekick. However improvements to the aerials and colour are needed and so I hope to do that the next time I can.
- 10. Date: 3/4/14 Today I decided t0o carry on with the sidekick out of lesson time and during the breaks; I was progressing through other tasks such as task 2 of this unit (HA5) My first priority as usual was to place in the guidelines which are my sketches. In addition I had to tweak them as usual e.g. change the size and even contrast. Another thing I had been doing was changing the image resolution from 512 x 512 to 2048 x 2048. The reason I had been doing this was so the image would look clearer. Now I had to carry on with the 2 back hearing Ariel’s on the back of the sidekick. I had to add a ball, duplicate it and then use the move tool “T” to put them into place. In addition, I decided to also add colour to each object so I could get a better understanding to whether the colours were good, or if they needed to be improved. After this I used the zoom tool to check the 2 aerials just in case they were out of line. Yet again the guidelines helped me with the accuracy. The next thing I did was improve the Eye of the sidekick. To improve the eye I used the multishift tool mostly, and now and then used bevel just to tweak things. Now I had that done I needed to add a pupil. To do this, I used a spherical primitive, but only drew on the Z axis to establish a flat, 2D oval-shape object which would fit in the centre of the eye to serve as the pupil.
- 11. However, I had more time to get to work with another important feature of the sidekick; and if I skipped my break I knew there was a chance to complete it. This part was the mouth. Carefully I highlighted each polygon around the mouth area; and then used a mixture of the multishift tool, bevel tool and drag tool. The mouth soon looked good,, but I was struggling to multishift the bottom half of the mouth. Through this part the tutor guided me and it turned out that I would have to use the stretch tool “H” and stretch it inwards. By doing this the mouth now looked better. However to make the mouth how I wanted it to be I then had to highlight the mouth area and hold shift and press the D key. I then changed the percentage to the number of small polygons I wanted. Now that was done I changed the colours of the mouth to make it look as if the mouth was a speaker.
- 12. Today I am pleased with the work I have done and I believe my sidekick is looking very well up to this stage. Date:7/4/14 Today, I started on moddler, Firstly I added the guidelines and then decided to add the eye protectors. These would be hard and so I decided to start first thing so I had enough time. To create the eye protectors I used the disc shape. Carefully I multishifted the shape and even used the stretch tool to get the disc flat enough and suitable enough for the Robot. To get the size of the disk correct I rotated the view so I had a Birdseye view and then I used the guidelines to warn me if I was making the disk to small. When I had complete the eye protector, I placed it in place using the guidelines and then I duplicated it (ctrl c – ctrl v). Then I changed the colour black and zoomed back out to get a better view of the sidekick new and improved. However, I decided to change the colours of the sidekick, I decided to change the colours to red, black and white. To do this I highlighted the polygons I needed to change colour and then pressed the “Q” key, selecting the sidekick part to change. Later I decided to improve the colours and so I went over the sidekick again refilling in colours in a different pattern. However, I decided to keep the same colours, but to just create a different pattern. I did this so the sidekick would look more appealing.
- 13. Near to the end of the session, I decided to change the black and red colours to black and gold and so I did. From doing this colour test it gave me a better understanding as I liked the black and gold colours better and thought they stood out more making the sidekick more appealing. However I realised that after the work on modeller would come lightwave meaning I could get better textures for the robot and beer colours. However even though I forgot about lightwave being able to change the texture of the Robot, I now had a better understanding on what the colours of the robot I wanted which is black and gold.
- 14. Overall, I believe today was very productive as I managed to add the eye protectors, different colours e.c.t. My next stage will be to go on lightwave and begin taking pictures of the sidekick and change its textures. Date: 10/4/14 Today I was able to enter lightwave Layout and place my sidekick on there. We were asked to add a template with stage lights so our sidekick would be easier to see. Our tutor shown us how to put this template on and then all we had to do was place our sidekick on lightwave layout from modeller. To do this we imported the latest saved sidekick from modeller on to lightwave. Now I had that done, I needed to take some pictures of my sidekick to get some different angels and views. To take the pictures on lightwave layout, I used the camera tool and then moved the camera into the positions I wanted it to be to capture the sidekick from different angels. Each time I had the position of the camera right, I needed to then press the “enter” key for it to take the picture. After the picture capturing I needed to double check them over to see if the pictures were correct.
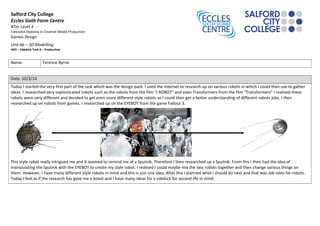
- 15. The pictures were finished and so the next stage was the side kick texturing. I still wanted to keep the sidekick black and god, But I wanted to make the eye f the sidekick stand out and so I use a texture in which made the eye mirror like Also I made the sidekicks signals very bright to portray power (electricity). After 15 minutes of texturing I now had the textures completed and the sidekick was now completed overall after weeks of producing. Now I had to save up the pictures into my folder. I saved the images as a JPEG ready for blogger.
- 16. Here is the final pictures of my sidekick
- 18. Today I am very pleased as my Robot is now completed; Now I plan on placing the tasks on blogger.
- 19. Date: