Hướng dẫn sử dụng Testo DiSCmini
•
0 likes•29 views

Hướng dẫn sử dụng Testo DiSCmini https://testostore.vn/san-pham/may-dem-hat-nano-testo-discmini/ https://testostore.vn/danh-muc/may-do-phat-xa/dong-ho-do-hat-nano/

Recommended
Recommended
More Related Content
What's hot
What's hot (14)
Similar to Hướng dẫn sử dụng Testo DiSCmini
Similar to Hướng dẫn sử dụng Testo DiSCmini (20)
More from Tenmars Việt Nam
More from Tenmars Việt Nam (20)
Recently uploaded
Recently uploaded (20)
Hướng dẫn sử dụng Testo DiSCmini
- 1. testo DiSCmini Diffusion Size Classifi er Miniature Instruction Manual Version: V1.12; September 2016
- 3. testo DiSCmini Diffusion Size Classifier Miniature - 1 - Instruction Manual Table of Contents Type of designation ................................................................2 Manufacturer..........................................................................2 Technical support...................................................................2 Sales support and customer service......................................2 Precautions............................................................................3 Foreword................................................................................3 Liabilities.................................................................................3 Liability to content ..................................................................3 Copyright © ...........................................................................3 Safety.....................................................................................4 Labels and explanations.........................................................4 Caution and Warnings............................................................4 Warnings for Testo DiSCmini..................................................4 Cautions for testo DiSCmin....................................................5 Product Overview...................................................................6 Unpacking the Instrument......................................................6 Controls, Indicators and Connections ....................................7 Aerosol Inlet ...........................................................................7 LCD screen............................................................................8 Main Screen...........................................................................8 Raw Data Screen (Main).........................................................8 Surface Area Screen (Main)....................................................9 Advanced mode navigation....................................................9 Charger Screen (advanced)....................................................9 Flow Screen (advanced).........................................................9 Heating Screen (advanced) ..................................................10 Offset compensation Screen (advanced)..............................10 Date/Time Screen (advanced)..............................................10 Miscellaneous Screen (advanced) ........................................10 Status Screen (advanced) ....................................................11 Using the Memory Card.......................................................11 Checking the Instrument......................................................12 Using the battery charger.....................................................12 Measuring with Testo DiSCmini............................................12 Automatic Offset Measurement............................................13 Software...............................................................................13 Error messages....................................................................16 Troubleshooting....................................................................17 Known Issues.......................................................................17 Service and Maintenance.....................................................17 Appendix: Specifications and technical data........................18
- 4. - 2 - Type of designation This user manual refers to the instrument type and version listed below. It replaces all previous dated user manuals for this instrument. Type: testo DiSCmini Diffusion Size Classifier Miniature Manufacturer Technical support For any technical support and spare parts purchase ordering contact your local distributor or testo techsup- port Email: support-nanoparticle@testo.de Sales support and customer service For commercial request please contact your local distributor or Testo as below. Tel.: +49 7653 681 5062 Fax: +49 7653 681 95062 Email: sales-nanoparticle@testo.de Testo SE & Co. KGaA Testo-Straße 1 79853 Lenzkirch Germany Tel.: +49 7653 681 5062 Fax: +49 7653 681 95062 Web: www.testo-particle.com Email: sales-nanoparticle@testo.de
- 5. - 3 - Precautions Foreword This manual guides you through the installation, starting up, operation and maintenance procedures of testo DiSCmini Diffusion Size Classifier. In detail you will find information about the system as. • safety • functionality of testo DiSCmini • technical information and specifaction • unpacking the instrument • handling, operation, maintenance and troubleshooting • software installation and operation Follow instructions provided by this manual for safe and proper operation of the DiSCmini Diffusion Size Classifier Miniature. Note Before operating the testo DiSCmini, the user has to read carefully this manual. For improper function, damages or injuries caused by ignoring the instructions by this manual no liabilities are accepted. Liabilities Testo SE & Co. KGaA accepts no liability to improper function or injury caused by: • neglecting the instructions provided by this manual or instructed person. • improper installation, operation, application or maintenance. • operation by untrained staff. • any technical modification not carried out by Testo SE & Co. KGaA or an authorised service partner. • use of not genuine spare parts. Liability to content The content of this manual is generated with most accurateness. Testo SE & Co. KGaA does not guaran- tee completeness, correctness and being up to date. Testo SE & Co. KGaA reserves the right to revise the content of the manual at any time and without notice. Follow the guidelines below to ensure proper operation of the instrument: • Read this instruction manual before installation and operation. • Handle the electrometers with care • Due to the volatile fraction emission measurements can only be carried out with corresponding gas conditioning. Refer to chapter Specificatons. • Always use genuine replacement parts supplied by Testo SE & Co. KGaA. • Do not start operating before heating process for all stages is accomplished. Copyright © All work and contents done are generated by Testo SE & Co. KGaA are subject of copyright © and law for intellectual property. This copyright includes all specifaction data of the instrument or part of it, electrical and fluidic and mechanical schematics, pictures, diagrams and text. Copying, editing, publishing or any other utilisation requires a written agreement of Testo SE & Co. KGaA. Safety
- 6. - 4 - Labels and explanations When operating testo DiSCmini, the user always is operating under certain risk factors like electricity and aerosols. Therefore testo DiSCmini includes several safety features. Nevertheless, some precautions still need to be taken to ensure safe and reliable operation. Listed labels, Caution and Warning are explained in general, and the further specific labels refer to type of hazard and danger. Note Notice means this content describes important, useful or necessary information to help through the guided manual. Caution and Warnings Warnings for testo DiSCmini Caution Caution means be careful. If do not follow the manual instruction you might result an in- strument or accessories damage, but no human injury. Also Caution refers to important information about installation, operation and maintenance. Warning Warning means that improper operating could cause a serious human or instrument damage or injury with concequence of irrevocable instrument damage. Electric shock Hazardous voltage inside. Contact may cause electric shock or burn. Do not open coverage of testo DiSCmini. Nanoparticles Particles hazard. Intake to breath nanoparticles may results adverse health effects. Battery charger Fire danger! Only use the battery charger delivered with the Testo DiSCmini instrument.
- 7. - 5 - Caution for Testo DiSCmini Impactor tubes Silicone or electrically conductive-based tubes lead to rapid contamination of the coro- na wire. Use only the supplied tubing for measurement. Suitable tubes are available at Testo SE & Co. KGaA or your local distributor. Condensing conditions Never operate the instrument at condensing conditions; e.g. do not measure exhaust gas directly. Condensing water may damage the instrument. High particle concentrations To avoid premature aging of the instrument, do not expose it to extremely high aerosol concentrations such as undiluted cigarette smoke. Large particle testo DiSCmini measures nanoparticles. If you use it to measure microparticles (>~0.7 μm) you will get wrong readings. Before starting any measurement, the impactor must always be fitted, either directly to the instrument or to the end of the sampling extension set.. SD-card interface SD-card interface is made and tested for use of SD-cards from Testo. Only use the SD- card delivered with the instrument.
- 8. - 6 - Product Overview The Diffusion Size Classifier miniature testo DiSCmini is a handheld instrument for the measurement of nano- particle number concentration , mean diameter and lung-deposited surface area LDSA with a time resolution of up to 1 second. The measuring principle is based on electrical charging of the aerosols. The small size of the Testo DiSCmini makes the instrument particularly suitable for personal carry-on measurement campai- gns. The device is battery powered with a lifetime of up to 8 hours; data is recorded on a memory card, and transferred to an external computer via USB cable. testo DiSCmini is based on the electrical charging of the aerosol. Positive air ions generated in a corona discharge are mixed with the aerosol. The charged particles are then detected in two stages by electrome- ters. The first detector stage is a pile of steel grids; small particles will preferably deposit on it by diffusion and detected as an electrical current. The remaining particles end up in a second stage, the filter stage, and are also detected as an electrical current. The ratio of these two currents is a measure of the average particle size determined during the instrument calibration. Because the charge per particle is a function of particle diameter, once this is known, the particle number concentration can be computed from the total current detected together with the flow rate of the instrument. Unpacking the Instrument Use the information in the following packing list to check if your delivery is complete: • Diffusion Size Classifier Miniature • Battery charger Mascot (enables also long-term measurements) • Instruction manual • Quick guide • SD-Card • Software (Testo DiSCmini data analysing tool) is delivered on SD-Card • SD-Card Reader • carrying bag • carrying case • Inlet tube connector • Impactor (mounted) • Tube for impactor • Calibration sheet • Country specific power cord If anything is missing or appears to be damaged, contact support-nanoparticle@testo.de
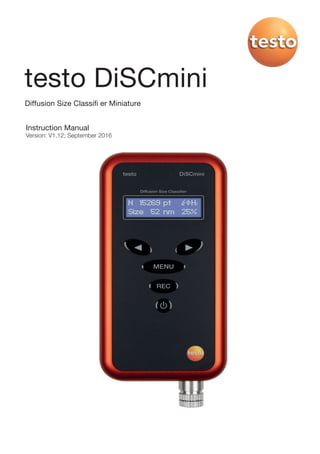
- 9. - 7 - Controls, Indicators and Connections All controls are located on the front panel of testo DiSCmini; connections are on the left side, and the aerosol inlet at the bottom of the instrument. Please refer to the image above for a description of the controls. The items are 1: Power button (Press to power on; press long (2s) - until beep sounds - to power off) 2: Menu button (Press >3s to enter or exit advanced menu) 3: Recording button (Press to record, press long (2s) - until beep sounds - to stop recording) 4: Left and right arrow buttons to select options in menus 5: Display 6: Status brea 7: Battery status On the left side of the instrument you will find the power connection, USB connection and the slot for the SD card. Note that the SD card is inserted „upside down“ (with the contacts visible). Aerosol Inlet The aerosol inlet is at the bottom of the instrument. The impactor is used to remove larger particles (> 0.7 microns), which would alter the measurements. The impactor must always be fitted before starting any measurement, either directly to the instrument or to the end of the sampling extension set. If the aerosol sampling point is far away from the testo DiSCmini inlet, please use the supplied extension set. The impactor is screwed into the testo DiSCmini housing. The „grit pot“ at the bottom of the impactor must be unscrewed to remove the accumulated dust. Impactor maintenance It is recommended to clean the impactor every 8 hours of operation to avoid possible clogging. For this purpose please remove the impactor from the testo DiSCmini and disassemble it by unscrewing its main body and grit pot. Clean the 6 lateral orificies of the main body using a thin steel pin or drill. The cylindrical surface of the grit pot can be cleaned using ethanol or isopropyl and a soft paper wipe.
- 10. - 8 - LCD Screen The LCD screen has 3 main menu screens and 7 auxiliary screens. Pressing the arrow key button on the front panel cycles through the main screens. Pressing the “Menu” button for 3 seconds will switch from basic display mode and advanced display mode (where all screens are cycled). Submenus can be selected by pressing “Menu”. The screens are: Main Screen N 6175 pt H Size 73 nm 74% N 6175 pt H Size 73 nm 74% In the main screen, the current particle number concentration and the average particle size are displayed. Note that the relative accuracy of these numbers depends on the concentration level. In the right upper cor- ner 4 status symbols are visible or invisible depending on the status of the testo DiSCmini: a lightning bolt for high voltage, a for flow, a H for heating and a blinking circle when recording. On the lower right corner, the remaining battery charge is displayed. This is only an approximate value. Pressing the right arrow button ( ) will lead you to the raw data screen, pressing the left arrow button ( ) will lead you to the surface area screen. Raw Data Screen (Main) + 8.8 fA H + 26.9 fA 74% + 8.8 fA H + 26.9 fA 74% The raw data screen displays the measured currents in fA on the electrometer stages; the upper value is the diffusion stage, the lower value the filter stage. These values are not offset-corrected, i.e. not the real mea- sured values, but rather measured value minus offset. The offset get compensated during the start-up process. The offset is additionally recorded every hour (more detail on Automatic Offset Measurement section page 13). The offset can be set manually by using the electrometer-related problems screen to diagnose (see offset compensation section). Press the left arrow button to go back to the main screen
- 11. - 9 - Surface Area Screen (Main) SA [um2/cm3] H 27.61 74% SA [um2/cm3] H 27.61 74% The surface area screen displays the active surface. A quantity that can be described as „alveolar lung-de- posited surface area“ (A-LDSA). This quantity is mainly influenced by particle concentration and particle aerodynamic mobility (e.g. size), as well as lung activity of the inhaling subject. As this parameter cannot be generalized easily, IRCP devoloped a model to estimate an average A-LDSA out of particle size and con- centration. During calibration, this model is used to calculate a calibration constant correlating this estimated A-LDSA with the total current signal. The resulting estimation for A-LDSA is given in here. Advanced Mode Navigation To access or exit the advanced menu described below, press 3 sec. the “menu” button. Press on “menu” to jump from one screen to the other. Charger Screen (advanced) 3244V 9nA H OFF HIGHVOLT ON 3244V 9nA H OFF HIGHVOLT ON The charger screen informs you about the voltage and the charging current applied on the corona charger that is used to charge the particles. By pressing the left or right arrow buttons located below the off and on display, you can turn the charger off or on. When the charger is turned off, the testo DiSCmini operates as an aerosol electrometer if you add up the two stage currents. Flow Screen (advanced) The flow screen informs you about the status of pump. The flow is displayed on the upper left hand side. Note that o.99L corresponds to the factory-calibrated flow of 1 liter per minute. By pressing the left or right arrow buttons located below the off and on display, you can turn the pump off or on. 0.99L FLOW H OFF PUMP ON 0.99L FLOW H OFF PUMP ON
- 12. - 10 - Heating Screen (advanced) 33.4 7.94V H OFF HEATING ON 33.4 7.94V H OFF HEATING ON The heating screen informs you about the status of the heating that is used to control the temperature of the sensor. It displays the measured temperature in °C, and the operating voltage of the device. By pressing the left or right arrow buttons located on display, you can turn the heating off or on. Offset Compensation Screen (advanced) OFFSET: +08 +27 AUTO ZEROING OFFSET: +08 +27 AUTO ZEROING The offsets can be compensated by AUTO ZEROING (press the left or right arrow button). We recommend that you place the instrument on a stable non-vibrating table during the offset compensation. Date/Time Screen (advanced) SET DATE&TIME 2000/04/ 18:29 SET DATE&TIME 2000/04/ 18:29 You can set the clock and date in this screen. Every element (year/month/day) will blink for a few seconds. The elements can be modified with the arrow buttons as they blink. If no modification is needed wait for the next element to blink. This procedure continues until every value is set. By pressing the right arrow key located below the YES you will save the adjusted date and time. 2000/04/09 18:52 Set Clock? YES 2000/04/09 18:52 Set Clock? YES Miscellaneous Screen (advanced) FUEL GAUGE: 71% OFF BACKLIGHT ON FUEL GAUGE: 71% OFF BACKLIGHT ON In this menu you can turn the backlight of the display on or off. Additionally, it displays an approximate value of the remaining battery charge. Status Screen (advanced)
- 13. - 11 - STATS: 41pC C: 0 W: 0 STATS: 41pC C: 0 W: 0 This menu will only be used for services. Using the Memory Card SD-card interface SD-card interface is made and tested for use of SD-cards from Testo. Only use the SD- card delivered with the instrument. testo DiSCmini saves its measurements to an SD card. To start recording, press the record “REC” button. The testo DiSCmini will indicate that it is recording by blinking a recording symbol in the upper right corner of its display. Stop the recording by pressing the “REC” for few seconds until the ring sound. Recording Do not turn off the instrument before stoping the recording. Otherwise the measurement will not be saved. The measurement data file recorded by the testo DiSCmini looks as follow:: The file header contains information on the firmware version, the filename, the averaging period, the start
- 14. - 12 - date and time, calibration data and zero offsets. The columns are time (in seconds), diffusion stage signal (in fA), filter stage signal (in fA), temperature (in °C), charging current (in nA), corona voltage (in kV), flow (in lpm), battery voltage (in V) and status (-) respectively. Tab-delimited text files can easily be imported into all common data processing programs. Checking the Instrument When you turn on the instrument, it will warm up for 5 minutes. After this interval, it will automatically mea- sure the zero offsets and start its pump. When it is cold, the 5-minute warmup interval will not be enough, and you should let the instrument warm up longer to reach a stable temperature. Press the menu button once to switch to the raw data screen. You will see the current on each of the stages (a few fA). These currents should be reasonably stable. Go to the pump screen, and turn the pump off and on – you will hear whether this is working. When the pump is turned off, go to the raw data screen, and verify that all stage signals are very close to 0fA, i.e. that their absolute values are all smaller than 2fA. To verify proper functioning of the pump and that the instrument is sealing, plug the inlet with a finger for a second or two - the pump should increase its speed audibly. If this is the case, the instrument may working properly. Using the Battery Charger Please use only the supplied battery charger Mascot. Battery charger Fire danger! Never use a power adapter for the testo DiSCmini. Only use the battery charger delivered with the testo DiSCmini instrument. Charging the battery takes between 2 and 4 hours, depending on the current status of the battery. The LED on the charger indicates if it is still charging or if charging is finished. Measuring with testo DiSCmini The purpose of this application note is to ensure that the data you collect with your testo DiSCmini is as accurate as possible. • Turn on the instrument and wait for it to warm up (300 seconds). • If accurate timing is important, set the instrument clock. • Unscrew the impactor cap from the impactor body (which can remain in the instrument), and wipe the cylindrical impaction surface with a soft paper to remove built up dirt. • Verify that charger, pump and stage heater are on (, , H visible in display upper right). • After the warmup phase, the instrument starts measuring, but is not collecting data yet. Optionally per- form a zero check by connecting a HEPA filter (Article number 98052) to the instrument. Switch to the current display (press the right arrow button) and verify that the displayed currents are below 1fA absolute. • Press the recording button once to start recording data. Warning: if you keep it pressed for more than about 3 seconds, it will stop recording again. A blinking circle appears on the upper right in the display to indicate that the instrument is recording. Keep the instrument running for about 1 minute with the HEPA filter, then disconnect it and perform your measurement. • Reconnect the HEPA filter for another minute after your measurement. Bracketing your measurement with zero data is good for quality assurance. • Press the recording button for about 3 seconds until a beep confirms that the recording has been stopped. • Run the Java data analysis tool and load the file you just saved. If any warnings are displayed, follow the instructions in the application note on software warnings
- 15. - 13 - Condensation Make sure that you avoid condensing conditions inside the instrument at all times. The operation of the electrometers depends on excellent insulation, which is no longer gu- aranteed if the insulators are humid. Automatic Offset Measurement The electrometer offset drifts with temperature, and can also drift if the insulator is dirty or humid. To verify proper instrument operation and to compensate for small drifts, testo DiSCmini automatically turns off its pump once an hour for one minute and continues recording data. testo DiSCmini does not use this data immediately; instead, the offline testo DiSCmini software detects the intervals where the pump was turned off and uses the values recorded there to correct zero offset drifts. Software The testo DiSCmini data conversion tool lets you open raw testo DiSCmini data files and export analyzed data in tab-file format. The program is controlled with the toolbar, which is separated into several different fields: File functions, computations, options, stage signals, and auxiliary signals. Hovering the mouse over a toolbar button displays a tooltip explaining what the button does.
- 16. - 14 - Open/Save file: opens a testo DiSCmini data file / exports the current data set with the current settings to a tab-delimited text file. It is suggested that you use a different directory to save exported data. Load previous/next file in directory - together, these two buttons allow you to quickly browse through a set of testo DiSCmini files in the same directory. Number concentration: displays the particle number concentration over time in the graph panel Diameter: displays the average particle diameter over time in the graph panel LDSA: displays the lung-deposited surface area over time in the graph panel Induction correction: Rapidly varying charge concentrations inside the instrument in- duce a current on the diffusion stage. This leads to error in number and concentration measurement. The induced current can be deduced from the time derivative of the filter stage signal. If you turn on the induction correction, this computed induced current is subtracted from the diffusion stage signal. The induction correction leads to a higher noise level on the diffusion stage, and thus should only be used when necessary.
- 17. - 15 - Averaging: press this button repeatedly to switch averaging between 1 second (no averaging), 10 seconds, 1 minute, 10 minutes or 1 hour. Note that the averaging is performed on the stage signals, and not on the computed values (number, diameter, LDSA). Because the computations are nonlinear, this is not the same as averaging the computed values - just as <x2> is not equal to <x>2 View all: By default, the data analysis tool doesn‘t display values measured during the hourly one-minute offset measurement. Press this button to see those values too. Zoom out: zoom out from the graph to view the entire data set. To zoom in on the graph, select an area on the graph with the mouse. Filter: displays the filter stage signal over time in the graph panel Diffusion: displays the diffusion stage signal over time in the graph panel Corona voltage: displays the corona high voltage over time in the graph panel. Press again the button to display the charging current over time in the graph panel. Zero offsets: displays the zero offsets over time in the graph panel. Check this if you are not sure whether the zero offsets were stable or if a warning on unstable zero offsets appears when you load a file. Temperature: displays the instrument temperature over time in the graph panel Flow: displays the flow in the instrument over time in the graph panel. Note that this is not actual flow in l/min, but the signal from the flow sensor. Data adjustment software options • If you have rapidly changing aerosol concentrations, the induction correction can give improved results (see software section). Switch to the diameter display, and check the look of the data with and without induction correction. If over- and undershoots during rapid transients are reduced with the induction correction, then use it, otherwise do not use it, because it adds some noise to the diffusion stage signal • Use the averaging option to reduce the number of data points if necessary • Use the “time since midnight” in the software option menu to get seconds since midnight rather than second-since start, if useful (to align data of multiple runs/instruments). • Use the “align averages” option to align averaged values if this is useful to you. For example, for hourly values, this option will give you averages between full hours rather than averages over the first 3600 se- conds. Be aware that you will lose the first noncomplete hour of data (i.e. if you start measuring at 10:30, your first data point will be the hour between 11:00 and 12:00). • Export the data for further analysis in your favorite program (Excel, Igor, Origin etc)
- 18. - 16 - Error messages Corona voltage out of range The voltage in the unipolar corona charger is high or low. It does not necessarily mean that the instrument is not operating properly. If you see this warning, you need to check the corona voltage in the advanced menu: If it is larger or equal to 5 kV, and remains so constantly, then it is appropriate to clean the corona wire. If it is between 2-3kV, this could be normal operation at low ambient pressure (i.e. you are at an alpine site or doing airborne measurements). If it is between 2-3kV and you are at or close to sea level, then it could be due to dirt on the counterelectrode of the charger. In either case, you should check the display of the charging current, both with the charger on, and with the charger off. It should be 0nA with the charger off, and 10±1nA with the charger on. If it is not 0nA with the charger off, this means there is either dirt on the counterelectrode, or that you are operating the instrument at condensing conditions (too high relative humidity RH) and that a film of water has formed on the countere- lectrode insulation. If you think the RH could have been too high, keep the charger turned off, and continue to run the instrument in an environment with low relative humidity. The charging current should then go back to 0. If it does not, you have to clean the counterelectrode. If the charging current is below 9nA with the charger on, and the corona voltage is >= 5kV, then the corona wire should be cleaned. Please concact the technical support and send the instrument for service. Dirt on counterelectrode This warning appears if the charging current is non zero when the corona charger is turned off. Follow the instructions in the section on corona voltage out of range above. No or bad SD-card inserted This warning appears if you try to start recording when no SD-card is inserted in the instrument, or if the SD-card is not formatted properly. If this warning appears despite that there is an SD-card in the instrument, then you should reformat the SD-Card. File system error If this error occurs, you should reformat your SD-card Card full This error occurs when your SD-card has no more space to write data. You should remove it, save all data on it, and reformat it. General error Contact instrument manufacturer. Email: support-nanoparticle@testo.de The filter (or diffusion) stage current reached its maximal value (overrange) At very high particle concentrations (larger than one million particles per cm3), the testo DiSCmini electro- meter amplifiers might reach their maximal level. In this case, all calculated signals (number, diameter, LDSA) are no longer correct. You can check where this occurred by pressing the filter or diffusion stage button on the toolbar in the software, to quickly see whether this was just a short episode, or whether the entire mea- surement was not reliable. Particle levels which cause the testo DiSCmini to reach its maximal electrometer currents should be avoided in any case – at such extreme particle levels, you will have to service your instrument very frequently! If you plan on doing measurements at high particle levels, you should use an external dilution system. Your instrument requires a service due to excessive dirt in diffusion stage The testo DiSCmini collects particles in both its measurement stages, which eventually become dirty and clog. The deposition characteristics in the diffusion stage will change with build-up of dirt, and the instrument readings become unreliable. To protect you from using an unreliable instrument, this warning appears when the integrated current deposited on the diffusion stage reaches a certain value , and we use it to recommend an instrument service. You can continue to use the instrument even if this warning appears, but you have to be aware that only the LDSA reading will then be reliable, whereas particle number and particle diameter are no longer reliable!
- 19. - 17 - The flow in your instrument is outside tolerance range This warning appears if the flow as measured by the internal sensor falls under 0.95 liters/minute. In this case, you should check the flow rate by pressing the flow button in the toolbar. A too low flow can be caused by different things: (1) pump failure, easily detected by the absence of any vacuum at the inlet of the testo DiSCmini, and a flow of about 0.3lpm displayed (2) external clogging of a tube when using the tube inlet, or (3) clogging of the impactor orifices – in both cases (2) or (3) check whether the flow is normal when you have the Testo DiSCmini running with only the tube inlet fitting. If you notice that the testo DiSCmini does not reach the nominal flow with the impactor inlet, you should clean the impactor. (4) internal clogging of the filter in the filter stage – this should only happen if you also have a warning that your instrument needs servicing. Troubleshooting Problem Solution dirt on counter electrode or High voltage in charger not present, although it is turned on. If the charger is exposed to too much coarse dirt, small conductive dirt par- ticles can produce a short circuit between the electrode and the charger housing. In this case, testo DiSCmini will measure a large diffusion current through the short circuit, and regulate the Corona voltage to 0V. The firmware detects this error and report „dirt on counter electrode“ The charger is not user-serviceable. Please contact Testo or your local distri- butor for service. Noise levels too high Run testo DiSCmini with filtered and dried air for several hours to remove a water film on the insulators, which can form at high RH conditions. If the problem persists, contact Testo or your local distributor for support. Zero offsets too far away from 0 Large / unstable zero offsets is a sign for contaminated insulators. Run testo DiSCmini for several hours with filtered and dried air and see whether this sol- ves the problem. If the problem persists, contact Testo or your local distributor for support. Known Issues This section lists all known issues with testo DiSCmini. • Due to the measurement principle of testo DiSCmini, the instrument can produce wrong results if the incoming aerosol is highly positively charged: if particles carry a higher positive charge than that which they would get in the testo DiSCmini charger, the current in the electrometer stages will be higher than expected, and testo DiSCmini will report a higher concentration than what is really there. • The instrument is calibrated for a size distribution with a given shape (lognormal with a geometric stan- dard deviation of 1.9). Service and Maintenance The service and calibration of your testo DiSCmini have to be done once a year. If you use it for continuous long-time measurements, we recommend to maintain and calibrate it more often. For service and maintenance and for calibration you have to send the testo DiSCmini to the manufacturer Testo SE & Co. KGaA or to your local distributor. Electric shock Hazardous voltage inside. Contact may cause electric shock or burn. Do not open coverage of testo DiSCmini.
- 20. - 18 - Nanoparticles Do not open your testo DiSCmini, as you may damage it. Warranty is voided if the case is opened and warranty-seal is broken. Appendix: Specifications and technical data Mean Particle size: 10…300nm (modal diameter) Particles c ounted: 10....700nm Particle concentration: Detectable particle concentrations depend on particle size and averaging time. Typical values are given below. 20nm: 2E3….1E6 pt/ccm 100nm: 5E2…5E5 pt/ccm Accuracy:: ±30% in size and number typical Flow rate: 1.0 L/min ± 0.1 L/min Operating conditions: Pressure: 800…1100 mbar abs ambient Δp max. at inlet: ±20mbar Temperature: 10…30°C Relative humidity: <90% Time resolution: 1 second Dimensions: 180 x 90 x 42,5 mm Weight: 0.7 kg Power requirements: The battery charger is compatible with the any 100-120 volt or 200-240 volt 50/60 Hz AC wall outlet. Battery lifetime: 8 hours typical; varies with ambient temperature. Charging time 2-4 hours depending on charger and status of battery Conformity: refering to EMC directive 2014/30/EU
- 22. 0970 3700 en 02 Testo SE & Co. KGaA Testo-Straße 1 79853 Lenzkirch Deutschland Tel.: +49 7653 681 5062 Fax: +49 7653 681 95062 Web: www.testo-particle.com E-Mail: sales-nanoparticle@testo.de