Hướng dẫn sử dụng máy nội soi công nghiệp Extech BR100
•
0 likes•26 views

Hướng dẫn sử dụng máy nội soi công nghiệp Extech BR100 http://extech.vn/vi/products/category/view/40 http://extech.vn/vi/products/product/view/40/60

Recommended
Recommended
More Related Content
What's hot
What's hot (10)
Similar to Hướng dẫn sử dụng máy nội soi công nghiệp Extech BR100
Similar to Hướng dẫn sử dụng máy nội soi công nghiệp Extech BR100 (20)
More from Tenmars Việt Nam
More from Tenmars Việt Nam (20)
Recently uploaded
Recently uploaded (20)
Hướng dẫn sử dụng máy nội soi công nghiệp Extech BR100
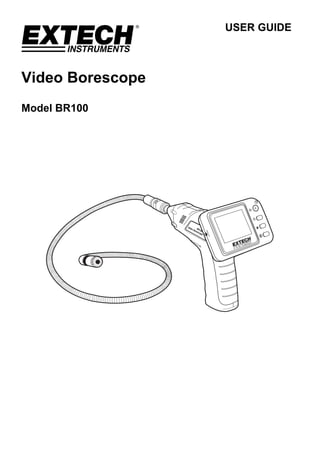
- 1. USER GUIDE Video Borescope Model BR100
- 2. BR100-en-US_V2.5 11/142 Introduction Congratulations on your purchase of this Extech BR100 Video Borescope. This instrument was designed for use as an inspection device. It can be used to peer into tight spots and then supply real- time video and images. Typical applications include HVAC inspection, automotive inspection, cable routing, and automotive/boat/aircraft inspection. This meter is shipped fully tested and, with proper use, will provide years of reliable service. Please visit the Extech Instruments website (www.extech.com) to check for the latest version of this User Guide.
- 3. BR100-en-US_V2.5 11/143 Description 1 Display 2 Handle/Battery compartment 3 Power On/Off, Dimmer 4 Flexible tube 5 Camera head and LED’s 1 Power indicator 2 Display On/OFF 3 Power On/Off (side) 4 Image orientation 5 Brightness 6 Contrast 7 Video output 8 Handle connector (rear) Safety Do not expose instrument to moisture Shut off the instrument when not in use Remove the batteries when cleaning the instrument Replace all batteries at the same time 1 2 3 4 5 1 2 3 4 5 6 7 8
- 4. BR100-en-US_V2.5 11/144 Installation Install the batteries into the instrument body, charge the monitor battery, connect the camera and flexible tube to the body, and install any accessory as needed. Battery Installation 1. Remove the screw and cover from the base of the handle. 2. Slide out the battery compartment. 3. Replace the four AA batteries observing polarity 4. Reinstall the battery compartment, cover and screw. Connect the camera and flexible tube Connect the camera tube to the instrument body; ensure that the keyed ends are properly aligned. Once aligned, tighten the knurled knob to hold the connection firmly in place. Warning. Permanent damage to the flex tube and loss of operation will occur if the flex tube is subjected to narrow radius or sharp angle bends.
- 5. BR100-en-US_V2.5 11/145 Attaching the Monitor to the instrument body Insert the connector on the handle into the opening of the connector on the monitor and slide down until the monitor is firmly attached. Installing the accessory tools The included accessories (mirror, hook and magnet) all attach to the camera in the same manner. Refer to the diagrams below: 1. Align the tool as shown in the diagram 2. Wrap the strap latch around the head and snap into place. Video Output Insert the video cable into the VIDEO OUT socket on the monitor. Insert the other end of the cable into the VIDEO IN jack of a TV or other monitor. The LCD Monitor will output a high quality video image. Battery Replacement When the battery icon appears on the LCD, the 'AA' battery must be replaced. The battery compartment is located on the bottom of the meter. 1. Press in and down on the arrow located above the tilt stand hinge. 2. Replace the 9V battery. 3. Replace the battery cover. Battery Safety Reminders Please dispose of batteries responsibly; always observe local, state, and federal regulations with regard to battery disposal. Never dispose of batteries in a fire. Batteries may explode or leak. Never mix battery types. Always install new batteries of the same type.
- 6. BR100-en-US_V2.5 11/146 Operation 1. Rotate the ON/OFF dial switch to power the camera. The power indicator on the top of the handle will switch on. 2. Further rotation of the switch adjusts the intensity of the two LEDs on the camera head. 3. Slide the On/Off switch on the side of the monitor to the ON position 4. Press the power button on the face of the monitor. The power light will turn on and the picture will appear. 5. Press the orientation button on the face of the monitor to rotate the picture as needed. 6. Press the brightness and contrast buttons in conjunction with the rotating the LED intensity for the best image quality. 7. The tube can be easily maneuvered into position. The tube can be bent into the shape of the area to be examined. 8. Use the supplied accessories to help retrieve small items. Charging the Meter 1. Place batteries into the handle of the meter. 2. Attach the monitor to the handle and slide the ON/OFF switch on the side of the meter to OFF. 3. Rotate the ON/OFF dial to power the camera. The power indicator on the top of the handle will switch ON. 4. The battery power from the handle will charge the monitor. 5. To save battery power: while charging the meter, remove the cable from the handle. This prevents the LEDs from lighting and consuming additional power. Specifications CAMERA Imaging Sensor CMOS Total Pixels 712×486 (NTSC) Horizontal View Angle 50 degree Transmission Frequency 2468MHz Minimum Illumination 0 Lux Power Supply 4 x AA batteries LCD Screen Type 2.36” TFT-LCD Effective Pixels 480 x 234 Video Output Level 0.9-1.3VP-P@75Ώ Receiving Sensitivity ≤-85dBm Dimensions (Monitor) (W x D x H) 3.9 x 2.8 x 1.2” (100 x 70 x 30mm) Operating Humidity (Max.) 15~85%RH Waterproof Capacity IP67 (imager head only) Dimensions (Handle) (W x D x H) 7.3 x 5.7 x 1.6” (186 x 145 x 41mm) (Excluding Flexible Tube) Weight (approx) 15.5 oz. (440g) Camera head Diameter 0.67” (17mm) Operating Temperature +14°F~+122°F (-10°C~+50°C)