1. Google Groups
Quick Reference Guide
Recommended Browsers - Enable Cookies & JavaScript
Internet Explorer 8 + Safari 4.0+
Firefox 3.6 +
Google Chrome
http://rebelmail.unlv.edu/groups
http://groups.google.com/a/unlv.nevada.edu
What can I do with Groups?
Google Groups makes it easy to communicate and collaborate with groups of people—such as classmates, project teams, or study groups—over
topics of common interests. For example, a group can be an online forum for discussing a class project or a mailing list for a student organization.
Each group has a unique e-mail address (e.g., math101-group@unlv.nevada.edu) and its own online discussion forum and where members can
share information. Using Google Groups, you can:
Create your own group: Organize meetings, social events, and study group among members of a group.
Join a group: Find groups created by other students in the Groups Directory. Join an open group or leave a group whenever you want.
Discuss online or over e-mail: Read and respond to posts through Rebelmail and/or the online discussion forum.
Communicate and collaborate: Send messages and share files with everyone in a group with one address.
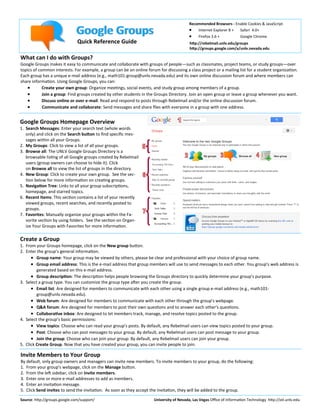
Google Groups Homepage Overview
1. Search Messages: Enter your search text (whole words
only) and click on the Search button to find specific messages within all your Groups.
2. My Groups: Click to view a list of all your groups.
3. Browse all: The UNLV Google Groups Directory is a
browsable listing of all Google groups created by Rebelmail
users (group owners can choose to hide it). Click
on Browse all to view the list of groups in the directory.
4. New Group: Click to create your own group. See the section below for more information on creating groups.
5. Navigation Tree: Links to all your group subscriptions,
homepage, and starred topics.
6. Recent Items: This section contains a list of your recently
viewed groups, recent searches, and recently posted to
groups.
7. Favorites: Manually organize your groups within the Favorite section by using folders. See the section on Organize Your Groups with Favorites for more information.
Create a Group
1. From your Groups homepage, click on the New group button.
2. Enter the group’s general information.
Group name: Your group may be viewed by others, please be clear and professional with your choice of group name.
Group email address: This is the e-mail address that group members will use to send messages to each other. You group's web address is
generated based on this e-mail address.
Group description: The description helps people browsing the Groups directory to quickly determine your group's purpose.
3. Select a group type. You can customize the group type after you create the group.
Email list: Are designed for members to communicate with each other using a single group e-mail address (e.g., math101group@unlv.nevada.edu).
Web forum: Are designed for members to communicate with each other through the group's webpage.
Q&A forum: Are designed for members to post their own questions and to answer each other's questions.
Collaborative inbox: Are designed to let members track, manage, and resolve topics posted to the group.
4. Select the group’s basic permissions:
View topics: Choose who can read your group's posts. By default, any Rebelmail users can view topics posted to your group.
Post: Choose who can post messages to your group. By default, any Rebelmail users can post message to your group.
Join the group: Choose who can join your group: By default, any Rebelmail users can join your group.
5. Click Create Group. Now that you have created your group, you can invite people to join.
Invite Members to Your Group
By default, only group owners and managers can invite new members. To invite members to your group, do the following:
1. From your group's webpage, click on the Manage button.
2. From the left sidebar, click on Invite members.
3. Enter one or more e-mail addresses to add as members.
4. Enter an invitation message.
5. Click Send invites to send the invitation. As soon as they accept the invitation, they will be added to the group.
Source: http://groups.google.com/support/
University of Nevada, Las Vegas Office of Information Technology http://oit.unlv.edu
2. Subscribe to a Group
You can subscribe to any group in the UNLV Groups Directory that is open to new members. Some groups let you subscribe directly, while others
might require you to send a request to the group owners or managers. Rebelmail users can subscribe to a group through the web interface or via
e-mail. To subscribe through the web interface, do the following:
1. Go directly to the group's webpage or access it through the Groups Directory.
2. Next to the group name, you will see one of the following buttons depending on how the group is setup:
Join group: Anyone can join the group.
Apply for membership: You must apply to join the group. The group owner and managers can approve or deny your request.
Request an invite to this group: You must request an invitation from the owner to join the group.
3. Choose your nickname and your e-mail delivery option.
4. Click Apply to this group.
Alternatively, you may subscribe to a public group via e-mail by sending an e-mail to groupname-group+subscribe@unlv.nevada.edu. For example, if you would like to subscribe to a group with the e-mail address tech-talk-group@unlv.nevada.edu, you would send an e-mail to tech-talkgroup+subscribe@unlv.nevada.edu. After you have sent the e-mail, you will receive a reply with further instructions.
Organize Your Groups with Favorites
If you belong to many groups, you can use Favorites to quickly access and organize your most used groups. To add a
group to Favorites, do the following:
1. From your Google Groups homepage, click on the My groups button.
2. From your list of groups, click on the star icon next to the group.
3. To add the group to an existing folder, click on Change folders and select a folder from the drop-down menu. To add
the group to a new folder, select New folder from the change folders drop-down menu.
Create a New Topic
When you create a new topic you are also creating the first post in the topic. You can create new topics through the group's webpage or via email. To submit a new topic using the web interface, do the following:
1. From the group's webpage, click on the New Topic.
2. Type in the post's Subject.
3. Select the type of post:
Start a Discussion: General posts where members of the group can read and response.
Ask a Question: Q&A posts where questions can be assigned to other members to answer.
Make an Announcement: Posts containing an announcement.
3. Click on the Attach a file link if you wish to add an attachment.
4. Type in the content of your topic. Add formatting as needed using the tools in the formatting toolbar.
5. Click on the Post button to post the topic. The topic appears in the topic list for the group.
Alternatively, you can also create a new topic by sending an e-mail to the group's e-mail address. The subject line of the e-mail will be the title of
the topic, and the body of the e-mail will be the content of the first post.
Manage Your E-mail Delivery Options
Google Groups allows you to receive messages sent to your groups in many different ways. You can choose to receive each message sent to the
group separately, or a summary of the messages sent to your groups once a day. You can change your e-mail delivery preferences by doing the
following:
1. From your Google Groups homepage, click on the My groups button.
2. Click on the Edit memberships button to see a list of all the groups that you are a member of.
3. In the drop-down menu for a group, select from one the following e-mail delivery options:
No E-mail: You will not receive messages sent to the group in your inbox. You can visit the group's webpage
to read messages.
Abridged E-mail: Once a day, you will receive a summary of new messages.
Digest E-mail: Once a day, you will receive full messages bundled into a single message.
E-mail: You will receive each message sent to the group separately.
Leave a Group
You can unsubscribe from a group through the manage membership page or by e-mail. You can only unsubscribe from groups that you do not
own. To unsubscribe from a group, do the following:
1. From your Google Groups homepage, click on the My groups button.
2. Click on the Edit memberships button to see a list of all the groups that you are a member of.
3. To the right of the group you wish to leave, click on the Manage membership link.
4. From the pop-up window, click on the Leave group button.
Alternatively, you can leave a group via e-mail by sending an e-mail to groupnamegroup+unsubscribe@unlv.nevada.edu. For example, if you would like to leave the group tech-talk-group@unlv.nevada.edu, send an e-mail to
tech-talk-group+unsubscribe@unlv.nevada.edu. You will receive an e-mail with further instructions.
Source: http://groups.google.com/support/
University of Nevada, Las Vegas Office of Information Technology http://oit.unlv.edu