
Recommended
More Related Content
What's hot
What's hot (20)
Similar to lap joint .ppt
Similar to lap joint .ppt (20)
Recently uploaded
Recently uploaded (20)
lap joint .ppt
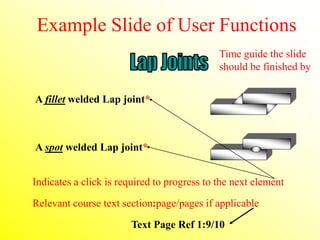
- 1. A spot welded Lap joint* A fillet welded Lap joint* Text Page Ref 1:9/10 Example Slide of User Functions Relevant course text section:page/pages if applicable Time guide the slide should be finished by Indicates a click is required to progress to the next element
- 3. A Joint:* A configuration of members A Weld:* A union between materials caused by heat, and or pressure Text Page Ref 1:1
- 4. Butt welds:* Fillet welds:* Spot/Seam welds:* Plug/Slot welds:* Edge welds:*
- 5. Closed corner Open corner* T joints: * Lap joints: * Corner joints:* Butt joints: *
- 6. This has major effects on economics and distortion control etc The root face, root gap and angle of bevel values, the choice of single, or double sided preparations, are dictated only by the type of welding process, the position and accessibility of the joint* The basic rule is this: The more you take out, then the more you must put back in* Remember, the purposes of a weld preparation is to allow access for the welding process, penetration and fusion through the area of the joint and its faces*
- 7. Angle of bevel* Included angle* Root gap* Root face* Root radius* Root landing*
- 8. Single V Single bevel Single J Single U*
- 9. Double bevel Double V Double J Double U*
- 10. A butt welded butt joint* A fillet welded butt joint* A compound welded butt joint*
- 11. A butt welded T joint* A fillet welded T joint* A compound welded T joint*
- 12. A compound welded Lap joint* A spot welded Lap joint* A fillet welded Lap joint*
- 13. A butt welded Closed Corner joint* A fillet welded Closed Corner joint* A compound welded Closed Corner joint*
- 14. An outside fillet welded Open Corner joint* An inside fillet welded Open Corner joint* A double fillet welded Open Corner joint*
- 15. 1 2 4 3 A B A + B = Excess Weld Metal** Weld Face* Weld Width* Design Throat Thickness* 1.2.3.4. Weld Toes* Fusion Boundary* Fusion Zone* Weld Root* HAZ* Actual Throat Thickness*
- 16. Weld face* Vertical Leg Length* Horizontal Leg Length* Design throat* Actual throat* Excess weld metal **
- 17. “s” = Effective throat thickness s a “a” = Nominal throat thickness Deep throat fillet welds from FCAW & SAW etc*
- 18. *
- 19. 80° 20° 6 mm 3 mm* Very Poor Weld Toe Blend Angle Improved Weld Toe Blend Angle
- 20. Extremely poor toe blend, but excess weld metal is within limits* It is also possible that the height of excess weld metal is within the accepted limit of an applied standard, but the toe blend is unacceptable, as shown below* 3 mm 90°
- 21. Weld Sizing (Fillets): DTT. ATT. Excess weld metal. Leg length * Weld Sizing (Butts): DTT. ATT. Excess weld metal. Weldment Terms: Weld face & root. Fusion zone & boundary. HAZ. Weld toes.Weld width Preparation Terms: Bevel/included angle. Root face/gap. Land/Radius Types of Preparation: Bevel’s. V’s. J’s. U’s. Single & Double Sided. Types of Joint: Butt. T. Lap. Corner (Open & Closed) Types of Weld: Butt. Fillet. Spot. Seam Plug. Slot. Edge. Weld Preparation: Preparing a joint to allow access and fusion. Joint: A Configuration of members Weld: A Union of materials
- 22. Describe your duties to your code of practise. “CSWIP Exam”* It is the duty of all welding inspectors: To ensure that welding operations are carried out in accordance with written, or agreed practices or specifications Before During After *
- 23. Discuss the following 1) Safety: Legislation and safe working practices 2) Documentation: Spec. Drawings. Procedures. Welder approvals. Certificates. Mill sheets 3) Welding Process and ancillaries: Equipme Cables. Regulators. Ovens. Quivers etc 4) Incoming Consumables: Materials/welding consumables (Size. Condition. Specification. Storage) 5) Marking out preparation & set up: Method. Angles/Root face/gap values. Distortion control. Pre-heat prior to tack welding if applicable* Before Welding:
- 24. During Welding: 1) Pre-Heating. (Method and control) 2) In process distortion control (Balance or sequence welding) 3) Consumable control. (Correct baking and storage prior to use) 4) Welding process (Related parameters i.e. volts/amps. gas flow rate) 5) Welding run sequence and inter-pass cleaning 6) Minimum/maximum Inter-pass temperatures 7) Full compliance with all elements given on the WPS*
- 25. After Welding: 1) Visual Inspection 2) Non Destructive testing 3) Repairs* 4) Repair procedures (NDT/Excavation/Welding/Welder approval) 5) PWHT 6) Hydro-static testing 7) Submission of all inspection reports to QC departments*
- 26. To Record To Compare To Observe Activities & Imperfections* Activities & Imperfections* Activities & Imperfections*
- 27. •Honest •Literate •Respected •Dedicated •Impartial •Observant •Decisive •Analytical* •Knowledgeable •Experienced •Record keeping skills •Communication skills •Safety conscious •Inquisitive •Responsible •Diplomatic skills* Some attributes/skills of an effective Welding Inspector:*
- 28. A Welding Inspectors toolbox should contain* A welding gauge (Cambridge style, or high low gauges etc) A tape measure and scale A wire brush A magnifying glass A torch and mirror A specification, pen and report, or note paper Any other aids to visual inspection*
- 29. Inspection may utilise the following specialised equipment:* Boroscopes (For assessing root runs in small Ø pipes) Flow-meter (For measuring gas flow rates in MIG/MAG/TIG) Simple NDT equipment (Penetrants and MPI) Complex NDT equipment (Radiography or Ultrasonics) Note: Both simple and complex NDT methods requires the specialised skills of qualified operators/technicians*
- 30. Welding imperfections can be categorized into groups: 3) Solid Inclusions 4) Lack of fusion 1) Cracks 6) Mechanical or Surface damage 5) Profile & Lack of Filling 2) Gas Pores & Porosity 7) Misalignment*
- 31. A HAZ hydrogen crack, initiated at the weld toe Most cracks are initiated from stress concentrations *
- 32. Surface breaking porosity Fine cluster porosity Blow hole > 1.6 mm Ø Hollow root bead An isolated internal porosity Coarse cluster porosity Shrinkage cavity*
- 33. Internal solid inclusion causing a lack of sidewall fusion Surface breaking solid inclusion Internal solid inclusion causing a lack of inter-run fusion* Solid inclusions caused by undercut in the previous weld run Internal solid inclusion
- 34. Lack of root fusion Overlap (Causing cold laps) Lack of inter-run fusion Lack of sidewall fusion Lack of sidewall fusion & incompletely filled grove*
- 35. An Incompletely filled groove Lack of root fusion Spatter A Poor toe blend Bulbous, or irregular contour Arc Strikes Incomplete root penetration B *
- 36. Root concavity Excess penetration, and burn through Root oxidation in Stainless Steel Crater pipe Shrinkage grooves *
- 37. Root Run or “Hot pass” undercut Parent metal, surface undercut Weld metal, surface undercut*
- 38. Weld metal, surface undercut Parent metal, “top toe” undercut*
- 39. Any surface damage caused by: Grinding Hammering/chisel marks Slag chipping hammer marks Torn cleats (Hammered off attachments) Arc strikes All of the above may cause serious weakness to the weld area*
- 40. Linear misalignment measured in mm 3 mm Angular misalignment measured in degrees* 15 Excess weld metal height Lowest plate to highest point Linear Angular
- 41. Why ?* To establish the level of mechanical properties* Which properties ?* 4) Ductility* 3) Tensile strength* 2) Toughness* 1) Hardness*
- 42. Hardness:* Toughness:* The ability of a material to absorb impact energy Tensile strength:* The ability to resist the action of a pulling force Ductility:* The ability to deform plastically under tension* Mechanical:* Describes the actions of “force & motion” Properties:* Something that makes one material useful for a job. These include the properties of: The ability of a material to resist indentation
- 43. We test welds to establish minimum levels of mechanical properties, and soundness of the welded joint* We divide tests into Quantitative & Qualitative methods:* 1) Quantitative tests: (Have units)* 2) Qualitative tests: (Have no units)*
- 44. Types of tests include: 1) Quantitative tests: Hardness tests Toughness tests Tensile strength tests* 2) Qualitative tests: Macro tests Bend tests Fracture tests*
- 45. The test weld is usually cut into sections as follows: The location of specimens will depend upon the standard Tensile test Charpy V test Bend test* Macro/Hardness test Start/ Stop
- 46. The specimen below has been polished and is ready to be hardness tested = Hardness Survey Further hardness surveys may be taken as the thickness of the specimen increases* Thickness Base metal HAZ Fusion boundary Weld metal
- 47. Generally we use a diamond or steel ball to form an indentation We measure the width of the indentation to gauge the hardness*
- 48. 1) Vickers Diamond Pyramid: Always uses a diamond* 2) Brinell hardness test: Always uses a steel ball* 3) Rockwell hardness test: Uses a ball, or diamond depending on the scale*
- 49. 10 x 10 mm Machined notch Pendulum Hammer Location of specimen The specimen may be tested from different areas of the weld.* Graduated scale of absorbed energy in Joules*
- 50. 1) Charpy V test: 10 x 10 (Specimen horizontal) Joules* 2) Izod test: 10 x 10 (Specimen vertical) Ft.lbs* 3) CTOD test: Specimen used is actual design size. Detailed fracture report. mm*
- 51. Testing temperature Joules absorbed Ductile Fracture 47 Joules 28 Joules Transition Zone Transition Temperature Range Mn < 1.6 % increases toughness in steels* Brittle Fracture Three specimens are normally tested at each temperature. -40 -30 -20 -10 0 +10 +20 +30 + 40
- 52. Transverse reduced test piece* A Section of weld is cut, or machined out across the test piece and tested in tension to failure. The units are usually in N/mm²
- 53. Weld HAZ Plate material Test gripping area Radius (For radius reduced test specimens only) Reduced Section Used to assess the tensile strength of the weld metal Direction of test
- 54. Tensile test piece cut along weld specimen. Direction of the test * BS 709 / BS En 10002 All Weld Metal Tensile Testing
- 55. Firstly, before the tensile test 2 marks are made 50mm apart During the test, Yield point & Tensile strength are measured The specimen is put together and the marks are re-measured A new measurement of 75mm will indicate Elongation E50 %* 50 mm 75 mm
- 56. 3) Lack of Root Fusion 1) Excess Weld Metal Height 8) Poor Toe Blend* 4) Slag inclusion & Lack of inter-run fusion 2) Lack of Sidewall Fusion 5) Root Penetration 6)Porosity 7) Laminations
- 57. Bend tests are used to establish fusion in the area under test Former Test Piece Lack of root fusion shown here* Further tests include face, side and longitudinal bend tests* For material over 12 mm thickness, side bend test may be used* Force A Guided root bend test* Guide
- 58. Specimen prior to test* Specimen after test*
- 59. Saw cut Hammer blow Full fracture Any strait line indicates a “Lack of root fusion”* 1 3 1 Fracture line 1 2 3 Inspect both surfaces 2 2 3 Line of fusion X Y X
- 60. A B Inclusions on fracture line* C Lack of root penetration or fusion Hammer blow Saw Cuts Fracture line Inspect both surfaces
- 61. We test welds to establish minimum levels of mechanical properties, and soundness of the welded joint We divide tests into Qualitative & Quantitative methods:* Qualitative: (Have no units) Macro tests Bend tests Fillet weld fracture tests Butt Nick break tests* Quantitative: (Have units) Hardness (VPN & BHN) Toughness (Joules & ft.lbs) Strength (N/mm2 & PSI) Ductility/Elongation (E%)
- 62. The main difference between Macro & Micro is that Micro is the study of the micro-structure at much higher magnification The limit of Macro inspection is magnification < X 10 The specimen is usually cut from a stop/start in the test piece The cut specimen is polished to a fine finish (400 grit) The specimen must be inspected, before etching*
- 63. Remember! The process of inspection is to first: Observe, then Report, then Compare!* Use the TWI macro sheets provided to observe and then make a report on a separate sheet of what you observe* When you have finished reporting, turn the macro sheet over and compare your observations with those given on the back of the sheet* (1 hour)
- 64. A definition of the term “Procedure”?* A systematic method of producing an aim* Therefore, a “Welding procedure” is?* A systematic method of producing a sound weld*
- 65. • Most procedures are approved, but not all? An approved welding procedure is one that has been tested to ensure that the procedure as carried out, produces a weld that satisfies a minimum level of quality for the mechanical, physical or chemical properties desired. If these are not required, then “procedural approval is unnecessary”* • Do all welding procedures need to be approved?* • Most production welding procedure are formatted on written documents or computer spreadsheets, but they need not be written and may be a product of experience • Do all welding procedures need to be written?* What do “you” think about the following statements?*
- 66. A Welding Procedure is a recipe of variable parameters, which will produce the same results of certain quality & properties if carried out in the same way each time* To evaluate a Provisional Welding Procedure we need to check if all the parameters set will work together to produce the desired results* .*
- 67. Once the weld has been completed it is usually visually inspected, then Radiography or Ultrasonic testing is usually applied* If all the desired properties have been met, then a procedure qualification record (WPQR or WPAR) is completed with all the test results, and the procedure then becomes qualified* Finally, and most importantly, Mechanically tested to ensure that the desired level of mechanical properties have been met* A CSWIP 3.2 Senior Welding Inspector is normally responsible for the testing and approval of welding procedures* From this data, a workable document for production welding is prepared and called a Welding Procedure Specification. (WPS)*
- 68. a) Diameter of pipe, or thickness of plate b) Welding position, amperage range, or number of runs c) Process (On multi process procedures only) d) Certain material groups e) Change of consumable to one of the same classification Only if the class is given in the original procedure f) Heat input range (kJ/mm)* Examples of “Extents of Approval” include:*
- 69. Once the procedure has been approved it is then important to test each welder, to ensure that he has the skill to reach the minimum level of quality in the weld, as laid down in the application standard* There is no need to carry out the mechanical tests of the procedure, although bend tests are often used to ensure good side wall fusion Normally; visual, x ray, bends, fractures and macro’s are used in welder approval tests*
- 70. 1) Check the welding process, condition of equipment and test area for suitability. 2) Check that extraction systems, goggles and all safety equipment are available. 3) Check grinders, chipping hammers, wire brush and all hand tools are available. 4) Check materials to be welded are correct and stamped correctly for the test. 5) Check welding consumables specification, diameter, and treatment with WPS. 6) Check the welder’s name and stamp details are correct. 7) Check that the joint has been correctly prepared and tacked, or jigged. 8) Check that the joint and seam is in the correct position for the test. 9) Explain the nature of the test and check that the welder understands the WPS. 10) Check that the welder carries out the root run, fill and cap as per the WPS. 11) Ensure welders identity and stop start location are clearly marked. 12) Supervise or carry out the required tests and submit results to Q/C department.* When supervising a welder test the welding inspector should:* A CSWIP 3.1 Welding Inspector is normally responsible for the supervision and testing of welder approvals *