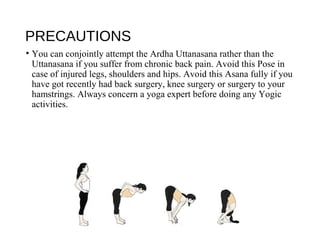
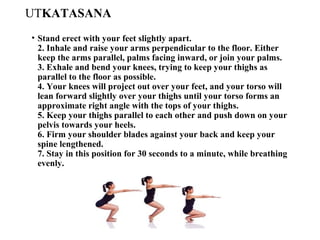
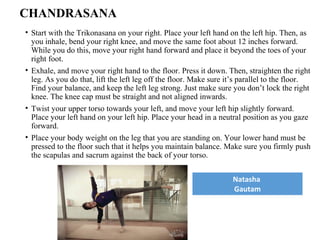
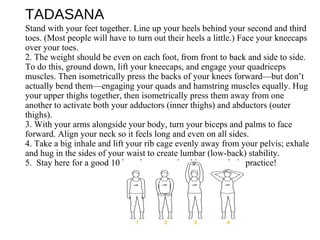
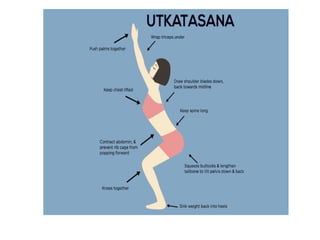
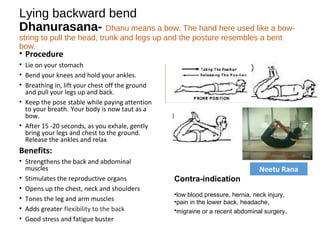
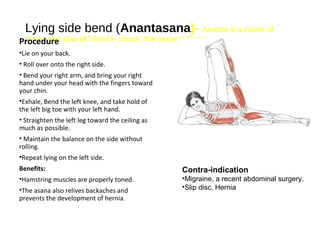
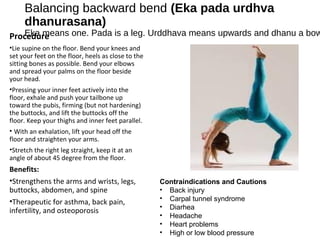
1. YOGA ASSINGNMENT
AMITY SCHOOL OF PHYSICAL
EDUCATION AND SPORYS
SCIENCES
RAJKAMAL MALLIK
B. P. ED (2ND SEM)
A3013816016
2. Asana
Asana is yoga pose or posture or position of the
body. Patanjali in ashtanga yoga defines asanas
as Steady and Comfortable pose.
Rajkamal
Mallik
3. ASANA CLASSIFICATION
1. According position of the body in a Yoga pose
• Forward bend
• Backward bend
• Side twist
• Balancing
1. According to the usefulness or purpose
• Meditative
• Health (yoga for Obesity, hypertension, diabetes)
• Relaxation
4. ASANA CLASSIFICATION
(According position of the body in a Yoga pose)
Standing Sitting Lying
Forward bending Uttasana Janu srisasana Pawanmuktasana
Backward bending Utkatsana Ustrasana Dhanurasana
Sideward bending Chandrasana Parighasana Anantasana
Balancing Tadasana Bakasana Eka pada urdhva
dhanurasana
5. Uttanasana
• In Sanskrit, “ut” means intense, “tan” means to stretch or
extend and “asana” means pose. In English, we call this pose the
Standing Forward Bend.
• Steps of Uttanasana: –
• Take a standing position; keep your feet and shoulder distance
apart and parallel to each other.
• Press your feet down in to the ground and ground yourself
powerfully.
• Now breathe out and gently bend down from the hips (not the
waist) and place your chest and stomach on your thighs.
• If you are a beginner, you ought to bend your knees slightly to
accomplish this.
• If your knees are bent, make sure that they’re straight over your
toes.
• Slowly begin to straighten out your legs however check that your
chest and abdomen never leave your thighs.
• Now elevate your hips as you straighten through your hamstring
muscles all whereas pressing your heels into the ground.
Neetu Rana
6. Benefits of Standing Forward Bend Pose:
• Stretches the hips, hamstrings, and calves
• Strengthens the thighs and knees
• Keeps your spine strong and flexible
• Reduces stress, anxiety, depression, and fatigue
• Calms the mind and soothes the nerves
• Relieves tension in the spine, neck, and back
• Activates the abdominal muscles
• Eases symptoms of menopause, asthma, headaches, and insomnia
• Stimulates the kidneys, liver, spleen
• Improves digestion
• May lower high blood pressure
7. PRECAUTIONS
• You can conjointly attempt the Ardha Uttanasana rather than the
Uttanasana if you suffer from chronic back pain. Avoid this Pose in
case of injured legs, shoulders and hips. Avoid this Asana fully if you
have got recently had back surgery, knee surgery or surgery to your
hamstrings. Always concern a yoga expert before doing any Yogic
activities.
8. UTKATASANA
• Stand erect with your feet slightly apart.
2. Inhale and raise your arms perpendicular to the floor. Either
keep the arms parallel, palms facing inward, or join your palms.
3. Exhale and bend your knees, trying to keep your thighs as
parallel to the floor as possible.
4. Your knees will project out over your feet, and your torso will
lean forward slightly over your thighs until your torso forms an
approximate right angle with the tops of your thighs.
5. Keep your thighs parallel to each other and push down on your
pelvis towards your heels.
6. Firm your shoulder blades against your back and keep your
spine lengthened.
7. Stay in this position for 30 seconds to a minute, while breathing
evenly.
9. benefits
• Utkatasana strengthens the thighs and gives them more
power and flexibility; in fact it is one of the best thigh
strengthening yoga asanas. This is one of the main benefits of
Utkatasana.
This pose also exercises the spine, hip and chest muscles.
Utkatasana strengthens the lower body while stretching the
upper back.
This pose increases your lung capacity and invigorates and
energizes your entire body
Practicing Utkatasana on a regular basis will also tone and
stabilize your knee and ankle joints.
Utkatasana also engages all your core muscles and helps to
reduce flat feet.
10. Precautions
• Precautions while performing “The Chair Pose” include
avoiding this pose if you suffer from low blood pressure,
insomnia, and headaches. Also, practice this pose with
caution if you have lower back pain. Other precautions
include:
• Make sure that you go into the pose only until you can
maintain the natural lumbar curve. You should stop just
before your lower back pops backwards or flattens.
• If you have a shoulder injury, you should make sure to
practice this pose with care. If you cannot raise your arms
over your head without experiencing pain, move only within
the areas where you don’t feel the pain.
• Keep your gaze straight forward if you have neck pain of
dizziness.
11. CHANDRASANA
• Start with the Trikonasana on your right. Place your left hand on the left hip. Then, as
you inhale, bend your right knee, and move the same foot about 12 inches forward.
While you do this, move your right hand forward and place it beyond the toes of your
right foot.
• Exhale, and move your right hand to the floor. Press it down. Then, straighten the right
leg. As you do that, lift the left leg off the floor. Make sure it’s parallel to the floor.
Find your balance, and keep the left leg strong. Just make sure you don’t lock the right
knee. The knee cap must be straight and not aligned inwards.
• Twist your upper torso towards your left, and move your left hip slightly forward.
Place your left hand on your left hip. Place your head in a neutral position as you gaze
forward.
• Place your body weight on the leg that you are standing on. Your lower hand must be
pressed to the floor such that it helps you maintain balance. Make sure you firmly push
the scapulas and sacrum against the back of your torso.
Natasha
Gautam
12. BENEFITS
• Strengthens ankles, knees and legs
• Roots thighbones to help alleviate backpain
• Strengthens abdomen, buttocks and spine
• Opens chest and shoulders
• Improves digestion
• Reduces anxiety, depression
• Improves balance, coordination
• Relives stress
13. PRECAUTIONS
• These are some points of caution you must keep in mind before you
do this asana.
• People with neck problems must continue looking straight, keeping
their neck long. Do not look upwards.
• Avoid doing this asana if you have the following problems.
• a. Migraines and headaches
b. Low blood pressure
c. Diarrhea
d. Insomnia
14. TADASANA
Stand with your feet together. Line up your heels behind your second and third
toes. (Most people will have to turn out their heels a little.) Face your kneecaps
over your toes.
2. The weight should be even on each foot, from front to back and side to side.
To do this, ground down, lift your kneecaps, and engage your quadriceps
muscles. Then isometrically press the backs of your knees forward—but don’t
actually bend them—engaging your quads and hamstring muscles equally. Hug
your upper thighs together, then isometrically press them away from one
another to activate both your adductors (inner thighs) and abductors (outer
thighs).
3. With your arms alongside your body, turn your biceps and palms to face
forward. Align your neck so it feels long and even on all sides.
4. Take a big inhale and lift your rib cage evenly away from your pelvis; exhale
and hug in the sides of your waist to create lumbar (low-back) stability.
5. Stay here for a good 10 breaths—or make this your whole practice!
15. BENEFITS
• This asana helps improve body posture.
2. With regular practice of this asana, your knees, thighs, and
ankles become stronger.
3.Your buttocks and abdomen get toned.
4. Practicing this asana helps alleviate sciatica.
5. This asana reduces flat feet.
6. It also makes your spine more agile.
7. It is an excellent asana for those who want to increase their
height in their formative years.
8. It also helps improve balance.
9. Your digestive, nervous, and respiratory systems are
regulated.
16. JANU SIRSANA
1. To begin, sit on the floor with your back erect.
2. Stretch out your left leg all the way from the hip joint. Bend your right knee, placing
the bottom of the right foot against the inner part of your left thigh. Your right leg
and knee should be comfortably pressed on the floor.
3. Your chest and navel should line up with your left leg. This will set your torso in the
right position.
4. Let your hands provide support as they rest beside the hips.
5. Inhale. Extend your belly and torso right up to the top of your head.
6. As you exhale, let the energy flow through the left leg, reaching till the ball of the
foot. Inhale and stretch your arms up such that it creates more length in your spine.
Then, exhale and bend forward from the base of the hip as if you are coming
forward from the groin to the front of the sitting bones. Reach for your ankles or
toes, if you can, with your hands, or stretch till you are comfortable.
7. Remember that if you stretch too far, it will tend to round the spine and, in turn,
lead to injury.
8. Hold the pose and breath deep and slow. As you breathe, feel the breath filling the
groin, the back of your left leg, and the entire area of your back.
9. Inhale and release the pose. Let the muscles in your abdomen contract. Then, lift
your torso. Stretch out your right leg. Relax for a few seconds. Repeat the asana
with the right leg stretched out.
19. PRECAUTIONS
• It is best to avoid this asana if you have the following problems:
• 1. Headaches
2. Insomnia
3. Low blood pressure
20. USTRASANA
• Sit on the floor stretching your leg and keeping your spine erect keeping palms on the
ground side by the buttocks.
• Bend your leg by the keens and sit on your heels placing the buttocks between the heels,
the right big toe overlapping the left.
• Kneel on floor keeping your knees in line with the shoulders and sole of the feet facing
the ceiling.
• Keep your hand on thighs.
• Inhale and arch your back and place your palms on the heels of the feet.
• Keep your arms straight.
• Do not strain your neck keep it neutral. Let your neck be free.
• Stay in this final position for couple of breaths or as much longer as you can.
• Breathe out and slowly come to the normal position withdrawing your hands from the
feet.
21.
22. BENEFITS
• Ustrasana Stretches the anterior muscles of the body.
• Improves flexibility of spine and strengthens it.
• Camel Pose Improves digestion
• Gives relaxation to the lower back.
• Useful as an initial practice for back bending.
23. PRECAUTIONS
People suffering from severe back and neck injury, high or low blood
pressure, migraine or other severe headache should perform this
asana or posture under the guidance of a yoga therapist or expert. Else
better to avoid the practice
24. Parigasana
• Kneel on the floor such that your knees are hip width apart and thighs parallel.
• Stretch out your right leg to the right side.
• The sole of the right foot should be flat on the floor and toes should be pointed forward. The right leg
should be straight without locking the knee.
• Place the right hand on the outer edge of the right thigh.
• Inhale and bring the left arm overhead, and fingers pointed towards the ceiling with palm facing your
right side. The left upper arm should be close to the left ear throughout.
• Exhale while bending from the waist as you stretch out to the right.
Your left shoulder should be back and relaxed at this time.
• Bring the right hand down the outer edge of the right leg. It should be straight but elbow should not be
locked.
• Look past your left elbow.
• Press the right foot into the floor while extending out through the finger tips and the crown of the head.
• Hold the pose for 10 to 20 seconds.
25.
26. BENEFITS
Stretches the sides of the body and makes the spine flexible. Tones the
abdomen and improves circulation.
Stretches the muscles joining the ribs, helping in lung expansion thus
increasing the capacity of deep breathing. Thus helps asthma patients.
PRECAUTIONS
•Use caution if you have problems with knees, shoulders or hips.
27. BAKASANA
1. Stand in the position of Tadasana.
2. After taking the position of Tadasana, come down to the Uttanasana position.
3. While doing Uttanasana, keep your hands on the floor just in front of your feet. For this,
you’ll need to bend a little more from your hips.
4. If you’re not capable to balance properly, attempt to keep a fold blanket below your
hands so your body gets a platform to rest on.
5. Now Bend your arms a bit (as much as possible).
6. Attempt to carry your left leg up within the air.
7. Fold your knee and take a look at to rest your left knee on the outer facet of your left arm.
8. Fold the right leg from the knee and take a look at to put the right knee on the outer facet
of the right arm.
9. There ought to be acceptable distance between each your hands, so it becomes easier for
you to balance your body on your hands.
10. Stay steady during this position for concerning 15-20 seconds, after that slowly-slowly
release.
11. Repeat this process three times a day.
29. BENEFITS
• Regular practice of this pose will increase mental and physical
strength.
• Helps in to make your body more flexible.
• It increases endurance capacity.
• Practicing this posture on a daily routine helps you in strengthening
your forearms, wrists and shoulders.
• It provides a decent stretch to your higher back and even
strengthens your abdominal muscles.
30. PRECAUTIONS
• Those people who are suffering from Carpal Tunnel Syndrome,
sciatica pain, slip disc, Spondilitis problems and wrist injury are not
allowed to practice this asana. Be extra careful if you have shoulders
injury or hamstrings while attempting this pose. If you are a beginner
then don’t try this pose immediately, at first start with basics, when
you are master in that then go for it .This is an advance Asana so try
this Asana under the supervision of a yoga teacher.
31. Lying forward bend(Pawanmuktasana)
• Procedure
• Lie down on floor in Shavasana posture.
• Then bend your both knee near to the stomach as
much as possible.
• Now exhale and push your both knee to touch the
chest with both hands by interlocking fingers
underneath the knee.
• After that raise your head and touch the nose with
the knee. If one is not able to practice such pose
then one should try to cover distance as nearer as
possible and stay for 10-30 seconds in such
posture by keeping breath out.
Benefits:
• the people who are suffering from gas problems,
acidity, arthritis pain, heart problems and back
pain. It also helps for removing unwanted
abdominal fat.
Contra-indications:
• High blood pressure, Sciatica, Slip disc, Abdominal
surgery, Hernia
• Testicle Disorder, Appendicitis, Menstruation
Natasha Gautam
32. Lying backward bend
Dhanurasana- Dhanu means a bow. The hand here used like a bow-
string to pull the head, trunk and legs up and the posture resembles a bent
bow.
• Procedure
• Lie on your stomach
• Bend your knees and hold your ankles.
• Breathing in, lift your chest off the ground
and pull your legs up and back.
• Keep the pose stable while paying attention
to your breath. Your body is now taut as a
bow.
• After 15 -20 seconds, as you exhale, gently
bring your legs and chest to the ground.
Release the ankles and relax
Benefits:
• Strengthens the back and abdominal
muscles
• Stimulates the reproductive organs
• Opens up the chest, neck and shoulders
• Tones the leg and arm muscles
• Adds greater flexibility to the back
• Good stress and fatigue buster
Contra-indication
•low blood pressure, hernia, neck injury,
•pain in the lower back, headache,
•migraine or a recent abdominal surgery.
Neetu Rana
33. Lying side bend (Anantasana)- Ananta is a name of
Visnu and also of Visnu’s couch, the serpent Sesa.Procedure
•Lie on your back.
• Roll over onto the right side.
• Bend your right arm, and bring your right
hand under your head with the fingers toward
your chin.
•Exhale, Bend the left knee, and take hold of
the left big toe with your left hand.
• Straighten the left leg toward the ceiling as
much as possible.
• Maintain the balance on the side without
rolling.
•Repeat lying on the left side.
Benefits:
•Hamstring muscles are properly toned.
•The asana also relives backaches and
prevents the development of hernia.
Contra-indication
•Migraine, a recent abdominal surgery.
•Slip disc, Hernia
34. Balancing backward bend (Eka pada urdhva
dhanurasana)
Eka means one. Pada is a leg. Urddhava means upwards and dhanu a bowProcedure
•Lie supine on the floor. Bend your knees and
set your feet on the floor, heels as close to the
sitting bones as possible. Bend your elbows
and spread your palms on the floor beside
your head.
•Pressing your inner feet actively into the
floor, exhale and push your tailbone up
toward the pubis, firming (but not hardening)
the buttocks, and lift the buttocks off the
floor. Keep your thighs and inner feet parallel.
• With an exhalation, lift your head off the
floor and straighten your arms.
•Stretch the right leg straight, keep it at an
angle of about 45 degree from the floor.
Benefits:
•Strengthens the arms and wrists, legs,
buttocks, abdomen, and spine
•Therapeutic for asthma, back pain,
infertility, and osteoporosis
Contraindications and Cautions
• Back injury
• Carpal tunnel syndrome
• Diarhea
• Headache
• Heart problems
• High or low blood pressure