Call Girls In Kirti Nagar 7042364481 Escort Service 24x7 Delhi
MCC Heater and Air Conditioner Service Manual Section
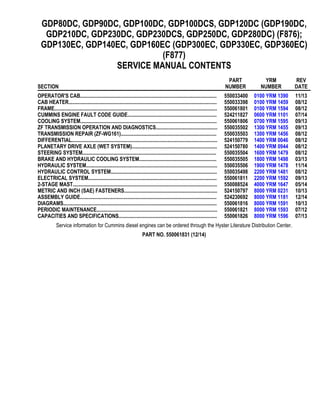
1. GDP80DC, GDP90DC, GDP100DC, GDP100DCS, GDP120DC (GDP190DC,
GDP210DC, GDP230DC, GDP230DCS, GDP250DC, GDP280DC) (F876);
GDP130EC, GDP140EC, GDP160EC (GDP300EC, GDP330EC, GDP360EC)
(F877)
SERVICE MANUAL CONTENTS
SECTION
PART
NUMBER
YRM
NUMBER
REV
DATE
OPERATOR'S CAB........................................................................................................ 550033400 0100 YRM 1390 11/13
CAB HEATER................................................................................................................. 550033398 0100 YRM 1459 08/12
FRAME............................................................................................................................ 550061801 0100 YRM 1594 08/12
CUMMINS ENGINE FAULT CODE GUIDE.................................................................... 524211827 0600 YRM 1101 07/14
COOLING SYSTEM........................................................................................................ 550061806 0700 YRM 1595 09/13
ZF TRANSMISSION OPERATION AND DIAGNOSTICS............................................... 550035502 1300 YRM 1455 09/13
TRANSMISSION REPAIR (ZF-WG161)......................................................................... 550035503 1300 YRM 1456 08/12
DIFFERENTIAL............................................................................................................... 524150779 1400 YRM 0046 08/12
PLANETARY DRIVE AXLE (WET SYSTEM)................................................................. 524150780 1400 YRM 0944 08/12
STEERING SYSTEM...................................................................................................... 550035504 1600 YRM 1479 08/12
BRAKE AND HYDRAULIC COOLING SYSTEM........................................................... 550035505 1800 YRM 1498 03/13
HYDRAULIC SYSTEM.................................................................................................... 550035506 1900 YRM 1478 11/14
HYDRAULIC CONTROL SYSTEM................................................................................. 550035498 2200 YRM 1481 08/12
ELECTRICAL SYSTEM.................................................................................................. 550061811 2200 YRM 1592 09/13
2-STAGE MAST.............................................................................................................. 550088524 4000 YRM 1647 05/14
METRIC AND INCH (SAE) FASTENERS....................................................................... 524150797 8000 YRM 0231 10/13
ASSEMBLY GUIDE........................................................................................................ 524230692 8000 YRM 1181 12/14
DIAGRAMS..................................................................................................................... 550061816 8000 YRM 1591 10/13
PERIODIC MAINTENANCE............................................................................................ 550061821 8000 YRM 1593 07/12
CAPACITIES AND SPECIFICATIONS........................................................................... 550061826 8000 YRM 1596 07/13
Service information for Cummins diesel engines can be ordered through the Hyster Literature Distribution Center.
PART NO. 550061831 (12/14)
2. MCC Heater and Air Conditioner
HEATER SYSTEM
General
Lift trucks with a closed cab are equipped with a
heater assembly which is installed on the underside of
the cab. The main components of the heater
assembly are the fan, heater core, vent door, and an
evaporator for the optional air conditioning system.
See Figure 1.
A. RECIRCULATED AIR
B. FRESH AIR ENTRY
C. CAB AIR FLOW
1. VENT DOOR
2. VENT DOOR ACTUATOR
3. EVAPORATOR CORE
4. HEATER CORE
5. BLOWER
6. THERMOSTAT
7. WATER VALVE
8. EXPANSION VALVE
Figure 1. Heater/Airco Assembly Components
The vent door determines the percentage of fresh air
and recirculated air that the fan pulls through the
heater assembly. In heater assemblies without an air
conditioner, the vent door is in a fixed position and
allows for an air mixture of 85% fresh air and 15%
recirculated air.
Cabs that are equipped with an air conditioner have
an electrically controlled vent door that can be used to
vary the percentage of recirculated air between 0 and
100 percent. The operator can select the position of
the vent door by turning a knob on the dashboard.
Cooling performance increases by reducing the
percentage of incoming fresh air.
Recirculated air enters the heater assembly through
the openings in the side console at the fuse cover.
Fresh air enters the heater assembly through the cab
air filter, which is located at the left rear corner of the
cab. As the filter becomes restricted or clogged, the
percentage of recirculated air will increase and the
percentage of fresh air will decrease.
When fresh air content and fan speed is increased,
positive air pressure is created in the cab, preventing
dust from entering the cab. The air pressure escapes
through the cab door posts and through openings in
the pedal area and sliding window brush profiles.
When the fan is switched ON, air is pushed through
channels in the cab floor to the air ducts at the front
window. Cabs that are equipped with an air
conditioner have three additional vents at the foot
area that can be opened or closed. Cooling capacity
is increased by opening the three vents. When the
three vents are open, air flow is less restricted,
increased air volume passes through the evaporator,
and the majority of the air no longer becomes warm in
the air channels that lead to the front window. See
Figure 2.
The heater consists of a heater core and a water
valve. See Figure 1. The water valve controls the flow
of heated coolant to the heater core. By varying the
opening of the water valve, the desired amount of
heat is transferred by the heater core to the air that
enters the cab. The water valve opens proportionally
to the selected position of the heat control knob. On
standard units the knob and valve are connected
mechanically, on units with an Air Conditioning
system there is an electronic connection.
0100 YRM 1459 MCC Heater and Air Conditioner
1
3. A. OPTIONAL AIR VENT
B. AIR TO FRONT WINDOW
C. CAB AIR FLOW
D. FRESH AIR ENTRY
1. CAB AIR FILTER
Figure 2. Ventilation
AIR CONDITIONING
General
CAUTION
Replacement, installation, and repairs to air
conditioning units that require discharging and/or
refilling of the refrigeration fluid may only be
performed by a certified technician.
The air conditioning system consists of a compressor
with an electromagnetic clutch, condenser, dryer,
evaporator, and interconnected sensors and switches.
See Figure 3.
The engine drives the compressor when the clutch at
the compressor has been activated. Activation of the
clutch is determined by several sensors and switches
that are connected in series. The operator must
switch ON the button for the air conditioning system
and select one of the fan switch speeds. Refer to the
electrical schematic SRM pertaining to each lift truck,
for the schematic locations and interconnections of
the sensors and switches.
The compressor compresses the refrigerant and
continuously pumps the refrigerant through the air
conditioning system. As the refrigerant is being
compressed, the refrigerant temperature will rise. The
absorbed heat is dissipated in the condenser, which is
installed outside the cab. Fans at the condenser
accelerate heat dissipation.
After the refrigerant passes through the condenser,
the liquefied refrigerant passes through the dryer that
also serves as a reservoir for the refrigerant. At the
expansion valve, the refrigerant will expand in the
evaporator, causing the temperature of the refrigerant
to drop substantially. The expansion valve regulates
the flow of the refrigerant, depending on the pressure
difference between the dryer and the compressor
inlet. A minimum pressure difference is necessary to
open the valve. After leaving the evaporator, the
refrigerant will reenter the compressor.
Dryer
The refrigerant functions as a coolant, and contains
lubricant for the compressor. Because humidity
affects the properties of the refrigerant and the
lubricant, a dryer is installed to absorb the trapped
humidity. The dryer also filters impurities in the
refrigerant.
Normal refrigerant leakage is approximately 10% per
year. To help prevent additional leakage through the
compressor seals, the air conditioning system should
be operated at least every two weeks for 15 minutes.
The air conditioning system cannot be operated at
temperatures below 0°C (32°F) because the anti-ice
switch will prevent the compressor clutch from being
activated.
The dryer, refrigerant, and lubricant must be replaced
every three years. Contact a certified technician every
three years to perform these repairs.
MCC Heater and Air Conditioner 0100 YRM 1459
2
4. 1. CONDENSER
2. SERVICE CONNECTION, HIGH PRESSURE
3. COMPRESSOR
4. SERVICE CONNECTION, LOW PRESSURE
5. ANTI-ICE SENSOR
6. EVAPORATOR
7. EXPANSION VALVE
8. RESERVOIR
9. DRYER
10. PRESSURE SWITCH
Figure 3. Refrigerant Cycle
Compressor Lubrication
The oil specification for the compressor is indicated
on the nameplate of the compressor.
Most of the compressors used on Big Truck air
conditioning systems use SP-15 oil.
The compressor on QSM-11 engines requires ZXL
100PG oil.
Control Systems, Sensors, and Switches
The air conditioning system (A/C) is activated by
pushing the A/C switch on the dashboard and
selecting one of the fan speeds. A control light in the
A/C switch will illuminate, and the fans on the
condenser will turn. The anti-ice switch and the
pressure switches must be closed before the clutch
engages the compressor. If the anti-ice switch or one
of the pressure switches is open, the clutch will
disengage and the air conditioning system will not
activate.
Water in the air condensates on the evaporator.
Normally, the condensated water drips on the bottom
plate of the heater assembly and escapes through
two hoses that open into the engine compartment. If
the condensated water becomes ice, the air flow
through the evaporator will be blocked, which will
block the entire cab ventilation system. The anti-ice
switch protects the evaporator against ice buildup by
opening at -1°C (30.2°F), causing the clutch to
disengage and allowing air to warm the evaporator.
The anti-ice switch, which is inserted between the fins
of the evaporator, will close when the temperature
reaches 2.3°C (36.14°F). The anti-ice sensor is
indicated by "T" on the electrical schematic.
0100 YRM 1459 MCC Heater and Air Conditioner
3
5. The pressure switches are located at the dryer, and
protect the system against pressures that are too low
or too high. See Figure 4. If the system pressure
drops below 2 bar (29 psi), the refrigerant level is too
low for proper functioning of the system and proper
lubrication of the compressor.
1. CONDENSER COVER
2. CONDENSER COIL
3. SIGHT GLASS
4. DRYER
5. PRESSURE SWITCH
6. FAN
Figure 4. Condenser
High system pressure is a recurrent situation. The
evaporator valve has a limited flow capacity. The
refrigerant flow generated by the compressor
fluctuates with engine speed, and regularly exceeds
the flow capacity of the evaporator valve. When the
flow capacity of the evaporator valve is exceeded, the
compressor will have raised system pressure to the
maximum allowable level. The pressure switch will
send a signal to disengage the compressor clutch,
and the evaporator valve will continue to regulate
refrigerant flow. Pressure will drop until the pressure
switch is enabled, causing the clutch to reengage.
System pressure will rise again until the maximum
allowable level has been reached.
CAUTION
NEVER bypass the electric clutch of the air
conditioning compressor. If the clutch does not
receive a signal, there is either an insufficient
amount of refrigerant, or the condenser or the
evaporator is iced, and the pressure switch will
not be enabled to protect the system against
excessive pressure. If the clutch does not receive
a signal, contact a certified and qualified air
conditioning specialist. Bypassing the
compressor will ALWAYS lead to system damage.
The pressure switch, as installed on the dryer,
physically combines the high and low pressure
switches and their electrical interconnection. The
pressure switch is indicated by "P1" on the electrical
schematic.
The pressure switch has an integrated third function
called the medium pressure switch. The medium
pressure switch changes the connection to the fans
on the condenser, causing them to turn at a higher
speed when pressure in the system has exceeded
16 bar (232 psi). At lower pressures, the fans are
connected in series, causing them to turn at a lower
speed. The medium pressure switch is indicated by
"P2" on the electrical schematic.
CLIMATE CONTROL
Description
Functionality of the individual components of the
normal air conditioning systems and the Climate
Control system is the same. The difference is that for
the Climate Control a controller sends the signals to
the components instead of the manually operated
knobs on the dashboard for the normal system. This
Controller is part of the control unit on the dashboard
that also has a display and a select button. The
display provides information on mode, temperature,
blower speed and fault conditions. An explanation of
the normally available information and settings is in
the Operating Manual.
The explanation for how to read information and apply
settings for service purposes is described under
Service Menu.
MCC Heater and Air Conditioner 0100 YRM 1459
4
6. Service Menu
1. Push the Power Button to turn the HVAC unit ON.
See Figure 5.
2. Pressing the Set Button scrolls the screen
between:
• Climate Control Mode Settings
• Air Circulation Settings
• Display Settings
1. POWER BUTTON 2. SET BUTTON
Figure 5. Climate Control
3. Press the set button to scroll to the Air Circulation
Settings.
4. Push and hold the Power Button, and turn the Set
Button three clicks clockwise to enter one of the
service menu selections:
• Set Up (Not an option for Hyster Lift trucks)
• View
• Error List
• Statistics
• Exit
To scroll to a next service screen, turn the Set
Button one click clockwise. Push the Set Button to
enter the selected service screen. Turning the Set
Button after the Exit screen further clockwise will
bring you back to the Set Up screen. To leave the
Service Menu scroll to Exit and push the Set
Button.
Set Up
The Set Up screen allows setting the date and the
blower speed for an additional interior heater. An
additional interior heater is not a standard option.
The date format is Month/Day/Year. To set the date,
go to Set Up screen and push the Set Button until it
flashes digital for "Month". Turn the Set Button until
the correct month number appears and push the
button to confirm. The digits for "Day" will now flash.
Repeat the procedure to set "Day" and "Year". When
finished, turn the knob to scroll to the Exit screen and
push the button to leave the service menu.
View 1 and View 2
There are two View pages that show readings and
actual setting of the HVAC unit. After leaving the
previous service screen "Set Up", screen View 1 will
appear. Push the button to scroll between screen
View 1 and screen View 2 (see Figure 6).
Screen "View 1" displays below information:
• Scale - Selected temperature scale: Cel for
Celsius or Fah for Fahrenheit.
• Setpoint - Selected (desired) interior
temperature.
• Inside - Cab interior temperature as measured
by the Inside Sensor.
• Outside - Cab exterior temperature as
measured by the Outside Sensor.
• Deice - Temperature of the refrigerant leaving
the evaporator coil.
• Coil - Temperature of the air at the blower.
• Heat - Flapper door position: Fresh or Recirc.
Screen "View 2" displays below information:
• AC - Indicates whether Air conditioning Mode
is switched ON or OFF.
• Heater - Indicates whether Heating Mode is
switched ON or OFF.
• Blower - Indicates the selected percentage of
maximum blower speed.
• D Heat Fan - Indicates the selected blower
speed percentage for an additional interior
heater.
• Valve - Indicates the percentage of maximum
heater valve opening that the controller sends
out as a signal.
• Contrast - Indicates the contrast percentage of
the display.
• Brightness - Indicates the brightness
percentage of the display.
0100 YRM 1459 MCC Heater and Air Conditioner
5
7. In case a temperature sensor is disconnected, the
display will show "open". Comparison of the different
values may provide an indication for a possible
defect.
Figure 6. Climate Control View Display
Error List
The Main Display shows a warning sign in the left
hand bottom corner of the Main Display if a fault
occurs. See Figure 7.
1. WARNING SIGN
Figure 7. Climate Control Warning
The Error List page shows for each of the
temperature sensors and for the water valve the
number of occurrences that the connection was
shortened or open since the last reset date. For the
Water Valve there is an additional indication for the
number of times that the Water Valve was stuck. See
Figure 8.
Figure 8. Climate Control Error Display
To further establish the cause of failure, see
Temperature Sensors or Water Valve.
To reset the number of occurrences and the reset
date, turn the Set Button one click in a counter
clockwise direction and push the Set Button for a
dialog box. When the dialog box is shown, press the
Set Button once to reset all values.
Statistics
The Statistics page shows operating hours and cycle
times since the last reset date. To reset the Statistics
Page, go to the Error Page, turn the Set Button one
click counter clockwise. A dialog box will appear.
When the dialog box is shown, press the Set Button
once to reset all values. See Figure 9.
Figure 9. Climate Control Statistics Display
MCC Heater and Air Conditioner 0100 YRM 1459
6
8. Exit
To leave the Service menu scroll to Exit and push the
Set Button.
Temperature Sensors
In addition to the normally present de-ice temperature
sensor in the evaporator, there are three further
temperature sensors that influence the reaction of the
controller:
• Outside Temperature Sensor, which is located
outside the cab under the condenser.
• Coil sensor, which is located behind the
evaporator and heater coil, in the suctioned air
flow of the blower fan.
• Inside Sensor, which is located in the side
console, measures the cab interior
temperature. Interior air flow past the sensor is
through a tube that connects between suction
side of the blower fan and inside sensor.
Troubleshooting
Disconnect the sensor for which an error has been
indicated. Use an Ohm meter to measure its
resistance. See Table 1 that provides an overview of
the resistance value for different temperatures. The
electrical properties of the four sensors are the same.
When the sensor itself shows no defects, check
continuity of the wiring harness. See Figure 10. The
sensors are connected to the controller connector at
the following pin numbers:
• Inside Sensor: Pin 14 and 32.
• Outside Sensor: Pin 4 and 33
• De-Ice Sensor: Pin 13 and 24
• Coil Sensor: Pin 12 and 34
Table 1. Sensor Resistance Values
°C °F k?
0 32 32,649
5 41 25,394
10 50 19,903
Table 1. Sensor Resistance Values (Continued)
°C °F k?
15 59 15,713
20 68 12,493
25 77 10,000
30 86 8,056
Water Valve
Fault indication "Valve Stuck" indicates a physical
obstruction that prevents the valve from moving. The
physical obstruction may have its cause at the outside
or inside of the water valve. The components of the
water valve are not serviced separately. Replace the
water valve if there is no obvious problem that can be
rectified.
Troubleshooting
When a fault for open or short circuit has been
indicated, use a volt meter to measure the voltage
over the different connections. Measures can be
taken at either the connector of the water valve or at
the controller connector. See Table 2. There are also
two 15 amp fuses located in the wiring system check
these if a fault for open or short circuit has been
indicated. For location of theses fuses see Figure 11.
Table 2. Water Valve Pin Outs
Water
Valve
Controller Value
Pin 8 Pin 31 ground
Pin 10 Pin 30 3.3 Volt
Pin 9 Pin 5 0.6 Volt when valve
is closed. 2.2 Volt
when valve is open.
Pin 6 Pin 18 12 Volt when the
valve is closing. 0
Volt when opening or
not moving.
Pin 5 Pin 19 12 Volt when the
valve is opening. 0
Volt when closing or
not moving.
0100 YRM 1459 MCC Heater and Air Conditioner
7
9. Figure 10. Climate Control Wiring Diagram
MCC Heater and Air Conditioner 0100 YRM 1459
8
11. Figure 11. Standard A/C Wiring Diagram
STANDARD HEATER ASSEMBLY
Access
WARNING
Make sure no one is under cab when raising or
lowering cab.
WARNING
Before placing any part of your body under cab,
always make sure the cab is fully tilted, or when
partially open, is locked using the tilt latch.
To access the heater assembly, raise the cab to the
fully open position. Support the heater assembly, then
remove the three screws holding the heater assembly
in place. Lower the heater assembly down, remove
screws and the cover plate. Individual components
are now accessible.
Remove
WARNING
Before removing the heater hoses, make sure the
heater hoses are cool. Hot coolant may cause
severe burns.
1. Remove the four screws that retain the fuse panel
cover to the right side of the instrument panel and
remove the cover to gain access to the underside
of the instrument panel. See Fuse Panel and
Cover Location.
2. Remove the heat control knob at the instrument
panel top console. See Switch Locations.
3. Remove the nut that retains the rotary control to
the instrument panel top console. See Figure 12.
4. Remove the rotary control assembly for the water
valve from the underside of the instrument panel
top console and place it with the cable on the
heater assembly.
5. Disconnect the wire harness from the fan speed
knob at the underside of the instrument panel top
console.
1. CABLE CLIP
2. EXTENDED CABLE (FULL HOT POSITION)
3. NUT
4. KNOB LOCATION
5. ROTARY CONTROL
Figure 12. Rotary Control
WARNING
DO NOT remove the pressure cap from the
expansion tank when the engine is hot. When the
pressure cap is removed, pressure is released
from the system. If the system is hot, the steam
and boiling coolant can cause burns.
6. Remove the pressure cap to release the pressure
and place it back on the radiator expansion tank.
7. Tilt/raise the cab to the fully open position. Refer
to the section Raising and Lowering Cab.
8. Tag and disconnect the two heater hoses from
the heater inlet and outlet ports, and plug the
heater hoses and ports. See Figure 13.
MCC Heater and Air Conditioner 0100 YRM 1459
10
12. 1. HEATER HINGE BRACKET
2. HEATER ASSEMBLY CAPSCREW LOCATION
3. HEATER OUTLET
4. HEATER INLET
Figure 13. Heater Assembly
NOTE: The heater assembly fits tightly underneath
the cab and will require a limited amount of force to
swing the heater assembly down and away from the
cab.
9. Loosen the two nuts and capscrews at the hinge
bracket. Remove the three capscrews that retain
the heater assembly to the cab. Pull the heater
assembly downwards and push simultaneously
towards the hinge bracket to provide sufficient
clearance between heater assembly and cab
frame. See Figure 13 for the location of the
capscrews.
10. Make sure the wire harness and the cable control
are free and can be removed together with the
heater assembly.
11. Support the heater assembly and remove the
capscrews that retain the heater assembly to the
hinge brackets.
12. Remove the heater assembly from the underside
of the cab.
Install
1. Position the heater assembly to the underside of
the cab.
2. Route the cable harness and cable control
correctly to the inside of the instrument panel box.
3. Support the heater assembly and install the
capscrews to retain the heater assembly to the
hinge brackets. Do not tighten capscrews at this
time.
4. Swing the heater assembly up toward the cab and
install the three capscrews to retain the heater
assembly to the cab. See Figure 13 for the
location of the capscrews.
5. Tighten the two capscrews at the hinge bracket.
6. Remove the plugs and connect the heater hoses
to the inlet and outlet ports.
7. Lower the cab to the fully lowered and latched
position. Refer to the section Raising and
Lowering Cab.
8. Connect the outer cable to the rotary control as
described in the section Push/Pull Cable
Replacement, Water Valve Cable, Install.
9. Connect the inner cable to the rotary control as
described in the section Push/Pull Cable
Replacement, Heater/Air Conditioner Assembly,
Install.
10. Connect the wire harness for the fan speed knob
to the connector at the underside of the
instrument panel top console.
11. Install the rotary control assembly for the water
valve to the underside of the instrument panel top
console.
12. Install the nut to retain the rotary control to the
instrument panel top console. See Figure 12.
13. Install the heat control knob at the instrument
panel top console. See Switch Locations.
14. Position the fuse panel cover to the right side of
the instrument panel and install the four screws.
See Fuse Panel and Cover Location.
15. If required, fill the coolant to the correct level.
Refer to the manual .
16. Start the engine and warm the engine to normal
operating temperature.
17. Make sure the heater functions correctly.
0100 YRM 1459 MCC Heater and Air Conditioner
11
13. STANDARD HEATER PARTS
REPLACEMENT
Heater Core
Remove
WARNING
Before removing the heater hoses, make sure the
heater hoses are cool. Hot coolant may cause
severe burns.
WARNING
When replacing the heater hoses, make sure the
replacement hoses meet correct specifications.
Failure to meet specifications may cause personal
injury.
WARNING
DO NOT remove the pressure cap from the
expansion tank when the engine is hot. When the
pressure cap is removed, the pressure is released
from the system. If the system is hot, the steam
and boiling coolant can cause burns.
1. Remove the pressure cap to release the pressure
and place it back on the radiator expansion tank.
2. Tilt/raise the cab to the fully open position. Refer
to the section Raising and Lowering Cab.
3. Loosen the hose clamp and disconnect the heater
inlet hose from the heater core pipe located at the
underside of the heater assembly and plug the
heater hose.
NOTE: The heater assembly fits tightly underneath
the cab and will require a limited amount of force to
swing the heater assembly down and away from the
cab.
4. Loosen the two nuts and capscrews at the hinge
bracket. Remove the three capscrews that retain
the heater assembly to the cab. Pull the heater
assembly downwards and push simultaneously
towards the hinge bracket to provide sufficient
clearance between heater assembly and cab
frame. See Figure 13 for the location of the
capscrews.
5. Remove the 10 screws that retain the top cover to
the heater assembly.
6. Remove the top cover from the heater assembly.
7. Loosen the hose clamp and disconnect the top
heater hose from the heater core, located
between the heater core and the water valve. See
Figure 14.
8. Remove the two capscrews that retain the heater
core bracket to the inside of the heater assembly.
See Figure 15.
1. BOTTOM HEATER HOSE
2. WATER VALVE
3. TOP HEATER HOSE
4. HEATER CORE
5. HOSE CLAMP
Figure 14. Heater Water Valve
Figure 15. Heater Assembly Components
MCC Heater and Air Conditioner 0100 YRM 1459
12
14. Legend for Figure 15
1. HEATER CORE
2. BLOWER
3. WATER VALVE
4. HEATER CORE BRACKET
5. HEATER CORE BRACKET CAPSCREWS
9. Remove the heater core bracket from the heater
assembly.
10. Slide the heater core out of the heater assembly.
Install
1. Slide the heater core into the heater assembly.
2. Position the heater core bracket to the inside of
the heater assembly and install the two retaining
capscrews.
3. Connect the top heater hose to the heater core
and tighten the hose clamp.
4. Position the top cover on the heater assembly.
5. Install the 10 screws to retain the top cover to the
heater assembly.
6. Swing the heater assembly up toward the cab and
install the three capscrews to retain the heater
assembly to the cab. See Figure 13 for the
location of the capscrews.
7. Connect the heater inlet hose to the heater core
pipe located at the underside of the heater
assembly and tighten the hose clamp.
8. Lower the cab to the fully lowered and latched
position. Refer to the section Raising and
Lowering Cab.
9. Add coolant as needed. Refer to the manual .
10. Start the engine and check for leaks. Add coolant
as needed.
11. Make sure the heater functions correctly.
Blower
Remove
1. Tilt/raise the cab to the fully open position. Refer
to the section Raising and Lowering Cab.
NOTE: The heater assembly fits tightly underneath
the cab and will require a limited amount of force to
swing the heater assembly down and away from the
cab.
2. Remove the three capscrews that retain the
heater assembly to the cab and swing the heater
assembly down. See Figure 13 for the location of
the capscrews.
3. Remove the 10 screws that retain the top cover to
the heater assembly.
4. Remove the top cover from the heater assembly.
5. Tag and disconnect the electrical connector
connected to the blower assembly. See
Figure 16.
6. Remove the four screws that retain the blower to
the heater assembly housing. See Figure 17.
1. ELECTRICAL CONNECTOR
Figure 16. Blower Electrical Connector
0100 YRM 1459 MCC Heater and Air Conditioner
13
15. 1. BLOWER RETAINING CAPSCREWS
Figure 17. Blower Retaining Screws
7. Partially remove the blower assembly from the
heater assembly housing and tag and disconnect
the four electrical wires from the blower assembly.
See Figure 18.
8. Remove the blower assembly from the heater
assembly housing.
1. ELECTRICAL WIRE CONNECTION
Figure 18. Blower Electrical Wire Connection
Install
1. Connect the electrical wires to the blower
assembly. See Figure 18.
2. Position the blower assembly into the heater
assembly housing.
3. Install the four screws to retain the blower to the
heater assembly housing. See Figure 17.
4. Connect the electrical connector to the blower
assembly. See Figure 16.
5. Position the top cover on the heater assembly.
6. Install the 10 screws to retain the top cover to the
heater assembly.
7. Swing the heater assembly up toward the cab and
install the three capscrews to retain the heater
assembly to the cab. See Figure 13 for the
location of the capscrews.
8. Lower the cab to the fully lowered and latched
position. Refer to the section Raising and
Lowering Cab.
9. Make sure the blower functions correctly.
Water Valve
Remove
WARNING
Before removing the heater hoses, make sure the
heater hoses are cool. Hot coolant may cause
severe burns.
WARNING
When replacing the heater hoses, make sure the
replacement hoses meet correct specifications.
Failure to meet specifications may cause personal
injury.
WARNING
DO NOT remove the pressure cap from the
expansion tank when the engine is hot. When the
pressure cap is removed, the pressure is released
from the system. If the system is hot, the steam
and boiling coolant can cause burns.
1. Remove the pressure cap to release the pressure
and place it back on the radiator expansion tank.
2. Turn the heat control knob on the instrument
panel counterclockwise to the fully open position
or (full hot position). See Switch Locations .
3. Tilt/raise the cab to the fully open position. Refer
to the section Raising and Lowering Cab.
MCC Heater and Air Conditioner 0100 YRM 1459
14
16. NOTE: The heater assembly fits tightly underneath
the cab and will require a limited amount of force to
swing the heater assembly down and away from the
cab.
4. Remove the three capscrews that retain the
heater assembly to the cab and swing the heater
assembly down. See Figure 13 for the location of
the capscrews.
5. Remove the 10 screws that retain the top cover to
the heater assembly.
6. Remove the top cover from the heater assembly.
7. Remove the cable clip that retains the outer cable
to the water valve.
8. Remove the snap ring that retains the inner cable
to the water valve and disconnect the inner cable
from the water valve.
9. Loosen the two hose clamps that retain the water
valve between the heater hoses. See Figure 14.
10. Disconnect the two heater hoses from the water
valve.
11. Remove the water valve from the heater
assembly.
Install
1. Make sure the heat control knob in the cab is in
the full hot position
2. Position the water valve between the two heater
hoses inside the heater assembly. See Figure 14.
3. Connect the two heater hoses to the water valve
and tighten the hose clamps.
4. Connect the inner cable to the water valve and
install the snap ring to retain the inner cable to the
water valve.
5. Push the lever of the water valve towards the
heater core until it reaches its final position. Hold
the lever and push the outer cable towards the
water valve.
6. Install and tighten the cable clip to retain the outer
cable to the water valve.
7. Position the top cover on the heater assembly.
8. Install the 10 screws to retain the top cover to the
heater assembly.
9. Swing the heater assembly up toward the cab and
install the three capscrews to retain the heater
assembly to the cab. See Figure 13 for the
location of the capscrews.
10. Lower the cab to the fully lowered and latched
position. Refer to the section Raising and
Lowering Cab.
11. Add coolant as needed. Refer to the manual .
12. Start the engine and check for leaks. Add coolant
as needed.
13. Make sure the heat control knob functions
correctly.
PUSH/PULL CABLE REPLACEMENT
Water Valve Cable
Remove
1. Turn the heat control knob on the instrument
panel counterclockwise to the fully open position
or the (full hot position). See Switch Locations .
2. Remove the four screws that retain the fuse panel
cover to the right side of the instrument panel and
remove the cover to gain access to the underside
of the instrument panel. See Fuse Panel and
Cover Location.
3. Remove the heat control knob at the instrument
panel top console. See Switch Locations.
4. Remove the nut that retains the rotary control
assembly to the instrument panel top console.
See Figure 12.
5. Remove the cable clip that retains the outer cable
to the rotary control assembly.
6. Remove the snap ring that retains the inner cable
to the rotary control and remove the inner cable
from the rotary control.
7. Raise the cab to the fully open position. Refer to
the section Raising and Lowering Cab.
NOTE: The heater assembly fits tightly underneath
the cab and will require a limited amount of force to
swing the heater assembly down and away from the
cab.
0100 YRM 1459 MCC Heater and Air Conditioner
15
17. 8. Remove the three capscrews that retain the
heater assembly to the cab and swing the heater
assembly down. See Figure 13.
9. Remove the 10 screws that retain the top cover to
the heater assembly.
10. Remove the top cover from the heater assembly.
11. Remove the cable clip that retains the outer cable
to the water valve.
12. Remove the snap ring that retains the inner cable
to the water valve and disconnect the inner cable
from the water valve.
13. Remove the water valve cable from the
instrument panel box and heater assembly.
Install
1. Position the water valve cable inside the
instrument panel box and heater assembly.
2. Connect the inner cable to the water valve and
install the snap ring to retain the inner cable to the
water valve.
3. Push the lever of the water valve towards the
heater core until it reaches its final position.
Position the outer cable until it extends a few mm
out of the cable clip.
4. Install and tighten the cable clip to retain the outer
cable to the water valve.
5. Position the top cover on the heater assembly.
6. Install the 10 screws to retain the top cover to the
heater assembly.
7. Swing the heater assembly up toward the cab and
install the three capscrews to retain the heater
assembly to the cab. See Figure 13.
8. Lower the cab to the fully lowered and latched
position. Refer to the section Raising and
Lowering Cab.
9. Turn the rotary control into the (full hot position).
See Figure 12.
10. Connect the inner cable to the rotary control and
install the snap ring to retain the inner cable to the
rotary control. See Figure 12.
11. Hold the inner cable extended and pull the outer
cable away from the rotary control.
12. Install the cable clip to retain the outer cable to
the rotary control assembly.
13. Make sure the heat control knob functions
correctly.
14. Install the rotary control assembly to the
underside of the instrument panel top console.
15. Install the nut to retain the rotary control assembly
to the instrument panel top console. See
Figure 12.
16. Install the heat control knob at the instrument
panel top console. See Switch Locations.
17. Position the fuse panel cover to the right side of
the instrument panel and install the four retaining
screws. See Fuse Panel and Cover Location.
Heater/Air Conditioner Assembly
Remove
WARNING
Before removing the heater hoses, make sure the
heater hoses are cool. Hot coolant may cause
severe burns.
1. Turn the key switch to the ON position.
2. Place the recirculation knob on the instrument
panel in position 1 or position 2.
3. Turn the key switch to the OFF position.
4. Remove the four screws that retain the fuse panel
cover to the right side of the instrument panel and
remove the cover to gain access to the underside
of the instrument panel. See Fuse Panel and
Cover Location.
5. Disconnect the wire harness for the fan speed
knob, heater knob, and recirculation knob from
the connectors at the underside of the instrument
panel top console.
6. Tag and disconnect the electrical wires for the air
conditioner switch at the underside of the
instrument panel top console.
MCC Heater and Air Conditioner 0100 YRM 1459
16
18. WARNING
DO NOT remove the pressure cap from the
expansion tank when the engine is hot. When the
pressure cap is removed, pressure is released
from the system. If the system is hot, the steam
and boiling coolant can cause burns.
7. Remove the pressure cap to release the pressure
and place it back on the radiator expansion tank.
8. Tilt/raise the cab to the fully open position. Refer
to the section Fuse Panel and Cover Location.
9. Tag and disconnect the two heater hoses from
the heater inlet and outlet ports and plug the
heater hoses and ports. See Figure 19.
CAUTION
Repairs to the air conditioning system that require
discharging and/or refilling of the refrigeration
fluid must be performed only by a certified air
conditioning specialist.
10. Contact a certified air conditioning specialist to
have the refrigerant extracted from the air
conditioning system.
1. HEATER INLET
2. HEATER OUTLET
3. HEATER ASSEMBLY CAPSCREW LOCATION
4. CONDENSATION DRAINS
5. AIR CONDITIONING OUTLET
6. AIR CONDITIONING INLET
7. HEATER HINGE BRACKET
Figure 19. Heater/Air Conditioner Assembly
11. Disconnect and plug the hose fittings leading to
the evaporator.
NOTE: The heater assembly fits tightly underneath
the cab and will require a limited amount of force to
swing the heater assembly down and away from the
cab.
12. Loosen the two nuts and capscrews at the hinge
bracket. Remove the three capscrews that retain
the heater assembly to the cab. Pull the heater
assembly downwards and push simultaneously
towards the hinge bracket to provide sufficient
clearance between heater assembly and cab
frame. See Figure 19 for the location of the
capscrews.
13. Make sure the wire harness is free and can be
removed together with the heater/air conditioner
assembly.
14. Disconnect the electrical connector on top of the
top cover from the actuator that controls the vent
door position.
15. Support the heater/air conditioner assembly and
remove the capscrews that retain the heater/air
conditioner assembly to the hinge brackets.
16. Remove the heater/air conditioner assembly from
the underside of the cab.
Install
1. Position the heater/air conditioner assembly to the
underside of the cab.
2. Support the heater/air conditioner assembly and
install the capscrews to retain the heater/air
conditioner assembly to the hinge brackets. Do
not tighten the capscrews at this time.
3. Connect the electrical connector on top of the top
cover to the actuator that controls the vent door
position.
4. Route the wire harness correctly to the side
instrument panel box.
5. Swing the heater/air conditioner assembly up
toward the cab and install the three screws to
retain the heater/air conditioner assembly to the
cab. See Figure 19 for the location of the
capscrews.
6. Tighten the two nuts and capscrews at the hinge
bracket.
0100 YRM 1459 MCC Heater and Air Conditioner
17
19. 7. Remove the plugs and connect the heater hose to
the inlet and outlet ports.
8. Connect the hose fittings leading to the
evaporator.
CAUTION
Repairs to the air conditioning system that require
discharging and/or refilling of the refrigeration
fluid must be performed only by a certified air
conditioning specialist.
9. Contact a qualified and certified technician to
have the air conditioning system filled with
refrigerant. See Air Conditioning Technical Detail,
Table 3 for the type and the amount of refrigerant
required to charge an evacuated A/C system.
10. Lower the cab to the fully lowered and latched
position. Refer to the section Raising and
Lowering Cab.
11. Connect the electrical wires for the air
conditioning switch at the underside of the
instrument panel top console.
12. Connect the wire harness for the fan speed knob,
heater knob, and recirculation knob to the
connectors at the underside of the instrument
panel top console.
13. Add coolant as needed. Refer to the manual .
14. Position the fuse panel cover to the right side of
the instrument panel and install the four retaining
screws. See Fuse Panel and Cover Location.
15. Make sure the heater/air conditioner functions
correctly. Turn the recirculation knob a few times
to the fully open and fully closed positions to be
sure that the recirculation functions correctly.
HEATER/AIR CONDITIONER PARTS
REPLACEMENT
Vent Door
Remove
1. Turn the key switch to the ON position.
2. Turn the recirculation knob located on the
instrument panel to position 1 or position 2. See
Switch Locations.
3. Turn the key switch to the OFF position.
4. Tilt/raise the cab to the fully open position. Refer
to the section Raising and Lowering Cab.
NOTE: The heater assembly fits tightly underneath
the cab and will require a limited amount of force to
swing the heater assembly down and away from the
cab.
5. Remove the three capscrews that retain the
heater/air conditioner assembly to the cab and
swing the heater/air conditioner assembly down.
See Figure 19 for the location of the capscrews.
6. Disconnect the electrical connector on top of the
top cover from the actuator that controls the vent
door position. See Figure 20.
7. Remove the 12 screws that retain the top cover to
the heater/air conditioner assembly.
8. Remove the top cover from the heater/air
conditioner assembly.
9. Remove the washer located on top of the nylon
bushing.
10. Remove the capscrew, two nuts, two washers,
and lock washer that retain the vent door to the
actuator that is located on the top cover.
11. Remove the vent door.
1. ELECTRICAL CONNECTOR
2. VENT DOOR ACTUATOR
3. TOP COVER
Figure 20. Electrical Connector Location of Vent
Door Actuator
MCC Heater and Air Conditioner 0100 YRM 1459
18
20. Install
1. Position the vent door and install the capscrew,
two nuts, two washers, and lock washer to retain
the vent door to the actuator on the top cover.
NOTE: Make sure the nylon bushing and washer are
correctly positioned inside the heater/air conditioner
assembly.
2. Position the top cover on the heater/air
conditioner assembly and make sure the pin at
the underside of the vent door is positioned in the
washer and nylon bushing.
3. Install the 12 screws to retain the top cover to the
heater/air conditioner assembly.
4. Connect the electrical connector on top of the top
cover to the actuator that controls the vent door
position. See Figure 20.
5. Swing the heater/air conditioner assembly up
toward the cab and install the three capscrews to
retain the heater/air conditioner assembly to the
cab. See Figure 19 for the location of the
capscrews.
6. Lower the cab to the fully lowered and latched
position. Refer to the section Raising and
Lowering Cab.
NOTE: The key switch much be turned to the ON
position before performing the following step.
7. Turn the recirculation knob a few times from the
fully open position to the fully closed position to
be sure that the recirculation system functions
correctly. See Switch Locations.
Heater Core
Remove
1. Turn the key switch to the ON position.
2. Turn the recirculation knob located on the
instrument panel to position 1 or position 2. See
Switch Locations.
3. Turn the key switch to the OFF position.
WARNING
Before removing the heater hoses, make sure the
heater hoses are cool. Hot coolant may cause
severe burns.
WARNING
DO NOT remove the pressure cap from the
expansion tank when the engine is hot. When the
pressure cap is removed, the pressure is released
from the system. If the system is hot, the steam
and boiling coolant can cause burns.
4. Remove the pressure cap to release the pressure
and place it back on the radiator expansion tank.
5. Tilt/raise the cab to the fully open position. Refer
to the section Raising and Lowering Cab.
6. Loosen the hose clamp and disconnect the inlet
heater hose from the heater core pipe located at
the underside of the heater/air conditioner
assembly. Plug the inlet heater hose. See
Figure 19.
NOTE: The heater assembly fits tightly underneath
the cab and will require a limited amount of force to
swing the heater assembly down and away from the
cab.
7. Remove the three capscrews that retain the
heater/air conditioner assembly to the cab and
swing the heater/air conditioner assembly down.
See Figure 19 for the location of the capscrews.
8. Disconnect the electrical connector on top of the
top cover from the actuator that controls the vent
door position. See Figure 20.
9. Remove the 12 screws that retain the top cover to
the heater/air conditioner assembly.
10. Remove the top cover from the heater/air
conditioner assembly.
11. Remove the washer that is positioned on top of
the nylon bushing.
12. Tag and disconnect the two electrical connectors
from the thermostat. See Figure 21.
0100 YRM 1459 MCC Heater and Air Conditioner
19
21. 13. Loosen the hose clamp that retains the top heater
hose to the heater core inside the heater/air
conditioner assembly and disconnect the heater
hose from the heater core.
14. Slide the heater core out of the heater/air
conditioner assembly.
Install
1. Slide the heater core into the heater/air
conditioner assembly.
2. Connect the top heater hose between the water
valve and heater core to the heater core and
tighten the hose clamp. See Figure 21.
3. Connect the two electrical connectors to the
thermostat.
NOTE: Make sure the nylon bushing and washer are
correctly positioned inside the heater/air conditioner
assembly.
4. Position the top cover on the heater/air
conditioner assembly and make sure the pin at
the underside of the vent door is positioned in the
washer and nylon bushing.
5. Install the 12 screws to retain the top cover to the
heater/air conditioner assembly.
6. Connect the electrical connector on top of the top
cover to the actuator that controls the vent door
position. See Figure 20.
7. Swing the heater/air conditioner assembly up
toward the cab and install the three capscrews to
retain the heater/air conditioner assembly to the
cab. See Figure 19 for the correct location of the
capscrews.
8. Connect the inlet heater hose to the heater core
pipe located at the underside of the heater/air
conditioner assembly and tighten the hose clamp.
9. Lower the cab to the fully lowered and latched
position. Refer to the section Raising and
Lowering Cab.
10. Start the engine and check for leaks. Add coolant
as needed. Refer to the manual for the correct
coolant specifications.
NOTE: The key switch much be turned to the ON
position before performing the following step.
11. Turn the recirculation knob a few times from the
fully open position to the fully closed position to
be sure that the recirculation system functions
correctly. See Switch Locations.
Evaporator Core
Remove
1. Turn the key switch to the ON position.
2. Turn the recirculation knob located on the
instrument panel to position 1 or position 2. See
Switch Locations.
3. Turn the key switch to the OFF position.
1. THERMOSTAT
2. ELECTRICAL CONNECTION POINTS
3. TOP HEATER HOSE
4. HOSE CLAMP
5. HEATER CORE
6. WATER VALVE
7. BOTTOM HEATER HOSE
8. BRACKET CAPSCREW (INNER)
9. BRACKET CAPSCREW (OUTER)
10. WATER VALVE BRACKET
Figure 21. Thermostat, Water Valve, and Heater
Hoses
MCC Heater and Air Conditioner 0100 YRM 1459
20
22. WARNING
Before removing the heater hoses, make sure the
heater hoses are cool. Hot coolant may cause
severe burns.
WARNING
DO NOT remove the pressure cap from the
expansion tank when the engine is hot. When the
pressure cap is removed, the pressure is released
from the system. If the system is hot, the steam
and boiling coolant can cause burns.
4. Remove the pressure cap to release the pressure
and place it back on the radiator expansion tank.
5. Tilt/raise the cab to the fully open position. Refer
to the section Raising and Lowering Cab.
CAUTION
Repairs to the evaporator core that require
discharging and/or refilling of the refrigeration
fluid must be performed only by a trained and
certified air conditioning specialist.
6. Contact a certified technician to have the
refrigerant extracted from the air-conditioning
system. See Air Conditioning Technical Detail,
Table 3 for the type and amount of refrigerant
required to charge an evacuated A/C system.
7. Tag and disconnect the two evaporator hoses that
are connected to the expansion block at the
underside of the heater/air conditioner assembly.
See Figure 19.
8. Remove the two capscrews that retain the
expansion block bracket to the bottom plate of the
heater/air conditioner assembly. See Figure 23.
NOTE: The heater assembly fits tightly underneath
the cab and will require a limited amount of force to
swing the heater assembly down and away from the
cab.
9. Remove the three capscrews that retain the
heater/air conditioner assembly to the cab and
swing the heater/air conditioner assembly down.
See Figure 19 for the correct location of the
capscrews.
10. Disconnect the electrical connector on top of the
top cover from the actuator that controls the vent
door position. See Figure 20.
11. Remove the 12 screws that retain the top cover to
the heater/air conditioner assembly.
12. Remove the top cover from the heater/air
conditioner assembly.
13. Remove the washer that is positioned on top of
the nylon bushing.
14. Remove the blower. Refer to the section Blower,
Remove.
15. Remove the water valve. Refer to the section
Water Valve, Remove.
16. Remove the two clips that retain the evaporator
core inside the heater/air conditioner assembly.
See Figure 22.
1. EVAPORATOR CORE CLIP
Figure 22. Evaporator Core Clips
17. Slide the evaporator core out of the heater/air
conditioner assembly.
18. Remove the expansion block from the evaporator
core pipes.
Install
1. Install the expansion block to the evaporator core
pipes.
2. Slide the evaporator core into the heater/air
conditioner assembly. Make sure the expansion
block is positioned correctly at the underside of
the heater/air conditioner assembly.
0100 YRM 1459 MCC Heater and Air Conditioner
21
23. 3. Install the two clips to retain the evaporator core
inside the heater/air conditioner assembly. See
Figure 22.
1. EXPANSION BRACKET CAPSCREWS
Figure 23. Expansion Bracket Capscrews
4. Install the two capscrews to retain the expansion
block bracket to the bottom plate of the heater/air
conditioner assembly. See Figure 23.
5. Install the water valve. Refer to the section Water
Valve, Install.
6. Install the blower. Refer to the section Blower,
Install.
NOTE: Make sure the nylon bushing and washer are
correctly positioned inside the heater/air conditioner
assembly.
7. Position the top cover on the heater/air
conditioner assembly and make sure the pin at
the underside of the vent door is positioned in the
washer and nylon bushing.
8. Install the 12 screws to retain the top cover to the
heater/air conditioner assembly.
9. Connect the electrical connector on top of the top
cover to the actuator that controls the vent door
position. See Figure 20.
10. Swing the heater/air conditioner assembly up
toward the cab and install the three capscrews to
retain the heater/air conditioner assembly to the
cab. See Figure 19 for the correct location of the
capscrews.
CAUTION
Repairs to the evaporator core that require
discharging and/or refilling of the refrigeration
fluid must be performed only by a trained and
certified air conditioning specialist.
11. Connect the two evaporator hoses to the
expansion block at the underside of the heater/air
conditioner assembly.
12. Lower the cab to the fully lowered and latched
position. Refer to the section Raising and
Lowering Cab.
13. Start the engine and check for leaks. Add coolant
as needed, see .
14. Turn the recirculation knob a few times from the
fully open position to the fully closed position to
be sure that the recirculation system functions
properly. See Switch Locations.
Blower
Remove
1. Turn the key switch to the ON position.
2. Turn the recirculation knob located on the
instrument panel to position 1 or position 2. See
Switch Locations.
3. Turn the key switch to the OFF position.
4. Tilt/raise the cab to the fully open position. Refer
to the section Raising and Lowering Cab.
NOTE: The heater assembly fits tightly underneath
the cab and will require a limited amount of force to
swing the heater assembly down and away from the
cab.
5. Remove the three capscrews that retain the
heater/air conditioner assembly to the cab and
swing the heater/air conditioner assembly down.
See Figure 19 for the correct location of the
capscrews.
6. Disconnect the electrical connector on top of the
top cover from the actuator that controls the vent
door position. See Figure 20.
7. Remove the 12 screws that retain the top cover to
the heater/air conditioner assembly.
MCC Heater and Air Conditioner 0100 YRM 1459
22
24. 8. Remove the top cover from the heater/air
conditioner assembly.
9. Remove the washer that is positioned on top of
the nylon bushing.
10. Tag and disconnect the electrical connector
connected to the blower assembly. See
Figure 16.
11. Remove the four screws and nuts that retain the
blower inside the heater/air conditioner assembly.
See Figure 17.
12. Partially remove the blower assembly from the
heater/air conditioner assembly housing and tag
and disconnect the four electrical wires from the
blower assembly. See Figure 18.
13. Remove the blower assembly from the heater/air
conditioner assembly housing.
Install
1. Connect the four electrical wires to the blower
assembly. See Figure 18.
2. Position the blower assembly into the heater/air
conditioner assembly.
3. Install the four screws and nuts to retain the
blower inside the heater/air conditioner assembly.
See Figure 17.
4. Connect the electrical connector to the blower
assembly. See Figure 16.
NOTE: Make sure the nylon bushing and washer are
correctly positioned inside the heater/air conditioner
assembly.
5. Position the top cover on the heater/air
conditioner assembly and make sure the pin at
the underside of the vent door is positioned in the
washer and nylon bushing.
6. Install the 12 screws to retain the top cover to the
heater/air conditioner assembly.
7. Connect the electrical connector on top of the top
cover to the actuator that controls the vent door
position. See Figure 20.
8. Swing the heater/air conditioner assembly up
toward the cab and install the three capscrews to
retain the heater/air conditioner assembly to the
cab. See Figure 19.
9. Lower the cab to the fully lowered and latched
position. Refer to the section Raising and
Lowering Cab.
10. Make sure the blower functions correctly.
Thermostat
Remove
1. Turn the key switch to the ON position.
2. Turn the recirculation knob located on the
instrument panel to position 1 or position 2. See
Switch Locations.
3. Turn the key switch to the OFF position.
WARNING
Before removing the heater hoses, make sure the
heater hoses are cool. Hot coolant may cause
severe burns.
WARNING
DO NOT remove the pressure cap from the
expansion tank when the engine is hot. When the
pressure cap is removed, the pressure is released
from the system. If the system is hot, the steam
and boiling coolant can cause burns.
4. Remove the pressure cap to release the pressure
and place it back on the radiator expansion tank.
5. Tilt/raise the cab to the fully open position. Refer
to the section Raising and Lowering Cab.
NOTE: The heater assembly fits tightly underneath
the cab and will require a limited amount of force to
swing the heater assembly down and away from the
cab.
6. Remove the three capscrews that retain the
heater/air conditioner assembly to the cab and
swing the heater/air conditioner assembly down.
See Figure 19.
7. Disconnect the electrical connector on top of the
top cover from the actuator that controls the vent
door position. See Figure 20.
8. Remove the 12 screws that retain the top cover to
the heater/air conditioner assembly.
9. Remove the top cover from the heater/air
conditioner assembly.
0100 YRM 1459 MCC Heater and Air Conditioner
23
25. 10. Remove the washer that is positioned on top of
the plastic bushing.
11. Tag and disconnect the two electrical connectors
from the thermostat. See Figure 21.
12. Loosen the hose clamp that retains the top heater
hose to the water valve inside the heater/air
conditioner assembly and disconnect the heater
hose.
13. Remove the temperature switch from the
evaporator core. See Figure 24.
1. TEMPERATURE SWITCH
Figure 24. Temperature Switch
14. Remove the nut and washer located outside the
heater/air conditioner assembly that retains the
thermostat inside the heater/air conditioner
assembly.
15. Remove the thermostat and temperature switch
from the heater/air conditioner assembly.
Install
1. Position the thermostat and temperature switch
inside the heater/air conditioner assembly and
correctly route the temperature switch.
2. Install the nut and washer located outside the
heater/air conditioner assembly to retain the
thermostat inside the heater/air conditioner
assembly.
3. Install the temperature switch to the evaporator
core. See Figure 24.
4. Connect the top heater hose between the water
valve and heater core to the water valve and
tighten the hose clamp.
5. Connect the two electrical connectors to the
thermostat. See Figure 21.
NOTE: Make sure the nylon bushing and washer are
correctly positioned inside the heater/air conditioner
assembly.
6. Position the top cover on the heater/air
conditioner assembly and make sure the pin at
the underside of the vent door is positioned in the
washer and nylon bushing.
7. Install the 12 screws to retain the top cover to the
heater/air conditioner assembly.
8. Connect the electrical connector on top of the top
cover to the actuator that controls the vent door
position. See Figure 20.
9. Swing the heater/air conditioner assembly up
toward the cab and install the three capscrews to
retain the heater/air conditioner assembly to the
cab. See Figure 19.
10. Lower the cab to the fully lowered and latched
position. Refer to the section Raising and
Lowering Cab.
11. Start the engine and check for leaks. Add coolant
as needed. Refer to Periodic Maintenance
manual for your lift truck.
12. Turn the recirculation knob a few times from the
fully open position to the fully closed position to
be sure that the recirculation system functions
correctly. See Switch Locations.
Water Valve
Remove
1. Turn the key switch to the ON position.
MCC Heater and Air Conditioner 0100 YRM 1459
24
26. 2. Turn the recirculation knob located on the
instrument panel to position 1 or position 2. See
Switch Locations.
3. Turn the key switch to the OFF position.
WARNING
Before removing the heater hoses, make sure the
heater hoses are cool. Hot coolant may cause
severe burns.
WARNING
DO NOT remove the pressure cap from the
expansion tank when the engine is hot. When the
pressure cap is removed, the pressure is released
from the system. If the system is hot, the steam
and boiling coolant can cause burns.
4. Remove the pressure cap to release the pressure
and place it back on the radiator expansion tank.
5. Tilt/raise the cab to the fully open position. Refer
to the section Raising and Lowering Cab.
NOTE: The heater assembly fits tightly underneath
the cab and will require a limited amount of force to
swing the heater assembly down and away from the
cab.
6. Remove the three capscrews that retain the
heater/air conditioner assembly to the cab and
swing the heater/air conditioner assembly down.
See Figure 19.
7. Disconnect the electrical connector on top of the
top cover from the actuator that controls the vent
door position. See Figure 20.
8. Remove the 12 screws that retain the top cover to
the heater/air conditioner assembly.
9. Remove the top cover from the heater/air
conditioner assembly.
10. Remove the washer that is positioned on top of
the plastic bushing.
11. Tag and disconnect the two electrical connectors
from the thermostat. See Figure 21.
12. Loosen the two hose clamps that retain the top
heater hose between the water valve and heater
core.
13. Remove the top heater hose and the two hose
clamps between the water valve and heater core.
14. Loosen the hose clamp that retains the bottom
heater hose to the water valve.
15. Remove the two capscrews located at the outside
of the heater/air conditioner assembly that retain
the water valve bracket to the heater/air
conditioner assembly.
16. Disconnect the electrical connector from the water
valve actuator.
17. Loosen the hose clamp and disconnect the
bottom heater hose from the water valve.
18. Remove the water valve bracket from the
heater/air conditioner assembly.
19. Remove the two screws that retain the water
valve to the water valve bracket.
Install
1. Position the water valve to the water valve
bracket and install the two retaining screws.
2. Position the water valve bracket inside the
heater/air conditioner assembly.
3. Connect the bottom heater hose to the water
valve and tighten the hose clamp.
4. Connect the electrical connector to the water
valve actuator.
5. Install the two capscrews located at the outside of
the heater/air conditioner assembly to retain the
water valve bracket inside the heater/air
conditioner assembly. See Figure 21.
6. Install the top heater hose and the two hose
clamps between the water valve and heater core.
Tighten the hose clamps.
7. Connect the two electrical connectors to the
thermostat.
0100 YRM 1459 MCC Heater and Air Conditioner
25
27. NOTE: Make sure the nylon bushing and washer are
correctly positioned inside the heater/air conditioner
assembly.
8. Position the top cover on the heater/air
conditioner assembly and make sure that the pin
at the underside of the vent door is positioned in
the washer and nylon bushing.
9. Install the 12 screws to retain the top cover to the
heater/air conditioner assembly.
10. Connect the electrical connector on top of the top
cover to the actuator that controls the vent door
position. See Figure 20.
11. Swing the heater/air conditioner assembly up
toward the cab and install the three capscrews
that retain the heater/air conditioner assembly to
the cab. See Figure 19.
12. Lower the cab to the fully lowered and latched
position. Refer to the section Raising and
Lowering Cab.
13. Start the engine and check for leaks. Add coolant
as needed. Refer to Periodic Maintenance
manual for your lift truck.
14. Turn the heat control knob a few times from the
fully open position to the fully closed position to
be sure that the heating system functions
properly. See Switch Locations.
AIR CONDITIONING TECHNICAL DETAIL
NOTE: Table 3 provides technical details. It is
intended for use by a certified air conditioning
specialist.
Table 3. Air Conditioning Specifications
Compressor Values
Lubricant Type PAG See Compressor Nameplate
Lubricant Quantity 200 grams
Suction Port 7/8-14 UNF
Discharge Port 3/4-16 UNF
Refrigerant
Refrigerant R134a
Fill Capacity 1300 ± 25 grams
Pressure Switch
High pressure OFF 2.70 ±0.2 MPa (392 ±29 psi)
High pressure ON 2.10 ±0.2 MPa (305 ±29 psi)
Med pressure OFF 1.30 ±0.15 MPa (188 ±22 psi)
Med pressure ON 1.60 ±0.13 MPa (232 ±19 psi)
Low pressure OFF 0.20 ±0.02 MPa (29 ±2.9 psi)
Low pressure ON 0.21 ±0.03 MPa (30.5 ±4.4 psi)
Anti-Icing Switch
Opens -1°C (30.2°F)
Closes 2°C (35.6°F)
This chart is intended for use by a certified air conditioning specialist.
MCC Heater and Air Conditioner 0100 YRM 1459
26
28. 100 YRM 1594 Description
General
This manual contains the removal and installation in-
structions for major assemblies attached to the frame.
The removal and installation procedures for some as-
semblies are described in the following service manu-
als:
• Operator’s Cab 100 YRM 1390
• Planetary Drive Axle, (Wet System) 1400 YRM 944
• Masts and Carriages, Starting 2003 4000 YRM
1062
• Hydraulic System 1900 YRM 1478
• Steering System 1600 YRM 1479
Description
CAUTION
Do not initiate repairs to the frame without consult-
ing a Yale service representative or damage to the
lift truck may occur.
The frame is a weldment with mounts for the major as-
semblies. See Figure 1. The mounts are designed
to keep the attached parts in position and transfer the
forces acting on them.
1
29. Description 100 YRM 1594
1. MAIN COUNTERWEIGHT MOUNT
2. COOLING ASSEMBLY MOUNT
3. TILT CYLINDER MOUNT
4. MAST MOUNT
5. DRIVE AXLE MOUNT
6. MAIN FRAME
7. SIDE TILTING CAB MOUNT
8. HYDRAULIC TANK MOUNT
9. STEER AXLE MOUNT
10. ENGINE MOUNT
11. TRANSMISSION MOUNT
12. MAIN CONTROL VALVE MOUNT
13. CAB TILT CYLINDER MOUNT
Figure 1. Frame
2
30. 100 YRM 1594 Air Cleaner
Air Cleaner
AIR CLEANER ASSEMBLY, TIER 3/STAGE
III A, F876/F877
Remove
1. Open the left- and right-hand hood doors.
2. Loosen the air duct clamp. See Figure 2.
3. Close the left- or right-hand hood to access the pre-
cleaner.
4. Remove the precleaner, with the air duct attached,
from the air cleaner.
5. Disconnect the connector from the vacuum switch
by pressing the metal clip.
6. Loosen the hose clamps on the air filter hose and
remove the hose.
7. Remove the bolts of the two air cleaner mounting
clamps.
8. Rotate the air cleaner until the air duct connection
clears the center of the hood opening and move the
air cleaner to the right-hand side of the truck.
9. Remove the retaining hardware from the mounting
clamps and remove the clamps from the hood.
Install
1. Install the retaining hardware to the mounting
clamps and install the clamps under the hood.
2. Position the air cleaner assembly in the mounting
clamps and tighten the two clamp bolts.
3. Install the air filter hose and tighten the hose
clamps.
4. Connect the vacuum switch connector to the air
cleaner assembly.
5. Close the left- or right-hand hood door.
6. Install the precleaner, with the air duct attached, on
the air cleaner and install and tighten the air duct
clamp.
7. Close the hood doors.
1. AIR FILTER HOSE
2. AIR CLEANER ASSEMBLY
3. VACUUM SWITCH
4. AIR DUCT CLAMP
5. PRECLEANER CLAMP
6. PRECLEANER
7. AIR DUCT
8. UPPER AIR HOSE CLAMP
9. MOUNTING CLAMP BOLT
10. AIR CLEANER MOUNTING CLAMP
Figure 2. Air Cleaner Assembly, Tier 3/Stage III A,
F876/F877
3
31. Air Cleaner 100 YRM 1594
AIR CLEANER ASSEMBLY, TIER 4I/STAGE
III B, F876/F877
Remove
1. Open the left- and right-hand hood doors.
2. Loosen the hose clamps on the air filter hose and
remove the hose. See Figure 3.
3. On F877 trucks, tag and disconnect the connectors
to the vacuum switch and to the Temperature and
Barometric Air Pressure (TBAP) sensor.
4. On F876 tag and disconnect the connectors to the
vacuum switch and to the Mass Air Flow (MAF)
Sensor. See Figure 4.
5. Remove the 4 capscrews that retain the brackets of
the air cleaner unit to the hood.
6. Lower the air cleaner unit until it clears the air duct.
7. Move the air cleaner to the right-hand side of the
truck.
Install
1. If removed, install the brackets on the cleaner unit.
2. Verify presence and correct seating of the seal on
the air cleaner intake tube
3. Move the air cleaner into its position under the hood
and then upwards, until it engages with the air duct.
4. Align the holes in the brackets with the spacers un-
der the hood.
5. Install the capscrews on the cleaner brackets.
6. On F877 trucks, connect the connectors to the vac-
uum switch and to the Temperature and Barometric
Air Pressure (TBAP) sensor according to tags.
7. On F876 trucks, connect the connectors to the vac-
uum switch and to the Mass Air Flow (MAF) Sensor
according to tags.
8. Install the air filter hose and tighten clamps.
9. Close the hood doors.
1. AIR HOSE
2. AIR CLEANER UNIT
3. VACUUM SWITCH
4. TBAP SENSOR
5. AIR CLEANER BRACKET
6. CAPSCREWS
7. PRECLEANER CLAMP
8. AIR PRECLEANER
9. AIR DUCT
Figure 3. Air Cleaner Assembly, Tier 4i/Stage III
B, F877
4
32. 100 YRM 1594 Exhaust System
Figure 4. Air Cleaner Assembly, Tier 4i/Stage III
B, F876
Legend for Figure 4
1. AIR HOSE
2. VACUUM SWITCH
3. AIR CLEANER UNIT
4. MAF SENSOR
5. AIR CLEANER BRACKET
6. AIR DUCT
7. PRECLEANER CLAMP
8. AIR PRECLEANER
Exhaust System
EXHAUST ASSEMBLY, TIER 3/STAGE III
A, F876/F877
Remove
WARNING
Exhaust system must be at room temperature be-
fore starting disassembly or personal injury may
occur.
1. Remove the two clamps from the flex tube. See
Figure 5.
2. Remove the U-bolt that retains the charge air cooler
tube to the exhaust tube.
3. Remove the clamp that holds the exhaust tube to
the engine and remove the exhaust tube and flex
tube.
4. Use a tool to retain the nut when loosening the cap-
screws that retain the muffler to the hood. Remove
the four capscrews and nuts.
5. Remove the muffler from the hood.
Install
1. Position the muffler on the hood.
2. Install the four capscrews and nuts that retain the
muffler to the hood.
3. Install the flex tube on the muffler. Do not yet tighten
the clamp.
4. Install the exhaust tube and clamp on the engine.
5. Connect the exhaust tube and flex tube.
6. Install the U-bolt that retains the charge air cooler
tube to the exhaust tube.
7. Tighten the clamps on the flex tube.
5
33. Exhaust System 100 YRM 1594
1. FLEX TUBE CLAMP
2. FLEX TUBE
3. CAPSCREWS
4. MUFFLER
5. U-BOLT
6. EXHAUST TUBE
7. EXHAUST TUBE CLAMP
Figure 5. Exhaust Assembly, Tier 3/Stage III A,
F876/F877
EXHAUST ASSEMBLY, TIER 4I/STAGE III
B, F876/F877
Remove
WARNING
Exhaust system must be at room temperature be-
fore starting disassembly or personal injury may
occur.
1. Remove the 6 capscrews from the perforated cover
on the exhaust muffler.
2. Remove the perforated cover from the exhaust muf-
fler.
3. Loosen the clamps at the bottom of the muffler.
4. Remove the T-bolt strap that retains the muffler to
the muffler bracket.
5. Remove the muffler from the muffler bracket.
6. Remove the 4 capscrews that retain the muffler
bracket to the hood.
7. Remove the muffler bracket from the hood.
8. On F877 trucks, remove the U-bolt that retains the
left-hand charge air cooler tube to the exhaust tube.
9. Remove the left-hand charge air cooler tube.
10. Remove the bolts that retain the hose clamps of the
coolant de-aeration hoses to the heat shield.
11. Loosen the lower clamp from the exhaust tube.
12. Maneuver the exhaust tube out of the engine com-
partment.
Install
1. Maneuver the exhaust tube into the engine com-
partment.
2. Maneuver the upper end through the opening in the
hood. See Figure 6 and Figure 7.
3. Slide the lower end onto the turbocharger and
tighten the clamp.
4. Position the hose clamps for the coolant de-aera-
tion hoses on the heat shield and install and tighten
the bolts.
5. On F877 trucks, install the left-hand charge air
cooler tube and install the U-bolt on the charge air
cooler tube. Tighten the nuts on the U-bolt.
6. Install the muffler bracket onto the hood.
7. Install the 4 capscrews that retain the muffler
bracket to the hood.
8. Install the muffler into the bracket and on the ex-
haust tube.
9. Install the T-bolt strap that retains the muffler to the
muffler bracket.
10. Tighten the clamps at the bottom of the muffler.
6
34. 100 YRM 1594 Exhaust System
11. Install the perforated cover on the exhaust muffler
bracket.
12. Install the 6 capscrews that retain the perforated
cover to the exhaust muffler bracket.
1. U-BOLT
2. CAPSCREWS
3. MUFFLER BRACKET
4. CAPSCREWS ON MUFFLER COVER
5. PERFORATED COVER
6. CHARGE AIR COOLER TUBE
7. HEAT SHIELD
8. EXHAUST TUBE BRACKET
9. EXHAUST TUBE
10. EXHAUST TUBE CLAMP
Figure 6. Exhaust Assembly, Tier 4i/Stage III B, F877 Shown
7
35. Hood Assembly 100 YRM 1594
Figure 7. Exhaust Muffler, Tier 4i/Stage III B
Legend for Figure 7
NOTE: PERFORATED COVER REMOVED
1. MUFFLER
2. CLAMP BOLTS
3. EXHAUST TUBE
4. DOUBLE T-BOLT STRAP
Hood Assembly
REMOVE
1. Tilt the mast completely forward.
2. Completely tilt (raise) the cab.
3. Disconnect the battery cables from the battery.
4. Open the rear cover and disconnect its two gas
springs from the counterweight.
5. Remove the rear cover by sliding it sideways off its
flexible hinge. See Figure 8.
6. Open the left and right hood doors.
7. On trucks with Tier 3/Stage III A engines, discon-
nect the air filter vacuum switch connector.
8. On trucks with Tier 4i/Stage III B engines, tag and
disconnect:
– The air filter vacuum switch connector.
– On F877 trucks, the connector to the TBAP (Tem-
perature Barometric Air Pressure) sensor on the
air filter assembly.
– On F876 trucks, the connector to the MAF (Mass
Air Flow) sensor.
9. Remove all tie-wraps holding electric cables to the
hood.
10. On Tier 3/Stage III A engines:
– Release the clamps on the flex tube
– Remove the air filter hose.
11. On Tier 4i/Stage III B engines:
– Remove the 6 capscrews from the perforated
cover on the exhaust muffler.
– Remove the perforated cover from the exhaust
muffler.
– Loosen the clamp at the bottom of the muffler.
– Remove the curved air filter hose.
8
36. 100 YRM 1594 Hood Assembly
NOTE: Note: Filled to the “MAX” mark, the expansion
tank with connecting hoses weighs 7 kg (15.4 lb).
12. Remove the capscrews, washers and nuts that re-
tain the expansion tank bracket to the hood.
13. Place the expansion tank inside the engine com-
partment and secure it to keep it from moving.
14. Remove the capscrews from the two insulators at
the top of the cooling core assembly. See Figure 9.
15. Remove the nut and washer on each side of the
hood that hold the front plate of the hood assembly
to the frame.
16. Remove the capscrews that retain the rear hood
bracket to the counterweight.
17. Attach a lifting device to the hood assembly.
CAUTION
Be very careful when lifting the hood assembly to
avoid damage to the rear of the operator’s cab.
18. Slowly lift the hood assembly and make sure all
electric cables are removed from the hood.
19. Place the hood assembly on the ground and put a
support under the rear of the assembly.
INSTALL
1. Attach a lifting device to the hood assembly.
CAUTION
Be very careful when installing the hood assembly
to avoid damage to the rear of the operator’s cab.
2. Make sure the muffler slides into the exhaust tube
and carefully position the hood assembly onto the
frame.
3. Install the nut and washer on each side of the hood
that hold the front plate of the hood assembly to the
frame.
4. Install the capscrews that retain the rear hood
bracket to the counterweight.
5. Install the capscrews in the insulators at the top of
the cooling core assembly.
6. Install the expansion tank bracket to the hood.
7. On Tier 3/Stage III A engines:
– Tighten the clamps on the flex tube.
– Install the air filter hose.
8. On Tier 4i/Stage III B engines:
– Tighten the clamp at the bottom of the muffler.
– Install the perforated cover on the exhaust muf-
fler.
– Install the 6 capscrews to retain the perforated
cover to the exhaust muffler.
– Install the curved air filter hose.
9. On Tier 3/Stage III A engines:
– Connect the air filter vacuum switch connector.
10. On trucks with Tier 4i/Stage III B engines, connect
according to tags:
– The air filter vacuum switch connector.
– On F877 trucks, the connector to the TBAP (Tem-
perature Barometric Air Pressure) sensor on the
air filter assembly.
– On F876 trucks, the connector to the MAF (Mass
Air Flow) sensor.
11. Install the electric cables to the hood with tie-wraps.
12. Close the left and right hood doors.
13. Slide the rear cover sideways onto its flexible hinge.
14. Install the two gas springs between rear cover and
counterweight.
15. Connect the battery cables.
16. Completely lower the cab.
17. Start the engine and check for leaks.
9
37. Hydraulic Tank 100 YRM 1594
1. HOOD
2. LEFT HOOD DOOR
3. HOOD FRONT PLATE
4. NUT ON THREADED FRAME STUD
5. RIGHT HOOD DOOR
6. CAPSCREWS ON COUNTERWEIGHT (NOT
VISIBLE)
7. REAR COVER
Figure 8. Hood Assembly, Tier 3/Stage III A Shown
1. COOLING CORE ASSEMBLY
2. BOLT
3. WASHER
4. INSULATOR
5. BRACKET
6. LEFT DOOR
7. HOOD
Figure 9. Top Insulators
Hydraulic Tank
The hydraulic tank is installed on the right side of the
frame between the front fender and counterweight.
REMOVE
NOTE: The hydraulic tank removal and installation must
be done with aid of an assistant.
1. Place the truck on a solid, level surface.
2. Lower the mast completely.
3. Shut down the engine.
4. Apply the parking brake.
5. Remove the four capscrews and washers holding
the right-hand panel on top of the hydraulic tank and
remove the right-hand panel. See Figure 10.
6. Remove the three capscrews and washers holding
the right-hand extension plate and remove the ex-
tension plate. See Figure 10.
CAUTION
Disconnect the negative (ground) cable first or lift
truck damage may occur.
7. Disconnect the negative (ground) and positive
(power) cables from the batteries.
8. Remove the batteries from the battery box.
NOTE: Use a drain pan to collect the oil from the hy-
draulic tank and hoses. The hydraulic system contains
125 liter (33 gal) of hydraulic oil.
10
38. 100 YRM 1594 Hydraulic Tank
9. Remove the drain plug at the bottom of the hydraulic
tank and drain the hydraulic oil into clean suitable
container.
10. Tag all hoses and tubes connected to the hydraulic
tank to facilitate re-installing.
11. Loosen and remove the hose clamps from the main
pump suction hose and from the wet brake pump
suction hose at the bottom of the hydraulic tank.
See Figure 11.
12. Put caps on the suction hoses. See Figure 11.
13. Disconnect the wet brake return, the main valve
return, and the main valve drain hoses from the
hydraulic tank. See Figure 11.
14. On trucks with a 3-stage mast, disconnect the lift
cylinder drain hose at the top of the hydraulic tank.
15. Put caps on the hoses and on the connections on
the hydraulic tank.
16. Disconnect wiring harness from hydraulic sensor
and remove hydraulic sensor, if necessary.
17. Remove the battery cables from the access hole of
the hydraulic tank. See Figure 10.
18. Remove the capscrews that hold the right running
board to the counterweight, front fender, and hy-
draulic tank and remove the running board.
1. HYDRAULIC TANK
2. BATTERY BOX
3. CAPSCREWS
4. WASHERS
5. RIGHT-HAND PANEL
6. SEAL
7. CAPSCREWS
8. WASHERS
9. RIGHT-HAND EXTENSION PLATE
10. BATTERY CABLE ACCESS
Figure 10. Hydraulic Tank
11
39. Hydraulic Tank 100 YRM 1594
WARNING
Make sure the hydraulic tank is supported with a
hydraulic jack, hand pallet lift, or a lift truck.
19. Support the hydraulic tank with blocks of at least
50 mm (2.0 in.) high to compensate the height of
the bracket at the bottom of the hydraulic tank.
20. Remove the three nuts and washers that hold the
hydraulic tank to the frame.
CAUTION
DO NOT to damage the studs during removal of the
hydraulic tank from the frame.
21. Lift the hydraulic tank from the studs and move the
hydraulic tank away from the frame.
1. TO PORT P2 ON STEERING PUMP
2. LOAD SENSE HOSES
3. TO MAIN VALVE
4. PUMP 1
5. BRAKE PUMP
6. TO HYDRAULIC COOLING CORE
7. WET BRAKE PUMP SUCTION HOSE
8. WET BRAKE PUMP SUPPLY HOSE
9. MAIN PUMP SUPPLY HOSE
10. PUMP DRAIN HOSE
11. MAIN VALVE DRAIN HOSE
12. HYDRAULIC TEMPERATURE SENSOR
13. MAIN RETURN HOSE
14. DRAIN PLUG
15. LIFT CYLINDER DRAIN HOSE (ONLY ON
TRUCKS WITH THREE-STAGE MASTS)
16. EXCESS WET BRAKE FLOW HOSE
17. WET BRAKE RETURN HOSE
18. TO WET BRAKE COOLING CORE
19. PUMP 2
Figure 11. Hydraulic Tank Connection, F876/F877, Tier 3/Stage III A, F876, Tier 4i/Stage III B
12
40. 100 YRM 1594 Hydraulic Tank
INSPECT
WARNING
Do not use tools that can produce sparks, heat, or
static electricity. The vapors in the tank can cause
an explosion.
Perform a visual inspection of all sides of the tank. In-
spect the welds for cracks and leakage. Check for wet
areas, accumulation of dirt, and loose or missing paint
caused by leakage. Areas of the tank that are not eas-
ily seen can be checked with an inspection mirror and
a light that is approved for locations with flammable va-
pors.
CLEAN
Tank can be cleaned with or without steam. If steam is
available use a hose with a minimum diameter of 19 mm
(0.75 in.). Control the pressure of the steam by a valve
installed at the nozzle of the hose. If a metal nozzle is
used, it must be made of a material that does not pro-
duce sparks. Make an electrical connection between
the nozzle and the tank. Connect a ground wire to the
tank to prevent static electricity.
1. Remove all the parts from the tank. Install the drain
plug.
WARNING
When cleaning the tank, do not use solutions that
produce dangerous gases at normal temperatures
or when heated. Wear eye and face protection. Pro-
tect the body from burns. If the tank is cleaned in-
side a building, make sure there is enough ventila-
tion.
CAUTION
Disposal of lubricants, fluids, and chemicals must
meet local environmental regulations.
2. Fill the tank with a cleaning solution. Proceed as
follows:
• If steam is available, fill the tank 1/4 full (approxi-
mately 30 liter (8 gal) with a solution of water and
sodium bicarbonate or sodium carbonate. Mix
0.5 kg (1 lb) per 4 liter (1 gal).
• If the tank cannot be cleaned with steam, mix
a solution of water and trisodium phosphate or
cleaning compound with an alkaline base. Follow
the instructions given by the manufacturer.
WARNING
Compressed air can move particles so that they
cause injury to the user or to other personnel.
Make sure that the path of the compressed air is
away from all personnel. Wear protective goggles
or a face shield to prevent injury to the eyes.
3. Mix the solution in the tank using air pressure.
Make sure all the surfaces on the inside of the tank
are flushed with the solution.
4. Drain the tank.
5. If steam is available, put steam into the tank until
the tank does not have odors and the metal is hot.
Steam vapors must come from all the openings.
6. Flush the inside of the tank with boiling water. Make
sure all the loose material and cleaning compound
is removed from the inside of the tank.
7. Perform an inspection of the inside of the tank. If
it is not clean, repeat Step 5 and Step 6 and per-
form another inspection. In these inspections, use
a light that is approved for locations with flammable
vapors.
8. Check the tank for flammable vapors. Put plugs in
all the openings in the tank. Wait 15 minutes, then
remove the inlet and outlet plugs. Test a sample of
the vapor with a special indicator for gas vapors. If
the amount of flammable vapors is above the lower
flammable limit, repeat the cleaning procedures.
ADDITIONAL PREPARATIONS FOR
REPAIR
If nitrogen gas or carbon dioxide gas is available, pre-
pare the cleaned tank for welding using these gases.
See the manual Safe Practices for Welding and Cutting
Containers That Have Held Combustibles by the Amer-
ican Welding Society, F4.1-1999.
If these gases are not available, fill the tank with water to
just below the point where the work will be done. Make
sure the space above the level of the water has a vent.
13
41. Hydraulic Tank 100 YRM 1594
REPAIR
WARNING
Special procedures must be followed when leaks or
other repairs need welding or cutting. All work must
be done by authorized personnel.
CAUTION
Welding on the truck may cause damage to the en-
gine, transmission, and/or hydraulic electronic con-
trol units if proper precautions are not taken. Dis-
connect the negative battery terminal from the bat-
tery. Disconnect all controllers. If welding must
be done in close proximity to a controller, that con-
troller must be removed. When welding to the chas-
sis, attach the ground cable as close to the weld as
possible.
1. Use the procedure described under Clean to pre-
pare the tank for repairs.
2. Contact your dealer for Yale lift trucks for welding
instructions.
3. Use acceptable welding practices to repair the
tank. See the American National Standard Safety
in Welding and Cutting, AWS Z 49.1 - 1999.
Preparations for use After Repair
1. Add more water to the tank so that the water goes
above the point of where the work was done. Check
to see if any water leaks from the tank.
2. If the tank shows no signs of leaks, remove all the
water from the tank.
INSTALL
NOTE: When installing the hydraulic system oil filter, it
is important to grease the O-ring before installation.
1. Place the hydraulic tank on lifting equipment and
support it with blocks of at least 50 mm (2.00 in.)
high to compensate the height of the bracket at the
bottom of the hydraulic tank.
2. Raise and place the hydraulic tank in front of the
right side of the frame in the correct height position.
CAUTION
DO NOT to damage the studs during installation of
the hydraulic tank to the frame.
3. Careful place the hydraulic tank over the studs with-
out damaging the studs.
4. Install the three washers and nuts that hold the top
of the hydraulic tank to the frame.
5. Remove the lifting device.
NOTE: While pushing the cab tilt shaft to the front of the
truck, keep the shims in their position between the cab
and cab tilt system.
6. Push the cab tilt shaft towards the front of the truck
and guide the shaft into the front bracket.
7. Install the anchor that secures the cab tilt shaft.
8. Inspect the right running board grommets. Replace
if damaged.
9. Put the right running board in place and install the
capscrews that hold the running board to the coun-
terweight, front fender, and hydraulic tank.
10. Install the right-hand extension plate using the three
capscrews and washer. See Figure 10.
11. Feed the battery cables through the access hole of
the hydraulic tank. See Figure 10.
12. Install the clamp on the large suction hose at the
bottom of the hydraulic tank. Connect large suction
hose to the hydraulic tank. Torque the clamp to 4 -
6 N•m (3 - 4 lbf ft).
13. Install the clamp on the smaller suction hose at the
bottom of the hydraulic tank. Connect smaller suc-
tion hose to the hydraulic tank and tighten clamp.
14. Install the wet brake return, the main valve return,
and the main valve drain hoses on the hydraulic
tank.
15. On trucks with a 3-stage mast, install the lift cylinder
drain hose at the top of the hydraulic tank.
16. Install the hydraulic temperature sensor and con-
nect the wiring harness.
17. Make sure the drain plug is installed at the bottom
of the hydraulic tank.
14
42. 100 YRM 1594 Hydraulic Tank
CAUTION
The pump is designed for a certain flow range,
if there is not enough or too much flow going
through the pumps, the resulting turbulence and
vortices can reduce performance and may damage
the pumps or equipment.
18. Fill the pump through the drain port with clean hy-
draulic oil. Install the drain hose.
CAUTION
Never start the engine with closed shutoff valves.
Open the shutoff valves before starting the engine
to prevent damage to hydraulic components.
19. Connect the suction hose and pressure hose to the
hydraulic pump.
CAUTION
Use a filtration system when filling the hydraulic
tank to prevent dirt and contamination from enter-
ing the hydraulic system. If dirt or contamination
enters the hydraulic system, damage may occur to
the components of the hydraulic system.
20. Fill the hydraulic tank with clean hydraulic oil as
specified in the maintenance table. Refer to the
manual Periodic Maintenance 8000 YRM 1593.
21. Release the clamp of the suction hose at the pump.
Slide the hose partly from its fitting allowing trapped
air to escape and tank oil to reach the pump. Rein-
stall the hose and tighten the clamp.
22. Install the batteries into the battery box.
CAUTION
Connect the positive (power) cable first or lift truck
damage may occur.
23. Connect the positive (power) and negative (ground)
cables to the batteries.
24. Start the engine while operating the lift function.
Keep engine speed at idle.
25. Lift the mast until it has almost reached its end of
stroke.
26. Lower the mast and keep the engine at idle for
about one minute.
27. Repeat Step 25 if the pump has produced a sound
that relates to cavitation.
28. Raise engine speed to high idle (1000 – 1200 rpm)
and lift the mast until it has almost reached its end
of stroke.
29. Lower the mast and keep the engine at idle for
about one minute.
30. Return to Step 28 if the pump has produced a
sound that relates to cavitation.
31. Operate each hydraulic function in both directions
twice, at high engine speed (1600 – 1900 rpm).
Release the function when it has reached its end
of stroke.
32. Turn the engine OFF.
WARNING
Do not try to locate hydraulic leaks by putting hands
on pressurized hydraulic components. Hydraulic
oil can be injected into the body and cause personal
injury.
33. Check for leaks.
34. Check hydraulic tank oil level. Fill the hydraulic tank
with clean hydraulic oil as specified in the mainte-
nance table. Refer to the manual Periodic Mainte-
nance 8000 YRM 1593.
35. Position the right-hand panel on top of the hydraulic
tank and install the four washers and capscrews.
15
43. Fuel Tank 100 YRM 1594
Fuel Tank
The fuel tank is installed on the left side of the frame
between the front fender and counterweight.
REMOVE
1. Place the truck on a solid, level surface.
2. Lower the mast completely.
3. Shut down the engine.
4. Apply the parking brake.
5. Completely tilt (raise) the cab.
6. Remove the connector from the push-button switch
at the left-hand panel.
7. Remove the four capscrews and washers holding
the left-hand panel and remove the panel.
8. Remove the left-hand extension plate between the
fuel tank and counterweight.
WARNING
When removing the fuel tank, do not use tools that
can produce sparks, heat, or static electricity. The
vapors in the tank can cause an explosion and per-
sonal injury may occur.
NOTE: Use a drain pan to collect the fuel from the fuel
tank. The fuel tank contains a maximum of 128 liter
(34 gal) of fuel.
9. Put a drain pan under the fuel tank.
10. Remove the drain plug to drain the fuel from the
tank. See Figure 12.
WARNING
If fuel is drained, put the fuel in a can or barrel that
has a protected seal cap.
11. Disconnect the fuel sender connector at the top of
the fuel tank. See Figure 12.
12. Put tags on the check valve and shutoff valve fuel
hoses and fittings for identification.
NOTE: Use a drain pan to catch the fuel in the fuel
hoses.
13. Disconnect the two fuel hoses from the check valve
and shutoff valve at the top of the fuel tank. See
Figure 12.
14. Put caps on the fuel hoses and fittings.
15. Remove the check valve and shut off valve at the
top of the fuel tank. See Figure 12.
16. Put caps on the fittings at the top of the fuel tank.
17. Loosen the fuel hose clamp located on top of the
frame.
18. Turn the ends of the hoses parallel to the frame.
19. Remove the hose clamp for the cab tilt hoses.
20. Remove the retaining hardware of the left- and
right-hand latch located on the frame.
21. Remove the two capscrews, and washers at the
back of the hand pump. See Figure 13.
22. Remove the capscrews holding the left running
board to the counterweight, front fender, and fuel
tank and remove the running board.
WARNING
Make sure that the lifting device has the rated ca-
pacity of 100 kg (220 lb) to lift the fuel tank.
NOTE: Removal of the fuel tank can be done with a lift-
ing device, hydraulic jack, hand pallet jack, or lift truck.
NOTE: Follow Step 23 and Step 24 when a lifting device
is used.
NOTE: Follow Step 25 when a hydraulic jack, hand pal-
let jack, or lift truck is used.
NOTE: When lifting, keep the fuel tank in the horizontal
position.
23. Attach a lifting device to the fuel tank. Attach lifting
eyes at the locations shown in Figure 14.
24. Create slight tension on the chains.
25. Support the fuel tank with blocks of at least 50 mm
(2.0 in.) high to compensate the height of the
bracket on the bottom of the fuel tank.
16
45. Fuel Tank 100 YRM 1594
CAUTION
DO NOT to damage the studs during removal of the
fuel tank from the frame.
26. Remove the two nuts and washers that hold the top
of the fuel tank and the electrical tilt pump bracket
to the frame.
27. Remove the electrical tilt pump and bracket from
the frame.
28. Place the electrical tilt pump, hand pump, left and
right latch inside the frame to avoid damage to the
hoses during the removal of the fuel tank.
29. Remove the remaining nut that holds the fuel tank
to the frame.
30. Lift the fuel tank from the studs and move the fuel
tank away from the frame.
REPAIR
WARNING
Do not use tools that can produce sparks, heat, or
static electricity. The vapors in the tank can cause
an explosion.
Repair the fuel tank as described in the section Hy-
draulic Tank.
INSTALL
NOTE: Follow Step 1 when a lifting device is used.
NOTE: Follow Step 2 when a hydraulic jack, hand pallet
jack, or lift truck will be used.
NOTE: When lifting, keep the fuel tank in a horizontal
position.
1. Attach a lifting device with lifting straps and lifting
eyes to the fuel tank.
2. Place the fuel tank on lifting equipment and support
with blocks of at least 50 mm (2.00 in.) high to
compensate the height of the bracket at the bottom
of the fuel tank.
3. Raise and place the fuel tank in front of the left side
of the frame.
CAUTION
DO NOT to damage the studs during installation of
the fuel tank.
4. Place the fuel tank over the studs of the frame.
1. ELECTRICAL TILT PUMP
2. HAND PUMP
3. FUEL TANK
Figure 13. Fuel Tank, Hand Pump, and Electric Tilt Pump
18
46. 100 YRM 1594 Fuel Tank
5. Install the washer and nut, located behind the hand
pump, that hold the top of the fuel tank to the frame.
6. Position the hand pump, electrical tilt pump, left and
right latch at the frame and route the hoses cor-
rectly.
7. Install the two washers and nuts that hold the top of
the fuel tank and the electrical tilt pump bracket to
the frame.
8. Install the hand pump with the two washers and
capscrews located behind the hand pump.
9. Install the left and right latch, located at the frame,
with the capscrews, spring washers, washers, and
nuts.
10. Install the hose clamps located on top of the frame.
11. Inspect the left running board grommets. Replace
if damaged.
12. Put the left running board in place and install the
capscrews that hold the running board to the coun-
terweight, front fender, and fuel tank.
13. Install the left hand extension plate between the
fuel tank and counterweight using the three wash-
ers and capscrews.
Figure 14. Lifting Eyes
19
47. Cab 100 YRM 1594
14. Install the drain plug at the bottom of the fuel tank.
15. Install the check valve and shutoff valve at the top
of the fuel tank.
16. Connect the two fuel hoses to the check valve and
shut off valve at the top of the fuel tank.
17. Connect the connector to the electrical tilt pump.
18. Connect the connector of the fuel sender to the top
of the fuel tank.
19. Position the left-hand panel on top of the fuel tank
and install the four capscrews and washers.
20. Connect the connector, located at the left-hand
panel, to the push button switch.
21. Fill the fuel tank to the correct level with fuel spec-
ified in the section Periodic Maintenance 8000
YRM 1593.
CAUTION
Connect the positive (power) cable first or lift truck
damage may occur.
22. Connect the positive (power) and negative (ground)
cable to the batteries.
23. Completely lower the cab.
24. Start the engine.
25. Check for leaks.
Cab
RAISING AND LOWERING CAB
Raise Cab
WARNING
Make sure no one is under cab when raising or low-
ering cab.
WARNING
Before you place any part of your body under cab,
always make sure that cab is fully tilted, or when
partially open, is locked by tilt latch.
CAUTION
Cab damage may occur if mast is not completely
tilted forward.
1. Tilt mast fully forward.
2. Remove all unsecured items from cab.
3. Close and securely latch both cab doors.
4. Clear all obstacles from right-hand side (as seen
from driver’s position) of truck. Provide minimum of
2 m (7 ft) of clearance space.
5. Use pump lever to turn direction valve clockwise to
"Raise" position. See Figure 15.
6. Operate pump with pump lever until cab locks in
partially open position.
NOTE: Just before fully open position is reached, move-
ment may be gravity controlled.
7. Pull tilt latch release and continue to raise cab to
fully open position. See Figure 16.
NOTE: If cab will not fully raise, lower cab until cab locks
in partially open position, and fill tilt system with oil. See
Oil Filling for Cab Tilt System.
NOTE: Raising cab gives access to components such
as engine, transmission/hydraulic compartment, throt-
tle/brake and steering control, heater, air conditioner,
and electrical connectors.
1. PUMP LEVER CONNECTION
2. VALVE DIRECTION SELECTION: CLOCKWISE -
RAISE, COUNTERCLOCKWISE - LOWER
Figure 15. Cab Tilt Pump and Direction Valve
20
48. 100 YRM 1594 Cab
1. CAB
2. FRAME
3. TILT LATCH RELEASE
4. PUMP LEVER
Figure 16. Pump Lever and Tilt Latch Release Knob
Lower Cab
WARNING
Make sure no one is under cab when raising or low-
ering cab.
WARNING
Before you place any part of your body under cab,
always make sure that cab is fully tilted, or when
partially open, is locked by tilt latch.
CAUTION
Cab damage may occur if mast is not completely
tilted forward.
1. Use pump lever to turn direction valve counterclock-
wise to "Lower" position. See Figure 15.
2. Check that all foreign items/tools are cleared away.
3. Operate pump with pump lever until cab locks in
partially open position.
4. Pull tilt latch release and continue to lower cab until
it is in fully lowered position and latched. See Fig-
ure 16.
NOTE: An electric-powered cab tilt system is available
to replace standard manual tilt system. The electric tilt
system contains a push button located on left side of
pump direction control. Procedure to raise or lower is
the same.
CAB REPAIR
Remove
WARNING
Before removing heater hoses, allow time for heater
hoses to cool down. Hot water may cause severe
burns.
WARNING
Make sure the lifting device has a minimum capac-
ity to lift 1000 kg (2205 lb). A lifting device that does
not have the minimum capacity can break causing
the cab to drop and may result in serious personal
injury.
CAUTION
Lift the operator’s cab carefully. Make sure all wires
and attachments are disconnected and loose com-
ponents are not obstructing the movement.
1. Switch off engine.
2. Disconnect battery ground lead.
3. Raise operator’s cab. See Raise Cab.
4. Remove the two side covers.
5. Disconnect connector CPR04 to throttle pedal sen-
sor.
6. Disconnect connector CPS07 to cab signals.
7. Disconnect connector CPS06 to cab power.
8. Disconnect connector CPS35 to aux-signals.
NOTE: Cab is equipped with a heater and air condi-
tioner assembly which is installed on the underside of
the cab.
9. Place a drain pan under the two heater hoses be-
fore disconnecting the heater hoses to catch the
coolant in the hoses and heater core.
10. Tag and disconnect the two heater hoses from the
heater inlet and outlet ports, and plug the heater
hoses and ports. See Figure 17.
21