SlideShare a Scribd company logo
1 of 100
Download to read offline
2003-06 ENGINE
Cylinder Head - MDX
SPECIAL TOOLS
Fig. 1: Identifying Special Tool
Courtesy of AMERICAN HONDA MOTOR CO., INC.
COMPONENT LOCATION INDEX
2006 Acura MDX
2003-06 ENGINE Cylinder Head - MDX
2006 Acura MDX
2003-06 ENGINE Cylinder Head - MDX
me
Sunday, May 10, 2009 3:57:15 PM Page 1 © 2005 Mitchell Repair Information Company, LLC.
me
Sunday, May 10, 2009 3:57:24 PM Page 1 © 2005 Mitchell Repair Information Company, LLC.
Fig. 2: Identifying Cylinder Head Components (1 Of 3)
Courtesy of AMERICAN HONDA MOTOR CO., INC.
2006 Acura MDX
2003-06 ENGINE Cylinder Head - MDX
me
Sunday, May 10, 2009 3:57:15 PM Page 2 © 2005 Mitchell Repair Information Company, LLC.
Fig. 3: Identifying Cylinder Head Components (2 Of 3)
Courtesy of AMERICAN HONDA MOTOR CO., INC.
2006 Acura MDX
2003-06 ENGINE Cylinder Head - MDX
me
Sunday, May 10, 2009 3:57:15 PM Page 3 © 2005 Mitchell Repair Information Company, LLC.
Fig. 4: Identifying Cylinder Head Components (3 Of 3)
Courtesy of AMERICAN HONDA MOTOR CO., INC.
ENGINE COMPRESSION INSPECTION
1. Warm up the engine to normal operating temperature (cooling fan comes on).
NOTE: After this inspection, you must reset the powertrain control module (PCM),
otherwise the PCM will continue to stop the injectors from functioning. Select
PCM reset using the Honda Diagnostic System (HDS) (see PCM RESET ).
2006 Acura MDX
2003-06 ENGINE Cylinder Head - MDX
me
Sunday, May 10, 2009 3:57:15 PM Page 4 © 2005 Mitchell Repair Information Company, LLC.
2. Turn the ignition switch OFF.
3. Connect the HDS to the data link connector (DLC) (see step 2 in GENERAL TROUBLESHOOTING
INFORMATION ).
4. Turn the ignition switch ON (II), and select PGM-FI, INSPECTION, then ALL INJECTORS OFF
function on the HDS
5. Remove the six ignition coils (see IGNITION COIL REMOVAL/INSTALLATION ).
6. Remove the six spark plugs.
7. Attach the compression gauge to a spark plug hole.
Fig. 5: Attaching Compression Gauge To Spark Plug Hole
Courtesy of AMERICAN HONDA MOTOR CO., INC.
8. Crank the engine with the starter motor and measure the compression.
Compression Pressure: Above 930 kPa (9.5 kgf/cm2 , 135 psi)
9. Measure the compression on the remaining cylinders.
2006 Acura MDX
2003-06 ENGINE Cylinder Head - MDX
me
Sunday, May 10, 2009 3:57:15 PM Page 5 © 2005 Mitchell Repair Information Company, LLC.
Maximum Variation: Within 200 kPa (2.0 kgf/cm2 , 28 psi)
10. If the compression is not within specification, check the following items, then remeasure the
compression.
Damaged or worn valves and seats
Damaged cylinder head gaskets
Damaged or worn piston rings
Damaged or worn piston and cylinder bore
11. Select PCM reset (see PCM RESET ) to cancel ALL INJECTORS OFF function on the HDS.
VTEC ROCKER ARM TEST
Special Tools Required
VTEC air adapter 07VAJ-P8A010A
VTEC air stopper 070AJ-0030100
Air pressure regulator 07AAJ-PNAA100
1. Start the engine and let it run for 5 minutes, then turn the ignition switch OFF.
2. Remove the intake manifold (see REMOVAL ).
3. Remove the cylinder head covers (see CYLINDER HEAD COVER REMOVAL ).
4. Set the No. 1 piston at top dead center (TDC) (see step 3 in VALVE CLEARANCE ADJUSTMENT )
5. Push on the intake mid rocker arm (A) for the No. 1 cylinder. The mid rocker arm should move
independently of the primary rocker arm (B) and secondary rocker arm (C).
If the mid rocker arm moves freely, go to step 6.
If the intake mid rocker arm does not move, remove the mid, primary, and secondary intake rocker
arms as an assembly, then check that the pistons in the mid and primary rocker arms move
smoothly. If any rocker arm needs replacing, replace the mid, primary, and secondary rocker arms
as an assembly, and retest.
2006 Acura MDX
2003-06 ENGINE Cylinder Head - MDX
me
Sunday, May 10, 2009 3:57:15 PM Page 6 © 2005 Mitchell Repair Information Company, LLC.
Fig. 6: Pushing On Intake Mid Rocker Arm For No. 1 Cylinder
Courtesy of AMERICAN HONDA MOTOR CO., INC.
6. Repeat step 5 on the remaining intake mid rocker arms with each piston at TDC. When all the mid rocker
arms pass the test, go to step 7.
7. Check that the air pressure on the shop air compressor gauge indicates over 690 kPa (7.0kgf/cm2 100
psi).
8. Inspect the valve clearance (see VALVE CLEARANCE ADJUSTMENT ).
9. Remove the No. 1 and No. 6 intake rocker shaft mounting bolts, then install and connect the special tools
as shown in Fig. 7 or Fig. 8 .
2006 Acura MDX
2003-06 ENGINE Cylinder Head - MDX
me
Sunday, May 10, 2009 3:57:15 PM Page 7 © 2005 Mitchell Repair Information Company, LLC.
Fig. 7: Installing And Connecting Special Tools (Front)
Courtesy of AMERICAN HONDA MOTOR CO., INC.
2006 Acura MDX
2003-06 ENGINE Cylinder Head - MDX
me
Sunday, May 10, 2009 3:57:15 PM Page 8 © 2005 Mitchell Repair Information Company, LLC.
Fig. 8: Installing And Connecting Special Tools (Rear)
Courtesy of AMERICAN HONDA MOTOR CO., INC.
10. Loosen the valve on the regulator, and apply the specified air pressure.
Specified Air Pressure: 440-540 kPa (4.5-5.5 kgf/cm2 , 64-78 psi)
11. Make sure that the intake primary rocker arm (A) and intake secondary rocker arm (B) are mechanically
connected by the piston and that the mid rocker arm (C) does not move when pushed manually. If any
intake mid rocker arm moves independently of the primary and secondary rocker arms, replace the rocker
arms as a set.
NOTE: If the synchronizing pistons do not move after applying air pressure, move
the primary or secondary rocker arm up and down manually.
2006 Acura MDX
2003-06 ENGINE Cylinder Head - MDX
me
Sunday, May 10, 2009 3:57:15 PM Page 9 © 2005 Mitchell Repair Information Company, LLC.
Fig. 9: Making Sure Intake Primary Rocker Arm And Intake Secondary Rocker Arm Are
Mechanically Connected By Piston
Courtesy of AMERICAN HONDA MOTOR CO., INC.
12. Remove the special tools.
13. Tighten the rocker shaft bolts to 24 N.m (2.4 kgf.m, 17 lbf.ft)
14. Install the cylinder head covers (see CYLINDER HEAD COVER INSTALLATION ).
15. Install the intake manifold (see INSTALLATION ).
VALVE CLEARANCE ADJUSTMENT
2006 Acura MDX
2003-06 ENGINE Cylinder Head - MDX
me
Sunday, May 10, 2009 3:57:15 PM Page 10 © 2005 Mitchell Repair Information Company, LLC.
1. Remove the intake manifold (see REMOVAL ).
2. Remove the cylinder head covers (see CYLINDER HEAD COVER REMOVAL ).
3. Set the No. 1 piston at top dead center (TDC). Align the pointer (A) on the front upper cover with the No.
1 piston TDC mark (B) on the front camshaft pulley.
Fig. 10: Aligning Pointer On Front Upper Cover With No. 1 Piston TDC Mark
Courtesy of AMERICAN HONDA MOTOR CO., INC.
NOTE: Adjust the valves only when the cylinder head temperature is less than 100°F
(38°C).
2006 Acura MDX
2003-06 ENGINE Cylinder Head - MDX
me
Sunday, May 10, 2009 3:57:15 PM Page 11 © 2005 Mitchell Repair Information Company, LLC.
4. Select the correct thickness feeler gauge for the valves you're going to check.
Valve Clearance
Intake: 0.20-0.24 mm (0.008-0.009 in.)
Exhaust: 0.28-0.32 mm (0.011-0.013 in.)
Fig. 11: Selecting Correct Thickness Feeler Gauge (Rear)
Courtesy of AMERICAN HONDA MOTOR CO., INC.
2006 Acura MDX
2003-06 ENGINE Cylinder Head - MDX
me
Sunday, May 10, 2009 3:57:15 PM Page 12 © 2005 Mitchell Repair Information Company, LLC.
Fig. 12: Selecting Correct Thickness Feeler Gauge (Front)
Courtesy of AMERICAN HONDA MOTOR CO., INC.
5. Insert the feeler gauge (A) between the adjusting screw and the end of the valve stem on No. 1 cylinder,
and slide it back and forth; you should feel a slight amount of drag.
2006 Acura MDX
2003-06 ENGINE Cylinder Head - MDX
me
Sunday, May 10, 2009 3:57:15 PM Page 13 © 2005 Mitchell Repair Information Company, LLC.
Fig. 13: Inserting Feeler Gauge Between Adjusting Screw And End Of Valve Stem On No. 1
Cylinder
Courtesy of AMERICAN HONDA MOTOR CO., INC.
6. If you feel too much or too little drag, loosen the locknut (A), and turn the adjusting screw (B) until the
drag on the feeler gauge is correct.
2006 Acura MDX
2003-06 ENGINE Cylinder Head - MDX
me
Sunday, May 10, 2009 3:57:15 PM Page 14 © 2005 Mitchell Repair Information Company, LLC.
Fig. 14: Loosening Locknut And Turning Adjusting Screw
Courtesy of AMERICAN HONDA MOTOR CO., INC.
7. Tighten the locknut and recheck the clearance. Repeat the adjustment, if necessary.
8. Rotate the crankshaft clockwise. Align the pointer (A) on the front upper cover with the No. 4 piston
TDC mark (B) on the front camshaft pulley.
2006 Acura MDX
2003-06 ENGINE Cylinder Head - MDX
me
Sunday, May 10, 2009 3:57:15 PM Page 15 © 2005 Mitchell Repair Information Company, LLC.
Fig. 15: Aligning Pointer On Front Upper Cover With No. 4 Piston TDC Mark On Front Camshaft
Pulley
Courtesy of AMERICAN HONDA MOTOR CO., INC.
9. Check and, if necessary, adjust the valve clearance on No. 4 cylinder.
10. Rotate the crankshaft clockwise. Align the pointer (A) on the front upper cover with the No. 2 piston
TDC mark (B) on the front camshaft pulley.
2006 Acura MDX
2003-06 ENGINE Cylinder Head - MDX
me
Sunday, May 10, 2009 3:57:15 PM Page 16 © 2005 Mitchell Repair Information Company, LLC.
Fig. 16: Aligning Pointer On Front Upper Cover With No. 2 Piston TDC Mark On Front Camshaft
Pulley
Courtesy of AMERICAN HONDA MOTOR CO., INC.
11. Check and, if necessary, adjust the valve clearance on No. 2 cylinder.
12. Rotate the crankshaft clockwise. Align the pointer (A) on the front upper cover with the No. 5 piston
TDC mark (B) on the front camshaft pulley.
2006 Acura MDX
2003-06 ENGINE Cylinder Head - MDX
me
Sunday, May 10, 2009 3:57:15 PM Page 17 © 2005 Mitchell Repair Information Company, LLC.
Fig. 17: Aligning Pointer On Front Upper Cover With No. 5 Piston TDC Mark On Front Camshaft
Pulley
Courtesy of AMERICAN HONDA MOTOR CO., INC.
13. Check and, if necessary, adjust the valve clearance on No. 5 cylinder.
14. Rotate the crankshaft clockwise. Align the pointer (A) on the front upper cover with the No. 3 piston
TDC mark (B) on the front camshaft pulley.
2006 Acura MDX
2003-06 ENGINE Cylinder Head - MDX
me
Sunday, May 10, 2009 3:57:15 PM Page 18 © 2005 Mitchell Repair Information Company, LLC.
Fig. 18: Aligning Pointer On Front Upper Cover With No. 3 Piston TDC Mark On Front Camshaft
Pulley
Courtesy of AMERICAN HONDA MOTOR CO., INC.
15. Check and, if necessary, adjust the valve clearance on No. 3 cylinder.
16. Rotate the crankshaft clockwise. Align the pointer (A) on the front upper cover with the No. piston TDC
mark (B) on the front camshaft pulley.
2006 Acura MDX
2003-06 ENGINE Cylinder Head - MDX
me
Sunday, May 10, 2009 3:57:15 PM Page 19 © 2005 Mitchell Repair Information Company, LLC.
Fig. 19: Aligning Pointer On Front Upper Cover With No. 6 Piston TDC Mark On Front Camshaft
Pulley
Courtesy of AMERICAN HONDA MOTOR CO., INC.
17. Check and, if necessary, adjust the valve clearance on No. 6 cylinder.
18. Install the cylinder head covers (see CYLINDER HEAD COVER INSTALLATION ).
19. Install the intake manifold (see INSTALLATION ).
CRANKSHAFT PULLEY REMOVAL AND INSTALLATION
Special Tools Required
Holder handle 07JAB-001020A
2006 Acura MDX
2003-06 ENGINE Cylinder Head - MDX
me
Sunday, May 10, 2009 3:57:15 PM Page 20 © 2005 Mitchell Repair Information Company, LLC.
Holder attachment, 50 mm, offset 07MAB-PY3010A
Socket, 19 mm 07JAA-001020A, or a commercially available 19 mm socket
REMOVAL
1. Remove the right front wheel.
2. Remove the splash shield.
Fig. 20: Removing Splash Shield
Courtesy of AMERICAN HONDA MOTOR CO., INC.
2006 Acura MDX
2003-06 ENGINE Cylinder Head - MDX
me
Sunday, May 10, 2009 3:57:15 PM Page 21 © 2005 Mitchell Repair Information Company, LLC.
3. Remove the drive belt (see DRIVE BELT REPLACEMENT ).
4. Hold the pulley with the holder handle (A) and holder attachment (B).
Fig. 21: Holding Pulley With Holder Handle And Holder Attachment
Courtesy of AMERICAN HONDA MOTOR CO., INC.
5. Remove the bolt with a heavy duty 19 mm socket (C) and breaker bar, then remove the crankshaft pulley.
INSTALLATION
1. Remove any oil or clean the pulleys (A), crankshaft (B), bolt (C), and washer (D). Lubricate new engine
oil as shown in Fig. 22 .
2006 Acura MDX
2003-06 ENGINE Cylinder Head - MDX
me
Sunday, May 10, 2009 3:57:15 PM Page 22 © 2005 Mitchell Repair Information Company, LLC.
Fig. 22: Removing Oil Or Cleaning Crankshaft Pulley
Courtesy of AMERICAN HONDA MOTOR CO., INC.
2. Install the crankshaft pulley, and tighten the bolt. Do not use an impact wrench.
-1 Hold the pulley with the handle (A) and holder attachment (B), then tighten the bolt to 64 N.m
(6.5 kgf.m, 47 lbf.ft) with a torque wrench and 19 mm socket (C).
-2 Mark (D) the bolt head and crankshaft pulley as shown in Fig. 24 , then tighten the bolt an
additional 60° (The mark on the bolt head line up with the mark on the crankshaft pulley).
2006 Acura MDX
2003-06 ENGINE Cylinder Head - MDX
me
Sunday, May 10, 2009 3:57:15 PM Page 23 © 2005 Mitchell Repair Information Company, LLC.
Fig. 23: Holding Pulley With Handle And Holder Attachment
Courtesy of AMERICAN HONDA MOTOR CO., INC.
2006 Acura MDX
2003-06 ENGINE Cylinder Head - MDX
me
Sunday, May 10, 2009 3:57:15 PM Page 24 © 2005 Mitchell Repair Information Company, LLC.
Fig. 24: Marking Bolt Head And Crankshaft Pulley
Courtesy of AMERICAN HONDA MOTOR CO., INC.
3. Install the drive belt (see DRIVE BELT REPLACEMENT ).
4. Install the splash shield.
5. Install the right front wheel.
TIMING BELT INSPECTION
1. Remove the drive belt (see DRIVE BELT REPLACEMENT ).
2. Remove the front upper cover.
2006 Acura MDX
2003-06 ENGINE Cylinder Head - MDX
me
Sunday, May 10, 2009 3:57:15 PM Page 25 © 2005 Mitchell Repair Information Company, LLC.
Fig. 25: Removing Front Upper Cover
Courtesy of AMERICAN HONDA MOTOR CO., INC.
3. Inspect the timing belt for cracks and oil or coolant contamination. Replace the belt if it is cracked, or is
contaminated with oil or coolant. Wipe off any oil or solvent that gets on the belt.
2006 Acura MDX
2003-06 ENGINE Cylinder Head - MDX
me
Sunday, May 10, 2009 3:57:15 PM Page 26 © 2005 Mitchell Repair Information Company, LLC.
Fig. 26: Inspecting Timing Belt For Cracks, Oil Or Coolant Contamination
Courtesy of AMERICAN HONDA MOTOR CO., INC.
TIMING BELT REMOVAL
1. Turn the crankshaft so its white mark (A) lines up with the pointer (B).
2006 Acura MDX
2003-06 ENGINE Cylinder Head - MDX
me
Sunday, May 10, 2009 3:57:15 PM Page 27 © 2005 Mitchell Repair Information Company, LLC.
Fig. 27: Lining Up White Mark With Pointer Turning Crankshaft
Courtesy of AMERICAN HONDA MOTOR CO., INC.
2. Check that the No. 1 piston top dead center (TDC) mark (A) on the front camshaft pulley and the pointer
(B) on the front upper cover are aligned.
2006 Acura MDX
2003-06 ENGINE Cylinder Head - MDX
me
Sunday, May 10, 2009 3:57:15 PM Page 28 © 2005 Mitchell Repair Information Company, LLC.
Fig. 28: Checking No. 1 Piston TDC Mark On Front Camshaft Pulley And Pointer Are Aligned
Courtesy of AMERICAN HONDA MOTOR CO., INC.
3. Remove the right front wheel.
4. Remove the splash shield.
2006 Acura MDX
2003-06 ENGINE Cylinder Head - MDX
me
Sunday, May 10, 2009 3:57:15 PM Page 29 © 2005 Mitchell Repair Information Company, LLC.
Fig. 29: Removing Splash Shield
Courtesy of AMERICAN HONDA MOTOR CO., INC.
5. Remove the drive belt (see DRIVE BELT REPLACEMENT ).
6. Support the engine with a jack and wood block under the oil pan.
7. Remove the upper half of the side engine mount bracket.
2006 Acura MDX
2003-06 ENGINE Cylinder Head - MDX
me
Sunday, May 10, 2009 3:57:15 PM Page 30 © 2005 Mitchell Repair Information Company, LLC.
Fig. 30: Removing Upper Half Of Side Engine Mount Bracket
Courtesy of AMERICAN HONDA MOTOR CO., INC.
8. Remove the crankshaft pulley (see CRANKSHAFT PULLEY REMOVAL AND INSTALLATION ).
9. Remove the front upper cover (A) and rear upper cover (B).
2006 Acura MDX
2003-06 ENGINE Cylinder Head - MDX
me
Sunday, May 10, 2009 3:57:15 PM Page 31 © 2005 Mitchell Repair Information Company, LLC.
Fig. 31: Removing Front And Rear Upper Cover
Courtesy of AMERICAN HONDA MOTOR CO., INC.
10. Remove the lower cover.
2006 Acura MDX
2003-06 ENGINE Cylinder Head - MDX
me
Sunday, May 10, 2009 3:57:15 PM Page 32 © 2005 Mitchell Repair Information Company, LLC.
Fig. 32: Removing Lower Cover
Courtesy of AMERICAN HONDA MOTOR CO., INC.
11. Remove one of the battery clamp bolts from the battery tray, and grind the end of it as shown in Fig. 33 .
2006 Acura MDX
2003-06 ENGINE Cylinder Head - MDX
me
Sunday, May 10, 2009 3:57:15 PM Page 33 © 2005 Mitchell Repair Information Company, LLC.
Fig. 33: Grinding End Of Battery Clamp Bolts
Courtesy of AMERICAN HONDA MOTOR CO., INC.
12. Screw the battery clamp bolt in as shown in Fig. 34 to hold the timing belt adjuster in its current position.
Tighten it by hand; do not use a wrench.
2006 Acura MDX
2003-06 ENGINE Cylinder Head - MDX
me
Sunday, May 10, 2009 3:57:15 PM Page 34 © 2005 Mitchell Repair Information Company, LLC.
Fig. 34: Installing Battery Clamp Bolt
Courtesy of AMERICAN HONDA MOTOR CO., INC.
13. Remove the timing belt guide plate (A).
2006 Acura MDX
2003-06 ENGINE Cylinder Head - MDX
me
Sunday, May 10, 2009 3:57:15 PM Page 35 © 2005 Mitchell Repair Information Company, LLC.
Fig. 35: Removing Timing Belt Guide Plate
Courtesy of AMERICAN HONDA MOTOR CO., INC.
14. Remove the lower side engine mount bracket.
2006 Acura MDX
2003-06 ENGINE Cylinder Head - MDX
me
Sunday, May 10, 2009 3:57:15 PM Page 36 © 2005 Mitchell Repair Information Company, LLC.
Fig. 36: Removing Lower Side Engine Mount Bracket
Courtesy of AMERICAN HONDA MOTOR CO., INC.
15. Remove the idler pulley bolt (A) and idler pulley (B), then remove the timing belt. Discard the idler
pulley bolt.
2006 Acura MDX
2003-06 ENGINE Cylinder Head - MDX
me
Sunday, May 10, 2009 3:57:15 PM Page 37 © 2005 Mitchell Repair Information Company, LLC.
Fig. 37: Removing Idler Pulley Bolt And Idler Pulley
Courtesy of AMERICAN HONDA MOTOR CO., INC.
TIMING BELT INSTALLATION
NOTE: The following procedure is for installing a used belt. If you are installing a new
belt, refer to the timing belt replacement procedures (see TIMING BELT
REPLACEMENT ).
2006 Acura MDX
2003-06 ENGINE Cylinder Head - MDX
me
Sunday, May 10, 2009 3:57:15 PM Page 38 © 2005 Mitchell Repair Information Company, LLC.
1. Clean the timing belt pulleys, timing belt guide plate, and the upper and lower covers.
2. Set the timing belt drive pulley to top dead center (TDC) by aligning the TDC mark (A) on the tooth of
the timing belt drive pulley with the pointer (B) on the oil pump.
Fig. 38: Alining TDC Mark On Tooth Of Timing Belt Drive Pulley With Pointer
Courtesy of AMERICAN HONDA MOTOR CO., INC.
3. Set the camshaft pulleys to TDC by aligning the TDC marks (A) on the camshaft pulleys with the
pointers (B) on the back covers.
2006 Acura MDX
2003-06 ENGINE Cylinder Head - MDX
me
Sunday, May 10, 2009 3:57:15 PM Page 39 © 2005 Mitchell Repair Information Company, LLC.
Fig. 39: Aligning TDC Marks On Camshaft Pulley With Pointers (Front)
Courtesy of AMERICAN HONDA MOTOR CO., INC.
2006 Acura MDX
2003-06 ENGINE Cylinder Head - MDX
me
Sunday, May 10, 2009 3:57:15 PM Page 40 © 2005 Mitchell Repair Information Company, LLC.
Fig. 40: Alining TDC Marks On Camshaft Pulley With Pointer (Rear)
Courtesy of AMERICAN HONDA MOTOR CO., INC.
4. Loosely install the idler pulley with a new idler pulley bolt so the pulley can move but does not come off.
5. If the auto-tensioner has extended and the timing belt cannot be installed, do the timing belt replacement
procedure (see TIMING BELT REPLACEMENT ).
6. Install the timing belt in a counterclockwise sequence starting with the drive pulley. Take care not to
damage the timing belt when installing it.
2006 Acura MDX
2003-06 ENGINE Cylinder Head - MDX
me
Sunday, May 10, 2009 3:57:15 PM Page 41 © 2005 Mitchell Repair Information Company, LLC.
Fig. 41: Installing Timing Belt In Counterclockwise Sequence
Courtesy of AMERICAN HONDA MOTOR CO., INC.
7. Tighten the idler pulley bolt.
2006 Acura MDX
2003-06 ENGINE Cylinder Head - MDX
me
Sunday, May 10, 2009 3:57:15 PM Page 42 © 2005 Mitchell Repair Information Company, LLC.
Fig. 42: Tightening Idler Pulley Bolt
Courtesy of AMERICAN HONDA MOTOR CO., INC.
8. Remove the battery clamp bolt from the back cover.
9. Install the lower half of the side engine mount bracket.
2006 Acura MDX
2003-06 ENGINE Cylinder Head - MDX
me
Sunday, May 10, 2009 3:57:15 PM Page 43 © 2005 Mitchell Repair Information Company, LLC.
Fig. 43: Installing Lower Half Of Side Engine Mount Bracket
Courtesy of AMERICAN HONDA MOTOR CO., INC.
10. Install the timing belt guide plate as shown in Fig. 44 .
2006 Acura MDX
2003-06 ENGINE Cylinder Head - MDX
me
Sunday, May 10, 2009 3:57:15 PM Page 44 © 2005 Mitchell Repair Information Company, LLC.
Fig. 44: Installing Timing Belt Guide Plate
Courtesy of AMERICAN HONDA MOTOR CO., INC.
11. Install the lower cover.
2006 Acura MDX
2003-06 ENGINE Cylinder Head - MDX
me
Sunday, May 10, 2009 3:57:15 PM Page 45 © 2005 Mitchell Repair Information Company, LLC.
Fig. 45: Installing Lower Cover
Courtesy of AMERICAN HONDA MOTOR CO., INC.
12. Install the crankshaft pulley (see INSTALLATION ).
13. Install the front upper cover (A) and rear upper cover (B).
2006 Acura MDX
2003-06 ENGINE Cylinder Head - MDX
me
Sunday, May 10, 2009 3:57:15 PM Page 46 © 2005 Mitchell Repair Information Company, LLC.
Fig. 46: Installing Front And Rear Upper Cover
Courtesy of AMERICAN HONDA MOTOR CO., INC.
14. Rotate the crankshaft pulley about five or six turns clockwise so the timing belt positions itself on the
pulleys.
15. Turn the crankshaft pulley so its white mark (A) lines up with the pointer (B).
2006 Acura MDX
2003-06 ENGINE Cylinder Head - MDX
me
Sunday, May 10, 2009 3:57:15 PM Page 47 © 2005 Mitchell Repair Information Company, LLC.
Fig. 47: Alining White Mark With Pointer By Turning Crankshaft Pulley
Courtesy of AMERICAN HONDA MOTOR CO., INC.
16. Check the camshaft pulley marks.
If the camshaft pulley marks are at TDC, go to step 17.
If the camshaft pulley marks are not at TDC, remove the timing belt and repeat steps 2 through 16.
2006 Acura MDX
2003-06 ENGINE Cylinder Head - MDX
me
Sunday, May 10, 2009 3:57:15 PM Page 48 © 2005 Mitchell Repair Information Company, LLC.
Fig. 48: Checking Camshaft Pulley Marks (Front)
Courtesy of AMERICAN HONDA MOTOR CO., INC.
2006 Acura MDX
2003-06 ENGINE Cylinder Head - MDX
me
Sunday, May 10, 2009 3:57:15 PM Page 49 © 2005 Mitchell Repair Information Company, LLC.
Fig. 49: Checking Camshaft Pulley Marks (Rear)
Courtesy of AMERICAN HONDA MOTOR CO., INC.
2006 Acura MDX
2003-06 ENGINE Cylinder Head - MDX
me
Sunday, May 10, 2009 3:57:15 PM Page 50 © 2005 Mitchell Repair Information Company, LLC.
17. Install the drive belt (see DRIVE BELT REPLACEMENT ).
18. Install the upper half of the side engine mount bracket, then tighten the mounting bolts in the numbered
sequence shown in Fig. 50 .
Fig. 50: Tightening Mounting Bolts In Sequence
Courtesy of AMERICAN HONDA MOTOR CO., INC.
19. Install the splash shield.
2006 Acura MDX
2003-06 ENGINE Cylinder Head - MDX
me
Sunday, May 10, 2009 3:57:15 PM Page 51 © 2005 Mitchell Repair Information Company, LLC.
Fig. 51: Installing Splash Shield
Courtesy of AMERICAN HONDA MOTOR CO., INC.
20. Install the right front wheel.
21. Do the crankshaft position (CKP) pattern clear/CKP pattern learn procedure (see CKP PATTERN
CLEAR/CKP PATTERN LEARN ).
TIMING BELT REPLACEMENT
1. Remove the timing belt (see TIMING BELT REMOVAL ).
2. Clean the timing belt pulleys, timing belt guide plate, and the upper and lower covers.
2006 Acura MDX
2003-06 ENGINE Cylinder Head - MDX
me
Sunday, May 10, 2009 3:57:15 PM Page 52 © 2005 Mitchell Repair Information Company, LLC.
3. Set the timing belt drive pulley to top dead center (TDC) by aligning the TDC mark (A) on the tooth of
the timing belt drive pulley with the pointer (B) on the oil pump.
Fig. 52: Aligning TDC Mark On Tooth Of Timing Belt Drive Pulley With Pointer
Courtesy of AMERICAN HONDA MOTOR CO., INC.
4. Set the camshaft pulleys to TDC by aligning the TDC marks (A) on the camshaft pulleys with the
pointers (B) on the back covers.
2006 Acura MDX
2003-06 ENGINE Cylinder Head - MDX
me
Sunday, May 10, 2009 3:57:15 PM Page 53 © 2005 Mitchell Repair Information Company, LLC.
Fig. 53: Aligning TDC Marks On Camshaft Pulleys With Pointers (Front)
Courtesy of AMERICAN HONDA MOTOR CO., INC.
2006 Acura MDX
2003-06 ENGINE Cylinder Head - MDX
me
Sunday, May 10, 2009 3:57:15 PM Page 54 © 2005 Mitchell Repair Information Company, LLC.
Fig. 54: Aligning TDC Marks On Camshaft Pulleys With Pointers (Rear)
Courtesy of AMERICAN HONDA MOTOR CO., INC.
5. Remove the battery clamp bolt from the back cover.
6. Remove the auto-tensioner.
2006 Acura MDX
2003-06 ENGINE Cylinder Head - MDX
me
Sunday, May 10, 2009 3:57:15 PM Page 55 © 2005 Mitchell Repair Information Company, LLC.
Fig. 55: Removing Auto-Tensioner
Courtesy of AMERICAN HONDA MOTOR CO., INC.
2006 Acura MDX
2003-06 ENGINE Cylinder Head - MDX
me
Sunday, May 10, 2009 3:57:15 PM Page 56 © 2005 Mitchell Repair Information Company, LLC.
7. Align the holes on the rod and housing of the auto-tensioner.
Fig. 56: Aligning Holes On Rod And Housing Of Auto-Tensioner
Courtesy of AMERICAN HONDA MOTOR CO., INC.
8. Use a hydraulic press to slowly compress the auto-tensioner. Insert a 2.0 mm (0.08 in.) pin through the
housing and the rod. Make sure the pin can be removed once the auto-tensioner is installed.
9. Install the auto-tensioner.
NOTE: The compression pressure should not exceed 9,800 N (1,000 kgf, 2,200
lbf).
NOTE: Make sure the pin stays in place.
2006 Acura MDX
2003-06 ENGINE Cylinder Head - MDX
me
Sunday, May 10, 2009 3:57:15 PM Page 57 © 2005 Mitchell Repair Information Company, LLC.
Fig. 57: Installing Auto-Tensioner
Courtesy of AMERICAN HONDA MOTOR CO., INC.
10. Screw the battery clamp bolt in as shown in Fig. 58 to hold the timing belt adjuster. Tighten it by hand;
do not use a wrench.
2006 Acura MDX
2003-06 ENGINE Cylinder Head - MDX
me
Sunday, May 10, 2009 3:57:15 PM Page 58 © 2005 Mitchell Repair Information Company, LLC.
Fig. 58: Installing Battery Clamp Bolt
Courtesy of AMERICAN HONDA MOTOR CO., INC.
11. Loosely install the idler pulley with a new idler pulley bolt so the pulley can move but does not come off.
12. Install the timing belt in a counterclockwise sequence starting with the drive pulley.
2006 Acura MDX
2003-06 ENGINE Cylinder Head - MDX
me
Sunday, May 10, 2009 3:57:15 PM Page 59 © 2005 Mitchell Repair Information Company, LLC.
Fig. 59: Installing Timing Belt In Counterclockwise Sequence
Courtesy of AMERICAN HONDA MOTOR CO., INC.
13. Tighten the idler pulley bolt.
2006 Acura MDX
2003-06 ENGINE Cylinder Head - MDX
me
Sunday, May 10, 2009 3:57:15 PM Page 60 © 2005 Mitchell Repair Information Company, LLC.
Fig. 60: Tightening Idler Pulley Bolt
Courtesy of AMERICAN HONDA MOTOR CO., INC.
14. Remove the pin from the auto-tensioner.
2006 Acura MDX
2003-06 ENGINE Cylinder Head - MDX
me
Sunday, May 10, 2009 3:57:15 PM Page 61 © 2005 Mitchell Repair Information Company, LLC.
Fig. 61: Removing Pin From Auto-Tensioner
Courtesy of AMERICAN HONDA MOTOR CO., INC.
15. Remove the battery clamp bolt from the back cover.
16. Install the lower half of the side engine mount bracket.
2006 Acura MDX
2003-06 ENGINE Cylinder Head - MDX
me
Sunday, May 10, 2009 3:57:15 PM Page 62 © 2005 Mitchell Repair Information Company, LLC.
Fig. 62: Installing Lower Half Of Side Engine Mount Bracket
Courtesy of AMERICAN HONDA MOTOR CO., INC.
17. Install the timing belt guide plate as shown in Fig. 63 .
2006 Acura MDX
2003-06 ENGINE Cylinder Head - MDX
me
Sunday, May 10, 2009 3:57:15 PM Page 63 © 2005 Mitchell Repair Information Company, LLC.
Fig. 63: Installing Timing Belt Guide Plate
Courtesy of AMERICAN HONDA MOTOR CO., INC.
18. Install the lower cover.
2006 Acura MDX
2003-06 ENGINE Cylinder Head - MDX
me
Sunday, May 10, 2009 3:57:15 PM Page 64 © 2005 Mitchell Repair Information Company, LLC.
Fig. 64: Installing Lower Cover
Courtesy of AMERICAN HONDA MOTOR CO., INC.
19. Install the crankshaft pulley (see INSTALLATION ).
20. Install the front upper cover (A) and rear upper cover (B).
2006 Acura MDX
2003-06 ENGINE Cylinder Head - MDX
me
Sunday, May 10, 2009 3:57:15 PM Page 65 © 2005 Mitchell Repair Information Company, LLC.
Fig. 65: Installing Front And Rear Upper Cover
Courtesy of AMERICAN HONDA MOTOR CO., INC.
21. Rotate the crankshaft pulley about five or six turns clockwise so the timing belt positions itself on the
pulleys.
22. Turn the crankshaft pulley so its white mark (A) lines up with the pointer (B).
2006 Acura MDX
2003-06 ENGINE Cylinder Head - MDX
me
Sunday, May 10, 2009 3:57:15 PM Page 66 © 2005 Mitchell Repair Information Company, LLC.
Fig. 66: Aligning White Mark With Pointer Turning Crankshaft Pulley
Courtesy of AMERICAN HONDA MOTOR CO., INC.
23. Check the camshaft pulley marks.
If the camshaft pulley marks are at TDC, go to step 24.
If the camshaft pulley marks are not at TDC, remove the timing belt and repeat steps 2 through 23.
2006 Acura MDX
2003-06 ENGINE Cylinder Head - MDX
me
Sunday, May 10, 2009 3:57:15 PM Page 67 © 2005 Mitchell Repair Information Company, LLC.
Fig. 67: Checking Camshaft Pulley Marks (Front)
Courtesy of AMERICAN HONDA MOTOR CO., INC.
2006 Acura MDX
2003-06 ENGINE Cylinder Head - MDX
me
Sunday, May 10, 2009 3:57:15 PM Page 68 © 2005 Mitchell Repair Information Company, LLC.
Fig. 68: Check Camshaft Pulley Marks (Rear)
Courtesy of AMERICAN HONDA MOTOR CO., INC.
2006 Acura MDX
2003-06 ENGINE Cylinder Head - MDX
me
Sunday, May 10, 2009 3:57:15 PM Page 69 © 2005 Mitchell Repair Information Company, LLC.
24. Install the upper half of the side engine mount bracket, then tighten the mounting bolts in the numbered
sequence shown in Fig. 69 .
Fig. 69: Tightening Mounting Bolts In Sequence
Courtesy of AMERICAN HONDA MOTOR CO., INC.
25. Install the drive belt (see DRIVE BELT REPLACEMENT ).
26. Install the splash shield.
2006 Acura MDX
2003-06 ENGINE Cylinder Head - MDX
me
Sunday, May 10, 2009 3:57:15 PM Page 70 © 2005 Mitchell Repair Information Company, LLC.
Fig. 70: Installing Splash Shield
Courtesy of AMERICAN HONDA MOTOR CO., INC.
27. Install the right front wheel.
28. Do the crankshaft position (CKP) pattern clear/CKP pattern learn procedure (see CKP PATTERN
CLEAR/CKP PATTERN LEARN ).
TIMING BELT ADJUSTER REPLACEMENT
1. Remove the timing belt (see TIMING BELT REMOVAL ).
2. Remove the auto-tensioner (see step 6 in TIMING BELT REPLACEMENT ).
2006 Acura MDX
2003-06 ENGINE Cylinder Head - MDX
me
Sunday, May 10, 2009 3:57:15 PM Page 71 © 2005 Mitchell Repair Information Company, LLC.
3. Remove the bolt (A), then remove the timing belt adjuster (B) and collar (C).
Fig. 71: Removing Timing Belt Adjuster And Collar
Courtesy of AMERICAN HONDA MOTOR CO., INC.
4. Install in the reverse order of removal.
5. Install the timing belt (see TIMING BELT INSTALLATION ).
TIMING BELT DRIVE PULLEY REPLACEMENT
1. Remove the timing belt (see TIMING BELT REMOVAL ).
2. Remove the crankshaft position (CKP) sensor A/B (see CKP SENSOR REPLACEMENT ).
3. Remove the timing belt drive pulley (A) and key (B).
2006 Acura MDX
2003-06 ENGINE Cylinder Head - MDX
me
Sunday, May 10, 2009 3:57:15 PM Page 72 © 2005 Mitchell Repair Information Company, LLC.
Fig. 72: Removing Timing Belt Drive Pulley And Key
Courtesy of AMERICAN HONDA MOTOR CO., INC.
4. Inspect the timing belt pulley and key for damage. If it is cracked or damaged, replace the timing belt
drive pulley.
5. Install the new timing belt drive pulley.
6. Install the CKP sensor A/B (see CKP SENSOR REPLACEMENT ).
7. Install the timing belt (see TIMING BELT INSTALLATION ).
8. Do the CKP pattern clear/CKP pattern learn procedure (see CKP PATTERN CLEAR/CKP PATTERN
LEARN ).
CYLINDER HEAD COVER REMOVAL
2006 Acura MDX
2003-06 ENGINE Cylinder Head - MDX
me
Sunday, May 10, 2009 3:57:15 PM Page 73 © 2005 Mitchell Repair Information Company, LLC.
1. Remove the intake manifold (see REMOVAL ).
2. Remove the six ignition coils (see IGNITION COIL REMOVAL/INSTALLATION ).
3. Remove the dipstick.
4. Remove the two bolts (A) securing the harness holder, and remove the positive crankcase ventilation
(PCV) hose (B).
2006 Acura MDX
2003-06 ENGINE Cylinder Head - MDX
me
Sunday, May 10, 2009 3:57:15 PM Page 74 © 2005 Mitchell Repair Information Company, LLC.
Fig. 73: Removing Harness Holder Bolts
Courtesy of AMERICAN HONDA MOTOR CO., INC.
5. Disconnect the three injector connectors from the injectors on the cylinder head (see INJECTOR
REPLACEMENT ).
6. Remove the power steering hose bracket mounting bolt (A) and the harness holder mounting bolts (B).
Fig. 74: Removing Power Steering Hose Bracket Mounting Bolt
Courtesy of AMERICAN HONDA MOTOR CO., INC.
7. Remove the harness clamps (C) and breather hose (D).
8. Remove the cylinder head cover.
2006 Acura MDX
2003-06 ENGINE Cylinder Head - MDX
me
Sunday, May 10, 2009 3:57:15 PM Page 75 © 2005 Mitchell Repair Information Company, LLC.
FRONT
Fig. 75: Removing Cylinder Head Cover (Front)
Courtesy of AMERICAN HONDA MOTOR CO., INC.
2006 Acura MDX
2003-06 ENGINE Cylinder Head - MDX
me
Sunday, May 10, 2009 3:57:15 PM Page 76 © 2005 Mitchell Repair Information Company, LLC.
REAR
Fig. 76: Removing Cylinder Head Cover (Rear)
Courtesy of AMERICAN HONDA MOTOR CO., INC.
CYLINDER HEAD COVER INSTALLATION
1. Clean the head cover contacting surfaces with a shop towel.
2. Visually check the spark plug seals for damage. Replace if necessary.
3. Set the spark plug seals (A) on the spark plug tubes, and install the cylinder head cover (B).
2006 Acura MDX
2003-06 ENGINE Cylinder Head - MDX
me
Sunday, May 10, 2009 3:57:15 PM Page 77 © 2005 Mitchell Repair Information Company, LLC.
Fig. 77: Installing Cylinder Head Cover (Front)
Courtesy of AMERICAN HONDA MOTOR CO., INC.
2006 Acura MDX
2003-06 ENGINE Cylinder Head - MDX
me
Sunday, May 10, 2009 3:57:15 PM Page 78 © 2005 Mitchell Repair Information Company, LLC.
Fig. 78: Install Cylinder Head Cover (Rear)
Courtesy of AMERICAN HONDA MOTOR CO., INC.
4. Inspect the cover washer (C). Replace any washer that is damaged or deteriorated.
5. Tighten the bolts in two or three steps. In the final step tighten all bolts, in sequence, 12 N.m (1.2 kgf.m,
8.7 lbf.ft).
2006 Acura MDX
2003-06 ENGINE Cylinder Head - MDX
me
Sunday, May 10, 2009 3:57:15 PM Page 79 © 2005 Mitchell Repair Information Company, LLC.
Fig. 79: Tightening Cylinder Head Cover Bolts In Sequence
Courtesy of AMERICAN HONDA MOTOR CO., INC.
6. Tighten the harness holder mounting bolts (A) and the power steering hose bracket mounting bolt (B).
2006 Acura MDX
2003-06 ENGINE Cylinder Head - MDX
me
Sunday, May 10, 2009 3:57:15 PM Page 80 © 2005 Mitchell Repair Information Company, LLC.
Fig. 80: Tightening Harness Holder Mounting Bolts
Courtesy of AMERICAN HONDA MOTOR CO., INC.
7. Install the harness clamps (C) and breather hose (D).
8. Connect the three injector connectors to the injectors on the cylinder head.
9. Tighten the two bolts (A) securing the harness holder, and install the positive crankcase ventilation (PCV)
hose (B).
2006 Acura MDX
2003-06 ENGINE Cylinder Head - MDX
me
Sunday, May 10, 2009 3:57:15 PM Page 81 © 2005 Mitchell Repair Information Company, LLC.
Fig. 81: Tightening Harness Holder Bolts
Courtesy of AMERICAN HONDA MOTOR CO., INC.
10. Install the dipstick
11. Install the six ignition coils (see IGNITION COIL REMOVAL/INSTALLATION ).
12. Install the intake manifold (see INSTALLATION ).
CYLINDER HEAD REMOVAL
NOTE: Use fender covers to avoid damaging painted surfaces.
To avoid damage, unplug the wiring connectors carefully while holding the
connector portion.
2006 Acura MDX
2003-06 ENGINE Cylinder Head - MDX
me
Sunday, May 10, 2009 3:57:16 PM Page 82 © 2005 Mitchell Repair Information Company, LLC.
1. Make sure you have the anti-theft codes for the radio and the navigation system, then write down the
customer's audio presets. Make sure the ignition switch is OFF.
2. Relieve the fuel pressure (see FUEL PRESSURE RELIEVING ).
3. Disconnect the negative cable from the battery.
4. Drain the engine coolant (see COOLANT REPLACEMENT ).
5. Remove the drive belt (see DRIVE BELT REPLACEMENT ).
6. Remove the power steering (P/S) pump (A) and the bolt (B) securing the P/S hose bracket.
Fig. 82: Removing P/S Pump
Courtesy of AMERICAN HONDA MOTOR CO., INC.
To avoid damaging the cylinder head, wait until the engine coolant
temperature drops below 100 °F (38 °C) before loose ning the cylinder head
bolts.
Mark all wiring and hoses to avoid misconnection. Also, be sure that they
do not contact any other wiring or hoses, or interfere with any other parts.
2006 Acura MDX
2003-06 ENGINE Cylinder Head - MDX
me
Sunday, May 10, 2009 3:57:16 PM Page 83 © 2005 Mitchell Repair Information Company, LLC.
7. Remove the alternator (see ALTERNATOR REMOVAL AND INSTALLATION ).
8. Remove the intake manifold (see REMOVAL ).
9. Remove the six ignition coils (see IGNITION COIL REMOVAL/INSTALLATION ).
10. Remove the timing belt (see TIMING BELT REMOVAL ).
11. Remove these engine wire harness connectors and wire harness clamps from the cylinder head:
Six injector connectors
Engine coolant temperature (ECT) sensor connector
Camshaft position (CMP) sensor connector
Crankshaft position (CKP) sensor A/B connector
Exhaust gas recirculation (EGR) valve connector
Rocker arm oil control solenoid (VTEC solenoid valve) connector
Rocker arm oil pressure switch (VTEC oil pressure switch) connector
Oil pressure switch connector
Two air fuel ratio (A/F) sensor connectors
Two secondary heated oxygen sensor (secondary HO2S) connectors
12. Remove the upper radiator hose (A) and lower radiator hose (B).
2006 Acura MDX
2003-06 ENGINE Cylinder Head - MDX
me
Sunday, May 10, 2009 3:57:16 PM Page 84 © 2005 Mitchell Repair Information Company, LLC.
Fig. 83: Removing Upper And Lower Radiator Hose
Courtesy of AMERICAN HONDA MOTOR CO., INC.
13. Remove the heater hose (A) and water bypass hose (B).
2006 Acura MDX
2003-06 ENGINE Cylinder Head - MDX
me
Sunday, May 10, 2009 3:57:16 PM Page 85 © 2005 Mitchell Repair Information Company, LLC.
Fig. 84: Removing Heater Hose And Water Bypass Hose
Courtesy of AMERICAN HONDA MOTOR CO., INC.
14. Remove the bolt securing the harness bracket.
2006 Acura MDX
2003-06 ENGINE Cylinder Head - MDX
me
Sunday, May 10, 2009 3:57:16 PM Page 86 © 2005 Mitchell Repair Information Company, LLC.
Fig. 85: Removing Harness Bracket Bolt
Courtesy of AMERICAN HONDA MOTOR CO., INC.
15. Remove the bolt securing the harness bracket.
2006 Acura MDX
2003-06 ENGINE Cylinder Head - MDX
me
Sunday, May 10, 2009 3:57:16 PM Page 87 © 2005 Mitchell Repair Information Company, LLC.
Fig. 86: Removing Harness Bracket Bolt
Courtesy of AMERICAN HONDA MOTOR CO., INC.
16. 2003-2004 models: Remove the fuel feed hose.
2006 Acura MDX
2003-06 ENGINE Cylinder Head - MDX
me
Sunday, May 10, 2009 3:57:16 PM Page 88 © 2005 Mitchell Repair Information Company, LLC.
Fig. 87: Removing Fuel Feed Hose (2003-04 Models)
Courtesy of AMERICAN HONDA MOTOR CO., INC.
17. 2005-2006 models: Remove the quick-connect fitting cover (A), then disconnect the fuel feed hose (see
FUEL LINE/QUICK-CONNECT FITTING REMOVAL ).
2006 Acura MDX
2003-06 ENGINE Cylinder Head - MDX
me
Sunday, May 10, 2009 3:57:16 PM Page 89 © 2005 Mitchell Repair Information Company, LLC.
Fig. 88: Removing Quick-Connect Fitting Cover (2005-06 Models)
Courtesy of AMERICAN HONDA MOTOR CO., INC.
18. 2005-2006 models: Remove the two nuts securing the purge joint.
2006 Acura MDX
2003-06 ENGINE Cylinder Head - MDX
me
Sunday, May 10, 2009 3:57:16 PM Page 90 © 2005 Mitchell Repair Information Company, LLC.
Fig. 89: Removing Purge Joint Nuts (2005-06 Models)
Courtesy of AMERICAN HONDA MOTOR CO., INC.
19. Remove the fuel rails (see COMPONENT LOCATION INDEX ).
20. Remove the front and rear warm up three way catalytic converter (WU-TWC) (see WARM UP TWC
REMOVAL/INSTALLATION ).
21. Remove the water passage.
2006 Acura MDX
2003-06 ENGINE Cylinder Head - MDX
me
Sunday, May 10, 2009 3:57:16 PM Page 91 © 2005 Mitchell Repair Information Company, LLC.
Fig. 90: Removing Water Passage
Courtesy of AMERICAN HONDA MOTOR CO., INC.
22. Remove the front and rear camshaft pulleys (A) and front and rear back covers (B).
2006 Acura MDX
2003-06 ENGINE Cylinder Head - MDX
me
Sunday, May 10, 2009 3:57:16 PM Page 92 © 2005 Mitchell Repair Information Company, LLC.
Fig. 91: Removing Front And Rear Camshaft Pulleys
Courtesy of AMERICAN HONDA MOTOR CO., INC.
23. Remove the cylinder head cover (see CYLINDER HEAD COVER REMOVAL ).
24. Remove the cylinder head bolts. To prevent warpage, unscrew the bolts in sequence 1/3 turn at a time;
repeat the sequence until all bolts are loosened.
2006 Acura MDX
2003-06 ENGINE Cylinder Head - MDX
me
Sunday, May 10, 2009 3:57:16 PM Page 93 © 2005 Mitchell Repair Information Company, LLC.
Fig. 92: Removing Cylinder Head Bolts In Sequence
Courtesy of AMERICAN HONDA MOTOR CO., INC.
25. Remove the cylinder head.
CAMSHAFT REPLACEMENT
FRONT
1. Make sure you have the anti-theft codes for the radio and the navigation system, then write down the
customer's radio station and XM radio channel presets. Make sure the ignition switch is OFF.
2. Disconnect the negative cable from the battery first, then the positive cable. Remove the battery.
3. Drain the engine coolant (see COOLANT REPLACEMENT ).
4. Remove the upper radiator hose.
2006 Acura MDX
2003-06 ENGINE Cylinder Head - MDX
me
Sunday, May 10, 2009 3:57:16 PM Page 94 © 2005 Mitchell Repair Information Company, LLC.
Fig. 93: Removing Upper Radiator Hose
Courtesy of AMERICAN HONDA MOTOR CO., INC.
5. Remove the exhaust gas recirculation (EGR) valve (see EGR VALVE REPLACEMENT ).
6. Remove the timing belt (see TIMING BELT REMOVAL ).
7. Remove the rocker arm assembly (see ROCKER ARM ASSEMBLY REMOVAL ).
8. Remove the front camshaft pulley.
9. Remove the thrust cover (A), then remove the camshaft (B).
2006 Acura MDX
2003-06 ENGINE Cylinder Head - MDX
me
Sunday, May 10, 2009 3:57:16 PM Page 95 © 2005 Mitchell Repair Information Company, LLC.
Fig. 94: Removing Thrust Cover
Courtesy of AMERICAN HONDA MOTOR CO., INC.
10. Install the camshaft in the reverse order of removal. Always use a new O-ring (C). Apply new engine oil
to the camshaft lobes and journals.
11. Apply new engine oil to the threads of the camshaft pulley mounting bolt, then install the front camshaft
pulley (see step 11 in CAMSHAFT, ROCKER ARM, CAMSHAFT SEAL, AND PULLEY
INSTALLATION ).
12. Install the rocker arm assembly, then tighten the mounting bolts (see step 9 in CAMSHAFT, ROCKER
ARM, CAMSHAFT SEAL, AND PULLEY INSTALLATION ).
13. Install the timing belt (see TIMING BELT INSTALLATION ).
14. Adjust the valve clearance (see VALVE CLEARANCE ADJUSTMENT ).
2006 Acura MDX
2003-06 ENGINE Cylinder Head - MDX
me
Sunday, May 10, 2009 3:57:16 PM Page 96 © 2005 Mitchell Repair Information Company, LLC.
15. Install the upper radiator hose.
16. Install the battery. Clean the battery posts and cable terminals with sandpaper, then assemble them and
apply grease to prevent corrosion.
17. Fill the radiator with engine coolant and bleed the air out from the system (see step 8 in COOLANT
REPLACEMENT ).
18. Do the powertrain control module (PCM) reset procedure (see PCM RESET ).
19. Do the crankshaft position (CKP) pattern clear/CKP pattern lean procedure (see CKP PATTERN
CLEAR/CKP PATTERN LEARN ).
20. Reset the power window control unit (see RESETTING THE POWER WINDOW CONTROL
UNIT ).
21. Enter the anti-theft codes for the radio and the navigation system, then enter the customer's radio station
and XM radio channel presets.
22. Set the clock.
REAR
1. Make sure you have the anti-theft codes for the radio and the navigation system, then write down the
customer's radio station and XM radio channel presets. Make sure the ignition switch is OFF.
2. Relieve the fuel pressure (see FUEL PRESSURE RELIEVING ).
3. Disconnect the negative cable from the battery first, then disconnect the positive cable.
4. Remove the under-hood fuse/relay box.
5. Drain the engine coolant (see COOLANT REPLACEMENT ).
6. 2003-2004 models: Remove the fuel feed hose (see step 16 in CYLINDER HEAD REMOVAL ).
7. 2003-2004 models: Remove the nuts (A) securing the fuel line.
2006 Acura MDX
2003-06 ENGINE Cylinder Head - MDX
me
Sunday, May 10, 2009 3:57:16 PM Page 97 © 2005 Mitchell Repair Information Company, LLC.
Fig. 95: Removing Fuel Line Nuts
Courtesy of AMERICAN HONDA MOTOR CO., INC.
8. Remove the brake lines from the master cylinder (see MASTER CYLINDER REPLACEMENT ).
9. Remove the timing belt (see TIMING BELT REMOVAL ).
10. Remove the rocker arm assembly (see ROCKER ARM ASSEMBLY REMOVAL ).
11. Remove the rear camshaft pulley.
12. 2005-2006 models: Remove the two nuts securing the purge joint.
2006 Acura MDX
2003-06 ENGINE Cylinder Head - MDX
me
Sunday, May 10, 2009 3:57:16 PM Page 98 © 2005 Mitchell Repair Information Company, LLC.
Fig. 96: Removing Purge Joint Nuts
Courtesy of AMERICAN HONDA MOTOR CO., INC.
13. Remove the thrust cover (A), then remove the camshaft (B).
2006 Acura MDX
2003-06 ENGINE Cylinder Head - MDX
me
Sunday, May 10, 2009 3:57:16 PM Page 99 © 2005 Mitchell Repair Information Company, LLC.
Thank you very much
for your reading.
Please Click Here
Then Get More
Information.

More Related Content

What's hot

Manual de-implementacao-euro-3-axor-pt
Manual de-implementacao-euro-3-axor-ptManual de-implementacao-euro-3-axor-pt
Manual de-implementacao-euro-3-axor-ptJotta Castro
 
Manual de serviço xlx250 r embreage
Manual de serviço xlx250 r embreageManual de serviço xlx250 r embreage
Manual de serviço xlx250 r embreageThiago Huari
 
Volvo g946 b motor grader service repair manual
Volvo g946 b motor grader service repair manualVolvo g946 b motor grader service repair manual
Volvo g946 b motor grader service repair manualjfskemsemm
 
Manaul de serviço ms cbx250 (2001) motor
Manaul de serviço ms cbx250 (2001) motorManaul de serviço ms cbx250 (2001) motor
Manaul de serviço ms cbx250 (2001) motorThiago Huari
 
Manual de serviço xlx350 r embreage
Manual de serviço xlx350 r embreageManual de serviço xlx350 r embreage
Manual de serviço xlx350 r embreageThiago Huari
 
Manual de serviços shadow 750
Manual de serviços shadow 750Manual de serviços shadow 750
Manual de serviços shadow 750Emerson Ayres
 
Manual serviço biz125 ks es 00 x6b-kss-001 embreagem
Manual serviço biz125 ks es   00 x6b-kss-001 embreagemManual serviço biz125 ks es   00 x6b-kss-001 embreagem
Manual serviço biz125 ks es 00 x6b-kss-001 embreagemThiago Huari
 
Manual de serviço shadow 750 00 x6b-meg-001 combustivel
Manual de serviço shadow 750   00 x6b-meg-001 combustivelManual de serviço shadow 750   00 x6b-meg-001 combustivel
Manual de serviço shadow 750 00 x6b-meg-001 combustivelThiago Huari
 
Elementos y modificaciones que aumentan la potencia del motor
Elementos y modificaciones que aumentan la potencia del motorElementos y modificaciones que aumentan la potencia del motor
Elementos y modificaciones que aumentan la potencia del motorguest97d4d7
 
2005 HONDA ACCORD Service Repair Manual
2005 HONDA ACCORD Service Repair Manual2005 HONDA ACCORD Service Repair Manual
2005 HONDA ACCORD Service Repair Manualjksmemmd
 
Manual de serviço cg125 titan ks es kse cg125 cargo (2002) embreagem
Manual de serviço cg125 titan  ks es kse cg125 cargo (2002) embreagemManual de serviço cg125 titan  ks es kse cg125 cargo (2002) embreagem
Manual de serviço cg125 titan ks es kse cg125 cargo (2002) embreagemThiago Huari
 
Manual de serviço cg125 titan ks es kse cg125 cargo (2002) alternad
Manual de serviço cg125 titan  ks es kse cg125 cargo (2002) alternadManual de serviço cg125 titan  ks es kse cg125 cargo (2002) alternad
Manual de serviço cg125 titan ks es kse cg125 cargo (2002) alternadThiago Huari
 
Manual serviço c 100 biz - 00 x6b-gce-761 suplemen
Manual serviço c 100 biz - 00 x6b-gce-761 suplemenManual serviço c 100 biz - 00 x6b-gce-761 suplemen
Manual serviço c 100 biz - 00 x6b-gce-761 suplemenThiago Huari
 
Manual de serviço xl250 r (1983) mskb7831p embreage
Manual de serviço xl250 r (1983)   mskb7831p embreageManual de serviço xl250 r (1983)   mskb7831p embreage
Manual de serviço xl250 r (1983) mskb7831p embreageThiago Huari
 
Manual de serviço xr250 embreagem
Manual de serviço xr250 embreagemManual de serviço xr250 embreagem
Manual de serviço xr250 embreagemThiago Huari
 
HINO J05D J08E Engine (1).pdf
HINO J05D J08E Engine (1).pdfHINO J05D J08E Engine (1).pdf
HINO J05D J08E Engine (1).pdfAutotronicaCax
 

What's hot (20)

Manual de-implementacao-euro-3-axor-pt
Manual de-implementacao-euro-3-axor-ptManual de-implementacao-euro-3-axor-pt
Manual de-implementacao-euro-3-axor-pt
 
Manual de serviço xlx250 r embreage
Manual de serviço xlx250 r embreageManual de serviço xlx250 r embreage
Manual de serviço xlx250 r embreage
 
Volvo g946 b motor grader service repair manual
Volvo g946 b motor grader service repair manualVolvo g946 b motor grader service repair manual
Volvo g946 b motor grader service repair manual
 
Manaul de serviço ms cbx250 (2001) motor
Manaul de serviço ms cbx250 (2001) motorManaul de serviço ms cbx250 (2001) motor
Manaul de serviço ms cbx250 (2001) motor
 
Caja de mandos
Caja de mandosCaja de mandos
Caja de mandos
 
Manual de serviço xlx350 r embreage
Manual de serviço xlx350 r embreageManual de serviço xlx350 r embreage
Manual de serviço xlx350 r embreage
 
Manual de serviços shadow 750
Manual de serviços shadow 750Manual de serviços shadow 750
Manual de serviços shadow 750
 
Manual serviço biz125 ks es 00 x6b-kss-001 embreagem
Manual serviço biz125 ks es   00 x6b-kss-001 embreagemManual serviço biz125 ks es   00 x6b-kss-001 embreagem
Manual serviço biz125 ks es 00 x6b-kss-001 embreagem
 
Manual de serviço shadow 750 00 x6b-meg-001 combustivel
Manual de serviço shadow 750   00 x6b-meg-001 combustivelManual de serviço shadow 750   00 x6b-meg-001 combustivel
Manual de serviço shadow 750 00 x6b-meg-001 combustivel
 
Elementos y modificaciones que aumentan la potencia del motor
Elementos y modificaciones que aumentan la potencia del motorElementos y modificaciones que aumentan la potencia del motor
Elementos y modificaciones que aumentan la potencia del motor
 
2005 HONDA ACCORD Service Repair Manual
2005 HONDA ACCORD Service Repair Manual2005 HONDA ACCORD Service Repair Manual
2005 HONDA ACCORD Service Repair Manual
 
Manual de serviço cg125 titan ks es kse cg125 cargo (2002) embreagem
Manual de serviço cg125 titan  ks es kse cg125 cargo (2002) embreagemManual de serviço cg125 titan  ks es kse cg125 cargo (2002) embreagem
Manual de serviço cg125 titan ks es kse cg125 cargo (2002) embreagem
 
Manual de serviço cg125 titan ks es kse cg125 cargo (2002) alternad
Manual de serviço cg125 titan  ks es kse cg125 cargo (2002) alternadManual de serviço cg125 titan  ks es kse cg125 cargo (2002) alternad
Manual de serviço cg125 titan ks es kse cg125 cargo (2002) alternad
 
Manual serviço c 100 biz - 00 x6b-gce-761 suplemen
Manual serviço c 100 biz - 00 x6b-gce-761 suplemenManual serviço c 100 biz - 00 x6b-gce-761 suplemen
Manual serviço c 100 biz - 00 x6b-gce-761 suplemen
 
Manual de serviço xl250 r (1983) mskb7831p embreage
Manual de serviço xl250 r (1983)   mskb7831p embreageManual de serviço xl250 r (1983)   mskb7831p embreage
Manual de serviço xl250 r (1983) mskb7831p embreage
 
Capitulo 1 mag 300
Capitulo 1 mag   300Capitulo 1 mag   300
Capitulo 1 mag 300
 
Manual de serviço xr250 embreagem
Manual de serviço xr250 embreagemManual de serviço xr250 embreagem
Manual de serviço xr250 embreagem
 
Cb400 83 servico
Cb400 83 servicoCb400 83 servico
Cb400 83 servico
 
HINO J05D J08E Engine (1).pdf
HINO J05D J08E Engine (1).pdfHINO J05D J08E Engine (1).pdf
HINO J05D J08E Engine (1).pdf
 
793F MOM-ESP.pdf
793F MOM-ESP.pdf793F MOM-ESP.pdf
793F MOM-ESP.pdf
 

Similar to 2003 ACURA MDX Service Repair Manual

2003 acura cl service repair manual
2003 acura cl service repair manual2003 acura cl service repair manual
2003 acura cl service repair manualfjskemdzaqmme
 
2001 acura cl service repair manual
2001 acura cl service repair manual2001 acura cl service repair manual
2001 acura cl service repair manualfjskekazxdmmme
 
Aerio-2006-2007 (1).pdf
Aerio-2006-2007 (1).pdfAerio-2006-2007 (1).pdf
Aerio-2006-2007 (1).pdfJuanCepeda44
 
2001 ford windstar service repair manual
2001 ford windstar service repair manual2001 ford windstar service repair manual
2001 ford windstar service repair manualfjskkedmmem
 
1999 FORD WINDSTAR Service Repair Manual
1999 FORD WINDSTAR Service Repair Manual1999 FORD WINDSTAR Service Repair Manual
1999 FORD WINDSTAR Service Repair Manual局万 jdhnj
 
1999 FORD WINDSTAR Service Repair Manual
1999 FORD WINDSTAR Service Repair Manual1999 FORD WINDSTAR Service Repair Manual
1999 FORD WINDSTAR Service Repair Manual雨 微
 
1999 ford windstar service repair manual
1999 ford windstar service repair manual1999 ford windstar service repair manual
1999 ford windstar service repair manualfsjekdmemmd
 
2003 ford windstar service repair manual
2003 ford windstar service repair manual2003 ford windstar service repair manual
2003 ford windstar service repair manualfjskekdmmme
 
2000 ford windstar service repair manual
2000 ford windstar service repair manual2000 ford windstar service repair manual
2000 ford windstar service repair manualfjskedmmem
 
2003 FORD WINDSTAR Service Repair Manual
2003 FORD WINDSTAR Service Repair Manual2003 FORD WINDSTAR Service Repair Manual
2003 FORD WINDSTAR Service Repair Manualhdnjn kmdjm
 
2003 FORD WINDSTAR Service Repair Manual
2003 FORD WINDSTAR Service Repair Manual2003 FORD WINDSTAR Service Repair Manual
2003 FORD WINDSTAR Service Repair Manualjksnendmmd
 
Manuales de reparaciones jeep compass y patriot limited 2007-2009
Manuales de reparaciones jeep compass y patriot limited 2007-2009Manuales de reparaciones jeep compass y patriot limited 2007-2009
Manuales de reparaciones jeep compass y patriot limited 2007-2009Gustavo Castro
 
Caterpillar cat 163 h na motor grader (prefix 5ak) service repair manual (5ak...
Caterpillar cat 163 h na motor grader (prefix 5ak) service repair manual (5ak...Caterpillar cat 163 h na motor grader (prefix 5ak) service repair manual (5ak...
Caterpillar cat 163 h na motor grader (prefix 5ak) service repair manual (5ak...fjsjekdmmeme
 
Caterpillar cat 160 h motor grader (prefix 9ej) service repair manual (9ej000...
Caterpillar cat 160 h motor grader (prefix 9ej) service repair manual (9ej000...Caterpillar cat 160 h motor grader (prefix 9ej) service repair manual (9ej000...
Caterpillar cat 160 h motor grader (prefix 9ej) service repair manual (9ej000...ufdjskeksmemzx
 
Caterpillar cat 160 h motor grader (prefix 9ej) service repair manual (9ej000...
Caterpillar cat 160 h motor grader (prefix 9ej) service repair manual (9ej000...Caterpillar cat 160 h motor grader (prefix 9ej) service repair manual (9ej000...
Caterpillar cat 160 h motor grader (prefix 9ej) service repair manual (9ej000...fiksfejjsekkmme
 
Caterpillar cat 325 c excavator (prefix bkh) service repair manual (bkh00001 ...
Caterpillar cat 325 c excavator (prefix bkh) service repair manual (bkh00001 ...Caterpillar cat 325 c excavator (prefix bkh) service repair manual (bkh00001 ...
Caterpillar cat 325 c excavator (prefix bkh) service repair manual (bkh00001 ...fjsekkdmme
 
Caterpillar cat 323 d l excavator (prefix pbm) service repair manual (pbm0000...
Caterpillar cat 323 d l excavator (prefix pbm) service repair manual (pbm0000...Caterpillar cat 323 d l excavator (prefix pbm) service repair manual (pbm0000...
Caterpillar cat 323 d l excavator (prefix pbm) service repair manual (pbm0000...fjjsekmsmmes
 
Caterpillar cat 235 excavator (prefix 62 x) service repair manual (62x00289 a...
Caterpillar cat 235 excavator (prefix 62 x) service repair manual (62x00289 a...Caterpillar cat 235 excavator (prefix 62 x) service repair manual (62x00289 a...
Caterpillar cat 235 excavator (prefix 62 x) service repair manual (62x00289 a...fusjejfkskemme
 
Caterpillar cat 235 excavator (prefix 62 x) service repair manual (62x00289 a...
Caterpillar cat 235 excavator (prefix 62 x) service repair manual (62x00289 a...Caterpillar cat 235 excavator (prefix 62 x) service repair manual (62x00289 a...
Caterpillar cat 235 excavator (prefix 62 x) service repair manual (62x00289 a...ujjdfjkskdme
 

Similar to 2003 ACURA MDX Service Repair Manual (20)

2003 acura cl service repair manual
2003 acura cl service repair manual2003 acura cl service repair manual
2003 acura cl service repair manual
 
2001 acura cl service repair manual
2001 acura cl service repair manual2001 acura cl service repair manual
2001 acura cl service repair manual
 
Acord-EX-2012.pdf
Acord-EX-2012.pdfAcord-EX-2012.pdf
Acord-EX-2012.pdf
 
Aerio-2006-2007 (1).pdf
Aerio-2006-2007 (1).pdfAerio-2006-2007 (1).pdf
Aerio-2006-2007 (1).pdf
 
2001 ford windstar service repair manual
2001 ford windstar service repair manual2001 ford windstar service repair manual
2001 ford windstar service repair manual
 
1999 FORD WINDSTAR Service Repair Manual
1999 FORD WINDSTAR Service Repair Manual1999 FORD WINDSTAR Service Repair Manual
1999 FORD WINDSTAR Service Repair Manual
 
1999 FORD WINDSTAR Service Repair Manual
1999 FORD WINDSTAR Service Repair Manual1999 FORD WINDSTAR Service Repair Manual
1999 FORD WINDSTAR Service Repair Manual
 
1999 ford windstar service repair manual
1999 ford windstar service repair manual1999 ford windstar service repair manual
1999 ford windstar service repair manual
 
2003 ford windstar service repair manual
2003 ford windstar service repair manual2003 ford windstar service repair manual
2003 ford windstar service repair manual
 
2000 ford windstar service repair manual
2000 ford windstar service repair manual2000 ford windstar service repair manual
2000 ford windstar service repair manual
 
2003 FORD WINDSTAR Service Repair Manual
2003 FORD WINDSTAR Service Repair Manual2003 FORD WINDSTAR Service Repair Manual
2003 FORD WINDSTAR Service Repair Manual
 
2003 FORD WINDSTAR Service Repair Manual
2003 FORD WINDSTAR Service Repair Manual2003 FORD WINDSTAR Service Repair Manual
2003 FORD WINDSTAR Service Repair Manual
 
Manuales de reparaciones jeep compass y patriot limited 2007-2009
Manuales de reparaciones jeep compass y patriot limited 2007-2009Manuales de reparaciones jeep compass y patriot limited 2007-2009
Manuales de reparaciones jeep compass y patriot limited 2007-2009
 
Caterpillar cat 163 h na motor grader (prefix 5ak) service repair manual (5ak...
Caterpillar cat 163 h na motor grader (prefix 5ak) service repair manual (5ak...Caterpillar cat 163 h na motor grader (prefix 5ak) service repair manual (5ak...
Caterpillar cat 163 h na motor grader (prefix 5ak) service repair manual (5ak...
 
Caterpillar cat 160 h motor grader (prefix 9ej) service repair manual (9ej000...
Caterpillar cat 160 h motor grader (prefix 9ej) service repair manual (9ej000...Caterpillar cat 160 h motor grader (prefix 9ej) service repair manual (9ej000...
Caterpillar cat 160 h motor grader (prefix 9ej) service repair manual (9ej000...
 
Caterpillar cat 160 h motor grader (prefix 9ej) service repair manual (9ej000...
Caterpillar cat 160 h motor grader (prefix 9ej) service repair manual (9ej000...Caterpillar cat 160 h motor grader (prefix 9ej) service repair manual (9ej000...
Caterpillar cat 160 h motor grader (prefix 9ej) service repair manual (9ej000...
 
Caterpillar cat 325 c excavator (prefix bkh) service repair manual (bkh00001 ...
Caterpillar cat 325 c excavator (prefix bkh) service repair manual (bkh00001 ...Caterpillar cat 325 c excavator (prefix bkh) service repair manual (bkh00001 ...
Caterpillar cat 325 c excavator (prefix bkh) service repair manual (bkh00001 ...
 
Caterpillar cat 323 d l excavator (prefix pbm) service repair manual (pbm0000...
Caterpillar cat 323 d l excavator (prefix pbm) service repair manual (pbm0000...Caterpillar cat 323 d l excavator (prefix pbm) service repair manual (pbm0000...
Caterpillar cat 323 d l excavator (prefix pbm) service repair manual (pbm0000...
 
Caterpillar cat 235 excavator (prefix 62 x) service repair manual (62x00289 a...
Caterpillar cat 235 excavator (prefix 62 x) service repair manual (62x00289 a...Caterpillar cat 235 excavator (prefix 62 x) service repair manual (62x00289 a...
Caterpillar cat 235 excavator (prefix 62 x) service repair manual (62x00289 a...
 
Caterpillar cat 235 excavator (prefix 62 x) service repair manual (62x00289 a...
Caterpillar cat 235 excavator (prefix 62 x) service repair manual (62x00289 a...Caterpillar cat 235 excavator (prefix 62 x) service repair manual (62x00289 a...
Caterpillar cat 235 excavator (prefix 62 x) service repair manual (62x00289 a...
 

More from yehnmdm jnkmem

YALE G807 ERP18VT LIFT TRUCK (EUROPE) Service Repair Manual
YALE G807 ERP18VT LIFT TRUCK (EUROPE) Service Repair ManualYALE G807 ERP18VT LIFT TRUCK (EUROPE) Service Repair Manual
YALE G807 ERP18VT LIFT TRUCK (EUROPE) Service Repair Manualyehnmdm jnkmem
 
YALE F879 GLC60VX LIFT TRUCK (EUROPE) Service Repair Manual
YALE F879 GLC60VX LIFT TRUCK (EUROPE) Service Repair ManualYALE F879 GLC60VX LIFT TRUCK (EUROPE) Service Repair Manual
YALE F879 GLC60VX LIFT TRUCK (EUROPE) Service Repair Manualyehnmdm jnkmem
 
YALE F876 GDP230DCS LIFT TRUCK Service Repair Manual
YALE F876 GDP230DCS LIFT TRUCK Service Repair ManualYALE F876 GDP230DCS LIFT TRUCK Service Repair Manual
YALE F876 GDP230DCS LIFT TRUCK Service Repair Manualyehnmdm jnkmem
 
YALE F818 GLC55SVX LIFT TRUCK (EUROPE) Service Repair Manual
YALE F818 GLC55SVX LIFT TRUCK (EUROPE) Service Repair ManualYALE F818 GLC55SVX LIFT TRUCK (EUROPE) Service Repair Manual
YALE F818 GLC55SVX LIFT TRUCK (EUROPE) Service Repair Manualyehnmdm jnkmem
 
YALE E879 GDC70VX LIFT TRUCK Service Repair Manual
YALE E879 GDC70VX LIFT TRUCK Service Repair ManualYALE E879 GDC70VX LIFT TRUCK Service Repair Manual
YALE E879 GDC70VX LIFT TRUCK Service Repair Manualyehnmdm jnkmem
 
MERCURY MERCRUISER MCM140 (6 CYL) STERN DRIVE UNITS AND MARINE ENGINE (1963-1...
MERCURY MERCRUISER MCM140 (6 CYL) STERN DRIVE UNITS AND MARINE ENGINE (1963-1...MERCURY MERCRUISER MCM140 (6 CYL) STERN DRIVE UNITS AND MARINE ENGINE (1963-1...
MERCURY MERCRUISER MCM140 (6 CYL) STERN DRIVE UNITS AND MARINE ENGINE (1963-1...yehnmdm jnkmem
 
Massey Ferguson MF 8140 Tractor Service Repair Manual
Massey Ferguson MF 8140 Tractor Service Repair ManualMassey Ferguson MF 8140 Tractor Service Repair Manual
Massey Ferguson MF 8140 Tractor Service Repair Manualyehnmdm jnkmem
 
Massey Ferguson MF 6255 Tractor Service Repair Manual
Massey Ferguson MF 6255 Tractor Service Repair ManualMassey Ferguson MF 6255 Tractor Service Repair Manual
Massey Ferguson MF 6255 Tractor Service Repair Manualyehnmdm jnkmem
 
2007 Artic Cat 570cc 2-Stroke Snowmobile Service Repair Manual
2007 Artic Cat 570cc 2-Stroke Snowmobile Service Repair Manual2007 Artic Cat 570cc 2-Stroke Snowmobile Service Repair Manual
2007 Artic Cat 570cc 2-Stroke Snowmobile Service Repair Manualyehnmdm jnkmem
 
2005 YAMAHA RSG90 SNOWMOBILE Service Repair Manual
2005 YAMAHA RSG90 SNOWMOBILE Service Repair Manual2005 YAMAHA RSG90 SNOWMOBILE Service Repair Manual
2005 YAMAHA RSG90 SNOWMOBILE Service Repair Manualyehnmdm jnkmem
 
2003 Arctic Cat 300 4x4 ATV Service Repair Manual
2003 Arctic Cat 300 4x4 ATV Service Repair Manual2003 Arctic Cat 300 4x4 ATV Service Repair Manual
2003 Arctic Cat 300 4x4 ATV Service Repair Manualyehnmdm jnkmem
 
1989 Yamaha Exciter 570 Snowmobile Service Repair Manual
1989 Yamaha Exciter 570 Snowmobile Service Repair Manual1989 Yamaha Exciter 570 Snowmobile Service Repair Manual
1989 Yamaha Exciter 570 Snowmobile Service Repair Manualyehnmdm jnkmem
 
2011 Yamaha FZ1 FZS1000AS Service Repair Manual
2011 Yamaha FZ1 FZS1000AS Service Repair Manual2011 Yamaha FZ1 FZS1000AS Service Repair Manual
2011 Yamaha FZ1 FZS1000AS Service Repair Manualyehnmdm jnkmem
 
2005 FORD ESCAPE HYBRID Service Repair Manual
2005 FORD ESCAPE HYBRID Service Repair Manual2005 FORD ESCAPE HYBRID Service Repair Manual
2005 FORD ESCAPE HYBRID Service Repair Manualyehnmdm jnkmem
 

More from yehnmdm jnkmem (14)

YALE G807 ERP18VT LIFT TRUCK (EUROPE) Service Repair Manual
YALE G807 ERP18VT LIFT TRUCK (EUROPE) Service Repair ManualYALE G807 ERP18VT LIFT TRUCK (EUROPE) Service Repair Manual
YALE G807 ERP18VT LIFT TRUCK (EUROPE) Service Repair Manual
 
YALE F879 GLC60VX LIFT TRUCK (EUROPE) Service Repair Manual
YALE F879 GLC60VX LIFT TRUCK (EUROPE) Service Repair ManualYALE F879 GLC60VX LIFT TRUCK (EUROPE) Service Repair Manual
YALE F879 GLC60VX LIFT TRUCK (EUROPE) Service Repair Manual
 
YALE F876 GDP230DCS LIFT TRUCK Service Repair Manual
YALE F876 GDP230DCS LIFT TRUCK Service Repair ManualYALE F876 GDP230DCS LIFT TRUCK Service Repair Manual
YALE F876 GDP230DCS LIFT TRUCK Service Repair Manual
 
YALE F818 GLC55SVX LIFT TRUCK (EUROPE) Service Repair Manual
YALE F818 GLC55SVX LIFT TRUCK (EUROPE) Service Repair ManualYALE F818 GLC55SVX LIFT TRUCK (EUROPE) Service Repair Manual
YALE F818 GLC55SVX LIFT TRUCK (EUROPE) Service Repair Manual
 
YALE E879 GDC70VX LIFT TRUCK Service Repair Manual
YALE E879 GDC70VX LIFT TRUCK Service Repair ManualYALE E879 GDC70VX LIFT TRUCK Service Repair Manual
YALE E879 GDC70VX LIFT TRUCK Service Repair Manual
 
MERCURY MERCRUISER MCM140 (6 CYL) STERN DRIVE UNITS AND MARINE ENGINE (1963-1...
MERCURY MERCRUISER MCM140 (6 CYL) STERN DRIVE UNITS AND MARINE ENGINE (1963-1...MERCURY MERCRUISER MCM140 (6 CYL) STERN DRIVE UNITS AND MARINE ENGINE (1963-1...
MERCURY MERCRUISER MCM140 (6 CYL) STERN DRIVE UNITS AND MARINE ENGINE (1963-1...
 
Massey Ferguson MF 8140 Tractor Service Repair Manual
Massey Ferguson MF 8140 Tractor Service Repair ManualMassey Ferguson MF 8140 Tractor Service Repair Manual
Massey Ferguson MF 8140 Tractor Service Repair Manual
 
Massey Ferguson MF 6255 Tractor Service Repair Manual
Massey Ferguson MF 6255 Tractor Service Repair ManualMassey Ferguson MF 6255 Tractor Service Repair Manual
Massey Ferguson MF 6255 Tractor Service Repair Manual
 
2007 Artic Cat 570cc 2-Stroke Snowmobile Service Repair Manual
2007 Artic Cat 570cc 2-Stroke Snowmobile Service Repair Manual2007 Artic Cat 570cc 2-Stroke Snowmobile Service Repair Manual
2007 Artic Cat 570cc 2-Stroke Snowmobile Service Repair Manual
 
2005 YAMAHA RSG90 SNOWMOBILE Service Repair Manual
2005 YAMAHA RSG90 SNOWMOBILE Service Repair Manual2005 YAMAHA RSG90 SNOWMOBILE Service Repair Manual
2005 YAMAHA RSG90 SNOWMOBILE Service Repair Manual
 
2003 Arctic Cat 300 4x4 ATV Service Repair Manual
2003 Arctic Cat 300 4x4 ATV Service Repair Manual2003 Arctic Cat 300 4x4 ATV Service Repair Manual
2003 Arctic Cat 300 4x4 ATV Service Repair Manual
 
1989 Yamaha Exciter 570 Snowmobile Service Repair Manual
1989 Yamaha Exciter 570 Snowmobile Service Repair Manual1989 Yamaha Exciter 570 Snowmobile Service Repair Manual
1989 Yamaha Exciter 570 Snowmobile Service Repair Manual
 
2011 Yamaha FZ1 FZS1000AS Service Repair Manual
2011 Yamaha FZ1 FZS1000AS Service Repair Manual2011 Yamaha FZ1 FZS1000AS Service Repair Manual
2011 Yamaha FZ1 FZS1000AS Service Repair Manual
 
2005 FORD ESCAPE HYBRID Service Repair Manual
2005 FORD ESCAPE HYBRID Service Repair Manual2005 FORD ESCAPE HYBRID Service Repair Manual
2005 FORD ESCAPE HYBRID Service Repair Manual
 

Recently uploaded

Dubai Call Girls R0yalty O525547819 Call Girls Dubai
Dubai Call Girls R0yalty O525547819 Call Girls DubaiDubai Call Girls R0yalty O525547819 Call Girls Dubai
Dubai Call Girls R0yalty O525547819 Call Girls Dubaikojalkojal131
 
如何办理麦考瑞大学毕业证(MQU毕业证书)成绩单原版一比一
如何办理麦考瑞大学毕业证(MQU毕业证书)成绩单原版一比一如何办理麦考瑞大学毕业证(MQU毕业证书)成绩单原版一比一
如何办理麦考瑞大学毕业证(MQU毕业证书)成绩单原版一比一ozave
 
Top Rated Call Girls Vashi : 9920725232 We offer Beautiful and sexy Call Girl...
Top Rated Call Girls Vashi : 9920725232 We offer Beautiful and sexy Call Girl...Top Rated Call Girls Vashi : 9920725232 We offer Beautiful and sexy Call Girl...
Top Rated Call Girls Vashi : 9920725232 We offer Beautiful and sexy Call Girl...amitlee9823
 
John Deere 7430 7530 Tractors Diagnostic Service Manual W.pdf
John Deere 7430 7530 Tractors Diagnostic Service Manual W.pdfJohn Deere 7430 7530 Tractors Diagnostic Service Manual W.pdf
John Deere 7430 7530 Tractors Diagnostic Service Manual W.pdfExcavator
 
Call Girls In Kotla Mubarakpur Delhi ❤️8448577510 ⊹Best Escorts Service In 24...
Call Girls In Kotla Mubarakpur Delhi ❤️8448577510 ⊹Best Escorts Service In 24...Call Girls In Kotla Mubarakpur Delhi ❤️8448577510 ⊹Best Escorts Service In 24...
Call Girls In Kotla Mubarakpur Delhi ❤️8448577510 ⊹Best Escorts Service In 24...lizamodels9
 
BOOK FARIDABAD CALL GIRL(VIP Sunny Leone) @8168257667 BOOK 24/7
BOOK FARIDABAD CALL GIRL(VIP Sunny Leone) @8168257667 BOOK  24/7BOOK FARIDABAD CALL GIRL(VIP Sunny Leone) @8168257667 BOOK  24/7
BOOK FARIDABAD CALL GIRL(VIP Sunny Leone) @8168257667 BOOK 24/7Hyderabad Escorts Agency
 
83778-77756 ( HER.SELF ) Brings Call Girls In Laxmi Nagar
83778-77756 ( HER.SELF ) Brings Call Girls In Laxmi Nagar83778-77756 ( HER.SELF ) Brings Call Girls In Laxmi Nagar
83778-77756 ( HER.SELF ) Brings Call Girls In Laxmi Nagardollysharma2066
 
Call Girls Kanakapura Road Just Call 👗 7737669865 👗 Top Class Call Girl Servi...
Call Girls Kanakapura Road Just Call 👗 7737669865 👗 Top Class Call Girl Servi...Call Girls Kanakapura Road Just Call 👗 7737669865 👗 Top Class Call Girl Servi...
Call Girls Kanakapura Road Just Call 👗 7737669865 👗 Top Class Call Girl Servi...amitlee9823
 
一比一原版(PU学位证书)普渡大学毕业证学历认证加急办理
一比一原版(PU学位证书)普渡大学毕业证学历认证加急办理一比一原版(PU学位证书)普渡大学毕业证学历认证加急办理
一比一原版(PU学位证书)普渡大学毕业证学历认证加急办理ezgenuh
 
Is Your BMW PDC Malfunctioning Discover How to Easily Reset It
Is Your BMW PDC Malfunctioning Discover How to Easily Reset ItIs Your BMW PDC Malfunctioning Discover How to Easily Reset It
Is Your BMW PDC Malfunctioning Discover How to Easily Reset ItEuroService Automotive
 
Madiwala Call Girls: 🍓 7737669865 🍓 High Profile Model Escorts | Bangalore Es...
Madiwala Call Girls: 🍓 7737669865 🍓 High Profile Model Escorts | Bangalore Es...Madiwala Call Girls: 🍓 7737669865 🍓 High Profile Model Escorts | Bangalore Es...
Madiwala Call Girls: 🍓 7737669865 🍓 High Profile Model Escorts | Bangalore Es...amitlee9823
 
FULL NIGHT — 9999894380 Call Girls In Jagat Puri | Delhi
FULL NIGHT — 9999894380 Call Girls In Jagat Puri | DelhiFULL NIGHT — 9999894380 Call Girls In Jagat Puri | Delhi
FULL NIGHT — 9999894380 Call Girls In Jagat Puri | DelhiSaketCallGirlsCallUs
 
John Deere 335 375 385 435 Service Repair Manual
John Deere 335 375 385 435 Service Repair ManualJohn Deere 335 375 385 435 Service Repair Manual
John Deere 335 375 385 435 Service Repair ManualExcavator
 
John Deere Tractors 6130M 6140M Diagnostic Manual
John Deere Tractors  6130M 6140M Diagnostic ManualJohn Deere Tractors  6130M 6140M Diagnostic Manual
John Deere Tractors 6130M 6140M Diagnostic ManualExcavator
 
+971565801893>>SAFE AND ORIGINAL ABORTION PILLS FOR SALE IN ABUDHABI,DUBAI MA...
+971565801893>>SAFE AND ORIGINAL ABORTION PILLS FOR SALE IN ABUDHABI,DUBAI MA...+971565801893>>SAFE AND ORIGINAL ABORTION PILLS FOR SALE IN ABUDHABI,DUBAI MA...
+971565801893>>SAFE AND ORIGINAL ABORTION PILLS FOR SALE IN ABUDHABI,DUBAI MA...Health
 
Vip Mumbai Call Girls Mumbai Call On 9920725232 With Body to body massage wit...
Vip Mumbai Call Girls Mumbai Call On 9920725232 With Body to body massage wit...Vip Mumbai Call Girls Mumbai Call On 9920725232 With Body to body massage wit...
Vip Mumbai Call Girls Mumbai Call On 9920725232 With Body to body massage wit...amitlee9823
 
Workplace-Hazards TLE EIM 10 QUARTER3 W2
Workplace-Hazards TLE EIM 10 QUARTER3 W2Workplace-Hazards TLE EIM 10 QUARTER3 W2
Workplace-Hazards TLE EIM 10 QUARTER3 W2johnreyloyola1
 
Escorts Service Rajajinagar ☎ 7737669865☎ Book Your One night Stand (Bangalore)
Escorts Service Rajajinagar ☎ 7737669865☎ Book Your One night Stand (Bangalore)Escorts Service Rajajinagar ☎ 7737669865☎ Book Your One night Stand (Bangalore)
Escorts Service Rajajinagar ☎ 7737669865☎ Book Your One night Stand (Bangalore)amitlee9823
 
Call Girls Kadugodi Just Call 👗 7737669865 👗 Top Class Call Girl Service Bang...
Call Girls Kadugodi Just Call 👗 7737669865 👗 Top Class Call Girl Service Bang...Call Girls Kadugodi Just Call 👗 7737669865 👗 Top Class Call Girl Service Bang...
Call Girls Kadugodi Just Call 👗 7737669865 👗 Top Class Call Girl Service Bang...amitlee9823
 

Recently uploaded (20)

Dubai Call Girls R0yalty O525547819 Call Girls Dubai
Dubai Call Girls R0yalty O525547819 Call Girls DubaiDubai Call Girls R0yalty O525547819 Call Girls Dubai
Dubai Call Girls R0yalty O525547819 Call Girls Dubai
 
如何办理麦考瑞大学毕业证(MQU毕业证书)成绩单原版一比一
如何办理麦考瑞大学毕业证(MQU毕业证书)成绩单原版一比一如何办理麦考瑞大学毕业证(MQU毕业证书)成绩单原版一比一
如何办理麦考瑞大学毕业证(MQU毕业证书)成绩单原版一比一
 
Top Rated Call Girls Vashi : 9920725232 We offer Beautiful and sexy Call Girl...
Top Rated Call Girls Vashi : 9920725232 We offer Beautiful and sexy Call Girl...Top Rated Call Girls Vashi : 9920725232 We offer Beautiful and sexy Call Girl...
Top Rated Call Girls Vashi : 9920725232 We offer Beautiful and sexy Call Girl...
 
John Deere 7430 7530 Tractors Diagnostic Service Manual W.pdf
John Deere 7430 7530 Tractors Diagnostic Service Manual W.pdfJohn Deere 7430 7530 Tractors Diagnostic Service Manual W.pdf
John Deere 7430 7530 Tractors Diagnostic Service Manual W.pdf
 
Call Girls In Kotla Mubarakpur Delhi ❤️8448577510 ⊹Best Escorts Service In 24...
Call Girls In Kotla Mubarakpur Delhi ❤️8448577510 ⊹Best Escorts Service In 24...Call Girls In Kotla Mubarakpur Delhi ❤️8448577510 ⊹Best Escorts Service In 24...
Call Girls In Kotla Mubarakpur Delhi ❤️8448577510 ⊹Best Escorts Service In 24...
 
BOOK FARIDABAD CALL GIRL(VIP Sunny Leone) @8168257667 BOOK 24/7
BOOK FARIDABAD CALL GIRL(VIP Sunny Leone) @8168257667 BOOK  24/7BOOK FARIDABAD CALL GIRL(VIP Sunny Leone) @8168257667 BOOK  24/7
BOOK FARIDABAD CALL GIRL(VIP Sunny Leone) @8168257667 BOOK 24/7
 
83778-77756 ( HER.SELF ) Brings Call Girls In Laxmi Nagar
83778-77756 ( HER.SELF ) Brings Call Girls In Laxmi Nagar83778-77756 ( HER.SELF ) Brings Call Girls In Laxmi Nagar
83778-77756 ( HER.SELF ) Brings Call Girls In Laxmi Nagar
 
Call Girls Kanakapura Road Just Call 👗 7737669865 👗 Top Class Call Girl Servi...
Call Girls Kanakapura Road Just Call 👗 7737669865 👗 Top Class Call Girl Servi...Call Girls Kanakapura Road Just Call 👗 7737669865 👗 Top Class Call Girl Servi...
Call Girls Kanakapura Road Just Call 👗 7737669865 👗 Top Class Call Girl Servi...
 
(ISHITA) Call Girls Service Jammu Call Now 8617697112 Jammu Escorts 24x7
(ISHITA) Call Girls Service Jammu Call Now 8617697112 Jammu Escorts 24x7(ISHITA) Call Girls Service Jammu Call Now 8617697112 Jammu Escorts 24x7
(ISHITA) Call Girls Service Jammu Call Now 8617697112 Jammu Escorts 24x7
 
一比一原版(PU学位证书)普渡大学毕业证学历认证加急办理
一比一原版(PU学位证书)普渡大学毕业证学历认证加急办理一比一原版(PU学位证书)普渡大学毕业证学历认证加急办理
一比一原版(PU学位证书)普渡大学毕业证学历认证加急办理
 
Is Your BMW PDC Malfunctioning Discover How to Easily Reset It
Is Your BMW PDC Malfunctioning Discover How to Easily Reset ItIs Your BMW PDC Malfunctioning Discover How to Easily Reset It
Is Your BMW PDC Malfunctioning Discover How to Easily Reset It
 
Madiwala Call Girls: 🍓 7737669865 🍓 High Profile Model Escorts | Bangalore Es...
Madiwala Call Girls: 🍓 7737669865 🍓 High Profile Model Escorts | Bangalore Es...Madiwala Call Girls: 🍓 7737669865 🍓 High Profile Model Escorts | Bangalore Es...
Madiwala Call Girls: 🍓 7737669865 🍓 High Profile Model Escorts | Bangalore Es...
 
FULL NIGHT — 9999894380 Call Girls In Jagat Puri | Delhi
FULL NIGHT — 9999894380 Call Girls In Jagat Puri | DelhiFULL NIGHT — 9999894380 Call Girls In Jagat Puri | Delhi
FULL NIGHT — 9999894380 Call Girls In Jagat Puri | Delhi
 
John Deere 335 375 385 435 Service Repair Manual
John Deere 335 375 385 435 Service Repair ManualJohn Deere 335 375 385 435 Service Repair Manual
John Deere 335 375 385 435 Service Repair Manual
 
John Deere Tractors 6130M 6140M Diagnostic Manual
John Deere Tractors  6130M 6140M Diagnostic ManualJohn Deere Tractors  6130M 6140M Diagnostic Manual
John Deere Tractors 6130M 6140M Diagnostic Manual
 
+971565801893>>SAFE AND ORIGINAL ABORTION PILLS FOR SALE IN ABUDHABI,DUBAI MA...
+971565801893>>SAFE AND ORIGINAL ABORTION PILLS FOR SALE IN ABUDHABI,DUBAI MA...+971565801893>>SAFE AND ORIGINAL ABORTION PILLS FOR SALE IN ABUDHABI,DUBAI MA...
+971565801893>>SAFE AND ORIGINAL ABORTION PILLS FOR SALE IN ABUDHABI,DUBAI MA...
 
Vip Mumbai Call Girls Mumbai Call On 9920725232 With Body to body massage wit...
Vip Mumbai Call Girls Mumbai Call On 9920725232 With Body to body massage wit...Vip Mumbai Call Girls Mumbai Call On 9920725232 With Body to body massage wit...
Vip Mumbai Call Girls Mumbai Call On 9920725232 With Body to body massage wit...
 
Workplace-Hazards TLE EIM 10 QUARTER3 W2
Workplace-Hazards TLE EIM 10 QUARTER3 W2Workplace-Hazards TLE EIM 10 QUARTER3 W2
Workplace-Hazards TLE EIM 10 QUARTER3 W2
 
Escorts Service Rajajinagar ☎ 7737669865☎ Book Your One night Stand (Bangalore)
Escorts Service Rajajinagar ☎ 7737669865☎ Book Your One night Stand (Bangalore)Escorts Service Rajajinagar ☎ 7737669865☎ Book Your One night Stand (Bangalore)
Escorts Service Rajajinagar ☎ 7737669865☎ Book Your One night Stand (Bangalore)
 
Call Girls Kadugodi Just Call 👗 7737669865 👗 Top Class Call Girl Service Bang...
Call Girls Kadugodi Just Call 👗 7737669865 👗 Top Class Call Girl Service Bang...Call Girls Kadugodi Just Call 👗 7737669865 👗 Top Class Call Girl Service Bang...
Call Girls Kadugodi Just Call 👗 7737669865 👗 Top Class Call Girl Service Bang...
 

2003 ACURA MDX Service Repair Manual

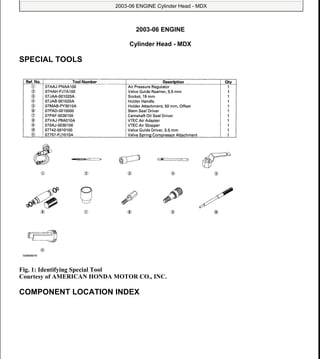
  • 1. 2003-06 ENGINE Cylinder Head - MDX SPECIAL TOOLS Fig. 1: Identifying Special Tool Courtesy of AMERICAN HONDA MOTOR CO., INC. COMPONENT LOCATION INDEX 2006 Acura MDX 2003-06 ENGINE Cylinder Head - MDX 2006 Acura MDX 2003-06 ENGINE Cylinder Head - MDX me Sunday, May 10, 2009 3:57:15 PM Page 1 © 2005 Mitchell Repair Information Company, LLC. me Sunday, May 10, 2009 3:57:24 PM Page 1 © 2005 Mitchell Repair Information Company, LLC.
  • 2. Fig. 2: Identifying Cylinder Head Components (1 Of 3) Courtesy of AMERICAN HONDA MOTOR CO., INC. 2006 Acura MDX 2003-06 ENGINE Cylinder Head - MDX me Sunday, May 10, 2009 3:57:15 PM Page 2 © 2005 Mitchell Repair Information Company, LLC.
  • 3. Fig. 3: Identifying Cylinder Head Components (2 Of 3) Courtesy of AMERICAN HONDA MOTOR CO., INC. 2006 Acura MDX 2003-06 ENGINE Cylinder Head - MDX me Sunday, May 10, 2009 3:57:15 PM Page 3 © 2005 Mitchell Repair Information Company, LLC.
  • 4. Fig. 4: Identifying Cylinder Head Components (3 Of 3) Courtesy of AMERICAN HONDA MOTOR CO., INC. ENGINE COMPRESSION INSPECTION 1. Warm up the engine to normal operating temperature (cooling fan comes on). NOTE: After this inspection, you must reset the powertrain control module (PCM), otherwise the PCM will continue to stop the injectors from functioning. Select PCM reset using the Honda Diagnostic System (HDS) (see PCM RESET ). 2006 Acura MDX 2003-06 ENGINE Cylinder Head - MDX me Sunday, May 10, 2009 3:57:15 PM Page 4 © 2005 Mitchell Repair Information Company, LLC.
  • 5. 2. Turn the ignition switch OFF. 3. Connect the HDS to the data link connector (DLC) (see step 2 in GENERAL TROUBLESHOOTING INFORMATION ). 4. Turn the ignition switch ON (II), and select PGM-FI, INSPECTION, then ALL INJECTORS OFF function on the HDS 5. Remove the six ignition coils (see IGNITION COIL REMOVAL/INSTALLATION ). 6. Remove the six spark plugs. 7. Attach the compression gauge to a spark plug hole. Fig. 5: Attaching Compression Gauge To Spark Plug Hole Courtesy of AMERICAN HONDA MOTOR CO., INC. 8. Crank the engine with the starter motor and measure the compression. Compression Pressure: Above 930 kPa (9.5 kgf/cm2 , 135 psi) 9. Measure the compression on the remaining cylinders. 2006 Acura MDX 2003-06 ENGINE Cylinder Head - MDX me Sunday, May 10, 2009 3:57:15 PM Page 5 © 2005 Mitchell Repair Information Company, LLC.
  • 6. Maximum Variation: Within 200 kPa (2.0 kgf/cm2 , 28 psi) 10. If the compression is not within specification, check the following items, then remeasure the compression. Damaged or worn valves and seats Damaged cylinder head gaskets Damaged or worn piston rings Damaged or worn piston and cylinder bore 11. Select PCM reset (see PCM RESET ) to cancel ALL INJECTORS OFF function on the HDS. VTEC ROCKER ARM TEST Special Tools Required VTEC air adapter 07VAJ-P8A010A VTEC air stopper 070AJ-0030100 Air pressure regulator 07AAJ-PNAA100 1. Start the engine and let it run for 5 minutes, then turn the ignition switch OFF. 2. Remove the intake manifold (see REMOVAL ). 3. Remove the cylinder head covers (see CYLINDER HEAD COVER REMOVAL ). 4. Set the No. 1 piston at top dead center (TDC) (see step 3 in VALVE CLEARANCE ADJUSTMENT ) 5. Push on the intake mid rocker arm (A) for the No. 1 cylinder. The mid rocker arm should move independently of the primary rocker arm (B) and secondary rocker arm (C). If the mid rocker arm moves freely, go to step 6. If the intake mid rocker arm does not move, remove the mid, primary, and secondary intake rocker arms as an assembly, then check that the pistons in the mid and primary rocker arms move smoothly. If any rocker arm needs replacing, replace the mid, primary, and secondary rocker arms as an assembly, and retest. 2006 Acura MDX 2003-06 ENGINE Cylinder Head - MDX me Sunday, May 10, 2009 3:57:15 PM Page 6 © 2005 Mitchell Repair Information Company, LLC.
  • 7. Fig. 6: Pushing On Intake Mid Rocker Arm For No. 1 Cylinder Courtesy of AMERICAN HONDA MOTOR CO., INC. 6. Repeat step 5 on the remaining intake mid rocker arms with each piston at TDC. When all the mid rocker arms pass the test, go to step 7. 7. Check that the air pressure on the shop air compressor gauge indicates over 690 kPa (7.0kgf/cm2 100 psi). 8. Inspect the valve clearance (see VALVE CLEARANCE ADJUSTMENT ). 9. Remove the No. 1 and No. 6 intake rocker shaft mounting bolts, then install and connect the special tools as shown in Fig. 7 or Fig. 8 . 2006 Acura MDX 2003-06 ENGINE Cylinder Head - MDX me Sunday, May 10, 2009 3:57:15 PM Page 7 © 2005 Mitchell Repair Information Company, LLC.
  • 8. Fig. 7: Installing And Connecting Special Tools (Front) Courtesy of AMERICAN HONDA MOTOR CO., INC. 2006 Acura MDX 2003-06 ENGINE Cylinder Head - MDX me Sunday, May 10, 2009 3:57:15 PM Page 8 © 2005 Mitchell Repair Information Company, LLC.
  • 9. Fig. 8: Installing And Connecting Special Tools (Rear) Courtesy of AMERICAN HONDA MOTOR CO., INC. 10. Loosen the valve on the regulator, and apply the specified air pressure. Specified Air Pressure: 440-540 kPa (4.5-5.5 kgf/cm2 , 64-78 psi) 11. Make sure that the intake primary rocker arm (A) and intake secondary rocker arm (B) are mechanically connected by the piston and that the mid rocker arm (C) does not move when pushed manually. If any intake mid rocker arm moves independently of the primary and secondary rocker arms, replace the rocker arms as a set. NOTE: If the synchronizing pistons do not move after applying air pressure, move the primary or secondary rocker arm up and down manually. 2006 Acura MDX 2003-06 ENGINE Cylinder Head - MDX me Sunday, May 10, 2009 3:57:15 PM Page 9 © 2005 Mitchell Repair Information Company, LLC.
  • 10. Fig. 9: Making Sure Intake Primary Rocker Arm And Intake Secondary Rocker Arm Are Mechanically Connected By Piston Courtesy of AMERICAN HONDA MOTOR CO., INC. 12. Remove the special tools. 13. Tighten the rocker shaft bolts to 24 N.m (2.4 kgf.m, 17 lbf.ft) 14. Install the cylinder head covers (see CYLINDER HEAD COVER INSTALLATION ). 15. Install the intake manifold (see INSTALLATION ). VALVE CLEARANCE ADJUSTMENT 2006 Acura MDX 2003-06 ENGINE Cylinder Head - MDX me Sunday, May 10, 2009 3:57:15 PM Page 10 © 2005 Mitchell Repair Information Company, LLC.
  • 11. 1. Remove the intake manifold (see REMOVAL ). 2. Remove the cylinder head covers (see CYLINDER HEAD COVER REMOVAL ). 3. Set the No. 1 piston at top dead center (TDC). Align the pointer (A) on the front upper cover with the No. 1 piston TDC mark (B) on the front camshaft pulley. Fig. 10: Aligning Pointer On Front Upper Cover With No. 1 Piston TDC Mark Courtesy of AMERICAN HONDA MOTOR CO., INC. NOTE: Adjust the valves only when the cylinder head temperature is less than 100°F (38°C). 2006 Acura MDX 2003-06 ENGINE Cylinder Head - MDX me Sunday, May 10, 2009 3:57:15 PM Page 11 © 2005 Mitchell Repair Information Company, LLC.
  • 12. 4. Select the correct thickness feeler gauge for the valves you're going to check. Valve Clearance Intake: 0.20-0.24 mm (0.008-0.009 in.) Exhaust: 0.28-0.32 mm (0.011-0.013 in.) Fig. 11: Selecting Correct Thickness Feeler Gauge (Rear) Courtesy of AMERICAN HONDA MOTOR CO., INC. 2006 Acura MDX 2003-06 ENGINE Cylinder Head - MDX me Sunday, May 10, 2009 3:57:15 PM Page 12 © 2005 Mitchell Repair Information Company, LLC.
  • 13. Fig. 12: Selecting Correct Thickness Feeler Gauge (Front) Courtesy of AMERICAN HONDA MOTOR CO., INC. 5. Insert the feeler gauge (A) between the adjusting screw and the end of the valve stem on No. 1 cylinder, and slide it back and forth; you should feel a slight amount of drag. 2006 Acura MDX 2003-06 ENGINE Cylinder Head - MDX me Sunday, May 10, 2009 3:57:15 PM Page 13 © 2005 Mitchell Repair Information Company, LLC.
  • 14. Fig. 13: Inserting Feeler Gauge Between Adjusting Screw And End Of Valve Stem On No. 1 Cylinder Courtesy of AMERICAN HONDA MOTOR CO., INC. 6. If you feel too much or too little drag, loosen the locknut (A), and turn the adjusting screw (B) until the drag on the feeler gauge is correct. 2006 Acura MDX 2003-06 ENGINE Cylinder Head - MDX me Sunday, May 10, 2009 3:57:15 PM Page 14 © 2005 Mitchell Repair Information Company, LLC.
  • 15. Fig. 14: Loosening Locknut And Turning Adjusting Screw Courtesy of AMERICAN HONDA MOTOR CO., INC. 7. Tighten the locknut and recheck the clearance. Repeat the adjustment, if necessary. 8. Rotate the crankshaft clockwise. Align the pointer (A) on the front upper cover with the No. 4 piston TDC mark (B) on the front camshaft pulley. 2006 Acura MDX 2003-06 ENGINE Cylinder Head - MDX me Sunday, May 10, 2009 3:57:15 PM Page 15 © 2005 Mitchell Repair Information Company, LLC.
  • 16. Fig. 15: Aligning Pointer On Front Upper Cover With No. 4 Piston TDC Mark On Front Camshaft Pulley Courtesy of AMERICAN HONDA MOTOR CO., INC. 9. Check and, if necessary, adjust the valve clearance on No. 4 cylinder. 10. Rotate the crankshaft clockwise. Align the pointer (A) on the front upper cover with the No. 2 piston TDC mark (B) on the front camshaft pulley. 2006 Acura MDX 2003-06 ENGINE Cylinder Head - MDX me Sunday, May 10, 2009 3:57:15 PM Page 16 © 2005 Mitchell Repair Information Company, LLC.
  • 17. Fig. 16: Aligning Pointer On Front Upper Cover With No. 2 Piston TDC Mark On Front Camshaft Pulley Courtesy of AMERICAN HONDA MOTOR CO., INC. 11. Check and, if necessary, adjust the valve clearance on No. 2 cylinder. 12. Rotate the crankshaft clockwise. Align the pointer (A) on the front upper cover with the No. 5 piston TDC mark (B) on the front camshaft pulley. 2006 Acura MDX 2003-06 ENGINE Cylinder Head - MDX me Sunday, May 10, 2009 3:57:15 PM Page 17 © 2005 Mitchell Repair Information Company, LLC.
  • 18. Fig. 17: Aligning Pointer On Front Upper Cover With No. 5 Piston TDC Mark On Front Camshaft Pulley Courtesy of AMERICAN HONDA MOTOR CO., INC. 13. Check and, if necessary, adjust the valve clearance on No. 5 cylinder. 14. Rotate the crankshaft clockwise. Align the pointer (A) on the front upper cover with the No. 3 piston TDC mark (B) on the front camshaft pulley. 2006 Acura MDX 2003-06 ENGINE Cylinder Head - MDX me Sunday, May 10, 2009 3:57:15 PM Page 18 © 2005 Mitchell Repair Information Company, LLC.
  • 19. Fig. 18: Aligning Pointer On Front Upper Cover With No. 3 Piston TDC Mark On Front Camshaft Pulley Courtesy of AMERICAN HONDA MOTOR CO., INC. 15. Check and, if necessary, adjust the valve clearance on No. 3 cylinder. 16. Rotate the crankshaft clockwise. Align the pointer (A) on the front upper cover with the No. piston TDC mark (B) on the front camshaft pulley. 2006 Acura MDX 2003-06 ENGINE Cylinder Head - MDX me Sunday, May 10, 2009 3:57:15 PM Page 19 © 2005 Mitchell Repair Information Company, LLC.
  • 20. Fig. 19: Aligning Pointer On Front Upper Cover With No. 6 Piston TDC Mark On Front Camshaft Pulley Courtesy of AMERICAN HONDA MOTOR CO., INC. 17. Check and, if necessary, adjust the valve clearance on No. 6 cylinder. 18. Install the cylinder head covers (see CYLINDER HEAD COVER INSTALLATION ). 19. Install the intake manifold (see INSTALLATION ). CRANKSHAFT PULLEY REMOVAL AND INSTALLATION Special Tools Required Holder handle 07JAB-001020A 2006 Acura MDX 2003-06 ENGINE Cylinder Head - MDX me Sunday, May 10, 2009 3:57:15 PM Page 20 © 2005 Mitchell Repair Information Company, LLC.
  • 21. Holder attachment, 50 mm, offset 07MAB-PY3010A Socket, 19 mm 07JAA-001020A, or a commercially available 19 mm socket REMOVAL 1. Remove the right front wheel. 2. Remove the splash shield. Fig. 20: Removing Splash Shield Courtesy of AMERICAN HONDA MOTOR CO., INC. 2006 Acura MDX 2003-06 ENGINE Cylinder Head - MDX me Sunday, May 10, 2009 3:57:15 PM Page 21 © 2005 Mitchell Repair Information Company, LLC.
  • 22. 3. Remove the drive belt (see DRIVE BELT REPLACEMENT ). 4. Hold the pulley with the holder handle (A) and holder attachment (B). Fig. 21: Holding Pulley With Holder Handle And Holder Attachment Courtesy of AMERICAN HONDA MOTOR CO., INC. 5. Remove the bolt with a heavy duty 19 mm socket (C) and breaker bar, then remove the crankshaft pulley. INSTALLATION 1. Remove any oil or clean the pulleys (A), crankshaft (B), bolt (C), and washer (D). Lubricate new engine oil as shown in Fig. 22 . 2006 Acura MDX 2003-06 ENGINE Cylinder Head - MDX me Sunday, May 10, 2009 3:57:15 PM Page 22 © 2005 Mitchell Repair Information Company, LLC.
  • 23. Fig. 22: Removing Oil Or Cleaning Crankshaft Pulley Courtesy of AMERICAN HONDA MOTOR CO., INC. 2. Install the crankshaft pulley, and tighten the bolt. Do not use an impact wrench. -1 Hold the pulley with the handle (A) and holder attachment (B), then tighten the bolt to 64 N.m (6.5 kgf.m, 47 lbf.ft) with a torque wrench and 19 mm socket (C). -2 Mark (D) the bolt head and crankshaft pulley as shown in Fig. 24 , then tighten the bolt an additional 60° (The mark on the bolt head line up with the mark on the crankshaft pulley). 2006 Acura MDX 2003-06 ENGINE Cylinder Head - MDX me Sunday, May 10, 2009 3:57:15 PM Page 23 © 2005 Mitchell Repair Information Company, LLC.
  • 24. Fig. 23: Holding Pulley With Handle And Holder Attachment Courtesy of AMERICAN HONDA MOTOR CO., INC. 2006 Acura MDX 2003-06 ENGINE Cylinder Head - MDX me Sunday, May 10, 2009 3:57:15 PM Page 24 © 2005 Mitchell Repair Information Company, LLC.
  • 25. Fig. 24: Marking Bolt Head And Crankshaft Pulley Courtesy of AMERICAN HONDA MOTOR CO., INC. 3. Install the drive belt (see DRIVE BELT REPLACEMENT ). 4. Install the splash shield. 5. Install the right front wheel. TIMING BELT INSPECTION 1. Remove the drive belt (see DRIVE BELT REPLACEMENT ). 2. Remove the front upper cover. 2006 Acura MDX 2003-06 ENGINE Cylinder Head - MDX me Sunday, May 10, 2009 3:57:15 PM Page 25 © 2005 Mitchell Repair Information Company, LLC.
  • 26. Fig. 25: Removing Front Upper Cover Courtesy of AMERICAN HONDA MOTOR CO., INC. 3. Inspect the timing belt for cracks and oil or coolant contamination. Replace the belt if it is cracked, or is contaminated with oil or coolant. Wipe off any oil or solvent that gets on the belt. 2006 Acura MDX 2003-06 ENGINE Cylinder Head - MDX me Sunday, May 10, 2009 3:57:15 PM Page 26 © 2005 Mitchell Repair Information Company, LLC.
  • 27. Fig. 26: Inspecting Timing Belt For Cracks, Oil Or Coolant Contamination Courtesy of AMERICAN HONDA MOTOR CO., INC. TIMING BELT REMOVAL 1. Turn the crankshaft so its white mark (A) lines up with the pointer (B). 2006 Acura MDX 2003-06 ENGINE Cylinder Head - MDX me Sunday, May 10, 2009 3:57:15 PM Page 27 © 2005 Mitchell Repair Information Company, LLC.
  • 28. Fig. 27: Lining Up White Mark With Pointer Turning Crankshaft Courtesy of AMERICAN HONDA MOTOR CO., INC. 2. Check that the No. 1 piston top dead center (TDC) mark (A) on the front camshaft pulley and the pointer (B) on the front upper cover are aligned. 2006 Acura MDX 2003-06 ENGINE Cylinder Head - MDX me Sunday, May 10, 2009 3:57:15 PM Page 28 © 2005 Mitchell Repair Information Company, LLC.
  • 29. Fig. 28: Checking No. 1 Piston TDC Mark On Front Camshaft Pulley And Pointer Are Aligned Courtesy of AMERICAN HONDA MOTOR CO., INC. 3. Remove the right front wheel. 4. Remove the splash shield. 2006 Acura MDX 2003-06 ENGINE Cylinder Head - MDX me Sunday, May 10, 2009 3:57:15 PM Page 29 © 2005 Mitchell Repair Information Company, LLC.
  • 30. Fig. 29: Removing Splash Shield Courtesy of AMERICAN HONDA MOTOR CO., INC. 5. Remove the drive belt (see DRIVE BELT REPLACEMENT ). 6. Support the engine with a jack and wood block under the oil pan. 7. Remove the upper half of the side engine mount bracket. 2006 Acura MDX 2003-06 ENGINE Cylinder Head - MDX me Sunday, May 10, 2009 3:57:15 PM Page 30 © 2005 Mitchell Repair Information Company, LLC.
  • 31. Fig. 30: Removing Upper Half Of Side Engine Mount Bracket Courtesy of AMERICAN HONDA MOTOR CO., INC. 8. Remove the crankshaft pulley (see CRANKSHAFT PULLEY REMOVAL AND INSTALLATION ). 9. Remove the front upper cover (A) and rear upper cover (B). 2006 Acura MDX 2003-06 ENGINE Cylinder Head - MDX me Sunday, May 10, 2009 3:57:15 PM Page 31 © 2005 Mitchell Repair Information Company, LLC.
  • 32. Fig. 31: Removing Front And Rear Upper Cover Courtesy of AMERICAN HONDA MOTOR CO., INC. 10. Remove the lower cover. 2006 Acura MDX 2003-06 ENGINE Cylinder Head - MDX me Sunday, May 10, 2009 3:57:15 PM Page 32 © 2005 Mitchell Repair Information Company, LLC.
  • 33. Fig. 32: Removing Lower Cover Courtesy of AMERICAN HONDA MOTOR CO., INC. 11. Remove one of the battery clamp bolts from the battery tray, and grind the end of it as shown in Fig. 33 . 2006 Acura MDX 2003-06 ENGINE Cylinder Head - MDX me Sunday, May 10, 2009 3:57:15 PM Page 33 © 2005 Mitchell Repair Information Company, LLC.
  • 34. Fig. 33: Grinding End Of Battery Clamp Bolts Courtesy of AMERICAN HONDA MOTOR CO., INC. 12. Screw the battery clamp bolt in as shown in Fig. 34 to hold the timing belt adjuster in its current position. Tighten it by hand; do not use a wrench. 2006 Acura MDX 2003-06 ENGINE Cylinder Head - MDX me Sunday, May 10, 2009 3:57:15 PM Page 34 © 2005 Mitchell Repair Information Company, LLC.
  • 35. Fig. 34: Installing Battery Clamp Bolt Courtesy of AMERICAN HONDA MOTOR CO., INC. 13. Remove the timing belt guide plate (A). 2006 Acura MDX 2003-06 ENGINE Cylinder Head - MDX me Sunday, May 10, 2009 3:57:15 PM Page 35 © 2005 Mitchell Repair Information Company, LLC.
  • 36. Fig. 35: Removing Timing Belt Guide Plate Courtesy of AMERICAN HONDA MOTOR CO., INC. 14. Remove the lower side engine mount bracket. 2006 Acura MDX 2003-06 ENGINE Cylinder Head - MDX me Sunday, May 10, 2009 3:57:15 PM Page 36 © 2005 Mitchell Repair Information Company, LLC.
  • 37. Fig. 36: Removing Lower Side Engine Mount Bracket Courtesy of AMERICAN HONDA MOTOR CO., INC. 15. Remove the idler pulley bolt (A) and idler pulley (B), then remove the timing belt. Discard the idler pulley bolt. 2006 Acura MDX 2003-06 ENGINE Cylinder Head - MDX me Sunday, May 10, 2009 3:57:15 PM Page 37 © 2005 Mitchell Repair Information Company, LLC.
  • 38. Fig. 37: Removing Idler Pulley Bolt And Idler Pulley Courtesy of AMERICAN HONDA MOTOR CO., INC. TIMING BELT INSTALLATION NOTE: The following procedure is for installing a used belt. If you are installing a new belt, refer to the timing belt replacement procedures (see TIMING BELT REPLACEMENT ). 2006 Acura MDX 2003-06 ENGINE Cylinder Head - MDX me Sunday, May 10, 2009 3:57:15 PM Page 38 © 2005 Mitchell Repair Information Company, LLC.
  • 39. 1. Clean the timing belt pulleys, timing belt guide plate, and the upper and lower covers. 2. Set the timing belt drive pulley to top dead center (TDC) by aligning the TDC mark (A) on the tooth of the timing belt drive pulley with the pointer (B) on the oil pump. Fig. 38: Alining TDC Mark On Tooth Of Timing Belt Drive Pulley With Pointer Courtesy of AMERICAN HONDA MOTOR CO., INC. 3. Set the camshaft pulleys to TDC by aligning the TDC marks (A) on the camshaft pulleys with the pointers (B) on the back covers. 2006 Acura MDX 2003-06 ENGINE Cylinder Head - MDX me Sunday, May 10, 2009 3:57:15 PM Page 39 © 2005 Mitchell Repair Information Company, LLC.
  • 40. Fig. 39: Aligning TDC Marks On Camshaft Pulley With Pointers (Front) Courtesy of AMERICAN HONDA MOTOR CO., INC. 2006 Acura MDX 2003-06 ENGINE Cylinder Head - MDX me Sunday, May 10, 2009 3:57:15 PM Page 40 © 2005 Mitchell Repair Information Company, LLC.
  • 41. Fig. 40: Alining TDC Marks On Camshaft Pulley With Pointer (Rear) Courtesy of AMERICAN HONDA MOTOR CO., INC. 4. Loosely install the idler pulley with a new idler pulley bolt so the pulley can move but does not come off. 5. If the auto-tensioner has extended and the timing belt cannot be installed, do the timing belt replacement procedure (see TIMING BELT REPLACEMENT ). 6. Install the timing belt in a counterclockwise sequence starting with the drive pulley. Take care not to damage the timing belt when installing it. 2006 Acura MDX 2003-06 ENGINE Cylinder Head - MDX me Sunday, May 10, 2009 3:57:15 PM Page 41 © 2005 Mitchell Repair Information Company, LLC.
  • 42. Fig. 41: Installing Timing Belt In Counterclockwise Sequence Courtesy of AMERICAN HONDA MOTOR CO., INC. 7. Tighten the idler pulley bolt. 2006 Acura MDX 2003-06 ENGINE Cylinder Head - MDX me Sunday, May 10, 2009 3:57:15 PM Page 42 © 2005 Mitchell Repair Information Company, LLC.
  • 43. Fig. 42: Tightening Idler Pulley Bolt Courtesy of AMERICAN HONDA MOTOR CO., INC. 8. Remove the battery clamp bolt from the back cover. 9. Install the lower half of the side engine mount bracket. 2006 Acura MDX 2003-06 ENGINE Cylinder Head - MDX me Sunday, May 10, 2009 3:57:15 PM Page 43 © 2005 Mitchell Repair Information Company, LLC.
  • 44. Fig. 43: Installing Lower Half Of Side Engine Mount Bracket Courtesy of AMERICAN HONDA MOTOR CO., INC. 10. Install the timing belt guide plate as shown in Fig. 44 . 2006 Acura MDX 2003-06 ENGINE Cylinder Head - MDX me Sunday, May 10, 2009 3:57:15 PM Page 44 © 2005 Mitchell Repair Information Company, LLC.
  • 45. Fig. 44: Installing Timing Belt Guide Plate Courtesy of AMERICAN HONDA MOTOR CO., INC. 11. Install the lower cover. 2006 Acura MDX 2003-06 ENGINE Cylinder Head - MDX me Sunday, May 10, 2009 3:57:15 PM Page 45 © 2005 Mitchell Repair Information Company, LLC.
  • 46. Fig. 45: Installing Lower Cover Courtesy of AMERICAN HONDA MOTOR CO., INC. 12. Install the crankshaft pulley (see INSTALLATION ). 13. Install the front upper cover (A) and rear upper cover (B). 2006 Acura MDX 2003-06 ENGINE Cylinder Head - MDX me Sunday, May 10, 2009 3:57:15 PM Page 46 © 2005 Mitchell Repair Information Company, LLC.
  • 47. Fig. 46: Installing Front And Rear Upper Cover Courtesy of AMERICAN HONDA MOTOR CO., INC. 14. Rotate the crankshaft pulley about five or six turns clockwise so the timing belt positions itself on the pulleys. 15. Turn the crankshaft pulley so its white mark (A) lines up with the pointer (B). 2006 Acura MDX 2003-06 ENGINE Cylinder Head - MDX me Sunday, May 10, 2009 3:57:15 PM Page 47 © 2005 Mitchell Repair Information Company, LLC.
  • 48. Fig. 47: Alining White Mark With Pointer By Turning Crankshaft Pulley Courtesy of AMERICAN HONDA MOTOR CO., INC. 16. Check the camshaft pulley marks. If the camshaft pulley marks are at TDC, go to step 17. If the camshaft pulley marks are not at TDC, remove the timing belt and repeat steps 2 through 16. 2006 Acura MDX 2003-06 ENGINE Cylinder Head - MDX me Sunday, May 10, 2009 3:57:15 PM Page 48 © 2005 Mitchell Repair Information Company, LLC.
  • 49. Fig. 48: Checking Camshaft Pulley Marks (Front) Courtesy of AMERICAN HONDA MOTOR CO., INC. 2006 Acura MDX 2003-06 ENGINE Cylinder Head - MDX me Sunday, May 10, 2009 3:57:15 PM Page 49 © 2005 Mitchell Repair Information Company, LLC.
  • 50. Fig. 49: Checking Camshaft Pulley Marks (Rear) Courtesy of AMERICAN HONDA MOTOR CO., INC. 2006 Acura MDX 2003-06 ENGINE Cylinder Head - MDX me Sunday, May 10, 2009 3:57:15 PM Page 50 © 2005 Mitchell Repair Information Company, LLC.
  • 51. 17. Install the drive belt (see DRIVE BELT REPLACEMENT ). 18. Install the upper half of the side engine mount bracket, then tighten the mounting bolts in the numbered sequence shown in Fig. 50 . Fig. 50: Tightening Mounting Bolts In Sequence Courtesy of AMERICAN HONDA MOTOR CO., INC. 19. Install the splash shield. 2006 Acura MDX 2003-06 ENGINE Cylinder Head - MDX me Sunday, May 10, 2009 3:57:15 PM Page 51 © 2005 Mitchell Repair Information Company, LLC.
  • 52. Fig. 51: Installing Splash Shield Courtesy of AMERICAN HONDA MOTOR CO., INC. 20. Install the right front wheel. 21. Do the crankshaft position (CKP) pattern clear/CKP pattern learn procedure (see CKP PATTERN CLEAR/CKP PATTERN LEARN ). TIMING BELT REPLACEMENT 1. Remove the timing belt (see TIMING BELT REMOVAL ). 2. Clean the timing belt pulleys, timing belt guide plate, and the upper and lower covers. 2006 Acura MDX 2003-06 ENGINE Cylinder Head - MDX me Sunday, May 10, 2009 3:57:15 PM Page 52 © 2005 Mitchell Repair Information Company, LLC.
  • 53. 3. Set the timing belt drive pulley to top dead center (TDC) by aligning the TDC mark (A) on the tooth of the timing belt drive pulley with the pointer (B) on the oil pump. Fig. 52: Aligning TDC Mark On Tooth Of Timing Belt Drive Pulley With Pointer Courtesy of AMERICAN HONDA MOTOR CO., INC. 4. Set the camshaft pulleys to TDC by aligning the TDC marks (A) on the camshaft pulleys with the pointers (B) on the back covers. 2006 Acura MDX 2003-06 ENGINE Cylinder Head - MDX me Sunday, May 10, 2009 3:57:15 PM Page 53 © 2005 Mitchell Repair Information Company, LLC.
  • 54. Fig. 53: Aligning TDC Marks On Camshaft Pulleys With Pointers (Front) Courtesy of AMERICAN HONDA MOTOR CO., INC. 2006 Acura MDX 2003-06 ENGINE Cylinder Head - MDX me Sunday, May 10, 2009 3:57:15 PM Page 54 © 2005 Mitchell Repair Information Company, LLC.
  • 55. Fig. 54: Aligning TDC Marks On Camshaft Pulleys With Pointers (Rear) Courtesy of AMERICAN HONDA MOTOR CO., INC. 5. Remove the battery clamp bolt from the back cover. 6. Remove the auto-tensioner. 2006 Acura MDX 2003-06 ENGINE Cylinder Head - MDX me Sunday, May 10, 2009 3:57:15 PM Page 55 © 2005 Mitchell Repair Information Company, LLC.
  • 56. Fig. 55: Removing Auto-Tensioner Courtesy of AMERICAN HONDA MOTOR CO., INC. 2006 Acura MDX 2003-06 ENGINE Cylinder Head - MDX me Sunday, May 10, 2009 3:57:15 PM Page 56 © 2005 Mitchell Repair Information Company, LLC.
  • 57. 7. Align the holes on the rod and housing of the auto-tensioner. Fig. 56: Aligning Holes On Rod And Housing Of Auto-Tensioner Courtesy of AMERICAN HONDA MOTOR CO., INC. 8. Use a hydraulic press to slowly compress the auto-tensioner. Insert a 2.0 mm (0.08 in.) pin through the housing and the rod. Make sure the pin can be removed once the auto-tensioner is installed. 9. Install the auto-tensioner. NOTE: The compression pressure should not exceed 9,800 N (1,000 kgf, 2,200 lbf). NOTE: Make sure the pin stays in place. 2006 Acura MDX 2003-06 ENGINE Cylinder Head - MDX me Sunday, May 10, 2009 3:57:15 PM Page 57 © 2005 Mitchell Repair Information Company, LLC.
  • 58. Fig. 57: Installing Auto-Tensioner Courtesy of AMERICAN HONDA MOTOR CO., INC. 10. Screw the battery clamp bolt in as shown in Fig. 58 to hold the timing belt adjuster. Tighten it by hand; do not use a wrench. 2006 Acura MDX 2003-06 ENGINE Cylinder Head - MDX me Sunday, May 10, 2009 3:57:15 PM Page 58 © 2005 Mitchell Repair Information Company, LLC.
  • 59. Fig. 58: Installing Battery Clamp Bolt Courtesy of AMERICAN HONDA MOTOR CO., INC. 11. Loosely install the idler pulley with a new idler pulley bolt so the pulley can move but does not come off. 12. Install the timing belt in a counterclockwise sequence starting with the drive pulley. 2006 Acura MDX 2003-06 ENGINE Cylinder Head - MDX me Sunday, May 10, 2009 3:57:15 PM Page 59 © 2005 Mitchell Repair Information Company, LLC.
  • 60. Fig. 59: Installing Timing Belt In Counterclockwise Sequence Courtesy of AMERICAN HONDA MOTOR CO., INC. 13. Tighten the idler pulley bolt. 2006 Acura MDX 2003-06 ENGINE Cylinder Head - MDX me Sunday, May 10, 2009 3:57:15 PM Page 60 © 2005 Mitchell Repair Information Company, LLC.
  • 61. Fig. 60: Tightening Idler Pulley Bolt Courtesy of AMERICAN HONDA MOTOR CO., INC. 14. Remove the pin from the auto-tensioner. 2006 Acura MDX 2003-06 ENGINE Cylinder Head - MDX me Sunday, May 10, 2009 3:57:15 PM Page 61 © 2005 Mitchell Repair Information Company, LLC.
  • 62. Fig. 61: Removing Pin From Auto-Tensioner Courtesy of AMERICAN HONDA MOTOR CO., INC. 15. Remove the battery clamp bolt from the back cover. 16. Install the lower half of the side engine mount bracket. 2006 Acura MDX 2003-06 ENGINE Cylinder Head - MDX me Sunday, May 10, 2009 3:57:15 PM Page 62 © 2005 Mitchell Repair Information Company, LLC.
  • 63. Fig. 62: Installing Lower Half Of Side Engine Mount Bracket Courtesy of AMERICAN HONDA MOTOR CO., INC. 17. Install the timing belt guide plate as shown in Fig. 63 . 2006 Acura MDX 2003-06 ENGINE Cylinder Head - MDX me Sunday, May 10, 2009 3:57:15 PM Page 63 © 2005 Mitchell Repair Information Company, LLC.
  • 64. Fig. 63: Installing Timing Belt Guide Plate Courtesy of AMERICAN HONDA MOTOR CO., INC. 18. Install the lower cover. 2006 Acura MDX 2003-06 ENGINE Cylinder Head - MDX me Sunday, May 10, 2009 3:57:15 PM Page 64 © 2005 Mitchell Repair Information Company, LLC.
  • 65. Fig. 64: Installing Lower Cover Courtesy of AMERICAN HONDA MOTOR CO., INC. 19. Install the crankshaft pulley (see INSTALLATION ). 20. Install the front upper cover (A) and rear upper cover (B). 2006 Acura MDX 2003-06 ENGINE Cylinder Head - MDX me Sunday, May 10, 2009 3:57:15 PM Page 65 © 2005 Mitchell Repair Information Company, LLC.
  • 66. Fig. 65: Installing Front And Rear Upper Cover Courtesy of AMERICAN HONDA MOTOR CO., INC. 21. Rotate the crankshaft pulley about five or six turns clockwise so the timing belt positions itself on the pulleys. 22. Turn the crankshaft pulley so its white mark (A) lines up with the pointer (B). 2006 Acura MDX 2003-06 ENGINE Cylinder Head - MDX me Sunday, May 10, 2009 3:57:15 PM Page 66 © 2005 Mitchell Repair Information Company, LLC.
  • 67. Fig. 66: Aligning White Mark With Pointer Turning Crankshaft Pulley Courtesy of AMERICAN HONDA MOTOR CO., INC. 23. Check the camshaft pulley marks. If the camshaft pulley marks are at TDC, go to step 24. If the camshaft pulley marks are not at TDC, remove the timing belt and repeat steps 2 through 23. 2006 Acura MDX 2003-06 ENGINE Cylinder Head - MDX me Sunday, May 10, 2009 3:57:15 PM Page 67 © 2005 Mitchell Repair Information Company, LLC.
  • 68. Fig. 67: Checking Camshaft Pulley Marks (Front) Courtesy of AMERICAN HONDA MOTOR CO., INC. 2006 Acura MDX 2003-06 ENGINE Cylinder Head - MDX me Sunday, May 10, 2009 3:57:15 PM Page 68 © 2005 Mitchell Repair Information Company, LLC.
  • 69. Fig. 68: Check Camshaft Pulley Marks (Rear) Courtesy of AMERICAN HONDA MOTOR CO., INC. 2006 Acura MDX 2003-06 ENGINE Cylinder Head - MDX me Sunday, May 10, 2009 3:57:15 PM Page 69 © 2005 Mitchell Repair Information Company, LLC.
  • 70. 24. Install the upper half of the side engine mount bracket, then tighten the mounting bolts in the numbered sequence shown in Fig. 69 . Fig. 69: Tightening Mounting Bolts In Sequence Courtesy of AMERICAN HONDA MOTOR CO., INC. 25. Install the drive belt (see DRIVE BELT REPLACEMENT ). 26. Install the splash shield. 2006 Acura MDX 2003-06 ENGINE Cylinder Head - MDX me Sunday, May 10, 2009 3:57:15 PM Page 70 © 2005 Mitchell Repair Information Company, LLC.
  • 71. Fig. 70: Installing Splash Shield Courtesy of AMERICAN HONDA MOTOR CO., INC. 27. Install the right front wheel. 28. Do the crankshaft position (CKP) pattern clear/CKP pattern learn procedure (see CKP PATTERN CLEAR/CKP PATTERN LEARN ). TIMING BELT ADJUSTER REPLACEMENT 1. Remove the timing belt (see TIMING BELT REMOVAL ). 2. Remove the auto-tensioner (see step 6 in TIMING BELT REPLACEMENT ). 2006 Acura MDX 2003-06 ENGINE Cylinder Head - MDX me Sunday, May 10, 2009 3:57:15 PM Page 71 © 2005 Mitchell Repair Information Company, LLC.
  • 72. 3. Remove the bolt (A), then remove the timing belt adjuster (B) and collar (C). Fig. 71: Removing Timing Belt Adjuster And Collar Courtesy of AMERICAN HONDA MOTOR CO., INC. 4. Install in the reverse order of removal. 5. Install the timing belt (see TIMING BELT INSTALLATION ). TIMING BELT DRIVE PULLEY REPLACEMENT 1. Remove the timing belt (see TIMING BELT REMOVAL ). 2. Remove the crankshaft position (CKP) sensor A/B (see CKP SENSOR REPLACEMENT ). 3. Remove the timing belt drive pulley (A) and key (B). 2006 Acura MDX 2003-06 ENGINE Cylinder Head - MDX me Sunday, May 10, 2009 3:57:15 PM Page 72 © 2005 Mitchell Repair Information Company, LLC.
  • 73. Fig. 72: Removing Timing Belt Drive Pulley And Key Courtesy of AMERICAN HONDA MOTOR CO., INC. 4. Inspect the timing belt pulley and key for damage. If it is cracked or damaged, replace the timing belt drive pulley. 5. Install the new timing belt drive pulley. 6. Install the CKP sensor A/B (see CKP SENSOR REPLACEMENT ). 7. Install the timing belt (see TIMING BELT INSTALLATION ). 8. Do the CKP pattern clear/CKP pattern learn procedure (see CKP PATTERN CLEAR/CKP PATTERN LEARN ). CYLINDER HEAD COVER REMOVAL 2006 Acura MDX 2003-06 ENGINE Cylinder Head - MDX me Sunday, May 10, 2009 3:57:15 PM Page 73 © 2005 Mitchell Repair Information Company, LLC.
  • 74. 1. Remove the intake manifold (see REMOVAL ). 2. Remove the six ignition coils (see IGNITION COIL REMOVAL/INSTALLATION ). 3. Remove the dipstick. 4. Remove the two bolts (A) securing the harness holder, and remove the positive crankcase ventilation (PCV) hose (B). 2006 Acura MDX 2003-06 ENGINE Cylinder Head - MDX me Sunday, May 10, 2009 3:57:15 PM Page 74 © 2005 Mitchell Repair Information Company, LLC.
  • 75. Fig. 73: Removing Harness Holder Bolts Courtesy of AMERICAN HONDA MOTOR CO., INC. 5. Disconnect the three injector connectors from the injectors on the cylinder head (see INJECTOR REPLACEMENT ). 6. Remove the power steering hose bracket mounting bolt (A) and the harness holder mounting bolts (B). Fig. 74: Removing Power Steering Hose Bracket Mounting Bolt Courtesy of AMERICAN HONDA MOTOR CO., INC. 7. Remove the harness clamps (C) and breather hose (D). 8. Remove the cylinder head cover. 2006 Acura MDX 2003-06 ENGINE Cylinder Head - MDX me Sunday, May 10, 2009 3:57:15 PM Page 75 © 2005 Mitchell Repair Information Company, LLC.
  • 76. FRONT Fig. 75: Removing Cylinder Head Cover (Front) Courtesy of AMERICAN HONDA MOTOR CO., INC. 2006 Acura MDX 2003-06 ENGINE Cylinder Head - MDX me Sunday, May 10, 2009 3:57:15 PM Page 76 © 2005 Mitchell Repair Information Company, LLC.
  • 77. REAR Fig. 76: Removing Cylinder Head Cover (Rear) Courtesy of AMERICAN HONDA MOTOR CO., INC. CYLINDER HEAD COVER INSTALLATION 1. Clean the head cover contacting surfaces with a shop towel. 2. Visually check the spark plug seals for damage. Replace if necessary. 3. Set the spark plug seals (A) on the spark plug tubes, and install the cylinder head cover (B). 2006 Acura MDX 2003-06 ENGINE Cylinder Head - MDX me Sunday, May 10, 2009 3:57:15 PM Page 77 © 2005 Mitchell Repair Information Company, LLC.
  • 78. Fig. 77: Installing Cylinder Head Cover (Front) Courtesy of AMERICAN HONDA MOTOR CO., INC. 2006 Acura MDX 2003-06 ENGINE Cylinder Head - MDX me Sunday, May 10, 2009 3:57:15 PM Page 78 © 2005 Mitchell Repair Information Company, LLC.
  • 79. Fig. 78: Install Cylinder Head Cover (Rear) Courtesy of AMERICAN HONDA MOTOR CO., INC. 4. Inspect the cover washer (C). Replace any washer that is damaged or deteriorated. 5. Tighten the bolts in two or three steps. In the final step tighten all bolts, in sequence, 12 N.m (1.2 kgf.m, 8.7 lbf.ft). 2006 Acura MDX 2003-06 ENGINE Cylinder Head - MDX me Sunday, May 10, 2009 3:57:15 PM Page 79 © 2005 Mitchell Repair Information Company, LLC.
  • 80. Fig. 79: Tightening Cylinder Head Cover Bolts In Sequence Courtesy of AMERICAN HONDA MOTOR CO., INC. 6. Tighten the harness holder mounting bolts (A) and the power steering hose bracket mounting bolt (B). 2006 Acura MDX 2003-06 ENGINE Cylinder Head - MDX me Sunday, May 10, 2009 3:57:15 PM Page 80 © 2005 Mitchell Repair Information Company, LLC.
  • 81. Fig. 80: Tightening Harness Holder Mounting Bolts Courtesy of AMERICAN HONDA MOTOR CO., INC. 7. Install the harness clamps (C) and breather hose (D). 8. Connect the three injector connectors to the injectors on the cylinder head. 9. Tighten the two bolts (A) securing the harness holder, and install the positive crankcase ventilation (PCV) hose (B). 2006 Acura MDX 2003-06 ENGINE Cylinder Head - MDX me Sunday, May 10, 2009 3:57:15 PM Page 81 © 2005 Mitchell Repair Information Company, LLC.
  • 82. Fig. 81: Tightening Harness Holder Bolts Courtesy of AMERICAN HONDA MOTOR CO., INC. 10. Install the dipstick 11. Install the six ignition coils (see IGNITION COIL REMOVAL/INSTALLATION ). 12. Install the intake manifold (see INSTALLATION ). CYLINDER HEAD REMOVAL NOTE: Use fender covers to avoid damaging painted surfaces. To avoid damage, unplug the wiring connectors carefully while holding the connector portion. 2006 Acura MDX 2003-06 ENGINE Cylinder Head - MDX me Sunday, May 10, 2009 3:57:16 PM Page 82 © 2005 Mitchell Repair Information Company, LLC.
  • 83. 1. Make sure you have the anti-theft codes for the radio and the navigation system, then write down the customer's audio presets. Make sure the ignition switch is OFF. 2. Relieve the fuel pressure (see FUEL PRESSURE RELIEVING ). 3. Disconnect the negative cable from the battery. 4. Drain the engine coolant (see COOLANT REPLACEMENT ). 5. Remove the drive belt (see DRIVE BELT REPLACEMENT ). 6. Remove the power steering (P/S) pump (A) and the bolt (B) securing the P/S hose bracket. Fig. 82: Removing P/S Pump Courtesy of AMERICAN HONDA MOTOR CO., INC. To avoid damaging the cylinder head, wait until the engine coolant temperature drops below 100 °F (38 °C) before loose ning the cylinder head bolts. Mark all wiring and hoses to avoid misconnection. Also, be sure that they do not contact any other wiring or hoses, or interfere with any other parts. 2006 Acura MDX 2003-06 ENGINE Cylinder Head - MDX me Sunday, May 10, 2009 3:57:16 PM Page 83 © 2005 Mitchell Repair Information Company, LLC.
  • 84. 7. Remove the alternator (see ALTERNATOR REMOVAL AND INSTALLATION ). 8. Remove the intake manifold (see REMOVAL ). 9. Remove the six ignition coils (see IGNITION COIL REMOVAL/INSTALLATION ). 10. Remove the timing belt (see TIMING BELT REMOVAL ). 11. Remove these engine wire harness connectors and wire harness clamps from the cylinder head: Six injector connectors Engine coolant temperature (ECT) sensor connector Camshaft position (CMP) sensor connector Crankshaft position (CKP) sensor A/B connector Exhaust gas recirculation (EGR) valve connector Rocker arm oil control solenoid (VTEC solenoid valve) connector Rocker arm oil pressure switch (VTEC oil pressure switch) connector Oil pressure switch connector Two air fuel ratio (A/F) sensor connectors Two secondary heated oxygen sensor (secondary HO2S) connectors 12. Remove the upper radiator hose (A) and lower radiator hose (B). 2006 Acura MDX 2003-06 ENGINE Cylinder Head - MDX me Sunday, May 10, 2009 3:57:16 PM Page 84 © 2005 Mitchell Repair Information Company, LLC.
  • 85. Fig. 83: Removing Upper And Lower Radiator Hose Courtesy of AMERICAN HONDA MOTOR CO., INC. 13. Remove the heater hose (A) and water bypass hose (B). 2006 Acura MDX 2003-06 ENGINE Cylinder Head - MDX me Sunday, May 10, 2009 3:57:16 PM Page 85 © 2005 Mitchell Repair Information Company, LLC.
  • 86. Fig. 84: Removing Heater Hose And Water Bypass Hose Courtesy of AMERICAN HONDA MOTOR CO., INC. 14. Remove the bolt securing the harness bracket. 2006 Acura MDX 2003-06 ENGINE Cylinder Head - MDX me Sunday, May 10, 2009 3:57:16 PM Page 86 © 2005 Mitchell Repair Information Company, LLC.
  • 87. Fig. 85: Removing Harness Bracket Bolt Courtesy of AMERICAN HONDA MOTOR CO., INC. 15. Remove the bolt securing the harness bracket. 2006 Acura MDX 2003-06 ENGINE Cylinder Head - MDX me Sunday, May 10, 2009 3:57:16 PM Page 87 © 2005 Mitchell Repair Information Company, LLC.
  • 88. Fig. 86: Removing Harness Bracket Bolt Courtesy of AMERICAN HONDA MOTOR CO., INC. 16. 2003-2004 models: Remove the fuel feed hose. 2006 Acura MDX 2003-06 ENGINE Cylinder Head - MDX me Sunday, May 10, 2009 3:57:16 PM Page 88 © 2005 Mitchell Repair Information Company, LLC.
  • 89. Fig. 87: Removing Fuel Feed Hose (2003-04 Models) Courtesy of AMERICAN HONDA MOTOR CO., INC. 17. 2005-2006 models: Remove the quick-connect fitting cover (A), then disconnect the fuel feed hose (see FUEL LINE/QUICK-CONNECT FITTING REMOVAL ). 2006 Acura MDX 2003-06 ENGINE Cylinder Head - MDX me Sunday, May 10, 2009 3:57:16 PM Page 89 © 2005 Mitchell Repair Information Company, LLC.
  • 90. Fig. 88: Removing Quick-Connect Fitting Cover (2005-06 Models) Courtesy of AMERICAN HONDA MOTOR CO., INC. 18. 2005-2006 models: Remove the two nuts securing the purge joint. 2006 Acura MDX 2003-06 ENGINE Cylinder Head - MDX me Sunday, May 10, 2009 3:57:16 PM Page 90 © 2005 Mitchell Repair Information Company, LLC.
  • 91. Fig. 89: Removing Purge Joint Nuts (2005-06 Models) Courtesy of AMERICAN HONDA MOTOR CO., INC. 19. Remove the fuel rails (see COMPONENT LOCATION INDEX ). 20. Remove the front and rear warm up three way catalytic converter (WU-TWC) (see WARM UP TWC REMOVAL/INSTALLATION ). 21. Remove the water passage. 2006 Acura MDX 2003-06 ENGINE Cylinder Head - MDX me Sunday, May 10, 2009 3:57:16 PM Page 91 © 2005 Mitchell Repair Information Company, LLC.
  • 92. Fig. 90: Removing Water Passage Courtesy of AMERICAN HONDA MOTOR CO., INC. 22. Remove the front and rear camshaft pulleys (A) and front and rear back covers (B). 2006 Acura MDX 2003-06 ENGINE Cylinder Head - MDX me Sunday, May 10, 2009 3:57:16 PM Page 92 © 2005 Mitchell Repair Information Company, LLC.
  • 93. Fig. 91: Removing Front And Rear Camshaft Pulleys Courtesy of AMERICAN HONDA MOTOR CO., INC. 23. Remove the cylinder head cover (see CYLINDER HEAD COVER REMOVAL ). 24. Remove the cylinder head bolts. To prevent warpage, unscrew the bolts in sequence 1/3 turn at a time; repeat the sequence until all bolts are loosened. 2006 Acura MDX 2003-06 ENGINE Cylinder Head - MDX me Sunday, May 10, 2009 3:57:16 PM Page 93 © 2005 Mitchell Repair Information Company, LLC.
  • 94. Fig. 92: Removing Cylinder Head Bolts In Sequence Courtesy of AMERICAN HONDA MOTOR CO., INC. 25. Remove the cylinder head. CAMSHAFT REPLACEMENT FRONT 1. Make sure you have the anti-theft codes for the radio and the navigation system, then write down the customer's radio station and XM radio channel presets. Make sure the ignition switch is OFF. 2. Disconnect the negative cable from the battery first, then the positive cable. Remove the battery. 3. Drain the engine coolant (see COOLANT REPLACEMENT ). 4. Remove the upper radiator hose. 2006 Acura MDX 2003-06 ENGINE Cylinder Head - MDX me Sunday, May 10, 2009 3:57:16 PM Page 94 © 2005 Mitchell Repair Information Company, LLC.
  • 95. Fig. 93: Removing Upper Radiator Hose Courtesy of AMERICAN HONDA MOTOR CO., INC. 5. Remove the exhaust gas recirculation (EGR) valve (see EGR VALVE REPLACEMENT ). 6. Remove the timing belt (see TIMING BELT REMOVAL ). 7. Remove the rocker arm assembly (see ROCKER ARM ASSEMBLY REMOVAL ). 8. Remove the front camshaft pulley. 9. Remove the thrust cover (A), then remove the camshaft (B). 2006 Acura MDX 2003-06 ENGINE Cylinder Head - MDX me Sunday, May 10, 2009 3:57:16 PM Page 95 © 2005 Mitchell Repair Information Company, LLC.
  • 96. Fig. 94: Removing Thrust Cover Courtesy of AMERICAN HONDA MOTOR CO., INC. 10. Install the camshaft in the reverse order of removal. Always use a new O-ring (C). Apply new engine oil to the camshaft lobes and journals. 11. Apply new engine oil to the threads of the camshaft pulley mounting bolt, then install the front camshaft pulley (see step 11 in CAMSHAFT, ROCKER ARM, CAMSHAFT SEAL, AND PULLEY INSTALLATION ). 12. Install the rocker arm assembly, then tighten the mounting bolts (see step 9 in CAMSHAFT, ROCKER ARM, CAMSHAFT SEAL, AND PULLEY INSTALLATION ). 13. Install the timing belt (see TIMING BELT INSTALLATION ). 14. Adjust the valve clearance (see VALVE CLEARANCE ADJUSTMENT ). 2006 Acura MDX 2003-06 ENGINE Cylinder Head - MDX me Sunday, May 10, 2009 3:57:16 PM Page 96 © 2005 Mitchell Repair Information Company, LLC.
  • 97. 15. Install the upper radiator hose. 16. Install the battery. Clean the battery posts and cable terminals with sandpaper, then assemble them and apply grease to prevent corrosion. 17. Fill the radiator with engine coolant and bleed the air out from the system (see step 8 in COOLANT REPLACEMENT ). 18. Do the powertrain control module (PCM) reset procedure (see PCM RESET ). 19. Do the crankshaft position (CKP) pattern clear/CKP pattern lean procedure (see CKP PATTERN CLEAR/CKP PATTERN LEARN ). 20. Reset the power window control unit (see RESETTING THE POWER WINDOW CONTROL UNIT ). 21. Enter the anti-theft codes for the radio and the navigation system, then enter the customer's radio station and XM radio channel presets. 22. Set the clock. REAR 1. Make sure you have the anti-theft codes for the radio and the navigation system, then write down the customer's radio station and XM radio channel presets. Make sure the ignition switch is OFF. 2. Relieve the fuel pressure (see FUEL PRESSURE RELIEVING ). 3. Disconnect the negative cable from the battery first, then disconnect the positive cable. 4. Remove the under-hood fuse/relay box. 5. Drain the engine coolant (see COOLANT REPLACEMENT ). 6. 2003-2004 models: Remove the fuel feed hose (see step 16 in CYLINDER HEAD REMOVAL ). 7. 2003-2004 models: Remove the nuts (A) securing the fuel line. 2006 Acura MDX 2003-06 ENGINE Cylinder Head - MDX me Sunday, May 10, 2009 3:57:16 PM Page 97 © 2005 Mitchell Repair Information Company, LLC.
  • 98. Fig. 95: Removing Fuel Line Nuts Courtesy of AMERICAN HONDA MOTOR CO., INC. 8. Remove the brake lines from the master cylinder (see MASTER CYLINDER REPLACEMENT ). 9. Remove the timing belt (see TIMING BELT REMOVAL ). 10. Remove the rocker arm assembly (see ROCKER ARM ASSEMBLY REMOVAL ). 11. Remove the rear camshaft pulley. 12. 2005-2006 models: Remove the two nuts securing the purge joint. 2006 Acura MDX 2003-06 ENGINE Cylinder Head - MDX me Sunday, May 10, 2009 3:57:16 PM Page 98 © 2005 Mitchell Repair Information Company, LLC.
  • 99. Fig. 96: Removing Purge Joint Nuts Courtesy of AMERICAN HONDA MOTOR CO., INC. 13. Remove the thrust cover (A), then remove the camshaft (B). 2006 Acura MDX 2003-06 ENGINE Cylinder Head - MDX me Sunday, May 10, 2009 3:57:16 PM Page 99 © 2005 Mitchell Repair Information Company, LLC.
  • 100. Thank you very much for your reading. Please Click Here Then Get More Information.