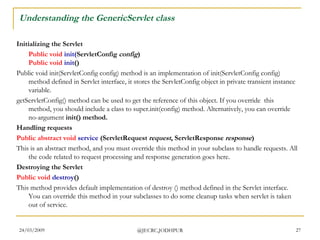
Downloaded 312 times
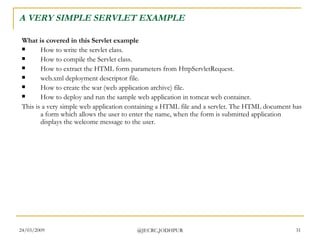
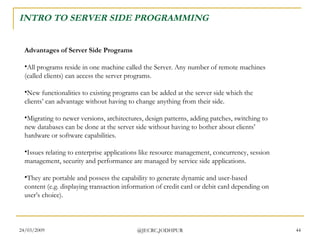
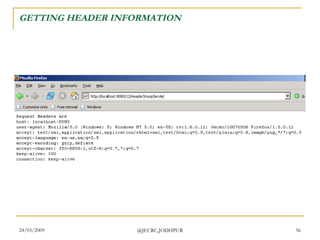
![HTTP METHODS Uploads a representation of the specified resource. PUT Converts the request connection to a transparent TCP/IP tunnel, usually to facilitate SSL-encrypted communication (HTTPS) through an unencrypted HTTP proxy. [3] CONNECT Returns the HTTP methods that the server supports for specified URL. This can be used to check the functionality of a web server by requesting '*' instead of a specific resource. OPTIONS Echoes back the received request, so that a client can see what intermediate servers are adding or changing in the request. TRACE Deletes the specified resource. DELETE Submits data to be processed (e.g., from an HTML form) to the identified resource. The data is included in the body of the request. POST means retrieve whatever data is identified by the URI GET Asks for the response identical to the one that would correspond to a GET request, but without the response body. This is useful for retrieving meta-information written in response headers, without having to transport the entire content. HEAD DESCRIPTION METHOD](https://image.slidesharecdn.com/webtech-javaservlet-090326221443-phpapp01/85/Web-Tech-Java-Servlet-Update1-3-320.jpg)
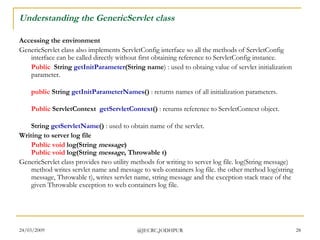
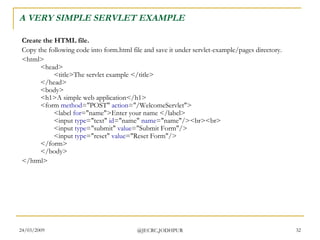
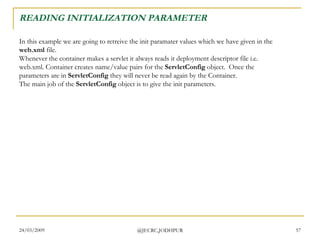
![HTTP METHODS HTTP servers are required to implement at least the GET and HEAD methods [4] and, whenever possible, also the OPTIONS method Safe methods Some methods (for example, HEAD, GET, OPTIONS and TRACE) are defined as safe , which means they are intended only for information retrieval and should not change the state of the server. Idempotent methods Some http methods are defined to be idempotent, meaning that multiple identical requests should have the same effect as a single request. Methods PUT, DELETE, GET, HEAD, OPTIONS and TRACE, being prescribed as safe, should also be idempotent. HTTP is a stateless protocol. By contrast, the POST method is not necessarily idempotent, and therefore sending an identical POST request multiple times may further affect state or cause further side effects.(like updating inserting records in database multiple times).](https://image.slidesharecdn.com/webtech-javaservlet-090326221443-phpapp01/85/Web-Tech-Java-Servlet-Update1-4-320.jpg)
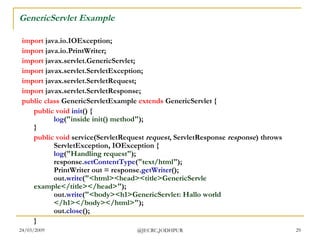
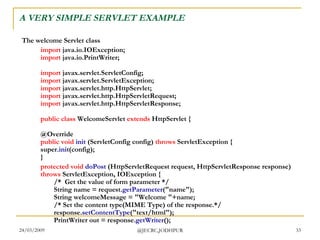

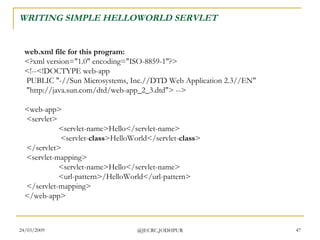
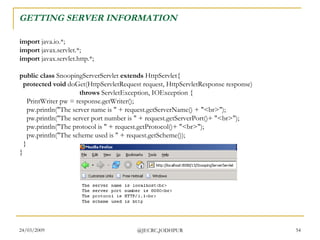
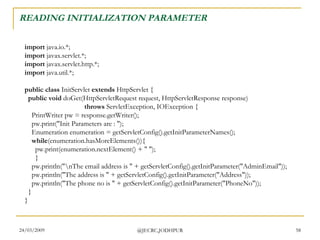
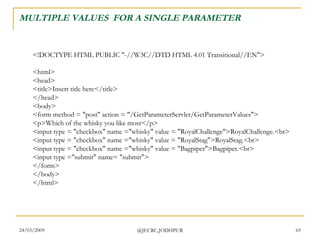
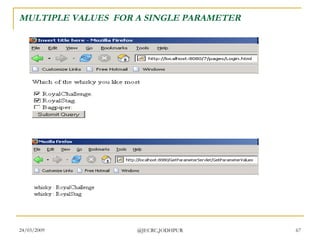
![MULTIPLE VALUES FOR A SINGLE PARAMETER import java.io.*; import javax.servlet.*; import javax.servlet.http.*; public class GetParameterValues extends HttpServlet{ protected void doPost(HttpServletRequest request, HttpServletResponse response) throws ServletException, IOException { response.setContentType("text/html"); PrintWriter pw = response.getWriter(); String[] whisky = request.getParameterValues("whisky"); for ( int i=0; i<whisky.length; i++){ pw.println("<br>whisky : " + whisky[i]); } } }](https://image.slidesharecdn.com/webtech-javaservlet-090326221443-phpapp01/85/Web-Tech-Java-Servlet-Update1-66-320.jpg)


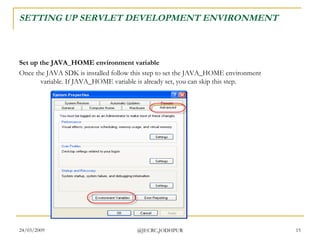
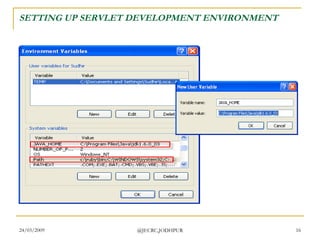
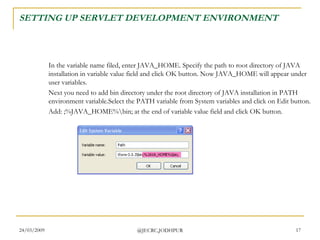
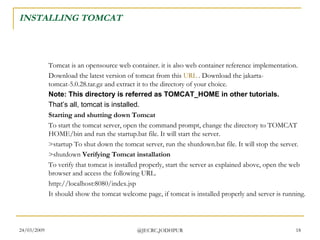
The document provides an introduction to Java web technology and servlets. It discusses HTTP and its request/response model. It describes common HTTP methods like GET and POST, and explains the difference between the two. It also covers the servlet lifecycle, web containers, and setting up a servlet development environment.