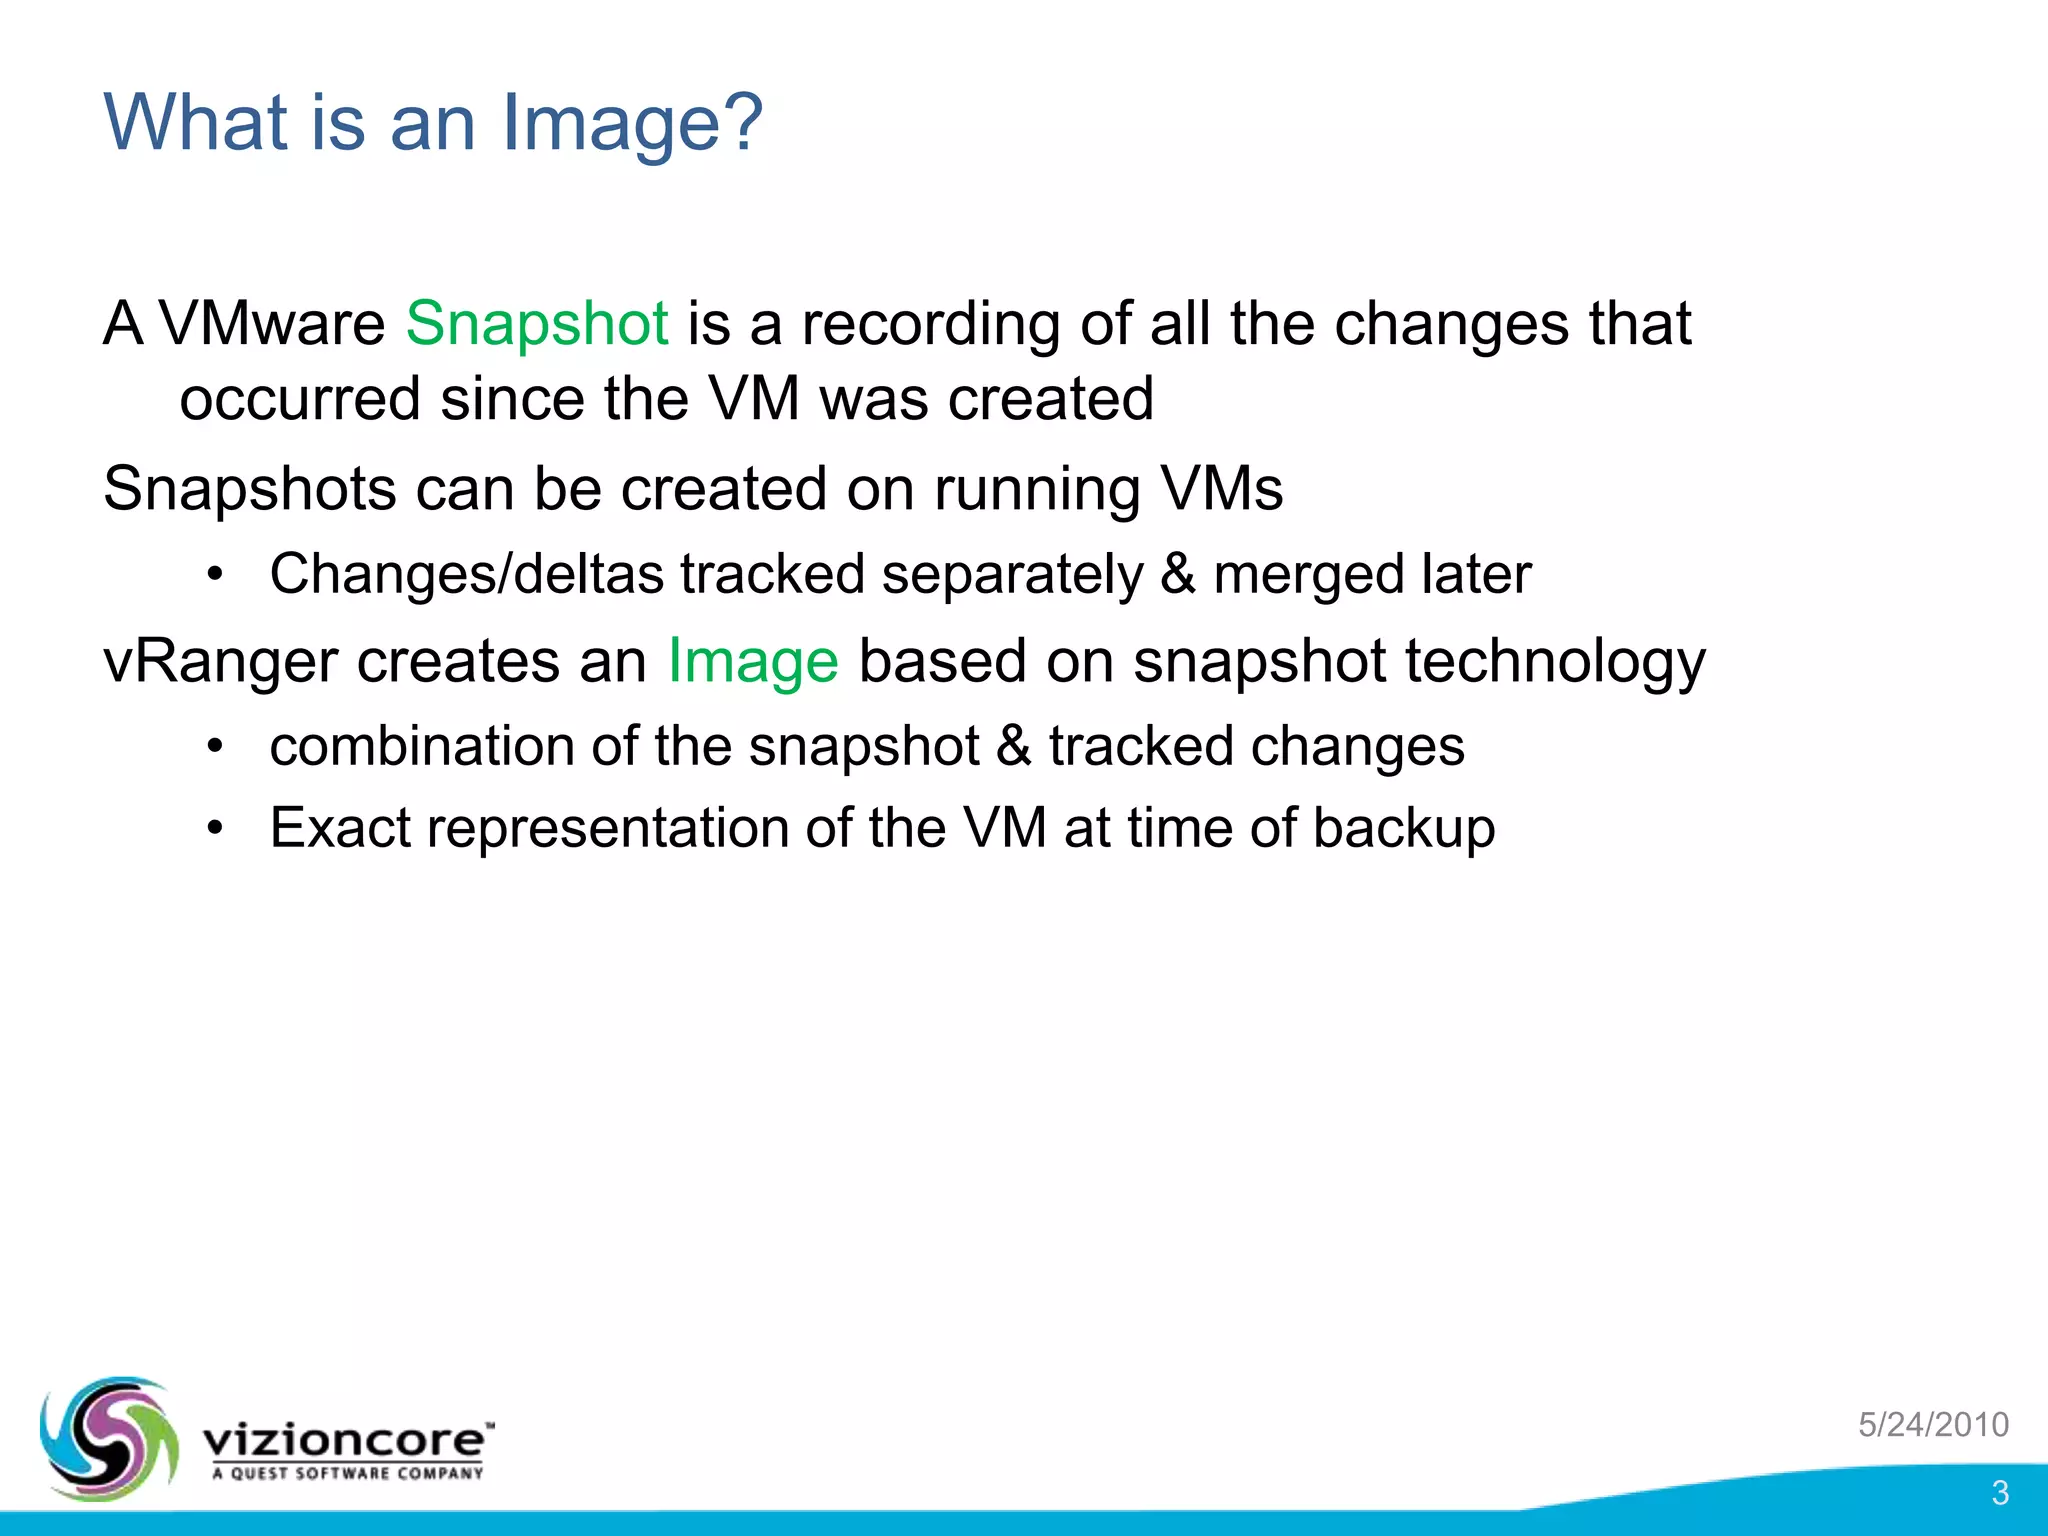
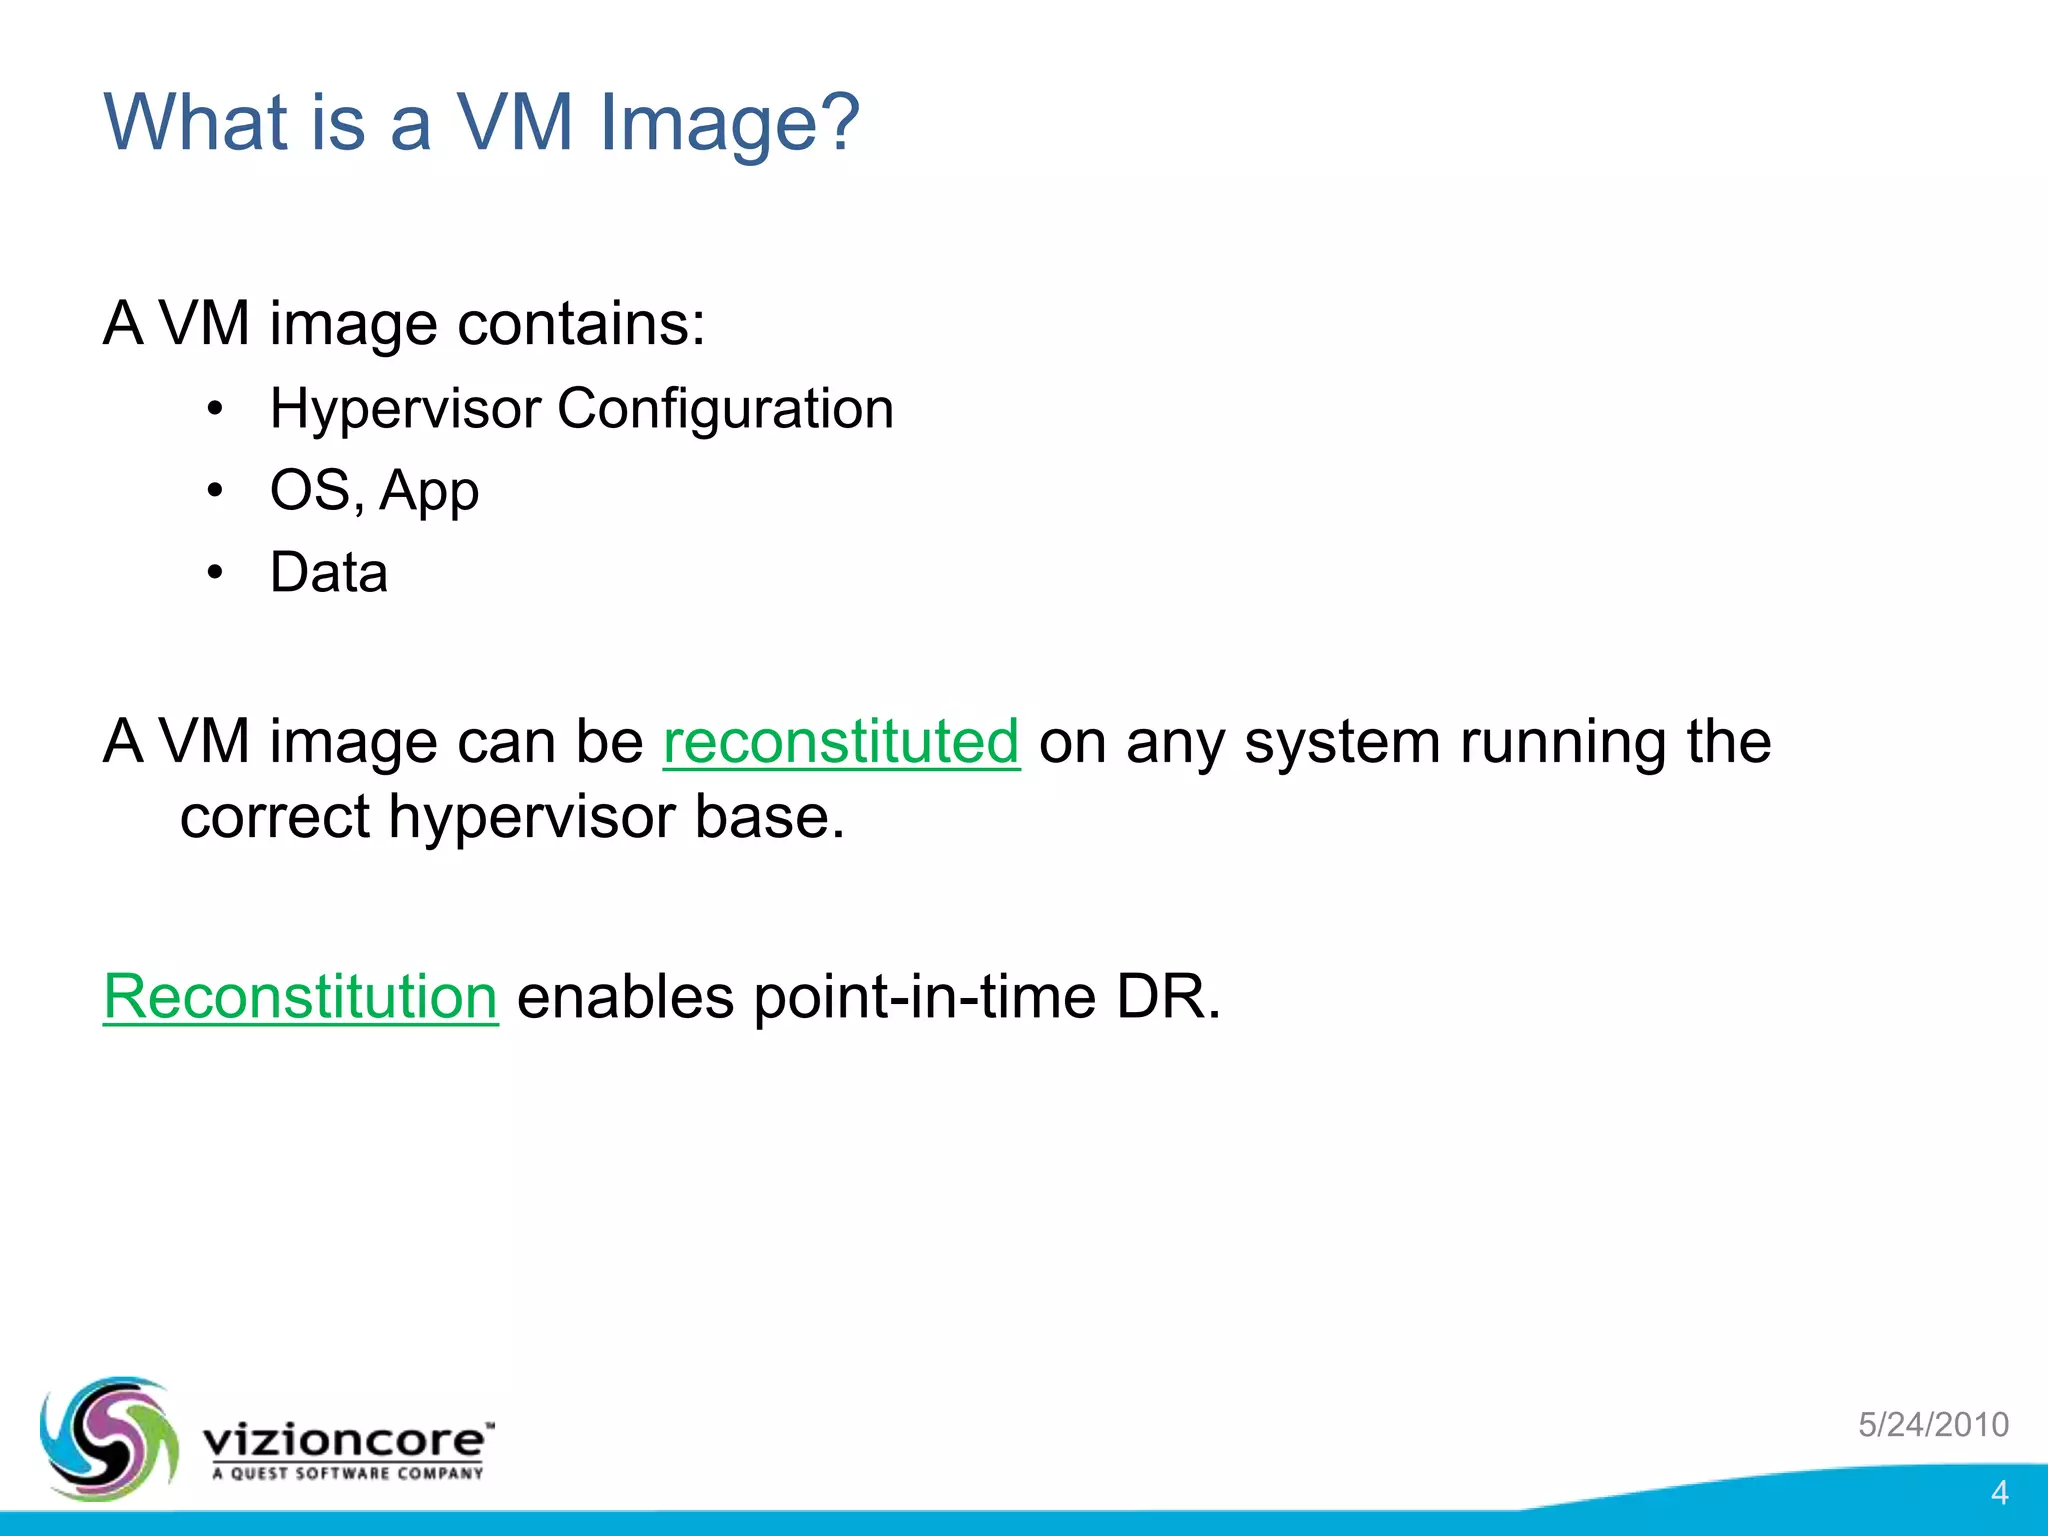
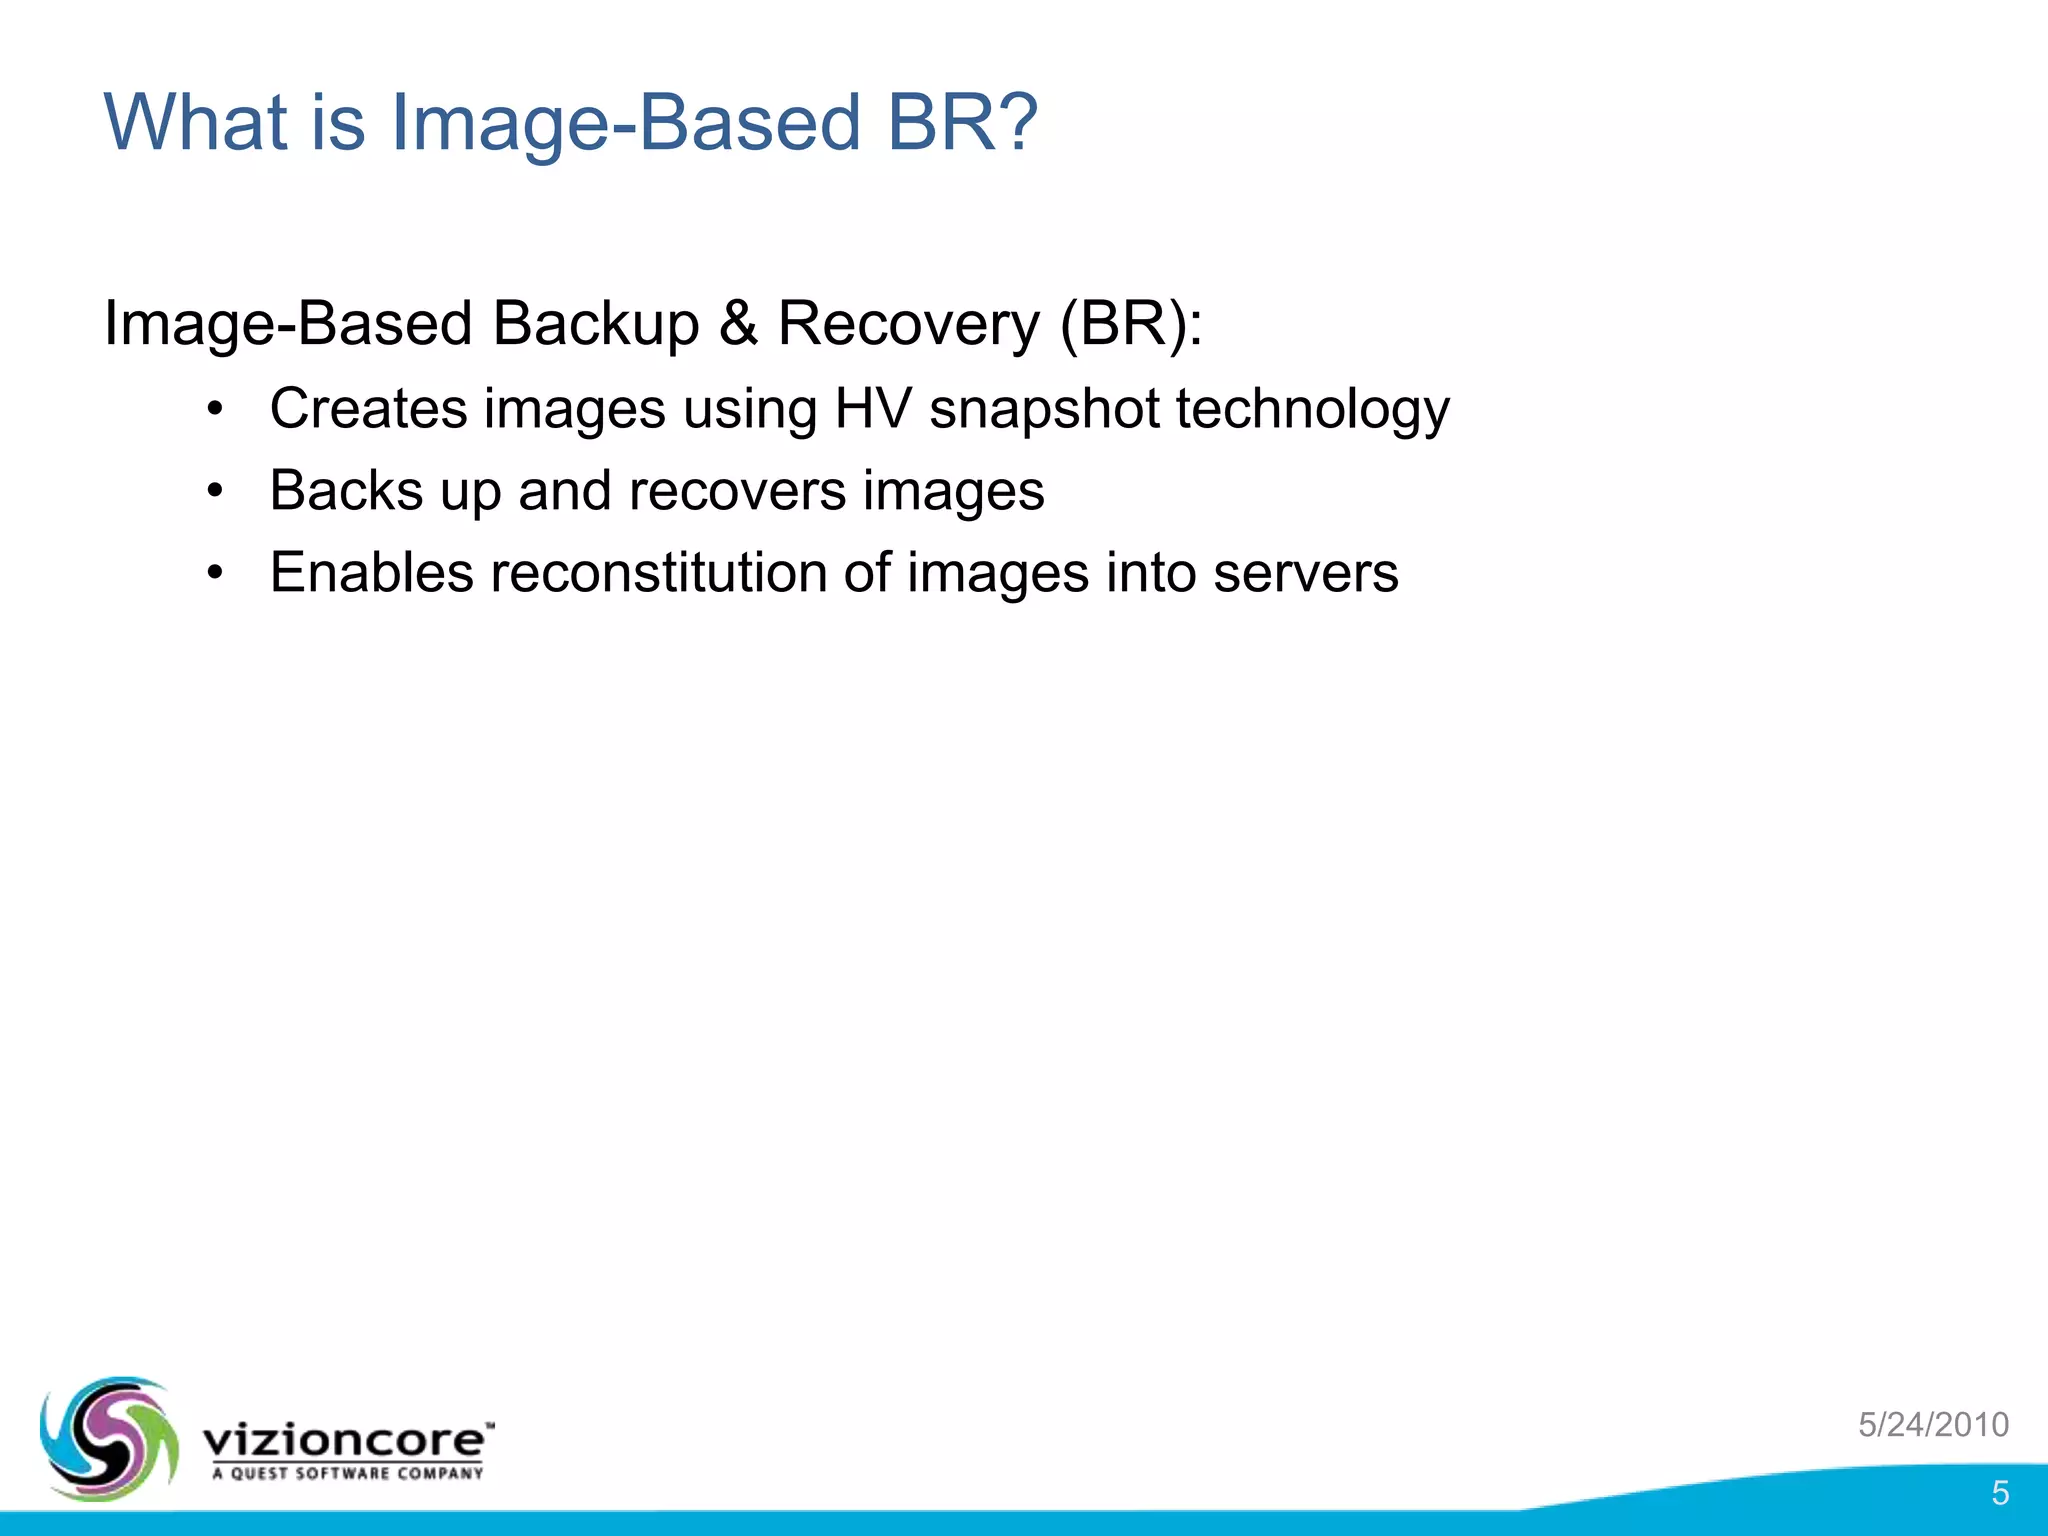
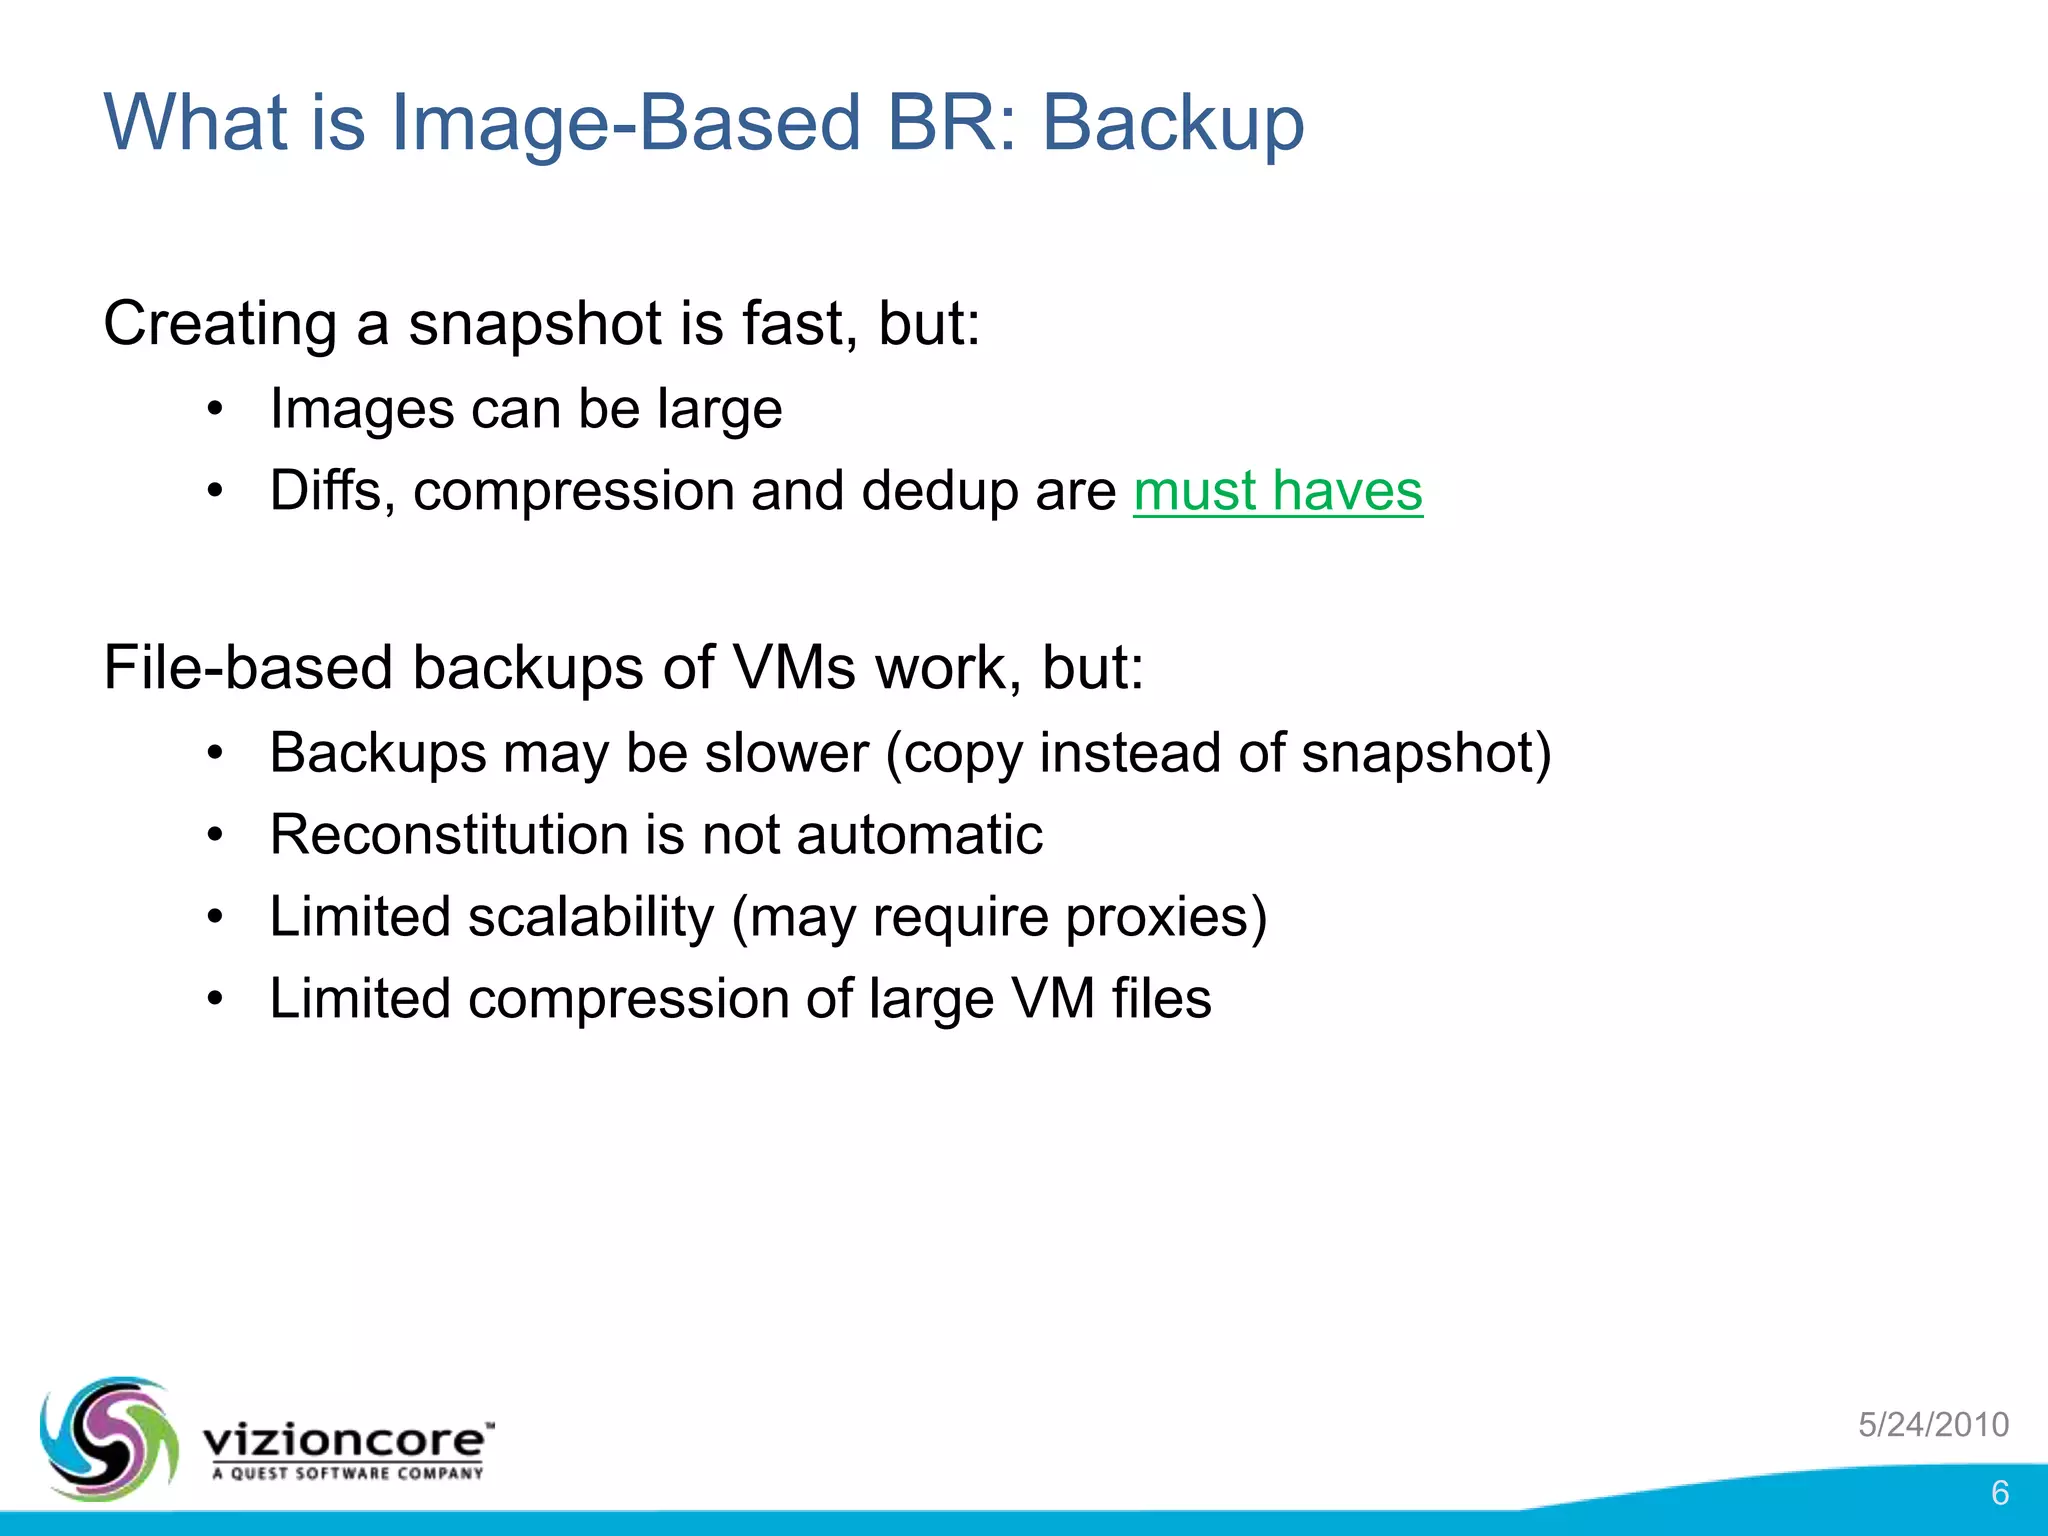
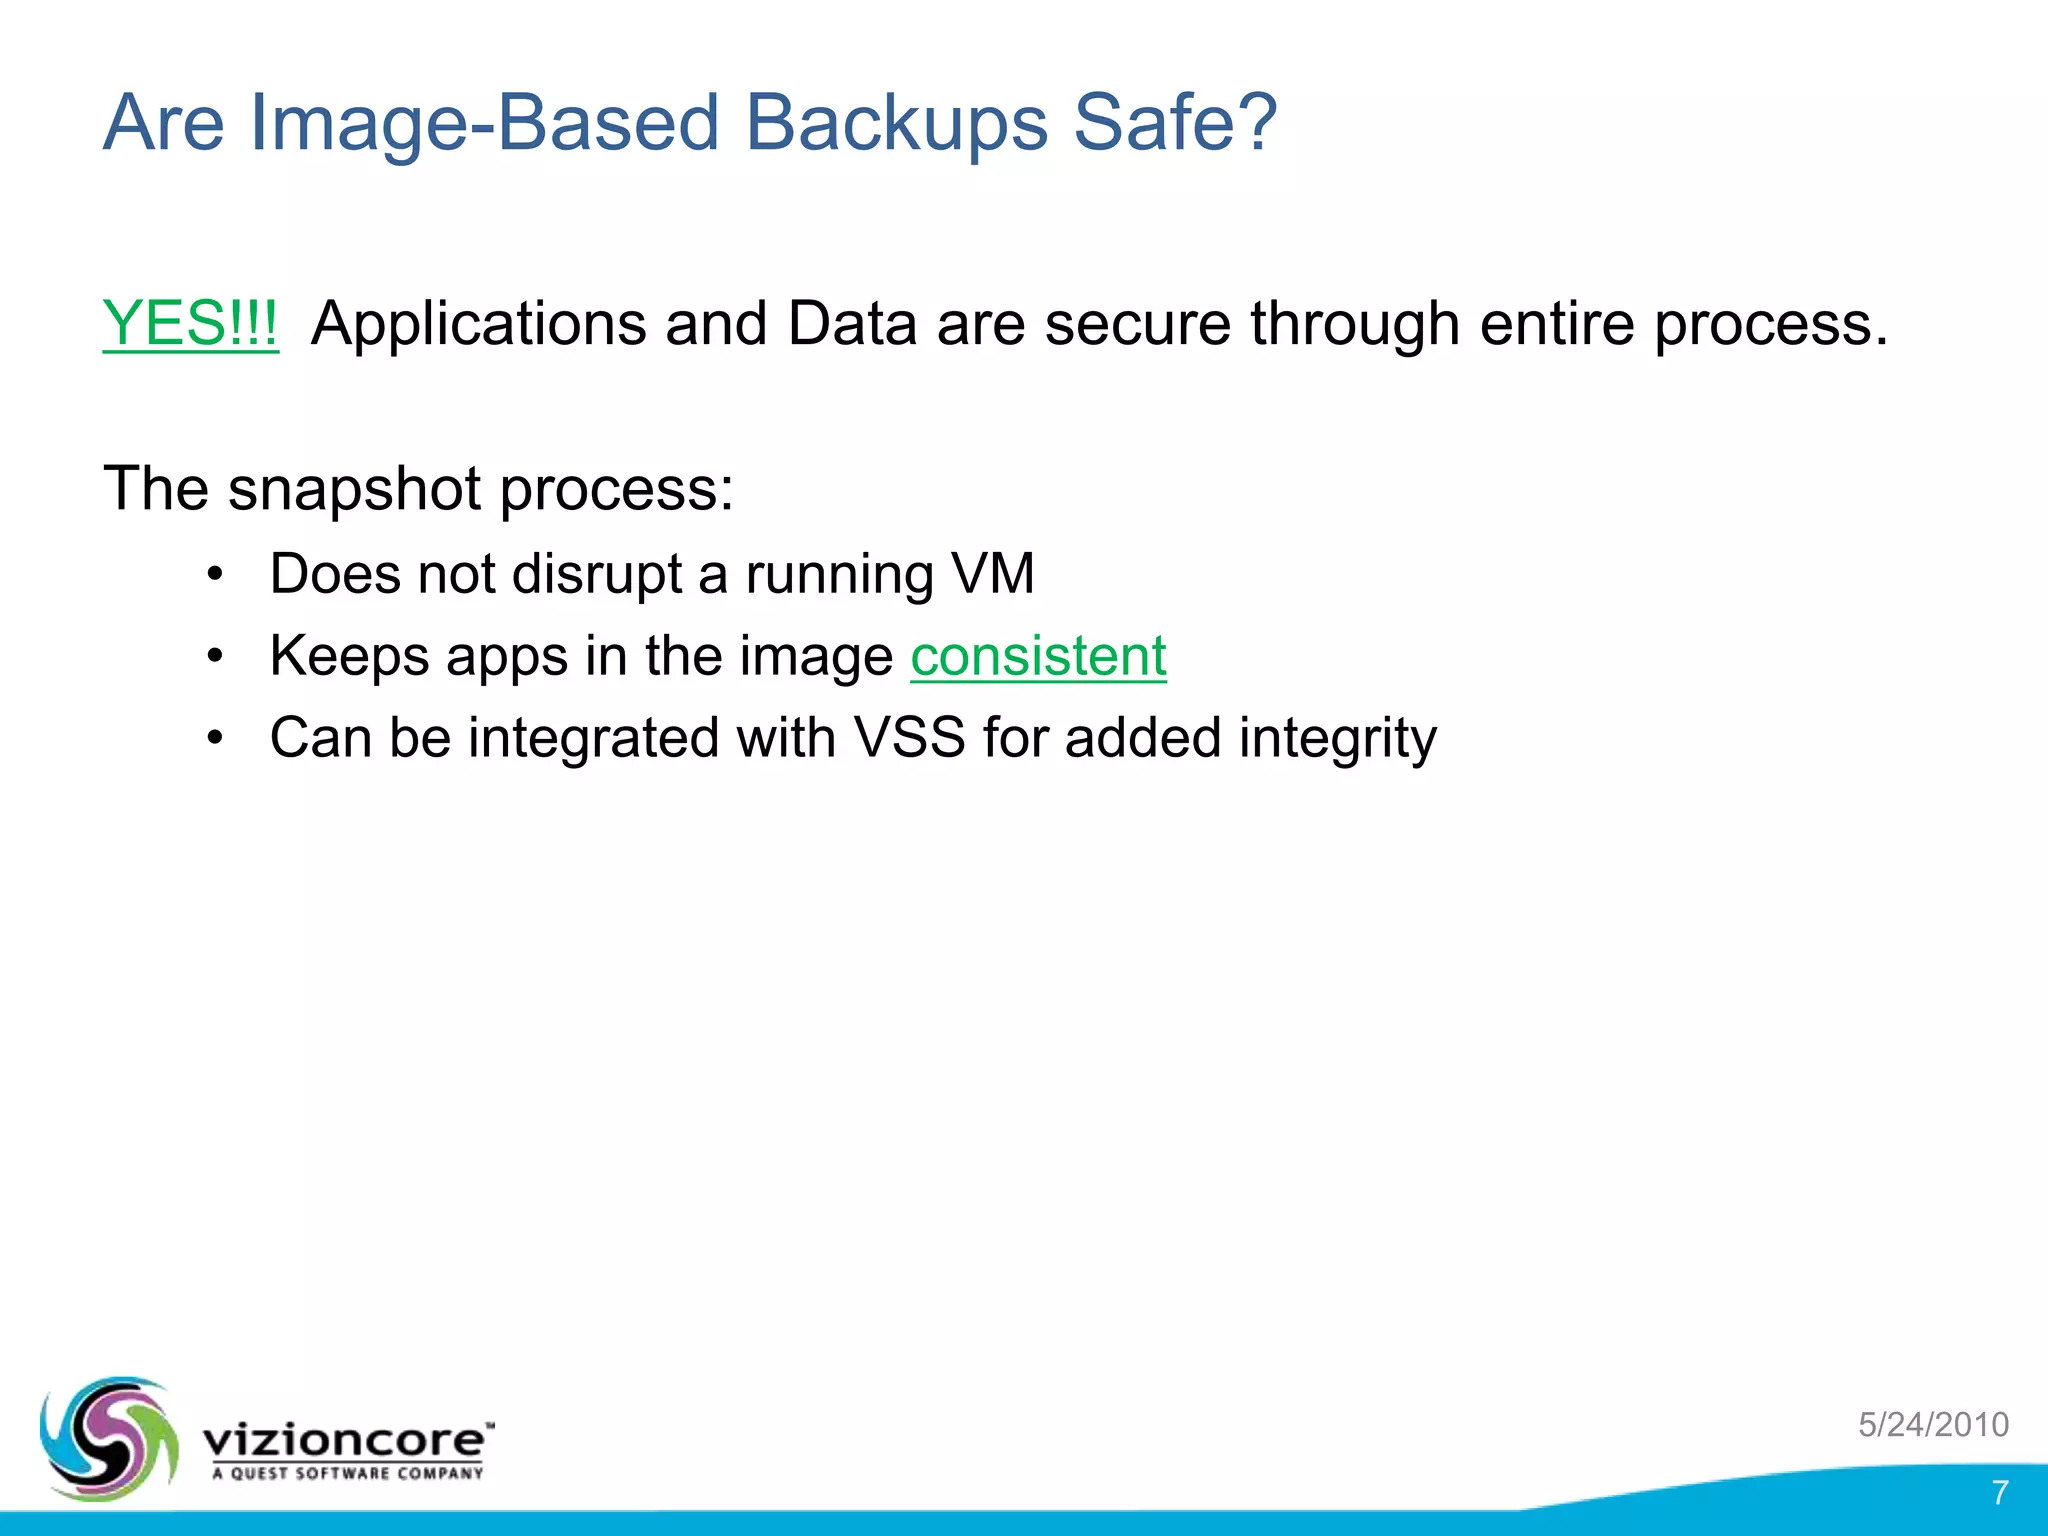
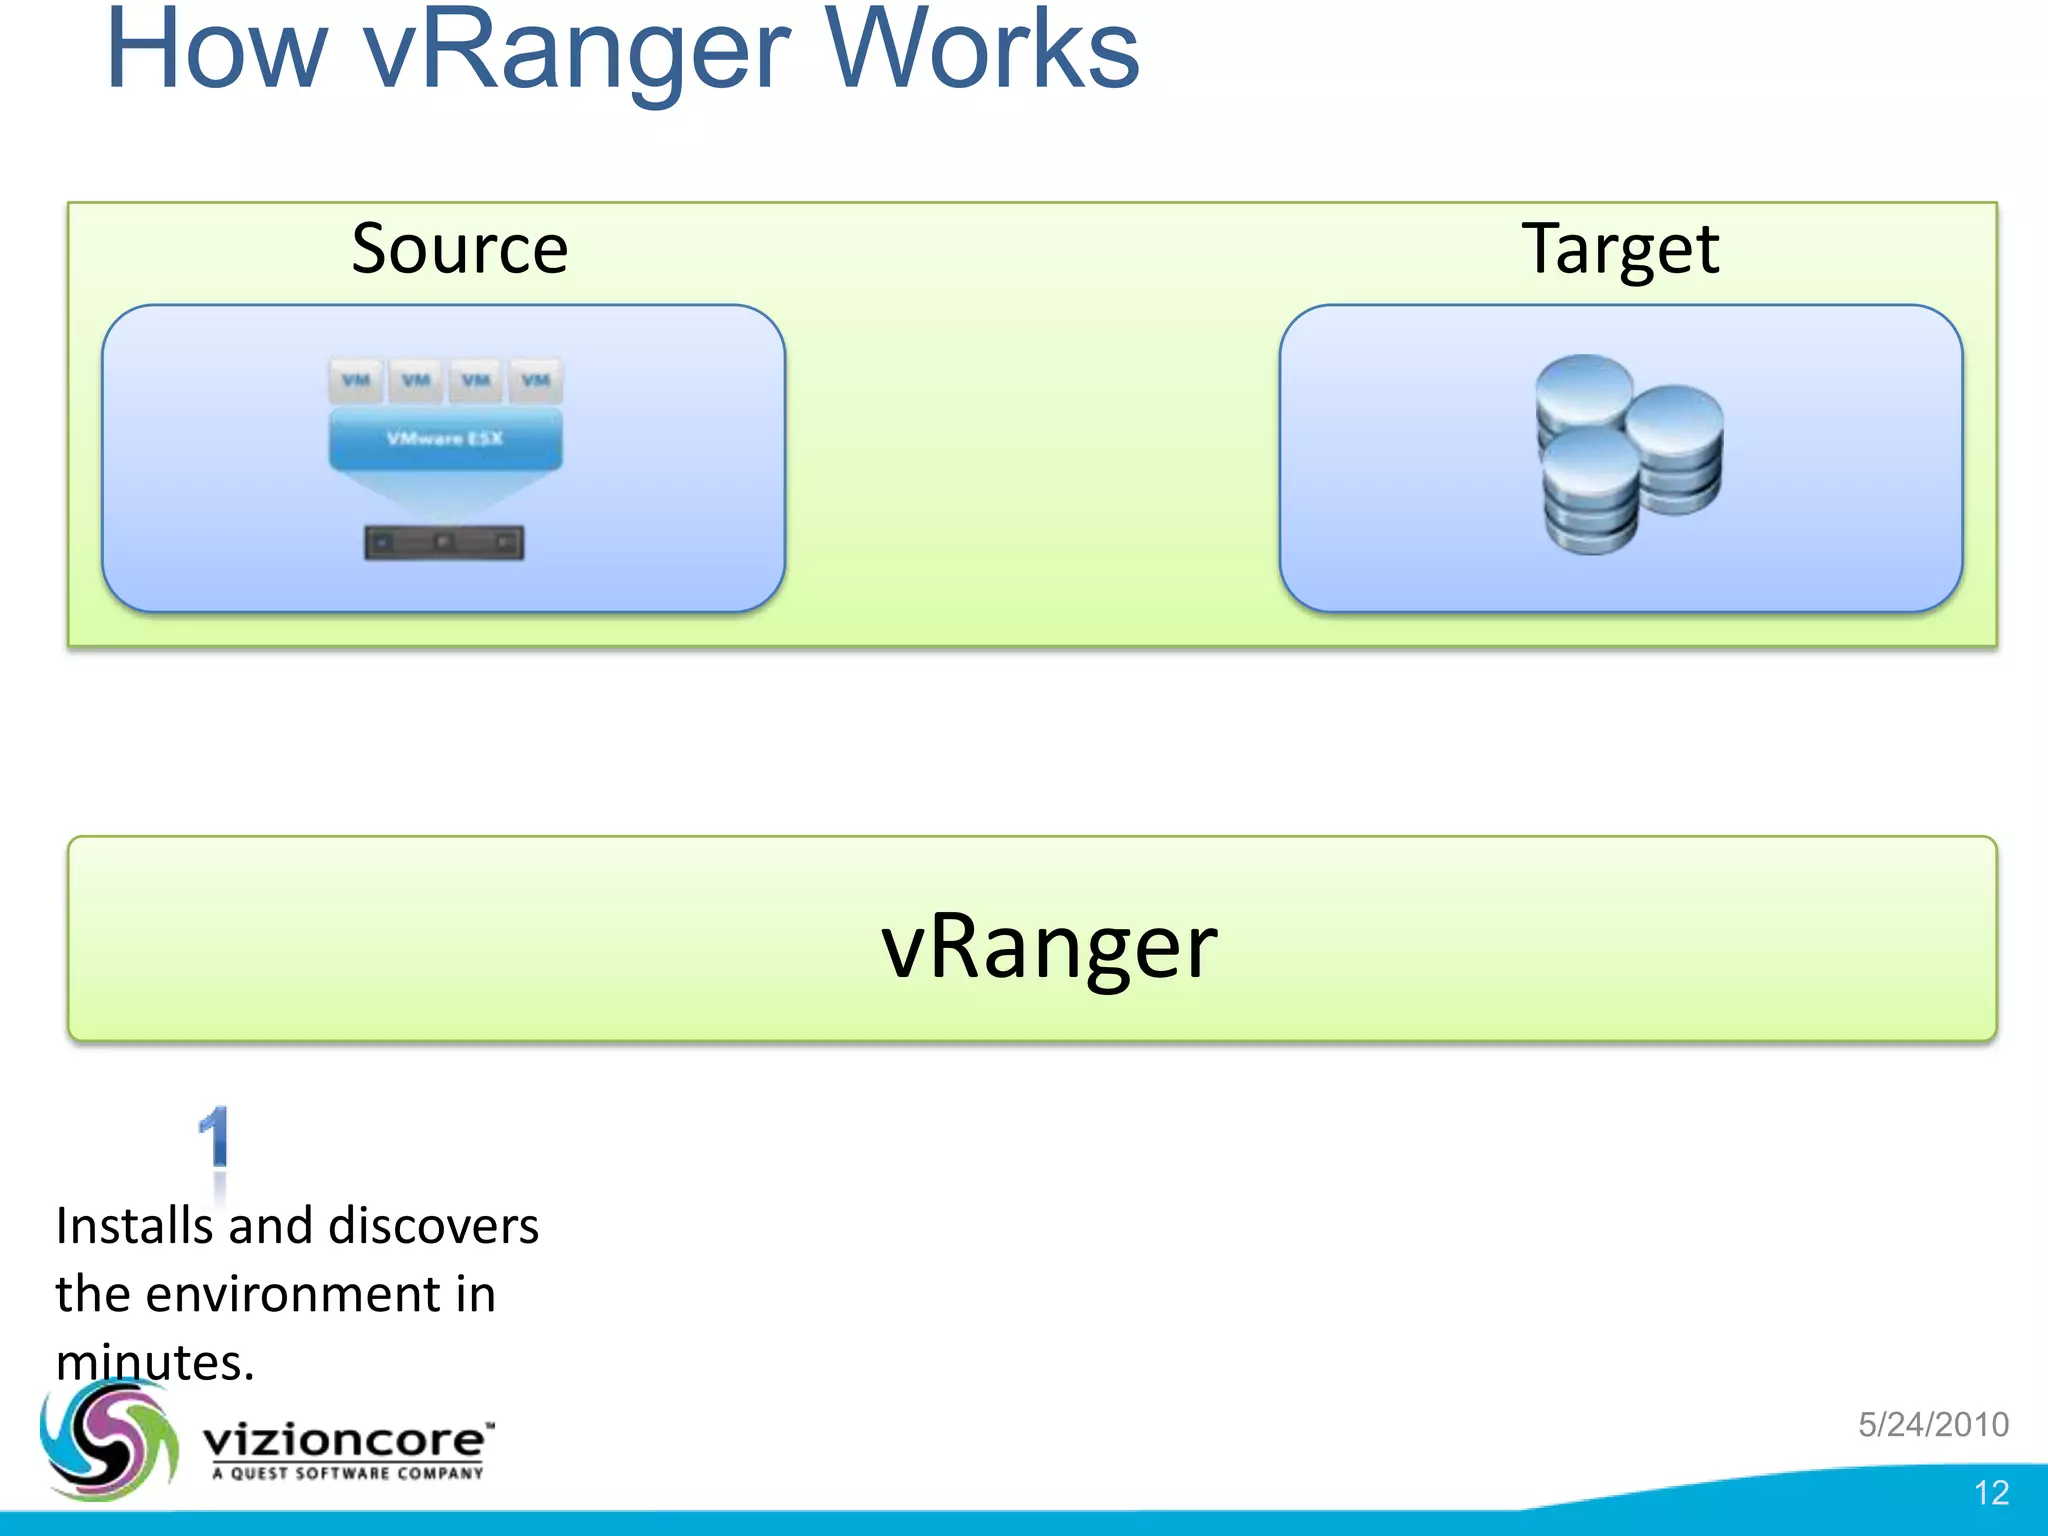
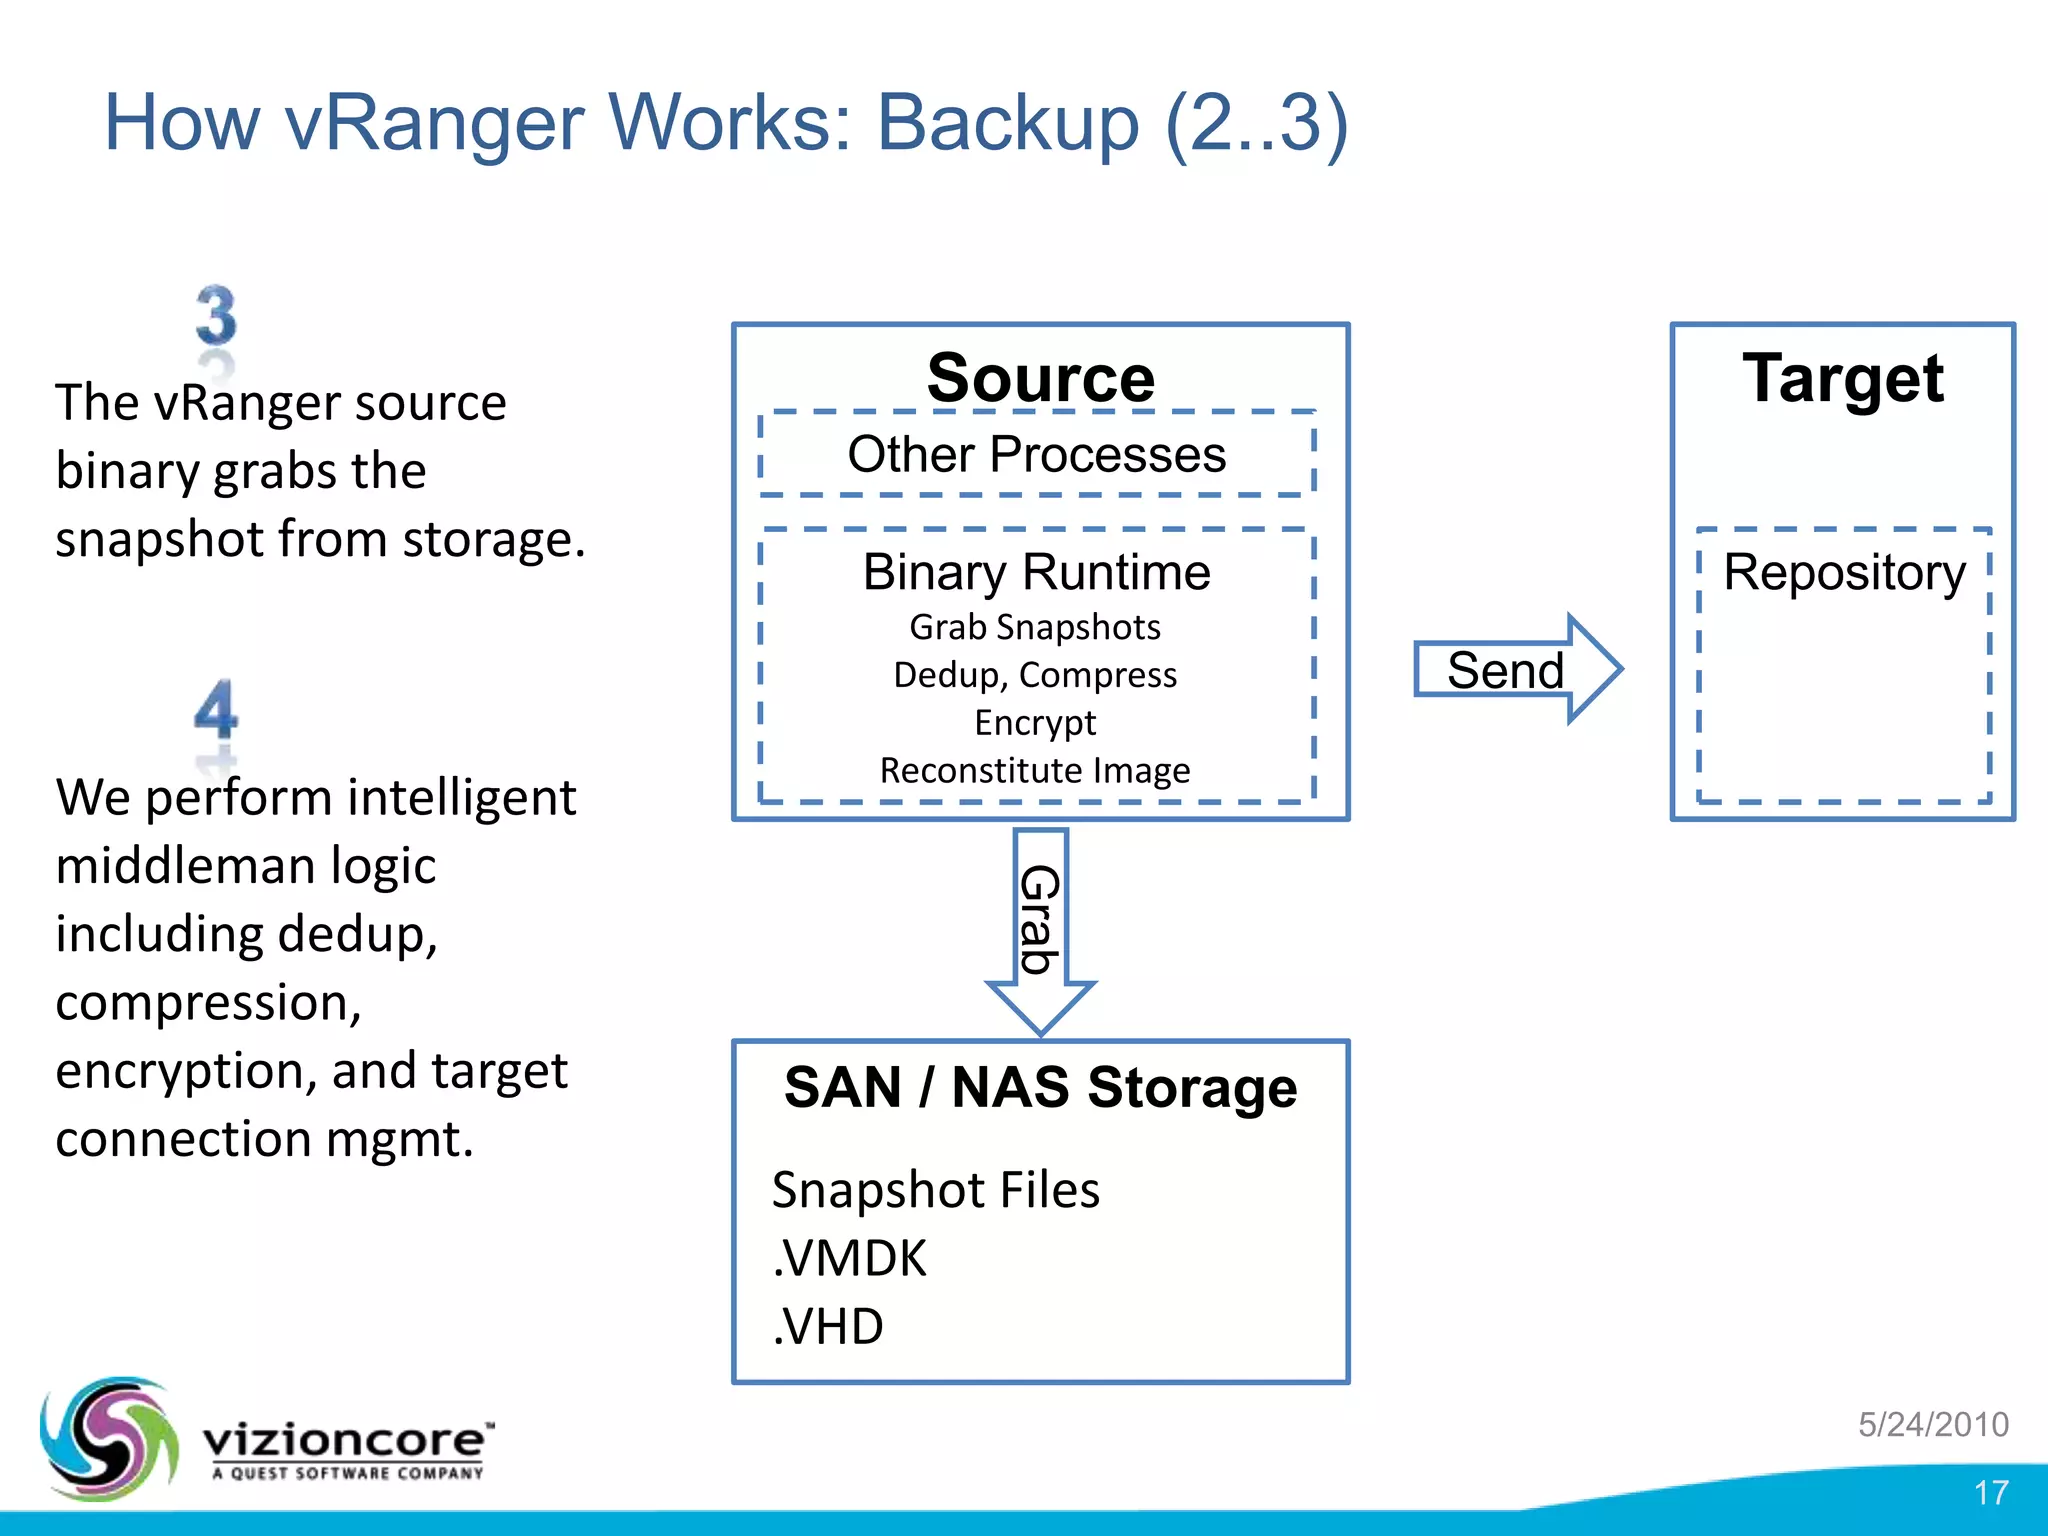
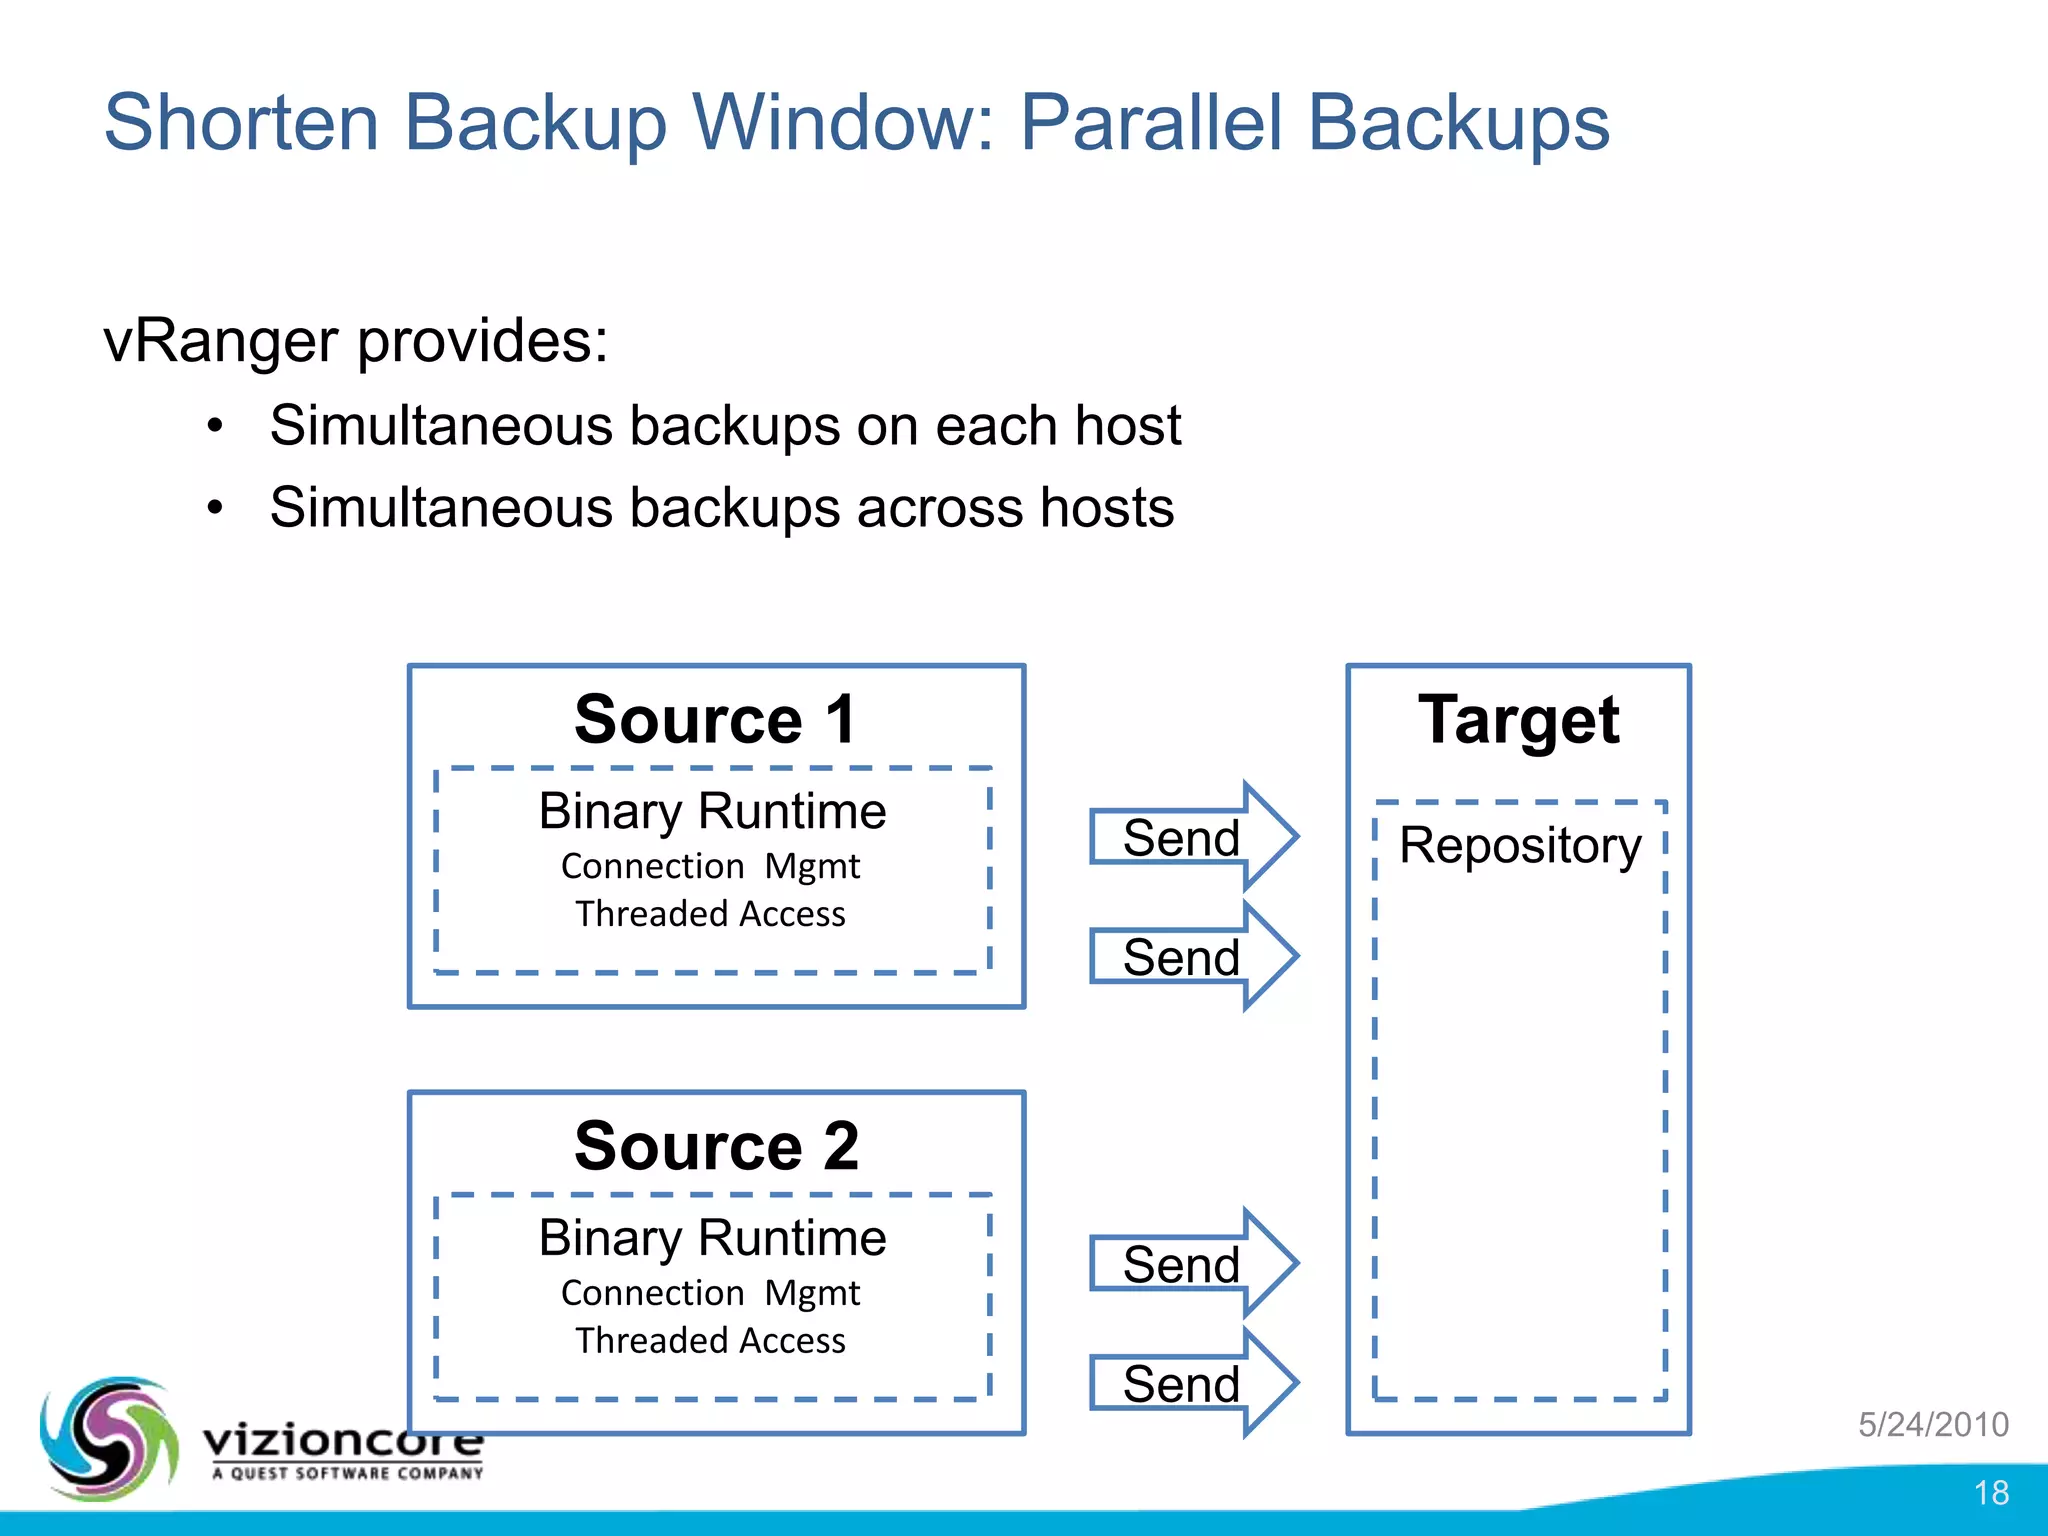
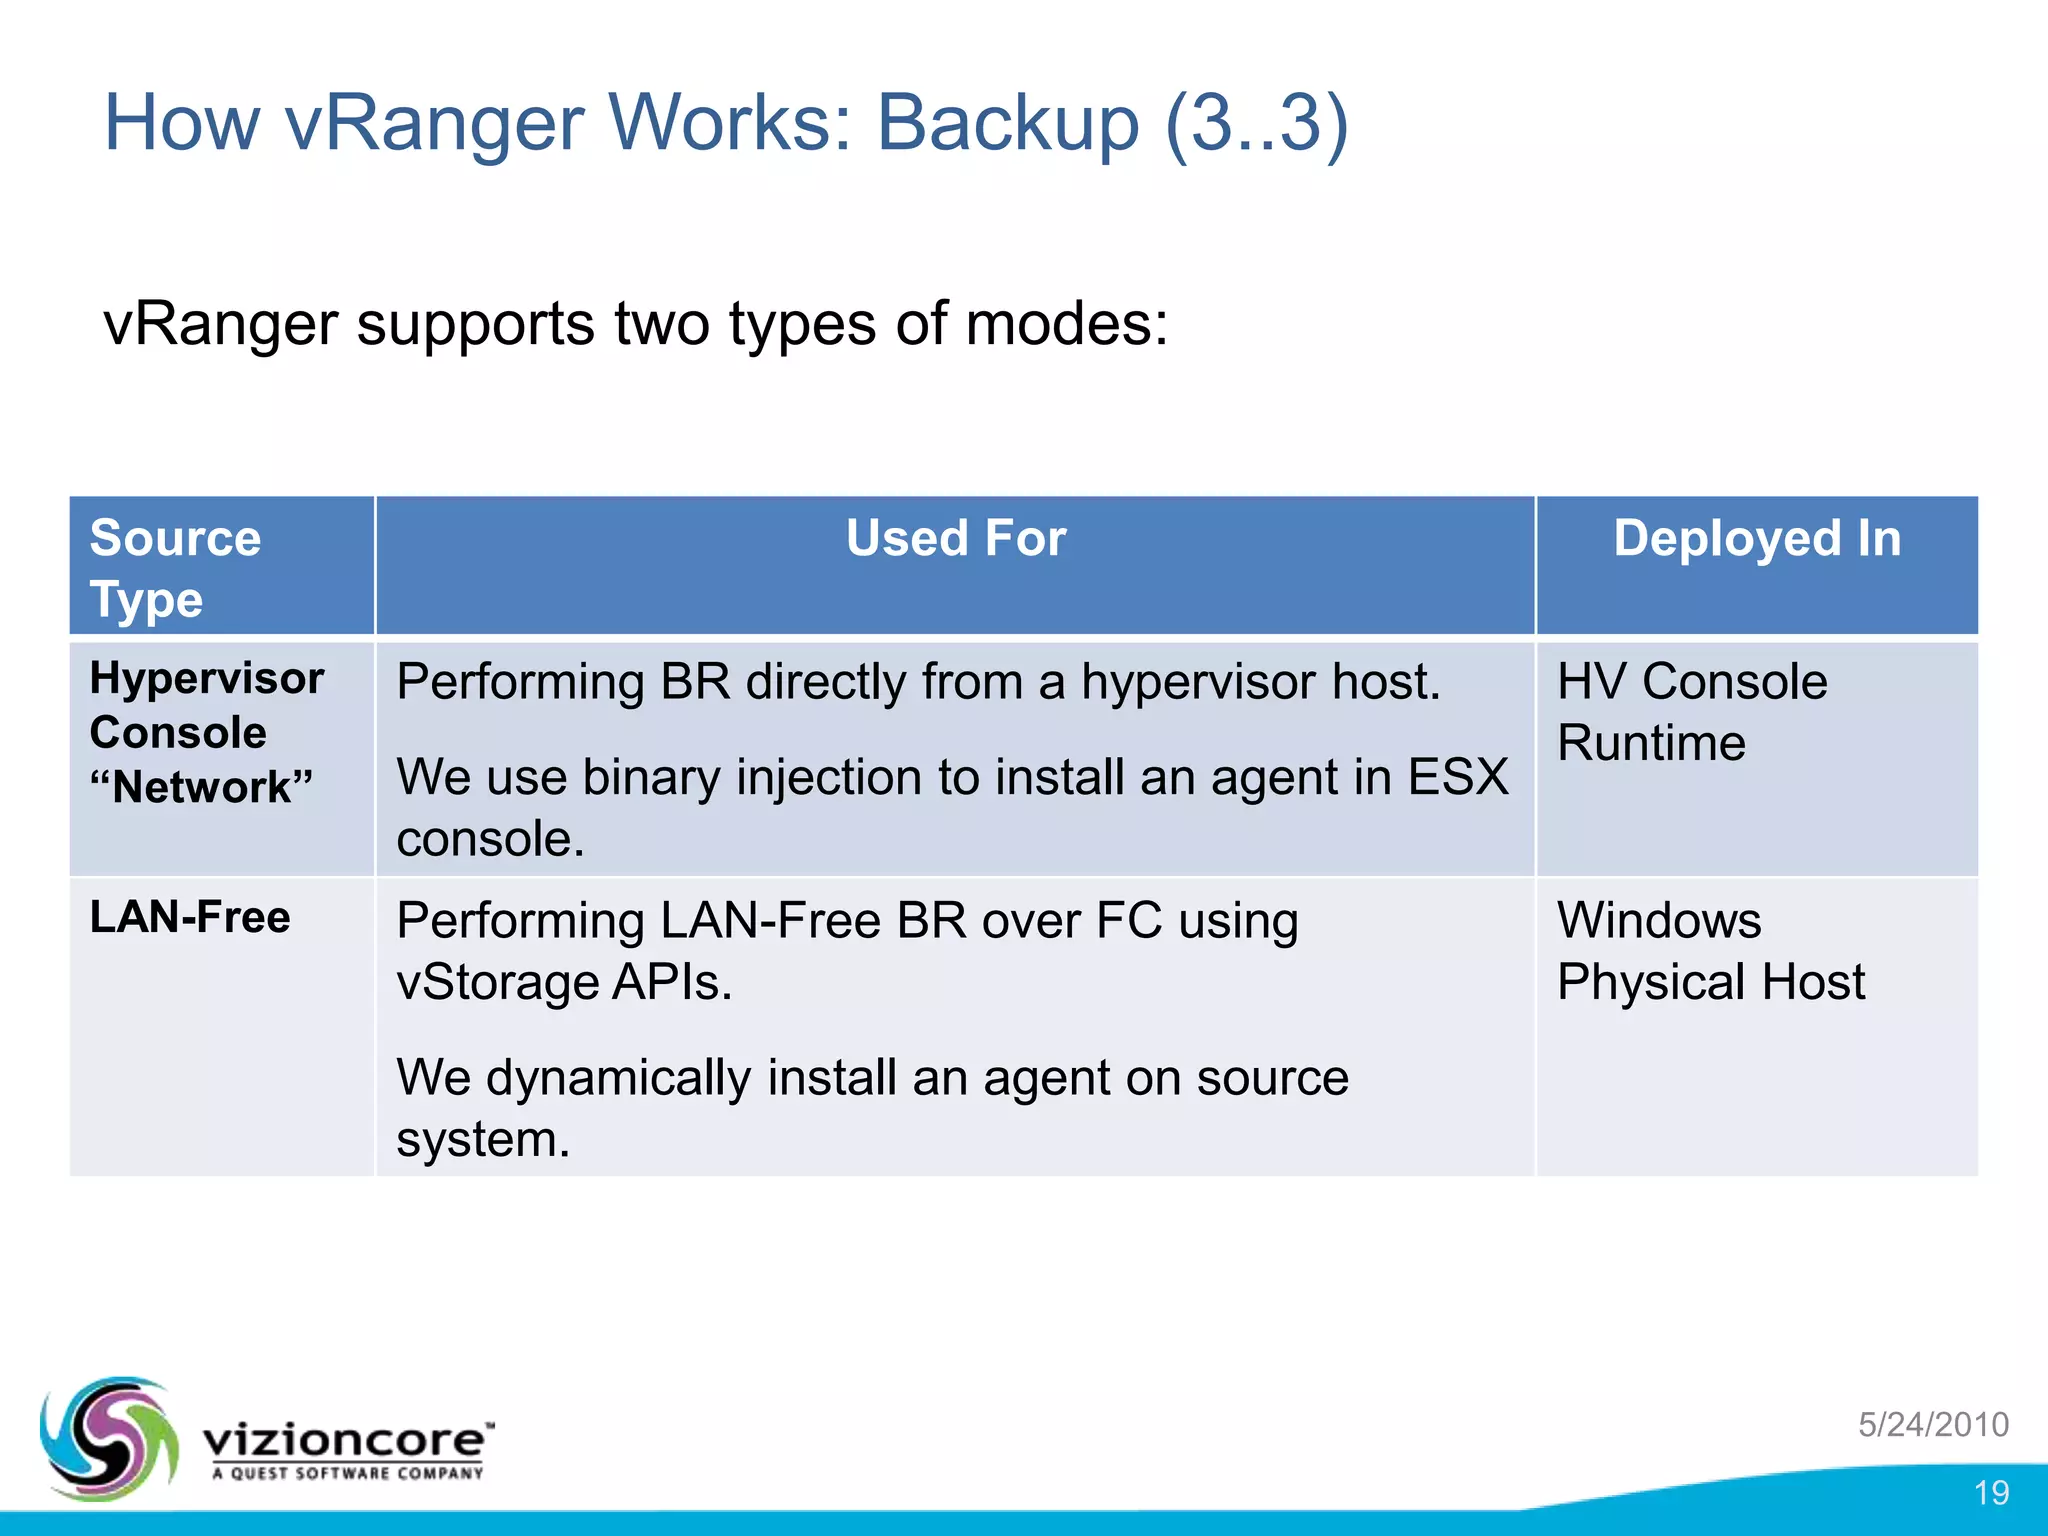
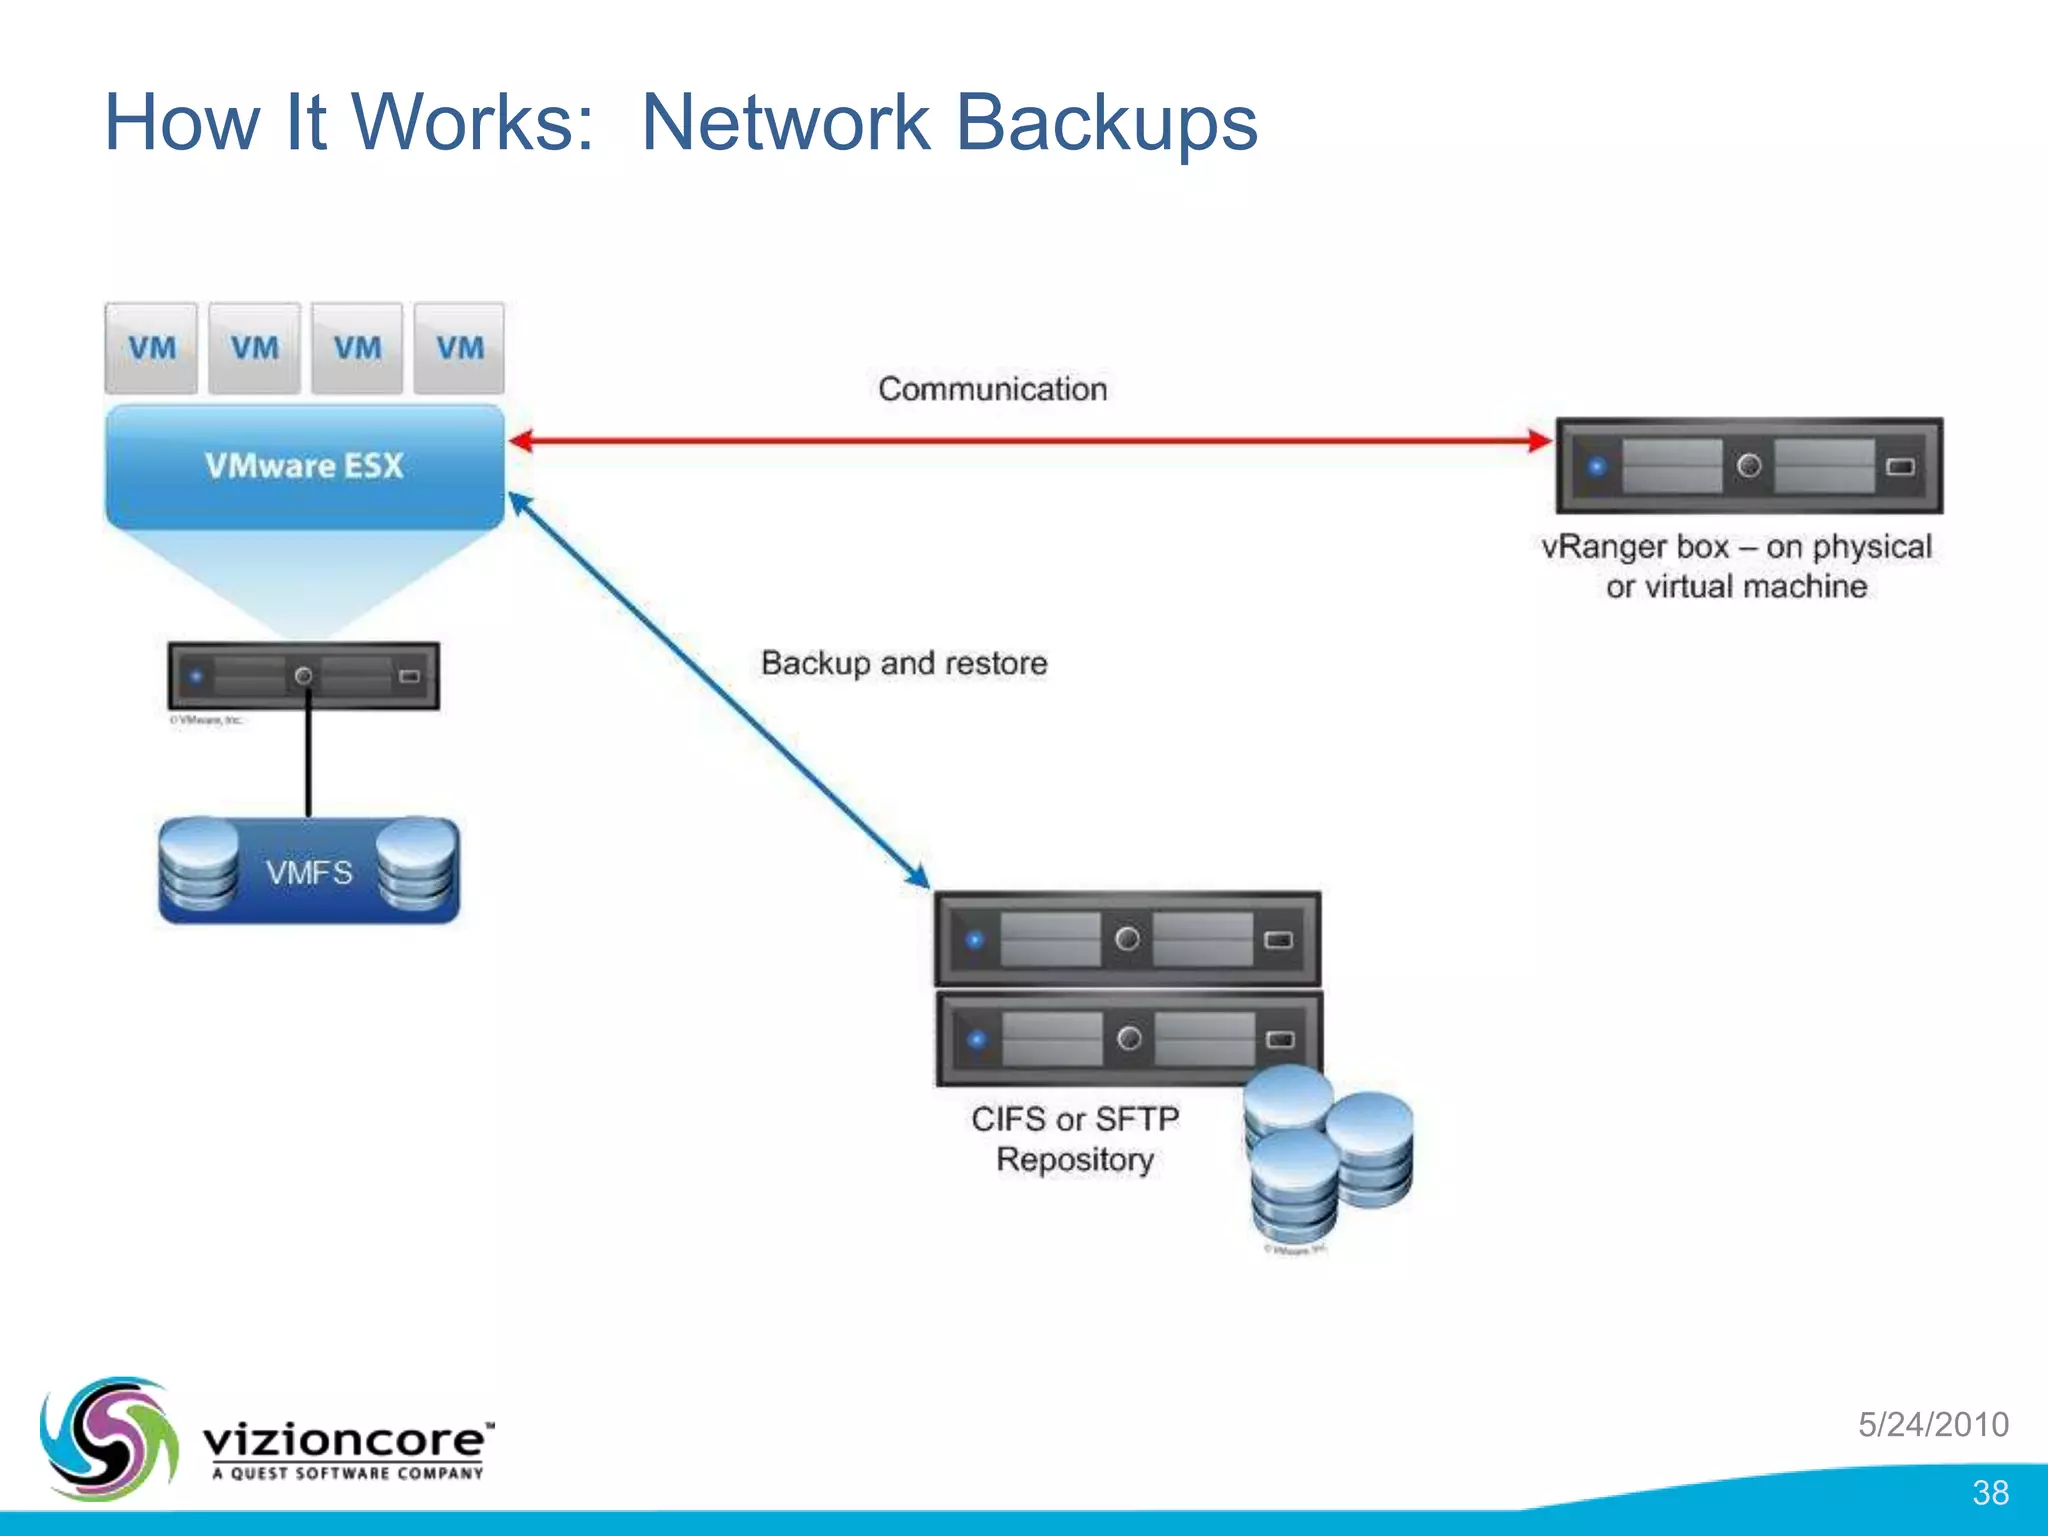
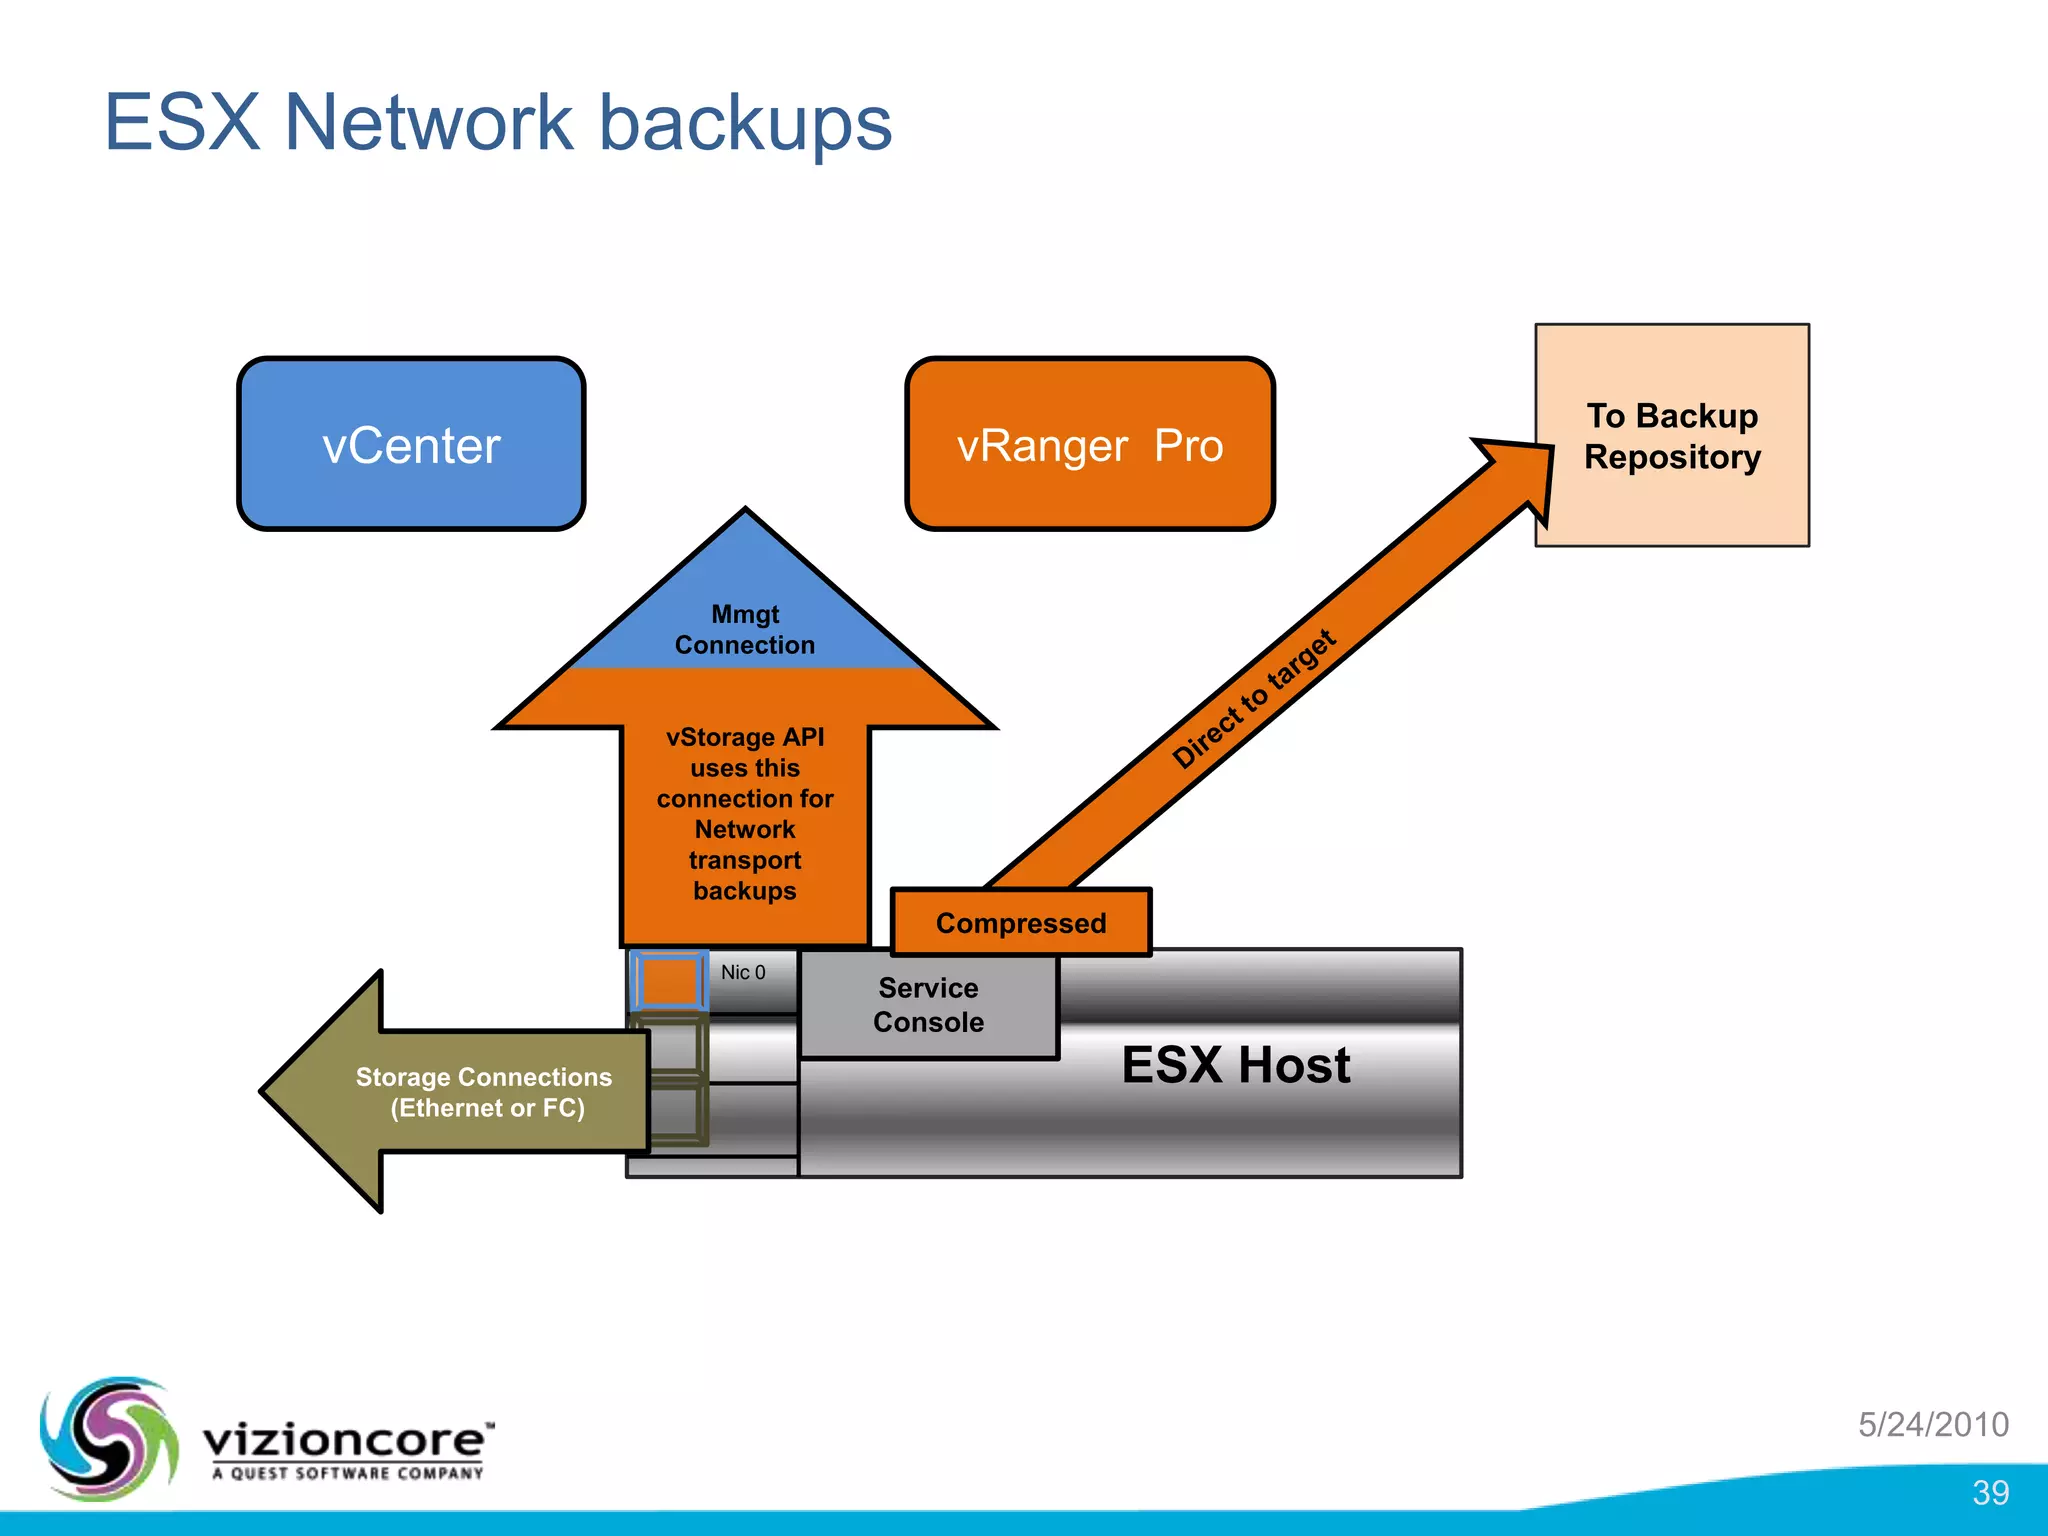
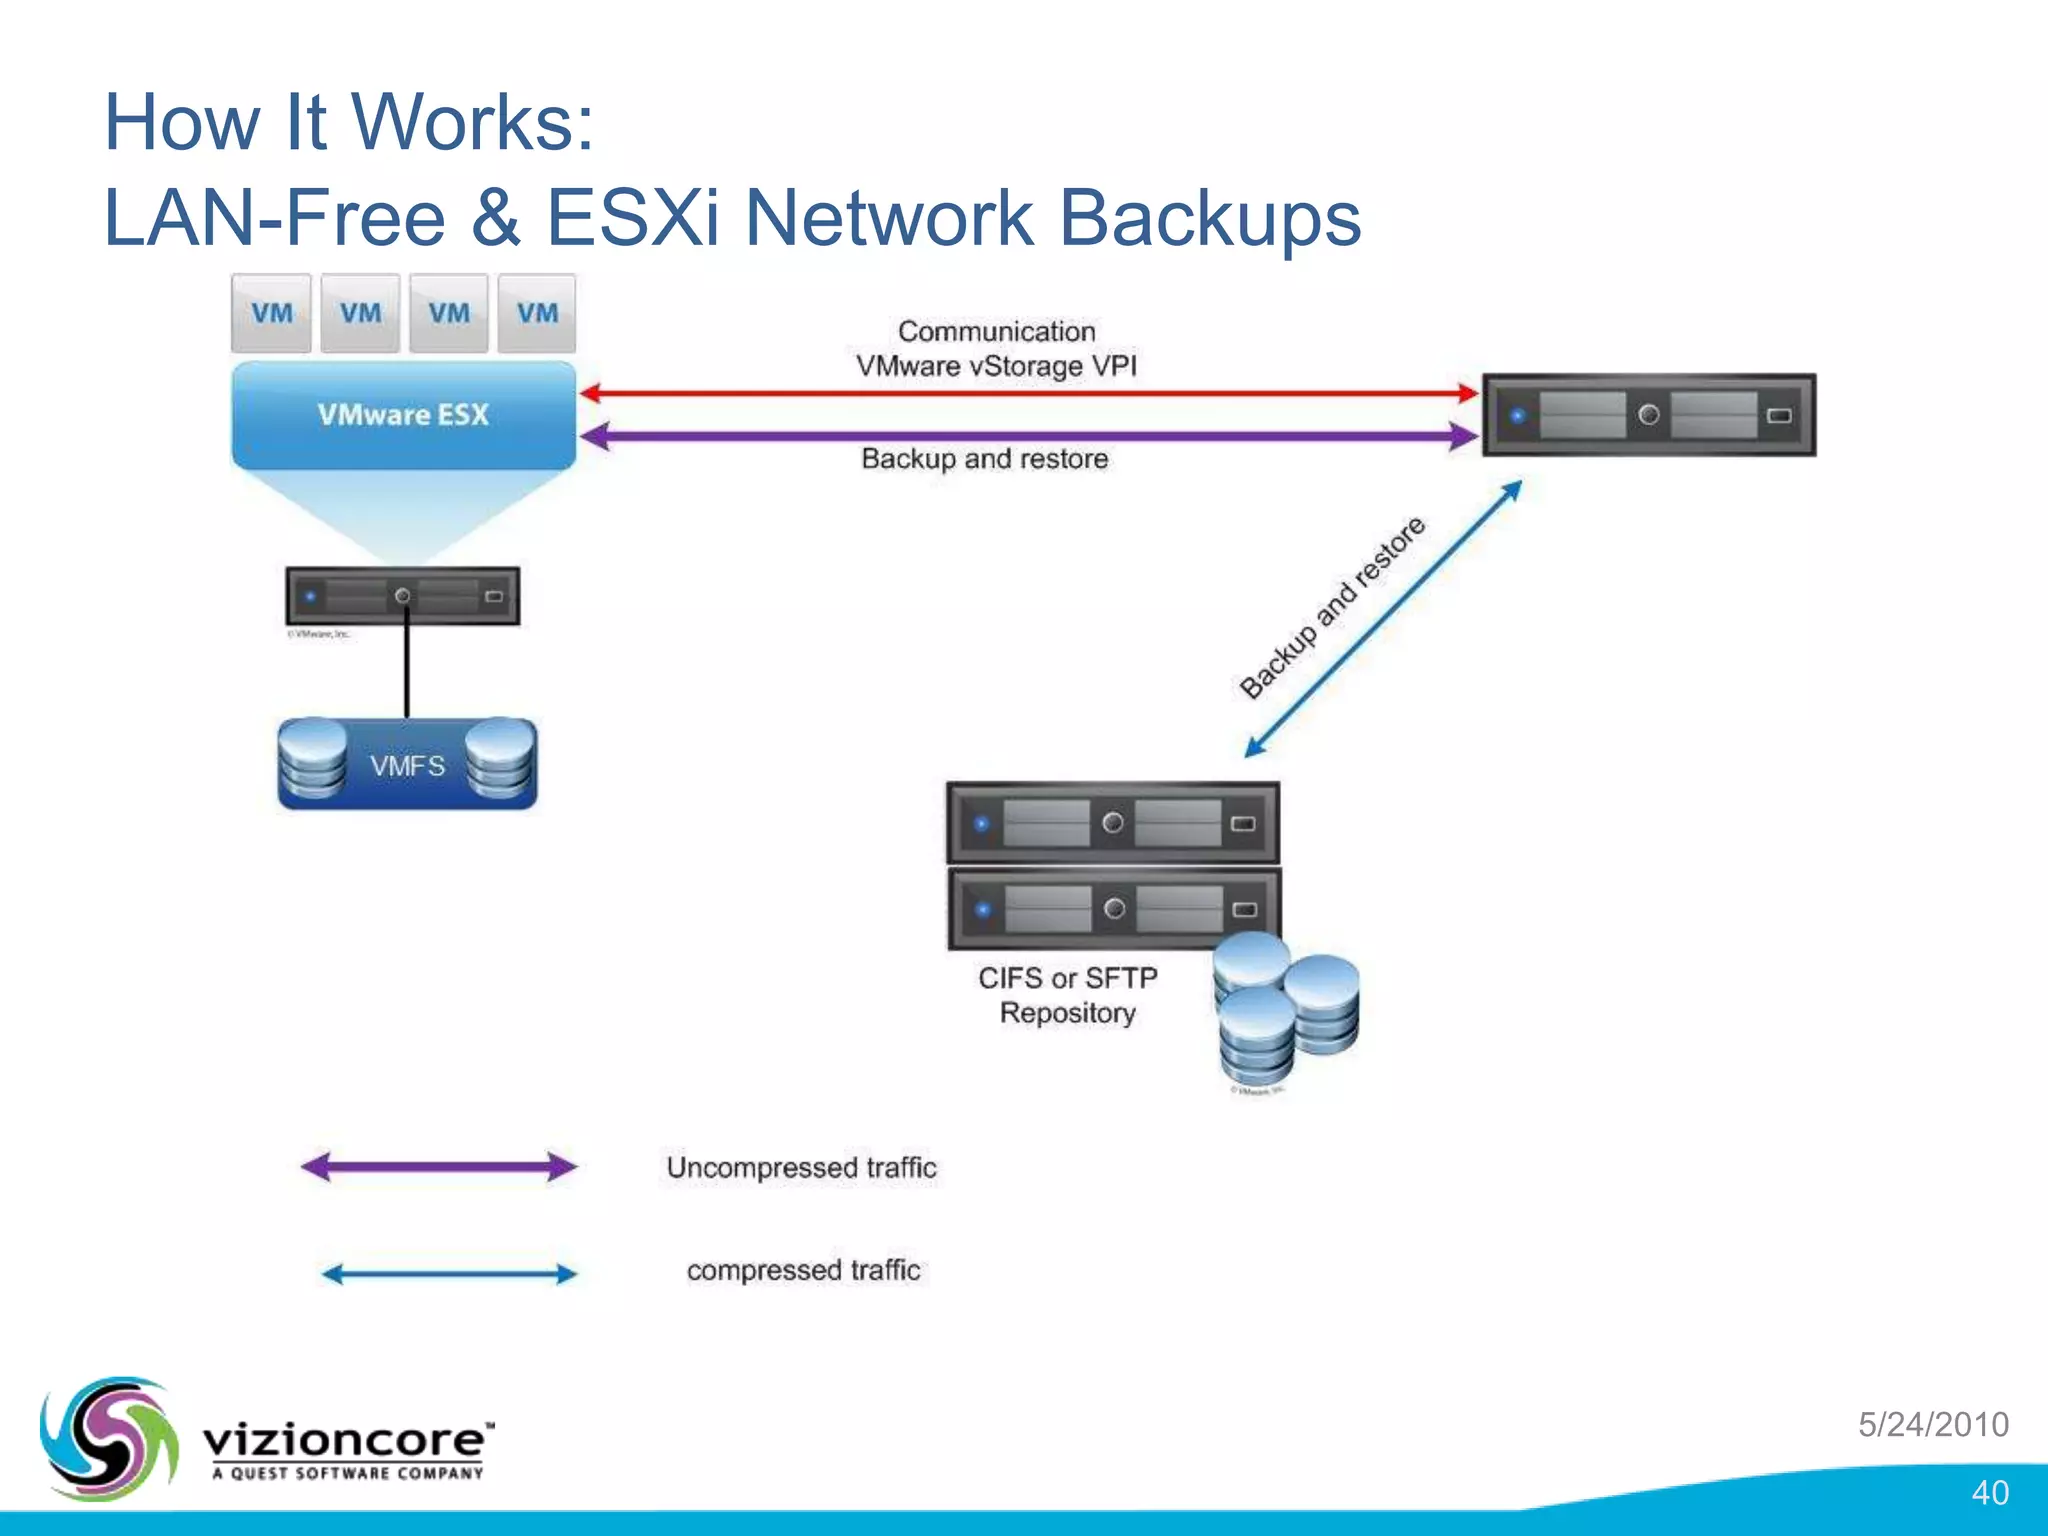
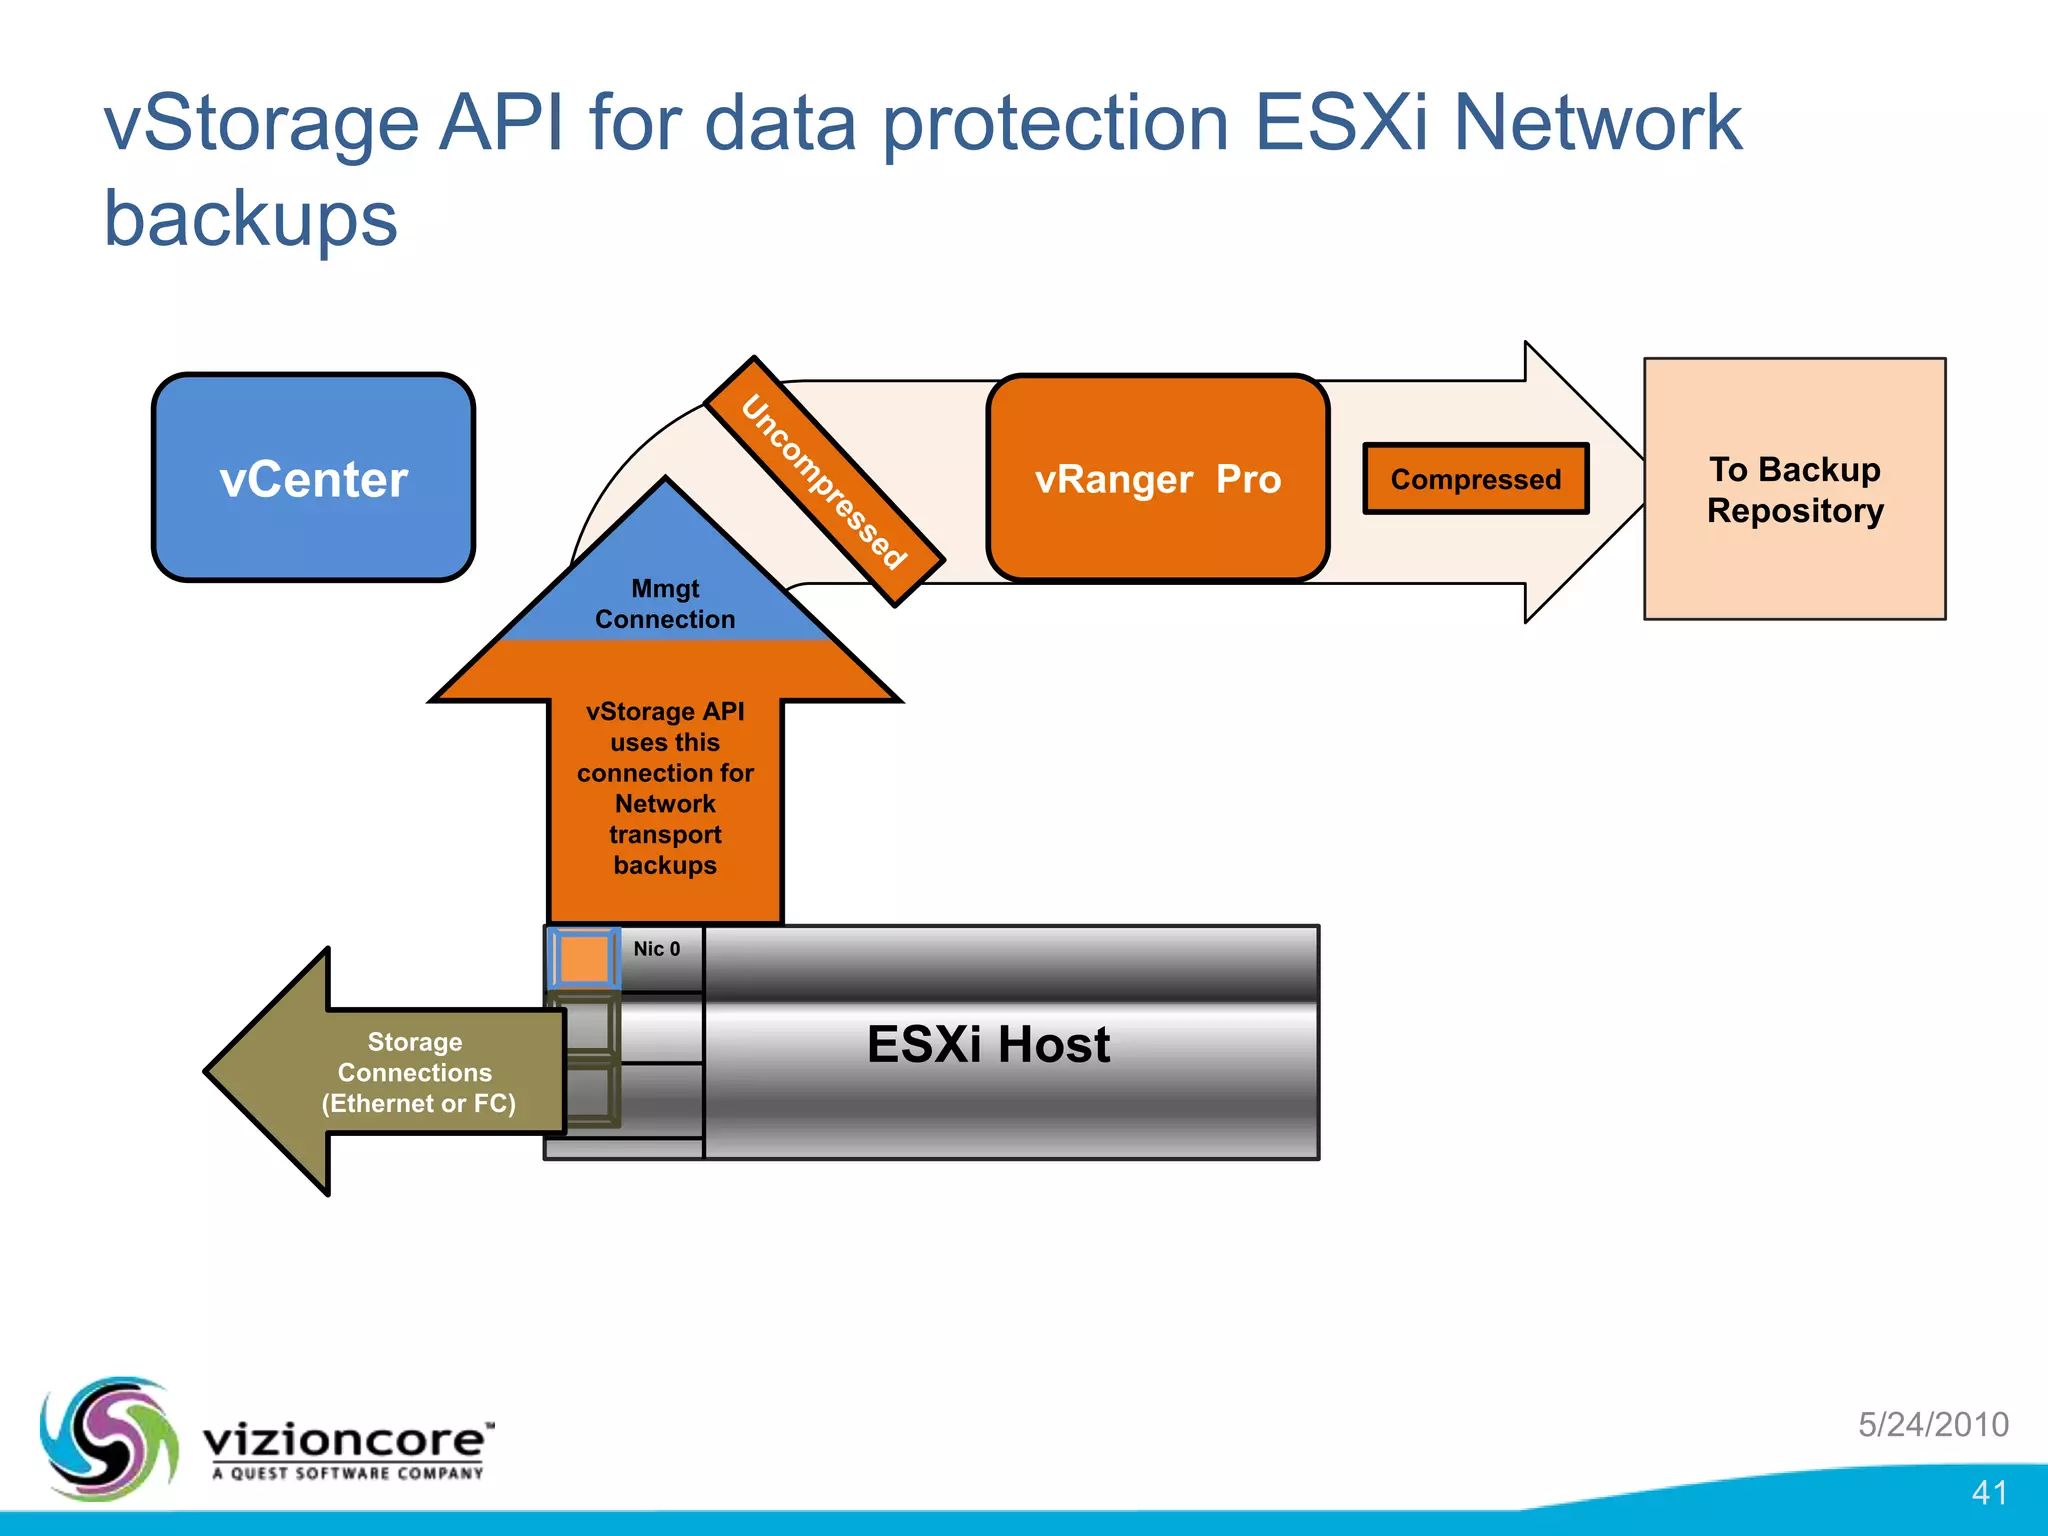
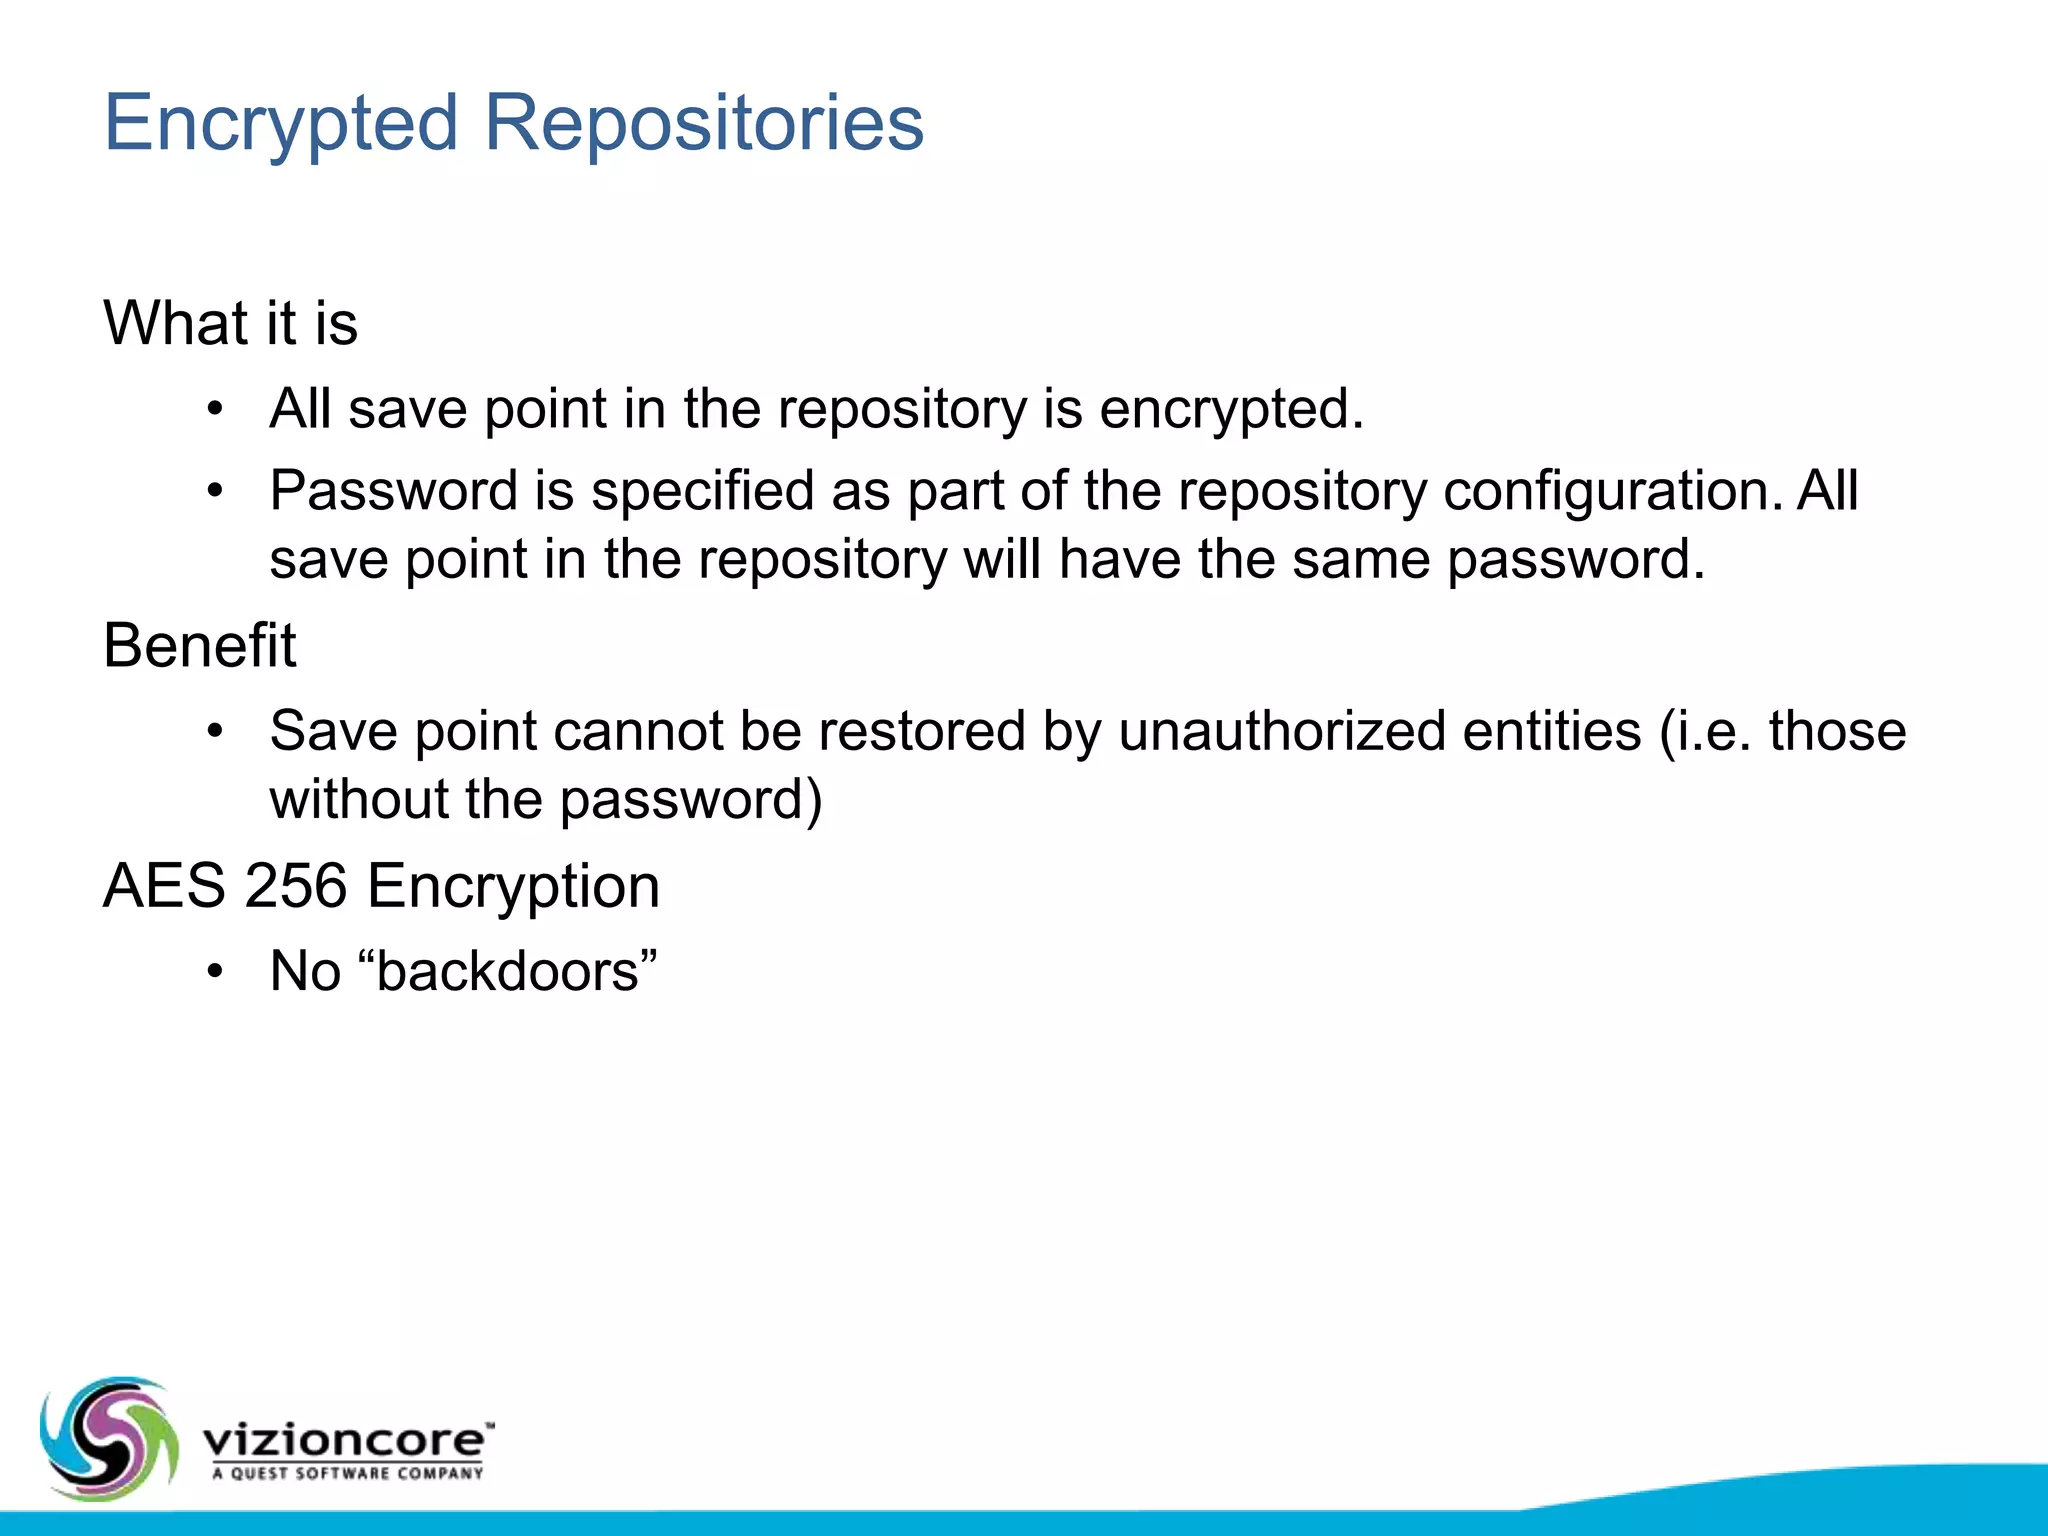
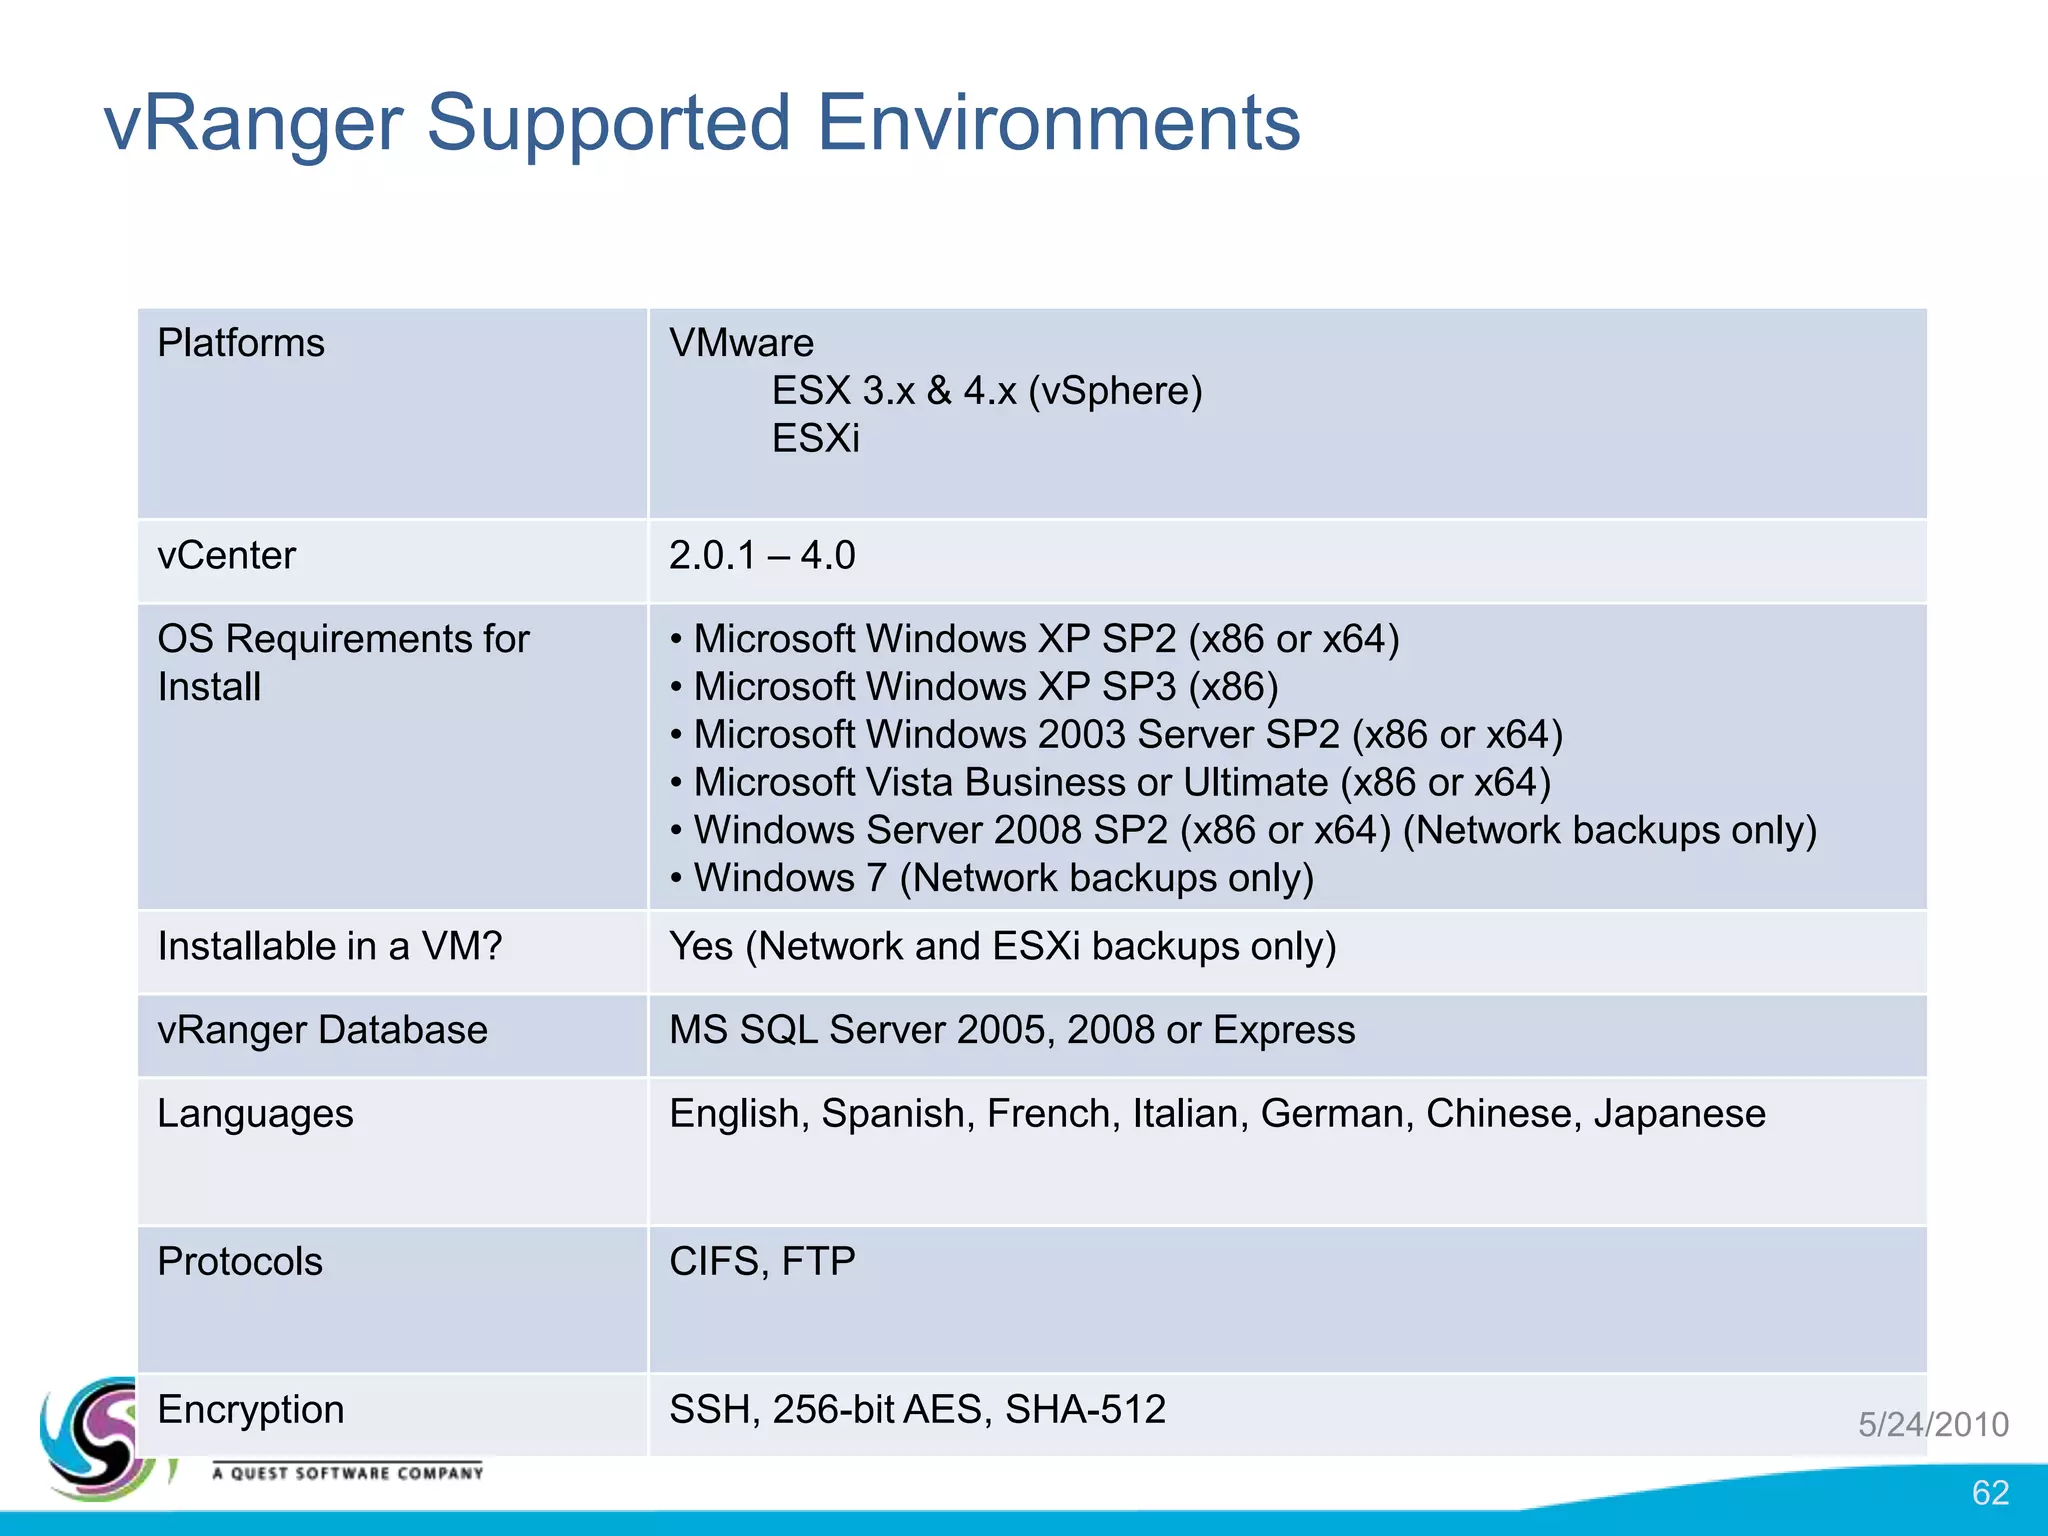
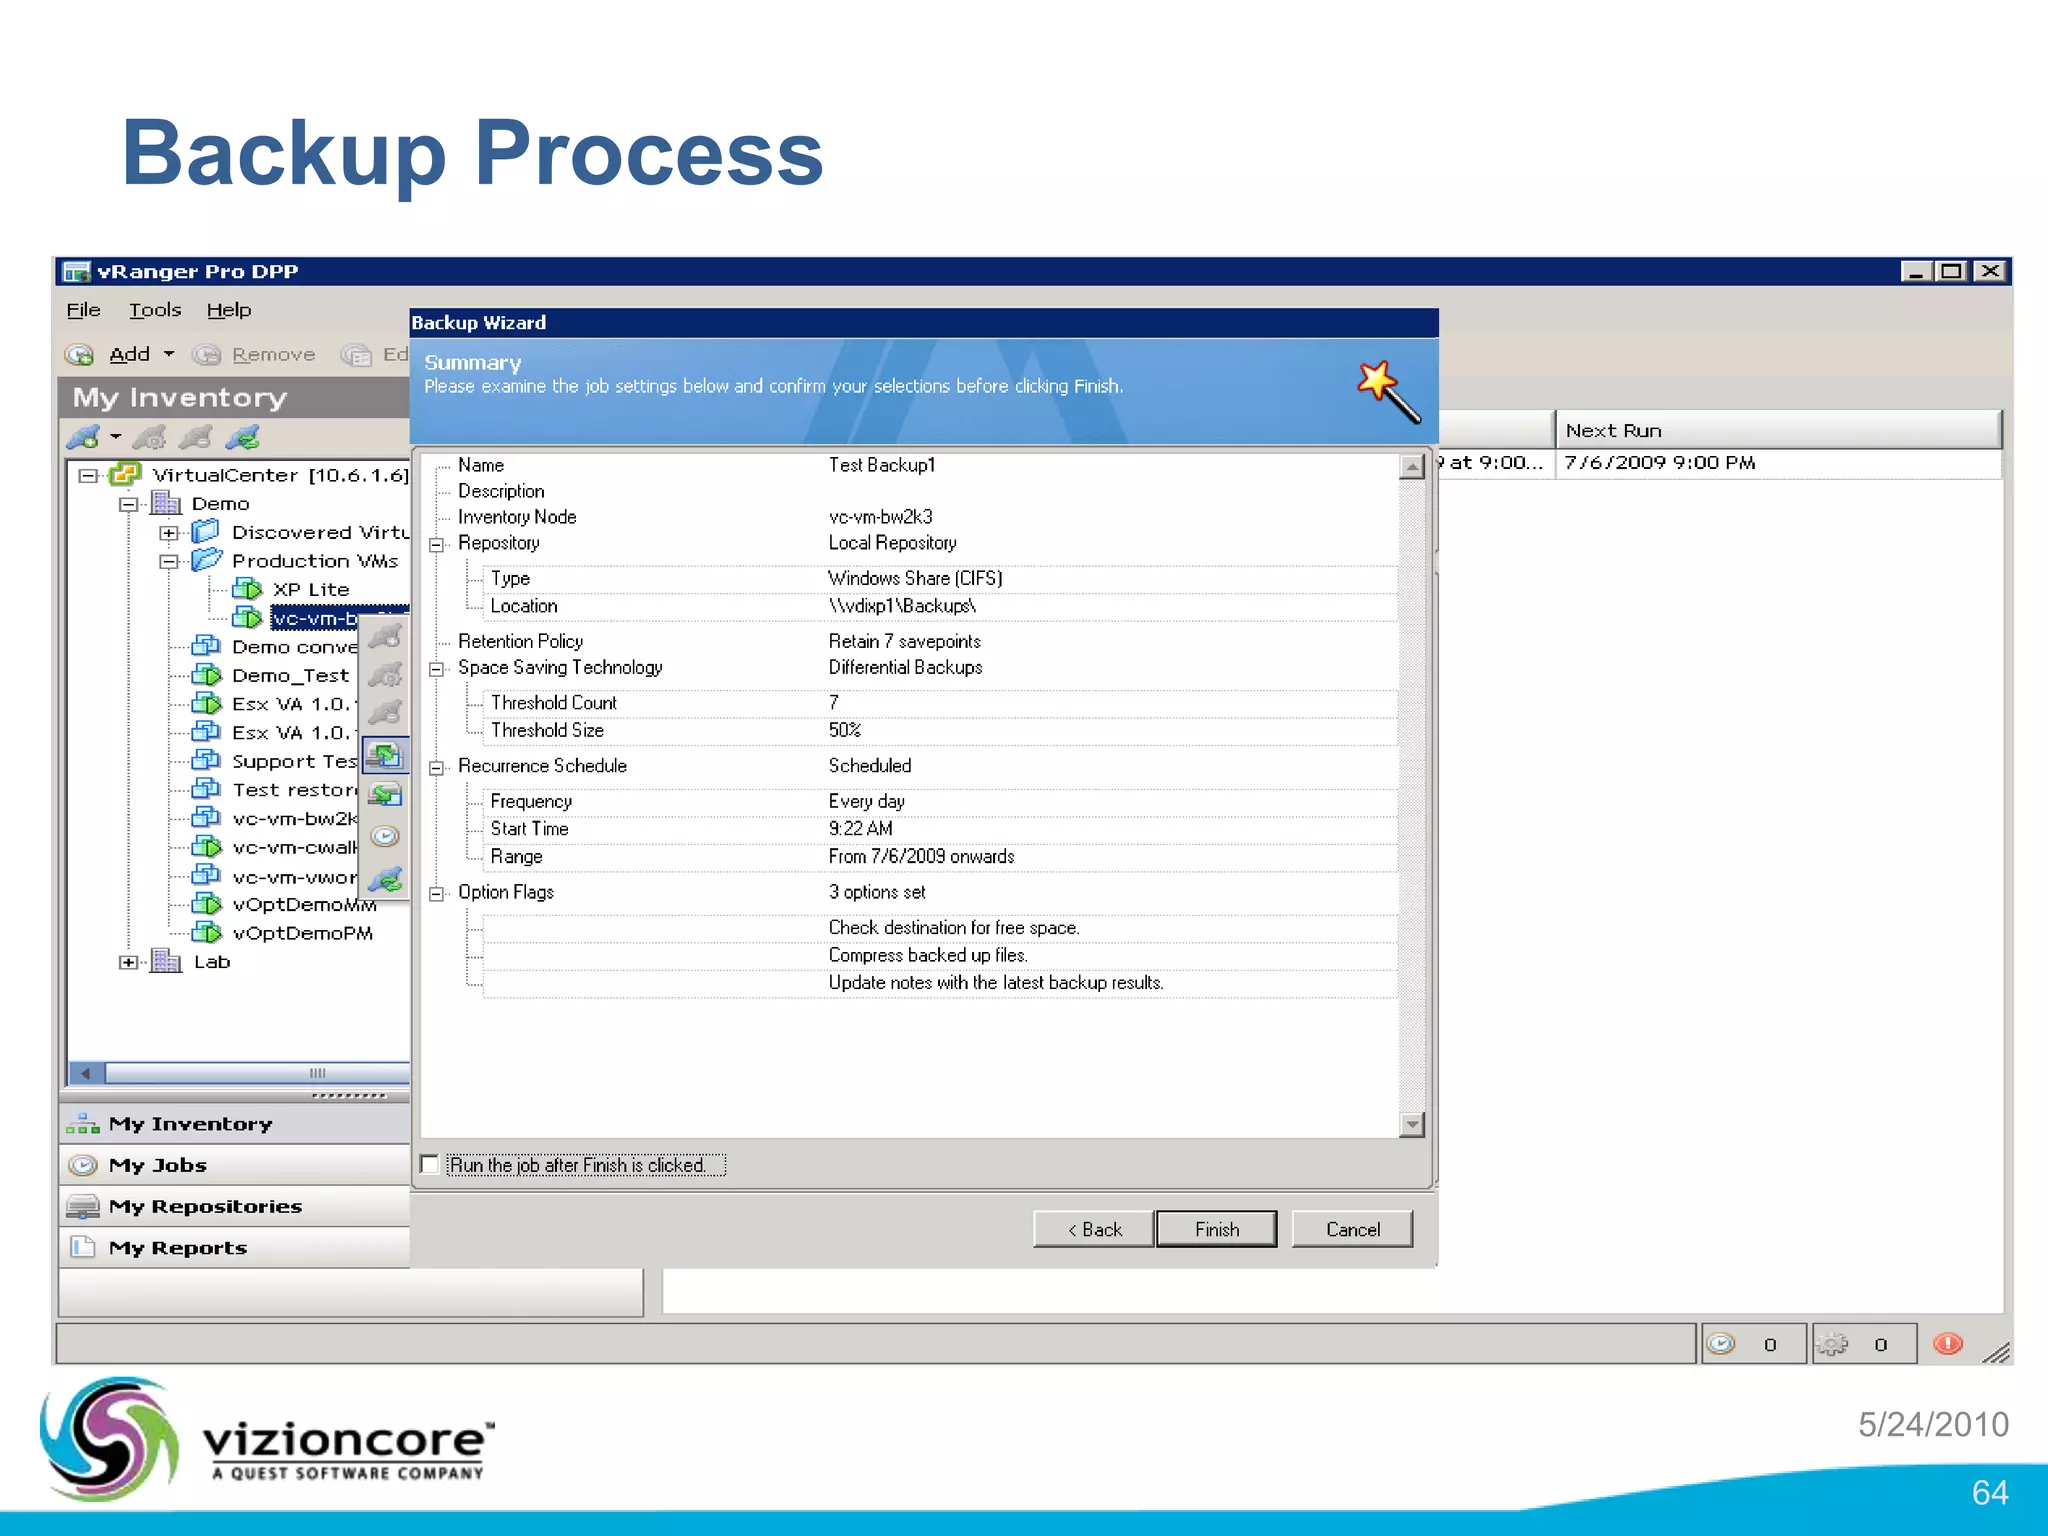
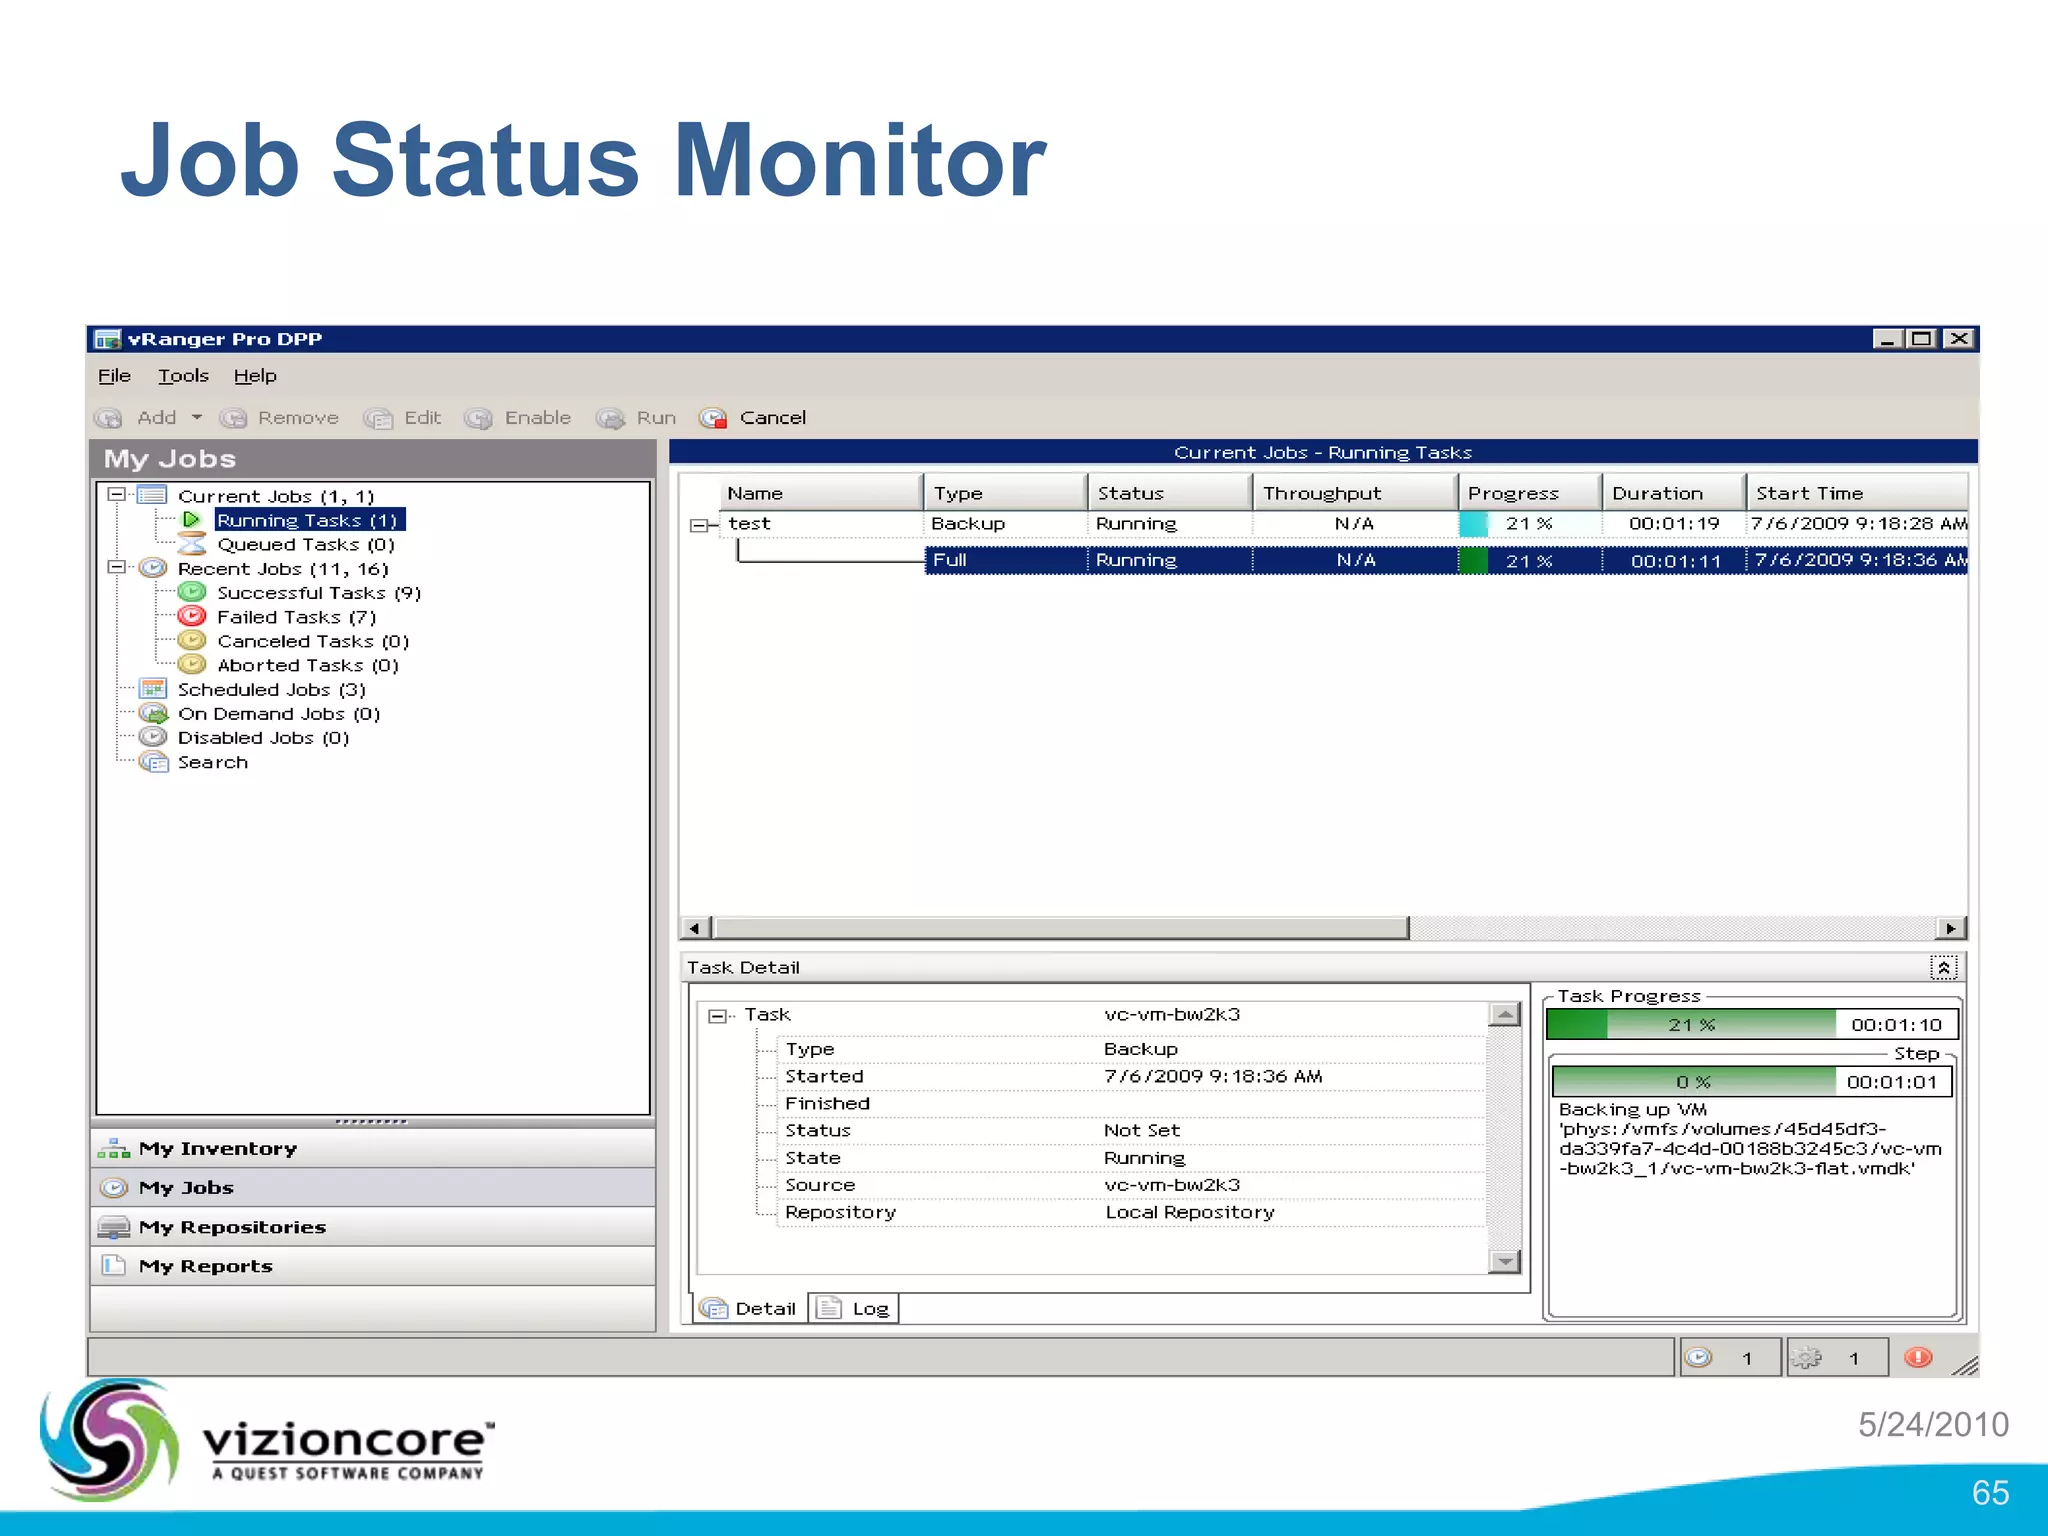
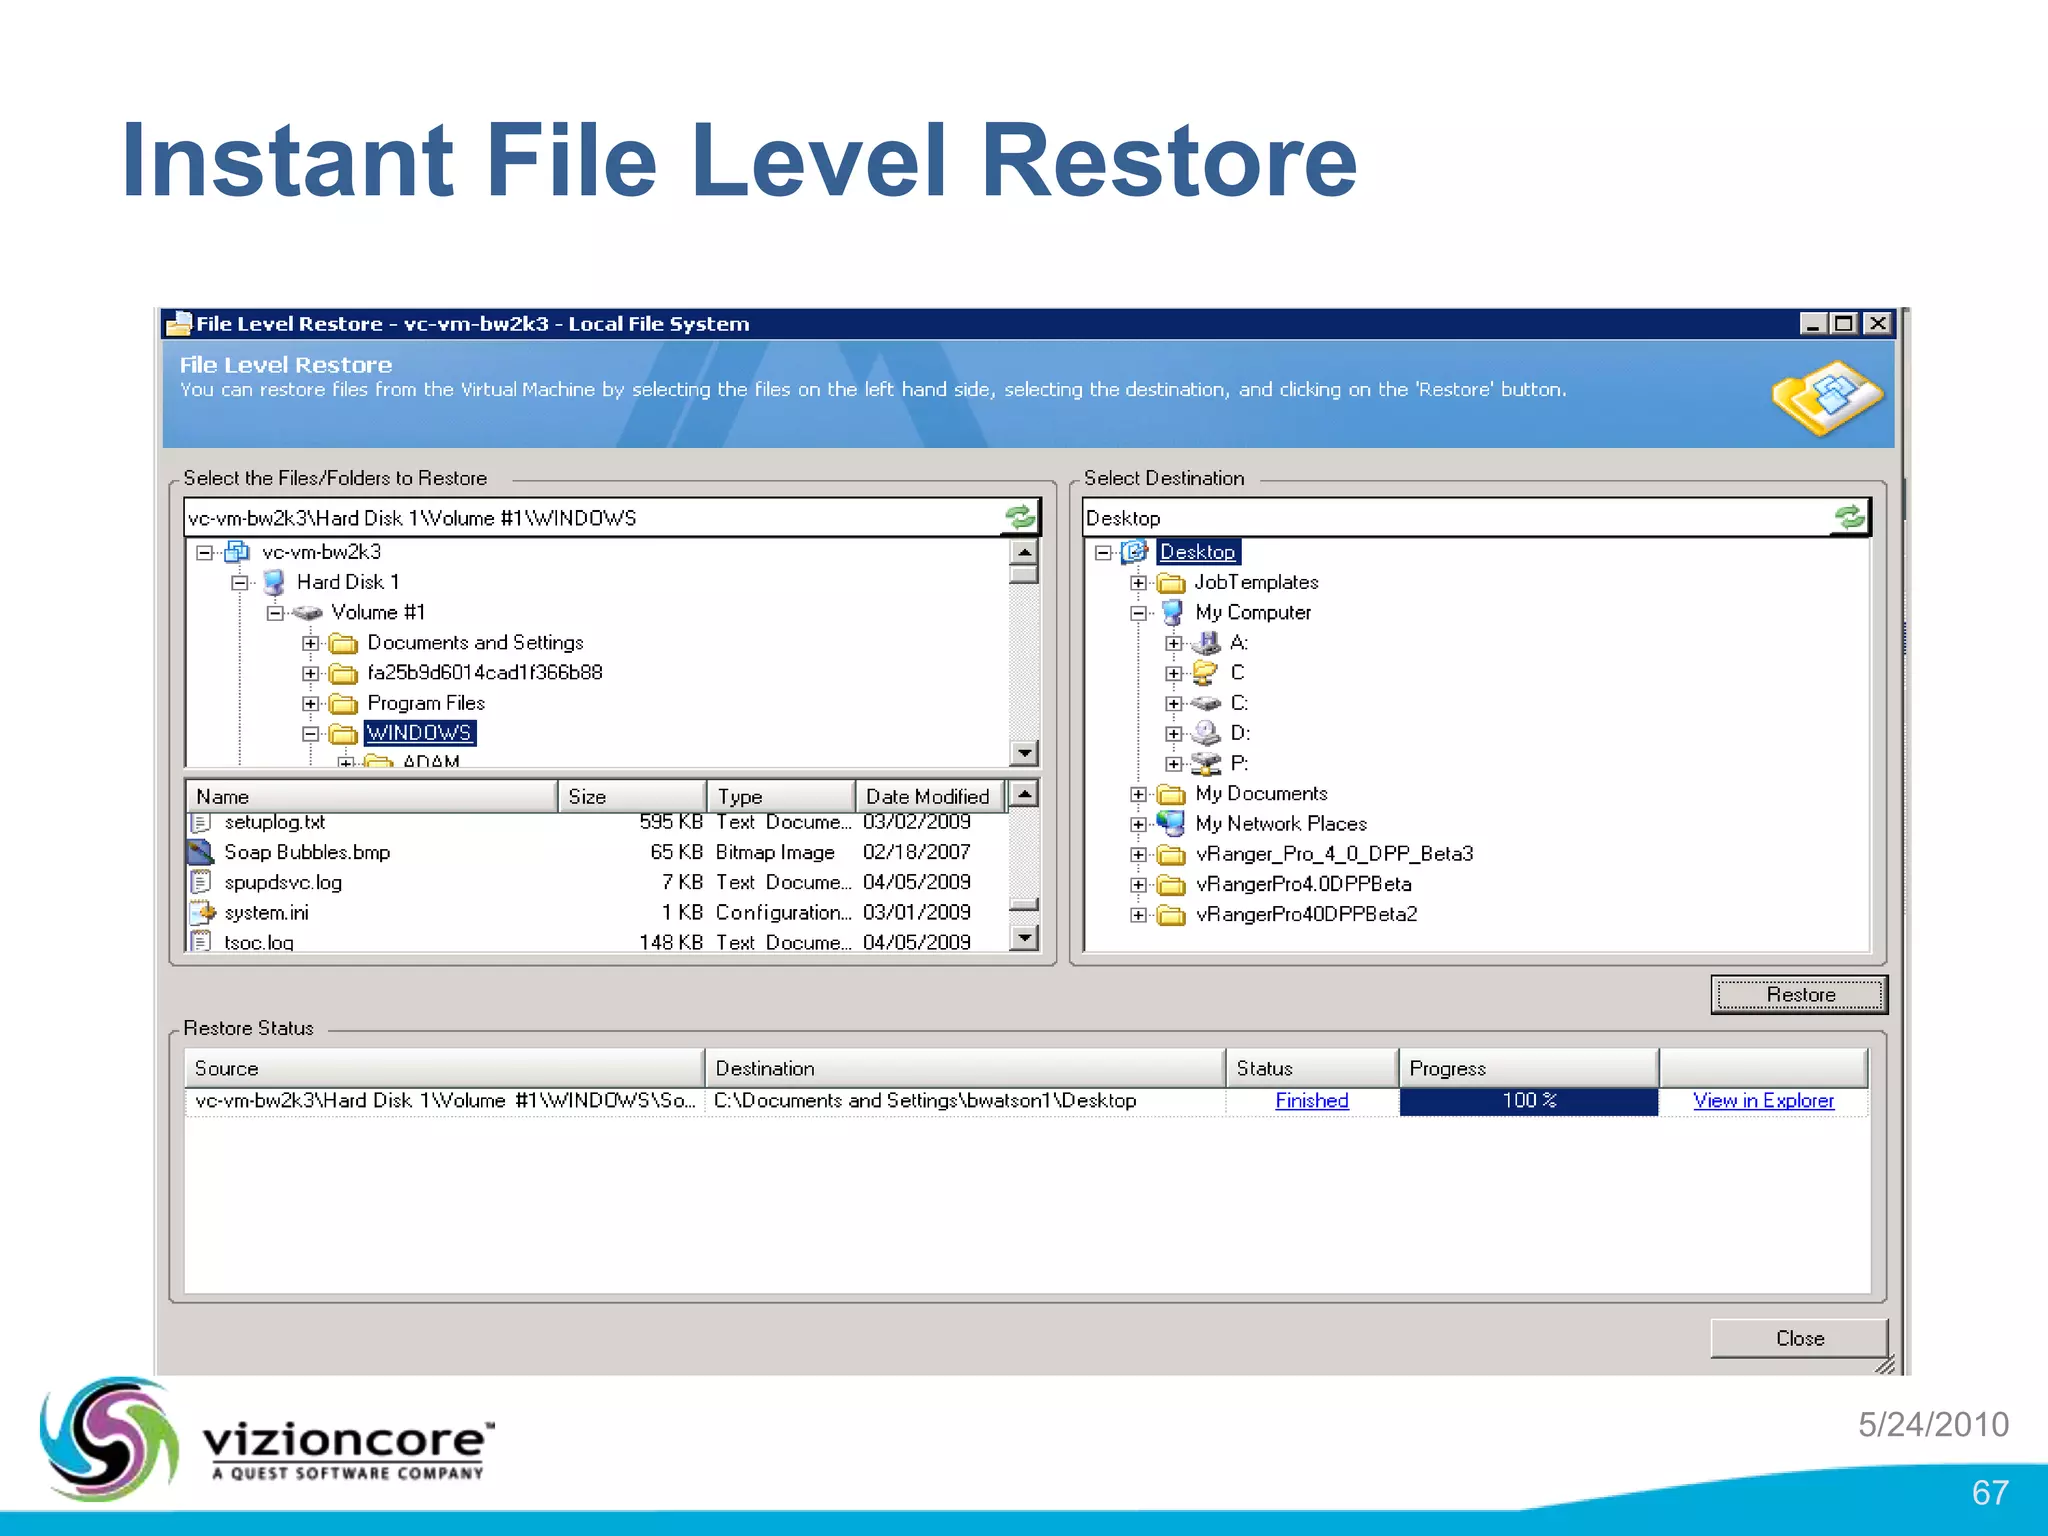
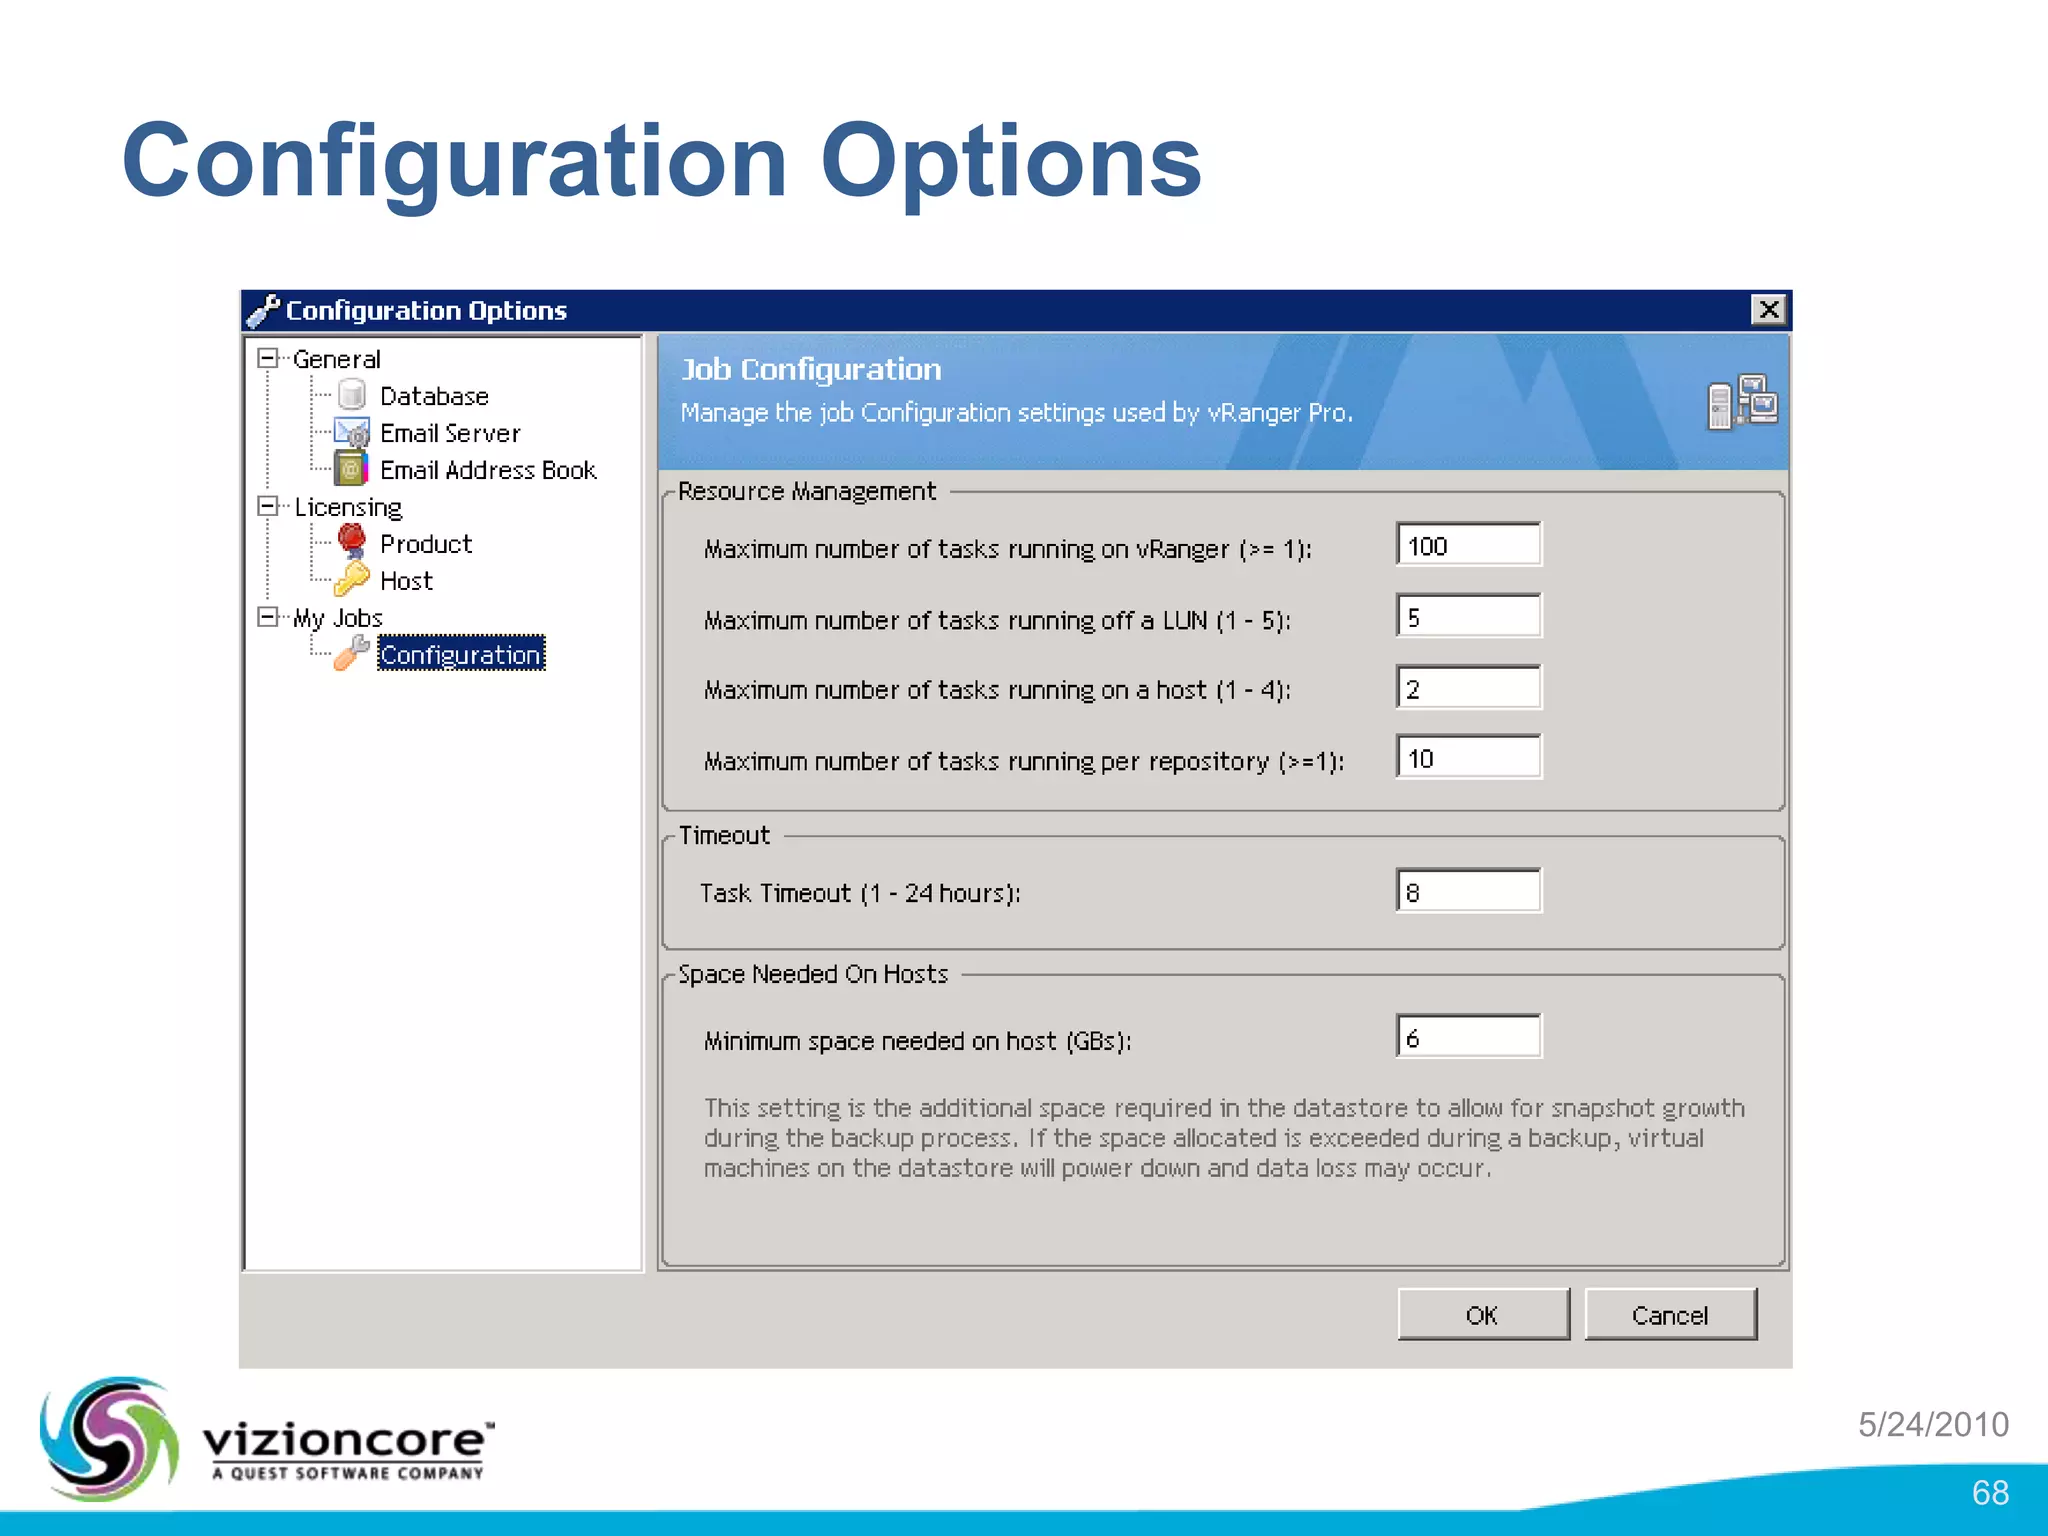
vRanger provides image-based backup and recovery of virtual machines using VMware snapshots. It creates an image of the entire virtual machine, including the operating system, applications, and data. This image can then be restored on any system running the correct hypervisor. vRanger backups are fast because it leverages snapshot technology instead of copying files. It also supports deduplication, compression, and encryption of backups. Restores can be done at the image, file, or object level and images can be restored on-premises or to the cloud.
3. What is an Image? A VMware Snapshot is a recording of all the changes that occurred since the VM was created Snapshots can be created on running VMs Changes/deltas tracked separately & merged later vRanger creates an Image based on snapshot technology combination of the snapshot & tracked changes Exact representation of the VM at time of backup 5/24/2010 3
4. What is a VM Image? A VM image contains: Hypervisor Configuration OS, App Data A VM image can be reconstituted on any system running the correct hypervisor base. Reconstitution enables point-in-time DR. 5/24/2010 4
5. What is Image-Based BR? Image-Based Backup & Recovery (BR): Creates images using HV snapshot technology Backs up and recovers images Enables reconstitution of images into servers 5/24/2010 5
6. What is Image-Based BR: Backup Creating a snapshot is fast, but: Images can be large Diffs, compression and dedup are must haves File-based backups of VMs work, but: Backups may be slower (copy instead of snapshot) Reconstitution is not automatic Limited scalability (may require proxies) Limited compression of large VM files 5/24/2010 6
7. Are Image-Based Backups Safe? YES!!!Applications and Data are secure through entire process. The snapshot process: Does not disrupt a running VM Keeps apps in the image consistent Can be integrated with VSS for added integrity 5/24/2010 7
8. What is Image-Based BR: Recovery Three things are recoverable from an image: Image (reconstituted server) File Object (e.g.: email) Files and objects can be recovered without image reconstitution. Recovered Object Stored Image Recovered File 5/24/2010 8
9. What is Image-Based BR: Recovery Image portability enables multiple “where” recovery options: Restore on-premise Restore to cloud Restore to dissimilar hardware Non-virtualized systems can be converted to images using P2V tools: Backup physical systems using image BR Recover a physical box into a VM 5/24/2010 9
10. Image-Based BR Scenarios Lab Automation: Maintaining test images Replication: Maintaining synchronized failover environments Data Security: Protect data and meet compliance requirements Disaster Recovery: Recreate production environments 5/24/2010 10
12. How vRanger Works Source Target vRanger 1 Installs and discovers the environment in minutes. 5/24/2010 12
13. How vRanger Works Source Target Direct To Target Backup Jobs vRanger 1 2 Installs and discovers the environment in minutes. SOURCES transmit images to TARGETS without proxying. We call this Direct To Target. 5/24/2010 13
14. How vRanger Works Source Target Direct To Target Backup Restore Jobs Restore vRanger 1 2 3 Installs and discovers the environment in minutes. SOURCES transmit images to TARGETS without proxying. We call this Direct To Target. SOURCES and vRanger restore directly from TARGETS. 5/24/2010 14
19. How vRanger Works: Backup (1..3) vRanger uses a patented binary injection process to implement Direct-To-Target. 1 vRanger Source Target The latest vRanger libraries are injected into source’s runtime. The runtime manages connections to targets. Other Processes Repository Binary Runtime Inject Comm 2 vRanger VCenter Source SAN / NAS Req vRanger issues snapshot requests to vCenter or ESX host. Snap or ESX Host Req 5/24/2010 16
20. How vRanger Works: Backup (2..3) 3 Source Target The vRanger source binary grabs the snapshot from storage. Other Processes Binary Runtime Repository Grab SnapshotsDedup, CompressEncryptReconstitute Image Send 4 We perform intelligent middleman logic including dedup, compression, encryption, and target connection mgmt. Grab SAN / NAS Storage Snapshot Files.VMDK.VHD 5/24/2010 17
40. resulting in much faster backups6 Active Block White Space Changed Block Deleted Data
41. Change Block Tracking (CBT) a vStorage API feature Eliminates change-scanning during inc/diff’s Reduces data to be backed-up Shortens backup window
42. Why CBT? Large disks Removes scan time needed to ID changes Network based VMFS Scanning for change slower on network based VMFS: CBT helps dramatically Example: A 94 minute backup of 2.8 GB could be dramatically reduced to only 3 minutes
43. CBT Support in vSphere Most VMs supported on ESX4 vSphere API has flag indicating VM support VMs must: Be Hardware Version 7 Be able to add Snapshots to the VMDK’s No independent disks or RDM LUNs Have a stun or unstun cycle to enable or disable No support on ESX3
44.
45. Active Block Mapping (ABM) What is it? A tool that reads the Windows NTFS file system in a VMDK and identifies blocks that are actually used by the OS vs. blocks have been deleted to recycle bin Benefit Faster incremental/differential backups: Only blocks that are actually used are read.
46. ABM: Details Activated in a backup job as an option. New jobs: on by default (remains off on jobs migrated from earlier versions) While CBT is VM-specific, ABM is Job-specific Can be used in conjunction with CBT
47. ABM, CBT and Backup Mode If ABM and CBT are both enabled ABM is always used on fulls incremental or differential use both the AB and CB filter. If only ABM is enabled ABM works regardless of backup type
48. ABM – Restore Behavior Note that undeleted programs will not work on a restored VM that was backed up with ABM. Deleted files from recycle bin are not available after a VM is restored from a save-point.
49. ABM: Support Windows XP - Windows 2008 R2 Windows NTFS only Basic disks only Supported only on ESX and LAN backups ABM not currently supported for vStorage API(vRanger: LAN-free and ESXi backups) Note: master file table needs to be ‘clean’ ‘file table not supported’ error: run chckdsk
52. ESX Network backups Direct to target To Backup Repository vCenter vRanger Pro Mmgt Connection vStorage API uses this connection for Network transport backups ESX Host Nic 0 Compressed Service Console Storage Connections (Ethernet or FC) 5/24/2010 39
54. vStorage API for data protection ESXi Network backups To Backup Repository vCenter vRanger Pro Compressed Uncompressed Mmgt Connection vStorage API uses this connection for Network transport backups ESXi Host Nic 0 Storage Connections (Ethernet or FC) 5/24/2010 41
55. Requirements for LAN free backups vRanger Pro installed on a physical proxy server One proxy per set of VMFS luns VMFS luns zoned so vRanger Pro can see and read them VCB application is no longer used Works with ESX 3.0.2 - ESX 4 (vSphere) ESX 4 hosts require minimum “Essentials” license to use the vStorage API. 5/24/2010 42
56. vRanger Pro LAN free jobs 5/24/2010 43 Compatible with 3.0.2 – 4.x ESX hosts Compatible with 3.5 – 4.x ESXi hosts
59. vRanger Pro Architecture for LAN free backups ESX Host ESX Host Fibre Channel Switch Lun 0 Lun 1 Lun 2 SAN Storage 5/24/2010 46
60. vRanger Pro Architecture for LAN free backups vRanger Server ESX Host ESX Host Fibre Channel Switch Lun 0 Lun 1 Lun 2 SAN Storage 5/24/2010 47
61. vRanger Pro Architecture for LAN free backups iSCSI Switch(s) vRanger Server ESX Host ESX Host The storage is presented to both the ESX hosts and the vRanger Pro server. Lun 1 Lun 2 Lun 0 SAN Storage 5/24/2010 48
62. vRanger Pro Architecture for LAN free backups Read Only Access FC / iSCSI Switch(s) ESX Host ESX Host vRanger Server The storage is presented to both the ESX hosts and the vRanger server. Lun 1 Lun 2 Lun 0 SAN Storage 5/24/2010 49
63. vRanger Pro Architecture for LAN free backups using a FC SAN Prod Network – to vCenter To Backup Repository Shared Storage (VMs) vRanger Pro (Proxy) Nic0 HBA2 HBA1 Lun 10 Lun 12 Lun 11 SAN Storage Lun 0 Lun 1 Lun 2 SAN Storage 5/24/2010 50
64. vRanger Pro Architecture for LAN free backups using an iSCSI SAN Shared Storage (VMs) Prod Network – to vCenter To Backup Repository vRanger Pro (Proxy) Nic0 Nic1 Nic2 Lun 0 Lun 1 Lun 10 Lun 12 Lun 11 Lun 2 SAN Storage SAN Storage 5/24/2010 51
65. vRanger Pro Architecture for LAN free backups using an iSCSI SAN (2) Shared Storage (VMs) Prod Network – to vCenter To Backup Repository Device A Nic0 Nic1 Nic2 Nic3 Nic5 Nic4 vRanger Pro (Proxy) To Backup Repository Device B 5/24/2010 52
66. Data Flows with LAN freebackups Prod Network – to vCenter Nic 0 Shared Storage (VMs) Reads Reads Reads vRanger Pro (Proxy) To Backup Repository Lun 0 Lun 10 Lun 12 Lun 11 Lun 1 Lun 2 SAN Storage SAN Storage 5/24/2010 53
67. Data Flows with LAN free Backups Prod Network – to vCenter Nic 0 Shared Storage (VMs) Reads Reads Reads vRanger Pro (Proxy) To Backup Repository Lun 0 Lun 10 Lun 12 Lun 11 Lun 1 Lun 2 SAN Storage SAN Storage 5/24/2010 54
68. Data Flows with LAN FREE Backups Prod Network – to vCenter Nic0 Shared Storage (VMs) Reads Reads Reads Writes Writes Writes vRanger Pro (Proxy) Read Connection Lun 0 Lun 10 Backup Repository Lun 12 Lun 11 Lun 1 Lun 2 Write Connection SAN Storage SAN Storage 5/24/2010 55
70. Custom Backup Groups Goal: more flexibility for backup jobs Groups disparate VMs, hosts, folders Separate structure from Virtual Center Accessible in “My Inventory” view
71. Thin Disk Support: Details vSphere-only feature ESX4 to ESX3 restoration isn’t supported GUI indicates if a disk is ‘Flat’ or ‘Thin’. Support for backup and restore Only blocks w/ data are restored
72. Encrypted Repositories What it is All save point in the repository is encrypted. Password is specified as part of the repository configuration. All save point in the repository will have the same password. Benefit Save point cannot be restored by unauthorized entities (i.e. those without the password) AES 256 Encryption No “backdoors”
73. Are Their Disks That Can’t Be Backed-Up? Independent, persistent disks Physical RDM Cannot create snapshots for these disks. They are automatically skipped and do not cause a job failure w/ the caveat that the VM has at least one, snap-shotable disk available to vR 5/24/2010 60
This section is intended to give a background in image-level backups, and how they’re especially relevant in the virtual environment. Some prospects will be unfamiliar with image-level, especially if they are using traditional, file-level backup applications.
The process runs as such:A Virtual Machine snap shot freezes its “VMDK” on the VMFS storage to a point in time.All change are then written to an alternative VMDK called a delta for the life span of the VMware snap shot When vRanger creates a backup job it executes 1, backups up the VMDK, and sends the API commands to merge 2 back into the original VMDK again.
An image of a VM is very versatile – it contains ALL of the information necessary to reconstitute that VM anytime, anywhere. Very important is the hypervisor configuration – info on how the VM is configured to run within the virtual env.
When we discuss “image-based BR” it is the concept of harnessing the snapshots available w/in a HV, saving them to remote repositories, and then being able to restore them back to fully-operational VMs. (at the original, or alternate locations w/in the virtual environment)“HV” = hypervisor
Lot of data is required for image-level: differential/incremental backups, compression and block-level data dedup are required to make this work in a practical manner. Therefore compression and space-saving functions are necessary (as vR has or will have through the 4.x releases)File-based has inherent limitations – it works, but requires extra complexities in either the SW or the workflow to overcome.
Addresses any fears over image-based transactions. Image-based BR is based on the HV’s snapshotting technology, which is specifically designed by the HV platform vendor for consistency and integrity
Image-based backups offer very flexible and efficient recovery scenarios: a wide spectrum of recovery options are avail (image-file-object) and can be accomplished w/o full image reconstitution (vR feature)
In addition to the flexibilities mentioned earlier, image-based BR in a virt. Environment also gives you additional benefits of:Restoring any-WHERE: the original VM/file location is no longer a pre-requisite to the restore process. Image-based BR allows organizations to skirt the restrictions of re-creating their environment exactly as it was, before the event. Dissimilar environments and hardware can be utilized now.In addition, physical systems can be restored quickly and easily into virt. Environments, with P2V tools (avail now in vR 3.x, coming to the 4.x platform in 2010)
At the image-level:Whatever time it takes to copy and uncompress the informationis the restore timeDirect-to-Targetfaster than streamed media and multiple VM’s can be restored simultaneously from multiple targets with vRanger Pro in the event of a multi-VM failureThe ENTIRE VM, including those settings “outside of the VM” are restored
This section details in graphic form how vRanger works
vRanger is a Windows .NET application that can be installed either in a VM or physical machine, running a windows OS. During the wizard-based install, it automatically discovers the virtual environment – making it ready to backup the entire virtual environment
During a backup job, vRanger executes on backup jobs created by the user. When a job launches, it copies data directly from the source VMs to the target repository. There are no proxies involved in the backup process: data travels directly from source to target, making for an extremely efficient transfer.
During the recovery process, the opposite occurs: data from backed-up images in the target repository is transmitted directly to a recovery point. If anything less than an entire VM is required, the recovery tools grab images, files, or objects WITHOUT image reconstitution, and present them to vRanger for saving to alternate locations.
The benefits of Direct to Target architecture are numerous and a direct value-add to the BR process. The process is faster, more efficient, and less complex to operate and maintain.
This slide is a more detailed version of the backup process: When a backup job is initiated, vRanger libraries are injected as a binary runtime onto the source machines. The runtime then manages its connections to the target repositories.vR requests a that the virtual platform (ESX) create a snapshot of the contents of the VM. (either through vCenter or directly to the host, depending on the ESX version)
3) Once the snapshot has been saved into the source storage environment, the vRanger binary can read from the snapshot files4) finally, vRanger performs several space-saving and value-add functions (i.e.. Compression, encryption, deduplication) and saves a image of the snapshot (or a delta of changes, if an incremental or differential backup is performed)
The entire backup process described in the previous slides can be repeated, simultaneously, across multiple backup streams. vRanger Pro 4 has a Smart Backup Manager that can harness the full processing power of your ESX environment to send multiple backup streams at once. This allows the backups to be completed faster, and preserves or improves upon backup windows.
FC = FibreChannelTo elaborate on how vR works, there are 2 fundamental types of operating modes for vR:‘hypervisor console’ is the traditional method, that has been described in previous slides. The ESX console hosts vR, to drive backups across the environment. This method, has been proven over years of vR releases.LAN-free: for those customers wishing to offload backup traffic to an alternate, FC network. Leverages the newer, more efficient vStorage API, as opposed to the older VCB technology. vR must be installed on a windows physical host for this
Since the 4.0 release ofvR, we have been able to skip whitespace on backups – across all ESX hosts
Enabling ABM allows backup of only active blocks Blocks occupied by deleted data are not replicated
At the next backup pass, vR will encounter multiple types of blocks on a virtual disk: active, but not changedActive and changedDeleted dataWhite space
At this point, with only CBT enabled on a diff/incremental backup:Differential backup will only selected those blocks that have changedboth active and deleted changed blocks will be selected for backup.
If on the other hand ABM is enabled, only changed active blocks are backed up. Obviously, less data is backed up, but performance can be improved dramatically by taking it to the next level…
Thebackedup blocks are the same as previous slide – only changed blocks, However, scan times are much lower resulting in significant faster performance and shorter windows.
This feature is part of the vStorage APIs for Data Protection (VADP) which allows 3rd party vendors to no longer scan for changes when performing incremental’s or differentials backups. This is a key feature for a shorting the backup window, which is a key story for 4.x.Reduces the amount of data that must be sent to repositoryShortens backup windows
Large disksRemoves the Scan time needed to find changed in-between backups.(however, it Does not change the amount of time it takes to compress and send data to the target.)Network based VMFSSince CBT removes the need to scan VMDK’s this helps a large amount on network based VMFS. Scanning for change is slower on network based VMFS.As an example, for this vizioncore backup:Start Time: 2/11/2010 10:09:27 PMEnd Time: 2/11/2010 11:43:33 PMDuration: 94 minute(s)Archive Size: 2.82 GBThe New Duration could be down to 3 minutes
VM’s hosted on ESX4, depending on the VM configuration, may support change tracking. The vSphere API has a flag that indicates whether or not a particular VM is change tracking capable.VM’s hosted on ESX3 do not support change tracking.
Vsphere : CBT must be turned on first. Not on by default. Is enabled per VM. Bulk-enable script:http://vcommunity.vizioncore.com/administration/vecoshell/b/weblog/archive/2010/04/19/bulk-enabling-cbt-for-vms.aspx This site discusses: http://itknowledgeexchange.techtarget.com/virtualization-pro/what-is-changed-block-tracking-in-vsphere/Otherwise, a backup job just works w/ CBT, as long as it’s been enabled on the individ. VMIF CBT or ABM fail for any reason, job still completes: this will show up though only in the logs. (this is future feature request)Screenshot credit: http://www.punchingclouds.com/wp-content/uploads/2009/12/Screen-shot-2009-12-09-at-6.38.44-PM.png
On backup execution, if ABM is enabled, If CBT is enabled on the VM (status persisted in vRanger database) to be backed upIf no space saving technology is chosen for the job, ABM shall always be used on all full backups. If incremental or differential is selected, ABM shall only be used on the initial full backup; any incremental or differential thereafter shall use both the AB and CB filter.If CBT is not enabled on the VM to be backed up, ABM shall always be used regardless of the space saving technology choiceABM shall be applied only to Windows guest OSes when it is enabled
Restore, VMDK is filled with Zero’s before restore started, only Active Data Blocks are restored to VMDK, not deleted blocks and we don’t spend time writing zero’s.Undeleted programs will not work on a restore VM that was backed up with ABM.
With the release of vRanger Pro 4.2, two new features have been added to the product.The first is support for licensed ESXi hosts. vRanger Pro is now able to backup VM’s running on ESXi hosts. The requirements to use an ESXi host are it must be licensed (not the free version). Typically this will mean that the ESXi server is managed by vCenter, but as long as it is licensed, it does not need to be managed by vCenter. You will have to discover and add the ESXi hosts individually within vRanger if they are not managed by vCenter.The second feature is support for LAN free backup options. vRanger Pro can now utilize Fibre Channel or iSCSI networks allowing administrators to separate backup traffic and not put any additional load on your ESX hosts. For this release, the LAN free option does not include a direct to target option. From a vRanger Pro user or admin point of view, support for ESXi involves no changes to how you use vRanger. You license your ESXi hosts in vRanger Pro the same as you would an ESX host and you configure your jobs the same way.For the remainder of this course update, we will focus on the LAN free feature that is now available in vRanger Pro.
This is a review: simply another way to diagramvR Direct To Target: backups across the network
This slide illustrates how vRanger Pro performs backups on an ESX host for comparison purposes. During backup, the vRanger Pro backup agent is injected into the service console OS, reads the VM’s disk, discards the empty blocks, compresses the data and then sends the compressed data directly to the backup respository, bypassing the vRanger Pro server. The agent does not remain resident in memory after the backup completes.
The current (intro. At 4.2) implementation of LAN-free, vR does act as a proxy for the backup traffic that comes from the repository, across the vR physical machine, and then finally to the target repository. That being said, the traffic goes across the FibreChannel network, off of the LAN, and has tested internally at fast rates of ~ 174 MB/sESXi backups work the same wayNetwork mode Backup - ESXi – All traffic from the ESXi host to the vRanger server will be uncompressed, compressed on the vRanger server then streamed to the repository – one step process.Network mode Restore – ESXi – The backup archive will be streamed from the repository in its compressed form to the vRanger server, while being streamed uncompression will occur from the vRanger server to the ESXi host.
This diagram illustrates how vRanger Pro performs backups on ESXi hosts. vRanger Pro utilizes the vStorage API to perform these backups.The backup traffic travels over the management connection of the ESXi host using the network transport method (NBD) of the vStorage API.The traffic between the ESXi host and the vRanger Pro server will be uncompressed, and then the vRanger Pro server will compress the traffic and send it to the backup respository. To improve performance vRanger Pro server discards empty blocks (“0’s”), compresses it and sends it to the backup repository “on the fly”, the only time the data is written to disk is on the backup respository.
You should read and understand all of the documentation published by Vizioncore for vRanger before implementing LAN FREE backups so as to avoid configuration errors. This slide highlights some important considerations for those organizations considering implementing LAN FREE backups with vRanger Pro 4.As in vRanger Pro 3 with VCB, you will need to install vRanger Pro on the physical proxy that is zoned and given access to the VMFS luns shared by your ESX hosts.Only one proxy should be used with a given set of VMFS luns.There is no need for the VCB application on the proxy server, the vStorage libraries are distributed with the vRanger Pro application. This means there is one less application to manage and maintain.The vStorage storage APIs are compatible with ESX 3.0.2 and later releases. In order to use the vStorage API for backups or replication, the ESX hosts require a minimum license level of “Essentials”. This is a VMware requirement.
vRanger Pro 4.2 jobs that have the “Use fiber or iSCSI” option selected will use the vStorage API to access a VM’s disks to read the VM’s data to perform the backup. Using the vStorage API, the data will be uncompressed as it travels from the storage device to the vRanger Pro server.At the vRanger server it the empty blocks will be ignored, and the data will be compressed and then sent to the storage repository.
This shows the physical proxy server where vRanger is installed and how it sees the storage when everything is connected and working.Disk 0 is the local disk where the OS and vRanger Pro application are installed.Disks 1-4 are the VMFS luns that are shared by the ESX hosts and the physical proxy server where vRanger Pro is installed.Disk 5 in this case, is the storage repository, in this case an iSCSI lun formatted with NTFS.Notice that for the VMFS luns that the partition is unknown. This is because it is formatted with VMFS and not NTFS. You should read and understand the documentation for proper configuration of the proxy server. (For example, disable auto mount so the Windows OS on the proxy server does not try to write a disk signature to the shared storage (VMFS) luns and corrupt the disks).
To use the LAN free option, edit or create a new job and select the “Use Fiber or iSCSI” option in your backup job.Also notice the setting below it which is to perform a Network backup if the Fiber or iSCSI attempt fails. This is selected by default and should be de-selected if you do not want this option enabled.
This diagram shows a typical environment where the ESX hosts are connected to a FC switch which connects to the FC storage device.For illustration purposes we only show one switch, when many environments use redundant switches to provide multipathing failover protection.To be able to implement LAN free backups with the same functionality as VCB, you will need to implement a physical proxy that uses the FC infrastructure and is zoned and given access to the shared storage where the VMs are stored. This part of the setup is the same as VCB and all the best practices from VCB days still apply.
So here we see the physical proxy server added to the environment. This is where vRanger Pro will be installed. There is no need to install anything besides vRanger Pro, it contains all of the dll’s necessary to use the vStorage APIs. So this is a simpler implementation to install and configure as well as maintain.
Similar to a Fibre Channel network, the iSCSI network architecture has the same basic requirements of allowing connectivity to the iSCSI SAN storage device and granting access to the LUNS where the VMs are stored. With an iSCSI network, implementations will require that the vRanger proxy server connections to be in the same vlan (where vlans are used) as the ESX connections to the shared storage.
If your storage device provides the ability to provide very granular access, the vRanger Pro server only needs read only access to the shared storage where the VMs are stored. This is not a requirement, but a best practice when possible.
This diagram illustrates an environment where the VMs are stored on a FC SAN and the storage repository for backups are also on a FC SAN.To improve performance, use one HBA to read the source VMs’ disks and a second HBA to write to the repository. This will allow you to scale the number of concurrent backups and reduce your overall backup window.
This diagram illustrates an environment where the VMs are stored on a iSCSI SAN and the storage repository for backups is an iSCSI SAN. So we see an NIC connection where the physical vRanger proxy server reads the VMs’ data, and a second NIC where the compressed data is sent to the repository to store the archives. In a small environment, this could be a typical design.
In a large production environment, organizations can utilize multiple connections to the shared storage. If you have additional NICs in your vRanger Pro proxy server to use for the connection(s) to the backup repository(s), this can also improve your backup performance and shorten your backup window. Having your different storage repository devices available on different subnets for your vRanger Pro server will simplify analyzing performance and identifying bottlenecks. Limiting the number of hops between your vRanger server to the storage repository, and ideally using a separate storage network infrastructure are also best practices for performance and security reasons.
Now lets take a look on how the data flows when you use the LAN free option in vRanger Pro. First, the data will be read from the shared storage using vRanger Pro’s connection to the shared storage. As the data is read, the vRanger Pro compression engine will gather and compress the data stream to conserve space on the storage repository and also lower the amount of traffic on that connection. Consequently, there will always be more traffic occurring on the read connections as compared to the write connections.
Here we see data that has been collected on the vRanger Pro server. > Now we will see the illustration as is shows the data being compressed, this all happens continuously throughout the backup process. <Next slide>
>Here you should notice that the data blocks have changed color > to indicate that there are now in a compressed state and will travel over the write connection where they will be stored on your backup repository.So as you can see, if you add more read and write connections, you should be able to increase the speed of your individual backups, be able to run more jobs in parallel, and reduce your backup windows. At some point you may saturate some resource. It may be a nic or hba, or a group of disks, a port buffer or physical link, or the physical resources on your vRanger Proxy server.So measuring performance to get some baseline performance data as you begin to implement and then continuing to gather some performance data as you change configurations and increase the backup loads will help you determine if there are factors in your environment that are creating performance bottlenecks.
This is a new window that appears in the vRanger “My Inventory” view. It allows a user to group disparate VMs, hosts, and folders together, for the purpose of creating backup jobs on those particular assets. This gives you more flexibility for setting up your backup jobs.Can include any VC object, DC, Clusters, VM’s, foldersObject can be static or dynamic.
Restore, VMDK is filled with Zero’s before restore started, only Blocks with data are restored to VMDK, this way we won’t spend time writing zero’s and inflating a thin disk.In the event you (or support) performs a manual restore and end up with a flat disk you can clone a VM or migrate a VM from flat too thin to change its type.
When creating a backup, The user provided encryption password shall meet the following complexity requirements:Contains at least six charactersContains characters from three of the following categoriesUppercase alphabet characters (A-Z)Uppercase alphabet characters (a-z)Arabic numerals(0-9)Non-alphanumeric characters (for example, !$#%)RestoreOn restore you will be asked for this passwordImporting a repositorySave point Manifest restoreManual restore
Wizard-driven, GUI interface for creating backup jobs
Intuitive, graphic interface for at-a-glance feedback on current jobs
Summary screen of a restore job: -description,The savepoints used to restore any scheduling infoOptions used
A simple, straight-forward interface for FLR: select the files from the savepoint on the leftChoose your destination on the rightStatus/progress is shown at bottom
configuration options, gives users complete control over the process:Max num of tasks running at one timeMax num of tasks off a LUNMax num of tasks on a hostMax num of tasks per repositoryTimeout value (in hours) for a taskMin space needed on hostsThese settings that tweak the Smart Backup Manager, allow for a user to either increase or decrease vR’s activity, based on their specific environmental requirements