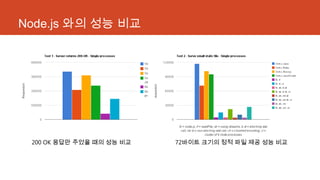
Node.js 와의 성능비교
200 OK 응답만 주었을 때의 성능 비교 72바이트 크기의 정적 파일 제공 성능 비교
7.
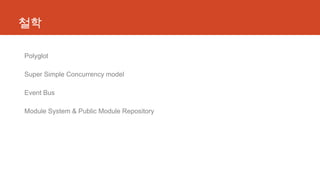
개인적으로 좋은 부분
1.Event-based 프로그래밍 모델을 제공하
는 프레임웍.
2. 멀티코어 리소스를 쉼게 사용.
3. Event Bus.
4. Module System.
5. Polyglot.
8.
개발자 커뮤니티
자료를 얻기위한 실질적인 유일한 곳!!
주요 답변자
• timfox – RabbitMQ 개발자
• normanmaurer – Netty 개발자
Please don’t use StackOverflow to ask Vert.x questions – ask them here!
9.
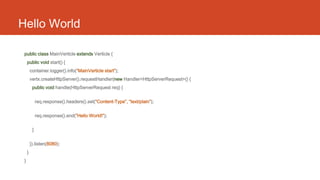
Hello World
public classMainVerticle extends Verticle {
public void start() {
container.logger().info(“MainVerticle start”);
vertx.createHttpServer().requestHandler(new Handler<HttpServerRequest>() {
public void handle(HttpServerRequest req) {
req.response().headers().set(“Content-Type”, “text/plain”);
req.response().end(“Hello World!”);
}
}).listen(8080);
}
}
10.
주의 사항
1. 코드의중첩이 깊어지게 하지 말자
2. 차단 코드를 작성하지 말자
3. 상태전이에 주의 하자
11.
개발 환경 구축
목차
1.환경설정
2. 설치
3. 셋팅
4. gradle project template
5. auto redeploy
6. remote debugging
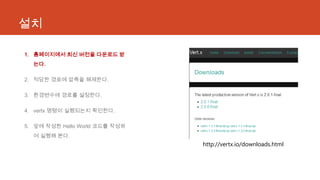
설치
1. 홈페이지에서 최신버전을 다운로드 받
는다.
2. 적당한 경로에 압축을 해제한다.
3. 환경변수에 경로를 설정한다.
4. vertx 명령이 실행되는지 확인한다.
5. 앞에 작성한 Hello World 코드를 작성하
여 실행해 본다.
http://vertx.io/downloads.html
14.
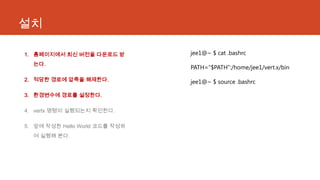
설치
1. 홈페이지에서 최신버전을 다운로드 받
는다.
2. 적당한 경로에 압축을 해제한다.
3. 환경변수에 경로를 설정한다.
4. vertx 명령이 실행되는지 확인한다.
5. 앞에 작성한 Hello World 코드를 작성하
여 실행해 본다.
jee1@~ $ cat .bashrc
PATH=“$PATH”:/home/jee1/vert.x/bin
jee1@~ $ source .bashrc
15.
설치
1. 홈페이지에서 최신버전을 다운로드 받
는다.
2. 적당한 경로에 압축을 해제한다.
3. 환경변수에 경로를 설정한다.
4. vertx 명령이 실행되는지 확인한다.
5. 앞에 작성한 Hello World 코드를 작성하
여 실행해 본다.
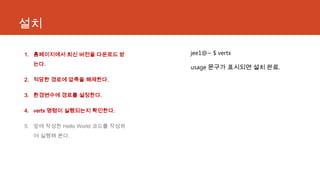
jee1@~ $ vertx
usage 문구가 표시되면 설치 완료.
16.
설치
1. 홈페이지에서 최신버전을 다운로드 받
는다.
2. 적당한 경로에 압축을 해제한다.
3. 환경변수에 경로를 설정한다.
4. vertx 명령이 실행되는지 확인한다.
5. 앞에 작성한 Hello World 코드를 작성하
여 실행해 본다.
jee1@work $ vertx run
HelloWorldVerticle.java
Verticle start.
이후 브라우저로 8080 포트에 접속하면
Hello World! 문구를 확인할 수 있음.
17.
셋팅
기본 설정은 로그가OS의 temp 디렉토리에
vertx.log 로 생성.
설정파일 위치 vert.x/conf/logging.properties
# Put the log in the system temporary directory
# java.util.logging.FileHandler.pattern = %t/vertx.log
java.uril.logging.FileHandler.pattern =
/home/jee1/vertx/log/vertx.log
jee1@~ $ cat vertx/log/vertx.log
[vert.x-eventloop-thread-2] 03:06:37,789 INFO [null-
HelloWorldVerticle.java-704507910] Verticle start.
18.
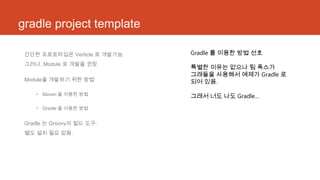
gradle project template
간단한프로토타입은 Verticle 로 개발가능.
그러나, Module 로 개발을 권장.
Module을 개발하기 위한 방법
• Maven 을 이용한 방법
• Gradle 을 이용한 방법
Gradle 는 Groovy의 빌드 도구.
별도 설치 필요 없음.
Gradle 를 이용한 방법 선호
특별한 이유는 없으나 팀 폭스가
그래들을 사용해서 예제가 Gradle 로
되어 있음.
그래서 너도 나도 Gradle…
19.
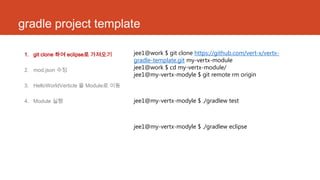
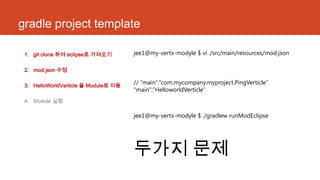
gradle project template
1.git clone 하여 eclipse로 가져오기
2. mod.json 수정
3. HelloWorldVerticle 을 Module로 이동
4. Module 실행
20.
gradle project template
1.git clone 하여 eclipse로 가져오기
2. mod.json 수정
3. HelloWorldVerticle 을 Module로 이동
4. Module 실행
jee1@work $ git clone https://github.com/vert-x/vertx-
gradle-template.git my-vertx-module
jee1@work $ cd my-vertx-module/
jee1@my-vertx-modyle $ git remote rm origin
jee1@my-vertx-modyle $ ./gradlew test
jee1@my-vertx-modyle $ ./gradlew eclipse
21.
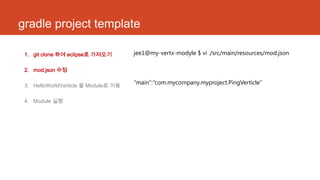
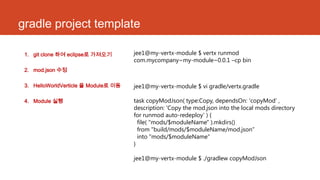
gradle project template
1.git clone 하여 eclipse로 가져오기
2. mod.json 수정
3. HelloWorldVerticle 을 Module로 이동
4. Module 실행
jee1@my-vertx-modyle $ vi ./src/main/resources/mod.json
“main”:“com.mycompany.myproject.PingVerticle”
22.
gradle project template
1.git clone 하여 eclipse로 가져오기
2. mod.json 수정
3. HelloWorldVerticle 을 Module로 이동
4. Module 실행
jee1@my-vertx-modyle $ vi ./src/main/resources/mod.json
// “main”:“com.mycompany.myproject.PingVerticle”
“main”:”HelloworldVerticle”
jee1@my-vertx-modyle $ ./gradlew runModEclipse
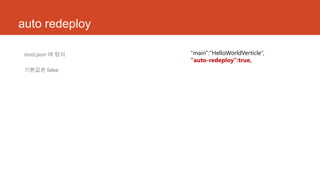
두가지 문제
23.
gradle project template
1.git clone 하여 eclipse로 가져오기
2. mod.json 수정
3. HelloWorldVerticle 을 Module로 이동
4. Module 실행
jee1@my-vertx-module $ vertx runmod
com.mycompany~my-module~0.0.1 –cp bin
jee1@my-vertx-module $ vi gradle/vertx.gradle
task copyModJson( type:Copy, dependsOn: 'copyMod' ,
description: 'Copy the mod.json into the local mods directory
for runmod auto-redeploy' ) {
file( "mods/$moduleName" ).mkdirs()
from "build/mods/$moduleName/mod.json”
into "mods/$moduleName“
}
jee1@my-vertx-module $ ./gradlew copyModJson
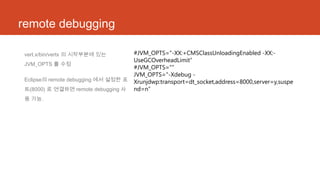
remote debugging
vert.x/bin/vertx 의시작부분에 있는
JVM_OPTS 를 수정
Eclipse의 remote debugging 에서 설정한 포
트(8000) 로 연결하면 remote debugging 사
용 가능.
#JVM_OPTS="-XX:+CMSClassUnloadingEnabled -XX:-
UseGCOverheadLimit“
#JVM_OPTS="“
JVM_OPTS="-Xdebug -
Xrunjdwp:transport=dt_socket,address=8000,server=y,suspe
nd=n”
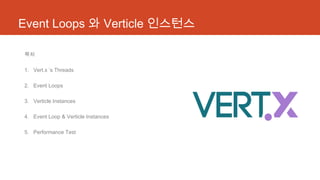
Event Loops
왜 eventloop-thread가 4개인가? org.vertx.java.core.impl.VertxExecutorFactory.java
public static EventLoopGroup eventLoopGroup(String
poolName) {
int poolSize =
Integer.getInteger( "vertx.pool.eventloop.size" ,
Runtime.getRuntime().availableProcessors());
return new NioEventLoopGroup(poolSize, new
VertxThreadFactory(poolName));
}
jee1@my-vertx-module $ grep –c processor /proc/cpuinfo
4
30.
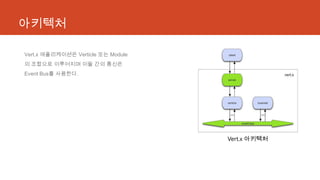
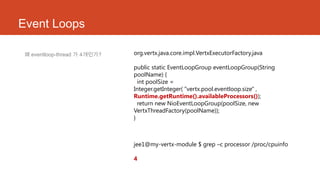
Verticle Instances
-instances 옵션을사용하여 인스턴스를 늘
릴수 있음.
Verticle 생성시 EventLoopGroup에서 하나
의 eventloop_thread를 할당하고 Verticle을
맵핑. 동기화등의 고민없이 쉽게 작성가
능.
jee1@my-vertx-module $ vertx runmod
com.mycompany~my-module~0.0.1 –cp bin –instances 10
org.vertx.java.platform.impl.DefaultPlatformManager.java
org.vertx.java.core.impl.DefaultContext.java
org.vertx.java.core.impl.DefaultVertx.java
31.
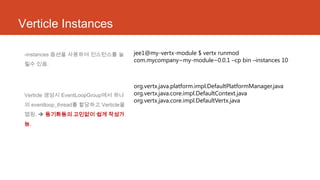
Event Loop &Verticle Instances
• Event Loops 는 코어수에 따라 쓰레드 수
를 자동 결정
• Verticle Instances 는 –instances 옵션을
지정해서 인스턴스 수 변경 가능
• 1개의 Verticle 인스턴스가 생성될 때
Event Loops 에서 하나의 eventloop-
thread 가 할당
1. vertx-eventloop-thread-0
• Verticle-0
• Verticle-4
• Verticle-8
2. vertx-eventloop-thread-1
• Verticle-1
• Verticle-5
• Verticle-9
3. vertx-eventloop-thread-2
• Verticle-2
• Verticle-6
4. vertx-eventloop-thread-3
• Verticle-3
• Verticle-7
32.
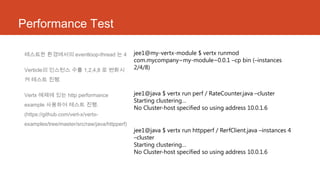
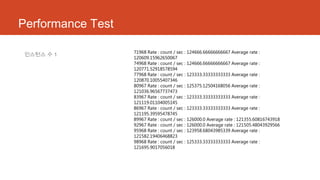
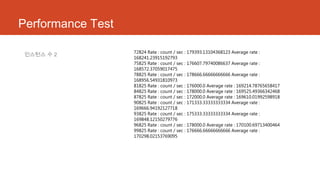
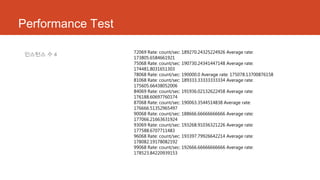
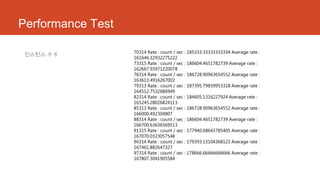
Performance Test
테스트한 환경에서의eventloop-thread 는 4
Verticle의 인스턴스 수를 1,2,4,8 로 변화시
켜 테스트 진행.
Vertx 예제에 있는 http performance
example 사용하여 테스트 진행.
(https://github.com/vert-x/vertx-
examples/tree/master/src/raw/java/httpperf)
jee1@my-vertx-module $ vertx runmod
com.mycompany~my-module~0.0.1 –cp bin (–instances
2/4/8)
jee1@java $ vertx run perf / RateCounter.java –cluster
Starting clustering…
No Cluster-host specified so using address 10.0.1.6
jee1@java $ vertx run httpperf / RerfClient.java –instances 4
–cluster
Starting clustering…
No Cluster-host specified so using address 10.0.1.6


![셋팅
기본 설정은 로그가 OS의 temp 디렉토리에
vertx.log 로 생성.
설정파일 위치 vert.x/conf/logging.properties
# Put the log in the system temporary directory
# java.util.logging.FileHandler.pattern = %t/vertx.log
java.uril.logging.FileHandler.pattern =
/home/jee1/vertx/log/vertx.log
jee1@~ $ cat vertx/log/vertx.log
[vert.x-eventloop-thread-2] 03:06:37,789 INFO [null-
HelloWorldVerticle.java-704507910] Verticle start.](https://image.slidesharecdn.com/vert-130902231431-phpapp02/85/Vert-x-_-17-320.jpg)


![[Hello world 오픈세미나]vertx&socket io](https://cdn.slidesharecdn.com/ss_thumbnails/helloworldvertxsocketio-130717011923-phpapp02-thumbnail.jpg?width=640&height=640&fit=bounds)


![[H3 2012] 내컴에선 잘되던데? - vagrant로 서버와 동일한 개발환경 꾸미기](https://cdn.slidesharecdn.com/ss_thumbnails/c6-vagrantshare-121107074434-phpapp01-thumbnail.jpg?width=640&height=640&fit=bounds)


![[1A4]자바스크립트 라이브러리 개발 운영 경험기](https://cdn.slidesharecdn.com/ss_thumbnails/1a4-140928080702-phpapp01-thumbnail.jpg?width=640&height=640&fit=bounds)
![XECon2015 :: [2-2] 박상현 - React로 개발하는 SPA 실무 이야기](https://cdn.slidesharecdn.com/ss_thumbnails/react1-160404022032-thumbnail.jpg?width=640&height=640&fit=bounds)


![[231]나는서버를썰터이니너는개발만하여라 양지욱](https://cdn.slidesharecdn.com/ss_thumbnails/231-161025004555-thumbnail.jpg?width=640&height=640&fit=bounds)


![[리뷰] 풀스택 개발자를 위한 MEAM 스택 입문](https://cdn.slidesharecdn.com/ss_thumbnails/mean-re-151003142901-lva1-app6892-thumbnail.jpg?width=640&height=640&fit=bounds)


![[NDC17] 왓 스튜디오 서비스파트](https://cdn.slidesharecdn.com/ss_thumbnails/random-170427100335-thumbnail.jpg?width=640&height=640&fit=bounds)


![[225]빅데이터를 위한 분산 딥러닝 플랫폼 만들기](https://cdn.slidesharecdn.com/ss_thumbnails/2251016final-171017052307-thumbnail.jpg?width=640&height=640&fit=bounds)


![[오픈소스컨설팅]Gradle Basic - How to use Gradle in Java Project](https://cdn.slidesharecdn.com/ss_thumbnails/gradle-140122201033-phpapp01-thumbnail.jpg?width=640&height=640&fit=bounds)