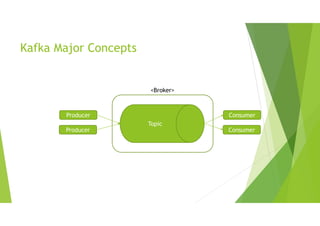
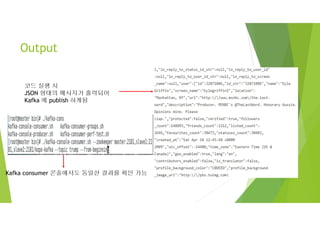
Kafka Major Concepts
대용량실시간 데이터 처리 + 분산된 데이터 파이프라인 표준화
높은 처리량, 빠른 메시지 전송, 운영 효율화를 위해
분산시스템, 페이지캐쉬, 배치전송처리
5.
Kafka Major Concepts
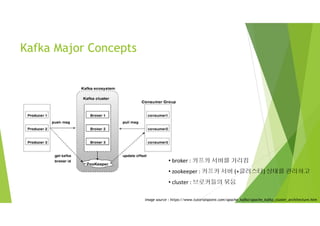
imagesource : https://www.tutorialspoint.com/apache_kafka/apache_kafka_cluster_architecture.htm
• broker : 카프카 서버를 가리킴
• zookeeper : 카프카 서버 (+클러스터) 상태를 관리하고
• cluster : 브로커들의 묶음
6.
Kafka Major Concepts
imagesource : https://kafka.apache.org/documentation/
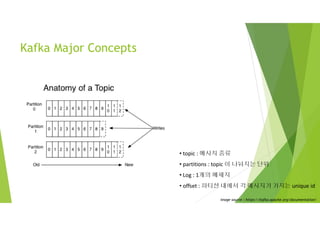
• topic : 메시지 종류
• partitions : topic 이 나눠지는 단위
• Log : 1개의 메세지
• offset : 파티션 내에서 각 메시지가 가지는 unique id
7.
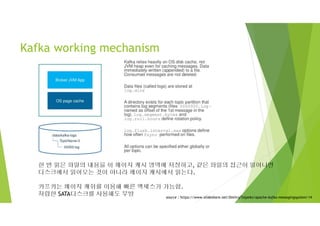
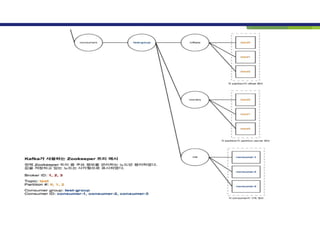
Kafka working mechanism
imagesource : https://fr.wikipedia.org/wiki/Fichier:Overview_of_Apache_Kafka.svg
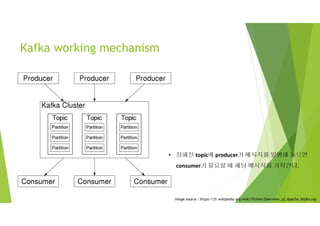
• 정해진 topic에 producer가 메시지를 발행해 놓으면
consumer가 필요할 때 해당 메시지를 가져간다.
8.
Kafka working mechanism
imagesource : https://www.tutorialspoint.com/apache_kafka/apache_kafka_cluster_architecture.htm
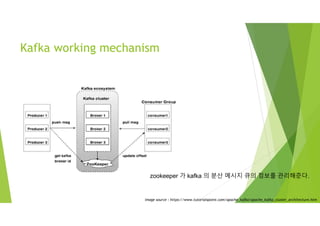
zookeeper 가 kafka 의 분산 메시지 큐의 정보를 관리해준다.
9.
Kafka working mechanism
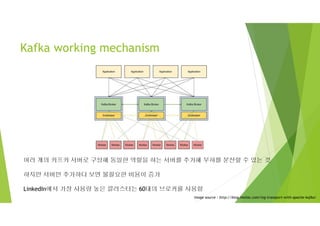
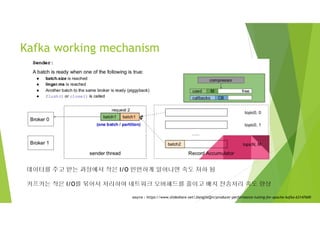
여러개의 카프카 서버로 구성해 동일한 역할을 하는 서버를 추가해 부하를 분산할 수 있는 것
하지만 서버만 추가하다 보면 불필요한 비용이 증가
LinkedIn에서 가장 사용량 높은 클러스터는 60대의 브로커를 사용함
image source : http://blog.mmlac.com/log-transport-with-apache-kafka/
10.
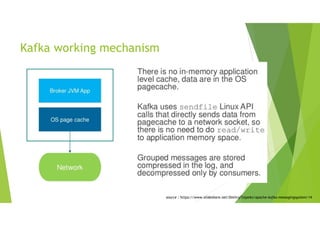
한 번 읽은파일의 내용을 이 페이지 캐시 영역에 저장하고, 같은 파일의 접근이 일어나면
디스크에서 읽어오는 것이 아니라 페이지 캐시에서 읽는다.
카프카는 페이지 캐쉬를 이용해 빠른 액세스가 가능함.
저렴한 SATA디스크를 사용해도 무방
Kafka working mechanism
source : https://www.slideshare.net/DmitryTolpeko/apache-kafka-messagingsystem/14
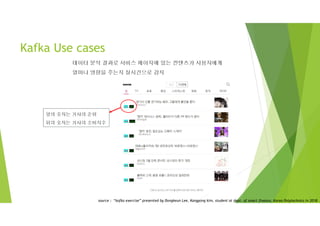
Kafka Use cases
데이터분석 결과로 서비스 페이지에 있는 컨텐츠가 사용자에게
얼마나 영향을 주는지 실시간으로 감지
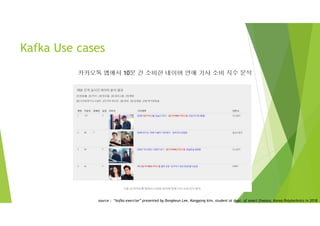
앞의 숫자는 기사의 순위
뒤의 숫자는 기사의 소비지수
source : “kafka exercise” presented by Dongkeun Lee, Kangyong kim, student at dept. of smart finance, Korea Polytechnics in 2018
14.
Kafka Use cases
카카오톡앱에서 10분 간 소비한 네이버 연애 기사 소비 지수 분석
source : “kafka exercise” presented by Dongkeun Lee, Kangyong kim, student at dept. of smart finance, Korea Polytechnics in 2018
가상 머신(VM)
• VirtualBox이용
• 준비 및 점검 사항
- VirtualBox Latest Ver.
- CentOS 7 (DVD Ver.)
- JDK 1.8
- 모든 설치 및
환경설정은 root권한으로
설치함
source : “Hadoop ecosystem” presented by prof. HyoKwan Kim at dept. of smart finance, Korea Polytechnics
18.
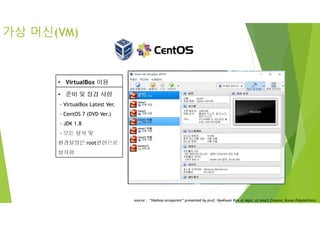
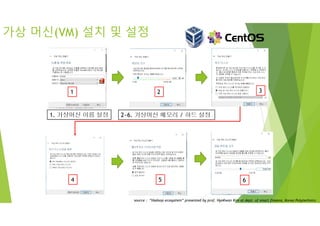
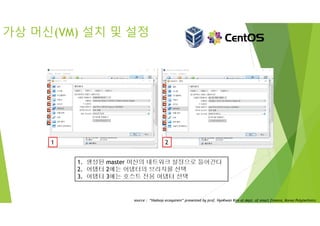
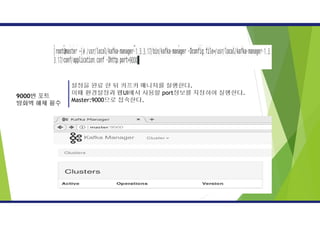
가상 머신(VM) 설치및 설정
1. 가상머신 이름 설정 2~6. 가상머신 메모리 / 하드 설정
2
4
3
5 6
1
5 6
source : “Hadoop ecosystem” presented by prof. HyoKwan Kim at dept. of smart finance, Korea Polytechnics
19.
가상 머신(VM) 설치및 설정
1. 생성된 master 머신의 네트워크 설정으로 들어간다
2. 어탭터 2에는 어댑터의 브리지를 선택
3. 어탭터 3에는 호스트 전용 어댑터 선택
1 2
source : “Hadoop ecosystem” presented by prof. HyoKwan Kim at dept. of smart finance, Korea Polytechnics
20.
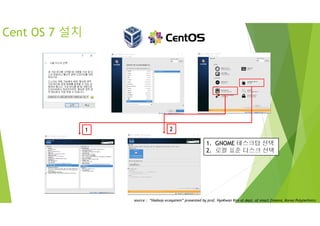
Cent OS 7설치
1. GNOME 테스크탑 선택
2. 로컬 표준 디스크 선택
1 2
source : “Hadoop ecosystem” presented by prof. HyoKwan Kim at dept. of smart finance, Korea Polytechnics
21.
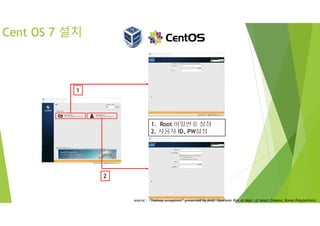
Cent OS 7설치
1. Root 비밀번호 설정
2. 사용자 ID, PW설정
1
2
source : “Hadoop ecosystem” presented by prof. HyoKwan Kim at dept. of smart finance, Korea Polytechnics
22.
네트워크 설정
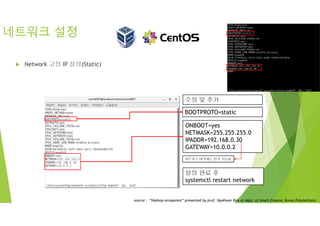
Network고정 IP 설정(Static)
* vi /etc/sysconfig/network-scripts/ifcfg-enp0s8
BOOTPROTO=static
수정 및 추가
ONBOOT=yes
NETMASK=255.255.255.0
IPADDR=192.168.0.30
GATEWAY=10.0.0.2
네트워크 대역대는 변경 가능함
설정 완료 후
systemctl restart network
source : “Hadoop ecosystem” presented by prof. HyoKwan Kim at dept. of smart finance, Korea Polytechnics
23.
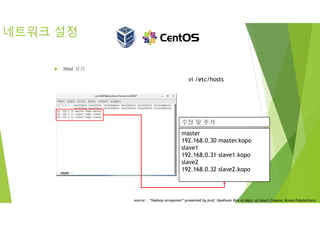
네트워크 설정
Host설정
vi /etc/hosts
master
192.168.0.30 master.kopo
slave1
192.168.0.31 slave1.kopo
slave2
192.168.0.32 slave2.kopo
수정 및 추가
source : “Hadoop ecosystem” presented by prof. HyoKwan Kim at dept. of smart finance, Korea Polytechnics
vi /etc/hosts
24.
네트워크 설정
Hostname 설정
vi /etc/sysconfig/network
NETWORKING=yes
HOSTNAME=master.kopo
수정 및 추가
--나머지 VM도 변경--
예시)
NETWORKING=yes
HOSTNAME=slave1.kopo
[root@localhost ~]# hostnamectl set-hostname master.kopo
source : “Hadoop ecosystem” presented by prof. HyoKwan Kim at dept. of smart finance, Korea Polytechnics
25.
네트워크 설정
방화벽해제
- 방화벽 끄기
systemctl stop firewalld
- 프로그램 자동 시작 해제
systemctl disable firewalld
-방화벽 해체 후 ping test
ping –c 3 8.8.8.8
- CentOS의 경우 OS를 처음 설치했을 때 기본 포트를 제외한 모든 포트를 방화벽에서 막고 있어 사용할 포트를 개방해 주어야함.
- 포트 추가
firewall-cmd --permanent --zone=public --add-port=포트번호/tcp
- 방화벽 재시작
firewall-cmd --reload
- 완전히 방화벽을 해체하고 싶은 경우
- 사용 가능한 모든 서비스/포트 목록을 조회
firewall-cmd --list-all
- 허용한 포트 목록
firewall-cmd --list-ports
- 방화벽 상태 확인
firewall-cmd –state
# 주키퍼 클라이언트 접속용 포트
firewall-cmd --permanent --zone=public --add-port=2181/tcp
firewall-cmd --reload
firewall-cmd --list-ports
nc -z master 2181
#주키퍼 앙상블 포트
firewall-cmd --permanent --zone=public --add-port=2888/tcp
firewall-cmd --permanent --zone=public --add-port=3888/tcp
firewall-cmd --reload
firewall-cmd --list-ports
#카프카 접속 포트
firewall-cmd --permanent --zone=public --add-port=9092/tcp
firewall-cmd --reload
firewall-cmd --list-ports
yum install nc-1.84-24.el6.x86_64.rpm
source : “Hadoop ecosystem” presented by prof. HyoKwan Kim at dept. of smart finance, Korea Polytechnics
26.
Java 설치
Java설치
1.다운로드
Java jdk 1.8을 리눅스 서버에 다운로드 후
특정 폴더에 저장
2. 압축해체
tar xzf jdk-8u181-linux-x64.tar.gz 명령어로
압축 해체
3. 폴더 이동
mv jdk1.8.0_181 /usr/local
명령어를 통해 폴더 이동
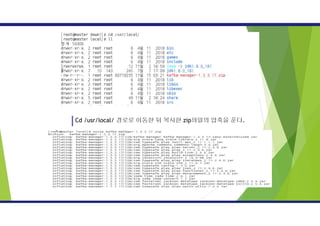
4. 링크 설정
-local 폴더로 이동
cd /usr/local
-링크 설정
ln –s jdk1.8.0_181 java
또는 yum –y install java-1.8.0-openjdk
source : “Hadoop ecosystem” presented by prof. HyoKwan Kim at dept. of smart finance, Korea Polytechnics
27.
주키퍼 설정
cd /usr/local
wgethttp://apache.mirror.cdnetworks.com/zookeeper/zookeeper-3.4.13/zookeeper-3.4.13.tar.gz
tar zxf zookeeper-3.4.13.tar.gz
ln -s zookeeper-3.4.13 zookeeper
mkdir -p /data
cd /data
echo 1 > /data/myid
zookeeper node
28.
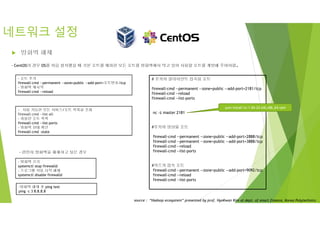
[root@master conf]# ll
total16
-rw-r--r--. 1 501 games 535 Jun 29 2018 configuration.xsl
-rw-r--r--. 1 501 games 2161 Jun 29 2018 log4j.properties
-rw-r--r--. 1 root root 167 Nov 8 23:38 zoo.cfg
-rw-r--r--. 1 501 games 922 Jun 29 2018 zoo_sample.cfg
[root@master conf]# pwd
/usr/local/zookeeper/conf
[root@master conf]# more zoo.cfg
tickTime=2000
initLimit=10
syncLimit=5
dataDir=/data
clientPort=2181
server.1=master:2888:3888
server.2=slave1:2888:3888
server.3=slave2:2888:3888
maxClientCnxns=200
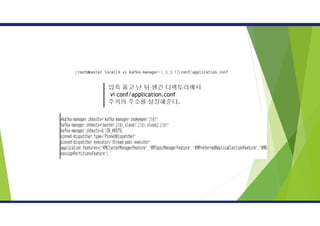
주키퍼 설정
vi zoo.cfg로 실행하여
좌측과 같이 수정 및 추가한다.
tickTime : 주키퍼가 사용하는 시간에 대한 기본 측정 단위(밀리초)
initLimit : Follower가 Leader와 초기에 연결하는 시간에 대한 TimeOut tick 수
syncLimit : Follower가 Leader와 동기화 하는 시간에 대한 TimeOut tick 수
dataDir : 주키퍼의 트랜잭션 로그와 스냅샷이 저장되는 경로
clientPort : 주키퍼 사용 TCP 포트
server.* : 주키퍼 앙상블 구성을 위한 서버 설정, server.myid 형식으로 사용
29.
Java 설치
JAVAPath 설정 ( Optional for Kafka)
vi /etc/profile
Shift + g 제일 밑으로 이동
- PATH 추가 -
export JAVA_HOME=/usr/local/java
export PATH=$JAVA_HOME/bin:$PATH
export CLASSPATH=“.”
Esc 후 shift + : wq 설정 저장
- 환경변수 반영
source /etc/profile
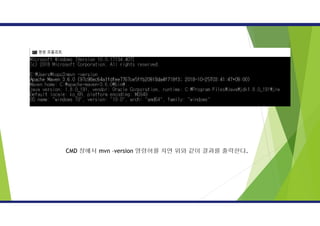
java -versionjava 설치 확인
source : “Hadoop ecosystem” presented by prof. HyoKwan Kim at dept. of smart finance, Korea Polytechnics
30.
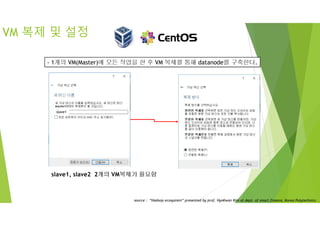
VM 복제 및설정
- 1개의 VM(Master)에 모든 작업을 한 후 VM 복제를 통해 datanode를 구축한다.
slave1
slave1, slave2 2개의 VM복제가 필요함
source : “Hadoop ecosystem” presented by prof. HyoKwan Kim at dept. of smart finance, Korea Polytechnics
31.
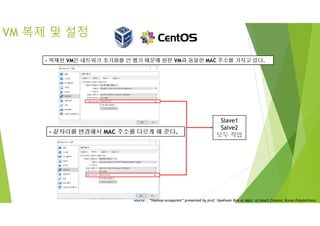
VM 복제 및설정
Slave1
Salve2
모두 작업
- 복제된 VM은 네트워크 초기화를 안 했기 때문에 원본 VM과 동일한 MAC 주소를 가지고 있다.
- 끝자리를 변경해서 MAC 주소를 다르게 해 준다.
source : “Hadoop ecosystem” presented by prof. HyoKwan Kim at dept. of smart finance, Korea Polytechnics
32.
VM 복제 및설정
Slave1
Salve2
모두 작업
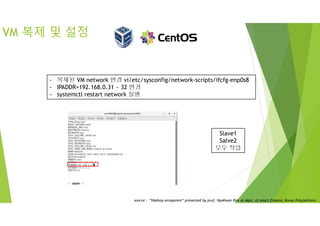
- 복제된 VM network 변경 vi/etc/sysconfig/network-scripts/ifcfg-enp0s8
- IPADDR=192.168.0.31 ~ 32 변경
- systemctl restart network 실행
source : “Hadoop ecosystem” presented by prof. HyoKwan Kim at dept. of smart finance, Korea Polytechnics
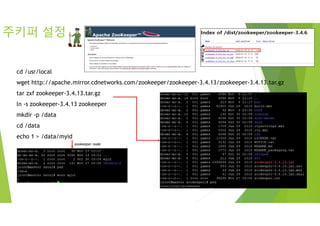
33.
VM 복제 및설정
Slave1
Salve2
모두 작업
- network 변경 vi/etc/sysconfig/network
- NETWORKING=yes
HOSTNAME=slave1~2.kopo 으로 변경
[root@localhost ~]# hostnamectl set-hostname master.kopo
vi /etc/sysconfig/network
source : “Hadoop ecosystem” presented by prof. HyoKwan Kim at dept. of smart finance, Korea Polytechnics
34.
마스터 및 슬레이브SSH 설정
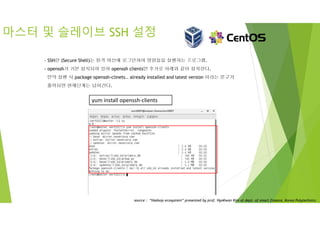
- SSH란 (Secure Shell)는 원격 머신에 로그인하여 명령들을 실행하는 프로그램.
- openssh가 기본 설치되어 있어 openssh clients만 추가로 아래와 같이 설치한다.
만약 실행 시 package openssh-clinets.. already installed and latest version 이라는 문구가
출력되면 현재단계는 넘어간다.
yum install openssh-clients
source : “Hadoop ecosystem” presented by prof. HyoKwan Kim at dept. of smart finance, Korea Polytechnics
35.
마스터 및 슬레이브SSH 설정
- key-gen 생성
Master에서만 ssh-keygen 명령어를 사용하여 RSA 키 페어를 생성한다.
cd
ssh-keygen 입력 후 엔터 3번
ssh-copy-id –i ~/.ssh/id_rsa.pub root@slave1.kopo
ssh-copy-id –i ~/.ssh/id_rsa.pub root@slave1.kopo
입력 후 Are you sure you want
continue connection ? yes 입력 후
각 slave 서버 root 비밀번호 입력
source : “Hadoop ecosystem” presented by prof. HyoKwan Kim at dept. of smart finance, Korea Polytechnics
36.
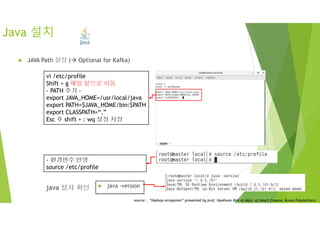
[root@slave1 data]# ll
total4
-rw-r--r--. 1 root root 2 Oct 30 03:08 myid
drwxr-xr-x. 2 root root 131 Nov 27 02:57 version-2
[root@slave1 data]# pwd
/data
[root@slave1 data]# more myid
2
[root@slave1 data]#
복제 노드(slave1, slave2)주키퍼 설정
vi myid로 id를 수정한다.
slave1 : 2
slave2 : 3
37.
주키퍼 시작과 종료,상태확인
[root@slave2 ~]# sh /usr/local/zookeeper/bin/zkServer.sh start
ZooKeeper JMX enabled by default
Using config: /usr/local/zookeeper/bin/../conf/zoo.cfg
Starting zookeeper ... STARTED
[root@slave2 ~]# sh /usr/local/zookeeper/bin/zkServer.sh stop
ZooKeeper JMX enabled by default
Using config: /usr/local/zookeeper/bin/../conf/zoo.cfg
Stopping zookeeper ... STOPPED
[root@slave2 ~]#
[root@master conf]# sh /usr/local/zookeeper/bin/zkCli.sh
wget http://apache.mirror.cdnetworks.com/kafka/1.0.0/kafka_2.11-1.0.0.tgz
tar zxfkafka_2.11-1.0.0.tgz
ln -s kafka_2.11-1.0.0 kafka
scp kafka_2.11-1.0.0.tgz root@slave1:/usr/local
scp kafka_2.11-1.0.0.tgz root@slave2:/usr/local
vi /usr/local/kafka/config/server.properties
카프카 설치
# The id of the broker. This must be set to a unique integer for each broker.
broker.id=1
# A comma seperated list of directories under which to store log files
log.dirs=/kdata1,/kdata2
############################# Zookeeper #############################
# Zookeeper connection string (see zookeeper docs for details).
# This is a comma separated host:port pairs, each corresponding to a zk
# server. e.g. "127.0.0.1:3000,127.0.0.1:3001,127.0.0.1:3002".
# You can also append an optional chroot string to the urls to specify the
# root directory for all kafka znodes.
zookeeper.connect=master:2181,slave1:2181,slave2:2181/kopo-kafka
slave1 : 2
slave2 : 3
mkdir /kdata1
mkdir /kdata2
실 운영시 별도 파티션으로 설정
for more information:
https://kafka.apacheaorg/documentation/#brokerconfigs
* 주키퍼노드명 미작성時
주키퍼 루트노드에 저장
이 예제에선 kopo-kafka로 설정하였음
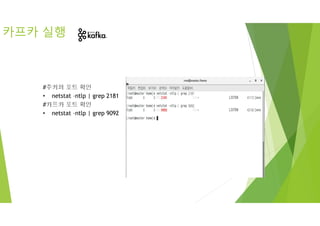
#주키퍼 포트 확인
•netstat –ntlp | grep 2181
#카프카 포트 확인
• netstat –ntlp | grep 9092
카프카 실행
42.
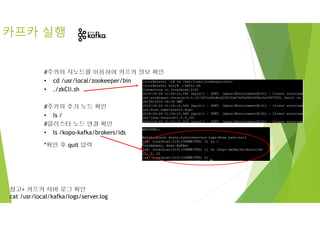
#주키퍼 지노드를 이용하여카프카 정보 확인
• cd /usr/local/zookeeper/bin
• ./zkCli.sh
#주키퍼 추가 노드 확인
• ls /
#클러스터 노드 연결 확인
• ls /kopo-kafka/brokers/ids
*확인 후 quit 입력
카프카 실행
참고> 카프카 서버 로그 확인
cat /usr/local/kafka/logs/server.log
43.
카프카 테스트
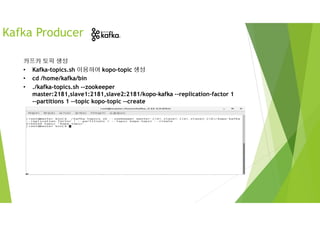
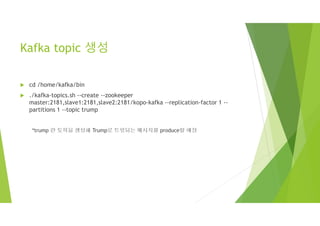
카프카 토픽생성
• Kafka-topics.sh 이용하여 kopo-topic 생성
• cd /home/kafka/bin
• ./kafka-topics.sh --zookeeper
master:2181,slave1:2181,slave2:2181/kopo-kafka --replication-factor 1
--partitions 1 --topic kopo-topic --create
[root@master ~]# /usr/local/kafka/bin/kafka-topics.sh --zookeeper master:2181,slave1:2181,slave2:2181/kopo-kafka
--replication-factor 1 --partitions 1 --topic ds-topic –create
Created topic "ds-topic".
44.
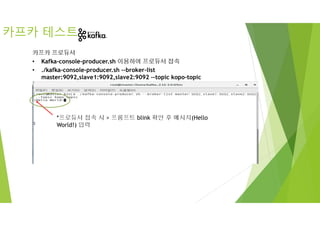
*프로듀서 접속 시> 프롬프트 blink 확인 후 메시지(Hello
World!) 입력
카프카 테스트
카프카 프로듀서
• Kafka-console-producer.sh 이용하여 프로듀서 접속
• ./kafka-console-producer.sh --broker-list
master:9092,slave1:9092,slave2:9092 --topic kopo-topic
45.
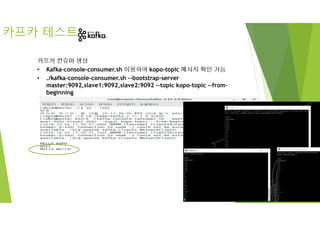
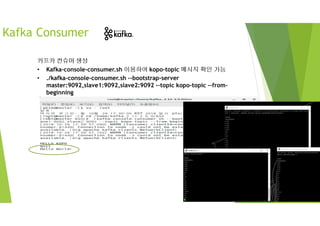
카프카 테스트
카프카 컨슈머생성
• Kafka-console-consumer.sh 이용하여 kopo-topic 메시지 확인 가능
• ./kafka-console-consumer.sh --bootstrap-server
master:9092,slave1:9092,slave2:9092 --topic kopo-topic --from-
beginning
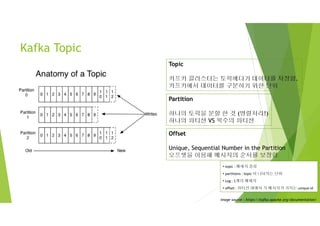
image source :https://kafka.apache.org/documentation/
• topic : 메세지 종류
• partitions : topic 이 나눠지는 단위
• Log : 1개의 메세지
• offset : 파티션 내에서 각 메시지가 가지는 unique id
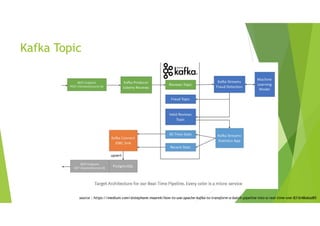
Topic
카프카 클러스터는 토픽에다가 데이터를 저장함.
카프카에서 데이터를 구분하기 위한 단위
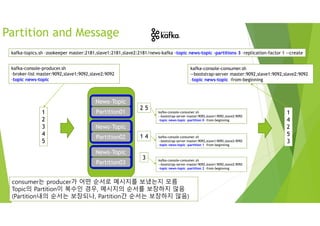
Partition
하나의 토픽을 분할 한 것 (병렬처리!)
하나의 파티션 VS 복수의 파티션
Kafka Topic
Offset
Unique, Sequential Number in the Partition
오프셋을 이용해 메시지의 순서를 보장함
49.
Kafka Partition
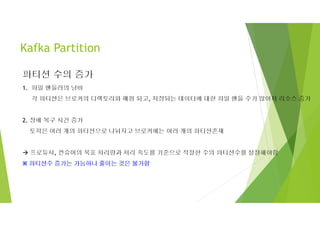
파티션 수의증가
1. 파일 핸들러의 낭비
각 파티션은 브로커의 디렉토리와 매핑 되고, 저장되는 데이터에 대한 파일 핸들 수가 많아져 리소스 증가
2. 장애 복구 시간 증가
토픽은 여러 개의 파티션으로 나눠지고 브로커에는 여러 개의 파티션존재
프로듀서, 컨슈머의 목표 처리량과 처리 속도를 기준으로 적절한 수의 파티션수를 설정해야함
※ 파티션수 증가는 가능하나 줄이는 것은 불가함
50.
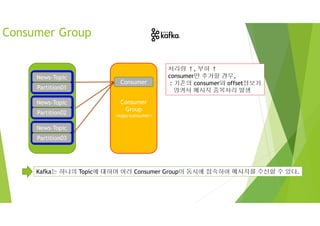
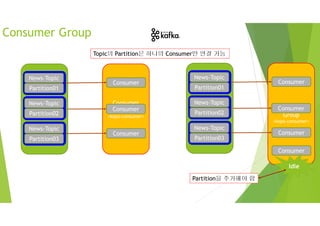
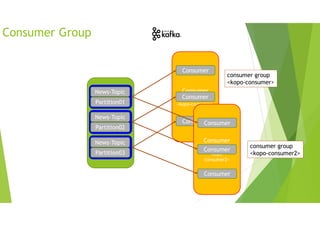
Consumer
Consumer
Consumer
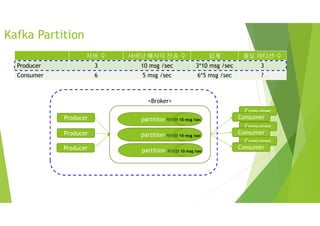
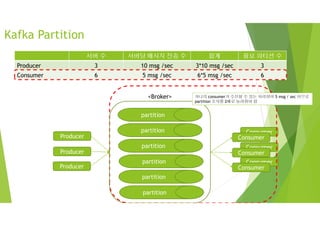
서버 수 서버당메시지 전송 수 합계 필요 파티션 수
Producer 3 10 msg /sec 3*10 msg /sec 3
Consumer 6 5 msg /sec 6*5 msg /sec ?
partition
Producer
Producer
Consumer
Consumer
<Broker>
Producer
partition
partition
Consumer
Kafka Partition
처리량 10 msg /sec
처리량 10 msg /sec
처리량 10 msg /sec
51.
Consumer
Consumer
Consumer
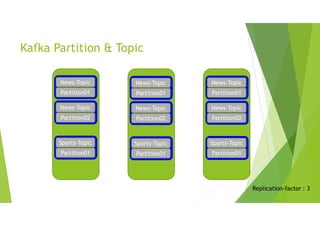
서버 수 서버당메시지 전송 수 합계 필요 파티션 수
Producer 3 10 msg /sec 3*10 msg /sec 3
Consumer 6 5 msg /sec 6*5 msg /sec 6
partition
Producer
Producer
Consumer
Consumer
<Broker>
Producer
partition
partition
Consumer
partition
partition
partition
Kafka Partition
하나의 consumer가 수신할 수 있는 처리량이 5 msg / sec 이므로
partition 숫자를 2배로 늘려줘야 함
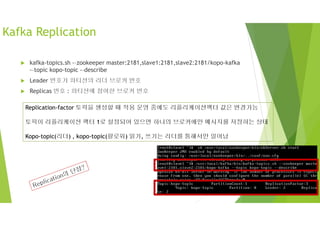
Kafka Replication
kafka-topics.sh-–zookeeper master:2181,slave1:2181,slave2:2181/kopo-kafka
-–topic kopo-topic -–describe
Leader 번호가 파티션의 리더 브로커 번호
Replicas 번호 : 파티션에 참여한 브로커 번호
Replication-factor 토픽을 생성할 때 적용 운영 중에도 리플리케이션팩터 값은 변경가능
토픽이 리플리케이션 팩터 1로 설정되어 있으면 하나의 브로커에만 메시지를 저장하는 상태
Kopo-topic(리더) , kopo-topic(팔로워) 읽기, 쓰기는 리더를 통해서만 일어남
55.
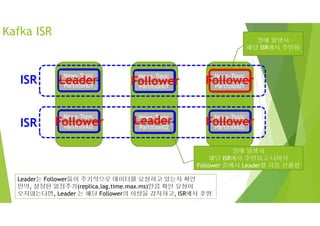
Kafka ISR
ISR: In Sync Replica
리플리케이션 되고 있는 리플리케이션 그룹을 의미함
ISR그룹의 구성원만이 리더의 자격을 갖음
리더(Leader)만 읽고 쓰기, Follower는 Leader의 데이터를 읽어서 동기화(Sync)
리더와 데이터 동기화작업을 하고 이것을 유지하여 리플리케이션의 신뢰성을 높임.
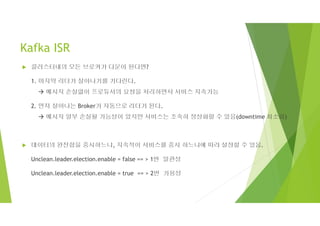
Kafka ISR
클러스터내의모든 브로커가 다운이 된다면?
1. 마지막 리더가 살아나기를 기다린다.
메시지 손실없이 프로듀서의 요청을 처리하면서 서비스 지속가능
2. 먼저 살아나는 Broker가 자동으로 리더가 된다.
메시지 일부 손실될 가능성이 있지만 서비스는 조속히 정상화할 수 있음(downtime 최소화)
데이터의 완전함을 중시하느냐, 지속적이 서비스를 중시 하느냐에 따라 설정할 수 있음.
Unclean.leader.election.enable = false == > 1번 일관성
Unclean.leader.election.enable = true == > 2번 가용성
58.
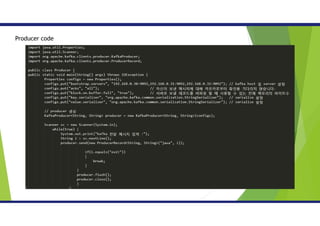
Kafka Producer
카프카 토픽생성
• Kafka-topics.sh 이용하여 kopo-topic 생성
• cd /home/kafka/bin
• ./kafka-topics.sh --zookeeper
master:2181,slave1:2181,slave2:2181/kopo-kafka --replication-factor 1
--partitions 1 --topic kopo-topic --create
59.
*프로듀서 접속 시> 프롬프트 blink 확인 후 메시지(Hello
World!) 입력
카프카 프로듀서
• Kafka-console-producer.sh 이용하여 프로듀서 접속
• ./kafka-console-producer.sh --broker-list master:9092,slave1:9092,slave2:9092 --topic
kopo-topic -–request-required-acks 1
Kafka Producer
프로듀서 주요 옵션
Broker-list
카프카 클러스터에 처음연결 하기 위한 호스트와 포트 정보로 구성된 리스트 정보 나타냄
호스트 하나만 쓸 수 도 있지만 장애가 생길 수 있기때문에 리스트 전체를 입력하는 걸 권장
Acks
프로듀서가 카프카 토픽의 리더에게 메시지를 보낸 후 요청을 완료하기 전 승인의 수
해당 옵션의 수가 작으면 성능이 좋지만, 메시지 손실 가능성이 있음
60.
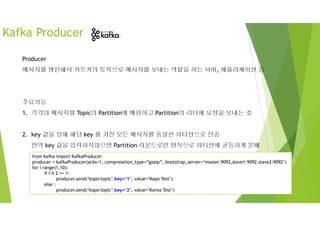
Producer
메시지를 생산해서 카프카의토픽으로 메시지를 보내는 역할을 하는 서버, 애플리케이션 등
주요기능
1. 각각의 메시지를 Topic의 Partition에 매핑하고 Partition의 리더에 요청을 보내는 것
2. key 값을 정해 해당 key 를 가진 모든 메시지를 동일한 파티션으로 전송
만약 key 값을 입력하지않으면 Partition 라운드로빈 방식으로 파티션에 균등하게 분배
Kafka Producer
from kafka import KafkaProducer
producer = kafkaProducer(acks=1, compresstion_type=“gzaip”, bootstrap_server=‘master:9092,slave1:9092,slave2:9092’)
for i range(1,10):
if I % 2 == 1:
producer.send(‘kopo-topic’,key=‘1’, value=‘Kopo Test’)
else :
producer.send(‘kopo-topic’,key=‘2’, value=‘Korea Test’)
61.
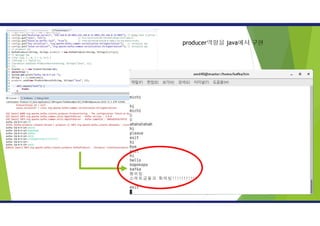
[Producer] Kafka-python https://github.com/dpkp/kafka-python
★pip install kafka-python 으로 라이브러리 설치 (사전 조건 : python 3.xx 설치)
from kafka import KafkaProducer
producer = KafkaProducer(bootstrap_servers='master:9092,slave1:9092,slave2:9092')
future = producer.send('kopo-topic','HWY TEST')
result = future.get(timeout=60)
print(result)
print("END")
[root@slave1 pyKafkaTest]# python producer-option.py
RecordMetadata(topic='kopo-topic', partition=0, topic_partition=TopicPartition(topic='kopo-topic', partition=0),
offset=7, timestamp=1542334214067, checksum=None, serialized_key_size=-1, serialized_value_size=8)
END
이를 타 서버(slave2)에서 consumer로 확인한 결과는 아래와 같습니다.
[root@master ~]# /usr/local/kafka/bin/kafka-console-consumer.sh --bootstrap-server master:9092,slave1:9092,slave2:9092
--topic kopo-topic --from-beginning
HWY TEST
62.
Kafka Consumer
카프카 컨슈머생성
• Kafka-console-consumer.sh 이용하여 kopo-topic 메시지 확인 가능
• ./kafka-console-consumer.sh --bootstrap-server
master:9092,slave1:9092,slave2:9092 --topic kopo-topic --from-
beginning
63.
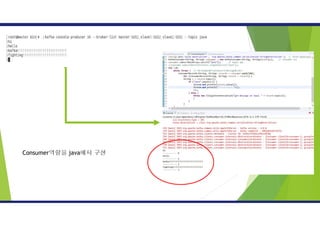
from kafka importKafkaConsumer
consumer = KafkaConsumer('kopo-topic',group_id='kopo-consumer',bootstrap_servers='master:9092,slave1:9092,slave2:9092',enable_auto_commit=True,auto_offset_reset='latest')
for message in consumer:
print "Topic : %s, Partition: %d, Offset: %d, Key: %s, Value: %s" % (message.topic, message.partition, message.offset, message.key, message.value.decode('utf-8'))
https://github.com/dpkp/kafka-python
[Consumer] Kafka-python
★ pip install kafka-python 으로 라이브러리 설치 (사전 조건 : python 3.xx 설치)
late response
64.
[Consumer] Kafka-python https://github.com/dpkp/kafka-python
fromkafka import KafkaConsumer
consumer = KafkaConsumer('kopo-topic',group_id='kopo-consumer',bootstrap_servers='master:9092,slave1:9092,slave2:9092’,
enable_auto_commit=True,auto_offset_reset='latest',fetch_min_bytes=1)
while True:
message = consumer.poll(1.0)
#print (message.keys()) #print (message.values())
#print "Offset: %d, Key: %s, Value: %s" % (message.offset, message.key, message.value.decode('utf-8'))
for tp, mg in message.items():
for m in mg:
print ("%s : %d %d : key=%s value=%s" % ( tp.topic, tp.partition, m.offset, m.key, m.value))
consumer 주요 옵션:
https://kafka-python.readthedocs.io/en/master/apidoc/KafkaConsumer.html#
https://www.oreilly.com/library/view/kafka-the-definitive/9781491936153/ch04.html
컨슈머 리스트 명령어
--bootstrap: 브로커리스트 설정
--list : 컨슈머 리스트를 보여줌.
./kafka-consumer-groups.sh --bootstrap-server master:9092,slave1:092,slave2:9092 --list
Kafka Consumer
[root@master bin]# ./kafka-consumer-groups.sh --bootstrap-server master:9092,slave1:092,slave2:9092 --list
OpenJDK 64-Bit Server VM warning: If the number of processors is expected to increase from one, then you should configure the number of parallel GC threads appropriately using -XX:ParallelGCThreads=
Note: This will not show information about old Zookeeper-based consumers.
[2019-05-15 23:03:11,612] WARN Connection to node -2 could not be established. Broker may not be available. (org.apache.kafka.clients.NetworkClient)
kopo-consumer
71.
Kafka Consumer
컨슈머의 상세정보를 조회함
--bootstrap-server : 브로커 리스트 입력
--group : 컨슈머 그룹 이름 설정
--describe : 상세정보 보기
*LAG : 현재토픽의 저장된 메시지와 컨슈머가 가져간 메시지의 차이
프로듀서와 컨슈머의 처리 속도차이를 알 수 있음
./kafka-consumer-groups.sh --bootstrap-server master:9092,slave1:9092,slave2:9092 --group kopo-consumer --describe
[root@master bin]# ./kafka-consumer-groups.sh --bootstrap-server master:9092,slave1:9092,slave2:9092 --group kopo-consumer --describe
OpenJDK 64-Bit Server VM warning: If the number of processors is expected to increase from one, then you should configure the number of parallel GC threads appropriately using -XX:ParallelGCThreads=N
Note: This will not show information about old Zookeeper-based consumers.
TOPIC PARTITION CURRENT-OFFSET LOG-END-OFFSET LAG CONSUMER-ID HOST CLIENT-ID
test-topic 0 21 21 0 kafka-python-1.4.3-3d11d79a-04f0-4da5-a1b9-808c34f99865/192.168.0.31 kafka-python-1.4.3
kopo-topic 0 425 426 1 - - -
[root@master bin]#
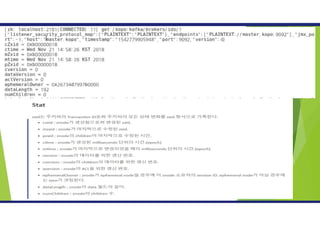
How to findZookeeper Leader in
zookeeper ensemble?
To identify a Zookeeper leader/follower, there are few possible options. Mentioning 2 for keeping this document simple.
1. Check the zookeeper log file on each node, and grep as below:
# grep LEAD /var/log/zookeeper/zookeeper-zookeeper-server-xyz.out
2016-02-29 22:33:47,113 - INFO [QuorumPeer[myid=3]/0:0:0:0:0:0:0:0:2181:QuorumPeer@829] - LEADING
2016-02-29 22:33:47,114 - INFO [QuorumPeer[myid=3]/0:0:0:0:0:0:0:0:2181:Leader@358] - LEADING - LEADER ELECTION TOOK - 9066
2. Use "nc" command to listen TCP communication on port 2181 and determine if the ZooKeeper server is a leader or a follower.
Bellow is a way to check the same:
# echo stat | nc localhost 2181
Zookeeper version: 3.4.6-3485--1, built on 12/16/2015 02:35 GMT
Clients:
/172.25.16.243:37619[1](queued=0,recved=54,sent=54)
/172.25.16.253:58745[1](queued=0,recved=53,sent=53)
Latency min/avg/max: 0/1/362
Received: 627
Sent: 626
Connections: 9
Outstanding: 0
Zxid: 0x400000003
Mode: leader
Node count: 182
Here, we see that the Mode is shown as "leader". If it is a follower, the Mode will be seen as "follower".
For example:
# echo stat | nc localhost 2181 | grep Mode
Mode: leader
# echo stat | nc localhost 2181 | grep Mode
Mode: follower
source : https://community.hortonworks.com/content/supportkb/49435/how-to-find-zookeeper-leader-in-zookeeper-ensemble.html
77.
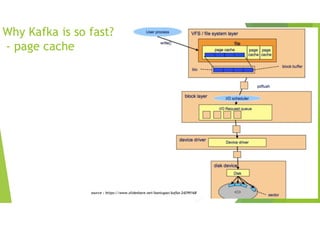
Why Kafka isso fast?
- page cache
source : https://www.slideshare.net/baniuyao/kafka-24299168
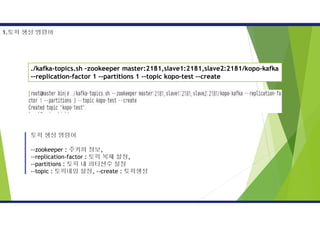
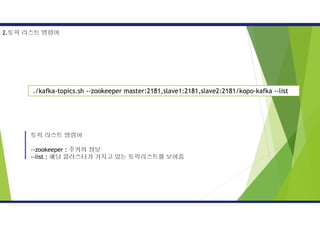
토픽 생성 명령어
--zookeeper: 주키퍼 정보,
--replication-factor : 토픽 복제 설정,
--partitions : 토픽 내 파티션수 설정
--topic : 토픽네임 설정, --create : 토픽생성
1.토픽 생성 명령어
./kafka-topics.sh –zookeeper master:2181,slave1:2181,slave2:2181/kopo-kafka
-–replication-factor 1 --partitions 1 -–topic kopo-test --create
80.
토픽 리스트 명령어
--zookeeper: 주키퍼 정보
--list : 해당 클러스터가 가지고 있는 토픽리스트를 보여줌
2.토픽 리스트 명령어
./kafka-topics.sh --zookeeper master:2181,slave1:2181,slave2:2181/kopo-kafka --list
81.
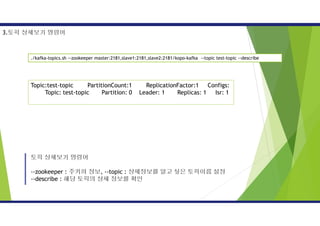
토픽 상세보기 명령어
--zookeeper: 주키퍼 정보, --topic : 상세정보를 알고 싶은 토픽이름 설정
--describe : 해당 토픽의 상세 정보를 확인
3.토픽 상세보기 명령어
./kafka-topics.sh --zookeeper master:2181,slave1:2181,slave2:2181/kopo-kafka --topic test-topic --describe
Topic:test-topic PartitionCount:1 ReplicationFactor:1 Configs:
Topic: test-topic Partition: 0 Leader: 1 Replicas: 1 Isr: 1
82.
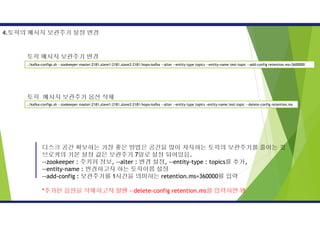
디스크 공간 확보하는가장 좋은 방법은 공간을 많이 차지하는 토픽의 보관주기를 줄이는 것
브로커의 기본 설정 값은 보관주기 7일로 설정 되어있음.
--zookeeper : 주키퍼 정보, --alter : 변경 설정, --entity-type : topics를 추가,
--entity-name : 변경하고자 하는 토픽이름 설정
--add-config : 보관주기를 1시간을 의미하는 retention.ms=360000를 입력
*추가된 옵션을 삭제하고자 할땐 -–delete-config retention.ms를 입력하면 됌
4.토픽의 메시지 보관주기 설정 변경
./kafka-configs.sh --zookeeper master:2181,slave1:2181,slave2:2181/kopo-kafka --alter --entity-type topics --entity-name test-topic --add-config retention.ms=3600000
./kafka-configs.sh --zookeeper master:2181,slave1:2181,slave2:2181/kopo-kafka --alter --entity-type topics -entity-name test-topic --delete-config retention.ms
토픽 메시지 보관주기 변경
토픽 메시지 보관주기 옵션 삭제
83.
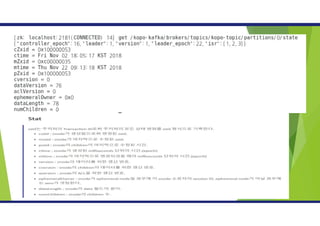
토픽의 파티션 수변경
토픽의 파티션은 증가는 가능하지만, 감소는 불가능함
처음 토픽을 생성할 때 파티션 수를 처리량에 대해 미리 확인하고 설정!
--zookeeper : 주키퍼 정보
--alter : 변경 옵션 선택
--topic : 해당 토픽 설정
--partitions : 파티션 수 설정
./kafka-topics.sh -zookeeper master:2181,slave1:2181,slave2:2181/kopo-kafka -alter -topic test-topic -partitions 2
5.토픽의 파티션 수 변경
[root@master bin]# ./kafka-topics.sh --zookeeper master:2181,slave1:2181,slave2:2181/kopo-kafka --topic test-topic --describe
Topic:test-topic PartitionCount:2 ReplicationFactor:1 Configs:retention.ms=3600000
Topic: test-topic Partition: 0 Leader: 1 Replicas: 1 Isr: 1
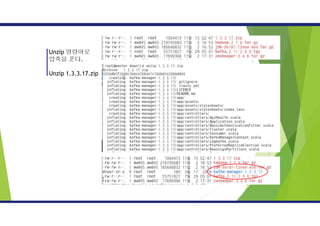
Topic: test-topic Partition: 1 Leader: 2 Replicas: 2 Isr: 2
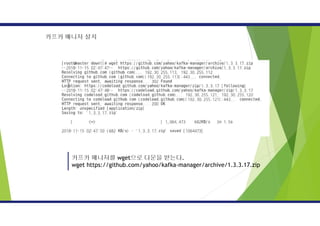
Cd kafka-manager-1.3.3.17 로이동 한 뒤
Zip형태의 배포 파일을 생성한다.
./sbt clean dist
[참고] 만약 javac 가 없어서 에러가 발생한다면?
다음과 같이 설치가능한 jdk를 확인한다.
# yum list java*jdk-devel
설치가능한 jdk 리스트 중 jdk 1.8 버전을 설치한다.(아래 예시)
# yum install java-1.8.0-openjdk-devel.x86_64
설치 후 java compiler 버전을 확인한다.
# javac –version
다시 ./sbt clean dist 를 실행한다.
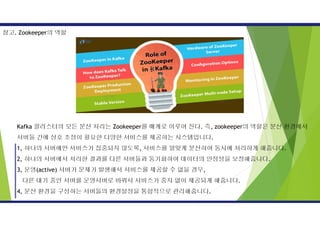
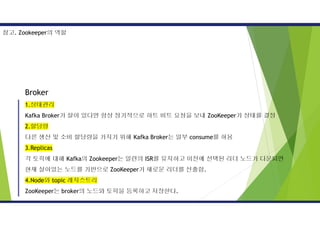
Kafka 클러스터의 모든분산 처리는 Zookeeper를 매개로 이루어 진다. 즉, zookeeper의 역할은 분산 환경에서
서버들 간에 상호 조정이 필요한 다양한 서비스를 제공하는 시스템입니다.
1, 하나의 서버에만 서비스가 집중되지 않도록, 서비스를 알맞게 분산하여 동시에 처리하게 해줍니다.
2, 하나의 서버에서 처리한 결과를 다른 서버들과 동기화하여 데이터의 안정성을 보장해줍니다.
3, 운영(active) 서버가 문제가 발생해서 서비스를 제공할 수 없을 경우,
다른 대기 중인 서버를 운영서버로 바꿔서 서비스가 중지 없이 제공되게 해줍니다.
4, 분산 환경을 구성하는 서버들의 환경설정을 통합적으로 관리해줍니다.
참고. Zookeeper의 역할
97.
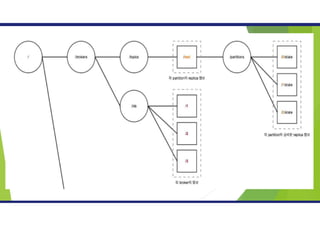
Broker
1.상태관리
Kafka Broker가 살아있다면 항상 정기적으로 하트 비트 요청을 보내 ZooKeeper가 상태를 결정
2.할당량
다른 생산 및 소비 할당량을 가지기 위해 Kafka Broker는 일부 consume를 허용
3.Replicas
각 토픽에 대해 Kafka의 Zookeeper는 일련의 ISR를 유지하고 이전에 선택된 리더 노드가 다운되면
현재 살아있는 노드를 기반으로 ZooKeeper가 새로운 리더를 선출함.
4.Node와 topic 레지스트리
ZooKeeper는 broker의 노드와 토픽을 등록하고 저장한다.
참고. Zookeeper의 역할
101.
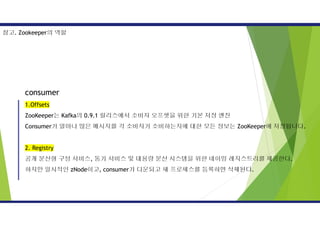
consumer
1.Offsets
ZooKeeper는 Kafka의 0.9.1릴리스에서 소비자 오프셋을 위한 기본 저장 엔진
Consumer가 얼마나 많은 메시지를 각 소비자가 소비하는지에 대한 모든 정보는 ZooKeeper에 저장됩니다.
2. Registry
공개 분산형 구성 서비스, 동기 서비스 및 대용량 분산 시스템을 위한 네이밍 레지스트리를 제공한다.
하지만 일시적인 zNode이고, consumer가 다운되고 새 프로세스를 등록하면 삭제된다.
참고. Zookeeper의 역할
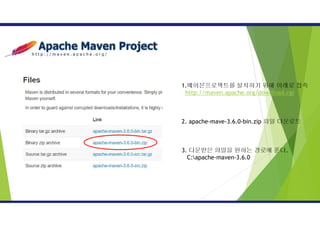
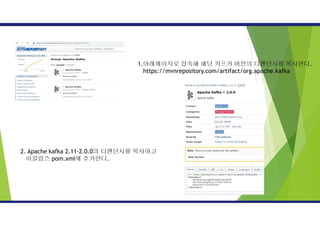
1.메이븐프로젝트를 설치하기 위해아래로 접속
http://maven.apache.org/download.cgi
2. apache-mave-3.6.0-bin.zip 파일 다운로드
3. 다운받은 파일을 원하는 경로에 푼다.
C:apache-maven-3.6.0
105.
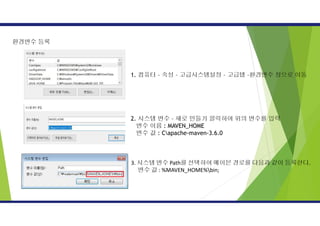
환경변수 등록
1. 컴퓨터– 속성 – 고급시스템설정 – 고급탭 –환경변수 창으로 이동
2. 시스템 변수 – 새로 만들기 클릭하여 위의 변수를 입력
변수 이름 : MAVEN_HOME
변수 값 : Capache-maven-3.6.0
3. 시스템 변수 Path를 선택하여 메이븐 경로를 다음과 같이 등록한다.
변수 값 : %MAVEN_HOME%bin;
Linux(CentOS)에서 Anaconda 설치하기
Anaconda: 데이터분석에 필요한 라이브러리를 모아놓은 파이썬 기반의 플랫폼
1. Anaconda 설치파일(.sh) 다운로드
2. Anaconda 설치하기
3. License 승인하기
4. 설치할 주소 설정하기
5. PATH 지정하기
6. 설치완료
118.
1. Anaconda 설치파일(.sh)다운로드
wget https:// repo.continuum.io/archive/Anaconda3-5.2.0-Linux-x86_64.sh
2. Anaconda 설치하기
bash Anaconda3-5.2.0-Linux-x86_64.sh
위의 명령어를 입력하면 아래와 같이 Anaconda License가 나타난다. Enter 키를 눌러서 쭉쭉 넘길 수 있는데,
무작정 눌러대면 설치가 취소되니 한 줄씩 조심히 넘기도록 한다.
3. 라이선스 승인하기
yes를 입력하고 Enter 키를 누른다.
119.
4. 설치할 주소설정하기
기본값 주소(/root/anaconda3)에 설치를 할 것이라면 Enter 키를 누르고, 다른 곳에 저장을 하고싶다면 해당
주소를 입력하고 Enter 키를 누른다.( 되도록이면 root 폴더에는 설치하지 말 것 )
yes를 입력하고 나면, 어디에 설치할 것인지 묻는 메시지가 나타난다.
5. PATH 지정하기
설치가 마무리되면 사용자에게 PATH를 추가할 것인지 yes 또는 no를 묻는 창이 나타난다. 특별한 경우를 제
외하고는 yes를 입력해주면 된다.
120.
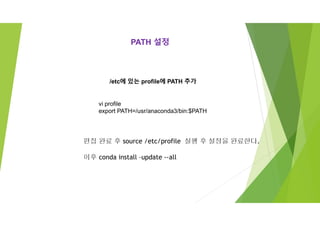
PATH 설정
/etc에 있는profile에 PATH 추가
vi profile
export PATH=/usr/anaconda3/bin:$PATH
편집 완료 후 source /etc/profile 실행 후 설정을 완료한다.
이후 conda install –update --all
121.
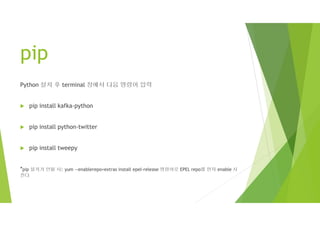
pip
Python 설치 후terminal 창에서 다음 명령어 입력
pip install kafka-python
pip install python-twitter
pip install tweepy
*pip 설치가 안될 시: yum --enablerepo=extras install epel-release 명령어로 EPEL repo를 먼저 enable 시
킨다
122.
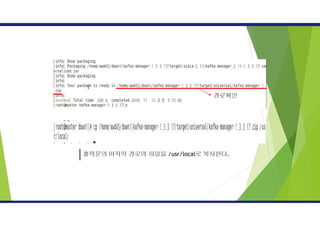
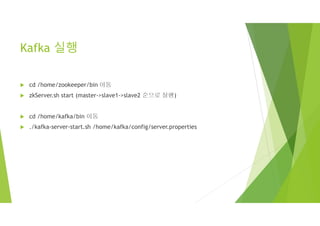
Kafka 실행
cd/home/zookeeper/bin 이동
zkServer.sh start (master->slave1->slave2 순으로 실행)
cd /home/kafka/bin 이동
./kafka-server-start.sh /home/kafka/config/server.properties
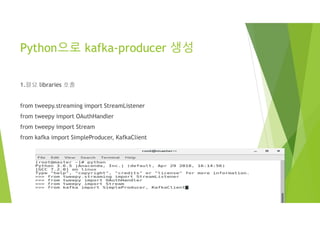
Python으로 kafka-producer 생성
1.필요libraries 호출
from tweepy.streaming import StreamListener
from tweepy import OAuthHandler
from tweepy import Stream
from kafka import SimpleProducer, KafkaClient
125.
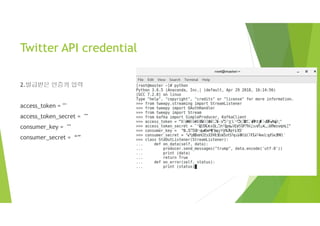
Twitter API credential
2.발급받은인증키 입력
access_token = ""
access_token_secret = ""
consumer_key = ""
consumer_secret = “”
126.
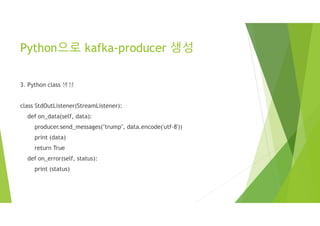
Python으로 kafka-producer 생성
3.Python class 생성
class StdOutListener(StreamListener):
def on_data(self, data):
producer.send_messages("trump", data.encode('utf-8'))
print (data)
return True
def on_error(self, status):
print (status)


![네트워크 설정
Host name 설정
vi /etc/sysconfig/network
NETWORKING=yes
HOSTNAME=master.kopo
수정 및 추가
--나머지 VM도 변경--
예시)
NETWORKING=yes
HOSTNAME=slave1.kopo
[root@localhost ~]# hostnamectl set-hostname master.kopo
source : “Hadoop ecosystem” presented by prof. HyoKwan Kim at dept. of smart finance, Korea Polytechnics](https://image.slidesharecdn.com/kafka-slideshare-190516061038/85/Kafka-slideshare-24-320.jpg)

![[root@master conf]# ll
total 16
-rw-r--r--. 1 501 games 535 Jun 29 2018 configuration.xsl
-rw-r--r--. 1 501 games 2161 Jun 29 2018 log4j.properties
-rw-r--r--. 1 root root 167 Nov 8 23:38 zoo.cfg
-rw-r--r--. 1 501 games 922 Jun 29 2018 zoo_sample.cfg
[root@master conf]# pwd
/usr/local/zookeeper/conf
[root@master conf]# more zoo.cfg
tickTime=2000
initLimit=10
syncLimit=5
dataDir=/data
clientPort=2181
server.1=master:2888:3888
server.2=slave1:2888:3888
server.3=slave2:2888:3888
maxClientCnxns=200
주키퍼 설정
vi zoo.cfg로 실행하여
좌측과 같이 수정 및 추가한다.
tickTime : 주키퍼가 사용하는 시간에 대한 기본 측정 단위(밀리초)
initLimit : Follower가 Leader와 초기에 연결하는 시간에 대한 TimeOut tick 수
syncLimit : Follower가 Leader와 동기화 하는 시간에 대한 TimeOut tick 수
dataDir : 주키퍼의 트랜잭션 로그와 스냅샷이 저장되는 경로
clientPort : 주키퍼 사용 TCP 포트
server.* : 주키퍼 앙상블 구성을 위한 서버 설정, server.myid 형식으로 사용](https://image.slidesharecdn.com/kafka-slideshare-190516061038/85/Kafka-slideshare-28-320.jpg)
![VM 복제 및 설정
Slave1
Salve2
모두 작업
- network 변경 vi/etc/sysconfig/network
- NETWORKING=yes
HOSTNAME=slave1~2.kopo 으로 변경
[root@localhost ~]# hostnamectl set-hostname master.kopo
vi /etc/sysconfig/network
source : “Hadoop ecosystem” presented by prof. HyoKwan Kim at dept. of smart finance, Korea Polytechnics](https://image.slidesharecdn.com/kafka-slideshare-190516061038/85/Kafka-slideshare-33-320.jpg)

![[root@slave1 data]# ll
total 4
-rw-r--r--. 1 root root 2 Oct 30 03:08 myid
drwxr-xr-x. 2 root root 131 Nov 27 02:57 version-2
[root@slave1 data]# pwd
/data
[root@slave1 data]# more myid
2
[root@slave1 data]#
복제 노드(slave1, slave2)주키퍼 설정
vi myid로 id를 수정한다.
slave1 : 2
slave2 : 3](https://image.slidesharecdn.com/kafka-slideshare-190516061038/85/Kafka-slideshare-36-320.jpg)
![주키퍼 시작과 종료, 상태확인
[root@slave2 ~]# sh /usr/local/zookeeper/bin/zkServer.sh start
ZooKeeper JMX enabled by default
Using config: /usr/local/zookeeper/bin/../conf/zoo.cfg
Starting zookeeper ... STARTED
[root@slave2 ~]# sh /usr/local/zookeeper/bin/zkServer.sh stop
ZooKeeper JMX enabled by default
Using config: /usr/local/zookeeper/bin/../conf/zoo.cfg
Stopping zookeeper ... STOPPED
[root@slave2 ~]#
[root@master conf]# sh /usr/local/zookeeper/bin/zkCli.sh](https://image.slidesharecdn.com/kafka-slideshare-190516061038/85/Kafka-slideshare-37-320.jpg)


![카프카 실행
/usr/local/kafka/bin/kafka-server-start.sh /usr/local/kafka/config/server.properties
/usr/local/kafka/bin/kafka-server-stop.sh
#...중략…(다량의 메시지 팝업 후)
#[kafkaServer id=1] started (kafka.server.KafkaServer) 가 뜨면 성공](https://image.slidesharecdn.com/kafka-slideshare-190516061038/85/Kafka-slideshare-40-320.jpg)
![카프카 테스트
카프카 토픽 생성
• Kafka-topics.sh 이용하여 kopo-topic 생성
• cd /home/kafka/bin
• ./kafka-topics.sh --zookeeper
master:2181,slave1:2181,slave2:2181/kopo-kafka --replication-factor 1
--partitions 1 --topic kopo-topic --create
[root@master ~]# /usr/local/kafka/bin/kafka-topics.sh --zookeeper master:2181,slave1:2181,slave2:2181/kopo-kafka
--replication-factor 1 --partitions 1 --topic ds-topic –create
Created topic "ds-topic".](https://image.slidesharecdn.com/kafka-slideshare-190516061038/85/Kafka-slideshare-43-320.jpg)


![[Producer] Kafka-python https://github.com/dpkp/kafka-python
★ pip install kafka-python 으로 라이브러리 설치 (사전 조건 : python 3.xx 설치)
from kafka import KafkaProducer
producer = KafkaProducer(bootstrap_servers='master:9092,slave1:9092,slave2:9092')
future = producer.send('kopo-topic','HWY TEST')
result = future.get(timeout=60)
print(result)
print("END")
[root@slave1 pyKafkaTest]# python producer-option.py
RecordMetadata(topic='kopo-topic', partition=0, topic_partition=TopicPartition(topic='kopo-topic', partition=0),
offset=7, timestamp=1542334214067, checksum=None, serialized_key_size=-1, serialized_value_size=8)
END
이를 타 서버(slave2)에서 consumer로 확인한 결과는 아래와 같습니다.
[root@master ~]# /usr/local/kafka/bin/kafka-console-consumer.sh --bootstrap-server master:9092,slave1:9092,slave2:9092
--topic kopo-topic --from-beginning
HWY TEST](https://image.slidesharecdn.com/kafka-slideshare-190516061038/85/Kafka-slideshare-61-320.jpg)
![from kafka import KafkaConsumer
consumer = KafkaConsumer('kopo-topic',group_id='kopo-consumer',bootstrap_servers='master:9092,slave1:9092,slave2:9092',enable_auto_commit=True,auto_offset_reset='latest')
for message in consumer:
print "Topic : %s, Partition: %d, Offset: %d, Key: %s, Value: %s" % (message.topic, message.partition, message.offset, message.key, message.value.decode('utf-8'))
https://github.com/dpkp/kafka-python
[Consumer] Kafka-python
★ pip install kafka-python 으로 라이브러리 설치 (사전 조건 : python 3.xx 설치)
late response](https://image.slidesharecdn.com/kafka-slideshare-190516061038/85/Kafka-slideshare-63-320.jpg)
![[Consumer] Kafka-python https://github.com/dpkp/kafka-python
from kafka import KafkaConsumer
consumer = KafkaConsumer('kopo-topic',group_id='kopo-consumer',bootstrap_servers='master:9092,slave1:9092,slave2:9092’,
enable_auto_commit=True,auto_offset_reset='latest',fetch_min_bytes=1)
while True:
message = consumer.poll(1.0)
#print (message.keys()) #print (message.values())
#print "Offset: %d, Key: %s, Value: %s" % (message.offset, message.key, message.value.decode('utf-8'))
for tp, mg in message.items():
for m in mg:
print ("%s : %d %d : key=%s value=%s" % ( tp.topic, tp.partition, m.offset, m.key, m.value))
consumer 주요 옵션:
https://kafka-python.readthedocs.io/en/master/apidoc/KafkaConsumer.html#
https://www.oreilly.com/library/view/kafka-the-definitive/9781491936153/ch04.html](https://image.slidesharecdn.com/kafka-slideshare-190516061038/85/Kafka-slideshare-64-320.jpg)

![컨슈머 리스트 명령어
--bootstrap : 브로커리스트 설정
--list : 컨슈머 리스트를 보여줌.
./kafka-consumer-groups.sh --bootstrap-server master:9092,slave1:092,slave2:9092 --list
Kafka Consumer
[root@master bin]# ./kafka-consumer-groups.sh --bootstrap-server master:9092,slave1:092,slave2:9092 --list
OpenJDK 64-Bit Server VM warning: If the number of processors is expected to increase from one, then you should configure the number of parallel GC threads appropriately using -XX:ParallelGCThreads=
Note: This will not show information about old Zookeeper-based consumers.
[2019-05-15 23:03:11,612] WARN Connection to node -2 could not be established. Broker may not be available. (org.apache.kafka.clients.NetworkClient)
kopo-consumer](https://image.slidesharecdn.com/kafka-slideshare-190516061038/85/Kafka-slideshare-70-320.jpg)
![Kafka Consumer
컨슈머의 상세 정보를 조회함
--bootstrap-server : 브로커 리스트 입력
--group : 컨슈머 그룹 이름 설정
--describe : 상세정보 보기
*LAG : 현재토픽의 저장된 메시지와 컨슈머가 가져간 메시지의 차이
프로듀서와 컨슈머의 처리 속도차이를 알 수 있음
./kafka-consumer-groups.sh --bootstrap-server master:9092,slave1:9092,slave2:9092 --group kopo-consumer --describe
[root@master bin]# ./kafka-consumer-groups.sh --bootstrap-server master:9092,slave1:9092,slave2:9092 --group kopo-consumer --describe
OpenJDK 64-Bit Server VM warning: If the number of processors is expected to increase from one, then you should configure the number of parallel GC threads appropriately using -XX:ParallelGCThreads=N
Note: This will not show information about old Zookeeper-based consumers.
TOPIC PARTITION CURRENT-OFFSET LOG-END-OFFSET LAG CONSUMER-ID HOST CLIENT-ID
test-topic 0 21 21 0 kafka-python-1.4.3-3d11d79a-04f0-4da5-a1b9-808c34f99865/192.168.0.31 kafka-python-1.4.3
kopo-topic 0 425 426 1 - - -
[root@master bin]#](https://image.slidesharecdn.com/kafka-slideshare-190516061038/85/Kafka-slideshare-71-320.jpg)
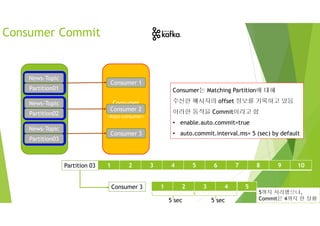

![Consumer Commit
Manual Commit
메시지가 처리가 완료될 때까지 Commit을 보류
• enable.auto.commit : false
• commitSync 함수 호출
[참고] 특정 파티션이나 특정 오프셋부터 가져오는 기능도 있음
News-Topic
Partition01
News-Topic
Partition02
News-Topic
Partition03
News-Topic
Partition01
News-Topic
Partition02
News-Topic
Partition03
Consumer
Group
<kopo-consumer>
Consumer 1
Consumer 2](https://image.slidesharecdn.com/kafka-slideshare-190516061038/85/Kafka-slideshare-74-320.jpg)

![How to find Zookeeper Leader in
zookeeper ensemble?
To identify a Zookeeper leader/follower, there are few possible options. Mentioning 2 for keeping this document simple.
1. Check the zookeeper log file on each node, and grep as below:
# grep LEAD /var/log/zookeeper/zookeeper-zookeeper-server-xyz.out
2016-02-29 22:33:47,113 - INFO [QuorumPeer[myid=3]/0:0:0:0:0:0:0:0:2181:QuorumPeer@829] - LEADING
2016-02-29 22:33:47,114 - INFO [QuorumPeer[myid=3]/0:0:0:0:0:0:0:0:2181:Leader@358] - LEADING - LEADER ELECTION TOOK - 9066
2. Use "nc" command to listen TCP communication on port 2181 and determine if the ZooKeeper server is a leader or a follower.
Bellow is a way to check the same:
# echo stat | nc localhost 2181
Zookeeper version: 3.4.6-3485--1, built on 12/16/2015 02:35 GMT
Clients:
/172.25.16.243:37619[1](queued=0,recved=54,sent=54)
/172.25.16.253:58745[1](queued=0,recved=53,sent=53)
Latency min/avg/max: 0/1/362
Received: 627
Sent: 626
Connections: 9
Outstanding: 0
Zxid: 0x400000003
Mode: leader
Node count: 182
Here, we see that the Mode is shown as "leader". If it is a follower, the Mode will be seen as "follower".
For example:
# echo stat | nc localhost 2181 | grep Mode
Mode: leader
# echo stat | nc localhost 2181 | grep Mode
Mode: follower
source : https://community.hortonworks.com/content/supportkb/49435/how-to-find-zookeeper-leader-in-zookeeper-ensemble.html](https://image.slidesharecdn.com/kafka-slideshare-190516061038/85/Kafka-slideshare-76-320.jpg)

![토픽의 파티션 수 변경
토픽의 파티션은 증가는 가능하지만, 감소는 불가능함
처음 토픽을 생성할 때 파티션 수를 처리량에 대해 미리 확인하고 설정!
--zookeeper : 주키퍼 정보
--alter : 변경 옵션 선택
--topic : 해당 토픽 설정
--partitions : 파티션 수 설정
./kafka-topics.sh -zookeeper master:2181,slave1:2181,slave2:2181/kopo-kafka -alter -topic test-topic -partitions 2
5.토픽의 파티션 수 변경
[root@master bin]# ./kafka-topics.sh --zookeeper master:2181,slave1:2181,slave2:2181/kopo-kafka --topic test-topic --describe
Topic:test-topic PartitionCount:2 ReplicationFactor:1 Configs:retention.ms=3600000
Topic: test-topic Partition: 0 Leader: 1 Replicas: 1 Isr: 1
Topic: test-topic Partition: 1 Leader: 2 Replicas: 2 Isr: 2](https://image.slidesharecdn.com/kafka-slideshare-190516061038/85/Kafka-slideshare-83-320.jpg)

![Cd kafka-manager-1.3.3.17 로 이동 한 뒤
Zip형태의 배포 파일을 생성한다.
./sbt clean dist
[참고] 만약 javac 가 없어서 에러가 발생한다면?
다음과 같이 설치가능한 jdk를 확인한다.
# yum list java*jdk-devel
설치가능한 jdk 리스트 중 jdk 1.8 버전을 설치한다.(아래 예시)
# yum install java-1.8.0-openjdk-devel.x86_64
설치 후 java compiler 버전을 확인한다.
# javac –version
다시 ./sbt clean dist 를 실행한다.](https://image.slidesharecdn.com/kafka-slideshare-190516061038/85/Kafka-slideshare-87-320.jpg)


![[pgday.Seoul 2022] PostgreSQL with Google Cloud](https://cdn.slidesharecdn.com/ss_thumbnails/pgday-postgresqlwithgooglecloud-221114013605-5def484f-thumbnail.jpg?width=640&height=640&fit=bounds)


![[오픈소스컨설팅] 프로메테우스 모니터링 살펴보고 구성하기](https://cdn.slidesharecdn.com/ss_thumbnails/oscprometheus-190422050231-thumbnail.jpg?width=640&height=640&fit=bounds)


![[네이버오픈소스세미나] Contribution, 전쟁의 서막 : Apache OpenWhisk 성능 개선 - 김동경](https://cdn.slidesharecdn.com/ss_thumbnails/apacheopenwhiskpublicfont-180905052401-thumbnail.jpg?width=640&height=640&fit=bounds)

![[ 2021 AI + X 여름 캠프 ] 2. 장비 상호 연결 kafka를 이용한 매체 전송](https://cdn.slidesharecdn.com/ss_thumbnails/2-210731153335-thumbnail.jpg?width=640&height=640&fit=bounds)


![[AWSKRUG] 모바일게임 하이브 런칭기 (2018)](https://cdn.slidesharecdn.com/ss_thumbnails/awskrugawsformobilegame-190419125248-thumbnail.jpg?width=640&height=640&fit=bounds)


![[국비지원 대졸자 취업교육] 한국폴리텍대학 서울강서캠퍼스 스마트금융과](https://cdn.slidesharecdn.com/ss_thumbnails/random-251117104355-c083ddbd-thumbnail.jpg?width=640&height=640&fit=bounds)