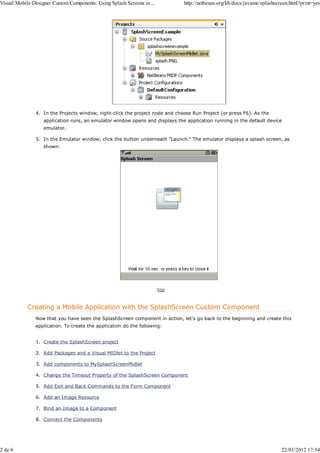
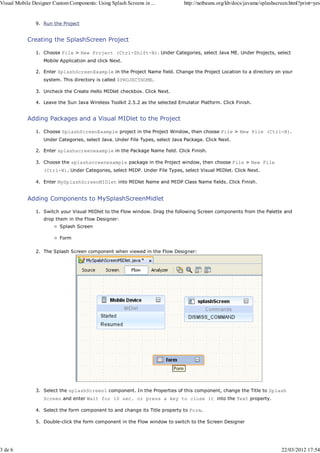
Visual Mobile Designer Custom Components: Using Splash Screens in ...              http://netbeans.org/kb/docs/javame/splashscreen.html?print=yes


            Visual Mobile Designer Custom Components: Using Splash Screens in
            Java ME Applications
            Splash screens are used to enhance the look and feel of an application. Typically, you use a splash screen when
            the program starts, or to display a logo or branding information. It gives users the first impression of your
            application. The Visual Mobile Designer (VMD) in NetBeans includes the SplashScreen custom component in the
            VMD palette. This brief example shows you how to create a new Java ME project using NetBeans that uses the
            SplashScreen component. It will also explain how to use the features to design and implement your own splash
            screens using this feature.

            If you are new to mobile application development in NetBeans, you should start with the NetBeans Java ME MIDP
            Quick Start Guide before continuing.

                 Note: If you are using NetBeans IDE 6.8, refer to the Using Splash Screens in Java ME Applications in
                 NetBeans IDE 6.8 tutorial.


            Contents
                   Installing and Running the Sample Application

                   Creating a Mobile Application with the SplashScreen Custom Component

                          Creating the SplashScreenExample project

                          Adding Packages and a Visual MIDlet to the Project

                          Adding Components to MySplashScreenMidlet

                          Changing the Timeout Property of the SplashScreen Component

                          Adding Exit and Back Commands to the Form Component

                          Adding an Image Resource

                          Binding an Image to a Component

                          Connecting the Components

                          Running the Project

                   Javadoc for the SplashScreen Component

                   See Also

            To complete this tutorial, you need the following software and resources:

               Software or Resource          Version Required

             NetBeans IDE with Java ME     Version 6.9 and later

             Java Development Kit (JDK) Version 6 or version 7


            Installing and Running the Sample Application
            Before we begin, you might want to see final result of the tutorial.
            Take the following steps to install SplashScreenExample application:


               1. Download SplashScreenExample.zip.

               2. Unzip the file.

               3. The Projects window should look like the following:


1 de 6                                                                                                                         22/03/2012 17:54
Visual Mobile Designer Custom Components: Using Splash Screens in ...         http://netbeans.org/kb/docs/javame/splashscreen.html?print=yes


               4. In the Projects window, right-click the project node and choose Run Project (or press F6). As the
                   application runs, an emulator window opens and displays the application running in the default device
                   emulator.

               5. In the Emulator window, click the button underneath "Launch." The emulator displays a splash screen, as
                   shown:


                                                                        top


            Creating a Mobile Application with the SplashScreen Custom Component
               Now that you have seen the SplashScreen component in action, let's go back to the beginning and create this
               application. To create the application do the following:


               1. Create the SplashScreen project

               2. Add Packages and a Visual MIDlet to the Project

               3. Add components to MySplashScreenMidlet

               4. Change the Timeout Property of the SplashScreen Component

               5. Add Exit and Back Commands to the Form Component

               6. Add an Image Resource

               7. Bind an Image to a Component

               8. Connect the Components


2 de 6                                                                                                                    22/03/2012 17:54
Visual Mobile Designer Custom Components: Using Splash Screens in ...          http://netbeans.org/kb/docs/javame/splashscreen.html?print=yes


               9. Run the Project


            Creating the SplashScreen Project

               1. Choose File > New Project (Ctrl-Shift-N). Under Categories, select Java ME. Under Projects, select
                   Mobile Application and click Next.

               2. Enter SplashScreenExample in the Project Name field. Change the Project Location to a directory on your
                   system. This directory is called $PROJECTHOME.

               3. Uncheck the Create Hello MIDlet checkbox. Click Next.

               4. Leave the Sun Java Wireless Toolkit 2.5.2 as the selected Emulator Platform. Click Finish.


            Adding Packages and a Visual MIDlet to the Project

               1. Choose SplashScreenExample project in the Project Window, then choose File > New File (Ctrl-N).
                   Under Categories, select Java. Under File Types, select Java Package. Click Next.

               2. Enter splashscreenexample in the Package Name field. Click Finish.

               3. Choose the splashscreenexample package in the Project window, then choose File > New File
                   (Ctrl-N). Under Categories, select MIDP. Under File Types, select Visual MIDlet. Click Next.

               4. Enter MySplashScreenMIDlet into MIDlet Name and MIDP Class Name fields. Click Finish.


            Adding Components to MySplashScreenMidlet

               1. Switch your Visual MIDlet to the Flow window. Drag the following Screen components from the Palette and
                   drop them in the Flow Designer:
                          Splash Screen

                          Form

               2. The Splash Screen component when viewed in the Flow Designer:


               3. Select the splashScreen1 component. In the Properties of this component, change the Title to Splash
                   Screen and enter Wait for 10 sec. or press a key to close it into the Text property.

               4. Select the form component to and change its Title property to Form.

               5. Double-click the form component in the Flow window to switch to the Screen Designer


3 de 6                                                                                                                     22/03/2012 17:54
Visual Mobile Designer Custom Components: Using Splash Screens in ...            http://netbeans.org/kb/docs/javame/splashscreen.html?print=yes


               6. Select the StringItem component from the Form Items section of the Palette, then drag and drop it into
                   form1.

               7. Double-click stringItem1 inside Screen Designer. Delete the stringItem1 title and change <Enter
                   Text> to Press Exit to close application.


            Changing the Timeout Property of the SplashScreen Component

               1. Choose Flow at the top of the Visual Mobile Designer window to re-open the Flow Design view.

               2. Select the Splash Screen component.

               3. In the Properties Window find the Timeout property and change it from 5000 to 10000 milliseconds.


            Adding Exit and Back Commands to the Form Component
            Choose the Exit Command from the Commands section in the Palette, and drag it into the form1 component.


            Adding an Image Resource

               1. Copy the splash.png file to the $PROJECTHOME/src/splashscreenexample folder.

               2. Right-click the splashScreen component and choose Properties in the popup menu.

               3. In the Properties dialog box, click the ellipsis button (   ) against the Image property.

               4. In the Image dialog box, click Add.
                   The image1 component is added.

               5. In the Open dialog box specify the path to the copied splash.png file.
                   The image is added.

               6. Click OK to close the Open dialog box.

               7. Click Close to close the Properties dialog box.


            Binding an Image to a Component

               1. Select the splashScreen1 component.

               2. In the Properties Window, use the drop-down menu to change the Image property to image1. Double-click
                   the component to open the splash screen in the Screen Designer. It should look like the folowing screen.


4 de 6                                                                                                                       22/03/2012 17:54
Visual Mobile Designer Custom Components: Using Splash Screens in ...       http://netbeans.org/kb/docs/javame/splashscreen.html?print=yes


            Connecting Components
            In the Flow view, click on the Start Point and drag the arrow to the splashscreen1 component. In the same
            manner, connect the components as shown in the following graphic.


            Running the Project
            Press F6 to run the main project. Alternatively you could select Run > Run Main Project.


            Javadoc for the SplashScreen Component
            The NetBeans IDE provides API Javadocs for the SplashScreen component, as well as other components you can
            use in the VMD. To read the Javadocs for the SplashScreen component:


               1. Place the cursor on the SplashScreen component in the source code and press Ctr-Shift-Space (or choose
                   Source > Show Documentation).


5 de 6                                                                                                                  22/03/2012 17:54
Visual Mobile Designer Custom Components: Using Splash Screens in ...         http://netbeans.org/kb/docs/javame/splashscreen.html?print=yes


                   The Javadoc for this element displays in a popup window.

               2. Click the Show documentation in external web browser icon (     ) in the popup window to view the
                   detailed information about the SplashScreen component in your browser.


                                                                                                     Send Us Your Feedback

                                                                        top


            See Also
                   Visual Mobile Designer Custom Components: Creating an SMS Composer Application

                   Visual Mobile Designer Custom Components: Creating Mobile Device File Browser

                   Visual Mobile Designer Custom Components: Creating a Personal Information Manager Application

                   Visual Mobile Designer Custom Components: Creating Mobile Login Screens

                   Visual Mobile Designer Custom Components: Creating Wait Screens for Mobile Applications

                   Visual Mobile Designer Custom Components: Using Table Items in Java ME Applications

                   Reference: Visual Mobile Designer Palette Guide

                                                                        top


6 de 6                                                                                                                    22/03/2012 17:54

Using splash screens in java me applications

  • 1.
    Visual Mobile DesignerCustom Components: Using Splash Screens in ... http://netbeans.org/kb/docs/javame/splashscreen.html?print=yes Visual Mobile Designer Custom Components: Using Splash Screens in Java ME Applications Splash screens are used to enhance the look and feel of an application. Typically, you use a splash screen when the program starts, or to display a logo or branding information. It gives users the first impression of your application. The Visual Mobile Designer (VMD) in NetBeans includes the SplashScreen custom component in the VMD palette. This brief example shows you how to create a new Java ME project using NetBeans that uses the SplashScreen component. It will also explain how to use the features to design and implement your own splash screens using this feature. If you are new to mobile application development in NetBeans, you should start with the NetBeans Java ME MIDP Quick Start Guide before continuing. Note: If you are using NetBeans IDE 6.8, refer to the Using Splash Screens in Java ME Applications in NetBeans IDE 6.8 tutorial. Contents Installing and Running the Sample Application Creating a Mobile Application with the SplashScreen Custom Component Creating the SplashScreenExample project Adding Packages and a Visual MIDlet to the Project Adding Components to MySplashScreenMidlet Changing the Timeout Property of the SplashScreen Component Adding Exit and Back Commands to the Form Component Adding an Image Resource Binding an Image to a Component Connecting the Components Running the Project Javadoc for the SplashScreen Component See Also To complete this tutorial, you need the following software and resources: Software or Resource Version Required NetBeans IDE with Java ME Version 6.9 and later Java Development Kit (JDK) Version 6 or version 7 Installing and Running the Sample Application Before we begin, you might want to see final result of the tutorial. Take the following steps to install SplashScreenExample application: 1. Download SplashScreenExample.zip. 2. Unzip the file. 3. The Projects window should look like the following: 1 de 6 22/03/2012 17:54
  • 2.
    Visual Mobile DesignerCustom Components: Using Splash Screens in ... http://netbeans.org/kb/docs/javame/splashscreen.html?print=yes 4. In the Projects window, right-click the project node and choose Run Project (or press F6). As the application runs, an emulator window opens and displays the application running in the default device emulator. 5. In the Emulator window, click the button underneath "Launch." The emulator displays a splash screen, as shown: top Creating a Mobile Application with the SplashScreen Custom Component Now that you have seen the SplashScreen component in action, let's go back to the beginning and create this application. To create the application do the following: 1. Create the SplashScreen project 2. Add Packages and a Visual MIDlet to the Project 3. Add components to MySplashScreenMidlet 4. Change the Timeout Property of the SplashScreen Component 5. Add Exit and Back Commands to the Form Component 6. Add an Image Resource 7. Bind an Image to a Component 8. Connect the Components 2 de 6 22/03/2012 17:54
  • 3.
    Visual Mobile DesignerCustom Components: Using Splash Screens in ... http://netbeans.org/kb/docs/javame/splashscreen.html?print=yes 9. Run the Project Creating the SplashScreen Project 1. Choose File > New Project (Ctrl-Shift-N). Under Categories, select Java ME. Under Projects, select Mobile Application and click Next. 2. Enter SplashScreenExample in the Project Name field. Change the Project Location to a directory on your system. This directory is called $PROJECTHOME. 3. Uncheck the Create Hello MIDlet checkbox. Click Next. 4. Leave the Sun Java Wireless Toolkit 2.5.2 as the selected Emulator Platform. Click Finish. Adding Packages and a Visual MIDlet to the Project 1. Choose SplashScreenExample project in the Project Window, then choose File > New File (Ctrl-N). Under Categories, select Java. Under File Types, select Java Package. Click Next. 2. Enter splashscreenexample in the Package Name field. Click Finish. 3. Choose the splashscreenexample package in the Project window, then choose File > New File (Ctrl-N). Under Categories, select MIDP. Under File Types, select Visual MIDlet. Click Next. 4. Enter MySplashScreenMIDlet into MIDlet Name and MIDP Class Name fields. Click Finish. Adding Components to MySplashScreenMidlet 1. Switch your Visual MIDlet to the Flow window. Drag the following Screen components from the Palette and drop them in the Flow Designer: Splash Screen Form 2. The Splash Screen component when viewed in the Flow Designer: 3. Select the splashScreen1 component. In the Properties of this component, change the Title to Splash Screen and enter Wait for 10 sec. or press a key to close it into the Text property. 4. Select the form component to and change its Title property to Form. 5. Double-click the form component in the Flow window to switch to the Screen Designer 3 de 6 22/03/2012 17:54
  • 4.
    Visual Mobile DesignerCustom Components: Using Splash Screens in ... http://netbeans.org/kb/docs/javame/splashscreen.html?print=yes 6. Select the StringItem component from the Form Items section of the Palette, then drag and drop it into form1. 7. Double-click stringItem1 inside Screen Designer. Delete the stringItem1 title and change <Enter Text> to Press Exit to close application. Changing the Timeout Property of the SplashScreen Component 1. Choose Flow at the top of the Visual Mobile Designer window to re-open the Flow Design view. 2. Select the Splash Screen component. 3. In the Properties Window find the Timeout property and change it from 5000 to 10000 milliseconds. Adding Exit and Back Commands to the Form Component Choose the Exit Command from the Commands section in the Palette, and drag it into the form1 component. Adding an Image Resource 1. Copy the splash.png file to the $PROJECTHOME/src/splashscreenexample folder. 2. Right-click the splashScreen component and choose Properties in the popup menu. 3. In the Properties dialog box, click the ellipsis button ( ) against the Image property. 4. In the Image dialog box, click Add. The image1 component is added. 5. In the Open dialog box specify the path to the copied splash.png file. The image is added. 6. Click OK to close the Open dialog box. 7. Click Close to close the Properties dialog box. Binding an Image to a Component 1. Select the splashScreen1 component. 2. In the Properties Window, use the drop-down menu to change the Image property to image1. Double-click the component to open the splash screen in the Screen Designer. It should look like the folowing screen. 4 de 6 22/03/2012 17:54
  • 5.
    Visual Mobile DesignerCustom Components: Using Splash Screens in ... http://netbeans.org/kb/docs/javame/splashscreen.html?print=yes Connecting Components In the Flow view, click on the Start Point and drag the arrow to the splashscreen1 component. In the same manner, connect the components as shown in the following graphic. Running the Project Press F6 to run the main project. Alternatively you could select Run > Run Main Project. Javadoc for the SplashScreen Component The NetBeans IDE provides API Javadocs for the SplashScreen component, as well as other components you can use in the VMD. To read the Javadocs for the SplashScreen component: 1. Place the cursor on the SplashScreen component in the source code and press Ctr-Shift-Space (or choose Source > Show Documentation). 5 de 6 22/03/2012 17:54
  • 6.
    Visual Mobile DesignerCustom Components: Using Splash Screens in ... http://netbeans.org/kb/docs/javame/splashscreen.html?print=yes The Javadoc for this element displays in a popup window. 2. Click the Show documentation in external web browser icon ( ) in the popup window to view the detailed information about the SplashScreen component in your browser. Send Us Your Feedback top See Also Visual Mobile Designer Custom Components: Creating an SMS Composer Application Visual Mobile Designer Custom Components: Creating Mobile Device File Browser Visual Mobile Designer Custom Components: Creating a Personal Information Manager Application Visual Mobile Designer Custom Components: Creating Mobile Login Screens Visual Mobile Designer Custom Components: Creating Wait Screens for Mobile Applications Visual Mobile Designer Custom Components: Using Table Items in Java ME Applications Reference: Visual Mobile Designer Palette Guide top 6 de 6 22/03/2012 17:54