Download as PDF, PPTX
![USING REASON
FOR LIVE P.A.
By Lionel Zivan S. Valdellon [acid42]
http://acid42.bluechronicles.net
http://www.twitter.com/acid42
acid42@gmail.com](https://image.slidesharecdn.com/using-reason-for-live-pa-acid42-rev2009-090726165855-phpapp02/85/Using-Reason-For-Live-P-A-by-Acid42-1-320.jpg)
![USING REASON
FOR LIVE P.A.
By Lionel Zivan S. Valdellon [acid42]
http://acid42.bluechronicles.net
http://www.twitter.com/acid42
acid42@gmail.com](https://image.slidesharecdn.com/using-reason-for-live-pa-acid42-rev2009-090726165855-phpapp02/75/Using-Reason-For-Live-P-A-by-Acid42-1-2048.jpg)
![#1. Use Reason as a sequencer
[A] Go Linear. For ultimate control.
– Sequence entire songs.
– Play them from start to finish.
– Problem: Not much variety.
6](https://image.slidesharecdn.com/using-reason-for-live-pa-acid42-rev2009-090726165855-phpapp02/85/Using-Reason-For-Live-P-A-by-Acid42-6-320.jpg)
![#1. Use Reason as a sequencer
[B] Play short repeating grooves.
– Pre-sequence short phrases
(think 16, 32, 64 measures)
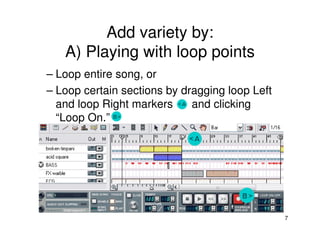
– Play with loop points.
Here is an example of a track I made with only two sections, each 16
bars in length. Toggling between sections is the tricky part.
12](https://image.slidesharecdn.com/using-reason-for-live-pa-acid42-rev2009-090726165855-phpapp02/85/Using-Reason-For-Live-P-A-by-Acid42-12-320.jpg)
![#1. Use Reason as a sequencer
[C] Build it from scratch
• Most radical method. Most stressful.
• Start with basic drum loop
• Build parts as you go
• Spontaneity results in either pure genius
or massive error
13](https://image.slidesharecdn.com/using-reason-for-live-pa-acid42-rev2009-090726165855-phpapp02/85/Using-Reason-For-Live-P-A-by-Acid42-13-320.jpg)
![#1. Use Reason as a sequencer
[D] Mix pre-made songs like a DJ.
– You can have several songs open at a time
(watch your CPU)
– Match the BPMs of your songs
(Beat matching)
14](https://image.slidesharecdn.com/using-reason-for-live-pa-acid42-rev2009-090726165855-phpapp02/85/Using-Reason-For-Live-P-A-by-Acid42-14-320.jpg)


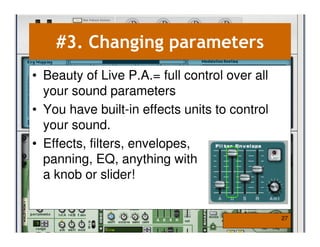
![#3. Changing parameters
[A] TWEAK EFFECTS
• Easiest way to "play" with your sound
• Effects in Reason are built-in, thus stable
• Play around. Experiment.
28](https://image.slidesharecdn.com/using-reason-for-live-pa-acid42-rev2009-090726165855-phpapp02/85/Using-Reason-For-Live-P-A-by-Acid42-28-320.jpg)
![#3. Changing parameters
[B] ALTER NOTES
• Highlight some sequenced notes,
right-click, and pick
Change Events>
Alter Notes. Choose %
• Randomly changes note
position. New melodies
and rhythms from old.
29](https://image.slidesharecdn.com/using-reason-for-live-pa-acid42-rev2009-090726165855-phpapp02/85/Using-Reason-For-Live-P-A-by-Acid42-29-320.jpg)
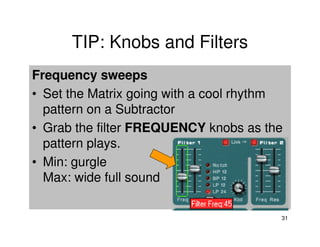
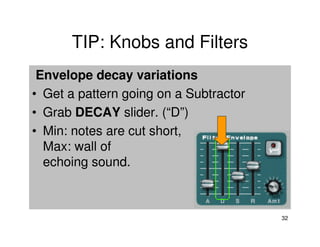
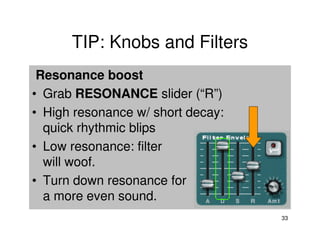
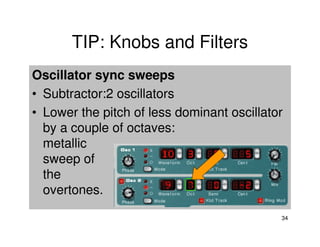
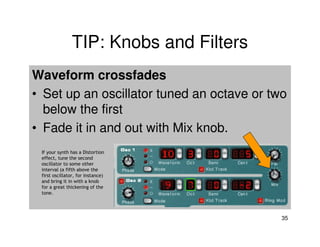
![#3. Changing parameters
[C] TWEAK THOSE KNOBS
• Parameters such as: filter, resonance,
attack, decay, sustain, release.
• Find out what each can do to a sound.
And then play with your sound.
• Some examples…
30](https://image.slidesharecdn.com/using-reason-for-live-pa-acid42-rev2009-090726165855-phpapp02/85/Using-Reason-For-Live-P-A-by-Acid42-30-320.jpg)
![#4. Personalized settings
[A] KEYBOARD MAPPING
• Allows you to activate something without using
mouse.
• Options > Edit Keyboard Remote
• Assign QWERTY keys to buttons you’ll need
• Personally, I have set it up so that each mixer
channel mute button, each Redrum pattern
and each Matrix pattern is mapped to a
QWERTY key.
37](https://image.slidesharecdn.com/using-reason-for-live-pa-acid42-rev2009-090726165855-phpapp02/85/Using-Reason-For-Live-P-A-by-Acid42-37-320.jpg)
![#4. Personalized
[A] KEYBOARD MAPPING settings
ACID42's Keyboard Map:
Mixer Channel mute buttons: 1: Q. 2: W. 3: E 4: R 5: T 6: Y 7: U 8: I 9: O 10: P
Redrum Pattern enable buttons: 1, 2, 3, 4, 5, 6, 7, 8
Redrum Bank A enable: shift + 1
Redrum Bank B enable: shift + 2
Redrum Bank C enable: shift + 3
Redrum Bank D enable: shift + 4
Matrix Pattern enable buttons: 1: A 2:S 3: D 4: F 5: G 6: H 7: J 8: K
Matrix Bank A enable: shift + A
Matrix Bank B enable: shift + S
Matrix Bank C enable: shift + D
Matrix Bank D enable: shift + F
38](https://image.slidesharecdn.com/using-reason-for-live-pa-acid42-rev2009-090726165855-phpapp02/85/Using-Reason-For-Live-P-A-by-Acid42-38-320.jpg)
![#4. Personalized settings
[B] YOUR OWN DEFAULT SONG
• Save your keyboard
mappings and all
shortcuts as your
"Default Song.rns"
• Start every new song
with "Default Song.rns"
39](https://image.slidesharecdn.com/using-reason-for-live-pa-acid42-rev2009-090726165855-phpapp02/85/Using-Reason-For-Live-P-A-by-Acid42-39-320.jpg)
![#4. Personalized settings
[C] SONG INFO = USEFUL INFO
• Pressing CTRL+I >
Song Information
window
• Place useful
info for your
performance:
a.) Chords (in “Text in window title”)
b.) List relevant measure numbers where
sections change (in “Text in window title”)
c.) Lyrics even! (in “More information”)
40](https://image.slidesharecdn.com/using-reason-for-live-pa-acid42-rev2009-090726165855-phpapp02/85/Using-Reason-For-Live-P-A-by-Acid42-40-320.jpg)
![#4. Personalized settings
[D] MAKE FILENAMES USEFUL
• Make it is easy to find songs which can
be beat-matched.
• Put BPM before
song title.
• Put genre
after BPM.
41](https://image.slidesharecdn.com/using-reason-for-live-pa-acid42-rev2009-090726165855-phpapp02/85/Using-Reason-For-Live-P-A-by-Acid42-41-320.jpg)
![END
Hope this tutorial has been useful. If you have any
questions or comments or even your own tips,
I’d love to hear them. Email me at
acid42@gmail.com.
Thanks for reading!
Lionel Zivan S. Valdellon [acid42]
web: http:/ / acid42.bluechronicles.net
Twitter: http://www.twitter.com/acid42
Email: acid42@gmail.com
42](https://image.slidesharecdn.com/using-reason-for-live-pa-acid42-rev2009-090726165855-phpapp02/85/Using-Reason-For-Live-P-A-by-Acid42-42-320.jpg)
![About the Author
• Acid42 = Lionel Valdellon
• Live P.A. since 2002
[Japan, Brunei, Malaysia, USA]
• Originally from Philippines,
now based in California
• Member of ElectronicaManila
• All Acid42 music = Creative Commons
• Netlabel releases on QED Records
• Web: http://acid42.bluechronicles.net
• Email: acid42@gmail.com
43](https://image.slidesharecdn.com/using-reason-for-live-pa-acid42-rev2009-090726165855-phpapp02/85/Using-Reason-For-Live-P-A-by-Acid42-43-320.jpg)

This document is a guide on using Reason software for live performance, outlining essential equipment and techniques for effective setups. It covers sequencing, adding variety to performances, changing parameters, and personalizing settings to enhance control and creativity. The guide also includes practical tips and tricks for optimizing the live music experience.


