Download to read offline


![How to use template driven forms:
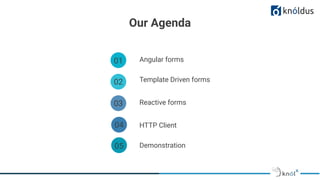
Step 1 : Import and add FormModules in out application module
import {FormsModule} from "@angular/forms";
@NgModule({
declarations: [App],
imports: [BrowserModule, FormsModule],
bootstrap: [App]
})
export class AppModule {}
By including this FormsModule in your application,
Angular will now already apply a NgForm directive to
every <form> HTML template element implicitly](https://image.slidesharecdn.com/userformsapiintegration-210915064929/85/User-Forms-API-integration-8-320.jpg)
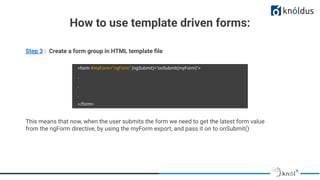
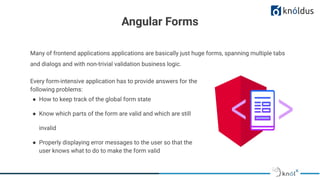
![Step 4 : Create a form group in HTML template file
<div class="form-group">
<label for="email">Email</label>
<input
type="text"
name="email"
required email
[(ngModel)]="model.email"
#email="ngModel"
[ngClass]="{ 'is-invalid': myForm.submitted && email.invalid }"
class="form-control"
/>
<div *ngIf="myForm.submitted && email.invalid" class="invalid-feedback">
<div *ngIf="email.errors.required">Email is required</div>
<div *ngIf="email.errors.email">Email must be a valid email address</div>
</div>
</div>
</div>
- The NgModel directive reconciles
value changes in the attached
form element with changes in the
data model, allowing you to
respond to user input with input
validation and error handling.
- You must define a name attribute
for that element. Angular uses the
assigned name to register the
element with the NgForm
directive attached to the parent
<form> element.
How to use template driven forms:](https://image.slidesharecdn.com/userformsapiintegration-210915064929/85/User-Forms-API-integration-11-320.jpg)
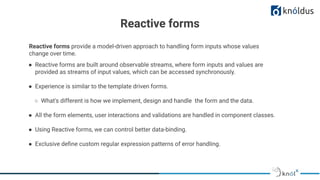
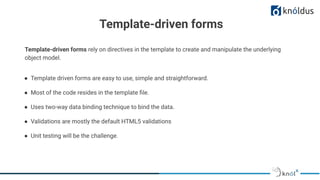
![Steps to build the reactive driven forms are as follows:
How to use reactive forms:
import { ReactiveFormsModule } from
'@angular/forms';
@NgModule({
imports: [
// other imports ...
ReactiveFormsModule
],
})
export class AppModule { }
Step 1 : Import and add ReactiveFormModules in our application module](https://image.slidesharecdn.com/userformsapiintegration-210915064929/85/User-Forms-API-integration-14-320.jpg)
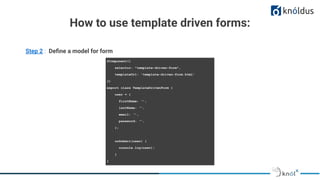
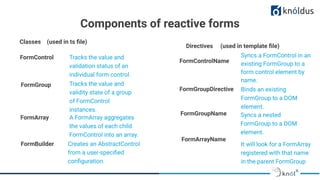
![How to use reactive forms:
Step 2 : Create a form group instance with form control instances
@Component({
selector: 'app-reactive-form',
templateUrl: './reactive-form.component.html'
})
export class ReactiveFormComponent {
loginForm = new FormGroup({
firstName: new FormControl('', [Validator.required]),
address: new FormGroup({
street: new FormControl(''),
zip: new FormControl('', [Validator.minLength(6), Validator.pattern(/[0-9]/)])
})
});
}](https://image.slidesharecdn.com/userformsapiintegration-210915064929/85/User-Forms-API-integration-15-320.jpg)
![How to use reactive forms:
username: new FormControl(
{value: ‘’, disabled: false},
[Validators.required, Validators.minLength],
[VerifyUsername]
)
Form control state
Validators
Async Validators](https://image.slidesharecdn.com/userformsapiintegration-210915064929/85/User-Forms-API-integration-16-320.jpg)
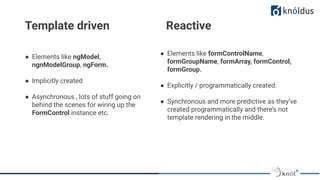
![Step 3 : Associate the form in model to view
<form [formGroup]="loginForm" (ngSubmit)=”onSubmit()”>
<label for="first-name">First Name: </label>
<input id="first-name" type="text"
formControlName="firstName">
..
..
..
<input type="button" value=”submit”> Submit
</form>
How to use reactive forms:](https://image.slidesharecdn.com/userformsapiintegration-210915064929/85/User-Forms-API-integration-17-320.jpg)

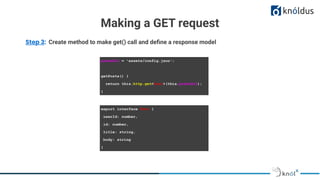
![Making a GET request
Step 1 : Import and add HttpClientModule in out application module
@NgModule({
declarations: [App],
imports: [BrowserModule, HttpClientModule],
bootstrap: [App]
})
export class AppModule {}
Step 2 : Inject the HttpClient service as a dependency of an application service class
@Injectable({
provideIn: ‘root’
})
export class ConfigService {
constructor(private http: HttpClient) { }
}](https://image.slidesharecdn.com/userformsapiintegration-210915064929/85/User-Forms-API-integration-22-320.jpg)
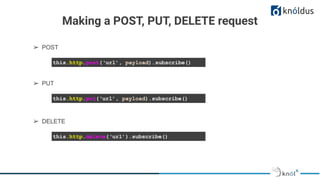
![Making a GET request
Step 3: Create method to make get() call and define a response model
export class PostsComponent {
posts = []
constructor(private appService: AppService)
getPosts() {
this.appService.getPosts()
.subscribe((data: Post) => {
this.posts = data
});
}](https://image.slidesharecdn.com/userformsapiintegration-210915064929/85/User-Forms-API-integration-24-320.jpg)


The document presents guidelines for etiquette during Knolx sessions and discusses Angular forms, including template-driven and reactive forms. It provides a detailed explanation of how to implement these forms, their components, and their validation techniques, along with information about the Angular HttpClient for back-end communication. The document concludes with resources for further learning and contact information.


![[Android] DI in multimodule application](https://cdn.slidesharecdn.com/ss_thumbnails/androiddiinmultimoduleapplication-201008125609-thumbnail.jpg?width=640&height=640&fit=bounds)


![Getting Started with Apache Spark: Big Data Made Simple [Free Meetup]](https://cdn.slidesharecdn.com/ss_thumbnails/apachesparkgettingstarted-260203175547-8361bcc3-thumbnail.jpg?width=640&height=640&fit=bounds)


