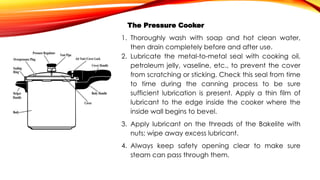
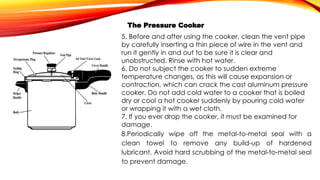
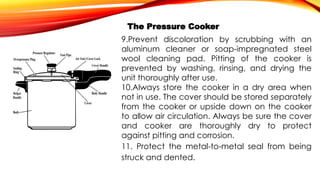
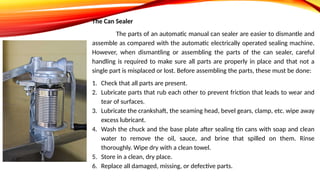
USE AND MAINTAIN
FOOD PROCESSING
TOOLS AND EQUIPMENT
WEEK 5 (SEPTEMBER 05-09, 2022)
Different procedures
in using standard
measuring devices
and instruments
HOW DO YOU USE A
SALINOMETER?
a. Prepare the brine solution.
b. Pour brine solution into a cylinder.
c. Dip the salinometer in the brine
solution.
d. Record the reading.
e. Clean instrument after use.
HOW DO YOU USE A
THERMOMETER?
a. Dip the thermometer in the
boiling liquid.
b. Record the reading by ˚C or ˚F.
c. Clean after using.
HOW DO YOU USE A
WEIGHING SCALE ?
a. Put the food on the weighing
scale.
b. Record the reading in grams or
kilograms.
HOW DO YOU USE A
MEASURING CUPS FOR DRY
INGREDIENTS?
a. Gently spoon the ingredients into
the cup, filling the cup to
overflowing.
b. Level off with a spatula or straight-
edge knife.
HOW DO YOU USE MEASURING
CUPS FOR LIQUID INGREDIENTS?
a. Pour the liquid on the level
surface of the measuring cups.
b. the measuring lines at eye level
to be sure of the extra
measurement.
Why is it important to
know the procedures
regarding the use of all
standard measuring
devices?
For this week’s topic, some
of the tools presented here
are not given in the 4th
week's topic. Tools and
equipment are needed in
food processing.
This equipment is
very important
because it seals cans
that are seen in the
groceries.
CAN SEALER
1. Put the lid on the top of the can. Make sure
the lid is facing the right way; ridges should be
on the top. Place the can on the can pedestal.
Press the lower level on your machine to lift the
raising disk or can pedestal. Press the lever
down and to the left to lock it into position
Can you imagine how it works?
2. Push the sealing handle away
from you to begin the sealing
operation. Increase pressure on the
sealing arm for approximately five
seconds. Repeat the action with the
sealing handle pulled toward you.
This completes the can seam or
sealing process.
Can you imagine how it works?
This is a pressure cooker- a
commercial-size pressure cooker. It is
used in factories to tenderize/cook the
meat inside the can. The cooking
temperature varies depending on the
type of meat, and the can size. And
when the meat is ready, the technician
removes the cans and sets them aside
for an hour to cool and dry.
Pressure Cooker
Why is equipment in food
processing very
important?
Equipment is essential machines in a food
processing plant that are important in
undertaking activities in line with processing
foods such as meat, fish, fruits, and vegetables
through salting, smoking, drying, pickling,
freezing, or canning. In every method of
processing or preserving food, different kinds of
equipment are used.
• Food processing equipment is meant to
streamline food processing and make it less
labor intensive.
• The equipment food needs can be customized
for home owners or large-scale businesses in
the food industry.
• Food processing goes through several stages
with each stage detailing a specific food
handling function.
Why do we need to inspect
and check equipment
before, during, and after
using them?
To ensure that there is a smooth
operation of any equipment, they must
be properly maintained.
Proper maintenance starts with regular
checking and inspection of their parts,
proper use or operation/manipulation,
and conducting post-operating activities
such as cleaning/sanitizing, applying oil
and lubricants to machine parts before
stowing or storing them until such time
that they will be again used.
Equipment or machines which
undergo preventive maintenance
have longer serviceability and are
more efficient in terms of their
operation.
Inspecting and Checking Condition Of
Equipment or Machines Before, During,
and After Operation
Inspecting and checking the equipment before,
during, and after using them will also help in effectively
planning and efficiently carrying out troubleshooting
and preventive maintenance activities, which include
checking the following:
1.Machine temperature- this is checked to
avoid overheating.
2. Hydraulic fluid- this must be checked
to guarantee that the
machine/equipment, which is operated
by water or other liquids moving
through pipes under pressure, will
function well.
3. Crack- this needs to be checked to
see that there are no broken parts in
equipment or machine that will cause
the breakdown of the machine or as a
source of the leak.
4. Wear and surface condition- this is
being checked to ensure no machine
parts are deteriorating or defective
due to everyday use.
5. Leak detection- this is
checked to prevent the
accidental release of gas,
water, and oil from the
machine.
Performing Minor Preventive Maintenance
Preventive Maintenance is a system of
maintenance that aims to minimize or
eliminate breakdowns in equipment and
machinery, a program of regular
inspection and repairs. This is done to
make sure that all equipment machines in
the food processing plant are always in
good condition and ready for use anytime.
The following are some minor
preventive maintenance done with
equipment/machines:
1.Checking the switch, plugs, and electrical
cords of electrically operated equipment.
2.Checking the parts of some
equipment/machines to determine if there are
defects, wear and tear, cracks, leaks, rusts, or
corrosion.
3. Checking the equipment/machines
thoroughly to make sure that all parts are
intact. Missing parts will cause the
equipment/machine to malfunction.
4.Cleaning, sanitizing and stowing all
equipment/machines according to
manufacturer's specifications and
workplace policies and regulations.
5.Regularly checking and inspecting main
machine parts to guarantee that the
machine is in top shape or condition.
6.Checking the condition of the machine and
classify them as:
a.Serviceable
b.Repairable
c.Defective
7.Applying lubricants like oil and grease that
undergo corrosion and friction to prevent or
minimize wear and tear of rubbing surfaces.
8.Checking machine temperature, hydraulic
fluid, vibration, etc.
9.Performing proper cleaning, care, and
sanitation.
Below are examples of how
some equipment/machines are
properly maintained or cared
for:
The Pressure Cooker
1. Thoroughly wash with soap and hot clean water,
then drain completely before and after use.
2. Lubricate the metal-to-metal seal with cooking oil,
petroleum jelly, vaseline, etc., to prevent the cover
from scratching or sticking. Check this seal from time
to time during the canning process to be sure
sufficient lubrication is present. Apply a thin film of
lubricant to the edge inside the cooker where the
inside wall begins to bevel.
3. Apply lubricant on the threads of the Bakelite with
nuts; wipe away excess lubricant.
4. Always keep safety opening clear to make sure
steam can pass through them.
The Pressure Cooker
5. Before and after using the cooker, clean the vent pipe
by carefully inserting a thin piece of wire in the vent and
run it gently in and out to be sure it is clear and
unobstructed. Rinse with hot water.
6. Do not subject the cooker to sudden extreme
temperature changes, as this will cause expansion or
contraction, which can crack the cast aluminum pressure
cooker. Do not add cold water to a cooker that is boiled
dry or cool a hot cooker suddenly by pouring cold water
or wrapping it with a wet cloth.
7. If you ever drop the cooker, it must be examined for
damage.
8.Periodically wipe off the metal-to-metal seal with a
clean towel to remove any build-up of hardened
lubricant. Avoid hard scrubbing of the metal-to-metal seal
to prevent damage.
The Pressure Cooker
9.Prevent discoloration by scrubbing with an
aluminum cleaner or soap-impregnated steel
wool cleaning pad. Pitting of the cooker is
prevented by washing, rinsing, and drying the
unit thoroughly after use.
10.Always store the cooker in a dry area when
not in use. The cover should be stored separately
from the cooker or upside down on the cooker
to allow air circulation. Always be sure the cover
and cooker are thoroughly dry to protect
against pitting and corrosion.
11. Protect the metal-to-metal seal from being
struck and dented.
The Can Sealer
The parts of an automatic manual can sealer are easier to dismantle and
assemble as compared with the automatic electrically operated sealing machine.
However, when dismantling or assembling the parts of the can sealer, careful
handling is required to make sure all parts are properly in place and that not a
single part is misplaced or lost. Before assembling the parts, these must be done:
1. Check that all parts are present.
2. Lubricate parts that rub each other to prevent friction that leads to wear and
tear of surfaces.
3. Lubricate the crankshaft, the seaming head, bevel gears, clamp, etc. wipe away
excess lubricant.
4. Wash the chuck and the base plate after sealing tin cans with soap and clean
water to remove the oil, sauce, and brine that spilled on them. Rinse
thoroughly. Wipe dry with a clean towel.
5. Store in a clean, dry place.
6. Replace all damaged, missing, or defective parts.
The Freezer
1. Use the freezer following the purpose described in
the user’s manual.
2. Properly install the freezer in accordance with
installation requirements
3. Switch control to OFF before unplugging.
4. Unplug the freezer before cleaning and before
repairing any parts by a qualified repairman.
5. Always grip the plug firmly and pull it straight out
from the outlet when unplugging.
6. When moving the freezer away from the wall, be
careful not to roll over or damage the power cord.
The Freezer
7.Immediately repair or replace all electric
service cords that have become frayed or
otherwise damaged. Do not use a cord that
shows cracks or abrasion damage along its
length or either the plug or connector end.
8.After the freezer is in operation, do not touch
the cold surface, particularly when your hands
are damp or wet. The skin may adhere to these
extremely cold surfaces.
9.Operate freezer away from explosive fumes.
10.Refrain from using electrical devices or sharp
instruments in defrosting your freezer.
The Freezer
11.The freezer must be properly grounded when
installed.
12. Defrost regularly.
13. Clean the interior to prevent food from
being contaminated during storage. Remove
detachable parts and wash in warm water and
baking soda solution (Use 1 tablespoon of
baking soda per liter of water). Follow the same
procedure for cleaning the door gasket, wire
basket, and all plastic parts.
The Freezer
14. Clean exterior surfaces with warm water and
dishwashing detergent. Dry and polish with a
soft cloth. Do not wipe with a soiled dishwashing
cloth or wet towel. This may leave a residue that
may corrode the paint. Do not use scouring
pads, bleach, or cleaners because they scratch
and weaken the paint finish.
15.In case of brownouts, turn the temperature
control to OFF and unplug your freezer to avoid
overloading your compressor when power is
stored.
The Refrigerator
The refrigerator, which has an automatic defroster,
should be thoroughly cleaned every week by wiping off
containers of food and removing all foods that cannot be
used. Refrigerators that do not have automatic defrosters
should be defrosted whenever the frosting unit is ¼ inch
thick. When caring for your refrigerator, follow the procedure
below:
1. Wipe up spilled food immediately.
2. Wash inside shelves and trays at least twice a week with 1
tablespoon of baking soda dissolved in 1-liter clean water.
3. Rinse and dry thoroughly.
4. Flush drains/defrost weekly.
When defrosting the refrigerator, follow these steps:
1. Turn off the electric current.
2. Remove all ice trays and frozen foods from the freezing
unit.
3. Wrap frozen foods in newspapers to keep them from
thawing. Thawing means to go from a frozen to a liquid
state.
4. Put the drip tray in the proper place to catch the melted
ice.
5. Place pans of hot water in the lower part of the freezing
unit. Allow the ice to melt. Never use a sharp or pointed
object to remove the ice.
6. Remove the food in the lower part of the refrigerator.
7. Wipe the inside portion of the freezing unit as well as the
refrigerator with water to which 1 teaspoon of baking
soda has been added for each quart.
8. Turn on the current and return the food to the refrigerator.
The Gas Range and Gas Stove
In caring for your cooking equipment,
follow the steps below:
1. Remove all burnt sediments and wipe the
grease from the top of the stove after each
use.
2. Scrape grease from cracks, openings, and
hinges.
3. When cool, wash the top of the stove.
4. When burners clean. Gas burners can be
soaked and scrubbed with a stiff brush.
5. Wipe with a clean cloth dipped in a
sanitizing solution.
Use-and-MaintaiProcessing-Tools-and-Equi

Use-and-MaintaiProcessing-Tools-and-Equi

  • 1.
    USE AND MAINTAIN FOODPROCESSING TOOLS AND EQUIPMENT WEEK 5 (SEPTEMBER 05-09, 2022)
  • 2.
    Different procedures in usingstandard measuring devices and instruments
  • 3.
    HOW DO YOUUSE A SALINOMETER? a. Prepare the brine solution. b. Pour brine solution into a cylinder. c. Dip the salinometer in the brine solution. d. Record the reading. e. Clean instrument after use.
  • 4.
    HOW DO YOUUSE A THERMOMETER? a. Dip the thermometer in the boiling liquid. b. Record the reading by ˚C or ˚F. c. Clean after using.
  • 5.
    HOW DO YOUUSE A WEIGHING SCALE ? a. Put the food on the weighing scale. b. Record the reading in grams or kilograms.
  • 6.
    HOW DO YOUUSE A MEASURING CUPS FOR DRY INGREDIENTS? a. Gently spoon the ingredients into the cup, filling the cup to overflowing. b. Level off with a spatula or straight- edge knife.
  • 7.
    HOW DO YOUUSE MEASURING CUPS FOR LIQUID INGREDIENTS? a. Pour the liquid on the level surface of the measuring cups. b. the measuring lines at eye level to be sure of the extra measurement.
  • 8.
    Why is itimportant to know the procedures regarding the use of all standard measuring devices?
  • 9.
    For this week’stopic, some of the tools presented here are not given in the 4th week's topic. Tools and equipment are needed in food processing.
  • 10.
    This equipment is veryimportant because it seals cans that are seen in the groceries. CAN SEALER
  • 11.
    1. Put thelid on the top of the can. Make sure the lid is facing the right way; ridges should be on the top. Place the can on the can pedestal. Press the lower level on your machine to lift the raising disk or can pedestal. Press the lever down and to the left to lock it into position Can you imagine how it works?
  • 12.
    2. Push thesealing handle away from you to begin the sealing operation. Increase pressure on the sealing arm for approximately five seconds. Repeat the action with the sealing handle pulled toward you. This completes the can seam or sealing process. Can you imagine how it works?
  • 13.
    This is apressure cooker- a commercial-size pressure cooker. It is used in factories to tenderize/cook the meat inside the can. The cooking temperature varies depending on the type of meat, and the can size. And when the meat is ready, the technician removes the cans and sets them aside for an hour to cool and dry. Pressure Cooker
  • 14.
    Why is equipmentin food processing very important?
  • 15.
    Equipment is essentialmachines in a food processing plant that are important in undertaking activities in line with processing foods such as meat, fish, fruits, and vegetables through salting, smoking, drying, pickling, freezing, or canning. In every method of processing or preserving food, different kinds of equipment are used.
  • 16.
    • Food processingequipment is meant to streamline food processing and make it less labor intensive. • The equipment food needs can be customized for home owners or large-scale businesses in the food industry. • Food processing goes through several stages with each stage detailing a specific food handling function.
  • 17.
    Why do weneed to inspect and check equipment before, during, and after using them?
  • 18.
    To ensure thatthere is a smooth operation of any equipment, they must be properly maintained.
  • 19.
    Proper maintenance startswith regular checking and inspection of their parts, proper use or operation/manipulation, and conducting post-operating activities such as cleaning/sanitizing, applying oil and lubricants to machine parts before stowing or storing them until such time that they will be again used.
  • 20.
    Equipment or machineswhich undergo preventive maintenance have longer serviceability and are more efficient in terms of their operation.
  • 21.
    Inspecting and CheckingCondition Of Equipment or Machines Before, During, and After Operation Inspecting and checking the equipment before, during, and after using them will also help in effectively planning and efficiently carrying out troubleshooting and preventive maintenance activities, which include checking the following:
  • 22.
    1.Machine temperature- thisis checked to avoid overheating.
  • 23.
    2. Hydraulic fluid-this must be checked to guarantee that the machine/equipment, which is operated by water or other liquids moving through pipes under pressure, will function well.
  • 24.
    3. Crack- thisneeds to be checked to see that there are no broken parts in equipment or machine that will cause the breakdown of the machine or as a source of the leak.
  • 25.
    4. Wear andsurface condition- this is being checked to ensure no machine parts are deteriorating or defective due to everyday use.
  • 26.
    5. Leak detection-this is checked to prevent the accidental release of gas, water, and oil from the machine.
  • 27.
    Performing Minor PreventiveMaintenance Preventive Maintenance is a system of maintenance that aims to minimize or eliminate breakdowns in equipment and machinery, a program of regular inspection and repairs. This is done to make sure that all equipment machines in the food processing plant are always in good condition and ready for use anytime.
  • 28.
    The following aresome minor preventive maintenance done with equipment/machines: 1.Checking the switch, plugs, and electrical cords of electrically operated equipment. 2.Checking the parts of some equipment/machines to determine if there are defects, wear and tear, cracks, leaks, rusts, or corrosion.
  • 29.
    3. Checking theequipment/machines thoroughly to make sure that all parts are intact. Missing parts will cause the equipment/machine to malfunction. 4.Cleaning, sanitizing and stowing all equipment/machines according to manufacturer's specifications and workplace policies and regulations.
  • 30.
    5.Regularly checking andinspecting main machine parts to guarantee that the machine is in top shape or condition. 6.Checking the condition of the machine and classify them as: a.Serviceable b.Repairable c.Defective
  • 31.
    7.Applying lubricants likeoil and grease that undergo corrosion and friction to prevent or minimize wear and tear of rubbing surfaces. 8.Checking machine temperature, hydraulic fluid, vibration, etc. 9.Performing proper cleaning, care, and sanitation.
  • 32.
    Below are examplesof how some equipment/machines are properly maintained or cared for:
  • 33.
    The Pressure Cooker 1.Thoroughly wash with soap and hot clean water, then drain completely before and after use. 2. Lubricate the metal-to-metal seal with cooking oil, petroleum jelly, vaseline, etc., to prevent the cover from scratching or sticking. Check this seal from time to time during the canning process to be sure sufficient lubrication is present. Apply a thin film of lubricant to the edge inside the cooker where the inside wall begins to bevel. 3. Apply lubricant on the threads of the Bakelite with nuts; wipe away excess lubricant. 4. Always keep safety opening clear to make sure steam can pass through them.
  • 34.
    The Pressure Cooker 5.Before and after using the cooker, clean the vent pipe by carefully inserting a thin piece of wire in the vent and run it gently in and out to be sure it is clear and unobstructed. Rinse with hot water. 6. Do not subject the cooker to sudden extreme temperature changes, as this will cause expansion or contraction, which can crack the cast aluminum pressure cooker. Do not add cold water to a cooker that is boiled dry or cool a hot cooker suddenly by pouring cold water or wrapping it with a wet cloth. 7. If you ever drop the cooker, it must be examined for damage. 8.Periodically wipe off the metal-to-metal seal with a clean towel to remove any build-up of hardened lubricant. Avoid hard scrubbing of the metal-to-metal seal to prevent damage.
  • 35.
    The Pressure Cooker 9.Preventdiscoloration by scrubbing with an aluminum cleaner or soap-impregnated steel wool cleaning pad. Pitting of the cooker is prevented by washing, rinsing, and drying the unit thoroughly after use. 10.Always store the cooker in a dry area when not in use. The cover should be stored separately from the cooker or upside down on the cooker to allow air circulation. Always be sure the cover and cooker are thoroughly dry to protect against pitting and corrosion. 11. Protect the metal-to-metal seal from being struck and dented.
  • 36.
    The Can Sealer Theparts of an automatic manual can sealer are easier to dismantle and assemble as compared with the automatic electrically operated sealing machine. However, when dismantling or assembling the parts of the can sealer, careful handling is required to make sure all parts are properly in place and that not a single part is misplaced or lost. Before assembling the parts, these must be done: 1. Check that all parts are present. 2. Lubricate parts that rub each other to prevent friction that leads to wear and tear of surfaces. 3. Lubricate the crankshaft, the seaming head, bevel gears, clamp, etc. wipe away excess lubricant. 4. Wash the chuck and the base plate after sealing tin cans with soap and clean water to remove the oil, sauce, and brine that spilled on them. Rinse thoroughly. Wipe dry with a clean towel. 5. Store in a clean, dry place. 6. Replace all damaged, missing, or defective parts.
  • 37.
    The Freezer 1. Usethe freezer following the purpose described in the user’s manual. 2. Properly install the freezer in accordance with installation requirements 3. Switch control to OFF before unplugging. 4. Unplug the freezer before cleaning and before repairing any parts by a qualified repairman. 5. Always grip the plug firmly and pull it straight out from the outlet when unplugging. 6. When moving the freezer away from the wall, be careful not to roll over or damage the power cord.
  • 38.
    The Freezer 7.Immediately repairor replace all electric service cords that have become frayed or otherwise damaged. Do not use a cord that shows cracks or abrasion damage along its length or either the plug or connector end. 8.After the freezer is in operation, do not touch the cold surface, particularly when your hands are damp or wet. The skin may adhere to these extremely cold surfaces. 9.Operate freezer away from explosive fumes. 10.Refrain from using electrical devices or sharp instruments in defrosting your freezer.
  • 39.
    The Freezer 11.The freezermust be properly grounded when installed. 12. Defrost regularly. 13. Clean the interior to prevent food from being contaminated during storage. Remove detachable parts and wash in warm water and baking soda solution (Use 1 tablespoon of baking soda per liter of water). Follow the same procedure for cleaning the door gasket, wire basket, and all plastic parts.
  • 40.
    The Freezer 14. Cleanexterior surfaces with warm water and dishwashing detergent. Dry and polish with a soft cloth. Do not wipe with a soiled dishwashing cloth or wet towel. This may leave a residue that may corrode the paint. Do not use scouring pads, bleach, or cleaners because they scratch and weaken the paint finish. 15.In case of brownouts, turn the temperature control to OFF and unplug your freezer to avoid overloading your compressor when power is stored.
  • 41.
    The Refrigerator The refrigerator,which has an automatic defroster, should be thoroughly cleaned every week by wiping off containers of food and removing all foods that cannot be used. Refrigerators that do not have automatic defrosters should be defrosted whenever the frosting unit is ¼ inch thick. When caring for your refrigerator, follow the procedure below: 1. Wipe up spilled food immediately. 2. Wash inside shelves and trays at least twice a week with 1 tablespoon of baking soda dissolved in 1-liter clean water. 3. Rinse and dry thoroughly. 4. Flush drains/defrost weekly.
  • 42.
    When defrosting therefrigerator, follow these steps: 1. Turn off the electric current. 2. Remove all ice trays and frozen foods from the freezing unit. 3. Wrap frozen foods in newspapers to keep them from thawing. Thawing means to go from a frozen to a liquid state. 4. Put the drip tray in the proper place to catch the melted ice. 5. Place pans of hot water in the lower part of the freezing unit. Allow the ice to melt. Never use a sharp or pointed object to remove the ice. 6. Remove the food in the lower part of the refrigerator. 7. Wipe the inside portion of the freezing unit as well as the refrigerator with water to which 1 teaspoon of baking soda has been added for each quart. 8. Turn on the current and return the food to the refrigerator.
  • 43.
    The Gas Rangeand Gas Stove In caring for your cooking equipment, follow the steps below: 1. Remove all burnt sediments and wipe the grease from the top of the stove after each use. 2. Scrape grease from cracks, openings, and hinges. 3. When cool, wash the top of the stove. 4. When burners clean. Gas burners can be soaked and scrubbed with a stiff brush. 5. Wipe with a clean cloth dipped in a sanitizing solution.