Downloaded 17 times

![[Networking For Home and Small Business] [2013]
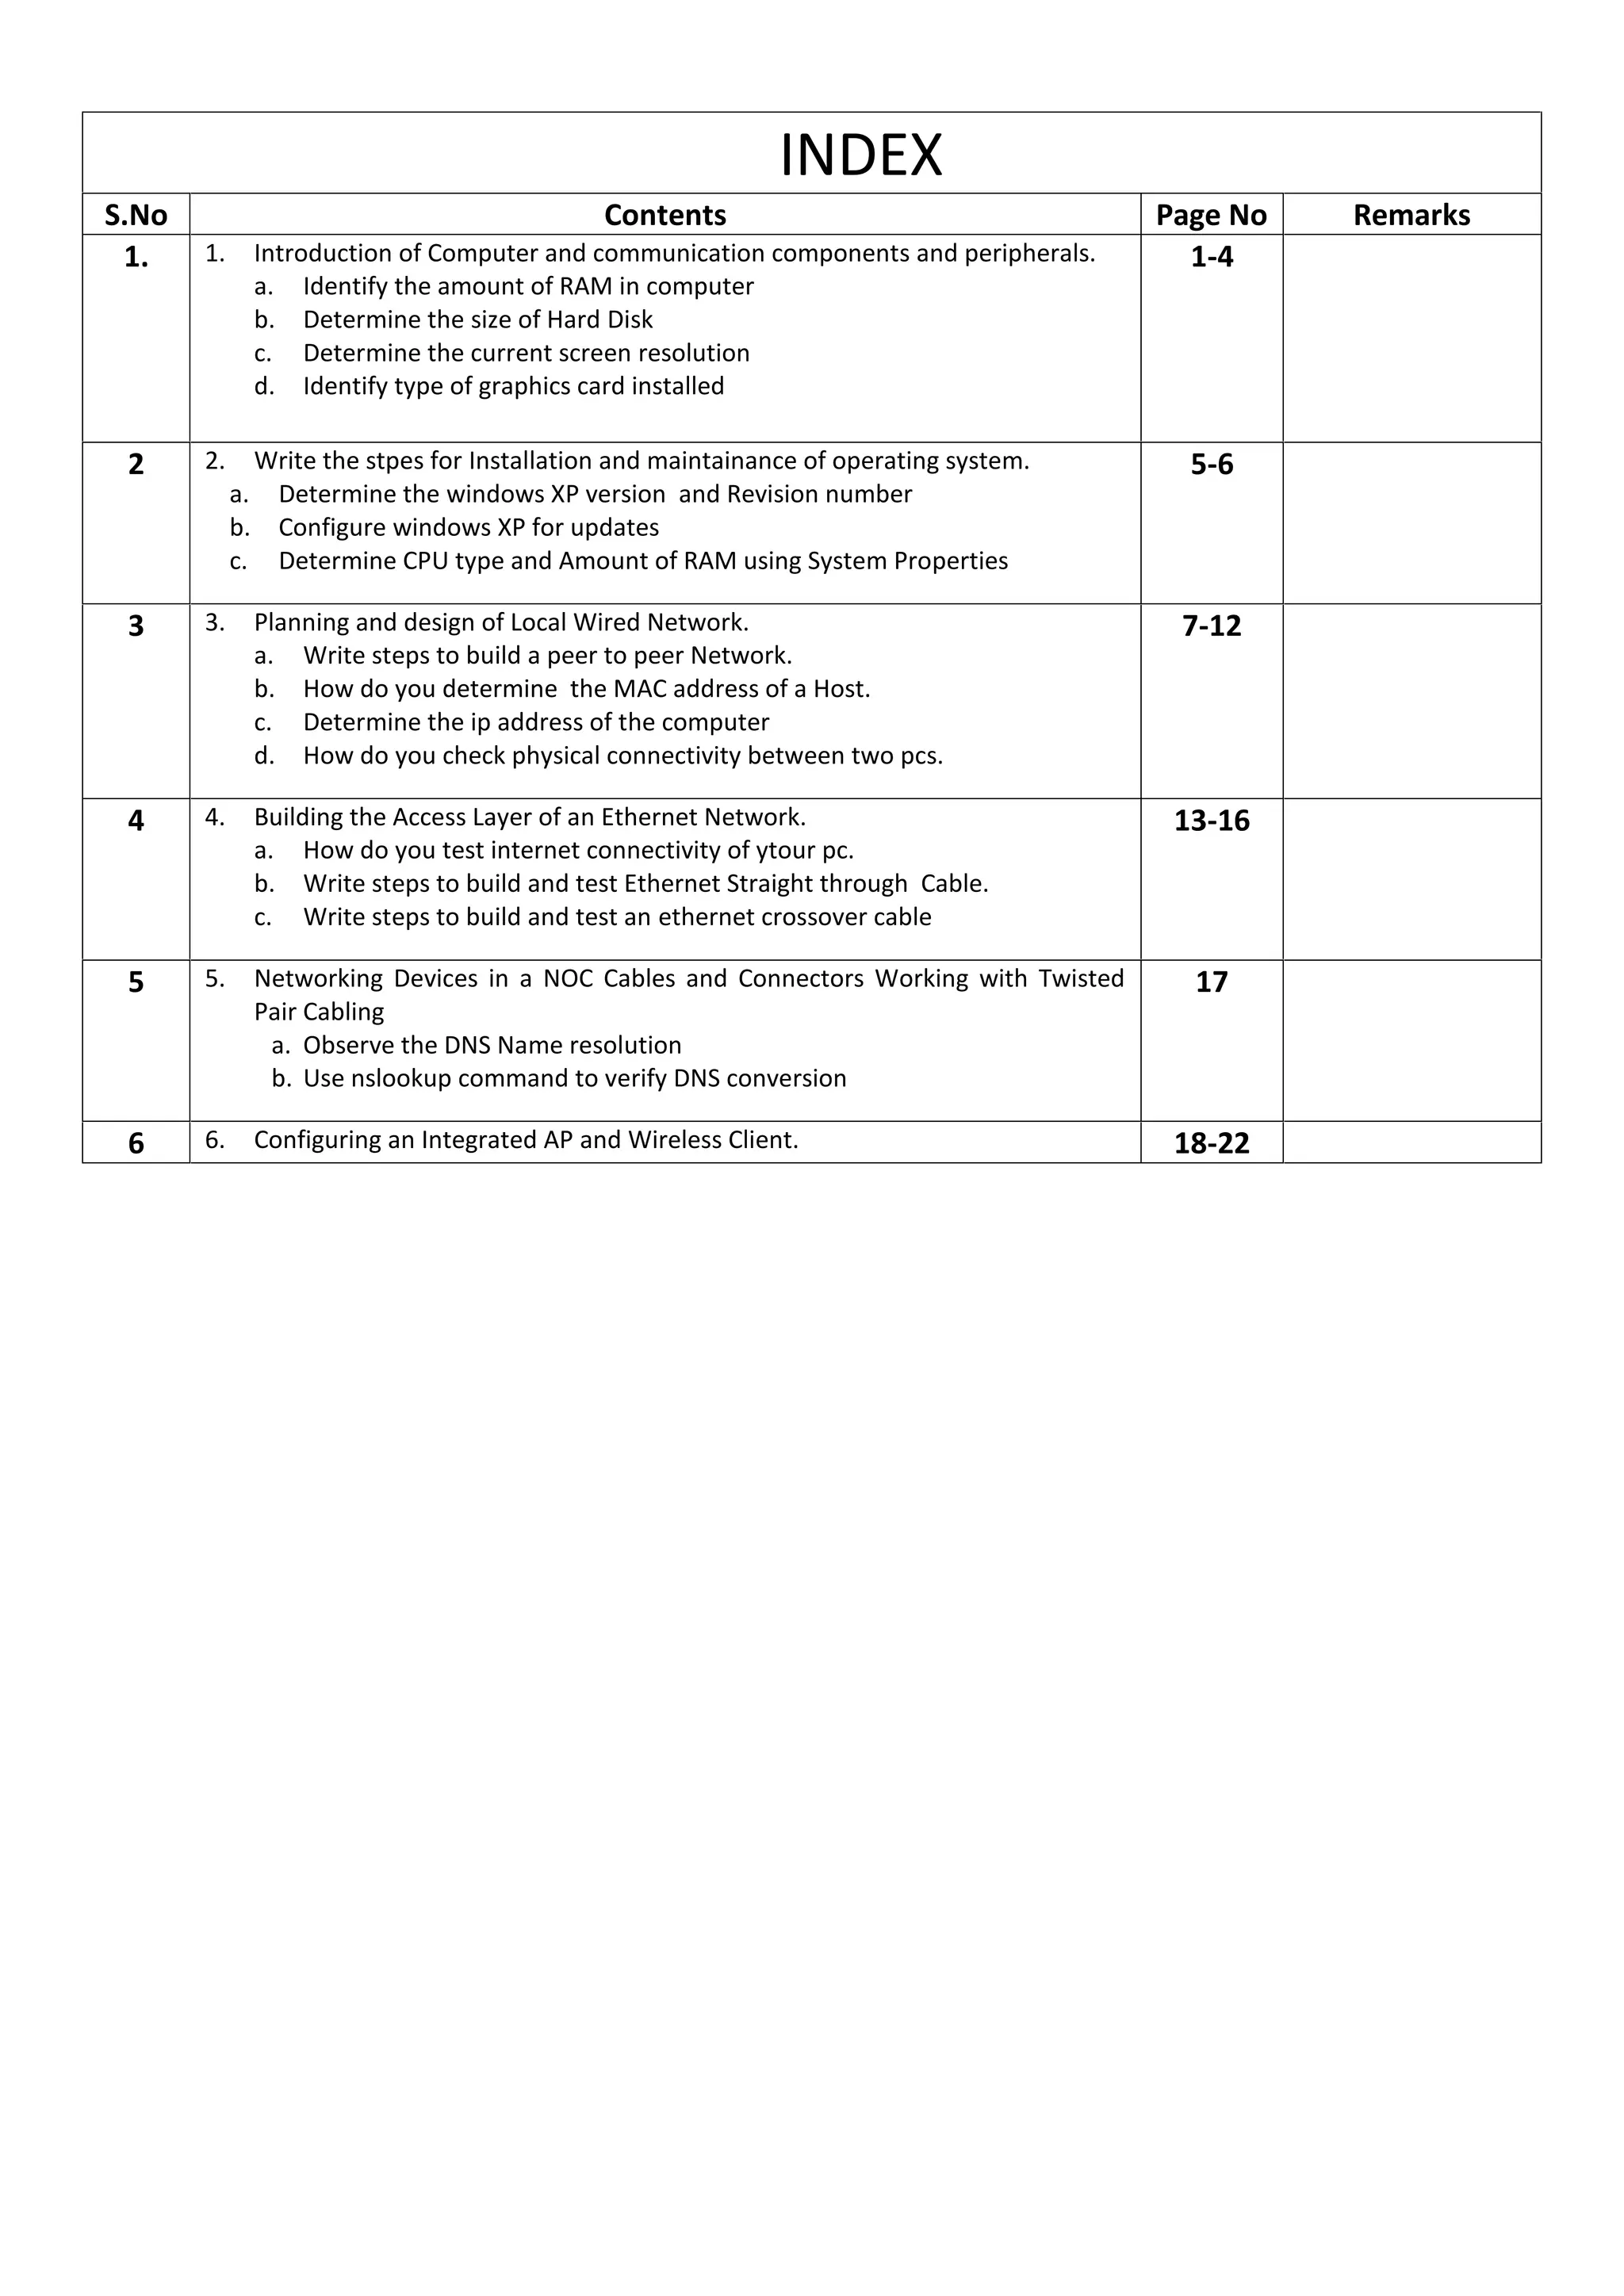
1. Introduction of Computer and communication components and peripherals.
a. Identify the amount of RAM in computer
b. Determine the size of Hard Disk
c. Determine the current screen resolution
d. Identify type of graphics card installed
Step 1: Identify the RAM in a computer
In windows 7 open the My computer by Double Clicking on the My Computer icon on the Desktop or by
selecting it from the start menu. After the My Computer window is open Click on System Properties on the top
of the Window. And then a dialog box appears.
The computer operating system and service pack information are listed in the upper part of the dialog box. The
computer processor type, speed, and memory are listed.
Computer operating system
and service pack information
Computer Processor Speed,
Type and Memory.
c. In this example, the computer processor Intel Core i3-3217U processor with a clock speed of 1.80 gigahertz
(GHz). Clock speed is a measurement of the number of cycles per second that a processor is capable of doing.
The number of cycles impacts the number of instructions per second that the CPU can process. A higher clock
speed generally means that a processor is capable of executing more instructions per second.
The computer has 3.98 GB of RAM available for the CPU.
-1-](https://image.slidesharecdn.com/untitled-130324170928-phpapp02/75/B-Sc-IT-II-Sem-NHSB-Networking-For-Home-And-Small-Business-Amity-University-3-2048.jpg)
![[Networking For Home and Small Business] [2013]
Step 2: Determine the size of the hard disk drive
a. Double-click the My Computer icon on your computer desktop. If you do not have a My Computer icon,
click Start and choose My Computer.
b. Right-click the local disk drive under the Hard Disk Drives Section (which is usually the C drive), and
select Properties. This opens the Local Disk Properties dialog box. The total capacity of the hard drive is
shown above the Drive C icon.
-2-](https://image.slidesharecdn.com/untitled-130324170928-phpapp02/75/B-Sc-IT-II-Sem-NHSB-Networking-For-Home-And-Small-Business-Amity-University-4-2048.jpg)
![[Networking For Home and Small Business] [2013]
Step 3: Determine the current screen resolution
To view the current screen resolution and color quality settings, right-click on any empty space on the desktop and
select Properties from the context menu. In the Display Properties window, select the Settings tab.
You can also access Display Properties by opening the Control Panel and clicking the Display
icon.
-3-](https://image.slidesharecdn.com/untitled-130324170928-phpapp02/75/B-Sc-IT-II-Sem-NHSB-Networking-For-Home-And-Small-Business-Amity-University-5-2048.jpg)
![[Networking For Home and Small Business] [2013]
Step 4: Identify the type of graphics card installed
You can get detailed information about the graphics card (also called the display adapter) in the Display
Properties screen.
a. In the Display Properties screen, click the Advanced button.
b. Select the Adapter tab.
-4-](https://image.slidesharecdn.com/untitled-130324170928-phpapp02/75/B-Sc-IT-II-Sem-NHSB-Networking-For-Home-And-Small-Business-Amity-University-6-2048.jpg)
![[Networking For Home and Small Business] [2013]
2. Write the stpes for Installation and maintenance of operating system.
a. Determine the windows XP version and Revision number
b. Configure windows XP for updates
c. Determine CPU type and Amount of RAM using System Properties
The Steps for installation and maintenance of operating system are:
1. Verify that all the hardware is certified to work with the selected OS. Experienced users can monitor
tech blogs to see what problems are being experienced on specific machines/motherboards and so
on.This can save the installer time and potential problems.
2. Verify that the hardware resources meet or exceed the published minimum requirements.
3. Confirm that the appropriate installation medium is available. Due to the file size of current operating
systems, they usually are available on both CD and DVD medium.
4. If the OS is to be installed on a system that already contains data:
a. Use system diagnostic tools and utilities to ensure that the current OS installation is in good
condition, free of malicious or damaging files and codes.
b. Complete a full backup of all important files.
5. If performing a clean install, verify that all the application software is available for installation.
6. If connecting the computer to a network at this time, verify that the network configuration information
is available.
7. If this is an end user computer and a different OS is to be installed, verify that the user has
adequate training in the use of the new OS.
Before starting the installation, determining the partition structure that best meets the user requirements
is necessary.
Determine the Windows XP version and revision number
a. Click the Start button and select All Programs > Accessories > Windows Explorer.
b. From the Help menu, choose About Windows.
c. In this example, the computer has Windows XP Professional Service Pack 2 installed with a version 5.1.
-5-](https://image.slidesharecdn.com/untitled-130324170928-phpapp02/75/B-Sc-IT-II-Sem-NHSB-Networking-For-Home-And-Small-Business-Amity-University-7-2048.jpg)
![[Networking For Home and Small Business] [2013]
Step 2: Configure Windows XP for updates
a. Click on the Start button and select the Control Panel option.
b. Double-click the Automatic Updates option.
c. There will be many options available for choosing the automatic update such as:
1. Automatic (recommended) Automatically download recommended updates for my
computer and install them
2. Download updates for me, but let me choose when to install them
3. Notify me but don't automatically download or install them
d. Now choose the type of update settings that you wish to have.
e. Click on the OK button below.
f. Close the Automatic Updates window.
Note: In order to Update the windows the user should have a working Internet Connection.
Step 3: Determine CPU type and Amount of RAM using System Properties
In windows 7 open the My computer by Double Clicking on the My Computer icon on the Desktop or by
selecting it from the start menu. After the My Computer window is open Click on System Properties on the top
of the Window. And then a dialog box appears.
The computer operating system and service pack information are listed in the upper part of the dialog box. The
computer processor type, speed, and memory are listed.
Computer operating system
and service pack information
Computer Processor Speed,
Type and Memory.
c. In this example, the computer processor Intel Core i3-3217U processor with a clock speed of 1.80 gigahertz
(GHz). Clock speed is a measurement of the number of cycles per second that a processor is capable of doing.
The number of cycles impacts the number of instructions per second that the CPU can process. A higher clock
speed generally means that a processor is capable of executing more instructions per second.
The computer has 3.98 GB of RAM available for the CPU.
-6-](https://image.slidesharecdn.com/untitled-130324170928-phpapp02/75/B-Sc-IT-II-Sem-NHSB-Networking-For-Home-And-Small-Business-Amity-University-8-2048.jpg)
![[Networking For Home and Small Business] [2013]
3. Planning and design of Local Wired Network.
a. Write steps to build a peer to peer Network.
b. How do you determine the MAC address of a Host.
c. Determine the ip address of the computer
d. How do you check physical connectivity between two pcs.
Write steps to build a peer to peer Network.
Step 1: Diagram the network
a. A network diagram is a map of the logical topology of the network. In the space below, sketch a
simple peer-to-peer network connecting two PCs. Label one PC with IP address 192.168.1.1 and the
other PC with IP address 192.168.1.2. Use labels to indicate connecting media and any necessary
network devices.
b. A simple network like the one you designed can use a hub or switch as a central connecting device,
or the PCs may be directly connected. Which kind of cable is required for a direct Ethernet connection
between the two PCs
Step 2: Document the PCs
a. Check the computer name settings for each PC and make adjustments as necessary. For each PC,
select Start and Control Panel. Double-click the System icon, then click the Computer Name tab.
Write down the computer name that is displayed following Full computer name:
PC1 Name:
PC2 Name:
b. Check to see if the two PCs have the same
name. If they do, change the name of one PC by
clicking the Change button, typing a new name
in the Computer name field, then clicking OK.
c. Click OK to close the System Properties
window.
-7-](https://image.slidesharecdn.com/untitled-130324170928-phpapp02/75/B-Sc-IT-II-Sem-NHSB-Networking-For-Home-And-Small-Business-Amity-University-9-2048.jpg)
![[Networking For Home and Small Business] [2013]
Step 3: Connect the Ethernet cable
a. Use the Ethernet crossover cable provided by the instructor. Plug one end of the cable into the
Ethernet NIC of PC1.
b. Plug the other end of the cable into the Ethernet NIC of PC2. As you insert the cable, you should
hear a click which indicates that the cable connector is properly inserted into the port.
Step 4: Verify physical connectivity
a. After the Ethernet crossover cable is connected to both PCs, take a close look at each Ethernet port.
A light (usually green or amber) indicates that physical connectivity has been established between the
two NICs. Try unplugging the cable from one PC then reconnecting it to verify that the light goes off
then back on.
b. Go to the Control Panel, double click the Network Connections icon, and confirm that the local
area connection is established. The following figure shows an active local area connection. If physical
connectivity problems exist, you will see a red X over the Local Area Connection icon with the words
Network cable unplugged.
c. If the Local Area Connection does not indicate that it is connected, troubleshoot by repeating Steps 3
and 4. You may also want to ask your instructor to confirm that you are using an Ethernet crossover
cable.
-8-](https://image.slidesharecdn.com/untitled-130324170928-phpapp02/75/B-Sc-IT-II-Sem-NHSB-Networking-For-Home-And-Small-Business-Amity-University-10-2048.jpg)
![[Networking For Home and Small Business] [2013]
Step 5: Configure IP settings
a. Configure the logical addresses for the two PCs so that they are able to communicate using TCP/IP.
On one of the PCs, go to the Control Panel, double click the Network Connections icon, and then
right click the connected Local Area Connection icon. Choose Properties from the pull-down menu.
b. Using the scroll bar in the Local Area Connection Properties window, scroll down to highlight
Internet Protocol (TCP/IP). Click the Properties button.
After configuring the IP settings the Peer-to-Peer Network is ready to work.
-9-](https://image.slidesharecdn.com/untitled-130324170928-phpapp02/75/B-Sc-IT-II-Sem-NHSB-Networking-For-Home-And-Small-Business-Amity-University-11-2048.jpg)
![[Networking For Home and Small Business] [2013]
How do you determine the MAC address of a Host.
1. Open the command prompt from the Run.
2. Enter the ipconfig /all command at the command prompt.
3. Press Enter
Locate the MAC (physical) address(es) in the output from the ipconfig /all command
According to this example the MAC Address of the device is 00-50-2C-A5-P5-73
- 10 -](https://image.slidesharecdn.com/untitled-130324170928-phpapp02/75/B-Sc-IT-II-Sem-NHSB-Networking-For-Home-And-Small-Business-Amity-University-12-2048.jpg)
![[Networking For Home and Small Business] [2013]
Determine the ip address of the computer
1. Open the command prompt from the Run.
2. Enter the ipconfig /all command at the command prompt.
3. Press Enter
Locate the IP Address in the output from the ipconfig /all command
According to this example the IP Address of the device is 10.77.114.92
- 11 -](https://image.slidesharecdn.com/untitled-130324170928-phpapp02/75/B-Sc-IT-II-Sem-NHSB-Networking-For-Home-And-Small-Business-Amity-University-13-2048.jpg)
![[Networking For Home and Small Business] [2013]
How do you check physical connectivity between two pcs.
NOTE: To test TCP/IP connectivity between the PCs, Windows Firewall must be disabled temporarily on both
PCs. Windows Firewall should be re-enabled after the tests have been completed.
a. On PC1, on the Windows XP desktop, click Start. From the Start menu, select Control Panel, and double-
click Network Connections.
b. Right-click the Local Area Connection icon and select Properties. Click the Advanced tab. Locate and click the
Settings button.
c . Make a note of whether the firewall settings are ENABLED (ON) for the Ethernet port or DISABLED (OFF) for
the Ethernet port.
d. If the firewall settings are enabled, click the Off (not recommended) radio button to disable the firewall. The
setting will be re-enabled in a later step. Click OK in this dialog box and the following to apply this setting.
e. From the same command prompt on the first PC, type ping 192.168.10.3 to test connectivity with the second
PC.
f. If the ping is successful, you will see results similar to the following figure. If the ping is not successful, perform the
appropriate troubleshooting steps such as checking the cabling and checking your IP address, subnet mask, and
default gateway assignments.
- 12 -](https://image.slidesharecdn.com/untitled-130324170928-phpapp02/75/B-Sc-IT-II-Sem-NHSB-Networking-For-Home-And-Small-Business-Amity-University-14-2048.jpg)
![[Networking For Home and Small Business] [2013]
4. Building the Access Layer of an Ethernet Network.
a. How do you test internet connectivity of your pc.
b. Write steps to build and test Ethernet Straight through Cable.
c. Write steps to build and test an ethernet crossover cable
To test the internet connectivity of your PC follow the following steps:
1. First see if the Network Cable is plugged into the device.
2. Now open the command prompt from the Run.
3. Now to check the inter connectivity of the Computer type ping and enter the name of any website.
For eg lets do it with ping www.google.com
4. Now since the ping succeed, it means that the Computer has a Internet Connectivity and if the ping
wouldn’t have succeeded then that wold have meant that the computer does not has working
internet connectivity.
Build and test an Ethernet straight-through patch cable
Step 1: Obtain and prepare the cable
a. Determine the length of cable required. This could be from a device such as a computer to the device to
which it connects (like a hub or switch) or between a device and an RJ-45 outlet jack. Add at least
30.48 cm (12 in.) to the distance. The TIA/EIA standard states the maximum length is 5 m (16.4 ft.). Standard
Ethernet cable lengths are usually .6 m (2 ft.), 1.83 m (6 ft.), or 3.05 m (10 ft.).
b. Cut a piece of cable to the desired length. Stranded UTP cable is commonly used for patch cables
(the cables between an end network device such as a PC and an RJ-45 connector) because it is
more durable when bent repeatedly. It is called stranded because each of the wires within the cable is made up
of many strands of fine copper wire, rather than a single solid wire. Solid wire is used for cable runs that are
between the RJ-45 jack and a punch-down block.
c. Using wire strippers, remove 5.08 cm (2 in.) of the cable jacket from both ends of the cable.
Step 2: Prepare and insert the wires
a. Determine which wiring standard will be used.
b. Locate the correct table based on the wiring standard used.
c. Spread the cable pairs and arrange them roughly in the desired order based on the standard chosen.
d. Untwist a short length of the pairs and arrange them in the exact order needed by the standard. It is
very important to untwist as little as possible. The twists are important because they provide
noise cancellation.
e. Straighten and flatten the wires between your thumb and forefinger. f.
Ensure the cable wires are still in the correct order as the standard.
g. Cut the cable in a straight line to within 1.25 to 1.9 cm (1/2 to 3/4 in.) from the edge of the cable jacket. If it
is longer than this, the cable will be susceptible to crosstalk (the interference of bits from one wire with an
adjacent wire).
- 13 -](https://image.slidesharecdn.com/untitled-130324170928-phpapp02/75/B-Sc-IT-II-Sem-NHSB-Networking-For-Home-And-Small-Business-Amity-University-15-2048.jpg)
![[Networking For Home and Small Business] [2013]
h. The tang (the prong that sticks out from the RJ-45 connector) should be on the underside pointing
downward when inserting the wires. Insert the wires firmly into the RJ-45 connector until all wires are pushed as
far as possible into the connector.
Step 3: Inspect, crimp, and reinspect
a. Visually inspect the cable and ensure the right color codes are connected to the correct pin numbers.
b. Visually inspect the end of the connector. The eight wires should be pressed firmly against the end of
the RJ-45 connector. Some of the cable jacket should be inside the first portion of the connector.
This provides strain relief for the cable. If the cable jacket is not far enough inside the connector, it may
eventually cause the cable to fail.
c. If everything is correctly aligned and inserted properly, place the RJ-45 connector and cable into the crimper.
The crimper will push two plungers down on the RJ-45 connector.
d. Visually re-inspect the connector. If improperly installed, cut the end off and repeat the process.
Step 4: Terminate the other cable end
a. Use the previously described steps to attach an RJ-45 connector to the other end of the cable. b.
Visually re-inspect the connector. If improperly installed, cut the end off and repeat the process.
c. Which standard [T568A | T568B] is used for patch cables in your school?
Step 5: Test the cable
a. Using a cable tester, test the straight-through cable for functionality. If it fails, repeat the lab.
b. (Optional) Use the cable to connect a PC to a network.
c. (Optional) Click the Start button and select the Run option.
d. (Optional) Type cmd and press Enter.
e. (Optional) From the command prompt, type ipconfig.
f. (Optional) Write down the default gateway IP address.
g. (Optional) From the command prompt, type ping followed by the default gateway IP address. If the
cable is functional, the ping should be successful (provided that no other network problem exists and
the default gateway router is connected and functional).
- 14 -](https://image.slidesharecdn.com/untitled-130324170928-phpapp02/75/B-Sc-IT-II-Sem-NHSB-Networking-For-Home-And-Small-Business-Amity-University-16-2048.jpg)
![[Networking For Home and Small Business] [2013]
Build and test an Ethernet crossover cable
Step 1: Obtain and prepare the cable
a. Determine the length of cable required. This could be from a hub to a hub, hub to switch, switch to
switch, computer to router, or from one computer to another computer. Add at least 30.48 cm (12 in.)
to the distance. Which length of cable did you choose and why did you choose this length?
b. Cut a piece of cable to the desired length and, using wire strippers, remove 5.08 cm (2 in.) of the
cable jacket from both ends of the cable.
Step 2: Prepare and insert the T568A wires
a. Locate the T568A table at the beginning of the lab.
b. Spread the cable pairs and arrange them roughly in the desired order based on the T568A standard. c.
Untwist a short length of the pairs and arrange them in the exact order needed by the standard. It is
very important to untwist as little as possible. Twists are important because they provide noise
cancellation.
d. Straighten and flatten the wires between your thumb and forefinger.
e. Ensure the cable wires are in the correct order based on the standard.
f. Cut the cable in a straight line to within 1.25 to 1.9 cm (1/2 to 3/4 in.) from the edge of the cable
jacket. If it is longer than this, the cable will be susceptible to crosstalk (the interference of bits from
one wire with an adjacent wire).
g. The tang (the prong that sticks out from the RJ-45 connector) should be on the underside pointing
downward when inserting the wires. Insert the wires firmly into the RJ-45 connector until all wires are
pushed as far as possible into the connector.
Step 3: Inspect, crimp, and re-inspect
a. Visually inspect the cable and ensure the right color codes are connected to the correct pin numbers.
b. Visually inspect the end of the connector. The eight wires should be pressed firmly against the RJ-45
connector. Some of the cable jacket should be inside the first portion of the connector. This provides
for cable strain relief which can eventually cause the cable to fail.
c. If everything is correctly aligned and inserted properly, place the RJ-45 connector and cable into the
crimper. The crimper will push two plungers down on the RJ-45 connector.
d. Visually re-inspect the connector. If improperly installed, cut the end off and repeat the process.
Step 4: Terminate the T568B cable end
a. On the other end, use the previously described steps (but use the T568B table and standard) to
attach an RJ-45 connector to the cable.
b. Visually re-inspect the connector. If improperly installed, cut the end off and repeat the process.
c. Which standard [T568A | T568B] would you rather use at home if you have or would like to have a
home network?
- 15 -](https://image.slidesharecdn.com/untitled-130324170928-phpapp02/75/B-Sc-IT-II-Sem-NHSB-Networking-For-Home-And-Small-Business-Amity-University-17-2048.jpg)
![[Networking For Home and Small Business] [2013]
Step 5: Test the cable
a. Using a cable tester, test the crossover cable for functionality. If it fails, repeat the lab.
b. Use the cable to connect two PCs.
c. On both computers, click the Start button and select Run.
NOTE: If the Run command is unavailable on your PC, visually check the LED status lights on the
NIC card. If they are on (usually green or amber) the cable is functional.
d. On both computers, type cmd and press Enter.
e. On both computers from the command prompt, type ipconfig.
f. Write the IP address of both computers.
Computer 1:
Computer 2:
g. From the command prompt of one computer, type ping followed by the IP address of the other
computer. If the cable is functional, the ping should be successful. Do the ping on the other computer
as well.
- 16 -](https://image.slidesharecdn.com/untitled-130324170928-phpapp02/75/B-Sc-IT-II-Sem-NHSB-Networking-For-Home-And-Small-Business-Amity-University-18-2048.jpg)
![[Networking For Home and Small Business] [2013]
5. Networking Devices in a NOC Cables and Connectors Working with Twisted Pair Cabling
a. Observe the DNS Name resolution
b. Use nslookup command to verify DNS conversion
Observe DNS conversion
a. Click the Start button, select Run, type cmd, and then click OK. The command prompt window
appears.
b. At the command prompt, type ping www.cisco.com. The computer needs to translate www.cisco.com
into an IP address so it knows where to send the Internet Control Message Protocol (ICMP) packets. Ping
is a type of ICMP packet.
c. The first line of the output shows www.cisco.com converted to an IP address by DNS. You should be
able to see the effect of DNS even if your school has a firewall that prevents pinging, or if Cisco has
prevented people from pinging their web server.
Verify DNS operation using the nslookup command
a. At the command prompt, type the nslookup command.
b. Notice how the command prompt changed. This is the NSLOOKUP prompt. From this prompt, you
can enter commands related to DNS
c. At the NSLOOKUP prompt, type www.cisco.com.
d. The ip address of the Cisco.com is displayed that is same as in the Ping Command. The IP address is
198.133219.2
i. At the prompt, type the IP address of the Cisco web server that you just found. You can use
NSLOOKUP to get the domain name of an IP address if you do not know the URL.
- 17 -](https://image.slidesharecdn.com/untitled-130324170928-phpapp02/75/B-Sc-IT-II-Sem-NHSB-Networking-For-Home-And-Small-Business-Amity-University-19-2048.jpg)
![[Networking For Home and Small Business] [2013]
6. Configuring an Integrated AP and Wireless Client.
Configuring a Access Point (AP)
Step 1: Verify connectivity between the computer and the multi-function device
a. The computer used to configure the AP should be attached to one of the multi-
function device’s switch ports.
b. On the computer, click the Start button and select Run. Type cmd and click OK or press Enter.
c. At the command prompt, ping the multi-function device using the default IP address
192.168.1.1 or the IP that has been configured on the multi-function device’s port.
Do not proceed until the ping succeeds.
d. Write down the command used to ping the multi-function device.
NOTE: If the ping is not successful, try these
troubleshooting steps:
• Check to make sure the IP address of the computer is on the 192.168.1.0 network.
The computer must be on the same network as the multi-function device to be able to
ping it. The DHCP service of the multi-function device is enabled by default. If the
computer is configured as a DHCP client it should have a valid IP address and subnet
mask. If the computer has a static IP address, it must be in on the 192.168.1.0
network and the subnet mask must be 255.255.255.0.
• Make sure the cable is a known-good straight-through cable. Test to verify.
• Verify that the link light for the port where the computer is attached is lit.
• Check whether the multi-function device has power.
If none of these steps correct the problem, check with your instructor.
Step 2: Log in to the multi-function device and configure the wireless network
a. Open a web browser. In the address line, type http://ip_address, where ip_address is the IP address
of the wireless router (default is 192.168.1.1). At the prompt, leave the user name textbox empty, but
type the password assigned to the router. The default password is admin. Click OK.
b. In the main menu, click on the Wireless option.
c. In the Basic Wireless Settings window, the Network Mode shows mixed by default, because the
AP supports 802.11b, g, and n wireless devices. You can use any of these standards to connect to
the AP. If the wireless portion of the multi-function device is NOT being used, the network mode
- 18 -](https://image.slidesharecdn.com/untitled-130324170928-phpapp02/75/B-Sc-IT-II-Sem-NHSB-Networking-For-Home-And-Small-Business-Amity-University-20-2048.jpg)
![[Networking For Home and Small Business] [2013]
would be set to Disabled. Leave the default of Mixed selected.
d. Delete the default SSID (linksys) in the Network Name (SSID) textbox. Enter a new SSID using your
last name or name chosen by your instructor. SSIDs are case-sensitive.
e. Write down the exact SSID name that you are using.
f. Click on the Radio Band drop-down menu and write down the two options.
g. For a wireless network that can use 802.11b, g, or n client devices, the default is Auto. Auto allows
the Wide Channel option to be chosen and gives the best performance. The Standard Channel
option is used if the wireless client devices are 802.11b or g, or both b and g. The Wide Channel
option is used if only 802.11n client devices are being used. Leave the default of Auto selected.
h. SSID Broadcast is set to enabled by default, which enables the AP to periodically send out the SSID
using the wireless antenna. Any wireless devices in the area can detect this broadcast. This is how
clients detect nearby wireless networks.
i. Click on the Save Settings button. When the settings have been successfully saved, click on
Continue.
j. The AP is now configured for a wireless network with the name (SSID) that you gave it. It is important
to write down this information before starting the next lab or attaching any wireless NICs to the
wireless network.
Configuring a Wireless Client
Step 1: Install the wireless NIC driver
a. Insert the CD that contains the wireless NIC driver into the CD/DVD drive and
install the driver according to the manufacturer recommendations. Most USB
devices require that the driver be
installed before the device is physically attached. Note that you may do part of the
installation process now and part of it after the wireless NIC is installed.
Step 2: Install the wireless NIC
a. When prompted, connect the USB NIC cable to an available USB port. Click Next to continue.
- 19 -](https://image.slidesharecdn.com/untitled-130324170928-phpapp02/75/B-Sc-IT-II-Sem-NHSB-Networking-For-Home-And-Small-Business-Amity-University-21-2048.jpg)
![[Networking For Home and Small Business] [2013]
Step 3: Attach to the wireless network
a. Most wireless NIC adapters have client software to control the NIC. The software shows any wireless
networks that are discovered. Select the SSID of the wireless network that you configured on the AP in
a previous lab.
b. Enter the name of the SSID that you are going to use.
c. If the wireless NIC did not connect to the wireless network, perform the appropriate troubleshooting.
d. Check the signal strength of the Wireless Client.
Step 4: Determine the NIC driver version
a. Hardware manufacturers continually update drivers. The driver that ships with a NIC or other piece of
hardware is frequently not the most current.
b. To check the driver version for the NIC you installed, click Start, select Control Panel and then
Network Connections. Right-click on the wireless connection and select Properties. Click the
Configure button for the NIC and then the Driver tab. What is the name and version of the driver you
installed?
- 20 -](https://image.slidesharecdn.com/untitled-130324170928-phpapp02/75/B-Sc-IT-II-Sem-NHSB-Networking-For-Home-And-Small-Business-Amity-University-22-2048.jpg)
![[Networking For Home and Small Business] [2013]
Step 5: Determine if the NIC driver is the most current
a. Search the NIC manufacturer web site for drivers that support the wirelss NIC you installed. Are
there more current ones available?
b. What is the most current one listed?
c. If there is a more current driver, how would you apply it?
Step 6: Verify connectivity
a. Once you have installed the NIC, it is time to verify connectivity with the Linksys WRT300N.
b. Open a web browser such as Windows Internet Explorer or Mozilla Firefox.
c. In the address line type http://192.168.1.1, which is the default setting on the AP.
d. In the Connect to 192.168.1.1 dialog box, leave the username text box empty, and type admin in the
password text box. Leave the Remember my password checkbox unchecked. Click OK.
- 21 -](https://image.slidesharecdn.com/untitled-130324170928-phpapp02/75/B-Sc-IT-II-Sem-NHSB-Networking-For-Home-And-Small-Business-Amity-University-23-2048.jpg)
![[Networking For Home and Small Business] [2013]
e. If you receive the Linksys Setup screen, you have established connectivity with the AP. If you do not
establish connectivity, you will have to troubleshoot the connection by checking to ensure the devices
are turned on and the IP addresses on all devices are correct. Which IP address should be
configured on the wireless NIC?
- 22 -](https://image.slidesharecdn.com/untitled-130324170928-phpapp02/75/B-Sc-IT-II-Sem-NHSB-Networking-For-Home-And-Small-Business-Amity-University-24-2048.jpg)

The document is a practical file for a networking course at Amity University, covering essential topics on computer components, system installation and maintenance, local wired network planning, and Ethernet network access layer building. It includes detailed steps for identifying computer specifications, setting up networks, and configuring networking devices and protocols. The practical instructions are structured in a step-by-step format to facilitate learning in network setup and management.