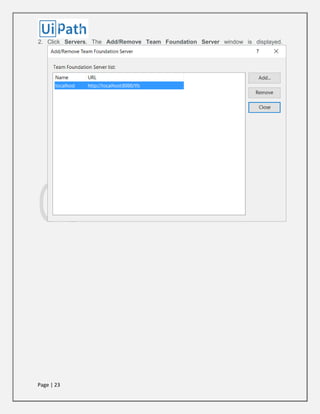
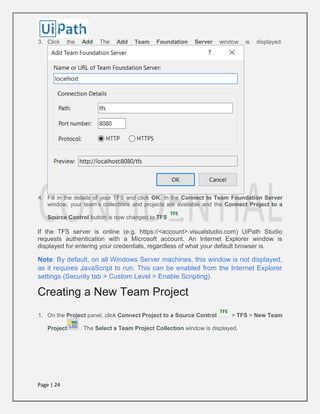
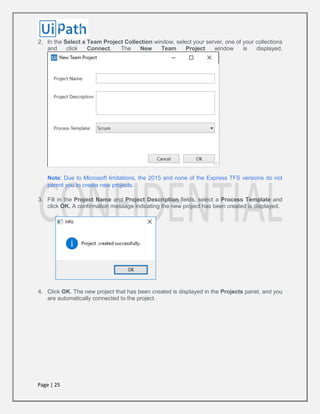
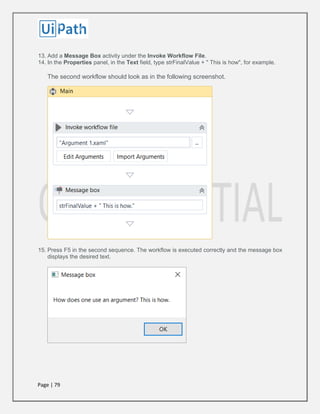
Downloaded 58 times


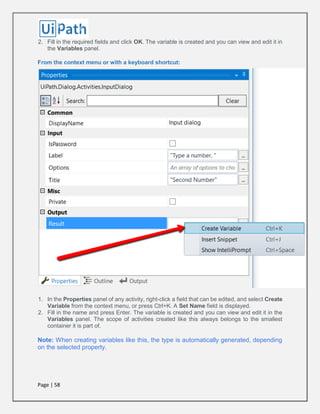
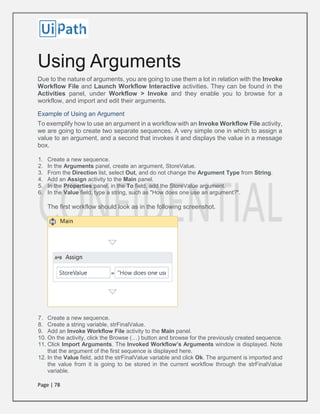
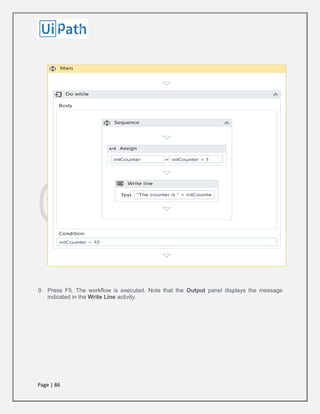
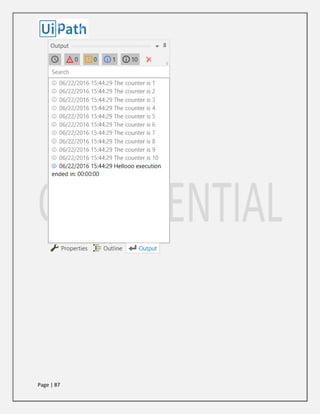
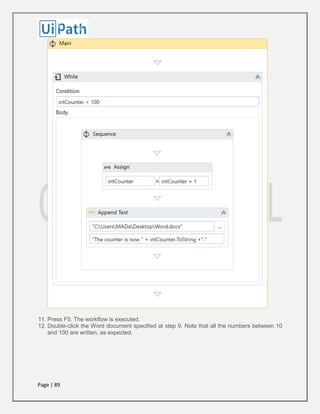
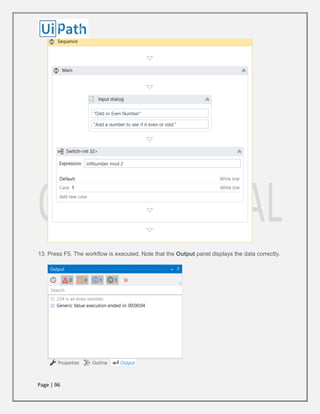
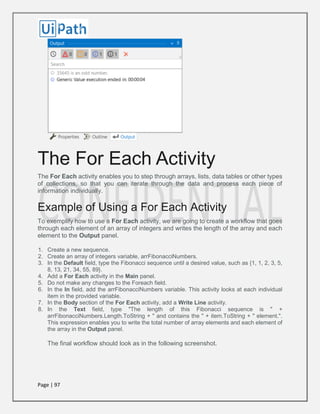
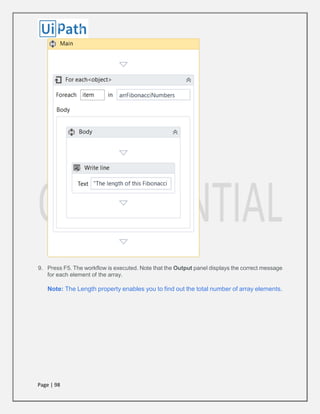
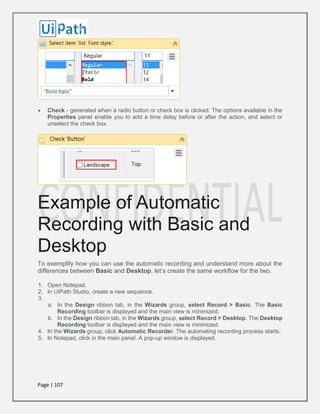
![Page | 57
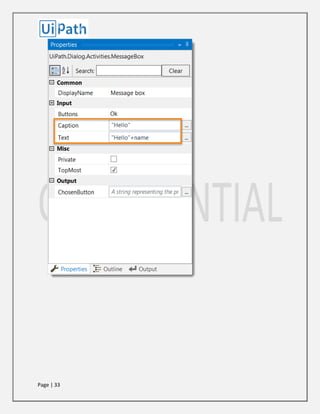
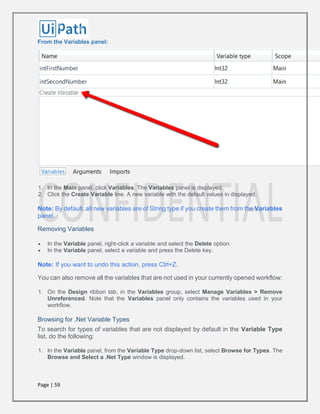
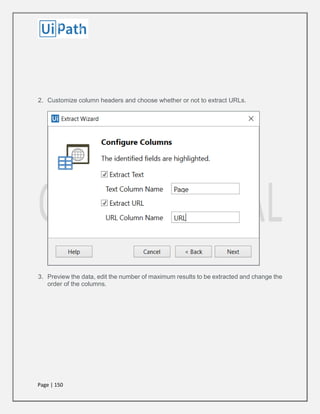
VARIABLES
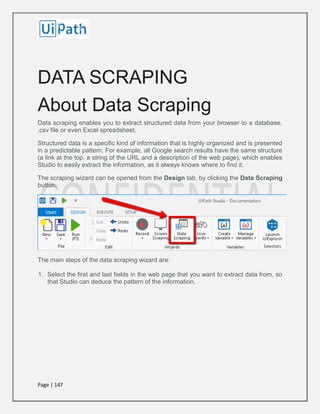
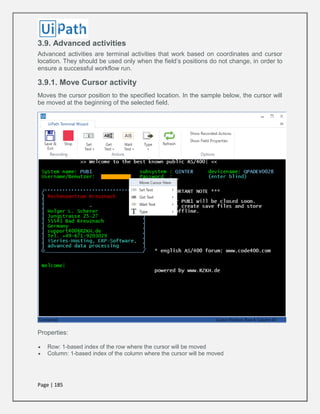
Managing Variables
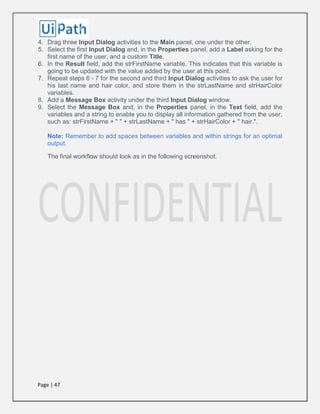
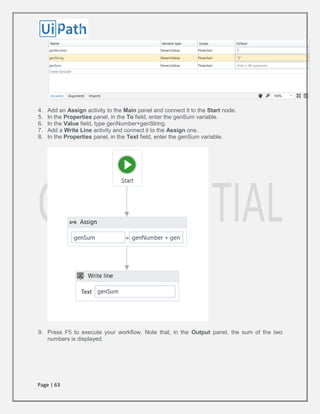
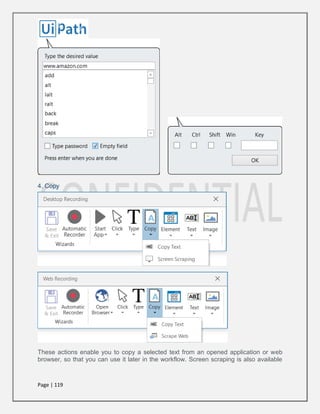
Managing Variables
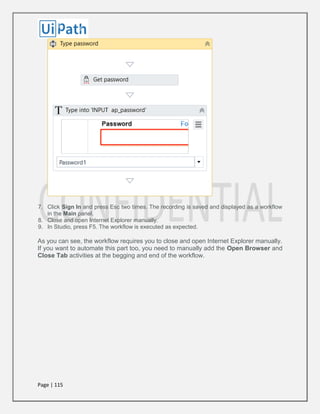
In UiPath Studio, variables are used to store multiples type of data. Another key aspect
of variables is that their value can change so that you can, for example, control how many
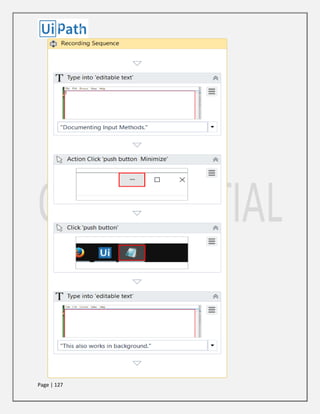
times the body of a loop is executed.
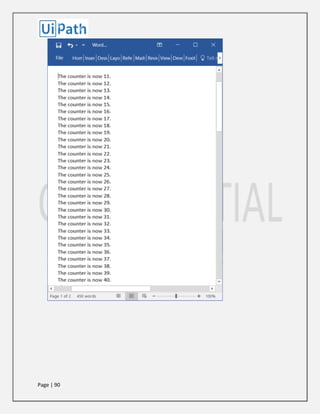
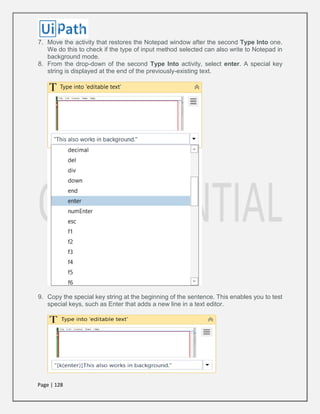
The data stored within a variable is called a value, and it can be of multiple types. In
UiPath, we support a large amount of types, ranging from generic value, text, number,
data table, time and date, to UiElements.
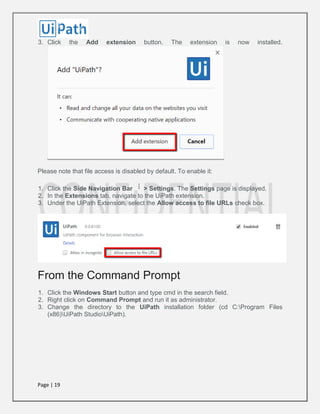
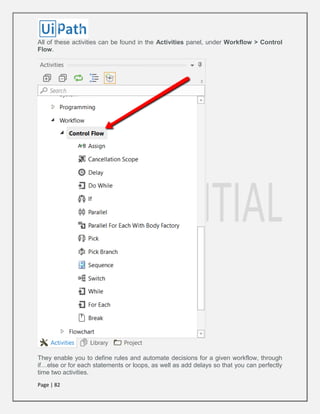
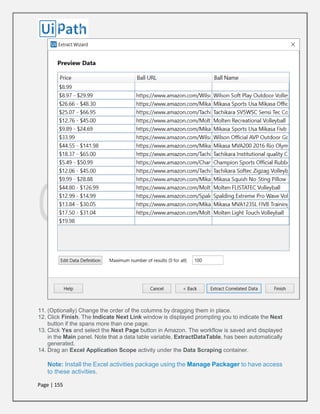
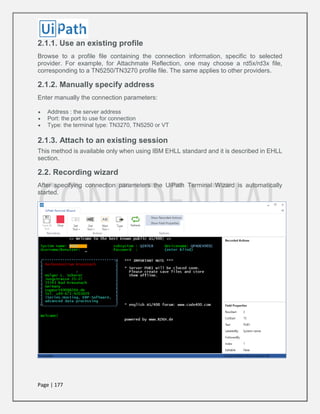
Creating Variables
Note: Variables cannot be created if the Main panel does not contain at least one activity.
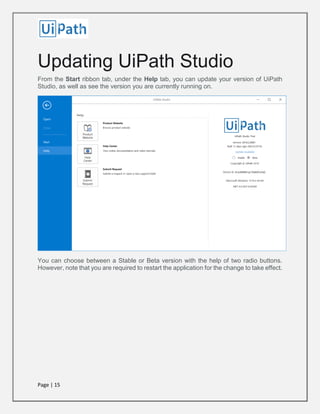
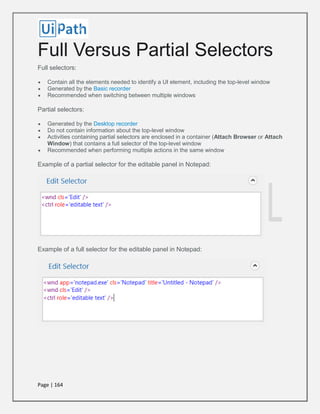
From the Design ribbon:
1. On the Design ribbon tab, in the Variables group, select Create Variable > [Type of
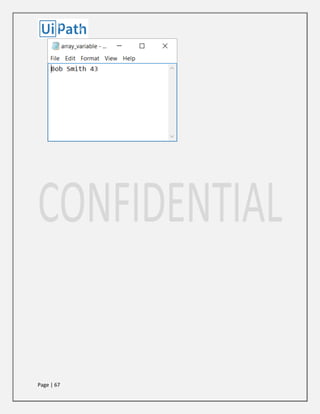
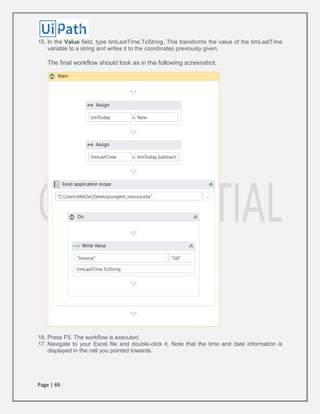
variable]. The Create Variable window is displayed.](https://image.slidesharecdn.com/uipathuserguide-220619155239-2947ae8f/85/UiPath-User-Guide-pdf-57-320.jpg)

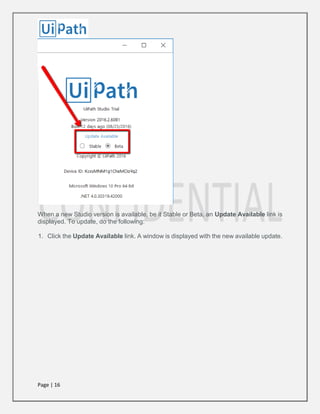
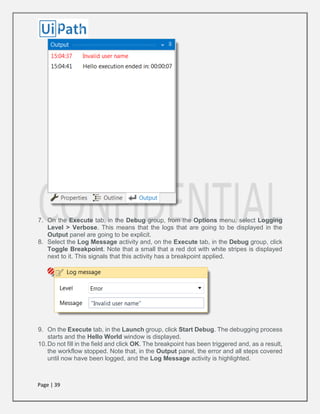
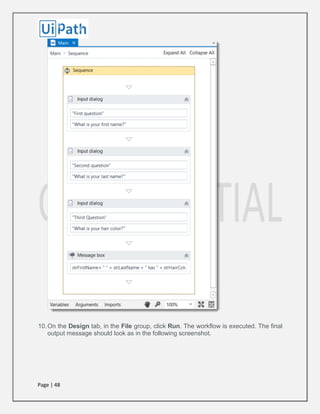
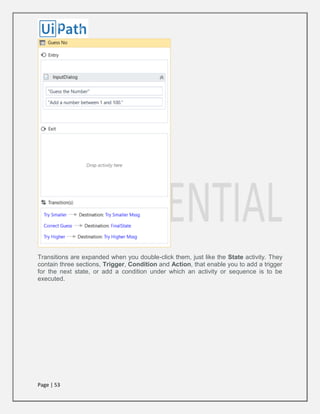
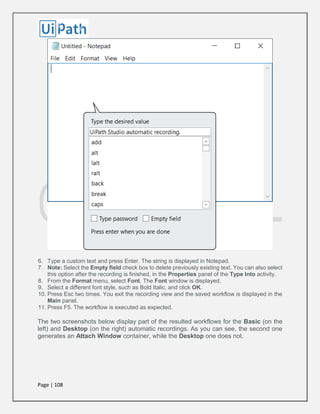
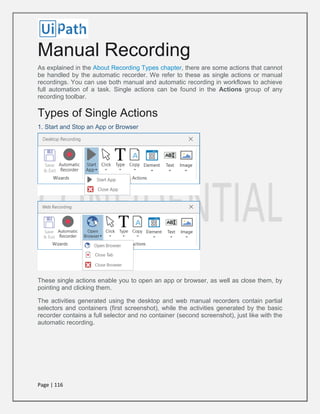
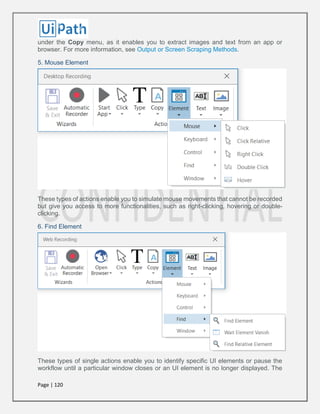
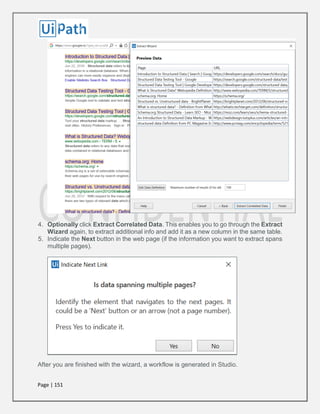
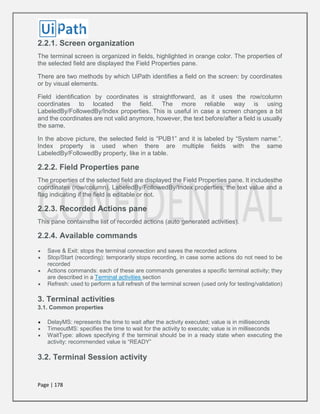
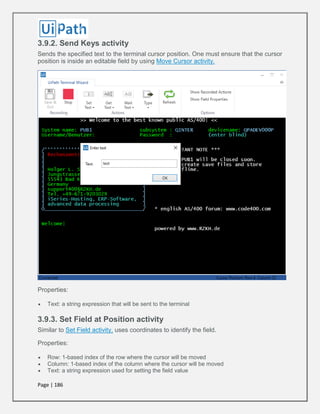
![Page | 62
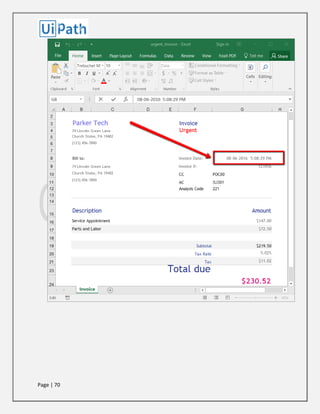
Int32
String
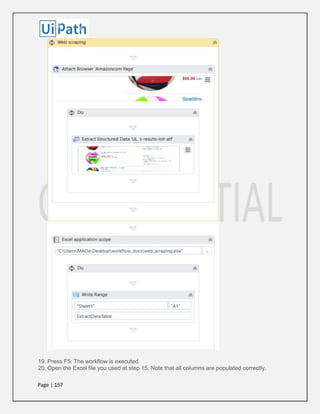
Object
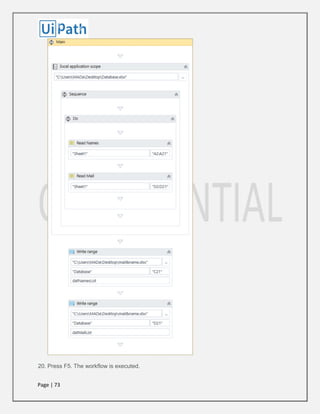
Generic Value
Array of [T]
Browse for Types
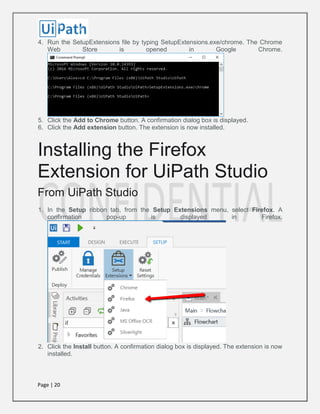
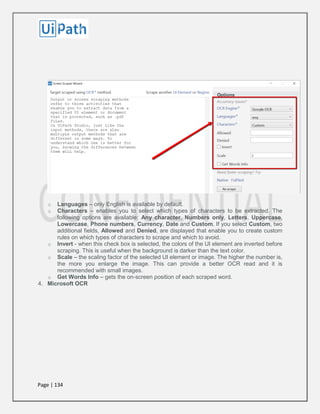
Scope
Mandatory.
The are in which a variable is available, such as a specific activity. By default,
they are available in the entire workflow.
Default
Optional.
The default value of the variable. If this field is empty, the variable does not
have a default value.
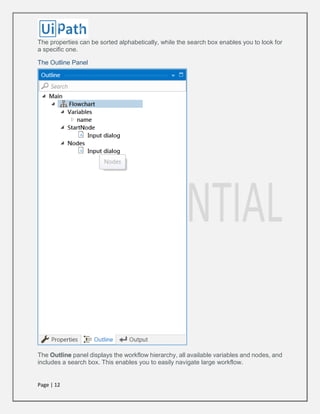
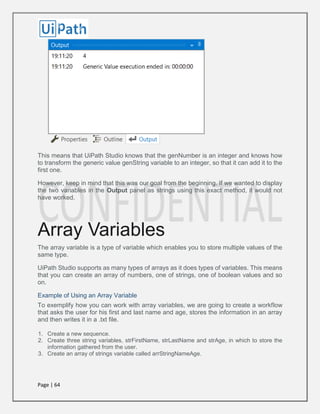
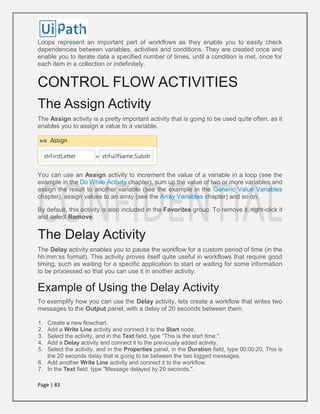
Generic Value Variables
The generic value variable is a type of variable with a wide range that can store any kind
of data, including text, numbers, dates and arrays, and is particular to UiPath Studio.
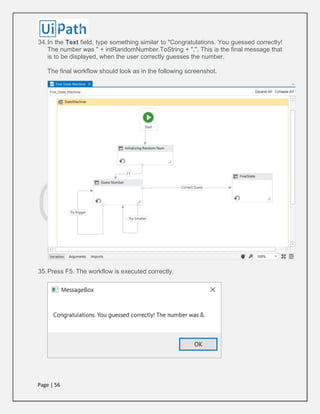
Generic value variables are automatically converted to other types, in order to perform
certain actions. However, it is important to use these types of variables carefully, as their
conversion may not always be the correct one for your workflow.
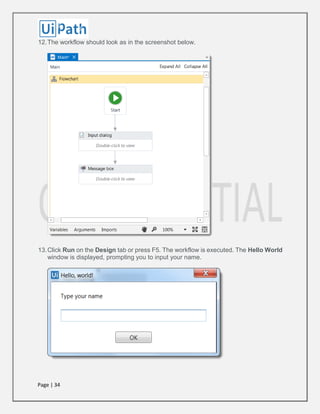
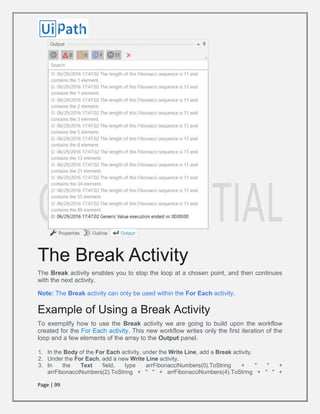
Example of Using a Generic Value Variable
To demonstrate how a generic value variable can be converted and used, let's create a
workflow that displays in the Output panel the sum of two numbers, using generic value
variables with different types of values.
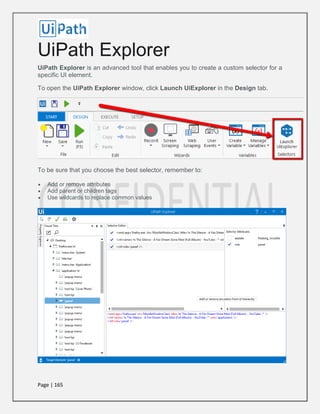
1. Create a flowchart.
2. Create three generic value variables, genNumber, genString and genSum.
3. In the Default column for the genNumber variable, type 2, and for the genString variable,
type"2." The first value is interpreted as as integer, and the second one as a string.](https://image.slidesharecdn.com/uipathuserguide-220619155239-2947ae8f/85/UiPath-User-Guide-pdf-62-320.jpg)


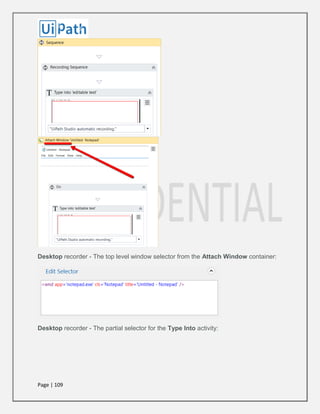
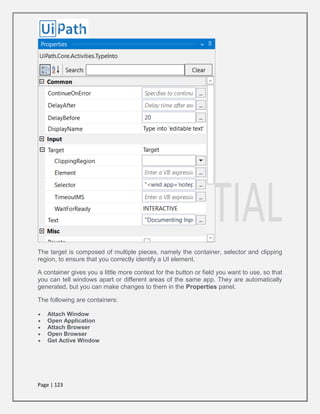
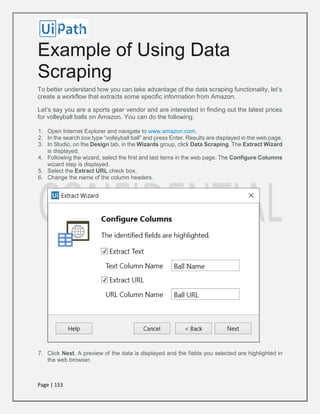
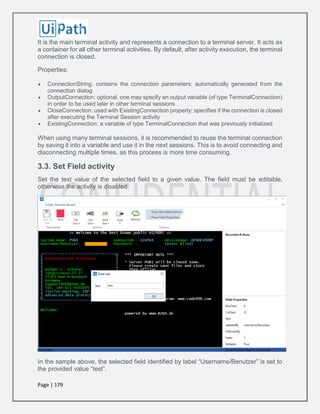
![Page | 77
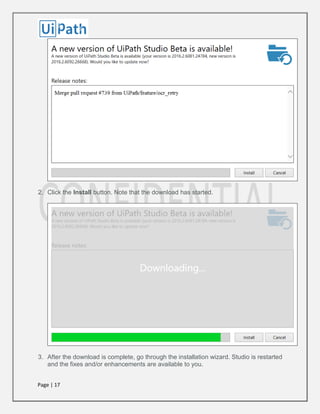
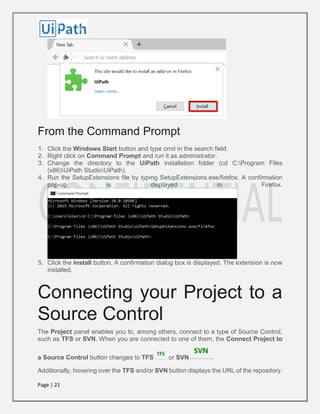
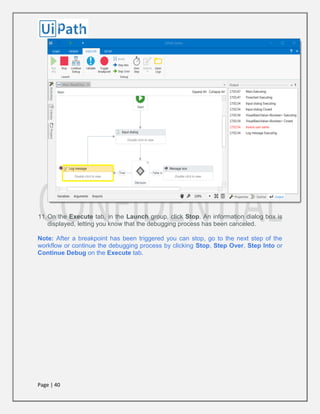
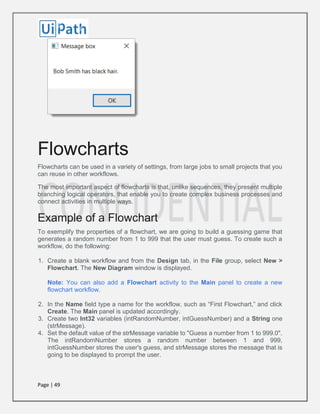
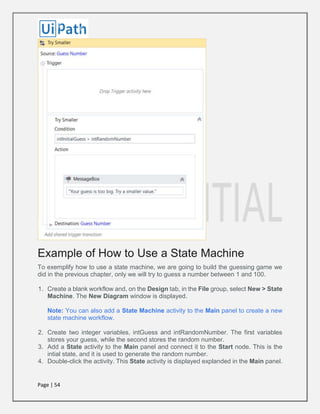
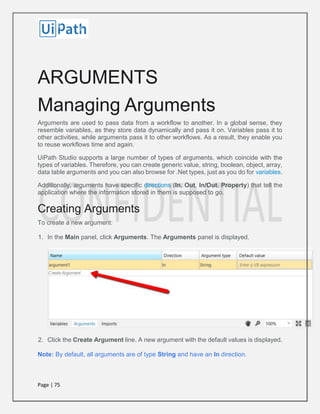
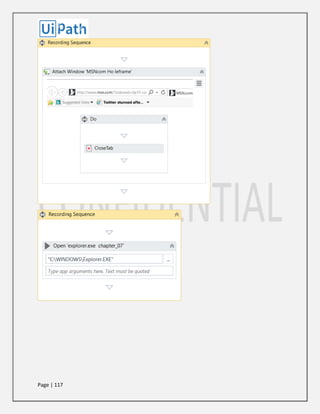
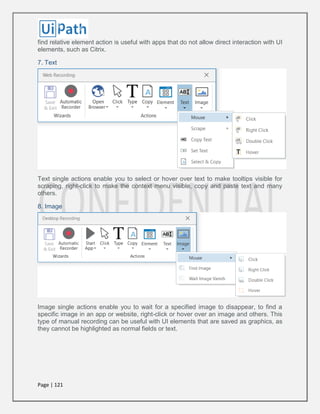
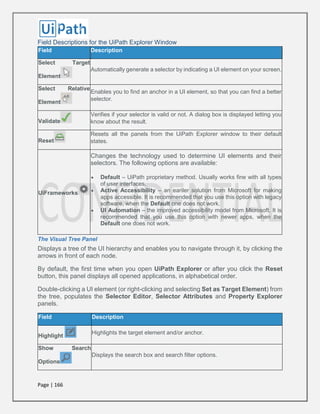
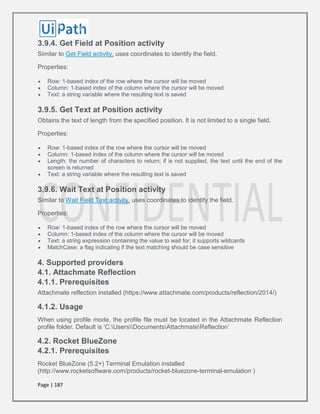
The Arguments Panel
The Arguments panel enables you to create arguments and make changes to them.
Field Description
Name
Mandatory.
The name of your argument. If you do not add a name to an argument, one
is automatically generated. For more information on how to name your
arguments, see Naming Best Practices.
Direction
Mandatory.
Select a direction for your argument. The following options are available:
In - the argument can only be used within the given workflow.
Out - the argument can be used to pass data outside of a given
workflow.
In/Out - the argument can be used both within or outside of a given
workflow.
Property - not currently used.
Argument
Type
Mandatory.
Choose the value type you want your argument to store. The following
options are available:
String
Int32
Object
Array of [T]
Browse for Types
If you select a .Net type from the Browse and Select a .Net Type window,
it is added to the Argument Type drop-down list.
Default
Value
Optional.
The default value of the argument. If this field is empty, the variable does
not have a default value.](https://image.slidesharecdn.com/uipathuserguide-220619155239-2947ae8f/85/UiPath-User-Guide-pdf-77-320.jpg)

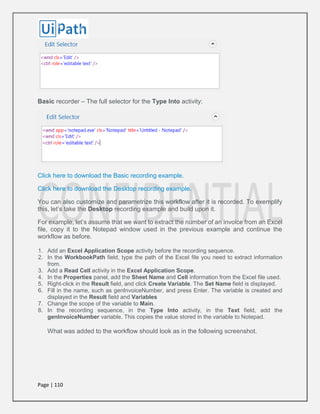
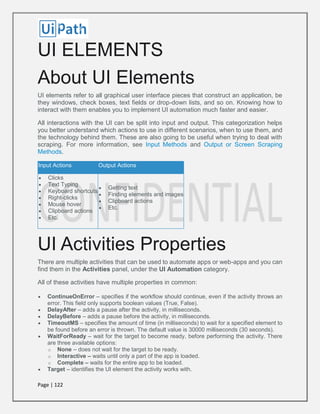


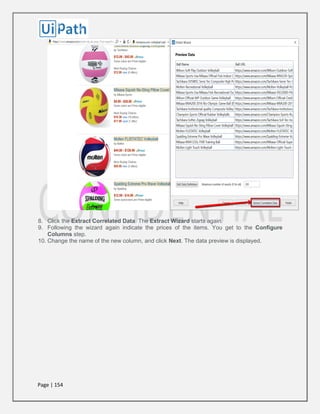

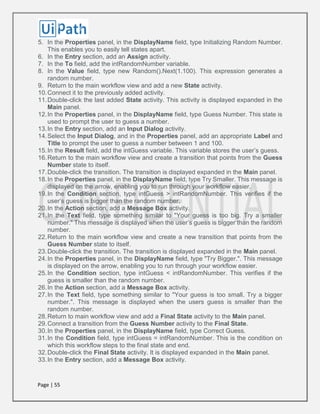
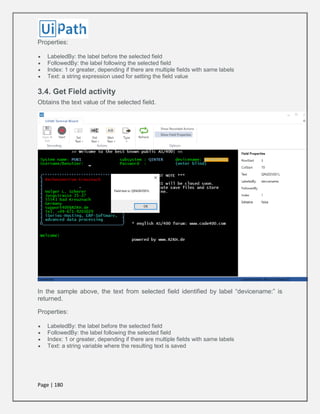
![Page | 172
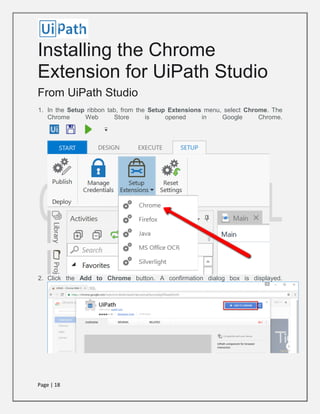
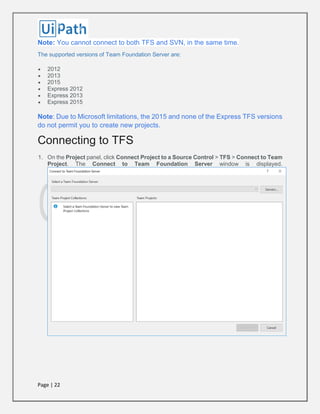
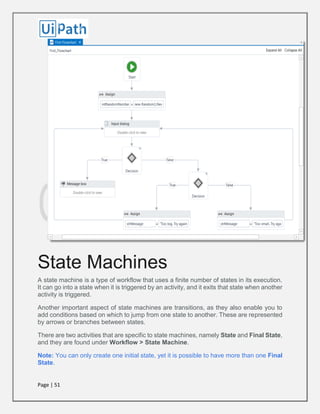
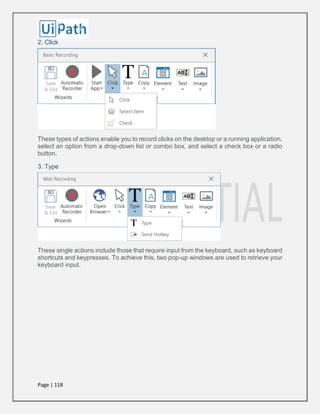
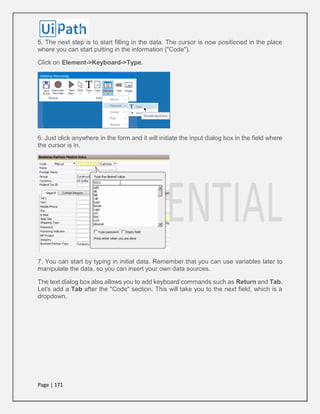
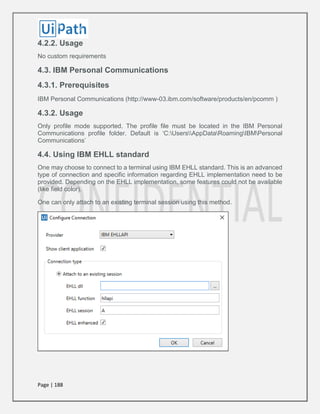
8. You can notice that it creates a code right next to the text you entered. It's the same
thing you can apply when adding more keyboard commands. This is how you can
manipulate the movement of the cursor:
Arrow Down: [k(down)]
Enter: [k(enter)]
Tab: [k(tab)]
You can follow the same steps from step 5 to fill in any other input fields.
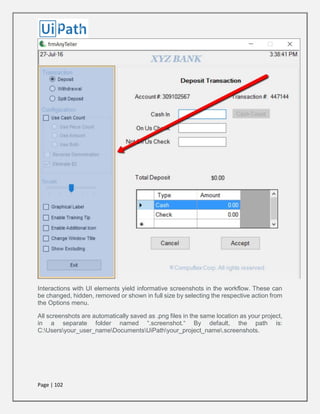
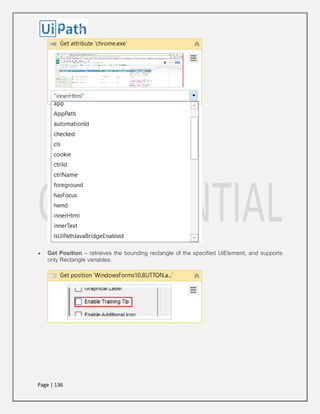
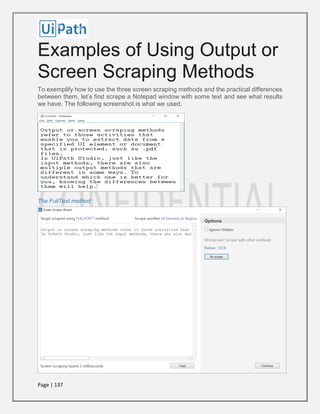
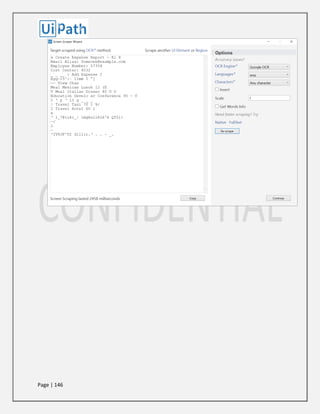
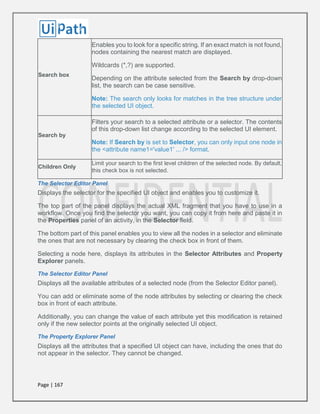
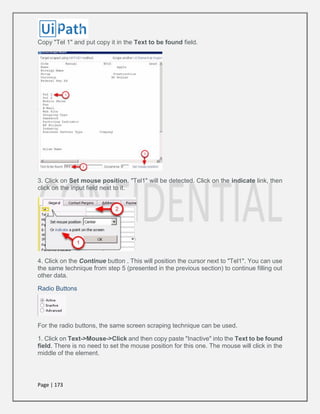
Automating SAP via Click on Text and Screen Scraping
The keyboard commands are very helpful when moving to and manipulating input fields.
If you want to jump to a different field from within the form it could be hard to do so using
keyboard activities. That's where the UiPath built-in screen scraping comes in.
You have to run an OCR which reads the text in the form and captures the targeted text.
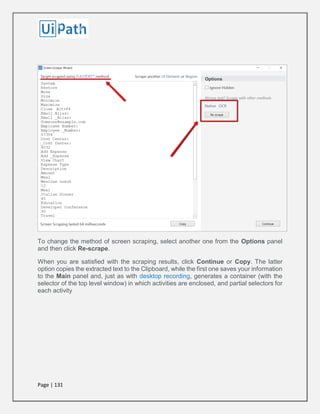
1. Click on Text->Mouse->Click.
2. This will pull up the Screen Scraping wizard. The target field is next to "Tel 1". The
cursor position should be set next to it.](https://image.slidesharecdn.com/uipathuserguide-220619155239-2947ae8f/85/UiPath-User-Guide-pdf-172-320.jpg)

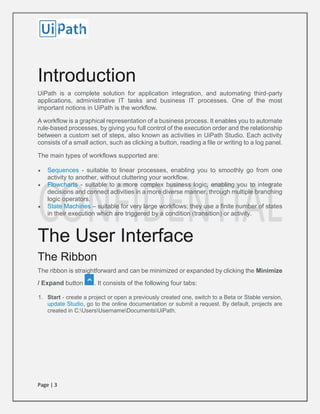
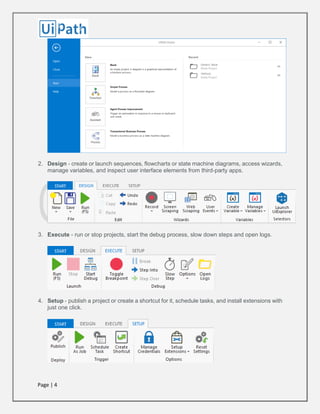
This document provides an overview of the UiPath Studio user interface and workflow design tools. It describes the main panels including the ribbon, activities panel, properties panel, and output panel. It also explains how to create variables, connect a project to source control, use control flow activities, and create a basic workflow. The document is a user guide for getting started with UiPath Studio and designing robotic process automation workflows.