TypeScript provides basic types like Boolean, Number, String, Array, Enum, Any, and Void to define the type of a variable. It allows defining interfaces to describe the shape of an object and ensure variables match the expected structure. Classes can be created that implement interfaces, support inheritance, and use public/private modifiers. Accessors can be used to control read/write access to class properties. Static properties exist on the class level rather than instance level. Classes can also be defined using constructor functions for additional flexibility.

![Basic Types(1)
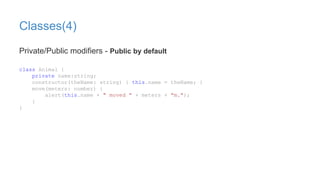
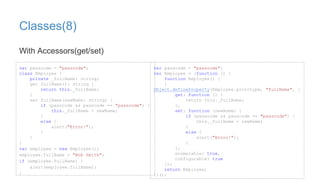
TypeScript
JavaScript
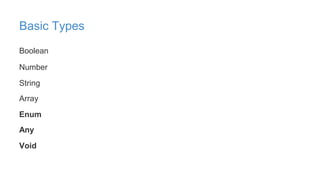
Boolean var isDone: boolean = false; var isDone = false;
Number var height: number = 6; var height = 6;
String var name: string = "bob"; var name = "bob";
name = 'smith'; name = 'smith';
Array type of the elements followed by '[]'
var list:number[] = [1, 2, 3]; var list = [1, 2, 3];
Array<elemType>
var list:Array<number> = [1, 2, 3]; *JS With
Type Annotation](https://image.slidesharecdn.com/howard-typescript-150922033755-lva1-app6892/85/TypeScript-by-Howard-3-320.jpg)
![Basic Types(2)
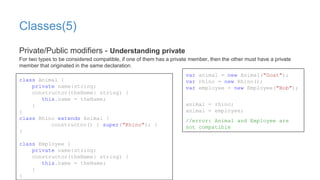
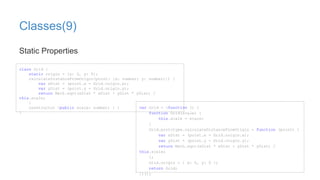
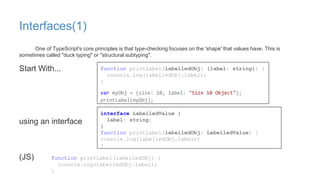
Enum 1 enum Color {Red, Green, Blue};
var c: Color = Color.Green;
Enum 2 enum Color {Red = 1, Green, Blue};
var c: Color = Color.Green;
Enum 3 enum Color {Red = 1, Green = 2, Blue = 4};
var c: Color = Color.Green;
from a numeric value to the name of that value
enum Color {Red = 1, Green, Blue};
var colorName: string = Color[2];](https://image.slidesharecdn.com/howard-typescript-150922033755-lva1-app6892/85/TypeScript-by-Howard-4-320.jpg)
![Basic Types(3)
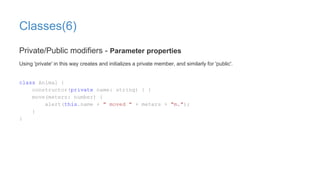
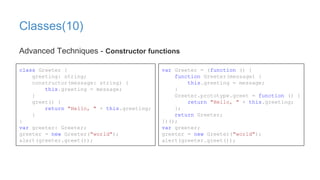
Enum var Color;
enum Color {Red, Green, Blue}; (function (Color) {
Color[Color[“Red”] = 0] = “Red”;
Color[Color[“Green”] = 1] =
“Green”;
Color[Color[“Blue”] = 2] = “Blue”;
})(Color || (Color = {}));1. Color[Color[“Red”] = 0] =
“Red”;
Color[“Red”] = 0;
Color[0] = “Red”;
2. immediately executing function
(function (Color) {...})();
var a = function(Color){...};
a(Color || (Color = {}));3. var Color = {};
(function (Color)
{...})(Color);](https://image.slidesharecdn.com/howard-typescript-150922033755-lva1-app6892/85/TypeScript-by-Howard-5-320.jpg)
![Basic Types(4)
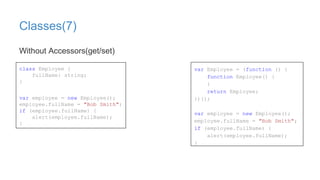
Any Allow you to gradually opt-in and opt-out of type-checking during compilation.
var notSure: any = 4;
notSure = "maybe a string instead";
notSure = false; // okay, definitely a boolean
var list:any[] = [1, true, "free"];
list[1] = 100;
Void function warnUser(): void {
alert("This is my warning message");
}](https://image.slidesharecdn.com/howard-typescript-150922033755-lva1-app6892/85/TypeScript-by-Howard-6-320.jpg)
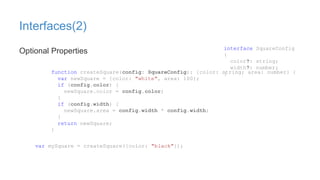
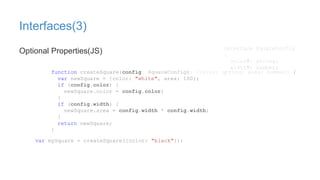
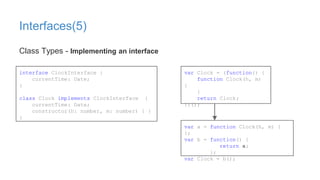
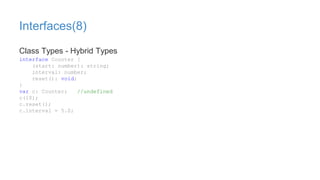
![Interfaces(4)
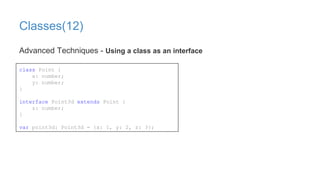
Array Types
Dictionary
interface StringArray {
[index: number]: string;
}
var myArray: StringArray;
myArray = ["Bob", "Fred"];
interface Dictionary {
[index: string]: string;
length: number;
// error, the type of 'length' is not a subtype of the indexer
owner: string;
}
var dic: Dictionary;
dic.length: return a number
=> dic[“length”]](https://image.slidesharecdn.com/howard-typescript-150922033755-lva1-app6892/85/TypeScript-by-Howard-11-320.jpg)