Model View Controller (MVC) adalah metode pemrograman C# yang dikembangkan oleh Microsoft untuk menjawab seluruh programmer dunia tentang pengembangan bahasa program secara mudah dalam penggunaannya seperti bahasa java yang menjadi populer belakangan ini.
The document discusses implementing MVC architecture in ASP.Net using C# and the Microsoft Data Access Application block. It describes creating class libraries for the abstract, business and data layers. The abstract layer defines a customer class. The data layer implements data access interfaces and uses the application block. The business layer calls the data layer. A web application is created that references the business layer and allows inserting and viewing customers by calling its methods. Implementing MVC in this way separates concerns and improves maintainability.
This document provides instructions for connecting an SQLite database to an Android application using Android Studio. It describes creating a database using SQLite Manager and placing it in the Android project's assets folder. It then explains creating a Connection class with paths to the database folder and file. The document outlines creating a DataDB class to connect to the Connection class and calling getNameDB in the MainActivity to retrieve the database name. It provides code snippets for the Connection and DataDB classes.
This paper’s aim is to point out the RAD ( Rapid application development) elements present in the Microsoft’s MVC 3 and WCF 4.0 using Microsoft Visual Studio 2010. It will describe why creating a new web application using MVC 3 and WCF 4.0 is a easy and fast and also present simple ways to develop such applications.
The document provides instructions for creating a simple "Hello World" application using Struts in Eclipse. It describes creating the necessary files - a form bean class (HelloWorldForm), an action class (HelloWorldAction), configuration files (struts-config.xml and web.xml), and JSP pages (index.jsp and helloWorld.jsp). The application demonstrates a basic MVC workflow in Struts - the action handles the request, sets a message on the form, and forwards to a JSP to display the message.
Storing data is a basic and very common need in mobile apps. The Android application framework provides several storage options, one of which is SQLite databases.
In this tutorial you will see a simple Android database example. The example is based on the Android ListView Tutorial and the Android AsyncTask Tutorial, however these tutorials are not mandatory for the purpose of understanding the principles of proper Android database usage.
Generic Repository Pattern in MVC3 Application with Entity FrameworkAkhil Mittal
This document discusses implementing a generic repository pattern and unit of work pattern in an MVC application using Entity Framework. It begins by introducing the concepts of a generic repository and unit of work. It then shows how to create a generic repository class that can be used for any entity. A unit of work class is created to manage transactions and repositories. Properties on the unit of work class provide access to repositories without having to create separate classes. CRUD operations on entities are demonstrated using the generic repository through the unit of work. This completes the tutorial on implementing these patterns to reduce redundant code and complexity in an MVC application.
SQL injection is a common web application security vulnerability that allows attackers to control an application's database by tricking the application into sending unexpected SQL commands to the database. It works by submitting malicious SQL code as input, which gets executed by the database since the application concatenates user input directly into SQL queries. The key to preventing SQL injection is using prepared statements with bound parameters instead of building SQL queries through string concatenation. This separates the SQL statement from any user-supplied input that could contain malicious code.
The document discusses how to use SQLite database in Android applications. It covers creating a SQLiteHelper class to manage the database, defining model classes, and performing CRUD operations like inserting, updating, deleting and selecting records. Layouts are created for displaying records and for data entry forms. The onCreate() and onUpgrade() methods of SQLiteHelper are used to create and manage the database and tables.
This document provides a tutorial on exploiting MySQL injection vulnerabilities to extract information from a database. It begins by introducing SQL injection and MySQL. It then walks through testing for vulnerabilities, exploiting a sample site to get the MySQL version, user, databases, tables, and columns. The document demonstrates how to use these techniques to retrieve usernames and passwords stored in the database. The goal is to illustrate how an attacker can access sensitive information by chaining together SQL injection commands.
This tutorial provides an overview of creating a sample Django application that demonstrates basic components including models, views, templates, URLs, forms, and the admin site. Key steps covered include:
- Setting up a Django project in Eclipse with Python, Django, SQLite
- Creating models, views, URLs, and templates
- Using the Django admin site to populate the database
- Displaying model data in templates
- Creating and processing a basic form
This document provides an overview of the Django web framework. It discusses what Django is, how to install and create a Django project and app. It also covers Django's MVT architecture, model definitions, templates, views, URLs and common tags used in templates. Key topics covered include installing Django, generating a project and app, model definitions, template usage, URL mapping and parameters, the admin interface, forms, and sessions. The document serves as a tutorial for getting started with basic Django development.
Cis407 a ilab 6 web application development devry universitylhkslkdh89009
This document provides instructions for an iLab assignment to create a login form for a web application. Students are asked to:
1. Create a login form that validates username and password and assigns a session variable for the user's security level.
2. Restrict access to certain functions on an existing form based on the security level.
3. Add a user management form to allow adding, editing, and removing users, and testing the login and security functionality.
The assignment involves adding authentication code, restricting page elements based on roles, and creating a user database interface form. Students are provided detailed steps and advised to add comments to their code.
Usability evaluation of the RunKeeper Application David O' Connor
The document describes a heuristic evaluation of the RunKeeper mobile application. It outlines Nielsen's 10 usability heuristics that were used for the evaluation. An evaluator tested tasks in the app and scored each heuristic on a scale of 1 to 4 based on a rubric. The results found that navigation and home page usability needed some improvement, but task orientation, forms/data entry, and visual design were strong points. In conclusion, the app has useful features but the distance tracking could be more accurate and some aspects may take time to learn.
This document provides instructions for using an SQLite database in an Android application to store and manage student data. It describes creating model and helper classes to define the student data structure and perform CRUD operations on the database. These include a StudentInfo model class to store student attributes, a DBHelper class extending SQLiteOpenHelper to handle database creation and operations like insert, update, delete and fetch. Layout files are created for listing student records, and an adapter class connects the database records to list views. The tutorial then explains creating activities to display and manage the student data using these classes.
Introduction to Vue.js. The first half consists of all slides, and the second half consists of all those slides along with detailed notes.
All the sample code can be found at https://github.com/MarkFreedman/VueJS101
Show the reader the potential damage that a SQL injection vulnerability can make. Show evading techniques to some filters. Show some common mistakes that the programmers make when protecting their sites. Show the best practices to protect your code.
The document discusses using SQLite database in Android applications. It explains that SQLite is a lightweight database that can be used to store and retrieve data in Android apps. It provides steps to create a database, add and retrieve records, and use the SQLiteOpenHelper class. Methods like onCreate(), onUpgrade(), and onOpen() are called at different stages of the database lifecycle. The document also discusses updating, deleting, and implementing the database in an example Android application.
Struts 2 uses interceptors based on the intercepting filter design pattern. It follows a pull-MVC architecture where the view layer retrieves data stored in the value stack by the controller. Interceptors are not thread-safe. Interceptors and filters both intercept requests, but interceptors are specific to Struts 2, can be configured to call methods conditionally, and replace the need for some filters. The front controller in Struts 2 is a filter rather than a servlet to avoid loading issues and allow interceptors to replace some filters. Actions serve as both models and controllers by containing business logic and data for the view. Interceptors make Struts 2 more configurable, reusable, and integrated with other frameworks compared
This document provides an overview and tutorial for using SQLite database tools in Android application development. It discusses the SQLiteOpenHelper and SQLiteDatabase classes, which are used to create, open, and manage an app's database. It then demonstrates how to create a database manager class that extends SQLiteOpenHelper to define the database structure, and includes methods like addRow(), deleteRow(), and updateRow() to interact with the database. The goal is to build reusable database functionality that can be included in most Android apps.
This document provides an overview of SQLite, including:
- SQLite is an embedded SQL database that is not a client-server system and stores the entire database in a single disk file.
- It supports ACID transactions for reliability and data integrity.
- SQLite is used widely in applications like web browsers, Adobe software, Android, and more due to its small size and not requiring a separate database server.
- The Android SDK includes classes for managing SQLite databases like SQLiteDatabase for executing queries, updates and deletes.
This document provides steps to create a contact list iOS application. It involves creating multiple view controllers and classes to manage the contact list, table view, and contact details view.
Key steps include:
1. Creating a MasterViewController to manage the contact list table view.
2. Creating a CustomCell class to display contact cells.
3. Creating a DetailViewController to add/edit contact details with text fields and image picker.
4. Implementing delegate methods and outlets to populate the table view from the contact list and pass data between view controllers.
5. Adding gestures and image picker integration for the contact photo.
This document provides a tutorial on SQL injection, including:
- Explaining what SQL injection is and how it works by exploiting vulnerabilities in database queries
- Steps to test for SQL injection vulnerabilities like determining the database type and getting environment information
- Methods for extracting data through SQL injection like getting database, table, and column names and record data
- Recommending the use of automated SQL injection scanning tools like WebCruiser to more efficiently test for and exploit SQL injection vulnerabilities
- Instructions for setting up sample PHP/MySQL and ASP/SQL Server testing environments to practice SQL injection techniques
The document discusses SQL injection and GreenSQL. SQL injection is a code injection technique that allows attackers to gain unauthorized access to databases. GreenSQL is a database firewall that works as a proxy for SQL commands, calculates query risks, and supports different protection modes like IDS, IPS, and learning modes. It fingerprints databases and detects risky queries like stack-based and tautological queries. GreenSQL provides a dashboard to monitor queries and configure whitelist rules and alerts.
The document discusses SQL injection attacks. It explains that SQL injection works by tricking web applications into treating malicious user input as SQL code rather than data. This allows attackers to view sensitive data from the database or make changes by having the application execute unintended SQL commands. The key to preventing SQL injection is using prepared statements with bound parameters rather than concatenating user input into SQL queries. Other types of injection attacks on different interpreters are also discussed.
Microsoft SQL Azure - Developing And Deploying With SQL Azure WhitepaperMicrosoft Private Cloud
SQL Azure is built on the SQL Server’s core engine, so developing against SQL Azure is very similar to developing against on-premise SQL Server. While there are certain features that are not compatible with SQL Azure, most T-SQL syntax is compatible. The MSDN link http://msdn.microsoft.com/en-us/library/ee336281.aspx provides a comprehensive description of T-SQL features that are supported, not supported and partially supported in SQL Azure.
The document discusses the benefits of exercise for mental health. Regular physical activity can help reduce anxiety and depression and improve mood and cognitive function. Exercise stimulates the production of endorphins in the brain which elevate mood and reduce stress levels.
The document discusses the benefits of exercise for mental health. Regular physical activity can help reduce anxiety and depression and improve mood and cognitive functioning. Exercise boosts blood flow and levels of neurotransmitters and endorphins which elevate and stabilize mood.
This document discusses a farm school called Foxfire that teaches students meaningful life skills through hands-on experiences like farming and grocery shopping. It also mentions a project called The Old Apple Tree Project that allows for lifelong meaningful encounters.
Speler volg systeem ter ondersteuning van uw visie en expertise!Remco Witkamp
Speler Volg Systeem - Ter ondersteuning van uw visie en expertise!
Evaluatie en beoordeling van spelers om ontwikkeling sport talent te volgen en prestaties te verbeteren
Talent ontwikkeling in elke sport op ieder niveau
Wat is het?
Coach-Planet.com is een web gebaseerde tool, ontwikkeld om trainers en coaches te ondersteunen. Het primaire doel is om spelers (of teams) te monitoren en te volgen in de ontwikkeling. De tool stelt de coaches en trainers in staat om aandachtsgebieden te identificeren. Ook beschikt de tool over een eenvoudig te gebruiken evaluatie systeem, een kalender en de mogelijkheid om aanvullende gegevens bij te houden en te rapporteren in grafiekvorm.
En, maak animaties aan om trainingen voor te bereiden of spelsituaties te laten zien.
Wie kunnen het gebruiken?
De tool kan gebruikt worden door een enkele coach of trainer met een handvol spelers, een grote sportclub met meerdere teams en honderden spelers en alles daar tussen in. Zie de tarieven pagina voor aanvullende informatie.
Werkt dit systeem ook voor mijn sport?
Spelers beoordelen en evaluatie en progressie in de ontwikkeling vergelijken aan de hand van heldere rapportages
De Coach-Planet.com applicatie werkt voor elke sport, van hockey tot voetbal en van tennis tot basketbal. Dit door onze visie dat de gebruiker in staat moet zijn om de tool in te richten naar eigen keus, zodat de tool aansluit op de visie van de coach en trainer betreft de benodigde gegevens om de ontwikkeling van de atleet of speler te volgen.
Welke informatie wordt er opgeslagen?
Wat u ook maar op wilt slaan. De gebruiker kan geheel naar eigen inzicht bepalen welke gegevens er mogen worden opgeslagen, welke vragen er in evaluatieformulieren staan en wat voor numerieke data (zoals gewicht) moet worden vastgelegd.
Functies:
beheer van relevante speler gegevens
doeltreffend spelers, trainers en coaches evalueren
wedstrijden evalueren
ontwikkeling volgen
flexibel in te richten
teamindelingen
kalender
communicatie
artikelen samenstellen, bijvoorbeeld over training
animaties maken, trainingen en wedstrijdsituaties laten zien
Coach-Planet.com - Meer dan een Speler Volg Systeem!
The document provides tips for taking good pictures. It recommends aiming for the action and starting to shoot before it starts. Photographers should use the rule of thirds to frame subjects, ensure faces are captured, and that lighting and focus are adequate. Essential gear includes a camera, memory card, extra battery, and telephoto or wide-angle lenses depending on the subject. The rule of thirds and proper focus are emphasized for artistic composition. Tips are also given for camera use and preparation.
Talent volg systeem voor elke sport!
Coach-Planet.com is er voor elke sport op ieder niveau om spelers en atleten te volgen in de ontwikkeling. Het is meer dan alleen een talent volg systeem!
Geheel naar eigen visie en expertise in te richten dankzij de grote mate van flexibiliteit!
Het talent volg systeem biedt onder andere de volgende functies:
beheer van relevante speler gegevens
doeltreffend spelers, trainers en coaches evalueren
wedstrijden evalueren
ontwikkeling volgen
flexibel in te richten
teamindelingen
kalender
communicatie
artikelen samenstellen, bijvoorbeeld over training
animaties maken, trainingen en wedstrijdsituaties laten zien
Voor top- en breedtesporten. Voor coach en trainer, academie, school, club en vereniging.
Spelervolsysteem - Talent Volg Systeem maar dan anders!
This document discusses the roles of supervisors in managing employee performance. It explores the differences between management and supervision, with supervision focusing more on overseeing employee productivity and progress. Key responsibilities of supervisors include conducting basic management tasks like planning and problem-solving, organizing departments, managing employee performance, and disciplining employees for development. Effective supervision requires setting clear performance goals, providing ongoing feedback, addressing performance issues promptly, and conducting formal performance reviews.
This document discusses communication and team building. It provides information on communication skills including verbal, vocal, and visual communication. Effective communication involves understanding messages and two-way communication. Team building requires trust, shared goals, and understanding different roles and strengths of team members. The stages of team development include forming, storming, norming, performing, and adjourning. Working together as a cohesive team can lead to success.
This lesson teaches ASP.NET Core MVC and Entity Framework Core with controllers and views.
The EMS sample web application demonstrates how to create ASP.NET Core 2.2 MVC web applications using Entity Framework (EF) Core 2.0 and Visual Studio 2017.
Learning MVC Part 3 Creating MVC Application with EntityFrameworkAkhil Mittal
This document discusses connecting an existing MVC application to a database using Entity Framework instead of LINQ to SQL. It provides steps to generate an Entity Data Model from an existing database, generate strongly typed entity classes, and modify the application's controllers to use the Entity Framework context instead of the LINQ to SQL context. The key steps are: 1) Adding an Entity Data Model file and generating entity classes; 2) Modifying controllers to use the Entity Framework context instead of LINQ to SQL; 3) Binding views to the generated entity classes. The document emphasizes that Entity Framework automates CRUD operations and allows focusing on business logic rather than data access code.
This document provides instructions for creating a simple tasklist application using ASP.NET MVC. It describes creating the controller, views, database, and model. The controller contains actions for listing, creating, and completing tasks. Views are created for displaying the task list and creating new tasks. A database with a Tasks table is set up using LINQ to SQL. Logic is added to the controller actions to retrieve and save tasks from the database. The task list view is modified to display tasks from the model.
MVC Design Pattern in JavaScript by ADMEC Multimedia InstituteRavi Bhadauria
This presentation is one of the best presentations from our study material for our JavaScript Object Oriented workshops which ADMEC conducts every week at the
center.
This document describes how to rapidly develop a web application using ASP.NET MVC 3 in Microsoft Visual Studio 2010. It outlines how to create a new project, add models, contexts, controllers with CRUD functionality, and use HTML helpers and dynamic templates to simplify development. MVC 3 enables full control over HTML while separating concerns, and allows both basic and complex applications to be built quickly through its RAD elements integrated into Visual Studio.
This document discusses moving existing websites with security issues to the ASP.NET MVC framework using Entity Framework. It provides an overview of MVC and EF, how to set them up in Visual Studio, and examples of using them to improve security by removing direct SQL queries and moving more logic to the server. Key benefits highlighted include built-in features for validation and preventing cross-site request forgery attacks. Examples demonstrate querying databases and validating models without writing direct SQL or adding additional code.
This document provides an overview of Asp.Net MVC and how it compares to traditional Asp.Net web forms. Some key points:
- Asp.Net MVC follows the MVC pattern, separating concerns into models, views, and controllers, allowing for cleaner code and easier testing compared to Asp.Net web forms.
- In Asp.Net MVC, controllers handle requests and return action results, views are responsible for the UI, and models represent application data. This separation of concerns is more aligned with HTTP concepts.
- Asp.Net MVC aims to be more flexible, maintainable, and testable than web forms. It allows for tighter control over HTML and adheres to conventions over configurations
This document describes how to connect to a database and run commands like UPDATE, INSERT, or DELETE using ADO.NET in a Visual Basic .NET console application. It explains how to create a connection string, open a connection, construct a command object specifying the SQL statement, and execute the command. Parameters can also be used in the SQL statement and values bound to the parameters when executing the command.
This document describes how to connect to a database and run commands like UPDATE, INSERT, or DELETE using ADO.NET in a Visual Basic .NET console application. It explains how to create a connection string, open a connection, construct a command object specifying the SQL statement, and execute the command. Parameters can be used in the SQL statement and values bound to the parameters when executing the command.
This document discusses creating an MVC application from scratch using LINQ to SQL to perform CRUD operations on a database. It covers:
1. Creating an empty MVC project and adding controllers, views and models
2. Creating a sample database and using LINQ to SQL for communication between the MVC app and database
3. Performing CRUD operations in the MVC app by querying the database and passing data between controllers and views
The document introduces ASP.NET Identity, which is Microsoft's new platform for managing users in ASP.NET applications. It has replaced the older ASP.NET Membership platform. The document discusses setting up an ASP.NET Identity implementation in an example project, including installing NuGet packages, defining a database context class, and creating a basic user management interface. It also provides an overview of how ASP.NET Identity uses OWIN/Katana to provide services to web applications in a more modular way compared to the previous ASP.NET Membership system.
Creating Single Page Web App using Backbone JSAkshay Mathur
This was presented during the workshop on the topic. The complete code of the app that was created during the workshop is available at Github https://github.com/mathurakshay/explore-venues
An assembly in .NET is a collection of types and resources that form a logical unit. Assemblies can contain metadata about types using attributes. Attributes provide additional information that can be attached to classes, methods, and other members. There are built-in attributes in .NET and custom attributes can be created by deriving from the Attribute base class. Built-in attributes like Required and StringLength are used to validate model data in ASP.NET MVC. A custom MyLicenseAttribute was created to require a license key by applying the attribute to assemblies. Attributes help add metadata and customize behavior.
This document provides an overview and introduction to ASP.NET MVC 3 training. It discusses the evolution of ASP.NET, key concepts of MVC like models, views, and controllers, how MVC works, and differences between MVC and web forms. The training will build a simple ASP.NET MVC application and cover controllers, models, views, routing, and action results.
This document provides an overview of different data storage options in Android including shared preferences, internal storage, external storage, SQLite databases, and network connections. It also includes examples and workshops for using each data storage type with key points on shared preferences, internal and external storage paths, SQLiteOpenHelper, CRUD operations, and displaying data in a ListView.
Mvc interview questions – deep dive jinal desaijinaldesailive
Can you describe ASP.NET MVC Request Life Cycle? 1. Receive request, look up Route object in RouteTable collection and create RouteData object. 2. Create RequestContext instance. 3. Create MvcHandler and pass RequestContext to handler. 4. Identify IControllerFactory from RequestContext. 5. Create instance of class that implements ControllerBase. 6. Call MyController.Execute method. 7. The ControllerActionInvoker determines which action to invoke on the controller and executes the action on the controller, which results in calling the model and returning a view.
Repository Pattern in MVC3 Application with Entity FrameworkAkhil Mittal
The document discusses implementing a repository pattern in an MVC application using Entity Framework. It begins with an introduction and roadmap of previous articles. It then discusses the benefits of a repository pattern in abstracting the data access layer from business logic. Steps are provided to create a sample repository interface and class to implement basic CRUD operations on a User entity, abstracting the data access code from the controller. The repository class uses the Entity Framework context to perform operations while resolving tight coupling issues between layers. It concludes that while this implementation works for a single entity, a generic repository will be needed to cleanly support multiple entities without duplication.
Microsoft has provided an ORM framework called "Entity Framework" to automate database related activities for application that enables to work with relational data as domain-specific objects, eliminating the need for most of the data access plumbing code that developers usually need to write.
ASP.NET MVC 5 Building Your First Web Application (A Beginner S GuideAlicia Buske
This document provides a beginner's guide to building a web application using ASP.NET MVC 5. It includes an overview of ASP.NET MVC and its core components - Models, Views, and Controllers. It then outlines steps to create an MVC project, setup a database using Entity Framework and SQL Server, and build pages for user registration, login, profile editing, and role-based authorization. It concludes with deploying the application to IIS.
Similar to Tutorial mvc (pelajari ini jika ingin tahu mvc) keren (20)
ASP.NET MVC 5 Building Your First Web Application (A Beginner S Guide
Tutorial mvc (pelajari ini jika ingin tahu mvc) keren
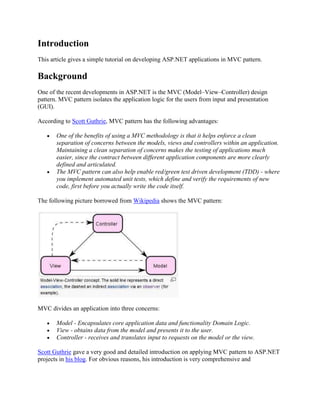
1. Introduction
This article gives a simple tutorial on developing ASP.NET applications in MVC pattern.
Background
One of the recent developments in ASP.NET is the MVC (Model–View–Controller) design
pattern. MVC pattern isolates the application logic for the users from input and presentation
(GUI).
According to Scott Guthrie, MVC pattern has the following advantages:
One of the benefits of using a MVC methodology is that it helps enforce a clean
separation of concerns between the models, views and controllers within an application.
Maintaining a clean separation of concerns makes the testing of applications much
easier, since the contract between different application components are more clearly
defined and articulated.
The MVC pattern can also help enable red/green test driven development (TDD) - where
you implement automated unit tests, which define and verify the requirements of new
code, first before you actually write the code itself.
The following picture borrowed from Wikipedia shows the MVC pattern:
MVC divides an application into three concerns:
Model - Encapsulates core application data and functionality Domain Logic.
View - obtains data from the model and presents it to the user.
Controller - receives and translates input to requests on the model or the view.
Scott Guthrie gave a very good and detailed introduction on applying MVC pattern to ASP.NET
projects in his blog. For obvious reasons, his introduction is very comprehensive and
2. authoritative. It should be the first reference for application developers who want to understand
ASP.NET MVC.
This article is intended to give a simpler tutorial on developing ASP.NET MVC applications in
the Microsoft Visual Studio context to help application developers to get a quick start.
When working on ASP.NET MVC web sites, the first thing you may notice is that the URLs to
access the web pages are no longer the familiar "http://www.codeproject.com/info/search.aspx"
style. Instead the URLs will look like http://localhost/VirtualDirectoryName/Controller/Action.
After reading this article, hopefully you will be able to quickly develop your own ASP.NET
MVC web applications in Visual Studio. The article is intended to answer the following
questions:
How are the ASP.NET MVC URLs associated to the resources on the web server?
In ASP.NET, what are the Models, Views, and Controllers and how are they
implemented?
How is information passed among the Models, Views, and Controllers?
How does the application code on the server access the data passed to the server by URL
parameters and form submissions from the browser?
How to access the session data in ASP.NET MVC?
How to use code behind when implementing the Views?
This tutorial application is developed in Visual Studio 2008, and the language used is C#. If you
have Visual Studio 2010, your environment may be different.
This article comes with the source code for this tutorial. It may be a good idea if you download
the source code and run it in your Visual Studio before you start to read this tutorial. This should
give you a better idea on the functions implemented in this simple tutorial ASP.NET MVC
application. This should make your reading of this article easier. If you are unable to load the
source code in your Visual Studio, you may need to first set up your development environment.
Let us begin the tutorial by first setting up our development environment.
Set up the Development Environment
In order to develop MVC ASP.NET applications, you will need to install the Visual Studio
ASP.NET MVC Add-on. If you have not done so, you can go to the Microsoft web site to
download the Add-on and install it on your computer.
Create an Empty MVC ASP.NET Project in Visual Studio
After installing the ASP.NET MVC Add-on, we can start to create an ASP.NET MVC project in
Visual Studio.
3. We can create two types of ASP.NET MVC applications. In this tutorial, we will create an
"ASP.NET MVC 2 Empty Web Application". Give the project the name "ASPNetMVCTutorial"
and browse a folder where you want to save the files that the Visual Studio will be generating
and click the "OK" button.
After the project is created, the solution explorer will have the following contents:
In order to better focus on the MVC pattern in this ASP.NET development, I will be limiting the
use of JavaScripts, and CSS style sheets. Let us delete the folders that are not MVC related and
4. add a folder called "Utilities". The "Utilities" folder will be later used to add some utility classes
to the project. After the cleaning, the solution explorer will have the following contents:
In this project, we can see three folders generated by the "ASP.NET MVC 2 Empty Web
Application" template:
Models
Views
Controllers
The models, views, and controllers (MVC) will be added into the corresponding folders later in
this tutorial.
You can also notice that there are two "Web.config" files in the project. Most of the configuration
information will be in the "Web.config" file in the root folder, the one in the "Views" folder is
used to block direct access to the view "aspx" pages. For most of the ASP.NET MVC
applications, we do not need to make changes to this "Web.config" file.
Add Some Configurations into the Root "Web.config" File
Before working on creating the models, views, and controllers, let us first change the
"<AppSettings />" section of the "Web.config" file in the root folder to the following:
Collapse | Copy Code
<appSettings>
<add key="ApplicationName"
value="A Simple Tutorial on How to Develop ASP.NET
Web Projects in MVC Pattern"/>
<add key="Author" value="Song Li"/>
5. <add key="DevelopmentTime" value="5/4/2010"/>
<add key="DeploymentVirtualDirectory" value=""/>
</appSettings>
The configuration information will be used in the ASP.NET MVC application later.
Add Model Classes to the "Models" Folder
The models in the MVC pattern represent the application data. In this tutorial, we will be
developing an application to manage a list of students. The application will allow the users to
display, add, and delete the students. Right click the "Models" folder and choose to add a class.
Give the class file a name called "StudentsModel.cs".
After the class is added, we can implement the class as the following:
Collapse | Copy Code
using System;
using System.Data;
namespace ASPNetMVCTutorial.Models
{
public class StudentsModel
{
private DataTable Students;
public StudentsModel()
{
Students = new DataTable();
DataColumn IDColumn = Students.Columns.Add
("ID", Type.GetType("System.Int32"));
IDColumn.AutoIncrement = true;
IDColumn.AutoIncrementSeed = 1;
IDColumn.AutoIncrementStep = 1;
Students.Columns.Add("Name", Type.GetType("System.String"));
Students.Columns.Add("Score", Type.GetType("System.Int32"));
Students.Columns.Add("Time Added",
Type.GetType("System.DateTime"));
DataColumn[] keys = new DataColumn[1];
keys[0] = IDColumn;
Students.PrimaryKey = keys;
Random rd = new Random();
for (int Idex = 1; Idex <= 5; Idex++)
{
DataRow row = Students.NewRow();
Students.Rows.Add(row);
row["Name"] = "Student Name No. " + Idex.ToString();
row["Score"] = 60 + rd.NextDouble() * 40;
row["Time Added"] = System.DateTime.Now;
}
}
6. public void AddStudent(string Name, int Score)
{
DataRow row = Students.NewRow();
Students.Rows.Add(row);
row["Name"] = Name;
row["Score"] = Score;
row["Time Added"] = System.DateTime.Now;
}
public void DeleteStudent(int ID)
{
DataRow RowToDelete = Students.Rows.Find(ID);
if (RowToDelete != null)
{
Students.Rows.Remove(RowToDelete);
}
}
public DataTable GetStudents()
{
return Students;
}
}
}
This class has a private variable "Students". Its data type is "DataTable". The information
for the students is saved in this "DataTable". Besides the constructor, it exposes the methods to
add and delete a student. The "GetSudents" method returns the "DataTable" which has the
information for all the students to the caller. When an object of this class is first created, the
constructor will initiate the "DataTable" and insert 5 randomly generated students in it.
For this ASP.NET MVC application to use the configuration information that we have added to
the "Web.config" file, we will add another model class file called "ApplicationInformation.cs":
Collapse | Copy Code
using System;
using System.Configuration;
namespace ASPNetMVCTutorial.Models
{
public class ApplicationInformation
{
private static ApplicationInformation _thisInstance = null;
private static object _threadLock = new Object();
public string ApplicationName { get; private set; }
public string Author { get; private set; }
public string DevelopmentTime { get; private set; }
public string DeploymentVirtualDirectory { get; private set; }
public ApplicationInformation()
{
7. ApplicationName =
ConfigurationManager.AppSettings["ApplicationName"];
Author = ConfigurationManager.AppSettings["Author"];
DevelopmentTime =
ConfigurationManager.AppSettings["DevelopmentTime"];
DeploymentVirtualDirectory =
ConfigurationManager.AppSettings["DeploymentVirtualDirectory"];
}
public static ApplicationInformation GetInstance()
{
lock (_threadLock)
{
if (_thisInstance == null)
{
_thisInstance = new ApplicationInformation();
}
}
return _thisInstance;
}
}
}
The ASP.NET MVC project will use the class "ApplicationInformation" to access the
configurations.
Add a Utility Class to the "Utilities" Folder
To make the later development work easier, we will add a class "ApplicationUtility" to the
"Utilities" folder. Right click the "Utilities" folder, and choose to add a class. Give the class file
the name "ApplicationUtility.cs" and implement the class as the following:
Collapse | Copy Code
using System;
using System.Text;
using ASPNetMVCTutorial.Models;
namespace ASPNetMVCTutorial.Utilities
{
public static class ApplicationUtility
{
public static string FormatURL(string
PathWithoutVirtualDirectoryName)
{
ApplicationInformation appInfomation
= ApplicationInformation.GetInstance();
string DeploymentVirtualDirectory
= appInfomation.DeploymentVirtualDirectory;
if (DeploymentVirtualDirectory == "")
{
return PathWithoutVirtualDirectoryName;
8. }
StringBuilder SB = new StringBuilder();
SB.Append("/");
SB.Append(appInfomation.DeploymentVirtualDirectory);
SB.Append("/");
SB.Append(PathWithoutVirtualDirectoryName);
return SB.ToString();
}
}
}
The static method "FormatURL" is used to convert a relative ASP.NET MVC URL to an
absolute URL depending on the virtual directory name at the deployment time. The virtual
directory name is configured in the "Web.config" file. At development time, we will need to
configure it as an empty string. At deployment time, we will have to put the correct virtual
directory name in the "Web.config" file.
Add a Master Page for the ASP.NET MVC Project
Before adding the views, we will first add a master page for this ASP.NET project. By default,
an ASP.NET MVC application will use master pages in Visual Studio, so let us first create a
master page. The master page will be added to the "ViewsShared" folder.
Right click the "ViewsShared" folder and choose to add a new item.
Select the "Master Page" template, give the mater page the name "Site.Master" and click the
"Add" button, the master page is added to the project.
We will implement the "Site.Master" file as the following:
9. Collapse | Copy Code
<%@ Master Language="C#"
CodeBehind="~/Views/Shared/Site.Master.cs"
Inherits="ASPNetMVCTutorial.Views.Shared.Site" %>
<!DOCTYPE html PUBLIC "-//W3C//DTD XHTML 1.0 Strict//EN"
"http://www.w3.org/TR/xhtml1/DTD/xhtml1-strict.dtd">
<html xmlns="http://www.w3.org/1999/xhtml">
<head id="Head1" runat="server">
<title><asp:Literal id="litAppTitle" runat="server" /></title>
<style type="text/css">
.ApplicationDefault {font-family: Verdana; font-size: 10px;}
.Title {text-align: center; font-size: 12px; color:Maroon; font-
family:
Verdana; font-weight: bold;}
.AuthorInformation {text-align: center; color:green; margin-top: 5px}
.MainContent {margin-top: 10px; background-color: #F1FFFF; height:
600px;
overflow: auto; width: 95%; text-align: center;
margin-left:auto; margin-right:auto;}
.Copyright {margin-top: 10px; color: Gray; font-weight:bold; width:
100%;
float: left; text-align: center;}
.ErrorText {font-family: Verdana; font-weight: bold; color:Maroon;}
.BoldText {font-family: Verdana; font-weight: bold;}
</style>
</head>
<body class="ApplicationDefault">
<div class="Title">
<asp:Literal id="litApplicationName" runat="server" />
</div>
<div class="AuthorInformation">
<asp:Literal id="litAuthorInformation" runat="server" />
</div>
<div id="MainContent" class="MainContent">
<asp:ContentPlaceHolder id="ApplicationContent" runat="server" />
</div>
<div class="Copyright">Copy right: The Code Project Open License
(CPOL)</div>
</body>
</html>
We will implement the code-behind file "Site.Master.cs" as the following:
Collapse | Copy Code
using System;
using System.Collections.Generic;
using System.Linq;
using System.Web;
using System.Text;
using System.Web.UI.WebControls;
using ASPNetMVCTutorial.Models;
using ASPNetMVCTutorial.Utilities;
10. namespace ASPNetMVCTutorial.Views.Shared
{
public partial class Site : System.Web.Mvc.ViewMasterPage
{
protected void Page_Load(object sender, EventArgs e)
{
ApplicationInformation appInfomation =
ApplicationInformation.GetInstance();
litAppTitle.Text = appInfomation.ApplicationName;
litApplicationName.Text = appInfomation.ApplicationName;
StringBuilder SB = new StringBuilder();
SB.Append("Developed by ");
SB.Append(appInfomation.Author);
SB.Append(" on ");
SB.Append(appInfomation.DevelopmentTime);
litAuthorInformation.Text = SB.ToString();
}
}
}
The master page will be used for the entire project to control the display style and to display
some general information about the application.
Add the Views to the "Views" Folder
The views in ASP.NET MVC are actually specialized "aspx" pages. In this project, we will be
adding three views:
StudentList.aspx
AddStudent.aspx
Error.aspx
The "StudentList.aspx" is used to list all the students and to provide the user interactions to
navigate to the "AddStudent.aspx" view to add student. It also provides the user interaction to
delete the students. The "Error.aspx" view is used to display any possible errors during the
operation.
The "StudentList.aspx" and "AddStudent.aspx" views will be added to the "ViewsStudents"
folder and the "Error.aspx" will be added to the "ViewsShared" folder. Right click the folder
"Views" and add a folder "Students" to it. We can then add the "StudentList.aspx" view. Right
click the "ViewsStudents" folder and add a view.
11. Give the view the name "StudentList", choose the master page "Site.Master", type in the
ContentPlaceHolderID as "ApplicationContent" and click the "Add" button. In the solution
explorer, the view is created as "StudentList.aspx" file in the "ViewsStudents" folder.
12. You may be surprised that the "StudentList.aspx" view does not have the familiar code-behind
file. It is a hot discussion if the code-behind files should be used on the ASP.NET MVC views.
Some people call the using of code-behind on views "Evil", but some other people say that it is
"Not Evil". I am not going to get into this discussion. I just feel that if the application developers
choose to use code-behind files, they should have the option to use it. We will add the code-
behind file for the "StudentList.aspx" manually.
Right click the "ViewsStudents" folder and add a class file named "StudentList.aspx.cs". The
"StudentList.aspx.cs" file will automatically implement a class "StudentList". Make the
"SudentList" class inherit from "System.Web.Mvc.ViewPage". In the "StudentList.aspx" file,
add the "CodeBehind" reference to the "StudentList.aspx.cs" and change the "Inherits" value to
the class "StudentList". By doing this, the code behind file is manually added in the solution
explorer:
After adding the code behind file, we will implement the "StudentList.aspx" as the following:
Collapse | Copy Code
<%@ Page Language="C#"
MasterPageFile="~/Views/Shared/Site.Master"
CodeBehind="~/Views/Students/StudentList.aspx.cs"
Inherits="ASPNetMVCTutorial.Views.Students.StudentList" %>
<asp:Content id="IndexContent" ContentPlaceHolderID="ApplicationContent"
runat="server">
<div style="float: right; margin-right: 10px">
<asp:HyperLink id="linkAddStudent" runat="server"
Text="Click to add a student to the list" />
</div>
<br />
<div style="margin-top: 5px">
<asp:Literal id="litStudentDetail" runat="server" />
13. </div>
</asp:Content>
The code-behind file "StudentList.aspx" will be implemented as the following:
Collapse | Copy Code
using System;
using System.Collections.Generic;
using System.Text;
using System.Web;
using System.Data;
using System.Web.UI.WebControls;
using ASPNetMVCTutorial.Models;
using ASPNetMVCTutorial.Utilities;
namespace ASPNetMVCTutorial.Views.Students
{
public class StudentList : System.Web.Mvc.ViewPage
{
protected Literal litStudentDetail;
protected HyperLink linkAddStudent;
protected void Page_Load(object sender, EventArgs e)
{
Response.Cache.SetCacheability(HttpCacheability.NoCache);
linkAddStudent.NavigateUrl =
ApplicationUtility.FormatURL("/Students/AddStudent");
DataTable StudentsTable = (DataTable)ViewData["Students"];
DataView StudentsView = StudentsTable.DefaultView;
StudentsView.Sort = "ID Desc";
StringBuilder SB = new StringBuilder();
SB.Append("<table style="width: 99%;" ");
SB.Append("rules="all" border="1px" ");
SB.Append("cellspacing="0px" cellpadding="4px">");
SB.Append("<tr style="background-color: Silver; color: white;
");
SB.Append("font-weight: bold">");
foreach (DataColumn aColumn in StudentsTable.Columns)
{
SB.Append("<td>");
SB.Append(aColumn.ColumnName);
SB.Append("</td>");
}
SB.Append("<td> </td>");
SB.Append("</tr>");
foreach (DataRowView aRowView in StudentsView)
{
SB.Append("<tr>");
foreach (DataColumn aColumn in StudentsTable.Columns)
{
14. SB.Append("<td>");
SB.Append(aRowView[aColumn.ColumnName].ToString());
SB.Append("</td>");
}
string ID = aRowView["ID"].ToString();
SB.Append("<td>");
SB.Append("<a href="");
SB.Append(ApplicationUtility.FormatURL("/Students/DeleteStudent"));
SB.Append("?ID=");
SB.Append(ID);
SB.Append("">Delete this student</a>");
SB.Append("</td>");
SB.Append("</tr>");
}
SB.Append("</table>");
litStudentDetail.Text = SB.ToString();
}
}
}
Similarly we will implement the "AddStudent.aspx" to the "ViewsStudents" folder as the
following:
Collapse | Copy Code
<%@ Page Language="C#"
MasterPageFile="~/Views/Shared/Site.Master"
CodeBehind="~/Views/Students/AddStudent.aspx.cs"
Inherits="ASPNetMVCTutorial.Views.Students.AddStudent" %>
<asp:Content ID="AddStudentContent"
ContentPlaceHolderID="ApplicationContent" runat="server">
<script language="javascript" type="text/javascript">
function SubmitForm() {
frmAddStudent.action = hidAddstudentActionURL.value;
frmAddStudent.submit();
}
</script>
<asp:Literal ID="litAddStudentActionHidden" runat="server" />
<form id="frmAddStudent" method="post" action="">
<div style="text-align: center">
<table cellspacing="5px" cellpadding="0px" style="text-align:
center; margin-left:auto; margin-right:auto;">
<tr>
<td class="BoldText" style="text-align: left">
Please provide the following information to add the student:
</td>
</tr>
<tr><td style="height: 10px"></td></tr>
<tr>
<td>
Name <input type="text" id="textName" name="textName" />
15.
Score <input type="text" id="txtScore" name="txtScore"
/>
</td>
</tr>
<tr>
<td>
<asp:HyperLink ID="linkCancelAddStudent"
Text="Cancel add student and
return to the main page" runat="server" />
<input type="button" value="Add student" onclick="return
SubmitForm()" />
</td>
</tr>
</table>
</div>
</form>
</asp:Content>
The code-behind file for the "AddStudent.aspx" view will be implemented as the following:
Collapse | Copy Code
using System;
using System.Text;
using System.Web;
using System.Web.UI.WebControls;
using ASPNetMVCTutorial.Models;
using ASPNetMVCTutorial.Utilities;
namespace ASPNetMVCTutorial.Views.Students
{
public class AddStudent : System.Web.Mvc.ViewPage
{
protected HyperLink linkCancelAddStudent;
protected Literal litAddStudentActionHidden;
protected void Page_Load(object sender, EventArgs e)
{
Response.Cache.SetCacheability(HttpCacheability.NoCache);
StringBuilder SB = new StringBuilder();
SB.Append("<input type="hidden" id="hidAddstudentActionURL"
value="");
SB.Append(ApplicationUtility.FormatURL("/Students/AddStudentAction"));
SB.Append("" />");
linkCancelAddStudent.NavigateUrl
= ApplicationUtility.FormatURL("/Students/StudentList");
litAddStudentActionHidden.Text = SB.ToString();
}
}
}
The "Error.aspx" view will be implemented in the "ViewsShared" folder as the following:
16. Collapse | Copy Code
<%@ Page Language="C#"
CodeBehind="~/Views/Shared/Error.aspx.cs"
MasterPageFile="~/Views/Shared/Site.Master"
Inherits="ASPNetMVCTutorial.Views.Shared.Error" %>
<asp:Content ID="ErrorContent" ContentPlaceHolderID="ApplicationContent"
runat="server">
<div style="margin-top: 10px; text-align: center">
<table cellpadding="4px" cellspacing="4px" style="margin-left:auto;
margin-right:auto;">
<tr><td class="ErrorText"><asp:Literal ID="litErrorMessage"
runat="server" /></td></tr>
<tr><td style="text-align: right">
<asp:HyperLink ID="linkBackToMainPage" Text="Go back to main
page"
runat="server" />
</td></tr>
</table>
</div>
</asp:Content>
The code-behind file for the "Error.aspx" will be implemented as the following:
Collapse | Copy Code
using System;
using System.Collections.Generic;
using System.Linq;
using System.Text;
using System.Web;
using System.Web.UI.WebControls;
using ASPNetMVCTutorial.Models;
using ASPNetMVCTutorial.Utilities;
namespace ASPNetMVCTutorial.Views.Shared
{
public class Error : System.Web.Mvc.ViewPage
{
protected Literal litErrorMessage;
protected HyperLink linkBackToMainPage;
protected void Page_Load(object sender, EventArgs e)
{
Response.Cache.SetCacheability(HttpCacheability.NoCache);
linkBackToMainPage.NavigateUrl
= ApplicationUtility.FormatURL("/Students/StudentList");
string ErrorMessage = ViewData["ERROR"].ToString();
litErrorMessage.Text = ErrorMessage;
}
}
}
The ASP.NET MVC views are specialized ASP.NET pages. The "System.Web.Mvc.ViewPage"
class is an immediate child class of the "System.Web.UI.Page" class in the class inheritance
17. hierarchy. When developing the views, it is important to avoid any modifications to the
application data to better conform to the MVC methodology.
Add a Controller to the "Controllers" Folder
Now we are ready to add the controller for this ASP.NET MVC project. Right click the
"Controllers" folder to add the control class and name the class as "StudentsController" and
implement this controller class as the following:
Collapse | Copy Code
using System;
using System.Collections.Generic;
using System.Linq;
using System.Web;
using System.Web.Mvc;
using ASPNetMVCTutorial.Models;
namespace ASPNetMVCTutorial.Controllers
{
public class StudentsController : Controller
{
private StudentsModel GetStudentModelFromSession()
{
StudentsModel theModel = (StudentsModel)Session["Students"];
if (theModel == null)
{
theModel = new StudentsModel();
Session["Students"] = theModel;
}
return theModel;
}
public ActionResult StudentList()
{
StudentsModel theModel = GetStudentModelFromSession();
ViewData["Students"] = theModel.GetStudents();
return View();
}
public ActionResult AddStudent()
{
return View();
}
public ActionResult AddStudentAction()
{
string Name = Request.Form["textName"];
string Score = Request.Form["txtScore"];
if ((Name == null) || (Name.Trim() == ""))
{
18. ViewData["ERROR"] = "Please provide a name for the student to
add";
return View("../Shared/Error");
}
if (Name.Length < 6)
{
ViewData["ERROR"]
= "The student's name should not be less than 6
characters.";
return View("../Shared/Error");
}
int intScore;
if (!Int32.TryParse(Score, out intScore))
{
ViewData["ERROR"]
= "Please provide a valid score to the student to add.";
return View("../Shared/Error");
}
if ((intScore < 60) || (intScore > 100))
{
ViewData["ERROR"]
= "We only accept students with scores between 60 and
100.";
return View("../Shared/Error");
}
StudentsModel theModel = GetStudentModelFromSession();
theModel.AddStudent(Name, intScore);
ViewData["Students"] = theModel.GetStudents();
return View("StudentList");
}
public ActionResult DeleteStudent()
{
string ID = Request.QueryString["ID"];
int intID;
if (!Int32.TryParse(ID, out intID))
{
ViewData["ERROR"] = "Please provide a valid student ID";
return View("../Shared/Error");
}
StudentsModel theModel = GetStudentModelFromSession();
theModel.DeleteStudent(intID);
return RedirectToAction("StudentList");
}
}
}
This controller is named as "StudentsController". It implements 5 methods.
19. The private method "GetStudentModelFromSession" is used to demonstrate how the web
session is used in this ASP.NET MVC projects. It returns an object of type "StudentsModel",
which is implemented in the "Models" folder. The method first tries to obtain this object from the
web session. If it is unable to get it, it will create a new object and add it to the web session. This
object will be used as the data storage in this tutorial web application.
The four public methods are called "actions" in the ASP.NET MVC terminology:
StudentList
AddStudent
AddStudentAction
DeleteStudent
These methods are used to perform certain operations on the application data saved in the web
session. When the operations on the application data are completed, each method will choose a
view implemented in the "Views" folder to display the data to the users. If the view of choice is
the same name as the "action", the name of the view can be omitted. To access the user input
from the browser, these methods can use the familiar "Request.QueryString' and "Request.Form"
methods.
The action methods pass the data for the views to display by the "ViewData" dictionary.
"Global.asax" - Where the Magic Happens
When we create the ASP.NET MVC project, Visual Studio generates a default "Global.asax" file
for us. Now we will make changes to this file to the following:
Collapse | Copy Code
using System;
using System.Collections.Generic;
using System.Linq;
using System.Web;
using System.Web.Mvc;
using System.Web.Routing;
namespace ASPNetMVCTutorial
{
public class MvcApplication : System.Web.HttpApplication
{
public static void RegisterRoutes(RouteCollection routes)
{
routes.IgnoreRoute("{resource}.axd/{*pathInfo}");
routes.MapRoute(
"Default",
"{controller}/{action}/{id}",
new { controller = "Students",
action = "StudentList",
id = UrlParameter.Optional }
);
20. }
protected void Application_Start()
{
AreaRegistration.RegisterAllAreas();
RegisterRoutes(RouteTable.Routes);
}
}
}
The URLs to access the web pages developed in ASP.NET MVC projects are like
"http://localhost/VirtualDirectoryName/Controller/Action". The calling of the
"routes.MapRoute" method in the "Global.asax" file makes sure the correct controller and action
are located. If the URL does not specify the controller and action, the controller "Student" and
the action "StudentList" will be used as default.
When a URL is received by the web application, it will first find the controller. If the controller
in the URL is "Student", the web application will try to locate a class named as
"StudentController" in the "Controllers" folder. After the controller class is located, the
method of the same name as the action, say "StudentList" is called. The chosen action method
in the controller class will perform all the operations on the application data, and choose a view
to display to the user. The action methods pass the data for the views to display by the
"ViewData" dictionary.
If you want to mix regular "aspx" pages with the MVC views in the same ASP.NET project, you
can add the following code before mapping the ASP.NET MVC routing:
Collapse | Copy Code
routes.IgnoreRoute("{resource}.aspx/{*pathInfo}");
This way, the routing will ignore the URLs pointing to regular "aspx" pages. These pages will be
loaded directly without going through the controller-action-view pattern.
The Completed Project Shown in the Solution Explorer
Now we completed the development of this tutorial ASP.NET MVC application. The following
picture shows all the files including the code-behind files in the solution explorer:
21. Run the ASP.NET MVC Application
Press "F5" when Visual Studio is having the focus, we can start to debug run the tutorial
application. The following picture shows the application running in "Google Chrome":
22. Click on one of the "Delete this student" links, we can delete the student from the list. Click on
the link "Click to add a student to the list", the web page is then navigated to the following:
Type in a student name and give the student a score, and click the "Add student" button, we can
see that the student is added.
23. Points of Interest
This tutorial is intended for readers to get a quick start on developing ASP.NET MVC
applications in Visual Studio. It may not follow Scott Guthrie, or even the general MVC
exactly. If there are any differences, you should definitely go with Scott Guthrie.
Regarding if the code-behind files should be used in the views, I do not want to get into
the discussion. I think it is better to leave this choice to the application developers. If the
MVC pattern is to separate the concerns in the application development, why should we
not further separate the concerns in the development of the views? In this tutorial, all the
views have code-behind files.
It should be noted that the ASP.NET MVC pattern is different from the MVVM pattern
in the WPF development. In MVVM, we have the more mature two-way databinding,
which allows the MVVM to minimize the use of the code-behind file of a "xaml" file.
But in the ASP.NET MVC pattern, the controllers pass the data for display by the
"ViewData" dictionary to the views. In the views, if we do not use the code-behind files,
we will need to use the in-line server scripts in the "aspx" files, which makes the unit
testing of the views almost impossible.
The "Model" part of this MVC tutorial is a "DataTable" saved in the web session. By
doing this, Visual Studio is the only thing needed for the readers to complete the tutorial.
For any practical ASP.NET MVC application, persistent data storage will be needed.
The "FormatURL" method in the utility class "ApplicationUtility" is to make sure that
we can always get the correct ASP.NET MVC pattern URL even when the virtual
directory name is changed at the deployment time. There are many ways to achieve the
same goal. If you do not like this method, you can always implement your own.
Developing applications running in the web browsers is a comprehensive task by nature.
It is always better if you can combine all the available technologies, such as CSS style
24. sheets, Javascripts, Ajax, jQuery, Silverlight, as well as the MVC pattern to give the best
performance and user experiences.
Conclusion
To finish this tutorial, we will answer the questions listed at the beginning of the article:
How are the ASP.Net MVC URLs associated to the resources on the web server?
o The URLs for an ASP.NET MVC application have a controller part and an action
part, the application will use the controller part to locate the controller class and
use the action part to locate the action method implemented in the controller class.
When the action method finishes the operations on the application data, it will
choose a view to display the application data.
In ASP.NET, what are the Models, Views, and Controllers and how are they
implemented?
o In a standard ASP.NET MVC application created by the Visual Studio, there are
three folders named as "Models", "Views", and "Controllers". The models, views,
and controllers will be implemented in the corresponding folders.
o The models represent the applications data. In this tutorial, it is a "DataTable" to
be saved in the application's web session.
o The views are specialized ASP.NET "aspx" pages, the development of the views
is very similar to the development of the "aspx" pages of the
"System.Web.UI.Page type.
o The controllers are classes that implements the actions. Each action will
optionally perform some operations on the application data and choose a view to
display the data.
How is information passed among the Models, Views, and Controllers?
o How the controllers access the application data implemented in the models should
be a design issue and should be decided by the application developers based on
the business need.
o The controllers can pass data for the views to display by "ViewData" dictionary.
How does the application code on the server access the data passed to the server by URL
parameters and form submissions from the browser?
o This tutorial demonstrated that the application can use the familiar
"Request.QueryString and "Request.Form" to access the user input data. To
conform to the MVC methodology, the user input data should be accessed in the
controllers, but not in the views.
How to access the session data in ASP.NET MVC?
o This tutorial demonstrated that web sessions can be used the same way when we
develop the "aspx" pages of the "System.Web.UI.Page type. To conform to the
MVC methodology, the session data should be accessed in the controllers, but not
in the views.
How to use code-behind when implementing the Views?
o In Visual Studio, the code-behind files for the views can be added manually.
There is a hot discussion on if we should use code-behind files for the views, but
25. if you like to use the code-behind files, you can add them anyway. If we do not
use the code-behind files, we will need to use in-line server scripts in the views.