SlideShare a Scribd company logo
2009 TRANSFER CASE
Power Transfer Unit - Compass & Patriot
STANDARD PROCEDURE
DRAIN AND FILL
Fig. 1: DRAIN AND FILL PLUGS
Courtesy of CHRYSLER LLC
1. If fluid level is low or fluid change is required fill with MOPAR® MS9020 SAE 80W90 Gear Lube until
to bottom of fill plug.
2. Tighten fill plug (1) to 32 N.m (24 ft.lbs.).
3. Tighten drain plug (2) to 32 N.m (24 ft.lbs.).
REMOVAL
REMOVAL
2009 Jeep Patriot Limited
2009 TRANSFER CASE Power Transfer Unit - Compass & Patriot
2009 Jeep Patriot Limited
2009 TRANSFER CASE Power Transfer Unit - Compass & Patriot
a
Saturday, September 08, 2012 2:16:38 PM Page 1 © 2006 Mitchell Repair Information Company, LLC.
a
Saturday, September 08, 2012 2:16:41 PM Page 1 © 2006 Mitchell Repair Information Company, LLC.
Fig. 2: AIR CLEANER ASSEMBLY
Courtesy of CHRYSLER LLC
1. Disconnect negative battery cable (2).
2. Remove the engine trim cover.
3. Remove air cleaner assembly (1).
4. Remove Power Distribution Center (PDC) from bracket.
5. Raise the vehicle on the hoist.
6. Remove front halfshafts. Refer to Differential and Driveline/Half Shaft - Removal .
2009 Jeep Patriot Limited
2009 TRANSFER CASE Power Transfer Unit - Compass & Patriot
a
Saturday, September 08, 2012 2:16:38 PM Page 2 © 2006 Mitchell Repair Information Company, LLC.
Fig. 3: PTU DRAIN - FILL PLUGS
Courtesy of CHRYSLER LLC
7. Remove drain plug (2) at PTU and allow fluid to drain.
8. Reinstall drain plug.
Fig. 4: MARK PROP SHAFT
Courtesy of CHRYSLER LLC
9. Mark (2) prop shaft and differential (3) for proper installation.
2009 Jeep Patriot Limited
2009 TRANSFER CASE Power Transfer Unit - Compass & Patriot
a
Saturday, September 08, 2012 2:16:38 PM Page 3 © 2006 Mitchell Repair Information Company, LLC.
10. Remove the rear prop shaft. Refer to Differential and Driveline/Propeller Shaft - Removal .
Fig. 5: EXHAUST TO MANIVERTER BOLTS
Courtesy of CHRYSLER LLC
11. Remove the two exhaust to maniverter (exhaust manifold with catalytic converter) bolts (1).
12. Unplug the downstream O2 sensor connector.
13. Remove the exhaust system. Refer to Exhaust System/MUFFLER, Exhaust - Removal .
14. Lower the vehicle on the hoist.
15. Unplug the upstream O2 sensor connector.
2009 Jeep Patriot Limited
2009 TRANSFER CASE Power Transfer Unit - Compass & Patriot
a
Saturday, September 08, 2012 2:16:38 PM Page 4 © 2006 Mitchell Repair Information Company, LLC.
Fig. 6: USE O2 SENSOR TOOL - 8439
Courtesy of CHRYSLER LLC
16. Remove upstream O2 sensor from the maniverter (exhaust manifold with catalytic converter) using O2s
(Oxygen Sensor) Remover/Installer 8439 (2).
Fig. 7: MANIVERTER HEAT SHIELD AND BOLTS
Courtesy of CHRYSLER LLC
17. Remove the four maniverter heat shield bolts (1).
2009 Jeep Patriot Limited
2009 TRANSFER CASE Power Transfer Unit - Compass & Patriot
a
Saturday, September 08, 2012 2:16:38 PM Page 5 © 2006 Mitchell Repair Information Company, LLC.
Fig. 8: MANIVERTER SIDE HEAT SHIELD
Courtesy of CHRYSLER LLC
18. Remove the two retaining bolts (2) and one nut (1) from the maniverter side heat shield (3).
Fig. 9: SUPPORT MANIVERTER
Courtesy of CHRYSLER LLC
19. Remove the seven maniverter to head retaining bolts.
20. Slide the maniverter up and to the right, support the maniverter (1) with the help of a bungie cord.
2009 Jeep Patriot Limited
2009 TRANSFER CASE Power Transfer Unit - Compass & Patriot
a
Saturday, September 08, 2012 2:16:38 PM Page 6 © 2006 Mitchell Repair Information Company, LLC.
Fig. 10: MANIVERTER TO BLOCK SUPPORT BRACKET
Courtesy of CHRYSLER LLC
21. Raise the vehicle on the hoist.
22. Remove the four (1) engine to maniverter bracket bolts.
Fig. 11: REAR ENGINE MOUNT
Courtesy of CHRYSLER LLC
23. Remove the rear engine mount through bolt (2).
2009 Jeep Patriot Limited
2009 TRANSFER CASE Power Transfer Unit - Compass & Patriot
a
Saturday, September 08, 2012 2:16:38 PM Page 7 © 2006 Mitchell Repair Information Company, LLC.
24. Remove the three front engine mount to frame bolts and the mount through bolt.
Fig. 12: PTU MOUNTING BOLTS
Courtesy of CHRYSLER LLC
25. Remove the PTU mounting bolts (1, 2).
Fig. 13: JACK AT TRANS MOUNT
Courtesy of CHRYSLER LLC
2009 Jeep Patriot Limited
2009 TRANSFER CASE Power Transfer Unit - Compass & Patriot
a
Saturday, September 08, 2012 2:16:38 PM Page 8 © 2006 Mitchell Repair Information Company, LLC.
26. Install a screw jack (2) on front engine mount bracket (1).
Fig. 14: REAR MOUNT PTU BOLTS
Courtesy of CHRYSLER LLC
27. Raise the front of the engine until the rear mount has dropped (1, 2).
28. Separate the PTU from the transaxle.
29. Remove and discard old O-ring between Transmission and PTU.
2009 Jeep Patriot Limited
2009 TRANSFER CASE Power Transfer Unit - Compass & Patriot
a
Saturday, September 08, 2012 2:16:38 PM Page 9 © 2006 Mitchell Repair Information Company, LLC.
Fig. 15: REMOVE - INSTALL PTU
Courtesy of CHRYSLER LLC
30. Roll the PTU (1) forward and down to remove.
DISASSEMBLY
DISASSEMBLY
Fig. 16: EXTENSION AND PINION HOUSING BOLT
Courtesy of CHRYSLER LLC
1. Remove extension housing bolts.
2009 Jeep Patriot Limited
2009 TRANSFER CASE Power Transfer Unit - Compass & Patriot
a
Saturday, September 08, 2012 2:16:38 PM Page 10 © 2006 Mitchell Repair Information Company, LLC.
Fig. 17: EXTENSION HOUSING O-RING
Courtesy of CHRYSLER LLC
2. Remove the extension housing.
3. Remove the extension housing O-ring.
Fig. 18: DUST SHIELD OFF PTU
Courtesy of CHRYSLER LLC
4. Using a chisel (2) remove the dust shield (1) from the extension housing (3).
2009 Jeep Patriot Limited
2009 TRANSFER CASE Power Transfer Unit - Compass & Patriot
a
Saturday, September 08, 2012 2:16:38 PM Page 11 © 2006 Mitchell Repair Information Company, LLC.
Fig. 19: EXTENSION AND PINION HOUSING BOLT
Courtesy of CHRYSLER LLC
5. Remove the pinion housing bolts.
Fig. 20: PINION HOUSING
Courtesy of CHRYSLER LLC
6. Remove the pinion housing.
2009 Jeep Patriot Limited
2009 TRANSFER CASE Power Transfer Unit - Compass & Patriot
a
Saturday, September 08, 2012 2:16:38 PM Page 12 © 2006 Mitchell Repair Information Company, LLC.
Fig. 21: PINION HOUSING SHIM
Courtesy of CHRYSLER LLC
7. Remove the pinion housing shim.
8. Remove the pinion housing O-ring.
Fig. 22: PINION SHAFT NUT
Courtesy of CHRYSLER LLC
NOTE: The pinion nut is a staked type nut.
2009 Jeep Patriot Limited
2009 TRANSFER CASE Power Transfer Unit - Compass & Patriot
a
Saturday, September 08, 2012 2:16:38 PM Page 13 © 2006 Mitchell Repair Information Company, LLC.
9. Using a chisel or a grinder, remove the staked depression in the pinion nut.
Fig. 23: REMOVE PINION NUT
Courtesy of CHRYSLER LLC
10. Remove the output shaft nut, using the Output Shaft Nut Socket 9921 and Spline Socket 9922.
Fig. 24: PRESS PINION
Courtesy of CHRYSLER LLC
2009 Jeep Patriot Limited
2009 TRANSFER CASE Power Transfer Unit - Compass & Patriot
a
Saturday, September 08, 2012 2:16:38 PM Page 14 © 2006 Mitchell Repair Information Company, LLC.
11. Press the output shaft from the housing using a press.
Fig. 25: PINION SHAFT SPACER
Courtesy of CHRYSLER LLC
12. Remove the output shaft spacer.
Fig. 26: PINION SHAFT BEARING.
Courtesy of CHRYSLER LLC
2009 Jeep Patriot Limited
2009 TRANSFER CASE Power Transfer Unit - Compass & Patriot
a
Saturday, September 08, 2012 2:16:38 PM Page 15 © 2006 Mitchell Repair Information Company, LLC.
13. Remove the output shaft bearing.
Fig. 27: REMOVE SMALL SIDE BEARING CUP PINION HOUSING
Courtesy of CHRYSLER LLC
14. Remove the output shaft housing small side bearing cup using a brass drift.
Fig. 28: REMOVE LARGE SIDE BEARING CUP PINION HOUSING
Courtesy of CHRYSLER LLC
2009 Jeep Patriot Limited
2009 TRANSFER CASE Power Transfer Unit - Compass & Patriot
a
Saturday, September 08, 2012 2:16:38 PM Page 16 © 2006 Mitchell Repair Information Company, LLC.
15. Remove the output shaft housing large side bearing cup using a brass drift.
Fig. 29: PULL PINION HEAD BEARING
Courtesy of CHRYSLER LLC
16. Install Puller 6444 and Jaws 6451 onto output shaft head bearing.
17. Place Puller in a vice and remove the bearing.
Fig. 30: INSPECTION COVER
Courtesy of CHRYSLER LLC
2009 Jeep Patriot Limited
2009 TRANSFER CASE Power Transfer Unit - Compass & Patriot
a
Saturday, September 08, 2012 2:16:38 PM Page 17 © 2006 Mitchell Repair Information Company, LLC.
18. Remove the inspection cover bolts (1).
Fig. 31: REMOVE INSPECTION COVER
Courtesy of CHRYSLER LLC
19. Remove the inspection cover.
Fig. 32: SIDE COVER
Courtesy of CHRYSLER LLC
2009 Jeep Patriot Limited
2009 TRANSFER CASE Power Transfer Unit - Compass & Patriot
a
Saturday, September 08, 2012 2:16:38 PM Page 18 © 2006 Mitchell Repair Information Company, LLC.
20. Remove the side cover bolts (1).
Fig. 33: REMOVE SIDE COVER.
Courtesy of CHRYSLER LLC
21. Remove the side cover from case.
Fig. 34: CARRIER
Courtesy of CHRYSLER LLC
22. Remove the carrier assembly.
2009 Jeep Patriot Limited
2009 TRANSFER CASE Power Transfer Unit - Compass & Patriot
a
Saturday, September 08, 2012 2:16:38 PM Page 19 © 2006 Mitchell Repair Information Company, LLC.
Fig. 35: CARRIER BEARING CUP AND SEAL.
Courtesy of CHRYSLER LLC
23. Remove bearing cup by hand (1) or by using a pick.
Fig. 36: COVER SIDE CUP AND SHIM
Courtesy of CHRYSLER LLC
24. Remove the shim (1) under the bearing cup (3). Measure and record the size of the shim.
NOTE: Bearing cup is a slip fit.
2009 Jeep Patriot Limited
2009 TRANSFER CASE Power Transfer Unit - Compass & Patriot
a
Saturday, September 08, 2012 2:16:38 PM Page 20 © 2006 Mitchell Repair Information Company, LLC.
Fig. 37: INNER COVER SEAL
Courtesy of CHRYSLER LLC
25. Remove the inner seal from the PTU cover.
26. Remove the outer seal from the PTU cover.
Fig. 38: CARRIER RACE HOUSING SIDE
Courtesy of CHRYSLER LLC
27. Remove bearing cup by hand (1) or by using a pick.
2009 Jeep Patriot Limited
2009 TRANSFER CASE Power Transfer Unit - Compass & Patriot
a
Saturday, September 08, 2012 2:16:38 PM Page 21 © 2006 Mitchell Repair Information Company, LLC.
28. Remove the shim (3) under the bearing cup (1). Measure and record the size of the shim.
Fig. 39: CARRIER CASE SEAL.
Courtesy of CHRYSLER LLC
29. Remove the carrier case seal.
Fig. 40: RING GEAR BOLTS
Courtesy of CHRYSLER LLC
2009 Jeep Patriot Limited
2009 TRANSFER CASE Power Transfer Unit - Compass & Patriot
a
Saturday, September 08, 2012 2:16:38 PM Page 22 © 2006 Mitchell Repair Information Company, LLC.
30. Remove the ring gear bolts.
Fig. 41: RING GEAR
Courtesy of CHRYSLER LLC
31. Remove the ring gear.
Fig. 42: REMOVE DIFFERENTIAL SIDE BEARING
Courtesy of CHRYSLER LLC
2009 Jeep Patriot Limited
2009 TRANSFER CASE Power Transfer Unit - Compass & Patriot
a
Saturday, September 08, 2012 2:16:38 PM Page 23 © 2006 Mitchell Repair Information Company, LLC.
32. Remove ring gear side bearing using Puller C-293-PA, Inserts C-293-37 and Insert C-4487-1.
Fig. 43: REMOVE OUTPUT SIDE BEARING
Courtesy of CHRYSLER LLC
33. Remove output side bearing using Puller C-293-PA, Inserts C-293-37 and Insert C-4487-1.
ASSEMBLY
ASSEMBLY
2009 Jeep Patriot Limited
2009 TRANSFER CASE Power Transfer Unit - Compass & Patriot
a
Saturday, September 08, 2012 2:16:38 PM Page 24 © 2006 Mitchell Repair Information Company, LLC.
Fig. 44: SPOOL SHAFT OUTPUT SIDE BEARING
Courtesy of CHRYSLER LLC
1. Install output side spool shaft bearing using Installer C-3095-A.
Fig. 45: SPOOL SHAFT RING GEAR SIDE BEARING
Courtesy of CHRYSLER LLC
2. Install ring gear side bearing using Installer 8148.
2009 Jeep Patriot Limited
2009 TRANSFER CASE Power Transfer Unit - Compass & Patriot
a
Saturday, September 08, 2012 2:16:38 PM Page 25 © 2006 Mitchell Repair Information Company, LLC.
Fig. 46: RING GEAR
Courtesy of CHRYSLER LLC
3. Install the ring gear.
Fig. 47: RING GEAR BOLTS
Courtesy of CHRYSLER LLC
4. Install the new ring gear bolts and tighten to 74 N.m (55 ft. lbs.).
2009 Jeep Patriot Limited
2009 TRANSFER CASE Power Transfer Unit - Compass & Patriot
a
Saturday, September 08, 2012 2:16:38 PM Page 26 © 2006 Mitchell Repair Information Company, LLC.
Fig. 48: INSTALL CARRIER CASE SEAL
Courtesy of CHRYSLER LLC
5. Install the carrier case seal using Installer 9851 and Handle C- 4171.
Fig. 49: CARRIER RACE HOUSING SIDE
Courtesy of CHRYSLER LLC
6. Install the shim (3) under the bearing cup (1) in the case side.
7. Install the bearing cup by hand.
2009 Jeep Patriot Limited
2009 TRANSFER CASE Power Transfer Unit - Compass & Patriot
a
Saturday, September 08, 2012 2:16:38 PM Page 27 © 2006 Mitchell Repair Information Company, LLC.
Fig. 50: INSTALL CARRIER COVER INNER SEAL
Courtesy of CHRYSLER LLC
8. Install the inner seal into the PTU cover using Installer 9852 and Handle C-4171.
Fig. 51: INSTALL CARRIER COVER OUTER SEAL
Courtesy of CHRYSLER LLC
9. Install the outer seal into the PTU cover using Installer 9853 and Handle C-4171.
2009 Jeep Patriot Limited
2009 TRANSFER CASE Power Transfer Unit - Compass & Patriot
a
Saturday, September 08, 2012 2:16:38 PM Page 28 © 2006 Mitchell Repair Information Company, LLC.
Fig. 52: COVER SIDE CUP AND SHIM
Courtesy of CHRYSLER LLC
10. Install the shim (1) under the bearing cup (3).
11. Install bearing cup by hand (3).
Fig. 53: SIDE COVER
Courtesy of CHRYSLER LLC
12. Install the carrier assembly into the case
2009 Jeep Patriot Limited
2009 TRANSFER CASE Power Transfer Unit - Compass & Patriot
a
Saturday, September 08, 2012 2:16:38 PM Page 29 © 2006 Mitchell Repair Information Company, LLC.
13. Install the side cover
14. Tighten side cover bolts (1) to 23 N.m (17 ft. lbs.).
Fig. 54: INSTALL PINION HEAD BEARING
Courtesy of CHRYSLER LLC
15. Install the output shaft head bearing on to the pinion shaft using Installer 9714 and a Press.
Fig. 55: INSTALL PINION HEAD BEARING CUP
Courtesy of CHRYSLER LLC
2009 Jeep Patriot Limited
2009 TRANSFER CASE Power Transfer Unit - Compass & Patriot
a
Saturday, September 08, 2012 2:16:38 PM Page 30 © 2006 Mitchell Repair Information Company, LLC.
16. Install the output shaft head bearing cup using Installer 6061 and Handle C-4171.
Fig. 56: OUTPUT SHAFT TAIL BEARING CUP
Courtesy of CHRYSLER LLC
17. Install the output shaft tail bearing cup using Installer 9855 and Handle C-4171.
Fig. 57: PINION SHAFT SPACER
Courtesy of CHRYSLER LLC
2009 Jeep Patriot Limited
2009 TRANSFER CASE Power Transfer Unit - Compass & Patriot
a
Saturday, September 08, 2012 2:16:38 PM Page 31 © 2006 Mitchell Repair Information Company, LLC.
18. Install the output shaft spacer onto the output shaft.
Fig. 58: OUTPUT SHAFT TAIL BEARING
Courtesy of CHRYSLER LLC
19. Install output shaft into output shaft housing.
20. Install output shaft tail bearing on to out put shaft using Installer L-4411.
Fig. 59: OUTPUT SHAFT NUT
Courtesy of CHRYSLER LLC
2009 Jeep Patriot Limited
2009 TRANSFER CASE Power Transfer Unit - Compass & Patriot
a
Saturday, September 08, 2012 2:16:38 PM Page 32 © 2006 Mitchell Repair Information Company, LLC.
21. Install the output shaft nut (1) onto the output shaft (2).
Fig. 60: INSTALL PINION NUT
Courtesy of CHRYSLER LLC
22. Tighten the output shaft nut using Pinion Nut Socket 9921 to 150 N.m (111 ft. lbs.).
23. Using an inch pound torque wrench check and Pinion Nut Socket 9921 (1) check the rotating torque, it
should be 30 in. lbs. Add 0.002 in. larger shim to increase rotating torque and add 0.002 in. smaller shim
to decrease rotating torque. Repeat until proper turning torque is obtained.
24. Using a punch stake the output shaft nut.
NOTE: The output shaft nut is a staked type nut.
2009 Jeep Patriot Limited
2009 TRANSFER CASE Power Transfer Unit - Compass & Patriot
a
Saturday, September 08, 2012 2:16:38 PM Page 33 © 2006 Mitchell Repair Information Company, LLC.
Fig. 61: PINION HOUSING SHIM
Courtesy of CHRYSLER LLC
25. Install the pinion housing O-ring (3).
26. Install the pinion housing shim (1).
Fig. 62: PINION SHAFT SEAL
Courtesy of CHRYSLER LLC
27. Install the output shaft seal using Installer 9851 and Handle C-4171.
2009 Jeep Patriot Limited
2009 TRANSFER CASE Power Transfer Unit - Compass & Patriot
a
Saturday, September 08, 2012 2:16:38 PM Page 34 © 2006 Mitchell Repair Information Company, LLC.
Fig. 63: EXTENSION HOUSING O-RING
Courtesy of CHRYSLER LLC
28. Install a new extension housing O-ring.
Fig. 64: PINION HOUSING
Courtesy of CHRYSLER LLC
29. Install the output shaft housing and bolts onto the carrier housing.
30. Apply pattern check grease to the ring gear.
2009 Jeep Patriot Limited
2009 TRANSFER CASE Power Transfer Unit - Compass & Patriot
a
Saturday, September 08, 2012 2:16:38 PM Page 35 © 2006 Mitchell Repair Information Company, LLC.
Fig. 65: DUST SHIELD ON PTU
Courtesy of CHRYSLER LLC
31. Using a block of wood (2) install the dust shield (3) onto the extension housing (1).
Fig. 66: EXTENSION AND PINION HOUSING BOLT
Courtesy of CHRYSLER LLC
32. Install the extension housing and bolts.
33. Tighten output shaft housing bolts to 38 N.m (28 ft. lbs.).
2009 Jeep Patriot Limited
2009 TRANSFER CASE Power Transfer Unit - Compass & Patriot
a
Saturday, September 08, 2012 2:16:38 PM Page 36 © 2006 Mitchell Repair Information Company, LLC.
34. Tighten the extension housing bolts to 38 N.m (28 ft. lbs.).
Fig. 67: VENT
Courtesy of CHRYSLER LLC
35. Clean cover and apply MOPAR® axle RTV or equivalent.
36. Install the vent and bolts, tighten the bolts to 23 N.m (17 ft. lbs.).
Fig. 68: VENT SHIELD
Courtesy of CHRYSLER LLC
2009 Jeep Patriot Limited
2009 TRANSFER CASE Power Transfer Unit - Compass & Patriot
a
Saturday, September 08, 2012 2:16:38 PM Page 37 © 2006 Mitchell Repair Information Company, LLC.
37. Install the vent shield and bolts. tighten the bolts to 23 N.m (17 ft. lbs.).
Fig. 69: INSPECTION COVER
Courtesy of CHRYSLER LLC
38. Clean cover and apply MOPAR® axle RTV.
39. Apply MOPAR® lock AND seal adhesive or equivalent to bolts.
40. Install the inspection cover and bolts. tighten the bolts to 23 N.m (17 ft. lbs.).
41. Fill the PTU. See Transmission and Transfer Case/Power Transfer Unit - Standard Procedure.
INSTALLATION
INSTALLATION
2009 Jeep Patriot Limited
2009 TRANSFER CASE Power Transfer Unit - Compass & Patriot
a
Saturday, September 08, 2012 2:16:38 PM Page 38 © 2006 Mitchell Repair Information Company, LLC.
Fig. 70: REMOVE - INSTALL PTU
Courtesy of CHRYSLER LLC
1. Roll the PTU in, moving from front to back (1) .
Fig. 71: PTU INSTALL
Courtesy of CHRYSLER LLC
2. Rest the PTU (1) on the frame (3) while the engine and transaxle (2) are raised back into position.
2009 Jeep Patriot Limited
2009 TRANSFER CASE Power Transfer Unit - Compass & Patriot
a
Saturday, September 08, 2012 2:16:38 PM Page 39 © 2006 Mitchell Repair Information Company, LLC.
Fig. 72: JACK AT TRANS MOUNT
Courtesy of CHRYSLER LLC
3. Lower screw jack (2) until rear mount through bolt can be installed.
Fig. 73: REAR ENGINE MOUNT
Courtesy of CHRYSLER LLC
4. Install rear mount through bolt (2) and tighten bolt to 75 Nm (55 ft. lbs.).
2009 Jeep Patriot Limited
2009 TRANSFER CASE Power Transfer Unit - Compass & Patriot
a
Saturday, September 08, 2012 2:16:38 PM Page 40 © 2006 Mitchell Repair Information Company, LLC.
Fig. 74: FRONT ENGINE MOUNT
Courtesy of CHRYSLER LLC
5. Install the transmission crossmember and bolts, (2) tighten to 75 Nm (55 ft. lbs.).
6. Install the through bolt at the front transmission mount (1) and tighten to 75 Nm (55 ft. lbs.).
Fig. 75: PTU O-RING
Courtesy of CHRYSLER LLC
NOTE: STICKING THE O-RING WITH VASELINE OR TRANS ASSEMBLY GREASE
2009 Jeep Patriot Limited
2009 TRANSFER CASE Power Transfer Unit - Compass & Patriot
a
Saturday, September 08, 2012 2:16:38 PM Page 41 © 2006 Mitchell Repair Information Company, LLC.
7. Insure that the O-ring (1) between the PTU and transaxle is in place.
Fig. 76: PTU MOUNTING BOLTS
Courtesy of CHRYSLER LLC
8. Slide the PTU into place.
9. Install and tighten the PTU mounting bolts (1,2) to 58 N.m (43ft. lbs.).
10. Lower the hoist.
11. Install the maniverter. Refer to Exhaust System/CONVERTER, Catalytic - Installation .
IS RECOMMENDED.
2009 Jeep Patriot Limited
2009 TRANSFER CASE Power Transfer Unit - Compass & Patriot
a
Saturday, September 08, 2012 2:16:38 PM Page 42 © 2006 Mitchell Repair Information Company, LLC.
Fig. 77: AIR CLEANER ASSEMBLY
Courtesy of CHRYSLER LLC
12. Install the air box (1).
13. Install engine trim cover.
14. Raise the vehicle on the hoist.
15. Install the exhaust system. Refer to Exhaust System/MUFFLER, Exhaust - Installation .
16. Install the Prop shaft. Refer to Differential and Driveline/Propeller Shaft - Installation .
17. Install the axle shafts. Refer to Differential and Driveline/Half Shaft - Installation .
18. Fill PTU. See Transmission and Transfer Case/Power Transfer Unit - Standard Procedure.
19. Lower hoist.
20. Connect battery cables (2).
21. Top off the fluids. See Transmission and Transfer Case/Power Transfer Unit - Standard Procedure.
SPECIFICATIONS
TORQUE
TORQUE
DESCRIPTION N.m Ft. Lbs. In. Lbs.
Plug, Fill 32 24 -
Plug, Drain 32 24 -
Bolts, Inspection cover 23 17 -
Bolts, Vent Shield 23 17 -
Bolts, Vent 23 17 -
2009 Jeep Patriot Limited
2009 TRANSFER CASE Power Transfer Unit - Compass & Patriot
a
Saturday, September 08, 2012 2:16:38 PM Page 43 © 2006 Mitchell Repair Information Company, LLC.
SPECIAL TOOLS
SPECIAL TOOLS
Fig. 78: TRAK-LOK AXLE TOOL - C-4487
Courtesy of CHRYSLER LLC
Fig. 79: INSTALLER, CUP - 6061
Courtesy of CHRYSLER LLC
Bolts, Output Shaft
Housing
38 28 -
Bolts, extension housing 38 28 -
Nut, Output Shaft 150 111 -
Bolts, Carrier Assembly
Side Cover
23 17 -
Bolts, Ring Gear 74 55 -
Bolt and Nut, Rear
Mount Through
75 55 -
Bolts, Transmission
Crossmember
75 55 -
Bolt and Nut,
Transmission
Crossmember through
75 55 -
Bolts, PTU Mounting 58 43 -
2009 Jeep Patriot Limited
2009 TRANSFER CASE Power Transfer Unit - Compass & Patriot
a
Saturday, September 08, 2012 2:16:38 PM Page 44 © 2006 Mitchell Repair Information Company, LLC.
Fig. 80: PULLER, BEARING/GEAR - 6444
Courtesy of CHRYSLER LLC
Fig. 81: JAWS, PULLER - 6451
Courtesy of CHRYSLER LLC
Fig. 82: CUP - 8148
Courtesy of CHRYSLER LLC
Fig. 83: O2 SENSOR WRENCH - 8439
Courtesy of CHRYSLER LLC
2009 Jeep Patriot Limited
2009 TRANSFER CASE Power Transfer Unit - Compass & Patriot
a
Saturday, September 08, 2012 2:16:38 PM Page 45 © 2006 Mitchell Repair Information Company, LLC.
Fig. 84: INSTALLER, BEARING - 9714
Courtesy of CHRYSLER LLC
Fig. 85: INSTALLER, SEAL - 9715
Courtesy of CHRYSLER LLC
2009 Jeep Patriot Limited
2009 TRANSFER CASE Power Transfer Unit - Compass & Patriot
a
Saturday, September 08, 2012 2:16:38 PM Page 46 © 2006 Mitchell Repair Information Company, LLC.
Fig. 86: SPLINED SOCKET - 9742
Courtesy of CHRYSLER LLC
Fig. 87: INSTALLER, SEAL - 9851
Courtesy of CHRYSLER LLC
2009 Jeep Patriot Limited
2009 TRANSFER CASE Power Transfer Unit - Compass & Patriot
a
Saturday, September 08, 2012 2:16:38 PM Page 47 © 2006 Mitchell Repair Information Company, LLC.
Fig. 88: INSTALLER, SEAL - 9852
Courtesy of CHRYSLER LLC
Fig. 89: INSTALLER, SEAL - 9853
Courtesy of CHRYSLER LLC
Fig. 90: INSTALLER, BEARING CUP - 9855
Courtesy of CHRYSLER LLC
2009 Jeep Patriot Limited
2009 TRANSFER CASE Power Transfer Unit - Compass & Patriot
a
Saturday, September 08, 2012 2:16:38 PM Page 48 © 2006 Mitchell Repair Information Company, LLC.
Fig. 91: WRENCH, PINION NUT - 9921
Courtesy of CHRYSLER LLC
Fig. 92: SOCKET, SPLINED - 9922
Courtesy of CHRYSLER LLC
Fig. 93: PULLER, PRESS - C-293-PA
Courtesy of CHRYSLER LLC
Fig. 94: BLOCK SET, PULLER - C-293-37
Courtesy of CHRYSLER LLC
2009 Jeep Patriot Limited
2009 TRANSFER CASE Power Transfer Unit - Compass & Patriot
a
Saturday, September 08, 2012 2:16:38 PM Page 49 © 2006 Mitchell Repair Information Company, LLC.
Fig. 95: INSTALLER, BEARING - C-3095-A
Courtesy of CHRYSLER LLC
Fig. 96: DRIVER HANDLE, UNIVERSAL - C-4171
Courtesy of CHRYSLER LLC
Fig. 97: INSTALLER, BEARING - L-4411
Courtesy of CHRYSLER LLC
SEAL, DIFFERENTIAL CARRIER
REMOVAL
REMOVAL
1. Remove PTU from transaxle. See Transmission and Transfer Case/Power Transfer Unit - Removal.
2. Use a screw mounted in a slide hammer to remove seal. Be careful not to damage seal journal when
removing seal.
2009 Jeep Patriot Limited
2009 TRANSFER CASE Power Transfer Unit - Compass & Patriot
a
Saturday, September 08, 2012 2:16:38 PM Page 50 © 2006 Mitchell Repair Information Company, LLC.
INSTALLATION
INSTALLATION
Fig. 98: INSTALL CARRIER CASE SEAL
Courtesy of CHRYSLER LLC
1. Install the carrier case seal using Installer 9851 and Handle C-4171.
2. Install the PTU. See Transmission and Transfer Case/Power Transfer Unit - Installation.
SEAL, OUTPUT FLANGE
REMOVAL
REMOVAL
1. Remove the propeller shaft. Refer to Differential and Driveline/Propeller Shaft - Removal .
2. Using a screwdriver remove the output seal.
INSTALLATION
INSTALLATION
2009 Jeep Patriot Limited
2009 TRANSFER CASE Power Transfer Unit - Compass & Patriot
a
Saturday, September 08, 2012 2:16:38 PM Page 51 © 2006 Mitchell Repair Information Company, LLC.
Fig. 99: PINION SHAFT SEAL
Courtesy of CHRYSLER LLC
1. Install the output shaft seal using Installer 9851 and Handle C-4171.
2. Install the propeller shaft. Refer to Differential and Driveline/Propeller Shaft - Installation .
SEALS, END COVER
REMOVAL
REMOVAL
Fig. 100: SIDE COVER
2009 Jeep Patriot Limited
2009 TRANSFER CASE Power Transfer Unit - Compass & Patriot
a
Saturday, September 08, 2012 2:16:38 PM Page 52 © 2006 Mitchell Repair Information Company, LLC.
Courtesy of CHRYSLER LLC
1. Remove the right halfshaft. Refer to Differential and Driveline/Half Shaft - Removal .
2. Remove the side cover bolts.
3. Remove the side cover.
Fig. 101: INNER COVER SEAL
Courtesy of CHRYSLER LLC
4. Using a drift remove both inner and outer seals.
INSTALLATION
INSTALLATION
2009 Jeep Patriot Limited
2009 TRANSFER CASE Power Transfer Unit - Compass & Patriot
a
Saturday, September 08, 2012 2:16:39 PM Page 53 © 2006 Mitchell Repair Information Company, LLC.
Fig. 102: INSTALL CARRIER COVER INNER SEAL
Courtesy of CHRYSLER LLC
1. Install the inner seal into the PTU cover using Installer 9852 and Handle C-4171.
Fig. 103: INSTALL CARRIER COVER OUTER SEAL
Courtesy of CHRYSLER LLC
2. Install the outer seal into the PTU cover using Installer 9853 and Handle C-4171.
2009 Jeep Patriot Limited
2009 TRANSFER CASE Power Transfer Unit - Compass & Patriot
a
Saturday, September 08, 2012 2:16:39 PM Page 54 © 2006 Mitchell Repair Information Company, LLC.
Fig. 104: SIDE COVER
Courtesy of CHRYSLER LLC
3. Install the side cover.
4. Tighten side cover bolts (1) to 23 N.m (17 ft. lbs.).
5. Install the right halfshaft. Refer to Differential and Driveline/Half Shaft - Installation .
SHIELD, EXTENSION HOUSING DUST
REMOVAL
REMOVAL
2009 Jeep Patriot Limited
2009 TRANSFER CASE Power Transfer Unit - Compass & Patriot
a
Saturday, September 08, 2012 2:16:39 PM Page 55 © 2006 Mitchell Repair Information Company, LLC.
Fig. 105: EXTENSION AND PINION HOUSING BOLT
Courtesy of CHRYSLER LLC
1. Remove the propeller shaft. Refer to Differential and Driveline/Propeller Shaft - Removal .
2. Remove the extension housing bolts (1).
3. Remove the extension housing.
4. Remove the extension housing O-ring and inspect.
Fig. 106: DUST SHIELD OFF PTU
Courtesy of CHRYSLER LLC
2009 Jeep Patriot Limited
2009 TRANSFER CASE Power Transfer Unit - Compass & Patriot
a
Saturday, September 08, 2012 2:16:39 PM Page 56 © 2006 Mitchell Repair Information Company, LLC.
5. Using a chisel (2) remove the dust shield (1) from the extension housing (3).
INSTALLATION
INSTALLATION
Fig. 107: DUST SHIELD ON PTU
Courtesy of CHRYSLER LLC
1. Using a block of wood (2) install the dust shield (3) onto the extension housing (1).
2009 Jeep Patriot Limited
2009 TRANSFER CASE Power Transfer Unit - Compass & Patriot
a
Saturday, September 08, 2012 2:16:39 PM Page 57 © 2006 Mitchell Repair Information Company, LLC.
Fig. 108: EXTENSION AND PINION HOUSING BOLTS
Courtesy of CHRYSLER LLC
2. Install the extension housing and bolts.
3. Tighten the extension housing bolts to 38 N.m (28 ft. lbs.).
4. Install the propeller shaft. Refer to Differential and Driveline/Propeller Shaft - Installation .
2009 Jeep Patriot Limited
2009 TRANSFER CASE Power Transfer Unit - Compass & Patriot
a
Saturday, September 08, 2012 2:16:39 PM Page 58 © 2006 Mitchell Repair Information Company, LLC.

More Related Content

What's hot

Manual reparacion Jeep Compass - Patriot Limited 2007-2009_Sunroof
Manual reparacion Jeep Compass - Patriot Limited 2007-2009_SunroofManual reparacion Jeep Compass - Patriot Limited 2007-2009_Sunroof
Manual reparacion Jeep Compass - Patriot Limited 2007-2009_Sunroof
Gustavo Castro
 
Manual reparacion Jeep Compass - Patriot Limited 2007-2009_Front suspension
Manual reparacion Jeep Compass - Patriot Limited 2007-2009_Front suspensionManual reparacion Jeep Compass - Patriot Limited 2007-2009_Front suspension
Manual reparacion Jeep Compass - Patriot Limited 2007-2009_Front suspension
Gustavo Castro
 
Manual de serviço cb450 diagrama
Manual de serviço cb450 diagramaManual de serviço cb450 diagrama
Manual de serviço cb450 diagramaThiago Huari
 
Manual: 2005 and Newer - LS2 LS3 Drive By EFI Wiring Harness
Manual: 2005 and Newer - LS2 LS3 Drive By EFI Wiring Harness Manual: 2005 and Newer - LS2 LS3 Drive By EFI Wiring Harness
Manual: 2005 and Newer - LS2 LS3 Drive By EFI Wiring Harness
PSI Conversion
 
2005 HONDA ACCORD Service Repair Manual
2005 HONDA ACCORD Service Repair Manual2005 HONDA ACCORD Service Repair Manual
2005 HONDA ACCORD Service Repair Manual
jksmemmd
 
16M B9H1-750 Hydraulic Schematic.pdf
16M B9H1-750 Hydraulic Schematic.pdf16M B9H1-750 Hydraulic Schematic.pdf
16M B9H1-750 Hydraulic Schematic.pdf
junprc1
 
Apostila arquivo imobilizador
Apostila arquivo imobilizadorApostila arquivo imobilizador
Apostila arquivo imobilizador
LucianoFreitas58
 
2001 hino fd series truck service repair manual
2001 hino fd series truck service repair manual2001 hino fd series truck service repair manual
2001 hino fd series truck service repair manual
fusjejfkskeme
 
Manual de serviço xl125 s (1984) ms437841pinformac
Manual de serviço xl125 s (1984)   ms437841pinformacManual de serviço xl125 s (1984)   ms437841pinformac
Manual de serviço xl125 s (1984) ms437841pinformac
Thiago Huari
 
SCANIA SLIDE&APU-1.ppt
SCANIA SLIDE&APU-1.pptSCANIA SLIDE&APU-1.ppt
SCANIA SLIDE&APU-1.ppt
SauravkumarMallick1
 
Manaul de serviço cbr600 f(3) (2001~) manutenc
Manaul de serviço cbr600 f(3) (2001~) manutencManaul de serviço cbr600 f(3) (2001~) manutenc
Manaul de serviço cbr600 f(3) (2001~) manutencThiago Huari
 
2005 elelctrical component locator
2005 elelctrical component locator2005 elelctrical component locator
2005 elelctrical component locatorJeff Sparks
 
Brake & Suspension (1).pptx
Brake & Suspension (1).pptxBrake & Suspension (1).pptx
Brake & Suspension (1).pptx
MeghanNagvekar
 
Manual de serviço cg125 today cg125 titan cg125 cargo (1994) mskch941 p dia...
Manual de serviço cg125 today cg125 titan cg125 cargo (1994)   mskch941 p dia...Manual de serviço cg125 today cg125 titan cg125 cargo (1994)   mskch941 p dia...
Manual de serviço cg125 today cg125 titan cg125 cargo (1994) mskch941 p dia...
Thiago Huari
 
Manaul de serviço cbr600 f(2) (1998~2000) informac
Manaul de serviço cbr600 f(2) (1998~2000) informacManaul de serviço cbr600 f(2) (1998~2000) informac
Manaul de serviço cbr600 f(2) (1998~2000) informacThiago Huari
 
Manual de serviço xlx250 r (1986) mskb7861p-s supl xlx250r
Manual de serviço xlx250 r (1986)   mskb7861p-s supl xlx250rManual de serviço xlx250 r (1986)   mskb7861p-s supl xlx250r
Manual de serviço xlx250 r (1986) mskb7861p-s supl xlx250r
Thiago Huari
 
manual de taller ranger (ford) a partir del 2001
manual de taller ranger (ford) a partir del 2001manual de taller ranger (ford) a partir del 2001
manual de taller ranger (ford) a partir del 2001Alex Morales
 
Clark gcs standard forklift service repair manual
Clark gcs standard forklift service repair manualClark gcs standard forklift service repair manual
Clark gcs standard forklift service repair manual
fhsjejkdm
 
Manual serviço c 100 biz c-100 biz es c-100 biz+ (2002) - 00 x6b-gce-763 diag...
Manual serviço c 100 biz c-100 biz es c-100 biz+ (2002) - 00 x6b-gce-763 diag...Manual serviço c 100 biz c-100 biz es c-100 biz+ (2002) - 00 x6b-gce-763 diag...
Manual serviço c 100 biz c-100 biz es c-100 biz+ (2002) - 00 x6b-gce-763 diag...Thiago Huari
 

What's hot (20)

Manual reparacion Jeep Compass - Patriot Limited 2007-2009_Sunroof
Manual reparacion Jeep Compass - Patriot Limited 2007-2009_SunroofManual reparacion Jeep Compass - Patriot Limited 2007-2009_Sunroof
Manual reparacion Jeep Compass - Patriot Limited 2007-2009_Sunroof
 
Manual reparacion Jeep Compass - Patriot Limited 2007-2009_Front suspension
Manual reparacion Jeep Compass - Patriot Limited 2007-2009_Front suspensionManual reparacion Jeep Compass - Patriot Limited 2007-2009_Front suspension
Manual reparacion Jeep Compass - Patriot Limited 2007-2009_Front suspension
 
Manual de serviço cb450 diagrama
Manual de serviço cb450 diagramaManual de serviço cb450 diagrama
Manual de serviço cb450 diagrama
 
Manual: 2005 and Newer - LS2 LS3 Drive By EFI Wiring Harness
Manual: 2005 and Newer - LS2 LS3 Drive By EFI Wiring Harness Manual: 2005 and Newer - LS2 LS3 Drive By EFI Wiring Harness
Manual: 2005 and Newer - LS2 LS3 Drive By EFI Wiring Harness
 
2005 HONDA ACCORD Service Repair Manual
2005 HONDA ACCORD Service Repair Manual2005 HONDA ACCORD Service Repair Manual
2005 HONDA ACCORD Service Repair Manual
 
16M B9H1-750 Hydraulic Schematic.pdf
16M B9H1-750 Hydraulic Schematic.pdf16M B9H1-750 Hydraulic Schematic.pdf
16M B9H1-750 Hydraulic Schematic.pdf
 
Apostila arquivo imobilizador
Apostila arquivo imobilizadorApostila arquivo imobilizador
Apostila arquivo imobilizador
 
2001 hino fd series truck service repair manual
2001 hino fd series truck service repair manual2001 hino fd series truck service repair manual
2001 hino fd series truck service repair manual
 
Manual de serviço xl125 s (1984) ms437841pinformac
Manual de serviço xl125 s (1984)   ms437841pinformacManual de serviço xl125 s (1984)   ms437841pinformac
Manual de serviço xl125 s (1984) ms437841pinformac
 
SCANIA SLIDE&APU-1.ppt
SCANIA SLIDE&APU-1.pptSCANIA SLIDE&APU-1.ppt
SCANIA SLIDE&APU-1.ppt
 
Manaul de serviço cbr600 f(3) (2001~) manutenc
Manaul de serviço cbr600 f(3) (2001~) manutencManaul de serviço cbr600 f(3) (2001~) manutenc
Manaul de serviço cbr600 f(3) (2001~) manutenc
 
2005 elelctrical component locator
2005 elelctrical component locator2005 elelctrical component locator
2005 elelctrical component locator
 
Brake & Suspension (1).pptx
Brake & Suspension (1).pptxBrake & Suspension (1).pptx
Brake & Suspension (1).pptx
 
Manual de serviço cg125 today cg125 titan cg125 cargo (1994) mskch941 p dia...
Manual de serviço cg125 today cg125 titan cg125 cargo (1994)   mskch941 p dia...Manual de serviço cg125 today cg125 titan cg125 cargo (1994)   mskch941 p dia...
Manual de serviço cg125 today cg125 titan cg125 cargo (1994) mskch941 p dia...
 
Manaul de serviço cbr600 f(2) (1998~2000) informac
Manaul de serviço cbr600 f(2) (1998~2000) informacManaul de serviço cbr600 f(2) (1998~2000) informac
Manaul de serviço cbr600 f(2) (1998~2000) informac
 
Diagrama cummins
Diagrama cumminsDiagrama cummins
Diagrama cummins
 
Manual de serviço xlx250 r (1986) mskb7861p-s supl xlx250r
Manual de serviço xlx250 r (1986)   mskb7861p-s supl xlx250rManual de serviço xlx250 r (1986)   mskb7861p-s supl xlx250r
Manual de serviço xlx250 r (1986) mskb7861p-s supl xlx250r
 
manual de taller ranger (ford) a partir del 2001
manual de taller ranger (ford) a partir del 2001manual de taller ranger (ford) a partir del 2001
manual de taller ranger (ford) a partir del 2001
 
Clark gcs standard forklift service repair manual
Clark gcs standard forklift service repair manualClark gcs standard forklift service repair manual
Clark gcs standard forklift service repair manual
 
Manual serviço c 100 biz c-100 biz es c-100 biz+ (2002) - 00 x6b-gce-763 diag...
Manual serviço c 100 biz c-100 biz es c-100 biz+ (2002) - 00 x6b-gce-763 diag...Manual serviço c 100 biz c-100 biz es c-100 biz+ (2002) - 00 x6b-gce-763 diag...
Manual serviço c 100 biz c-100 biz es c-100 biz+ (2002) - 00 x6b-gce-763 diag...
 

Viewers also liked

Manual reparacion Jeep Compass - Patriot Limited 2007-2009_Wiper washer
Manual reparacion Jeep Compass - Patriot Limited 2007-2009_Wiper washerManual reparacion Jeep Compass - Patriot Limited 2007-2009_Wiper washer
Manual reparacion Jeep Compass - Patriot Limited 2007-2009_Wiper washer
Gustavo Castro
 
Manual reparacion Jeep Compass - Patriot Limited 2007-2009_Cabin air filter
Manual reparacion Jeep Compass - Patriot Limited 2007-2009_Cabin air filterManual reparacion Jeep Compass - Patriot Limited 2007-2009_Cabin air filter
Manual reparacion Jeep Compass - Patriot Limited 2007-2009_Cabin air filter
Gustavo Castro
 
Manual reparacion Jeep Compass - Patriot Limited 2007-2009_Cruise control
Manual reparacion Jeep Compass - Patriot Limited 2007-2009_Cruise controlManual reparacion Jeep Compass - Patriot Limited 2007-2009_Cruise control
Manual reparacion Jeep Compass - Patriot Limited 2007-2009_Cruise control
Gustavo Castro
 
MANUAL DE IMPLEMENTACIÓN PROGRAMA 5S
MANUAL DE IMPLEMENTACIÓN PROGRAMA 5S MANUAL DE IMPLEMENTACIÓN PROGRAMA 5S
MANUAL DE IMPLEMENTACIÓN PROGRAMA 5S
Gustavo Castro
 
Presentacion Final Arias Rosales T.G.I.
Presentacion Final Arias Rosales T.G.I.Presentacion Final Arias Rosales T.G.I.
Presentacion Final Arias Rosales T.G.I.
Jorge Enrique Arias Diaz
 
Modify elm327 to add the hs/ms can switch
Modify elm327 to add the hs/ms can switchModify elm327 to add the hs/ms can switch
Modify elm327 to add the hs/ms can switch
amysmyy
 
Catalogue jeep compass 2011 autoprestige-accessoires-4x4
Catalogue jeep compass 2011 autoprestige-accessoires-4x4Catalogue jeep compass 2011 autoprestige-accessoires-4x4
Catalogue jeep compass 2011 autoprestige-accessoires-4x4
autoprestige
 
DIA 2010 Presentation - Time To Make It Work
DIA 2010 Presentation -  Time To Make It WorkDIA 2010 Presentation -  Time To Make It Work
DIA 2010 Presentation - Time To Make It Work
Michael Myers
 
2010 jeep patriot installation with quicktime control
2010 jeep patriot installation with quicktime control2010 jeep patriot installation with quicktime control
2010 jeep patriot installation with quicktime controlbuttenob
 
Elm327
Elm327Elm327
Elm327
Chip Tuning
 
Elm327 at commands
Elm327 at commandsElm327 at commands
Elm327 at commands
Bill Zhao
 
LA CONVERSION DEL EUNUCO ETIOPE
LA CONVERSION DEL EUNUCO ETIOPELA CONVERSION DEL EUNUCO ETIOPE
LA CONVERSION DEL EUNUCO ETIOPEJulio Tellez
 
Wearable Computing - Part II: Sensors
Wearable Computing - Part II: SensorsWearable Computing - Part II: Sensors
Wearable Computing - Part II: Sensors
Daniel Roggen
 

Viewers also liked (15)

Manual reparacion Jeep Compass - Patriot Limited 2007-2009_Wiper washer
Manual reparacion Jeep Compass - Patriot Limited 2007-2009_Wiper washerManual reparacion Jeep Compass - Patriot Limited 2007-2009_Wiper washer
Manual reparacion Jeep Compass - Patriot Limited 2007-2009_Wiper washer
 
Manual reparacion Jeep Compass - Patriot Limited 2007-2009_Cabin air filter
Manual reparacion Jeep Compass - Patriot Limited 2007-2009_Cabin air filterManual reparacion Jeep Compass - Patriot Limited 2007-2009_Cabin air filter
Manual reparacion Jeep Compass - Patriot Limited 2007-2009_Cabin air filter
 
Manual reparacion Jeep Compass - Patriot Limited 2007-2009_Cruise control
Manual reparacion Jeep Compass - Patriot Limited 2007-2009_Cruise controlManual reparacion Jeep Compass - Patriot Limited 2007-2009_Cruise control
Manual reparacion Jeep Compass - Patriot Limited 2007-2009_Cruise control
 
MANUAL DE IMPLEMENTACIÓN PROGRAMA 5S
MANUAL DE IMPLEMENTACIÓN PROGRAMA 5S MANUAL DE IMPLEMENTACIÓN PROGRAMA 5S
MANUAL DE IMPLEMENTACIÓN PROGRAMA 5S
 
Cvt trdg
Cvt trdgCvt trdg
Cvt trdg
 
Presentacion Final Arias Rosales T.G.I.
Presentacion Final Arias Rosales T.G.I.Presentacion Final Arias Rosales T.G.I.
Presentacion Final Arias Rosales T.G.I.
 
Modify elm327 to add the hs/ms can switch
Modify elm327 to add the hs/ms can switchModify elm327 to add the hs/ms can switch
Modify elm327 to add the hs/ms can switch
 
Catalogue jeep compass 2011 autoprestige-accessoires-4x4
Catalogue jeep compass 2011 autoprestige-accessoires-4x4Catalogue jeep compass 2011 autoprestige-accessoires-4x4
Catalogue jeep compass 2011 autoprestige-accessoires-4x4
 
DIA 2010 Presentation - Time To Make It Work
DIA 2010 Presentation -  Time To Make It WorkDIA 2010 Presentation -  Time To Make It Work
DIA 2010 Presentation - Time To Make It Work
 
2010 jeep patriot installation with quicktime control
2010 jeep patriot installation with quicktime control2010 jeep patriot installation with quicktime control
2010 jeep patriot installation with quicktime control
 
Elm327
Elm327Elm327
Elm327
 
Elm327 at commands
Elm327 at commandsElm327 at commands
Elm327 at commands
 
Felipe y el etíope
Felipe y el etíopeFelipe y el etíope
Felipe y el etíope
 
LA CONVERSION DEL EUNUCO ETIOPE
LA CONVERSION DEL EUNUCO ETIOPELA CONVERSION DEL EUNUCO ETIOPE
LA CONVERSION DEL EUNUCO ETIOPE
 
Wearable Computing - Part II: Sensors
Wearable Computing - Part II: SensorsWearable Computing - Part II: Sensors
Wearable Computing - Part II: Sensors
 

Similar to Manual reparacion Jeep Compass - Patriot Limited 2007-2009_Transfer case

2001 ford windstar service repair manual
2001 ford windstar service repair manual2001 ford windstar service repair manual
2001 ford windstar service repair manual
fjskkedmmem
 
1999 FORD WINDSTAR Service Repair Manual
1999 FORD WINDSTAR Service Repair Manual1999 FORD WINDSTAR Service Repair Manual
1999 FORD WINDSTAR Service Repair Manual
局万 jdhnj
 
2003 FORD WINDSTAR Service Repair Manual
2003 FORD WINDSTAR Service Repair Manual2003 FORD WINDSTAR Service Repair Manual
2003 FORD WINDSTAR Service Repair Manual
jksnendmmd
 
1999 FORD WINDSTAR Service Repair Manual
1999 FORD WINDSTAR Service Repair Manual1999 FORD WINDSTAR Service Repair Manual
1999 FORD WINDSTAR Service Repair Manual
雨 微
 
1999 ford windstar service repair manual
1999 ford windstar service repair manual1999 ford windstar service repair manual
1999 ford windstar service repair manual
fsjekdmemmd
 
2003 ford windstar service repair manual
2003 ford windstar service repair manual2003 ford windstar service repair manual
2003 ford windstar service repair manual
fjskekdmmme
 
2000 ford windstar service repair manual
2000 ford windstar service repair manual2000 ford windstar service repair manual
2000 ford windstar service repair manual
fjskedmmem
 
2003 FORD WINDSTAR Service Repair Manual
2003 FORD WINDSTAR Service Repair Manual2003 FORD WINDSTAR Service Repair Manual
2003 FORD WINDSTAR Service Repair Manual
hdnjn kmdjm
 
2006 FORD EXPEDITION Service Repair Manual
2006 FORD EXPEDITION Service Repair Manual2006 FORD EXPEDITION Service Repair Manual
2006 FORD EXPEDITION Service Repair Manual
jhdnjdn sekjmd
 
2003 ford expedition service repair manual
2003 ford expedition service repair manual2003 ford expedition service repair manual
2003 ford expedition service repair manual
fsjekdmemmd
 
2004 ford expedition service repair manual
2004 ford expedition service repair manual2004 ford expedition service repair manual
2004 ford expedition service repair manual
fjseedcxkmdmme
 
2005 FORD EXPEDITION Service Repair Manual
2005 FORD EXPEDITION Service Repair Manual2005 FORD EXPEDITION Service Repair Manual
2005 FORD EXPEDITION Service Repair Manual
jhndkj sejnh
 
2004 ford expedition service repair manual
2004 ford expedition service repair manual2004 ford expedition service repair manual
2004 ford expedition service repair manual
fjskedmmem
 
2005 ford expedition service repair manual
2005 ford expedition service repair manual2005 ford expedition service repair manual
2005 ford expedition service repair manual
fjskkedmmem
 
326 CATERPILLAR EXCAVATOR SERVICE REPAIR MANUAL MFJ
326 CATERPILLAR EXCAVATOR SERVICE REPAIR MANUAL MFJ326 CATERPILLAR EXCAVATOR SERVICE REPAIR MANUAL MFJ
326 CATERPILLAR EXCAVATOR SERVICE REPAIR MANUAL MFJ
Manual Labs
 
2001 TOYOTA RAV4 Service Repair Manual
2001 TOYOTA RAV4 Service Repair Manual2001 TOYOTA RAV4 Service Repair Manual
2001 TOYOTA RAV4 Service Repair Manual
hsemmd sehkdmm
 
2004 toyota rav4 service repair manual
2004 toyota rav4 service repair manual2004 toyota rav4 service repair manual
2004 toyota rav4 service repair manual
jksnmdms
 
2003 toyota rav4 service repair manual
2003 toyota rav4 service repair manual2003 toyota rav4 service repair manual
2003 toyota rav4 service repair manual
jkmsedopl
 
2003 TOYOTA RAV4 Service Repair Manual
2003 TOYOTA RAV4 Service Repair Manual2003 TOYOTA RAV4 Service Repair Manual
2003 TOYOTA RAV4 Service Repair Manual
hjnskmdje
 
2005 toyota rav4 service repair manual
2005 toyota rav4 service repair manual2005 toyota rav4 service repair manual
2005 toyota rav4 service repair manual
jknsmmem
 

Similar to Manual reparacion Jeep Compass - Patriot Limited 2007-2009_Transfer case (20)

2001 ford windstar service repair manual
2001 ford windstar service repair manual2001 ford windstar service repair manual
2001 ford windstar service repair manual
 
1999 FORD WINDSTAR Service Repair Manual
1999 FORD WINDSTAR Service Repair Manual1999 FORD WINDSTAR Service Repair Manual
1999 FORD WINDSTAR Service Repair Manual
 
2003 FORD WINDSTAR Service Repair Manual
2003 FORD WINDSTAR Service Repair Manual2003 FORD WINDSTAR Service Repair Manual
2003 FORD WINDSTAR Service Repair Manual
 
1999 FORD WINDSTAR Service Repair Manual
1999 FORD WINDSTAR Service Repair Manual1999 FORD WINDSTAR Service Repair Manual
1999 FORD WINDSTAR Service Repair Manual
 
1999 ford windstar service repair manual
1999 ford windstar service repair manual1999 ford windstar service repair manual
1999 ford windstar service repair manual
 
2003 ford windstar service repair manual
2003 ford windstar service repair manual2003 ford windstar service repair manual
2003 ford windstar service repair manual
 
2000 ford windstar service repair manual
2000 ford windstar service repair manual2000 ford windstar service repair manual
2000 ford windstar service repair manual
 
2003 FORD WINDSTAR Service Repair Manual
2003 FORD WINDSTAR Service Repair Manual2003 FORD WINDSTAR Service Repair Manual
2003 FORD WINDSTAR Service Repair Manual
 
2006 FORD EXPEDITION Service Repair Manual
2006 FORD EXPEDITION Service Repair Manual2006 FORD EXPEDITION Service Repair Manual
2006 FORD EXPEDITION Service Repair Manual
 
2003 ford expedition service repair manual
2003 ford expedition service repair manual2003 ford expedition service repair manual
2003 ford expedition service repair manual
 
2004 ford expedition service repair manual
2004 ford expedition service repair manual2004 ford expedition service repair manual
2004 ford expedition service repair manual
 
2005 FORD EXPEDITION Service Repair Manual
2005 FORD EXPEDITION Service Repair Manual2005 FORD EXPEDITION Service Repair Manual
2005 FORD EXPEDITION Service Repair Manual
 
2004 ford expedition service repair manual
2004 ford expedition service repair manual2004 ford expedition service repair manual
2004 ford expedition service repair manual
 
2005 ford expedition service repair manual
2005 ford expedition service repair manual2005 ford expedition service repair manual
2005 ford expedition service repair manual
 
326 CATERPILLAR EXCAVATOR SERVICE REPAIR MANUAL MFJ
326 CATERPILLAR EXCAVATOR SERVICE REPAIR MANUAL MFJ326 CATERPILLAR EXCAVATOR SERVICE REPAIR MANUAL MFJ
326 CATERPILLAR EXCAVATOR SERVICE REPAIR MANUAL MFJ
 
2001 TOYOTA RAV4 Service Repair Manual
2001 TOYOTA RAV4 Service Repair Manual2001 TOYOTA RAV4 Service Repair Manual
2001 TOYOTA RAV4 Service Repair Manual
 
2004 toyota rav4 service repair manual
2004 toyota rav4 service repair manual2004 toyota rav4 service repair manual
2004 toyota rav4 service repair manual
 
2003 toyota rav4 service repair manual
2003 toyota rav4 service repair manual2003 toyota rav4 service repair manual
2003 toyota rav4 service repair manual
 
2003 TOYOTA RAV4 Service Repair Manual
2003 TOYOTA RAV4 Service Repair Manual2003 TOYOTA RAV4 Service Repair Manual
2003 TOYOTA RAV4 Service Repair Manual
 
2005 toyota rav4 service repair manual
2005 toyota rav4 service repair manual2005 toyota rav4 service repair manual
2005 toyota rav4 service repair manual
 

Recently uploaded

一比一原版(AUT毕业证)奥克兰理工大学毕业证成绩单如何办理
一比一原版(AUT毕业证)奥克兰理工大学毕业证成绩单如何办理一比一原版(AUT毕业证)奥克兰理工大学毕业证成绩单如何办理
一比一原版(AUT毕业证)奥克兰理工大学毕业证成绩单如何办理
mymwpc
 
Bài tập - Tiếng anh 11 Global Success UNIT 1 - Bản HS.doc
Bài tập - Tiếng anh 11 Global Success UNIT 1 - Bản HS.docBài tập - Tiếng anh 11 Global Success UNIT 1 - Bản HS.doc
Bài tập - Tiếng anh 11 Global Success UNIT 1 - Bản HS.doc
daothibichhang1
 
Wondering if Your Mercedes EIS is at Fault Here’s How to Tell
Wondering if Your Mercedes EIS is at Fault Here’s How to TellWondering if Your Mercedes EIS is at Fault Here’s How to Tell
Wondering if Your Mercedes EIS is at Fault Here’s How to Tell
Vic Auto Collision & Repair
 
Why Isn't Your BMW X5's Comfort Access Functioning Properly Find Out Here
Why Isn't Your BMW X5's Comfort Access Functioning Properly Find Out HereWhy Isn't Your BMW X5's Comfort Access Functioning Properly Find Out Here
Why Isn't Your BMW X5's Comfort Access Functioning Properly Find Out Here
Masters European & Gapanese Auto Repair
 
Ec330B Lc Excavator Volvo Service Repair.pdf
Ec330B Lc Excavator Volvo Service Repair.pdfEc330B Lc Excavator Volvo Service Repair.pdf
Ec330B Lc Excavator Volvo Service Repair.pdf
Excavator
 
一比一原版(AIS毕业证)奥克兰商学院毕业证成绩单如何办理
一比一原版(AIS毕业证)奥克兰商学院毕业证成绩单如何办理一比一原版(AIS毕业证)奥克兰商学院毕业证成绩单如何办理
一比一原版(AIS毕业证)奥克兰商学院毕业证成绩单如何办理
eygkup
 
Digital Fleet Management - Why Your Business Need It?
Digital Fleet Management - Why Your Business Need It?Digital Fleet Management - Why Your Business Need It?
Digital Fleet Management - Why Your Business Need It?
jennifermiller8137
 
Tyre Industrymarket overview with examples of CEAT
Tyre Industrymarket overview with examples of CEATTyre Industrymarket overview with examples of CEAT
Tyre Industrymarket overview with examples of CEAT
kshamashah95
 
gtyccccccccccccccccccccccccccccccccccccccccccccccccccccccc
gtycccccccccccccccccccccccccccccccccccccccccccccccccccccccgtyccccccccccccccccccccccccccccccccccccccccccccccccccccccc
gtyccccccccccccccccccccccccccccccccccccccccccccccccccccccc
4thzenzstar
 
Core technology of Hyundai Motor Group's EV platform 'E-GMP'
Core technology of Hyundai Motor Group's EV platform 'E-GMP'Core technology of Hyundai Motor Group's EV platform 'E-GMP'
Core technology of Hyundai Motor Group's EV platform 'E-GMP'
Hyundai Motor Group
 
What Causes 'Trans Failsafe Prog' to Trigger in BMW X5
What Causes 'Trans Failsafe Prog' to Trigger in BMW X5What Causes 'Trans Failsafe Prog' to Trigger in BMW X5
What Causes 'Trans Failsafe Prog' to Trigger in BMW X5
European Service Center
 
Ec460b lc Excavator Volvo Service Repair.pdf
Ec460b lc Excavator Volvo Service Repair.pdfEc460b lc Excavator Volvo Service Repair.pdf
Ec460b lc Excavator Volvo Service Repair.pdf
Excavator
 
Statistics5,c.xz,c.;c.;d.c;d;ssssss.pptx
Statistics5,c.xz,c.;c.;d.c;d;ssssss.pptxStatistics5,c.xz,c.;c.;d.c;d;ssssss.pptx
Statistics5,c.xz,c.;c.;d.c;d;ssssss.pptx
coc7987515756
 
What do the symbols on vehicle dashboard mean?
What do the symbols on vehicle dashboard mean?What do the symbols on vehicle dashboard mean?
What do the symbols on vehicle dashboard mean?
Hyundai Motor Group
 
Things to remember while upgrading the brakes of your car
Things to remember while upgrading the brakes of your carThings to remember while upgrading the brakes of your car
Things to remember while upgrading the brakes of your car
jennifermiller8137
 
What Exactly Is The Common Rail Direct Injection System & How Does It Work
What Exactly Is The Common Rail Direct Injection System & How Does It WorkWhat Exactly Is The Common Rail Direct Injection System & How Does It Work
What Exactly Is The Common Rail Direct Injection System & How Does It Work
Motor Cars International
 
Antique Plastic Traders Company Profile
Antique Plastic Traders Company ProfileAntique Plastic Traders Company Profile
Antique Plastic Traders Company Profile
Antique Plastic Traders
 
Empowering Limpopo Entrepreneurs Consulting SMEs.pptx
Empowering Limpopo Entrepreneurs  Consulting SMEs.pptxEmpowering Limpopo Entrepreneurs  Consulting SMEs.pptx
Empowering Limpopo Entrepreneurs Consulting SMEs.pptx
Precious Mvulane CA (SA),RA
 
5 Warning Signs Your BMW's Intelligent Battery Sensor Needs Attention
5 Warning Signs Your BMW's Intelligent Battery Sensor Needs Attention5 Warning Signs Your BMW's Intelligent Battery Sensor Needs Attention
5 Warning Signs Your BMW's Intelligent Battery Sensor Needs Attention
Bertini's German Motors
 
Why Is Your BMW X3 Hood Not Responding To Release Commands
Why Is Your BMW X3 Hood Not Responding To Release CommandsWhy Is Your BMW X3 Hood Not Responding To Release Commands
Why Is Your BMW X3 Hood Not Responding To Release Commands
Dart Auto
 

Recently uploaded (20)

一比一原版(AUT毕业证)奥克兰理工大学毕业证成绩单如何办理
一比一原版(AUT毕业证)奥克兰理工大学毕业证成绩单如何办理一比一原版(AUT毕业证)奥克兰理工大学毕业证成绩单如何办理
一比一原版(AUT毕业证)奥克兰理工大学毕业证成绩单如何办理
 
Bài tập - Tiếng anh 11 Global Success UNIT 1 - Bản HS.doc
Bài tập - Tiếng anh 11 Global Success UNIT 1 - Bản HS.docBài tập - Tiếng anh 11 Global Success UNIT 1 - Bản HS.doc
Bài tập - Tiếng anh 11 Global Success UNIT 1 - Bản HS.doc
 
Wondering if Your Mercedes EIS is at Fault Here’s How to Tell
Wondering if Your Mercedes EIS is at Fault Here’s How to TellWondering if Your Mercedes EIS is at Fault Here’s How to Tell
Wondering if Your Mercedes EIS is at Fault Here’s How to Tell
 
Why Isn't Your BMW X5's Comfort Access Functioning Properly Find Out Here
Why Isn't Your BMW X5's Comfort Access Functioning Properly Find Out HereWhy Isn't Your BMW X5's Comfort Access Functioning Properly Find Out Here
Why Isn't Your BMW X5's Comfort Access Functioning Properly Find Out Here
 
Ec330B Lc Excavator Volvo Service Repair.pdf
Ec330B Lc Excavator Volvo Service Repair.pdfEc330B Lc Excavator Volvo Service Repair.pdf
Ec330B Lc Excavator Volvo Service Repair.pdf
 
一比一原版(AIS毕业证)奥克兰商学院毕业证成绩单如何办理
一比一原版(AIS毕业证)奥克兰商学院毕业证成绩单如何办理一比一原版(AIS毕业证)奥克兰商学院毕业证成绩单如何办理
一比一原版(AIS毕业证)奥克兰商学院毕业证成绩单如何办理
 
Digital Fleet Management - Why Your Business Need It?
Digital Fleet Management - Why Your Business Need It?Digital Fleet Management - Why Your Business Need It?
Digital Fleet Management - Why Your Business Need It?
 
Tyre Industrymarket overview with examples of CEAT
Tyre Industrymarket overview with examples of CEATTyre Industrymarket overview with examples of CEAT
Tyre Industrymarket overview with examples of CEAT
 
gtyccccccccccccccccccccccccccccccccccccccccccccccccccccccc
gtycccccccccccccccccccccccccccccccccccccccccccccccccccccccgtyccccccccccccccccccccccccccccccccccccccccccccccccccccccc
gtyccccccccccccccccccccccccccccccccccccccccccccccccccccccc
 
Core technology of Hyundai Motor Group's EV platform 'E-GMP'
Core technology of Hyundai Motor Group's EV platform 'E-GMP'Core technology of Hyundai Motor Group's EV platform 'E-GMP'
Core technology of Hyundai Motor Group's EV platform 'E-GMP'
 
What Causes 'Trans Failsafe Prog' to Trigger in BMW X5
What Causes 'Trans Failsafe Prog' to Trigger in BMW X5What Causes 'Trans Failsafe Prog' to Trigger in BMW X5
What Causes 'Trans Failsafe Prog' to Trigger in BMW X5
 
Ec460b lc Excavator Volvo Service Repair.pdf
Ec460b lc Excavator Volvo Service Repair.pdfEc460b lc Excavator Volvo Service Repair.pdf
Ec460b lc Excavator Volvo Service Repair.pdf
 
Statistics5,c.xz,c.;c.;d.c;d;ssssss.pptx
Statistics5,c.xz,c.;c.;d.c;d;ssssss.pptxStatistics5,c.xz,c.;c.;d.c;d;ssssss.pptx
Statistics5,c.xz,c.;c.;d.c;d;ssssss.pptx
 
What do the symbols on vehicle dashboard mean?
What do the symbols on vehicle dashboard mean?What do the symbols on vehicle dashboard mean?
What do the symbols on vehicle dashboard mean?
 
Things to remember while upgrading the brakes of your car
Things to remember while upgrading the brakes of your carThings to remember while upgrading the brakes of your car
Things to remember while upgrading the brakes of your car
 
What Exactly Is The Common Rail Direct Injection System & How Does It Work
What Exactly Is The Common Rail Direct Injection System & How Does It WorkWhat Exactly Is The Common Rail Direct Injection System & How Does It Work
What Exactly Is The Common Rail Direct Injection System & How Does It Work
 
Antique Plastic Traders Company Profile
Antique Plastic Traders Company ProfileAntique Plastic Traders Company Profile
Antique Plastic Traders Company Profile
 
Empowering Limpopo Entrepreneurs Consulting SMEs.pptx
Empowering Limpopo Entrepreneurs  Consulting SMEs.pptxEmpowering Limpopo Entrepreneurs  Consulting SMEs.pptx
Empowering Limpopo Entrepreneurs Consulting SMEs.pptx
 
5 Warning Signs Your BMW's Intelligent Battery Sensor Needs Attention
5 Warning Signs Your BMW's Intelligent Battery Sensor Needs Attention5 Warning Signs Your BMW's Intelligent Battery Sensor Needs Attention
5 Warning Signs Your BMW's Intelligent Battery Sensor Needs Attention
 
Why Is Your BMW X3 Hood Not Responding To Release Commands
Why Is Your BMW X3 Hood Not Responding To Release CommandsWhy Is Your BMW X3 Hood Not Responding To Release Commands
Why Is Your BMW X3 Hood Not Responding To Release Commands
 

Manual reparacion Jeep Compass - Patriot Limited 2007-2009_Transfer case

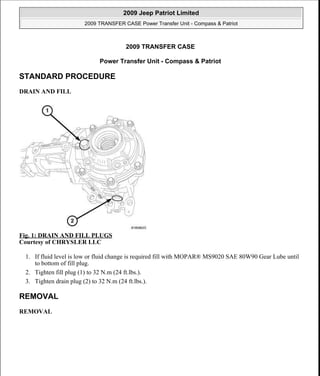
  • 1. 2009 TRANSFER CASE Power Transfer Unit - Compass & Patriot STANDARD PROCEDURE DRAIN AND FILL Fig. 1: DRAIN AND FILL PLUGS Courtesy of CHRYSLER LLC 1. If fluid level is low or fluid change is required fill with MOPAR® MS9020 SAE 80W90 Gear Lube until to bottom of fill plug. 2. Tighten fill plug (1) to 32 N.m (24 ft.lbs.). 3. Tighten drain plug (2) to 32 N.m (24 ft.lbs.). REMOVAL REMOVAL 2009 Jeep Patriot Limited 2009 TRANSFER CASE Power Transfer Unit - Compass & Patriot 2009 Jeep Patriot Limited 2009 TRANSFER CASE Power Transfer Unit - Compass & Patriot a Saturday, September 08, 2012 2:16:38 PM Page 1 © 2006 Mitchell Repair Information Company, LLC. a Saturday, September 08, 2012 2:16:41 PM Page 1 © 2006 Mitchell Repair Information Company, LLC.
  • 2. Fig. 2: AIR CLEANER ASSEMBLY Courtesy of CHRYSLER LLC 1. Disconnect negative battery cable (2). 2. Remove the engine trim cover. 3. Remove air cleaner assembly (1). 4. Remove Power Distribution Center (PDC) from bracket. 5. Raise the vehicle on the hoist. 6. Remove front halfshafts. Refer to Differential and Driveline/Half Shaft - Removal . 2009 Jeep Patriot Limited 2009 TRANSFER CASE Power Transfer Unit - Compass & Patriot a Saturday, September 08, 2012 2:16:38 PM Page 2 © 2006 Mitchell Repair Information Company, LLC.
  • 3. Fig. 3: PTU DRAIN - FILL PLUGS Courtesy of CHRYSLER LLC 7. Remove drain plug (2) at PTU and allow fluid to drain. 8. Reinstall drain plug. Fig. 4: MARK PROP SHAFT Courtesy of CHRYSLER LLC 9. Mark (2) prop shaft and differential (3) for proper installation. 2009 Jeep Patriot Limited 2009 TRANSFER CASE Power Transfer Unit - Compass & Patriot a Saturday, September 08, 2012 2:16:38 PM Page 3 © 2006 Mitchell Repair Information Company, LLC.
  • 4. 10. Remove the rear prop shaft. Refer to Differential and Driveline/Propeller Shaft - Removal . Fig. 5: EXHAUST TO MANIVERTER BOLTS Courtesy of CHRYSLER LLC 11. Remove the two exhaust to maniverter (exhaust manifold with catalytic converter) bolts (1). 12. Unplug the downstream O2 sensor connector. 13. Remove the exhaust system. Refer to Exhaust System/MUFFLER, Exhaust - Removal . 14. Lower the vehicle on the hoist. 15. Unplug the upstream O2 sensor connector. 2009 Jeep Patriot Limited 2009 TRANSFER CASE Power Transfer Unit - Compass & Patriot a Saturday, September 08, 2012 2:16:38 PM Page 4 © 2006 Mitchell Repair Information Company, LLC.
  • 5. Fig. 6: USE O2 SENSOR TOOL - 8439 Courtesy of CHRYSLER LLC 16. Remove upstream O2 sensor from the maniverter (exhaust manifold with catalytic converter) using O2s (Oxygen Sensor) Remover/Installer 8439 (2). Fig. 7: MANIVERTER HEAT SHIELD AND BOLTS Courtesy of CHRYSLER LLC 17. Remove the four maniverter heat shield bolts (1). 2009 Jeep Patriot Limited 2009 TRANSFER CASE Power Transfer Unit - Compass & Patriot a Saturday, September 08, 2012 2:16:38 PM Page 5 © 2006 Mitchell Repair Information Company, LLC.
  • 6. Fig. 8: MANIVERTER SIDE HEAT SHIELD Courtesy of CHRYSLER LLC 18. Remove the two retaining bolts (2) and one nut (1) from the maniverter side heat shield (3). Fig. 9: SUPPORT MANIVERTER Courtesy of CHRYSLER LLC 19. Remove the seven maniverter to head retaining bolts. 20. Slide the maniverter up and to the right, support the maniverter (1) with the help of a bungie cord. 2009 Jeep Patriot Limited 2009 TRANSFER CASE Power Transfer Unit - Compass & Patriot a Saturday, September 08, 2012 2:16:38 PM Page 6 © 2006 Mitchell Repair Information Company, LLC.
  • 7. Fig. 10: MANIVERTER TO BLOCK SUPPORT BRACKET Courtesy of CHRYSLER LLC 21. Raise the vehicle on the hoist. 22. Remove the four (1) engine to maniverter bracket bolts. Fig. 11: REAR ENGINE MOUNT Courtesy of CHRYSLER LLC 23. Remove the rear engine mount through bolt (2). 2009 Jeep Patriot Limited 2009 TRANSFER CASE Power Transfer Unit - Compass & Patriot a Saturday, September 08, 2012 2:16:38 PM Page 7 © 2006 Mitchell Repair Information Company, LLC.
  • 8. 24. Remove the three front engine mount to frame bolts and the mount through bolt. Fig. 12: PTU MOUNTING BOLTS Courtesy of CHRYSLER LLC 25. Remove the PTU mounting bolts (1, 2). Fig. 13: JACK AT TRANS MOUNT Courtesy of CHRYSLER LLC 2009 Jeep Patriot Limited 2009 TRANSFER CASE Power Transfer Unit - Compass & Patriot a Saturday, September 08, 2012 2:16:38 PM Page 8 © 2006 Mitchell Repair Information Company, LLC.
  • 9. 26. Install a screw jack (2) on front engine mount bracket (1). Fig. 14: REAR MOUNT PTU BOLTS Courtesy of CHRYSLER LLC 27. Raise the front of the engine until the rear mount has dropped (1, 2). 28. Separate the PTU from the transaxle. 29. Remove and discard old O-ring between Transmission and PTU. 2009 Jeep Patriot Limited 2009 TRANSFER CASE Power Transfer Unit - Compass & Patriot a Saturday, September 08, 2012 2:16:38 PM Page 9 © 2006 Mitchell Repair Information Company, LLC.
  • 10. Fig. 15: REMOVE - INSTALL PTU Courtesy of CHRYSLER LLC 30. Roll the PTU (1) forward and down to remove. DISASSEMBLY DISASSEMBLY Fig. 16: EXTENSION AND PINION HOUSING BOLT Courtesy of CHRYSLER LLC 1. Remove extension housing bolts. 2009 Jeep Patriot Limited 2009 TRANSFER CASE Power Transfer Unit - Compass & Patriot a Saturday, September 08, 2012 2:16:38 PM Page 10 © 2006 Mitchell Repair Information Company, LLC.
  • 11. Fig. 17: EXTENSION HOUSING O-RING Courtesy of CHRYSLER LLC 2. Remove the extension housing. 3. Remove the extension housing O-ring. Fig. 18: DUST SHIELD OFF PTU Courtesy of CHRYSLER LLC 4. Using a chisel (2) remove the dust shield (1) from the extension housing (3). 2009 Jeep Patriot Limited 2009 TRANSFER CASE Power Transfer Unit - Compass & Patriot a Saturday, September 08, 2012 2:16:38 PM Page 11 © 2006 Mitchell Repair Information Company, LLC.
  • 12. Fig. 19: EXTENSION AND PINION HOUSING BOLT Courtesy of CHRYSLER LLC 5. Remove the pinion housing bolts. Fig. 20: PINION HOUSING Courtesy of CHRYSLER LLC 6. Remove the pinion housing. 2009 Jeep Patriot Limited 2009 TRANSFER CASE Power Transfer Unit - Compass & Patriot a Saturday, September 08, 2012 2:16:38 PM Page 12 © 2006 Mitchell Repair Information Company, LLC.
  • 13. Fig. 21: PINION HOUSING SHIM Courtesy of CHRYSLER LLC 7. Remove the pinion housing shim. 8. Remove the pinion housing O-ring. Fig. 22: PINION SHAFT NUT Courtesy of CHRYSLER LLC NOTE: The pinion nut is a staked type nut. 2009 Jeep Patriot Limited 2009 TRANSFER CASE Power Transfer Unit - Compass & Patriot a Saturday, September 08, 2012 2:16:38 PM Page 13 © 2006 Mitchell Repair Information Company, LLC.
  • 14. 9. Using a chisel or a grinder, remove the staked depression in the pinion nut. Fig. 23: REMOVE PINION NUT Courtesy of CHRYSLER LLC 10. Remove the output shaft nut, using the Output Shaft Nut Socket 9921 and Spline Socket 9922. Fig. 24: PRESS PINION Courtesy of CHRYSLER LLC 2009 Jeep Patriot Limited 2009 TRANSFER CASE Power Transfer Unit - Compass & Patriot a Saturday, September 08, 2012 2:16:38 PM Page 14 © 2006 Mitchell Repair Information Company, LLC.
  • 15. 11. Press the output shaft from the housing using a press. Fig. 25: PINION SHAFT SPACER Courtesy of CHRYSLER LLC 12. Remove the output shaft spacer. Fig. 26: PINION SHAFT BEARING. Courtesy of CHRYSLER LLC 2009 Jeep Patriot Limited 2009 TRANSFER CASE Power Transfer Unit - Compass & Patriot a Saturday, September 08, 2012 2:16:38 PM Page 15 © 2006 Mitchell Repair Information Company, LLC.
  • 16. 13. Remove the output shaft bearing. Fig. 27: REMOVE SMALL SIDE BEARING CUP PINION HOUSING Courtesy of CHRYSLER LLC 14. Remove the output shaft housing small side bearing cup using a brass drift. Fig. 28: REMOVE LARGE SIDE BEARING CUP PINION HOUSING Courtesy of CHRYSLER LLC 2009 Jeep Patriot Limited 2009 TRANSFER CASE Power Transfer Unit - Compass & Patriot a Saturday, September 08, 2012 2:16:38 PM Page 16 © 2006 Mitchell Repair Information Company, LLC.
  • 17. 15. Remove the output shaft housing large side bearing cup using a brass drift. Fig. 29: PULL PINION HEAD BEARING Courtesy of CHRYSLER LLC 16. Install Puller 6444 and Jaws 6451 onto output shaft head bearing. 17. Place Puller in a vice and remove the bearing. Fig. 30: INSPECTION COVER Courtesy of CHRYSLER LLC 2009 Jeep Patriot Limited 2009 TRANSFER CASE Power Transfer Unit - Compass & Patriot a Saturday, September 08, 2012 2:16:38 PM Page 17 © 2006 Mitchell Repair Information Company, LLC.
  • 18. 18. Remove the inspection cover bolts (1). Fig. 31: REMOVE INSPECTION COVER Courtesy of CHRYSLER LLC 19. Remove the inspection cover. Fig. 32: SIDE COVER Courtesy of CHRYSLER LLC 2009 Jeep Patriot Limited 2009 TRANSFER CASE Power Transfer Unit - Compass & Patriot a Saturday, September 08, 2012 2:16:38 PM Page 18 © 2006 Mitchell Repair Information Company, LLC.
  • 19. 20. Remove the side cover bolts (1). Fig. 33: REMOVE SIDE COVER. Courtesy of CHRYSLER LLC 21. Remove the side cover from case. Fig. 34: CARRIER Courtesy of CHRYSLER LLC 22. Remove the carrier assembly. 2009 Jeep Patriot Limited 2009 TRANSFER CASE Power Transfer Unit - Compass & Patriot a Saturday, September 08, 2012 2:16:38 PM Page 19 © 2006 Mitchell Repair Information Company, LLC.
  • 20. Fig. 35: CARRIER BEARING CUP AND SEAL. Courtesy of CHRYSLER LLC 23. Remove bearing cup by hand (1) or by using a pick. Fig. 36: COVER SIDE CUP AND SHIM Courtesy of CHRYSLER LLC 24. Remove the shim (1) under the bearing cup (3). Measure and record the size of the shim. NOTE: Bearing cup is a slip fit. 2009 Jeep Patriot Limited 2009 TRANSFER CASE Power Transfer Unit - Compass & Patriot a Saturday, September 08, 2012 2:16:38 PM Page 20 © 2006 Mitchell Repair Information Company, LLC.
  • 21. Fig. 37: INNER COVER SEAL Courtesy of CHRYSLER LLC 25. Remove the inner seal from the PTU cover. 26. Remove the outer seal from the PTU cover. Fig. 38: CARRIER RACE HOUSING SIDE Courtesy of CHRYSLER LLC 27. Remove bearing cup by hand (1) or by using a pick. 2009 Jeep Patriot Limited 2009 TRANSFER CASE Power Transfer Unit - Compass & Patriot a Saturday, September 08, 2012 2:16:38 PM Page 21 © 2006 Mitchell Repair Information Company, LLC.
  • 22. 28. Remove the shim (3) under the bearing cup (1). Measure and record the size of the shim. Fig. 39: CARRIER CASE SEAL. Courtesy of CHRYSLER LLC 29. Remove the carrier case seal. Fig. 40: RING GEAR BOLTS Courtesy of CHRYSLER LLC 2009 Jeep Patriot Limited 2009 TRANSFER CASE Power Transfer Unit - Compass & Patriot a Saturday, September 08, 2012 2:16:38 PM Page 22 © 2006 Mitchell Repair Information Company, LLC.
  • 23. 30. Remove the ring gear bolts. Fig. 41: RING GEAR Courtesy of CHRYSLER LLC 31. Remove the ring gear. Fig. 42: REMOVE DIFFERENTIAL SIDE BEARING Courtesy of CHRYSLER LLC 2009 Jeep Patriot Limited 2009 TRANSFER CASE Power Transfer Unit - Compass & Patriot a Saturday, September 08, 2012 2:16:38 PM Page 23 © 2006 Mitchell Repair Information Company, LLC.
  • 24. 32. Remove ring gear side bearing using Puller C-293-PA, Inserts C-293-37 and Insert C-4487-1. Fig. 43: REMOVE OUTPUT SIDE BEARING Courtesy of CHRYSLER LLC 33. Remove output side bearing using Puller C-293-PA, Inserts C-293-37 and Insert C-4487-1. ASSEMBLY ASSEMBLY 2009 Jeep Patriot Limited 2009 TRANSFER CASE Power Transfer Unit - Compass & Patriot a Saturday, September 08, 2012 2:16:38 PM Page 24 © 2006 Mitchell Repair Information Company, LLC.
  • 25. Fig. 44: SPOOL SHAFT OUTPUT SIDE BEARING Courtesy of CHRYSLER LLC 1. Install output side spool shaft bearing using Installer C-3095-A. Fig. 45: SPOOL SHAFT RING GEAR SIDE BEARING Courtesy of CHRYSLER LLC 2. Install ring gear side bearing using Installer 8148. 2009 Jeep Patriot Limited 2009 TRANSFER CASE Power Transfer Unit - Compass & Patriot a Saturday, September 08, 2012 2:16:38 PM Page 25 © 2006 Mitchell Repair Information Company, LLC.
  • 26. Fig. 46: RING GEAR Courtesy of CHRYSLER LLC 3. Install the ring gear. Fig. 47: RING GEAR BOLTS Courtesy of CHRYSLER LLC 4. Install the new ring gear bolts and tighten to 74 N.m (55 ft. lbs.). 2009 Jeep Patriot Limited 2009 TRANSFER CASE Power Transfer Unit - Compass & Patriot a Saturday, September 08, 2012 2:16:38 PM Page 26 © 2006 Mitchell Repair Information Company, LLC.
  • 27. Fig. 48: INSTALL CARRIER CASE SEAL Courtesy of CHRYSLER LLC 5. Install the carrier case seal using Installer 9851 and Handle C- 4171. Fig. 49: CARRIER RACE HOUSING SIDE Courtesy of CHRYSLER LLC 6. Install the shim (3) under the bearing cup (1) in the case side. 7. Install the bearing cup by hand. 2009 Jeep Patriot Limited 2009 TRANSFER CASE Power Transfer Unit - Compass & Patriot a Saturday, September 08, 2012 2:16:38 PM Page 27 © 2006 Mitchell Repair Information Company, LLC.
  • 28. Fig. 50: INSTALL CARRIER COVER INNER SEAL Courtesy of CHRYSLER LLC 8. Install the inner seal into the PTU cover using Installer 9852 and Handle C-4171. Fig. 51: INSTALL CARRIER COVER OUTER SEAL Courtesy of CHRYSLER LLC 9. Install the outer seal into the PTU cover using Installer 9853 and Handle C-4171. 2009 Jeep Patriot Limited 2009 TRANSFER CASE Power Transfer Unit - Compass & Patriot a Saturday, September 08, 2012 2:16:38 PM Page 28 © 2006 Mitchell Repair Information Company, LLC.
  • 29. Fig. 52: COVER SIDE CUP AND SHIM Courtesy of CHRYSLER LLC 10. Install the shim (1) under the bearing cup (3). 11. Install bearing cup by hand (3). Fig. 53: SIDE COVER Courtesy of CHRYSLER LLC 12. Install the carrier assembly into the case 2009 Jeep Patriot Limited 2009 TRANSFER CASE Power Transfer Unit - Compass & Patriot a Saturday, September 08, 2012 2:16:38 PM Page 29 © 2006 Mitchell Repair Information Company, LLC.
  • 30. 13. Install the side cover 14. Tighten side cover bolts (1) to 23 N.m (17 ft. lbs.). Fig. 54: INSTALL PINION HEAD BEARING Courtesy of CHRYSLER LLC 15. Install the output shaft head bearing on to the pinion shaft using Installer 9714 and a Press. Fig. 55: INSTALL PINION HEAD BEARING CUP Courtesy of CHRYSLER LLC 2009 Jeep Patriot Limited 2009 TRANSFER CASE Power Transfer Unit - Compass & Patriot a Saturday, September 08, 2012 2:16:38 PM Page 30 © 2006 Mitchell Repair Information Company, LLC.
  • 31. 16. Install the output shaft head bearing cup using Installer 6061 and Handle C-4171. Fig. 56: OUTPUT SHAFT TAIL BEARING CUP Courtesy of CHRYSLER LLC 17. Install the output shaft tail bearing cup using Installer 9855 and Handle C-4171. Fig. 57: PINION SHAFT SPACER Courtesy of CHRYSLER LLC 2009 Jeep Patriot Limited 2009 TRANSFER CASE Power Transfer Unit - Compass & Patriot a Saturday, September 08, 2012 2:16:38 PM Page 31 © 2006 Mitchell Repair Information Company, LLC.
  • 32. 18. Install the output shaft spacer onto the output shaft. Fig. 58: OUTPUT SHAFT TAIL BEARING Courtesy of CHRYSLER LLC 19. Install output shaft into output shaft housing. 20. Install output shaft tail bearing on to out put shaft using Installer L-4411. Fig. 59: OUTPUT SHAFT NUT Courtesy of CHRYSLER LLC 2009 Jeep Patriot Limited 2009 TRANSFER CASE Power Transfer Unit - Compass & Patriot a Saturday, September 08, 2012 2:16:38 PM Page 32 © 2006 Mitchell Repair Information Company, LLC.
  • 33. 21. Install the output shaft nut (1) onto the output shaft (2). Fig. 60: INSTALL PINION NUT Courtesy of CHRYSLER LLC 22. Tighten the output shaft nut using Pinion Nut Socket 9921 to 150 N.m (111 ft. lbs.). 23. Using an inch pound torque wrench check and Pinion Nut Socket 9921 (1) check the rotating torque, it should be 30 in. lbs. Add 0.002 in. larger shim to increase rotating torque and add 0.002 in. smaller shim to decrease rotating torque. Repeat until proper turning torque is obtained. 24. Using a punch stake the output shaft nut. NOTE: The output shaft nut is a staked type nut. 2009 Jeep Patriot Limited 2009 TRANSFER CASE Power Transfer Unit - Compass & Patriot a Saturday, September 08, 2012 2:16:38 PM Page 33 © 2006 Mitchell Repair Information Company, LLC.
  • 34. Fig. 61: PINION HOUSING SHIM Courtesy of CHRYSLER LLC 25. Install the pinion housing O-ring (3). 26. Install the pinion housing shim (1). Fig. 62: PINION SHAFT SEAL Courtesy of CHRYSLER LLC 27. Install the output shaft seal using Installer 9851 and Handle C-4171. 2009 Jeep Patriot Limited 2009 TRANSFER CASE Power Transfer Unit - Compass & Patriot a Saturday, September 08, 2012 2:16:38 PM Page 34 © 2006 Mitchell Repair Information Company, LLC.
  • 35. Fig. 63: EXTENSION HOUSING O-RING Courtesy of CHRYSLER LLC 28. Install a new extension housing O-ring. Fig. 64: PINION HOUSING Courtesy of CHRYSLER LLC 29. Install the output shaft housing and bolts onto the carrier housing. 30. Apply pattern check grease to the ring gear. 2009 Jeep Patriot Limited 2009 TRANSFER CASE Power Transfer Unit - Compass & Patriot a Saturday, September 08, 2012 2:16:38 PM Page 35 © 2006 Mitchell Repair Information Company, LLC.
  • 36. Fig. 65: DUST SHIELD ON PTU Courtesy of CHRYSLER LLC 31. Using a block of wood (2) install the dust shield (3) onto the extension housing (1). Fig. 66: EXTENSION AND PINION HOUSING BOLT Courtesy of CHRYSLER LLC 32. Install the extension housing and bolts. 33. Tighten output shaft housing bolts to 38 N.m (28 ft. lbs.). 2009 Jeep Patriot Limited 2009 TRANSFER CASE Power Transfer Unit - Compass & Patriot a Saturday, September 08, 2012 2:16:38 PM Page 36 © 2006 Mitchell Repair Information Company, LLC.
  • 37. 34. Tighten the extension housing bolts to 38 N.m (28 ft. lbs.). Fig. 67: VENT Courtesy of CHRYSLER LLC 35. Clean cover and apply MOPAR® axle RTV or equivalent. 36. Install the vent and bolts, tighten the bolts to 23 N.m (17 ft. lbs.). Fig. 68: VENT SHIELD Courtesy of CHRYSLER LLC 2009 Jeep Patriot Limited 2009 TRANSFER CASE Power Transfer Unit - Compass & Patriot a Saturday, September 08, 2012 2:16:38 PM Page 37 © 2006 Mitchell Repair Information Company, LLC.
  • 38. 37. Install the vent shield and bolts. tighten the bolts to 23 N.m (17 ft. lbs.). Fig. 69: INSPECTION COVER Courtesy of CHRYSLER LLC 38. Clean cover and apply MOPAR® axle RTV. 39. Apply MOPAR® lock AND seal adhesive or equivalent to bolts. 40. Install the inspection cover and bolts. tighten the bolts to 23 N.m (17 ft. lbs.). 41. Fill the PTU. See Transmission and Transfer Case/Power Transfer Unit - Standard Procedure. INSTALLATION INSTALLATION 2009 Jeep Patriot Limited 2009 TRANSFER CASE Power Transfer Unit - Compass & Patriot a Saturday, September 08, 2012 2:16:38 PM Page 38 © 2006 Mitchell Repair Information Company, LLC.
  • 39. Fig. 70: REMOVE - INSTALL PTU Courtesy of CHRYSLER LLC 1. Roll the PTU in, moving from front to back (1) . Fig. 71: PTU INSTALL Courtesy of CHRYSLER LLC 2. Rest the PTU (1) on the frame (3) while the engine and transaxle (2) are raised back into position. 2009 Jeep Patriot Limited 2009 TRANSFER CASE Power Transfer Unit - Compass & Patriot a Saturday, September 08, 2012 2:16:38 PM Page 39 © 2006 Mitchell Repair Information Company, LLC.
  • 40. Fig. 72: JACK AT TRANS MOUNT Courtesy of CHRYSLER LLC 3. Lower screw jack (2) until rear mount through bolt can be installed. Fig. 73: REAR ENGINE MOUNT Courtesy of CHRYSLER LLC 4. Install rear mount through bolt (2) and tighten bolt to 75 Nm (55 ft. lbs.). 2009 Jeep Patriot Limited 2009 TRANSFER CASE Power Transfer Unit - Compass & Patriot a Saturday, September 08, 2012 2:16:38 PM Page 40 © 2006 Mitchell Repair Information Company, LLC.
  • 41. Fig. 74: FRONT ENGINE MOUNT Courtesy of CHRYSLER LLC 5. Install the transmission crossmember and bolts, (2) tighten to 75 Nm (55 ft. lbs.). 6. Install the through bolt at the front transmission mount (1) and tighten to 75 Nm (55 ft. lbs.). Fig. 75: PTU O-RING Courtesy of CHRYSLER LLC NOTE: STICKING THE O-RING WITH VASELINE OR TRANS ASSEMBLY GREASE 2009 Jeep Patriot Limited 2009 TRANSFER CASE Power Transfer Unit - Compass & Patriot a Saturday, September 08, 2012 2:16:38 PM Page 41 © 2006 Mitchell Repair Information Company, LLC.
  • 42. 7. Insure that the O-ring (1) between the PTU and transaxle is in place. Fig. 76: PTU MOUNTING BOLTS Courtesy of CHRYSLER LLC 8. Slide the PTU into place. 9. Install and tighten the PTU mounting bolts (1,2) to 58 N.m (43ft. lbs.). 10. Lower the hoist. 11. Install the maniverter. Refer to Exhaust System/CONVERTER, Catalytic - Installation . IS RECOMMENDED. 2009 Jeep Patriot Limited 2009 TRANSFER CASE Power Transfer Unit - Compass & Patriot a Saturday, September 08, 2012 2:16:38 PM Page 42 © 2006 Mitchell Repair Information Company, LLC.
  • 43. Fig. 77: AIR CLEANER ASSEMBLY Courtesy of CHRYSLER LLC 12. Install the air box (1). 13. Install engine trim cover. 14. Raise the vehicle on the hoist. 15. Install the exhaust system. Refer to Exhaust System/MUFFLER, Exhaust - Installation . 16. Install the Prop shaft. Refer to Differential and Driveline/Propeller Shaft - Installation . 17. Install the axle shafts. Refer to Differential and Driveline/Half Shaft - Installation . 18. Fill PTU. See Transmission and Transfer Case/Power Transfer Unit - Standard Procedure. 19. Lower hoist. 20. Connect battery cables (2). 21. Top off the fluids. See Transmission and Transfer Case/Power Transfer Unit - Standard Procedure. SPECIFICATIONS TORQUE TORQUE DESCRIPTION N.m Ft. Lbs. In. Lbs. Plug, Fill 32 24 - Plug, Drain 32 24 - Bolts, Inspection cover 23 17 - Bolts, Vent Shield 23 17 - Bolts, Vent 23 17 - 2009 Jeep Patriot Limited 2009 TRANSFER CASE Power Transfer Unit - Compass & Patriot a Saturday, September 08, 2012 2:16:38 PM Page 43 © 2006 Mitchell Repair Information Company, LLC.
  • 44. SPECIAL TOOLS SPECIAL TOOLS Fig. 78: TRAK-LOK AXLE TOOL - C-4487 Courtesy of CHRYSLER LLC Fig. 79: INSTALLER, CUP - 6061 Courtesy of CHRYSLER LLC Bolts, Output Shaft Housing 38 28 - Bolts, extension housing 38 28 - Nut, Output Shaft 150 111 - Bolts, Carrier Assembly Side Cover 23 17 - Bolts, Ring Gear 74 55 - Bolt and Nut, Rear Mount Through 75 55 - Bolts, Transmission Crossmember 75 55 - Bolt and Nut, Transmission Crossmember through 75 55 - Bolts, PTU Mounting 58 43 - 2009 Jeep Patriot Limited 2009 TRANSFER CASE Power Transfer Unit - Compass & Patriot a Saturday, September 08, 2012 2:16:38 PM Page 44 © 2006 Mitchell Repair Information Company, LLC.
  • 45. Fig. 80: PULLER, BEARING/GEAR - 6444 Courtesy of CHRYSLER LLC Fig. 81: JAWS, PULLER - 6451 Courtesy of CHRYSLER LLC Fig. 82: CUP - 8148 Courtesy of CHRYSLER LLC Fig. 83: O2 SENSOR WRENCH - 8439 Courtesy of CHRYSLER LLC 2009 Jeep Patriot Limited 2009 TRANSFER CASE Power Transfer Unit - Compass & Patriot a Saturday, September 08, 2012 2:16:38 PM Page 45 © 2006 Mitchell Repair Information Company, LLC.
  • 46. Fig. 84: INSTALLER, BEARING - 9714 Courtesy of CHRYSLER LLC Fig. 85: INSTALLER, SEAL - 9715 Courtesy of CHRYSLER LLC 2009 Jeep Patriot Limited 2009 TRANSFER CASE Power Transfer Unit - Compass & Patriot a Saturday, September 08, 2012 2:16:38 PM Page 46 © 2006 Mitchell Repair Information Company, LLC.
  • 47. Fig. 86: SPLINED SOCKET - 9742 Courtesy of CHRYSLER LLC Fig. 87: INSTALLER, SEAL - 9851 Courtesy of CHRYSLER LLC 2009 Jeep Patriot Limited 2009 TRANSFER CASE Power Transfer Unit - Compass & Patriot a Saturday, September 08, 2012 2:16:38 PM Page 47 © 2006 Mitchell Repair Information Company, LLC.
  • 48. Fig. 88: INSTALLER, SEAL - 9852 Courtesy of CHRYSLER LLC Fig. 89: INSTALLER, SEAL - 9853 Courtesy of CHRYSLER LLC Fig. 90: INSTALLER, BEARING CUP - 9855 Courtesy of CHRYSLER LLC 2009 Jeep Patriot Limited 2009 TRANSFER CASE Power Transfer Unit - Compass & Patriot a Saturday, September 08, 2012 2:16:38 PM Page 48 © 2006 Mitchell Repair Information Company, LLC.
  • 49. Fig. 91: WRENCH, PINION NUT - 9921 Courtesy of CHRYSLER LLC Fig. 92: SOCKET, SPLINED - 9922 Courtesy of CHRYSLER LLC Fig. 93: PULLER, PRESS - C-293-PA Courtesy of CHRYSLER LLC Fig. 94: BLOCK SET, PULLER - C-293-37 Courtesy of CHRYSLER LLC 2009 Jeep Patriot Limited 2009 TRANSFER CASE Power Transfer Unit - Compass & Patriot a Saturday, September 08, 2012 2:16:38 PM Page 49 © 2006 Mitchell Repair Information Company, LLC.
  • 50. Fig. 95: INSTALLER, BEARING - C-3095-A Courtesy of CHRYSLER LLC Fig. 96: DRIVER HANDLE, UNIVERSAL - C-4171 Courtesy of CHRYSLER LLC Fig. 97: INSTALLER, BEARING - L-4411 Courtesy of CHRYSLER LLC SEAL, DIFFERENTIAL CARRIER REMOVAL REMOVAL 1. Remove PTU from transaxle. See Transmission and Transfer Case/Power Transfer Unit - Removal. 2. Use a screw mounted in a slide hammer to remove seal. Be careful not to damage seal journal when removing seal. 2009 Jeep Patriot Limited 2009 TRANSFER CASE Power Transfer Unit - Compass & Patriot a Saturday, September 08, 2012 2:16:38 PM Page 50 © 2006 Mitchell Repair Information Company, LLC.
  • 51. INSTALLATION INSTALLATION Fig. 98: INSTALL CARRIER CASE SEAL Courtesy of CHRYSLER LLC 1. Install the carrier case seal using Installer 9851 and Handle C-4171. 2. Install the PTU. See Transmission and Transfer Case/Power Transfer Unit - Installation. SEAL, OUTPUT FLANGE REMOVAL REMOVAL 1. Remove the propeller shaft. Refer to Differential and Driveline/Propeller Shaft - Removal . 2. Using a screwdriver remove the output seal. INSTALLATION INSTALLATION 2009 Jeep Patriot Limited 2009 TRANSFER CASE Power Transfer Unit - Compass & Patriot a Saturday, September 08, 2012 2:16:38 PM Page 51 © 2006 Mitchell Repair Information Company, LLC.
  • 52. Fig. 99: PINION SHAFT SEAL Courtesy of CHRYSLER LLC 1. Install the output shaft seal using Installer 9851 and Handle C-4171. 2. Install the propeller shaft. Refer to Differential and Driveline/Propeller Shaft - Installation . SEALS, END COVER REMOVAL REMOVAL Fig. 100: SIDE COVER 2009 Jeep Patriot Limited 2009 TRANSFER CASE Power Transfer Unit - Compass & Patriot a Saturday, September 08, 2012 2:16:38 PM Page 52 © 2006 Mitchell Repair Information Company, LLC.
  • 53. Courtesy of CHRYSLER LLC 1. Remove the right halfshaft. Refer to Differential and Driveline/Half Shaft - Removal . 2. Remove the side cover bolts. 3. Remove the side cover. Fig. 101: INNER COVER SEAL Courtesy of CHRYSLER LLC 4. Using a drift remove both inner and outer seals. INSTALLATION INSTALLATION 2009 Jeep Patriot Limited 2009 TRANSFER CASE Power Transfer Unit - Compass & Patriot a Saturday, September 08, 2012 2:16:39 PM Page 53 © 2006 Mitchell Repair Information Company, LLC.
  • 54. Fig. 102: INSTALL CARRIER COVER INNER SEAL Courtesy of CHRYSLER LLC 1. Install the inner seal into the PTU cover using Installer 9852 and Handle C-4171. Fig. 103: INSTALL CARRIER COVER OUTER SEAL Courtesy of CHRYSLER LLC 2. Install the outer seal into the PTU cover using Installer 9853 and Handle C-4171. 2009 Jeep Patriot Limited 2009 TRANSFER CASE Power Transfer Unit - Compass & Patriot a Saturday, September 08, 2012 2:16:39 PM Page 54 © 2006 Mitchell Repair Information Company, LLC.
  • 55. Fig. 104: SIDE COVER Courtesy of CHRYSLER LLC 3. Install the side cover. 4. Tighten side cover bolts (1) to 23 N.m (17 ft. lbs.). 5. Install the right halfshaft. Refer to Differential and Driveline/Half Shaft - Installation . SHIELD, EXTENSION HOUSING DUST REMOVAL REMOVAL 2009 Jeep Patriot Limited 2009 TRANSFER CASE Power Transfer Unit - Compass & Patriot a Saturday, September 08, 2012 2:16:39 PM Page 55 © 2006 Mitchell Repair Information Company, LLC.
  • 56. Fig. 105: EXTENSION AND PINION HOUSING BOLT Courtesy of CHRYSLER LLC 1. Remove the propeller shaft. Refer to Differential and Driveline/Propeller Shaft - Removal . 2. Remove the extension housing bolts (1). 3. Remove the extension housing. 4. Remove the extension housing O-ring and inspect. Fig. 106: DUST SHIELD OFF PTU Courtesy of CHRYSLER LLC 2009 Jeep Patriot Limited 2009 TRANSFER CASE Power Transfer Unit - Compass & Patriot a Saturday, September 08, 2012 2:16:39 PM Page 56 © 2006 Mitchell Repair Information Company, LLC.
  • 57. 5. Using a chisel (2) remove the dust shield (1) from the extension housing (3). INSTALLATION INSTALLATION Fig. 107: DUST SHIELD ON PTU Courtesy of CHRYSLER LLC 1. Using a block of wood (2) install the dust shield (3) onto the extension housing (1). 2009 Jeep Patriot Limited 2009 TRANSFER CASE Power Transfer Unit - Compass & Patriot a Saturday, September 08, 2012 2:16:39 PM Page 57 © 2006 Mitchell Repair Information Company, LLC.
  • 58. Fig. 108: EXTENSION AND PINION HOUSING BOLTS Courtesy of CHRYSLER LLC 2. Install the extension housing and bolts. 3. Tighten the extension housing bolts to 38 N.m (28 ft. lbs.). 4. Install the propeller shaft. Refer to Differential and Driveline/Propeller Shaft - Installation . 2009 Jeep Patriot Limited 2009 TRANSFER CASE Power Transfer Unit - Compass & Patriot a Saturday, September 08, 2012 2:16:39 PM Page 58 © 2006 Mitchell Repair Information Company, LLC.