SlideShare a Scribd company logo
2004 DRIVELINE/AXLES
Rear Differential Carrier (4WD) - RAV4
ON-VEHICLE REPAIR
REPLACE REAR DIFFERENTIAL OIL
a. Remove the filler plug and gasket.
b. Remove the drain plug and gasket, and drain the oil.
c. Reinstall the drain plug with a new gasket.
Torque: 49 N.m (500 kgf.cm, 36 ft.lbf)
d. Fill new differential oil as shown in Fig. 1 .
Fig. 1: Identifying Differential Oil Level
Courtesy of TOYOTA MOTOR SALES, U.S.A., INC.
Capacity: 0.9 liter (1.0 US qts, 0.8 Imp. qts)
2004 Toyota RAV4
2004 DRIVELINE/AXLES Rear Differential Carrier (4WD) - RAV4
2004 Toyota RAV4
2004 DRIVELINE/AXLES Rear Differential Carrier (4WD) - RAV4
Microsoft
Tuesday, July 21, 2009 4:07:09 PM Page 1 © 2005 Mitchell Repair Information Company, LLC.
Microsoft
Tuesday, July 21, 2009 4:07:14 PM Page 1 © 2005 Mitchell Repair Information Company, LLC.
Oil grade: Hypoid gear oil API GL-5
Recommended oil viscosity:
OIL VISCOSITY IDENTIFICATION
e. Reinstall the filler plug with a new gasket.
COMPONENTS
Fig. 2: Identifying Rear Differential Carrier Assembly (1 Of 2)
Courtesy of TOYOTA MOTOR SALES, U.S.A., INC.
Above - 18°C (0°F) SAE 90
Below -18°C (0°F) SAE 80W or 80W-90
2004 Toyota RAV4
2004 DRIVELINE/AXLES Rear Differential Carrier (4WD) - RAV4
Microsoft
Tuesday, July 21, 2009 4:07:10 PM Page 2 © 2005 Mitchell Repair Information Company, LLC.
Fig. 3: Identifying Rear Differential Carrier Assembly (2 Of 2)
Courtesy of TOYOTA MOTOR SALES, U.S.A., INC.
REMOVAL
1. REMOVE DRIVE SHAFTS (See REMOVAL )
2004 Toyota RAV4
2004 DRIVELINE/AXLES Rear Differential Carrier (4WD) - RAV4
Microsoft
Tuesday, July 21, 2009 4:07:10 PM Page 3 © 2005 Mitchell Repair Information Company, LLC.
HINT:
Support the drive shafts securely.
2. REMOVE PROPELLER SHAFT (See COMPONENTS )
HINT:
Support the propeller shaft securely.
3. DRAIN DIFFERENTIAL OIL
Torque: 49 N.m (500 kgf.cm, 36 ft.lbf)
4. REMOVE DIFFERENTIAL
a. Support the differential with a jack.
b. Remove the 2 rear mounting bolts.
Torque: 65 N.m (660 kgf.cm, 48 ft.lbf)
2004 Toyota RAV4
2004 DRIVELINE/AXLES Rear Differential Carrier (4WD) - RAV4
Microsoft
Tuesday, July 21, 2009 4:07:10 PM Page 4 © 2005 Mitchell Repair Information Company, LLC.
Fig. 4: Removing Rear Mounting Bolts
Courtesy of TOYOTA MOTOR SALES, U.S.A., INC.
c. Remove the 2 front mounting bolts and differential.
Torque: 117 N.m (1,190 kgf.cm, 86 ft.lbf)
d. Remove the 2 bolts and differential rear mount cushion from the differential.
Torque: 137 N.m (1,400 kgf.cm, 101 ft.lbf)
2004 Toyota RAV4
2004 DRIVELINE/AXLES Rear Differential Carrier (4WD) - RAV4
Microsoft
Tuesday, July 21, 2009 4:07:10 PM Page 5 © 2005 Mitchell Repair Information Company, LLC.
Fig. 5: Removing Differential Rear Mount Cushion & Bolts
Courtesy of TOYOTA MOTOR SALES, U.S.A., INC.
DISASSEMBLY
1. REMOVE DIFFERENTIAL CARRIER COVER
a. Remove the 8 bolts from the carrier cover.
b. Using a brass bar and a hammer, separate the cover from the carrier.
c. Remove the breather plug from the differential carrier cover.
d. Torque sensing LSD:
Remove the bolt and oil deflector from the differential.
2. CHECK RUNOUT OF COMPANION FLANGE
a. Using a dial indicator, measure the runout of the companion flange vertically.
Maximum runout: 0.10 mm (0.0039 in.)
2004 Toyota RAV4
2004 DRIVELINE/AXLES Rear Differential Carrier (4WD) - RAV4
Microsoft
Tuesday, July 21, 2009 4:07:10 PM Page 6 © 2005 Mitchell Repair Information Company, LLC.
Fig. 6: Measuring Runout Of Companion Flange Vertically
Courtesy of TOYOTA MOTOR SALES, U.S.A., INC.
b. Place a dial indicator on the place 30 mm (1.181 in.) apart from the center of the companion flange.
c. Measure the runout of the companion flange horizontally.
2004 Toyota RAV4
2004 DRIVELINE/AXLES Rear Differential Carrier (4WD) - RAV4
Microsoft
Tuesday, July 21, 2009 4:07:10 PM Page 7 © 2005 Mitchell Repair Information Company, LLC.
Maximum runout: 0.10 mm (0.0039 in.)
Fig. 7: Measuring Runout Of Companion Flange Horizontally
Courtesy of TOYOTA MOTOR SALES, U.S.A., INC.
3. CHECK RING GEAR
2004 Toyota RAV4
2004 DRIVELINE/AXLES Rear Differential Carrier (4WD) - RAV4
Microsoft
Tuesday, July 21, 2009 4:07:10 PM Page 8 © 2005 Mitchell Repair Information Company, LLC.
a. Check the runout.
Using a dial indicator, check the runout of the ring gear.
Maximum runout: 0.07 mm (0.0028 in.)
If the runout is greater than the maximum value, replace it with a new ring gear.
Fig. 8: Measuring Runout Of Ring Gear
Courtesy of TOYOTA MOTOR SALES, U.S.A., INC.
b. Check the backlash.
Using a dial indicator, check the backlash of the ring gear.
Backlash: 0.13 - 0.18 mm (0.0051 - 0.0071 in.)
2004 Toyota RAV4
2004 DRIVELINE/AXLES Rear Differential Carrier (4WD) - RAV4
Microsoft
Tuesday, July 21, 2009 4:07:10 PM Page 9 © 2005 Mitchell Repair Information Company, LLC.
Fig. 9: Checking Backlash Of Ring Gear
Courtesy of TOYOTA MOTOR SALES, U.S.A., INC.
If the backlash is not within the specification, adjust the side bearing preload or repair as necessary.
4. CHECK TOOTH CONTACT BETWEEN RING GEAR AND DRIVE PINION (See
REASSEMBLY )
2004 Toyota RAV4
2004 DRIVELINE/AXLES Rear Differential Carrier (4WD) - RAV4
Microsoft
Tuesday, July 21, 2009 4:07:10 PM Page 10 © 2005 Mitchell Repair Information Company, LLC.
5. 2 pinion differential: CHECK BACKLASH OF SIDE GEAR
Using a dial indicator, check the backlash of the side gear with holding 1 pinion gear toward the
differential case.
Backlash: 0.05 - 0.20 mm (0.0020 - 0.0079 in.)
Fig. 10: Checking Backlash Of Side Gear
Courtesy of TOYOTA MOTOR SALES, U.S.A., INC.
If the backlash is not within the specification, install the 2 side gear thrust washers of different thickness
(See REASSEMBLY ).
6. MEASURE DRIVE PINION PRELOAD
Using a torque wrench, measure the preload of the backlash between the drive pinion and ring gear.
2004 Toyota RAV4
2004 DRIVELINE/AXLES Rear Differential Carrier (4WD) - RAV4
Microsoft
Tuesday, July 21, 2009 4:07:10 PM Page 11 © 2005 Mitchell Repair Information Company, LLC.
Fig. 11: Measuring Drive Pinion Preload
Courtesy of TOYOTA MOTOR SALES, U.S.A., INC.
Preload (at starting):
0.6 - 0.9 N.m (6 - 9 kgf.cm, 5.3 - 8.0 in.lbf)
7. CHECK TOTAL PRELOAD
Using a torque wrench, measure the preload.
Total preload (at starting):
Drive pinion preload plus
0.3 - 0.5 N.m (3 - 5 kgf.cm, 2.6 - 4.3 in.lbf)
If necessary, disassemble and inspect the differential.
8. REMOVE COMPANION FLANGE
a. Using a chisel and a hammer, unstake the staked part of the nut.
2004 Toyota RAV4
2004 DRIVELINE/AXLES Rear Differential Carrier (4WD) - RAV4
Microsoft
Tuesday, July 21, 2009 4:07:10 PM Page 12 © 2005 Mitchell Repair Information Company, LLC.
b. Using SST to hold the flange, remove the nut.
SST 09330-00021
Fig. 12: Removing Companion Flange Nut
Courtesy of TOYOTA MOTOR SALES, U.S.A., INC.
c. Using SST, remove the companion flange.
SST 09950-30012 (09951-03010, 09953-03010, 09954-03010, 09955-03040, 09956-03020)
2004 Toyota RAV4
2004 DRIVELINE/AXLES Rear Differential Carrier (4WD) - RAV4
Microsoft
Tuesday, July 21, 2009 4:07:10 PM Page 13 © 2005 Mitchell Repair Information Company, LLC.
Fig. 13: Removing Companion Flange
Courtesy of TOYOTA MOTOR SALES, U.S.A., INC.
9. REMOVE FRONT OIL SEAL AND OIL SLINGER
a. Using SST, remove the oil seal from the differential carrier.
SST 09308-10010
b. Remove the oil slinger.
2004 Toyota RAV4
2004 DRIVELINE/AXLES Rear Differential Carrier (4WD) - RAV4
Microsoft
Tuesday, July 21, 2009 4:07:10 PM Page 14 © 2005 Mitchell Repair Information Company, LLC.
2004 Toyota RAV4
2004 DRIVELINE/AXLES Rear Differential Carrier (4WD) - RAV4
Microsoft
Tuesday, July 21, 2009 4:07:10 PM Page 15 © 2005 Mitchell Repair Information Company, LLC.
Fig. 14: Removing Oil Seal & Slinger
Courtesy of TOYOTA MOTOR SALES, U.S.A., INC.
10. REMOVE FRONT BEARING AND BEARING SPACER
a. Using SST, remove the front bearing from the drive pinion.
SST 09556-22010
b. Remove the bearing spacer.
Fig. 15: Removing Front Bearing & Bearing Spacer
Courtesy of TOYOTA MOTOR SALES, U.S.A., INC.
11. Torque sensing LSD: REMOVE SIDE GEAR SHAFTS
a. Using SST, remove the 2 side gear shafts from the differential carrier.
SST 09520-24010 (09520-04010, 09520-32040)
2004 Toyota RAV4
2004 DRIVELINE/AXLES Rear Differential Carrier (4WD) - RAV4
Microsoft
Tuesday, July 21, 2009 4:07:10 PM Page 16 © 2005 Mitchell Repair Information Company, LLC.
b. Using a screwdriver, remove the 2 snap rings from the 2 side gear shafts.
Fig. 16: Removing Side Gear Shaft (Torque Sensing LSD)
Courtesy of TOYOTA MOTOR SALES, U.S.A., INC.
12. 2 pinion differential: REMOVE SIDE GEAR SHAFTS
a. Using needle nose pliers, remove the 2 snap rings from the 2 side gear shafts.
b. Remove the 2 side gear shafts.
2004 Toyota RAV4
2004 DRIVELINE/AXLES Rear Differential Carrier (4WD) - RAV4
Microsoft
Tuesday, July 21, 2009 4:07:10 PM Page 17 © 2005 Mitchell Repair Information Company, LLC.
Fig. 17: Removing Side Gear Shaft (2 Pinion Differential)
Courtesy of TOYOTA MOTOR SALES, U.S.A., INC.
13. REMOVE SIDE GEAR SHAFT OIL SEALS
Using SST, remove the 2 oil seals from the housing.
SST 09308-10010
2004 Toyota RAV4
2004 DRIVELINE/AXLES Rear Differential Carrier (4WD) - RAV4
Microsoft
Tuesday, July 21, 2009 4:07:10 PM Page 18 © 2005 Mitchell Repair Information Company, LLC.
Fig. 18: Removing Side Gear Shaft Oil Seals
Courtesy of TOYOTA MOTOR SALES, U.S.A., INC.
14. REMOVE DIFFERENTIAL CASE
a. Place matchmarks on the bearing cap and differential carrier.
2004 Toyota RAV4
2004 DRIVELINE/AXLES Rear Differential Carrier (4WD) - RAV4
Microsoft
Tuesday, July 21, 2009 4:07:10 PM Page 19 © 2005 Mitchell Repair Information Company, LLC.
Fig. 19: Locating Matchmarks
Courtesy of TOYOTA MOTOR SALES, U.S.A., INC.
b. Remove the 4 bolts and 2 bearing caps.
c. Using SST and a hammer, remove the 2 plate washers.
SST 09504-22012
2004 Toyota RAV4
2004 DRIVELINE/AXLES Rear Differential Carrier (4WD) - RAV4
Microsoft
Tuesday, July 21, 2009 4:07:10 PM Page 20 © 2005 Mitchell Repair Information Company, LLC.
Fig. 20: Removing Plate Washers
Courtesy of TOYOTA MOTOR SALES, U.S.A., INC.
HINT:
Measure the plate washer and note down the thickness.
d. Remove the differential case and 2 bearing outer races from the carrier.
HINT:
Tag the 2 bearing outer races to show the location of reassembling.
15. REMOVE DRIVE PINION FROM DIFFERENTIAL CARRIER
2004 Toyota RAV4
2004 DRIVELINE/AXLES Rear Differential Carrier (4WD) - RAV4
Microsoft
Tuesday, July 21, 2009 4:07:10 PM Page 21 © 2005 Mitchell Repair Information Company, LLC.
16. REMOVE DRIVE PINION REAR BEARING
a. Using SST and a press, remove the bearing from the drive pinion.
SST 09950-00020
Fig. 21: Removing Drive Pinion Rear Bearing
Courtesy of TOYOTA MOTOR SALES, U.S.A., INC.
HINT:
If the drive pinion and ring gear are damaged, replace them as a set.
b. Remove the plate washer.
17. REMOVE FRONT AND REAR BEARING OUTER RACES
Using a brass bar and a hammer, remove the 2 outer races from the carrier.
2004 Toyota RAV4
2004 DRIVELINE/AXLES Rear Differential Carrier (4WD) - RAV4
Microsoft
Tuesday, July 21, 2009 4:07:10 PM Page 22 © 2005 Mitchell Repair Information Company, LLC.
Fig. 22: Removing Front & Rear Bearing Outer Races
Courtesy of TOYOTA MOTOR SALES, U.S.A., INC.
18. REMOVE RING GEAR
a. Place matchmarks on the ring gear and differential case.
b. Using a screwdriver and a hammer, unstake the 4 lock plates.
c. Remove the 8 ring gear set bolts and 4 lock plates.
d. Using a plastic hammer, tap the ring gear to separate it from the differential case.
2004 Toyota RAV4
2004 DRIVELINE/AXLES Rear Differential Carrier (4WD) - RAV4
Microsoft
Tuesday, July 21, 2009 4:07:10 PM Page 23 © 2005 Mitchell Repair Information Company, LLC.
Fig. 23: Removing Ring Gear & Locating Match Mark
Courtesy of TOYOTA MOTOR SALES, U.S.A., INC.
19. REMOVE SIDE BEARINGS
Using SST and a press, remove the 2 side bearings from the differential case.
SST 09950-00020
2004 Toyota RAV4
2004 DRIVELINE/AXLES Rear Differential Carrier (4WD) - RAV4
Microsoft
Tuesday, July 21, 2009 4:07:10 PM Page 24 © 2005 Mitchell Repair Information Company, LLC.
Fig. 24: Removing Side Bearings
Courtesy of TOYOTA MOTOR SALES, U.S.A., INC.
20. 2 pinion differential: DISASSEMBLE DIFFERENTIAL CASE
a. Using a pin punch and a hammer, remove the straight pin.
NOTE: Be careful not to drop the differential case.
NOTE: If equipped with torque sensing LSD, do not disassemble the differential
case.
2004 Toyota RAV4
2004 DRIVELINE/AXLES Rear Differential Carrier (4WD) - RAV4
Microsoft
Tuesday, July 21, 2009 4:07:10 PM Page 25 © 2005 Mitchell Repair Information Company, LLC.
Fig. 25: Removing Straight Pin Using Pin Punch & Hammer
Courtesy of TOYOTA MOTOR SALES, U.S.A., INC.
b. Remove the pinion shaft, 2 pinion gears, 2 pinion gear thrust washers, 2 side gears and 2 side gear
thrust washers.
REPLACEMENT
1. REPLACE SIDE GEAR SHAFT DUST COVER
a. Using a screwdriver and a hammer, remove the side gear shaft dust cover.
b. Using a steel plate and a press, install a new dust cover to the side gear shaft.
NOTE: Be careful not to damage the dust cover.
2004 Toyota RAV4
2004 DRIVELINE/AXLES Rear Differential Carrier (4WD) - RAV4
Microsoft
Tuesday, July 21, 2009 4:07:10 PM Page 26 © 2005 Mitchell Repair Information Company, LLC.
Fig. 26: Installing Dust Cover To Side Gear Shaft
Courtesy of TOYOTA MOTOR SALES, U.S.A., INC.
2. REPLACE COMPANION FLANGE DUST DEFLECTOR
a. Using SST and a press, remove the dust deflector.
SST 09950-00020
b. Using a press, install a new dust deflector.
2004 Toyota RAV4
2004 DRIVELINE/AXLES Rear Differential Carrier (4WD) - RAV4
Microsoft
Tuesday, July 21, 2009 4:07:10 PM Page 27 © 2005 Mitchell Repair Information Company, LLC.
Fig. 27: Replacing Companion Flange Dust Deflector
Courtesy of TOYOTA MOTOR SALES, U.S.A., INC.
REASSEMBLY
1. 2 pinion differential: REASSEMBLE DIFFERENTIAL CASE
a. Install the 2 proper thrust washers on the 2 side gears.
b. Install the 2 side gears, 2 pinion gears, 2 pinion gear thrust washers and pinion shaft in the
differential case.
HINT:
Align the holes of the differential case and pinion shaft.
2004 Toyota RAV4
2004 DRIVELINE/AXLES Rear Differential Carrier (4WD) - RAV4
Microsoft
Tuesday, July 21, 2009 4:07:10 PM Page 28 © 2005 Mitchell Repair Information Company, LLC.
Fig. 28: Installing Thrust Washers & Side Gears
Courtesy of TOYOTA MOTOR SALES, U.S.A., INC.
c. Measure the side gear backlash.
1. Install the 2 side gear shafts.
2. Measure the side gear backlash with holding 1 pinion gear toward the differential case.
Backlash: 0.05 - 0.20 mm (0.0020 - 0.0079 in.)
2004 Toyota RAV4
2004 DRIVELINE/AXLES Rear Differential Carrier (4WD) - RAV4
Microsoft
Tuesday, July 21, 2009 4:07:10 PM Page 29 © 2005 Mitchell Repair Information Company, LLC.
Fig. 29: Measuring Side Gear Backlash
Courtesy of TOYOTA MOTOR SALES, U.S.A., INC.
If the backlash is not within the specification, install the 2 side gear thrust washers with
different thicknesses.
HINT:
Refer to THRUST WASHER THICKNESS IDENTIFICATION and select 2 thrust
washers which ensures that the backlash is within the specification.
Thrust washer thickness [mm (in.)]
THRUST WASHER THICKNESS IDENTIFICATION [mm (in.)]
0.93 - 0.97 (0.0366 - 0.0382) 1.18 - 1.22 (0.0465 - 0.0480)
0.98 - 1.02 (0.0386 - 0.0402) 1.23 - 1.27 (0.0484 - 0.0500)
1.03 - 1.07 (0.0406 - 0.0421) 1.28 - 1.32 (0.0503 - 0.0520)
1.08 - 1.12 (0.0425 - 0.0441) 1.33 - 1.37 (0.0523 - 0.0539)
1.13 - 1.17 (0.0445 - 0.0461) 1.38 - 1.42 (0.0543 - 0.0559)
2004 Toyota RAV4
2004 DRIVELINE/AXLES Rear Differential Carrier (4WD) - RAV4
Microsoft
Tuesday, July 21, 2009 4:07:10 PM Page 30 © 2005 Mitchell Repair Information Company, LLC.
3. Remove the 2 side gear shafts.
d. Using a pin punch and a hammer, install the straight pin through the differential case and hole of
the pinion shaft.
Fig. 30: Installing Straight Pin Using Pin Pinch & Hammer
Courtesy of TOYOTA MOTOR SALES, U.S.A., INC.
e. Using a chisel and a hammer, stake the outside of the differential case pin hole.
2. INSTALL RING GEAR ON DIFFERENTIAL CASE
a. Clean the contact surfaces of the differential case and ring gear.
b. Heat the ring gear in boiling water.
c. Carefully remove the ring gear from the boiling water.
2004 Toyota RAV4
2004 DRIVELINE/AXLES Rear Differential Carrier (4WD) - RAV4
Microsoft
Tuesday, July 21, 2009 4:07:10 PM Page 31 © 2005 Mitchell Repair Information Company, LLC.
Fig. 31: Heating Ring Gear In Boiling Water
Courtesy of TOYOTA MOTOR SALES, U.S.A., INC.
d. After the moisture on the ring gear has completely evaporated, quickly install the ring gear to the
differential case.
e. Align the matchmarks on the ring gear and differential case.
2004 Toyota RAV4
2004 DRIVELINE/AXLES Rear Differential Carrier (4WD) - RAV4
Microsoft
Tuesday, July 21, 2009 4:07:10 PM Page 32 © 2005 Mitchell Repair Information Company, LLC.
Fig. 32: Aligning Matchmarks On Ring Gear & Differential Case
Courtesy of TOYOTA MOTOR SALES, U.S.A., INC.
f. Temporarily install 4 new lock plates and the 8 bolts.
g. After the ring gear cools down enough, torque the 8 bolts uniformly at a time.
Torque: 97 N.m (985 kgf.cm, 71 ft.lbf)
h. Using a chisel and a hammer, raise up claws of the 4 lock plates.
HINT:
 Bend one of the claws which touches the flat surface of the bolt so that the claw can contact
the surface firmly.
 If one of the claws is divided into two due the protruding portion of the bolt, make the claw
contact firmly with the tightening side of the bolt.
3. INSTALL SIDE BEARINGS
Using SST and a press, install the 2 side bearings into the differential case.
SST 09710-22021 (09710-01031)
2004 Toyota RAV4
2004 DRIVELINE/AXLES Rear Differential Carrier (4WD) - RAV4
Microsoft
Tuesday, July 21, 2009 4:07:10 PM Page 33 © 2005 Mitchell Repair Information Company, LLC.
Fig. 33: Installing Side Bearings
Courtesy of TOYOTA MOTOR SALES, U.S.A., INC.
4. INSPECT RING GEAR RUNOUT
a. Install the differential case on the carrier, and install the 2 plate washers so that there is no play in
the bearing.
b. Install the bearing caps.
c. Using a dial indicator, measure the runout of the ring gear.
Maximum runout: 0.07 mm (0.0028 in.)
2004 Toyota RAV4
2004 DRIVELINE/AXLES Rear Differential Carrier (4WD) - RAV4
Microsoft
Tuesday, July 21, 2009 4:07:10 PM Page 34 © 2005 Mitchell Repair Information Company, LLC.
Thank you very much
for your reading.
Please Click Here
Then Get More
Information.

More Related Content

What's hot

2000 ford windstar service repair manual
2000 ford windstar service repair manual2000 ford windstar service repair manual
2000 ford windstar service repair manual
fjskedmmem
 
1999 FORD WINDSTAR Service Repair Manual
1999 FORD WINDSTAR Service Repair Manual1999 FORD WINDSTAR Service Repair Manual
1999 FORD WINDSTAR Service Repair Manual
雨 微
 
2007 chevrolet equinox service repair manual
2007 chevrolet equinox service repair manual2007 chevrolet equinox service repair manual
2007 chevrolet equinox service repair manual
ofpsdjksemmds
 
Caterpillar cat 160 h na motor grader (prefix 3hr) service repair manual (3hr...
Caterpillar cat 160 h na motor grader (prefix 3hr) service repair manual (3hr...Caterpillar cat 160 h na motor grader (prefix 3hr) service repair manual (3hr...
Caterpillar cat 160 h na motor grader (prefix 3hr) service repair manual (3hr...
fjjsekkskeoelkm
 
2006 FORD EXPEDITION Service Repair Manual
2006 FORD EXPEDITION Service Repair Manual2006 FORD EXPEDITION Service Repair Manual
2006 FORD EXPEDITION Service Repair Manual
jhdnjdn sekjmd
 
2004 ford expedition service repair manual
2004 ford expedition service repair manual2004 ford expedition service repair manual
2004 ford expedition service repair manual
fjskedmmem
 

What's hot (7)

2000 ford windstar service repair manual
2000 ford windstar service repair manual2000 ford windstar service repair manual
2000 ford windstar service repair manual
 
1999 FORD WINDSTAR Service Repair Manual
1999 FORD WINDSTAR Service Repair Manual1999 FORD WINDSTAR Service Repair Manual
1999 FORD WINDSTAR Service Repair Manual
 
2007 chevrolet equinox service repair manual
2007 chevrolet equinox service repair manual2007 chevrolet equinox service repair manual
2007 chevrolet equinox service repair manual
 
Steering system column
Steering system columnSteering system column
Steering system column
 
Caterpillar cat 160 h na motor grader (prefix 3hr) service repair manual (3hr...
Caterpillar cat 160 h na motor grader (prefix 3hr) service repair manual (3hr...Caterpillar cat 160 h na motor grader (prefix 3hr) service repair manual (3hr...
Caterpillar cat 160 h na motor grader (prefix 3hr) service repair manual (3hr...
 
2006 FORD EXPEDITION Service Repair Manual
2006 FORD EXPEDITION Service Repair Manual2006 FORD EXPEDITION Service Repair Manual
2006 FORD EXPEDITION Service Repair Manual
 
2004 ford expedition service repair manual
2004 ford expedition service repair manual2004 ford expedition service repair manual
2004 ford expedition service repair manual
 

Similar to 2003 TOYOTA RAV4 Service Repair Manual

2002 toyota rav4 service repair manual
2002 toyota rav4 service repair manual2002 toyota rav4 service repair manual
2002 toyota rav4 service repair manual
fjjsjeusekkekm
 
2009 toyota 4 runner service repair manual
2009 toyota 4 runner service repair manual2009 toyota 4 runner service repair manual
2009 toyota 4 runner service repair manual
fjjsieskekfmmse
 
2003 toyota 4 runner service repair manual
2003 toyota 4 runner service repair manual2003 toyota 4 runner service repair manual
2003 toyota 4 runner service repair manual
fhsjejkdm
 
2004 toyota 4 runner service repair manual
2004 toyota 4 runner service repair manual2004 toyota 4 runner service repair manual
2004 toyota 4 runner service repair manual
dfjjsjekfkskemme
 
2008 toyota 4 runner service repair manual
2008 toyota 4 runner service repair manual2008 toyota 4 runner service repair manual
2008 toyota 4 runner service repair manual
dfjjkskeksmem
 
2006 toyota sequoia service repair manual
2006 toyota sequoia service repair manual2006 toyota sequoia service repair manual
2006 toyota sequoia service repair manual
fhsejkdkmen
 
2002 toyota sequoia service repair manual
2002 toyota sequoia service repair manual2002 toyota sequoia service repair manual
2002 toyota sequoia service repair manual
fjjfyjsekdmme
 

Similar to 2003 TOYOTA RAV4 Service Repair Manual (7)

2002 toyota rav4 service repair manual
2002 toyota rav4 service repair manual2002 toyota rav4 service repair manual
2002 toyota rav4 service repair manual
 
2009 toyota 4 runner service repair manual
2009 toyota 4 runner service repair manual2009 toyota 4 runner service repair manual
2009 toyota 4 runner service repair manual
 
2003 toyota 4 runner service repair manual
2003 toyota 4 runner service repair manual2003 toyota 4 runner service repair manual
2003 toyota 4 runner service repair manual
 
2004 toyota 4 runner service repair manual
2004 toyota 4 runner service repair manual2004 toyota 4 runner service repair manual
2004 toyota 4 runner service repair manual
 
2008 toyota 4 runner service repair manual
2008 toyota 4 runner service repair manual2008 toyota 4 runner service repair manual
2008 toyota 4 runner service repair manual
 
2006 toyota sequoia service repair manual
2006 toyota sequoia service repair manual2006 toyota sequoia service repair manual
2006 toyota sequoia service repair manual
 
2002 toyota sequoia service repair manual
2002 toyota sequoia service repair manual2002 toyota sequoia service repair manual
2002 toyota sequoia service repair manual
 

Recently uploaded

Digital Fleet Management - Why Your Business Need It?
Digital Fleet Management - Why Your Business Need It?Digital Fleet Management - Why Your Business Need It?
Digital Fleet Management - Why Your Business Need It?
jennifermiller8137
 
5 Warning Signs Your BMW's Intelligent Battery Sensor Needs Attention
5 Warning Signs Your BMW's Intelligent Battery Sensor Needs Attention5 Warning Signs Your BMW's Intelligent Battery Sensor Needs Attention
5 Warning Signs Your BMW's Intelligent Battery Sensor Needs Attention
Bertini's German Motors
 
Why Isn't Your BMW X5's Comfort Access Functioning Properly Find Out Here
Why Isn't Your BMW X5's Comfort Access Functioning Properly Find Out HereWhy Isn't Your BMW X5's Comfort Access Functioning Properly Find Out Here
Why Isn't Your BMW X5's Comfort Access Functioning Properly Find Out Here
Masters European & Gapanese Auto Repair
 
Tyre Industrymarket overview with examples of CEAT
Tyre Industrymarket overview with examples of CEATTyre Industrymarket overview with examples of CEAT
Tyre Industrymarket overview with examples of CEAT
kshamashah95
 
Ec460b lc Excavator Volvo Service Repair.pdf
Ec460b lc Excavator Volvo Service Repair.pdfEc460b lc Excavator Volvo Service Repair.pdf
Ec460b lc Excavator Volvo Service Repair.pdf
Excavator
 
What do the symbols on vehicle dashboard mean?
What do the symbols on vehicle dashboard mean?What do the symbols on vehicle dashboard mean?
What do the symbols on vehicle dashboard mean?
Hyundai Motor Group
 
Wondering if Your Mercedes EIS is at Fault Here’s How to Tell
Wondering if Your Mercedes EIS is at Fault Here’s How to TellWondering if Your Mercedes EIS is at Fault Here’s How to Tell
Wondering if Your Mercedes EIS is at Fault Here’s How to Tell
Vic Auto Collision & Repair
 
What Causes 'Trans Failsafe Prog' to Trigger in BMW X5
What Causes 'Trans Failsafe Prog' to Trigger in BMW X5What Causes 'Trans Failsafe Prog' to Trigger in BMW X5
What Causes 'Trans Failsafe Prog' to Trigger in BMW X5
European Service Center
 
Ec330B Lc Excavator Volvo Service Repair.pdf
Ec330B Lc Excavator Volvo Service Repair.pdfEc330B Lc Excavator Volvo Service Repair.pdf
Ec330B Lc Excavator Volvo Service Repair.pdf
Excavator
 
一比一原版(AUT毕业证)奥克兰理工大学毕业证成绩单如何办理
一比一原版(AUT毕业证)奥克兰理工大学毕业证成绩单如何办理一比一原版(AUT毕业证)奥克兰理工大学毕业证成绩单如何办理
一比一原版(AUT毕业证)奥克兰理工大学毕业证成绩单如何办理
mymwpc
 
Antique Plastic Traders Company Profile
Antique Plastic Traders Company ProfileAntique Plastic Traders Company Profile
Antique Plastic Traders Company Profile
Antique Plastic Traders
 
Things to remember while upgrading the brakes of your car
Things to remember while upgrading the brakes of your carThings to remember while upgrading the brakes of your car
Things to remember while upgrading the brakes of your car
jennifermiller8137
 
What Does the PARKTRONIC Inoperative, See Owner's Manual Message Mean for You...
What Does the PARKTRONIC Inoperative, See Owner's Manual Message Mean for You...What Does the PARKTRONIC Inoperative, See Owner's Manual Message Mean for You...
What Does the PARKTRONIC Inoperative, See Owner's Manual Message Mean for You...
Autohaus Service and Sales
 
What Exactly Is The Common Rail Direct Injection System & How Does It Work
What Exactly Is The Common Rail Direct Injection System & How Does It WorkWhat Exactly Is The Common Rail Direct Injection System & How Does It Work
What Exactly Is The Common Rail Direct Injection System & How Does It Work
Motor Cars International
 
一比一原版(AIS毕业证)奥克兰商学院毕业证成绩单如何办理
一比一原版(AIS毕业证)奥克兰商学院毕业证成绩单如何办理一比一原版(AIS毕业证)奥克兰商学院毕业证成绩单如何办理
一比一原版(AIS毕业证)奥克兰商学院毕业证成绩单如何办理
eygkup
 
Bài tập - Tiếng anh 11 Global Success UNIT 1 - Bản HS.doc
Bài tập - Tiếng anh 11 Global Success UNIT 1 - Bản HS.docBài tập - Tiếng anh 11 Global Success UNIT 1 - Bản HS.doc
Bài tập - Tiếng anh 11 Global Success UNIT 1 - Bản HS.doc
daothibichhang1
 
Statistics5,c.xz,c.;c.;d.c;d;ssssss.pptx
Statistics5,c.xz,c.;c.;d.c;d;ssssss.pptxStatistics5,c.xz,c.;c.;d.c;d;ssssss.pptx
Statistics5,c.xz,c.;c.;d.c;d;ssssss.pptx
coc7987515756
 
gtyccccccccccccccccccccccccccccccccccccccccccccccccccccccc
gtycccccccccccccccccccccccccccccccccccccccccccccccccccccccgtyccccccccccccccccccccccccccccccccccccccccccccccccccccccc
gtyccccccccccccccccccccccccccccccccccccccccccccccccccccccc
4thzenzstar
 
Empowering Limpopo Entrepreneurs Consulting SMEs.pptx
Empowering Limpopo Entrepreneurs  Consulting SMEs.pptxEmpowering Limpopo Entrepreneurs  Consulting SMEs.pptx
Empowering Limpopo Entrepreneurs Consulting SMEs.pptx
Precious Mvulane CA (SA),RA
 
欧洲杯比赛投注官网-欧洲杯比赛投注官网网站-欧洲杯比赛投注官网|【​网址​🎉ac123.net🎉​】
欧洲杯比赛投注官网-欧洲杯比赛投注官网网站-欧洲杯比赛投注官网|【​网址​🎉ac123.net🎉​】欧洲杯比赛投注官网-欧洲杯比赛投注官网网站-欧洲杯比赛投注官网|【​网址​🎉ac123.net🎉​】
欧洲杯比赛投注官网-欧洲杯比赛投注官网网站-欧洲杯比赛投注官网|【​网址​🎉ac123.net🎉​】
ahmedendrise81
 

Recently uploaded (20)

Digital Fleet Management - Why Your Business Need It?
Digital Fleet Management - Why Your Business Need It?Digital Fleet Management - Why Your Business Need It?
Digital Fleet Management - Why Your Business Need It?
 
5 Warning Signs Your BMW's Intelligent Battery Sensor Needs Attention
5 Warning Signs Your BMW's Intelligent Battery Sensor Needs Attention5 Warning Signs Your BMW's Intelligent Battery Sensor Needs Attention
5 Warning Signs Your BMW's Intelligent Battery Sensor Needs Attention
 
Why Isn't Your BMW X5's Comfort Access Functioning Properly Find Out Here
Why Isn't Your BMW X5's Comfort Access Functioning Properly Find Out HereWhy Isn't Your BMW X5's Comfort Access Functioning Properly Find Out Here
Why Isn't Your BMW X5's Comfort Access Functioning Properly Find Out Here
 
Tyre Industrymarket overview with examples of CEAT
Tyre Industrymarket overview with examples of CEATTyre Industrymarket overview with examples of CEAT
Tyre Industrymarket overview with examples of CEAT
 
Ec460b lc Excavator Volvo Service Repair.pdf
Ec460b lc Excavator Volvo Service Repair.pdfEc460b lc Excavator Volvo Service Repair.pdf
Ec460b lc Excavator Volvo Service Repair.pdf
 
What do the symbols on vehicle dashboard mean?
What do the symbols on vehicle dashboard mean?What do the symbols on vehicle dashboard mean?
What do the symbols on vehicle dashboard mean?
 
Wondering if Your Mercedes EIS is at Fault Here’s How to Tell
Wondering if Your Mercedes EIS is at Fault Here’s How to TellWondering if Your Mercedes EIS is at Fault Here’s How to Tell
Wondering if Your Mercedes EIS is at Fault Here’s How to Tell
 
What Causes 'Trans Failsafe Prog' to Trigger in BMW X5
What Causes 'Trans Failsafe Prog' to Trigger in BMW X5What Causes 'Trans Failsafe Prog' to Trigger in BMW X5
What Causes 'Trans Failsafe Prog' to Trigger in BMW X5
 
Ec330B Lc Excavator Volvo Service Repair.pdf
Ec330B Lc Excavator Volvo Service Repair.pdfEc330B Lc Excavator Volvo Service Repair.pdf
Ec330B Lc Excavator Volvo Service Repair.pdf
 
一比一原版(AUT毕业证)奥克兰理工大学毕业证成绩单如何办理
一比一原版(AUT毕业证)奥克兰理工大学毕业证成绩单如何办理一比一原版(AUT毕业证)奥克兰理工大学毕业证成绩单如何办理
一比一原版(AUT毕业证)奥克兰理工大学毕业证成绩单如何办理
 
Antique Plastic Traders Company Profile
Antique Plastic Traders Company ProfileAntique Plastic Traders Company Profile
Antique Plastic Traders Company Profile
 
Things to remember while upgrading the brakes of your car
Things to remember while upgrading the brakes of your carThings to remember while upgrading the brakes of your car
Things to remember while upgrading the brakes of your car
 
What Does the PARKTRONIC Inoperative, See Owner's Manual Message Mean for You...
What Does the PARKTRONIC Inoperative, See Owner's Manual Message Mean for You...What Does the PARKTRONIC Inoperative, See Owner's Manual Message Mean for You...
What Does the PARKTRONIC Inoperative, See Owner's Manual Message Mean for You...
 
What Exactly Is The Common Rail Direct Injection System & How Does It Work
What Exactly Is The Common Rail Direct Injection System & How Does It WorkWhat Exactly Is The Common Rail Direct Injection System & How Does It Work
What Exactly Is The Common Rail Direct Injection System & How Does It Work
 
一比一原版(AIS毕业证)奥克兰商学院毕业证成绩单如何办理
一比一原版(AIS毕业证)奥克兰商学院毕业证成绩单如何办理一比一原版(AIS毕业证)奥克兰商学院毕业证成绩单如何办理
一比一原版(AIS毕业证)奥克兰商学院毕业证成绩单如何办理
 
Bài tập - Tiếng anh 11 Global Success UNIT 1 - Bản HS.doc
Bài tập - Tiếng anh 11 Global Success UNIT 1 - Bản HS.docBài tập - Tiếng anh 11 Global Success UNIT 1 - Bản HS.doc
Bài tập - Tiếng anh 11 Global Success UNIT 1 - Bản HS.doc
 
Statistics5,c.xz,c.;c.;d.c;d;ssssss.pptx
Statistics5,c.xz,c.;c.;d.c;d;ssssss.pptxStatistics5,c.xz,c.;c.;d.c;d;ssssss.pptx
Statistics5,c.xz,c.;c.;d.c;d;ssssss.pptx
 
gtyccccccccccccccccccccccccccccccccccccccccccccccccccccccc
gtycccccccccccccccccccccccccccccccccccccccccccccccccccccccgtyccccccccccccccccccccccccccccccccccccccccccccccccccccccc
gtyccccccccccccccccccccccccccccccccccccccccccccccccccccccc
 
Empowering Limpopo Entrepreneurs Consulting SMEs.pptx
Empowering Limpopo Entrepreneurs  Consulting SMEs.pptxEmpowering Limpopo Entrepreneurs  Consulting SMEs.pptx
Empowering Limpopo Entrepreneurs Consulting SMEs.pptx
 
欧洲杯比赛投注官网-欧洲杯比赛投注官网网站-欧洲杯比赛投注官网|【​网址​🎉ac123.net🎉​】
欧洲杯比赛投注官网-欧洲杯比赛投注官网网站-欧洲杯比赛投注官网|【​网址​🎉ac123.net🎉​】欧洲杯比赛投注官网-欧洲杯比赛投注官网网站-欧洲杯比赛投注官网|【​网址​🎉ac123.net🎉​】
欧洲杯比赛投注官网-欧洲杯比赛投注官网网站-欧洲杯比赛投注官网|【​网址​🎉ac123.net🎉​】
 

2003 TOYOTA RAV4 Service Repair Manual

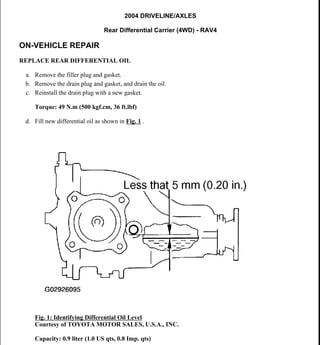
  • 1. 2004 DRIVELINE/AXLES Rear Differential Carrier (4WD) - RAV4 ON-VEHICLE REPAIR REPLACE REAR DIFFERENTIAL OIL a. Remove the filler plug and gasket. b. Remove the drain plug and gasket, and drain the oil. c. Reinstall the drain plug with a new gasket. Torque: 49 N.m (500 kgf.cm, 36 ft.lbf) d. Fill new differential oil as shown in Fig. 1 . Fig. 1: Identifying Differential Oil Level Courtesy of TOYOTA MOTOR SALES, U.S.A., INC. Capacity: 0.9 liter (1.0 US qts, 0.8 Imp. qts) 2004 Toyota RAV4 2004 DRIVELINE/AXLES Rear Differential Carrier (4WD) - RAV4 2004 Toyota RAV4 2004 DRIVELINE/AXLES Rear Differential Carrier (4WD) - RAV4 Microsoft Tuesday, July 21, 2009 4:07:09 PM Page 1 © 2005 Mitchell Repair Information Company, LLC. Microsoft Tuesday, July 21, 2009 4:07:14 PM Page 1 © 2005 Mitchell Repair Information Company, LLC.
  • 2. Oil grade: Hypoid gear oil API GL-5 Recommended oil viscosity: OIL VISCOSITY IDENTIFICATION e. Reinstall the filler plug with a new gasket. COMPONENTS Fig. 2: Identifying Rear Differential Carrier Assembly (1 Of 2) Courtesy of TOYOTA MOTOR SALES, U.S.A., INC. Above - 18°C (0°F) SAE 90 Below -18°C (0°F) SAE 80W or 80W-90 2004 Toyota RAV4 2004 DRIVELINE/AXLES Rear Differential Carrier (4WD) - RAV4 Microsoft Tuesday, July 21, 2009 4:07:10 PM Page 2 © 2005 Mitchell Repair Information Company, LLC.
  • 3. Fig. 3: Identifying Rear Differential Carrier Assembly (2 Of 2) Courtesy of TOYOTA MOTOR SALES, U.S.A., INC. REMOVAL 1. REMOVE DRIVE SHAFTS (See REMOVAL ) 2004 Toyota RAV4 2004 DRIVELINE/AXLES Rear Differential Carrier (4WD) - RAV4 Microsoft Tuesday, July 21, 2009 4:07:10 PM Page 3 © 2005 Mitchell Repair Information Company, LLC.
  • 4. HINT: Support the drive shafts securely. 2. REMOVE PROPELLER SHAFT (See COMPONENTS ) HINT: Support the propeller shaft securely. 3. DRAIN DIFFERENTIAL OIL Torque: 49 N.m (500 kgf.cm, 36 ft.lbf) 4. REMOVE DIFFERENTIAL a. Support the differential with a jack. b. Remove the 2 rear mounting bolts. Torque: 65 N.m (660 kgf.cm, 48 ft.lbf) 2004 Toyota RAV4 2004 DRIVELINE/AXLES Rear Differential Carrier (4WD) - RAV4 Microsoft Tuesday, July 21, 2009 4:07:10 PM Page 4 © 2005 Mitchell Repair Information Company, LLC.
  • 5. Fig. 4: Removing Rear Mounting Bolts Courtesy of TOYOTA MOTOR SALES, U.S.A., INC. c. Remove the 2 front mounting bolts and differential. Torque: 117 N.m (1,190 kgf.cm, 86 ft.lbf) d. Remove the 2 bolts and differential rear mount cushion from the differential. Torque: 137 N.m (1,400 kgf.cm, 101 ft.lbf) 2004 Toyota RAV4 2004 DRIVELINE/AXLES Rear Differential Carrier (4WD) - RAV4 Microsoft Tuesday, July 21, 2009 4:07:10 PM Page 5 © 2005 Mitchell Repair Information Company, LLC.
  • 6. Fig. 5: Removing Differential Rear Mount Cushion & Bolts Courtesy of TOYOTA MOTOR SALES, U.S.A., INC. DISASSEMBLY 1. REMOVE DIFFERENTIAL CARRIER COVER a. Remove the 8 bolts from the carrier cover. b. Using a brass bar and a hammer, separate the cover from the carrier. c. Remove the breather plug from the differential carrier cover. d. Torque sensing LSD: Remove the bolt and oil deflector from the differential. 2. CHECK RUNOUT OF COMPANION FLANGE a. Using a dial indicator, measure the runout of the companion flange vertically. Maximum runout: 0.10 mm (0.0039 in.) 2004 Toyota RAV4 2004 DRIVELINE/AXLES Rear Differential Carrier (4WD) - RAV4 Microsoft Tuesday, July 21, 2009 4:07:10 PM Page 6 © 2005 Mitchell Repair Information Company, LLC.
  • 7. Fig. 6: Measuring Runout Of Companion Flange Vertically Courtesy of TOYOTA MOTOR SALES, U.S.A., INC. b. Place a dial indicator on the place 30 mm (1.181 in.) apart from the center of the companion flange. c. Measure the runout of the companion flange horizontally. 2004 Toyota RAV4 2004 DRIVELINE/AXLES Rear Differential Carrier (4WD) - RAV4 Microsoft Tuesday, July 21, 2009 4:07:10 PM Page 7 © 2005 Mitchell Repair Information Company, LLC.
  • 8. Maximum runout: 0.10 mm (0.0039 in.) Fig. 7: Measuring Runout Of Companion Flange Horizontally Courtesy of TOYOTA MOTOR SALES, U.S.A., INC. 3. CHECK RING GEAR 2004 Toyota RAV4 2004 DRIVELINE/AXLES Rear Differential Carrier (4WD) - RAV4 Microsoft Tuesday, July 21, 2009 4:07:10 PM Page 8 © 2005 Mitchell Repair Information Company, LLC.
  • 9. a. Check the runout. Using a dial indicator, check the runout of the ring gear. Maximum runout: 0.07 mm (0.0028 in.) If the runout is greater than the maximum value, replace it with a new ring gear. Fig. 8: Measuring Runout Of Ring Gear Courtesy of TOYOTA MOTOR SALES, U.S.A., INC. b. Check the backlash. Using a dial indicator, check the backlash of the ring gear. Backlash: 0.13 - 0.18 mm (0.0051 - 0.0071 in.) 2004 Toyota RAV4 2004 DRIVELINE/AXLES Rear Differential Carrier (4WD) - RAV4 Microsoft Tuesday, July 21, 2009 4:07:10 PM Page 9 © 2005 Mitchell Repair Information Company, LLC.
  • 10. Fig. 9: Checking Backlash Of Ring Gear Courtesy of TOYOTA MOTOR SALES, U.S.A., INC. If the backlash is not within the specification, adjust the side bearing preload or repair as necessary. 4. CHECK TOOTH CONTACT BETWEEN RING GEAR AND DRIVE PINION (See REASSEMBLY ) 2004 Toyota RAV4 2004 DRIVELINE/AXLES Rear Differential Carrier (4WD) - RAV4 Microsoft Tuesday, July 21, 2009 4:07:10 PM Page 10 © 2005 Mitchell Repair Information Company, LLC.
  • 11. 5. 2 pinion differential: CHECK BACKLASH OF SIDE GEAR Using a dial indicator, check the backlash of the side gear with holding 1 pinion gear toward the differential case. Backlash: 0.05 - 0.20 mm (0.0020 - 0.0079 in.) Fig. 10: Checking Backlash Of Side Gear Courtesy of TOYOTA MOTOR SALES, U.S.A., INC. If the backlash is not within the specification, install the 2 side gear thrust washers of different thickness (See REASSEMBLY ). 6. MEASURE DRIVE PINION PRELOAD Using a torque wrench, measure the preload of the backlash between the drive pinion and ring gear. 2004 Toyota RAV4 2004 DRIVELINE/AXLES Rear Differential Carrier (4WD) - RAV4 Microsoft Tuesday, July 21, 2009 4:07:10 PM Page 11 © 2005 Mitchell Repair Information Company, LLC.
  • 12. Fig. 11: Measuring Drive Pinion Preload Courtesy of TOYOTA MOTOR SALES, U.S.A., INC. Preload (at starting): 0.6 - 0.9 N.m (6 - 9 kgf.cm, 5.3 - 8.0 in.lbf) 7. CHECK TOTAL PRELOAD Using a torque wrench, measure the preload. Total preload (at starting): Drive pinion preload plus 0.3 - 0.5 N.m (3 - 5 kgf.cm, 2.6 - 4.3 in.lbf) If necessary, disassemble and inspect the differential. 8. REMOVE COMPANION FLANGE a. Using a chisel and a hammer, unstake the staked part of the nut. 2004 Toyota RAV4 2004 DRIVELINE/AXLES Rear Differential Carrier (4WD) - RAV4 Microsoft Tuesday, July 21, 2009 4:07:10 PM Page 12 © 2005 Mitchell Repair Information Company, LLC.
  • 13. b. Using SST to hold the flange, remove the nut. SST 09330-00021 Fig. 12: Removing Companion Flange Nut Courtesy of TOYOTA MOTOR SALES, U.S.A., INC. c. Using SST, remove the companion flange. SST 09950-30012 (09951-03010, 09953-03010, 09954-03010, 09955-03040, 09956-03020) 2004 Toyota RAV4 2004 DRIVELINE/AXLES Rear Differential Carrier (4WD) - RAV4 Microsoft Tuesday, July 21, 2009 4:07:10 PM Page 13 © 2005 Mitchell Repair Information Company, LLC.
  • 14. Fig. 13: Removing Companion Flange Courtesy of TOYOTA MOTOR SALES, U.S.A., INC. 9. REMOVE FRONT OIL SEAL AND OIL SLINGER a. Using SST, remove the oil seal from the differential carrier. SST 09308-10010 b. Remove the oil slinger. 2004 Toyota RAV4 2004 DRIVELINE/AXLES Rear Differential Carrier (4WD) - RAV4 Microsoft Tuesday, July 21, 2009 4:07:10 PM Page 14 © 2005 Mitchell Repair Information Company, LLC.
  • 15. 2004 Toyota RAV4 2004 DRIVELINE/AXLES Rear Differential Carrier (4WD) - RAV4 Microsoft Tuesday, July 21, 2009 4:07:10 PM Page 15 © 2005 Mitchell Repair Information Company, LLC.
  • 16. Fig. 14: Removing Oil Seal & Slinger Courtesy of TOYOTA MOTOR SALES, U.S.A., INC. 10. REMOVE FRONT BEARING AND BEARING SPACER a. Using SST, remove the front bearing from the drive pinion. SST 09556-22010 b. Remove the bearing spacer. Fig. 15: Removing Front Bearing & Bearing Spacer Courtesy of TOYOTA MOTOR SALES, U.S.A., INC. 11. Torque sensing LSD: REMOVE SIDE GEAR SHAFTS a. Using SST, remove the 2 side gear shafts from the differential carrier. SST 09520-24010 (09520-04010, 09520-32040) 2004 Toyota RAV4 2004 DRIVELINE/AXLES Rear Differential Carrier (4WD) - RAV4 Microsoft Tuesday, July 21, 2009 4:07:10 PM Page 16 © 2005 Mitchell Repair Information Company, LLC.
  • 17. b. Using a screwdriver, remove the 2 snap rings from the 2 side gear shafts. Fig. 16: Removing Side Gear Shaft (Torque Sensing LSD) Courtesy of TOYOTA MOTOR SALES, U.S.A., INC. 12. 2 pinion differential: REMOVE SIDE GEAR SHAFTS a. Using needle nose pliers, remove the 2 snap rings from the 2 side gear shafts. b. Remove the 2 side gear shafts. 2004 Toyota RAV4 2004 DRIVELINE/AXLES Rear Differential Carrier (4WD) - RAV4 Microsoft Tuesday, July 21, 2009 4:07:10 PM Page 17 © 2005 Mitchell Repair Information Company, LLC.
  • 18. Fig. 17: Removing Side Gear Shaft (2 Pinion Differential) Courtesy of TOYOTA MOTOR SALES, U.S.A., INC. 13. REMOVE SIDE GEAR SHAFT OIL SEALS Using SST, remove the 2 oil seals from the housing. SST 09308-10010 2004 Toyota RAV4 2004 DRIVELINE/AXLES Rear Differential Carrier (4WD) - RAV4 Microsoft Tuesday, July 21, 2009 4:07:10 PM Page 18 © 2005 Mitchell Repair Information Company, LLC.
  • 19. Fig. 18: Removing Side Gear Shaft Oil Seals Courtesy of TOYOTA MOTOR SALES, U.S.A., INC. 14. REMOVE DIFFERENTIAL CASE a. Place matchmarks on the bearing cap and differential carrier. 2004 Toyota RAV4 2004 DRIVELINE/AXLES Rear Differential Carrier (4WD) - RAV4 Microsoft Tuesday, July 21, 2009 4:07:10 PM Page 19 © 2005 Mitchell Repair Information Company, LLC.
  • 20. Fig. 19: Locating Matchmarks Courtesy of TOYOTA MOTOR SALES, U.S.A., INC. b. Remove the 4 bolts and 2 bearing caps. c. Using SST and a hammer, remove the 2 plate washers. SST 09504-22012 2004 Toyota RAV4 2004 DRIVELINE/AXLES Rear Differential Carrier (4WD) - RAV4 Microsoft Tuesday, July 21, 2009 4:07:10 PM Page 20 © 2005 Mitchell Repair Information Company, LLC.
  • 21. Fig. 20: Removing Plate Washers Courtesy of TOYOTA MOTOR SALES, U.S.A., INC. HINT: Measure the plate washer and note down the thickness. d. Remove the differential case and 2 bearing outer races from the carrier. HINT: Tag the 2 bearing outer races to show the location of reassembling. 15. REMOVE DRIVE PINION FROM DIFFERENTIAL CARRIER 2004 Toyota RAV4 2004 DRIVELINE/AXLES Rear Differential Carrier (4WD) - RAV4 Microsoft Tuesday, July 21, 2009 4:07:10 PM Page 21 © 2005 Mitchell Repair Information Company, LLC.
  • 22. 16. REMOVE DRIVE PINION REAR BEARING a. Using SST and a press, remove the bearing from the drive pinion. SST 09950-00020 Fig. 21: Removing Drive Pinion Rear Bearing Courtesy of TOYOTA MOTOR SALES, U.S.A., INC. HINT: If the drive pinion and ring gear are damaged, replace them as a set. b. Remove the plate washer. 17. REMOVE FRONT AND REAR BEARING OUTER RACES Using a brass bar and a hammer, remove the 2 outer races from the carrier. 2004 Toyota RAV4 2004 DRIVELINE/AXLES Rear Differential Carrier (4WD) - RAV4 Microsoft Tuesday, July 21, 2009 4:07:10 PM Page 22 © 2005 Mitchell Repair Information Company, LLC.
  • 23. Fig. 22: Removing Front & Rear Bearing Outer Races Courtesy of TOYOTA MOTOR SALES, U.S.A., INC. 18. REMOVE RING GEAR a. Place matchmarks on the ring gear and differential case. b. Using a screwdriver and a hammer, unstake the 4 lock plates. c. Remove the 8 ring gear set bolts and 4 lock plates. d. Using a plastic hammer, tap the ring gear to separate it from the differential case. 2004 Toyota RAV4 2004 DRIVELINE/AXLES Rear Differential Carrier (4WD) - RAV4 Microsoft Tuesday, July 21, 2009 4:07:10 PM Page 23 © 2005 Mitchell Repair Information Company, LLC.
  • 24. Fig. 23: Removing Ring Gear & Locating Match Mark Courtesy of TOYOTA MOTOR SALES, U.S.A., INC. 19. REMOVE SIDE BEARINGS Using SST and a press, remove the 2 side bearings from the differential case. SST 09950-00020 2004 Toyota RAV4 2004 DRIVELINE/AXLES Rear Differential Carrier (4WD) - RAV4 Microsoft Tuesday, July 21, 2009 4:07:10 PM Page 24 © 2005 Mitchell Repair Information Company, LLC.
  • 25. Fig. 24: Removing Side Bearings Courtesy of TOYOTA MOTOR SALES, U.S.A., INC. 20. 2 pinion differential: DISASSEMBLE DIFFERENTIAL CASE a. Using a pin punch and a hammer, remove the straight pin. NOTE: Be careful not to drop the differential case. NOTE: If equipped with torque sensing LSD, do not disassemble the differential case. 2004 Toyota RAV4 2004 DRIVELINE/AXLES Rear Differential Carrier (4WD) - RAV4 Microsoft Tuesday, July 21, 2009 4:07:10 PM Page 25 © 2005 Mitchell Repair Information Company, LLC.
  • 26. Fig. 25: Removing Straight Pin Using Pin Punch & Hammer Courtesy of TOYOTA MOTOR SALES, U.S.A., INC. b. Remove the pinion shaft, 2 pinion gears, 2 pinion gear thrust washers, 2 side gears and 2 side gear thrust washers. REPLACEMENT 1. REPLACE SIDE GEAR SHAFT DUST COVER a. Using a screwdriver and a hammer, remove the side gear shaft dust cover. b. Using a steel plate and a press, install a new dust cover to the side gear shaft. NOTE: Be careful not to damage the dust cover. 2004 Toyota RAV4 2004 DRIVELINE/AXLES Rear Differential Carrier (4WD) - RAV4 Microsoft Tuesday, July 21, 2009 4:07:10 PM Page 26 © 2005 Mitchell Repair Information Company, LLC.
  • 27. Fig. 26: Installing Dust Cover To Side Gear Shaft Courtesy of TOYOTA MOTOR SALES, U.S.A., INC. 2. REPLACE COMPANION FLANGE DUST DEFLECTOR a. Using SST and a press, remove the dust deflector. SST 09950-00020 b. Using a press, install a new dust deflector. 2004 Toyota RAV4 2004 DRIVELINE/AXLES Rear Differential Carrier (4WD) - RAV4 Microsoft Tuesday, July 21, 2009 4:07:10 PM Page 27 © 2005 Mitchell Repair Information Company, LLC.
  • 28. Fig. 27: Replacing Companion Flange Dust Deflector Courtesy of TOYOTA MOTOR SALES, U.S.A., INC. REASSEMBLY 1. 2 pinion differential: REASSEMBLE DIFFERENTIAL CASE a. Install the 2 proper thrust washers on the 2 side gears. b. Install the 2 side gears, 2 pinion gears, 2 pinion gear thrust washers and pinion shaft in the differential case. HINT: Align the holes of the differential case and pinion shaft. 2004 Toyota RAV4 2004 DRIVELINE/AXLES Rear Differential Carrier (4WD) - RAV4 Microsoft Tuesday, July 21, 2009 4:07:10 PM Page 28 © 2005 Mitchell Repair Information Company, LLC.
  • 29. Fig. 28: Installing Thrust Washers & Side Gears Courtesy of TOYOTA MOTOR SALES, U.S.A., INC. c. Measure the side gear backlash. 1. Install the 2 side gear shafts. 2. Measure the side gear backlash with holding 1 pinion gear toward the differential case. Backlash: 0.05 - 0.20 mm (0.0020 - 0.0079 in.) 2004 Toyota RAV4 2004 DRIVELINE/AXLES Rear Differential Carrier (4WD) - RAV4 Microsoft Tuesday, July 21, 2009 4:07:10 PM Page 29 © 2005 Mitchell Repair Information Company, LLC.
  • 30. Fig. 29: Measuring Side Gear Backlash Courtesy of TOYOTA MOTOR SALES, U.S.A., INC. If the backlash is not within the specification, install the 2 side gear thrust washers with different thicknesses. HINT: Refer to THRUST WASHER THICKNESS IDENTIFICATION and select 2 thrust washers which ensures that the backlash is within the specification. Thrust washer thickness [mm (in.)] THRUST WASHER THICKNESS IDENTIFICATION [mm (in.)] 0.93 - 0.97 (0.0366 - 0.0382) 1.18 - 1.22 (0.0465 - 0.0480) 0.98 - 1.02 (0.0386 - 0.0402) 1.23 - 1.27 (0.0484 - 0.0500) 1.03 - 1.07 (0.0406 - 0.0421) 1.28 - 1.32 (0.0503 - 0.0520) 1.08 - 1.12 (0.0425 - 0.0441) 1.33 - 1.37 (0.0523 - 0.0539) 1.13 - 1.17 (0.0445 - 0.0461) 1.38 - 1.42 (0.0543 - 0.0559) 2004 Toyota RAV4 2004 DRIVELINE/AXLES Rear Differential Carrier (4WD) - RAV4 Microsoft Tuesday, July 21, 2009 4:07:10 PM Page 30 © 2005 Mitchell Repair Information Company, LLC.
  • 31. 3. Remove the 2 side gear shafts. d. Using a pin punch and a hammer, install the straight pin through the differential case and hole of the pinion shaft. Fig. 30: Installing Straight Pin Using Pin Pinch & Hammer Courtesy of TOYOTA MOTOR SALES, U.S.A., INC. e. Using a chisel and a hammer, stake the outside of the differential case pin hole. 2. INSTALL RING GEAR ON DIFFERENTIAL CASE a. Clean the contact surfaces of the differential case and ring gear. b. Heat the ring gear in boiling water. c. Carefully remove the ring gear from the boiling water. 2004 Toyota RAV4 2004 DRIVELINE/AXLES Rear Differential Carrier (4WD) - RAV4 Microsoft Tuesday, July 21, 2009 4:07:10 PM Page 31 © 2005 Mitchell Repair Information Company, LLC.
  • 32. Fig. 31: Heating Ring Gear In Boiling Water Courtesy of TOYOTA MOTOR SALES, U.S.A., INC. d. After the moisture on the ring gear has completely evaporated, quickly install the ring gear to the differential case. e. Align the matchmarks on the ring gear and differential case. 2004 Toyota RAV4 2004 DRIVELINE/AXLES Rear Differential Carrier (4WD) - RAV4 Microsoft Tuesday, July 21, 2009 4:07:10 PM Page 32 © 2005 Mitchell Repair Information Company, LLC.
  • 33. Fig. 32: Aligning Matchmarks On Ring Gear & Differential Case Courtesy of TOYOTA MOTOR SALES, U.S.A., INC. f. Temporarily install 4 new lock plates and the 8 bolts. g. After the ring gear cools down enough, torque the 8 bolts uniformly at a time. Torque: 97 N.m (985 kgf.cm, 71 ft.lbf) h. Using a chisel and a hammer, raise up claws of the 4 lock plates. HINT:  Bend one of the claws which touches the flat surface of the bolt so that the claw can contact the surface firmly.  If one of the claws is divided into two due the protruding portion of the bolt, make the claw contact firmly with the tightening side of the bolt. 3. INSTALL SIDE BEARINGS Using SST and a press, install the 2 side bearings into the differential case. SST 09710-22021 (09710-01031) 2004 Toyota RAV4 2004 DRIVELINE/AXLES Rear Differential Carrier (4WD) - RAV4 Microsoft Tuesday, July 21, 2009 4:07:10 PM Page 33 © 2005 Mitchell Repair Information Company, LLC.
  • 34. Fig. 33: Installing Side Bearings Courtesy of TOYOTA MOTOR SALES, U.S.A., INC. 4. INSPECT RING GEAR RUNOUT a. Install the differential case on the carrier, and install the 2 plate washers so that there is no play in the bearing. b. Install the bearing caps. c. Using a dial indicator, measure the runout of the ring gear. Maximum runout: 0.07 mm (0.0028 in.) 2004 Toyota RAV4 2004 DRIVELINE/AXLES Rear Differential Carrier (4WD) - RAV4 Microsoft Tuesday, July 21, 2009 4:07:10 PM Page 34 © 2005 Mitchell Repair Information Company, LLC.
  • 35. Thank you very much for your reading. Please Click Here Then Get More Information.