This document provides a step-by-step guide for building a React app. It outlines 5 steps: 1) Break the UI into a component hierarchy, 2) Build a static version with components, 3) Identify the minimal state needed, 4) Determine where state should live, 5) Add inverse data flow to support updating state from user input. The guide walks through applying these steps to build a product filtering table app, identifying the key components and how state would flow from parent to child and back again upon user interaction.

![Start With A Mock
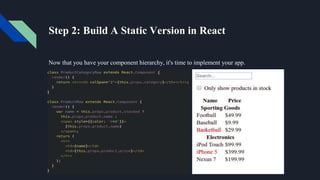
Imagine that we already have a JSON API.Our JSON API returns some
data that looks like this:
[
{category: "Sporting Goods", price: "$49.99", stocked: true, name: "Football"},
{category: "Sporting Goods", price: "$9.99", stocked: true, name: "Baseball"},
{category: "Sporting Goods", price: "$29.99", stocked: false, name: "Basketball"},
{category: "Electronics", price: "$99.99", stocked: true, name: "iPod Touch"},
{category: "Electronics", price: "$399.99", stocked: false, name: "iPhone 5"},
{category: "Electronics", price: "$199.99", stocked: true, name: "Nexus 7"}
];](https://image.slidesharecdn.com/5otyxvctmo17mwwg9tpe-signature-b3cb803483589fcfdfab2151355b3b43eb21fac6d43305da6c7e00f9f2e268d1-poli-170717035714/85/Thinking-in-react-3-320.jpg)