The Ring programming language version 1.9 book - Part 75 of 210
•
0 likes•17 views

The Ring programming language version 1.9 book - Part 75 of 210

Recommended
Recommended
More Related Content
What's hot
What's hot (20)
Similar to The Ring programming language version 1.9 book - Part 75 of 210
Similar to The Ring programming language version 1.9 book - Part 75 of 210 (20)
More from Mahmoud Samir Fayed
More from Mahmoud Samir Fayed (20)
Recently uploaded
Recently uploaded (20)
The Ring programming language version 1.9 book - Part 75 of 210
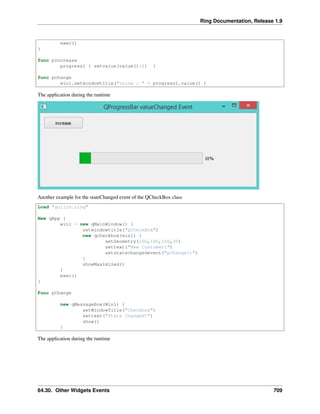
- 1. Ring Documentation, Release 1.9 exec() } func pIncrease progress1 { setvalue(value()+1) } func pchange win1.setwindowtitle("value : " + progress1.value() ) The application during the runtime Another example for the stateChanged event of the QCheckBox class Load "guilib.ring" New qApp { win1 = new qMainWindow() { setwindowtitle("QCheckBox") new qcheckbox(win1) { setGeometry(100,100,100,30) settext("New Customer!") setstatechangedevent("pchange()") } showMaximized() } exec() } Func pChange new qMessageBox(Win1) { setWindowTitle("Checkbox") settext("State Changed!") show() } The application during the runtime 64.30. Other Widgets Events 709
- 2. Ring Documentation, Release 1.9 64.31 Using the QTimer Class In this example we will learn about using the QTimer class Load "guilib.ring" new qApp { win1 = new qwidget() { setgeometry(100,100,200,70) setwindowtitle("Timer") label1 = new qlabel(win1) { setgeometry(10,10,200,30) settext(thetime()) } new qtimer(win1) { setinterval(1000) settimeoutevent("pTime()") start() } show() } exec() } func ptime label1.settext(thetime()) Func thetime return "Time : " + Time() The application during the runtime 64.31. Using the QTimer Class 710
- 3. Ring Documentation, Release 1.9 64.32 Using QProgressBar and Timer In this example we will learn about using the “animated” QProgressBar class and Timer ###------------------------------------ ### ProgressBar and Timer Example Load "guilib.ring" new qApp { win1 = new qwidget() { setgeometry(100,100,400,100) setwindowtitle("Timer and ProgressBar") LabelMan = new qlabel(win1) { setgeometry(10,10,200,30) settext(theTime()) ### ==>> func } TimerMan = new qtimer(win1) { setinterval(1000) settimeoutevent("pTime()") ### ==>> func start() } BarMan = new qprogressbar(win1) { setGeometry(100,50,300,10) ### Position X y, Length, Thickness setvalue(0) ### Percent filled } show() } exec() } func pTime LabelMan.settext(theTime()) ### ==>> func Increment = 10 if BarMan.value() >= 100 ### ProgressBar start over. BarMan.setvalue(0) ok BarMan{ setvalue(value() + Increment) } 64.32. Using QProgressBar and Timer 711
- 4. Ring Documentation, Release 1.9 Func theTime return "Time : " + Time() 64.33 Display Scaled Image using QLabel In this example we will learn about displaying and scaling an image so that it looks “animated” using the QLabel widget Load "guilib.ring" #---------------------------------------------------- # REQUIRES: image = "C:RINGbinstock.jpg" # imageStock: start dimensions for growing image imageW = 200 ; imageH = 200 ; GrowBy = 4 ###---------------------------------------------------- ### Window and Box Size dimensions WinWidth = 1280 ; WinHeight = 960 BoxWidth = WinWidth -80 ; BoxHeight = WinHeight -80 ###---------------------------------------------------- New qapp { win1 = new qwidget() { setgeometry(50,50, WinWidth,WinHeight) setwindowtitle("Animated Image - Display Image Scaled and Resized") imageStock = new qlabel(win1) { image = new qpixmap("C:RINGbinstock.jpg") AspectRatio = image.width() / image.height() imageW = 200 imageH = imageH / AspectRatio ### Size-H, Size-V, Aspect, Transform setpixmap(image.scaled(imageW , imageH ,0,0)) PosLeft = (BoxWidth - imageW ) / 2 PosTop = (BoxHeight - imageH ) / 2 64.33. Display Scaled Image using QLabel 712
- 5. Ring Documentation, Release 1.9 setGeometry(PosLeft,PosTop,imageW,imageH) } TimerMan = new qtimer(win1) { setinterval(100) ### interval 100 millisecs. settimeoutevent("pTime()") ### ==>> func start() } show() } exec() } ###------------------------------------------------------ ### Fuction TimerMan: calling interval 100 milliseconds func pTime ### Stop Timer when image is size of Window area if imageW > BoxWidth TimerMan.stop() imageStock.clear() ### Will clear the image ok ### Grow image imageW += GrowBy imageH = imageW / AspectRatio ### Scaled Image: Size-H, Size-V, Aspect, Transform imageStock.setpixmap(image.scaled(imageW , imageH ,0,0)) ### Center the image PosLeft = (WinWidth - imageW ) / 2 PosTop = (WinHeight - imageH ) / 2 imageStock.setGeometry(PosLeft,PosTop,imageW,imageH) 64.34 Using the QFileDialog Class Example Load "guilib.ring" New qapp { win1 = new qwidget() { setwindowtitle("open file") setgeometry(100,100,400,400) new qpushbutton(win1) { setgeometry(10,10,200,30) settext("open file") setclickevent("pOpen()") } show() } 64.34. Using the QFileDialog Class 713
- 6. Ring Documentation, Release 1.9 exec() } Func pOpen new qfiledialog(win1) { cName = getopenfilename(win1,"open file","c:","source files(*.ring)") win1.setwindowtitle(cName) } The application during the runtime 64.35 Drawing using QPainter In this example we will learn about drawing using the QPainter class Load "guilib.ring" New qapp { win1 = new qwidget() { setwindowtitle("Drawing using QPainter") setgeometry(100,100,500,500) label1 = new qlabel(win1) { setgeometry(10,10,400,400) settext("") } new qpushbutton(win1) { setgeometry(200,400,100,30) settext("draw") setclickevent("draw()") } show() } 64.35. Drawing using QPainter 714
- 7. Ring Documentation, Release 1.9 exec() } Func draw p1 = new qpicture() color = new qcolor() { setrgb(0,0,255,255) } pen = new qpen() { setcolor(color) setwidth(10) } new qpainter() { begin(p1) setpen(pen) drawline(500,150,950,450) drawline(950,550,500,150) endpaint() } label1 { setpicture(p1) show() } The application during the runtime 64.35. Drawing using QPainter 715
- 8. Ring Documentation, Release 1.9 64.36 Printing using QPrinter In this example we will learn how to print to PDF file using QPrinter Load "guilib.ring" new qApp { win1 = new qwidget() { setwindowtitle("Printer") setgeometry(100,100,500,500) myweb = new qwebview(win1) { setgeometry(100,100,1000,500) loadpage(new qurl("http://google.com")) } new qpushbutton(win1) { setGeometry(20,20,100,30) settext("Print") setclickevent("print()") } showmaximized() 64.36. Printing using QPrinter 716
- 9. Ring Documentation, Release 1.9 } exec() } func print printer1 = new qPrinter(0) { setoutputformat(1) # 1 = pdf setoutputfilename("test.pdf") painter = new qpainter() { begin(printer1) myfont = new qfont("Times",50,-1,0) setfont(myfont) drawtext(100,100,"test") printer1.newpage() drawtext(100,100,"test2") endpaint() } } printer1 = new qPrinter(0) { setoutputformat(1) setoutputfilename("test2.pdf") myweb.print(printer1) myweb.show() } system ("test.pdf") system ("test2.pdf") 64.37 Using QPrintPreviewDialog In this example we will learn how to use the QPrintPreviewDialog class. Example: load "guilib.ring" new qApp { win1 = new qwidget() { setwindowtitle("Printer Preview Dialog") setgeometry(100,100,800,880) printer1 = new qPrinter(0) show() oPreview = new qPrintPreviewDialog(printer1) { setParent(win1) move(10,10) setPaintrequestedevent("printPreview()") exec() } } exec() } func printPreview printer1 { painter = new qpainter() { 64.37. Using QPrintPreviewDialog 717
- 10. Ring Documentation, Release 1.9 begin(printer1) myfont = new qfont("Times",50,-1,0) setfont(myfont) drawtext(100,100,"Test - Page (1)") printer1.newpage() drawtext(100,100,"Test - Page (2)") printer1.newpage() myfont2 = new qfont("Times",14,-1,0) setfont(myfont2) for x = 1 to 30 drawtext(100,100+(20*x),"Number : " + x) next endpaint() } } Screen Shot: 64.37. Using QPrintPreviewDialog 718