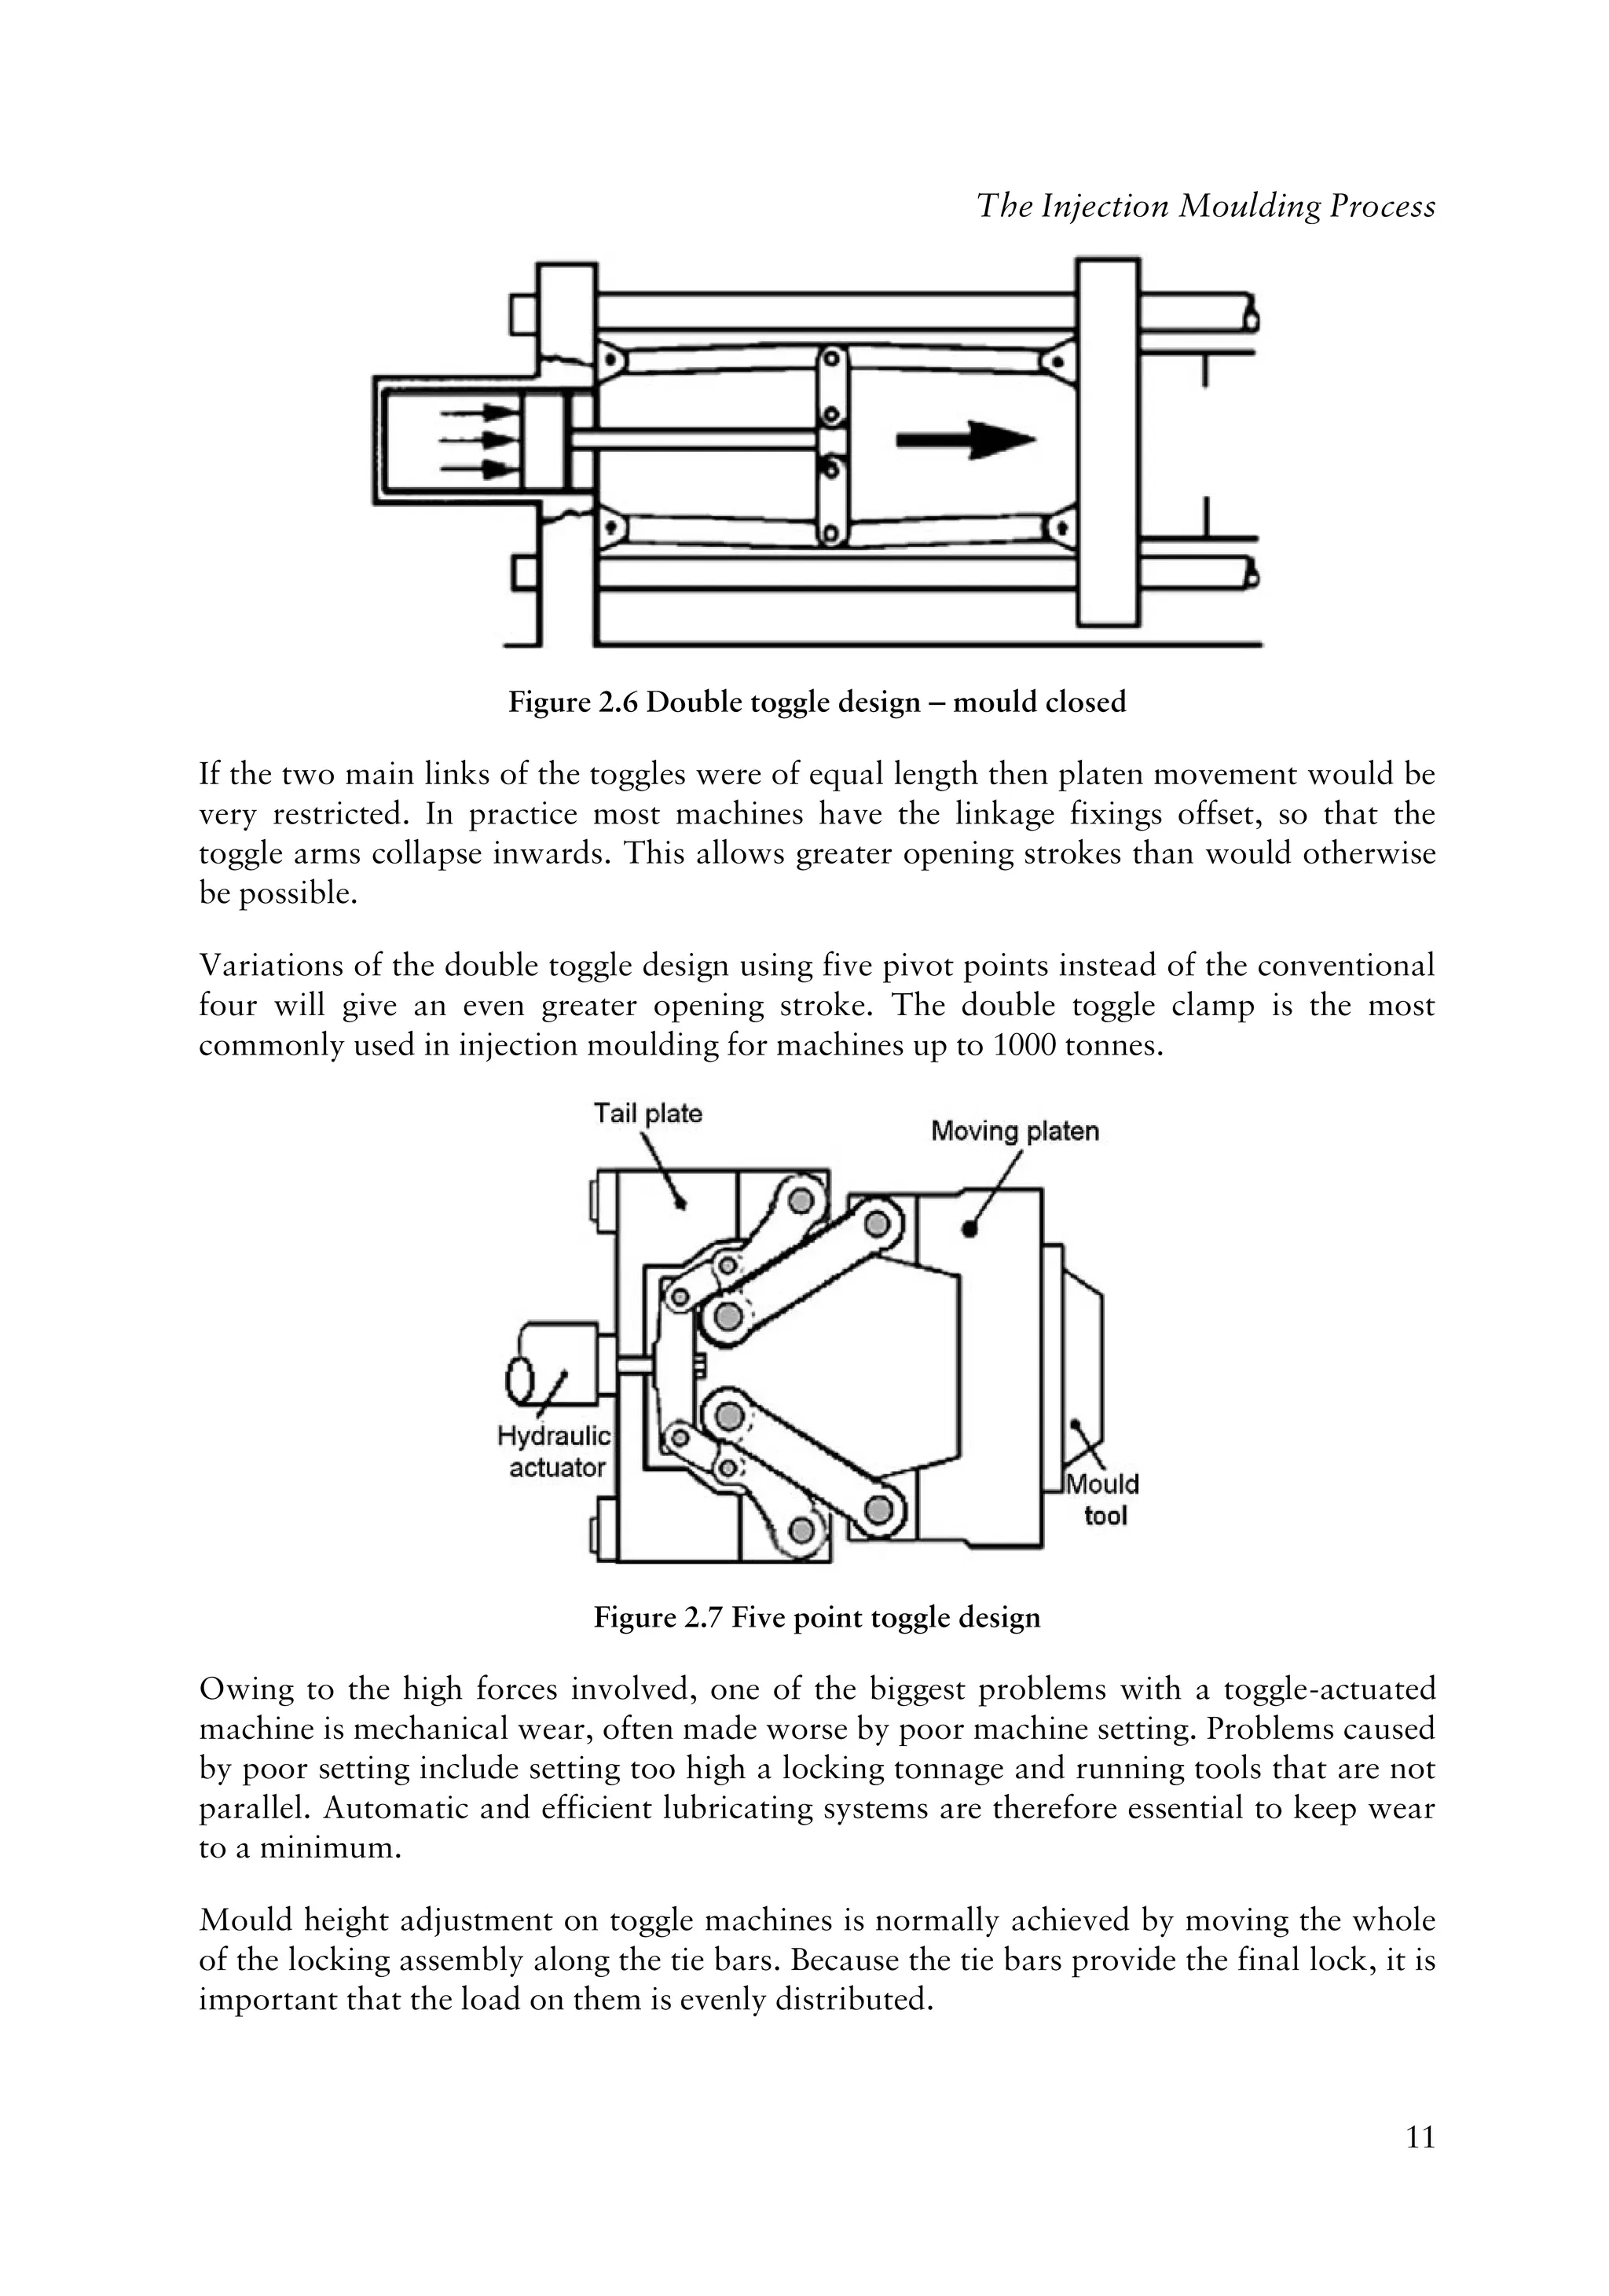
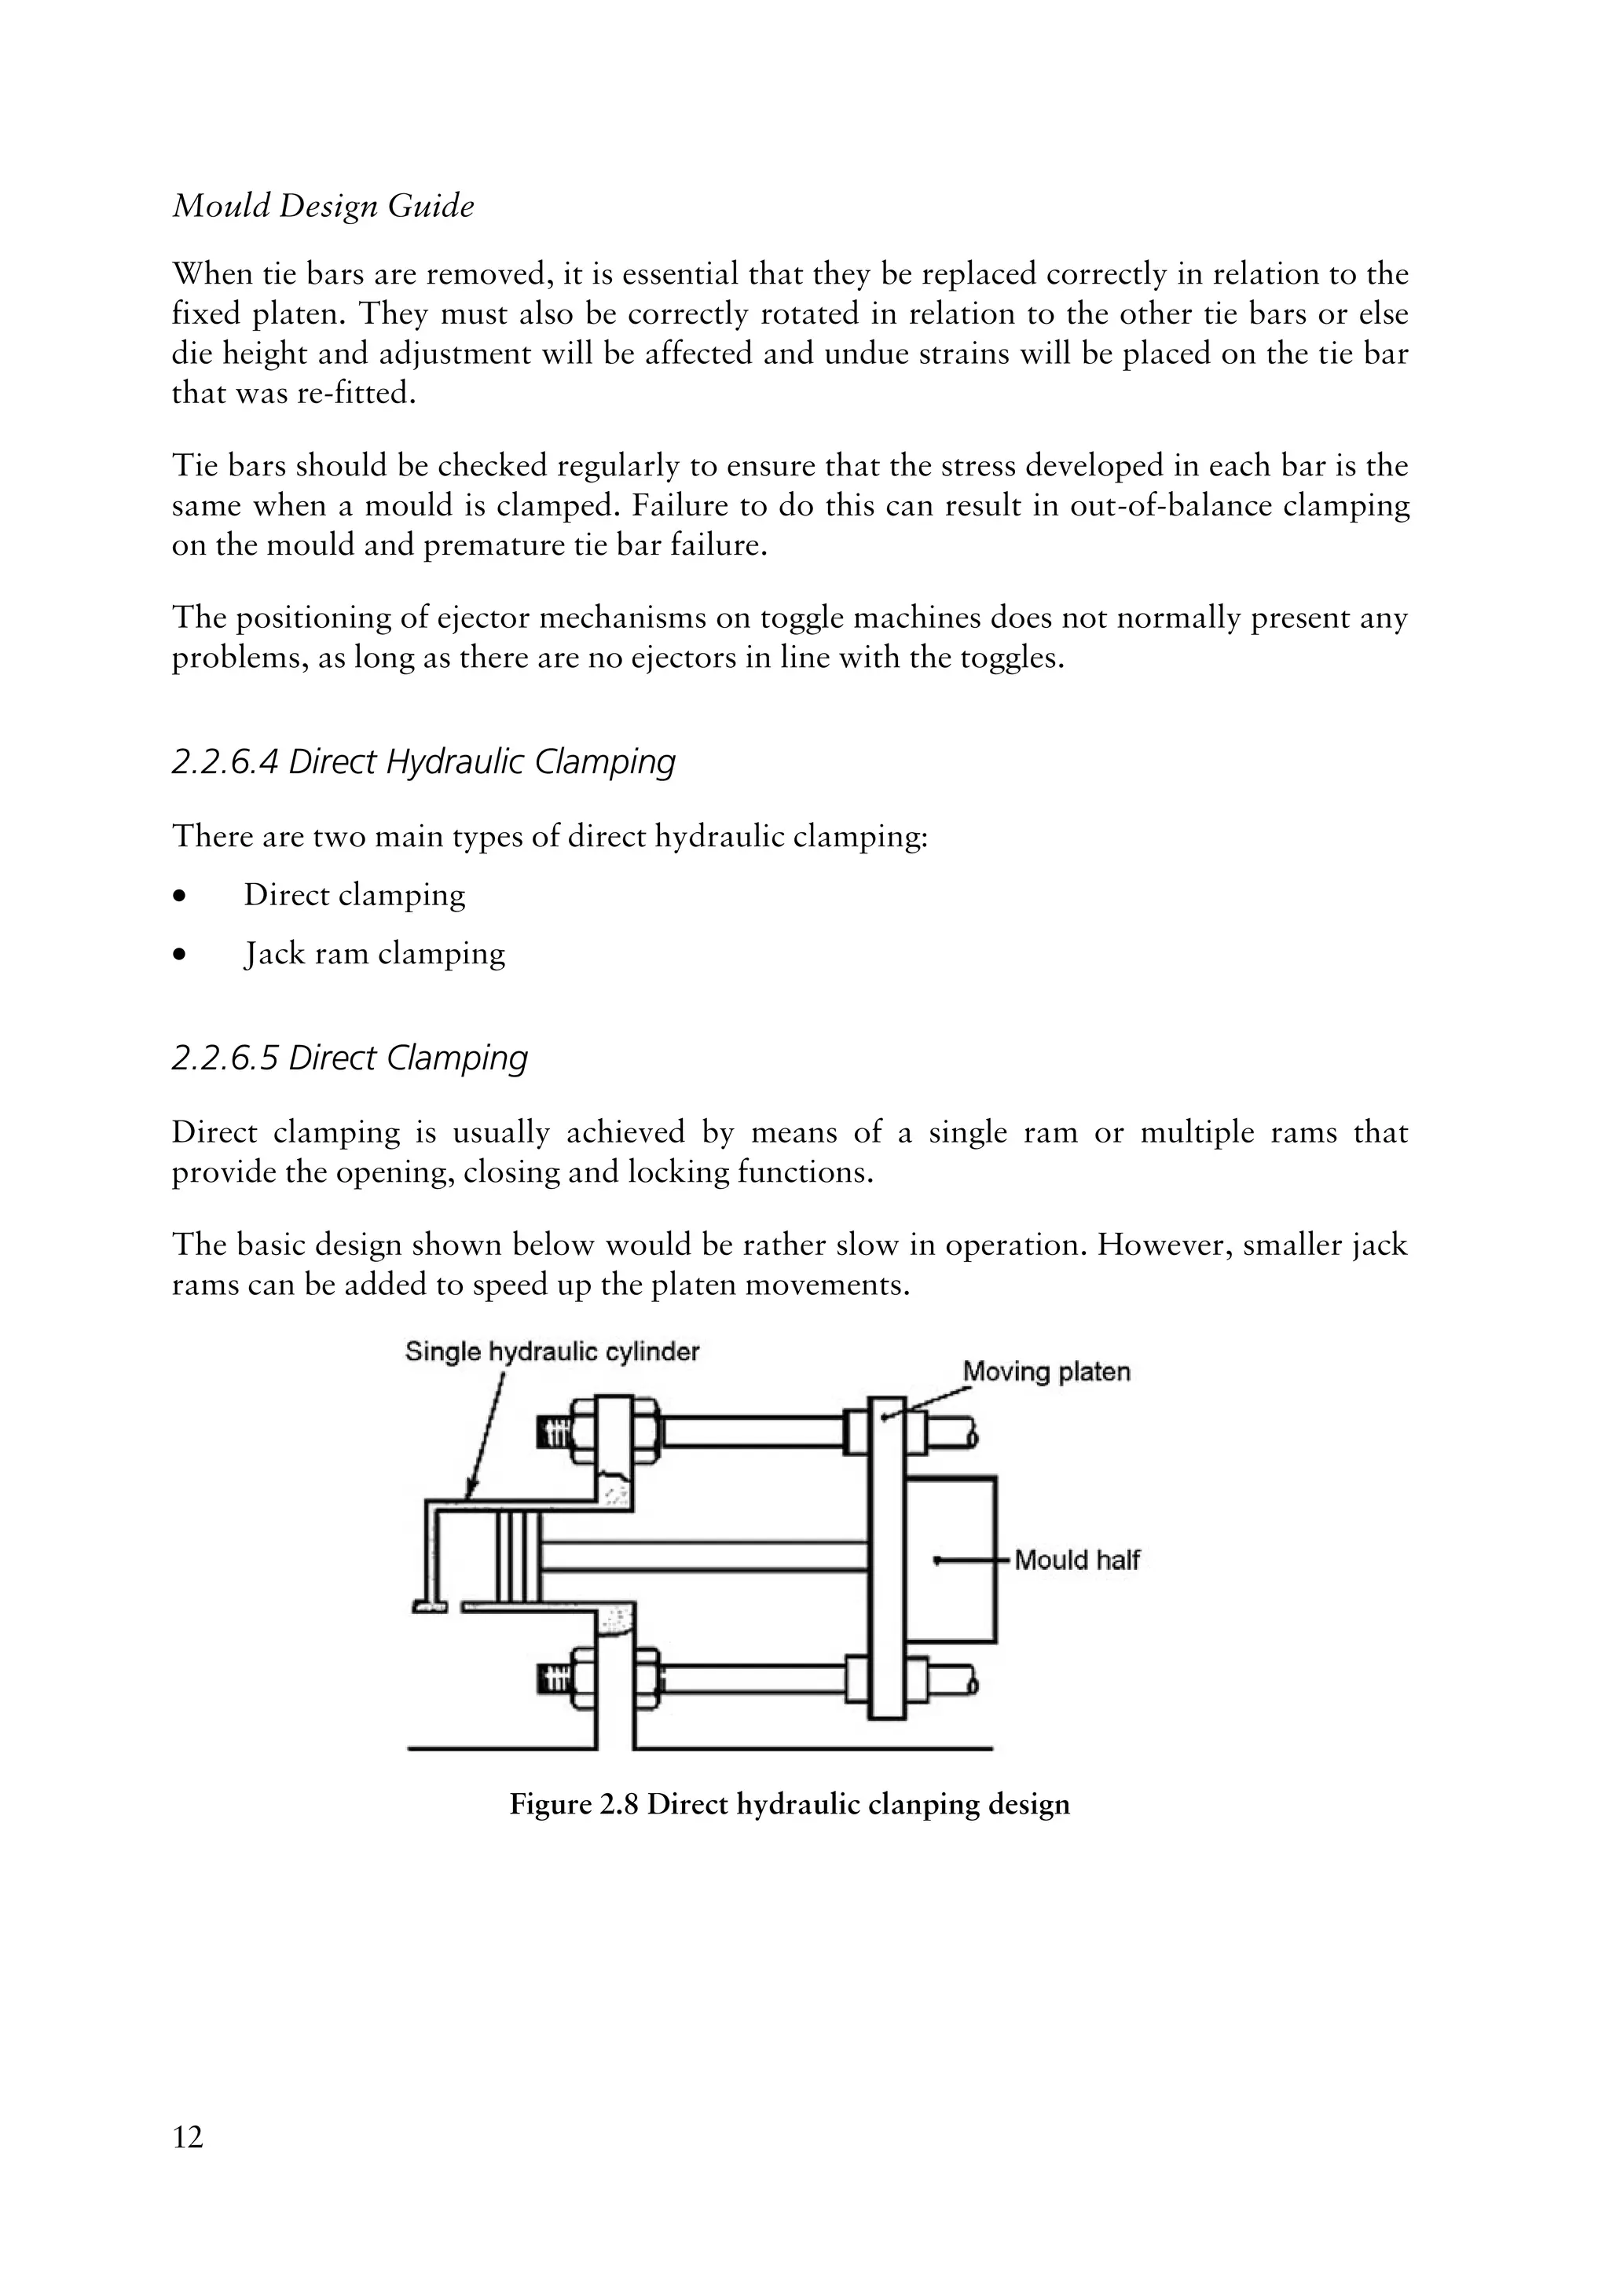
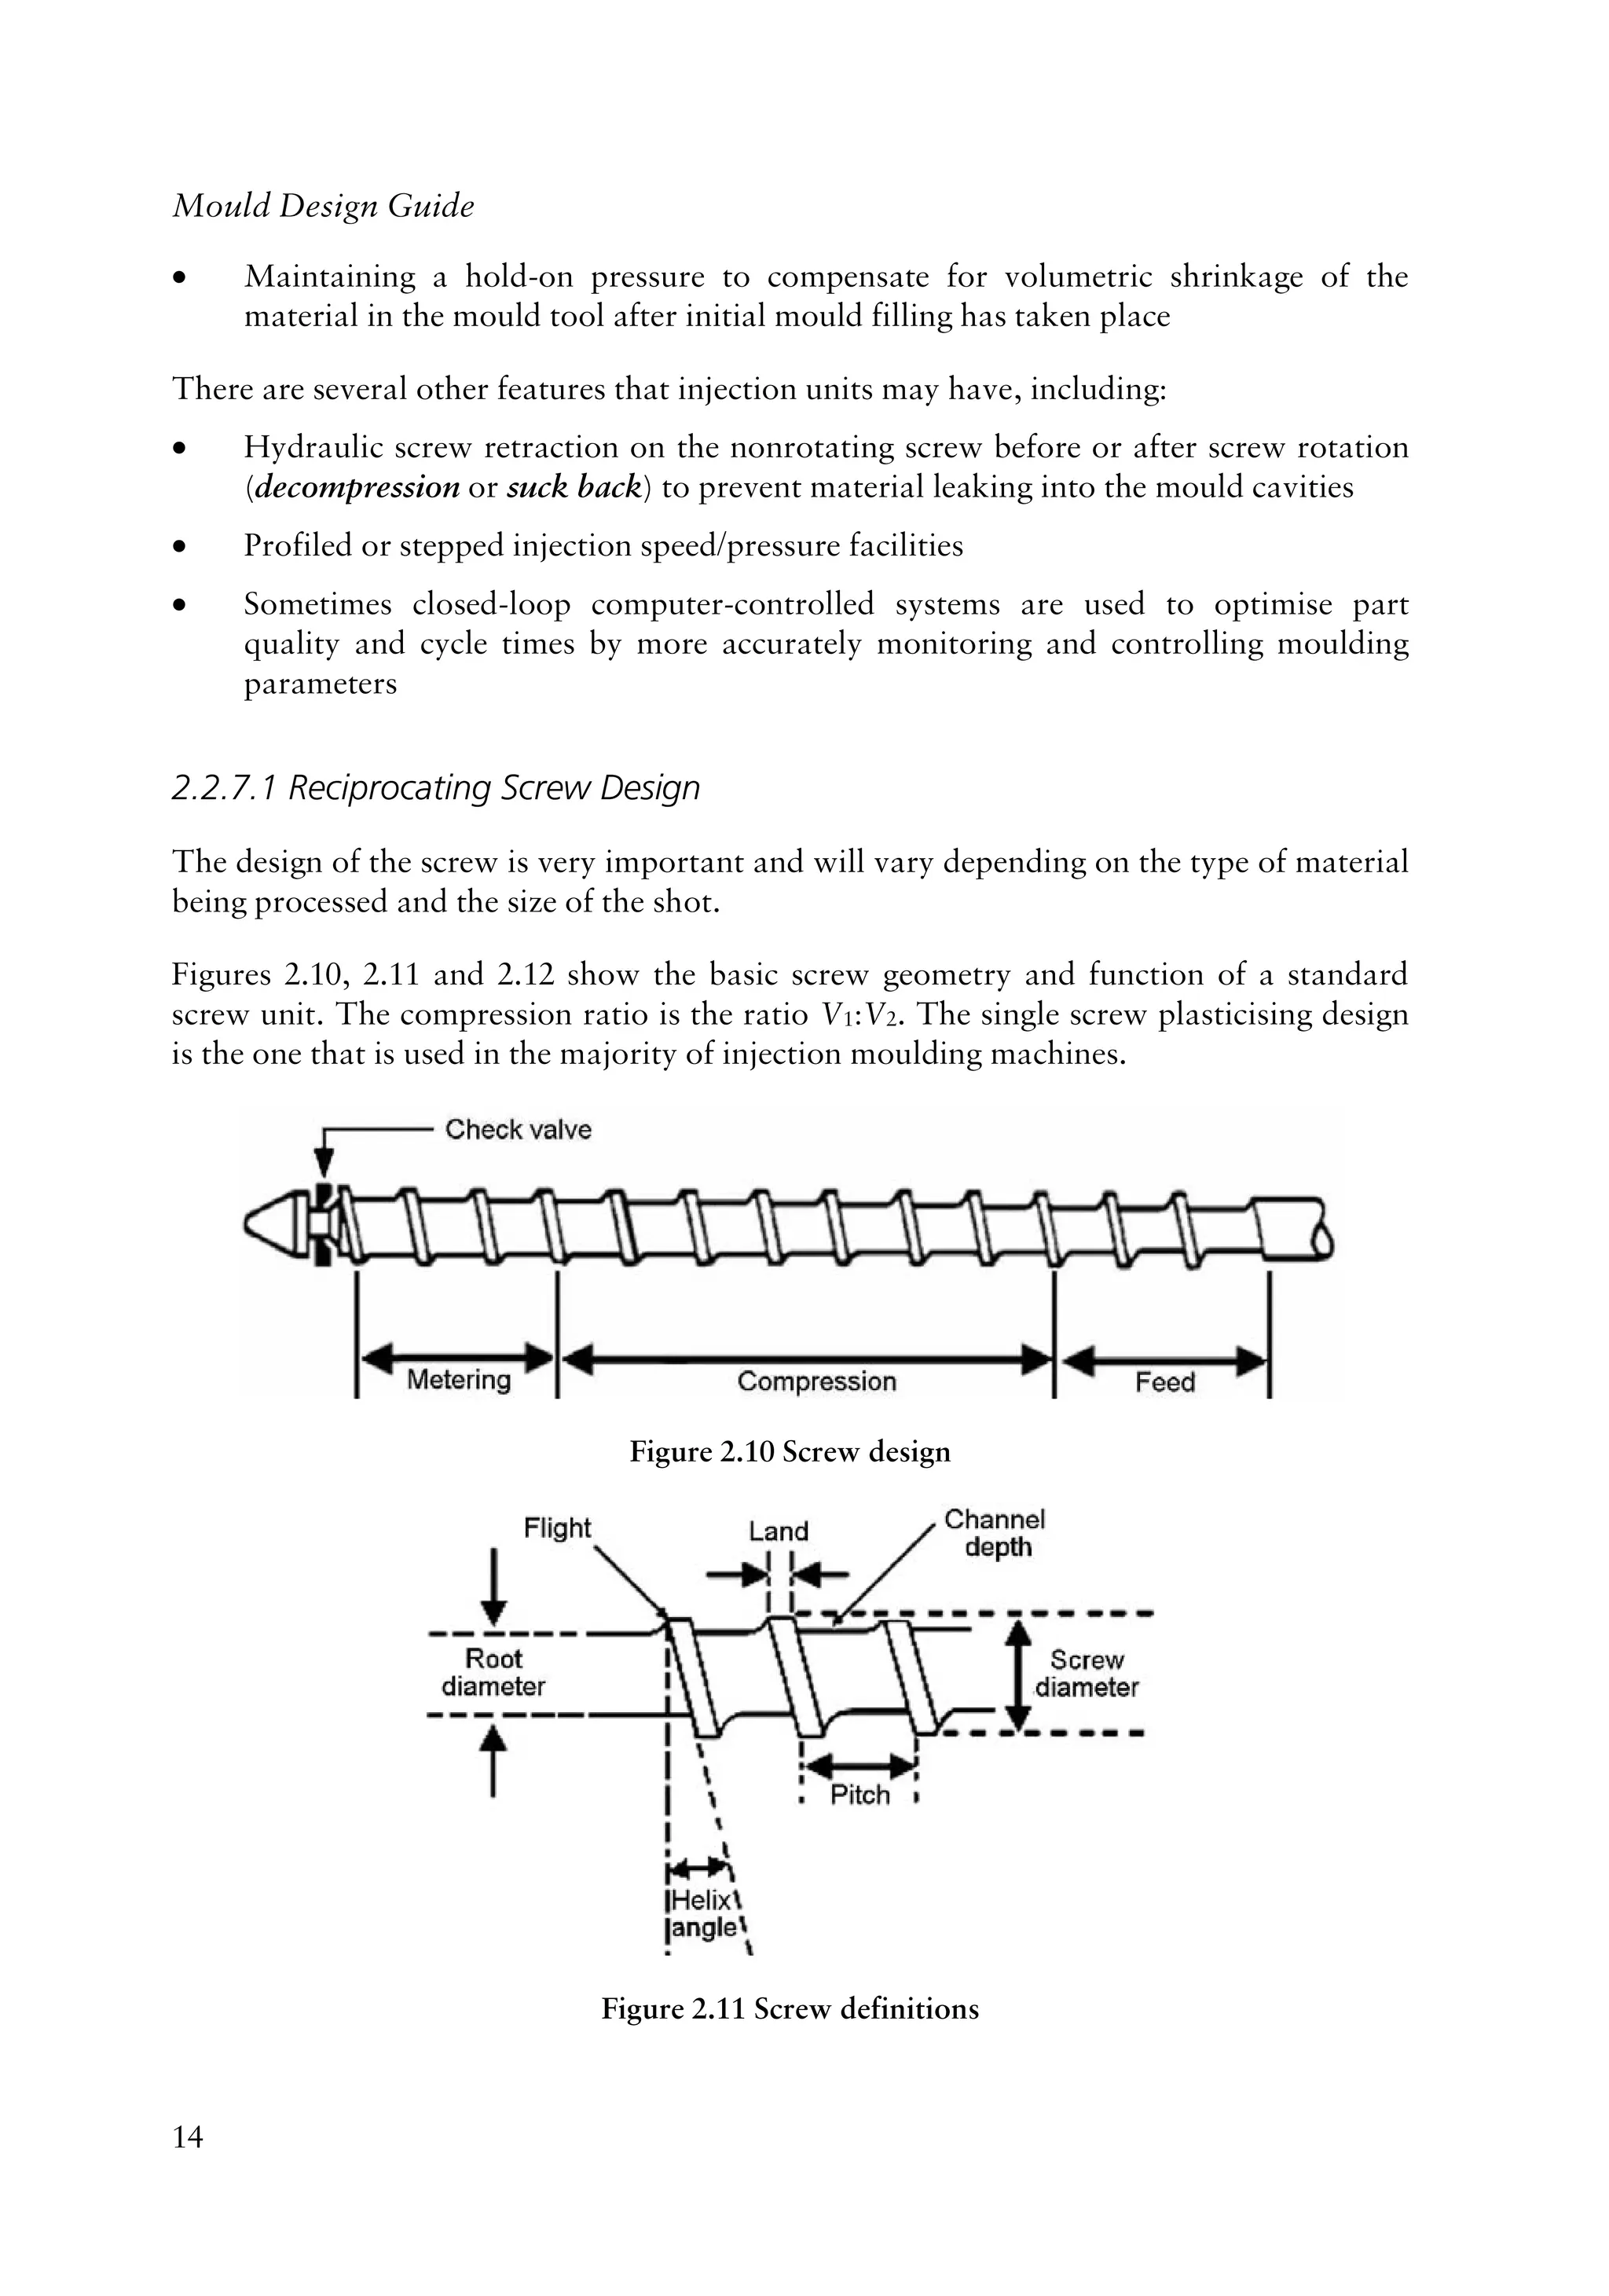
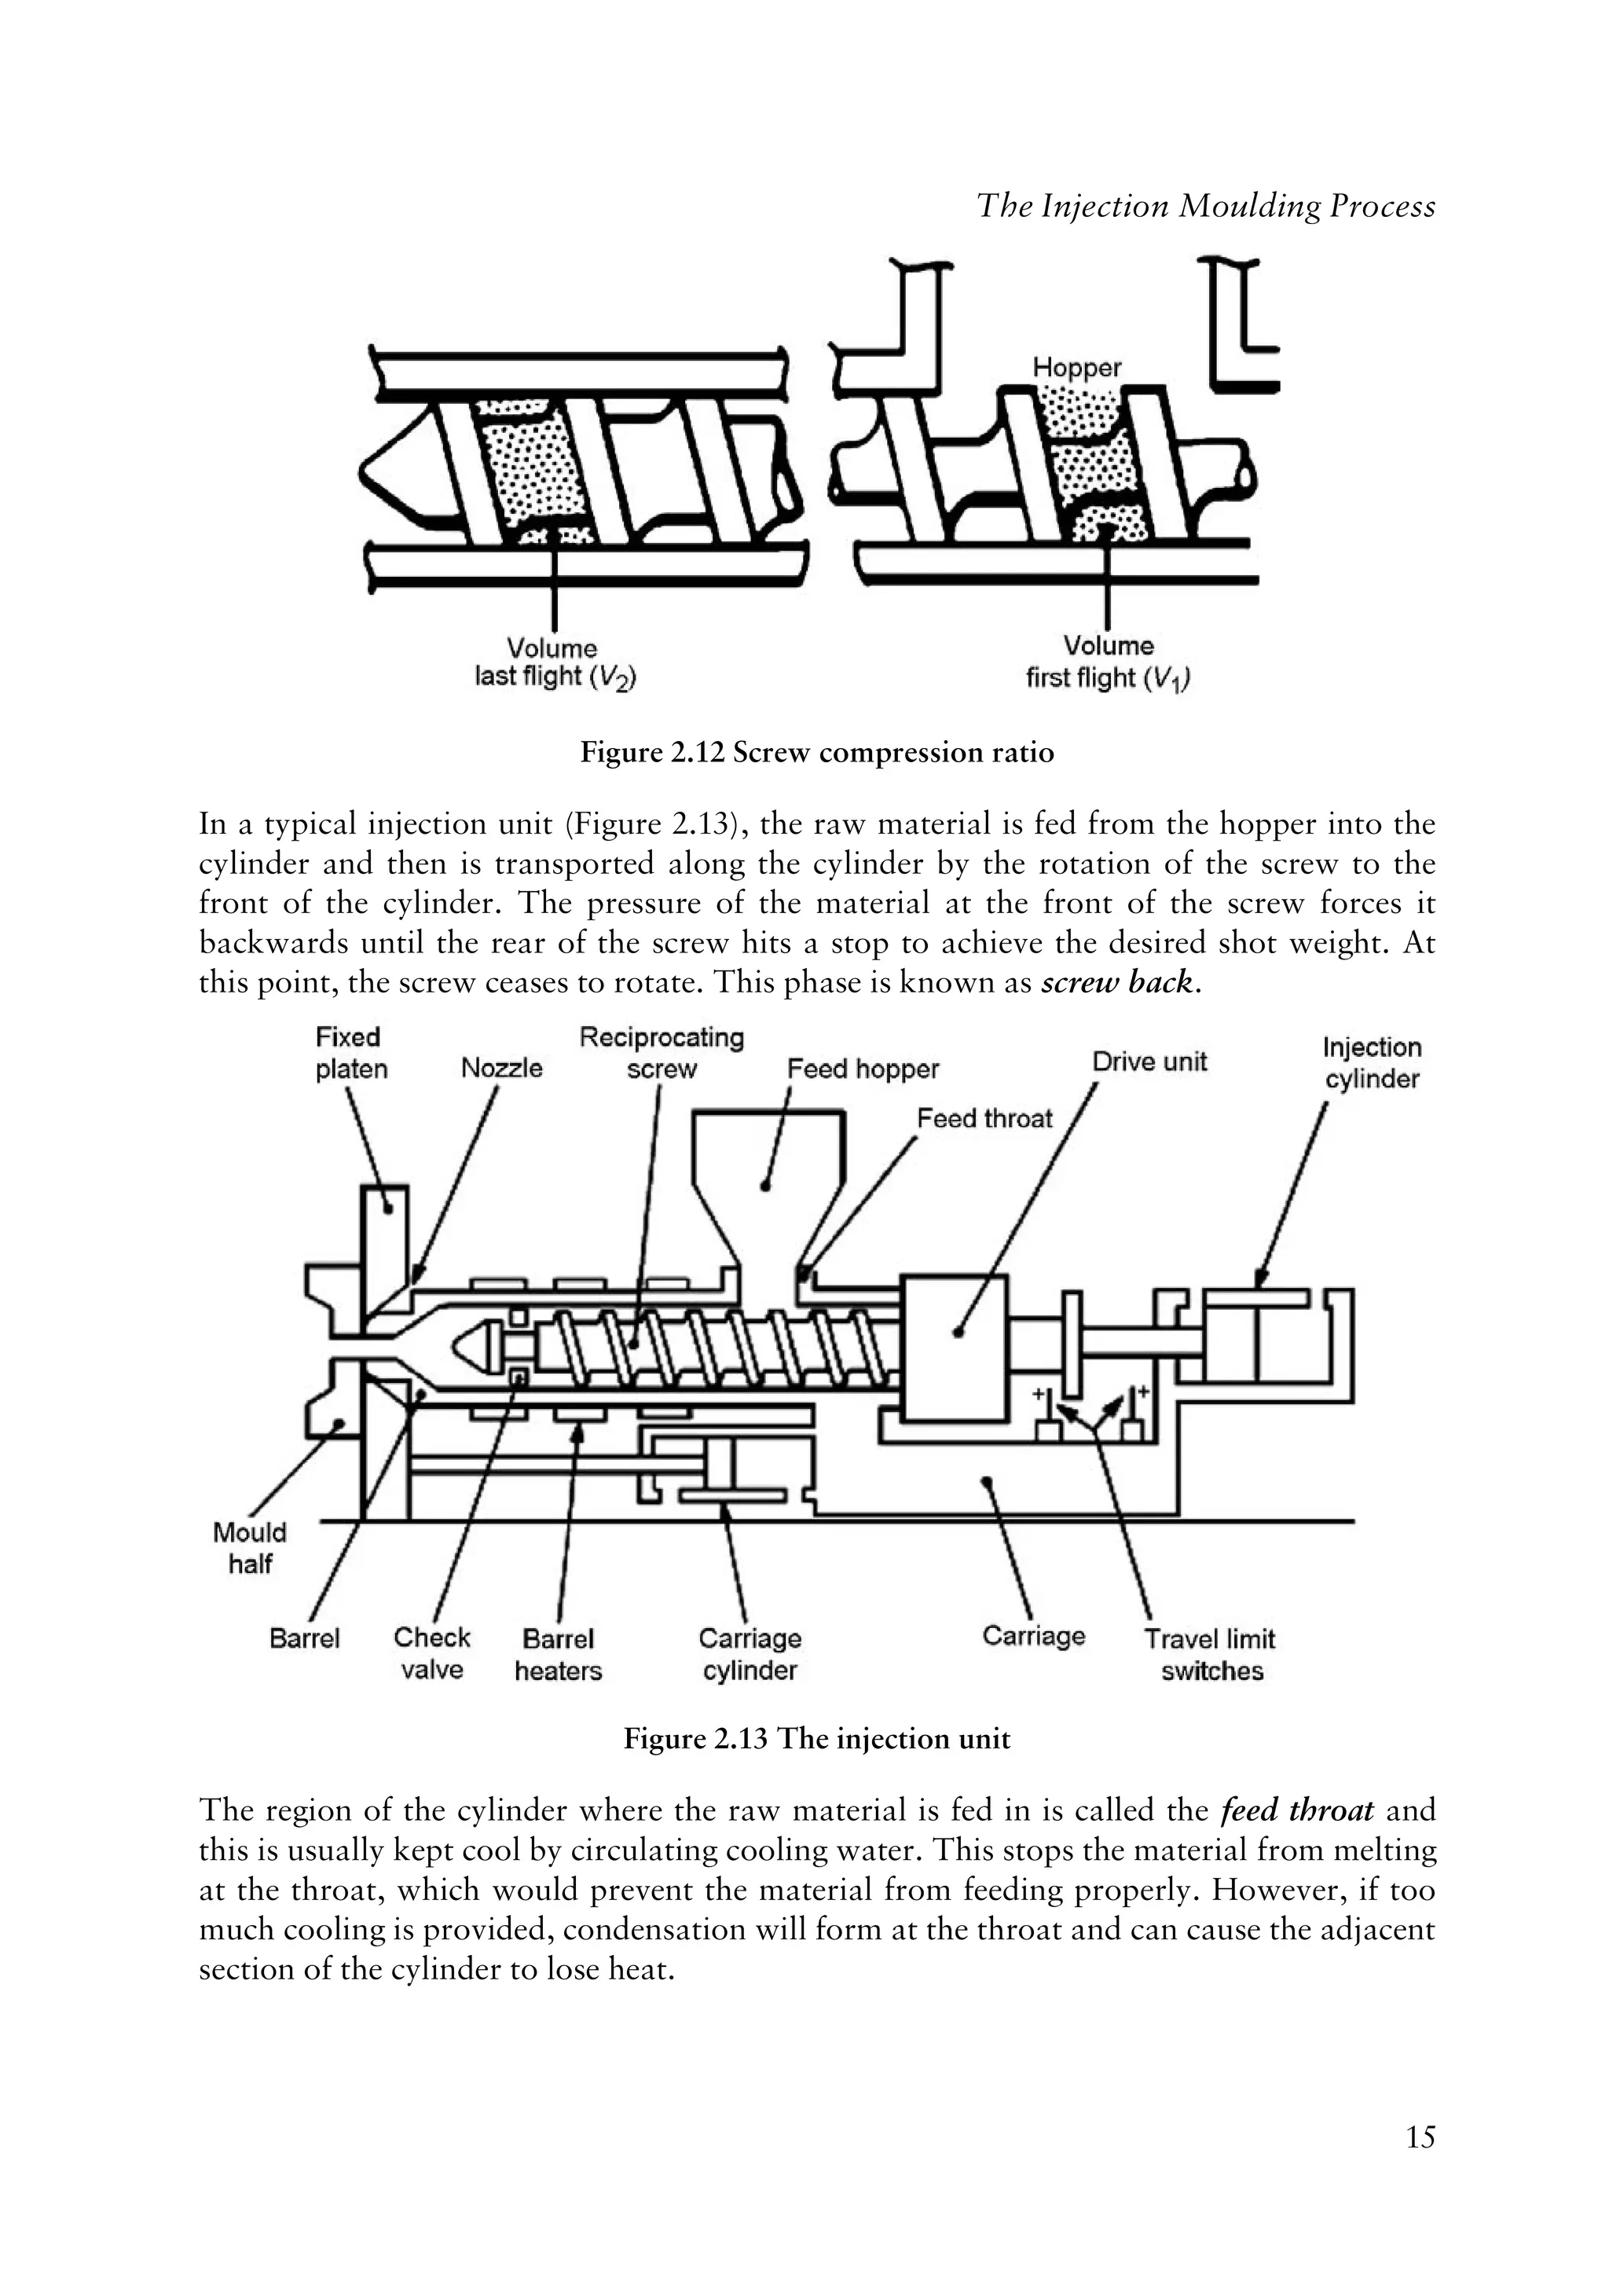
SlideShare a Scribd company logo
The Mould Design Guide
Peter Jones
The Mould Design Guide
Peter Jones
Smithers Rapra Technology Limited
A wholly owned subsidiary of The Smithers Group
Shawbury, Shrewsbury, Shropshire, SY4 4NR, United Kingdom
Telephone: +44 (0)1939 250383 Fax: +44 (0)1939 251118
http://www.rapra.net
First Published in 2008 by
Smithers Rapra Technology Limited
Shawbury, Shrewsbury, Shropshire, SY4 4NR, UK
©2008, Smithers Rapra Technology Limited
All rights reserved. Except as permitted under current legislation no part
of this publication may be photocopied, reproduced or distributed in any
form or by any means or stored in a database or retrieval system, without
the prior permission from the copyright holder.
A catalogue record for this book is available from the British Library.
Every effort has been made to contact copyright holders of any material reproduced
within the text and the authors and publishers apologise if any have been overlooked.
Typeset by documen.co.uk
Cover designed by Smithers Rapra Technology Limited
Printed and bound by Lightning Source
Soft-backed ISBN: 978-1-84735-088-6
Hard-backed ISBN: 978-1-84735-087-9
i
Contents
1 Introduction ......................................................................................................... 1
2 The Injection Moulding Process ............................................................................ 5
2.1 Background .............................................................................................. 5
2.2 Machine Design........................................................................................ 6
2.2.1 Machine Base Unit ...................................................................... 6
2.2.2 Clamp Unit................................................................................. 6
2.2.3 Mould Height ............................................................................. 6
2.2.4 Daylight...................................................................................... 7
2.2.5 Distance Between Tie Bars........................................................... 8
2.2.6 Clamping Mechanisms ................................................................ 9
2.2.7 The Injection Unit..................................................................... 13
2.3 Theoretical Mould Locking Force............................................................ 19
2.4 The Moulding Cycle ............................................................................... 20
2.4.1 Mould Closing Phase................................................................. 20
2.4.2 Mould Protection Phase ............................................................ 20
2.4.3 Injection (Mould Filling) Phase.................................................. 20
2.4.4 Holding Time and Pressurising Phase......................................... 20
2.4.5 Cooling and Refill Phase............................................................ 21
2.4.6 Screw Back Phase...................................................................... 21
2.4.7 Mould Open Phase.................................................................... 21
2.4.8 Ejection Phase........................................................................... 22
Mould Design Guide
ii
3 Plastics Materials................................................................................................ 23
3.1 Types of Plastics Materials...................................................................... 23
3.2 Definition of Plastics............................................................................... 23
3.3 The Nature of Plastics Materials ............................................................. 24
3.4 Monomers, Polymerisation and Polymers ................................................ 25
3.5 Classification of Plastics.......................................................................... 26
3.5.1 Thermosets and Thermoplastics ................................................ 26
3.5.2 Homopolymers, Copolymers and Polymer Blends (Alloys) ......... 27
3.5.3 Amorphous and Semicrystalline Thermoplastics ........................ 29
3.6 Melting and Solidification....................................................................... 30
3.7 Shrinkage ............................................................................................... 31
3.8 Engineering and Commodity Plastics....................................................... 32
3.8.1 Engineering Plastics................................................................... 32
3.8.2 Commodity Plastics .................................................................. 32
3.9 Material Additives .................................................................................. 33
3.10 Flow Properties of Thermoplastic Materials............................................. 35
3.11 Variable Molecular Weight ..................................................................... 35
3.12 Melt Flow Index (MFI) ........................................................................... 36
3.13 Reprocessed Material.............................................................................. 37
3.14 Polymer Molecules.................................................................................. 37
3.15 Material Names and Abbreviations ......................................................... 37
3.16 Material Applications ............................................................................. 40
Contents
iii
3.17 The Behaviour of Thermoplastics
During the Injection Moulding Process .................................................... 41
3.17.1 Pretreatment of Materials Before Injection Moulding ................. 41
3.17.2 Reprocessed Materials............................................................... 41
3.17.3 Colouring Materials.................................................................. 41
3.17.4 Additives .................................................................................. 41
3.17.5 Material Drying ........................................................................ 42
3.17.6 Plasticising or Melting............................................................... 43
3.17.7 Measurement of Melt Temperature ........................................... 44
3.17.8 Degradation of Materials During Plasticising ............................. 44
3.17.9 Selecting the Optimum Melt Temperature.................................. 45
3.17.10 The Effect of Screw Rotational Speed and Back Pressure ............ 45
3.17.11 Flow Characteristics of the Melt During the Injection Phase ....... 46
3.17.12 Selection of Injection Speed ....................................................... 46
3.18 Initial Cavity Filling Phase....................................................................... 48
3.19 Cavity Holding Pressure Phase ................................................................ 49
3.20 Gate Freeze-off Phase.............................................................................. 49
3.21 Melt Compressibility and Shrinkage ........................................................ 49
3.22 Sinks and Voids ...................................................................................... 50
3.23 Weld Lines and Meld Lines ..................................................................... 53
3.24 Cooling and Solidification of the Melt ..................................................... 54
4 Good Design Practice.......................................................................................... 55
4.1 Predesign Analysis .................................................................................. 56
4.2 Reading General Arrangement Diagrams (GA) ........................................ 56
4.3 Understanding Toolmaking Concepts...................................................... 57
Mould Design Guide
iv
4.4 Observing Mould Tools.......................................................................... 58
4.5 Summary of Good Design Practice........................................................... 58
5 Design Checklist................................................................................................. 59
5.1 Predesign Checklist ................................................................................. 59
5.2 Original Estimate Details ........................................................................ 60
5.3 Component Drawing .............................................................................. 60
5.4 Component Geometry............................................................................. 60
5.5 Component Material............................................................................... 61
5.6 Quantity Required.................................................................................. 61
5.7 Component Function .............................................................................. 61
5.8 Component Tolerances........................................................................... 62
5.9 Number of Impressions........................................................................... 62
5.10 Gating Method ....................................................................................... 62
5.11 Ejection Method ..................................................................................... 63
5.12 Component Aesthetics ............................................................................ 63
6 Determining the Right Number of Impressions .................................................... 65
6.1 Quality Versus Quantity ......................................................................... 66
6.2 Appearance............................................................................................. 66
6.3 Part Geometry ........................................................................................ 67
6.4 Drawing Tolerances................................................................................ 67
6.5 Discussion .............................................................................................. 67
6.6 More Cavities = Less Control.................................................................. 68
6.7 Summary................................................................................................ 70
Mould Design Guide
vi
8.3.3 Milling ..................................................................................... 86
8.3.4 Grinding................................................................................... 87
8.3.5 Fabrication ............................................................................... 88
8.3.6 Standard Electrodischarge Machining (EDM) ............................ 89
8.3.7 Wire Electrodischarge Machining .............................................. 91
8.3.8 Cold Hobbing........................................................................... 92
8.3.9 Beryllium-Copper...................................................................... 93
8.3.10 Electroforming.......................................................................... 93
8.3.11 Cavity Corrosion and Erosion ................................................... 95
8.3.12 Gassing and Burning ................................................................. 95
8.4 Differential Shrinkage ............................................................................. 96
8.5 Maximum Metal Conditions................................................................... 97
8.6 Example ................................................................................................. 97
9 Two-Plate Mould Tools...................................................................................... 99
9.1 Design Details......................................................................................... 99
9.1.1 Locating or Register Ring.........................................................101
9.1.2 Top Plate.................................................................................101
9.1.3 Split Line .................................................................................102
9.1.4 Cavity Insert ............................................................................102
9.1.5 Front Cavity Plate ....................................................................102
9.1.6 Rear Cavity Plate .....................................................................102
9.1.7 Cavity Support Plate ................................................................103
9.1.8 Ejection System........................................................................103
9.1.9 Ejection Gap............................................................................104
Contents
vii
9.1.10 Support Blocks.........................................................................104
9.1.11 Guide Pillar..............................................................................104
9.1.12 Return Pins..............................................................................104
9.1.13 Fine Tuning the Mould Tool ....................................................104
9.1.14 Clearances ...............................................................................106
9.1.15 Bushes .....................................................................................106
9.1.16 Screws .....................................................................................106
9.1.17 Support Pillars .........................................................................106
9.1.18 Taper Threads .........................................................................107
9.1.19 Stand-off Buttons .....................................................................107
9.1.20 Chamfers and Radii .................................................................107
9.1.21 Guide Bushes ...........................................................................107
10 Ejection Systems ................................................................................................109
10.1 Requirements.........................................................................................109
10.1.1 Part Geometry..........................................................................109
10.1.2 Draft Angles ............................................................................109
10.1.3 Tolerances ...............................................................................110
10.1.4 Material...................................................................................110
10.1.5 Gating .....................................................................................111
10.1.6 Ejection Balance.......................................................................112
10.1.7 Machine Specifications.............................................................113
10.1.8 Mould Opening Stroke.............................................................113
10.1.9 Machine Ejection Features........................................................113
10.1.10 Movement Control Features.....................................................114
10.1.11 Component Finish Requirements..............................................114
Mould Design Guide
viii
10.2 Ejection Methods...................................................................................114
10.2.1 Ejector Pins and Blades.............................................................114
10.2.2 Sleeve Ejectors..........................................................................116
10.2.3 Stripper Plate Ejection ..............................................................117
10.2.4 Valve Ejection..........................................................................118
10.2.5 Ejection Forces.........................................................................119
10.3 Ejection Force Calculation .....................................................................120
10.4 Formulae...............................................................................................120
10.4.1 Example ..................................................................................121
10.5 Ejection Assembly Actuation..................................................................122
10.5.1 Mechanical Ejection.................................................................122
10.5.2 Hydraulic Ejection ...................................................................125
10.5.3 Pneumatic Ejection...................................................................126
10.5.4 Hybrid Ejection Systems...........................................................126
10.5.5 Double Ejection .......................................................................129
10.6 Unsatisfactory Systems...........................................................................132
11 Mould Temperature Control..............................................................................133
11.1 Discussion .............................................................................................133
11.2 Heat Transfer Fluids..............................................................................134
11.2.1 Water ......................................................................................134
11.2.2 Heat Transfer Oil ....................................................................134
11.3 Chillers..................................................................................................135
11.4 Temperature Controllers........................................................................135
11.5 Cooling Channels ..................................................................................135
11.5.1 Core Cooling ...........................................................................137
Contents
ix
11.6 Cavity Cooling.......................................................................................145
11.7 Circuit Efficiency ...................................................................................148
11.7.1 Series Cooling ..........................................................................148
11.7.2 Parallel Cooling .......................................................................149
11.8 Beryllium-Copper Cores and Cavities .....................................................150
11.9 Factors Affecting the Cooling Cycle........................................................150
11.9.1 Part Geometry..........................................................................151
11.9.2 Wall Sections ...........................................................................151
11.9.3 Moulding Material...................................................................151
11.9.4 Influence of the Gate and Runner..............................................152
11.9.5 The Mould Material.................................................................152
11.10 Mould Temperature Control..................................................................152
11.11 Cooling Efficiency..................................................................................153
11.11.1 Cavity Material and Construction.............................................153
11.11.2 Channel Geometry ...................................................................154
11.11.3 Number of Channels Required .................................................154
11.11.4 Rate of Coolant Flow...............................................................154
11.12 Coolants................................................................................................155
11.12.1 Thermal Conductance of Metals...............................................155
11.13 Cooling Calculations..............................................................................155
11.13.1 Specific Heat............................................................................155
11.14 Pulsed Mould Cooling............................................................................161
11.14.1 Selective Pulsed Cooling ...........................................................162
11.15 Mould Cooling Variables.......................................................................163
11.16 Summary...............................................................................................163
Mould Design Guide
x
12 Undercut Injection Mould Tools ........................................................................165
12.1 Introduction ..........................................................................................165
12.1.1 Undercut Components .............................................................167
12.1.2 Basic Undercut Mould Designs .................................................168
12.1.3 Loose Inserts............................................................................168
12.1.4 Moulding in Splits....................................................................170
12.1.5 Straight Angle Dowels..............................................................170
12.2 Key Design Features...............................................................................172
12.2.1 Example ..................................................................................173
12.3 Offset Angle Dowels ..............................................................................175
12.3.1 Key Design Features.................................................................177
12.3.2 To Establish Point P.................................................................177
12.4 Use of Side Cores ...................................................................................178
12.4.1 Discussion ...............................................................................178
12.5 Angled Lift Splits ...................................................................................179
12.5.1 Discussion ...............................................................................179
12.5.2 Description of Operation..........................................................181
12.5.3 Key Design Features.................................................................181
12.5.4 Formulae .................................................................................181
12.6 Form Pins ..............................................................................................182
12.6.1 Discussion ...............................................................................182
12.6.2 Straight Action Form Pins.........................................................182
12.6.3 Key Design Features.................................................................183
12.6.4 Angled Form Pins.....................................................................184
12.6.5 Angled Action Form Pin ...........................................................185
Contents
xi
12.6.6 Description of Operation..........................................................186
12.6.7 Key Design Features.................................................................186
12.6.8 Description of Operation..........................................................188
12.6.9 Key Design Features.................................................................188
12.7 Nonstandard Side Core Designs .............................................................188
12.7.1 Undercuts at Angle to Tool Axis...............................................189
12.7.2 Description of Operation..........................................................189
12.7.3 Key Design Features.................................................................190
12.8 Curved Undercuts ..................................................................................190
12.8.1 Description of Operation..........................................................190
12.8.2 Key Design Features.................................................................192
12.9 Radial Undercuts ...................................................................................192
12.9.1 Description of Operation..........................................................195
12.9.2 Key Design Features.................................................................195
12.10 Undercuts on Helical Gears and Pump Impellers .....................................196
12.11 Normal Ejection Techniques ..................................................................196
12.11.1 Form of Undercut.....................................................................197
12.11.2 Component Material................................................................198
12.11.3 Satisfactory Materials...............................................................198
12.11.4 Unsatisfactory Materials...........................................................198
12.12 Special Ejection Designs .........................................................................199
12.12.1 Splitting the Component...........................................................200
12.12.2 Moulding in One Piece .............................................................202
12.12.3 Helical Ejection........................................................................202
Mould Design Guide
xii
13 Automatic Unscrewing Mould Tool Design........................................................205
13.1 Introduction ..........................................................................................205
13.2 Injection Moulding Thread Forms..........................................................206
13.3 Thread Geometry ..................................................................................207
13.3.1 Parallel Threads.......................................................................207
13.3.2 Number of Starts......................................................................207
13.3.3 Thread Form ...........................................................................208
13.3.4 Taper Threads .........................................................................213
13.3.5 British Standard Pipe Thread....................................................214
13.3.6 Jointing Threads......................................................................214
13.3.7 Longscrew Threads..................................................................214
13.3.8 Moulded Thread Forms ...........................................................216
13.4 Thread Shrinkage Compensation............................................................217
13.4.1 Discussion ...............................................................................217
13.4.2 The Effect of Incorrect Shrinkage on Thread Forms ..................217
13.4.3 Pitch Inaccuracy.......................................................................218
13.4.4 Thread Form Inaccuracy ..........................................................218
13.4.5 Inaccurate Thread Diameters....................................................218
13.5 Application of Shrinkage Allowance on Thread Forms............................218
13.5.1 Shrinkage Formulae .................................................................219
13.6 Injection Moulding Considerations.........................................................220
13.6.1 Moulding-related Problems ......................................................220
13.6.2 Injection Pressure.....................................................................220
13.6.3 Injection Speed.........................................................................220
13.6.4 Unscrewing Speed ....................................................................220
Contents
xiii
13.6.5 Ejection Speed..........................................................................220
13.6.6 Operating Window ..................................................................221
13.6.7 Tool Temperature Control.......................................................221
13.7 Basic Screw Thread Mould Designs ........................................................222
13.7.1 Split Tooling............................................................................222
13.7.2 Thread Jumping.......................................................................223
13.7.3 Collapsible Coring ...................................................................224
13.7.4 Operation of Multisegment Cores.............................................227
13.8 Rotary Unscrewing ................................................................................227
13.8.1 Collapsible Coring Details........................................................228
13.9 Types of Collapsible Core ......................................................................228
13.9.1 Two-segment Core Details .......................................................229
13.9.2 Multisegment Collapsible Cores ...............................................230
13.10 Using Silicone Rubber Sleeve Cores ........................................................231
13.10.1 Advantages ..............................................................................231
13.10.2 Disadvantages..........................................................................232
13.11 Core Unscrewing ...................................................................................234
13.11.1 Fixed Core Systems ..................................................................234
13.11.2 Cavity in Moving Half .............................................................234
13.11.3 Cavity in Fixed Half.................................................................235
13.11.4 Key Design Features of Figure 13.18..........................................238
13.12 Anti-Rotation Keying.............................................................................239
13.12.1 Base Key Geometry ..................................................................239
13.13 Moving Core Systems.............................................................................240
13.13.1 Key Design Features.................................................................241
Mould Design Guide
xiv
13.14 Cavity Rotation .....................................................................................242
13.14.1 Key Design Features.................................................................244
13.14.2 Guidelines................................................................................245
13.15 Two-thread Unscrewing Designs ............................................................245
13.15.1 Discussion ...............................................................................245
13.15.2 Key Design Features for Two External Threads.........................245
13.15.3 Operation................................................................................247
13.15.4 Key Design Features.................................................................249
13.15.5 Operation................................................................................250
13.16 Gearing Geometry .................................................................................250
13.16.1 Introduction.............................................................................250
13.16.2 Basic Spur Gear Definitions......................................................252
13.16.3 Basic Spur Gear Formulae ........................................................253
13.16.4 Conversion Between ISO and Imperial Systems .........................253
13.16.5 Example Gear Calculations (ISO) .............................................253
13.16.6 Guidelines for Gear Selection (ISO)...........................................255
13.16.7 Guidelines for Gear Train Design (ISO) ....................................255
13.17 General Mould Design Guide for Threads ..............................................256
13.17.1 Observation.............................................................................256
13.17.2 Stage 1.....................................................................................256
13.17.3 Stage 2.....................................................................................257
13.17.4 Stage 3.....................................................................................258
13.17.5 Stage 4.....................................................................................259
13.17.6 Stage 5.....................................................................................259
Contents
xv
13.18 Driving Systems .....................................................................................260
13.18.1 Rack-and-Pinion Systems .........................................................260
13.18.2 Opening Movement of Mould Tool..........................................260
13.18.3 Actuation by Cylinder ..............................................................261
13.18.4 Pneumatic Motors....................................................................263
13.18.5 Hydraulic Motors ....................................................................263
13.18.6 Electric Motors ........................................................................265
13.18.7 Clutches and Rotation Control.................................................265
13.18.8 Using Clutches .........................................................................266
13.18.9 Using Stepper Motors...............................................................267
13.18.10 Using Torque Limiters..............................................................268
13.19 Special Designs ......................................................................................269
13.20 Commercial Unscrewing Systems............................................................270
14 Multiplate Tool Systems ....................................................................................271
14.1 Three-Plate Tools ..................................................................................271
14.1.1 Three-Plate Tool Operation .....................................................273
14.2 Multiplate Undercut Tools.....................................................................279
14.2.1 Sequential Opening ..................................................................281
14.3 Stack Moulds.........................................................................................285
15 Runnerless Moulding.........................................................................................291
15.1 Sprueless Moulding................................................................................291
15.1.1 Basic Antechamber Type ..........................................................291
15.1.2 Heated Hot Sprue Bushes .........................................................293
15.1.3 Summary .................................................................................297
Mould Design Guide
xvi
15.2 Insulated Runner Systems.......................................................................298
15.2.1 Insulated..................................................................................298
15.2.2 Semi-insulated..........................................................................299
15.3 Full Hot Runner Systems........................................................................300
15.3.1 Advantages Over Cold Runner Moulds.....................................300
15.3.2 Nozzles and Gate Bushes..........................................................305
15.3.3 Open Gate Nozzles ..................................................................305
15.3.4 Spring-Operated Needle Nozzle................................................307
15.3.5 Hydraulically Operated Needle Valve Nozzle............................308
15.3.6 Multipoint Gating....................................................................309
15.3.7 Summary .................................................................................311
15.4 Heating .................................................................................................311
15.4.1 Band Heaters ...........................................................................311
15.4.2 Coil Heaters.............................................................................312
15.4.3 Cartridge Heaters.....................................................................312
15.4.4 Tubular Heaters.......................................................................312
15.4.5 Integral Heating.......................................................................313
15.4.6 Heat Pipes................................................................................313
15.5 Temperature Control in Manifolds.........................................................313
15.5.1 Closed-Loop Control ...............................................................314
15.5.2 Open-Loop Control .................................................................314
15.5.3 Other Factors...........................................................................314
15.6 Gating...................................................................................................315
15.6.1 Pin and Edge Gating.................................................................315
15.6.2 Valve Gating............................................................................316
15.6.3 Thermal Sealing.......................................................................316
Mould Design Guide
xviii
16.5 Mould Finishing ....................................................................................340
16.5.1 Polishing..................................................................................341
16.5.2 Chromium Plating....................................................................341
16.5.3 Photochemical Etching .............................................................341
16.5.4 EDM Finishes ..........................................................................342
16.5.5 Bead Blasting ...........................................................................342
16.5.6 Vapour Blasting .......................................................................342
16.6 Mould Maintenance...............................................................................343
17 Runner and Gate Design ....................................................................................345
17.1 The Feed System ....................................................................................345
17.1.1 The Sprue ................................................................................346
17.1.2 Cold Slug Well.........................................................................346
17.1.3 Runner Design .........................................................................347
17.1.4 Runner System Design Rules ....................................................350
17.2 Calculating the Runner Length...............................................................352
17.2.1 Example ..................................................................................353
17.3 Gate Design...........................................................................................355
17.3.1 Manually Trimmed Gates ........................................................360
17.3.2 Automatically Trimmed Gates..................................................360
17.3.3 Gating Design Rules.................................................................362
17.3.4 Computer Simulations of Gate Designs.....................................363
17.3.5 Number and Location of Gates.................................................363
17.3.6 Gate Sizing...............................................................................365
17.3.7 Example ..................................................................................366
Contents
xix
17.3.8 Gate Land Length ....................................................................367
17.3.9 Gate Diameter..........................................................................367
17.4 Establishing the Correct Gate Size ..........................................................369
17.4.1 Computer Analysis...................................................................370
17.4.2 Empirical Analysis ...................................................................370
18 Standard Mould Parts........................................................................................373
18.1 Standard Parts Available ........................................................................373
18.1.1 Mould Base Units.....................................................................374
18.1.2 Mould Plates............................................................................374
18.1.3 Location and Alignment Components.......................................374
18.1.4 Ejection Components ...............................................................374
18.1.5 Feed Systems............................................................................374
18.1.6 Cooling Components ...............................................................375
18.1.7 Unscrewing Components..........................................................375
18.1.8 Miscellaneous ..........................................................................375
18.2 Mould Tool Designing Using Standard Parts...........................................375
18.3 Toolmaking Using Standard Parts ..........................................................376
18.4 Summary...............................................................................................378
19 Deflection and Stress in Mould Components.......................................................379
19.1 Discussion .............................................................................................379
19.1.1 Competition.............................................................................380
19.1.2 Energy Costs............................................................................380
19.1.3 Breakages ................................................................................380
19.1.4 Deflection................................................................................381
Mould Design Guide
xx
19.2 Force and Stress .....................................................................................381
19.2.1 Definitions of Forces ................................................................381
19.2.1.2 Compressive Force ...................................................................383
19.3 Stress.....................................................................................................384
19.4 Strain ....................................................................................................384
19.5 Stress–Strain Graph ...............................................................................385
19.5.1 Young’s Modulus of Elasticity..................................................385
19.5.2 Limit of Proportionality ...........................................................386
19.5.3 The Elastic Limit......................................................................386
19.5.4 Yield Stress ..............................................................................386
19.5.5 Tensile Strength .......................................................................386
19.6 Factor of Safety (FOS)............................................................................386
19.6.1 Brittle materials .......................................................................387
19.6.2 Ductile materials......................................................................387
19.7 Poisson’s Ratio ......................................................................................388
19.7.1 Example ..................................................................................389
19.8 Temperature Stresses .............................................................................390
19.8.1 Example ..................................................................................390
19.9 Beam Theory.........................................................................................390
19.9.1 Beam Models ...........................................................................392
19.10 Bending Moments..................................................................................393
19.10.1 Neutral Axis ............................................................................393
19.10.2 Second Moment of Area...........................................................394
19.11 Bending Formula ...................................................................................396
19.12 Section Modulus....................................................................................396
Contents
xxi
19.13 Deflection of Beams ...............................................................................397
19.14 Analysing Mould Tools..........................................................................397
19.14.1 Two-Plate Example..................................................................397
19.14.2 Split Tool Example ..................................................................400
19.14.3 Analysing Core Pins .................................................................403
19.15 Summary...............................................................................................405
20 Fatigue ..............................................................................................................407
20.1 Observations .........................................................................................407
20.2 Facts on Fatigue.....................................................................................408
20.3 Calculating Shut-off Areas .....................................................................410
20.3.1 Example ..................................................................................412
20.4 Factors Affecting Fatigue Life.................................................................414
20.4.1 Stress Concentrations...............................................................414
20.4.2 Stress Raisers ...........................................................................416
20.4.3 Machining Marks.....................................................................418
20.4.4 The Effect of Surface Finish......................................................419
20.4.5 Hardness Factors .....................................................................420
20.5 Summary...............................................................................................421
21 Limits and Fits...................................................................................................423
21.1 Interchangeability ..................................................................................423
21.2 Tolerance ..............................................................................................423
21.2.1 Unilateral.................................................................................424
21.2.2 Bilateral...................................................................................424
21.3 Limits....................................................................................................424
Mould Design Guide
xxii
21.4 Fits........................................................................................................425
21.4.1 Running Fit..............................................................................425
21.4.2 Push Fit ...................................................................................426
21.4.3 Drive Fit ..................................................................................426
21.4.4 Force Fit ..................................................................................426
21.5 British Standard Hole and Shaft Fits .......................................................426
21.5.1 Clearance Fit............................................................................427
21.5.2 Transition Fit...........................................................................427
21.5.3 Interference Fit.........................................................................427
21.6 British Standard Clearance Fits...............................................................427
21.7 British Standard Clearance Fits – Hole Basis ...........................................429
21.7.1 Example ..................................................................................430
21.8 Geometric Tolerancing ..........................................................................431
22 Impression Blanking ..........................................................................................437
22.1 Reasons for Impression Blanking............................................................437
22.2 Example ................................................................................................438
22.2.1 Original Estimate.....................................................................438
22.2.2 Effect of Running on Six Impressions........................................439
22.2.3 Effect of Running on a 6-imp Basis with an 18-second Cycle ......440
22.2.4 Cycle Required to Achieve Original Profit Level........................440
22.2.5 Cycle Required to Break Even...................................................441
22.3 Observations .........................................................................................442
22.4 Summary...............................................................................................442
Contents
xxii
i
22.5 Methods of Blanking Impressions...........................................................442
22.5.1 Glueing....................................................................................443
22.5.2 Gate Blocking ..........................................................................443
22.5.3 Cavity Rotation .......................................................................443
22.5.4 Blanking the Branch Runner.....................................................445
22.6 Summary...............................................................................................445
23 Summary of Mould Calculations........................................................................447
23.1 Production Rates ...................................................................................447
23.2 Cooling Channel Diameters....................................................................447
23.3 Runner Length Formulae........................................................................448
23.4 Gate Design...........................................................................................449
23.5 Ejection Forces.......................................................................................449
23.6 Stress and Strain.....................................................................................450
23.7 Factors of Safety ....................................................................................450
23.7.1 For Brittle Materials.................................................................450
23.7.2 For Ductile Materials ...............................................................450
23.8 Poisson’s Ratio ......................................................................................450
23.9 Moments of Inertia ................................................................................451
23.9.1 Rectangular Bar .......................................................................451
23.9.2 Circular Bar.............................................................................451
23.10 Temperature Stresses .............................................................................452
23.11 Bending Formulae..................................................................................452
23.11.1 Section Modulus ......................................................................453
23.12 Deflection of Beams ...............................................................................453
23.13 Blanking Impressions .............................................................................454
Mould Design Guide
xxiv
24 Integrated Design Examples ...............................................................................455
25 Mathematical and Reference Tables...................................................................485
25.1 Logarithms............................................................................................486
25.2 Anti-logarithms .....................................................................................488
25.3 Natural Sines ........................................................................................490
25.4 Natural Cosines.....................................................................................492
25.5 Natural Tangents...................................................................................494
25.6 Square Roots .........................................................................................496
25.7 Reciprocals............................................................................................500
25.8 Powers, Roots and Reciprocals...............................................................502
25.9 Thermal Properties of Some Common Mould-making Materials .............504
25.10 Typical Thermal and Mechanical Properties
of Steels for Injection Moulds.................................................................505
25.11 Thermal Properties of Plastics Materials.................................................506
25.12 I.S.O. Metric Fine Threads in mm ..........................................................507
25.13 I.S.O. Metric Coarse Threads in mm ......................................................508
25.14 B.S.F. Threads (55°) ...............................................................................509
25.15 Whitworth Threads (55°) .......................................................................509
25.16 British Pipe Thread (B.S.P.) – Basic Sizes in Inches...................................510
25.17 British Standard Taper Pipe (B.S.T.P.)
Tolerances and Allowances, Turns of Thread .........................................511
25.18 Hardness Comparison Table..................................................................512
25.19 Conversion Factors ................................................................................513
Contents
xxv
26 Glossary of Moulding Terminology....................................................................515
26.1 Time Elements in a Moulding Cycle .......................................................515
26.2 Mould and Processing Terminology .......................................................517
Index.........................................................................................................................527
Mould Design Guide
xxvi
xxvii
Preface
Peter Jones is a practising Consulting Engineer with over thirty five years experience
within the plastics industry. He has wide experience of mould tool design, toolmaking,
production management and has worked for a number of well-known companies
including ICI, United Gas Industries and Smiths.
During his time as an employee he has held positions of Chief Mould Designer, Technical
Manager, Production Director and Managing Director–all within the injection moulding
industry.
In his capacity as a Consulting Engineer, he has advised several well known national and
international companies in the engineering, medical, pharmaceutical, electronic,
consumer industries, the oil industry and many others.
Peter has advised on mould design and construction, processing, production and
management. In project management roles he has been responsible for setting up
complete injection moulding plants for both internal use and as stand-alone units. Several
of these have been turnkey projects where all the plant, machines, mould tools and
ancillaries and personnel have been provided.
Additionally he has lectured on courses on mould design and injection moulding
profitability and related topics to many well-known companies both in the UK and
overseas.
The intention of this book is to provide design engineers, toolmakers, moulding
technicians and production engineers with an in depth guide to the design and
manufacture of mould tools that work successfully in production.
At the end of the day, this is the standard by which the whole design/toolmaking project
will be judged. If this can be married with the entire project being profitable–the ideal has
been achieved.
Mould Design Guide
xxviii
The latter point is one that should not be overlooked and kept at the forefront of the
design engineer’s mind. A wonderful mould tool that produces exemplary quality parts is
no good to man or beast unless it results in the injection moulding operation making an
acceptable profit from it.
It is recognised that not all design engineers will be able to influence the profitability
factor but thinking outside the 'design box' will pay dividends in the future. After all,
engineers in this field often progress to become Managing Directors and CEOs.
Peter Jones 28.08.07
Mould Design Guide
2
The purpose of this book is to address these (and many other issues) and each of these
topics is discussed and examined in detail.
It is impossible to design a successful mould tool without some knowledge of plastics
materials, the injection moulding process, toolmaking and basic injection moulding
machine design. For example, it is necessary for the mould design engineer to know what
type of gate is required for a particular moulding. This in turn will be dependent on both
the material being used and the part geometry. Different materials behave differently and
the material being used will frequently influence the mould design. Some materials are
corrosive while others may be brittle, or very tough. All of these factors must be taken
into consideration at the earliest stages of the design.
Similarly, mould bases and the mould cavities must be designed in such a manner that
they can actually be made. The moulds must also be economic to make and operate
reliably in production. Therefore, knowledge of basic tool room machining procedures is
necessary so that the mould base and impressions are designed with specific machining
processes in mind.
Clearly the mould designer must also be reasonably familiar with the injection moulding
process and the basic moulding parameters such as runner sizing, gating, machine cycles
and the fundamental processing variables such as melt behaviour and so on.
A good knowledge of the basic construction of moulding machines and their operation is
also essential so that moulds can be mounted on machines and run successfully. In order
to achieve this, the mould designer must be able to understand all the specifications and
platen drawings provided by the machine manufacturer.
It is for these reasons that there are revision chapters dedicated to these topics so that that
the mould designer has a full account of all the variables that need to be taken into
account when designing successful mould tools.
All the major types of mould tools are covered including two-plate, three-plate, split, side
core, stack and hot runner. Some less frequently used designs are also discussed including
multiplate and rotary side core moulds.
There are additional chapters devoted to stress analysis and fatigue. These topics are not
usually included in textbooks on mould design, but there are no apologies for including
them in this book. Stress cracking of components and fatigue-induced failure are
frequently encountered in production and cost the industry millions of pounds per annum.
These chapters are included to try to invoke a more scientific approach to mould design
so that a blend of science and experience may be applied for more reliable results. They
also provide a means of determining the optimum mass size of the mould tool and its
components for maximum economy of production and part quality.
The theme throughout the book is based on design simplicity. The simpler the design of
the mould is, the more likely it is to provide trouble-free mouldings.
Introduction
3
There are three golden rules in injection moulding:
x Good mould design
x Good-quality toolmaking
x Competent injection moulding
If all three of these can be achieved, all projects will result in success. If any one of them is
missing, trouble will result.
The information contained in this book is based on over thirty-five years’ experience in
the injection moulding industry and on over 3000 successful mould designs. It therefore
contains many tips, wrinkles and tweaks discovered over this period included in an effort
to equip the reader with information that will contribute significantly to successful mould
tool designs and avoid common pitfalls.
The book is essentially a data book that succinctly presents information in a logical,
understandable reference form for mould designers, tooling engineers, production
engineers and others associated directly or indirectly with injection mould tooling. Many
examples of mould designs are included with notes, providing a complete understanding
of the principles involved.
There are also many data tables, design examples and a gallery of full mould designs
included so that useful information may be referenced quickly. Also included is a glossary
of injection moulding terms with a full explanation in each case.
Throughout the book the term moulder represents the company or department carrying
out the injection moulding and the term customer refers to the end user of the mouldings.
The term toolmaker refers to the company or individual manufacturing the mould tool.
The injection mould is variously referred to as mould, tool or mould tool, all of which are
commonly used in the industry.
Please note that this book uses the ISO system throughout except in a few cases where
American examples are used that may be specified in the imperial system. It is important
to note that the ISO system uses newtons, metres and seconds.
Consequently, as most mould designs are dimensioned in millimetres, the designer must
be aware that all sizes used in calculations must be converted into metres first except
where stated otherwise.
Mould Design Guide
4
5
2
The Injection Moulding Process
2.1 Background
To produce moulded articles in thermoplastics it is necessary to heat the material to a
liquid state, and then force the liquid ‘melt’ to conform to the shape of a mould. The
liquid melt is then cooled, thereby returning it to the solid condition, and removed from
the mould.
These operations can be fulfilled by the compression moulding process, but this process is
wasteful of both heat and time and is better suited to thermosetting materials, where it is
not necessary to cool the material before removal.
The injection moulding process was developed following the principle of pressure die-
casting, in which molten metal is forced into a cool mould. JW and IS Hyatt used this
principle in their ‘stuffing machine’, which was patented in the USA in 1872. However,
the first machine actually used for production of thermoplastic parts was made in
Germany in 1920. The machine was entirely manually operated with no automatic
features. In 1927, again in Germany, a machine operated by pneumatic rams was
developed, which was able to develop higher injection pressures.
Since then, development has been rapid, especially following the introduction of the
reciprocating screw. Modern machines can operate completely automatically without
human involvement and can also change moulds and materials automatically. They can
also monitor and adjust the moulding parameters (to a limited extent) in an attempt to
maintain component quality.
Further developments are taking place with the improvement of control systems. Tie-bar-
less machines are now available, and modified injection moulding techniques such as gas-
assisted moulding are becoming widespread.
Mould Design Guide
6
2.2 Machine Design
2.2.1 Machine Base Unit
Often described as the machine ‘bed’, its function is to provide a rigid base to impart
dimensional stability, accuracy and strength. Considering the need for accurate mould
alignment and the high stresses during the moulding cycle, it is essential that both the
clamp unit and the injection unit be held rigidly in position.
2.2.2 Clamp Unit
This is the part of the machine that carries, closes and opens the mould. It provides the
force required to keep the mould closed during the injection phase and it ejects the
moulding once the mould is opened.
The clamp unit consists of three plates or platens:
x A fixed, stationary platen on to which is mounted the half of the mould that
contains the runner and sprue bush (the fixed or stationary half)
x A moveable platen on which is mounted the other mould half – the one containing
the ejection system (the moving or ejection half)
x The tail plate
All three platens are connected through the tie bars. It is on these that the moving platen
slides, carrying with it the ejection half of the mould tool. Housed between the tail plate
and the moveable platen is the clamping mechanism.
The function of the clamping mechanism is to open and close the moveable platen thus
opening, closing and clamping the mould.
The size of the mould tool that can be mounted on a machine is determined by the mould
height, the daylight and the distance between the tie bars. These and other parameters are
specified in the machine platen details supplied with the machine.
2.2.3 Mould Height
The thickness or height of mould that can be fitted into a machine is dependent on the
amount of mould height adjustment that is available on the machine. This is the
maximum amount of space with the machine toggles closed or the ram fully extended
that is available between the fixed and moving platens. The mould height available is
dependent on the type of clamping mechanism that is used.
The Injection Moulding Process
7
2.2.4 Daylight
The amount of daylight on a given machine is the furthest distance that the machine
platens can be separated from each other. The amount of daylight should be at least twice
the depth of the moulding (d). This gives sufficient space for the mouldings to fall freely
out of the tool.
Figure 2.1 Mould Daylight
Mould Design Guide
8
2.2.5 Distance Between Tie Bars
The internal horizontal or vertical distance between the tie bars also determines the
maximum size of mould tool that can be mounted on a machine. Normally the mould is
designed so that it will drop down between the tie bars from above. Once the mould has
been located in the register ring hole in the platen, it can be secured to the platen directly
with cap screws or indirectly with tool clamps.
Figure 2.2 Platen drawing for mould fixing
The Injection Moulding Process
9
2.2.6 Clamping Mechanisms
There are several types of machine clamping unit designs and each has to be capable of
advancing and retracting the moveable platen so that the two halves of the tool can be
brought into smooth contact. When the full lock is applied, the two halves of the tool are
kept closed under pressure while the molten plastic is injected into the mould and allowed
to set.
The most commonly used methods of machine clamping are:
x Toggle mechanisms (mechanical lock)
x Direct hydraulic lock
x Combined mechanical–hydraulic systems
2.2.6.1 Toggle Mechanisms
A toggle joint is essentially a system of links that multiplies the power that is applied to
them to deliver the required clamping force.
Toggle mechanisms are divided into two types:
x Single toggle joint clamp
x Double toggle joint clamp
2.2.6.2 Single Toggle Joint Clamp
The single toggle joint, often called a collapsing strut or link, consists of a set of links that
are directly actuated by a hydraulic cylinder through the central axis of the injection
mould tool.
Figure 2.3 Single toggle design – mould closed
Mould Design Guide
10
Figure 2.4 Single toggle design – mould open
Mould clamping is achieved by the mechanical locking of the toggles in the straightened
position. As the mould is locked, the tie bars are designed to stretch slightly to maintain
the clamped condition during the injection phase.
Because considerable forces are exerted on the platens during mould opening and closing,
there is a tendency for the platen to tilt. Consequently, such a mechanism tends only to be
used on smaller machines (70 tonnes or less).
2.2.6.3 Double Toggle Joint Clamp
The double toggle arrangement eliminates the platen-tilting problem and allows faster
platen speeds to be achieved.
Figure 2.5 Double toggle design – mould open
The Injection Moulding Process
11
Figure 2.6 Double toggle design – mould closed
If the two main links of the toggles were of equal length then platen movement would be
very restricted. In practice most machines have the linkage fixings offset, so that the
toggle arms collapse inwards. This allows greater opening strokes than would otherwise
be possible.
Variations of the double toggle design using five pivot points instead of the conventional
four will give an even greater opening stroke. The double toggle clamp is the most
commonly used in injection moulding for machines up to 1000 tonnes.
Figure 2.7 Five point toggle design
Owing to the high forces involved, one of the biggest problems with a toggle-actuated
machine is mechanical wear, often made worse by poor machine setting. Problems caused
by poor setting include setting too high a locking tonnage and running tools that are not
parallel. Automatic and efficient lubricating systems are therefore essential to keep wear
to a minimum.
Mould height adjustment on toggle machines is normally achieved by moving the whole
of the locking assembly along the tie bars. Because the tie bars provide the final lock, it is
important that the load on them is evenly distributed.
Mould Design Guide
12
When tie bars are removed, it is essential that they be replaced correctly in relation to the
fixed platen. They must also be correctly rotated in relation to the other tie bars or else
die height and adjustment will be affected and undue strains will be placed on the tie bar
that was re-fitted.
Tie bars should be checked regularly to ensure that the stress developed in each bar is the
same when a mould is clamped. Failure to do this can result in out-of-balance clamping
on the mould and premature tie bar failure.
The positioning of ejector mechanisms on toggle machines does not normally present any
problems, as long as there are no ejectors in line with the toggles.
2.2.6.4 Direct Hydraulic Clamping
There are two main types of direct hydraulic clamping:
x Direct clamping
x Jack ram clamping
2.2.6.5 Direct Clamping
Direct clamping is usually achieved by means of a single ram or multiple rams that
provide the opening, closing and locking functions.
The basic design shown below would be rather slow in operation. However, smaller jack
rams can be added to speed up the platen movements.
Figure 2.8 Direct hydraulic clanping design
The Injection Moulding Process
13
2.2.6.6 Combined Mechanical–Hydraulic Systems
In a combined system the major movement of the platen and the final locking force are
provided by different means. Such systems have become known as block and lock systems.
The most common of these systems combines a toggle joint for mould opening, and
closing with the final lock being provided by a small short-stroke hydraulic piston.
This gives a very smooth action and great flexibility to the moulder. Because the toggles
are only used for movement they do not have to be as substantial as those in a straight
mechanical system and lubrication is generally simpler. Methods of mould height
adjustment vary between manufacturers and this is dependent on the actual location and
design of the final pressuring cylinder.
Figure 2.9 Combined toggle – hydraulic design
2.2.7 The Injection Unit
This is the part of the machine that stores and heats the material prior to injecting it into
the mould tool. The injection unit has several functions:
x Metering the amount of material required for each shot
x Plasticising (or heat softening) the material
x Rotating an internal screw to transport the material via its screw flights to the front
of the cylinder while moving backwards ready to pick up the next shot of material
x Advancing and retracting the injection carriage to bring the nozzle into contact with
the mould sprue bush
x Providing a sufficient contact force between the injection cylinder and the mould
tool to prevent material leakage
x Providing a variable speed of injection and variable injection and backpressure
Mould Design Guide
14
x Maintaining a hold-on pressure to compensate for volumetric shrinkage of the
material in the mould tool after initial mould filling has taken place
There are several other features that injection units may have, including:
x Hydraulic screw retraction on the nonrotating screw before or after screw rotation
(decompression or suck back) to prevent material leaking into the mould cavities
x Profiled or stepped injection speed/pressure facilities
x Sometimes closed-loop computer-controlled systems are used to optimise part
quality and cycle times by more accurately monitoring and controlling moulding
parameters
2.2.7.1 Reciprocating Screw Design
The design of the screw is very important and will vary depending on the type of material
being processed and the size of the shot.
Figures 2.10, 2.11 and 2.12 show the basic screw geometry and function of a standard
screw unit. The compression ratio is the ratio V1:V2. The single screw plasticising design
is the one that is used in the majority of injection moulding machines.
Figure 2.10 Screw design
Figure 2.11 Screw definitions
The Injection Moulding Process
15
Figure 2.12 Screw compression ratio
In a typical injection unit (Figure 2.13), the raw material is fed from the hopper into the
cylinder and then is transported along the cylinder by the rotation of the screw to the
front of the cylinder. The pressure of the material at the front of the screw forces it
backwards until the rear of the screw hits a stop to achieve the desired shot weight. At
this point, the screw ceases to rotate. This phase is known as screw back.
Figure 2.13 The injection unit
The region of the cylinder where the raw material is fed in is called the feed throat and
this is usually kept cool by circulating cooling water. This stops the material from melting
at the throat, which would prevent the material from feeding properly. However, if too
much cooling is provided, condensation will form at the throat and can cause the adjacent
section of the cylinder to lose heat.
Mould Design Guide
16
Condensation in this area may also allow moisture to develop within the raw material. If
the material being moulded is hygroscopic, moulding difficulties are frequently
encountered.
2.2.7.2 Screw Rotation
The material is softened or plasticised by means of frictional heat provided by the
rotation of the screw and by external heater bands mounted on the cylinder. These two
sources of heat, combined with the mixing effect of the screw, provide a homogeneous
melt. As the screw rotates, pressure is built up within the barrel. This pressure forces
material towards the nozzle and the screw backwards. This in turn forces back the
hydraulic injection piston, moving the oil out of the cylinder to the tank. A valve is
provided to restrict the oil backflow pressure, which enables the oil pressure to be
increased or decreased. This regulates how much work the screw has to do in order to
fully screw back. This pressure is commonly called back pressure, but is sometimes called
reaction pressure.
The greater the amount of work the screw has to do, the greater is the amount of shear
heat (frictional heat) that is put into the melt. When sufficient melt has been produced for
a shot, the limit switch is tripped and screw rotation stops.
However, screw back pressure is also used to mix materials and additives more evenly
and also to reduce any trapped air that may be present in the melt.
2.2.7.3 Screw Forward (Injection Phase)
At the end of the screw back phase, the screw ceases to rotate and the hydraulic cylinder
then forces the screw forward, plunger-like, displacing the melt through the nozzle into
the mould – hence the term injection moulding. For most materials a check flow valve
prevents the melt from flowing backwards up the screw.
2.2.7.4 Injection Speeds and Pressures
Generally the injection phase is carried out in the shortest possible time to prevent the
melt from solidifying before mould cavities are completely filled.
The total injection time varies with the material to be injected. Normally, stepped control
is provided in order to give the requisite variation. The injection stroke is achieved at two
main pressure levels:
x The first pressure and velocity is applied during the mould filling stage that
represents 95% of the total injection stroke.
x At this point the second pressure, the packing or hold-on pressure, keeps the injected
material under pressure in the mould while the melt is cooling. This is to prevent
shrinkage and cavitation in the mould.
The Injection Moulding Process
17
As the force provided by the hydraulics to push the screw is constant, alteration of the
screw diameter will give higher or lower specific pressure per square cm depending on the
diameter of the screw. Table 2.1 below shows how the shot volume varies with screw for
a typical range of cylinders.
Table 2.1 Variation of shot volume with screw diameter
Injection unit
A B C
Screw diameter (mm) 60 70 85
Real injection volume (shot) (cm3) 698 950 1,400
Maximum specific pressure on material (MPa) 196.8 144.5 98
2.2.7.5 Hold-on pressure
The hold-on pressure is normally lower than the injection pressure. Different machine
manufacturers offer various numbers of stages for the holding phase, many of which may
be programmed on more sophisticated machines.
The graph in Figure 2.14 shows a typical injection pressure curve throughout the screw
stroke. This shows that the screw stops 5mm before the end of the stroke. This is
necessary to provide a cushion of material to allow hold-on pressure to be maintained on
the mouldings during solidification. At this point a limit switch is tripped to switch from
the main injection pressure to the holding pressure.
Figure 2.14 Injection pressure versus screw stroke
Mould Design Guide
18
2.2.7.6 Screw Speed
It is important that the speed of rotation of the screw is kept constant from cycle to cycle.
If this varies, the amount of shear heat put into the melt will vary. This would result in
varying moulding conditions and, consequently, inconsistent results.
The screw speed that should be used will depend on the material being processed and
other factors such as additives or difficult components such as acrylic lenses, etc.
Generally speaking, the screw speed is determined so that it screws fully back and stops
rotating just before the mould opens at the end of the cooling cycle. This avoids the
material stagnating in the cylinder if screw rotation stops early in the cooling cycle.
However, there are alternative theories that screw speed should be related to the
screw/cylinder surface area.
2.2.7.7 Screw Stroke
The return stroke of the injection screw is determined by the amount of material to be
injected (shot weight). The longest stroke is required for the largest volume.
The manufacturers of injection moulding machines for processing thermoplastics usually
offer the choice of three different screw diameters:
x A small diameter, which will give a high specific injection pressure and a smaller
maximum shot weight, often used for very thin-walled parts or other high-
pressure applications.
x A standard diameter, which gives a specific pressure in the region of 1400 bar on the
injected material. This is the commonly used version suitable for moulding a wide
range of parts.
x A larger-diameter screw, which gives reduced specific pressure but increases the shot
size proportionally. This is used for larger shot weights and sometimes for moulding
thick wall parts and for screw injection of larger, thick-walled items.
There is a relationship between specific injection pressure, screw diameter and the
maximum shot weight. Table 2.2 illustrates this relationship, assuming a standard
injection stroke is being used. This relationship is important when selecting screw
diameters for specific jobs.
Table 2.2 Specific pressure versus screw relationship
Screw Piston
Dia.
(cm)
Area
(cm2
)
Dia.
(cm)
Area
(cm2
)
Ratio of
piston to
screw area
Hydraulic
pressure
(MPa)
Specific
injection
pressure (MPa)
Shot
weight
(g)
3.5 9.62 15.0 176.71 18.4:1 14 252 198
4.5 15.9 15.0 176.71 11.1:1 14 154 323
Mould Design Guide
20
2.4 The Moulding Cycle
2.4.1 Mould Closing Phase
The mould should be closed as quickly as possible, without putting undue strain on the
mould or the machine until the mould protection facility is tripped.
2.4.2 Mould Protection Phase
This is applied at the final stage of mould closing just before the two mould halves meet
so as to avoid damage to the mould tool due to trapped mouldings or location of delicate
shot off areas on either half of the mould. Both the distance and operating pressure must
be set to suit the requirements on the machine control panel.
2.4.3 Injection (Mould Filling) Phase
In general, mould filling takes place rapidly, as previously discussed. However, care must
be taken in order not to generate excessive shear stress in the material by excessively short
fill times. An ideal fill time should prevent large reductions in melt temperature (less than
20 qC) and avoid the generation of high injection pressure (more than 100 MPa).
The injection speed should be adjusted to produce the required filling time and the
injection pressure should be set to enable this injection speed to be achieved. For example,
a large cavity may require a lower relative injection speed to give the air in the cavity time
to be displaced to prevent compressed air being developed giving rise to shorts or burning.
2.4.4 Holding Time and Pressurising Phase
During this stage, a little more material is forced into the mould before the gate freezes
off. The pressure prevents the material in the mould from flowing back into the injection
cylinder. The length of time required for holding depends upon the material being
moulded, gate size, melt and mould temperatures. The setting of the hold-on stage is
critical to the size and dimensional stability of components.
There are two aspects of this phase:
x Pressurisation, when the cavity pressure increases
x Compensation, when cavity pressure decreases
The Injection Moulding Process
21
2.4.5 Cooling and Refill Phase
This starts after the hold-on time finishes. Should the component become cool enough to
be ejected immediately after the screw back phase then no further cooling time is
necessary and the parts may be ejected. In most case, however, the mouldings will require
further cooling before ejection can take place.
The total cooling time required is largely dependent on the wall thickness of the
component and the material used, and can be calculated accordingly.
2.4.6 Screw Back Phase
During the cooling time the screw rotates and is displaced backwards along the injection
cylinder. This backward displacement takes place entirely during the cooling phase of the
components as previously described. Once the screw has transported sufficient material
to the front of the cylinder, the screw trips a limit switch and stops rotating.
2.4.7 Mould Open Phase
The same principles apply to the mould open phase as to the mould closing phase. Abrupt
opening should be avoided, to prevent damage to the machine and mould. The distance
of opening should be just enough to allow for the mouldings and any runners to be
ejected cleanly. This will keep cycle time to a minimum.
Mould Design Guide
22
2.4.8 Ejection Phase
Adequate time must be allowed for the ejection of the components from the mould.
Ejection can be employed in a semi-auto or automatic mode.
Automatic ejection can be by mechanical, hydraulic or pneumatics systems, depending on
the design of the ejector system. Air ejectors may be used to blow the component clear
and can be set on a pulsating or continuous blow sequence. Timers can be used on both
hydraulic and air ejectors.
Hydraulic ejectors may be used in a multistroke mode in certain circumstances to eject
components that tend to ‘stick’ to the ejector pins. Alternatively, pick-and-place robots
may be used where the cost is justified.
Many of these topics are discussed in more detail in the appropriate sections of this book.
Figure 2.15 illustrates a summary of the moulding cycle.
Figure 2.15 Summary of elements of the moulding cycle
Mould Design Guide
24
3.3 The Nature of Plastics Materials
Elements, Atoms and Molecules
All matter in the universe is made up of small particles called atoms. There are over 100
different types of atoms constituting the chemical elements. The atomic number of an
element is the number of protons in the nucleus of an atom. This is also known as the
proton number.
The mass number or nucleus number is the number of nucleons in its nucleus: in other
words it is the total number of protons + neutrons.
The elements most commonly found in plastics are:
Element Symbol
Carbon C
Hydrogen H
Oxygen O
Nitrogen N
Chlorine CL
Under normal circumstances the atoms of many of the elements do not occur singly. For
example, the atoms of oxygen in the air we breathe occur in pairs, the symbol or formula
for which is O2. Atoms of different elements can also combine with others: for example,
the carbon dioxide we expel from our lungs consists of pairs of oxygen atoms attached to
a single carbon atom, the formula for which is CO2.
These combinations of atoms are known as molecules. Another example of a molecule
has the formula H2O, and is very well known as ice, water or steam. This example also
demonstrates that the form in which a substance exists depends upon its temperature. In
this case the water is a solid (ice) below 0 qC; between this temperature and 100 qC it is
liquid (water); and above 100 qC it is a gas (steam).
The force which enables atoms to unite into molecules is known as chemical bonding,
and an assortment of different types of bonding exists. In many cases the bonding
between the atoms is extremely strong and can only be broken by vigorous chemical
attack or a large input of energy, as would occur when a substance is subjected to
intense heat.
Bonds also exist between molecules, but these are usually considerably weaker than the
chemical bonds between atoms within molecules. But with solid materials the bond
between individual molecules is sufficiently strong to prevent one molecule from straying
away from its neighbours. However, when the temperature is raised, the energy entering
the material weakens these bonds until eventually individual molecules can escape their
Plastics Materials
25
neighbours to a considerable extent and the material becomes a viscous liquid. If the
temperature is raised further, an even greater amount of energy is put into this liquid. The
individual molecules become largely separated from each other, the material degrades and
a gas is produced.
It is not within the remit of this book to provide a comprehensive coverage of plastics
materials technology or polymer chemistry. However, the following information may be
useful to mould designers, engineers and technicians and is covered in a simple, non-
chemistry-based manner. The information provided is primarily restricted to
thermoplastic polymers.
3.4 Monomers, Polymerisation and Polymers
The molecules that make up plastics materials also consist of groups of atoms united by
very powerful chemical bonds. However, in the case of plastics the number of atoms
incorporated in each molecule is extremely high, often running into many thousands.
This makes molecules of plastics very large compared with those other substances.
These very large molecules are made up of smaller units, repeated many times. In some
plastics these units are joined together in a chain formation rather like beads on a
necklace, whereas in other plastics a complex three-dimensional network is formed.
Figure 3.1 Polymerisation of monomers
One of the most well-known plastics materials is polythene, which more correctly should
be named polyethylene. Polyethylene is produced from the gas ethylene by a chemical
process called polymerisation. The large molecules produced by the polymerisation
reaction are known as the polymer. The small molecules that form the starting material
are called the monomer.
Mould Design Guide
26
Figure 3.2 Products derived from polymerisation
In the case of polythene, ethylene is the monomer, which polymerises to form
polyethylene; similarly, the monomer styrene polymerises to polystyrene and the
monomer vinyl chloride polymerises to polyvinylchloride (PVC).
This type of polymerisation, known as addition polymerisation, is just one example of a
range of polymerisation techniques used to produce the modern family of polymeric
materials. Polymers (sometimes called resins), as well as being the major constituent of
our plastics materials, also form the basis for natural and synthetic rubbers, adhesives,
paints and synthetic textiles.
3.5 Classification of Plastics
3.5.1 Thermosets and Thermoplastics
This distinction is probably the most fundamental way of classifying plastics. Using this
system the family of plastics materials is divided into two major branches, the thermosets
(e.g. Bakelite) and the thermoplastics (e.g. Nylon, polythene or ABS).
Plastics Materials
27
The main difference between the products made from thermosets and those made from
thermoplastics, apart from a few exceptions, is that thermoplastics components will
always soften and eventually melt if subject to high temperatures, whereas the thermosets
will not. There is also a major difference in the techniques used to process these two
classes of plastics materials.
Thermoplastic materials have to be heated until they soften sufficiently to be moulded
into the desired shape, after which they must be cooled in order to solidify and retain the
required shape. If a thermoplastic product is reheated to its original processing
temperature it will soften again. The thermoset materials also soften when first heated,
which enables them to be moulded into shape, but instead of cooling, the material is then
subject to additional heating. This additional heating causes a chemical reaction to take
place within the material, which converts the hot, softened mass into an equally hot
permanent solid. Further heating, even to a higher temperature, will not re-soften the
thermoset product. The reason for the difference in behaviour between the thermoset and
thermoplastic lies in the chemical composition of the molecular chains.
With the thermosets, the polymer in the moulding materials has roughly linear chain
structure; this enables the material to behave rather like a thermoplastic when first heated,
allowing it to soften and flow under pressure in order to take up the shape of the mould.
However, the structure of the thermoset polymer contains chemically reactive positions at
intervals along the molecular chains, which facilitate joining or cross-linking between
adjacent molecules provided that sufficient heat is applied. The cross-linking (sometimes
called curing) converts the linear structure into an infusible three-dimensional network.
With thermoplastics the long-chain molecules in the moulding compound do not have
reactive positions within the chain, so under normal moulding conditions no crosslinking
can occur. The material can only be solidified by cooling and of course it will soften and
melt again if reheated.
3.5.2 Homopolymers, Copolymers and Polymer Blends (Alloys)
In the examples of polymerisation quoted earlier, a single monomer type (e.g., ethylene or
styrene) was polymerised to produce a polymer (polyethylene or polystyrene) in which
the molecular chain was made up of the same repeat unit throughout its length. Polymers
of this type are known as homopolymers.
It is possible, however, to produce polymers from a combination of two or more
monomers, the final molecule chain then having a combination of repeat units
corresponding to the monomers selected, rather like a necklace with different coloured
beads along its length. This type of polymer is known as a copolymer.
Examples of copolymers include SAN (e.g., Tyril from Dow chemicals), a copolymer
based on styrene and acrylonitrile as monomers. ABS is a rather complex copolymer
based upon three monomers, acrylonitrile, butadiene and styrene. Another widely used
Mould Design Guide
28
copolymer is based upon propylene and ethylene monomers and is usually called
propylene copolymer, as distinct from polypropylene, which is the homopolymer based
on propylene alone.
These copolymers have been developed mainly in order to overcome the specific
shortcomings of the related homopolymers. For example, SAN is a much more heat- and
solvent-resistant material than the homopolymer polystyrene. ABS has similar advantages
over polystyrene, plus the additional benefit of greater toughness due to the butadiene
content. With propylene copolymer, the presence of the ethylene-derived units in the
polymer chain overcomes to a considerable extent the brittleness at subzero temperatures
displayed by the homopolymer polypropylene.
The properties of individual copolymers can also be varied by altering the relative
proportions of the monomers involved, or by arranging them in different patterns along
the length of the molecular chain.
Figure 3.3 Molecular structure of monomers
Plastics Materials
29
The development of polymer blends, or alloys, has further expanded the range of
materials for injection and other moulding processes. With this type of material, two or
more polymers are produced separately and then blended or ‘alloyed’ together to form
new materials having a combination of properties not possessed by the constituent
polymers individually.
Examples of polymer blends include Noryl, from General Electric, a blend of polystyrene
and polyphenylene oxide, or Bayblend, a combination of ABS and polycarbonate
produced by Bayer.
3.5.3 Amorphous and Semicrystalline Thermoplastics
Thermoplastics can be subdivided into two distinct classes based upon differences in their
molecular structure. These differences can have a significant bearing on the performance
of mouldings in service, and have a marked effect on the behaviour of the material
during processing.
Materials such as polystyrene, polycarbonate, acrylics, SAN, ABS and PVC are said to be
amorphous thermoplastics. This signifies that in the solid state their molecular structure
is random and nonordered, the long-chain molecules being all entangled rather like
solidified strands of spaghetti.
Materials such as most of the Nylons, acetal, polypropylene, polythene and the
thermoplastic polyesters, have a much more ordered structure in the solid state than
amorphous materials. They have a considerable proportion of the long-chain molecules
packed closely together in regular alignment. These materials are known as
semicrystalline thermoplastics. It should be noted, however, that with both types of
material the molecular structure is amorphous at melt temperature.
Most amorphous thermoplastics are transparent in their natural, unpigmented form,
although ABS, for example, is an exception, while most semicrystalline thermoplastics in
their solid unpigmented form are translucent or an opaque white colour.
It is interesting to observe (for example when ‘purging’ on injection moulding machines)
that fully molten natural polypropylene or acetal are initially transparent, but as the melt
cools it clouds over, becoming translucent in the case of polypropylene and opaque white
in the case of acetal. This clouding is due to the material’s molecular structure gradually
rearranging itself from the tangled amorphous state in the melt to the more ordered
semicrystalline state in the solid.
Mould Design Guide
30
Figure 3.4 Cooling behaviour of materials
The main differences in behaviour between the amorphous and semicrystalline materials
observed during injection moulding are discussed next.
3.6 Melting and Solidification
Amorphous thermoplastics exhibit a progressive softening over a wide temperature span,
whereas the semicrystalline materials rapidly change from the solid melt condition over a
quite narrow temperature band.
Conversely, when amorphous materials are cooled they solidify slowly over a wide range
of temperature, in contrast to the semicrystalline plastics, which change from melt to
solid over a narrow range of temperature.
Plastics Materials
31
Figure 3.5 Behaviour of materials with increasing temperature
3.7 Shrinkage
Amorphous thermoplastics display very low shrinkage when they solidify, typically
between 0.5% and 1%. Semicrystalline materials shrink very much more, usually between
1.5% and 5% depending upon the particular material.
The higher shrinkage with the semicrystalline materials is due to the repeat units along
the molecular chains being of such a form that they can pack very closely together in an
ordered manner depending on the moulding conditions being used.
For example, when semicrystalline thermoplastics are moulded in hot moulds, cooling
rates are slow to allow more time for the molecular chains to disentangle themselves and
take up their crystalline structure. This results in a greater proportion of the material
being in its crystalline state (higher crystallinity), giving a product with superior
mechanical strength and dimensional stability, but with relatively high shrinkage.
If the same material is moulded in a cold mould, the more rapid cooling will inhibit the
formation of crystalline areas. The resulting lower level of crystallinity will give the
product inferior physical properties, and lower shrinkage accompanied by a tendency for
dimensional instability and distortion during later service due to continued after-
moulding shrinkage.
Mould Design Guide
32
3.8 Engineering and Commodity Plastics
Another method of classifying plastics is to refer to the physical properties of plastics. A
plastic whose physical properties are adequate for, as an example, a DVD case, is not
likely to be adoequate for an electric drill body.
Based on this method, commodity and engineering plastics can be identified. It is
important to note that this system is not done on a scientific basis so there is no
predefined list of commodity and engineering plastics. Indeed, some materials like
polypropylene and polyacetal often fall into both classes.
3.8.1 Engineering Plastics
This term has evolved to describe those plastics that are used in place of metals for load-
bearing applications (e.g., gear wheels) or plastics that must retain good physical
properties at elevated temperature (e.g., in electric kettles).
3.8.2 Commodity Plastics
These plastics are not expected to be load bearing or to withstand elevated temperatures.
They are more likely to be attractive housings, covers, etc., and are often produced on a
very large scale, which affects their price.
Table 3.1 lists a range of commonly used commodity and engineering materials.
Table 3.1 Classification of common plastics
Amorphous Semicrystalline
Acrylic Acetal
PVC Nylon
SAN Polyester
Polystyrene Polyethylene
Polycarbonate Polypropylene
ABS PTFE
Commodity plastics Engineering plastics
Polypropylene PET
HDPE Acetal
LDPE Nylon
Polystyrene PBT
SAN PC
Acrylic PEEK
ABS PAI
The Mould Design Guide.pdf

More Related Content

What's hot

Report on 3-D Printing
Report on 3-D PrintingReport on 3-D Printing
Report on 3-D Printing
ayush goyal
 
Đề tài Thiết kế giảm xóc xe máy
Đề tài Thiết kế giảm xóc xe máyĐề tài Thiết kế giảm xóc xe máy
Đề tài Thiết kế giảm xóc xe máy
Man_Ebook
 
Thiết kế và chế tạo bộ khuôn ép nhựa sản phẩm giá đỡ sạc điện thoại.pdf
Thiết kế và chế tạo bộ khuôn ép nhựa sản phẩm giá đỡ sạc điện thoại.pdfThiết kế và chế tạo bộ khuôn ép nhựa sản phẩm giá đỡ sạc điện thoại.pdf
Thiết kế và chế tạo bộ khuôn ép nhựa sản phẩm giá đỡ sạc điện thoại.pdf
Man_Ebook
 
Giáo trình thiết kế phát triển sản phẩm phun ép nhựa.pdf
Giáo trình thiết kế phát triển sản phẩm phun ép nhựa.pdfGiáo trình thiết kế phát triển sản phẩm phun ép nhựa.pdf
Giáo trình thiết kế phát triển sản phẩm phun ép nhựa.pdf
Man_Ebook
 
Sixteen steps of mold design and design focus
Sixteen steps of mold design and design focusSixteen steps of mold design and design focus
Sixteen steps of mold design and design focus
Gud Mould Industry Limited
 
Gt thiet ke che tao khuon ep nhua 1
Gt thiet ke che tao khuon ep nhua 1Gt thiet ke che tao khuon ep nhua 1
Gt thiet ke che tao khuon ep nhua 1
Ứng Dụng Máy Tính
 
Thiết kế chế tạo khuôn ép phun nhựa sản phẩm Nắp bịt ống thủy lực.pdf
Thiết kế chế tạo khuôn ép phun nhựa sản phẩm Nắp bịt ống thủy lực.pdfThiết kế chế tạo khuôn ép phun nhựa sản phẩm Nắp bịt ống thủy lực.pdf
Thiết kế chế tạo khuôn ép phun nhựa sản phẩm Nắp bịt ống thủy lực.pdf
Man_Ebook
 
cong nghe che tao may
cong nghe che tao maycong nghe che tao may
cong nghe che tao may
Trieu Albert
 
Đồ án tốt nghiệp: Thiết kế máy ép nhựa 250 tấn, HAY!
Đồ án tốt nghiệp: Thiết kế máy ép nhựa 250 tấn, HAY!Đồ án tốt nghiệp: Thiết kế máy ép nhựa 250 tấn, HAY!
Đồ án tốt nghiệp: Thiết kế máy ép nhựa 250 tấn, HAY!
Nhận Viết Đề Tài Trọn Gói ZALO 0932091562
 
Plastic Introduction to Automotive Interiors
Plastic Introduction to Automotive InteriorsPlastic Introduction to Automotive Interiors
Plastic Introduction to Automotive Interiors
Aditya Deshpande
 
Thiết kế máy đột thủy lực.pdf
Thiết kế máy đột thủy lực.pdfThiết kế máy đột thủy lực.pdf
Thiết kế máy đột thủy lực.pdf
Man_Ebook
 
Báo cáo thực tập tốt nghiệp khoa Cơ khí Cty TNHH Cơ Khí TM Lê Duyên Anh
Báo cáo thực tập tốt nghiệp khoa Cơ khí Cty TNHH Cơ Khí TM Lê Duyên AnhBáo cáo thực tập tốt nghiệp khoa Cơ khí Cty TNHH Cơ Khí TM Lê Duyên Anh
Báo cáo thực tập tốt nghiệp khoa Cơ khí Cty TNHH Cơ Khí TM Lê Duyên Anh
Dịch Vụ Viết Thuê Khóa Luận Zalo/Telegram 0917193864
 
Đề tài: Bộ điều khiển trượt cho tay máy Robot 2 bậc tự do, HAY
Đề tài: Bộ điều khiển trượt cho tay máy Robot 2 bậc tự do, HAYĐề tài: Bộ điều khiển trượt cho tay máy Robot 2 bậc tự do, HAY
Đề tài: Bộ điều khiển trượt cho tay máy Robot 2 bậc tự do, HAY
Dịch vụ viết bài trọn gói ZALO 0917193864
 
4.2.1. thiết kế bộ điều khiển trượt cho robot 2 bậc tự do và mô phỏng trên ma...
4.2.1. thiết kế bộ điều khiển trượt cho robot 2 bậc tự do và mô phỏng trên ma...4.2.1. thiết kế bộ điều khiển trượt cho robot 2 bậc tự do và mô phỏng trên ma...
4.2.1. thiết kế bộ điều khiển trượt cho robot 2 bậc tự do và mô phỏng trên ma...
TÀI LIỆU NGÀNH MAY
 
Additive Manufacturing (2.008x Lecture Slides)
Additive Manufacturing (2.008x Lecture Slides)Additive Manufacturing (2.008x Lecture Slides)
Additive Manufacturing (2.008x Lecture Slides)
A. John Hart
 
Điều khiển chuyển động của robot song song Delta không gian, HAY
Điều khiển chuyển động của robot song song Delta không gian, HAYĐiều khiển chuyển động của robot song song Delta không gian, HAY
Điều khiển chuyển động của robot song song Delta không gian, HAY
Dịch vụ viết bài trọn gói ZALO 0917193864
 
[ĐAMH] Thiết kế máy ép củi trấu
[ĐAMH] Thiết kế máy ép củi trấu[ĐAMH] Thiết kế máy ép củi trấu
[ĐAMH] Thiết kế máy ép củi trấu
Pham Hoang
 
Giáo trình thiết kế và chế tạo khuôn ép nhựa
Giáo trình thiết kế và chế tạo khuôn ép nhựa Giáo trình thiết kế và chế tạo khuôn ép nhựa
Giáo trình thiết kế và chế tạo khuôn ép nhựa
Cửa Hàng Vật Tư
 
Đề tài: Thiết kế hệ thống dẫn động thùng trộn, HOT, 9đ
Đề tài: Thiết kế hệ thống dẫn động thùng trộn, HOT, 9đĐề tài: Thiết kế hệ thống dẫn động thùng trộn, HOT, 9đ
Đề tài: Thiết kế hệ thống dẫn động thùng trộn, HOT, 9đ
Dịch vụ viết bài trọn gói ZALO 0917193864
 
Design for Plastics
Design for Plastics Design for Plastics
Design for Plastics
QualityMolds
 

What's hot (20)

Report on 3-D Printing
Report on 3-D PrintingReport on 3-D Printing
Report on 3-D Printing
 
Đề tài Thiết kế giảm xóc xe máy
Đề tài Thiết kế giảm xóc xe máyĐề tài Thiết kế giảm xóc xe máy
Đề tài Thiết kế giảm xóc xe máy
 
Thiết kế và chế tạo bộ khuôn ép nhựa sản phẩm giá đỡ sạc điện thoại.pdf
Thiết kế và chế tạo bộ khuôn ép nhựa sản phẩm giá đỡ sạc điện thoại.pdfThiết kế và chế tạo bộ khuôn ép nhựa sản phẩm giá đỡ sạc điện thoại.pdf
Thiết kế và chế tạo bộ khuôn ép nhựa sản phẩm giá đỡ sạc điện thoại.pdf
 
Giáo trình thiết kế phát triển sản phẩm phun ép nhựa.pdf
Giáo trình thiết kế phát triển sản phẩm phun ép nhựa.pdfGiáo trình thiết kế phát triển sản phẩm phun ép nhựa.pdf
Giáo trình thiết kế phát triển sản phẩm phun ép nhựa.pdf
 
Sixteen steps of mold design and design focus
Sixteen steps of mold design and design focusSixteen steps of mold design and design focus
Sixteen steps of mold design and design focus
 
Gt thiet ke che tao khuon ep nhua 1
Gt thiet ke che tao khuon ep nhua 1Gt thiet ke che tao khuon ep nhua 1
Gt thiet ke che tao khuon ep nhua 1
 
Thiết kế chế tạo khuôn ép phun nhựa sản phẩm Nắp bịt ống thủy lực.pdf
Thiết kế chế tạo khuôn ép phun nhựa sản phẩm Nắp bịt ống thủy lực.pdfThiết kế chế tạo khuôn ép phun nhựa sản phẩm Nắp bịt ống thủy lực.pdf
Thiết kế chế tạo khuôn ép phun nhựa sản phẩm Nắp bịt ống thủy lực.pdf
 
cong nghe che tao may
cong nghe che tao maycong nghe che tao may
cong nghe che tao may
 
Đồ án tốt nghiệp: Thiết kế máy ép nhựa 250 tấn, HAY!
Đồ án tốt nghiệp: Thiết kế máy ép nhựa 250 tấn, HAY!Đồ án tốt nghiệp: Thiết kế máy ép nhựa 250 tấn, HAY!
Đồ án tốt nghiệp: Thiết kế máy ép nhựa 250 tấn, HAY!
 
Plastic Introduction to Automotive Interiors
Plastic Introduction to Automotive InteriorsPlastic Introduction to Automotive Interiors
Plastic Introduction to Automotive Interiors
 
Thiết kế máy đột thủy lực.pdf
Thiết kế máy đột thủy lực.pdfThiết kế máy đột thủy lực.pdf
Thiết kế máy đột thủy lực.pdf
 
Báo cáo thực tập tốt nghiệp khoa Cơ khí Cty TNHH Cơ Khí TM Lê Duyên Anh
Báo cáo thực tập tốt nghiệp khoa Cơ khí Cty TNHH Cơ Khí TM Lê Duyên AnhBáo cáo thực tập tốt nghiệp khoa Cơ khí Cty TNHH Cơ Khí TM Lê Duyên Anh
Báo cáo thực tập tốt nghiệp khoa Cơ khí Cty TNHH Cơ Khí TM Lê Duyên Anh
 
Đề tài: Bộ điều khiển trượt cho tay máy Robot 2 bậc tự do, HAY
Đề tài: Bộ điều khiển trượt cho tay máy Robot 2 bậc tự do, HAYĐề tài: Bộ điều khiển trượt cho tay máy Robot 2 bậc tự do, HAY
Đề tài: Bộ điều khiển trượt cho tay máy Robot 2 bậc tự do, HAY
 
4.2.1. thiết kế bộ điều khiển trượt cho robot 2 bậc tự do và mô phỏng trên ma...
4.2.1. thiết kế bộ điều khiển trượt cho robot 2 bậc tự do và mô phỏng trên ma...4.2.1. thiết kế bộ điều khiển trượt cho robot 2 bậc tự do và mô phỏng trên ma...
4.2.1. thiết kế bộ điều khiển trượt cho robot 2 bậc tự do và mô phỏng trên ma...
 
Additive Manufacturing (2.008x Lecture Slides)
Additive Manufacturing (2.008x Lecture Slides)Additive Manufacturing (2.008x Lecture Slides)
Additive Manufacturing (2.008x Lecture Slides)
 
Điều khiển chuyển động của robot song song Delta không gian, HAY
Điều khiển chuyển động của robot song song Delta không gian, HAYĐiều khiển chuyển động của robot song song Delta không gian, HAY
Điều khiển chuyển động của robot song song Delta không gian, HAY
 
[ĐAMH] Thiết kế máy ép củi trấu
[ĐAMH] Thiết kế máy ép củi trấu[ĐAMH] Thiết kế máy ép củi trấu
[ĐAMH] Thiết kế máy ép củi trấu
 
Giáo trình thiết kế và chế tạo khuôn ép nhựa
Giáo trình thiết kế và chế tạo khuôn ép nhựa Giáo trình thiết kế và chế tạo khuôn ép nhựa
Giáo trình thiết kế và chế tạo khuôn ép nhựa
 
Đề tài: Thiết kế hệ thống dẫn động thùng trộn, HOT, 9đ
Đề tài: Thiết kế hệ thống dẫn động thùng trộn, HOT, 9đĐề tài: Thiết kế hệ thống dẫn động thùng trộn, HOT, 9đ
Đề tài: Thiết kế hệ thống dẫn động thùng trộn, HOT, 9đ
 
Design for Plastics
Design for Plastics Design for Plastics
Design for Plastics
 

Similar to The Mould Design Guide.pdf

Biomass
BiomassBiomass
Biomass
Lieuqn
 
REGIONAL WOOD ENERGY DEVELOPMENT PROGRAMME IN ASIA
REGIONAL WOOD ENERGY DEVELOPMENT PROGRAMME IN ASIAREGIONAL WOOD ENERGY DEVELOPMENT PROGRAMME IN ASIA
REGIONAL WOOD ENERGY DEVELOPMENT PROGRAMME IN ASIA
PT carbon indonesia
 
Asme b18241m
Asme b18241mAsme b18241m
Asme b18241m
Mahesh Marakana
 
9781315296494_previewpdf.pdf
9781315296494_previewpdf.pdf9781315296494_previewpdf.pdf
9781315296494_previewpdf.pdf
nishant038
 
Stair Workbook.pdf
Stair Workbook.pdfStair Workbook.pdf
Fadal CNC Safety Section Manual
Fadal CNC Safety Section Manual Fadal CNC Safety Section Manual
Fadal CNC Safety Section Manual
Independent Technology Service Inc
 
Fadal Parts Manual
Fadal Parts ManualFadal Parts Manual
Review of completion_technologies(1)
Review of completion_technologies(1)Review of completion_technologies(1)
Review of completion_technologies(1)
Lawrence Kwende
 
235770727 bitumen-safety-code
235770727 bitumen-safety-code235770727 bitumen-safety-code
235770727 bitumen-safety-code
Sameer Ahmed
 
2008 biodiesel handling & use guidelines
2008 biodiesel handling & use guidelines2008 biodiesel handling & use guidelines
2008 biodiesel handling & use guidelines
Biodiesel Automotive
 
Derivatives
DerivativesDerivatives
Derivatives
Gorani & Associates
 
Coatings
CoatingsCoatings
Coatings
Linnie Mcleod
 
process piping
process pipingprocess piping
process piping
RAMARAO SAMAYAM
 
Biodiesel
BiodieselBiodiesel
Biodiesel
walled ashwah
 
Industry 4.0 Final Report, National Academy of Science and Engineering of Ger...
Industry 4.0 Final Report, National Academy of Science and Engineering of Ger...Industry 4.0 Final Report, National Academy of Science and Engineering of Ger...
Industry 4.0 Final Report, National Academy of Science and Engineering of Ger...
Asia Pacific Intellectual Capital Centre Ltd
 
Отчет из Германии о 4й промышленной революции
Отчет из Германии о 4й промышленной революции Отчет из Германии о 4й промышленной революции
Отчет из Германии о 4й промышленной революции
Sergey Zhdanov
 
FOREX ICT & MMM NOTES.pdf
FOREX ICT & MMM NOTES.pdfFOREX ICT & MMM NOTES.pdf
FOREX ICT & MMM NOTES.pdf
HungLe593957
 
Engineering BIOCHAR.pdf
Engineering  BIOCHAR.pdfEngineering  BIOCHAR.pdf
Engineering BIOCHAR.pdf
MOHDZAINUDINJENAL
 
thesis
thesisthesis
thesis
Sam Hawkins
 
ASME B 31.3 (2008) PROCESS PIPING.pdf
ASME B 31.3 (2008) PROCESS PIPING.pdfASME B 31.3 (2008) PROCESS PIPING.pdf
ASME B 31.3 (2008) PROCESS PIPING.pdf
kjdfjrub34323
 

Similar to The Mould Design Guide.pdf (20)

Biomass
BiomassBiomass
Biomass
 
REGIONAL WOOD ENERGY DEVELOPMENT PROGRAMME IN ASIA
REGIONAL WOOD ENERGY DEVELOPMENT PROGRAMME IN ASIAREGIONAL WOOD ENERGY DEVELOPMENT PROGRAMME IN ASIA
REGIONAL WOOD ENERGY DEVELOPMENT PROGRAMME IN ASIA
 
Asme b18241m
Asme b18241mAsme b18241m
Asme b18241m
 
9781315296494_previewpdf.pdf
9781315296494_previewpdf.pdf9781315296494_previewpdf.pdf
9781315296494_previewpdf.pdf
 
Stair Workbook.pdf
Stair Workbook.pdfStair Workbook.pdf
Stair Workbook.pdf
 
Fadal CNC Safety Section Manual
Fadal CNC Safety Section Manual Fadal CNC Safety Section Manual
Fadal CNC Safety Section Manual
 
Fadal Parts Manual
Fadal Parts ManualFadal Parts Manual
Fadal Parts Manual
 
Review of completion_technologies(1)
Review of completion_technologies(1)Review of completion_technologies(1)
Review of completion_technologies(1)
 
235770727 bitumen-safety-code
235770727 bitumen-safety-code235770727 bitumen-safety-code
235770727 bitumen-safety-code
 
2008 biodiesel handling & use guidelines
2008 biodiesel handling & use guidelines2008 biodiesel handling & use guidelines
2008 biodiesel handling & use guidelines
 
Derivatives
DerivativesDerivatives
Derivatives
 
Coatings
CoatingsCoatings
Coatings
 
process piping
process pipingprocess piping
process piping
 
Biodiesel
BiodieselBiodiesel
Biodiesel
 
Industry 4.0 Final Report, National Academy of Science and Engineering of Ger...
Industry 4.0 Final Report, National Academy of Science and Engineering of Ger...Industry 4.0 Final Report, National Academy of Science and Engineering of Ger...
Industry 4.0 Final Report, National Academy of Science and Engineering of Ger...
 
Отчет из Германии о 4й промышленной революции
Отчет из Германии о 4й промышленной революции Отчет из Германии о 4й промышленной революции
Отчет из Германии о 4й промышленной революции
 
FOREX ICT & MMM NOTES.pdf
FOREX ICT & MMM NOTES.pdfFOREX ICT & MMM NOTES.pdf
FOREX ICT & MMM NOTES.pdf
 
Engineering BIOCHAR.pdf
Engineering  BIOCHAR.pdfEngineering  BIOCHAR.pdf
Engineering BIOCHAR.pdf
 
thesis
thesisthesis
thesis
 
ASME B 31.3 (2008) PROCESS PIPING.pdf
ASME B 31.3 (2008) PROCESS PIPING.pdfASME B 31.3 (2008) PROCESS PIPING.pdf
ASME B 31.3 (2008) PROCESS PIPING.pdf
 

Recently uploaded

BRAIN TUMOR DETECTION for seminar ppt.pdf
BRAIN TUMOR DETECTION for seminar ppt.pdfBRAIN TUMOR DETECTION for seminar ppt.pdf
BRAIN TUMOR DETECTION for seminar ppt.pdf
LAXMAREDDY22
 
Electric vehicle and photovoltaic advanced roles in enhancing the financial p...
Electric vehicle and photovoltaic advanced roles in enhancing the financial p...Electric vehicle and photovoltaic advanced roles in enhancing the financial p...
Electric vehicle and photovoltaic advanced roles in enhancing the financial p...
IJECEIAES
 
Rainfall intensity duration frequency curve statistical analysis and modeling...
Rainfall intensity duration frequency curve statistical analysis and modeling...Rainfall intensity duration frequency curve statistical analysis and modeling...
Rainfall intensity duration frequency curve statistical analysis and modeling...
bijceesjournal
 
cnn.pptx Convolutional neural network used for image classication
cnn.pptx Convolutional neural network used for image classicationcnn.pptx Convolutional neural network used for image classication
cnn.pptx Convolutional neural network used for image classication
SakkaravarthiShanmug
 
Redefining brain tumor segmentation: a cutting-edge convolutional neural netw...
Redefining brain tumor segmentation: a cutting-edge convolutional neural netw...Redefining brain tumor segmentation: a cutting-edge convolutional neural netw...
Redefining brain tumor segmentation: a cutting-edge convolutional neural netw...
IJECEIAES
 
Material for memory and display system h
Material for memory and display system hMaterial for memory and display system h
Material for memory and display system h
gowrishankartb2005
 
Software Engineering and Project Management - Introduction, Modeling Concepts...
Software Engineering and Project Management - Introduction, Modeling Concepts...Software Engineering and Project Management - Introduction, Modeling Concepts...
Software Engineering and Project Management - Introduction, Modeling Concepts...
Prakhyath Rai
 
CEC 352 - SATELLITE COMMUNICATION UNIT 1
CEC 352 - SATELLITE COMMUNICATION UNIT 1CEC 352 - SATELLITE COMMUNICATION UNIT 1
CEC 352 - SATELLITE COMMUNICATION UNIT 1
PKavitha10
 
Unit-III-ELECTROCHEMICAL STORAGE DEVICES.ppt
Unit-III-ELECTROCHEMICAL STORAGE DEVICES.pptUnit-III-ELECTROCHEMICAL STORAGE DEVICES.ppt
Unit-III-ELECTROCHEMICAL STORAGE DEVICES.ppt
KrishnaveniKrishnara1
 
People as resource Grade IX.pdf minimala
People as resource Grade IX.pdf minimalaPeople as resource Grade IX.pdf minimala
People as resource Grade IX.pdf minimala
riddhimaagrawal986
 
Generative AI leverages algorithms to create various forms of content
Generative AI leverages algorithms to create various forms of contentGenerative AI leverages algorithms to create various forms of content
Generative AI leverages algorithms to create various forms of content
Hitesh Mohapatra
 
spirit beverages ppt without graphics.pptx
spirit beverages ppt without graphics.pptxspirit beverages ppt without graphics.pptx
spirit beverages ppt without graphics.pptx
Madan Karki
 
Design and optimization of ion propulsion drone
Design and optimization of ion propulsion droneDesign and optimization of ion propulsion drone
Design and optimization of ion propulsion drone
bjmsejournal
 
Software Quality Assurance-se412-v11.ppt
Software Quality Assurance-se412-v11.pptSoftware Quality Assurance-se412-v11.ppt
Software Quality Assurance-se412-v11.ppt
TaghreedAltamimi
 
ITSM Integration with MuleSoft.pptx
ITSM  Integration with MuleSoft.pptxITSM  Integration with MuleSoft.pptx
ITSM Integration with MuleSoft.pptx
VANDANAMOHANGOUDA
 
Welding Metallurgy Ferrous Materials.pdf
Welding Metallurgy Ferrous Materials.pdfWelding Metallurgy Ferrous Materials.pdf
Welding Metallurgy Ferrous Materials.pdf
AjmalKhan50578
 
22CYT12-Unit-V-E Waste and its Management.ppt
22CYT12-Unit-V-E Waste and its Management.ppt22CYT12-Unit-V-E Waste and its Management.ppt
22CYT12-Unit-V-E Waste and its Management.ppt
KrishnaveniKrishnara1
 
Applications of artificial Intelligence in Mechanical Engineering.pdf
Applications of artificial Intelligence in Mechanical Engineering.pdfApplications of artificial Intelligence in Mechanical Engineering.pdf
Applications of artificial Intelligence in Mechanical Engineering.pdf
Atif Razi
 
132/33KV substation case study Presentation
132/33KV substation case study Presentation132/33KV substation case study Presentation
132/33KV substation case study Presentation
kandramariana6
 
Optimizing Gradle Builds - Gradle DPE Tour Berlin 2024
Optimizing Gradle Builds - Gradle DPE Tour Berlin 2024Optimizing Gradle Builds - Gradle DPE Tour Berlin 2024
Optimizing Gradle Builds - Gradle DPE Tour Berlin 2024
Sinan KOZAK
 

Recently uploaded (20)

BRAIN TUMOR DETECTION for seminar ppt.pdf
BRAIN TUMOR DETECTION for seminar ppt.pdfBRAIN TUMOR DETECTION for seminar ppt.pdf
BRAIN TUMOR DETECTION for seminar ppt.pdf
 
Electric vehicle and photovoltaic advanced roles in enhancing the financial p...
Electric vehicle and photovoltaic advanced roles in enhancing the financial p...Electric vehicle and photovoltaic advanced roles in enhancing the financial p...
Electric vehicle and photovoltaic advanced roles in enhancing the financial p...
 
Rainfall intensity duration frequency curve statistical analysis and modeling...
Rainfall intensity duration frequency curve statistical analysis and modeling...Rainfall intensity duration frequency curve statistical analysis and modeling...
Rainfall intensity duration frequency curve statistical analysis and modeling...
 
cnn.pptx Convolutional neural network used for image classication
cnn.pptx Convolutional neural network used for image classicationcnn.pptx Convolutional neural network used for image classication
cnn.pptx Convolutional neural network used for image classication
 
Redefining brain tumor segmentation: a cutting-edge convolutional neural netw...
Redefining brain tumor segmentation: a cutting-edge convolutional neural netw...Redefining brain tumor segmentation: a cutting-edge convolutional neural netw...
Redefining brain tumor segmentation: a cutting-edge convolutional neural netw...
 
Material for memory and display system h
Material for memory and display system hMaterial for memory and display system h
Material for memory and display system h
 
Software Engineering and Project Management - Introduction, Modeling Concepts...
Software Engineering and Project Management - Introduction, Modeling Concepts...Software Engineering and Project Management - Introduction, Modeling Concepts...
Software Engineering and Project Management - Introduction, Modeling Concepts...
 
CEC 352 - SATELLITE COMMUNICATION UNIT 1
CEC 352 - SATELLITE COMMUNICATION UNIT 1CEC 352 - SATELLITE COMMUNICATION UNIT 1
CEC 352 - SATELLITE COMMUNICATION UNIT 1
 
Unit-III-ELECTROCHEMICAL STORAGE DEVICES.ppt
Unit-III-ELECTROCHEMICAL STORAGE DEVICES.pptUnit-III-ELECTROCHEMICAL STORAGE DEVICES.ppt
Unit-III-ELECTROCHEMICAL STORAGE DEVICES.ppt
 
People as resource Grade IX.pdf minimala
People as resource Grade IX.pdf minimalaPeople as resource Grade IX.pdf minimala
People as resource Grade IX.pdf minimala
 
Generative AI leverages algorithms to create various forms of content
Generative AI leverages algorithms to create various forms of contentGenerative AI leverages algorithms to create various forms of content
Generative AI leverages algorithms to create various forms of content
 
spirit beverages ppt without graphics.pptx
spirit beverages ppt without graphics.pptxspirit beverages ppt without graphics.pptx
spirit beverages ppt without graphics.pptx
 
Design and optimization of ion propulsion drone
Design and optimization of ion propulsion droneDesign and optimization of ion propulsion drone
Design and optimization of ion propulsion drone
 
Software Quality Assurance-se412-v11.ppt
Software Quality Assurance-se412-v11.pptSoftware Quality Assurance-se412-v11.ppt
Software Quality Assurance-se412-v11.ppt
 
ITSM Integration with MuleSoft.pptx
ITSM  Integration with MuleSoft.pptxITSM  Integration with MuleSoft.pptx
ITSM Integration with MuleSoft.pptx
 
Welding Metallurgy Ferrous Materials.pdf
Welding Metallurgy Ferrous Materials.pdfWelding Metallurgy Ferrous Materials.pdf
Welding Metallurgy Ferrous Materials.pdf
 
22CYT12-Unit-V-E Waste and its Management.ppt
22CYT12-Unit-V-E Waste and its Management.ppt22CYT12-Unit-V-E Waste and its Management.ppt
22CYT12-Unit-V-E Waste and its Management.ppt
 
Applications of artificial Intelligence in Mechanical Engineering.pdf
Applications of artificial Intelligence in Mechanical Engineering.pdfApplications of artificial Intelligence in Mechanical Engineering.pdf
Applications of artificial Intelligence in Mechanical Engineering.pdf
 
132/33KV substation case study Presentation
132/33KV substation case study Presentation132/33KV substation case study Presentation
132/33KV substation case study Presentation
 
Optimizing Gradle Builds - Gradle DPE Tour Berlin 2024
Optimizing Gradle Builds - Gradle DPE Tour Berlin 2024Optimizing Gradle Builds - Gradle DPE Tour Berlin 2024
Optimizing Gradle Builds - Gradle DPE Tour Berlin 2024
 

The Mould Design Guide.pdf

  • 1. The Mould Design Guide Peter Jones
  • 2.
  • 3. The Mould Design Guide Peter Jones Smithers Rapra Technology Limited A wholly owned subsidiary of The Smithers Group Shawbury, Shrewsbury, Shropshire, SY4 4NR, United Kingdom Telephone: +44 (0)1939 250383 Fax: +44 (0)1939 251118 http://www.rapra.net
  • 4. First Published in 2008 by Smithers Rapra Technology Limited Shawbury, Shrewsbury, Shropshire, SY4 4NR, UK ©2008, Smithers Rapra Technology Limited All rights reserved. Except as permitted under current legislation no part of this publication may be photocopied, reproduced or distributed in any form or by any means or stored in a database or retrieval system, without the prior permission from the copyright holder. A catalogue record for this book is available from the British Library. Every effort has been made to contact copyright holders of any material reproduced within the text and the authors and publishers apologise if any have been overlooked. Typeset by documen.co.uk Cover designed by Smithers Rapra Technology Limited Printed and bound by Lightning Source Soft-backed ISBN: 978-1-84735-088-6 Hard-backed ISBN: 978-1-84735-087-9
  • 5. i Contents 1 Introduction ......................................................................................................... 1 2 The Injection Moulding Process ............................................................................ 5 2.1 Background .............................................................................................. 5 2.2 Machine Design........................................................................................ 6 2.2.1 Machine Base Unit ...................................................................... 6 2.2.2 Clamp Unit................................................................................. 6 2.2.3 Mould Height ............................................................................. 6 2.2.4 Daylight...................................................................................... 7 2.2.5 Distance Between Tie Bars........................................................... 8 2.2.6 Clamping Mechanisms ................................................................ 9 2.2.7 The Injection Unit..................................................................... 13 2.3 Theoretical Mould Locking Force............................................................ 19 2.4 The Moulding Cycle ............................................................................... 20 2.4.1 Mould Closing Phase................................................................. 20 2.4.2 Mould Protection Phase ............................................................ 20 2.4.3 Injection (Mould Filling) Phase.................................................. 20 2.4.4 Holding Time and Pressurising Phase......................................... 20 2.4.5 Cooling and Refill Phase............................................................ 21 2.4.6 Screw Back Phase...................................................................... 21 2.4.7 Mould Open Phase.................................................................... 21 2.4.8 Ejection Phase........................................................................... 22
  • 6. Mould Design Guide ii 3 Plastics Materials................................................................................................ 23 3.1 Types of Plastics Materials...................................................................... 23 3.2 Definition of Plastics............................................................................... 23 3.3 The Nature of Plastics Materials ............................................................. 24 3.4 Monomers, Polymerisation and Polymers ................................................ 25 3.5 Classification of Plastics.......................................................................... 26 3.5.1 Thermosets and Thermoplastics ................................................ 26 3.5.2 Homopolymers, Copolymers and Polymer Blends (Alloys) ......... 27 3.5.3 Amorphous and Semicrystalline Thermoplastics ........................ 29 3.6 Melting and Solidification....................................................................... 30 3.7 Shrinkage ............................................................................................... 31 3.8 Engineering and Commodity Plastics....................................................... 32 3.8.1 Engineering Plastics................................................................... 32 3.8.2 Commodity Plastics .................................................................. 32 3.9 Material Additives .................................................................................. 33 3.10 Flow Properties of Thermoplastic Materials............................................. 35 3.11 Variable Molecular Weight ..................................................................... 35 3.12 Melt Flow Index (MFI) ........................................................................... 36 3.13 Reprocessed Material.............................................................................. 37 3.14 Polymer Molecules.................................................................................. 37 3.15 Material Names and Abbreviations ......................................................... 37 3.16 Material Applications ............................................................................. 40
  • 7. Contents iii 3.17 The Behaviour of Thermoplastics During the Injection Moulding Process .................................................... 41 3.17.1 Pretreatment of Materials Before Injection Moulding ................. 41 3.17.2 Reprocessed Materials............................................................... 41 3.17.3 Colouring Materials.................................................................. 41 3.17.4 Additives .................................................................................. 41 3.17.5 Material Drying ........................................................................ 42 3.17.6 Plasticising or Melting............................................................... 43 3.17.7 Measurement of Melt Temperature ........................................... 44 3.17.8 Degradation of Materials During Plasticising ............................. 44 3.17.9 Selecting the Optimum Melt Temperature.................................. 45 3.17.10 The Effect of Screw Rotational Speed and Back Pressure ............ 45 3.17.11 Flow Characteristics of the Melt During the Injection Phase ....... 46 3.17.12 Selection of Injection Speed ....................................................... 46 3.18 Initial Cavity Filling Phase....................................................................... 48 3.19 Cavity Holding Pressure Phase ................................................................ 49 3.20 Gate Freeze-off Phase.............................................................................. 49 3.21 Melt Compressibility and Shrinkage ........................................................ 49 3.22 Sinks and Voids ...................................................................................... 50 3.23 Weld Lines and Meld Lines ..................................................................... 53 3.24 Cooling and Solidification of the Melt ..................................................... 54 4 Good Design Practice.......................................................................................... 55 4.1 Predesign Analysis .................................................................................. 56 4.2 Reading General Arrangement Diagrams (GA) ........................................ 56 4.3 Understanding Toolmaking Concepts...................................................... 57
  • 8. Mould Design Guide iv 4.4 Observing Mould Tools.......................................................................... 58 4.5 Summary of Good Design Practice........................................................... 58 5 Design Checklist................................................................................................. 59 5.1 Predesign Checklist ................................................................................. 59 5.2 Original Estimate Details ........................................................................ 60 5.3 Component Drawing .............................................................................. 60 5.4 Component Geometry............................................................................. 60 5.5 Component Material............................................................................... 61 5.6 Quantity Required.................................................................................. 61 5.7 Component Function .............................................................................. 61 5.8 Component Tolerances........................................................................... 62 5.9 Number of Impressions........................................................................... 62 5.10 Gating Method ....................................................................................... 62 5.11 Ejection Method ..................................................................................... 63 5.12 Component Aesthetics ............................................................................ 63 6 Determining the Right Number of Impressions .................................................... 65 6.1 Quality Versus Quantity ......................................................................... 66 6.2 Appearance............................................................................................. 66 6.3 Part Geometry ........................................................................................ 67 6.4 Drawing Tolerances................................................................................ 67 6.5 Discussion .............................................................................................. 67 6.6 More Cavities = Less Control.................................................................. 68 6.7 Summary................................................................................................ 70
  • 9. Mould Design Guide vi 8.3.3 Milling ..................................................................................... 86 8.3.4 Grinding................................................................................... 87 8.3.5 Fabrication ............................................................................... 88 8.3.6 Standard Electrodischarge Machining (EDM) ............................ 89 8.3.7 Wire Electrodischarge Machining .............................................. 91 8.3.8 Cold Hobbing........................................................................... 92 8.3.9 Beryllium-Copper...................................................................... 93 8.3.10 Electroforming.......................................................................... 93 8.3.11 Cavity Corrosion and Erosion ................................................... 95 8.3.12 Gassing and Burning ................................................................. 95 8.4 Differential Shrinkage ............................................................................. 96 8.5 Maximum Metal Conditions................................................................... 97 8.6 Example ................................................................................................. 97 9 Two-Plate Mould Tools...................................................................................... 99 9.1 Design Details......................................................................................... 99 9.1.1 Locating or Register Ring.........................................................101 9.1.2 Top Plate.................................................................................101 9.1.3 Split Line .................................................................................102 9.1.4 Cavity Insert ............................................................................102 9.1.5 Front Cavity Plate ....................................................................102 9.1.6 Rear Cavity Plate .....................................................................102 9.1.7 Cavity Support Plate ................................................................103 9.1.8 Ejection System........................................................................103 9.1.9 Ejection Gap............................................................................104
  • 10. Contents vii 9.1.10 Support Blocks.........................................................................104 9.1.11 Guide Pillar..............................................................................104 9.1.12 Return Pins..............................................................................104 9.1.13 Fine Tuning the Mould Tool ....................................................104 9.1.14 Clearances ...............................................................................106 9.1.15 Bushes .....................................................................................106 9.1.16 Screws .....................................................................................106 9.1.17 Support Pillars .........................................................................106 9.1.18 Taper Threads .........................................................................107 9.1.19 Stand-off Buttons .....................................................................107 9.1.20 Chamfers and Radii .................................................................107 9.1.21 Guide Bushes ...........................................................................107 10 Ejection Systems ................................................................................................109 10.1 Requirements.........................................................................................109 10.1.1 Part Geometry..........................................................................109 10.1.2 Draft Angles ............................................................................109 10.1.3 Tolerances ...............................................................................110 10.1.4 Material...................................................................................110 10.1.5 Gating .....................................................................................111 10.1.6 Ejection Balance.......................................................................112 10.1.7 Machine Specifications.............................................................113 10.1.8 Mould Opening Stroke.............................................................113 10.1.9 Machine Ejection Features........................................................113 10.1.10 Movement Control Features.....................................................114 10.1.11 Component Finish Requirements..............................................114
  • 11. Mould Design Guide viii 10.2 Ejection Methods...................................................................................114 10.2.1 Ejector Pins and Blades.............................................................114 10.2.2 Sleeve Ejectors..........................................................................116 10.2.3 Stripper Plate Ejection ..............................................................117 10.2.4 Valve Ejection..........................................................................118 10.2.5 Ejection Forces.........................................................................119 10.3 Ejection Force Calculation .....................................................................120 10.4 Formulae...............................................................................................120 10.4.1 Example ..................................................................................121 10.5 Ejection Assembly Actuation..................................................................122 10.5.1 Mechanical Ejection.................................................................122 10.5.2 Hydraulic Ejection ...................................................................125 10.5.3 Pneumatic Ejection...................................................................126 10.5.4 Hybrid Ejection Systems...........................................................126 10.5.5 Double Ejection .......................................................................129 10.6 Unsatisfactory Systems...........................................................................132 11 Mould Temperature Control..............................................................................133 11.1 Discussion .............................................................................................133 11.2 Heat Transfer Fluids..............................................................................134 11.2.1 Water ......................................................................................134 11.2.2 Heat Transfer Oil ....................................................................134 11.3 Chillers..................................................................................................135 11.4 Temperature Controllers........................................................................135 11.5 Cooling Channels ..................................................................................135 11.5.1 Core Cooling ...........................................................................137
  • 12. Contents ix 11.6 Cavity Cooling.......................................................................................145 11.7 Circuit Efficiency ...................................................................................148 11.7.1 Series Cooling ..........................................................................148 11.7.2 Parallel Cooling .......................................................................149 11.8 Beryllium-Copper Cores and Cavities .....................................................150 11.9 Factors Affecting the Cooling Cycle........................................................150 11.9.1 Part Geometry..........................................................................151 11.9.2 Wall Sections ...........................................................................151 11.9.3 Moulding Material...................................................................151 11.9.4 Influence of the Gate and Runner..............................................152 11.9.5 The Mould Material.................................................................152 11.10 Mould Temperature Control..................................................................152 11.11 Cooling Efficiency..................................................................................153 11.11.1 Cavity Material and Construction.............................................153 11.11.2 Channel Geometry ...................................................................154 11.11.3 Number of Channels Required .................................................154 11.11.4 Rate of Coolant Flow...............................................................154 11.12 Coolants................................................................................................155 11.12.1 Thermal Conductance of Metals...............................................155 11.13 Cooling Calculations..............................................................................155 11.13.1 Specific Heat............................................................................155 11.14 Pulsed Mould Cooling............................................................................161 11.14.1 Selective Pulsed Cooling ...........................................................162 11.15 Mould Cooling Variables.......................................................................163 11.16 Summary...............................................................................................163
  • 13. Mould Design Guide x 12 Undercut Injection Mould Tools ........................................................................165 12.1 Introduction ..........................................................................................165 12.1.1 Undercut Components .............................................................167 12.1.2 Basic Undercut Mould Designs .................................................168 12.1.3 Loose Inserts............................................................................168 12.1.4 Moulding in Splits....................................................................170 12.1.5 Straight Angle Dowels..............................................................170 12.2 Key Design Features...............................................................................172 12.2.1 Example ..................................................................................173 12.3 Offset Angle Dowels ..............................................................................175 12.3.1 Key Design Features.................................................................177 12.3.2 To Establish Point P.................................................................177 12.4 Use of Side Cores ...................................................................................178 12.4.1 Discussion ...............................................................................178 12.5 Angled Lift Splits ...................................................................................179 12.5.1 Discussion ...............................................................................179 12.5.2 Description of Operation..........................................................181 12.5.3 Key Design Features.................................................................181 12.5.4 Formulae .................................................................................181 12.6 Form Pins ..............................................................................................182 12.6.1 Discussion ...............................................................................182 12.6.2 Straight Action Form Pins.........................................................182 12.6.3 Key Design Features.................................................................183 12.6.4 Angled Form Pins.....................................................................184 12.6.5 Angled Action Form Pin ...........................................................185
  • 14. Contents xi 12.6.6 Description of Operation..........................................................186 12.6.7 Key Design Features.................................................................186 12.6.8 Description of Operation..........................................................188 12.6.9 Key Design Features.................................................................188 12.7 Nonstandard Side Core Designs .............................................................188 12.7.1 Undercuts at Angle to Tool Axis...............................................189 12.7.2 Description of Operation..........................................................189 12.7.3 Key Design Features.................................................................190 12.8 Curved Undercuts ..................................................................................190 12.8.1 Description of Operation..........................................................190 12.8.2 Key Design Features.................................................................192 12.9 Radial Undercuts ...................................................................................192 12.9.1 Description of Operation..........................................................195 12.9.2 Key Design Features.................................................................195 12.10 Undercuts on Helical Gears and Pump Impellers .....................................196 12.11 Normal Ejection Techniques ..................................................................196 12.11.1 Form of Undercut.....................................................................197 12.11.2 Component Material................................................................198 12.11.3 Satisfactory Materials...............................................................198 12.11.4 Unsatisfactory Materials...........................................................198 12.12 Special Ejection Designs .........................................................................199 12.12.1 Splitting the Component...........................................................200 12.12.2 Moulding in One Piece .............................................................202 12.12.3 Helical Ejection........................................................................202
  • 15. Mould Design Guide xii 13 Automatic Unscrewing Mould Tool Design........................................................205 13.1 Introduction ..........................................................................................205 13.2 Injection Moulding Thread Forms..........................................................206 13.3 Thread Geometry ..................................................................................207 13.3.1 Parallel Threads.......................................................................207 13.3.2 Number of Starts......................................................................207 13.3.3 Thread Form ...........................................................................208 13.3.4 Taper Threads .........................................................................213 13.3.5 British Standard Pipe Thread....................................................214 13.3.6 Jointing Threads......................................................................214 13.3.7 Longscrew Threads..................................................................214 13.3.8 Moulded Thread Forms ...........................................................216 13.4 Thread Shrinkage Compensation............................................................217 13.4.1 Discussion ...............................................................................217 13.4.2 The Effect of Incorrect Shrinkage on Thread Forms ..................217 13.4.3 Pitch Inaccuracy.......................................................................218 13.4.4 Thread Form Inaccuracy ..........................................................218 13.4.5 Inaccurate Thread Diameters....................................................218 13.5 Application of Shrinkage Allowance on Thread Forms............................218 13.5.1 Shrinkage Formulae .................................................................219 13.6 Injection Moulding Considerations.........................................................220 13.6.1 Moulding-related Problems ......................................................220 13.6.2 Injection Pressure.....................................................................220 13.6.3 Injection Speed.........................................................................220 13.6.4 Unscrewing Speed ....................................................................220
  • 16. Contents xiii 13.6.5 Ejection Speed..........................................................................220 13.6.6 Operating Window ..................................................................221 13.6.7 Tool Temperature Control.......................................................221 13.7 Basic Screw Thread Mould Designs ........................................................222 13.7.1 Split Tooling............................................................................222 13.7.2 Thread Jumping.......................................................................223 13.7.3 Collapsible Coring ...................................................................224 13.7.4 Operation of Multisegment Cores.............................................227 13.8 Rotary Unscrewing ................................................................................227 13.8.1 Collapsible Coring Details........................................................228 13.9 Types of Collapsible Core ......................................................................228 13.9.1 Two-segment Core Details .......................................................229 13.9.2 Multisegment Collapsible Cores ...............................................230 13.10 Using Silicone Rubber Sleeve Cores ........................................................231 13.10.1 Advantages ..............................................................................231 13.10.2 Disadvantages..........................................................................232 13.11 Core Unscrewing ...................................................................................234 13.11.1 Fixed Core Systems ..................................................................234 13.11.2 Cavity in Moving Half .............................................................234 13.11.3 Cavity in Fixed Half.................................................................235 13.11.4 Key Design Features of Figure 13.18..........................................238 13.12 Anti-Rotation Keying.............................................................................239 13.12.1 Base Key Geometry ..................................................................239 13.13 Moving Core Systems.............................................................................240 13.13.1 Key Design Features.................................................................241
  • 17. Mould Design Guide xiv 13.14 Cavity Rotation .....................................................................................242 13.14.1 Key Design Features.................................................................244 13.14.2 Guidelines................................................................................245 13.15 Two-thread Unscrewing Designs ............................................................245 13.15.1 Discussion ...............................................................................245 13.15.2 Key Design Features for Two External Threads.........................245 13.15.3 Operation................................................................................247 13.15.4 Key Design Features.................................................................249 13.15.5 Operation................................................................................250 13.16 Gearing Geometry .................................................................................250 13.16.1 Introduction.............................................................................250 13.16.2 Basic Spur Gear Definitions......................................................252 13.16.3 Basic Spur Gear Formulae ........................................................253 13.16.4 Conversion Between ISO and Imperial Systems .........................253 13.16.5 Example Gear Calculations (ISO) .............................................253 13.16.6 Guidelines for Gear Selection (ISO)...........................................255 13.16.7 Guidelines for Gear Train Design (ISO) ....................................255 13.17 General Mould Design Guide for Threads ..............................................256 13.17.1 Observation.............................................................................256 13.17.2 Stage 1.....................................................................................256 13.17.3 Stage 2.....................................................................................257 13.17.4 Stage 3.....................................................................................258 13.17.5 Stage 4.....................................................................................259 13.17.6 Stage 5.....................................................................................259
  • 18. Contents xv 13.18 Driving Systems .....................................................................................260 13.18.1 Rack-and-Pinion Systems .........................................................260 13.18.2 Opening Movement of Mould Tool..........................................260 13.18.3 Actuation by Cylinder ..............................................................261 13.18.4 Pneumatic Motors....................................................................263 13.18.5 Hydraulic Motors ....................................................................263 13.18.6 Electric Motors ........................................................................265 13.18.7 Clutches and Rotation Control.................................................265 13.18.8 Using Clutches .........................................................................266 13.18.9 Using Stepper Motors...............................................................267 13.18.10 Using Torque Limiters..............................................................268 13.19 Special Designs ......................................................................................269 13.20 Commercial Unscrewing Systems............................................................270 14 Multiplate Tool Systems ....................................................................................271 14.1 Three-Plate Tools ..................................................................................271 14.1.1 Three-Plate Tool Operation .....................................................273 14.2 Multiplate Undercut Tools.....................................................................279 14.2.1 Sequential Opening ..................................................................281 14.3 Stack Moulds.........................................................................................285 15 Runnerless Moulding.........................................................................................291 15.1 Sprueless Moulding................................................................................291 15.1.1 Basic Antechamber Type ..........................................................291 15.1.2 Heated Hot Sprue Bushes .........................................................293 15.1.3 Summary .................................................................................297
  • 19. Mould Design Guide xvi 15.2 Insulated Runner Systems.......................................................................298 15.2.1 Insulated..................................................................................298 15.2.2 Semi-insulated..........................................................................299 15.3 Full Hot Runner Systems........................................................................300 15.3.1 Advantages Over Cold Runner Moulds.....................................300 15.3.2 Nozzles and Gate Bushes..........................................................305 15.3.3 Open Gate Nozzles ..................................................................305 15.3.4 Spring-Operated Needle Nozzle................................................307 15.3.5 Hydraulically Operated Needle Valve Nozzle............................308 15.3.6 Multipoint Gating....................................................................309 15.3.7 Summary .................................................................................311 15.4 Heating .................................................................................................311 15.4.1 Band Heaters ...........................................................................311 15.4.2 Coil Heaters.............................................................................312 15.4.3 Cartridge Heaters.....................................................................312 15.4.4 Tubular Heaters.......................................................................312 15.4.5 Integral Heating.......................................................................313 15.4.6 Heat Pipes................................................................................313 15.5 Temperature Control in Manifolds.........................................................313 15.5.1 Closed-Loop Control ...............................................................314 15.5.2 Open-Loop Control .................................................................314 15.5.3 Other Factors...........................................................................314 15.6 Gating...................................................................................................315 15.6.1 Pin and Edge Gating.................................................................315 15.6.2 Valve Gating............................................................................316 15.6.3 Thermal Sealing.......................................................................316
  • 20. Mould Design Guide xviii 16.5 Mould Finishing ....................................................................................340 16.5.1 Polishing..................................................................................341 16.5.2 Chromium Plating....................................................................341 16.5.3 Photochemical Etching .............................................................341 16.5.4 EDM Finishes ..........................................................................342 16.5.5 Bead Blasting ...........................................................................342 16.5.6 Vapour Blasting .......................................................................342 16.6 Mould Maintenance...............................................................................343 17 Runner and Gate Design ....................................................................................345 17.1 The Feed System ....................................................................................345 17.1.1 The Sprue ................................................................................346 17.1.2 Cold Slug Well.........................................................................346 17.1.3 Runner Design .........................................................................347 17.1.4 Runner System Design Rules ....................................................350 17.2 Calculating the Runner Length...............................................................352 17.2.1 Example ..................................................................................353 17.3 Gate Design...........................................................................................355 17.3.1 Manually Trimmed Gates ........................................................360 17.3.2 Automatically Trimmed Gates..................................................360 17.3.3 Gating Design Rules.................................................................362 17.3.4 Computer Simulations of Gate Designs.....................................363 17.3.5 Number and Location of Gates.................................................363 17.3.6 Gate Sizing...............................................................................365 17.3.7 Example ..................................................................................366
  • 21. Contents xix 17.3.8 Gate Land Length ....................................................................367 17.3.9 Gate Diameter..........................................................................367 17.4 Establishing the Correct Gate Size ..........................................................369 17.4.1 Computer Analysis...................................................................370 17.4.2 Empirical Analysis ...................................................................370 18 Standard Mould Parts........................................................................................373 18.1 Standard Parts Available ........................................................................373 18.1.1 Mould Base Units.....................................................................374 18.1.2 Mould Plates............................................................................374 18.1.3 Location and Alignment Components.......................................374 18.1.4 Ejection Components ...............................................................374 18.1.5 Feed Systems............................................................................374 18.1.6 Cooling Components ...............................................................375 18.1.7 Unscrewing Components..........................................................375 18.1.8 Miscellaneous ..........................................................................375 18.2 Mould Tool Designing Using Standard Parts...........................................375 18.3 Toolmaking Using Standard Parts ..........................................................376 18.4 Summary...............................................................................................378 19 Deflection and Stress in Mould Components.......................................................379 19.1 Discussion .............................................................................................379 19.1.1 Competition.............................................................................380 19.1.2 Energy Costs............................................................................380 19.1.3 Breakages ................................................................................380 19.1.4 Deflection................................................................................381
  • 22. Mould Design Guide xx 19.2 Force and Stress .....................................................................................381 19.2.1 Definitions of Forces ................................................................381 19.2.1.2 Compressive Force ...................................................................383 19.3 Stress.....................................................................................................384 19.4 Strain ....................................................................................................384 19.5 Stress–Strain Graph ...............................................................................385 19.5.1 Young’s Modulus of Elasticity..................................................385 19.5.2 Limit of Proportionality ...........................................................386 19.5.3 The Elastic Limit......................................................................386 19.5.4 Yield Stress ..............................................................................386 19.5.5 Tensile Strength .......................................................................386 19.6 Factor of Safety (FOS)............................................................................386 19.6.1 Brittle materials .......................................................................387 19.6.2 Ductile materials......................................................................387 19.7 Poisson’s Ratio ......................................................................................388 19.7.1 Example ..................................................................................389 19.8 Temperature Stresses .............................................................................390 19.8.1 Example ..................................................................................390 19.9 Beam Theory.........................................................................................390 19.9.1 Beam Models ...........................................................................392 19.10 Bending Moments..................................................................................393 19.10.1 Neutral Axis ............................................................................393 19.10.2 Second Moment of Area...........................................................394 19.11 Bending Formula ...................................................................................396 19.12 Section Modulus....................................................................................396
  • 23. Contents xxi 19.13 Deflection of Beams ...............................................................................397 19.14 Analysing Mould Tools..........................................................................397 19.14.1 Two-Plate Example..................................................................397 19.14.2 Split Tool Example ..................................................................400 19.14.3 Analysing Core Pins .................................................................403 19.15 Summary...............................................................................................405 20 Fatigue ..............................................................................................................407 20.1 Observations .........................................................................................407 20.2 Facts on Fatigue.....................................................................................408 20.3 Calculating Shut-off Areas .....................................................................410 20.3.1 Example ..................................................................................412 20.4 Factors Affecting Fatigue Life.................................................................414 20.4.1 Stress Concentrations...............................................................414 20.4.2 Stress Raisers ...........................................................................416 20.4.3 Machining Marks.....................................................................418 20.4.4 The Effect of Surface Finish......................................................419 20.4.5 Hardness Factors .....................................................................420 20.5 Summary...............................................................................................421 21 Limits and Fits...................................................................................................423 21.1 Interchangeability ..................................................................................423 21.2 Tolerance ..............................................................................................423 21.2.1 Unilateral.................................................................................424 21.2.2 Bilateral...................................................................................424 21.3 Limits....................................................................................................424
  • 24. Mould Design Guide xxii 21.4 Fits........................................................................................................425 21.4.1 Running Fit..............................................................................425 21.4.2 Push Fit ...................................................................................426 21.4.3 Drive Fit ..................................................................................426 21.4.4 Force Fit ..................................................................................426 21.5 British Standard Hole and Shaft Fits .......................................................426 21.5.1 Clearance Fit............................................................................427 21.5.2 Transition Fit...........................................................................427 21.5.3 Interference Fit.........................................................................427 21.6 British Standard Clearance Fits...............................................................427 21.7 British Standard Clearance Fits – Hole Basis ...........................................429 21.7.1 Example ..................................................................................430 21.8 Geometric Tolerancing ..........................................................................431 22 Impression Blanking ..........................................................................................437 22.1 Reasons for Impression Blanking............................................................437 22.2 Example ................................................................................................438 22.2.1 Original Estimate.....................................................................438 22.2.2 Effect of Running on Six Impressions........................................439 22.2.3 Effect of Running on a 6-imp Basis with an 18-second Cycle ......440 22.2.4 Cycle Required to Achieve Original Profit Level........................440 22.2.5 Cycle Required to Break Even...................................................441 22.3 Observations .........................................................................................442 22.4 Summary...............................................................................................442
  • 25. Contents xxii i 22.5 Methods of Blanking Impressions...........................................................442 22.5.1 Glueing....................................................................................443 22.5.2 Gate Blocking ..........................................................................443 22.5.3 Cavity Rotation .......................................................................443 22.5.4 Blanking the Branch Runner.....................................................445 22.6 Summary...............................................................................................445 23 Summary of Mould Calculations........................................................................447 23.1 Production Rates ...................................................................................447 23.2 Cooling Channel Diameters....................................................................447 23.3 Runner Length Formulae........................................................................448 23.4 Gate Design...........................................................................................449 23.5 Ejection Forces.......................................................................................449 23.6 Stress and Strain.....................................................................................450 23.7 Factors of Safety ....................................................................................450 23.7.1 For Brittle Materials.................................................................450 23.7.2 For Ductile Materials ...............................................................450 23.8 Poisson’s Ratio ......................................................................................450 23.9 Moments of Inertia ................................................................................451 23.9.1 Rectangular Bar .......................................................................451 23.9.2 Circular Bar.............................................................................451 23.10 Temperature Stresses .............................................................................452 23.11 Bending Formulae..................................................................................452 23.11.1 Section Modulus ......................................................................453 23.12 Deflection of Beams ...............................................................................453 23.13 Blanking Impressions .............................................................................454
  • 26. Mould Design Guide xxiv 24 Integrated Design Examples ...............................................................................455 25 Mathematical and Reference Tables...................................................................485 25.1 Logarithms............................................................................................486 25.2 Anti-logarithms .....................................................................................488 25.3 Natural Sines ........................................................................................490 25.4 Natural Cosines.....................................................................................492 25.5 Natural Tangents...................................................................................494 25.6 Square Roots .........................................................................................496 25.7 Reciprocals............................................................................................500 25.8 Powers, Roots and Reciprocals...............................................................502 25.9 Thermal Properties of Some Common Mould-making Materials .............504 25.10 Typical Thermal and Mechanical Properties of Steels for Injection Moulds.................................................................505 25.11 Thermal Properties of Plastics Materials.................................................506 25.12 I.S.O. Metric Fine Threads in mm ..........................................................507 25.13 I.S.O. Metric Coarse Threads in mm ......................................................508 25.14 B.S.F. Threads (55°) ...............................................................................509 25.15 Whitworth Threads (55°) .......................................................................509 25.16 British Pipe Thread (B.S.P.) – Basic Sizes in Inches...................................510 25.17 British Standard Taper Pipe (B.S.T.P.) Tolerances and Allowances, Turns of Thread .........................................511 25.18 Hardness Comparison Table..................................................................512 25.19 Conversion Factors ................................................................................513
  • 27. Contents xxv 26 Glossary of Moulding Terminology....................................................................515 26.1 Time Elements in a Moulding Cycle .......................................................515 26.2 Mould and Processing Terminology .......................................................517 Index.........................................................................................................................527
  • 29. xxvii Preface Peter Jones is a practising Consulting Engineer with over thirty five years experience within the plastics industry. He has wide experience of mould tool design, toolmaking, production management and has worked for a number of well-known companies including ICI, United Gas Industries and Smiths. During his time as an employee he has held positions of Chief Mould Designer, Technical Manager, Production Director and Managing Director–all within the injection moulding industry. In his capacity as a Consulting Engineer, he has advised several well known national and international companies in the engineering, medical, pharmaceutical, electronic, consumer industries, the oil industry and many others. Peter has advised on mould design and construction, processing, production and management. In project management roles he has been responsible for setting up complete injection moulding plants for both internal use and as stand-alone units. Several of these have been turnkey projects where all the plant, machines, mould tools and ancillaries and personnel have been provided. Additionally he has lectured on courses on mould design and injection moulding profitability and related topics to many well-known companies both in the UK and overseas. The intention of this book is to provide design engineers, toolmakers, moulding technicians and production engineers with an in depth guide to the design and manufacture of mould tools that work successfully in production. At the end of the day, this is the standard by which the whole design/toolmaking project will be judged. If this can be married with the entire project being profitable–the ideal has been achieved.
  • 30. Mould Design Guide xxviii The latter point is one that should not be overlooked and kept at the forefront of the design engineer’s mind. A wonderful mould tool that produces exemplary quality parts is no good to man or beast unless it results in the injection moulding operation making an acceptable profit from it. It is recognised that not all design engineers will be able to influence the profitability factor but thinking outside the 'design box' will pay dividends in the future. After all, engineers in this field often progress to become Managing Directors and CEOs. Peter Jones 28.08.07
  • 31. Mould Design Guide 2 The purpose of this book is to address these (and many other issues) and each of these topics is discussed and examined in detail. It is impossible to design a successful mould tool without some knowledge of plastics materials, the injection moulding process, toolmaking and basic injection moulding machine design. For example, it is necessary for the mould design engineer to know what type of gate is required for a particular moulding. This in turn will be dependent on both the material being used and the part geometry. Different materials behave differently and the material being used will frequently influence the mould design. Some materials are corrosive while others may be brittle, or very tough. All of these factors must be taken into consideration at the earliest stages of the design. Similarly, mould bases and the mould cavities must be designed in such a manner that they can actually be made. The moulds must also be economic to make and operate reliably in production. Therefore, knowledge of basic tool room machining procedures is necessary so that the mould base and impressions are designed with specific machining processes in mind. Clearly the mould designer must also be reasonably familiar with the injection moulding process and the basic moulding parameters such as runner sizing, gating, machine cycles and the fundamental processing variables such as melt behaviour and so on. A good knowledge of the basic construction of moulding machines and their operation is also essential so that moulds can be mounted on machines and run successfully. In order to achieve this, the mould designer must be able to understand all the specifications and platen drawings provided by the machine manufacturer. It is for these reasons that there are revision chapters dedicated to these topics so that that the mould designer has a full account of all the variables that need to be taken into account when designing successful mould tools. All the major types of mould tools are covered including two-plate, three-plate, split, side core, stack and hot runner. Some less frequently used designs are also discussed including multiplate and rotary side core moulds. There are additional chapters devoted to stress analysis and fatigue. These topics are not usually included in textbooks on mould design, but there are no apologies for including them in this book. Stress cracking of components and fatigue-induced failure are frequently encountered in production and cost the industry millions of pounds per annum. These chapters are included to try to invoke a more scientific approach to mould design so that a blend of science and experience may be applied for more reliable results. They also provide a means of determining the optimum mass size of the mould tool and its components for maximum economy of production and part quality. The theme throughout the book is based on design simplicity. The simpler the design of the mould is, the more likely it is to provide trouble-free mouldings.
  • 32. Introduction 3 There are three golden rules in injection moulding: x Good mould design x Good-quality toolmaking x Competent injection moulding If all three of these can be achieved, all projects will result in success. If any one of them is missing, trouble will result. The information contained in this book is based on over thirty-five years’ experience in the injection moulding industry and on over 3000 successful mould designs. It therefore contains many tips, wrinkles and tweaks discovered over this period included in an effort to equip the reader with information that will contribute significantly to successful mould tool designs and avoid common pitfalls. The book is essentially a data book that succinctly presents information in a logical, understandable reference form for mould designers, tooling engineers, production engineers and others associated directly or indirectly with injection mould tooling. Many examples of mould designs are included with notes, providing a complete understanding of the principles involved. There are also many data tables, design examples and a gallery of full mould designs included so that useful information may be referenced quickly. Also included is a glossary of injection moulding terms with a full explanation in each case. Throughout the book the term moulder represents the company or department carrying out the injection moulding and the term customer refers to the end user of the mouldings. The term toolmaker refers to the company or individual manufacturing the mould tool. The injection mould is variously referred to as mould, tool or mould tool, all of which are commonly used in the industry. Please note that this book uses the ISO system throughout except in a few cases where American examples are used that may be specified in the imperial system. It is important to note that the ISO system uses newtons, metres and seconds. Consequently, as most mould designs are dimensioned in millimetres, the designer must be aware that all sizes used in calculations must be converted into metres first except where stated otherwise.
  • 34. 5 2 The Injection Moulding Process 2.1 Background To produce moulded articles in thermoplastics it is necessary to heat the material to a liquid state, and then force the liquid ‘melt’ to conform to the shape of a mould. The liquid melt is then cooled, thereby returning it to the solid condition, and removed from the mould. These operations can be fulfilled by the compression moulding process, but this process is wasteful of both heat and time and is better suited to thermosetting materials, where it is not necessary to cool the material before removal. The injection moulding process was developed following the principle of pressure die- casting, in which molten metal is forced into a cool mould. JW and IS Hyatt used this principle in their ‘stuffing machine’, which was patented in the USA in 1872. However, the first machine actually used for production of thermoplastic parts was made in Germany in 1920. The machine was entirely manually operated with no automatic features. In 1927, again in Germany, a machine operated by pneumatic rams was developed, which was able to develop higher injection pressures. Since then, development has been rapid, especially following the introduction of the reciprocating screw. Modern machines can operate completely automatically without human involvement and can also change moulds and materials automatically. They can also monitor and adjust the moulding parameters (to a limited extent) in an attempt to maintain component quality. Further developments are taking place with the improvement of control systems. Tie-bar- less machines are now available, and modified injection moulding techniques such as gas- assisted moulding are becoming widespread.
  • 35. Mould Design Guide 6 2.2 Machine Design 2.2.1 Machine Base Unit Often described as the machine ‘bed’, its function is to provide a rigid base to impart dimensional stability, accuracy and strength. Considering the need for accurate mould alignment and the high stresses during the moulding cycle, it is essential that both the clamp unit and the injection unit be held rigidly in position. 2.2.2 Clamp Unit This is the part of the machine that carries, closes and opens the mould. It provides the force required to keep the mould closed during the injection phase and it ejects the moulding once the mould is opened. The clamp unit consists of three plates or platens: x A fixed, stationary platen on to which is mounted the half of the mould that contains the runner and sprue bush (the fixed or stationary half) x A moveable platen on which is mounted the other mould half – the one containing the ejection system (the moving or ejection half) x The tail plate All three platens are connected through the tie bars. It is on these that the moving platen slides, carrying with it the ejection half of the mould tool. Housed between the tail plate and the moveable platen is the clamping mechanism. The function of the clamping mechanism is to open and close the moveable platen thus opening, closing and clamping the mould. The size of the mould tool that can be mounted on a machine is determined by the mould height, the daylight and the distance between the tie bars. These and other parameters are specified in the machine platen details supplied with the machine. 2.2.3 Mould Height The thickness or height of mould that can be fitted into a machine is dependent on the amount of mould height adjustment that is available on the machine. This is the maximum amount of space with the machine toggles closed or the ram fully extended that is available between the fixed and moving platens. The mould height available is dependent on the type of clamping mechanism that is used.
  • 36. The Injection Moulding Process 7 2.2.4 Daylight The amount of daylight on a given machine is the furthest distance that the machine platens can be separated from each other. The amount of daylight should be at least twice the depth of the moulding (d). This gives sufficient space for the mouldings to fall freely out of the tool. Figure 2.1 Mould Daylight
  • 37. Mould Design Guide 8 2.2.5 Distance Between Tie Bars The internal horizontal or vertical distance between the tie bars also determines the maximum size of mould tool that can be mounted on a machine. Normally the mould is designed so that it will drop down between the tie bars from above. Once the mould has been located in the register ring hole in the platen, it can be secured to the platen directly with cap screws or indirectly with tool clamps. Figure 2.2 Platen drawing for mould fixing
  • 38. The Injection Moulding Process 9 2.2.6 Clamping Mechanisms There are several types of machine clamping unit designs and each has to be capable of advancing and retracting the moveable platen so that the two halves of the tool can be brought into smooth contact. When the full lock is applied, the two halves of the tool are kept closed under pressure while the molten plastic is injected into the mould and allowed to set. The most commonly used methods of machine clamping are: x Toggle mechanisms (mechanical lock) x Direct hydraulic lock x Combined mechanical–hydraulic systems 2.2.6.1 Toggle Mechanisms A toggle joint is essentially a system of links that multiplies the power that is applied to them to deliver the required clamping force. Toggle mechanisms are divided into two types: x Single toggle joint clamp x Double toggle joint clamp 2.2.6.2 Single Toggle Joint Clamp The single toggle joint, often called a collapsing strut or link, consists of a set of links that are directly actuated by a hydraulic cylinder through the central axis of the injection mould tool. Figure 2.3 Single toggle design – mould closed
  • 39. Mould Design Guide 10 Figure 2.4 Single toggle design – mould open Mould clamping is achieved by the mechanical locking of the toggles in the straightened position. As the mould is locked, the tie bars are designed to stretch slightly to maintain the clamped condition during the injection phase. Because considerable forces are exerted on the platens during mould opening and closing, there is a tendency for the platen to tilt. Consequently, such a mechanism tends only to be used on smaller machines (70 tonnes or less). 2.2.6.3 Double Toggle Joint Clamp The double toggle arrangement eliminates the platen-tilting problem and allows faster platen speeds to be achieved. Figure 2.5 Double toggle design – mould open
  • 40. The Injection Moulding Process 11 Figure 2.6 Double toggle design – mould closed If the two main links of the toggles were of equal length then platen movement would be very restricted. In practice most machines have the linkage fixings offset, so that the toggle arms collapse inwards. This allows greater opening strokes than would otherwise be possible. Variations of the double toggle design using five pivot points instead of the conventional four will give an even greater opening stroke. The double toggle clamp is the most commonly used in injection moulding for machines up to 1000 tonnes. Figure 2.7 Five point toggle design Owing to the high forces involved, one of the biggest problems with a toggle-actuated machine is mechanical wear, often made worse by poor machine setting. Problems caused by poor setting include setting too high a locking tonnage and running tools that are not parallel. Automatic and efficient lubricating systems are therefore essential to keep wear to a minimum. Mould height adjustment on toggle machines is normally achieved by moving the whole of the locking assembly along the tie bars. Because the tie bars provide the final lock, it is important that the load on them is evenly distributed.
  • 41. Mould Design Guide 12 When tie bars are removed, it is essential that they be replaced correctly in relation to the fixed platen. They must also be correctly rotated in relation to the other tie bars or else die height and adjustment will be affected and undue strains will be placed on the tie bar that was re-fitted. Tie bars should be checked regularly to ensure that the stress developed in each bar is the same when a mould is clamped. Failure to do this can result in out-of-balance clamping on the mould and premature tie bar failure. The positioning of ejector mechanisms on toggle machines does not normally present any problems, as long as there are no ejectors in line with the toggles. 2.2.6.4 Direct Hydraulic Clamping There are two main types of direct hydraulic clamping: x Direct clamping x Jack ram clamping 2.2.6.5 Direct Clamping Direct clamping is usually achieved by means of a single ram or multiple rams that provide the opening, closing and locking functions. The basic design shown below would be rather slow in operation. However, smaller jack rams can be added to speed up the platen movements. Figure 2.8 Direct hydraulic clanping design
  • 42. The Injection Moulding Process 13 2.2.6.6 Combined Mechanical–Hydraulic Systems In a combined system the major movement of the platen and the final locking force are provided by different means. Such systems have become known as block and lock systems. The most common of these systems combines a toggle joint for mould opening, and closing with the final lock being provided by a small short-stroke hydraulic piston. This gives a very smooth action and great flexibility to the moulder. Because the toggles are only used for movement they do not have to be as substantial as those in a straight mechanical system and lubrication is generally simpler. Methods of mould height adjustment vary between manufacturers and this is dependent on the actual location and design of the final pressuring cylinder. Figure 2.9 Combined toggle – hydraulic design 2.2.7 The Injection Unit This is the part of the machine that stores and heats the material prior to injecting it into the mould tool. The injection unit has several functions: x Metering the amount of material required for each shot x Plasticising (or heat softening) the material x Rotating an internal screw to transport the material via its screw flights to the front of the cylinder while moving backwards ready to pick up the next shot of material x Advancing and retracting the injection carriage to bring the nozzle into contact with the mould sprue bush x Providing a sufficient contact force between the injection cylinder and the mould tool to prevent material leakage x Providing a variable speed of injection and variable injection and backpressure
  • 43. Mould Design Guide 14 x Maintaining a hold-on pressure to compensate for volumetric shrinkage of the material in the mould tool after initial mould filling has taken place There are several other features that injection units may have, including: x Hydraulic screw retraction on the nonrotating screw before or after screw rotation (decompression or suck back) to prevent material leaking into the mould cavities x Profiled or stepped injection speed/pressure facilities x Sometimes closed-loop computer-controlled systems are used to optimise part quality and cycle times by more accurately monitoring and controlling moulding parameters 2.2.7.1 Reciprocating Screw Design The design of the screw is very important and will vary depending on the type of material being processed and the size of the shot. Figures 2.10, 2.11 and 2.12 show the basic screw geometry and function of a standard screw unit. The compression ratio is the ratio V1:V2. The single screw plasticising design is the one that is used in the majority of injection moulding machines. Figure 2.10 Screw design Figure 2.11 Screw definitions
  • 44. The Injection Moulding Process 15 Figure 2.12 Screw compression ratio In a typical injection unit (Figure 2.13), the raw material is fed from the hopper into the cylinder and then is transported along the cylinder by the rotation of the screw to the front of the cylinder. The pressure of the material at the front of the screw forces it backwards until the rear of the screw hits a stop to achieve the desired shot weight. At this point, the screw ceases to rotate. This phase is known as screw back. Figure 2.13 The injection unit The region of the cylinder where the raw material is fed in is called the feed throat and this is usually kept cool by circulating cooling water. This stops the material from melting at the throat, which would prevent the material from feeding properly. However, if too much cooling is provided, condensation will form at the throat and can cause the adjacent section of the cylinder to lose heat.
  • 45. Mould Design Guide 16 Condensation in this area may also allow moisture to develop within the raw material. If the material being moulded is hygroscopic, moulding difficulties are frequently encountered. 2.2.7.2 Screw Rotation The material is softened or plasticised by means of frictional heat provided by the rotation of the screw and by external heater bands mounted on the cylinder. These two sources of heat, combined with the mixing effect of the screw, provide a homogeneous melt. As the screw rotates, pressure is built up within the barrel. This pressure forces material towards the nozzle and the screw backwards. This in turn forces back the hydraulic injection piston, moving the oil out of the cylinder to the tank. A valve is provided to restrict the oil backflow pressure, which enables the oil pressure to be increased or decreased. This regulates how much work the screw has to do in order to fully screw back. This pressure is commonly called back pressure, but is sometimes called reaction pressure. The greater the amount of work the screw has to do, the greater is the amount of shear heat (frictional heat) that is put into the melt. When sufficient melt has been produced for a shot, the limit switch is tripped and screw rotation stops. However, screw back pressure is also used to mix materials and additives more evenly and also to reduce any trapped air that may be present in the melt. 2.2.7.3 Screw Forward (Injection Phase) At the end of the screw back phase, the screw ceases to rotate and the hydraulic cylinder then forces the screw forward, plunger-like, displacing the melt through the nozzle into the mould – hence the term injection moulding. For most materials a check flow valve prevents the melt from flowing backwards up the screw. 2.2.7.4 Injection Speeds and Pressures Generally the injection phase is carried out in the shortest possible time to prevent the melt from solidifying before mould cavities are completely filled. The total injection time varies with the material to be injected. Normally, stepped control is provided in order to give the requisite variation. The injection stroke is achieved at two main pressure levels: x The first pressure and velocity is applied during the mould filling stage that represents 95% of the total injection stroke. x At this point the second pressure, the packing or hold-on pressure, keeps the injected material under pressure in the mould while the melt is cooling. This is to prevent shrinkage and cavitation in the mould.
  • 46. The Injection Moulding Process 17 As the force provided by the hydraulics to push the screw is constant, alteration of the screw diameter will give higher or lower specific pressure per square cm depending on the diameter of the screw. Table 2.1 below shows how the shot volume varies with screw for a typical range of cylinders. Table 2.1 Variation of shot volume with screw diameter Injection unit A B C Screw diameter (mm) 60 70 85 Real injection volume (shot) (cm3) 698 950 1,400 Maximum specific pressure on material (MPa) 196.8 144.5 98 2.2.7.5 Hold-on pressure The hold-on pressure is normally lower than the injection pressure. Different machine manufacturers offer various numbers of stages for the holding phase, many of which may be programmed on more sophisticated machines. The graph in Figure 2.14 shows a typical injection pressure curve throughout the screw stroke. This shows that the screw stops 5mm before the end of the stroke. This is necessary to provide a cushion of material to allow hold-on pressure to be maintained on the mouldings during solidification. At this point a limit switch is tripped to switch from the main injection pressure to the holding pressure. Figure 2.14 Injection pressure versus screw stroke
  • 47. Mould Design Guide 18 2.2.7.6 Screw Speed It is important that the speed of rotation of the screw is kept constant from cycle to cycle. If this varies, the amount of shear heat put into the melt will vary. This would result in varying moulding conditions and, consequently, inconsistent results. The screw speed that should be used will depend on the material being processed and other factors such as additives or difficult components such as acrylic lenses, etc. Generally speaking, the screw speed is determined so that it screws fully back and stops rotating just before the mould opens at the end of the cooling cycle. This avoids the material stagnating in the cylinder if screw rotation stops early in the cooling cycle. However, there are alternative theories that screw speed should be related to the screw/cylinder surface area. 2.2.7.7 Screw Stroke The return stroke of the injection screw is determined by the amount of material to be injected (shot weight). The longest stroke is required for the largest volume. The manufacturers of injection moulding machines for processing thermoplastics usually offer the choice of three different screw diameters: x A small diameter, which will give a high specific injection pressure and a smaller maximum shot weight, often used for very thin-walled parts or other high- pressure applications. x A standard diameter, which gives a specific pressure in the region of 1400 bar on the injected material. This is the commonly used version suitable for moulding a wide range of parts. x A larger-diameter screw, which gives reduced specific pressure but increases the shot size proportionally. This is used for larger shot weights and sometimes for moulding thick wall parts and for screw injection of larger, thick-walled items. There is a relationship between specific injection pressure, screw diameter and the maximum shot weight. Table 2.2 illustrates this relationship, assuming a standard injection stroke is being used. This relationship is important when selecting screw diameters for specific jobs. Table 2.2 Specific pressure versus screw relationship Screw Piston Dia. (cm) Area (cm2 ) Dia. (cm) Area (cm2 ) Ratio of piston to screw area Hydraulic pressure (MPa) Specific injection pressure (MPa) Shot weight (g) 3.5 9.62 15.0 176.71 18.4:1 14 252 198 4.5 15.9 15.0 176.71 11.1:1 14 154 323
  • 48. Mould Design Guide 20 2.4 The Moulding Cycle 2.4.1 Mould Closing Phase The mould should be closed as quickly as possible, without putting undue strain on the mould or the machine until the mould protection facility is tripped. 2.4.2 Mould Protection Phase This is applied at the final stage of mould closing just before the two mould halves meet so as to avoid damage to the mould tool due to trapped mouldings or location of delicate shot off areas on either half of the mould. Both the distance and operating pressure must be set to suit the requirements on the machine control panel. 2.4.3 Injection (Mould Filling) Phase In general, mould filling takes place rapidly, as previously discussed. However, care must be taken in order not to generate excessive shear stress in the material by excessively short fill times. An ideal fill time should prevent large reductions in melt temperature (less than 20 qC) and avoid the generation of high injection pressure (more than 100 MPa). The injection speed should be adjusted to produce the required filling time and the injection pressure should be set to enable this injection speed to be achieved. For example, a large cavity may require a lower relative injection speed to give the air in the cavity time to be displaced to prevent compressed air being developed giving rise to shorts or burning. 2.4.4 Holding Time and Pressurising Phase During this stage, a little more material is forced into the mould before the gate freezes off. The pressure prevents the material in the mould from flowing back into the injection cylinder. The length of time required for holding depends upon the material being moulded, gate size, melt and mould temperatures. The setting of the hold-on stage is critical to the size and dimensional stability of components. There are two aspects of this phase: x Pressurisation, when the cavity pressure increases x Compensation, when cavity pressure decreases
  • 49. The Injection Moulding Process 21 2.4.5 Cooling and Refill Phase This starts after the hold-on time finishes. Should the component become cool enough to be ejected immediately after the screw back phase then no further cooling time is necessary and the parts may be ejected. In most case, however, the mouldings will require further cooling before ejection can take place. The total cooling time required is largely dependent on the wall thickness of the component and the material used, and can be calculated accordingly. 2.4.6 Screw Back Phase During the cooling time the screw rotates and is displaced backwards along the injection cylinder. This backward displacement takes place entirely during the cooling phase of the components as previously described. Once the screw has transported sufficient material to the front of the cylinder, the screw trips a limit switch and stops rotating. 2.4.7 Mould Open Phase The same principles apply to the mould open phase as to the mould closing phase. Abrupt opening should be avoided, to prevent damage to the machine and mould. The distance of opening should be just enough to allow for the mouldings and any runners to be ejected cleanly. This will keep cycle time to a minimum.
  • 50. Mould Design Guide 22 2.4.8 Ejection Phase Adequate time must be allowed for the ejection of the components from the mould. Ejection can be employed in a semi-auto or automatic mode. Automatic ejection can be by mechanical, hydraulic or pneumatics systems, depending on the design of the ejector system. Air ejectors may be used to blow the component clear and can be set on a pulsating or continuous blow sequence. Timers can be used on both hydraulic and air ejectors. Hydraulic ejectors may be used in a multistroke mode in certain circumstances to eject components that tend to ‘stick’ to the ejector pins. Alternatively, pick-and-place robots may be used where the cost is justified. Many of these topics are discussed in more detail in the appropriate sections of this book. Figure 2.15 illustrates a summary of the moulding cycle. Figure 2.15 Summary of elements of the moulding cycle
  • 51. Mould Design Guide 24 3.3 The Nature of Plastics Materials Elements, Atoms and Molecules All matter in the universe is made up of small particles called atoms. There are over 100 different types of atoms constituting the chemical elements. The atomic number of an element is the number of protons in the nucleus of an atom. This is also known as the proton number. The mass number or nucleus number is the number of nucleons in its nucleus: in other words it is the total number of protons + neutrons. The elements most commonly found in plastics are: Element Symbol Carbon C Hydrogen H Oxygen O Nitrogen N Chlorine CL Under normal circumstances the atoms of many of the elements do not occur singly. For example, the atoms of oxygen in the air we breathe occur in pairs, the symbol or formula for which is O2. Atoms of different elements can also combine with others: for example, the carbon dioxide we expel from our lungs consists of pairs of oxygen atoms attached to a single carbon atom, the formula for which is CO2. These combinations of atoms are known as molecules. Another example of a molecule has the formula H2O, and is very well known as ice, water or steam. This example also demonstrates that the form in which a substance exists depends upon its temperature. In this case the water is a solid (ice) below 0 qC; between this temperature and 100 qC it is liquid (water); and above 100 qC it is a gas (steam). The force which enables atoms to unite into molecules is known as chemical bonding, and an assortment of different types of bonding exists. In many cases the bonding between the atoms is extremely strong and can only be broken by vigorous chemical attack or a large input of energy, as would occur when a substance is subjected to intense heat. Bonds also exist between molecules, but these are usually considerably weaker than the chemical bonds between atoms within molecules. But with solid materials the bond between individual molecules is sufficiently strong to prevent one molecule from straying away from its neighbours. However, when the temperature is raised, the energy entering the material weakens these bonds until eventually individual molecules can escape their
  • 52. Plastics Materials 25 neighbours to a considerable extent and the material becomes a viscous liquid. If the temperature is raised further, an even greater amount of energy is put into this liquid. The individual molecules become largely separated from each other, the material degrades and a gas is produced. It is not within the remit of this book to provide a comprehensive coverage of plastics materials technology or polymer chemistry. However, the following information may be useful to mould designers, engineers and technicians and is covered in a simple, non- chemistry-based manner. The information provided is primarily restricted to thermoplastic polymers. 3.4 Monomers, Polymerisation and Polymers The molecules that make up plastics materials also consist of groups of atoms united by very powerful chemical bonds. However, in the case of plastics the number of atoms incorporated in each molecule is extremely high, often running into many thousands. This makes molecules of plastics very large compared with those other substances. These very large molecules are made up of smaller units, repeated many times. In some plastics these units are joined together in a chain formation rather like beads on a necklace, whereas in other plastics a complex three-dimensional network is formed. Figure 3.1 Polymerisation of monomers One of the most well-known plastics materials is polythene, which more correctly should be named polyethylene. Polyethylene is produced from the gas ethylene by a chemical process called polymerisation. The large molecules produced by the polymerisation reaction are known as the polymer. The small molecules that form the starting material are called the monomer.
  • 53. Mould Design Guide 26 Figure 3.2 Products derived from polymerisation In the case of polythene, ethylene is the monomer, which polymerises to form polyethylene; similarly, the monomer styrene polymerises to polystyrene and the monomer vinyl chloride polymerises to polyvinylchloride (PVC). This type of polymerisation, known as addition polymerisation, is just one example of a range of polymerisation techniques used to produce the modern family of polymeric materials. Polymers (sometimes called resins), as well as being the major constituent of our plastics materials, also form the basis for natural and synthetic rubbers, adhesives, paints and synthetic textiles. 3.5 Classification of Plastics 3.5.1 Thermosets and Thermoplastics This distinction is probably the most fundamental way of classifying plastics. Using this system the family of plastics materials is divided into two major branches, the thermosets (e.g. Bakelite) and the thermoplastics (e.g. Nylon, polythene or ABS).
  • 54. Plastics Materials 27 The main difference between the products made from thermosets and those made from thermoplastics, apart from a few exceptions, is that thermoplastics components will always soften and eventually melt if subject to high temperatures, whereas the thermosets will not. There is also a major difference in the techniques used to process these two classes of plastics materials. Thermoplastic materials have to be heated until they soften sufficiently to be moulded into the desired shape, after which they must be cooled in order to solidify and retain the required shape. If a thermoplastic product is reheated to its original processing temperature it will soften again. The thermoset materials also soften when first heated, which enables them to be moulded into shape, but instead of cooling, the material is then subject to additional heating. This additional heating causes a chemical reaction to take place within the material, which converts the hot, softened mass into an equally hot permanent solid. Further heating, even to a higher temperature, will not re-soften the thermoset product. The reason for the difference in behaviour between the thermoset and thermoplastic lies in the chemical composition of the molecular chains. With the thermosets, the polymer in the moulding materials has roughly linear chain structure; this enables the material to behave rather like a thermoplastic when first heated, allowing it to soften and flow under pressure in order to take up the shape of the mould. However, the structure of the thermoset polymer contains chemically reactive positions at intervals along the molecular chains, which facilitate joining or cross-linking between adjacent molecules provided that sufficient heat is applied. The cross-linking (sometimes called curing) converts the linear structure into an infusible three-dimensional network. With thermoplastics the long-chain molecules in the moulding compound do not have reactive positions within the chain, so under normal moulding conditions no crosslinking can occur. The material can only be solidified by cooling and of course it will soften and melt again if reheated. 3.5.2 Homopolymers, Copolymers and Polymer Blends (Alloys) In the examples of polymerisation quoted earlier, a single monomer type (e.g., ethylene or styrene) was polymerised to produce a polymer (polyethylene or polystyrene) in which the molecular chain was made up of the same repeat unit throughout its length. Polymers of this type are known as homopolymers. It is possible, however, to produce polymers from a combination of two or more monomers, the final molecule chain then having a combination of repeat units corresponding to the monomers selected, rather like a necklace with different coloured beads along its length. This type of polymer is known as a copolymer. Examples of copolymers include SAN (e.g., Tyril from Dow chemicals), a copolymer based on styrene and acrylonitrile as monomers. ABS is a rather complex copolymer based upon three monomers, acrylonitrile, butadiene and styrene. Another widely used
  • 55. Mould Design Guide 28 copolymer is based upon propylene and ethylene monomers and is usually called propylene copolymer, as distinct from polypropylene, which is the homopolymer based on propylene alone. These copolymers have been developed mainly in order to overcome the specific shortcomings of the related homopolymers. For example, SAN is a much more heat- and solvent-resistant material than the homopolymer polystyrene. ABS has similar advantages over polystyrene, plus the additional benefit of greater toughness due to the butadiene content. With propylene copolymer, the presence of the ethylene-derived units in the polymer chain overcomes to a considerable extent the brittleness at subzero temperatures displayed by the homopolymer polypropylene. The properties of individual copolymers can also be varied by altering the relative proportions of the monomers involved, or by arranging them in different patterns along the length of the molecular chain. Figure 3.3 Molecular structure of monomers
  • 56. Plastics Materials 29 The development of polymer blends, or alloys, has further expanded the range of materials for injection and other moulding processes. With this type of material, two or more polymers are produced separately and then blended or ‘alloyed’ together to form new materials having a combination of properties not possessed by the constituent polymers individually. Examples of polymer blends include Noryl, from General Electric, a blend of polystyrene and polyphenylene oxide, or Bayblend, a combination of ABS and polycarbonate produced by Bayer. 3.5.3 Amorphous and Semicrystalline Thermoplastics Thermoplastics can be subdivided into two distinct classes based upon differences in their molecular structure. These differences can have a significant bearing on the performance of mouldings in service, and have a marked effect on the behaviour of the material during processing. Materials such as polystyrene, polycarbonate, acrylics, SAN, ABS and PVC are said to be amorphous thermoplastics. This signifies that in the solid state their molecular structure is random and nonordered, the long-chain molecules being all entangled rather like solidified strands of spaghetti. Materials such as most of the Nylons, acetal, polypropylene, polythene and the thermoplastic polyesters, have a much more ordered structure in the solid state than amorphous materials. They have a considerable proportion of the long-chain molecules packed closely together in regular alignment. These materials are known as semicrystalline thermoplastics. It should be noted, however, that with both types of material the molecular structure is amorphous at melt temperature. Most amorphous thermoplastics are transparent in their natural, unpigmented form, although ABS, for example, is an exception, while most semicrystalline thermoplastics in their solid unpigmented form are translucent or an opaque white colour. It is interesting to observe (for example when ‘purging’ on injection moulding machines) that fully molten natural polypropylene or acetal are initially transparent, but as the melt cools it clouds over, becoming translucent in the case of polypropylene and opaque white in the case of acetal. This clouding is due to the material’s molecular structure gradually rearranging itself from the tangled amorphous state in the melt to the more ordered semicrystalline state in the solid.
  • 57. Mould Design Guide 30 Figure 3.4 Cooling behaviour of materials The main differences in behaviour between the amorphous and semicrystalline materials observed during injection moulding are discussed next. 3.6 Melting and Solidification Amorphous thermoplastics exhibit a progressive softening over a wide temperature span, whereas the semicrystalline materials rapidly change from the solid melt condition over a quite narrow temperature band. Conversely, when amorphous materials are cooled they solidify slowly over a wide range of temperature, in contrast to the semicrystalline plastics, which change from melt to solid over a narrow range of temperature.
  • 58. Plastics Materials 31 Figure 3.5 Behaviour of materials with increasing temperature 3.7 Shrinkage Amorphous thermoplastics display very low shrinkage when they solidify, typically between 0.5% and 1%. Semicrystalline materials shrink very much more, usually between 1.5% and 5% depending upon the particular material. The higher shrinkage with the semicrystalline materials is due to the repeat units along the molecular chains being of such a form that they can pack very closely together in an ordered manner depending on the moulding conditions being used. For example, when semicrystalline thermoplastics are moulded in hot moulds, cooling rates are slow to allow more time for the molecular chains to disentangle themselves and take up their crystalline structure. This results in a greater proportion of the material being in its crystalline state (higher crystallinity), giving a product with superior mechanical strength and dimensional stability, but with relatively high shrinkage. If the same material is moulded in a cold mould, the more rapid cooling will inhibit the formation of crystalline areas. The resulting lower level of crystallinity will give the product inferior physical properties, and lower shrinkage accompanied by a tendency for dimensional instability and distortion during later service due to continued after- moulding shrinkage.
  • 59. Mould Design Guide 32 3.8 Engineering and Commodity Plastics Another method of classifying plastics is to refer to the physical properties of plastics. A plastic whose physical properties are adequate for, as an example, a DVD case, is not likely to be adoequate for an electric drill body. Based on this method, commodity and engineering plastics can be identified. It is important to note that this system is not done on a scientific basis so there is no predefined list of commodity and engineering plastics. Indeed, some materials like polypropylene and polyacetal often fall into both classes. 3.8.1 Engineering Plastics This term has evolved to describe those plastics that are used in place of metals for load- bearing applications (e.g., gear wheels) or plastics that must retain good physical properties at elevated temperature (e.g., in electric kettles). 3.8.2 Commodity Plastics These plastics are not expected to be load bearing or to withstand elevated temperatures. They are more likely to be attractive housings, covers, etc., and are often produced on a very large scale, which affects their price. Table 3.1 lists a range of commonly used commodity and engineering materials. Table 3.1 Classification of common plastics Amorphous Semicrystalline Acrylic Acetal PVC Nylon SAN Polyester Polystyrene Polyethylene Polycarbonate Polypropylene ABS PTFE Commodity plastics Engineering plastics Polypropylene PET HDPE Acetal LDPE Nylon Polystyrene PBT SAN PC Acrylic PEEK ABS PAI