What is TeachableMachine?
A web-based tool developed by Google Creative Lab. Lets anyone train ML
models using images, sounds, or poses. No coding or ML experience required
and Ideal for beginners, students, educators, and rapid prototyping.
3.
Key Features
• Easeof Use & No Coding required
• Web-Based Platform
• Real Time Training
• Multiple Input Options
• Export Flexibility
4.
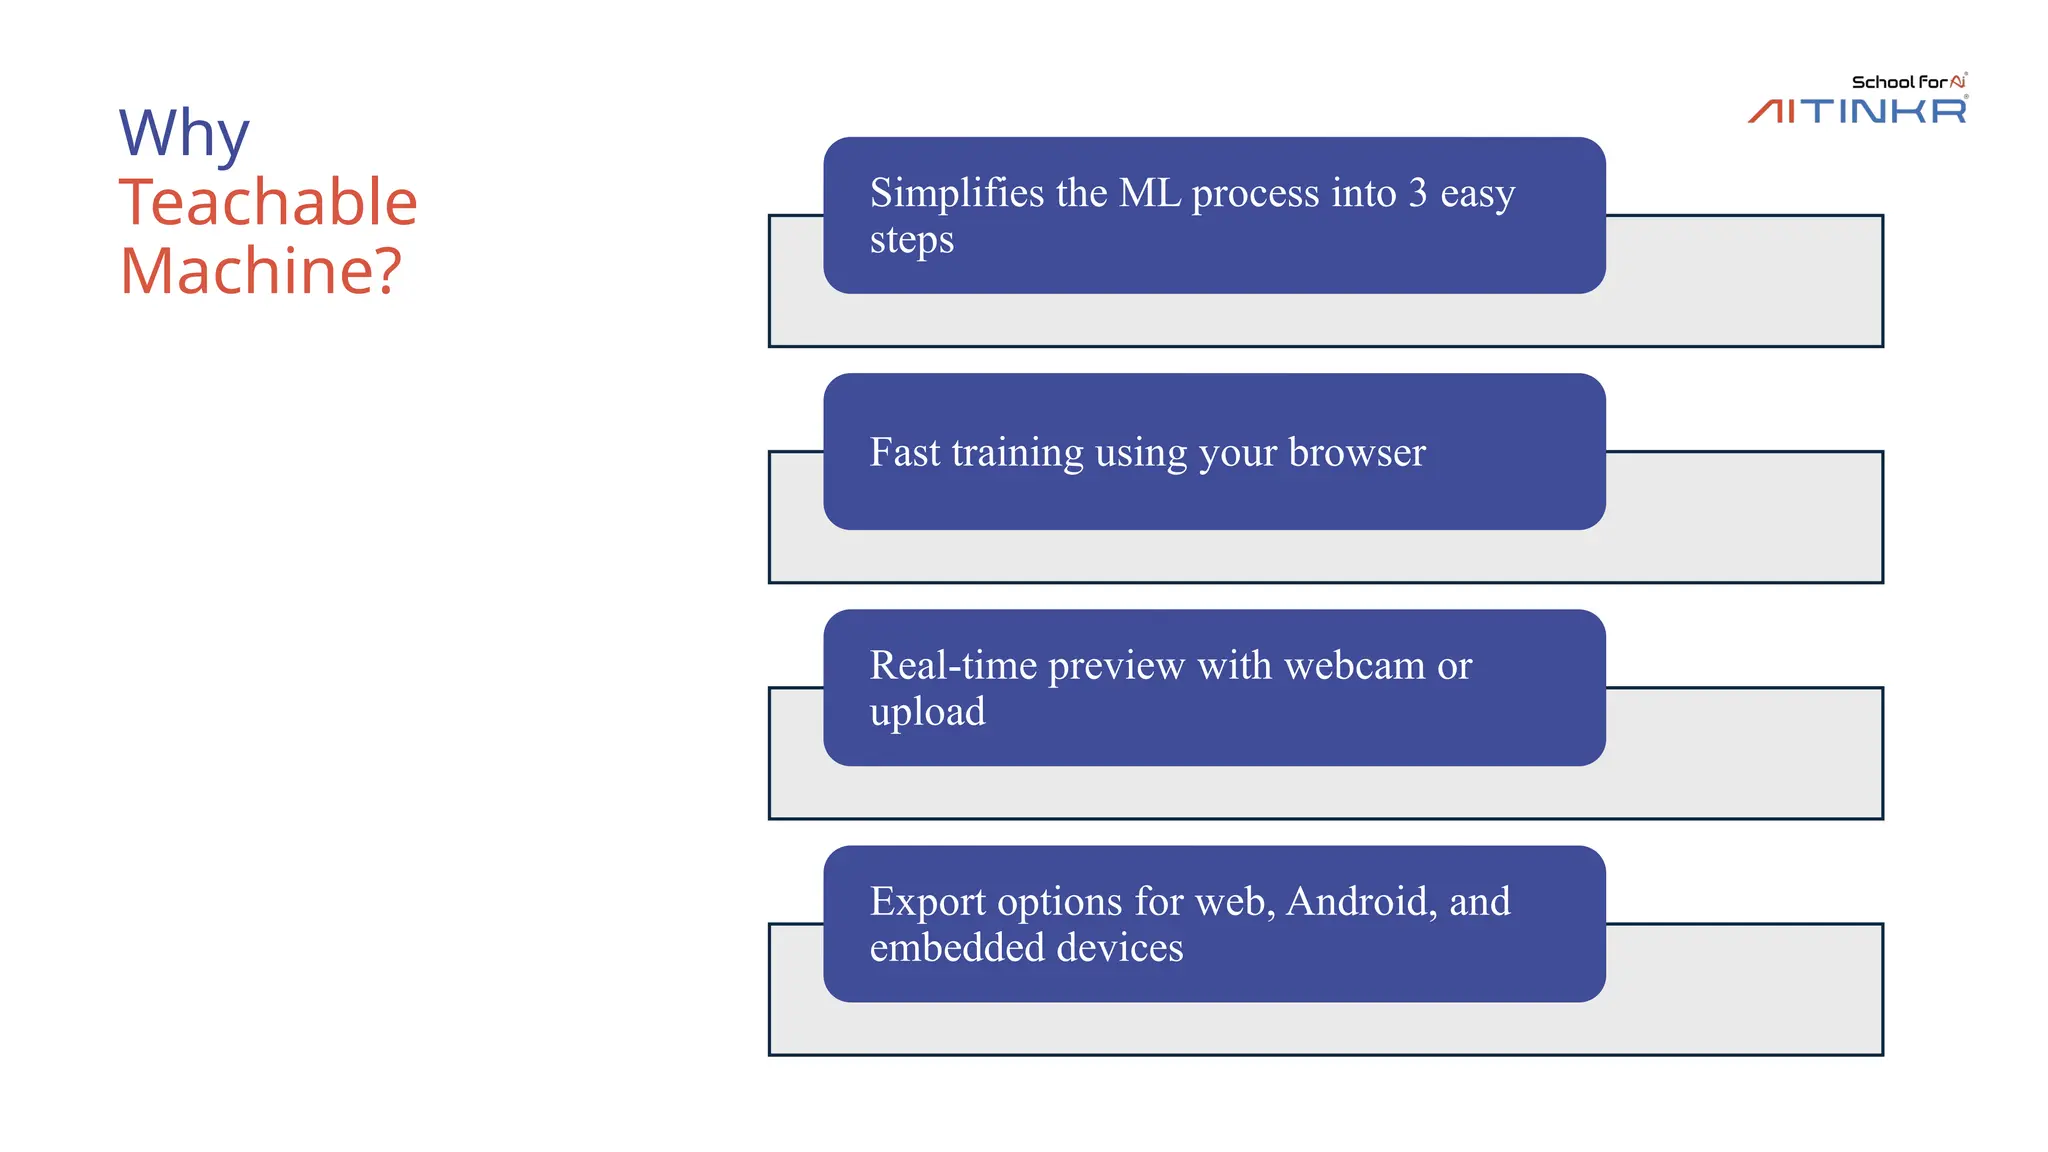
Why
Teachable
Machine?
Simplifies the MLprocess into 3 easy
steps
Fast training using your browser
Real-time preview with webcam or
upload
Export options for web, Android, and
embedded devices
5.
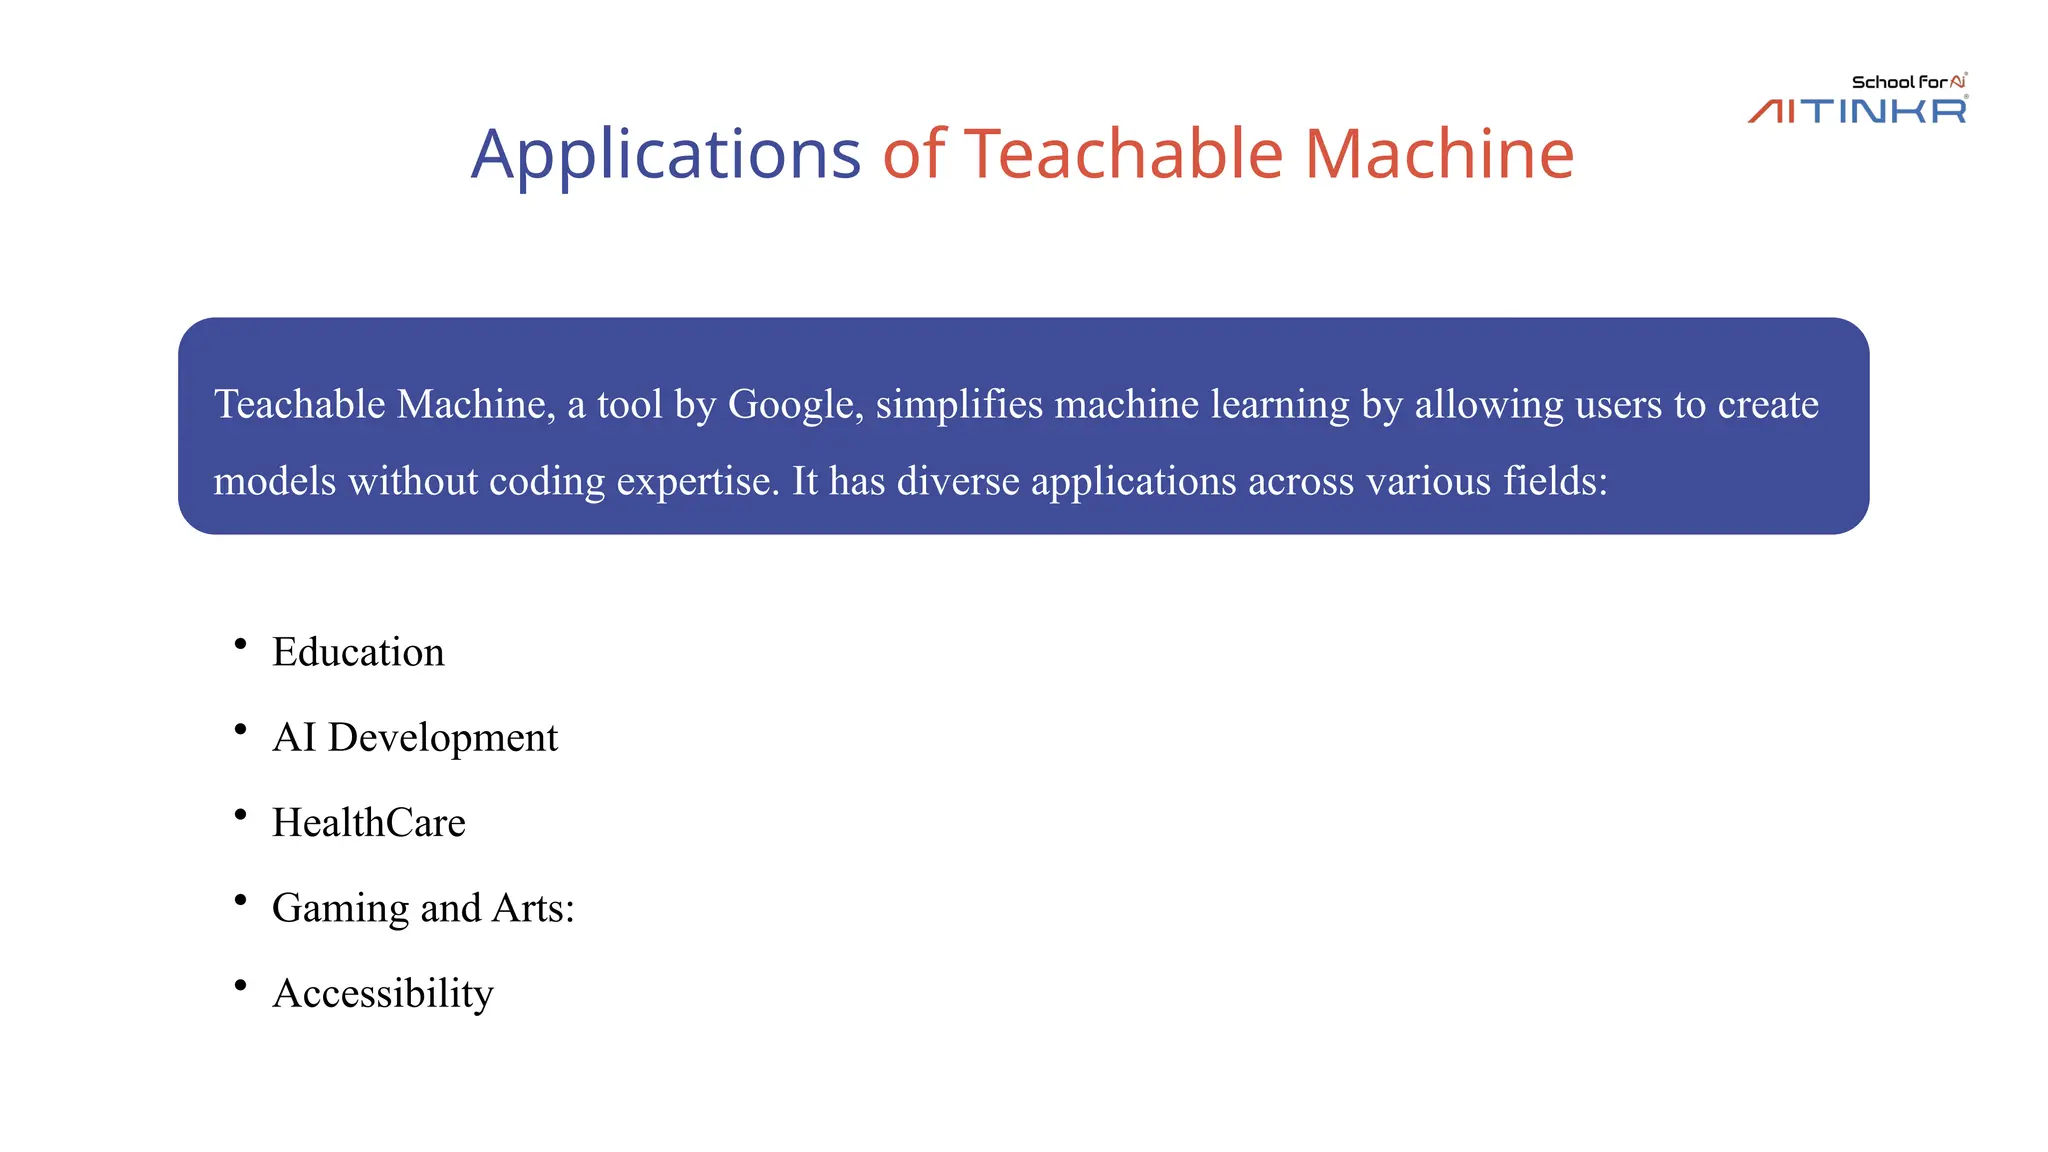
Applications of TeachableMachine
Teachable Machine, a tool by Google, simplifies machine learning by allowing users to create
models without coding expertise. It has diverse applications across various fields:
• Education
• AI Development
• HealthCare
• Gaming and Arts:
• Accessibility
6.
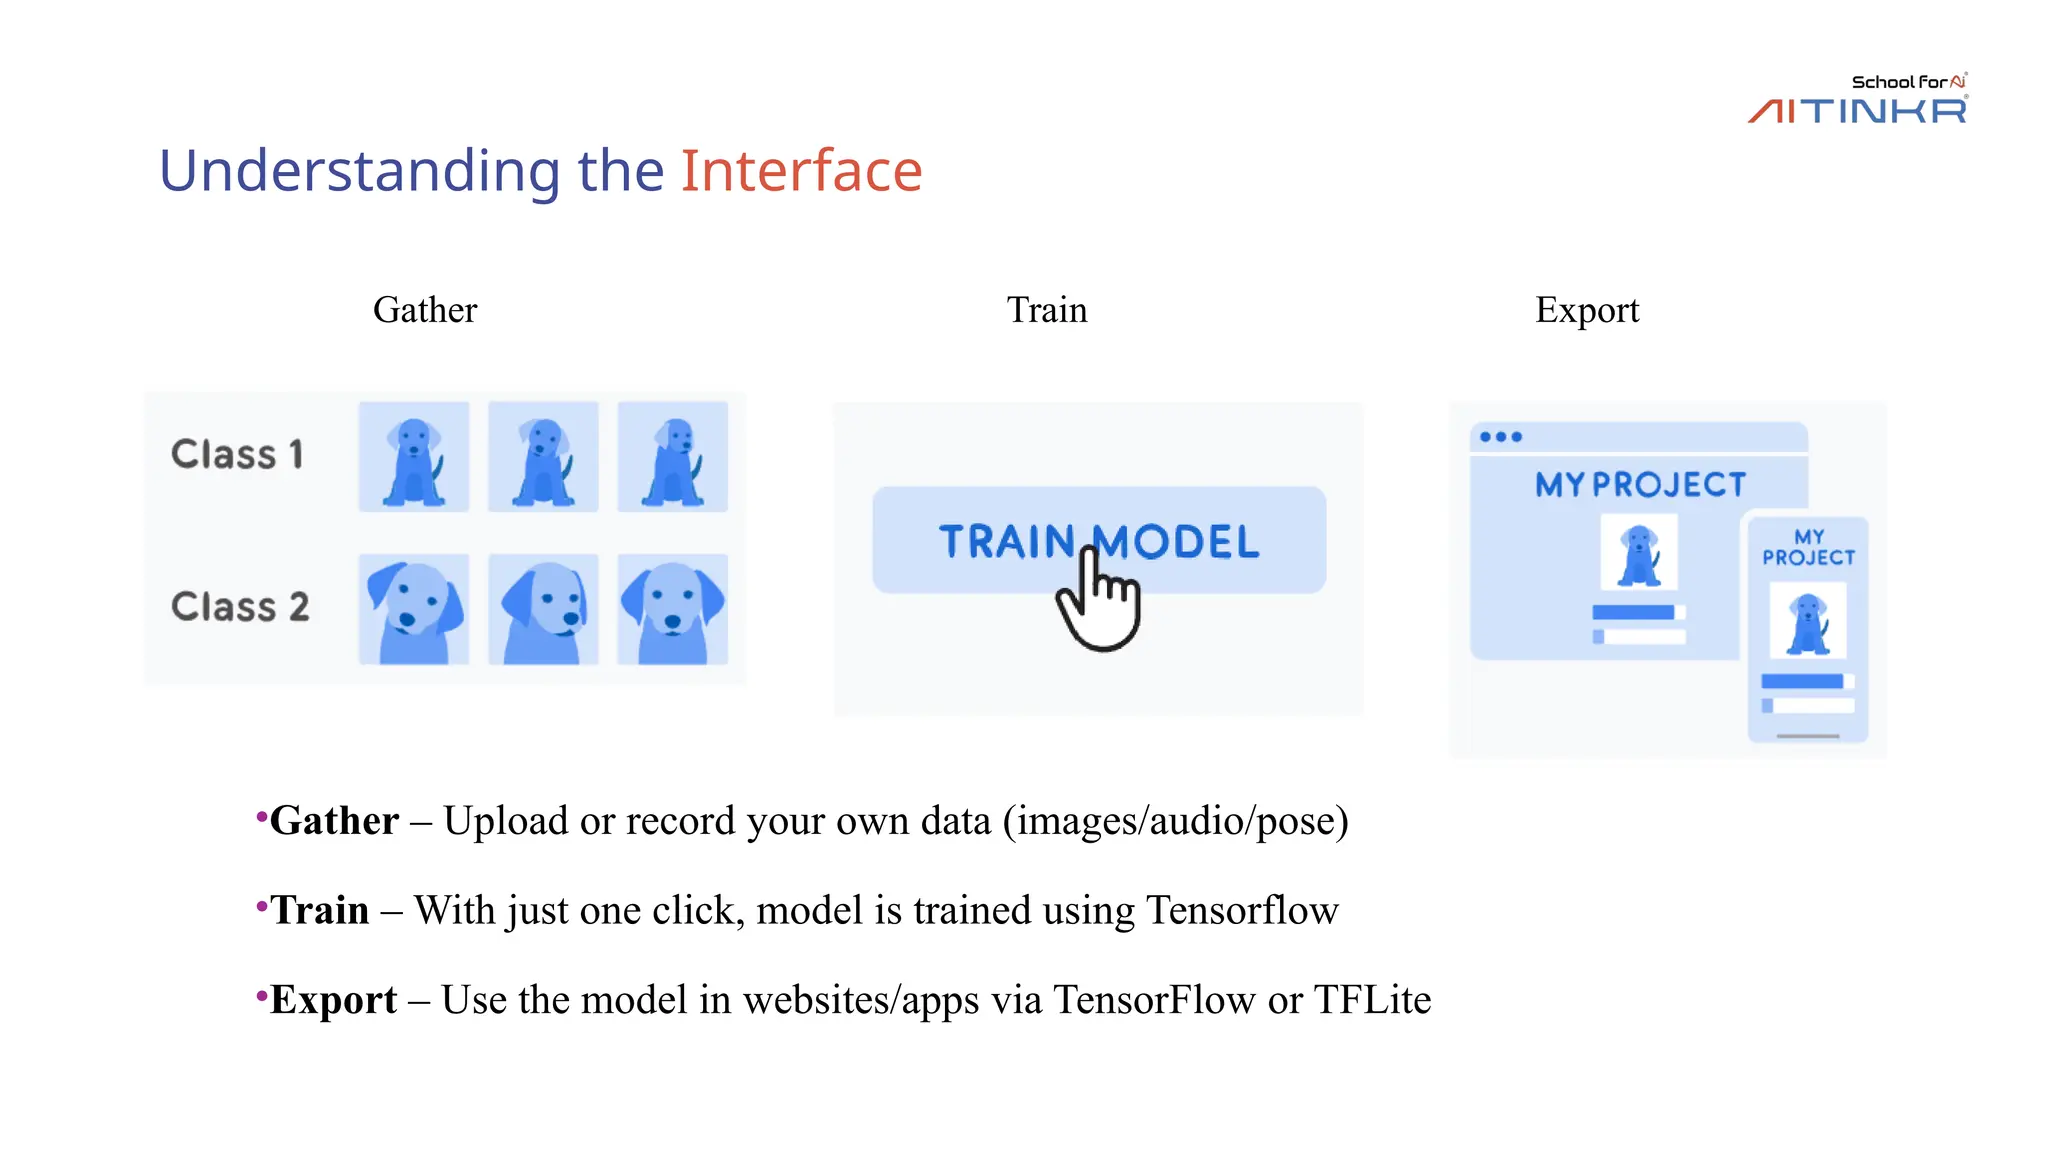
Understanding the Interface
•Gather– Upload or record your own data (images/audio/pose)
•Train – With just one click, model is trained using Tensorflow
•Export – Use the model in websites/apps via TensorFlow or TFLite
Gather Train Export
7.
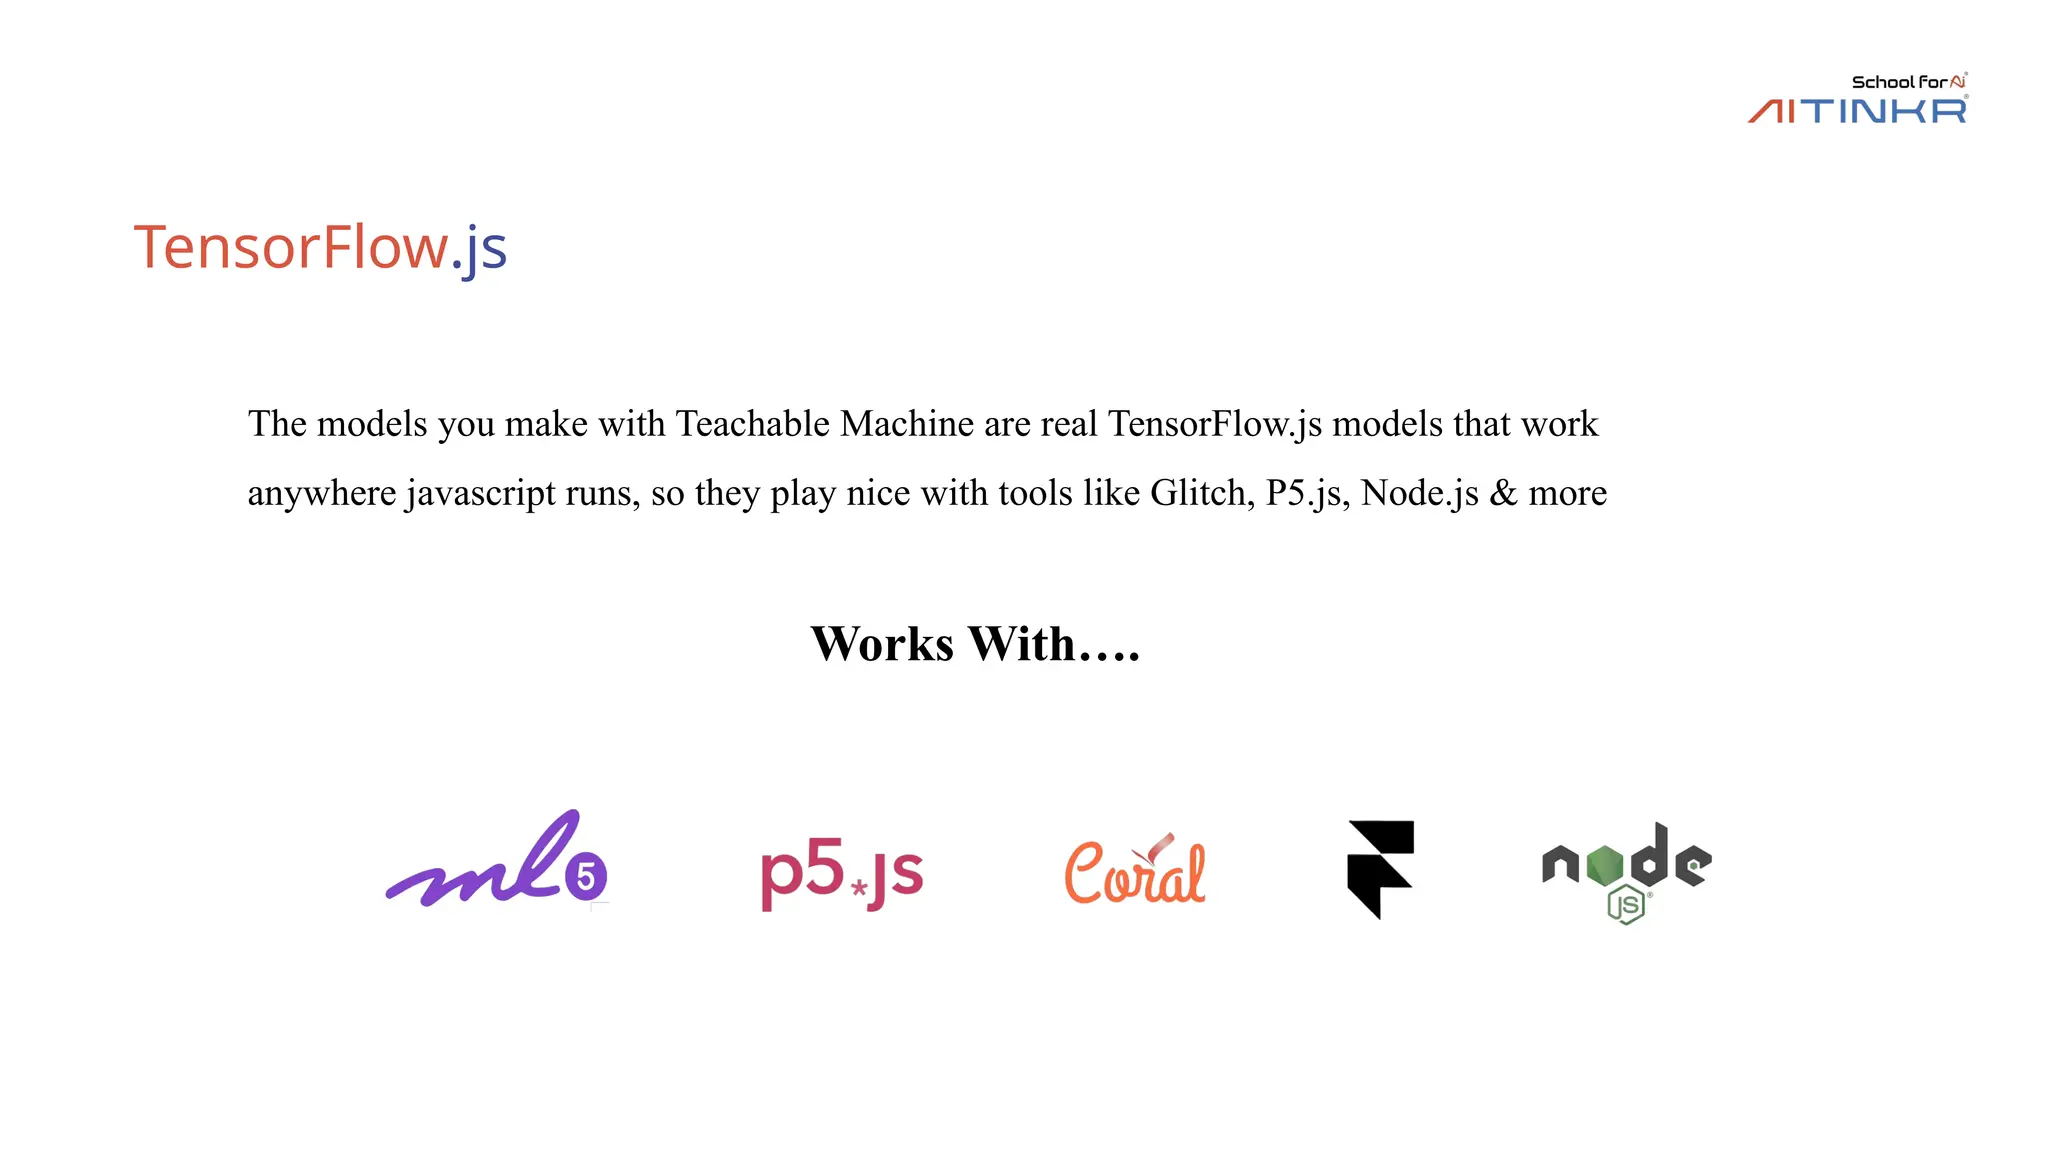
TensorFlow.js
The models youmake with Teachable Machine are real TensorFlow.js models that work
anywhere javascript runs, so they play nice with tools like Glitch, P5.js, Node.js & more
Works With….
8.
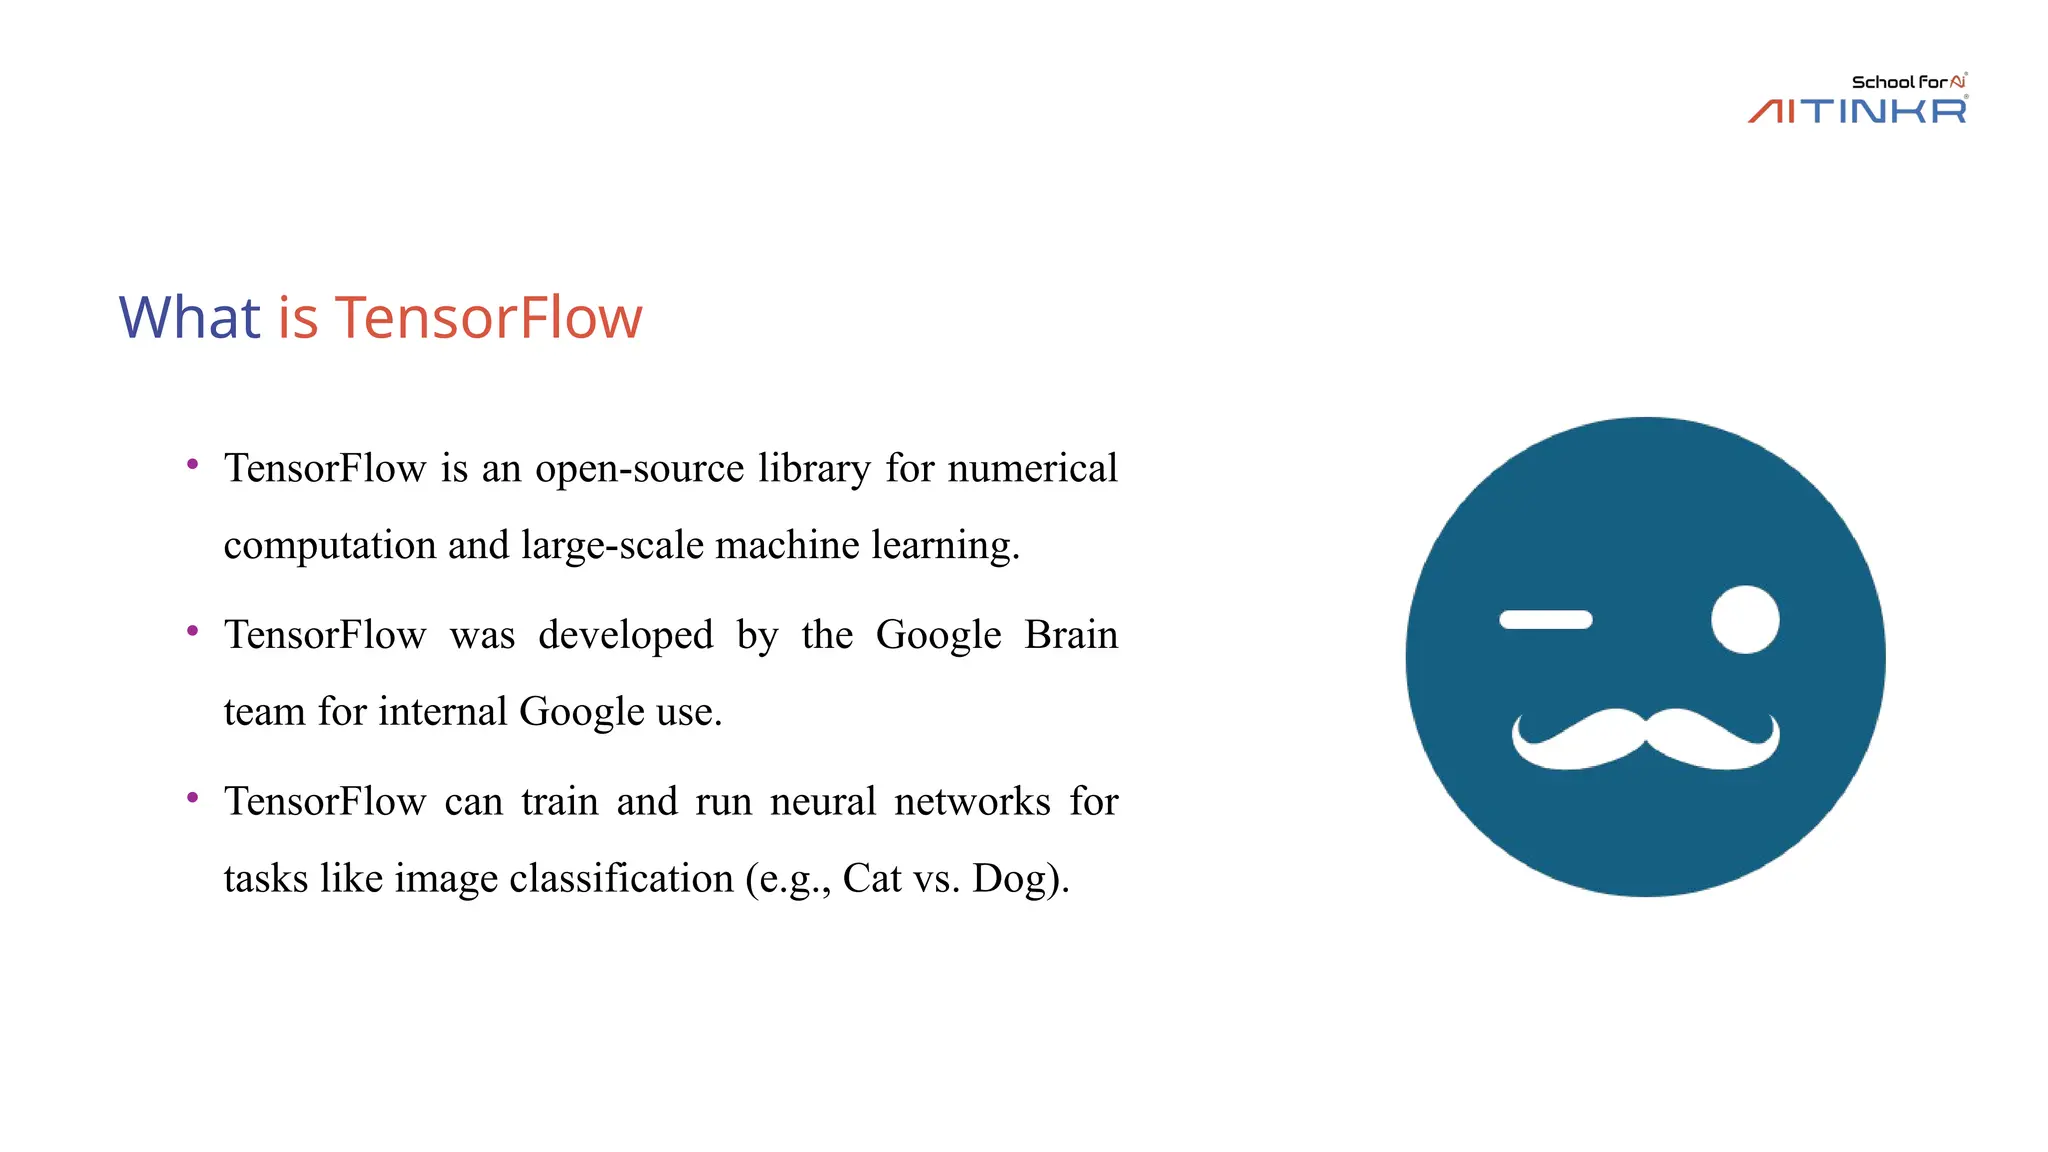
What is TensorFlow
•TensorFlow is an open-source library for numerical
computation and large-scale machine learning.
• TensorFlow was developed by the Google Brain
team for internal Google use.
• TensorFlow can train and run neural networks for
tasks like image classification (e.g., Cat vs. Dog).
9.
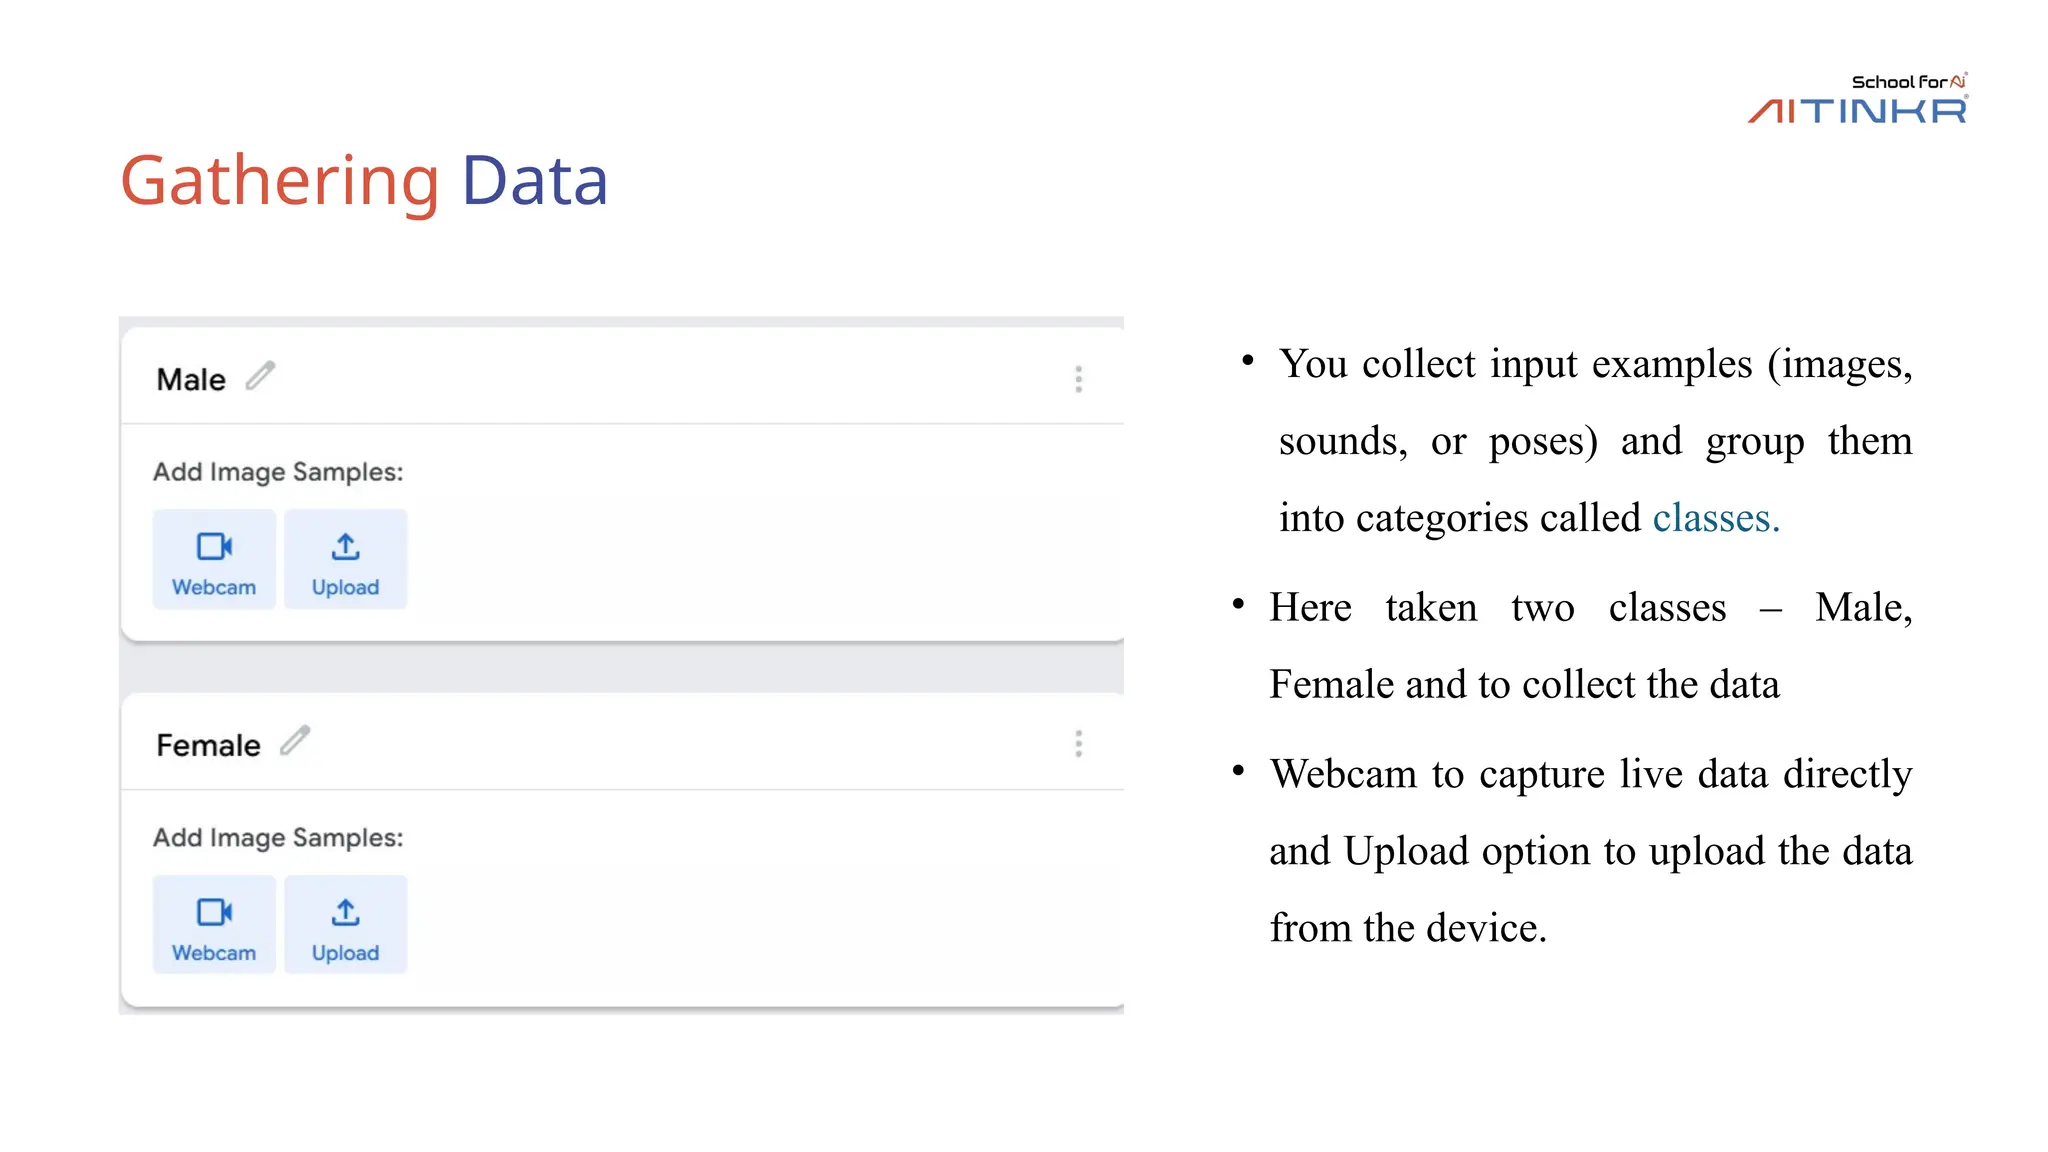
Gathering Data
• Youcollect input examples (images,
sounds, or poses) and group them
into categories called classes.
• Here taken two classes – Male,
Female and to collect the data
• Webcam to capture live data directly
and Upload option to upload the data
from the device.
10.
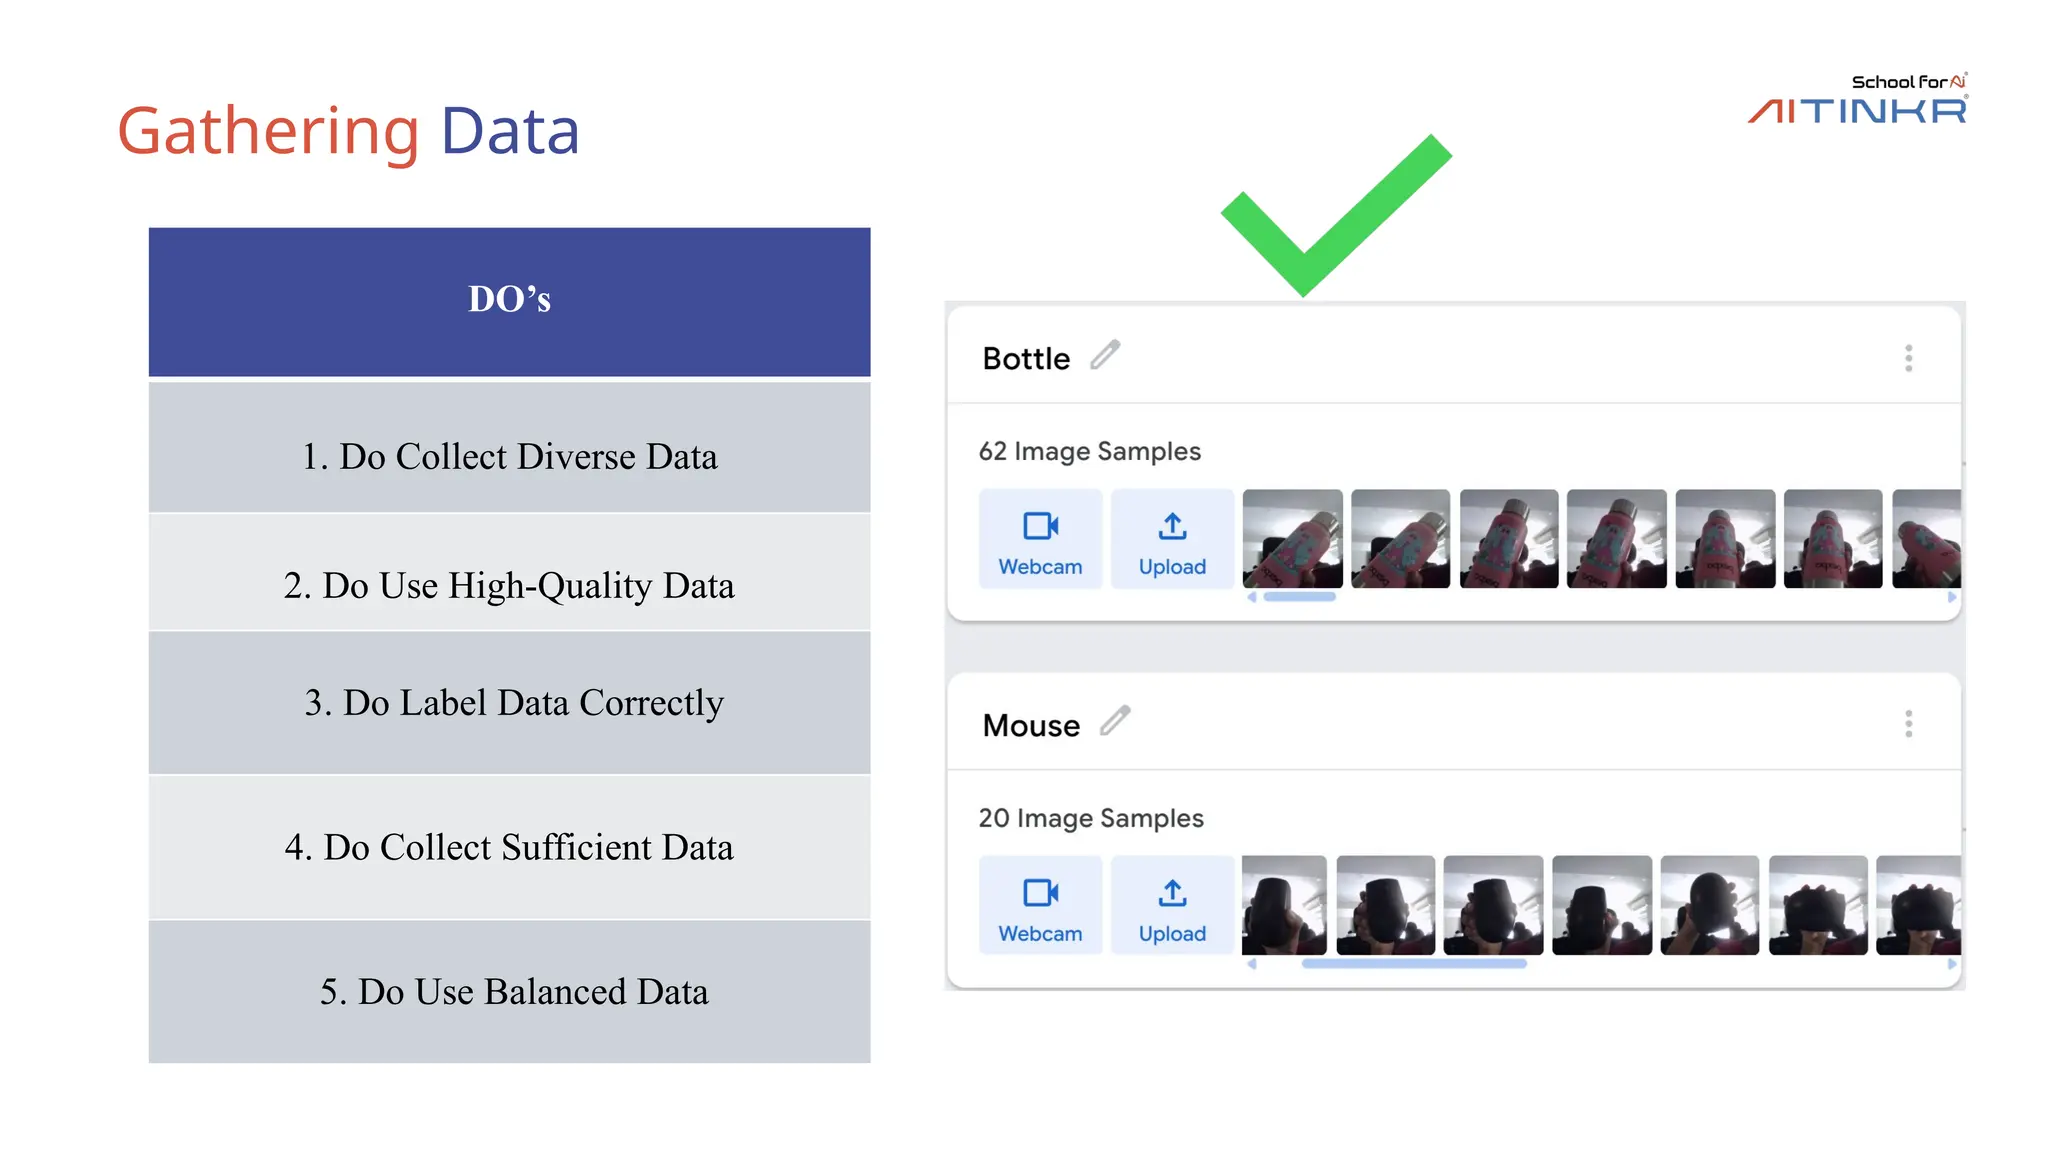
Gathering Data
DO’s
1. DoCollect Diverse Data
2. Do Use High-Quality Data
3. Do Label Data Correctly
4. Do Collect Sufficient Data
5. Do Use Balanced Data
11.
Gathering Data
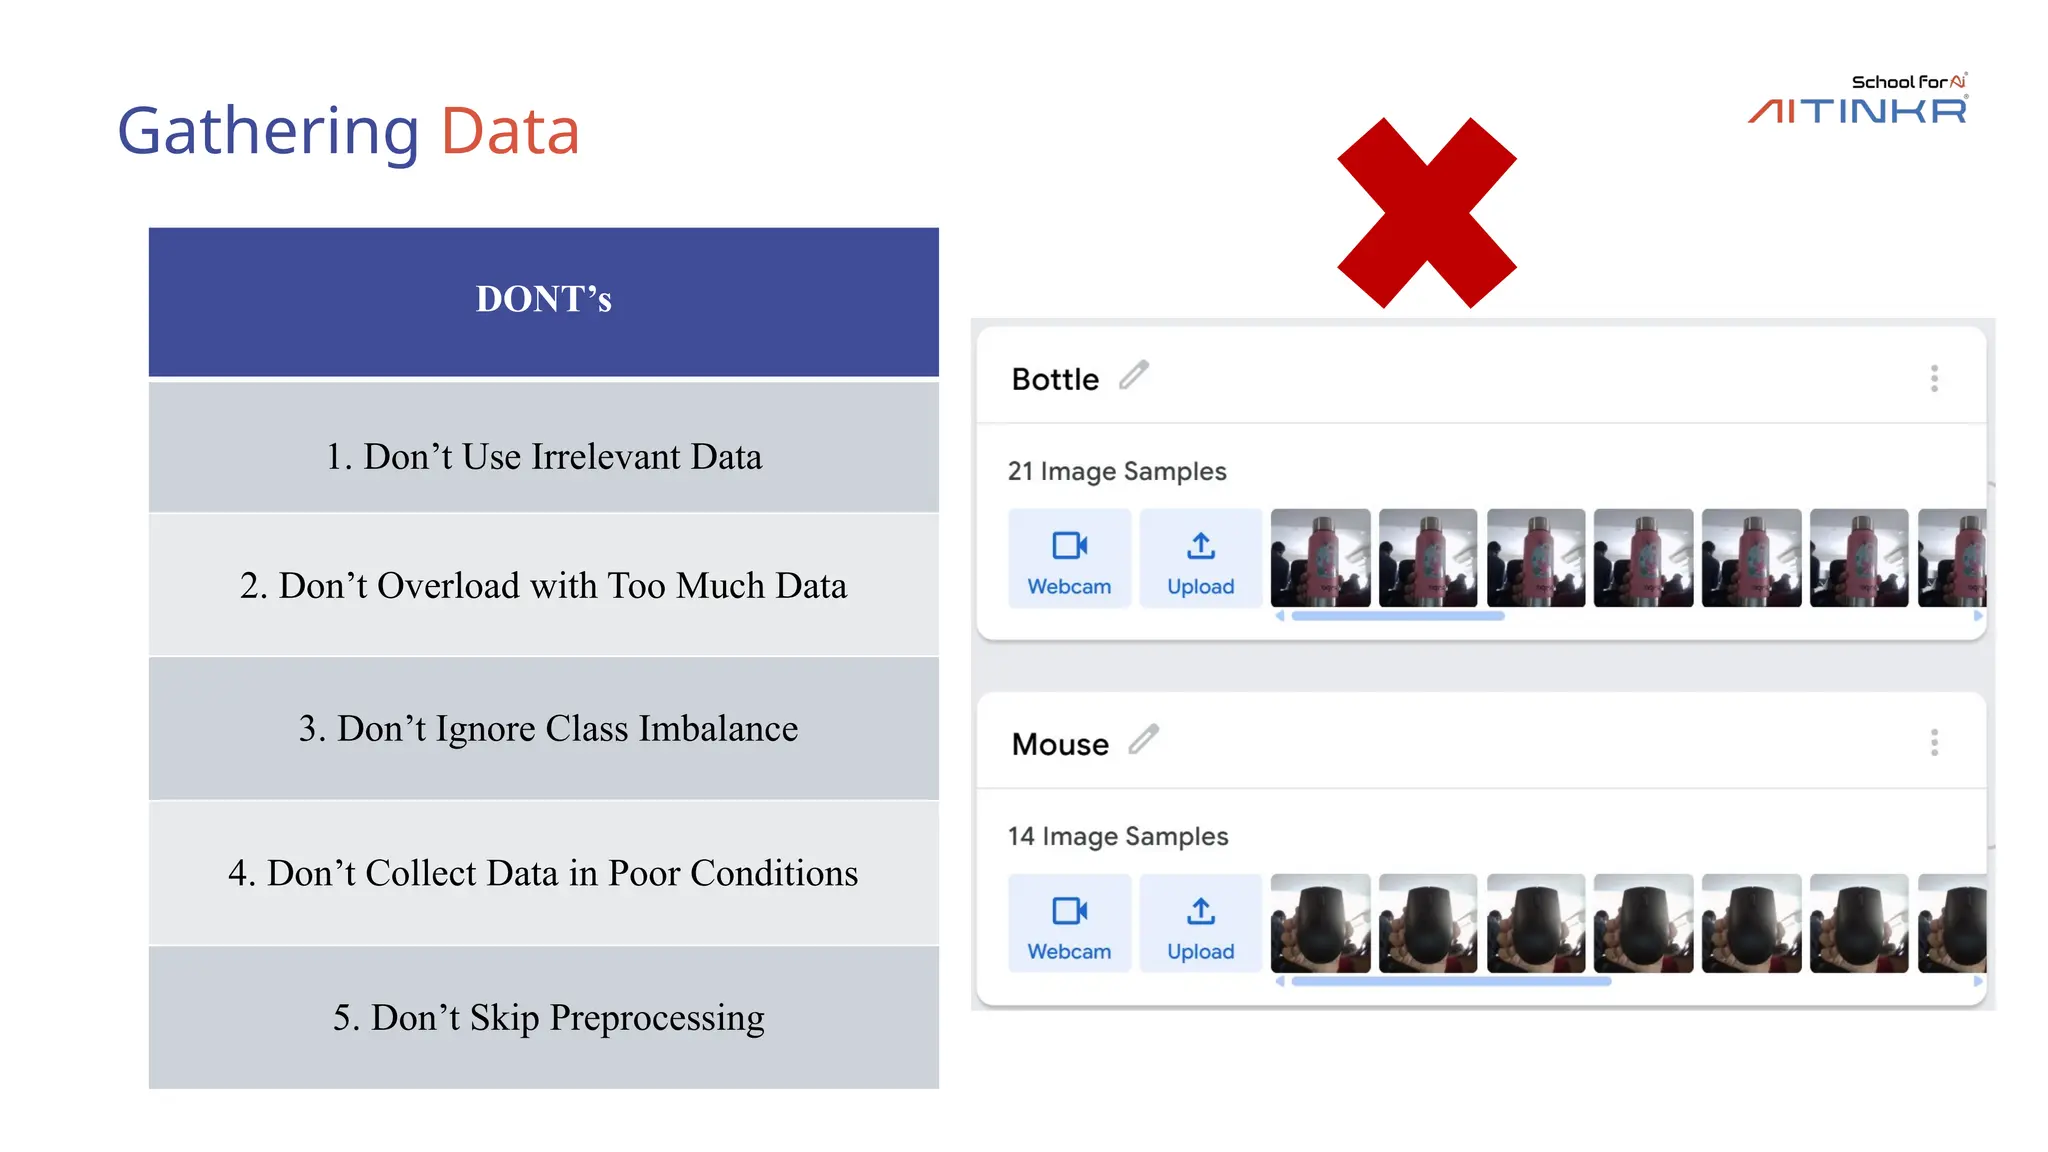
DONT’s
1. Don’tUse Irrelevant Data
2. Don’t Overload with Too Much Data
3. Don’t Ignore Class Imbalance
4. Don’t Collect Data in Poor Conditions
5. Don’t Skip Preprocessing
12.
Training Data
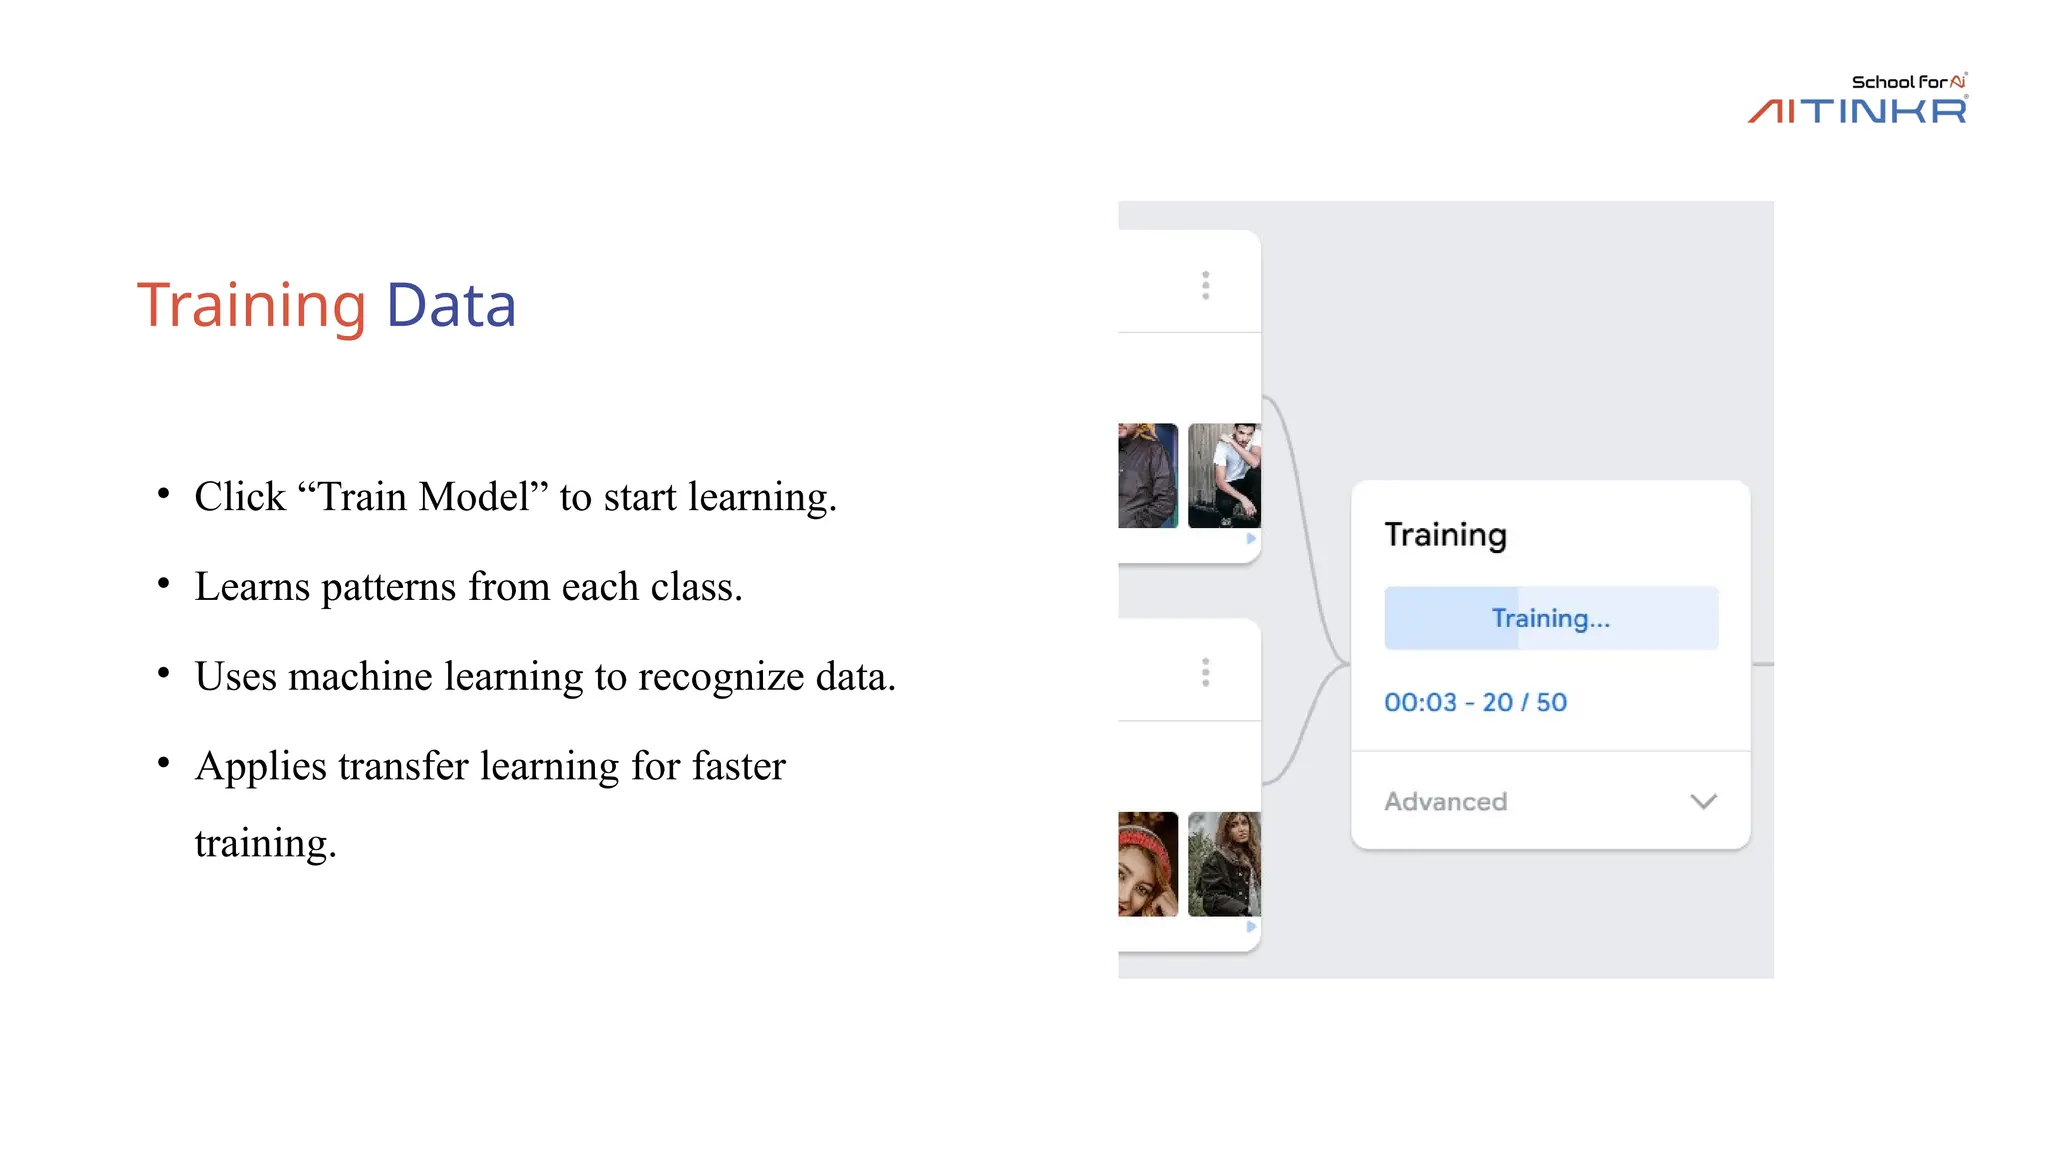
• Click“Train Model” to start learning.
• Learns patterns from each class.
• Uses machine learning to recognize data.
• Applies transfer learning for faster
training.
13.
Export Model
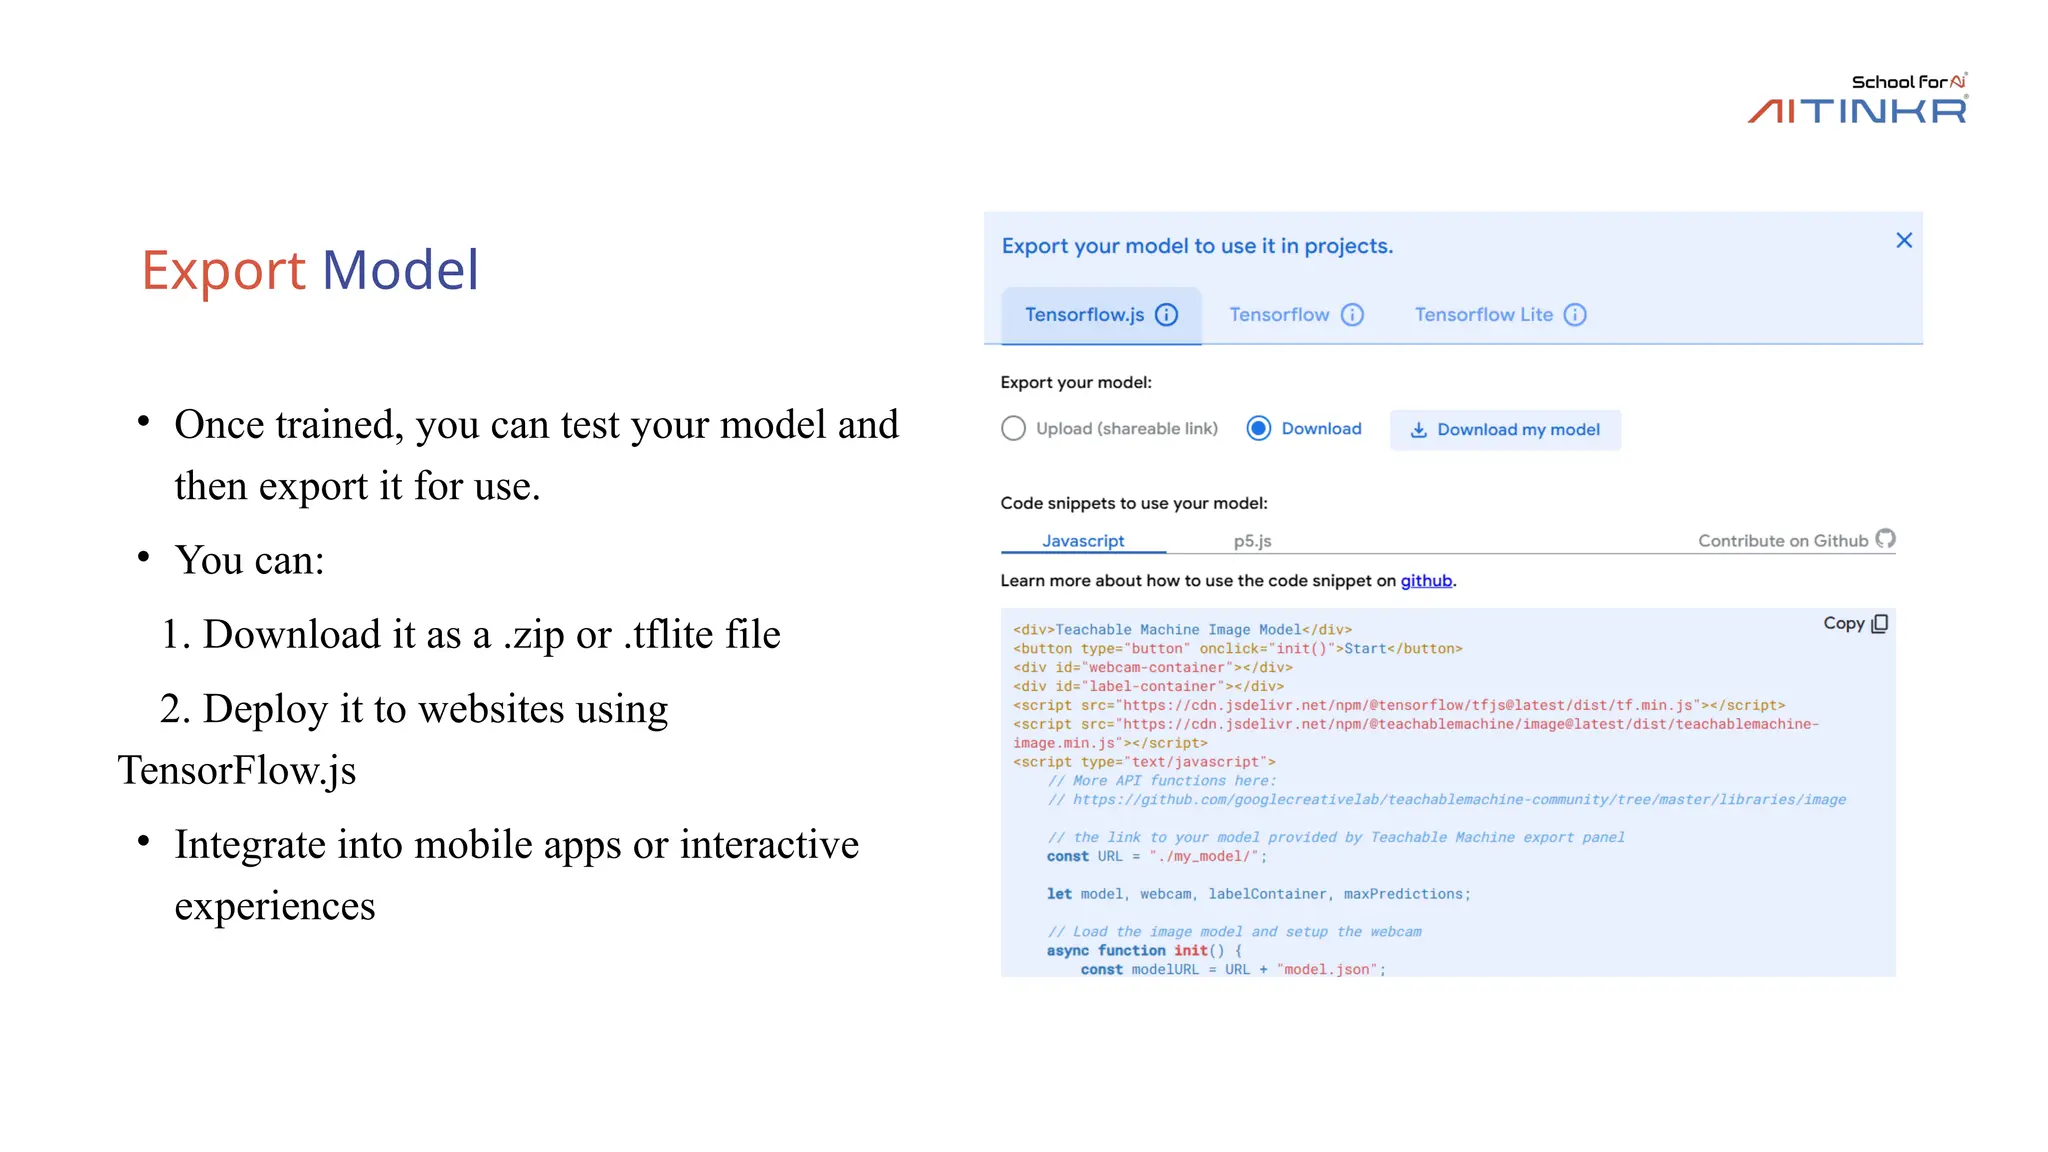
• Oncetrained, you can test your model and
then export it for use.
• You can:
1. Download it as a .zip or .tflite file
2. Deploy it to websites using
TensorFlow.js
• Integrate into mobile apps or interactive
experiences
14.
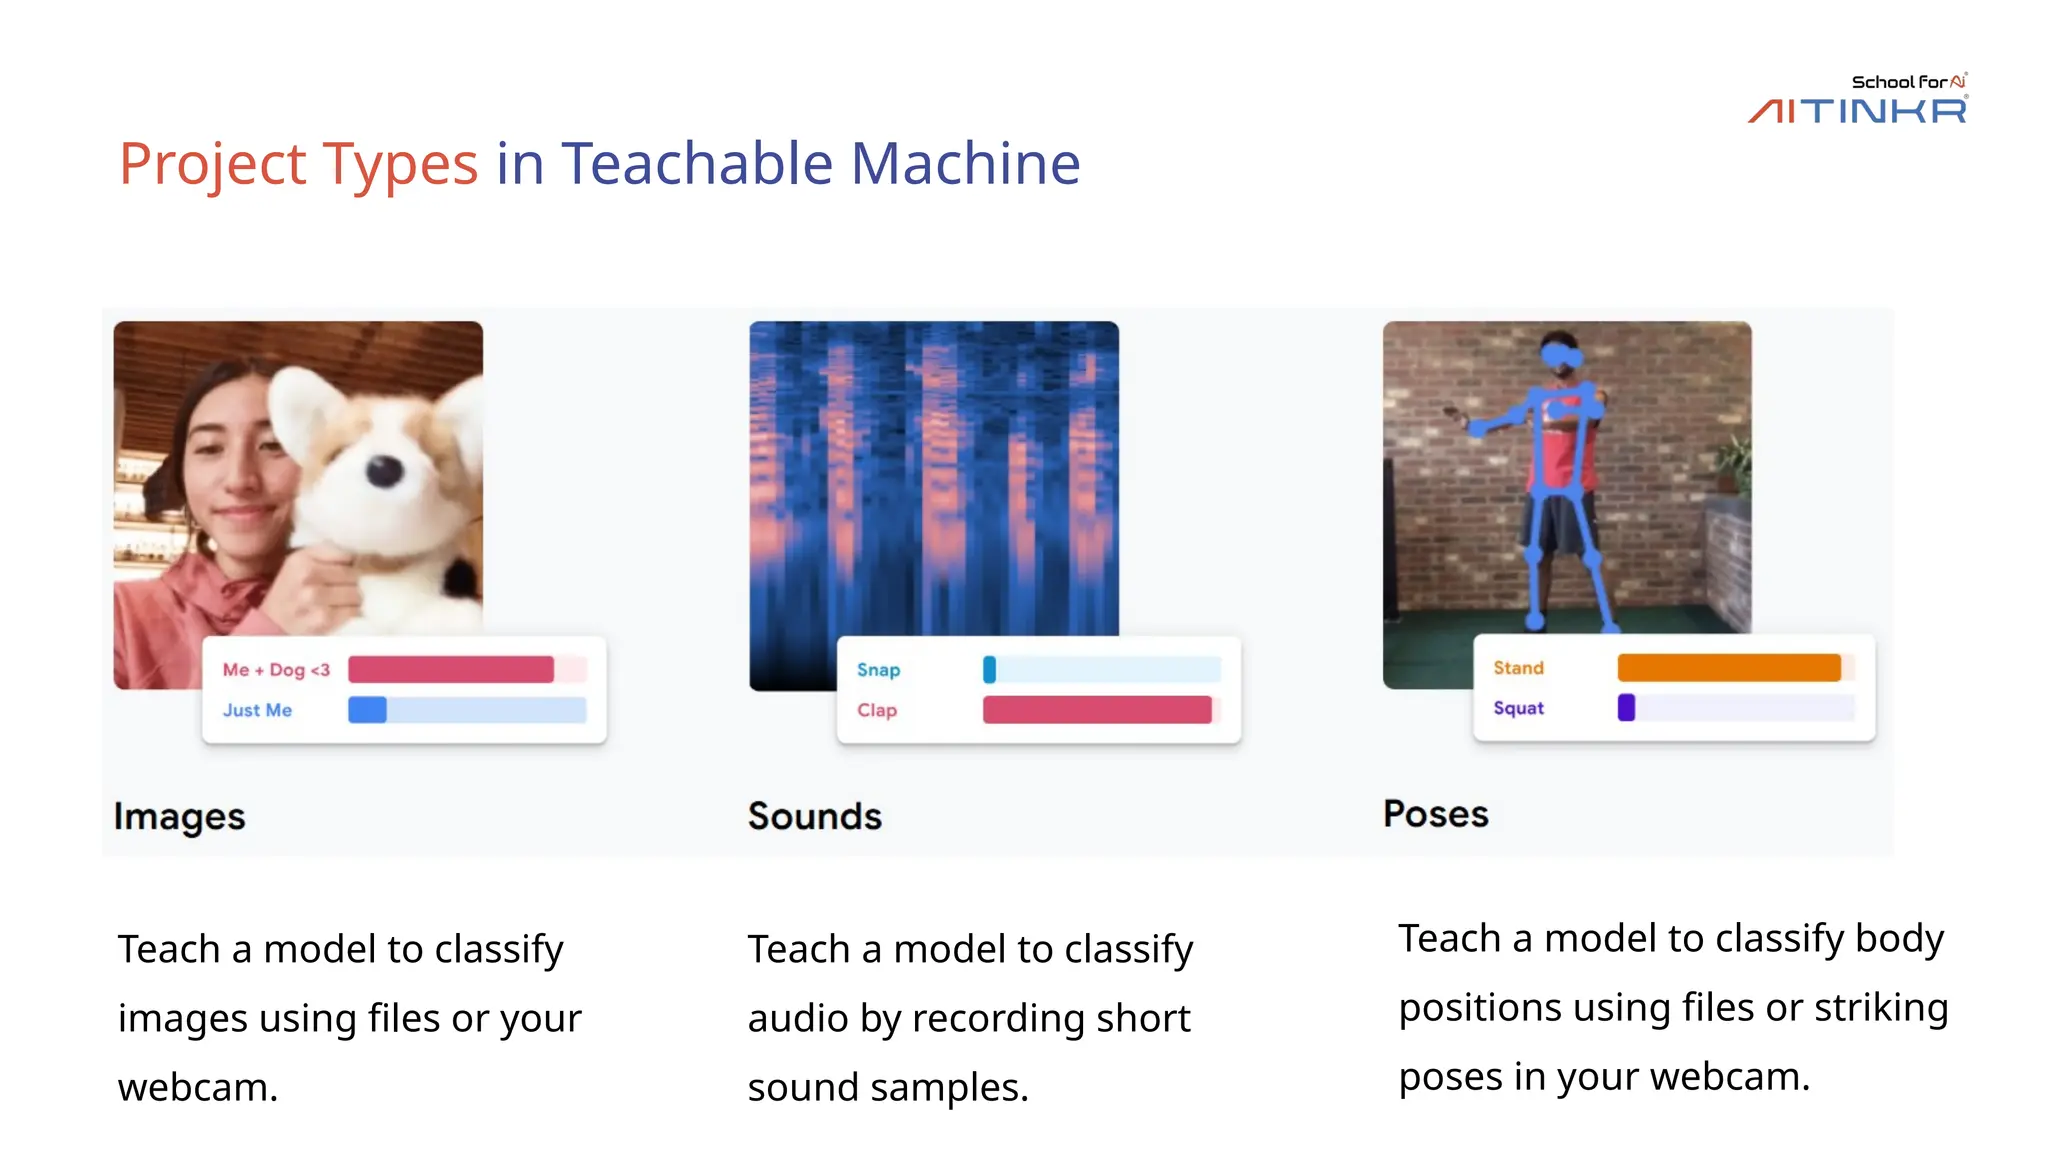
Project Types inTeachable Machine
Teach a model to classify
images using files or your
webcam.
Teach a model to classify
audio by recording short
sound samples.
Teach a model to classify body
positions using files or striking
poses in your webcam.
15.
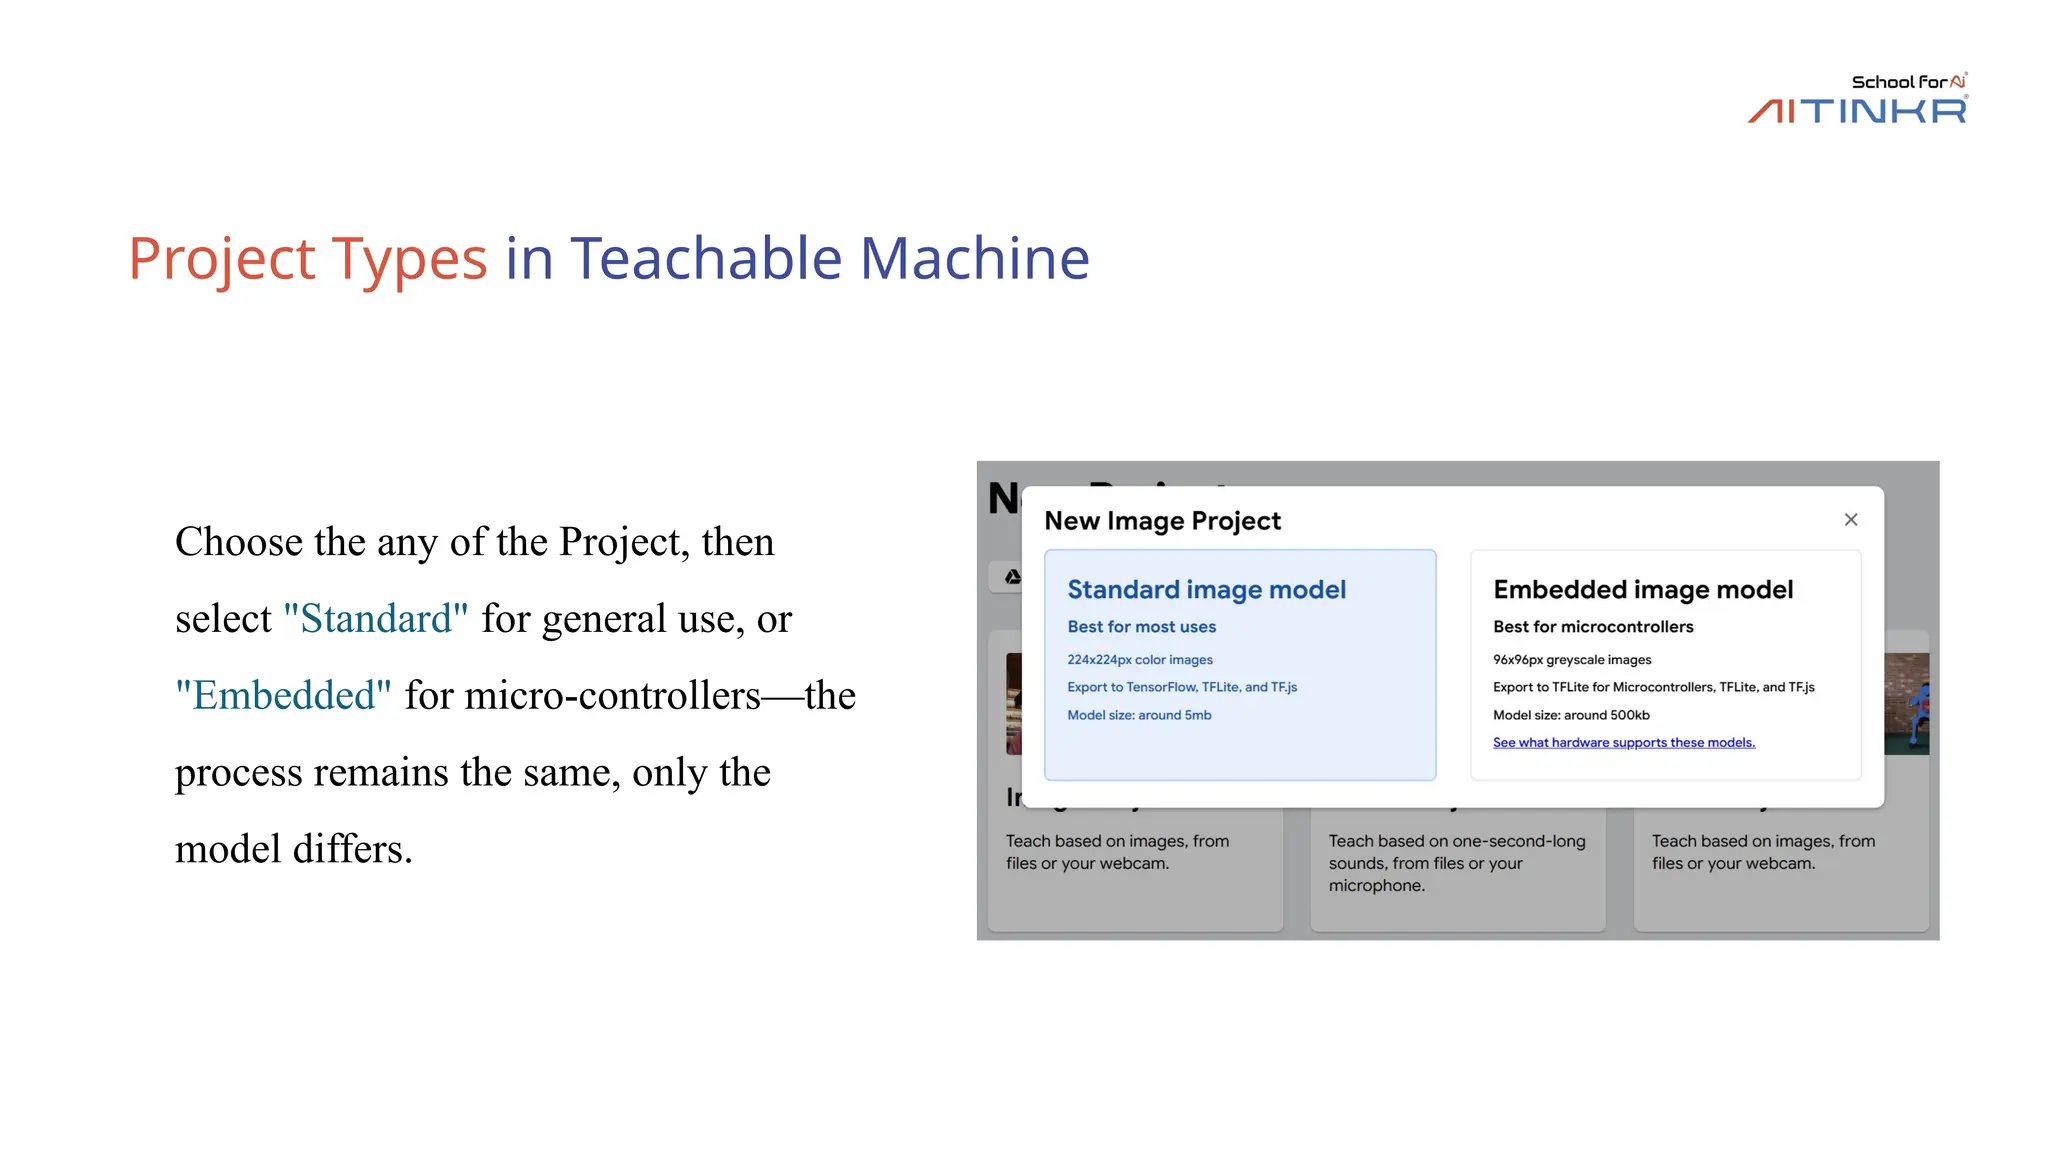
Project Types inTeachable Machine
Choose the any of the Project, then
select "Standard" for general use, or
"Embedded" for micro-controllers—the
process remains the same, only the
model differs.
16.
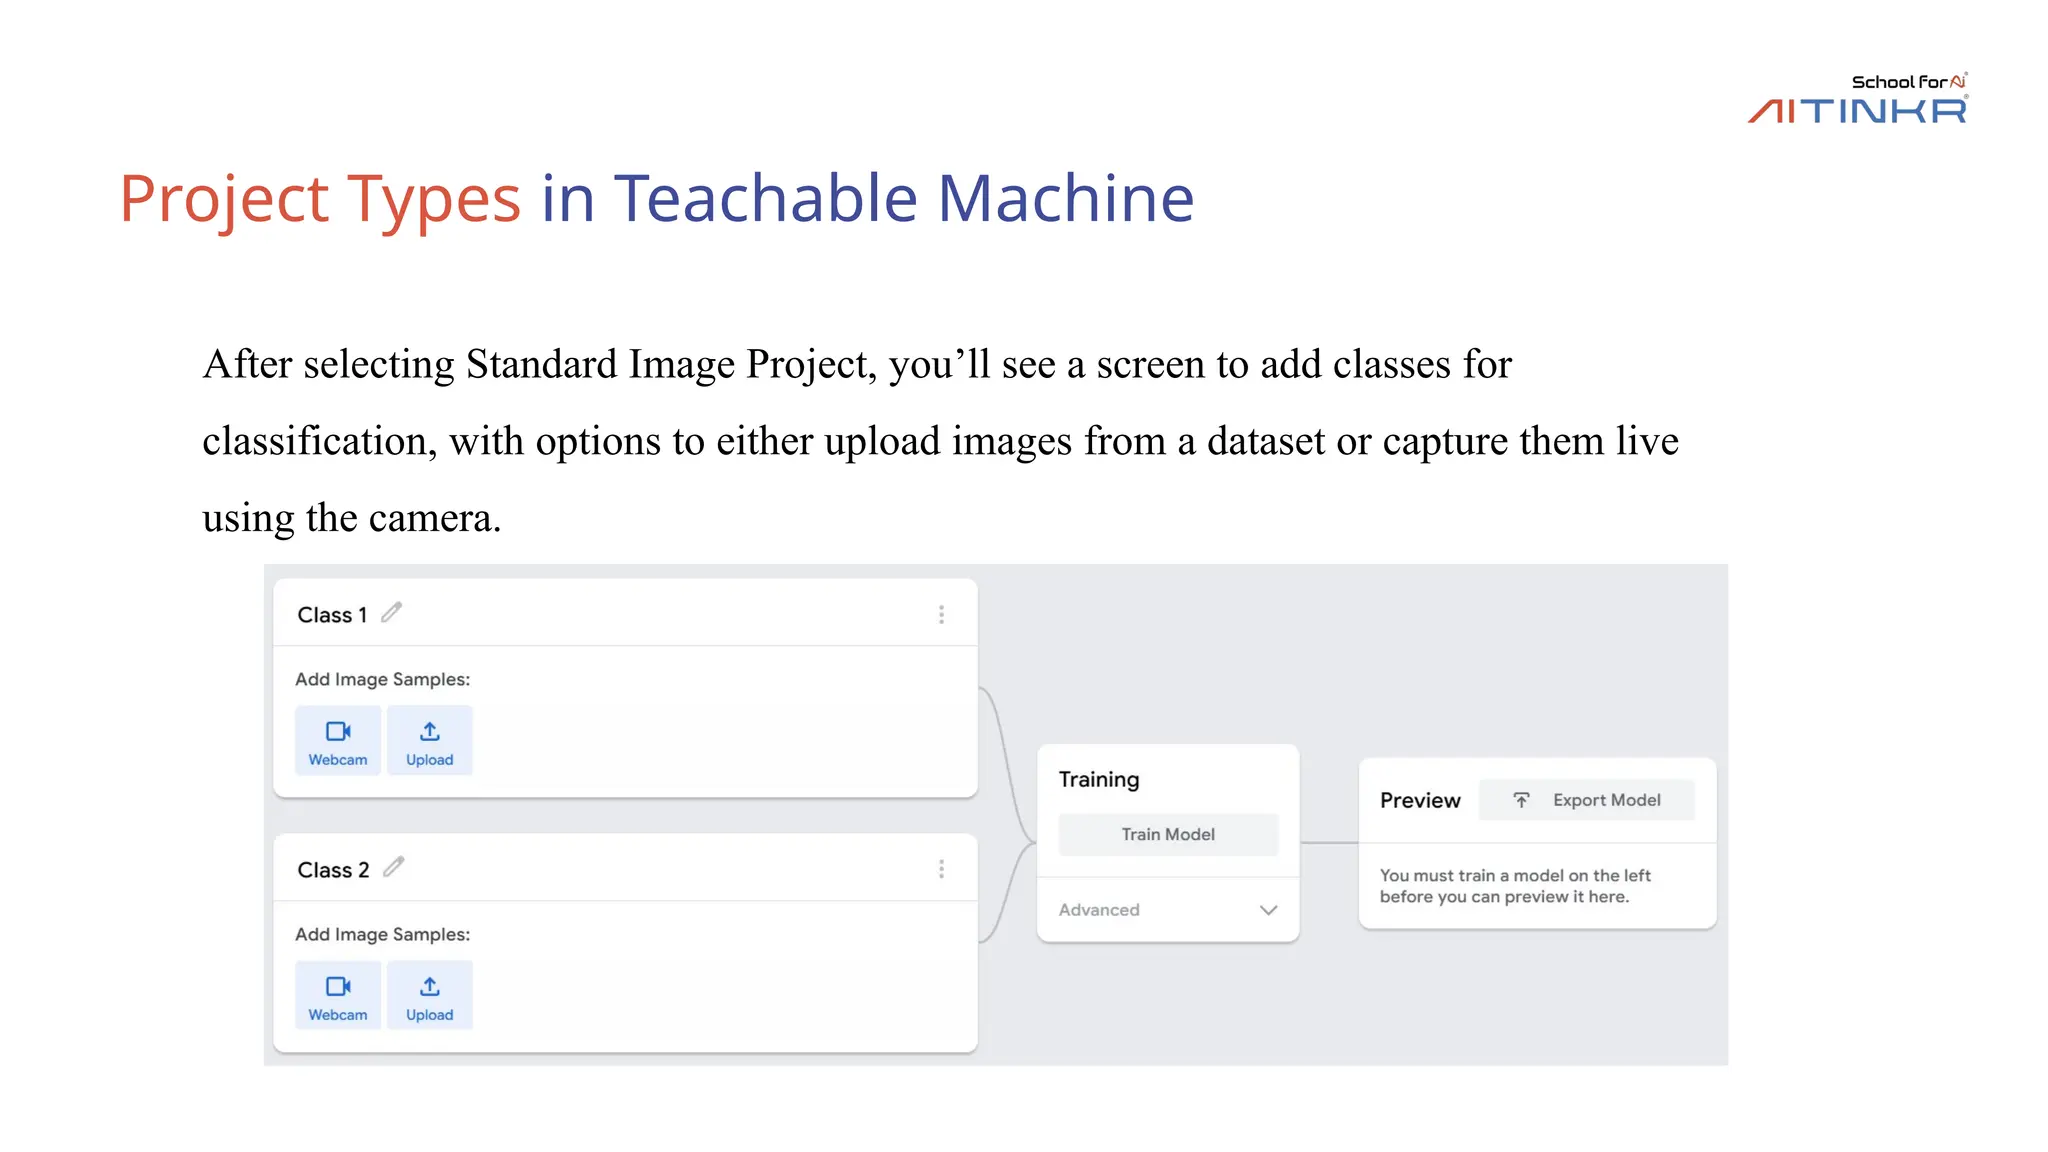
Project Types inTeachable Machine
After selecting Standard Image Project, you’ll see a screen to add classes for
classification, with options to either upload images from a dataset or capture them live
using the camera.
17.
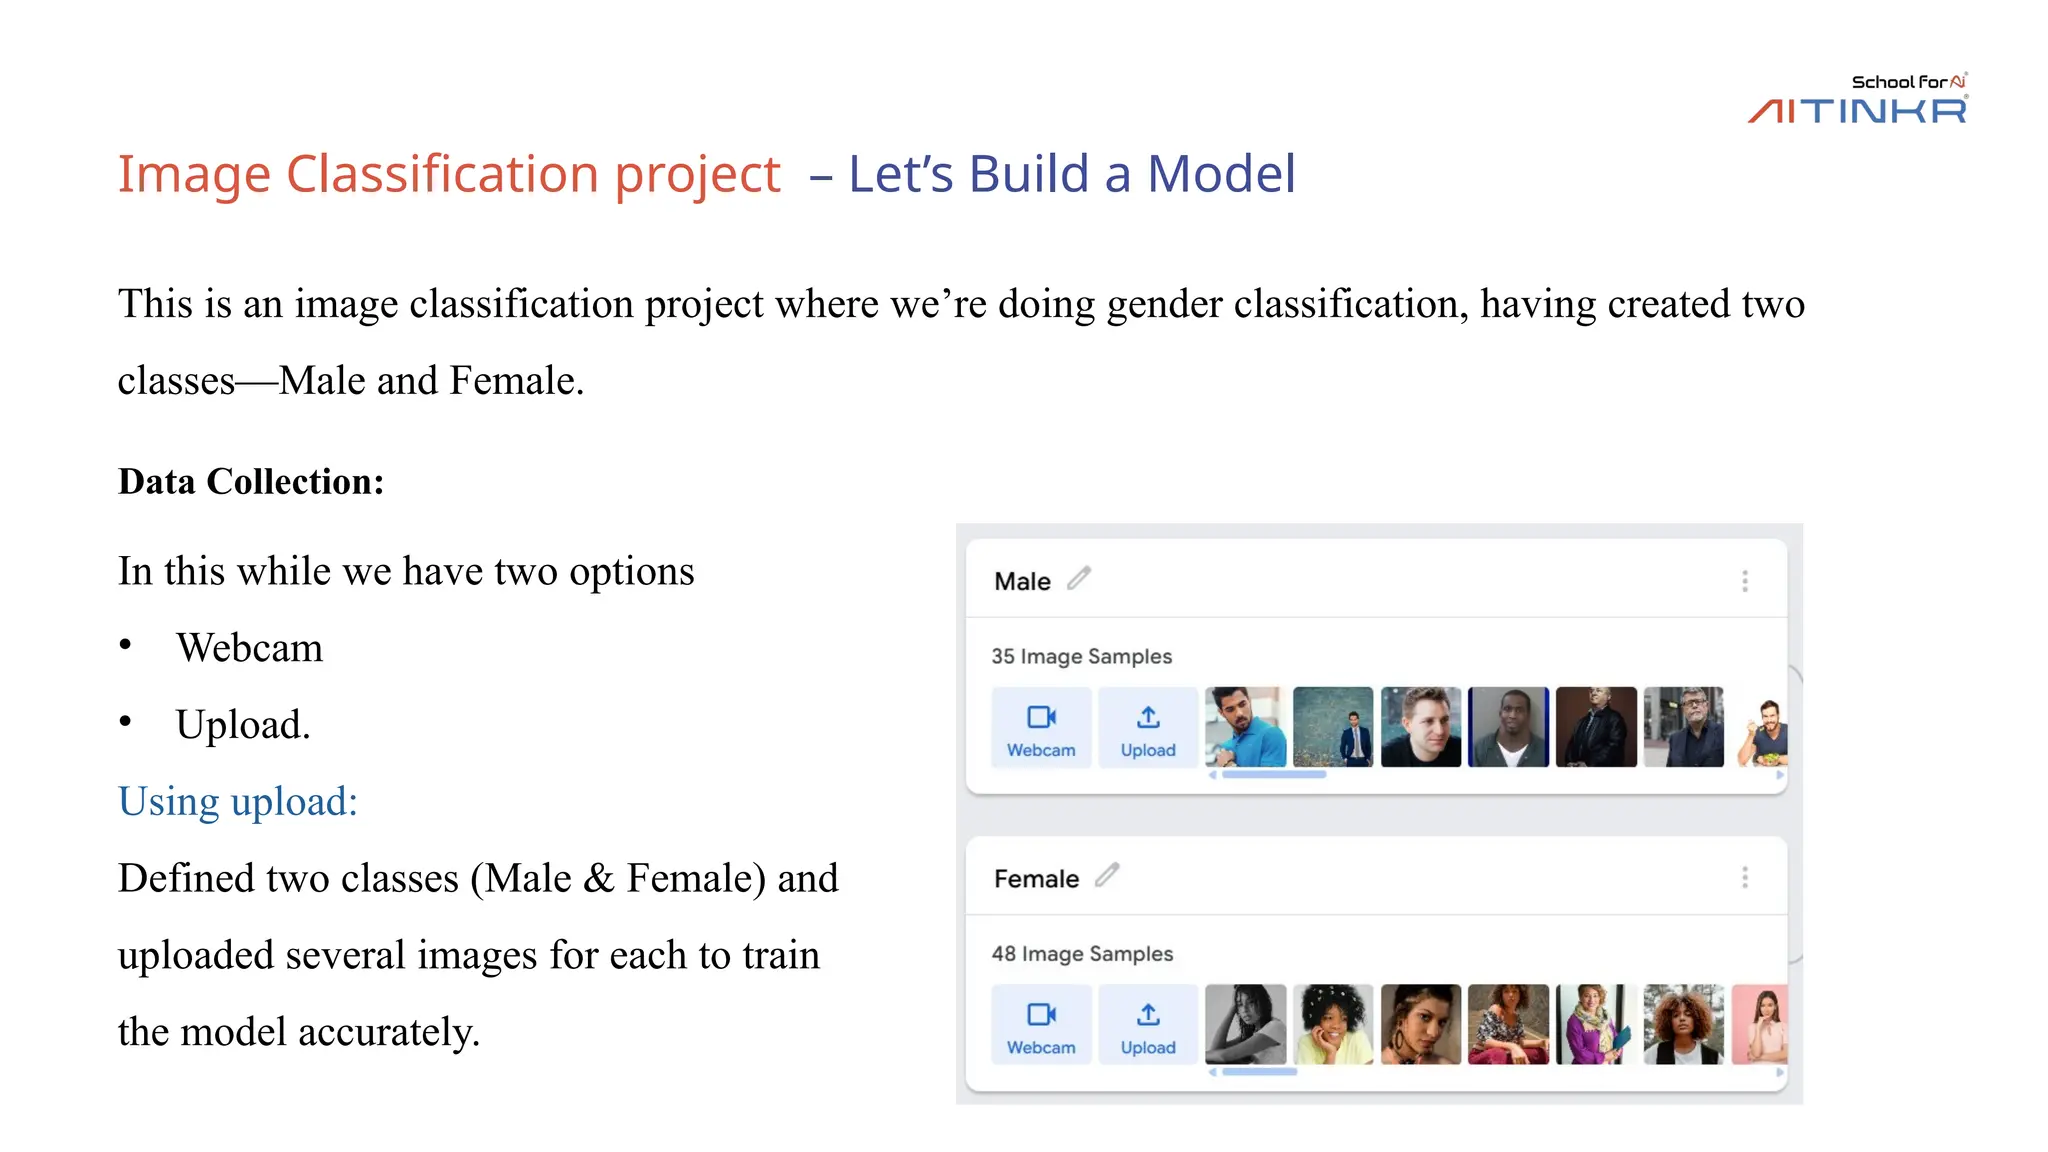
Image Classification project– Let’s Build a Model
Data Collection:
This is an image classification project where we’re doing gender classification, having created two
classes—Male and Female.
In this while we have two options
• Webcam
• Upload.
Using upload:
Defined two classes (Male & Female) and
uploaded several images for each to train
the model accurately.
18.
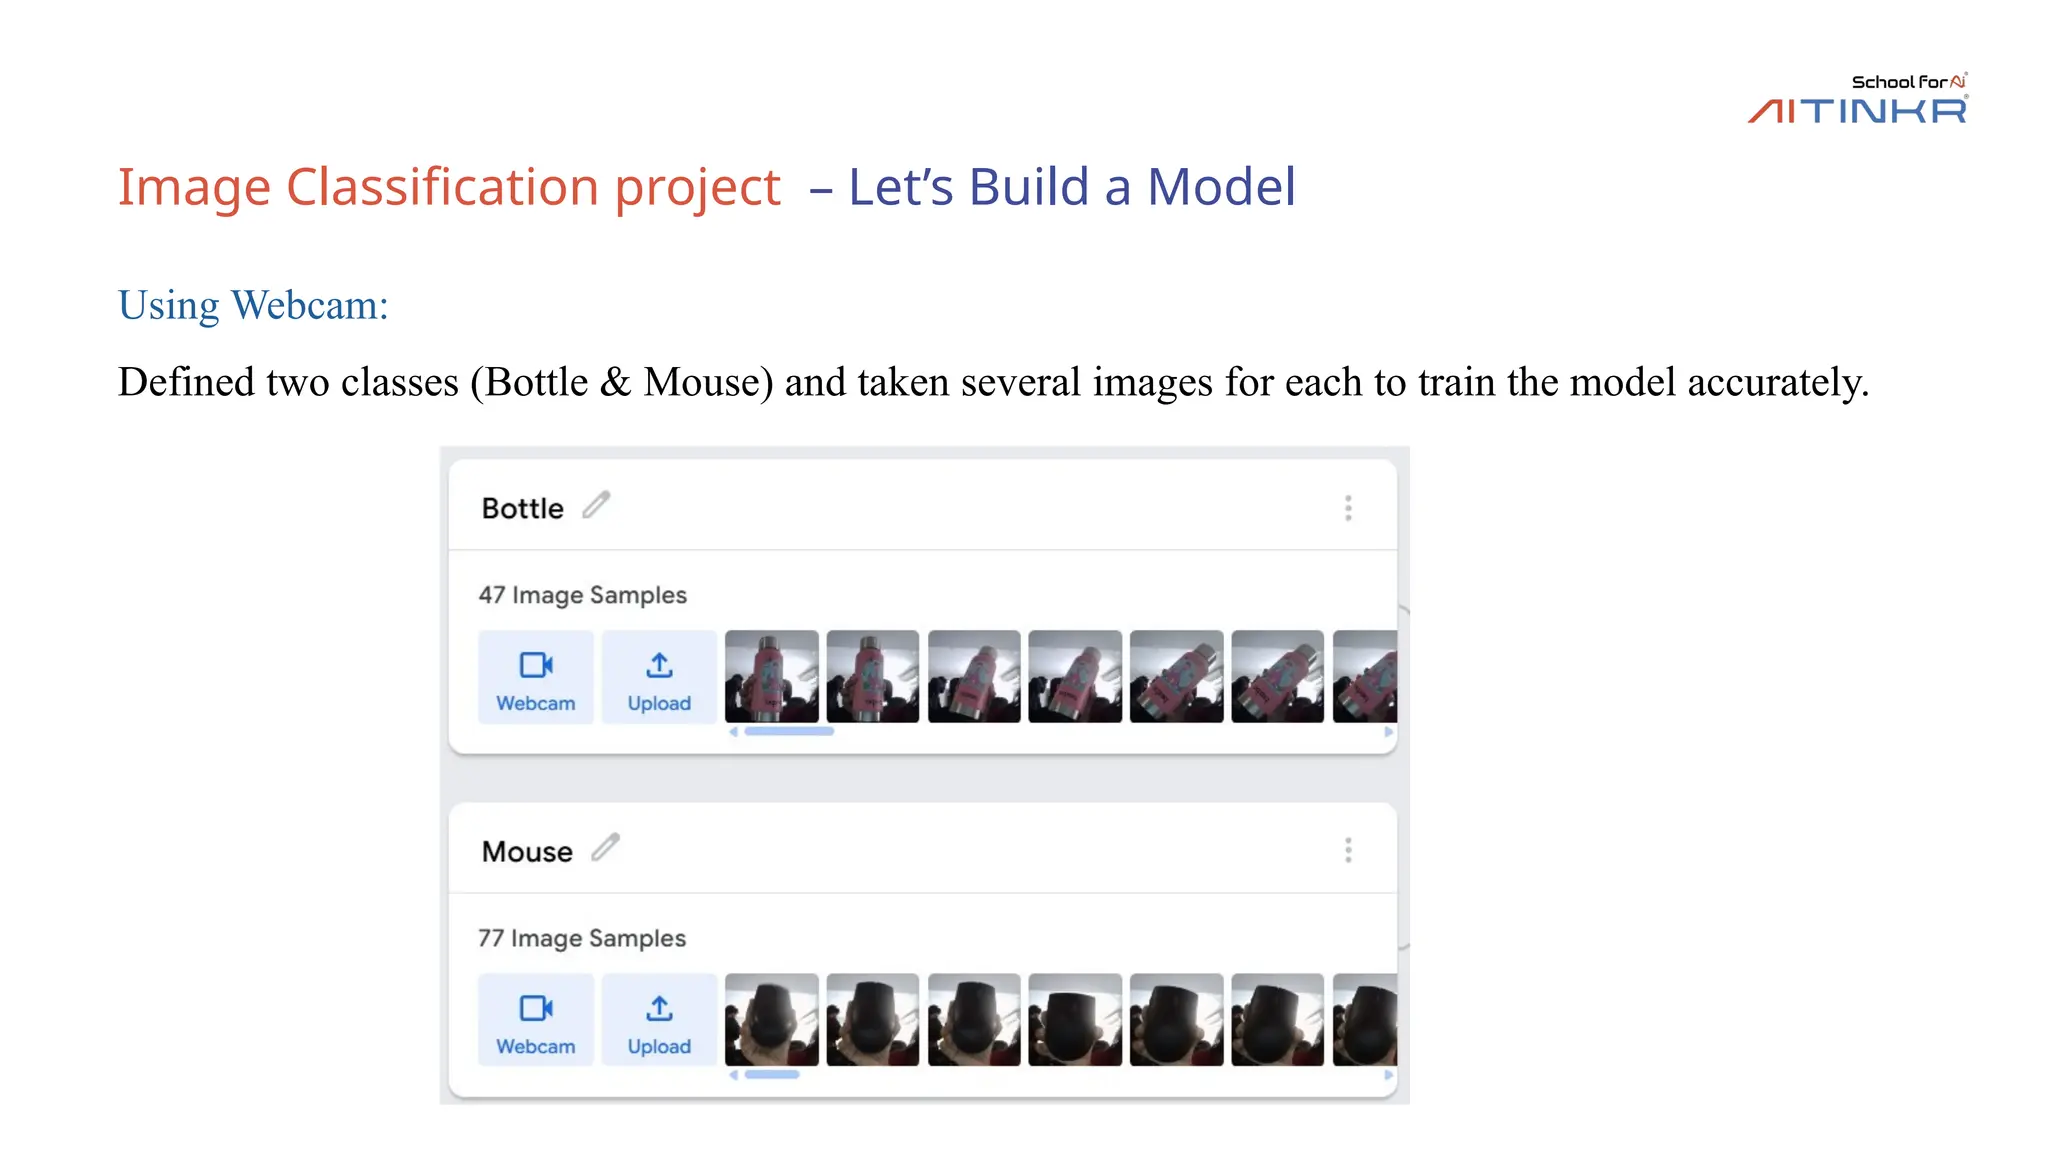
Image Classification project– Let’s Build a Model
Using Webcam:
Defined two classes (Bottle & Mouse) and taken several images for each to train the model accurately.
19.
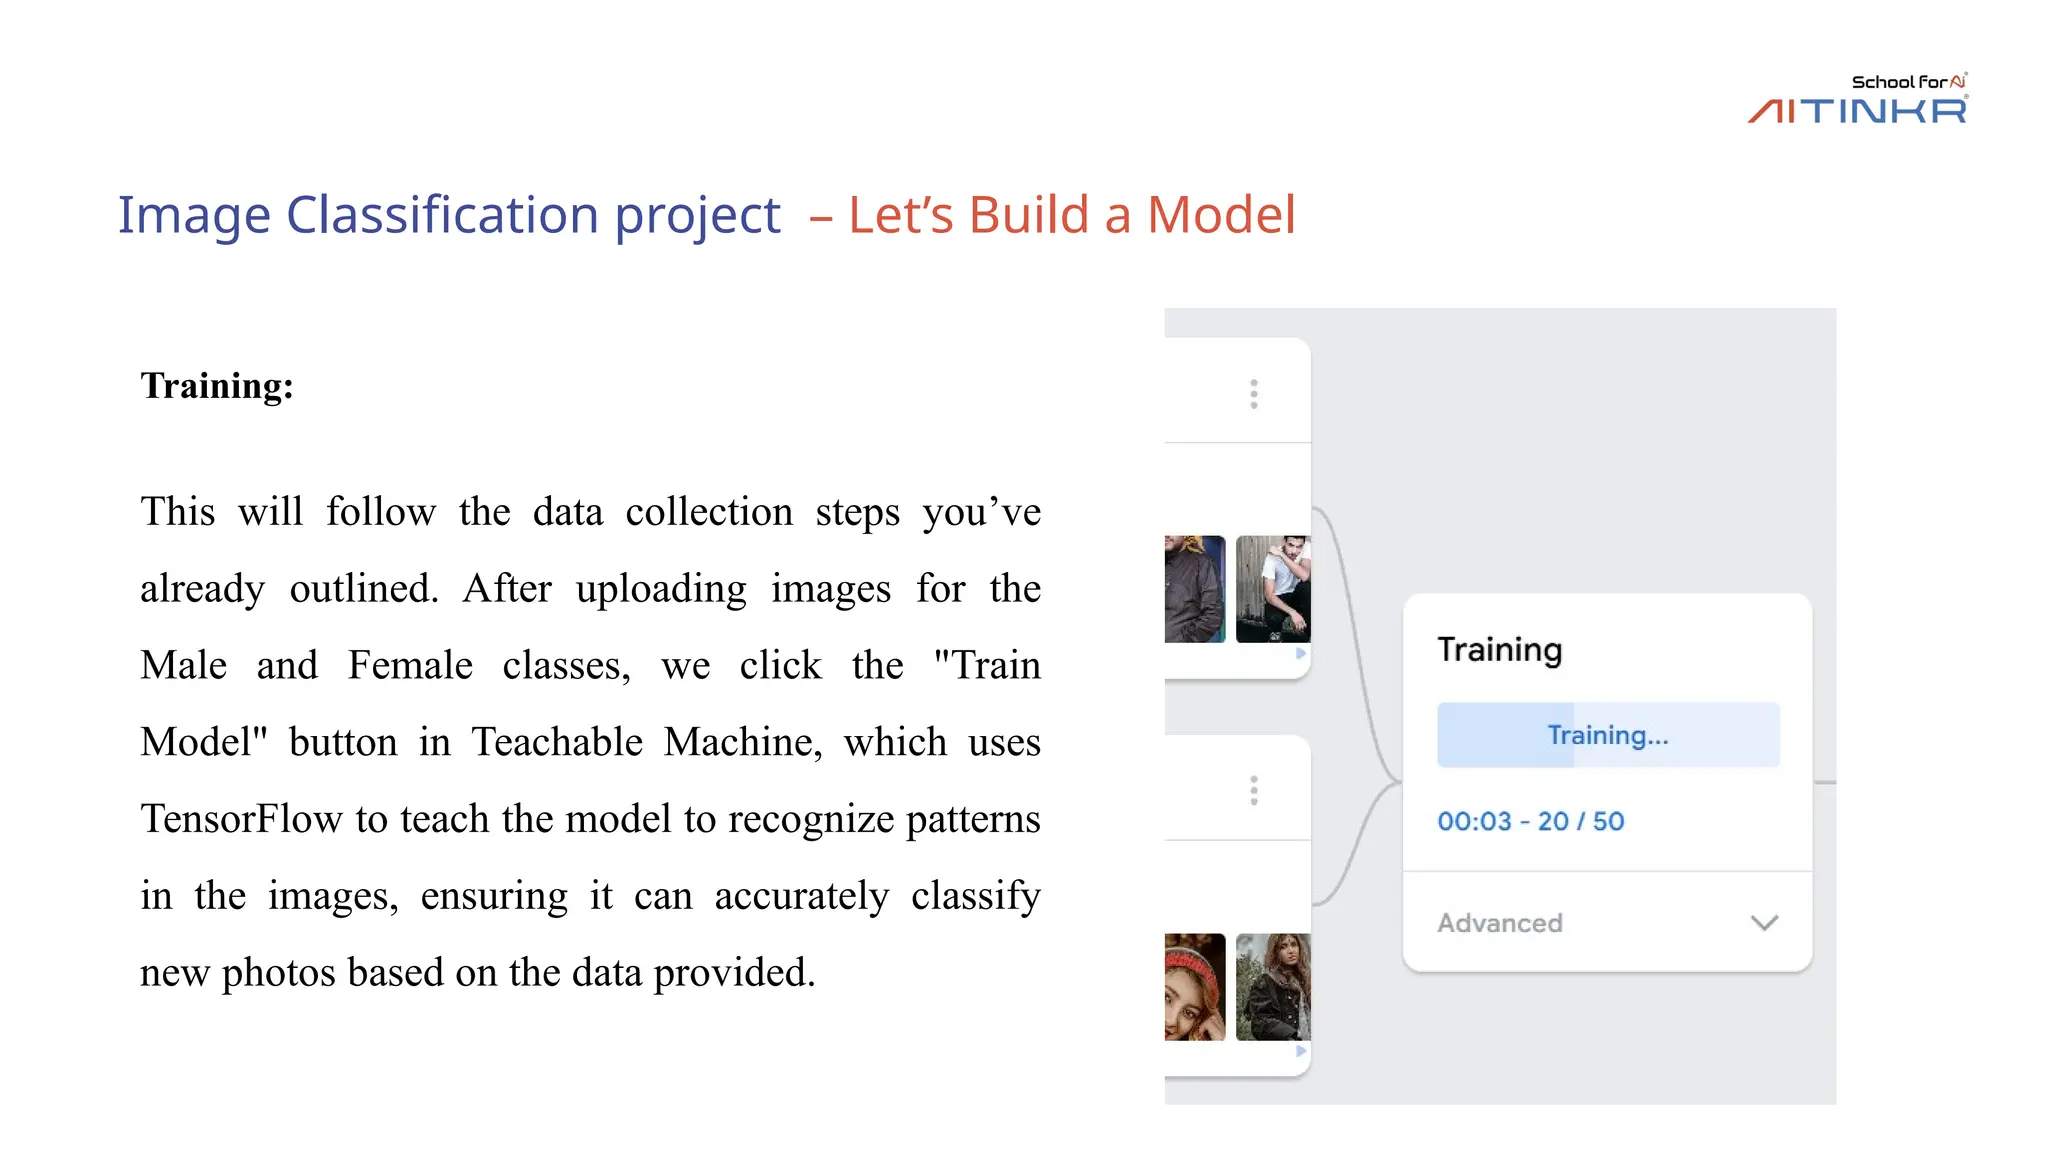
Image Classification project– Let’s Build a Model
Training:
This will follow the data collection steps you’ve
already outlined. After uploading images for the
Male and Female classes, we click the "Train
Model" button in Teachable Machine, which uses
TensorFlow to teach the model to recognize patterns
in the images, ensuring it can accurately classify
new photos based on the data provided.
20.
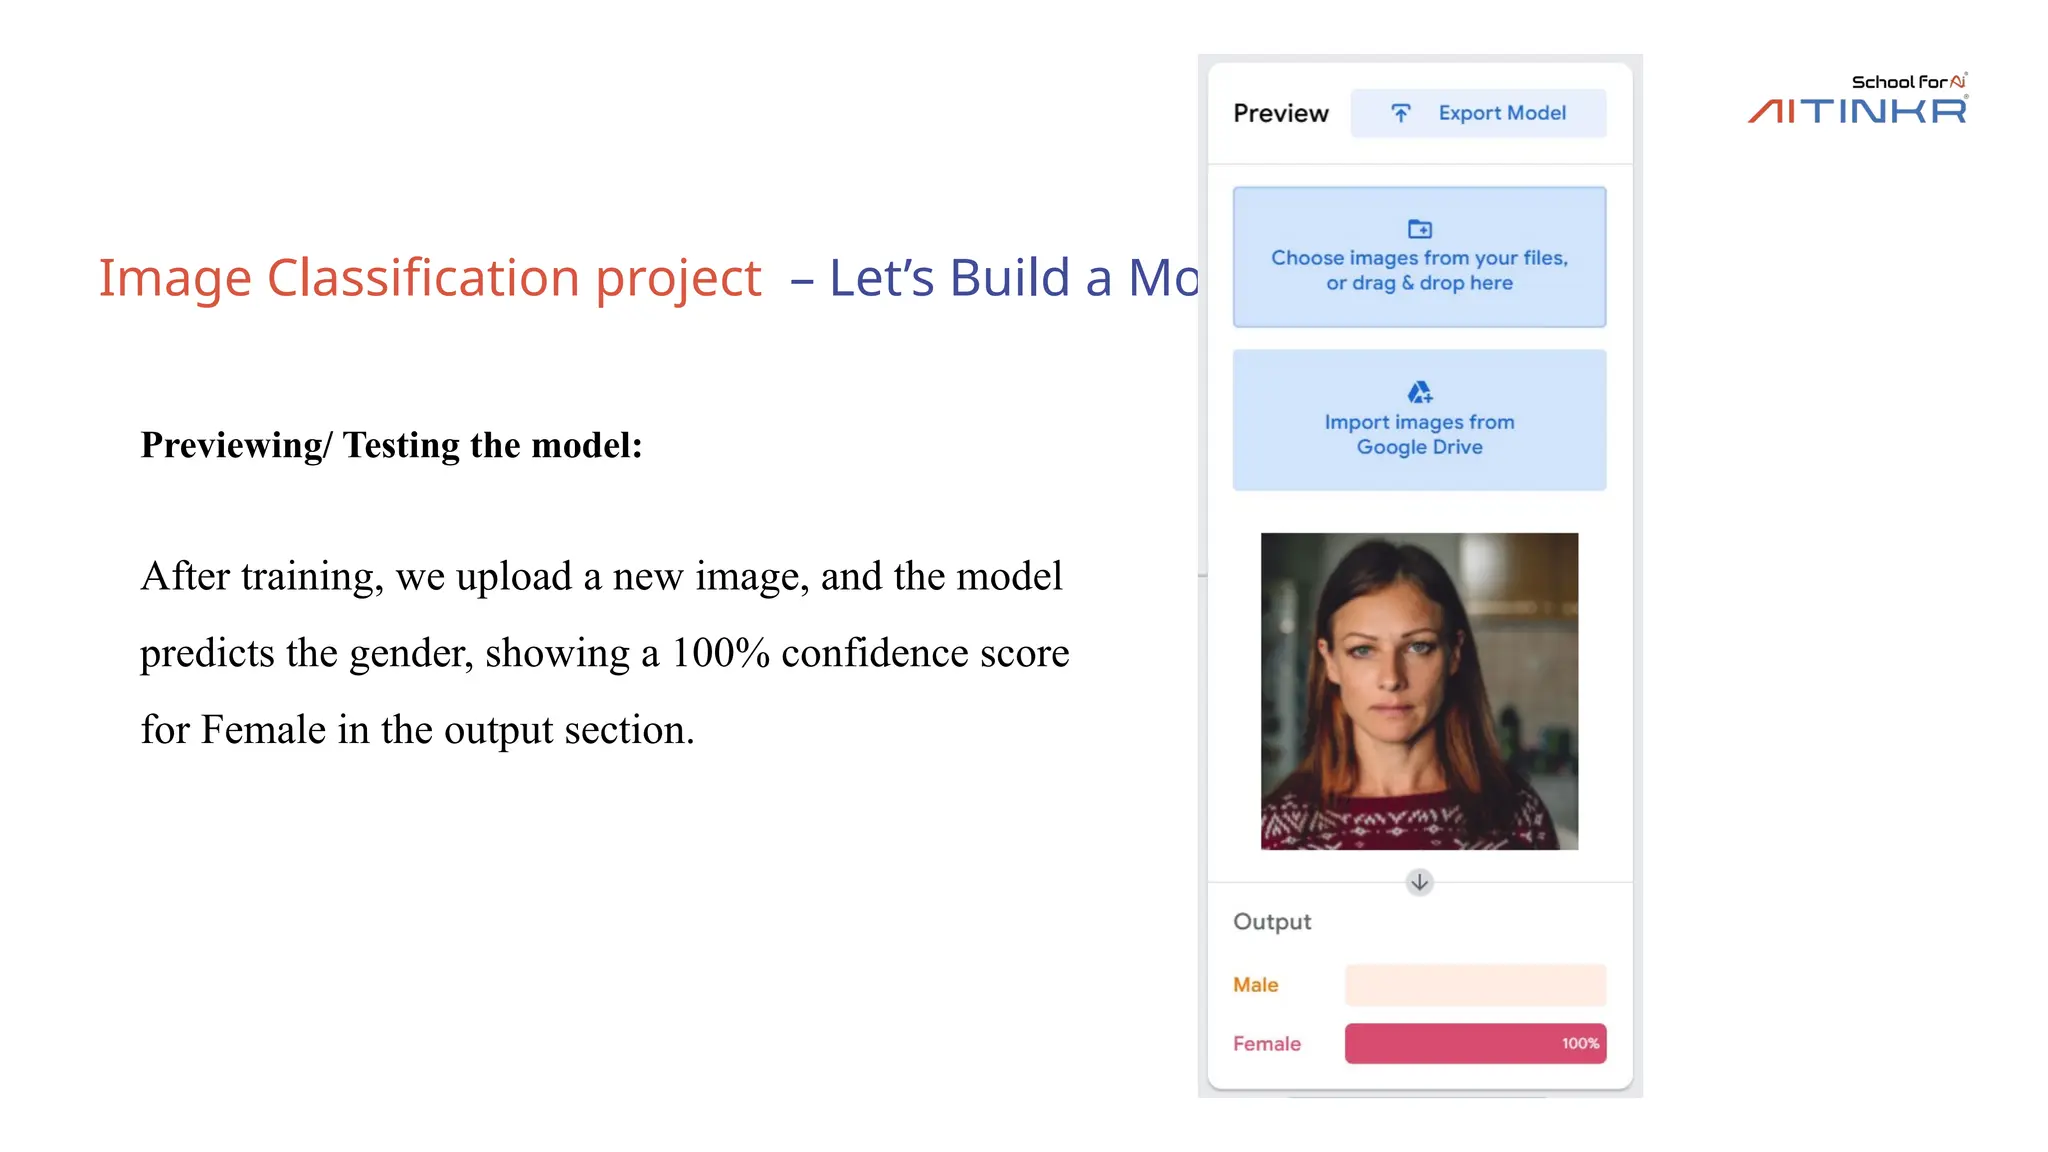
Image Classification project– Let’s Build a Model
Previewing/ Testing the model:
After training, we upload a new image, and the model
predicts the gender, showing a 100% confidence score
for Female in the output section.
21.
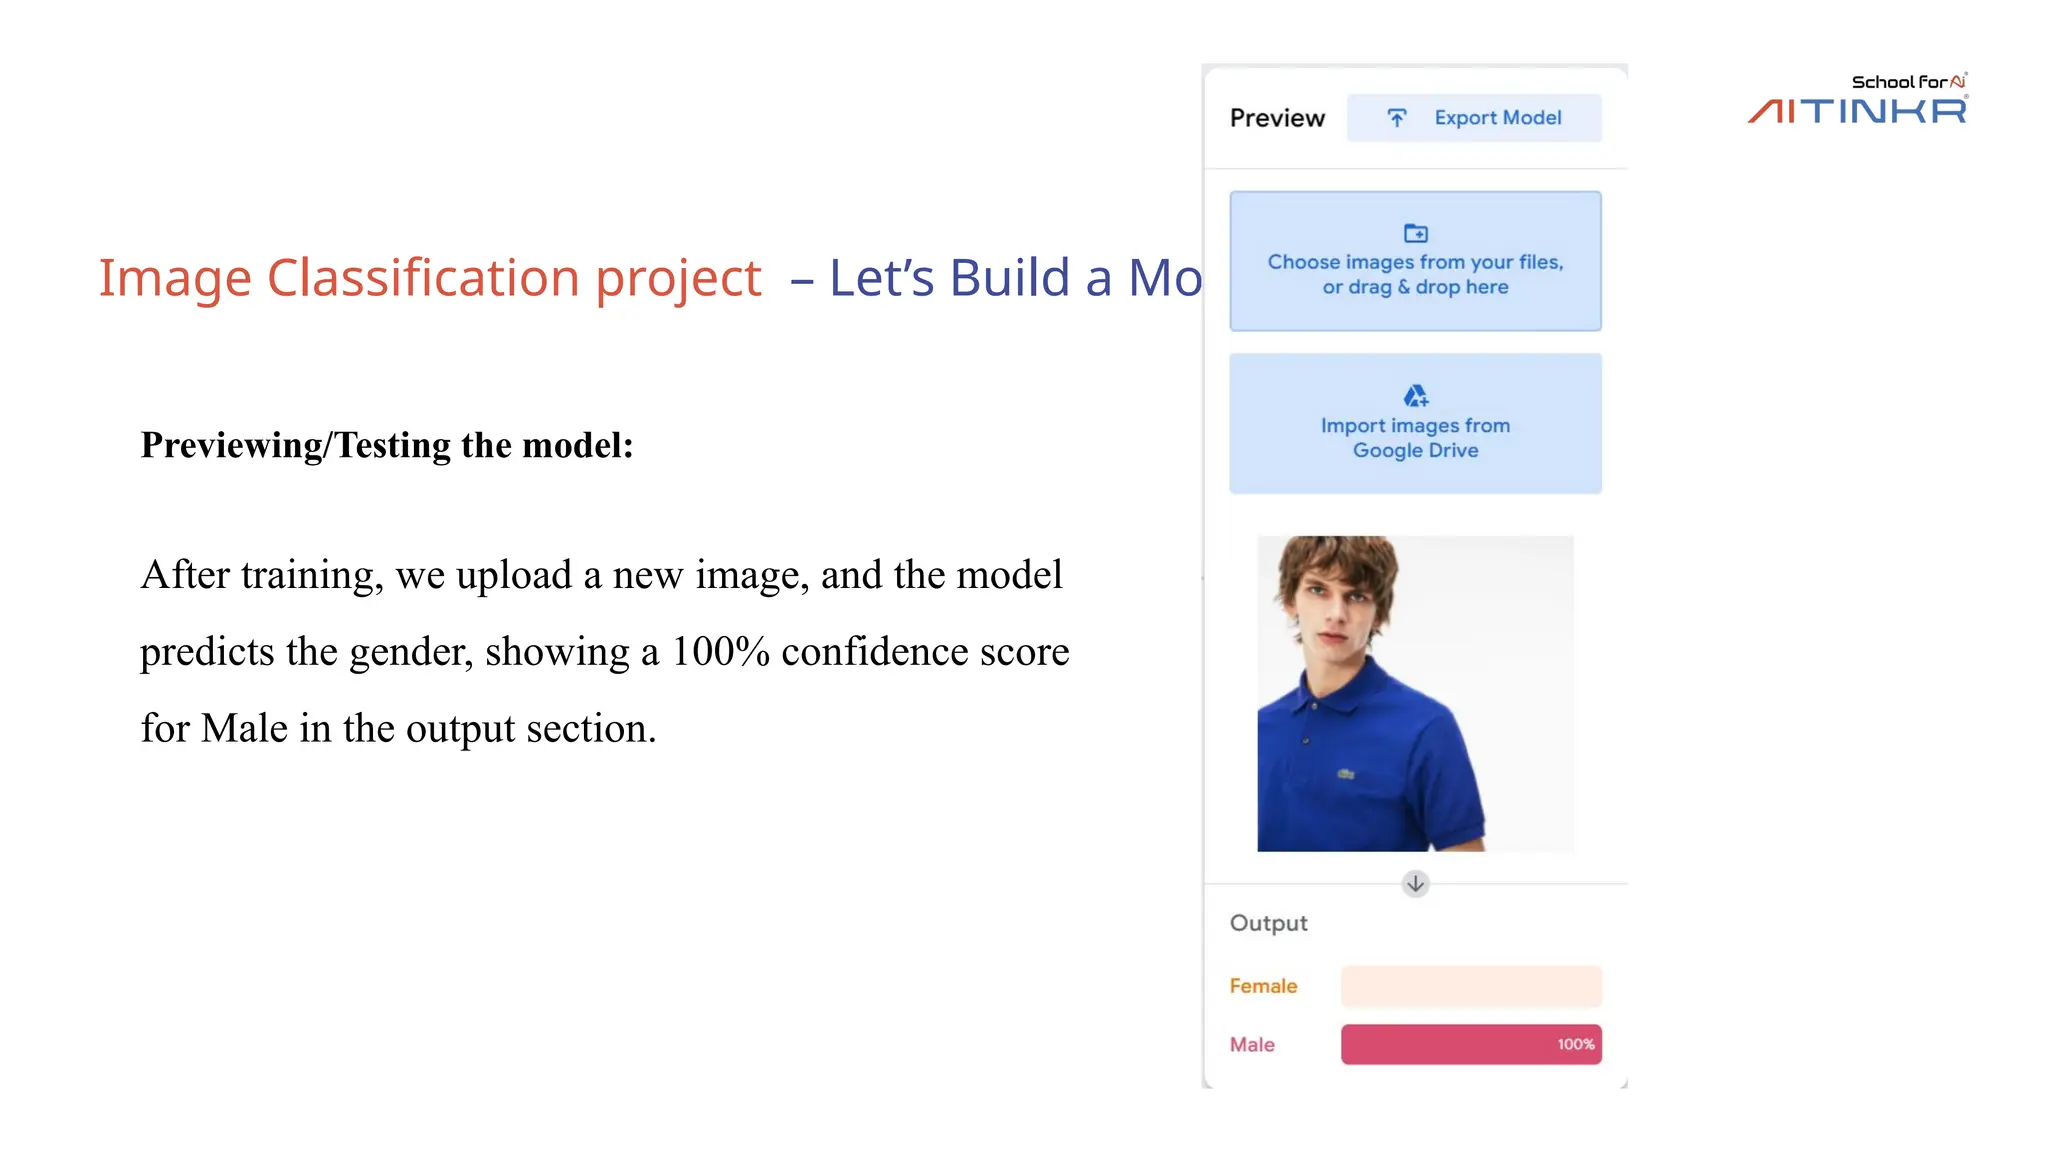
Image Classification project– Let’s Build a Model
Previewing/Testing the model:
After training, we upload a new image, and the model
predicts the gender, showing a 100% confidence score
for Male in the output section.
22.
Image Classification project– Let’s Build a Model
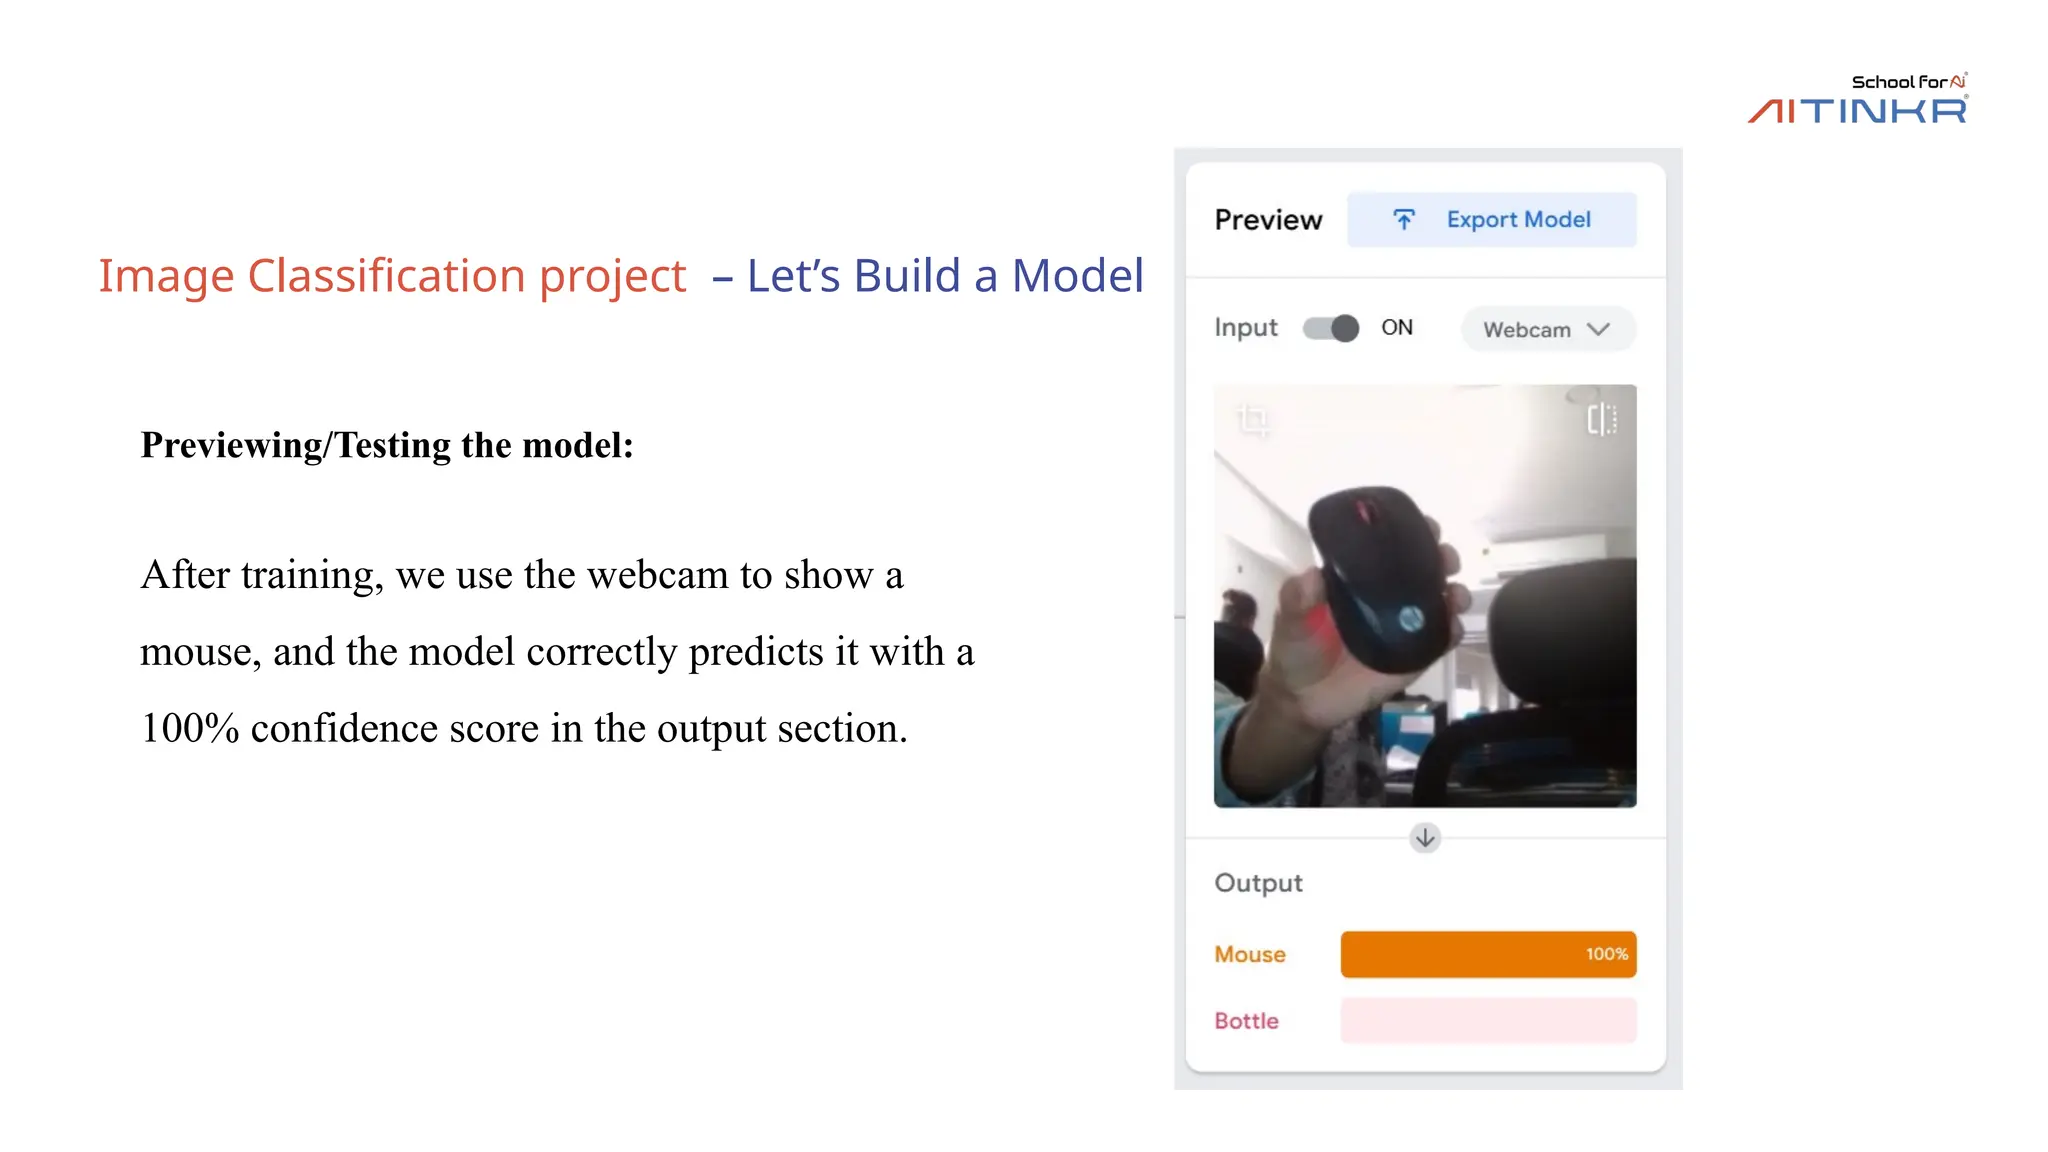
Previewing/Testing the model:
After training, we use the webcam to show a
mouse, and the model correctly predicts it with a
100% confidence score in the output section.
23.
Image Classification project– Let’s Build a Model
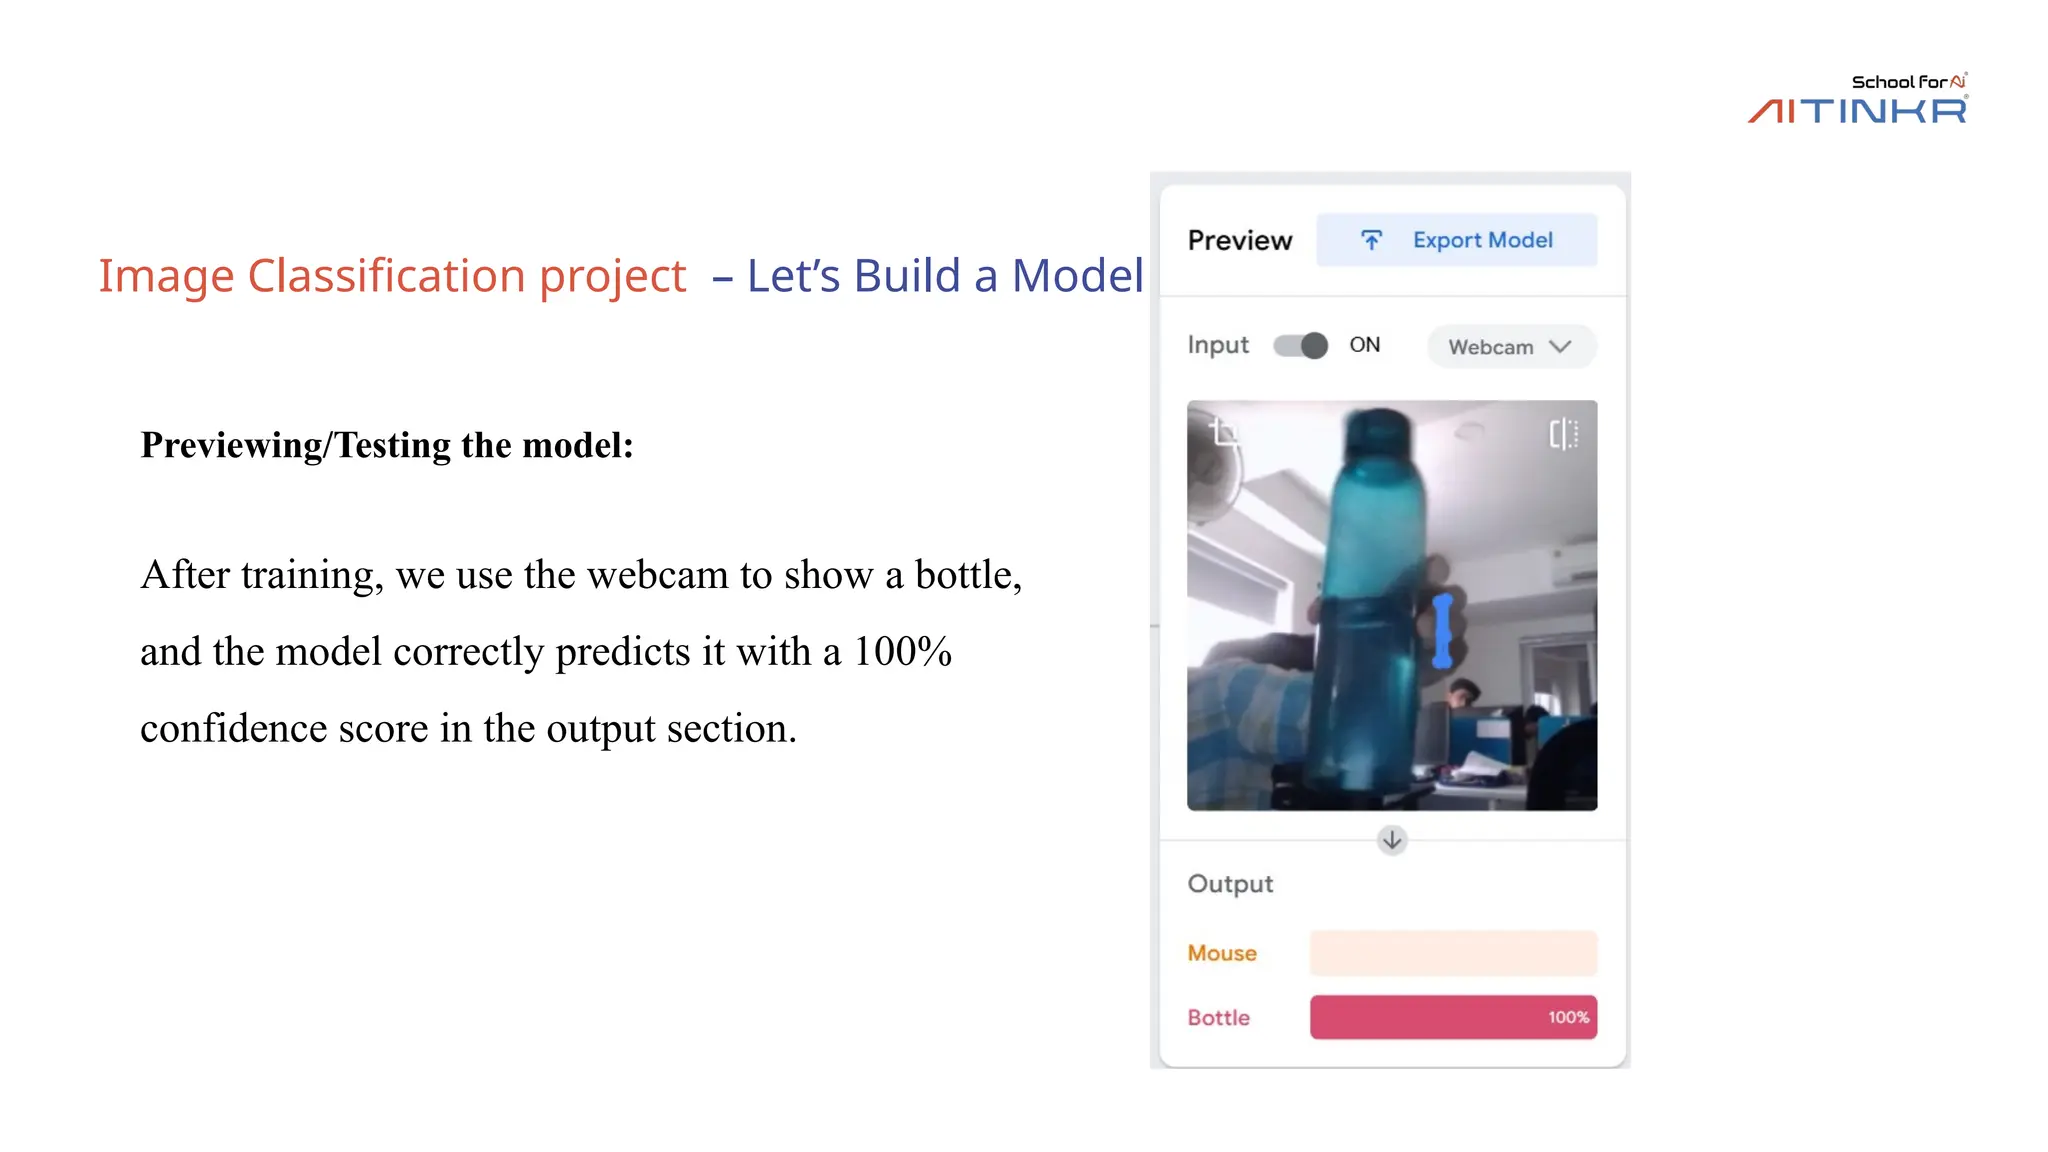
Previewing/Testing the model:
After training, we use the webcam to show a bottle,
and the model correctly predicts it with a 100%
confidence score in the output section.
24.
Pose Detection Project
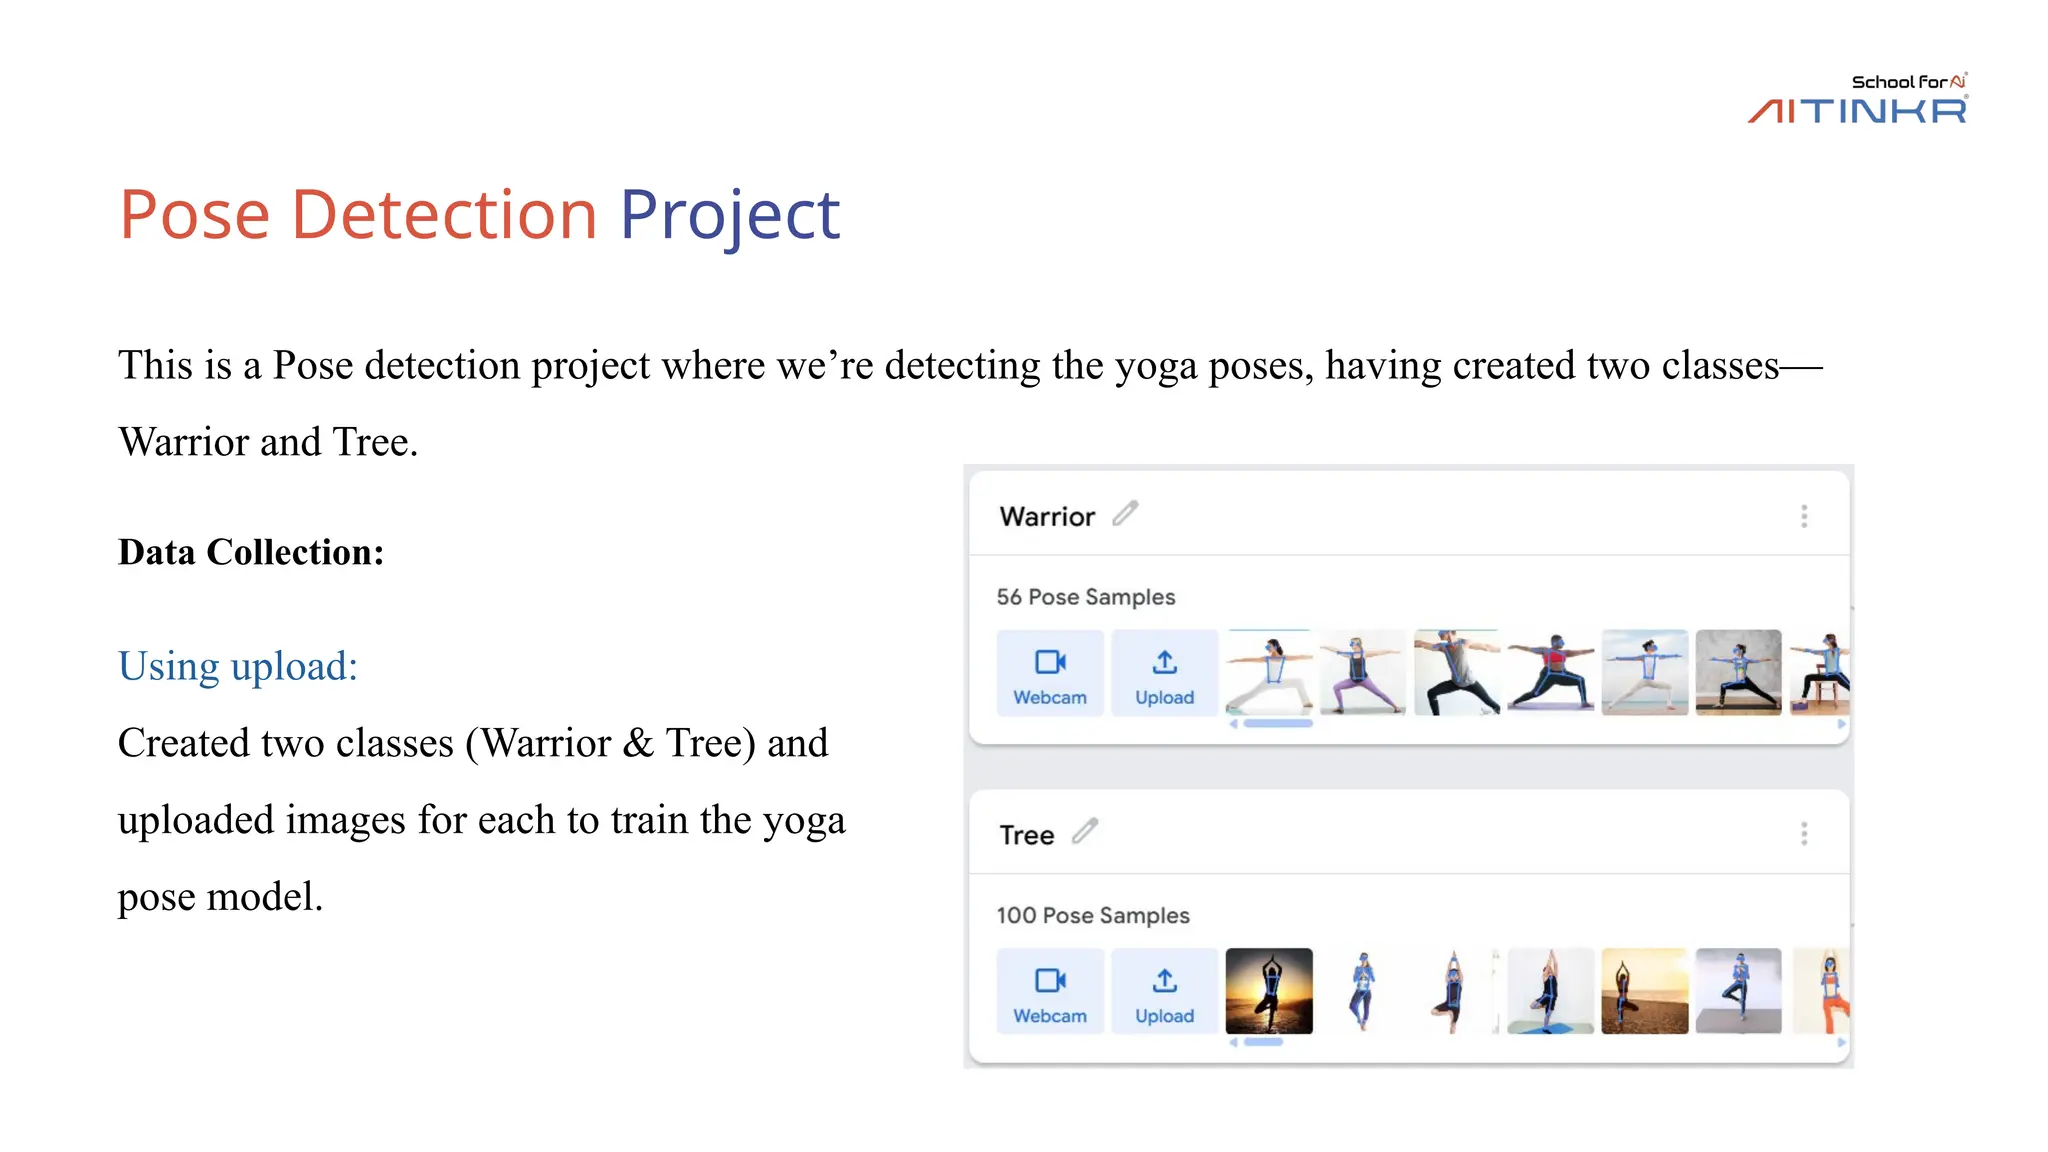
DataCollection:
This is a Pose detection project where we’re detecting the yoga poses, having created two classes—
Warrior and Tree.
Using upload:
Created two classes (Warrior & Tree) and
uploaded images for each to train the yoga
pose model.
25.
Pose Detection Project
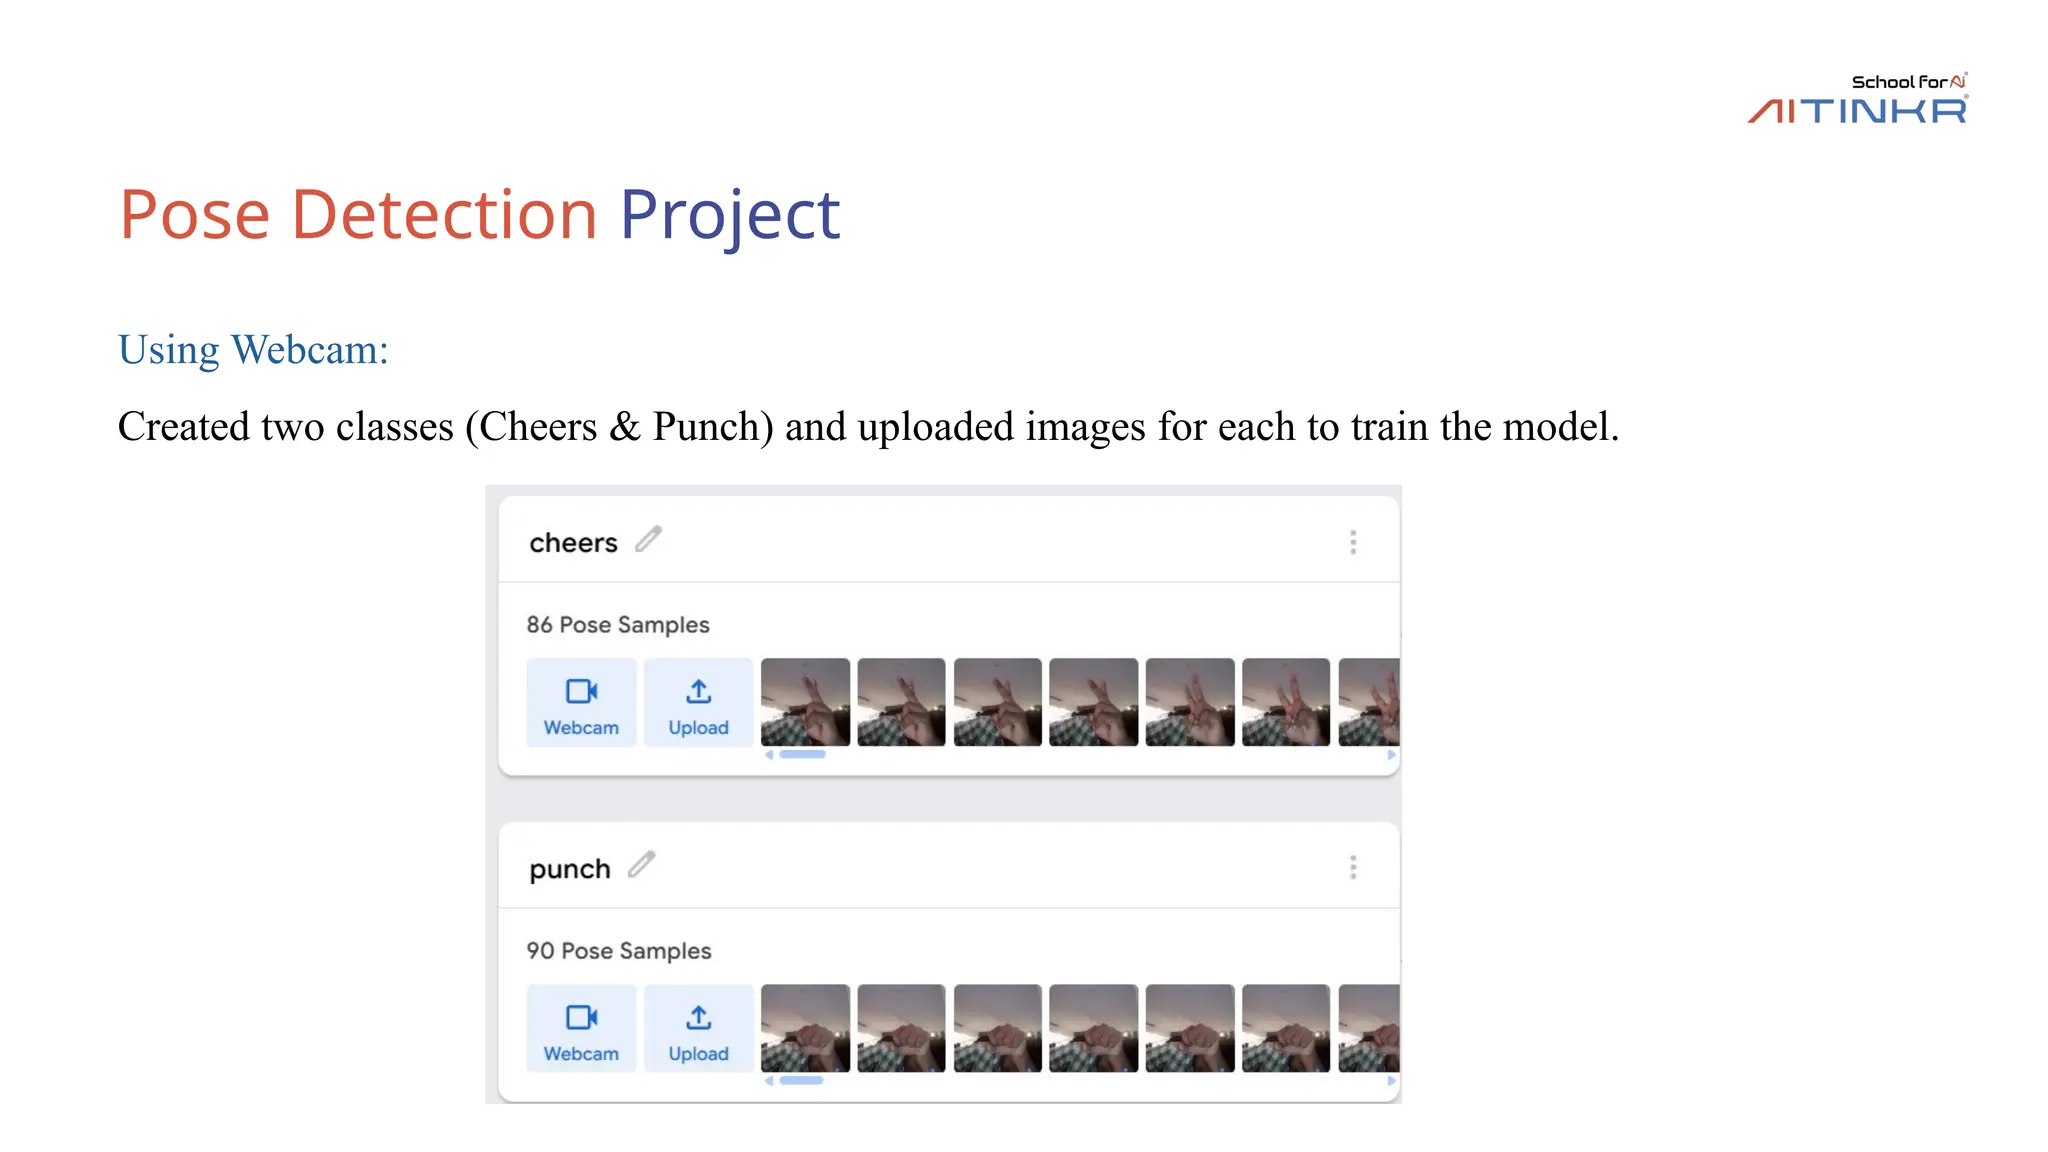
UsingWebcam:
Created two classes (Cheers & Punch) and uploaded images for each to train the model.
26.
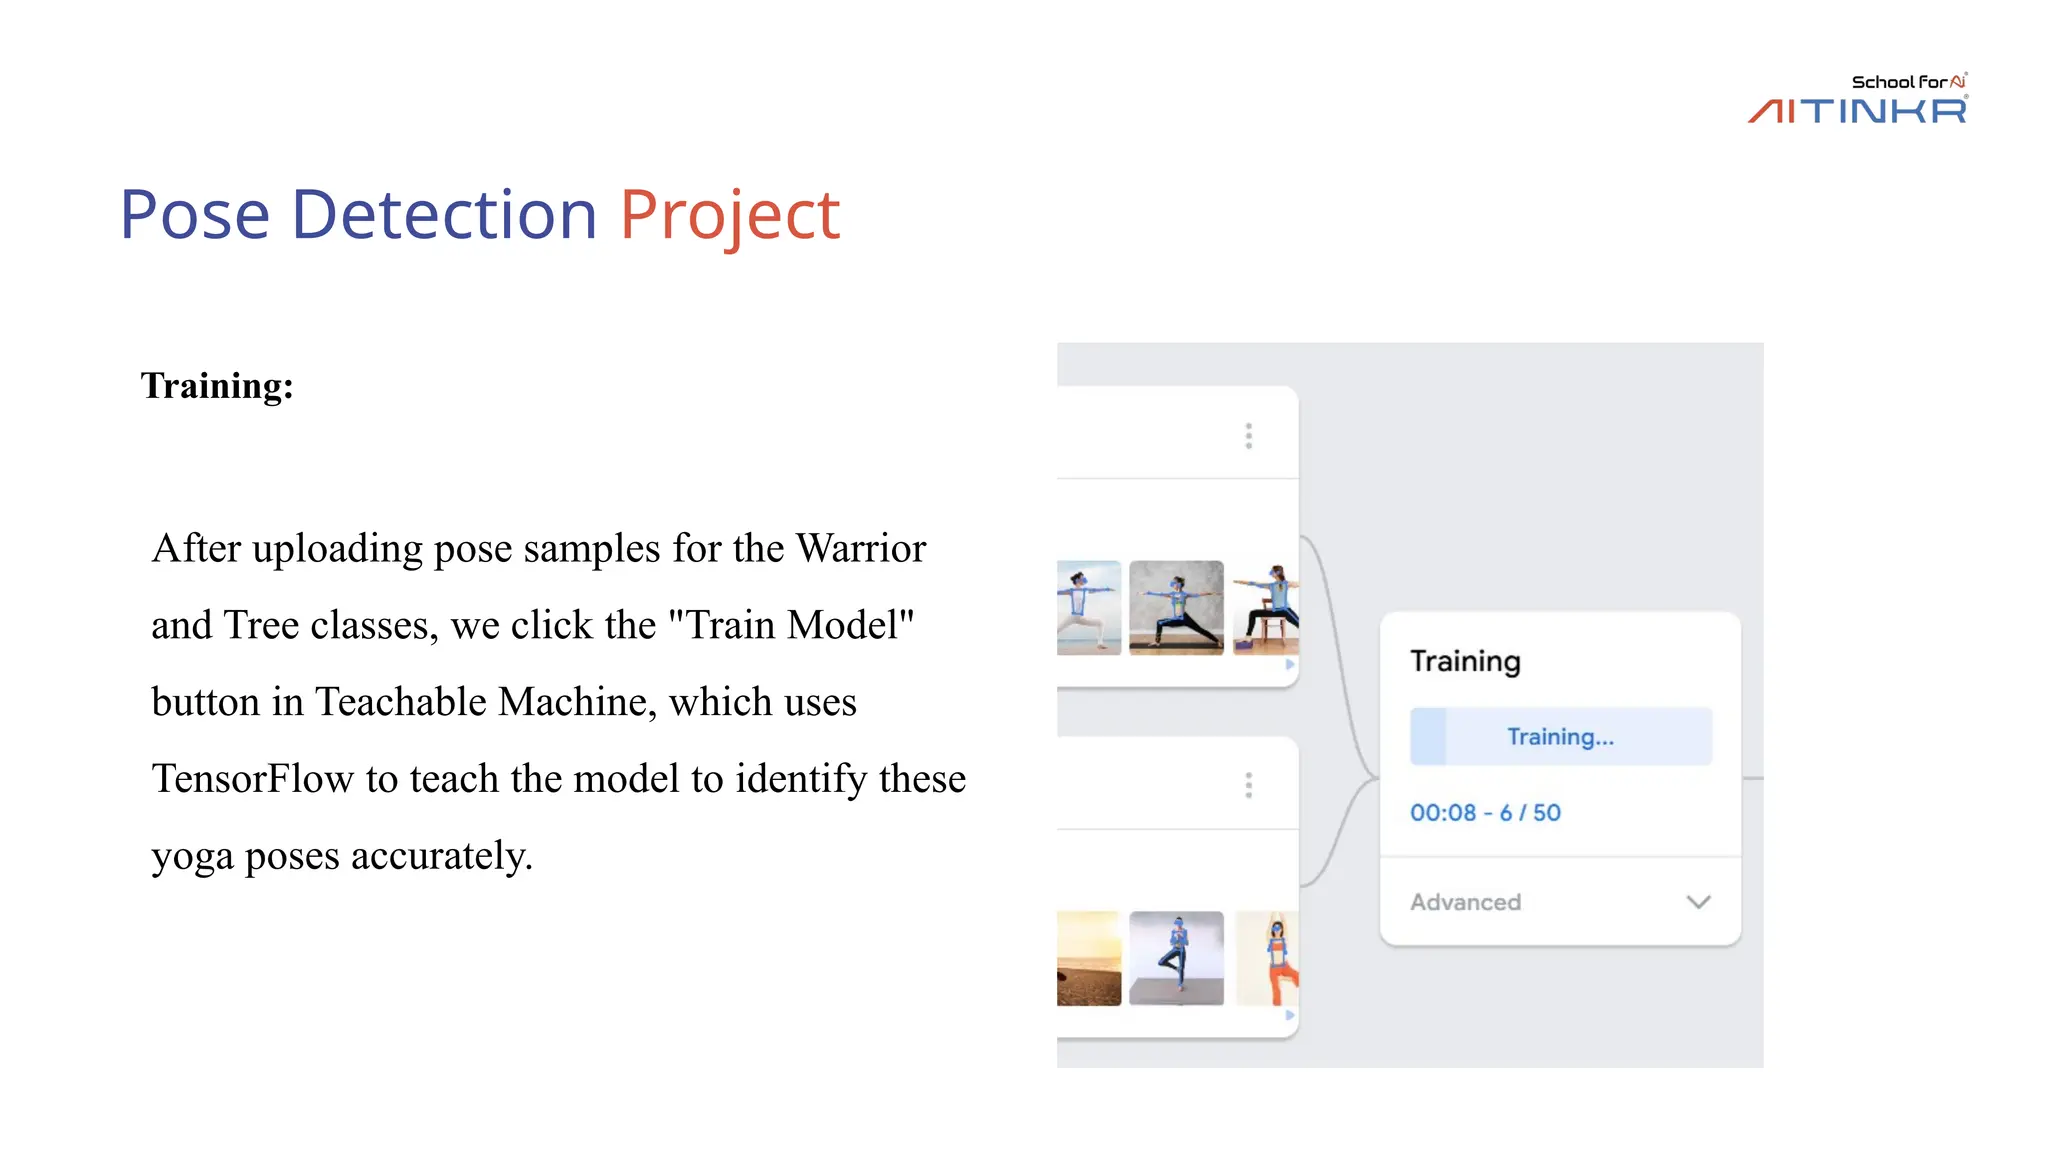
Pose Detection Project
Training:
Afteruploading pose samples for the Warrior
and Tree classes, we click the "Train Model"
button in Teachable Machine, which uses
TensorFlow to teach the model to identify these
yoga poses accurately.
27.
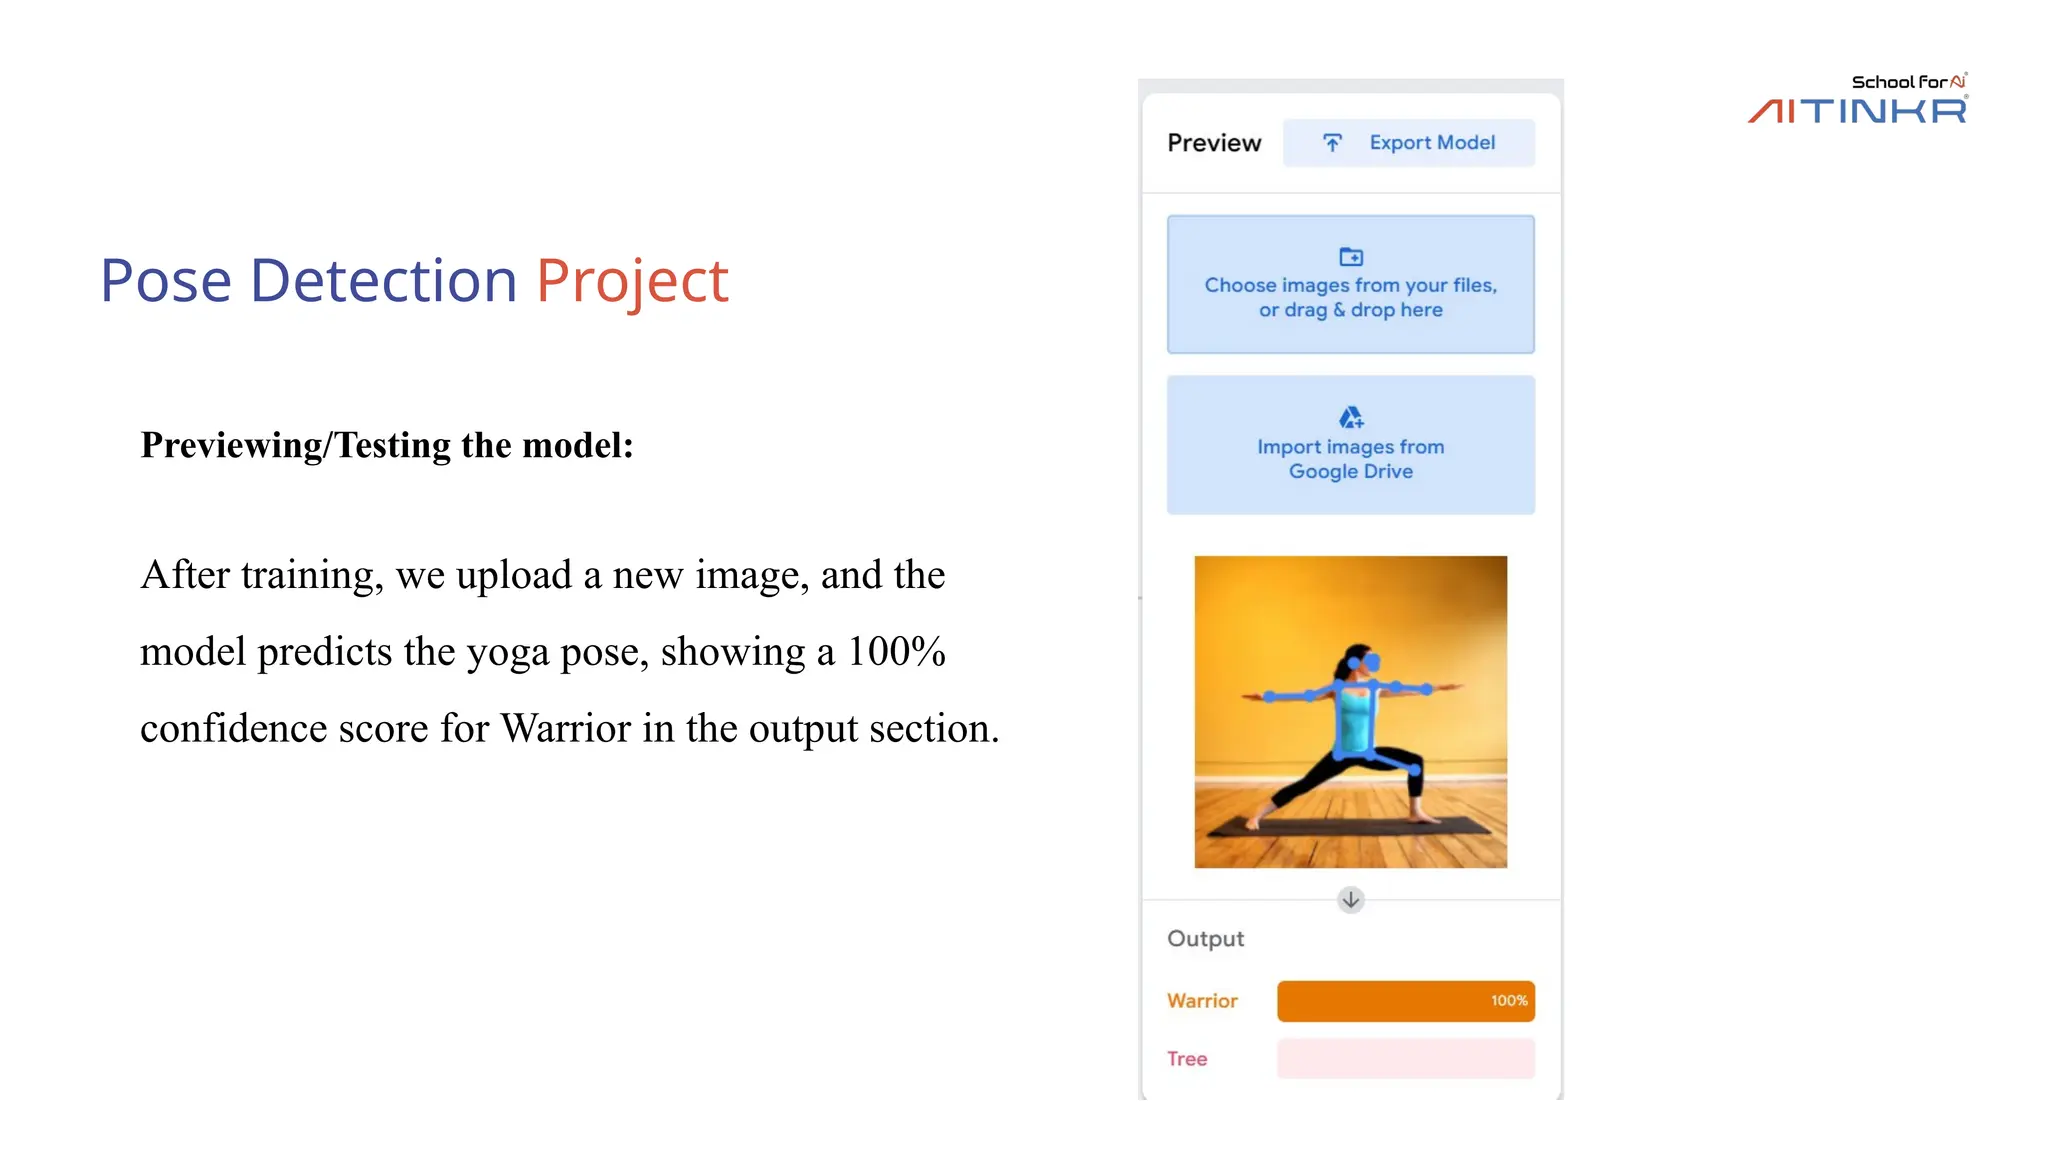
Pose Detection Project
Previewing/Testingthe model:
After training, we upload a new image, and the
model predicts the yoga pose, showing a 100%
confidence score for Warrior in the output section.
28.
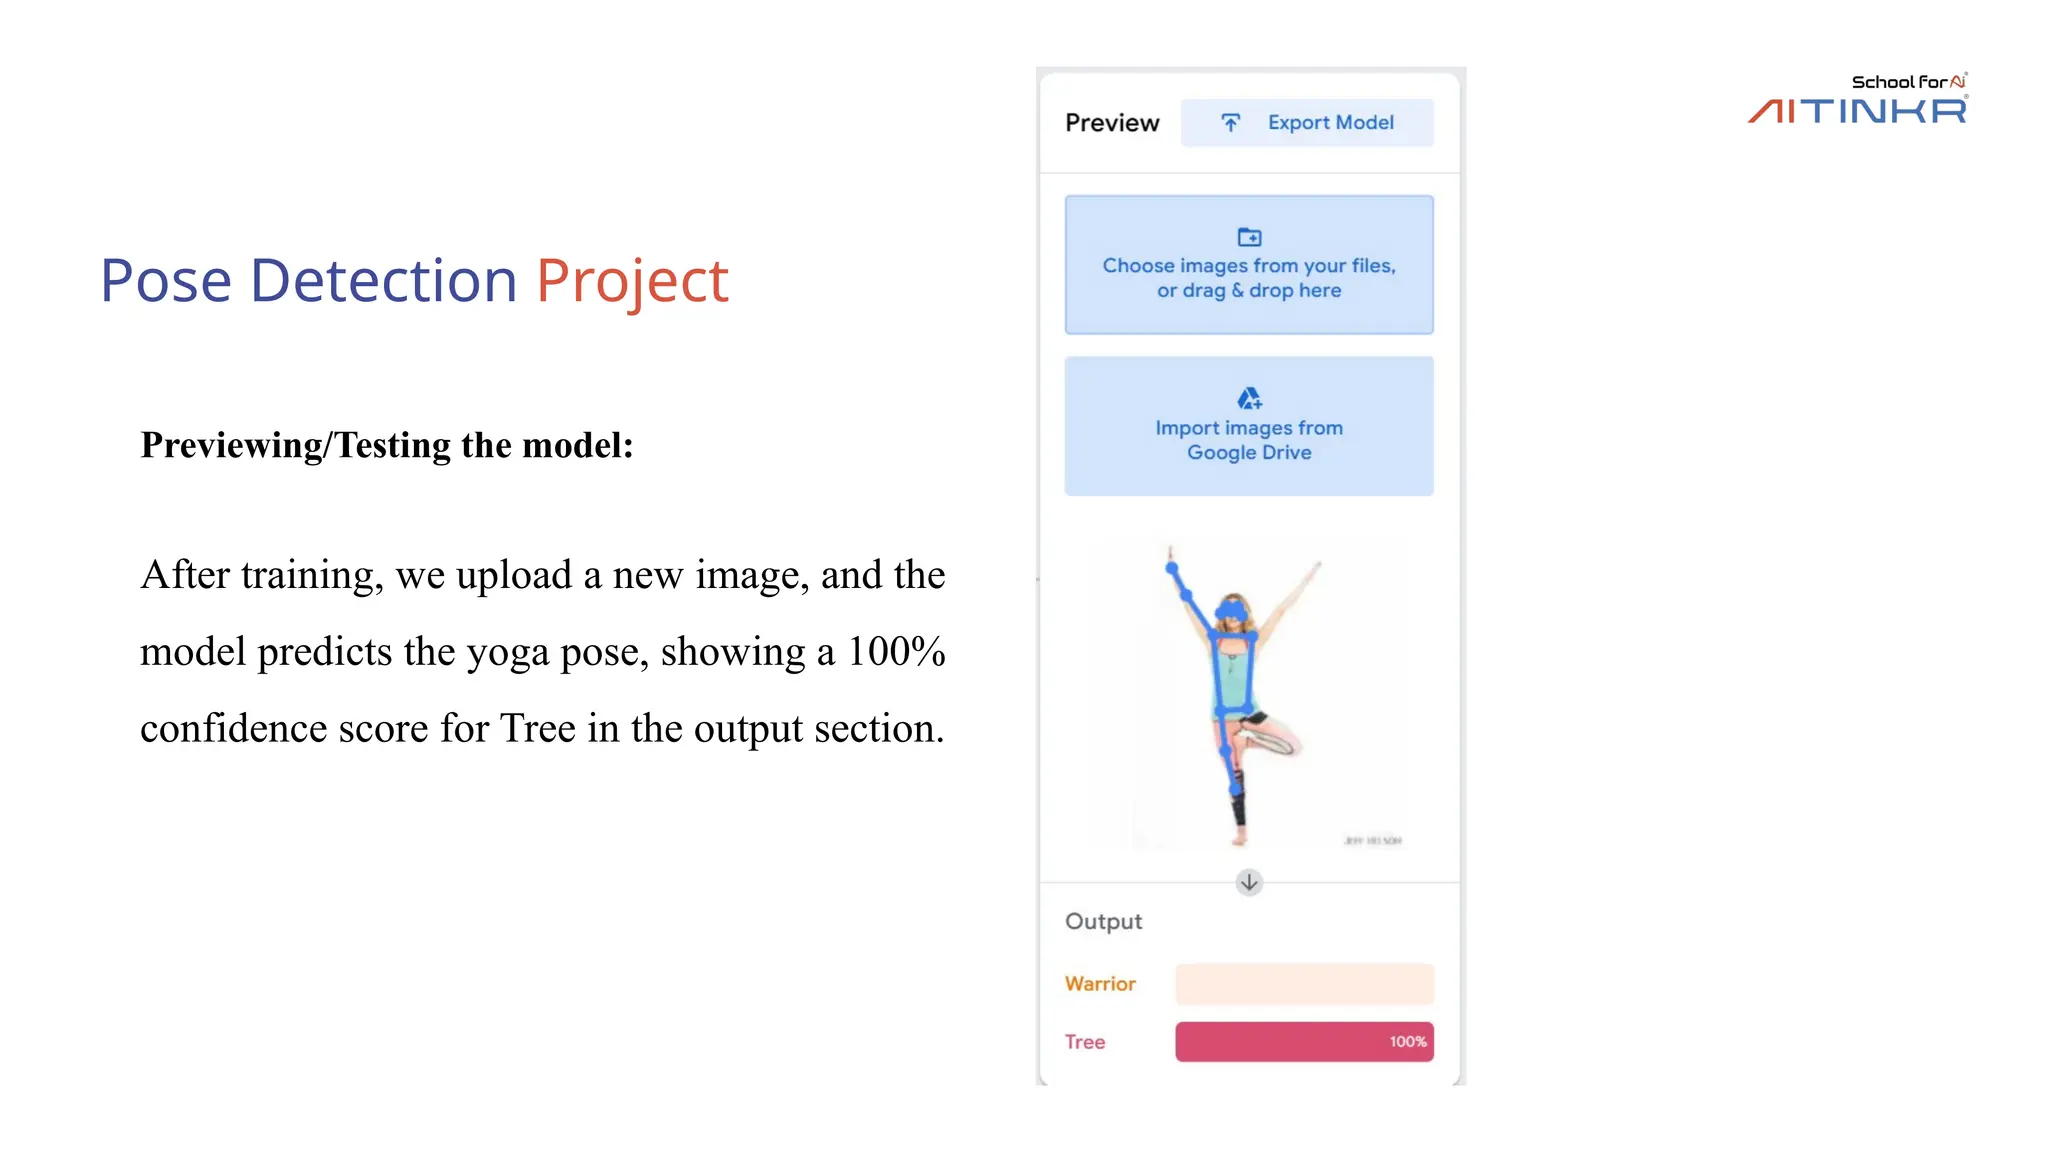
Pose Detection Project
Previewing/Testingthe model:
After training, we upload a new image, and the
model predicts the yoga pose, showing a 100%
confidence score for Tree in the output section.
29.
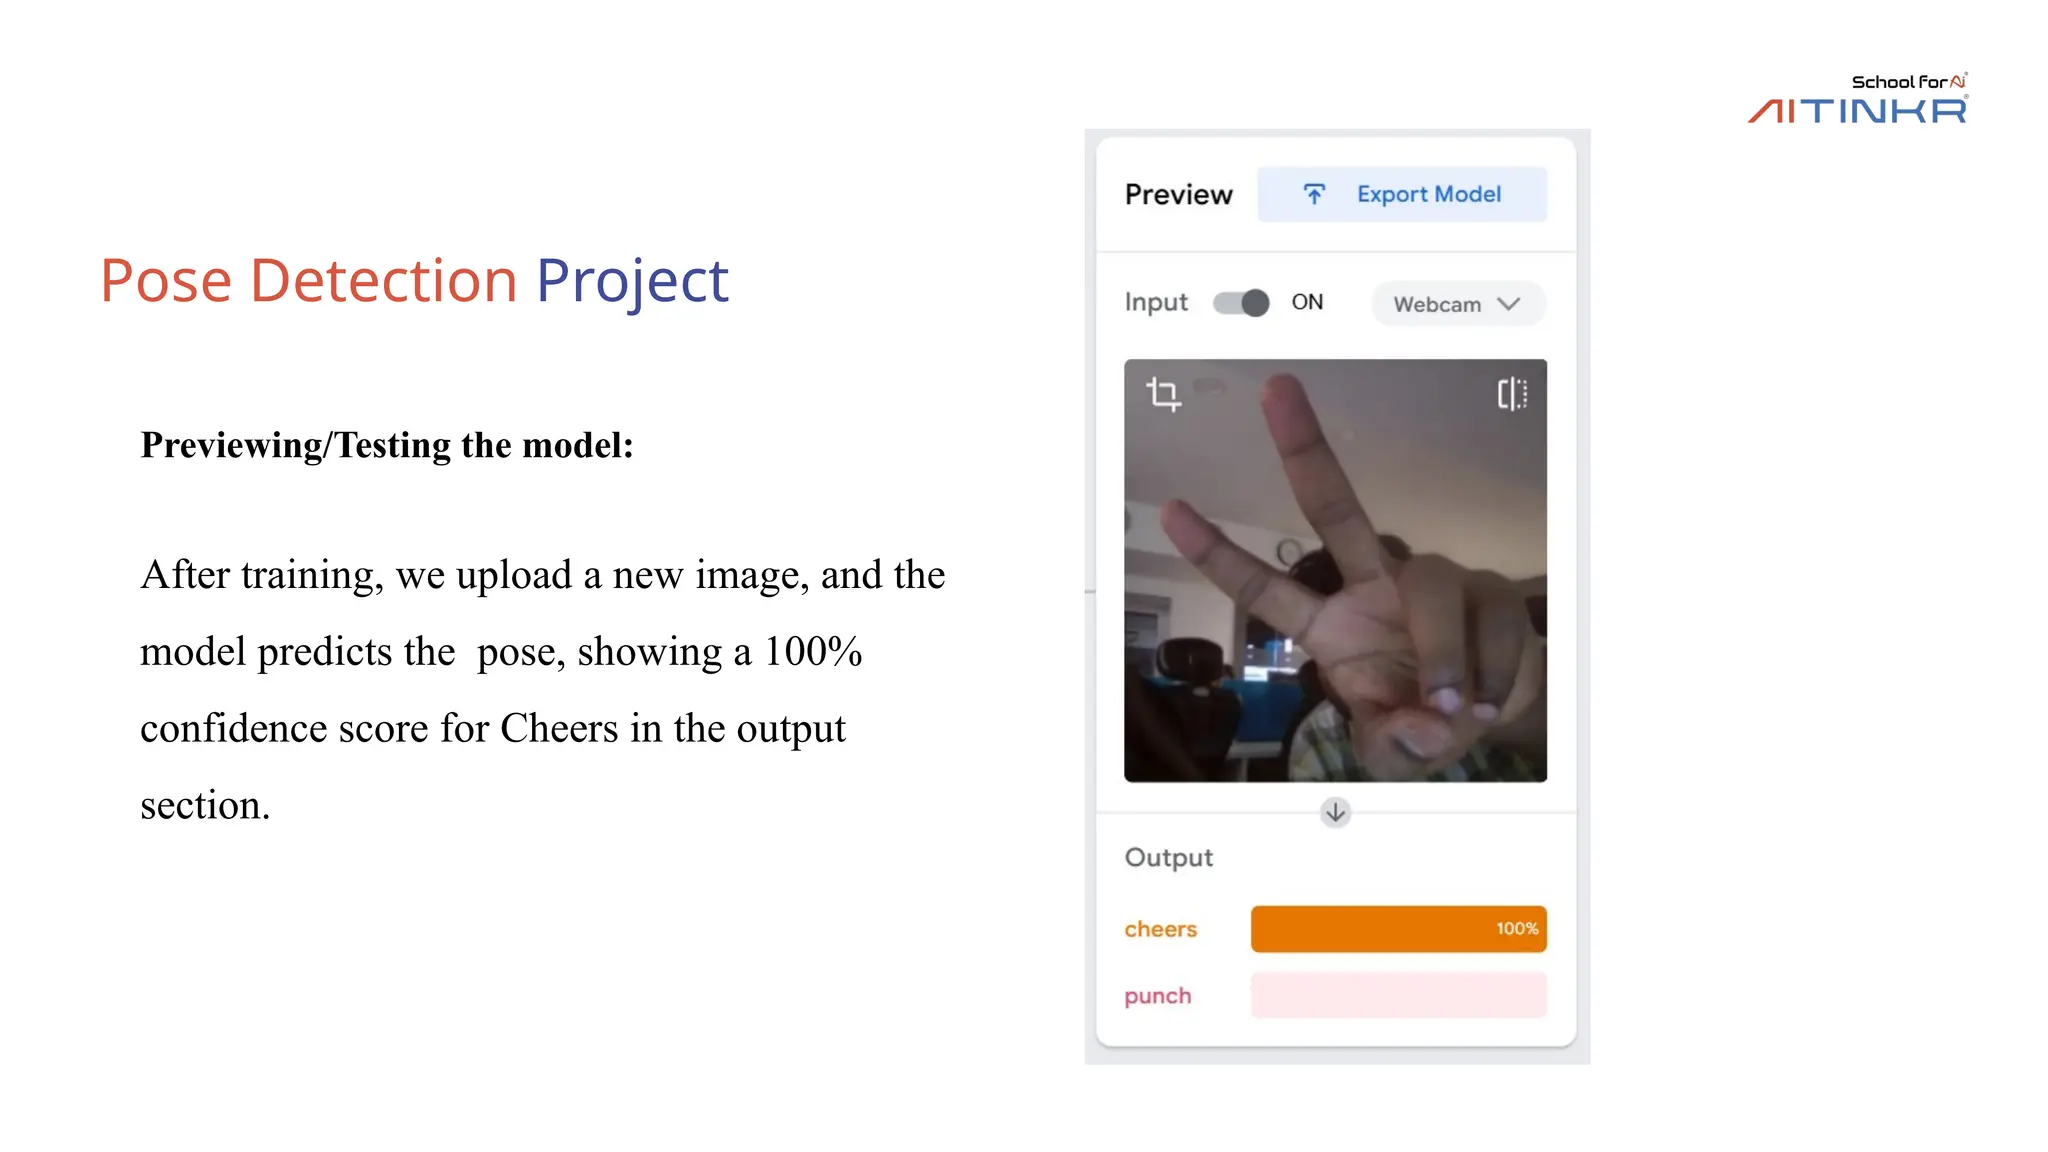
Pose Detection Project
Previewing/Testingthe model:
After training, we upload a new image, and the
model predicts the pose, showing a 100%
confidence score for Cheers in the output
section.
30.
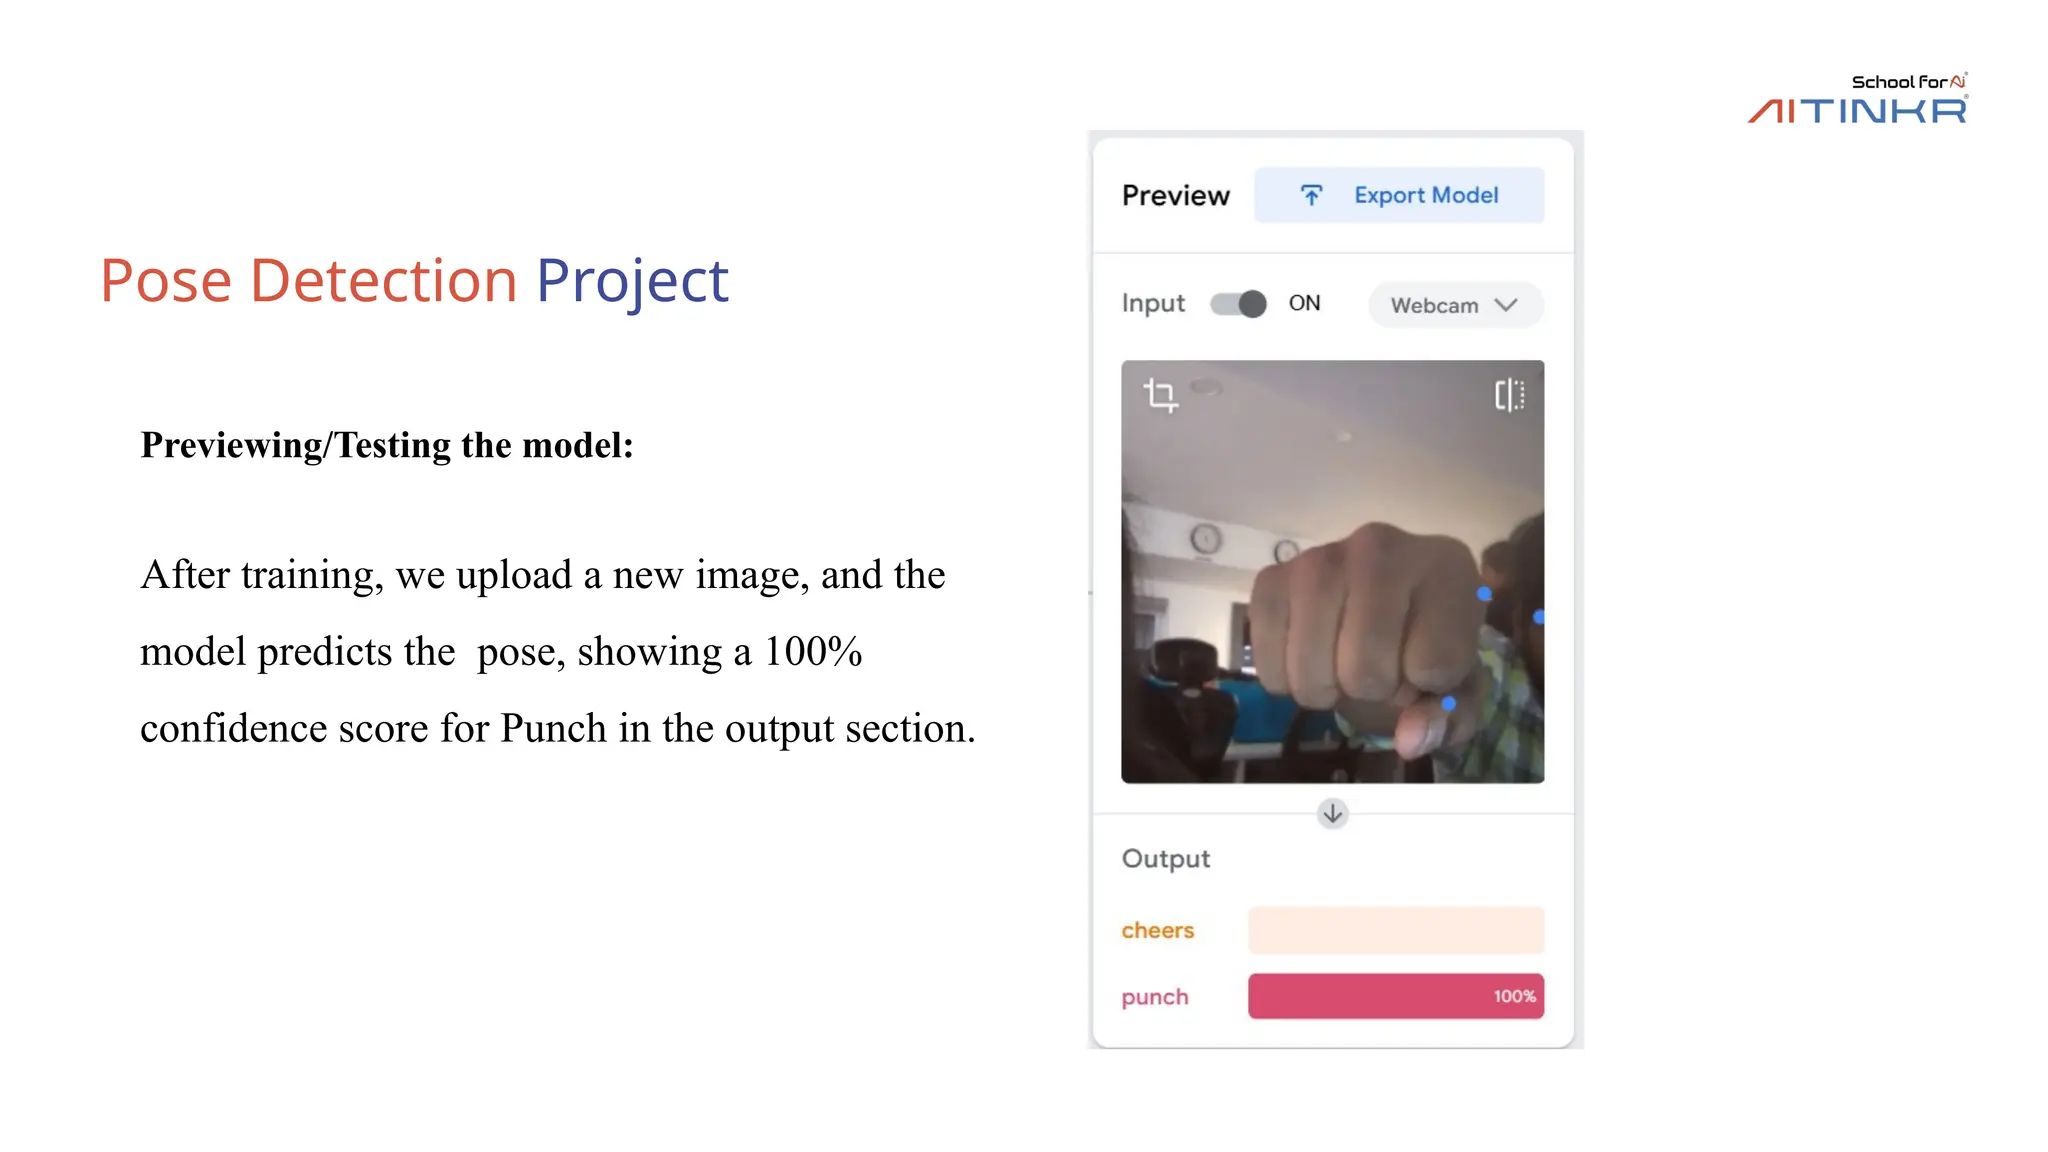
Pose Detection Project
Previewing/Testingthe model:
After training, we upload a new image, and the
model predicts the pose, showing a 100%
confidence score for Punch in the output section.
31.
Audio project demo
DataCollection:
First, we defined three classes,
Background Noise, Cat, and Dog, to
categorize the audio, then recorded
multiple sound samples for each class
using the webcam’s microphone to
improve the model’s accuracy.
This is an audio classification project where we’re identifying sounds, having created
three classes—Background Noise, Cat, and Dog—by recording audio for each.
32.
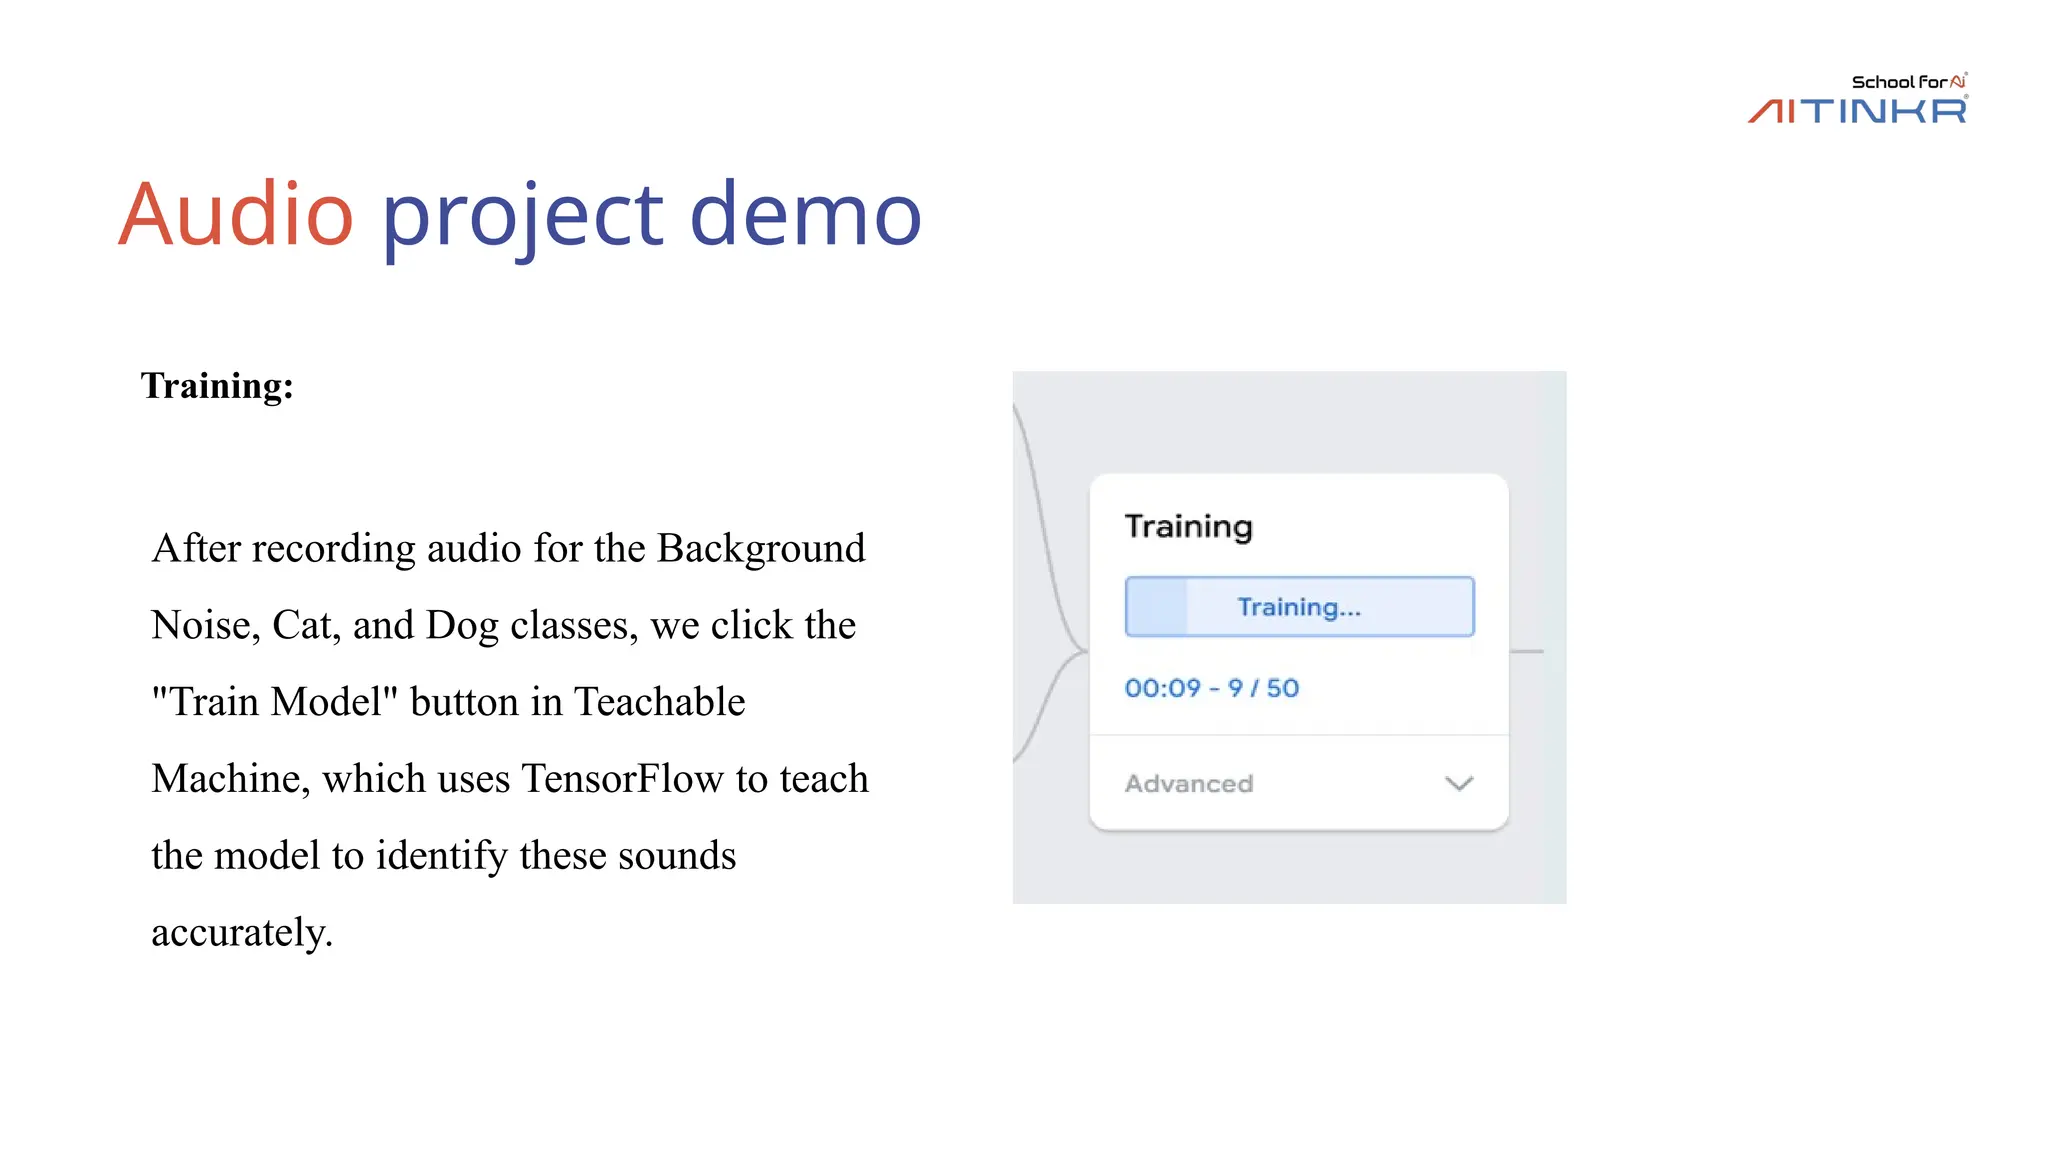
Audio project demo
Training:
Afterrecording audio for the Background
Noise, Cat, and Dog classes, we click the
"Train Model" button in Teachable
Machine, which uses TensorFlow to teach
the model to identify these sounds
accurately.
33.
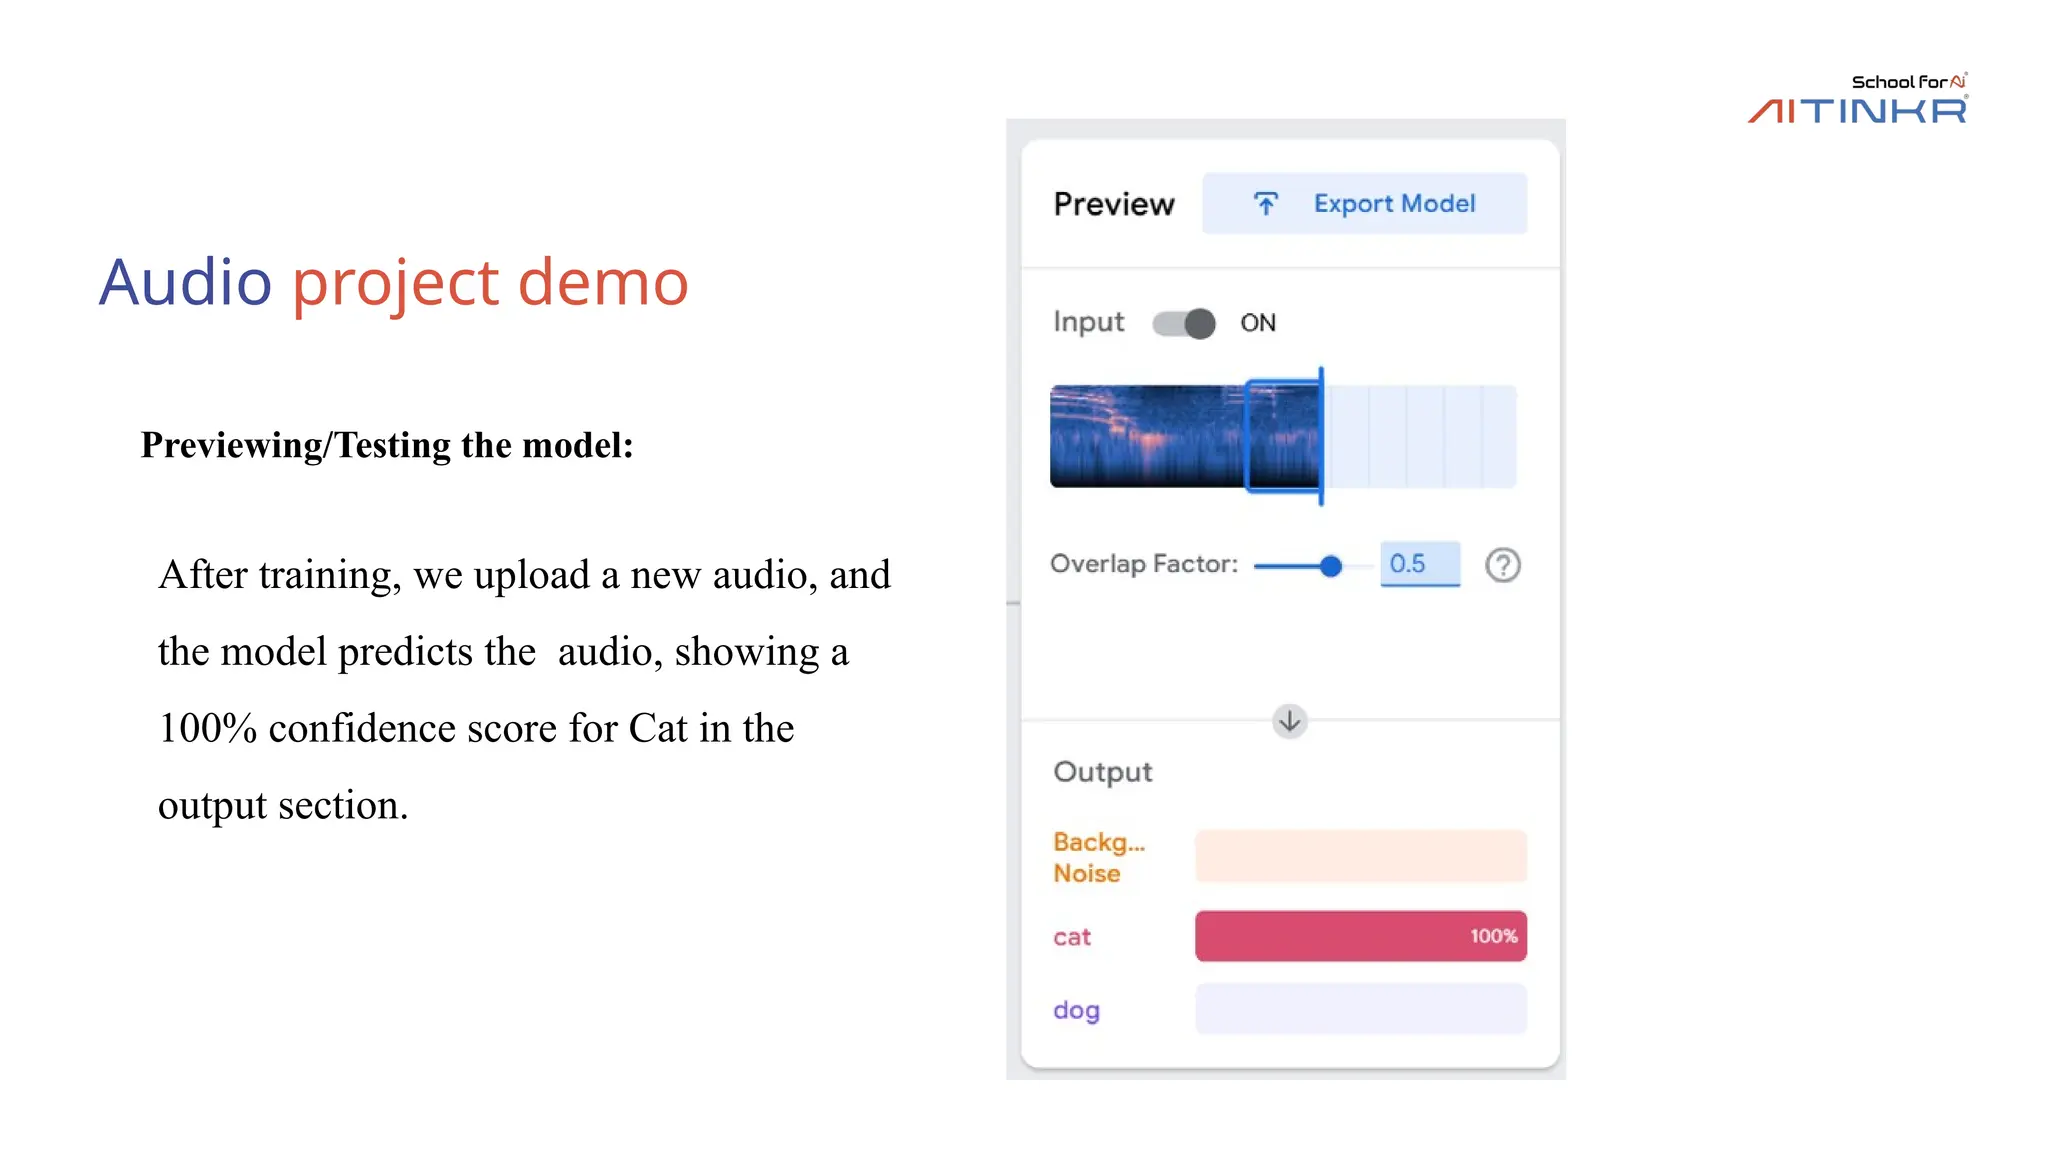
Audio project demo
Previewing/Testingthe model:
After training, we upload a new audio, and
the model predicts the audio, showing a
100% confidence score for Cat in the
output section.
34.
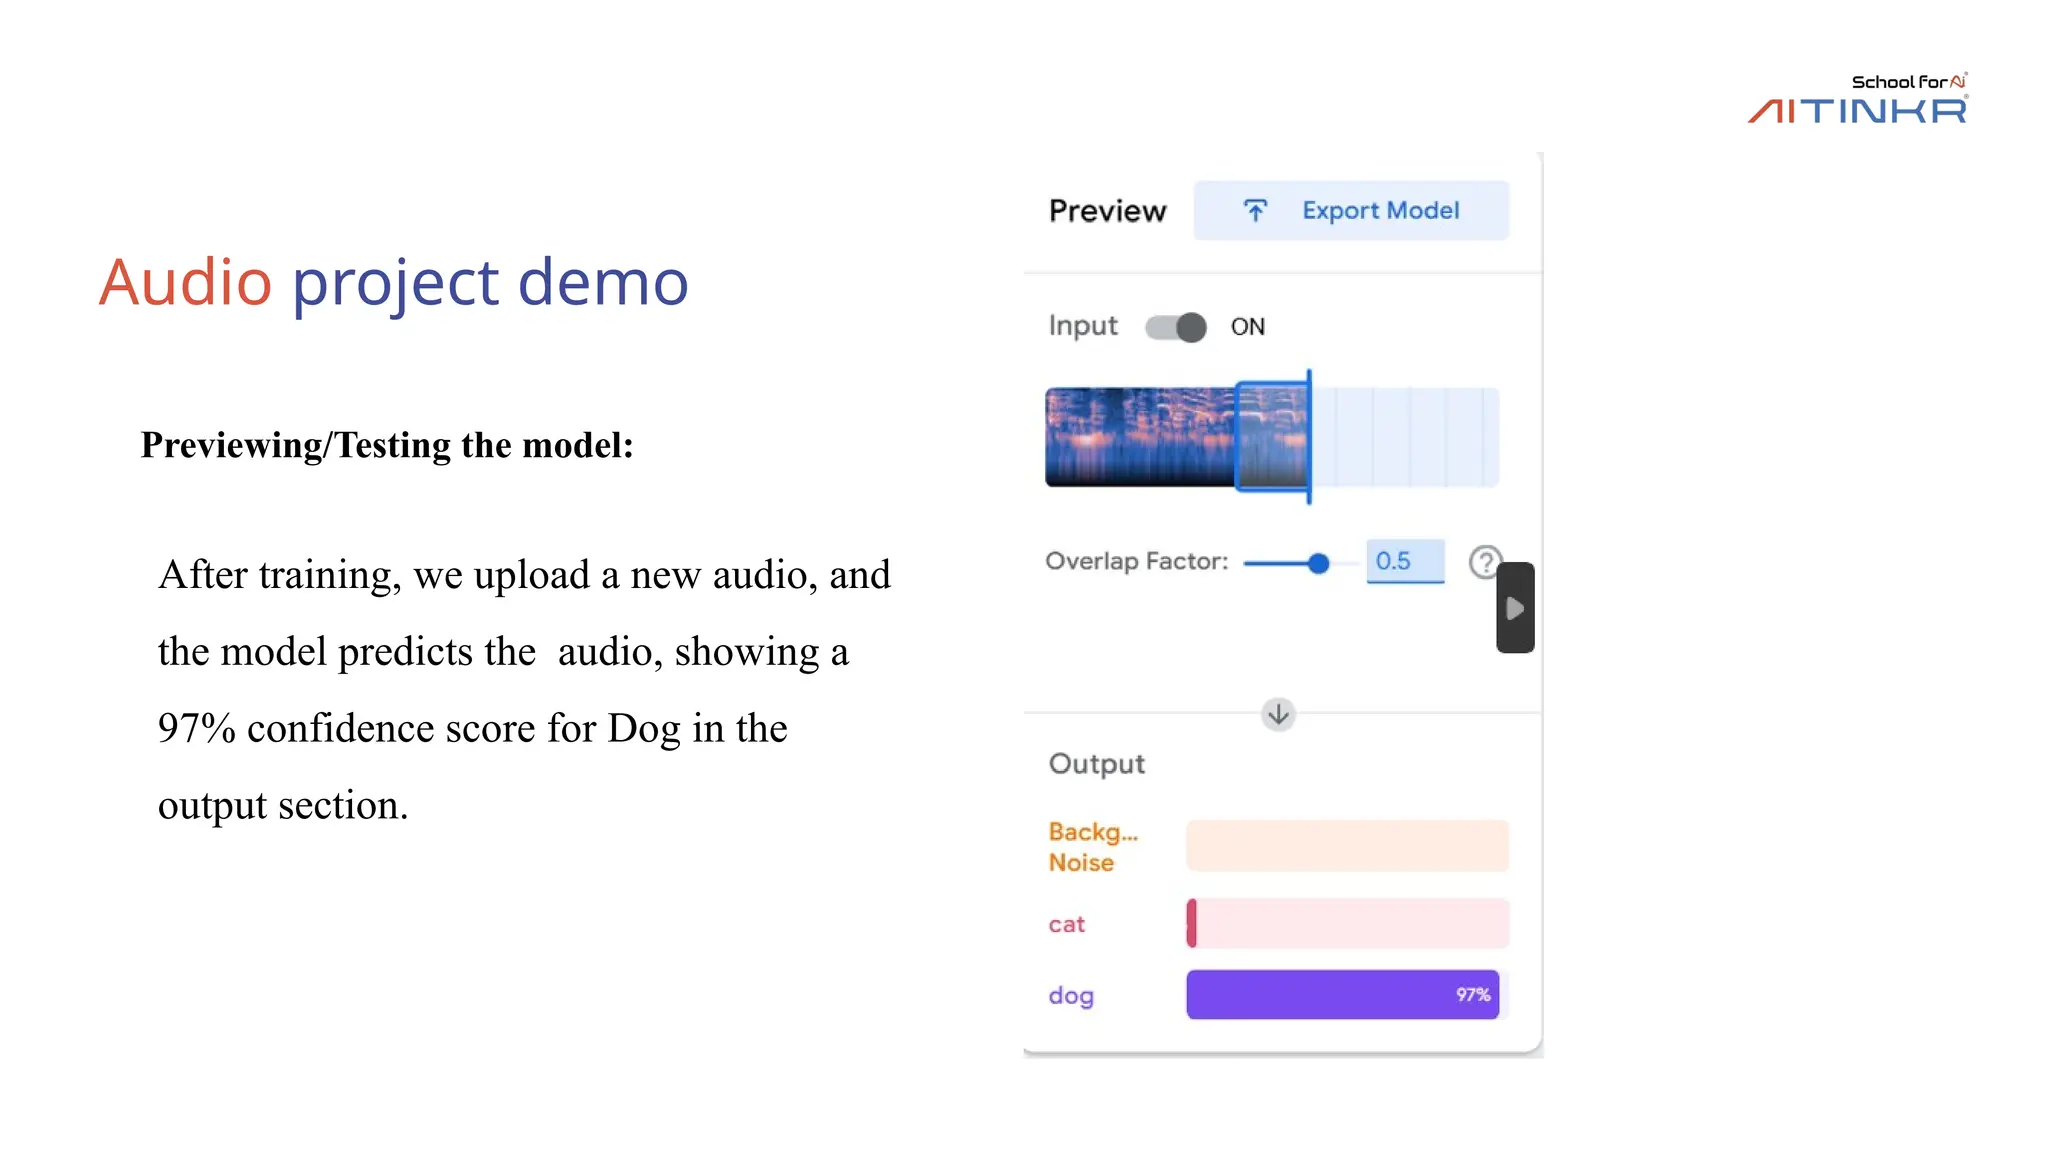
Audio project demo
Previewing/Testingthe model:
After training, we upload a new audio, and
the model predicts the audio, showing a
97% confidence score for Dog in the
output section.
35.
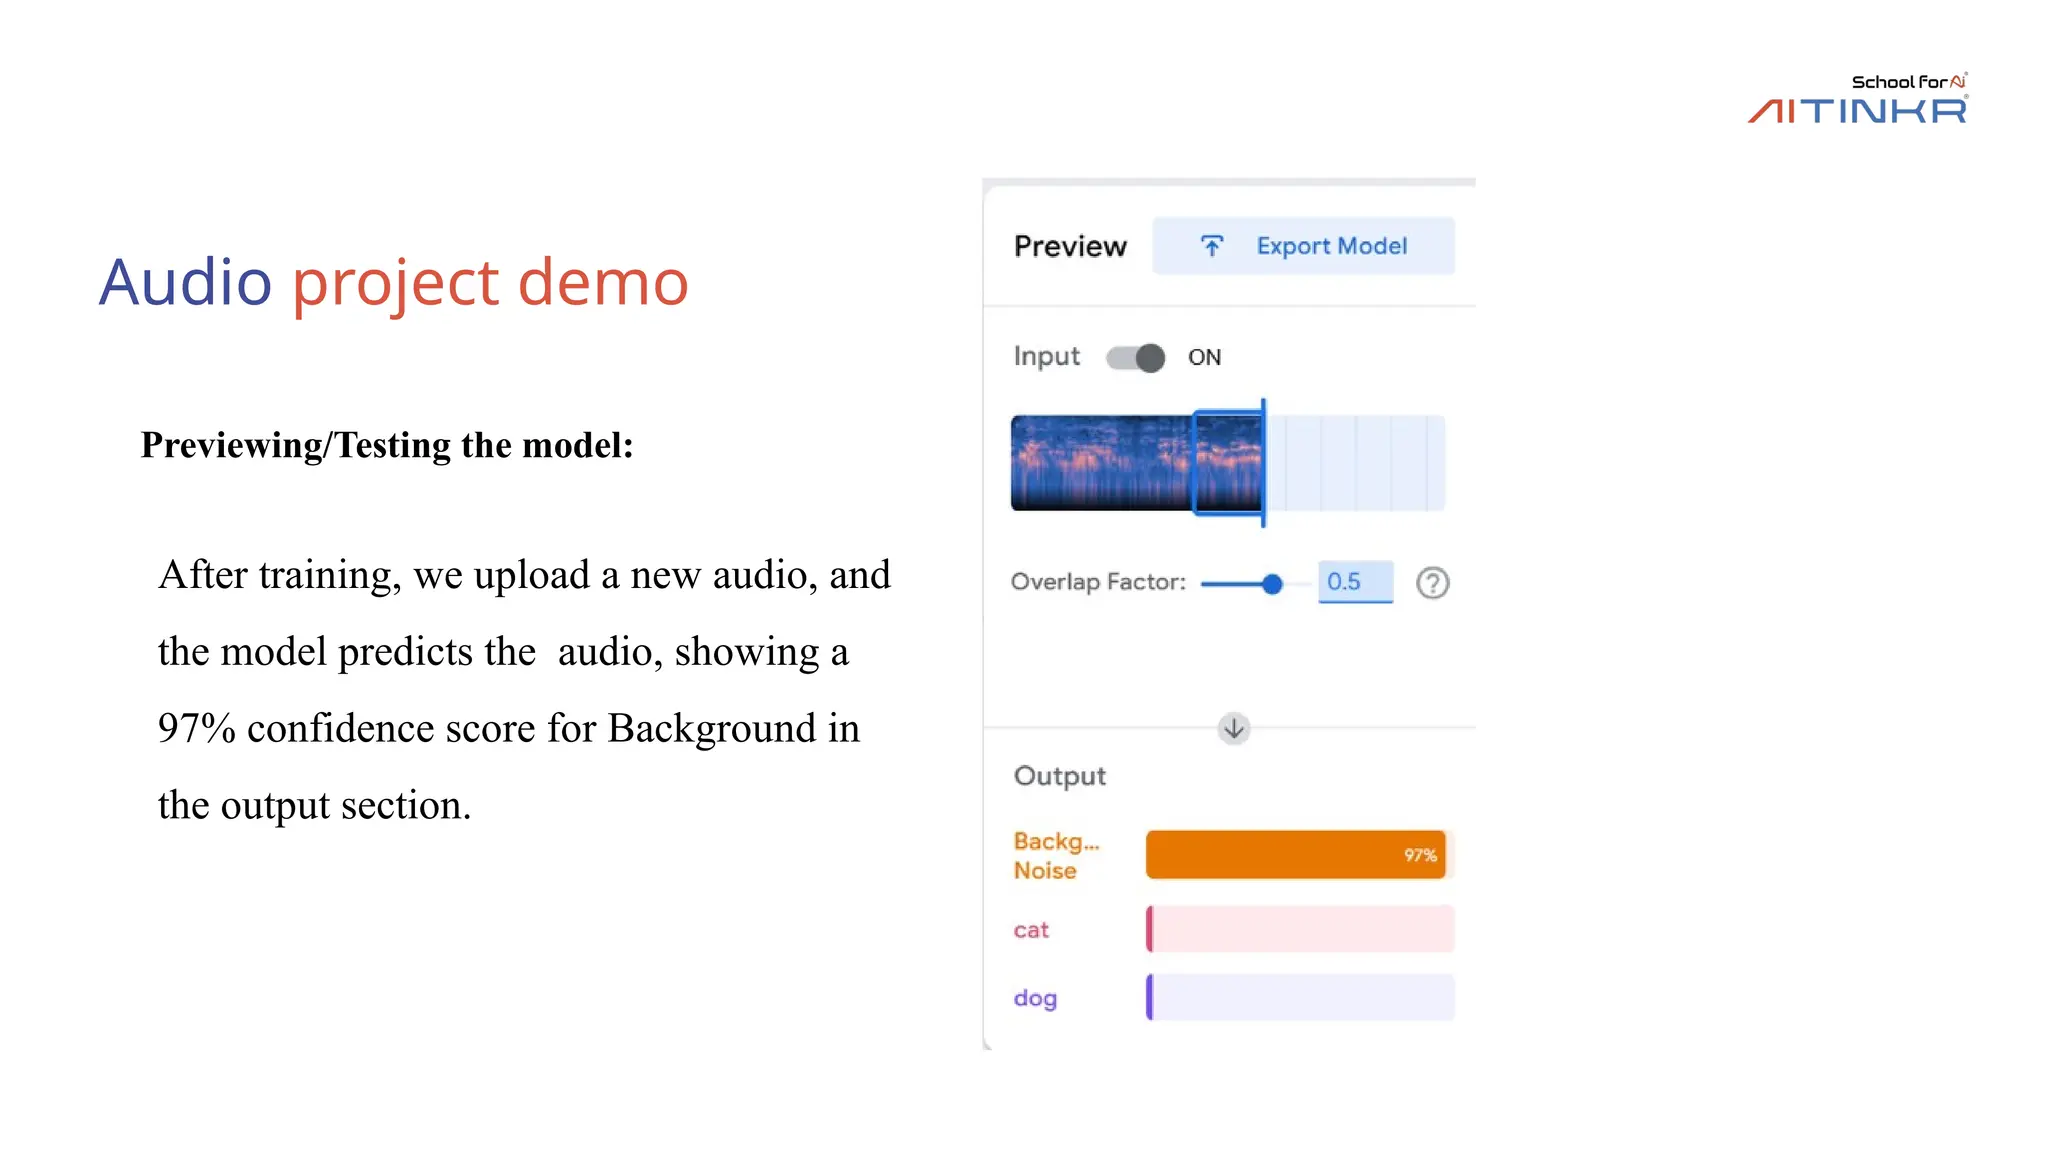
Audio project demo
Previewing/Testingthe model:
After training, we upload a new audio, and
the model predicts the audio, showing a
97% confidence score for Background in
the output section.
36.
Fine Tuning
• TeachableMachine trains image, sound, or pose models without coding.
• If the model struggles, collect more diverse, balanced data.
• For images, use varied lighting and angles; for audio, record in different settings.
• Remove poor-quality samples that confuse the model.
• Adjust training settings like epochs and learning rate to optimize learning.
• Preview and test to check improvements, then export the model for use.
37.
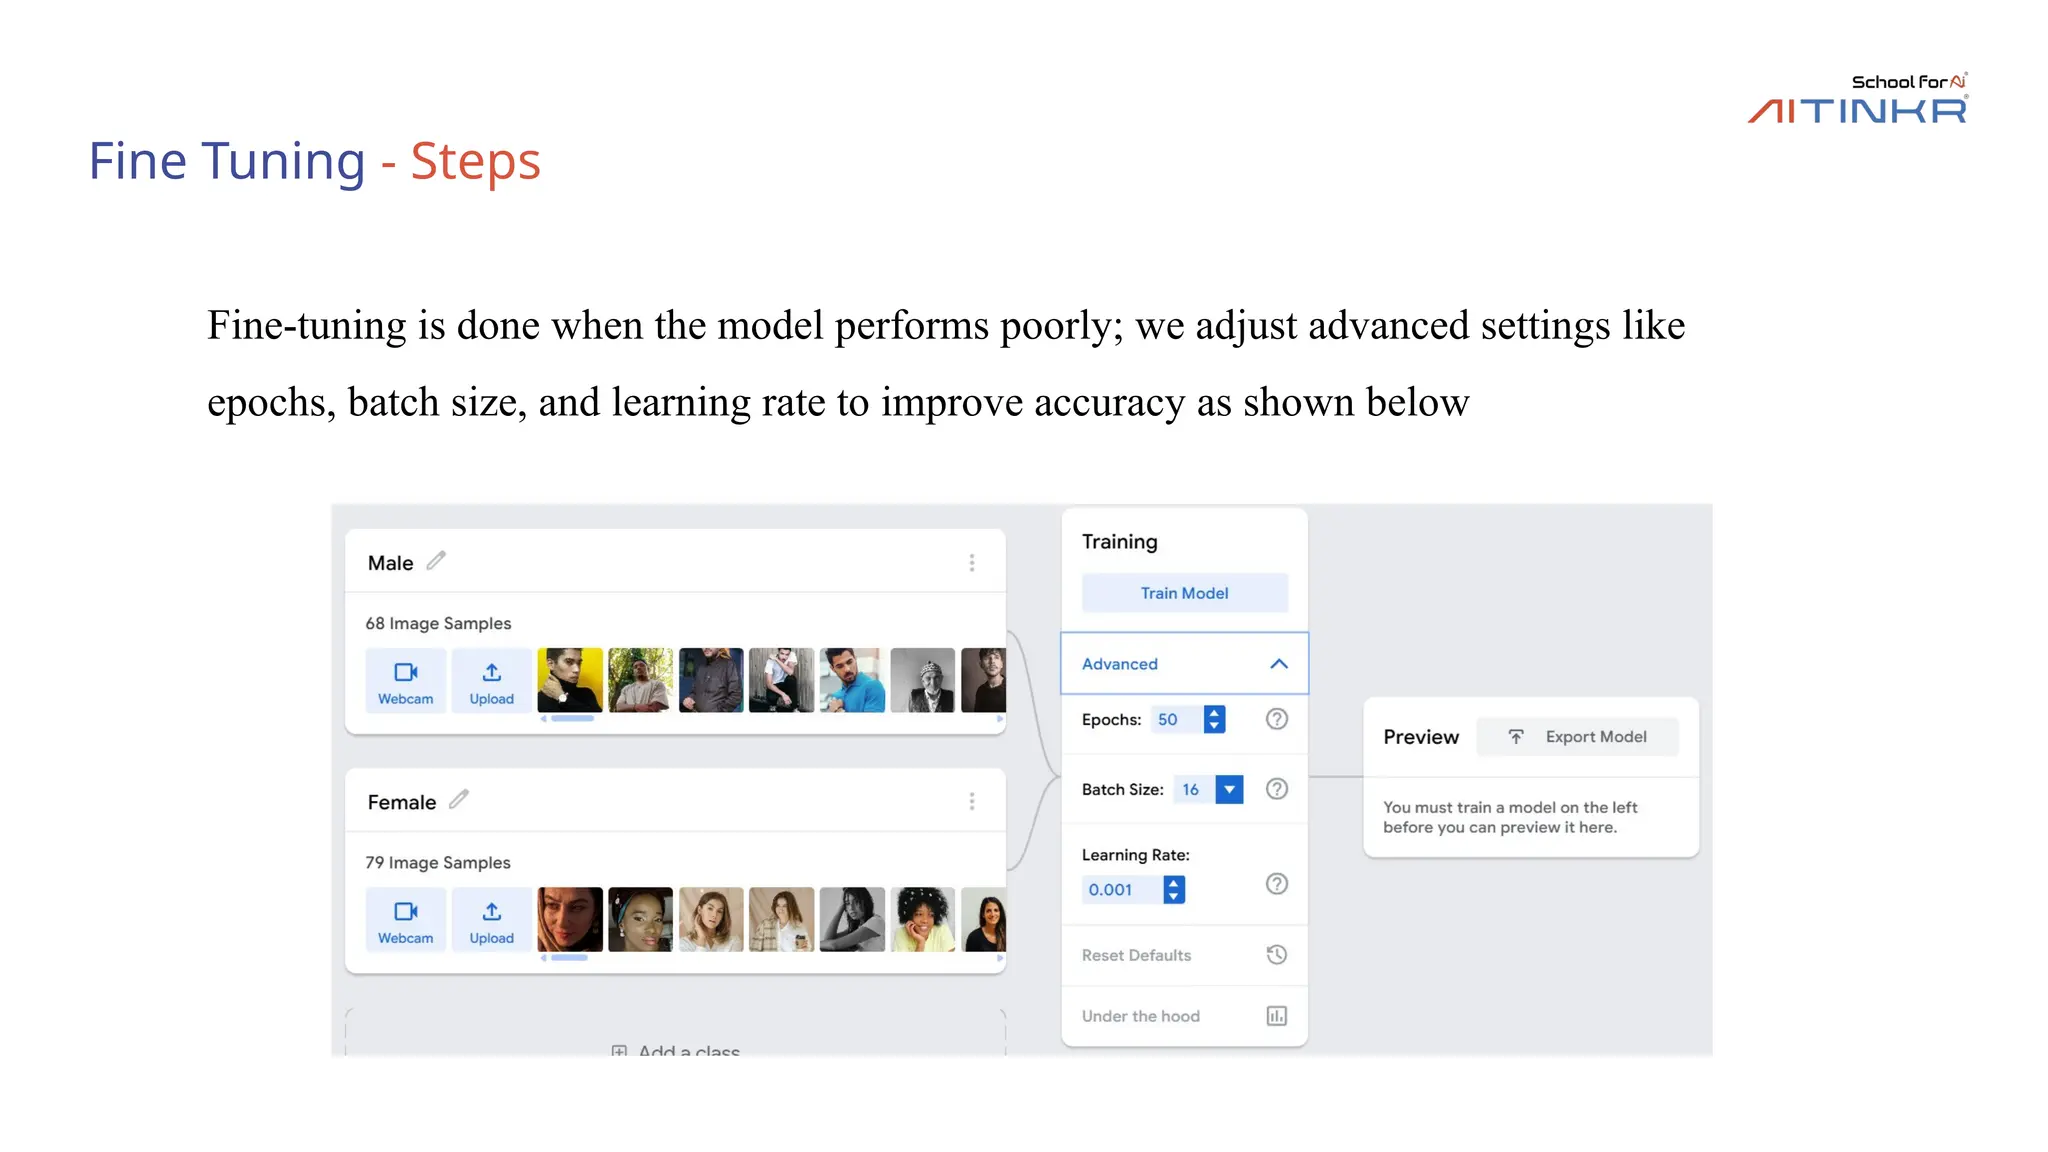
Fine Tuning -Steps
Fine-tuning is done when the model performs poorly; we adjust advanced settings like
epochs, batch size, and learning rate to improve accuracy as shown below
38.
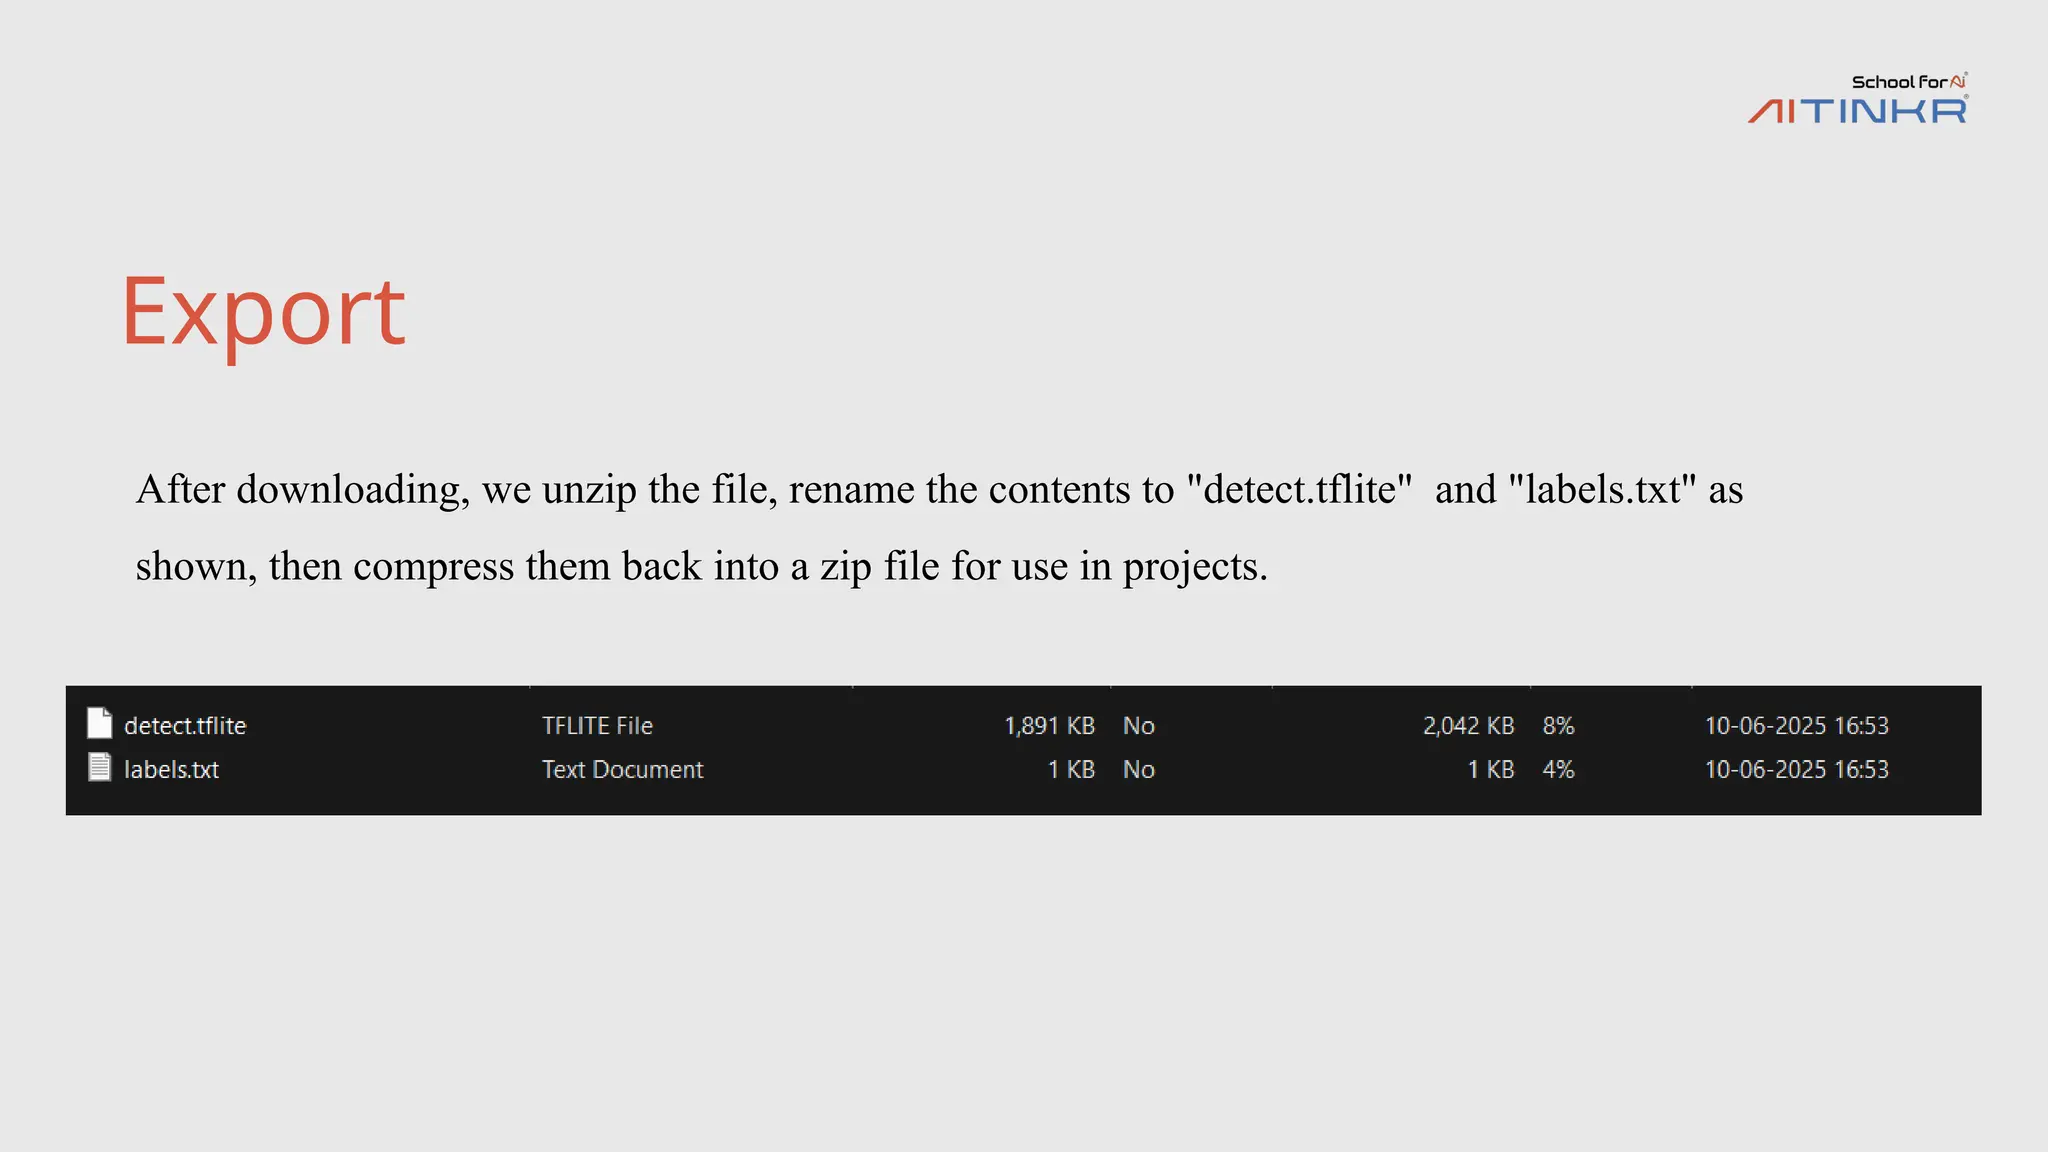
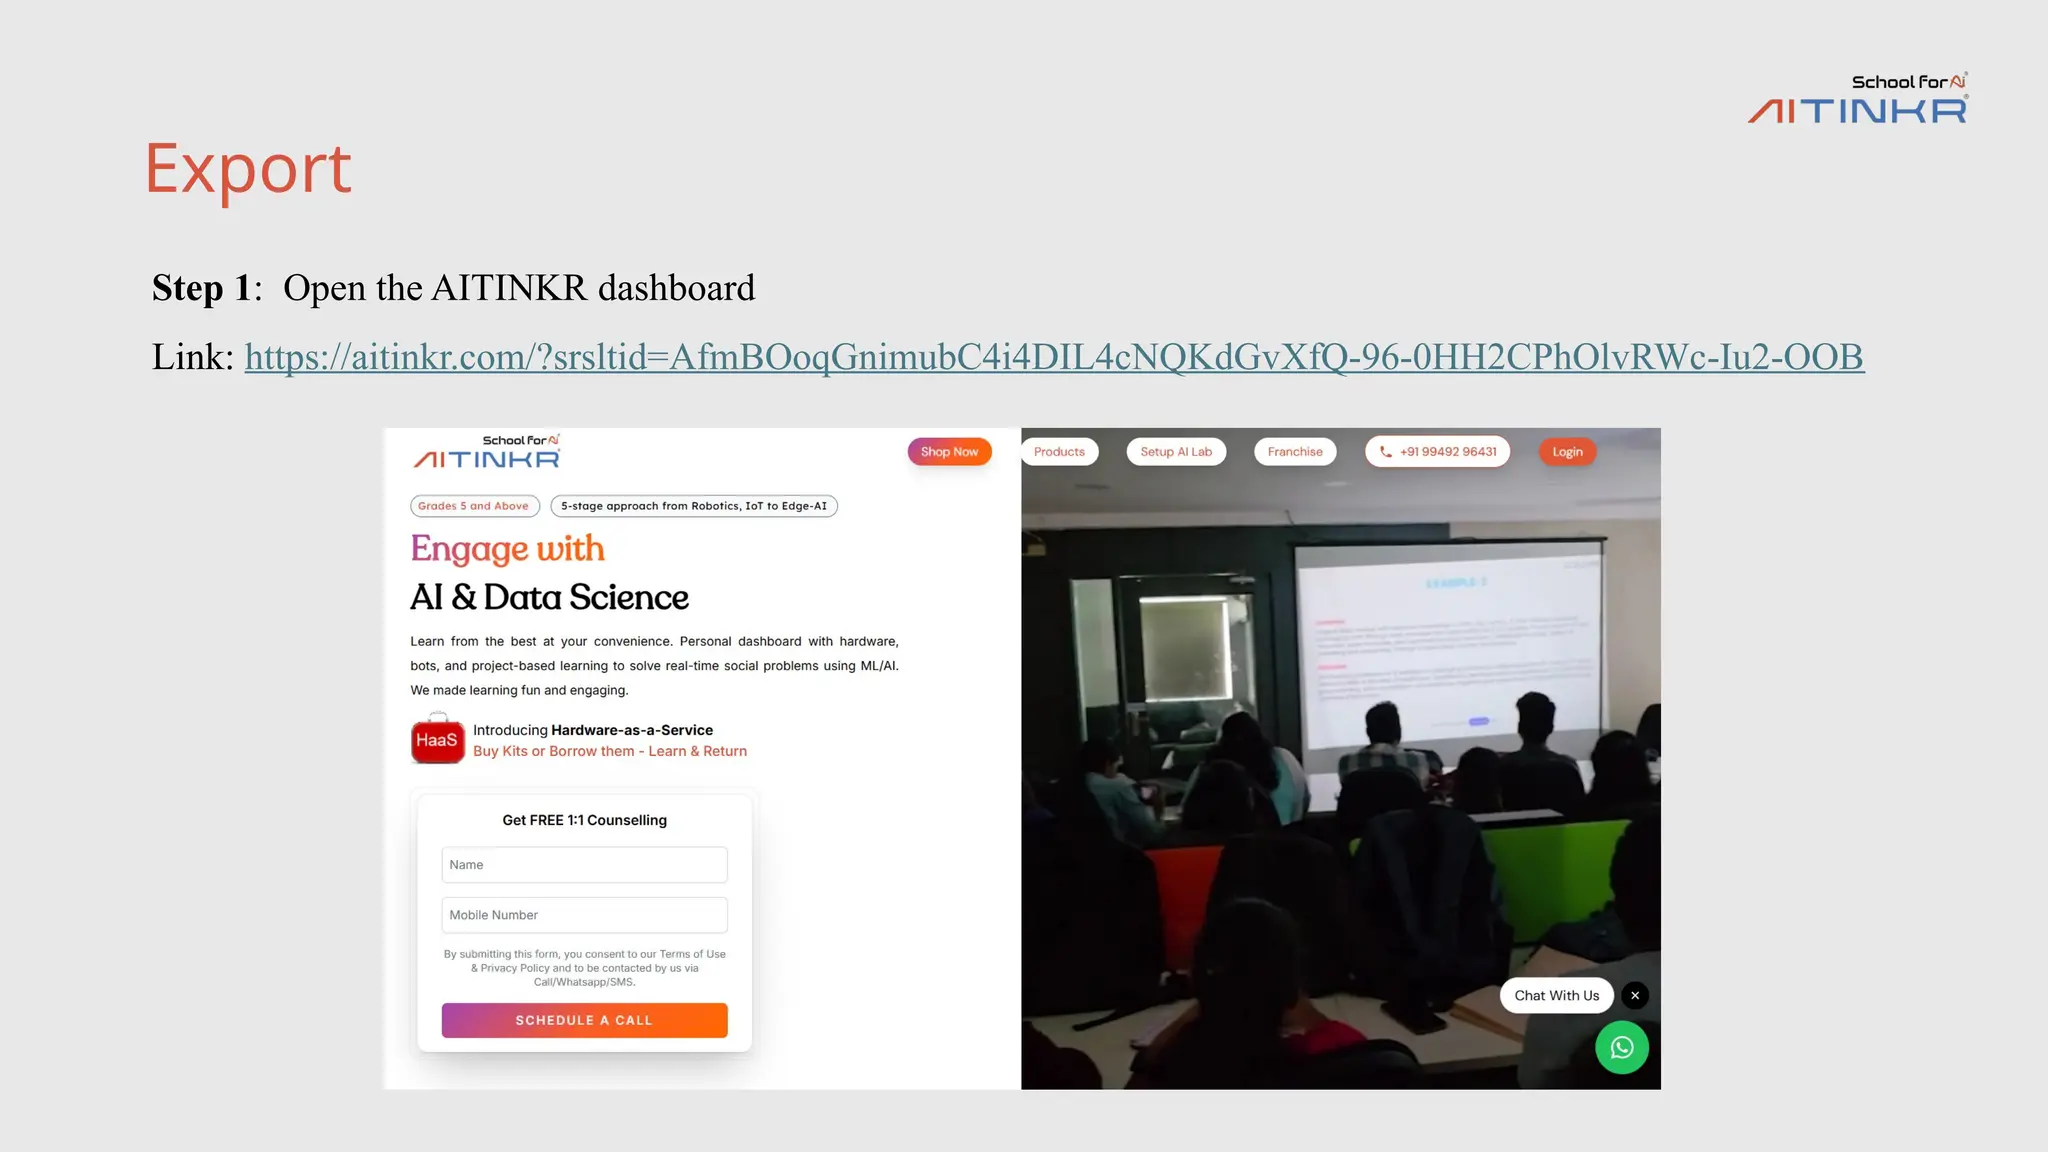
Export
After training, weselect TensorFlow Lite,
choose the “Floating point" model type,
and click "Download my model," which
downloads a zip file containing the
converted model for use in projects like
Android apps.
39.
Export
After downloading, weunzip the file, rename the contents to "detect.tflite" and "labels.txt" as
shown, then compress them back into a zip file for use in projects.
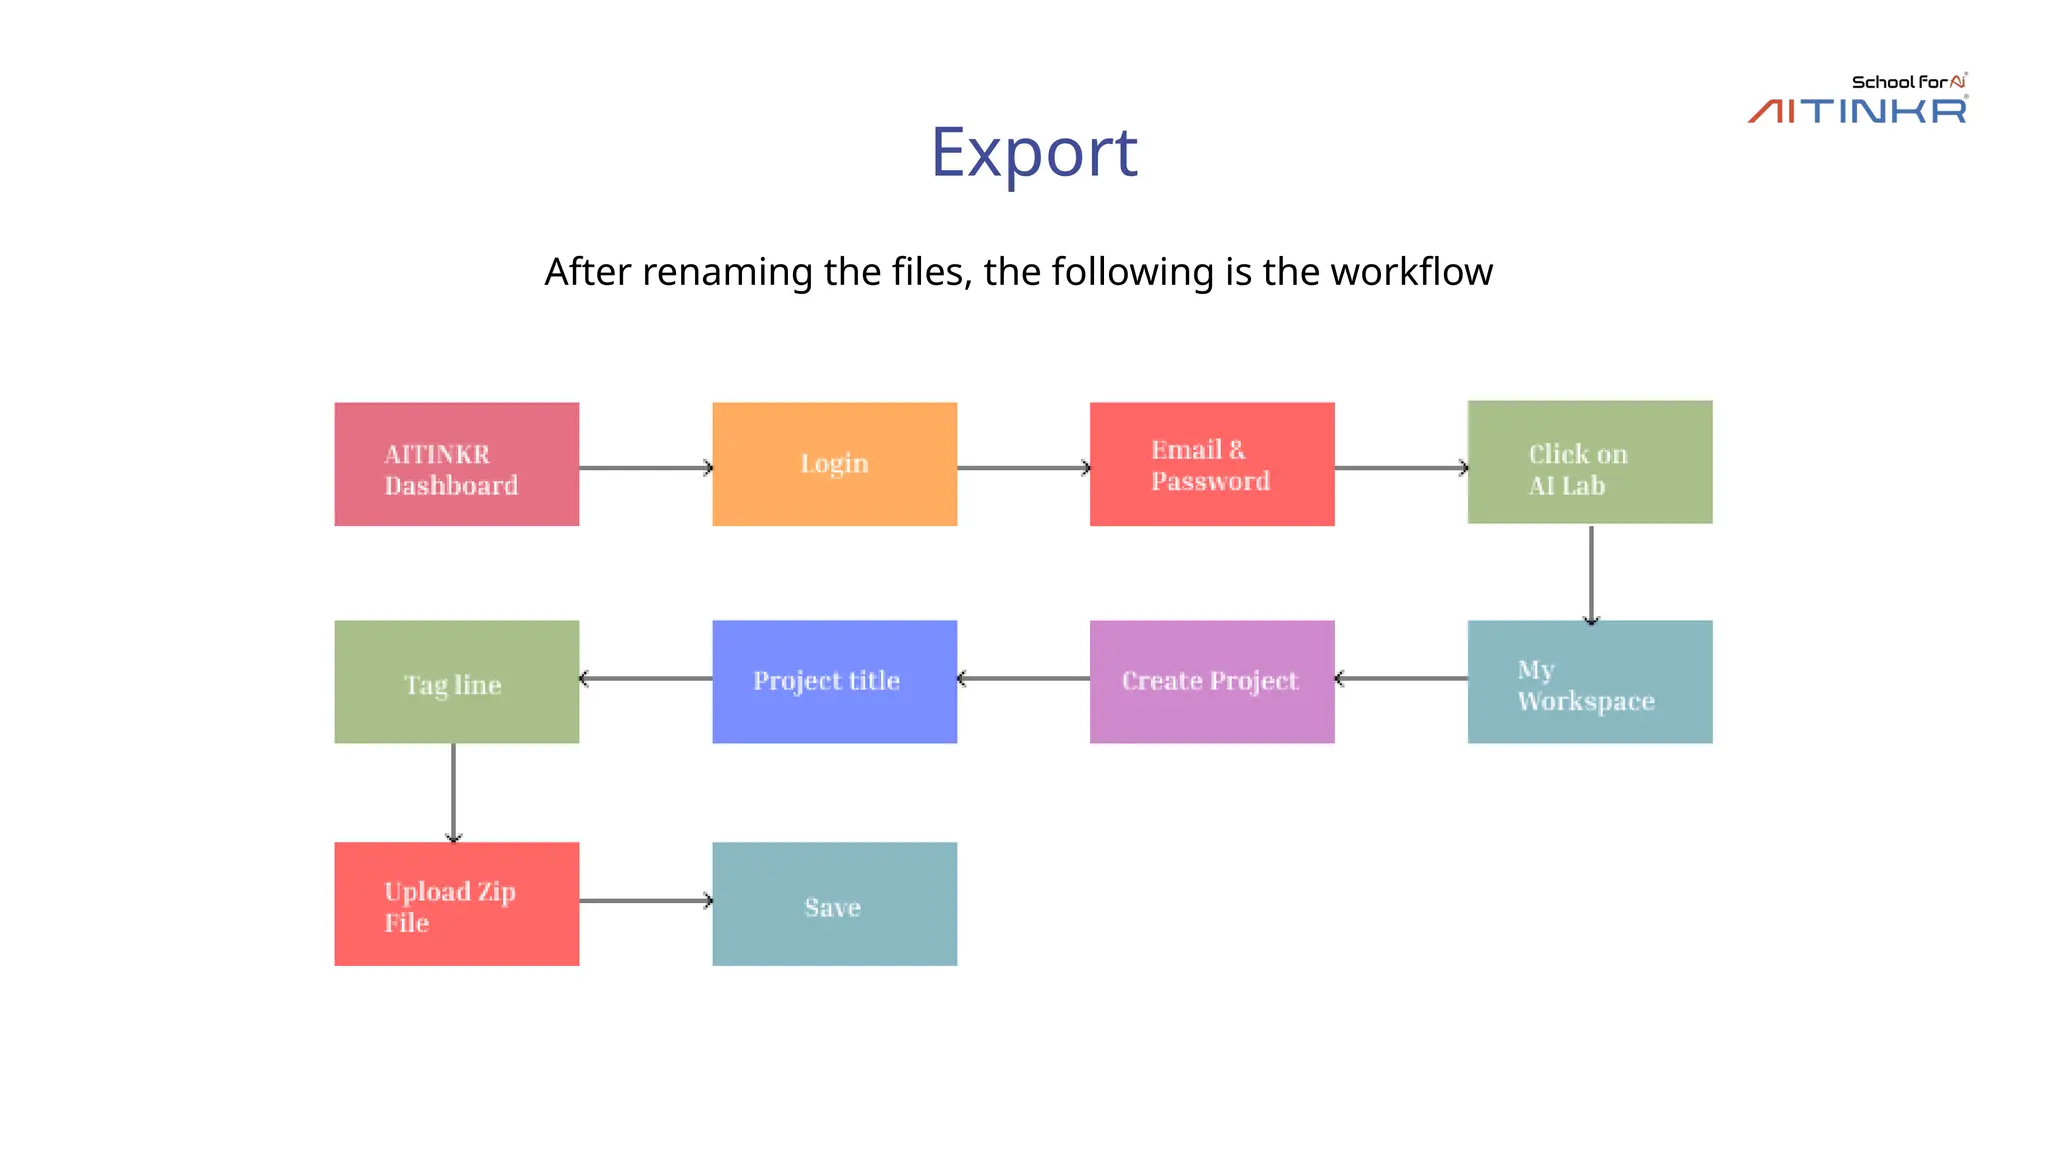
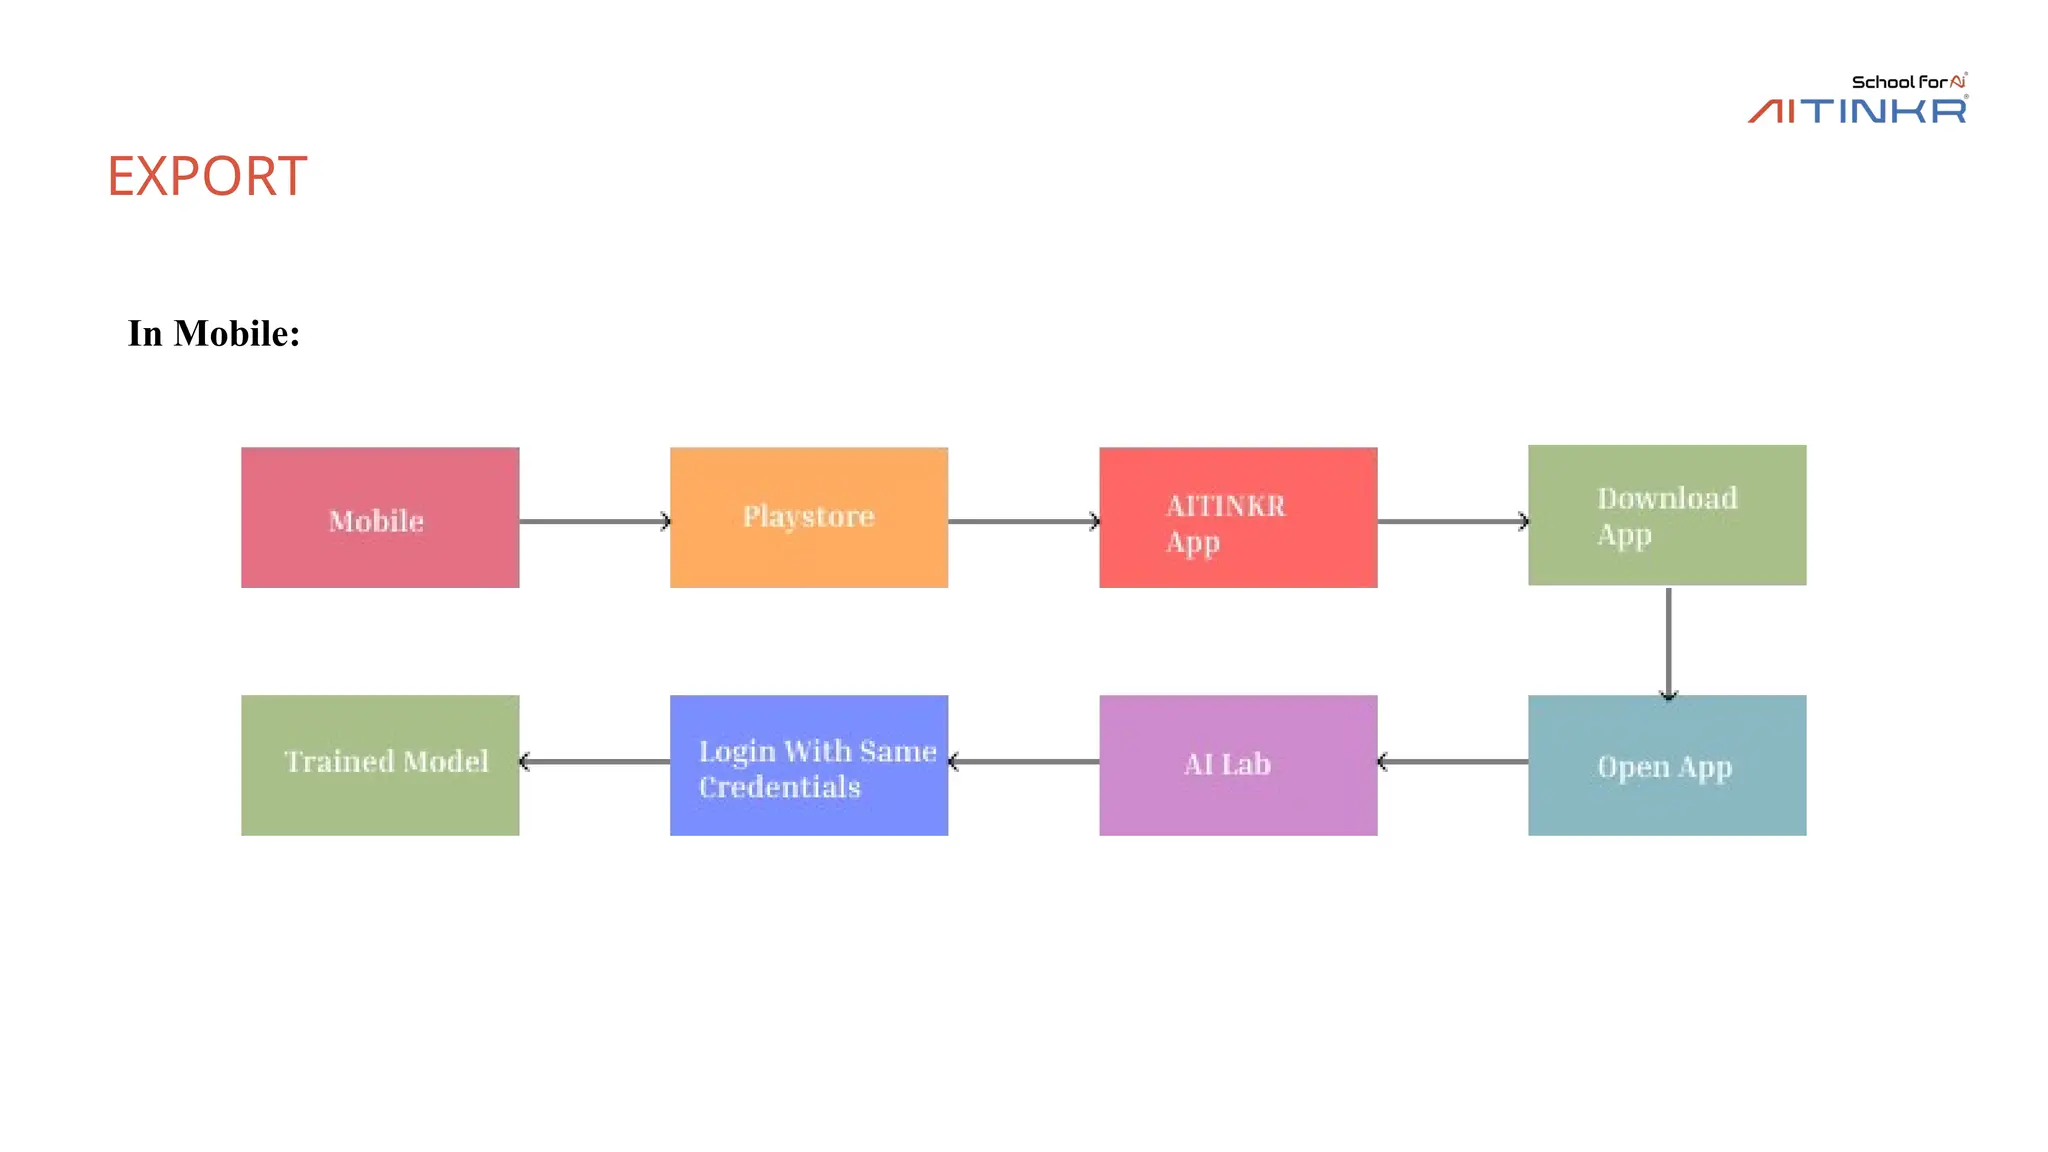
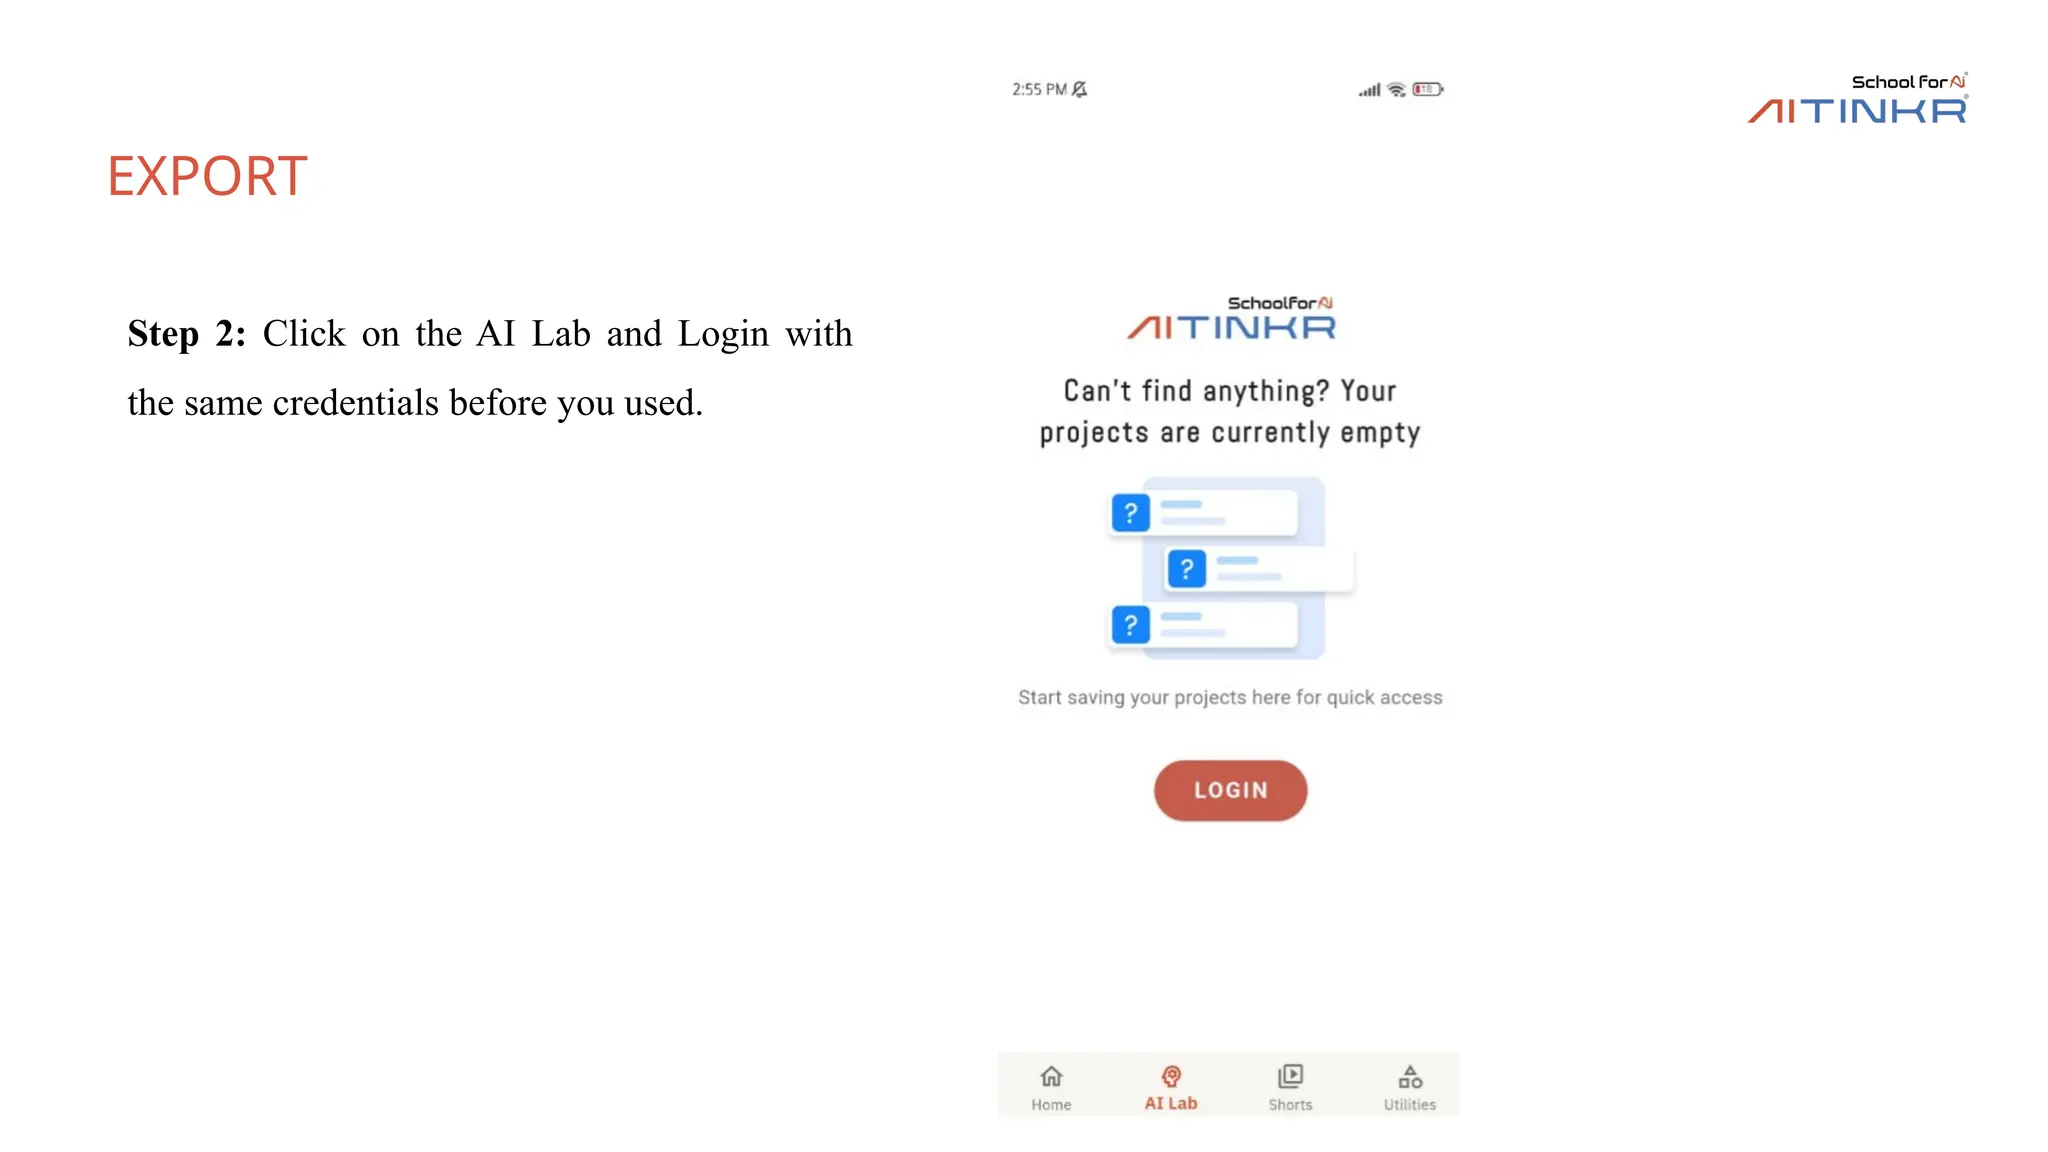
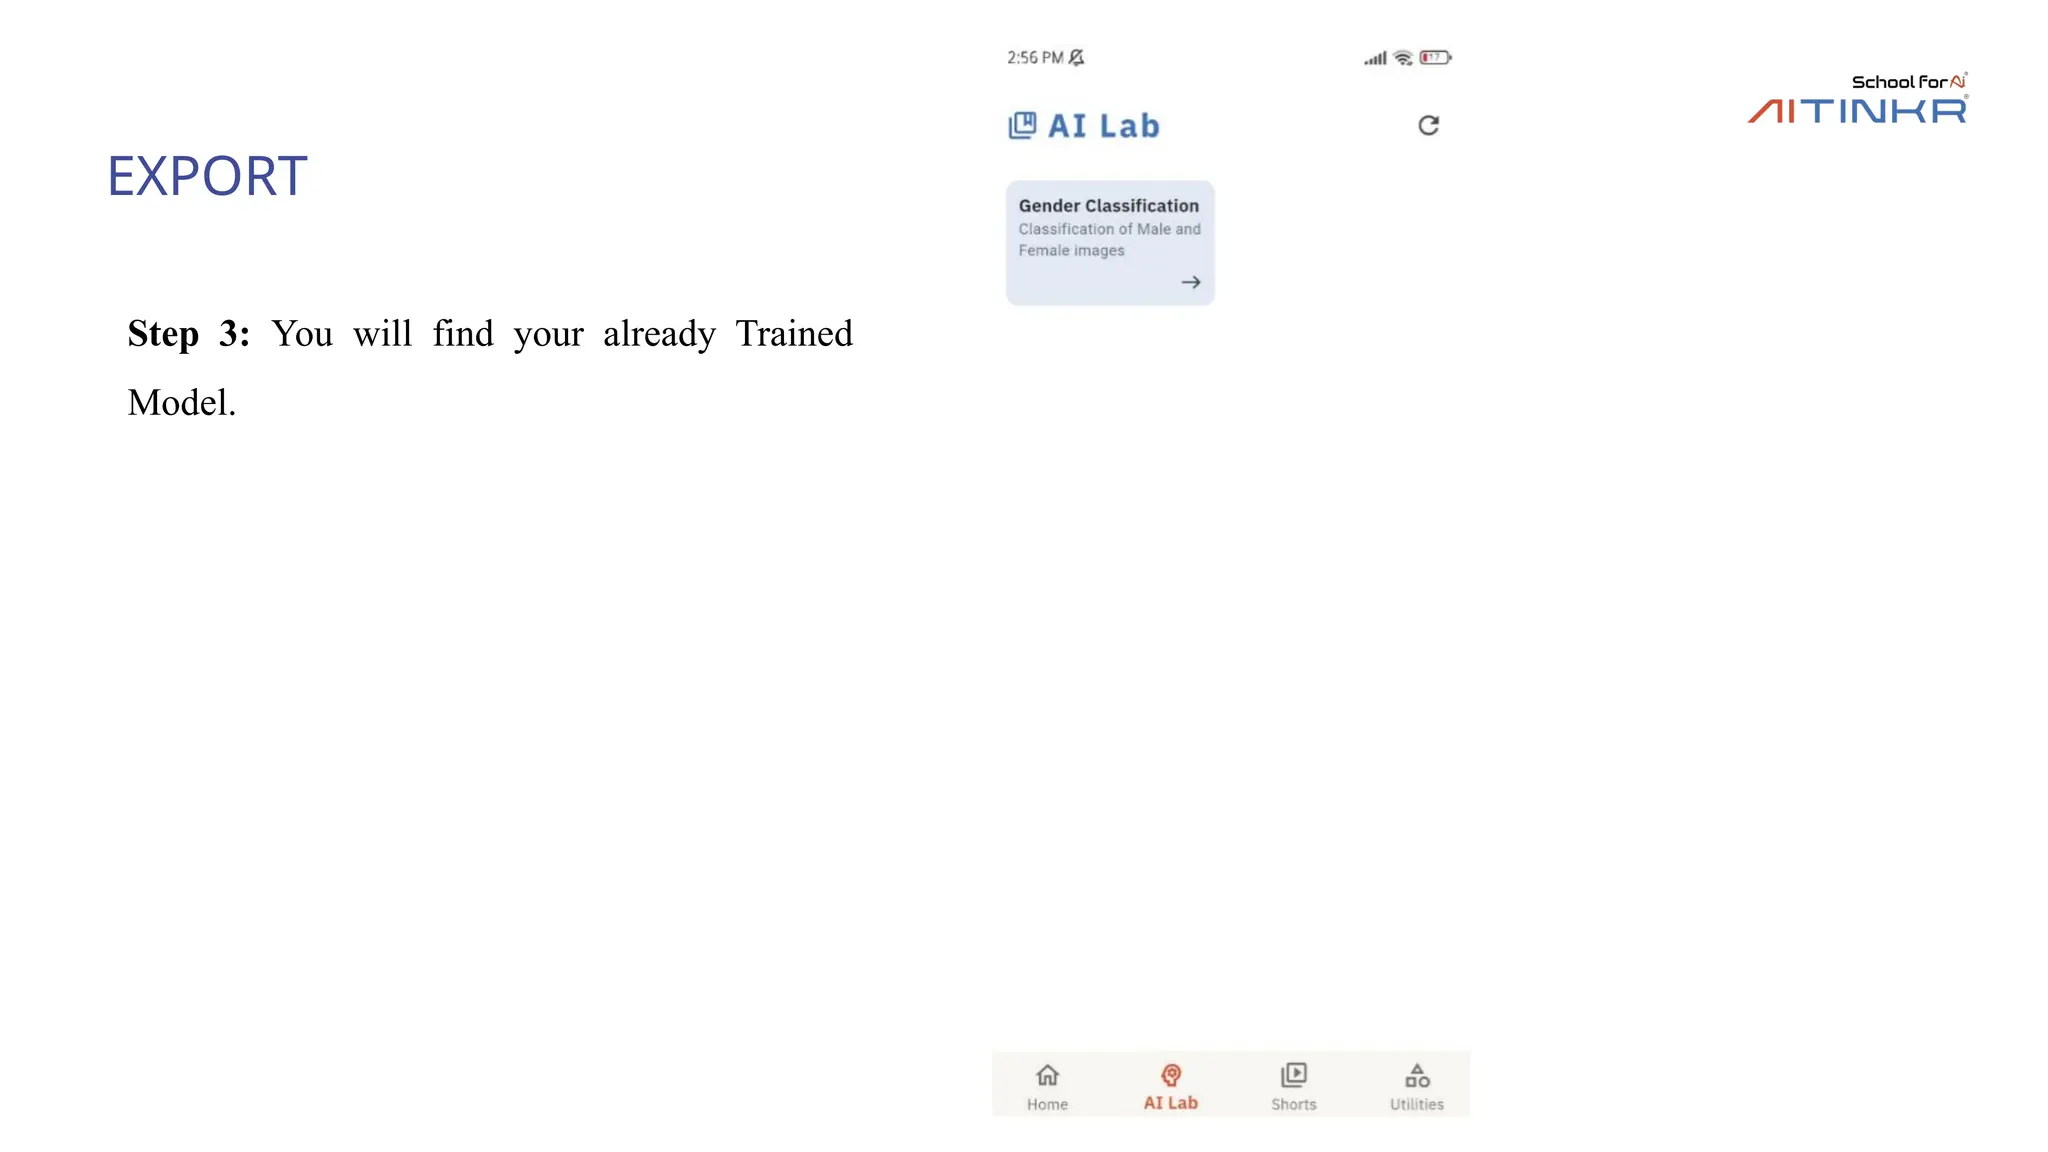
Export
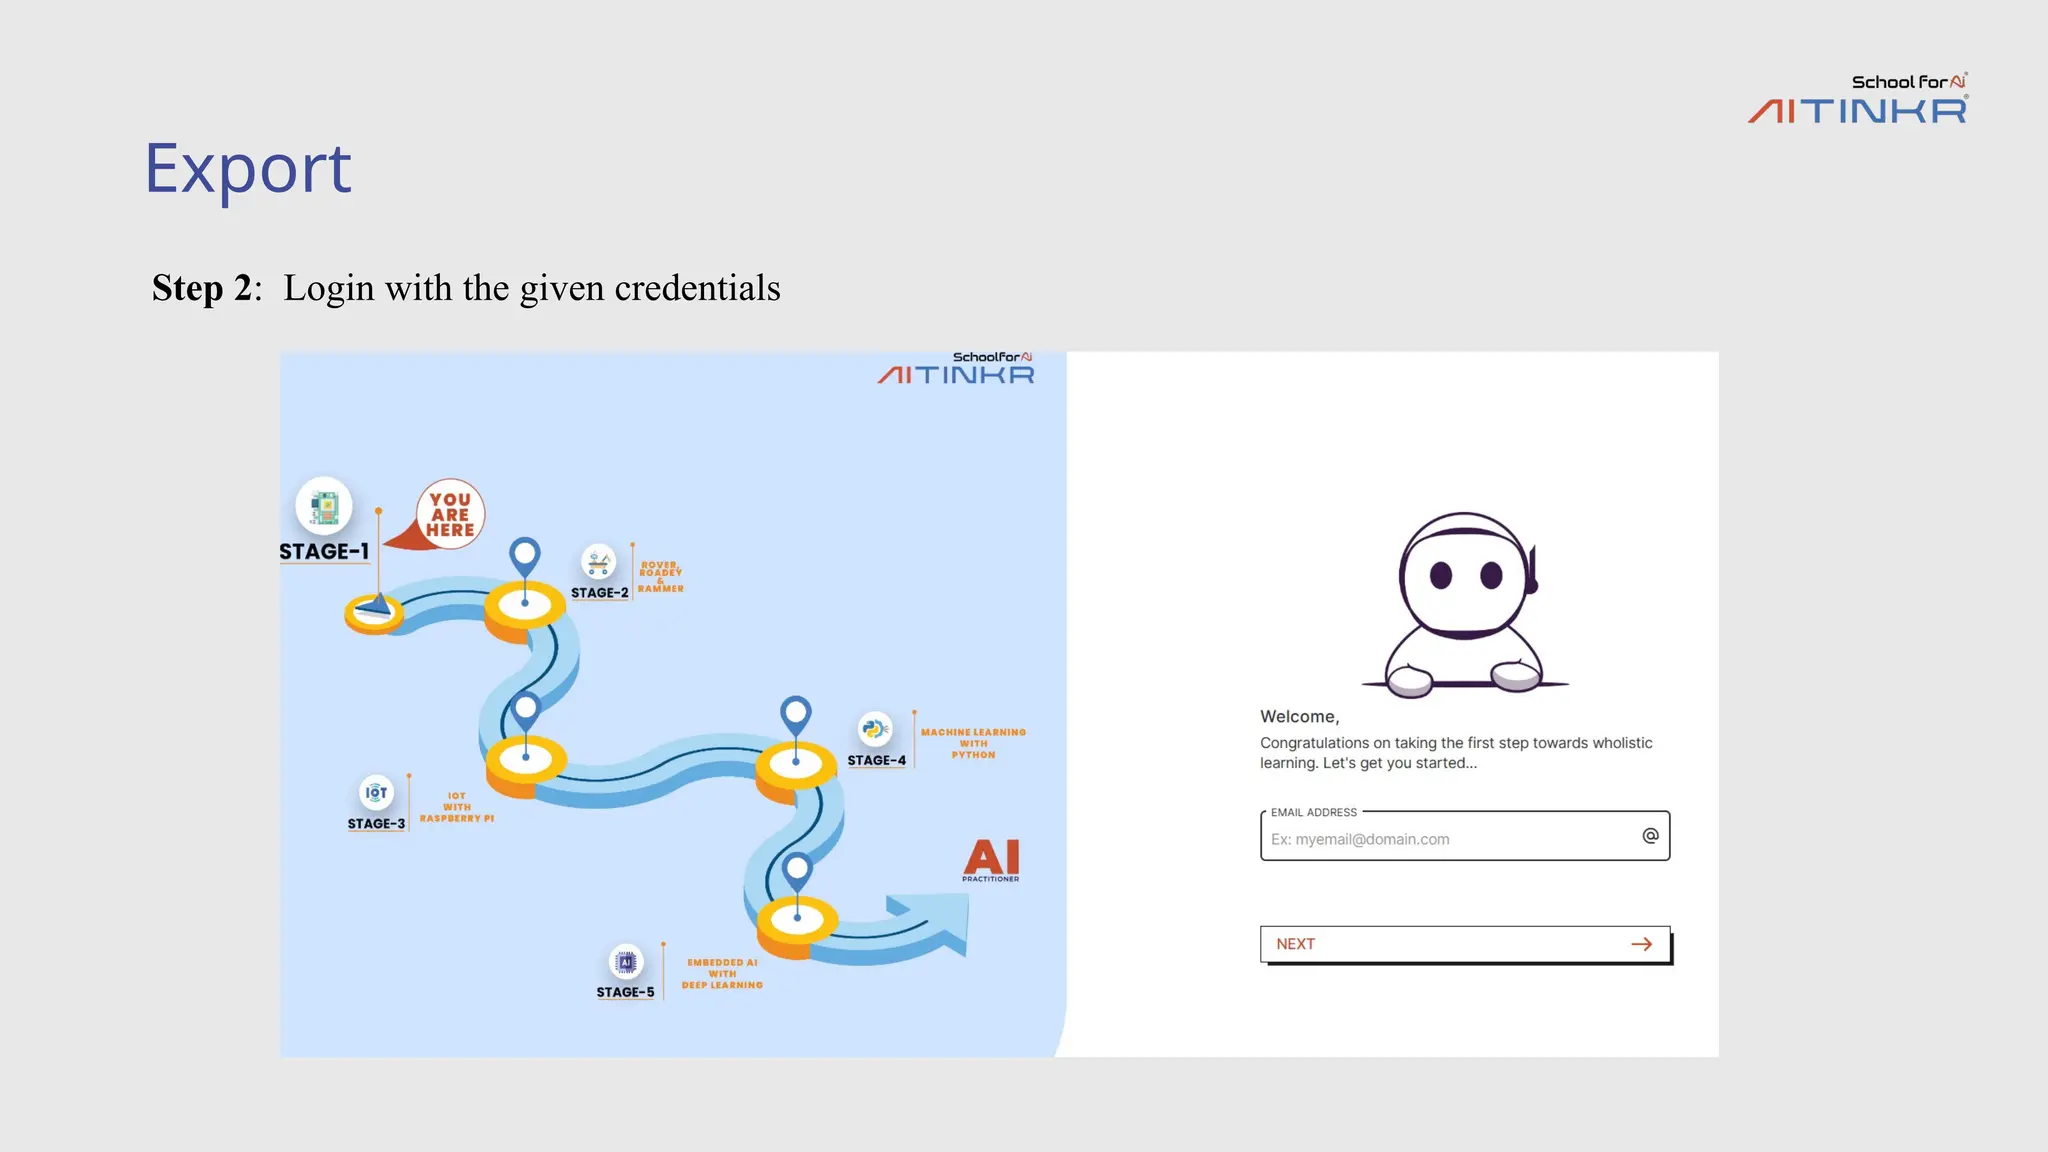
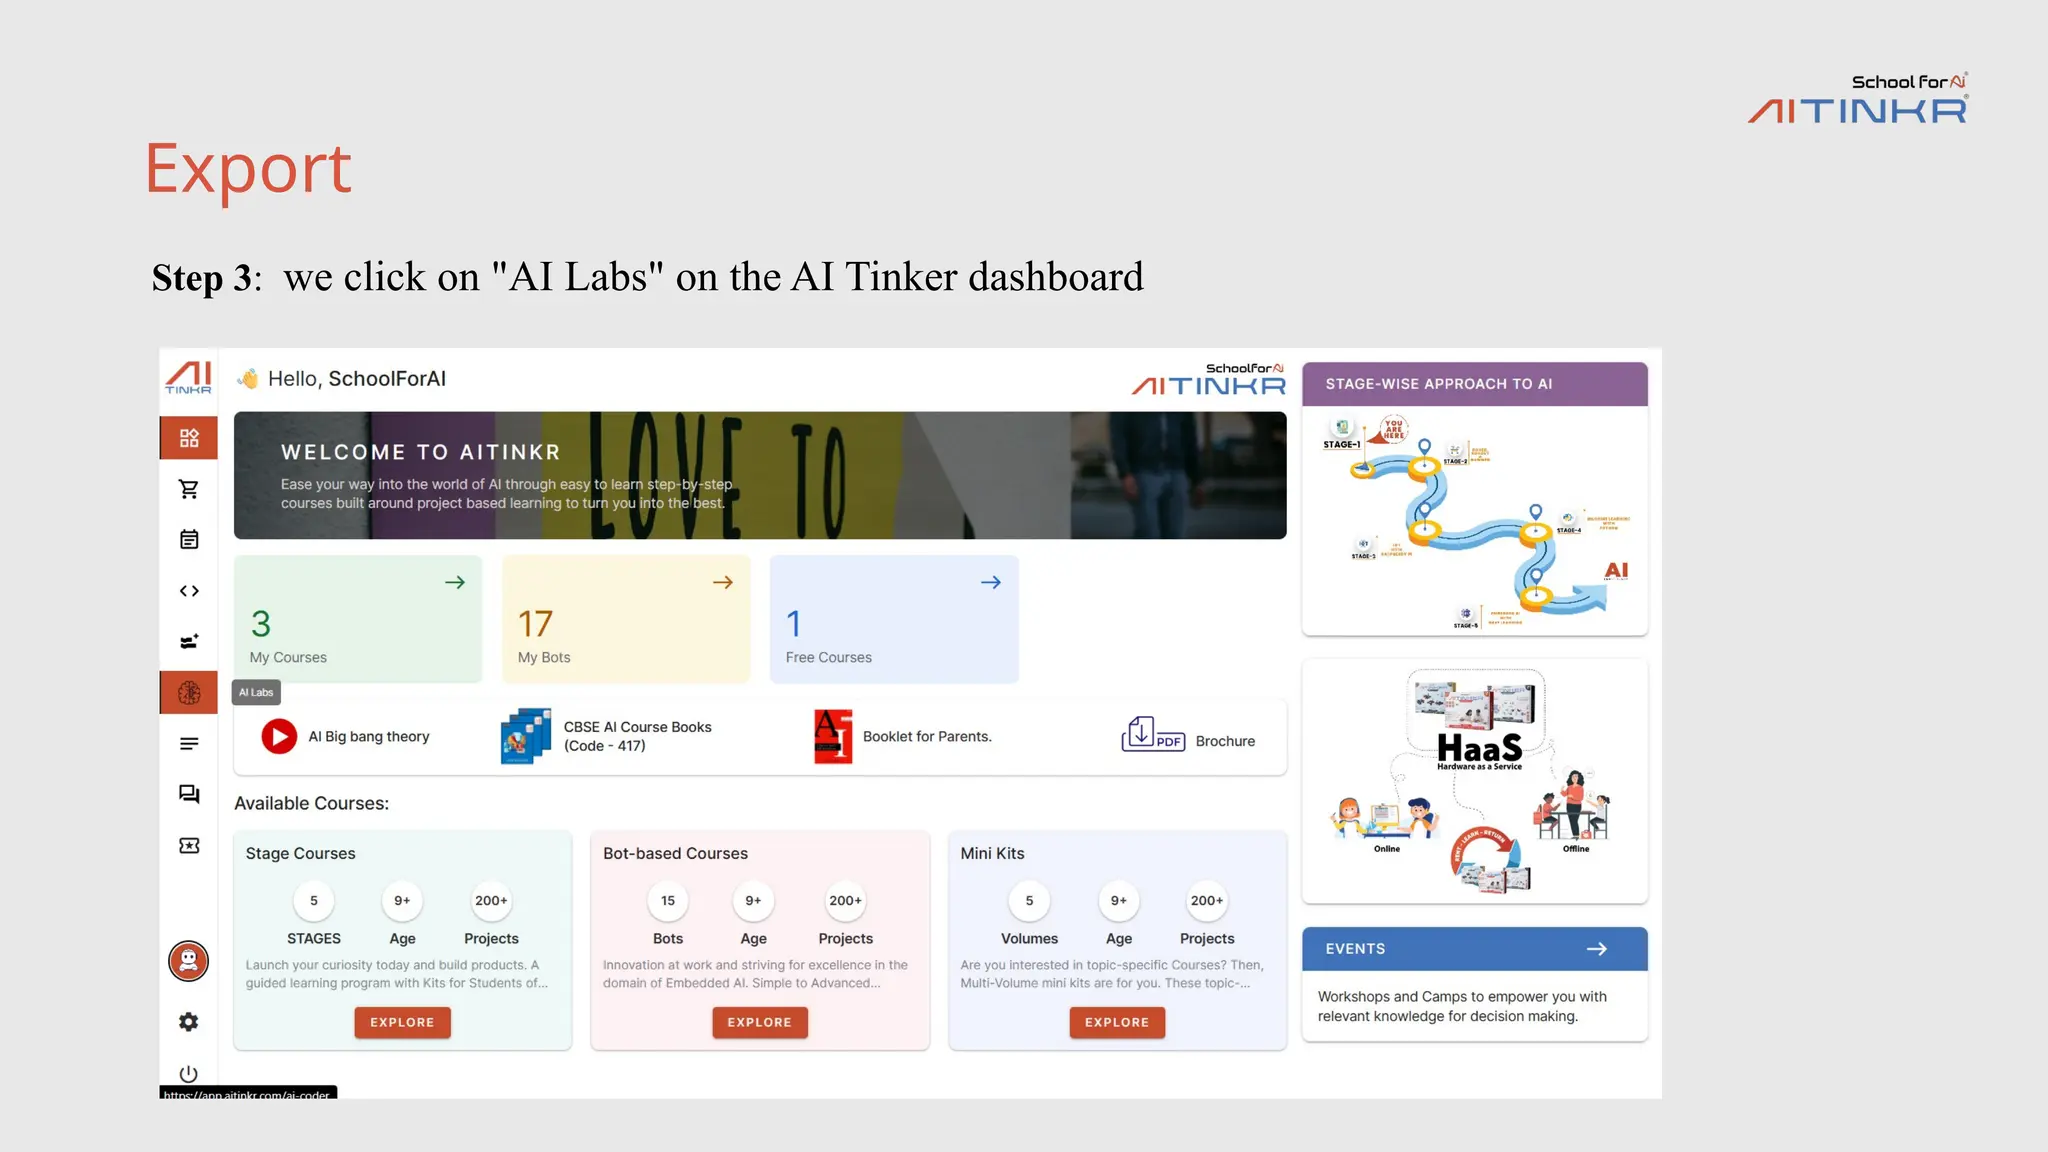
Step 4: Afterclicking on “AI LABS” you will see some option at the top then move to My WorkSpace
45.
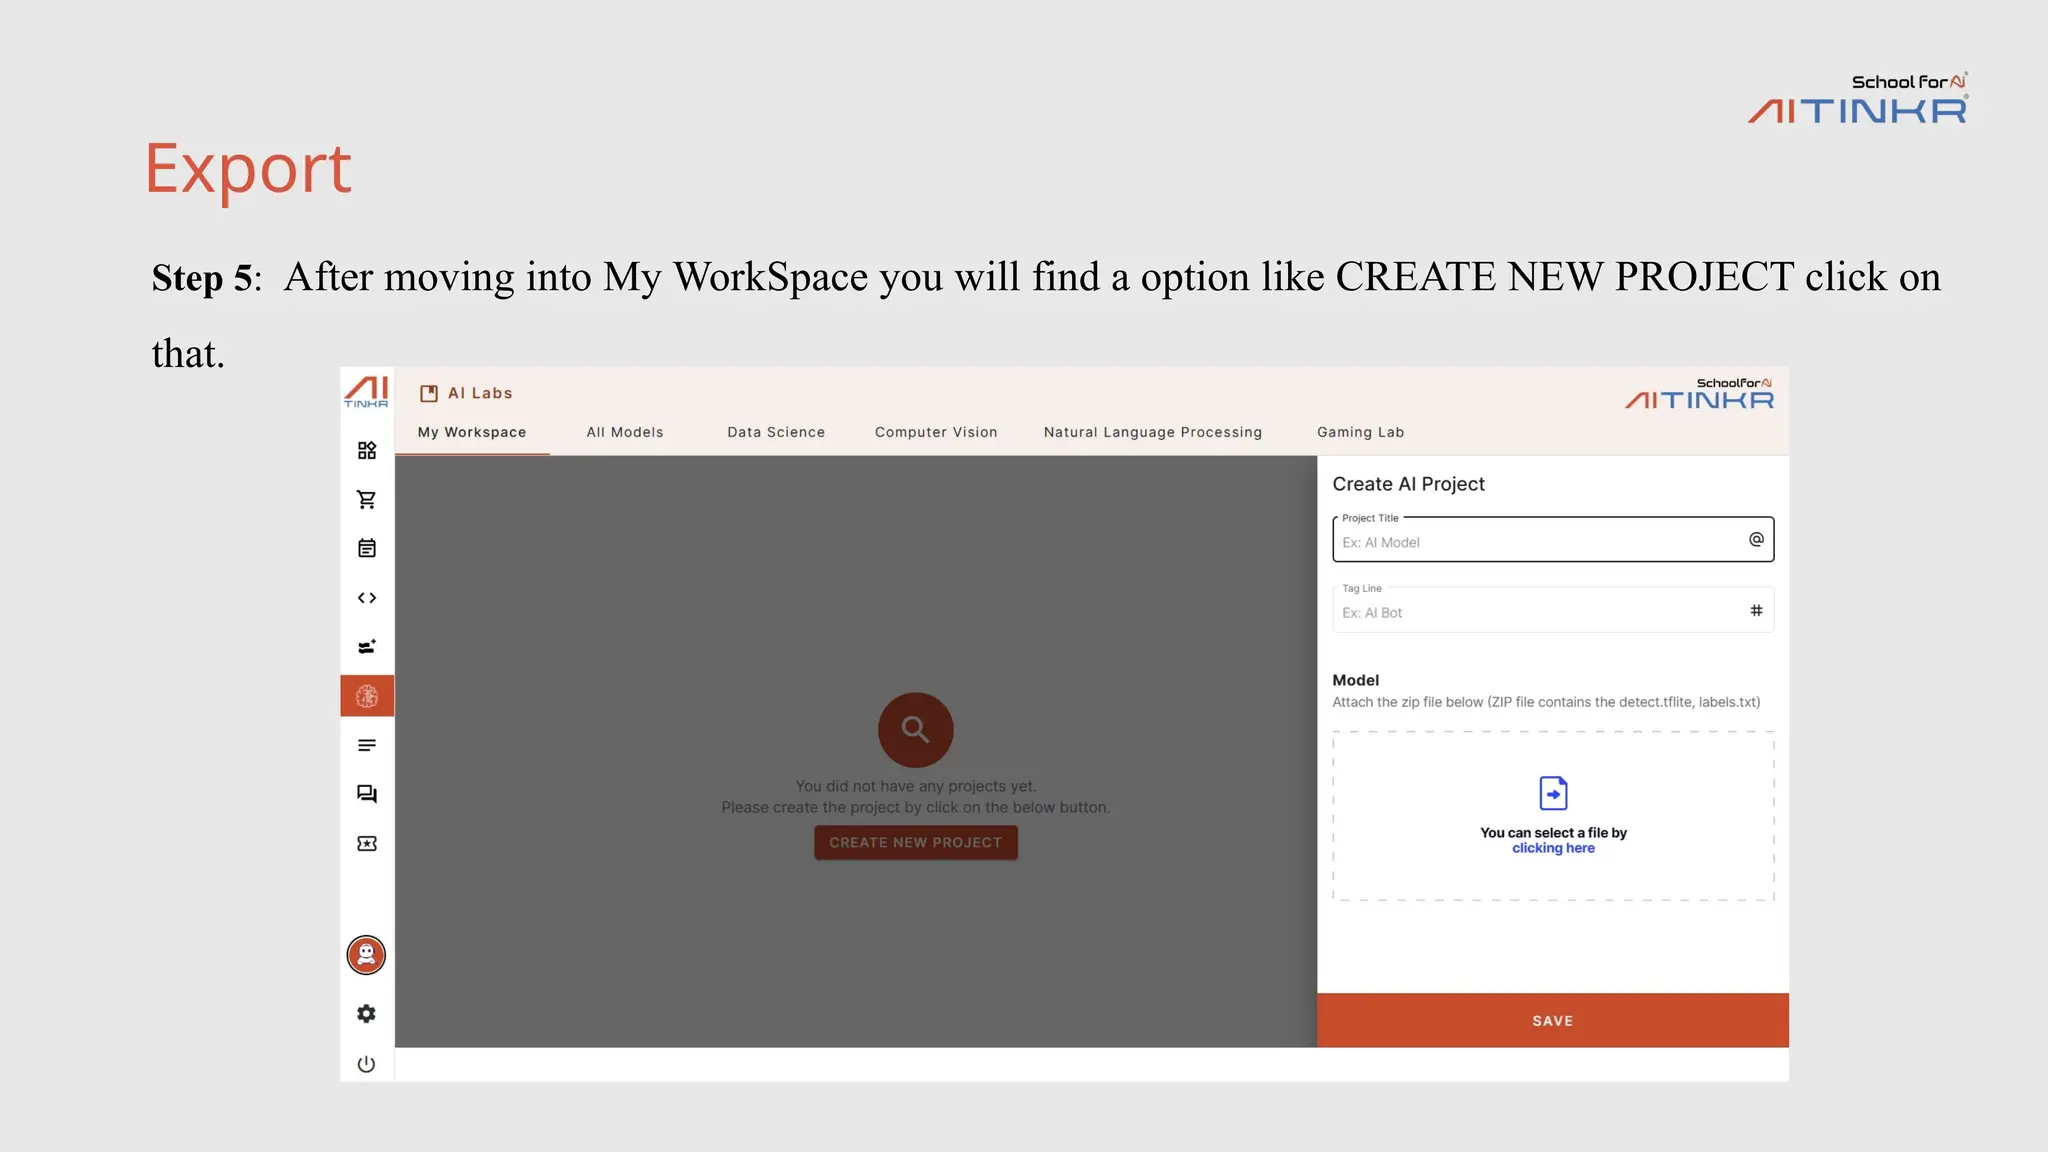
Export
Step 5: Aftermoving into My WorkSpace you will find a option like CREATE NEW PROJECT click on
that.
46.
Export
Step 6: Afterclicking on the CREATE
NEW PROJECT then you will get the pop
up window with project title, Tag line and at
the Model we need to upload that zip file of
that renamed files. And click on save option
to save the project.
Advantages of UsingTeachable Machine
•Easy to Use: Teachable Machine offers a simple, user-friendly interface that requires no coding skills, making it
accessible to everyone.
•No Data Science Expertise Required: With automation of key processes, Teachable Machine allows even non-
experts to create and train machine learning models effectively.
•Supports Multiple Input Types: It supports various input types like images, sounds, and poses, offering
versatility for diverse applications.
•Quick Iteration: Real-time feedback on model accuracy allows for fast testing and iteration, optimizing model
performance quickly.
•Supports Multiple Export Options: Teachable Machine provides several export formats, making it easy to
integrate your trained model into applications and platforms.