2
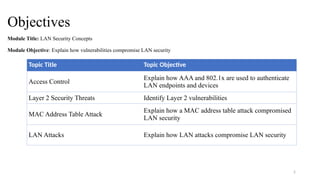
Objectives
Module Title: LANSecurity Concepts
Module Objective: Explain how vulnerabilities compromise LAN security
Topic Title Topic Objective
Access Control
Explain how AAA and 802.1x are used to authenticate
LAN endpoints and devices
Layer 2 Security Threats Identify Layer 2 vulnerabilities
MAC Address Table Attack
Explain how a MAC address table attack compromised
LAN security
LAN Attacks Explain how LAN attacks compromise LAN security
3.
3
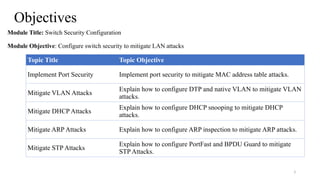
Objectives
Module Title: SwitchSecurity Configuration
Module Objective: Configure switch security to mitigate LAN attacks
Topic Title Topic Objective
Implement Port Security Implement port security to mitigate MAC address table attacks.
Mitigate VLAN Attacks
Explain how to configure DTP and native VLAN to mitigate VLAN
attacks.
Mitigate DHCP Attacks
Explain how to configure DHCP snooping to mitigate DHCP
attacks.
Mitigate ARP Attacks Explain how to configure ARP inspection to mitigate ARP attacks.
Mitigate STP Attacks
Explain how to configure PortFast and BPDU Guard to mitigate
STP Attacks.
Access Control
Authentication witha Local Password
The simplest method of remote access authentication is to
configure a login and password combination on console, vty
lines, and aux ports.
SSH is a more secure form of remote access:
• It requires a username and a password.
• The username and password can be authenticated locally.
The local database method has some limitations:
• User accounts must be configured locally on each device which is
not scalable.
• The method provides no fallback authentication method.
6.
Access Control
AAA Components
AAAstands for Authentication, Authorization, and Accounting, and provides the primary
framework to set up access control on a network device.
AAA is a way to control who is permitted to access a network (authenticate), what they can do
while they are there (authorize), and to audit what actions they performed while accessing the
network (accounting).
7.
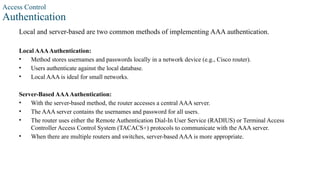
Access Control
Authentication
Local andserver-based are two common methods of implementing AAA authentication.
Local AAAAuthentication:
• Method stores usernames and passwords locally in a network device (e.g., Cisco router).
• Users authenticate against the local database.
• Local AAA is ideal for small networks.
Server-Based AAAAuthentication:
• With the server-based method, the router accesses a central AAA server.
• The AAA server contains the usernames and password for all users.
• The router uses either the Remote Authentication Dial-In User Service (RADIUS) or Terminal Access
Controller Access Control System (TACACS+) protocols to communicate with the AAA server.
• When there are multiple routers and switches, server-based AAA is more appropriate.
8.
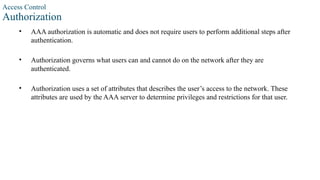
Access Control
Authorization
• AAAauthorization is automatic and does not require users to perform additional steps after
authentication.
• Authorization governs what users can and cannot do on the network after they are
authenticated.
• Authorization uses a set of attributes that describes the user’s access to the network. These
attributes are used by the AAA server to determine privileges and restrictions for that user.
9.
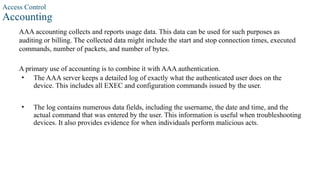
Access Control
Accounting
AAA accountingcollects and reports usage data. This data can be used for such purposes as
auditing or billing. The collected data might include the start and stop connection times, executed
commands, number of packets, and number of bytes.
A primary use of accounting is to combine it with AAA authentication.
• The AAA server keeps a detailed log of exactly what the authenticated user does on the
device. This includes all EXEC and configuration commands issued by the user.
• The log contains numerous data fields, including the username, the date and time, and the
actual command that was entered by the user. This information is useful when troubleshooting
devices. It also provides evidence for when individuals perform malicious acts.
10.
Access Control
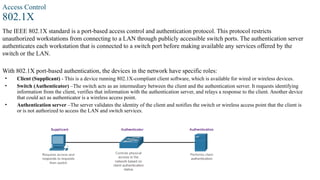
802.1X
The IEEE802.1X standard is a port-based access control and authentication protocol. This protocol restricts
unauthorized workstations from connecting to a LAN through publicly accessible switch ports. The authentication server
authenticates each workstation that is connected to a switch port before making available any services offered by the
switch or the LAN.
With 802.1X port-based authentication, the devices in the network have specific roles:
• Client (Supplicant) - This is a device running 802.1X-compliant client software, which is available for wired or wireless devices.
• Switch (Authenticator) –The switch acts as an intermediary between the client and the authentication server. It requests identifying
information from the client, verifies that information with the authentication server, and relays a response to the client. Another device
that could act as authenticator is a wireless access point.
• Authentication server –The server validates the identity of the client and notifies the switch or wireless access point that the client is
or is not authorized to access the LAN and switch services.
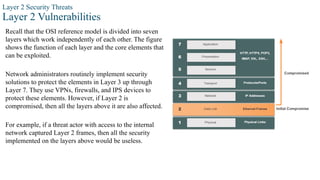
Layer 2 SecurityThreats
Layer 2 Vulnerabilities
Recall that the OSI reference model is divided into seven
layers which work independently of each other. The figure
shows the function of each layer and the core elements that
can be exploited.
Network administrators routinely implement security
solutions to protect the elements in Layer 3 up through
Layer 7. They use VPNs, firewalls, and IPS devices to
protect these elements. However, if Layer 2 is
compromised, then all the layers above it are also affected.
For example, if a threat actor with access to the internal
network captured Layer 2 frames, then all the security
implemented on the layers above would be useless.
13.
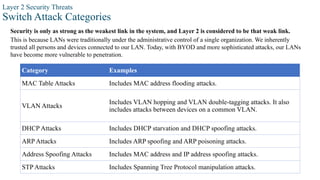
Layer 2 SecurityThreats
Switch Attack Categories
Security is only as strong as the weakest link in the system, and Layer 2 is considered to be that weak link.
This is because LANs were traditionally under the administrative control of a single organization. We inherently
trusted all persons and devices connected to our LAN. Today, with BYOD and more sophisticated attacks, our LANs
have become more vulnerable to penetration.
Category Examples
MAC Table Attacks Includes MAC address flooding attacks.
VLAN Attacks
Includes VLAN hopping and VLAN double-tagging attacks. It also
includes attacks between devices on a common VLAN.
DHCP Attacks Includes DHCP starvation and DHCP spoofing attacks.
ARP Attacks Includes ARP spoofing and ARP poisoning attacks.
Address Spoofing Attacks Includes MAC address and IP address spoofing attacks.
STP Attacks Includes Spanning Tree Protocol manipulation attacks.
14.
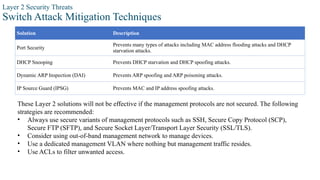
Layer 2 SecurityThreats
Switch Attack Mitigation Techniques
Solution Description
Port Security
Prevents many types of attacks including MAC address flooding attacks and DHCP
starvation attacks.
DHCP Snooping Prevents DHCP starvation and DHCP spoofing attacks.
Dynamic ARP Inspection (DAI) Prevents ARP spoofing and ARP poisoning attacks.
IP Source Guard (IPSG) Prevents MAC and IP address spoofing attacks.
These Layer 2 solutions will not be effective if the management protocols are not secured. The following
strategies are recommended:
• Always use secure variants of management protocols such as SSH, Secure Copy Protocol (SCP),
Secure FTP (SFTP), and Secure Socket Layer/Transport Layer Security (SSL/TLS).
• Consider using out-of-band management network to manage devices.
• Use a dedicated management VLAN where nothing but management traffic resides.
• Use ACLs to filter unwanted access.
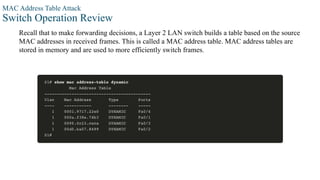
MAC Address TableAttack
Switch Operation Review
Recall that to make forwarding decisions, a Layer 2 LAN switch builds a table based on the source
MAC addresses in received frames. This is called a MAC address table. MAC address tables are
stored in memory and are used to more efficiently switch frames.
17.
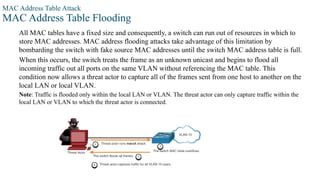
MAC Address TableAttack
MAC Address Table Flooding
All MAC tables have a fixed size and consequently, a switch can run out of resources in which to
store MAC addresses. MAC address flooding attacks take advantage of this limitation by
bombarding the switch with fake source MAC addresses until the switch MAC address table is full.
When this occurs, the switch treats the frame as an unknown unicast and begins to flood all
incoming traffic out all ports on the same VLAN without referencing the MAC table. This
condition now allows a threat actor to capture all of the frames sent from one host to another on the
local LAN or local VLAN.
Note: Traffic is flooded only within the local LAN or VLAN. The threat actor can only capture traffic within the
local LAN or VLAN to which the threat actor is connected.
18.
MAC Address TableAttack
MAC Address Table Attack Mitigation
What makes tools such as macof so dangerous is that an attacker can create a MAC table overflow
attack very quickly. For instance, a Catalyst 6500 switch can store 132,000 MAC addresses in its
MAC address table. A tool such as macof can flood a switch with up to 8,000 bogus frames per
second; creating a MAC address table overflow attack in a matter of a few seconds.
To mitigate MAC address table overflow attacks, network administrators must implement port
security. Port security will only allow a specified number of source MAC addresses to be learned
on the port. Port security is further discussed in another module.
LAN Attacks
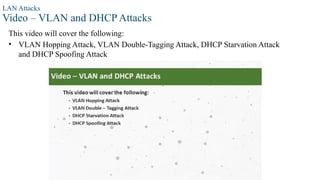
Video –VLAN and DHCP Attacks
This video will cover the following:
• VLAN Hopping Attack, VLAN Double-Tagging Attack, DHCP Starvation Attack
and DHCP Spoofing Attack
21.
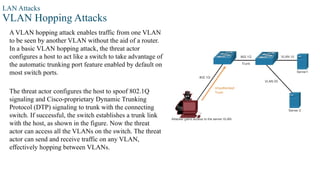
LAN Attacks
VLAN HoppingAttacks
A VLAN hopping attack enables traffic from one VLAN
to be seen by another VLAN without the aid of a router.
In a basic VLAN hopping attack, the threat actor
configures a host to act like a switch to take advantage of
the automatic trunking port feature enabled by default on
most switch ports.
The threat actor configures the host to spoof 802.1Q
signaling and Cisco-proprietary Dynamic Trunking
Protocol (DTP) signaling to trunk with the connecting
switch. If successful, the switch establishes a trunk link
with the host, as shown in the figure. Now the threat
actor can access all the VLANs on the switch. The threat
actor can send and receive traffic on any VLAN,
effectively hopping between VLANs.
22.
LAN Attacks
VLAN Double-TaggingAttacks
A threat actor is specific situations could embed a hidden 802.1Q tag inside the frame that already has an
802.1Q tag. This tag allows the frame to go to a VLAN that the original 802.1Q tag did not specify.
• Step 1: The threat actor sends a double-tagged 802.1Q frame to the switch. The outer header has the
VLAN tag of the threat actor, which is the same as the native VLAN of the trunk port.
• Step 2: The frame arrives on the first switch, which looks at the first 4-byte 802.1Q tag. The switch sees
that the frame is destined for the native VLAN. The switch forwards the packet out all native VLAN ports
after stripping the VLAN tag. The frame is not retagged because it is part of the native VLAN. At this
point, the inner VLAN tag is still intact and has not been inspected by the first switch.
• Step 3: The frame arrives at the second switch which has no knowledge that it was supposed to be for the
native VLAN. Native VLAN traffic is not tagged by the sending switch as specified in the 802.1Q
specification. The second switch looks only at the inner 802.1Q tag that the threat actor inserted and sees
that the frame is destined the target VLAN. The second switch sends the frame on to the target or floods
it, depending on whether there is an existing MAC address table entry for the target.
23.
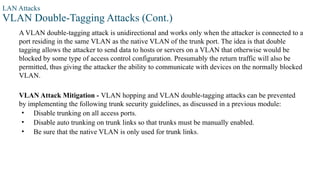
LAN Attacks
VLAN Double-TaggingAttacks (Cont.)
A VLAN double-tagging attack is unidirectional and works only when the attacker is connected to a
port residing in the same VLAN as the native VLAN of the trunk port. The idea is that double
tagging allows the attacker to send data to hosts or servers on a VLAN that otherwise would be
blocked by some type of access control configuration. Presumably the return traffic will also be
permitted, thus giving the attacker the ability to communicate with devices on the normally blocked
VLAN.
VLAN Attack Mitigation - VLAN hopping and VLAN double-tagging attacks can be prevented
by implementing the following trunk security guidelines, as discussed in a previous module:
• Disable trunking on all access ports.
• Disable auto trunking on trunk links so that trunks must be manually enabled.
• Be sure that the native VLAN is only used for trunk links.
24.
LAN Attacks
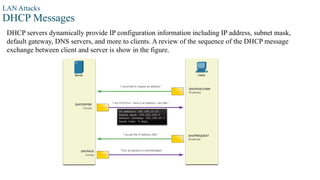
DHCP Messages
DHCPservers dynamically provide IP configuration information including IP address, subnet mask,
default gateway, DNS servers, and more to clients. A review of the sequence of the DHCP message
exchange between client and server is show in the figure.
25.
LAN Attacks
DHCP Attacks
Twotypes of DHCP attacks are DHCP starvation and DHCP spoofing. Both attacks are mitigated
by implementing DHCP snooping.
• DHCP Starvation Attack – The goal of this attack is to create a DoS for connecting clients.
DHCP starvation attacks require an attack tool such as Gobbler. Gobbler has the ability to look
at the entire scope of leasable IP addresses and tries to lease them all. Specifically, it creates
DHCP discovery messages with bogus MAC addresses.
• DHCP Spoofing Attack – This occurs when a rogue DHCP server is connected to the network
and provides false IP configuration parameters to legitimate clients. A rogue server can provide
a variety of misleading information, including the following:
• Wrong default gateway - The rogue server provides an invalid gateway or the IP address of its
host to create a man-in-the-middle attack. This may go entirely undetected as the intruder intercepts
the data flow through the network.
• Wrong DNS server - The rogue server provides an incorrect DNS server address pointing the user
to a nefarious website.
• Wrong IP address - The rogue server provides an invalid IP address effectively creating a DoS
attack on the DHCP client.
26.
LAN Attacks
Video –ARP Attacks, STP Attacks, and CDP Reconnaissance
This video will cover the following:
• ARP Spoofing Attack, ARP Poisoning Attack, STP Attack, CDP Reconnaissance
27.
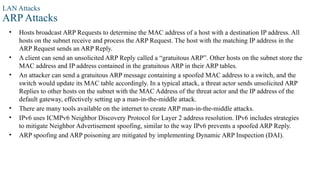
LAN Attacks
ARP Attacks
•Hosts broadcast ARP Requests to determine the MAC address of a host with a destination IP address. All
hosts on the subnet receive and process the ARP Request. The host with the matching IP address in the
ARP Request sends an ARP Reply.
• A client can send an unsolicited ARP Reply called a “gratuitous ARP”. Other hosts on the subnet store the
MAC address and IP address contained in the gratuitous ARP in their ARP tables.
• An attacker can send a gratuitous ARP message containing a spoofed MAC address to a switch, and the
switch would update its MAC table accordingly. In a typical attack, a threat actor sends unsolicited ARP
Replies to other hosts on the subnet with the MAC Address of the threat actor and the IP address of the
default gateway, effectively setting up a man-in-the-middle attack.
• There are many tools available on the internet to create ARP man-in-the-middle attacks.
• IPv6 uses ICMPv6 Neighbor Discovery Protocol for Layer 2 address resolution. IPv6 includes strategies
to mitigate Neighbor Advertisement spoofing, similar to the way IPv6 prevents a spoofed ARP Reply.
• ARP spoofing and ARP poisoning are mitigated by implementing Dynamic ARP Inspection (DAI).
28.
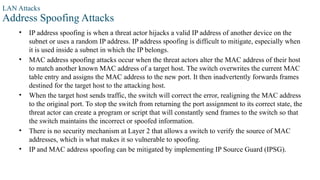
LAN Attacks
Address SpoofingAttacks
• IP address spoofing is when a threat actor hijacks a valid IP address of another device on the
subnet or uses a random IP address. IP address spoofing is difficult to mitigate, especially when
it is used inside a subnet in which the IP belongs.
• MAC address spoofing attacks occur when the threat actors alter the MAC address of their host
to match another known MAC address of a target host. The switch overwrites the current MAC
table entry and assigns the MAC address to the new port. It then inadvertently forwards frames
destined for the target host to the attacking host.
• When the target host sends traffic, the switch will correct the error, realigning the MAC address
to the original port. To stop the switch from returning the port assignment to its correct state, the
threat actor can create a program or script that will constantly send frames to the switch so that
the switch maintains the incorrect or spoofed information.
• There is no security mechanism at Layer 2 that allows a switch to verify the source of MAC
addresses, which is what makes it so vulnerable to spoofing.
• IP and MAC address spoofing can be mitigated by implementing IP Source Guard (IPSG).
29.
LAN Attacks
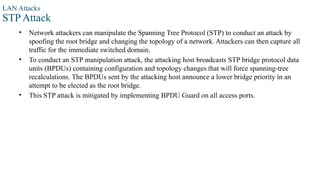
STP Attack
•Network attackers can manipulate the Spanning Tree Protocol (STP) to conduct an attack by
spoofing the root bridge and changing the topology of a network. Attackers can then capture all
traffic for the immediate switched domain.
• To conduct an STP manipulation attack, the attacking host broadcasts STP bridge protocol data
units (BPDUs) containing configuration and topology changes that will force spanning-tree
recalculations. The BPDUs sent by the attacking host announce a lower bridge priority in an
attempt to be elected as the root bridge.
• This STP attack is mitigated by implementing BPDU Guard on all access ports.
30.
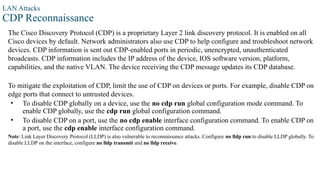
LAN Attacks
CDP Reconnaissance
TheCisco Discovery Protocol (CDP) is a proprietary Layer 2 link discovery protocol. It is enabled on all
Cisco devices by default. Network administrators also use CDP to help configure and troubleshoot network
devices. CDP information is sent out CDP-enabled ports in periodic, unencrypted, unauthenticated
broadcasts. CDP information includes the IP address of the device, IOS software version, platform,
capabilities, and the native VLAN. The device receiving the CDP message updates its CDP database.
To mitigate the exploitation of CDP, limit the use of CDP on devices or ports. For example, disable CDP on
edge ports that connect to untrusted devices.
• To disable CDP globally on a device, use the no cdp run global configuration mode command. To
enable CDP globally, use the cdp run global configuration command.
• To disable CDP on a port, use the no cdp enable interface configuration command. To enable CDP on
a port, use the cdp enable interface configuration command.
Note: Link Layer Discovery Protocol (LLDP) is also vulnerable to reconnaissance attacks. Configure no lldp run to disable LLDP globally. To
disable LLDP on the interface, configure no lldp transmit and no lldp receive.
Implement Port Security
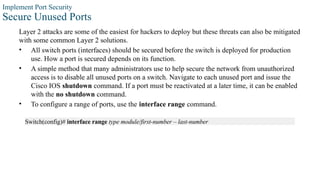
SecureUnused Ports
Layer 2 attacks are some of the easiest for hackers to deploy but these threats can also be mitigated
with some common Layer 2 solutions.
• All switch ports (interfaces) should be secured before the switch is deployed for production
use. How a port is secured depends on its function.
• A simple method that many administrators use to help secure the network from unauthorized
access is to disable all unused ports on a switch. Navigate to each unused port and issue the
Cisco IOS shutdown command. If a port must be reactivated at a later time, it can be enabled
with the no shutdown command.
• To configure a range of ports, use the interface range command.
Switch(config)# interface range type module/first-number – last-number
33.
Implement Port Security
MitigateMAC Address Table Attacks
The simplest and most effective method to prevent MAC address table overflow attacks is to enable
port security.
• Port security limits the number of valid MAC addresses allowed on a port. It allows an
administrator to manually configure MAC addresses for a port or to permit the switch to
dynamically learn a limited number of MAC addresses. When a port configured with port
security receives a frame, the source MAC address of the frame is compared to the list of
secure source MAC addresses that were manually configured or dynamically learned on the
port.
• By limiting the number of permitted MAC addresses on a port to one, port security can be used
to control unauthorized access to the network.
34.
Implement Port Security
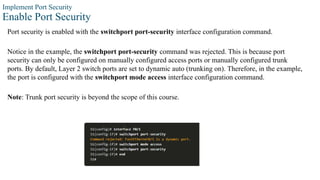
EnablePort Security
Port security is enabled with the switchport port-security interface configuration command.
Notice in the example, the switchport port-security command was rejected. This is because port
security can only be configured on manually configured access ports or manually configured trunk
ports. By default, Layer 2 switch ports are set to dynamic auto (trunking on). Therefore, in the example,
the port is configured with the switchport mode access interface configuration command.
Note: Trunk port security is beyond the scope of this course.
35.
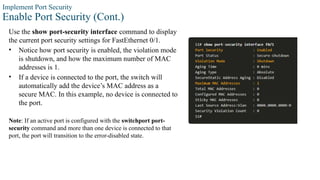
Implement Port Security
EnablePort Security (Cont.)
Use the show port-security interface command to display
the current port security settings for FastEthernet 0/1.
• Notice how port security is enabled, the violation mode
is shutdown, and how the maximum number of MAC
addresses is 1.
• If a device is connected to the port, the switch will
automatically add the device’s MAC address as a
secure MAC. In this example, no device is connected to
the port.
Note: If an active port is configured with the switchport port-
security command and more than one device is connected to that
port, the port will transition to the error-disabled state.
36.
Implement Port Security
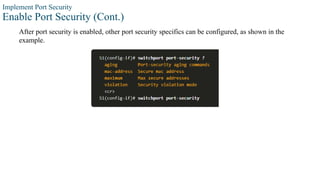
EnablePort Security (Cont.)
After port security is enabled, other port security specifics can be configured, as shown in the
example.
37.
Implement Port Security
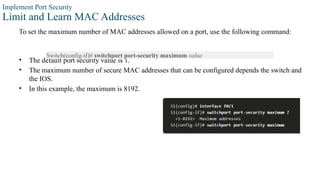
Limitand Learn MAC Addresses
To set the maximum number of MAC addresses allowed on a port, use the following command:
• The default port security value is 1.
• The maximum number of secure MAC addresses that can be configured depends the switch and
the IOS.
• In this example, the maximum is 8192.
Switch(config-if)# switchport port-security maximum value
38.
Implement Port Security
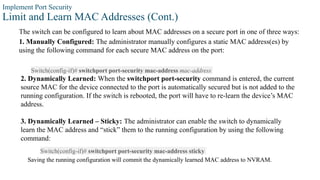
Limitand Learn MAC Addresses (Cont.)
The switch can be configured to learn about MAC addresses on a secure port in one of three ways:
1. Manually Configured: The administrator manually configures a static MAC address(es) by
using the following command for each secure MAC address on the port:
Switch(config-if)# switchport port-security mac-address mac-address
2. Dynamically Learned: When the switchport port-security command is entered, the current
source MAC for the device connected to the port is automatically secured but is not added to the
running configuration. If the switch is rebooted, the port will have to re-learn the device’s MAC
address.
3. Dynamically Learned – Sticky: The administrator can enable the switch to dynamically
learn the MAC address and “stick” them to the running configuration by using the following
command:
Switch(config-if)# switchport port-security mac-address sticky
Saving the running configuration will commit the dynamically learned MAC address to NVRAM.
39.
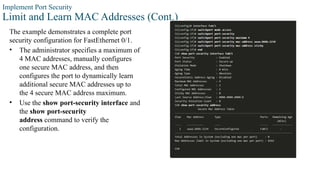
Implement Port Security
Limitand Learn MAC Addresses (Cont.)
The example demonstrates a complete port
security configuration for FastEthernet 0/1.
• The administrator specifies a maximum of
4 MAC addresses, manually configures
one secure MAC address, and then
configures the port to dynamically learn
additional secure MAC addresses up to
the 4 secure MAC address maximum.
• Use the show port-security interface and
the show port-security
address command to verify the
configuration.
40.
Implement Port Security
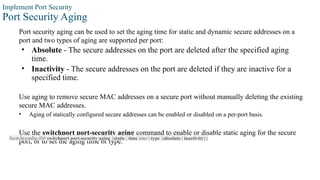
PortSecurity Aging
Port security aging can be used to set the aging time for static and dynamic secure addresses on a
port and two types of aging are supported per port:
• Absolute - The secure addresses on the port are deleted after the specified aging
time.
• Inactivity - The secure addresses on the port are deleted if they are inactive for a
specified time.
Use aging to remove secure MAC addresses on a secure port without manually deleting the existing
secure MAC addresses.
• Aging of statically configured secure addresses can be enabled or disabled on a per-port basis.
Use the switchport port-security aging command to enable or disable static aging for the secure
port, or to set the aging time or type.
Switch(config-if)# switchport port-security aging {static | time time | type {absolute | inactivity}}
41.
Implement Port Security
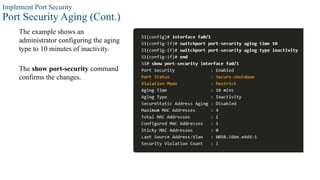
PortSecurity Aging (Cont.)
The example shows an
administrator configuring the aging
type to 10 minutes of inactivity.
The show port-security command
confirms the changes.
interface command to verify the
configuration.
42.
Implement Port Security
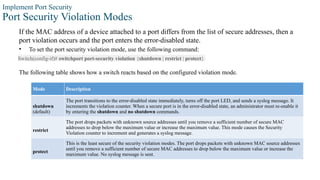
PortSecurity Violation Modes
If the MAC address of a device attached to a port differs from the list of secure addresses, then a
port violation occurs and the port enters the error-disabled state.
• To set the port security violation mode, use the following command:
Switch(config-if)# switchport port-security violation {shutdown | restrict | protect}
Mode Description
shutdown
(default)
The port transitions to the error-disabled state immediately, turns off the port LED, and sends a syslog message. It
increments the violation counter. When a secure port is in the error-disabled state, an administrator must re-enable it
by entering the shutdown and no shutdown commands.
restrict
The port drops packets with unknown source addresses until you remove a sufficient number of secure MAC
addresses to drop below the maximum value or increase the maximum value. This mode causes the Security
Violation counter to increment and generates a syslog message.
protect
This is the least secure of the security violation modes. The port drops packets with unknown MAC source addresses
until you remove a sufficient number of secure MAC addresses to drop below the maximum value or increase the
maximum value. No syslog message is sent.
The following table shows how a switch reacts based on the configured violation mode.
43.
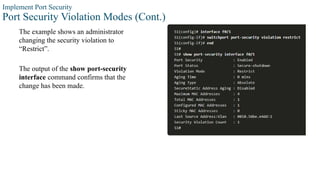
Implement Port Security
PortSecurity Violation Modes (Cont.)
The example shows an administrator
changing the security violation to
“Restrict”.
The output of the show port-security
interface command confirms that the
change has been made.
44.
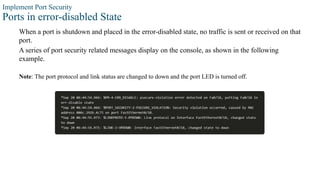
Implement Port Security
Portsin error-disabled State
When a port is shutdown and placed in the error-disabled state, no traffic is sent or received on that
port.
A series of port security related messages display on the console, as shown in the following
example.
Note: The port protocol and link status are changed to down and the port LED is turned off.
45.
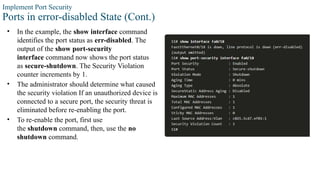
Implement Port Security
Portsin error-disabled State (Cont.)
• In the example, the show interface command
identifies the port status as err-disabled. The
output of the show port-security
interface command now shows the port status
as secure-shutdown. The Security Violation
counter increments by 1.
• The administrator should determine what caused
the security violation If an unauthorized device is
connected to a secure port, the security threat is
eliminated before re-enabling the port.
• To re-enable the port, first use
the shutdown command, then, use the no
shutdown command.
46.
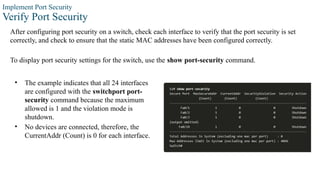
Implement Port Security
VerifyPort Security
After configuring port security on a switch, check each interface to verify that the port security is set
correctly, and check to ensure that the static MAC addresses have been configured correctly.
To display port security settings for the switch, use the show port-security command.
• The example indicates that all 24 interfaces
are configured with the switchport port-
security command because the maximum
allowed is 1 and the violation mode is
shutdown.
• No devices are connected, therefore, the
CurrentAddr (Count) is 0 for each interface.
47.
Implement Port Security
VerifyPort Security (Cont.)
Use the show port-security
interface command to view details for
a specific interface, as shown
previously and in this example.
48.
Implement Port Security
VerifyPort Security (Cont.)
To verify that MAC addresses are
“sticking” to the configuration, use
the show run command as shown in
the example for FastEthernet 0/19.
49.
Implement Port Security
VerifyPort Security (Cont.)
To display all secure MAC addresses
that are manually configured or
dynamically learned on all switch
interfaces, use the show port-security
address command as shown in the
example.
Mitigate VLAN Attacks
VLANAttacks Review
A VLAN hopping attack can be launched in one of three ways:
• Spoofing DTP messages from the attacking host to cause the switch to enter trunking mode.
From here, the attacker can send traffic tagged with the target VLAN, and the switch then
delivers the packets to the destination.
• Introducing a rogue switch and enabling trunking. The attacker can then access all the VLANs
on the victim switch from the rogue switch.
• Another type of VLAN hopping attack is a double-tagging (or double-encapsulated) attack. This
attack takes advantage of the way hardware on most switches operate.
52.
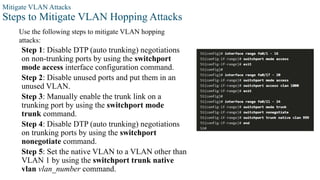
Mitigate VLAN Attacks
Stepsto Mitigate VLAN Hopping Attacks
Use the following steps to mitigate VLAN hopping
attacks:
Step 1: Disable DTP (auto trunking) negotiations
on non-trunking ports by using the switchport
mode access interface configuration command.
Step 2: Disable unused ports and put them in an
unused VLAN.
Step 3: Manually enable the trunk link on a
trunking port by using the switchport mode
trunk command.
Step 4: Disable DTP (auto trunking) negotiations
on trunking ports by using the switchport
nonegotiate command.
Step 5: Set the native VLAN to a VLAN other than
VLAN 1 by using the switchport trunk native
vlan vlan_number command.
Mitigate DHCP Attacks
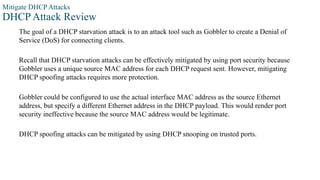
DHCPAttack Review
The goal of a DHCP starvation attack is to an attack tool such as Gobbler to create a Denial of
Service (DoS) for connecting clients.
Recall that DHCP starvation attacks can be effectively mitigated by using port security because
Gobbler uses a unique source MAC address for each DHCP request sent. However, mitigating
DHCP spoofing attacks requires more protection.
Gobbler could be configured to use the actual interface MAC address as the source Ethernet
address, but specify a different Ethernet address in the DHCP payload. This would render port
security ineffective because the source MAC address would be legitimate.
DHCP spoofing attacks can be mitigated by using DHCP snooping on trusted ports.
55.
Mitigate DHCP Attacks
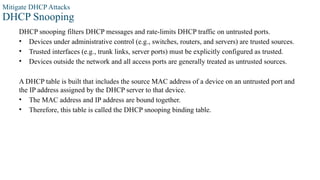
DHCPSnooping
DHCP snooping filters DHCP messages and rate-limits DHCP traffic on untrusted ports.
• Devices under administrative control (e.g., switches, routers, and servers) are trusted sources.
• Trusted interfaces (e.g., trunk links, server ports) must be explicitly configured as trusted.
• Devices outside the network and all access ports are generally treated as untrusted sources.
A DHCP table is built that includes the source MAC address of a device on an untrusted port and
the IP address assigned by the DHCP server to that device.
• The MAC address and IP address are bound together.
• Therefore, this table is called the DHCP snooping binding table.
56.
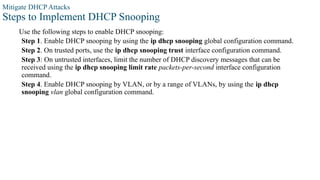
Mitigate DHCP Attacks
Stepsto Implement DHCP Snooping
Use the following steps to enable DHCP snooping:
Step 1. Enable DHCP snooping by using the ip dhcp snooping global configuration command.
Step 2. On trusted ports, use the ip dhcp snooping trust interface configuration command.
Step 3: On untrusted interfaces, limit the number of DHCP discovery messages that can be
received using the ip dhcp snooping limit rate packets-per-second interface configuration
command.
Step 4. Enable DHCP snooping by VLAN, or by a range of VLANs, by using the ip dhcp
snooping vlan global configuration command.
57.
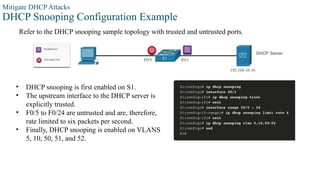
Mitigate DHCP Attacks
DHCPSnooping Configuration Example
Refer to the DHCP snooping sample topology with trusted and untrusted ports.
• DHCP snooping is first enabled on S1.
• The upstream interface to the DHCP server is
explicitly trusted.
• F0/5 to F0/24 are untrusted and are, therefore,
rate limited to six packets per second.
• Finally, DHCP snooping is enabled on VLANS
5, 10, 50, 51, and 52.
58.
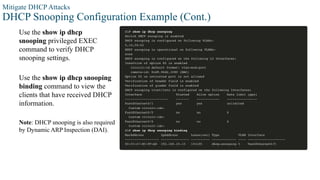
Mitigate DHCP Attacks
DHCPSnooping Configuration Example (Cont.)
Use the show ip dhcp
snooping privileged EXEC
command to verify DHCP
snooping settings.
Use the show ip dhcp snooping
binding command to view the
clients that have received DHCP
information.
Note: DHCP snooping is also required
by Dynamic ARP Inspection (DAI).
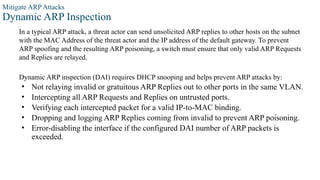
Mitigate ARP Attacks
DynamicARP Inspection
In a typical ARP attack, a threat actor can send unsolicited ARP replies to other hosts on the subnet
with the MAC Address of the threat actor and the IP address of the default gateway. To prevent
ARP spoofing and the resulting ARP poisoning, a switch must ensure that only valid ARP Requests
and Replies are relayed.
Dynamic ARP inspection (DAI) requires DHCP snooping and helps prevent ARP attacks by:
• Not relaying invalid or gratuitous ARP Replies out to other ports in the same VLAN.
• Intercepting all ARP Requests and Replies on untrusted ports.
• Verifying each intercepted packet for a valid IP-to-MAC binding.
• Dropping and logging ARP Replies coming from invalid to prevent ARP poisoning.
• Error-disabling the interface if the configured DAI number of ARP packets is
exceeded.
61.
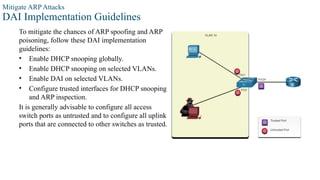
Mitigate ARP Attacks
DAIImplementation Guidelines
To mitigate the chances of ARP spoofing and ARP
poisoning, follow these DAI implementation
guidelines:
• Enable DHCP snooping globally.
• Enable DHCP snooping on selected VLANs.
• Enable DAI on selected VLANs.
• Configure trusted interfaces for DHCP snooping
and ARP inspection.
It is generally advisable to configure all access
switch ports as untrusted and to configure all uplink
ports that are connected to other switches as trusted.
62.
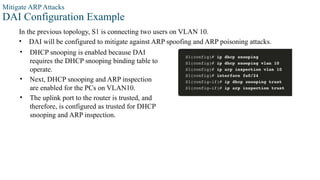
Mitigate ARP Attacks
DAIConfiguration Example
In the previous topology, S1 is connecting two users on VLAN 10.
• DAI will be configured to mitigate against ARP spoofing and ARP poisoning attacks.
• DHCP snooping is enabled because DAI
requires the DHCP snooping binding table to
operate.
• Next, DHCP snooping and ARP inspection
are enabled for the PCs on VLAN10.
• The uplink port to the router is trusted, and
therefore, is configured as trusted for DHCP
snooping and ARP inspection.
63.
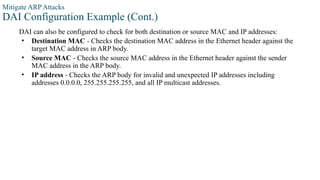
Mitigate ARP Attacks
DAIConfiguration Example (Cont.)
DAI can also be configured to check for both destination or source MAC and IP addresses:
• Destination MAC - Checks the destination MAC address in the Ethernet header against the
target MAC address in ARP body.
• Source MAC - Checks the source MAC address in the Ethernet header against the sender
MAC address in the ARP body.
• IP address - Checks the ARP body for invalid and unexpected IP addresses including
addresses 0.0.0.0, 255.255.255.255, and all IP multicast addresses.
64.
Mitigate ARP Attacks
DAIConfiguration Example (Cont.)
The ip arp inspection validate {[src-mac] [dst-mac] [ip]} global configuration command is used to
configure DAI to drop ARP packets when the IP addresses are invalid.
• It can be used when the MAC addresses in the body of the ARP packets do not match the
addresses that are specified in the Ethernet header.
• Notice in the following example how only one command can be configured.
• Therefore, entering multiple ip arp
inspection validate commands overwrites
the previous command.
• To include more than one validation
method, enter them on the same command
line as shown in the output.
Mitigate STP Attacks
PortFastand BPDU Guard
Recall that network attackers can manipulate the Spanning Tree Protocol (STP) to conduct an
attack by spoofing the root bridge and changing the topology of a network.
To mitigate STP attacks, use PortFast and Bridge Protocol Data Unit (BPDU) Guard:
PortFast
• PortFast immediately brings a port to the forwarding state from a blocking state, bypassing the
listening and learning states.
• Apply to all end-user access ports.
BPDU Guard
• BPDU guard immediately error disables a port that receives a BPDU.
• Like PortFast, BPDU guard should only be configured on interfaces attached to end devices.
67.
Mitigate STP Attacks
ConfigurePortFast
PortFast bypasses the STP listening and learning states to minimize the time that access ports must
wait for STP to converge.
• Only enable PortFast on access ports.
• PortFast on inter switch links can create a spanning-tree loop.
PortFast can be enabled:
• On an interface – Use the spanning-tree
portfast interface configuration command.
• Globally – Use the spanning-tree portfast
default global configuration command to
enable PortFast on all access ports.
68.
Mitigate STP Attacks
ConfigurePortFast (Cont.)
To verify whether PortFast is enabled globally you can use either the:
• show running-config | begin span command
• show spanning-tree summary command
To verify if PortFast is enabled an interface, use the show running-config interface type/number command.
The show spanning-tree interface type/number detail command can also be used for verification.
69.
Mitigate STP Attacks
ConfigureBPDU Guard
An access port could receive an unexpected BPDUs accidentally or because a user connected an unauthorized
switch to the access port.
• If a BPDU is received on a BPDU Guard enabled access port, the port is put into error-disabled state.
• This means the port is shut down and must be manually re-enabled or automatically recovered through
the errdisable recovery cause psecure_violation global command.
BPDU Guard can be enabled:
• On an interface – Use the spanning-tree bpduguard
enable interface configuration command.
• Globally – Use the spanning-tree portfast bpduguard
default global configuration command to enable BPDU
Guard on all access ports.
70.
Reference
[1] Watkins, M.,& Wallace, K. (2008). Ccna security official exam certification guide
(exam 640-553). Cisco Press.
[2] Odom, W. (2012). CCNA ICND2 640-816 Official Cert Guide (No. 1624). Cisco
Press.
[3] Arogundade, O. R. (2023). Network security concepts, dangers, and defense best
practical. Computer Engineering and Intelligent Systems, 14(2).
Editor's Notes
#1 Cisco Networking Academy Program
Switching, Routing and Wireless Essentials v7.0 (SRWE)
Module 10: LAN Security Concepts
#2 10- Introduction
10.0.2 – What will I learn in this module
#3 11- Switch Security Configuration
11.0- Introduction
11.0.2 – What will I learn in this module?
#4 10 – LAN Security Concepts
10.2 – Access Control
#5 حسابهای کاربری باید بهصورت محلی روی هر دستگاه بهطور جداگانه پیکربندی شوند، که این موضوع در محیطهای بزرگ قابلیت مقیاسپذیری (Scalability) را محدود میکند.
این روش هیچ مکانیزم جایگزینی برای احراز هویت (Fallback Authentication) ارائه نمیدهد، بنابراین اگر پایگاهداده محلی در دسترس نباشد، فرآیند احراز هویت شکست خواهد خورد.
#6 10 – LAN Security Concepts
10.2 – Access Control
10.2.2 – AAA Components
#7 10 – LAN Security Concepts
10.2 – Access Control
10.2.3 - Authentication
#8 10 – LAN Security Concepts
10.2 – Access Control
10.2.4 - Authorization
#9 10 – LAN Security Concepts
10.2 – Access Control
10.2.5 - Accounting
#10 10 – LAN Security Concepts
10.2 – Access Control
10.2.6 – 802.1X
10.2.7 – Check Your Understanding – Access Control
#51 حملهی VLAN Hopping را میتوان به یکی از سه روش زیر انجام داد:
جعل پیامهای DTP (Dynamic Trunking Protocol):
در این روش، مهاجم از میزبان مخرب خود پیامهای DTP جعلی ارسال میکند تا سوییچ را وادار به ورود به حالت trunk کند. پس از آن، مهاجم میتواند ترافیکی را ارسال کند که با VLAN هدف برچسبگذاری شده باشد (tagged)، و سوییچ آن بستهها را به مقصد مربوطه در آن VLAN تحویل میدهد.
وارد کردن یک سوییچ مخرب (rogue switch) و فعالسازی trunking:
مهاجم یک سوییچ جعلی را وارد شبکه میکند و حالت trunk را روی آن فعال مینماید. در نتیجه، از طریق این سوییچ مخرب، میتواند به تمامی VLANهای موجود در سوییچ قربانی دسترسی پیدا کند.
حملهی دوبرچسبی (double-tagging یا double-encapsulated):
این نوع حمله با سوءاستفاده از نحوهی عملکرد سختافزار اکثر سوییچها انجام میشود. در این روش، مهاجم یک بسته را با دو برچسب VLAN ارسال میکند. سوییچ اول برچسب بیرونی را حذف میکند و بدون بررسی برچسب داخلی، بسته را به سوییچ بعدی ارسال میکند. اگر برچسب داخلی مربوط به VLAN هدف باشد، بسته به آن VLAN منتقل میشود.
#55 چیست و چگونه عمل میکند؟
DHCP Snooping ترافیک DHCP را در شبکه فیلتر کرده و روی پورتهای غیرمطمئن (untrusted ports) محدودیت نرخ (Rate Limit) اعمال میکند.
تجهیزاتی که تحت کنترل مدیریتی هستند، مانند سوییچها، روترها و سرورها، به عنوان منابع مورد اعتماد (Trusted Sources) در نظر گرفته میشوند.
پورتهای مطمئن (مثل لینکهای trunk یا پورتهایی که به سرور DHCP متصلاند) باید بهصورت صریح و دستی بهعنوان trusted تنظیم شوند.
دستگاههایی که خارج از شبکه سازمان هستند، و همچنین تمام پورتهای دسترسی (Access Ports)، معمولاً به عنوان غیرمطمئن (Untrusted) شناخته میشوند.
📋 DHCP Snooping Binding Table چیست؟
وقتی DHCP Snooping فعال باشد، سوییچ جدولی میسازد به نام DHCP Snooping Binding Table که شامل اطلاعات زیر است:
MAC Address دستگاه متصل به پورت غیرمطمئن (Untrusted Port)
IP Address اختصاصیافته به آن دستگاه توسط DHCP سرور
این دو مقدار (MAC و IP) با هم bind (متصل) میشن، و این جدول برای بررسی صحت ترافیک آینده و جلوگیری از حملاتی مثل DHCP Spoofing و ARP Spoofing استفاده میشه.
#60 در یک حملهی رایج ARP (ARP Spoofing یا ARP Poisoning)، مهاجم میتونه پاسخهای ARP جعلی (Unsolicited ARP Replies) به سایر میزبانها در همان زیرشبکه ارسال کنه، طوری که آدرس MAC خودش را بهجای آدرس IP دروازه پیشفرض (Default Gateway) جا بزند.
به این ترتیب، سایر سیستمها فکر میکنن که آدرس IP گیتوی به آدرس MAC مهاجم تعلق دارد و ترافیکشان را به مهاجم میفرستن.
برای جلوگیری از این نوع حمله و آلودگی جدول ARP (ARP Poisoning)، سوییچ باید اطمینان حاصل کند که فقط درخواستها و پاسخهای معتبر ARP در شبکه منتشر میشن.
🛡️ Dynamic ARP Inspection (DAI) چیست و چگونه از حملات ARP جلوگیری میکند؟
ویژگی DAI به سوییچ این امکان را میدهد که تمام بستههای ARP ورودی را بررسی و اعتبارسنجی کند. این قابلیت نیازمند فعال بودن DHCP Snooping است، چون از آن برای شناخت نگاشتهای معتبر IP به MAC استفاده میکند.
DAI به روشهای زیر از حملات ARP جلوگیری میکند:
❌ از ارسال پاسخهای ARP نامعتبر یا Gratuitous ARP به سایر پورتهای VLAN جلوگیری میکند.
Gratuitous ARP به بستههایی گفته میشه که بدون درخواست قبلی ارسال میشن (و معمولاً در حملات استفاده میشن).
🔍 تمام درخواستها و پاسخهای ARP روی پورتهای غیرمطمئن (Untrusted Ports) را رهگیری میکند.
✅ هر بستهی رهگیریشده را با جدول نگاشت IP به MAC بررسی میکند (که توسط DHCP Snooping ساخته شده).
🚫 در صورتیکه پاسخ ARP با اطلاعات معتبر مطابقت نداشته باشه، بسته رو Drop و لاگ میکنه تا از Poisoning جلوگیری شه.
⚠️ اگر تعداد بستههای ARP دریافتی از یک پورت، از مقدار پیکربندیشده بیشتر شود، آن پورت را به حالت خطا (Error-Disable) میبرد.
این مکانیزم از حملات flood جلوگیری میکنه.
#66 به خاطر داشته باشید که مهاجمان شبکه میتوانند با دستکاری پروتکل Spanning Tree (STP)، حملهای را انجام دهند که در آن خود را بهعنوان Root Bridge جا میزنند و به این وسیله توپولوژی شبکه را تغییر میدهند. این کار میتواند باعث قطع ارتباط یا ایجاد مسیرهای ناامن در شبکه شود.
🛡️ برای مقابله با حملات STP از دو مکانیزم زیر استفاده میکنیم:
⚡ PortFast
ویژگی PortFast باعث میشود پورتهای Access که به دستگاههای انتهایی متصلاند، بلافاصله از حالت blocking به حالت forwarding بروند، بدون اینکه وارد حالتهای listening و learning شوند.
این کار باعث میشود اتصال کاربر نهایی (مثلاً کامپیوتر یا پرینتر) سریعتر برقرار شود.
PortFast فقط باید روی پورتهایی فعال شود که به End Device متصل هستند، نه پورتهای trunk یا uplink.
🛡️ BPDU Guard
BPDU Guard وقتی روی پورتی که PortFast دارد، پیغام BPDU دریافت کند، آن پورت را بلافاصله به حالت Error-Disabled میبرد.
این یعنی اگر یک مهاجم سعی کند یک سوییچ یا دستگاهی را به پورت کاربری متصل کند و پیامهای STP ارسال کند، پورت فوراً قطع میشود.
این قابلیت بهویژه برای جلوگیری از جعل Root Bridge توسط مهاجم بسیار حیاتی است.


![Mitigate ARP Attacks
DAI Configuration Example (Cont.)
The ip arp inspection validate {[src-mac] [dst-mac] [ip]} global configuration command is used to
configure DAI to drop ARP packets when the IP addresses are invalid.
• It can be used when the MAC addresses in the body of the ARP packets do not match the
addresses that are specified in the Ethernet header.
• Notice in the following example how only one command can be configured.
• Therefore, entering multiple ip arp
inspection validate commands overwrites
the previous command.
• To include more than one validation
method, enter them on the same command
line as shown in the output.](https://image.slidesharecdn.com/switchsecurity-azadsanjari-250426212449-45ff0b0f/85/SwitchSecurity-SwitchSecurity-SwitchSecurity-SwitchSecurity-64-320.jpg)

![Reference
[1] Watkins, M., & Wallace, K. (2008). Ccna security official exam certification guide
(exam 640-553). Cisco Press.
[2] Odom, W. (2012). CCNA ICND2 640-816 Official Cert Guide (No. 1624). Cisco
Press.
[3] Arogundade, O. R. (2023). Network security concepts, dangers, and defense best
practical. Computer Engineering and Intelligent Systems, 14(2).](https://image.slidesharecdn.com/switchsecurity-azadsanjari-250426212449-45ff0b0f/85/SwitchSecurity-SwitchSecurity-SwitchSecurity-SwitchSecurity-70-320.jpg)


