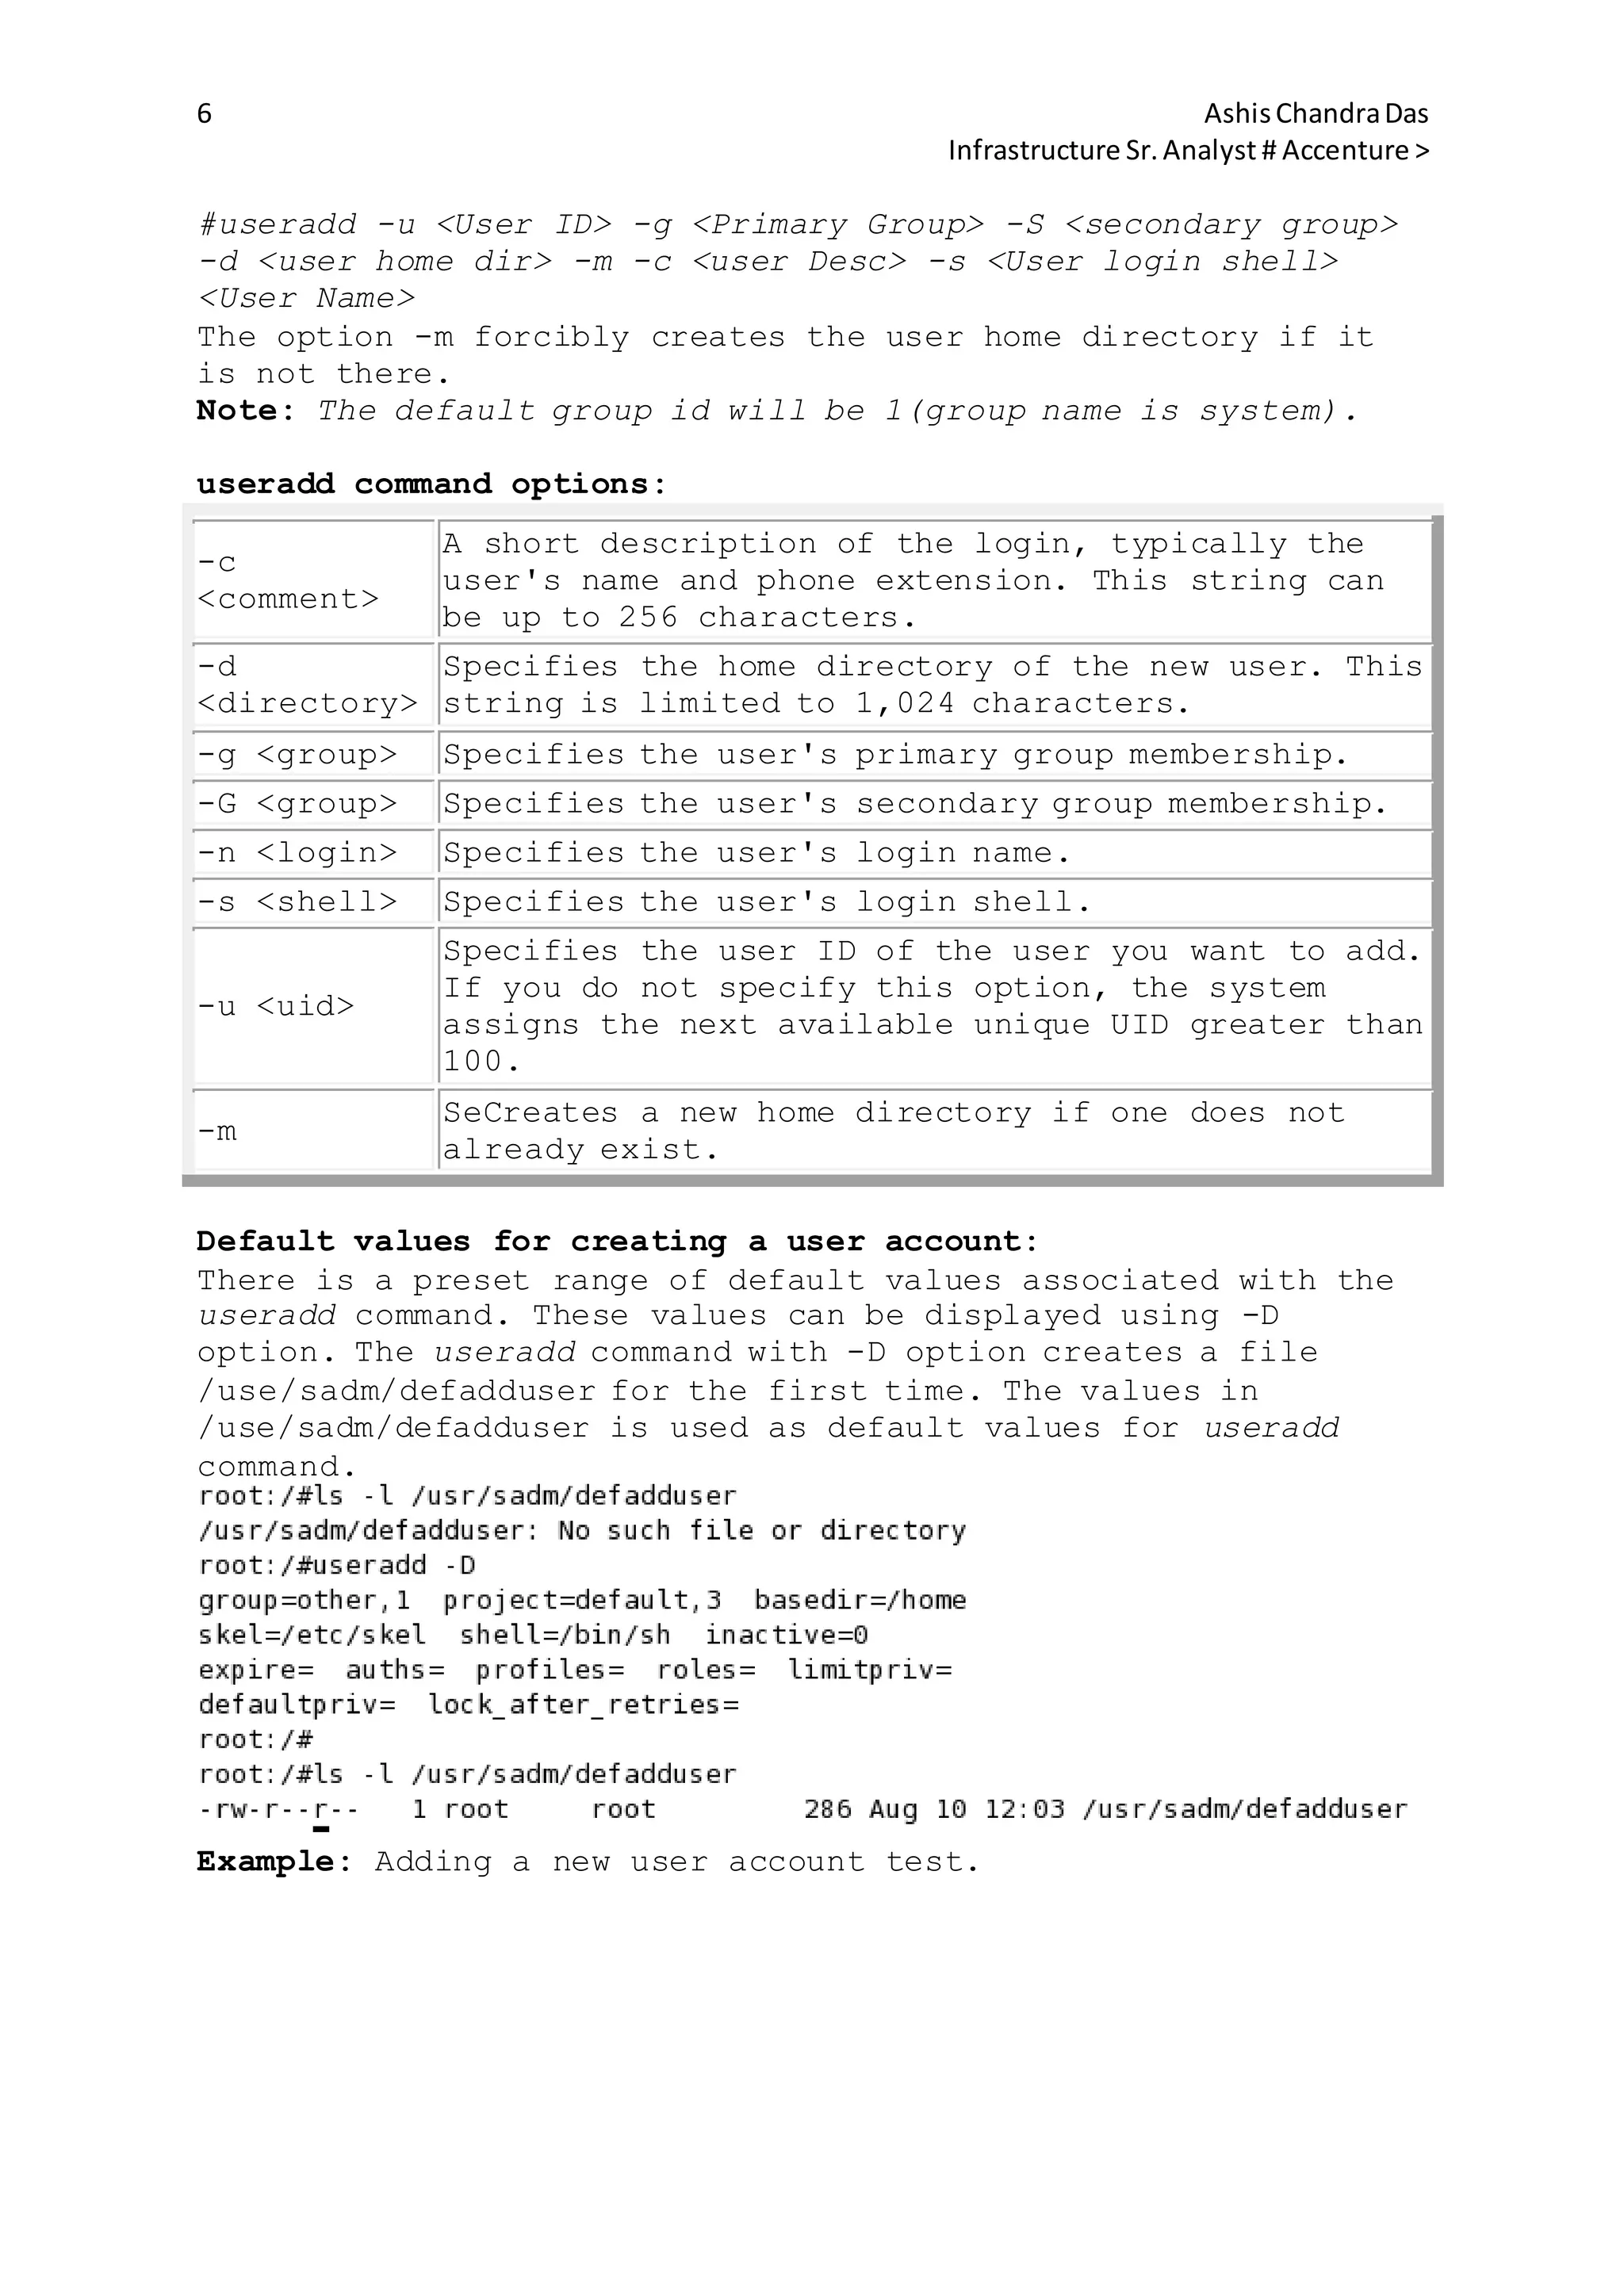
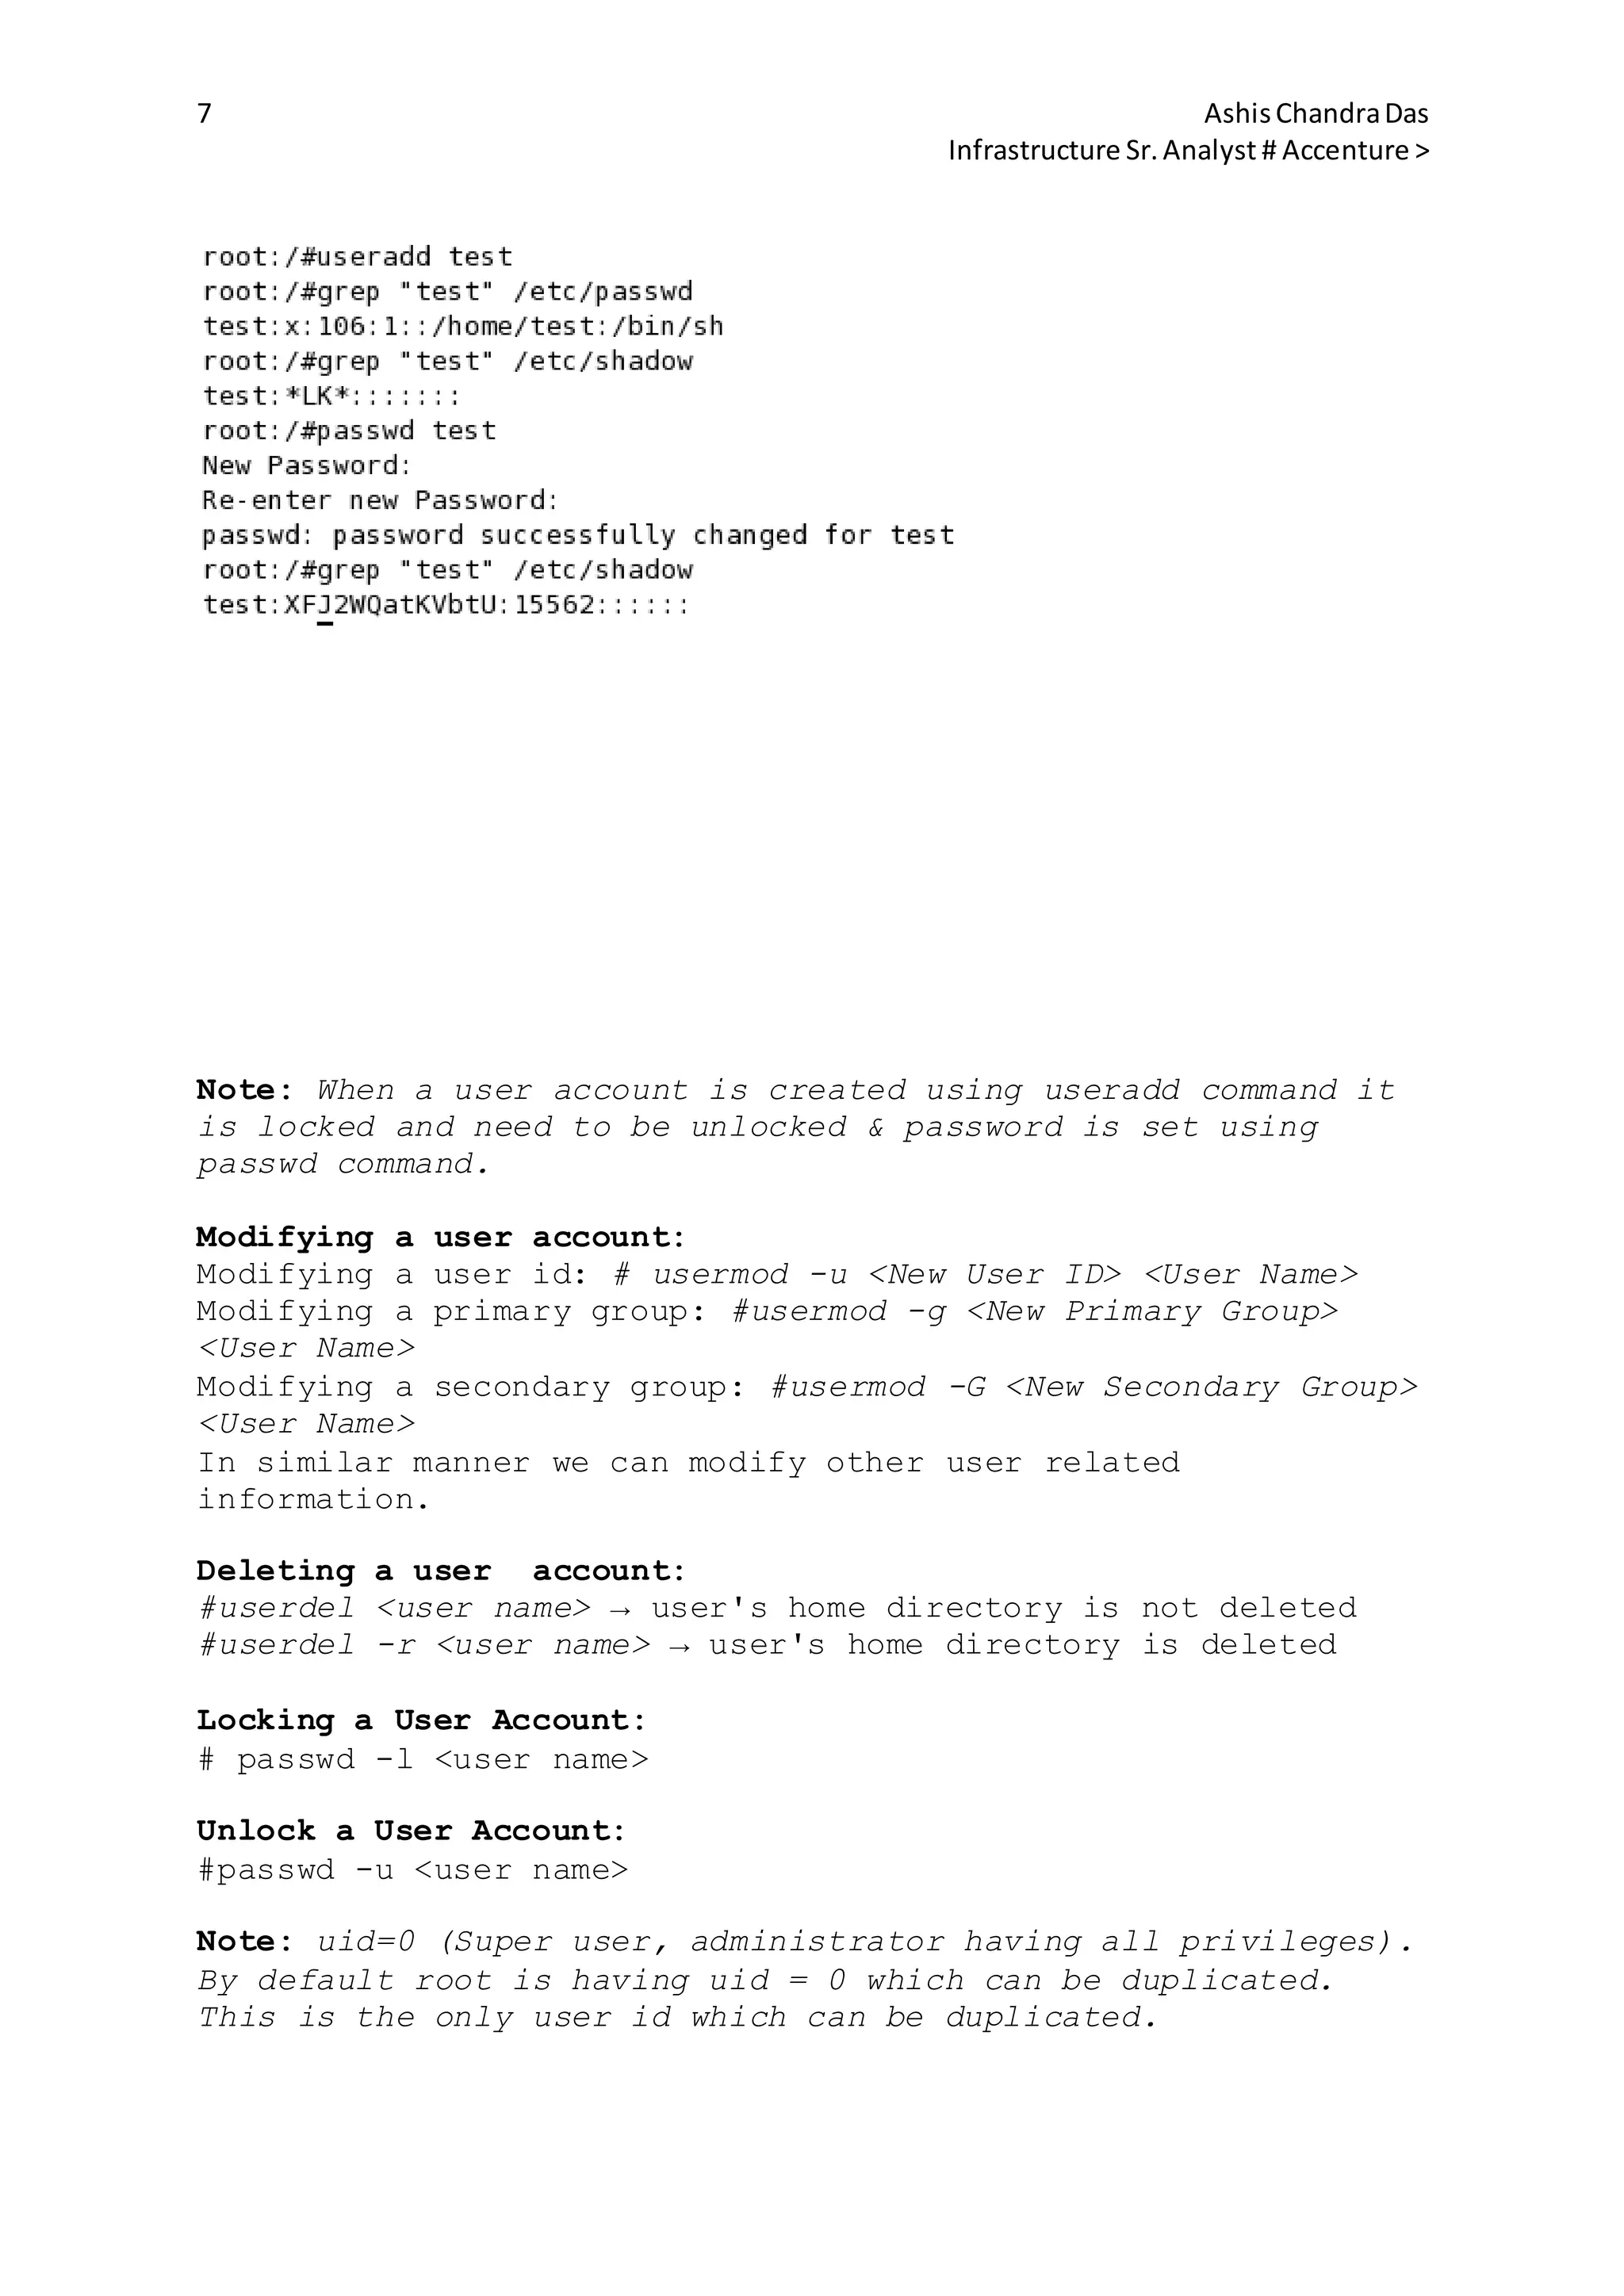
This document provides information on user administration in Solaris, including:
- The system files used to store user account information like /etc/passwd, /etc/shadow, and /etc/group.
- Commands for managing user accounts like useradd, usermod, userdel, passwd, and su.
- Configuring password policies using /etc/default/passwd and locking accounts after failed login attempts.
- Managing groups using groupadd, groupmod, and groupdel.
- Variables that customize a user's session and setting them.
- Commands to monitor system access like who, finger, last, and recording failed login attempts.

![10 AshisChandraDas
Infrastructure Sr.Analyst # Accenture >
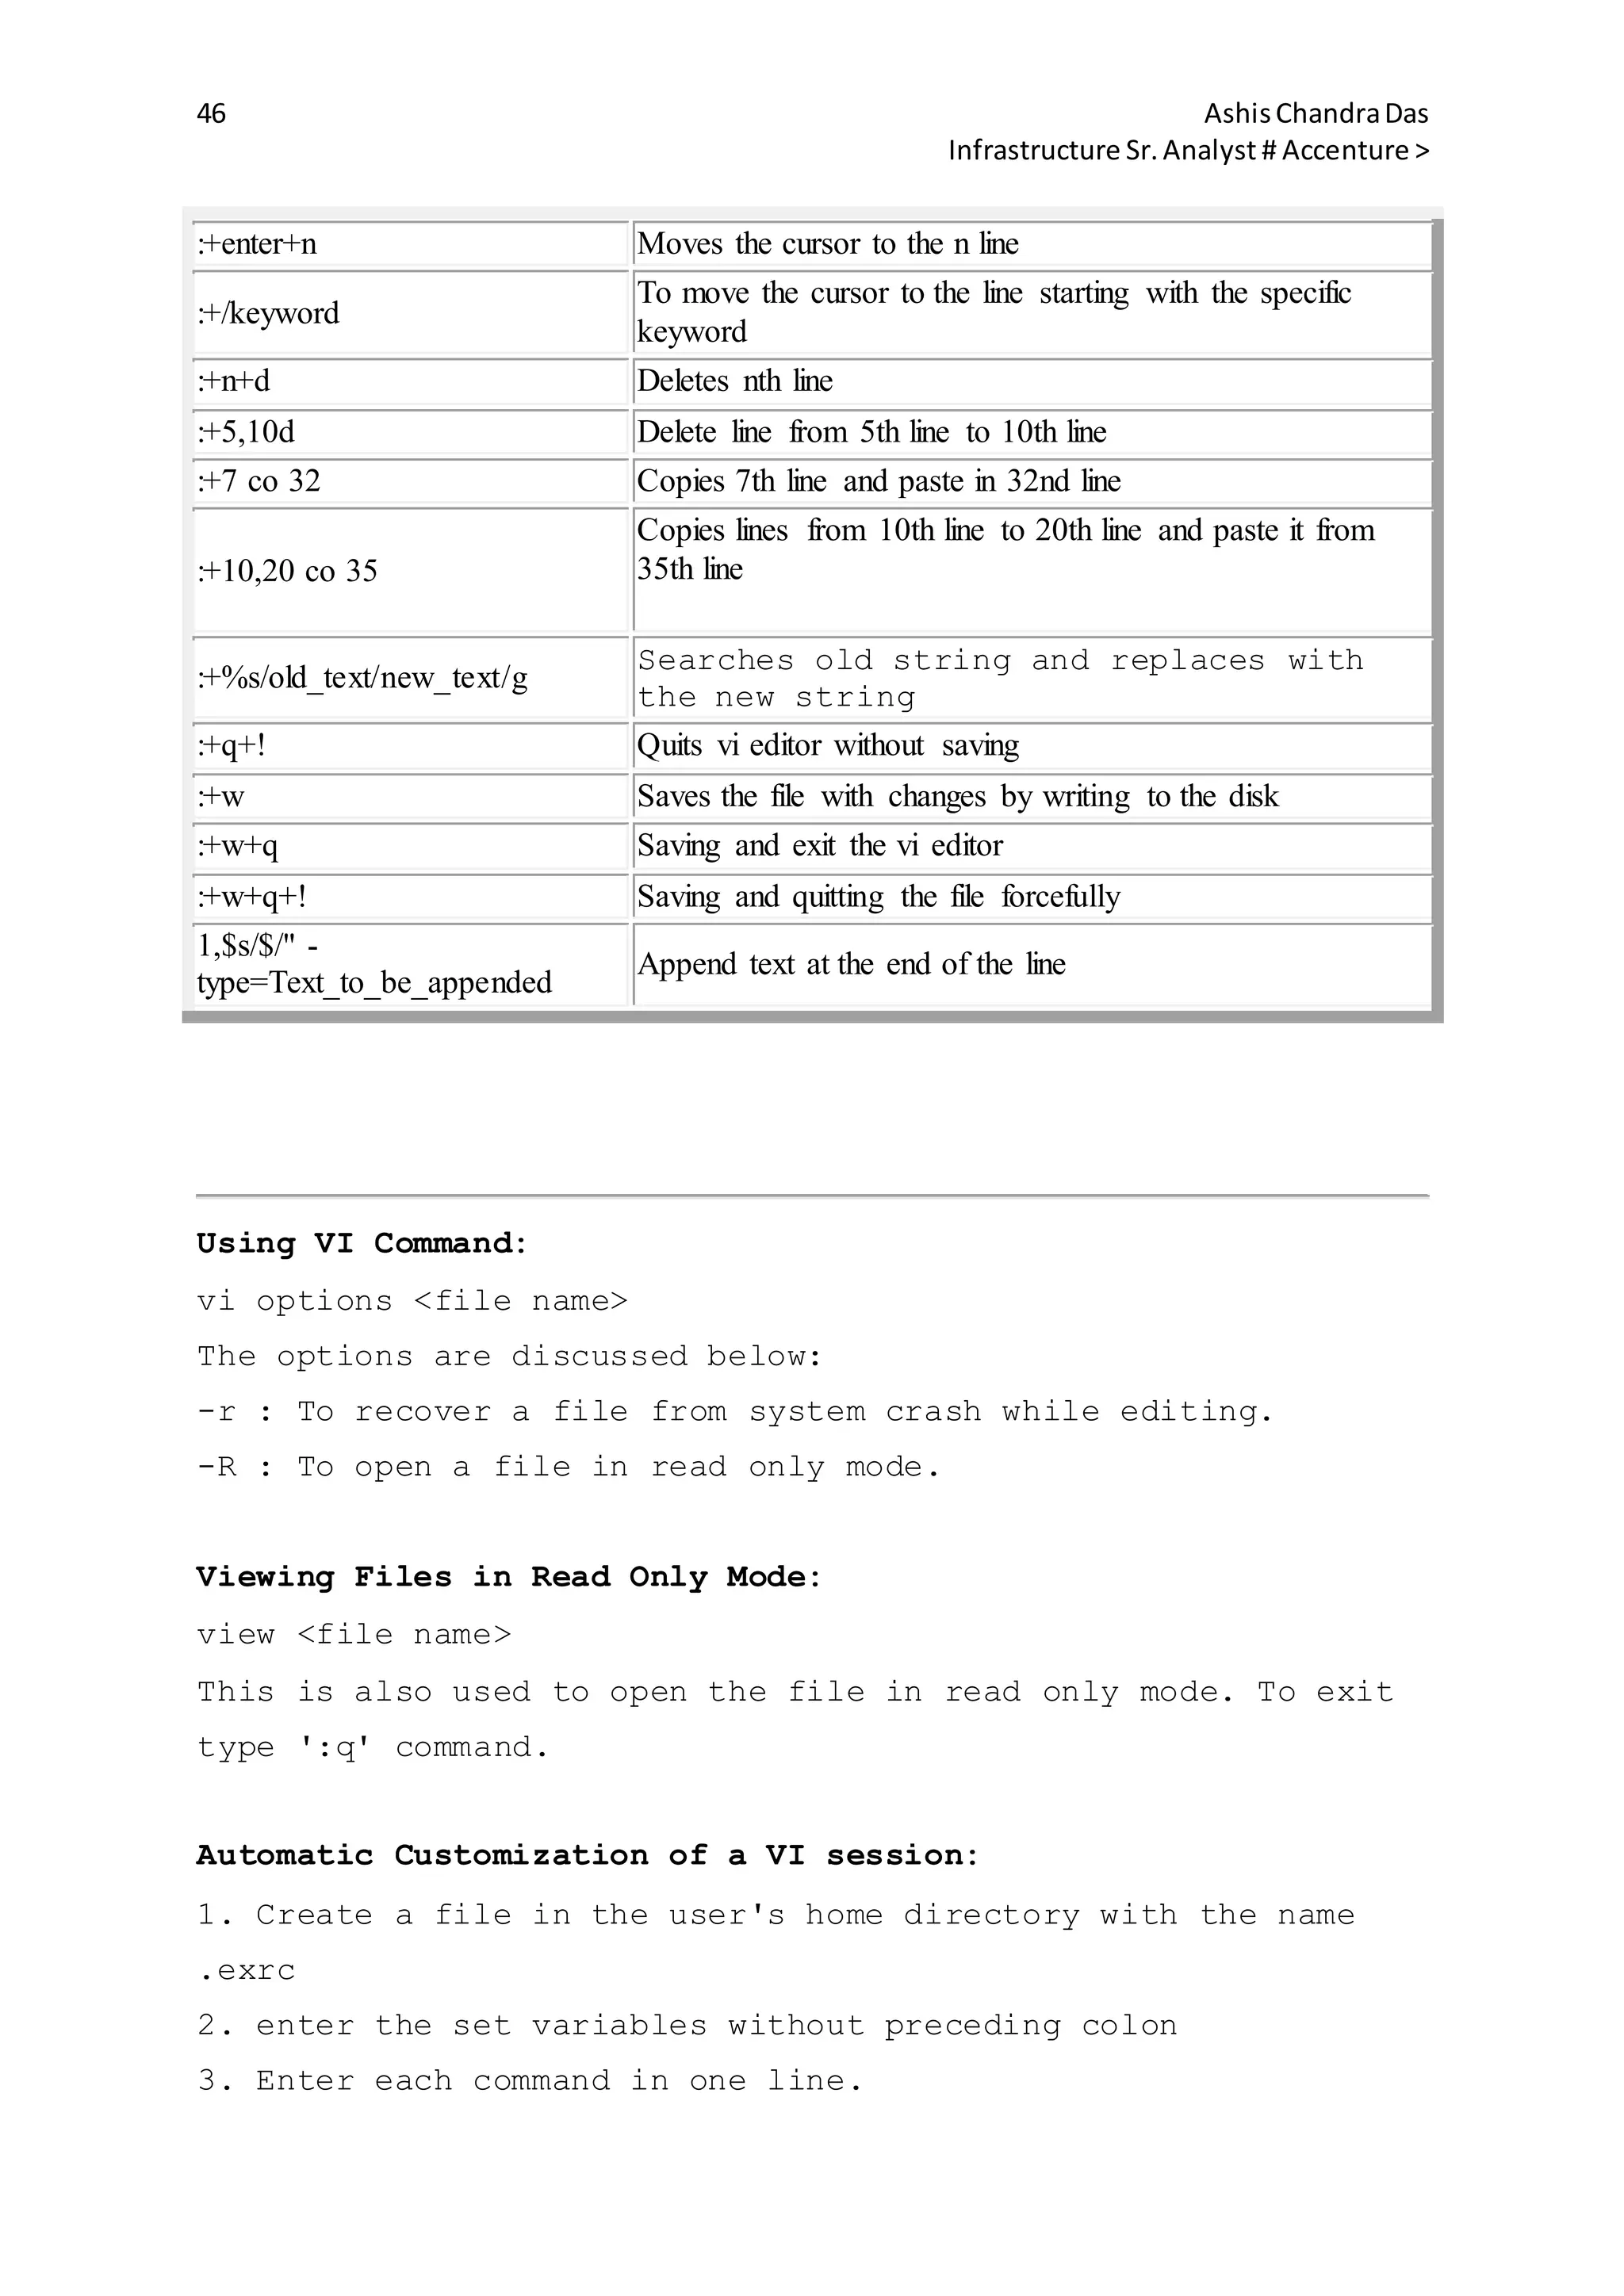
PATH login
Sets the default path where the command is
searched
MAIL login Sets path to the mailbox of the user
TERM login Used to define the terminal
PWD shell Defines the current working directory
PS1 shell Defines shell prompt for bourne or korn shell
prompt shell Contains the shell prompt for C shell
Setting login variables for the shell:
Shell User's Initialization file
Bourne/Korn
VARIABLE=value;export VARIBLE
eg:#PS1="$HOSTNAME";export PS1
C setenv variable value
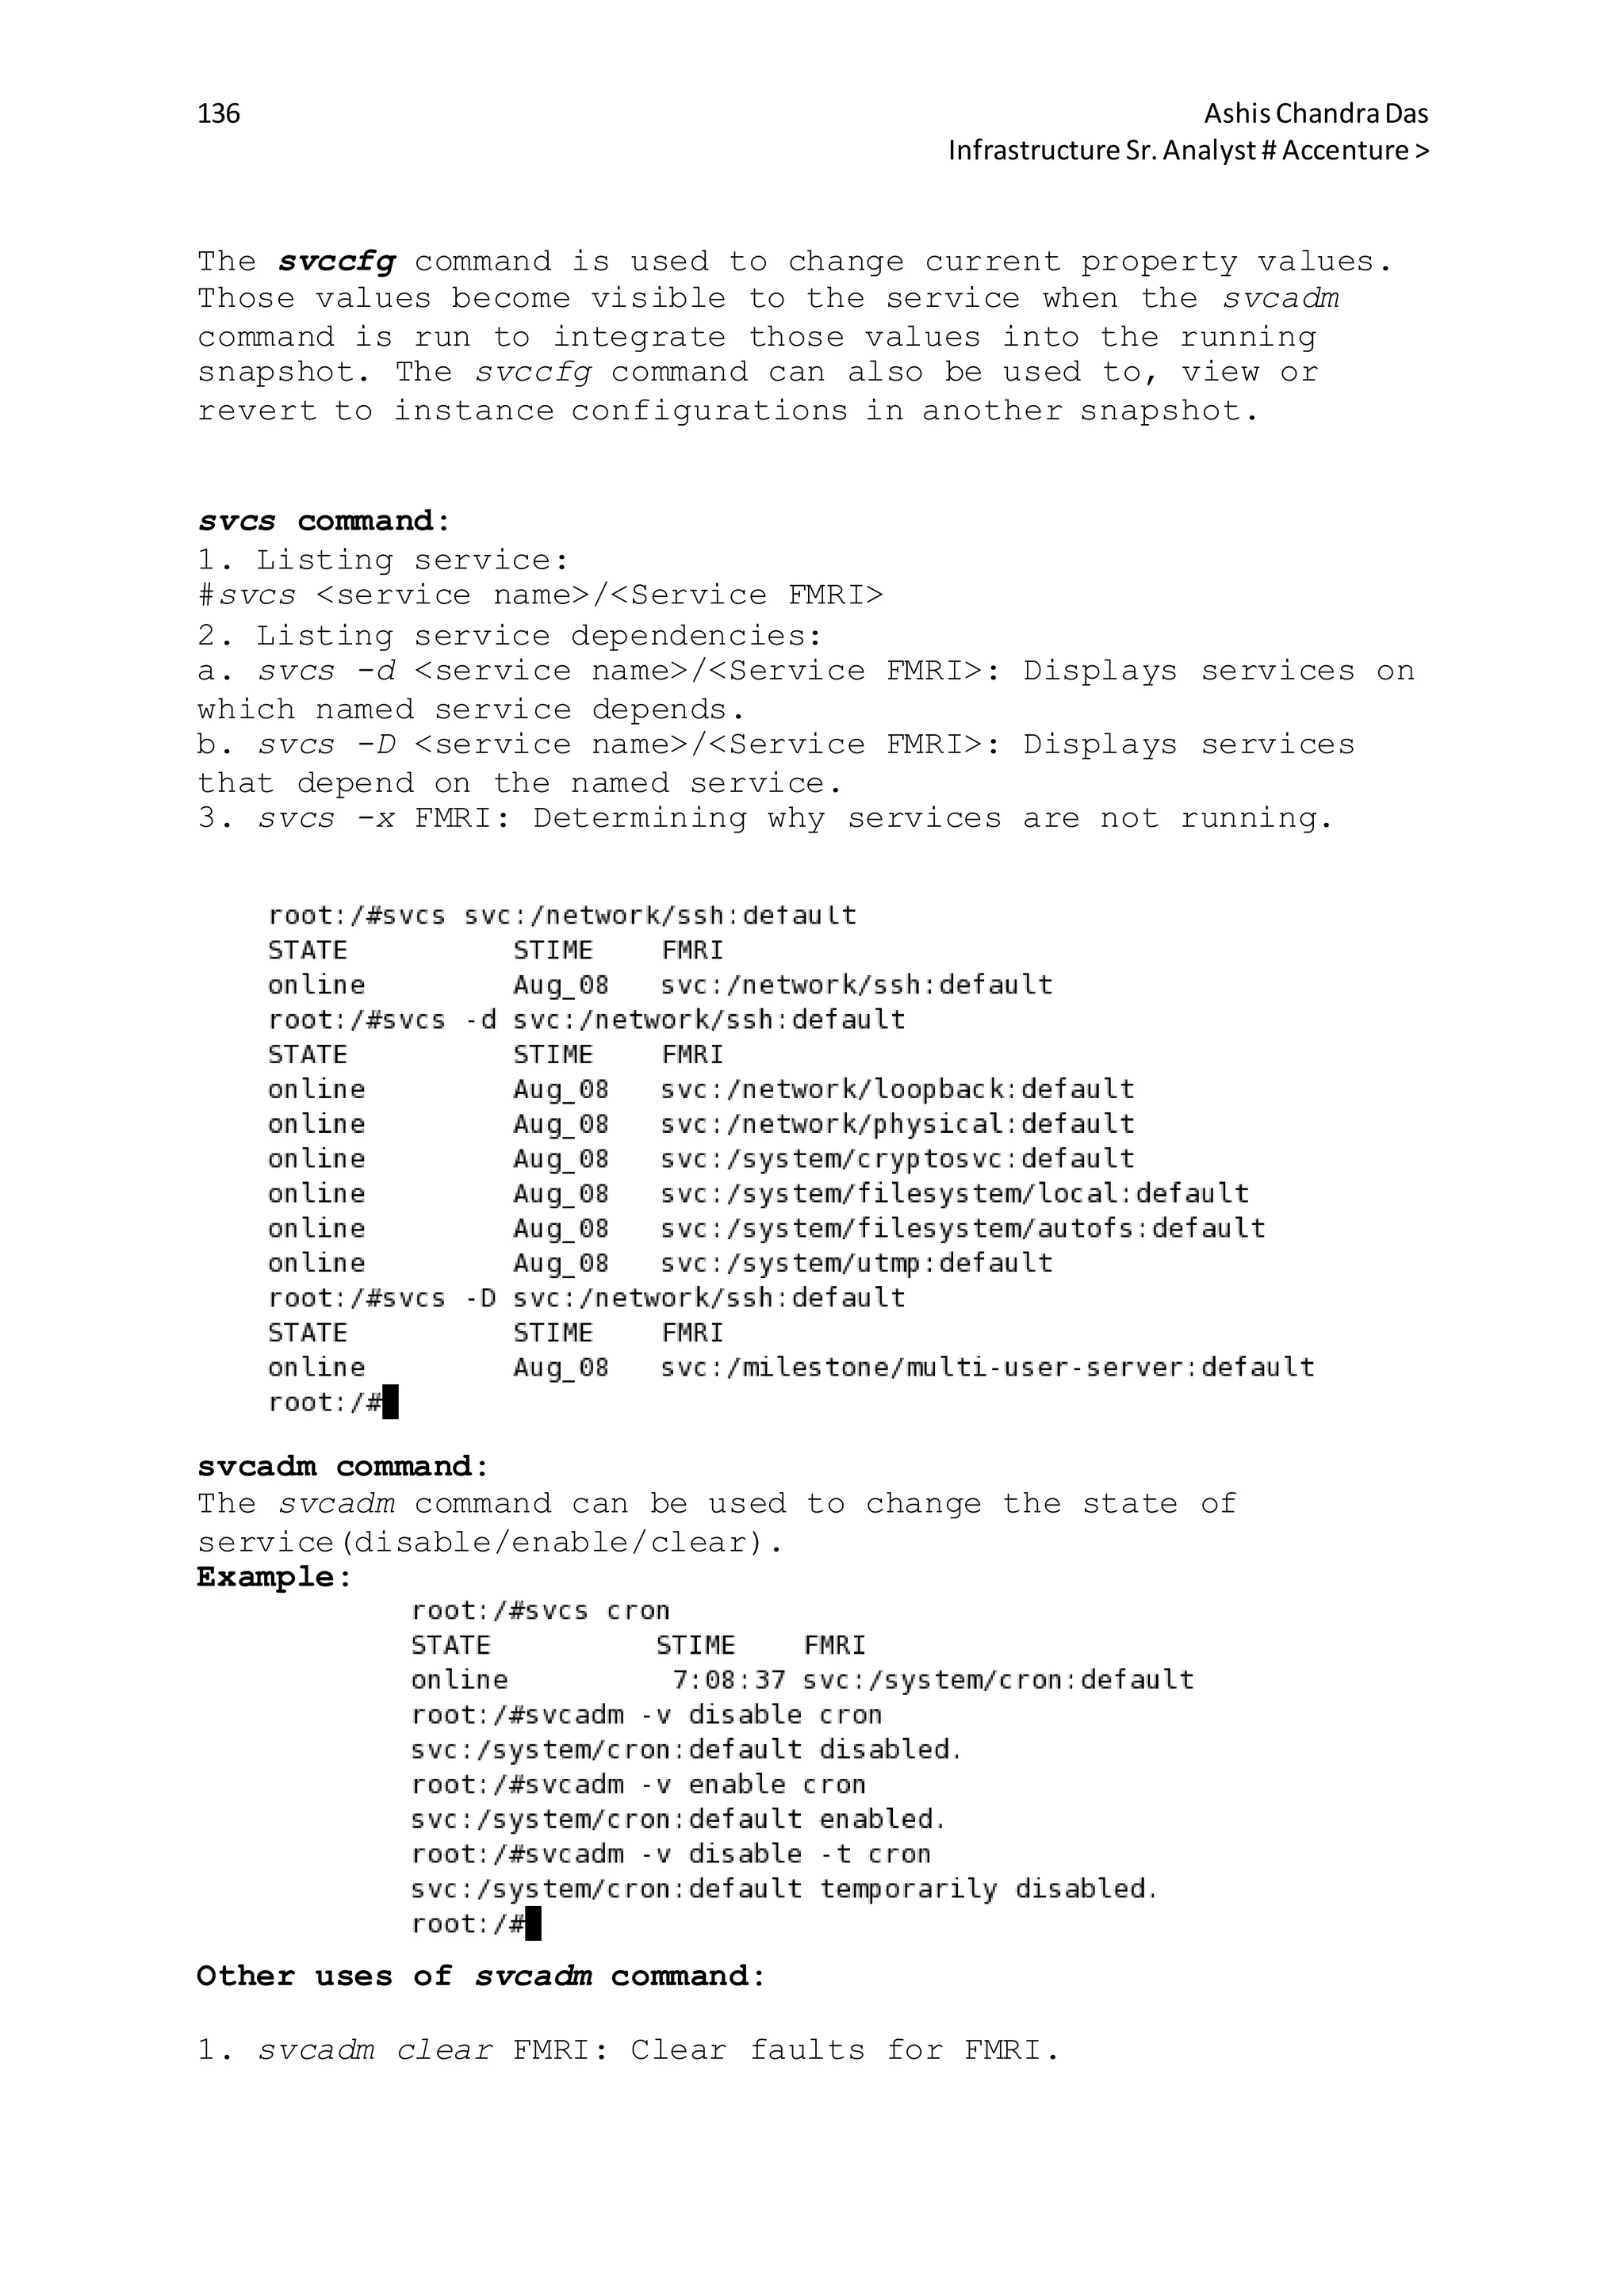
Monitoring System Access:
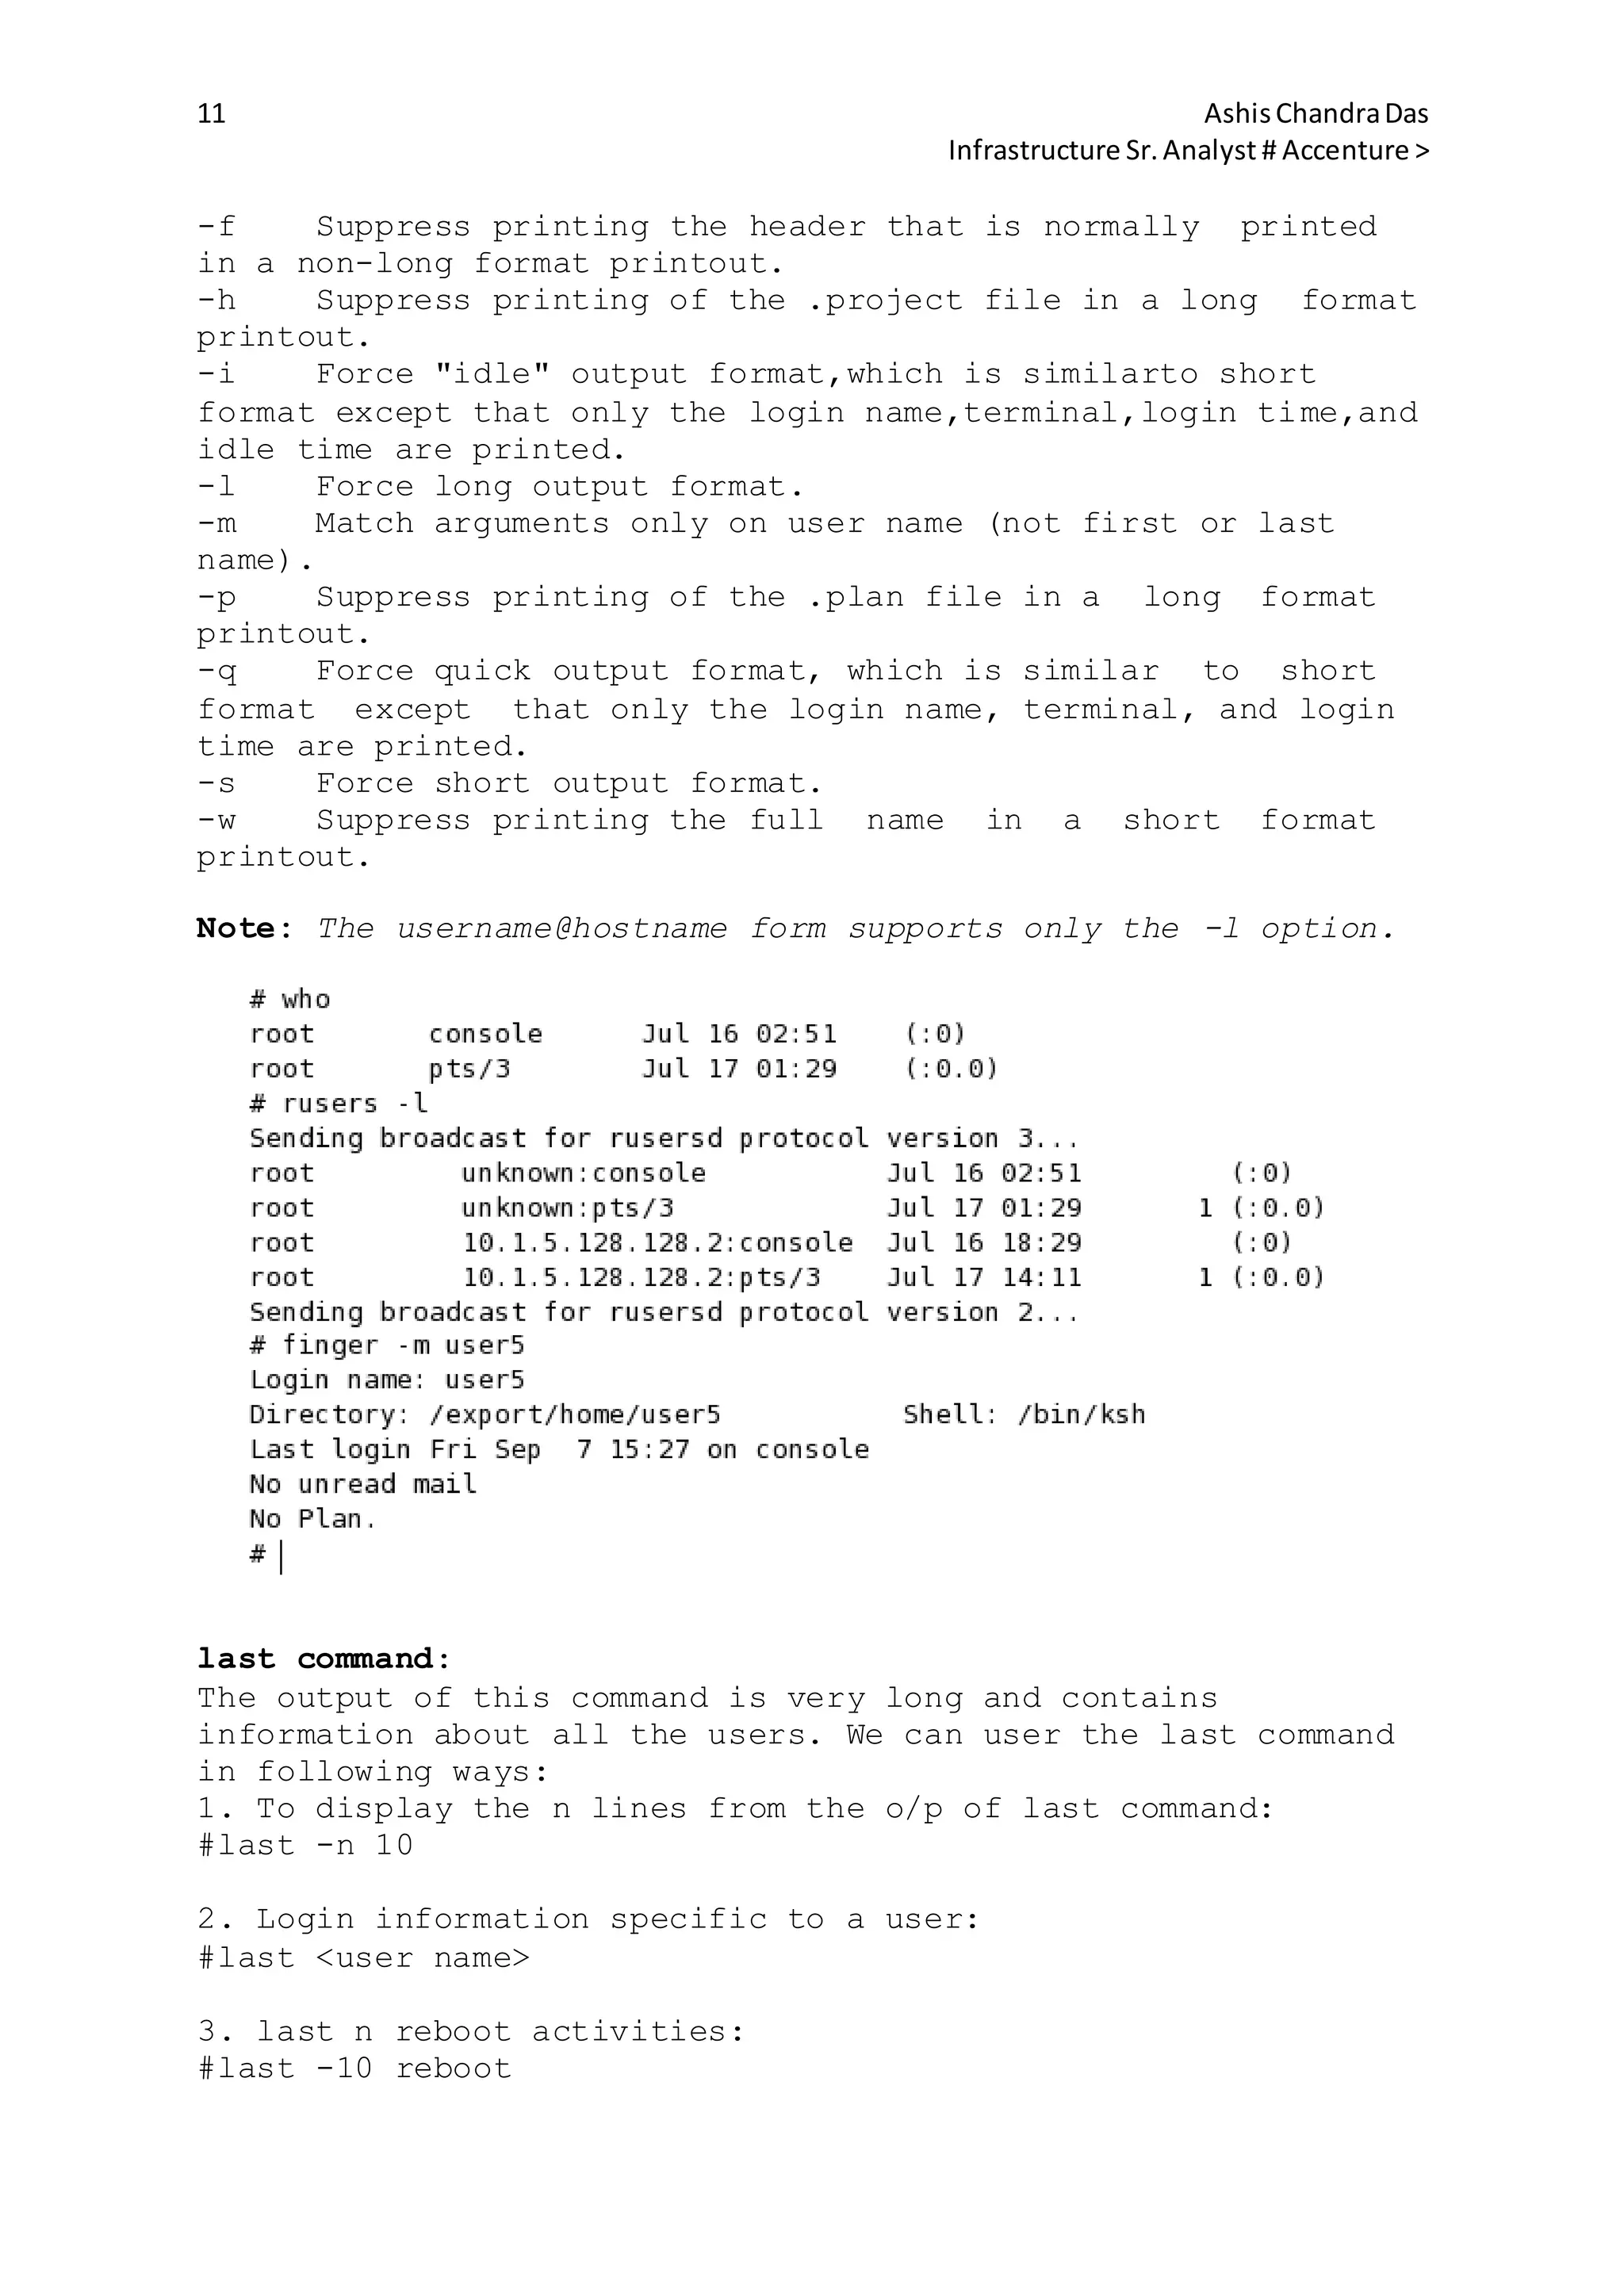
who command :
This command displays the list of users currently logged in to
the system.
It contains user's login name, device(eg. console or
terminal), login date & time and the remote host IP address.
ruser command:
This command displays the list of users logged in to the local
and remote host. The output is similar to the who command.
Finger Command:
By default, the finger command displays in multi-column format
the following information about each logged-in user:
user name
user's full name
terminal name(prepended with a '*' (asterisk) if write-
permission is denied)
idle time
login time
host name, if logged in remotely
Syntax:
finger [ -bfhilmpqsw ] [ username... ]
finger [-l ] [
username@hostname1[@hostname2...@hostnamen] ... ]
finger [-l ] [ @hostname1[@hostname2...@hostnamen] ... ]
Options:
-b Suppress printing the user's home directory and shell
in a long format printout.](https://image.slidesharecdn.com/4e6bde96-791e-42d1-bde6-b6c2b6569e45-150512182826-lva1-app6891/75/sun-solaris-10-2048.jpg)
![12 AshisChandraDas
Infrastructure Sr.Analyst # Accenture >
Recording failed login attempts:
1. Create a file /var/adm/loginlog.
#touch /var/adm/loginlog
2. Root user should be the owner of this file and it should
belog to group sys.
#chown root:sys /var/adm/loginlog
3. Assign read and write permission for the root user.
#chmod 600 /var/adm/loginlog
This will log all failed login attempts after five consecutive
failed attempts. This can be changed by modifying the RETRIES
entry in /etc/default/login.
The loginlog file contains:
user's login name
user's login device
time of the failed attempt
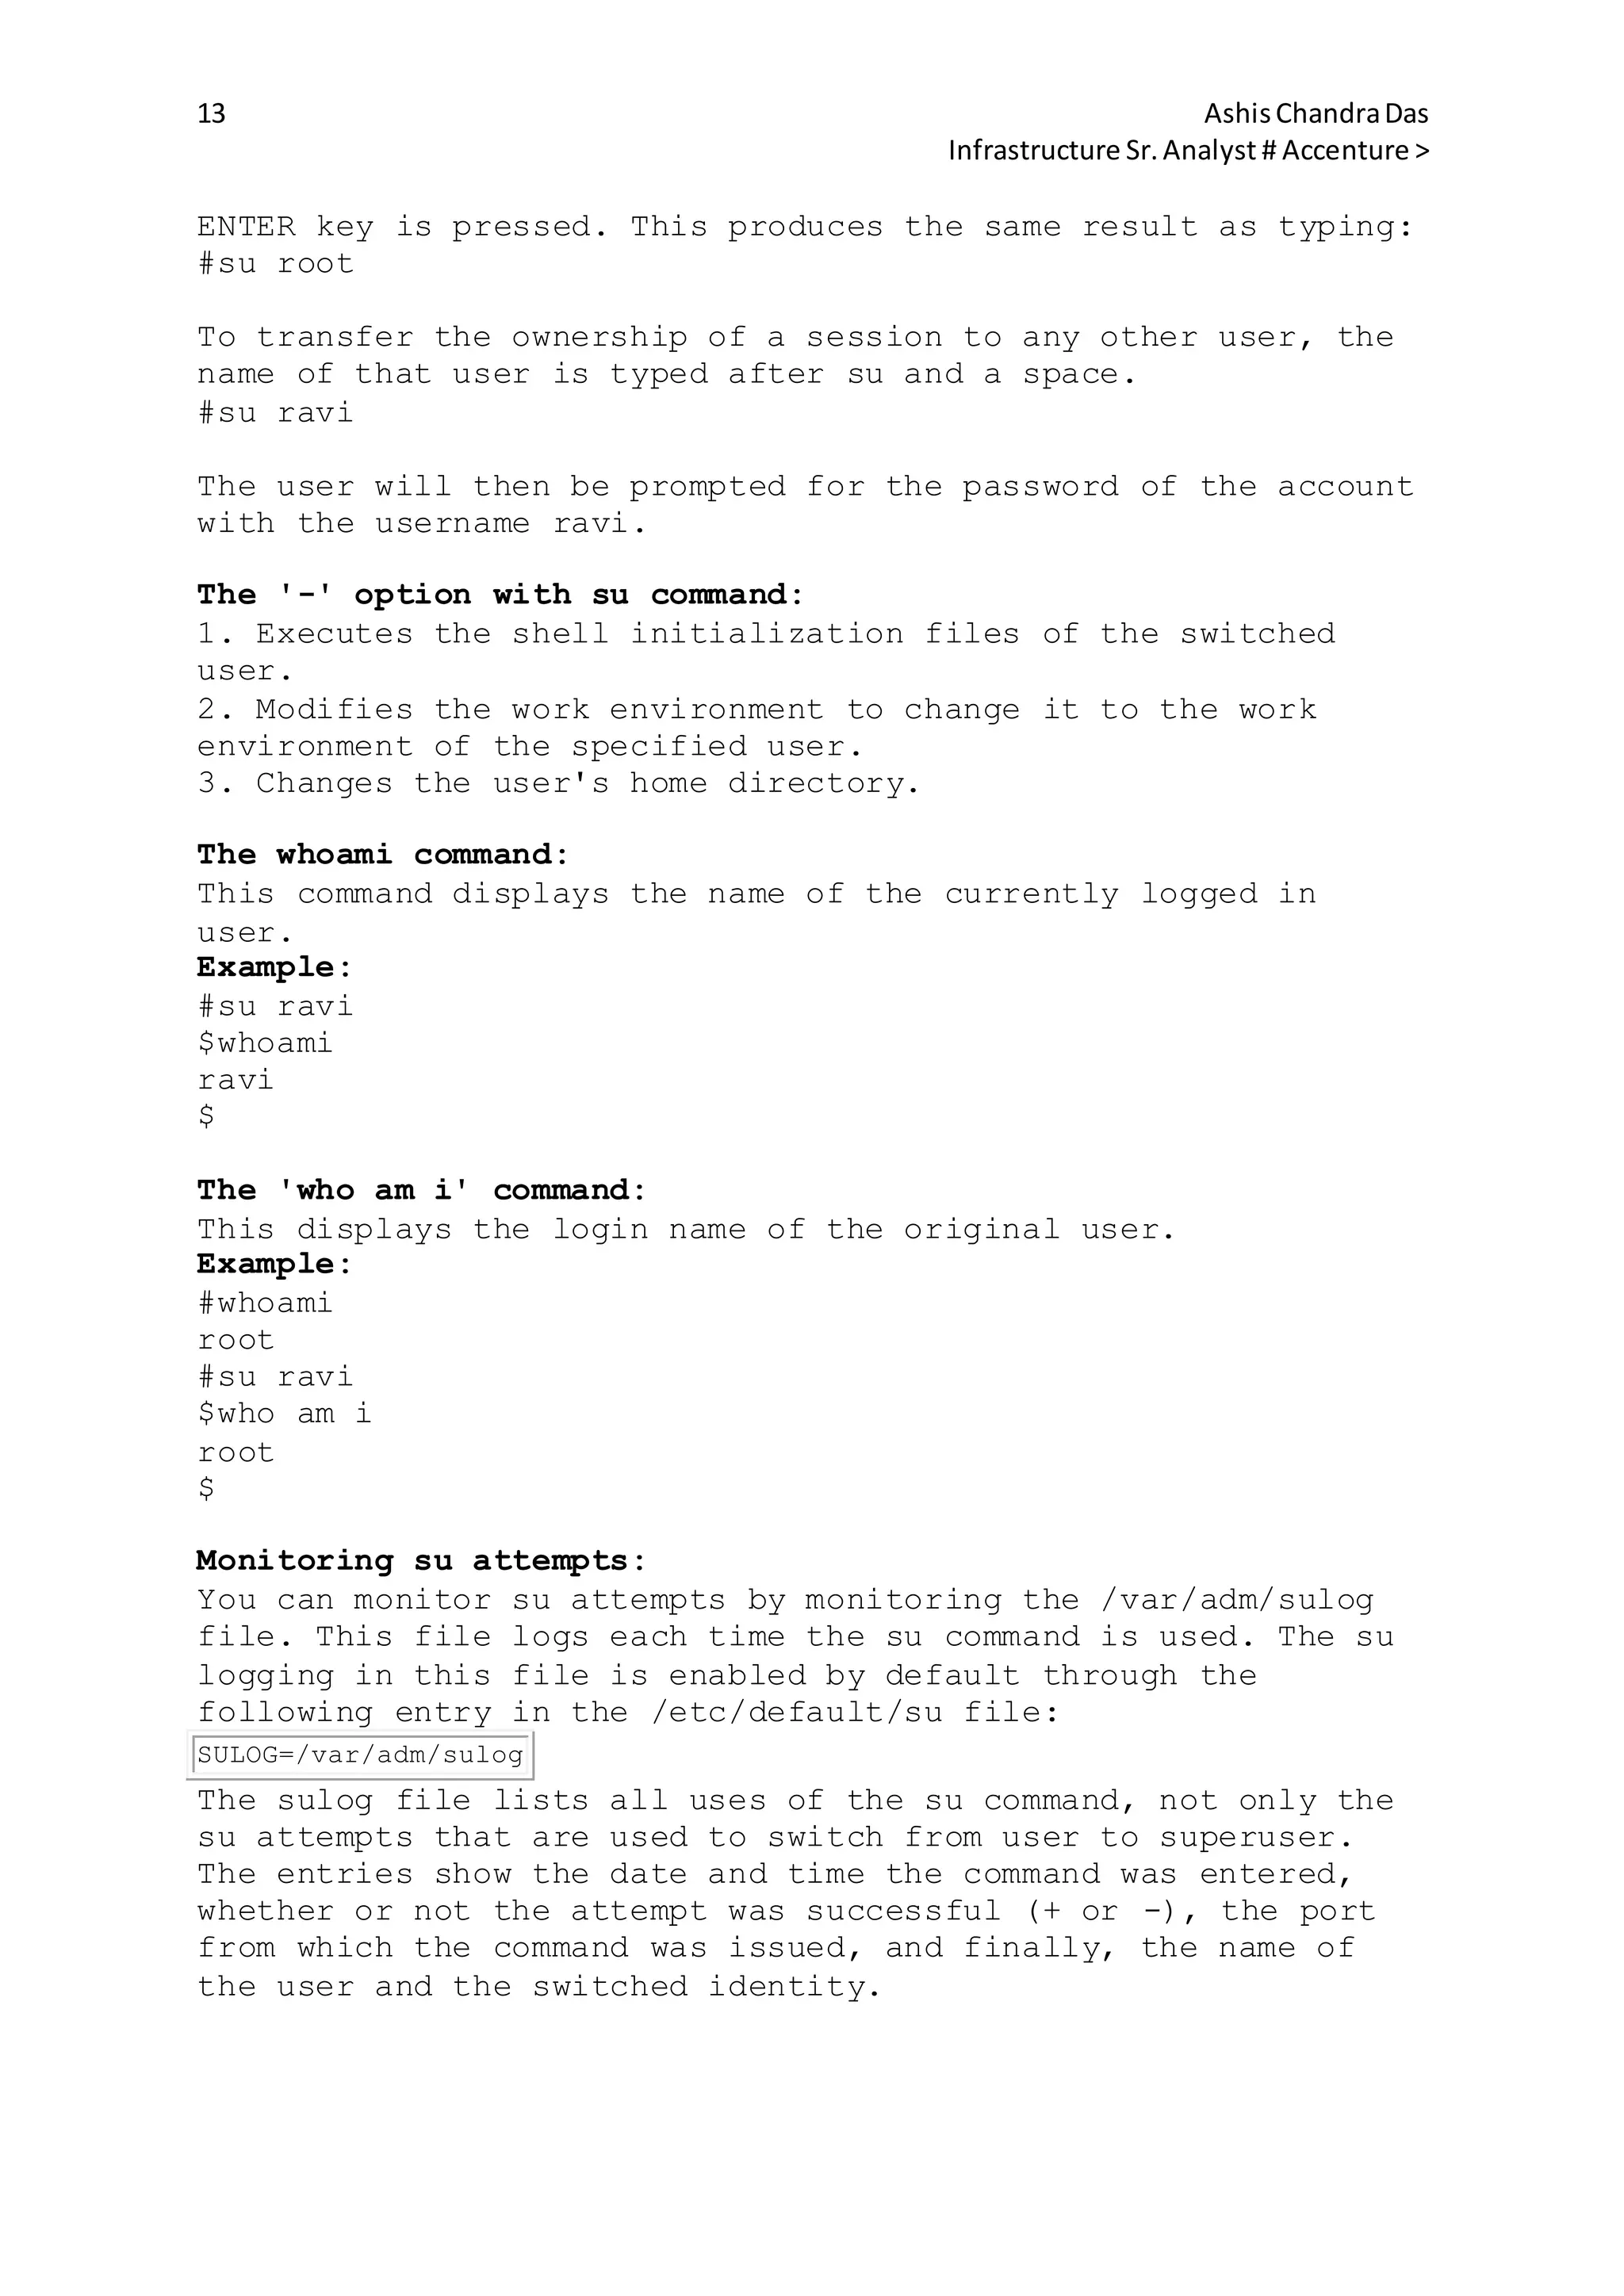
su command:
The su (substitute user) command enables to change a login
session's owner without the owner having to first log out of
that session.
Syntax:
#su [options] [commands] [-] [username]
Examples:
#su
The operating system assumes that, in the absence of a
username, the user wants to change to a root session, and thus
the user is prompted for the root password as soon as the](https://image.slidesharecdn.com/4e6bde96-791e-42d1-bde6-b6c2b6569e45-150512182826-lva1-app6891/75/sun-solaris-12-2048.jpg)
![20 AshisChandraDas
Infrastructure Sr.Analyst # Accenture >
The /etc/hostname.xxn files contain either the host name or
the IP address of the system that contains the xxn interface.
The host name must be there in the file /etc/inet/hosts file
so that it can be resolved to an IP address at system boot.
Example:
# cat /etc/hostname.ce0
Computer1 netmask + broadcast + up
/etc/inet/hosts file:
It is the file which associates the IP addresses of hosts with
their names.It can be used with, or instead of , other hosts
databases including DNS, NIS hosts map & NIS+ hosts table.
The /etc/inet/hosts file contains at least the loopback & host
information. It has one entry for each IP address of each
host. The entries in the files are in following format:
<IP address> <Host name> [aliases]
127.0.0.1 localhost
/etc/inet/ipnodes file:
It is a local database or file that associates the names of
nodes with their IP addresses. It is a symbolic link to the
/etc/inet/hosts file. It associates the names of nodes with
their Internet Protocol (IP) addresses. The ipnodes file can
be used in conjuction with, instead of, other ipnodes
databases, including the DNS, the NIS ipnodes map, and LDAP.
The fomat of each line is:
<IP address> <Host Name> [alias]
# internet host table
::1 localhost
127:0:0:1 localhost
10.21.108.254 system1
Changing the System Host Name:
The system host name is in four system files & we must modify
these files and perform a reboot to change a system host name:
/etc/nodename
/etc/hostname.xxn
/etc/inet/hosts
/etc/inet/ipnodes
sys-unconfig Command:
The /usr/sbin/sys-unconfig command is used to restore a system
configuration to an unconfigured state. This command does the
following:
1. It saves the current /etc/inet/hosts files information in
the /etc/inet/hosts.saved file.
2. It saves the /etc/vfstab files to the /etc/vfstab.orig file
if the current /etc/vfstab file contains NFS mount entries.
3. It restores the default /etc/inet/hosts file.](https://image.slidesharecdn.com/4e6bde96-791e-42d1-bde6-b6c2b6569e45-150512182826-lva1-app6891/75/sun-solaris-20-2048.jpg)


![39 AshisChandraDas
Infrastructure Sr.Analyst # Accenture >
root in /etc directory :
# cd /etc
# grep -l root group passwd hosts
group
passwd
To count the number of lines containing the pattern root in
the /etc/group file:
# grep -c root group
11
Using regular expression Metacharacters with grep command:
Metachar Purpose Example Result
^
Begining of line
Anchor
'^test'
Matches all lines
begining with test
$
End of line
anchor
'test$'
Matches all the lines
ending with test
. Matches one char 't..t'
Matches all the line
starting and ending with
t and 2 char between them
*
Matches the
preceding item 0
or more times
'[a-s]*'
Matches all lines
starting with lowercase
a-s
[]
Matches one
character in the
pattern
'[Tt]est'
Matches lines containing
test ot Test
[^]
Matches one
character not in
pattern
'[^a-
s]est'
Matches lines that do not
contain "a" though "s"
and followed by est
Using egrep command :
With egrep we can search one or more files for a pattern using
extended regular expression metacharacters.
Following table describes the Extended Regular Expression
Metacharacters :
Metachar Purpose Example Result
+
Matches one
of more
preceding
chars
'[a-z]+est'
Matches one or more
lowercase letters
followed by est(for
example chest, pest,
best, test, crest etc
x|y Matches 'printer|scanner' Matches for either](https://image.slidesharecdn.com/4e6bde96-791e-42d1-bde6-b6c2b6569e45-150512182826-lva1-app6891/75/sun-solaris-39-2048.jpg)
![40 AshisChandraDas
Infrastructure Sr.Analyst # Accenture >
either x or
y
expression
(|)
Groups
characters
'(1|2)+' or
'test(s|ing)'
Matches for one or
more occurrence.
Syntax: egrep -options pattern filenames
Examples:
#egrep '[a-z]+day' /ravi/testdays
sunday
monday
friday
goodday
badday
In the above example, we searched for the letter ending with
day in the file /ravi/testdays
#egrep '(vacation |sick)' leave' /ravi/leavedata
vacation leave on 7th march
sick leave on 8th march
In the above example we are displaying sick leave and vacation
leave from file /ravi/leavedata
Using fgrep command :
It searches for all the character regardless of it being
metacharacter as we have seen in case of grep and egrep
commands.
Syntax: fgrep options string filenames
Example:
#fgrep '$?*' /ravi/test
this is for testing fgrep command $?*
#
Using Find command :
This command is used to locate files and directories. You can
relate it with windows search in terms of functionality.
Syntax: find pathnames expressions actions
Pathname: The absolute or relative path from where the search
begins.
Expressions: The search criteria is mentioned here. We will
discuss search criteria below in details.
Expression Definition
-name
filename
Finds the file matching.
-size [+|-]n Finds files that are larger than +n, smaller than](https://image.slidesharecdn.com/4e6bde96-791e-42d1-bde6-b6c2b6569e45-150512182826-lva1-app6891/75/sun-solaris-40-2048.jpg)
![41 AshisChandraDas
Infrastructure Sr.Analyst # Accenture >
-n, or exactly n.
-atime [+|-
]n
Find files that have been accessed more than +n
days, less than -n or exactly n days ago.
-mtime [+|-
]n
Find files that have been modified more than +n
days, less than -n or exactly n days ago.
-user
loginID
Finds all files that are owned by the loginID
name.
-type Finds a file type : f for file, d for directory.
-perm
Find files that have certain access permission
bits.
Action: Action required after all the files have been found.
By default it displays all the matching pathnames
Action Definition
-exec
command {}
;
Runs the specified command on each file located.
-ok
commadn {}
:
Requires confirmation before the find command
applies the command to each file located.
-print Prints the search result
-ls
Displays the current pathname and associated stats
: inode number, size in kb, protection mode, no. of
hard links and the user.
-user
loginID
Finds all files that are owned by the loginID name.
-type Finds a file type : f for file, d for directory.
-perm
Find files that have certain access permission
bits.
Examples:
#touch findtest
#cat >> findtest
This is for test.
#find ~ -name findtest -exec cat {} ;
This is for test.
#
The above examples searches for the file : findtest and
displays its content. We can also use 'ok' option instead of
exec. This will prompt for confirmation before displaying the
contents of file findtest.
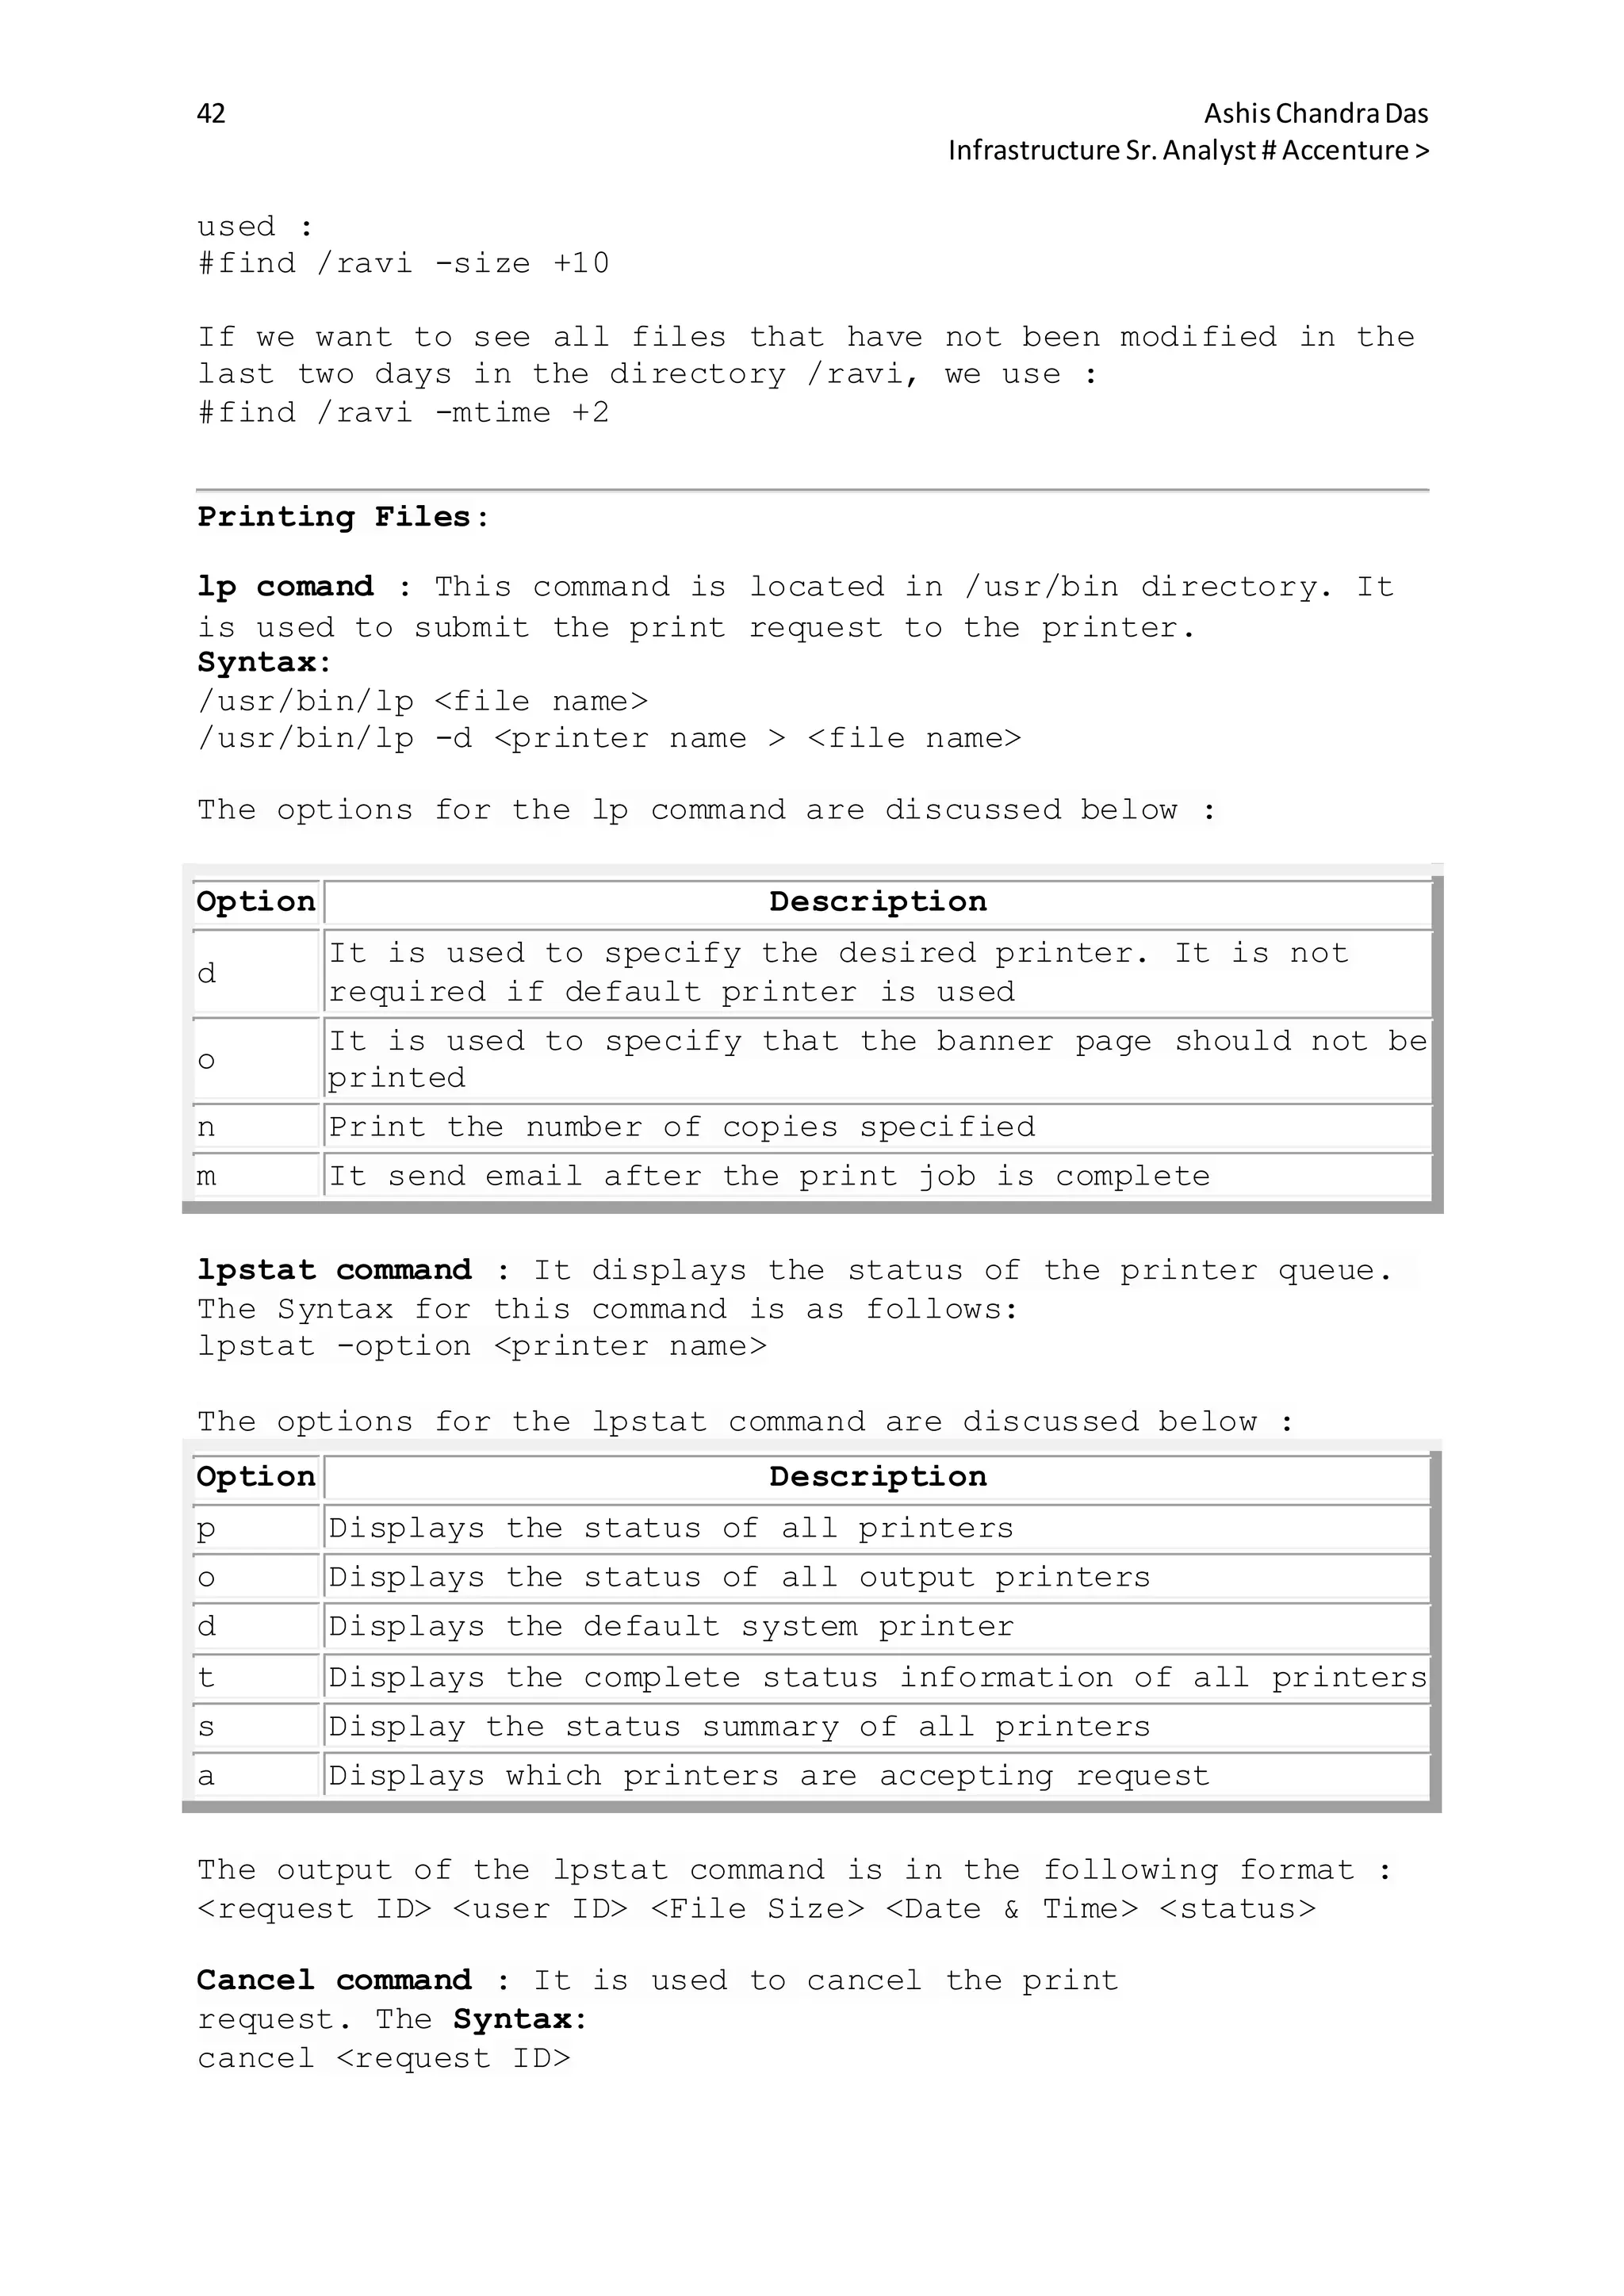
If we want to find files larger than 10 blocks (1 block =
512bytes) starting from /ravi directory, following command is](https://image.slidesharecdn.com/4e6bde96-791e-42d1-bde6-b6c2b6569e45-150512182826-lva1-app6891/75/sun-solaris-41-2048.jpg)
![50 AshisChandraDas
Infrastructure Sr.Analyst # Accenture >
/export/home/ravi
#cd -
#pwd
/
#cd -
#pwd
/export/home/ravi
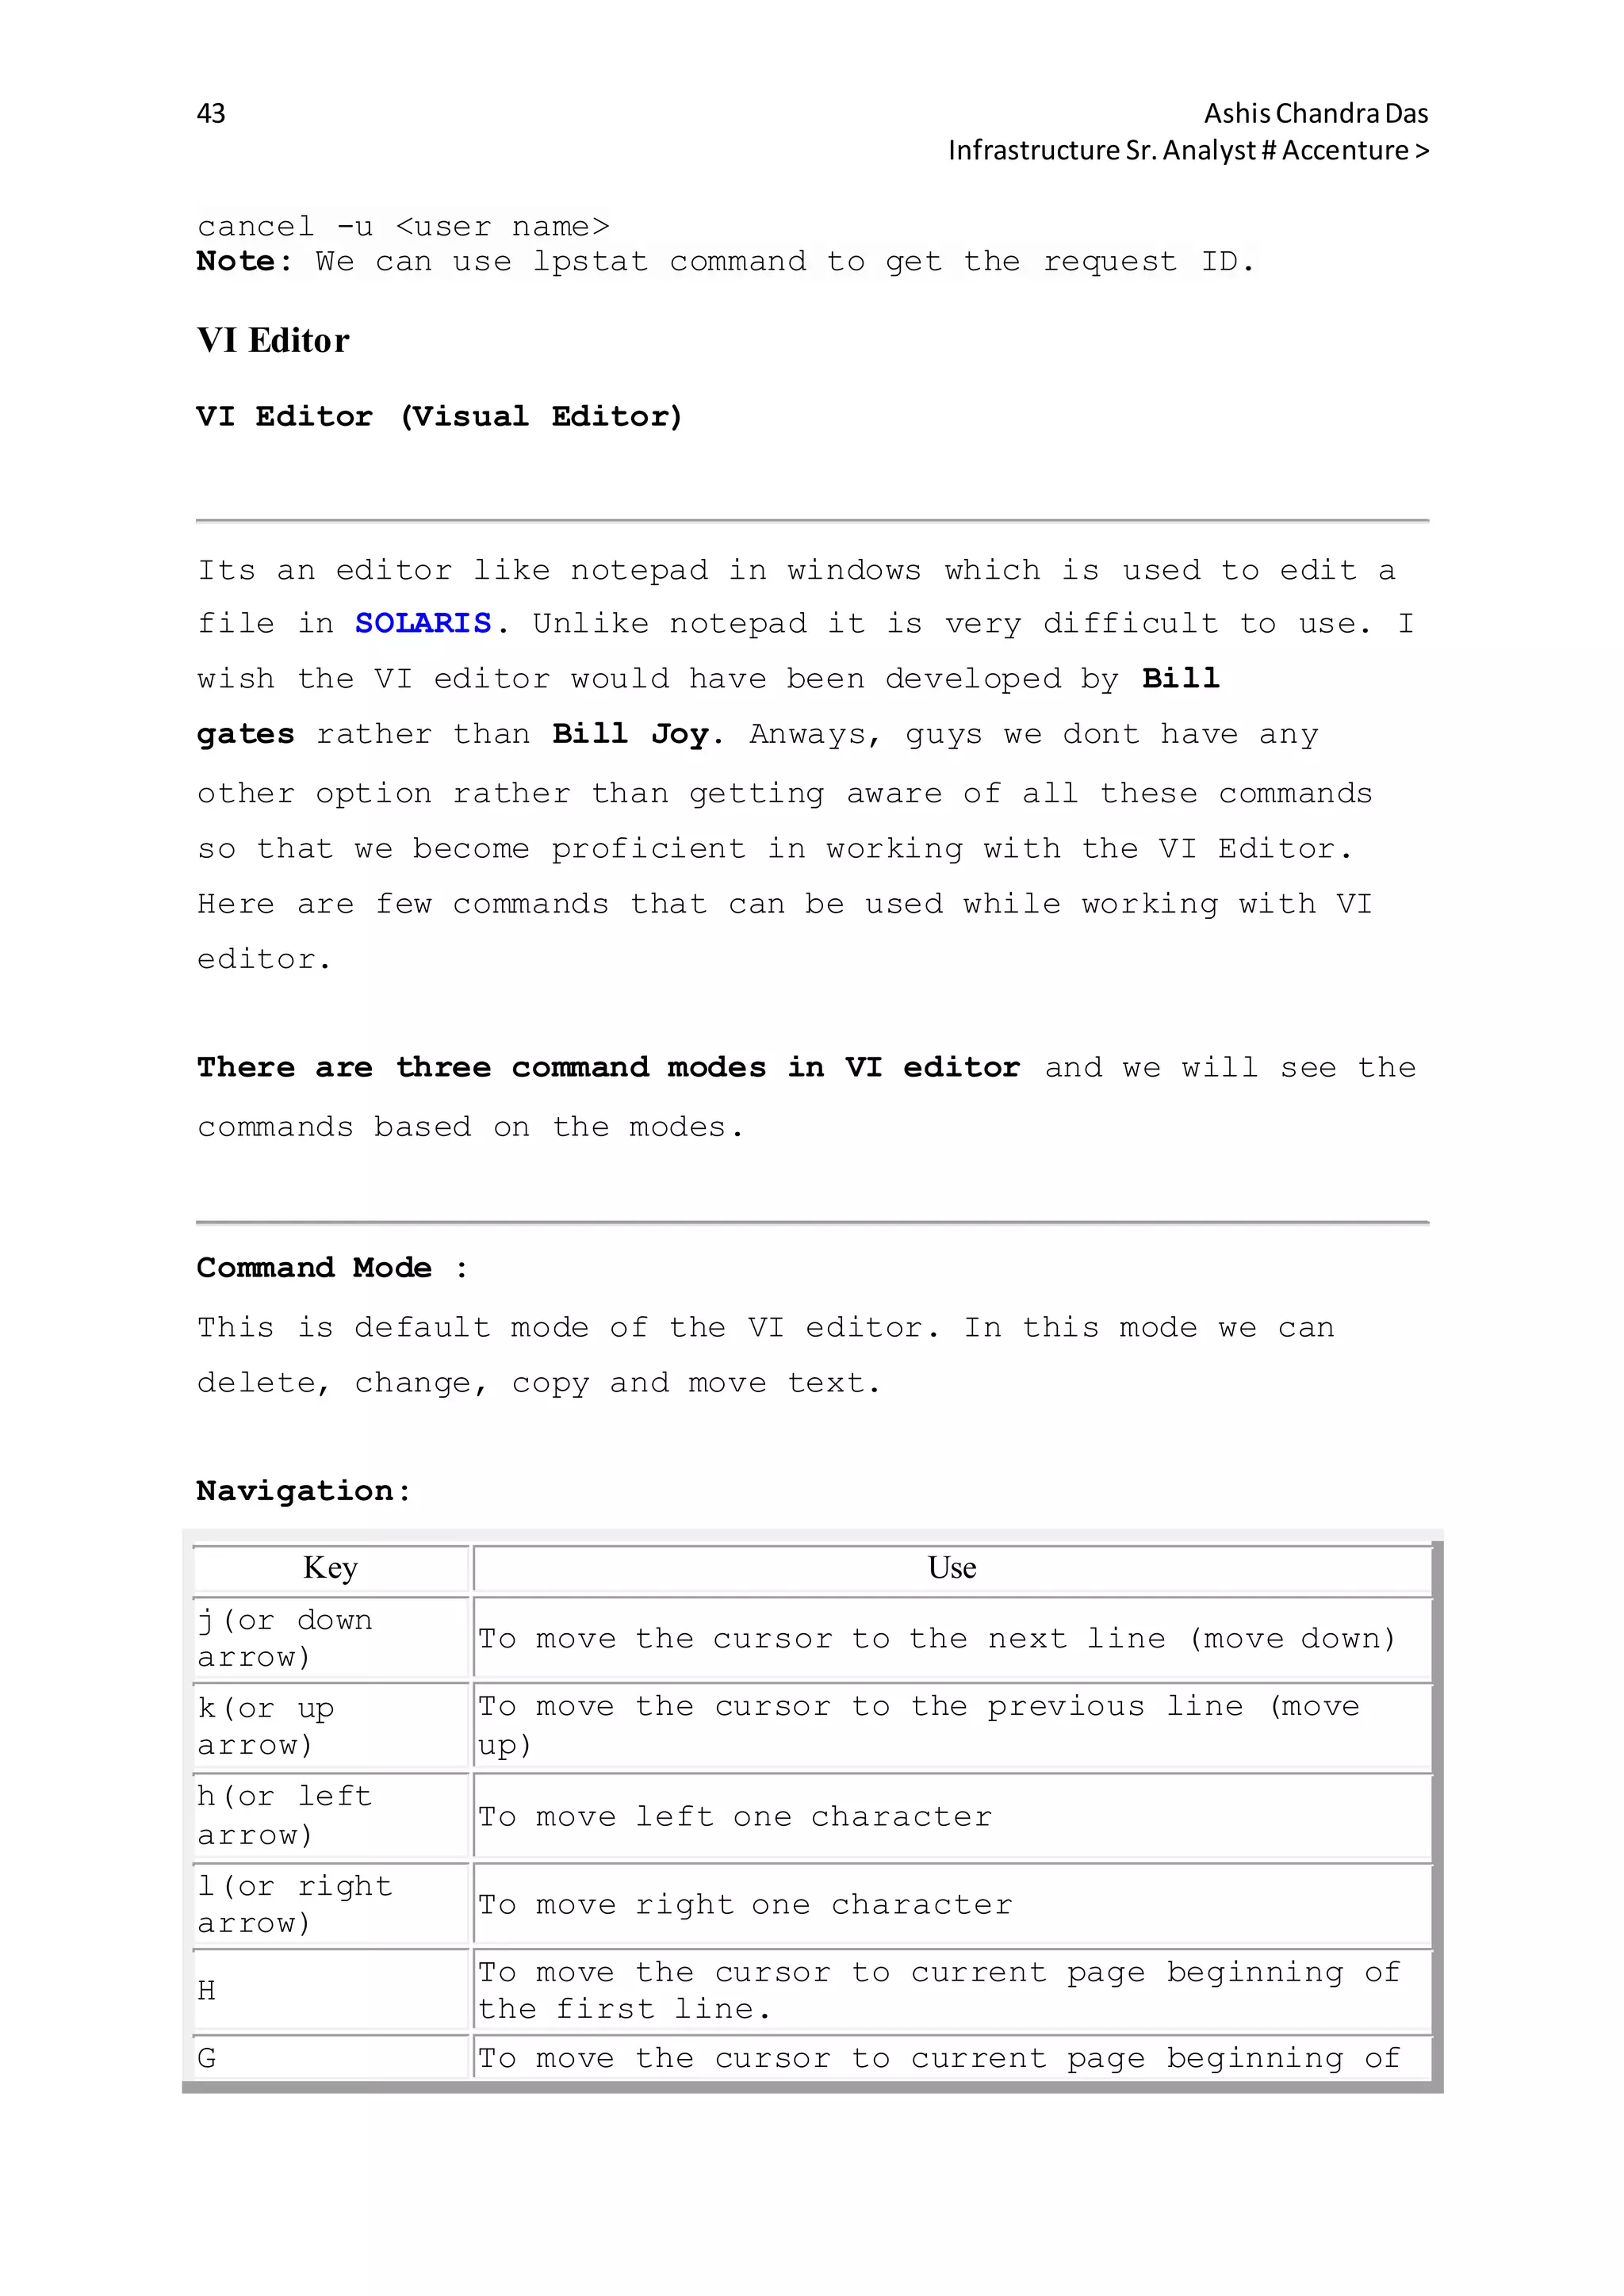
File Name Substitution Metacharacters :
Asterisk (*) Character: It is a called wild card character and
represents zero or more characters except for leading period
'.' of a hidden file.
#pwd
/export/home/ravi
#ls dir*
dir1 dir2 directory1 directory2
#
Question Mark (?) Metacharacters: It is also a wild card
character and represents any single character except the
leading period (.) of a hidden file.
#pwd
/export/home/ravi
#ls dir?
dir1 dir2
#
Compare the examples of Asterisk and Question mark
metacharacter and you will get to know the difference.
Square Bracket Metacharacters: It represents a set or range of
characters for a single character position.
The range list can be anything like : [0-9], [a-z], [A-Z].
#ls [a-d]*
apple boy cat dog](https://image.slidesharecdn.com/4e6bde96-791e-42d1-bde6-b6c2b6569e45-150512182826-lva1-app6891/75/sun-solaris-50-2048.jpg)
![51 AshisChandraDas
Infrastructure Sr.Analyst # Accenture >
#
The above example will list all the files/directories starting
with either 'a' or 'b' or 'c' or 'd'.
#ls [di]*
dir1 dir2 india ice
#
The above example will list all the files starting with either
'd' or 'i'.
Few shell metacharacters are listed below:
Metacharacter Description
~
The '~' represents the home directory of the
currently logged in user
-
The '-' character represents the previous working
directory
*
A wild card character that matches any group of
characters of any length
?
A wild card character that matches any single
character
$
Indicates that the following text is the name of
a shell (environment) variable whose value is to
be used
|
Separates command to form a pipe and redirects
the o/p of one command as the input to another
< Redirect the standard input
>
Redirect the standard output to replace current
contents
>>
Redirect the standard output to append to current
contents
;
Separates sequences of commands (or pipes) that
are on one line
Used to "quote" the following metacharacter so it
is treated as a plain character, as in *
& Place a process into the background
Korn Shell Variables: It is referred to as temporary storage
area in memory.It enables us to store value into the variable.
These variables are of two types :](https://image.slidesharecdn.com/4e6bde96-791e-42d1-bde6-b6c2b6569e45-150512182826-lva1-app6891/75/sun-solaris-51-2048.jpg)
![66 AshisChandraDas
Infrastructure Sr.Analyst # Accenture >
# echo ?
1
#
In the above example there is no nfsd process running, hence 1
is returned.
Using the test Command:
It is used for testing conditions. It can be used to verify
many conditions, including:
Variable contents
File Access permissions
File types
Syntax : #test expression or #[ expression ]
The test builtin command returns 0 (True) or 1 (False),
depending on the evaluation of an expression, expr.
Syntax:test expr or [ expr ]
We can examine the return value by displaying $?;
We can use the return value with && and ||; or we can test it
using the various conditional constructs.
We can compare arithmetic values using one of the following:
Option Tests for Arithmetical Values
-eq equal to
-ne not equal to
-lt less than
-le less than or equal to
-gt greater than
-ge greater than or equal to
We can compare strings for equality, inequality etc. Following
table lists the various options that can be used to compare
strings:
Option Tests for strings
=
equal to.
e.g #test "string1" = "string2"
!=
not equal to.
e.g #test "string1" = "string2"
<
less than.
e.g #test "ab" < "cd"](https://image.slidesharecdn.com/4e6bde96-791e-42d1-bde6-b6c2b6569e45-150512182826-lva1-app6891/75/sun-solaris-66-2048.jpg)
![67 AshisChandraDas
Infrastructure Sr.Analyst # Accenture >
>
greater than.
e.g #test "ab" > "cd" "
-z
for a null string.
e.g #test -z "string1"
-n
returns True if a string is not empty.
e.g. #test -n "string1"
Note: the < and > operators are also used by the shell for
redirection, so we must escape them using < or >.
Example :
Lets test that the value of variable $LOGNAME is ravi.
#echo $LOGNAME
ravi
# test "LOGNAME" = "ravi"
#echo $?
0
#[ "LOGNAME" = "ravi" ]
#echo $?
0
Lets test if read permissions on the /ravi
#ls -l /ravi
-rw-r--r-- 1 root sys 290 Jan 10 01:10 /ravi
#test -r /ravi
#echo $?
0
#[ -r /ravi ]
#echo $?
0
Lets test if /var is a directory
#test -d /var
#echo $?
0
#[ -d /var ]
#echo $?
0](https://image.slidesharecdn.com/4e6bde96-791e-42d1-bde6-b6c2b6569e45-150512182826-lva1-app6891/75/sun-solaris-67-2048.jpg)
![72 AshisChandraDas
Infrastructure Sr.Analyst # Accenture >
Syntax: kill [-signals] PIDs
Examples:
# pgrep -l java
2441 java
#kill 2441
If the process does not terminates, issue signal 9 to
forcefully terminate the process as below :
#kill -9 2441
Using pkill Command: It is used to terminate the process with signal
15. We can specify the process names(to be terminated) also in this
command.
Syntax: pkill [-options] pattern
The options are same as that of pgrep command.
Example:
#pkill java
We can force the process to terminate by using signal 9:
#pkill -9 -x java
Solaris File System
Understanding the SOLARIS file system is very important,
before we discuss anything further. Its huge topic and I
suggest you really need to be patient while going through it.
If you find anything difficult to understand, you can comment
and I will get back to you as soon as possible.
File is the basic unit in Solaris, similar to atom for an
element in chemistry. For example commands are executable
files, documents are text file or file having code/script,
directories are special files containing other files etc.
Blocks: A file occupies the space on disks in units. These
units are called Blocks. The blocks are measured in two sizes
:
1. Physical Block size: Its the size of the smallest block
that the disk controller can read or write. The physical block
size is usually 512B for UFS(Unix Files System). It may vary
from file system to file system.
2. Logical Block size: Its the size of the block that UNIX](https://image.slidesharecdn.com/4e6bde96-791e-42d1-bde6-b6c2b6569e45-150512182826-lva1-app6891/75/sun-solaris-72-2048.jpg)
![84 AshisChandraDas
Infrastructure Sr.Analyst # Accenture >
When we create a new file or directory in Solaris, OS assigns
initial permission automatically. The initial permission of a
file or a directory are modified based on default umask value.
UMASK(User Mask Value)
It is used to provide security to files and directories.It is
three digit octal value that is associated with the read,
write, and execute permissions. The default UMASK value is
[022]. It is stored under /etc/profile.
The Various Permission and their Values are listed below:
r (read only) = 4
w (write) = 2
x (execute) = 1
rwx (read+write+execute) 4+2+1 = 7
rw (read + write) 4+2 =6
Computation of Default permission for a directory:
The directory has a default UMASK value of [777]. When a user
creates a directory the user's umask value is subtracted from
the Directory's UMASK value.
The UMASK Value of a directory created[755](rwx-rw-rw) =
[777](Directory's UMASK value) - [022](Default user's UMASK
Value)
Computation of Default permission for a file:
The file has a UMASK value of [666]. When a user creates a
file the user's umask value is subtracted from the File's
UMASK value.
The UMASK Value of a file created[644](rw-r-r) = [666](File's
UMASK value) - [022](Default user's UMASK Value)
#umask→ Displays the user's UMASK Value
#umask 000 → Changes the user's UMASK Value to 000](https://image.slidesharecdn.com/4e6bde96-791e-42d1-bde6-b6c2b6569e45-150512182826-lva1-app6891/75/sun-solaris-84-2048.jpg)
![85 AshisChandraDas
Infrastructure Sr.Analyst # Accenture >
Note: It is strictly not recommended to change the UMASK
value.
chmod(Change Mode):
This command is used to change the file's or directory's
pemission.There are two ways of doing it.
1. Absolute or Octal Mode:
e.g. chmod 464 <FileName>/<DirectoryName>
The above command gives the permission r-rw-r.
2. Symbolic Mode:
First we need to understand the below mentioned symbols:
'+' It is used to add a permission
'-' It is used to remove a permission
'u' It er
'g' It is uis used to assign/remove the permission of the
ussed to assign/remove the permission of the group
'o' It is used to assign/remove the permission of other user
'a' Permission for all.
e.g. chmod u-wx,g-x,g+w,o-x
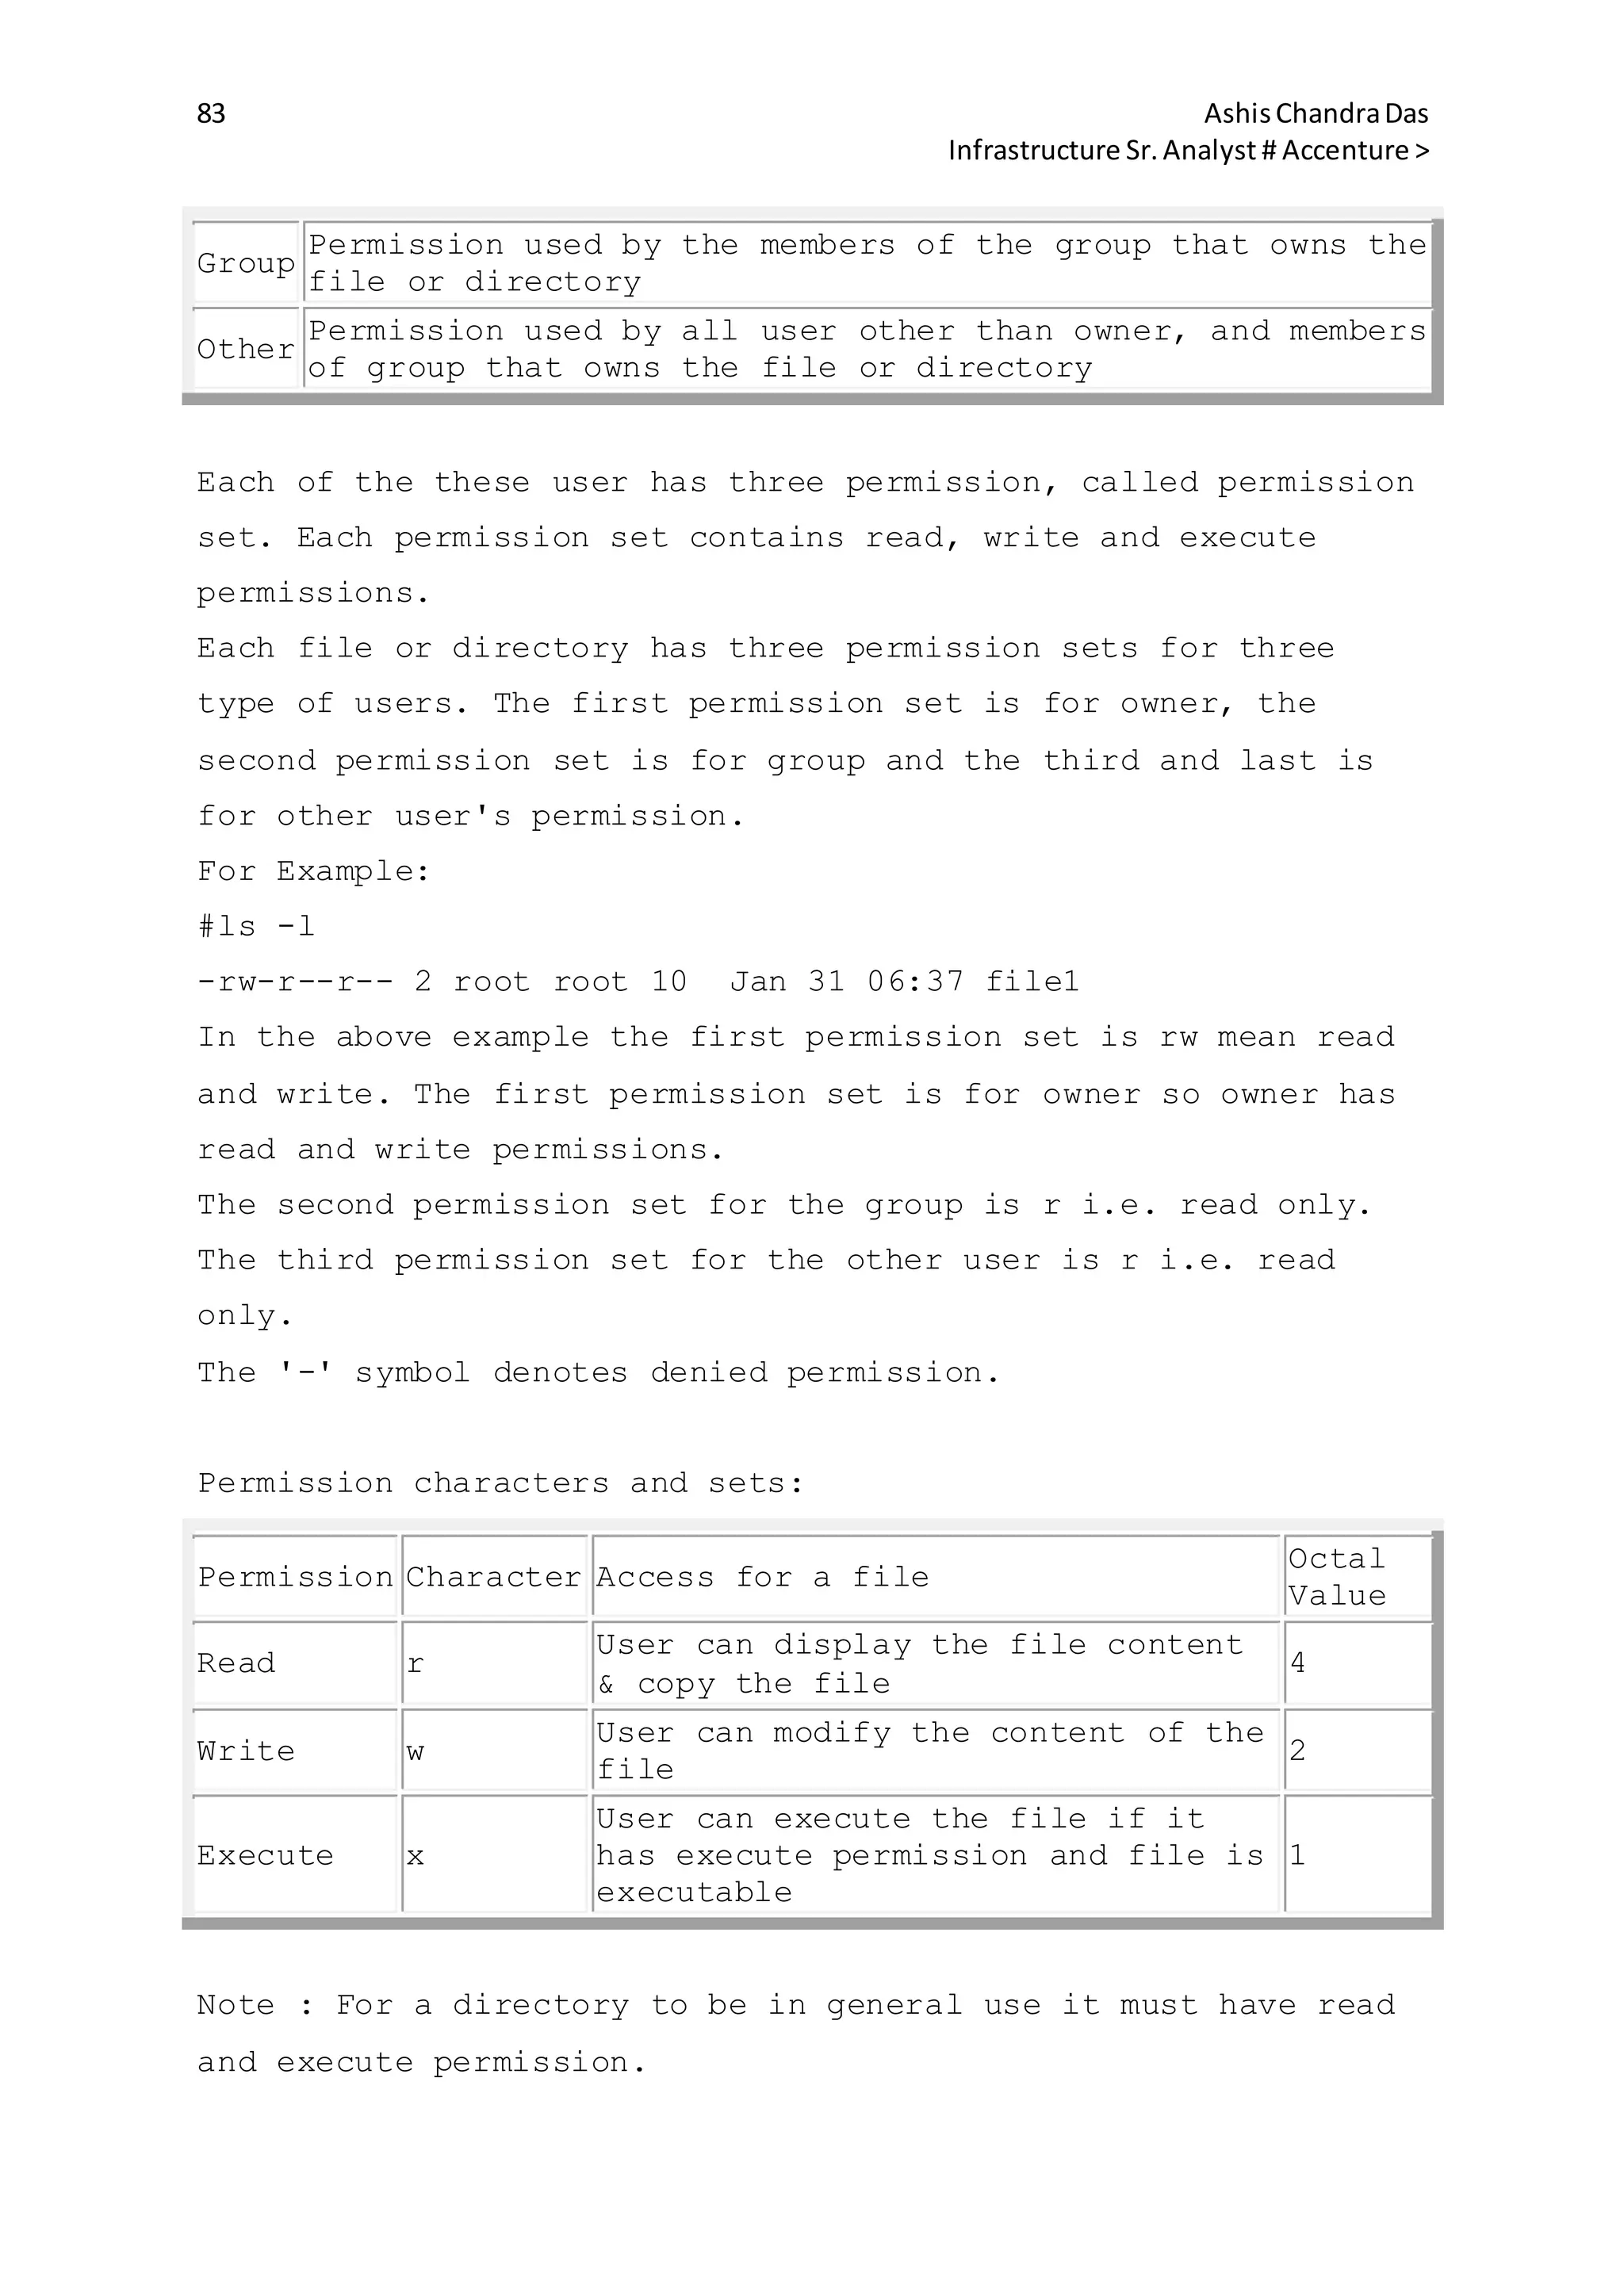
ACL (Access Control LIst) :
We have seen above how permission for owner, group and other
users are set by default. However, if we want to customize the
permission of files, we need to use ACL. There are two ACL
commands used and we will discuss these one by one :
1. getfacl : It displays ACL entries for files.
Syntax : getfacl [-a] file1] [file2] ........
-a : Displays the file name, file owner, file group and ACL
entries for the specified file or directory.
Example:
#getfacl acltest
#file: acltest
#owner: root](https://image.slidesharecdn.com/4e6bde96-791e-42d1-bde6-b6c2b6569e45-150512182826-lva1-app6891/75/sun-solaris-85-2048.jpg)
![86 AshisChandraDas
Infrastructure Sr.Analyst # Accenture >
#group: root
user::rw-
group::r--
#effective:r--
mask::r--
other:r--
ACL Entry Types:
u[ser]::perm The permissions for the file owner
The permissions for the file owner's
group
o[ther]:perm
The permissions for users other than
owner and owner's group
u[ser]:UID:perm or
The permissions for a specific user. The
username must exist in the /etc/passwd
file
u[ser]:username:perm
The permissions for a specific user. The
username must exist in the /etc/group
file
g[roup]:GID:perm or
The permissions for a specific group.
The groupname must exist in the
/etc/passwd file
g[roup]:groupname:perm
The permissions for a specific group.
The groupname must exist in the
/etc/passwd file
m[ask]
It indicates the maximum effective
permissions allowed for all specified
users and groups except for user owner
or others.
Determining if a file have an ACL : The files having ACL entry
are called Non-Trivial ACL entry and if file do not have any
ACL entry except the default one it is called Trivial-ACL
entry. When we do ls -l, the file having Non-Trivial ACL entry
is having +sign at the end of permission. For example :
#ls -l ravi
-rw-r--r--+ 1 root root 0 April 07 09:00 acltest
#getfacl acltest
#file: acltest](https://image.slidesharecdn.com/4e6bde96-791e-42d1-bde6-b6c2b6569e45-150512182826-lva1-app6891/75/sun-solaris-86-2048.jpg)
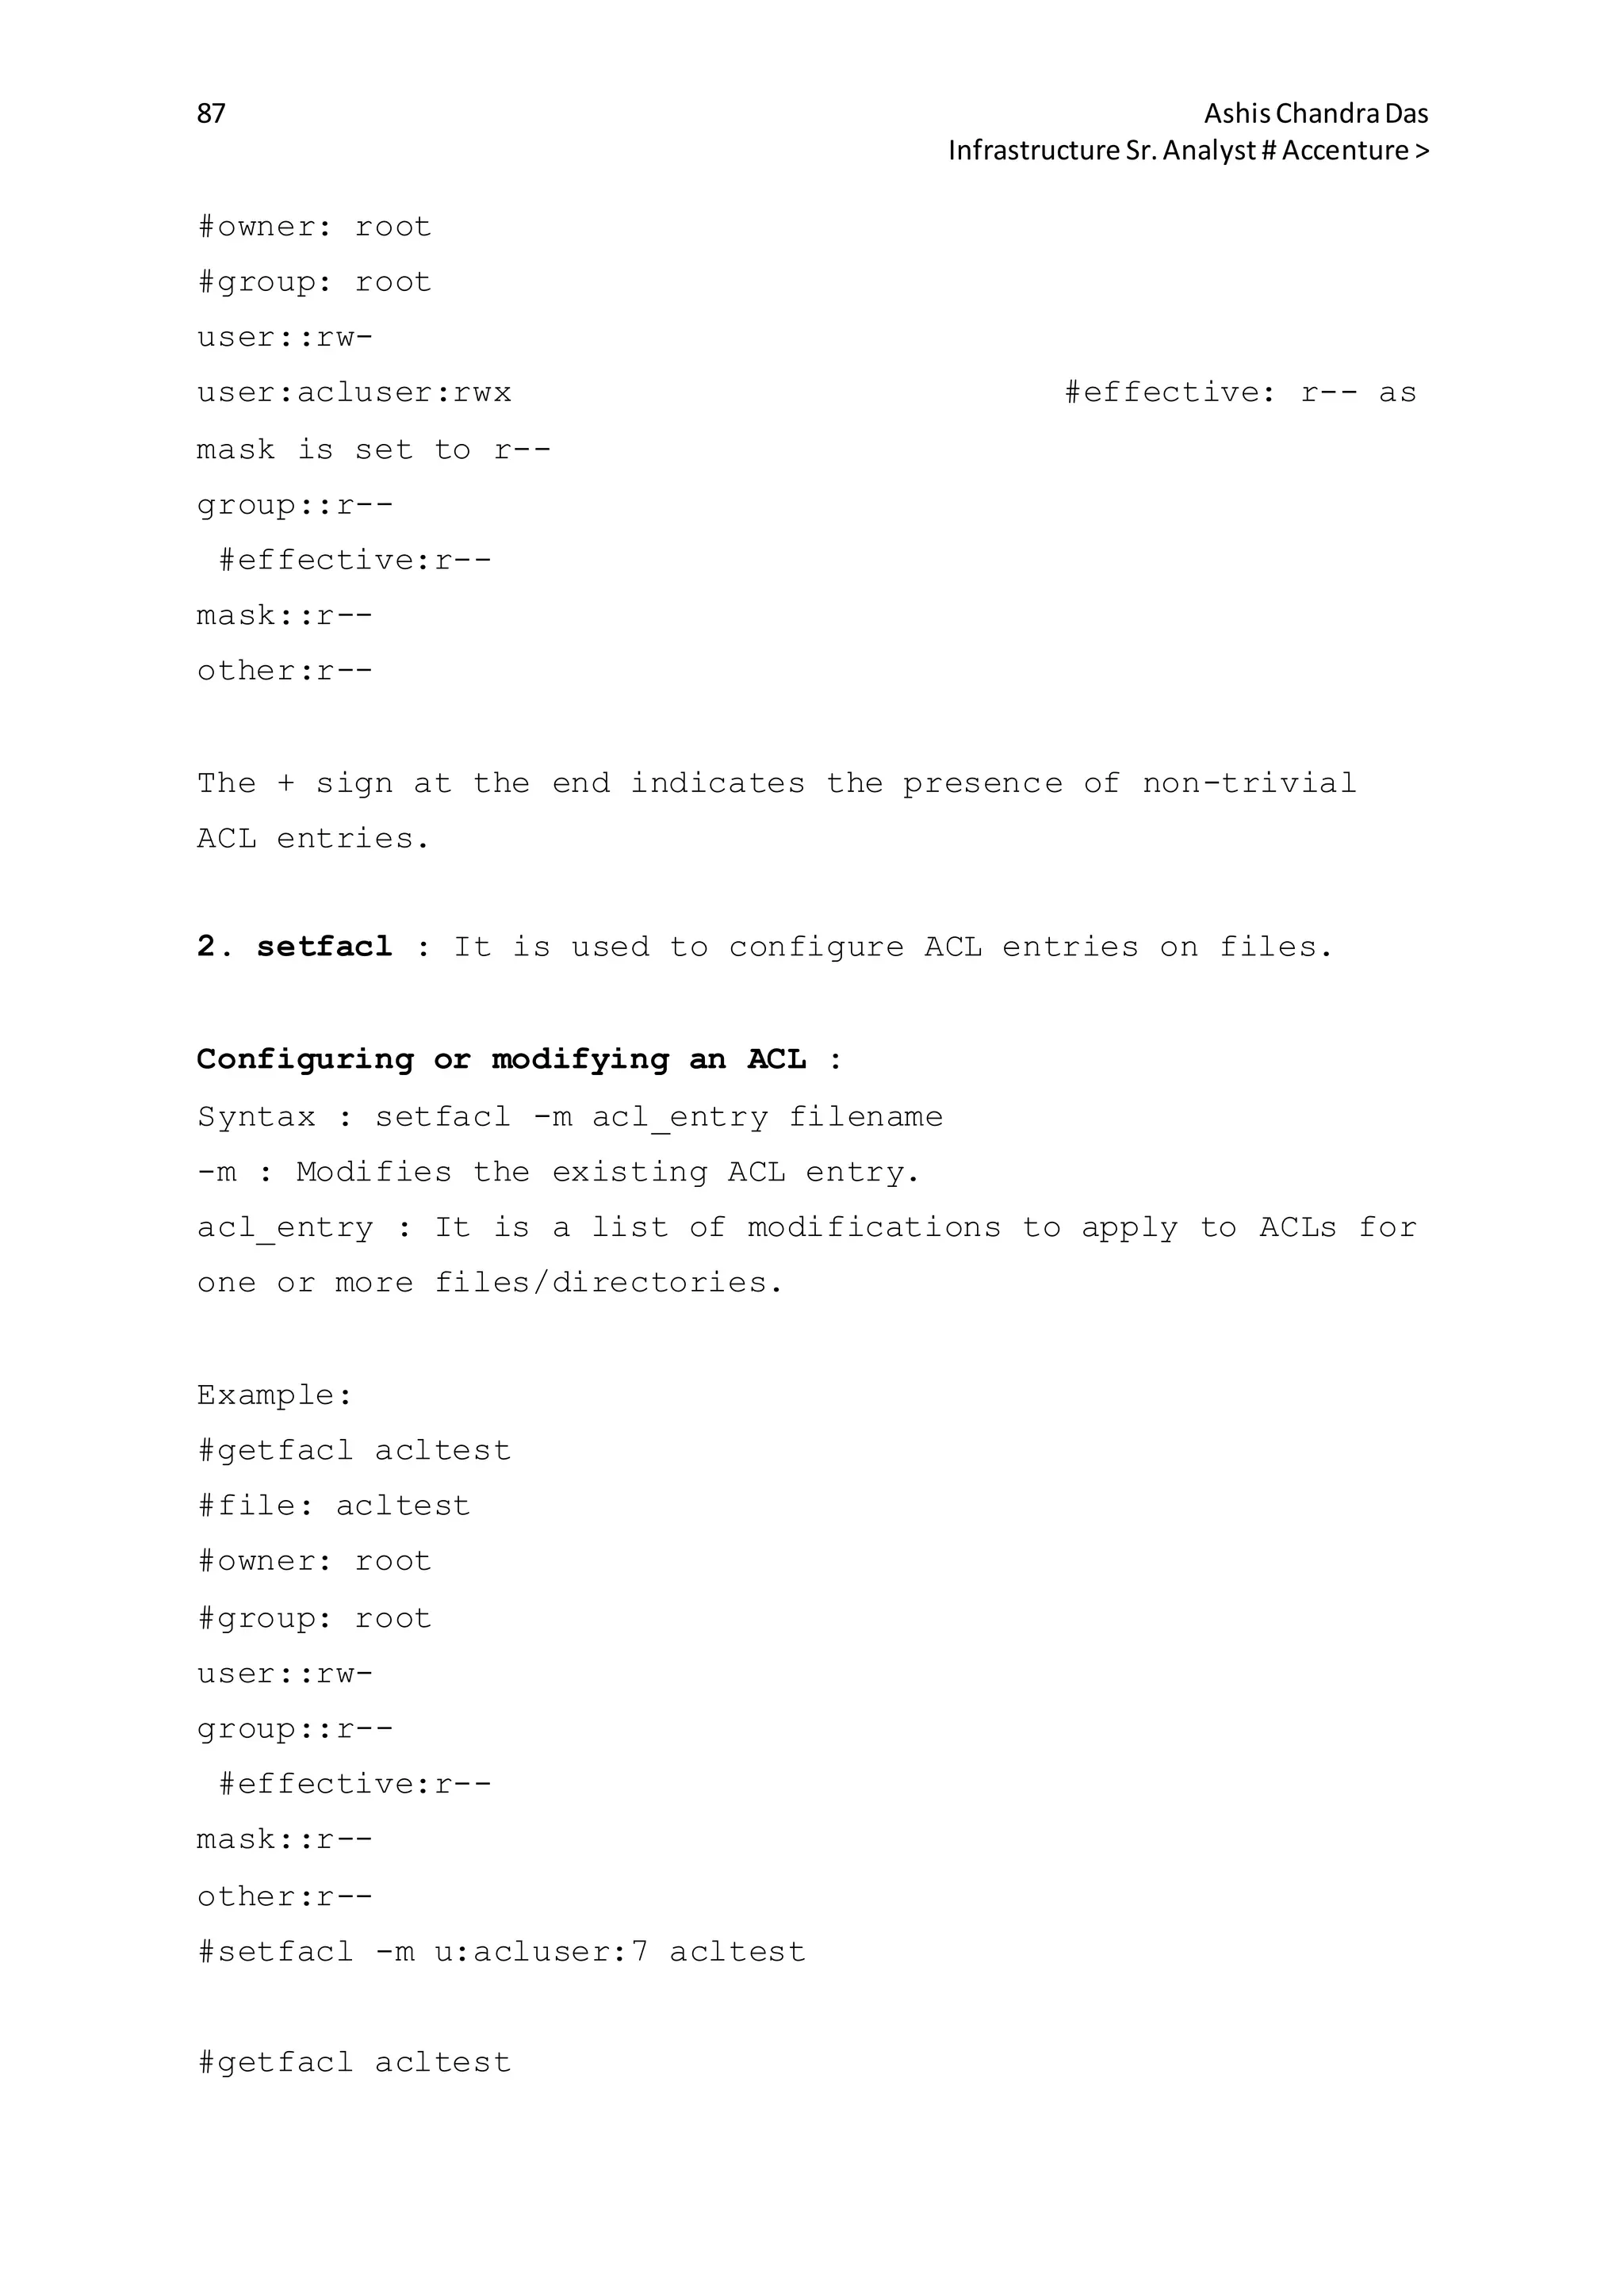
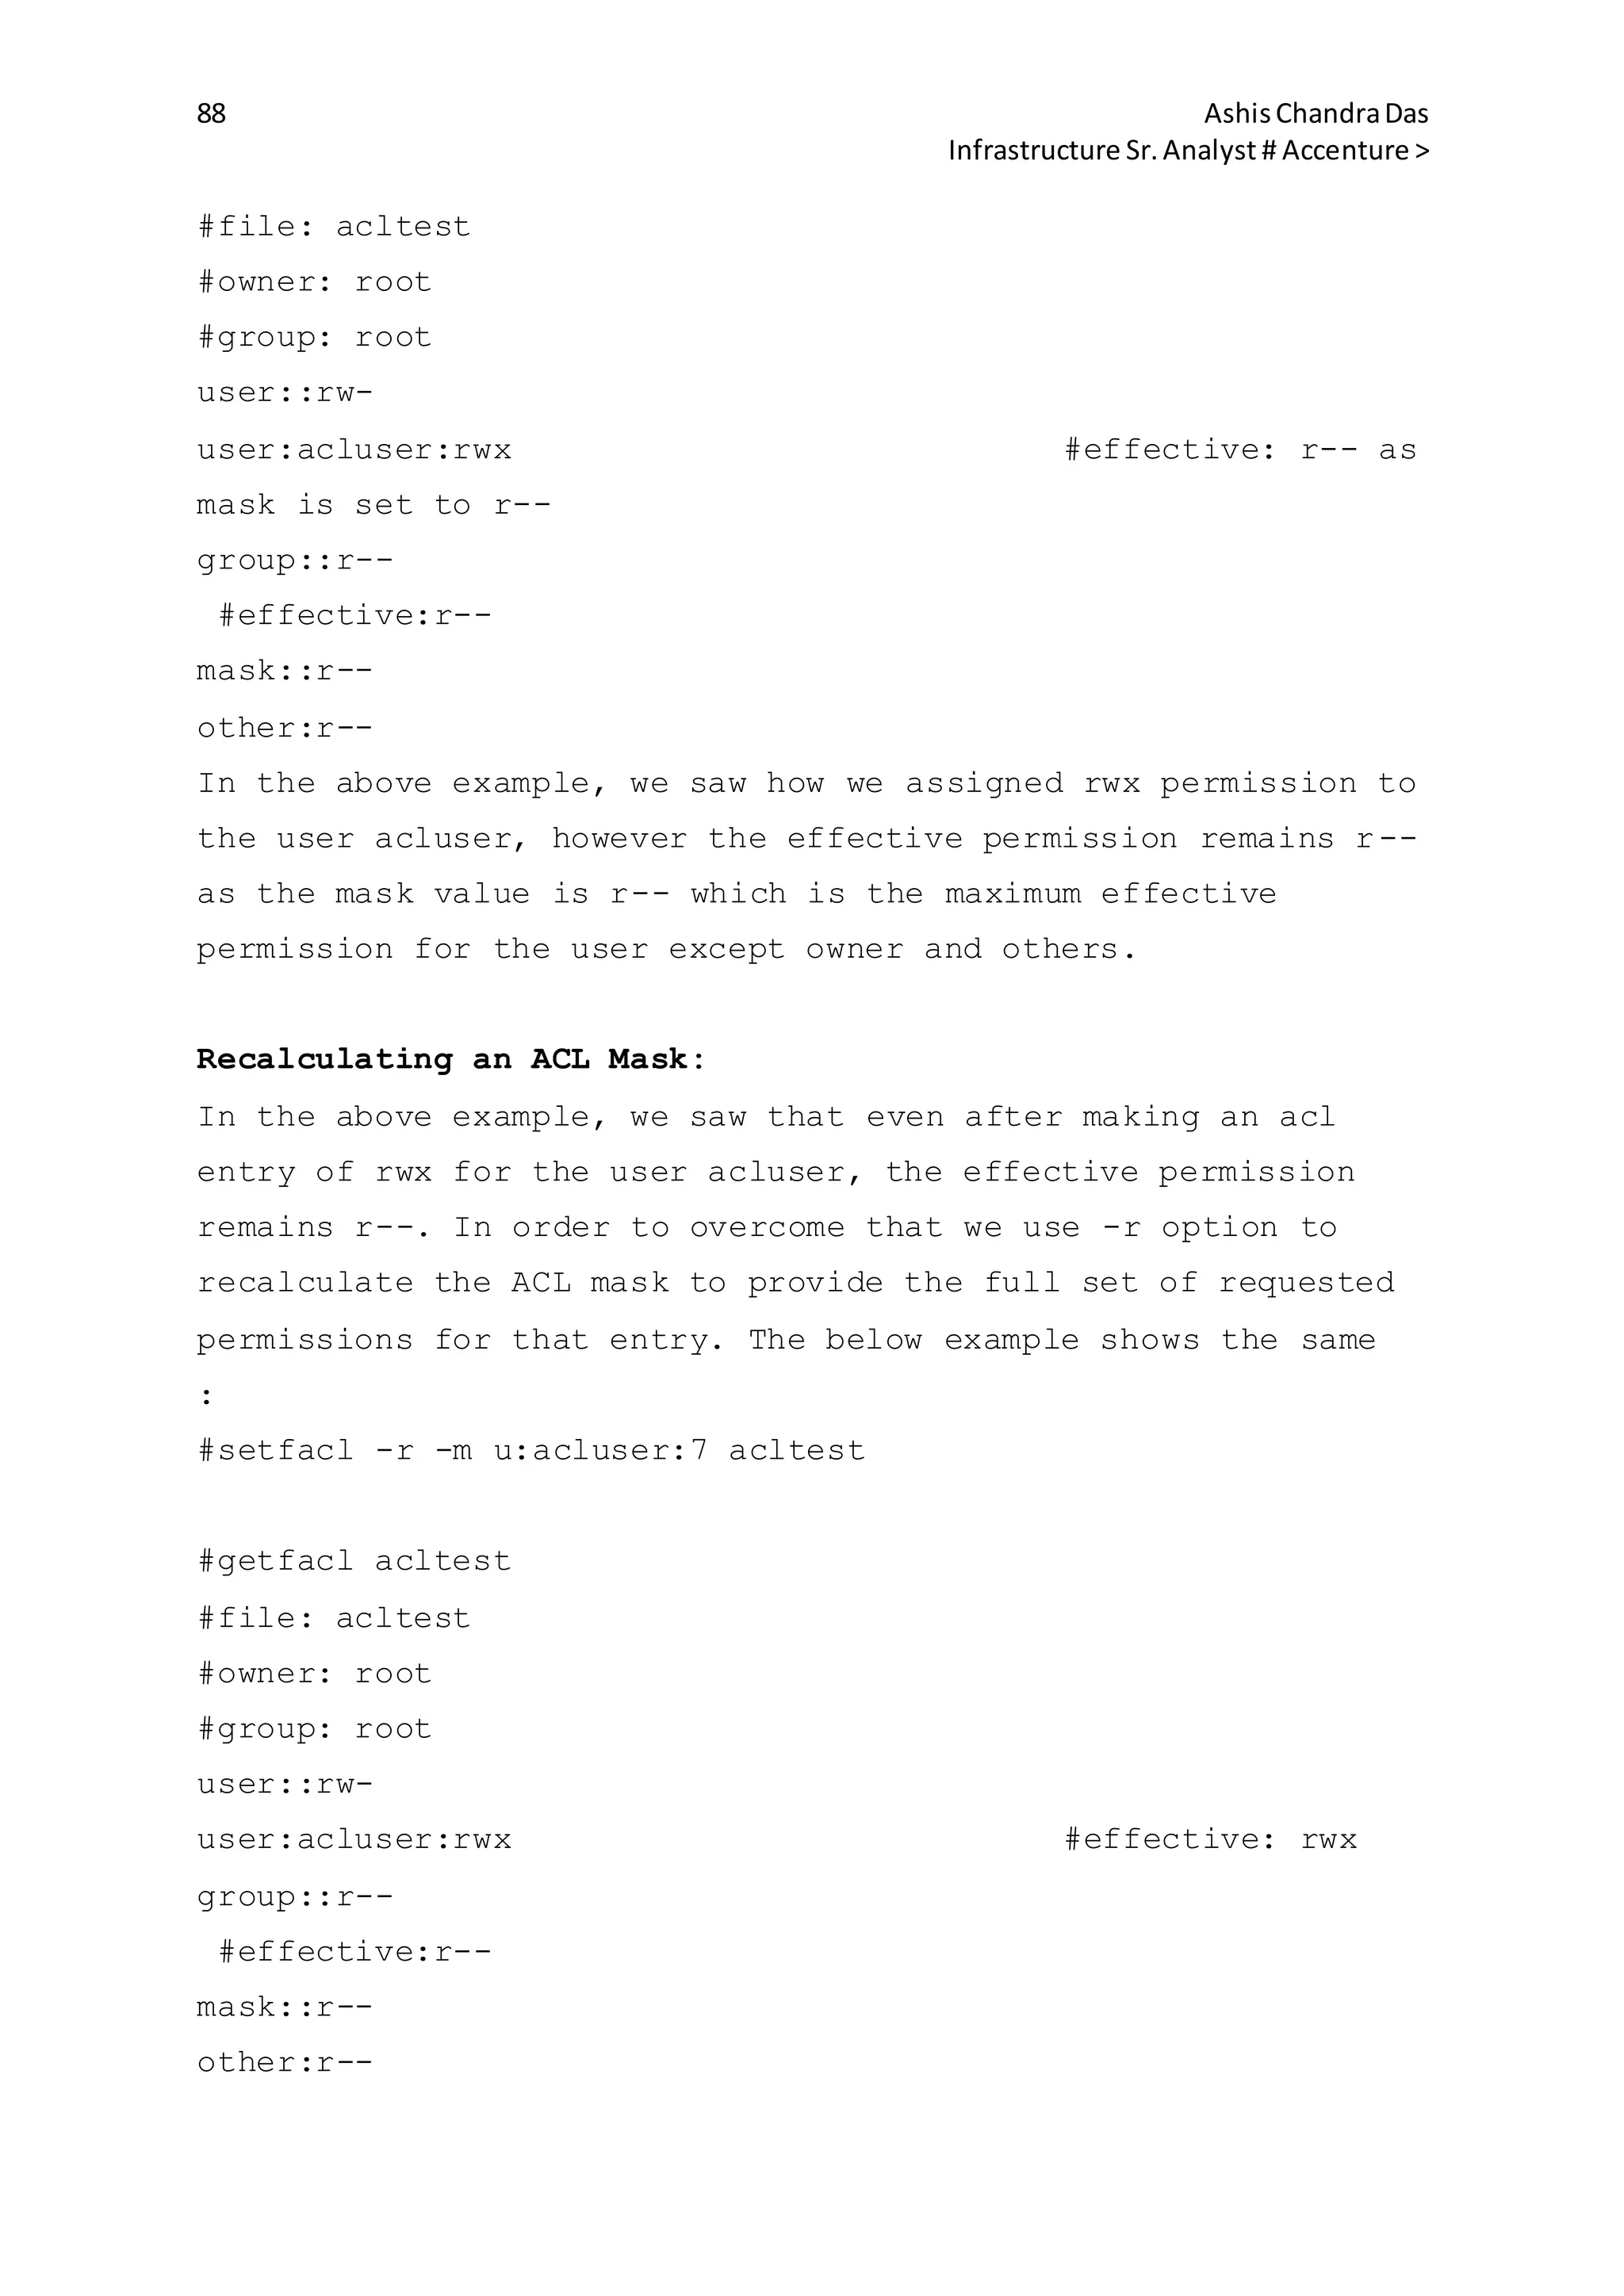
![89 AshisChandraDas
Infrastructure Sr.Analyst # Accenture >
We have seen above how chmod is used to change permissions
too. However we should be careful while using this command if
ACL entry exists for the file/directory as it recalculates the
mask and changes the effective permission. Lets proceed with
the above example. We have changed the effective permission of
user acluser to rwx. Now, lets change the group permission to
rw- using chmod command:
#chmod 664 acltest
#getacl acltest
#file: acltest
#owner: root
#group: root
user::rw-
user:acluser:rwx #effective: rw-
group::rw-
#effective:rw-
mask::rw-
other:r--
So we saw that the effective permission changes to rw from
rwx for the user acluser.
Substituting an ACL:
This is used to replace the entire set of ACL entry with the
specified one. So, we should not miss the basic set of an ACL
entries : user, group, other and ACL mask permissions.
Syntax: setfacl -s u::perm, g::perm, o::perm, [u:UID:perm],
[g:GID:perm] filename
-s : for the substitution of an acl entry
Deleting an ACL :
It is used to delete and ACL entry.
Syntax :setfacl -d acl_entry filename
Lets go with the last example of file acltest. Now we want to](https://image.slidesharecdn.com/4e6bde96-791e-42d1-bde6-b6c2b6569e45-150512182826-lva1-app6891/75/sun-solaris-89-2048.jpg)

![108 AshisChandraDas
Infrastructure Sr.Analyst # Accenture >
inconsistencies. We will discuss now in detail, how to use the
fsck utility to manage the disks/file system.
File System Check(fsck) (Always runs on raw device):
The main purpose of fsck is to bring the file system
inconsistency to consistent. FSCK should be applied to
unmounted file system. There are two modes of it:
1. Interactive Mode: If we are running fsck in interactive
mode we need to give yes option every time to continue to next
step.
#fsck /dev/rdsk/c0t0d0s7
2. Non-Interactive Mode: If we are running fsck in non-
interactive mode by default it takes yes option to continue to
next step.
#fsck -y /dev/rdsk/c0t0d0s7
Other fsck command options:
fsck -m [Displays all file system along with states]
fsck -m <raw device> [States of specific device/file system]
State Flag: The Solaris fsck command uses a state flag, which
is stored in the superblock, to record the condition of the
file system. Following are the possible state values:
State
Flag
Value
FSACTIVE
The mounted file system is active and the data will
be lost if system is interrupted
FSBAD The File System contains inconsistent data
FSCLEAN
The File System is unmounted properly and don't need
to be checked for in consistency.
FSLOG Logging is enabled for the File System.
FSSTABLE
The file system do not have any inconsistency and
therefore no need to runfsck command before mounting
the file system.
fsck is a multipass file system check program that performs
successive passes over each file system, checking blocks and
sizes, pathnames, connectivity, reference counts, and the map
of free blocks (possibly rebuilding it). fsck also performs
cleanup. fsck command fixes the file system in multiple passes
as listed below :
Phase 1 : Checks blocks and sizes.
Phase 2 : Checks path names.
Phase 3 : Checks connectivity.
Phase 4 : Checks reference counts.
Phase 5 : Checks cylinder groups.](https://image.slidesharecdn.com/4e6bde96-791e-42d1-bde6-b6c2b6569e45-150512182826-lva1-app6891/75/sun-solaris-108-2048.jpg)
![109 AshisChandraDas
Infrastructure Sr.Analyst # Accenture >
Note: The File System to be repaired must be inactive before
it can be fixed. So it is always advisable to un-mount the
file system before running the fsck command on that file
system.
Identifying issues on file systems using fsck:
Type fsck -m /dev/rdsk/c0t0d0s7 and press Enter. The state
flag in the superblock of the file system specified is checked
to see whether the file system is clean or requires checking.
If we omit the device argument, all the UFS file systems
listed in /etc/vfstab with an fsck pass value of greater than
0 are checked.
In the following example, the first file system needs
checking, but the second file system does not:
#fsck -m /dev/rdsk/c0t0d0s7
** /dev/rdsk/c0t0d0s7
ufs fsck: sanity check: /dev/rdsk/c0t0d0s7 needs checking
#fsck -m /dev/rdsk/c0t0d0s8
** /dev/rdsk/c0t0d0s8
ufs fsck: sanity check: /dev/rdsk/c0t0d0s8 okay
Recover Super block(when fsck fails to fix):
1. #newfs -N /dev/dsk/c0t0d0s7
2. fsck -F ufs -o b=32 /dev/rdsk/c0t0d0s7
The syntax for the fsck command is as follows:
#fsck [<options>] [<rawDevice>]
The <rawDevice> is the device interface in /dev/rdsk. If no
<rawDevice> is specified,fsck checks the /etc/vfstab file. The
file systems are checked which are represented by the entries
in the /etc/vfstab with :
1. The value of the fsckdev field is a character-special
device.
2. The value of the fsckpass field is a non-zero numeral.
The options for the fsck command are as follows:
-F <FSType>. Limit the check to the file systems specified by
<FSType>.
-m. Check but do not repair—useful for checking whether the
file system is suitable for mounting.
-n | -N. Assume a "no" response to all questions that will be
asked during the fsck run.
-y | - Y. Assume a "yes" response to all questions that will
be asked during the fsck run.](https://image.slidesharecdn.com/4e6bde96-791e-42d1-bde6-b6c2b6569e45-150512182826-lva1-app6891/75/sun-solaris-109-2048.jpg)
![110 AshisChandraDas
Infrastructure Sr.Analyst # Accenture >
Steps to run fsck command :
1. Become superuser.
2. Unmount the file system that need to check for the file
system inconsistency.
3. Use the fsck command by specifying the mount point
directory or the/dev/dsk/<deviceName> as an argument to the
command.
4. The inconsistency messages will be displayed.
5. fsck command will not necessarily fix all the error. You
may have to run twice or thrice until you see following
message:
"FILE SYSTEM STATE NOT SET TO OKAY or FILE SYSTEM MODIFIED"
6. Mount the repaired file system.
7. Move the files and directories of lost+found directories to
their corresponding location. If you are unable to locate the
files/directories in lost+found directories, remove
the files/directories.
Repairing files if boot fails on a SPARC system:
1. Insert the Solaris DVD
2. Execute a single user boot from DVD
ok boot cdrom -s
3. use fsck command on faulty / (root) partition to check and
repair any potential problems in the file system and make the
device writable.
#fsck /dev/rdsk/c0t0d0s0
4. If the fsck command is success, mount the /(root) file
system on the /a directory.
#mount /dev/dsk/c0t0d0s0 /a
5. Set and export the TERM variable, which enables vi editor
to work properly.
#TERM=vt100
#export TERM
6. Edit /etc/vfstab file & correct any problems.
#vi /a/etc/vfstab
:wq!
7.Unmount the file system.
#cd /
#unmount /a
8. Reboot the system
#init 6
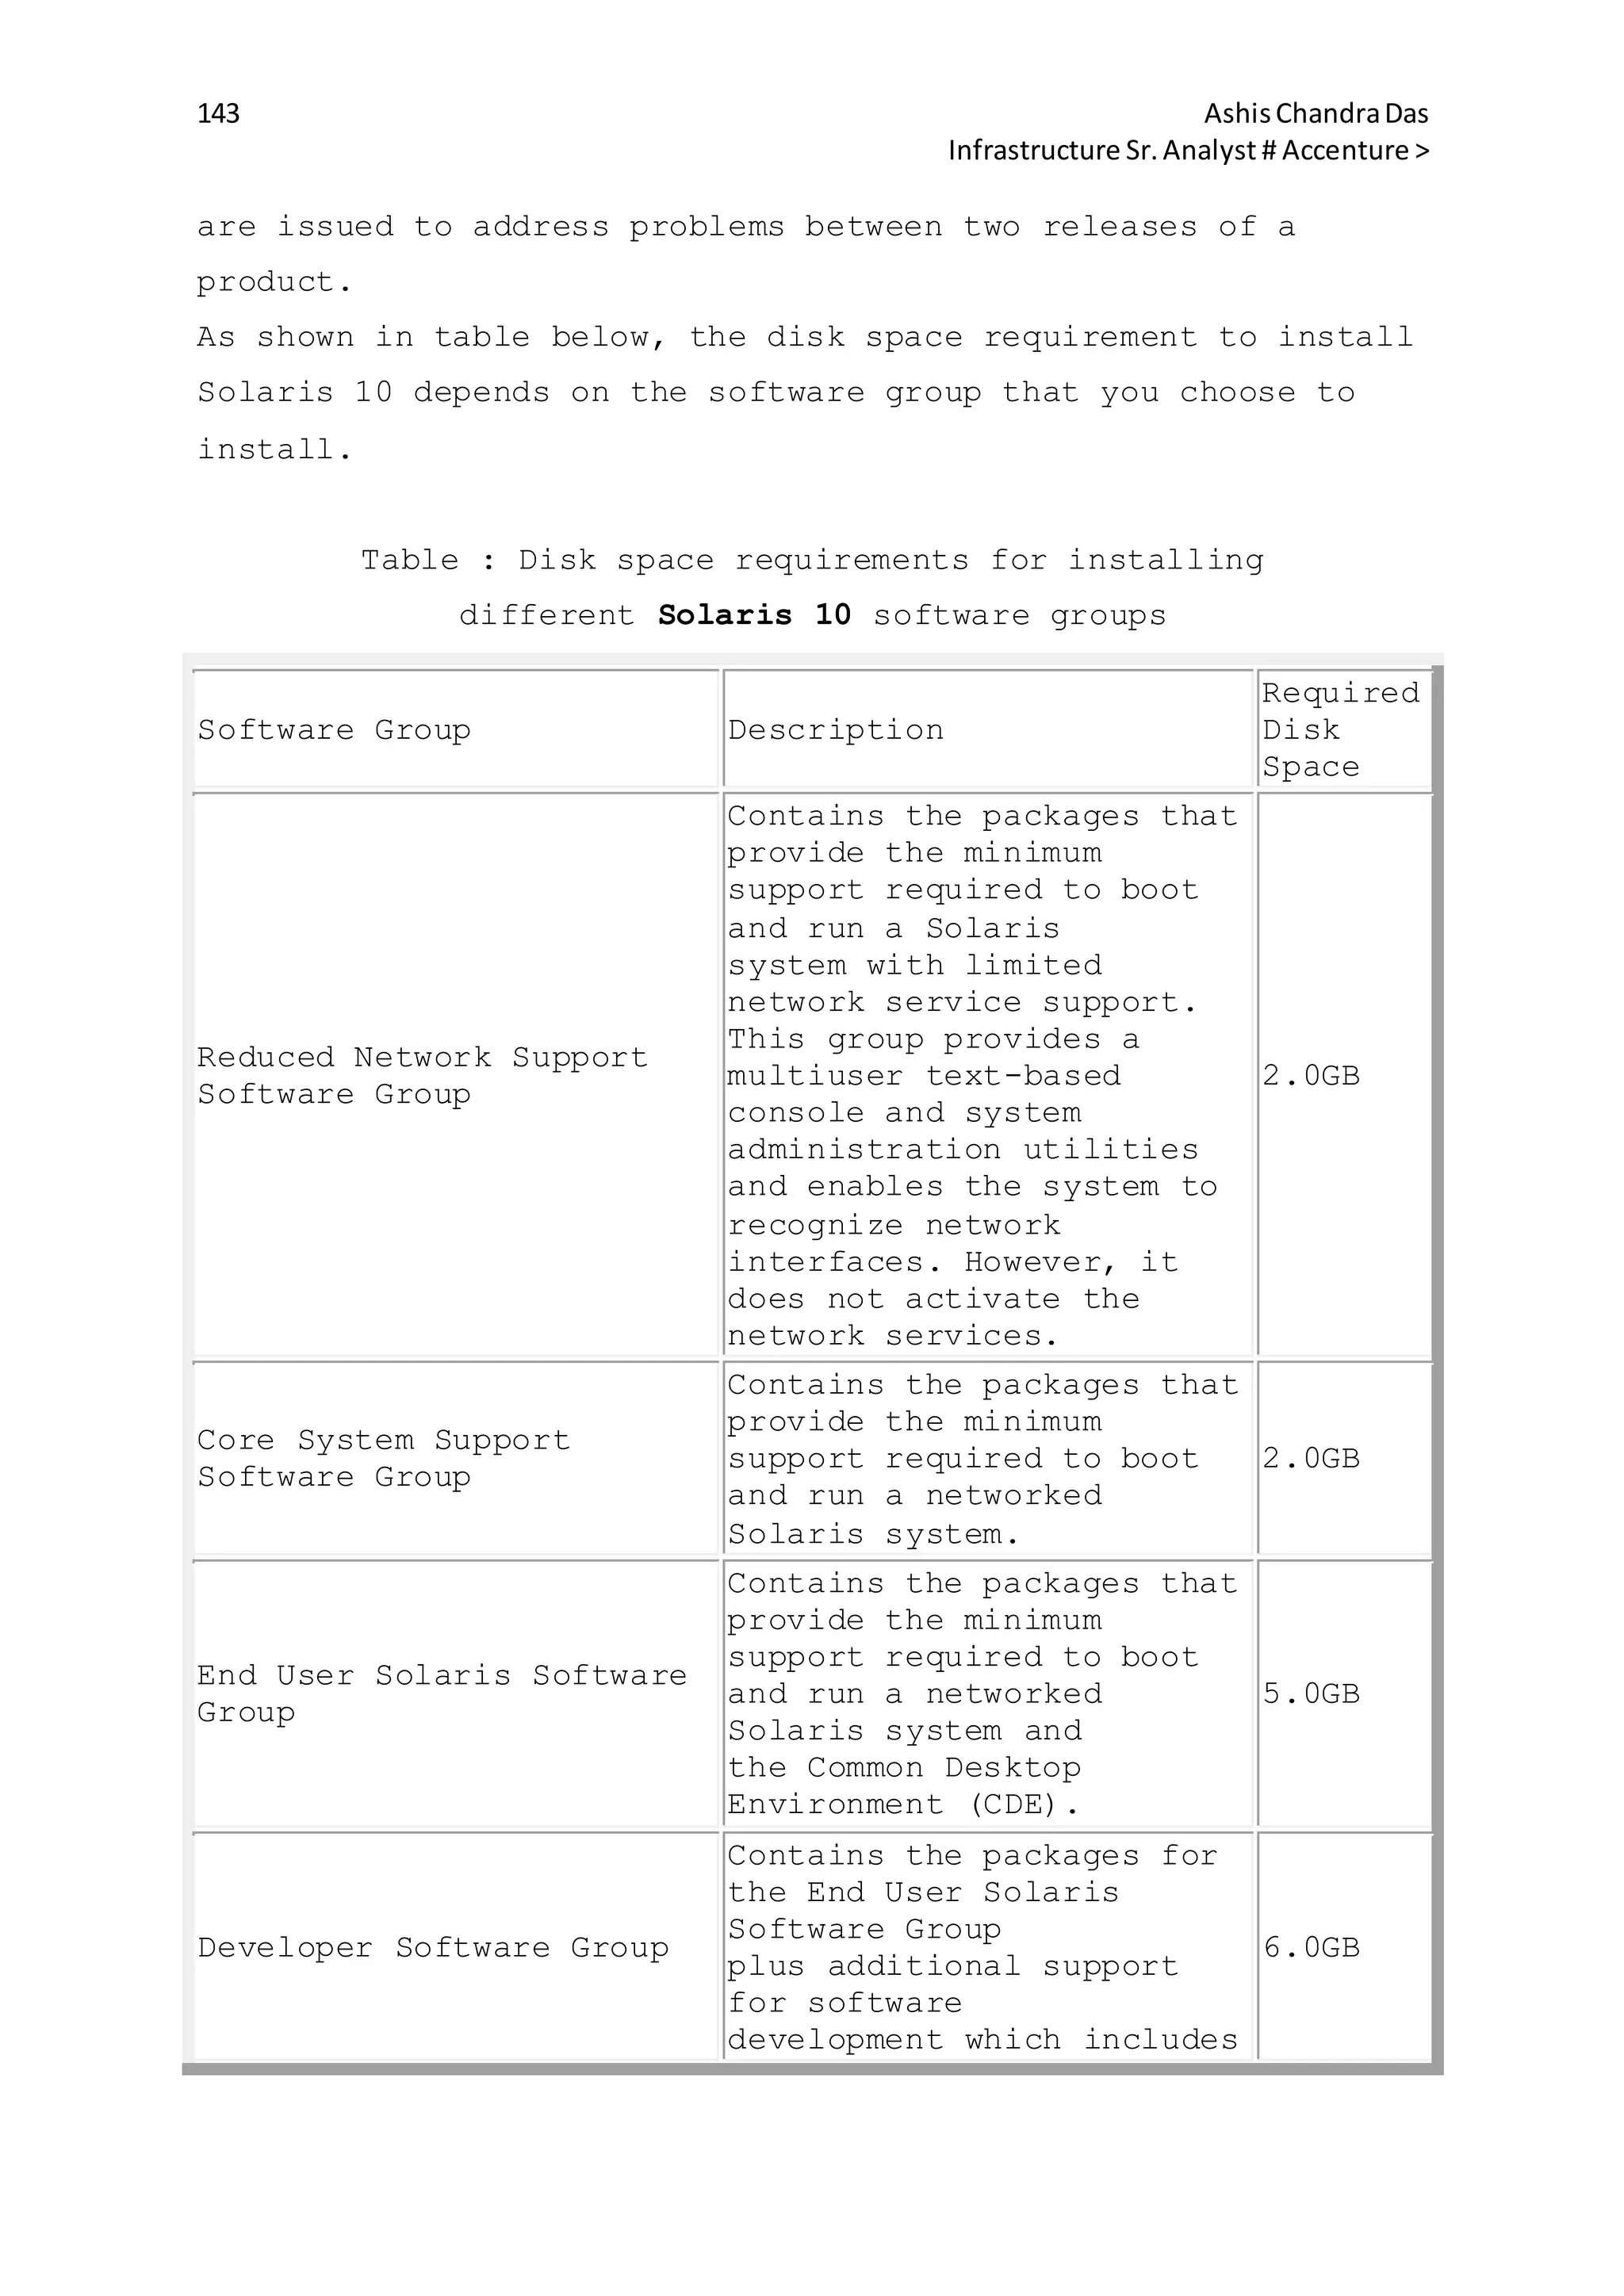
Solaris Disk Architecture Summary:
1. VTOC (Volume Table of Content) [0-sector]:
It contains information about the disk geometry and hard drive
information. The default location is in '0' sector. The](https://image.slidesharecdn.com/4e6bde96-791e-42d1-bde6-b6c2b6569e45-150512182826-lva1-app6891/75/sun-solaris-110-2048.jpg)
![111 AshisChandraDas
Infrastructure Sr.Analyst # Accenture >
command to display VTOC is as follows:
#prtvtoc <Device/Slice Name>
2. Boot Sector [sector 1-15]:
It contain boot traps program information.
3. Super Block [sector 16-31]:
It contains following information:
1. Hardware manufacturer
2. Cylinders
3. Inodes
4. Data Block
4. Backup Super Block:
Super block maintains identical copy of its data in Backup
Super Block. If Super Block is corrupted we can recover it
using backup server super block number.
The command to display the backup super block number of a
slice is:
newfs -N <SliceName>
5. Data Block:
It contains complete information about the data. Each block is
divided into 8KBs. For every 8KB there are addresses called
block address for kernel reference
6. Inode Block:
Inode block contains information about all inodes.
Note: Backup Super bock, data block, inode block are available
in any part of the hard drive starting from 32 sectors of hard
drive.
Swap Management:
The anonymous memory pages used by process are placed in swap
area but unchanged file system pages are not placed in swap
area. In the primary Solaris 10 OS, the default location for
the primary swap is slice 1 of the boot disk, which, by
default, starts at cylinder 0.
Swap files:
It is used to provide additional swap space. This is useful
when re-slicing of disk is difficult. Swap files reside on
files system and are created using mkfile command.
swapfs file system:
The swapfs file system consists of Swap Slice, Swap files &
physical memory(RAM).
Paging:](https://image.slidesharecdn.com/4e6bde96-791e-42d1-bde6-b6c2b6569e45-150512182826-lva1-app6891/75/sun-solaris-111-2048.jpg)
![138 AshisChandraDas
Infrastructure Sr.Analyst # Accenture >
It is preferred to use shutdown command as it notifies the
logged in users and systems using mounted resource of the
server.
Syntax:
/usr/sbin/shutdown [-i<initState>] [-g<gracePeriod>] [-y]
[<message>]
-y: Pre-answers the confirmation questions so that the command
continues without asking for your intervention.
-g<grace Period>: Specifies the number of seconds before the
shutdown begins. The default value is 60.
-i<init State>: Specifies the run level to which the system
will be shut down. Default is the single-user level: S.
<message>: It specifies the message to be appended to the
standard warning message. If the <message> contains multiple
words, it should be enclosed in single or double quotes.
Examples:
#shutdown -i0 -g120 "!!!! System Maintenance is going to
happen, plz save your work ASAP!!!"
If the -y option is used in the command, you will not be
prompted to confirm.
If you are asked for confirmation, type y.
Do you want to continue? (y or n): y
#shutdown : Its shuts down the system to single user mode
#shutdown -i0: It stops the Solaris OS & displays the ok or
Press any key to reboot prompt.
#shutdown -i5: To shut down the & automatically power it off.
#shutdown -i6: Reboots the system to state or run level
defined in /etc/inittab.
Note: Run levels 0 and 5 are states reserved for shutting the
system down. Run level 6 reboots the system. Run level 2 is
available as a multiuser operating state.
Note: The shutdown command invokes init daemon & executes rc0
kill scripts to properly shut down a system.
Some shutdown scenarios and commands to be used:
1. Bring down the server for anticipated outage:](https://image.slidesharecdn.com/4e6bde96-791e-42d1-bde6-b6c2b6569e45-150512182826-lva1-app6891/75/sun-solaris-138-2048.jpg)
![148 AshisChandraDas
Infrastructure Sr.Analyst # Accenture >
If the patches you downloaded are in a compressed format, you
will need to use the unzip or the tar
command to uncompress them before installing them.
Installing Patches : patchadd command is used to install
patches and to find out which patches are
already installed on system.
patchadd [-d] [-G] [-u] [-B <backoutDir>] <source>
[<destination>]
-d. Do not back up the files to be patched (changed or removed
due to patch installation). When this option
is used, the patch cannot be removed once it has been added.
The default is to save (back up) the copy of
all files being updated as a result of patch installation so
that the patch can be removed if necessary.
-G. Adds patches to the packages in the current zone only
-u. Turns off file validation. That means that the patch is
installed even if some of the files to be patched have
been modified since their original installation.
-u. Turns off file validation. That means that the patch is
installed even if some of the files to be patched have
been modified since their original installation.
<source>. Specifies the source from which to retrieve the
patch, such as a directory and a patch id.
<destination>. Specifies the destination to which the patch is
to be applied. The default destination is the
current system.
The log for the patchadd command is saved into the file
: /var/sadm/patch/<patch-ID>/log](https://image.slidesharecdn.com/4e6bde96-791e-42d1-bde6-b6c2b6569e45-150512182826-lva1-app6891/75/sun-solaris-148-2048.jpg)
![149 AshisChandraDas
Infrastructure Sr.Analyst # Accenture >
Few practical scenarios :
Obtaining information about all the patches that have already
been applied on your system.
#patchadd -p.
Finding out if a particular patch with the base number 102129
has been applied on your system.
#patchadd -p | grep 102129 .
Install a patch with patch id 107512-10 from the
/var/sadm/spool directory on the current
standalone system.
#patchadd /var/sadm/spool/107512-10.
Verify that the patch has been installed.
#patchadd -p | 105754.
The showrev command is meant for displaying the machine,
software revision, and patch revision
information. e.g : #showrev -p
Removing Patches : patchrm command can be used to remove
(uninstall) a patch and restore the
previously saved files. The command has the following syntax:
patchrm [-f] [-G] -B <backoutDir>] <patchID>
The operand <patchID> specifies the patch ID such as 105754-
03. The options are described here:
-f. Forces the patch removal even if the patch was superseded
by another patch.
-G. Removes the patch from the packages in the current zone
only.
-B <backoutDir>. Specifics the backout directory for a patch](https://image.slidesharecdn.com/4e6bde96-791e-42d1-bde6-b6c2b6569e45-150512182826-lva1-app6891/75/sun-solaris-149-2048.jpg)
![152 AshisChandraDas
Infrastructure Sr.Analyst # Accenture >
2GB
The Jar command: The Jar command is used to combine multiple
files into a single archive file and compresses it.
Syntax : jar options destination <file names>
Function Definition
c creates a new jar file
t List the table of contents to the jar file
x Extracts files from the jar file
f
Specifies the jar file to process. The jar command
send data to screen if this option is not specified.
v
Executes in verbose mode, writes to the standard
output
Creating a jar archive
#jar cvf /tmp/ravi.jar ravi/
This example, creates a jar file named ravi.jar containing all
the files from the /ravi directory(and any of its
subdirectories)
Viewing a jar archive
#jar tf ravi.jar
Retrieving a jar archive
#jar xvf ravi.jar
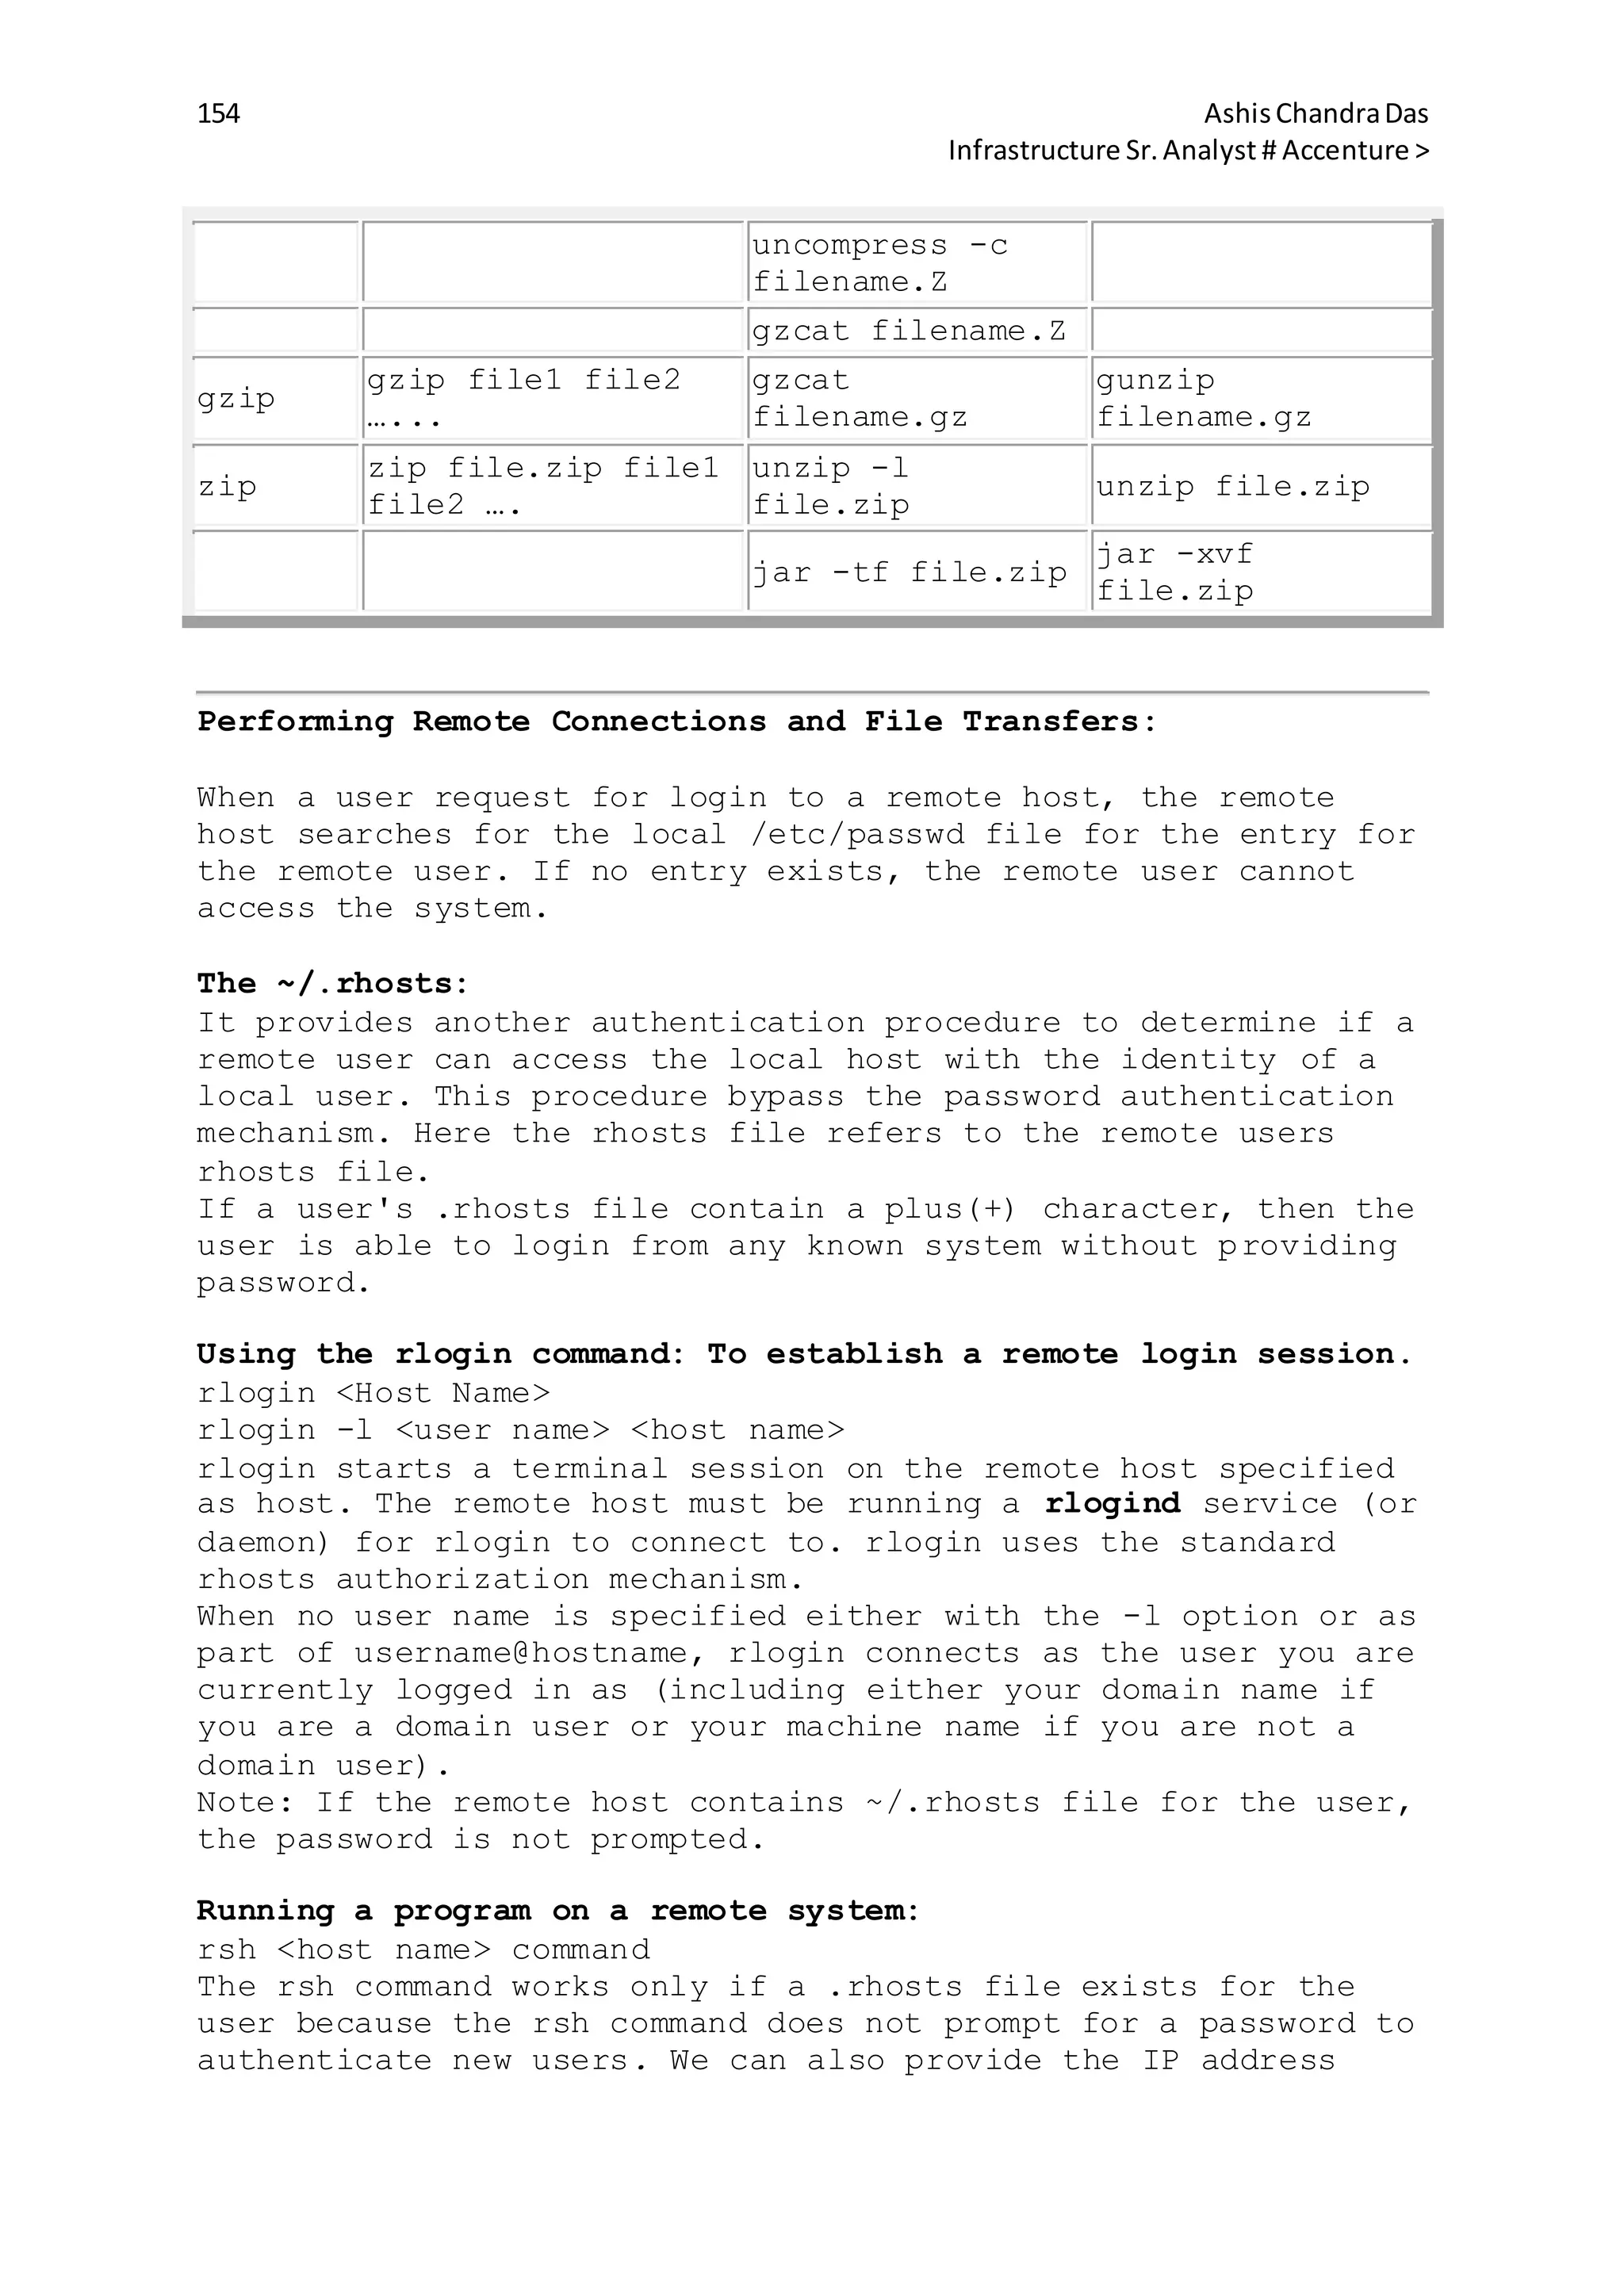
Compressing, viewing & Uncompressing files:
Compress & uncompress files using compress command:
Using compress command
compress [-v] <file name>
The compress command replaces the original file with a new
file that has a .Z extension.
Using uncompress command
uncompress -v file1.tar.Z #replaces file1.tar.Z with file1.tar
uncompress -c file.tar.Z | tar tvf - #to view the contents
View compressed file's content:
#uncompress -c files.tar.tz | tar tvf -
View compressed file's content using zcat command:
zcat <file name>
zcat ravi.Z | more
zcat files.tar.Z | tar xvf -
The '-' at the end indicates that the tar command should read
tar input from standard input.](https://image.slidesharecdn.com/4e6bde96-791e-42d1-bde6-b6c2b6569e45-150512182826-lva1-app6891/75/sun-solaris-152-2048.jpg)
![153 AshisChandraDas
Infrastructure Sr.Analyst # Accenture >
Note: If a compressed file is compressed again, its file size
increases.
Using 7za command:
For compressing:
7za a file1.7z file1
For decompressing:
7za x file1.7z
Using gzip command:
For compressing:
gzip [-v] <file name>
gzip file1 file2 # compresses file1 and file 2 and replaces
the file with extension .gzip
For decompressing :
gunzip file1.gz #uncompress the file.gz
Note: It performs the same compression as compress command but
generally produces smaller files.
'gzcat' command:
It is used to view compressed files using gzip or compress
command:
gzcat <file name>
gzcat file.gz
Using zip command: To compress multiple files into a single
archive file.
For compressing:
zip target_filename source_filenames
zip file.zip file1 file2 file3
For decompressing :
unzip <zipfile> # unzip the file
unzip -l <zipfile> #list the files in the zip archive.
It adds .zip extension of no name/extension is give for the
zipped file.
Note: The jar command and zip command create files that are
compatible with each other. The unzip command can uncompress a
jar file and the jar command can uncompress a zip file.
Following table summarizes the various compressing/archiving:
Utility Compress View Uncompress
tar
tar -cvf
Archivedfile.tar
<file1 file2 …..>
tar -tf
Archivedfile.tar
tar -xvf
Archivedfile.tar
jar
jar -cvf
Archivedfile.tar
<file1 file2 …..>
jar -tf
Archivedfile.tar
jar -xvf
Archivedfile.tar
compress
compress
<filename>
zcat filename.Z
uncompress
<filename>](https://image.slidesharecdn.com/4e6bde96-791e-42d1-bde6-b6c2b6569e45-150512182826-lva1-app6891/75/sun-solaris-153-2048.jpg)
![155 AshisChandraDas
Infrastructure Sr.Analyst # Accenture >
instead of host name.
Example: #rsh host1 ls -l /var
Terminating a Process Remotely by Logging on to a another
system:
rlogin <host name>
pkill shell
Using Secure Shell (SSH) remote login:
Syntax: ssh [-l <login name>] <host name> | username@hostname
[command]
If the system that user logs in from is listed in
/etc/hosts.equiv or /etc/shosts.equiv on the remote system and
the user name is same on both the systems, the user is
immediately permitted to log in.
If .rhosts or .shosts exists in the user's home directory on
remote system and contains entry with the client system and
user name on that system, the user is permitted to log in.
Note: The above two types of authentication is normally not
allowed as they are not secure.
Using a telnet Command: To log on to a remote system and work
in that environment.
telnet <Host Name>
Note: telnet command always prompts for password and does not
uses ~/.rhosts file.
Using Virtual network Computing(VNC):
It provides remote desktop session over the Remote Frame
Buffer (RFB). The VNC consists of two components:
1. X VNC server
2. VNC Client for X
Xvnc is an X VNC server that allows sharing a Solaris 10 X
windows sessions with another Solaris, Linux or Windows
system. Use vncserver command to start or stop an Xvnc server:
vncserver options
Vncviewer is and X VNC Client that allows viewing an X windows
session from another Solaris, Linux, or Windows system on
Solaris 10 system. Use vncviewer command to establish a
connection to an Xvnc srver.
Vncviewer options host:display#
Copying Files or directories :
Th rcp command:
To copy files from one host to another.
rcp <sourcer file> <host name>:<destination file>
rcp <host name>:<source file> <destination file>](https://image.slidesharecdn.com/4e6bde96-791e-42d1-bde6-b6c2b6569e45-150512182826-lva1-app6891/75/sun-solaris-155-2048.jpg)
![158 AshisChandraDas
Infrastructure Sr.Analyst # Accenture >
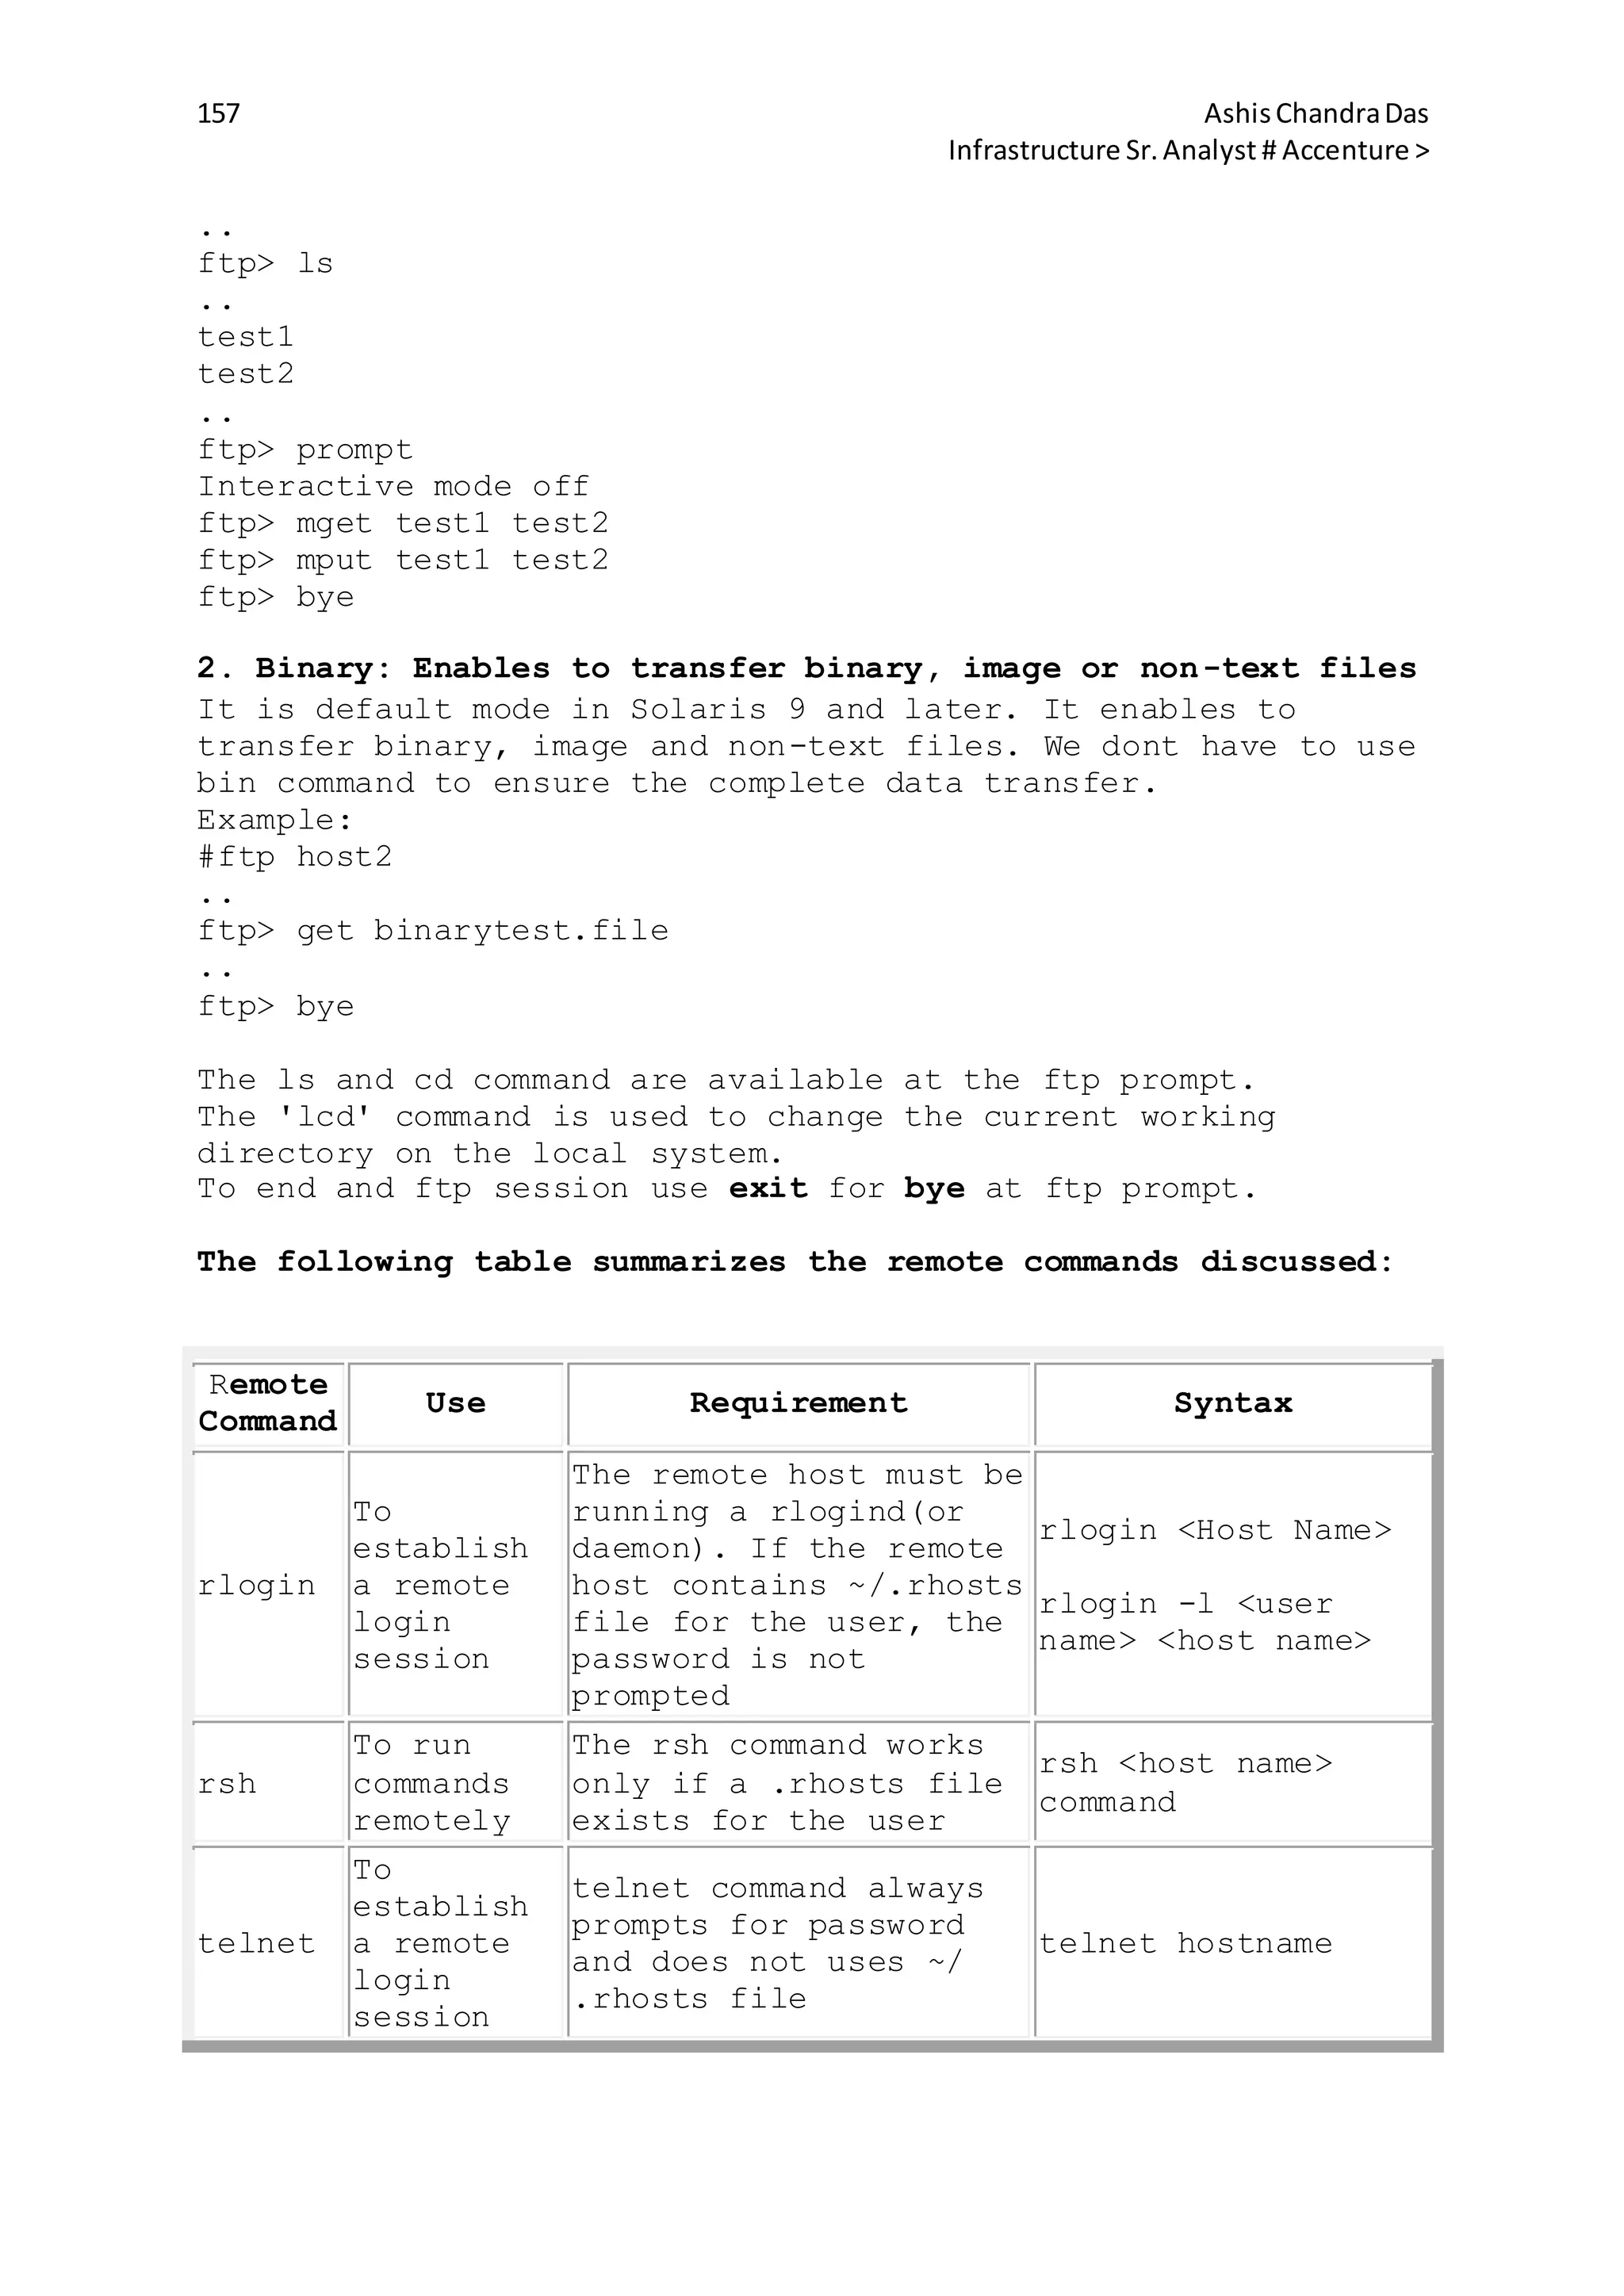
ssh
To
establish
a secure
remote
login
session
If the remote system is
listed in
/etc/hosts.equiv or
/etc/shosts.equiv and
user name is same in
local and remote
machine, the user is
permitted to log in.
If ~/.rhosts or
~/.shosts exists on
remote system and has
entry for client system
and user name on client
system, the user is
permitted to log in.
ssh [-l login_name]
hostname
ssh user@hostname
rcp
To copy
files from
one host
to another
It checks for the
~/.rhosts file for
access permissions.
rcp <sourcer file>
<host
name>:<destination
file>
rcp <host
name>:<source file>
<destination file>
rcp <host
name>:<source file>
<host
name>:<destination
file>
ftp
Remote
File
Transfer
User needs to
authenticate for FTP
session. For anonymous
FTP a valid email
address is needed. It
does not uses the
.rhosts file for
authentication
ftp <host name>
get/put filename :
For single file
transfer
mget/mput file1
file2 …. : For
multiple file
transfer
NFS & AutoFS
Configuring NFS:
NFS(Network File System):
This file system is implemented by most unix type](https://image.slidesharecdn.com/4e6bde96-791e-42d1-bde6-b6c2b6569e45-150512182826-lva1-app6891/75/sun-solaris-158-2048.jpg)
![159 AshisChandraDas
Infrastructure Sr.Analyst # Accenture >
OS(SOLARIS/LINUX/FreeBSD). NFS seamlessly mounts remote file
systems locally.
NFS major versions:
2 → Original
3 → improved upon version 2
4 → Current & default version
Note: NFS versions 3 & higher supports large files (>2GB)
NFS Benefits:
1. It enables file system sharing on network across different
systems.
2. It can be implemented across different OS.
3. The working of the nfs file system is as easy as the
locally mounted file system.
NFS component include:
1. NFS Client: It mounts the file resource shared across the
network by the NFS server.
2. NFS Server: It contains the file system that has to be
shared across the network.
3. Auto FS
Managing NFS Server:
We use NFS server files, NFS server daemons & NFS server
commands to configure and manage an NFS server.
To support NFS server activities we need following files:
file Description
/etc/dfs/dfstab
Lists the local resource to share at boot
time. This file contains the commands that
share local directories. Each line of
dfstab file consists of a share command.
E.g: share [-F fstype] [-o options] [-d
"test"] <file system to be shared>
/etc/dfs/sharetab
Lists the local resource currently being
shared by the NFS server. Do not edit this
file.
/etc/dfs/fstypes
Lists the default file system types for
the remote file systems.
/etc/rmtab
Lists the file systems remotely mounted by
the NFS Client. Do not edit this file.
E.g:system1:/export/sharedir1
/etc/nfs/nfslog.conf
Lists the information defining the local
configuration logs used for NFS server
logging.
/etc/default/nfslogd Lists the configuration information](https://image.slidesharecdn.com/4e6bde96-791e-42d1-bde6-b6c2b6569e45-150512182826-lva1-app6891/75/sun-solaris-159-2048.jpg)
![161 AshisChandraDas
Infrastructure Sr.Analyst # Accenture >
Note: The features provided by mountd & lockd daemons are
integrated in NFSv4 protocol.
NFS Server Commands:
share:
Makes a local directory on an NFS server available for
mounting. It also displays the contents of the
/etc/dfs/sharetab file. It writes information for all shared
resource into /etc/dfs/sharetab file.
Syntax:
share [-F fstype] [-o options] [-d "text"] [Path Name]
-o options: Controls a client's access to an NFS shared
resource.
The options lists are as follows:
ro: read only request
rw: read & write request
root=access-list: Informs client that the root user on the
specified client systems cna perform superuser-privileged
requests on the shared resource.
ro=acess-list: Allows read requests from specified access
list.
rw=acess-list: Allows read & write requests from specified
access list.
anon=n: Sets n to be the effective user ID for anonymous
users. By default it is 6001. If it is set to -1, the access
is denied.
access-list=client:client : Allows access based on a colon-
separated list of one or more clients.
access-list=@network : Allows access based on a network name.
The network name must be defined in the /etc/networks file.
access-list=.domain : Allows access based on DNS domain. The
(.) dot identifies the value as a DNS domain.
access-list=netgroup_name: Allows access based on a configured
net group(NIS or NIS+ only)
-d description: Describes the shared file resource.
Path name: Absolute path of the resource for sharing.
Example:
#share -o ro /export/share1
The above command provides read only permission to
/export/share1.
#share -F nfs -o ro,rw=client1 directory
This command restricts access to read only, but accept read
and and write request from client1.
Note: If no argument is specified share command displays list
of all shared file resource.
unshare:](https://image.slidesharecdn.com/4e6bde96-791e-42d1-bde6-b6c2b6569e45-150512182826-lva1-app6891/75/sun-solaris-161-2048.jpg)
![162 AshisChandraDas
Infrastructure Sr.Analyst # Accenture >
Makes a previously available directory unavailable for the
client side mount operations.
#unshare [ -F nfs ] pathname
#unshare <resource name>
shareall:
Reads and executes share statements in the /etc/dfs/dfstab
file.
This shares all resources listed in the /etc/dfs/dfstab file.
shareall [-F nfs]
unshareall:
Makes previously share resource unavailable which is listed
/etc/dfs/sharetab.
shareall [-F nfs]
dfshares:
Lists available shared resources from a remote or local
server.
Displaying currently shared all resources when used without
argument:
#dfshares
RESOURCE SERVER ACCESS TRANSPORT
dfshares command with host name as argument, lists the
resources shared by the host.
#dfshares system1
dfmounts:
Displays a list of NFS server directories that are currently
mounted.
#dfmounts
RESOURCE SERVER PATHNAME CLIENTS
Note: The dfmount command uses mountd daemon to display
currently shared NFS resources, it will not display NFSv4
shares.
Managing NFS client:
NFS client files, NFS client daemon and NFS client commands
work together to manage NFS Client.
NFS client Files:
/etc/vfstab : Defines file system to be mounted. A sample
entry in this file for nfs file system is shown below:
system1:/export/local_share1 - /export/remote_share1 nfs - yes
soft,bg
Here the /export/remote_share1 is the file system at the NFS
server and is shared by nfs client locally on](https://image.slidesharecdn.com/4e6bde96-791e-42d1-bde6-b6c2b6569e45-150512182826-lva1-app6891/75/sun-solaris-162-2048.jpg)
![163 AshisChandraDas
Infrastructure Sr.Analyst # Accenture >
/export/local_share1.
/etc/mnttab : Lists currently mounted file system, including
automounted directories. This file is maintained by kernel and
cannot be edited. It provides read only access to the mounted
file system.
/etc/dfs/fstypes: Lists the default file system types for
remote file systems.
#cat /etc/dfs/fstypes
nfs NFS Utilities
autofs AUTOFS Utilities
cachefs CACHEFS Utilities
/etc/default/nfs : Contains parameters used by NFS protocols &
daemons.
NFS client Daemons:
The nfs daemons are started by using the
svc:/network/nfs/client service. The nfs client daemons are:
statd : Works with lockd daemon to provide crash recovery
functions for lock manager.
#svcadm -v enable nfs/status
svc:/network/nfs/status:default enabled
lockd : Supportd recording locks on nfs shared files.
#svcadm -v enable nfs/lockmgr
svcs:/network/nfs/nlockmgr:default enabled
nfs4cbd : It is an NFSv4 call back daemon. Following is the
FMRI for the nfs4cbd service:
svc:/network/nfs/cbd:default
NFS client commands:
dfshares:
Lists available shared resources from a remote/local NFS
server.
mount:
Attaches a file resource(local/remote) to a specified local
mount point.
Syntax:
mount [ -F nfs] [-o options] server:pathname mount_point
where:
-F nfs: Specifies NFS as the file system type. It is default
option and not necessary.
-o options: Specifies a comma-separated list of file system
specific options such as rw, ro. The default is rw.
server:pathname: Specifies the name of the server and path
name of the remote file resource. The name of the server and](https://image.slidesharecdn.com/4e6bde96-791e-42d1-bde6-b6c2b6569e45-150512182826-lva1-app6891/75/sun-solaris-163-2048.jpg)
![166 AshisChandraDas
Infrastructure Sr.Analyst # Accenture >
Mount a file system:
#mount server_name:share_resource local_directory
server_name: Name of NFS server
share_resource: Path of the shared remote directory
local_directory: Path of local mount point
Enable the nfs service:
#svcadm enable network/nfs/client
NFS File Sharing:
At server side:
1. Create following entry in /etc/dfs/dfstab :
#share -F nfs <resource path name>
2. Share the file system:
#exportfs -a
-a: Exports all directories listed in the dfstab file.
3. List all shared file system:
#showmount -e
4. Export the shared file system to kernel:
To share all file system: #shareall
To share specific file system: #share <resource path name>
5. Start the nfs server daemon:
#svcadm enable nfs/server
At Client side:
1. Create a directory to mount the file system.
2. Mount the file system:
#mount -F nfs <Server Name/IP>:<Path name> <Local mount point>
3. Start the nfs client daemon:
#svcadm enable nfs/client
4. To make the file sharing permanent make an entry to
vfstab.
Different File Sharing options:
Share to all clients share -F nfs [path name]
Share to client1 & client2 with
read only permission
share -F nfs -o
ro=client1:client2 [path
name]
Share to client1 with read &
write permission and for others
read only
share -F nfs -o
ro,rw=client1[path name]](https://image.slidesharecdn.com/4e6bde96-791e-42d1-bde6-b6c2b6569e45-150512182826-lva1-app6891/75/sun-solaris-166-2048.jpg)
![167 AshisChandraDas
Infrastructure Sr.Analyst # Accenture >
Share to client1 with root
permission
share -F nfs -o root=client1
[path name]
Share with anonymous client with
root user privilege
share -F nfs anon=0 [path
name]
Share to a domain
share -F nfs -o
ro=DomainName [path name]
The common NFS errors and troubleshooting:
The "rpcbind failure" error
Cause:
1. There is a combination of an incorrect Internet address and
a correct host or node name in the hosts database file that
supports the client node.
2. The hosts database file that supports the client has the
correct server node, but the server node temporarily stops due
to an overload.
Resolution:
Check if the server is out of critical resources as memory,
swap, disk space etc.
The "server not responding" error
Cause: An accessible server is not running NFS daemon.
Resolution:
1. The network between the local system and server is down. To
verify the network, ping the server.
2. The server is down.
The "NFS client fails a reboot" error
Cause: Client is requesting an NFS mount from a non-
operational NFS srver.
Resolution:
1. Press stop+A
2. edit /etc/vfstab and comment out the entry for NFS mount.
3. Press Ctrl+D to continue normal boot.
4. Check if the NFS server is operational and functioning
properly.
5. After resolving the issue, uncomment the entry in step 2.
The "service not responding" error
Cause: NFS server daemon is not running.
Resolution:
1. Check the run level on server and verify if it is 3:
#who -r
2. check the status of the nfs server daemon:
#svcs svc:/network/nfs/server
#svcadm enable svc:/network/nfs/server](https://image.slidesharecdn.com/4e6bde96-791e-42d1-bde6-b6c2b6569e45-150512182826-lva1-app6891/75/sun-solaris-167-2048.jpg)
![171 AshisChandraDas
Infrastructure Sr.Analyst # Accenture >
server1 & server2 are the servers sharing
resource /export/home/user1 & /export/home/user2 respectively.
Reducing the auto_home map into single line:
Lets take a scenario where we want : for every login ID, the
client remotely mounts the /export/home/loginID directory from
the NFS server server1 onto the local mount point
/home/loginID.
* server1:/export/home/&
• Special: It provides access to NFS server by using their
host names. The two special maps listed in example for
/etc/auto_master file are:
The -hosts map: This provides access to all the resources
shared by NFS server. The shared resources are mounted below
the /net/server_name or /net/server_ip_address directory.
The auto_home map: This provides mechanism to allow users to
access their centrally located $HOME directories.
The /net directory:
The shared resources associated with the hosts map entry are
mounted below the /net/server_name or /net/server_ip_address
directory. Lets say we have a shared resources Shared_Dir1 on
Server1. This shared resource can be found under
/net/Server1/Shared_Dir1 directory. When we use cd command to
this directory, the resource is auto-mounted.
Updating Automount Maps:
After making changes to master map or creation of a direct
map, execute the autmount command to make the changes
effective.
#automount [-t duration] [-v]
-t : Specifies time in seconds for which file system remains
mounted when not in use. The default is 600s.
-v: Verbose mode
Note:
1. There is no need to restart automountd daemon after making
the changes to existing entries in a direct map. The new
information is used when the automountd daemon next access the
map entry to perform a mount.
2. If mount point(first field) of the direct map is changed,
automountd should be restarted.
Following Table should be referred to run automount command:
Automount Map Run if entry is added/deleted Is Modified](https://image.slidesharecdn.com/4e6bde96-791e-42d1-bde6-b6c2b6569e45-150512182826-lva1-app6891/75/sun-solaris-171-2048.jpg)