SugarCE For Small And Medium Enterprises
•
1 like•790 views

The aim of this tutorial is to help the developers that are new with SugarCE to get started quickly. It will take a hands-on step-by-step approach, starting from installation, continuing with configuration, creating new modules, customizations, etc. It will take a real case of customizing SugarCE for a small business and building some new warehouse modules.

Recommended
More Related Content
Similar to SugarCE For Small And Medium Enterprises
Similar to SugarCE For Small And Medium Enterprises (20)
More from Dashamir Hoxha
More from Dashamir Hoxha (20)
SugarCE For Small And Medium Enterprises
- 1. USING SUGARCE FOR THE NEEDS OF SMALL AND MEDIUM ENTERPRISES Dashamir Hoxha <dashohoxha@gmail.com> Introduction Sugar Community Edition (SugarCE) is the non-commercial version of the SugarCRM. CRM stands for Customer Relationship Management. Like any CRM, SugarCE can be used to record the customers/clients of a company and to keep track of the relations of the company with them. It has modules for accounts, contacts, cases, campaigns, leads, opportunities, projects, etc. Most of them are advanced features that may be useful only for big companies/enterprises. Then, is SugarCE suitable, interesting, useful for small and medium enterprises? I think that it is. The point is that SugarCE can be customized very easily and quickly to fit the needs of a company. The modules that are not needed can be removed, the remaining modules can be customized, and even new modules can be built quite easily using a GUI web interface. I have even been able to customize SugarCE in order to record the books of a library. However, as a complex software, it takes some time to get familiar with SugarCE. So, the aim of this tutorial is to help the developers that are new with SugarCE to get started quickly. It will take a hands-on step-by-step approach, starting from installation, continuing with configuration, creating new modules, customizations, etc. Windows will be used as the development platform, since actually it is more popular than Linux, and it has been proved to be difficult for small businesses to switch to Linux just for the sake of an application (at least this is my experience). I will take a real case of customizing SugarCE for a small business and building some new warehouse modules. Installing the Tools As a quick editor in Windows environment I prefer Cream, which is a version of vim adopted to Windows. It has all the power of vim (including syntax highlight) and also has some small customizations that make it user friendly for Windows users. Get it from http://cream.sourceforge.net/download.html . Its installation is straight forward. For version control in Windows I prefer TortoiseSVN. It is very simple and intuitive and it is the best way to start learning Subversion. Get it from http://tortoisesvn.net/downloads and install it. It has a great help and tutorial, so don't forget to check it. For web development in Windows my preferred environment is XAMPP. In order to install it, download the self-extracting archive xampp-win32-1.7.0.exe from http://www.apachefriends.org/en/xampp-windows.html and extract it on C:. Then go to C:xampp, run xampp-control.exe, and you will see the XAMPP Control Panel Application. Here, check the Svc next to Apache and MySql, in order to install them as services (so that when computer is rebooted, Apache and MySql will start automatically). Click also on the button Start of Apache and MySql, in order to start them now. Now open http://127.0.0.1/ in Firefox, to check that XAMPP is installed and running.
- 2. Installing SugarCE Download SugarCE-5.2.0a.zip from http://www.sugarcrm.com/crm/download/sugar- suite.html and extract it on C:xampphtdocs. Then rename the folder SugarCE-Full- 5.2.0a to warehouse. Open http://127.0.0.1/warehouse/ in Firefox and the installation will start. Click Next up to the Database Configuration page. Here change the Database Name to 'warehouse', set the Database Administrator Username to 'root' and leave the Database Administrator Password empty, select 'Define user to create' for Sugar Database Username and then set a username and password. On the section Choose Demo Data select 'Yes', then click Next. On the next page type the sugar admin password twice and go to the next page. Then customize the locale setting and click Next. On the summary page, notice that the PHP memory limit needs to be increased and the cURL module should also be enabled (these warnings are emphasized with red color). So, find the file C:xamppapachebinphp.ini, right-click on it and edit it with Cream(Vim). Search for 'memory' and set the memory-limit to '64M'. Search also for 'curl' and remove the semicolumn that comments the line: extension=php_curl.dll . After changing the PHP configuration, apache needs to be restarted, so run xampp-control.exe , stop apache and then start it again. Refresh the page http://127.0.0.1/warehouse/install.php on Firefox and notice that the warnings are gone. Now just click Install and wait for a few moments; the installation will be finished. To test it, open http://127.0.0.1/warehouse/ in Firefox and login with username 'admin' and the sugar admin password that you typed during installation. Putting the Project Under Version Control Before starting to customize or make any changes to the application, I usually put it on Subversion. It is like making a backup of the code and all of the development that is done on it, and it can be used to revert back the application to a stable state, in case that some modifications break it. Putting the code under version control is not required and it may add some overhead to the management of the project, however I strongly suggest not to skip it. It is a good project management habit and there may be times when you will be happy that you did not neglect it. Follow these steps to create the subversion repository for the warehouse: 1. Initially create the folder C:SVN_Repositories where we are going to keep all the subversion repositories. 2. Inside it create another folder named warehouse. 3. Go inside the empty folder warehouse, right-click and select the menu item TortoiseSVN -> Create repository here. A new empty repository will be created. Never touch manually the files in this folder. Then, import the application files on this repository: 1. Go to C:xampphtdocs 2. Right-click on the folder warehouse and select TortoiseSVN -> Import... 3. As URL of the repository use this 'file:///C:/SVN_Repositories/warehouse/trunk' and click OK. After importing the code on the repository, we have to check out a working copy of the application, on which we are going to work and to make modifications:
- 3. 1. Rename the directory C:xampphtdocswarehouse to something else, for example warehouse-1. 2. Right-click on the directory C:xampphtdocs and select SVN Checkout... from the menu. 3. The URL of the repository that is being checked out should be: 'file:///C:/SVN_Repositories/warehouse/trunk' and the checkout directory should be: C:xampphtdocswarehouse . Click OK. 4. Delete the backup folder warehouse-1. Notice that the folder warehouse that is created by check out has a check mark with green color. It means that it is synchronized with the copy on the repository. Making a Database Backup In SugarCRM, most of the configuration settings are stored in the database, so in order to be able to revert to a previous state of the application, we should be able to make database backups and to put them on version control. On the directory C:xampphtdocswarehouse, create the subdirectory db/ and inside it create the file dump.bat with this content: c:xamppmysqlbinmysqldump --user root --compact --extended- insert=false warehouse > warehouse.sql c:xamppmysqlbinmysqldump --user root --compact --no-data warehouse > warehouse-tables.sql Then run this batch file by double-click. It will create the files warehouse.sql and warehouse-tables.sql . The first one is a backup of the whole database and the second one is a backup of the structure of the database only (without the data). The option --extended-insert==false makes the sqldump to output a separate insert statement for each record of the table. This is important so that subversion can track the database changes easily. Notice that the folder db/ has a blue question mark. It means that this file is not in the subversion repository. Right-click on it and then select TortoiseSVN -> +Add... (see the screenshot). After adding, it will be marked with a plus. Right-click on it and select SVN Commit.... Configuration of SugarCRM Open http://127.0.0.1/warehouse/ in browser and login with username 'admin' and the sugar admin password that you typed during installation. Spend some time checking the pre-build modules and their features. They are great, however we don't need most of them. So, we are going to disable them and we will build instead some new modules about a warehouse. On the top of the page click the link Admin. On the administration page there are tools that can be used for the configuration administration, development and maintenance of the application. Initially let us modify some system settings:
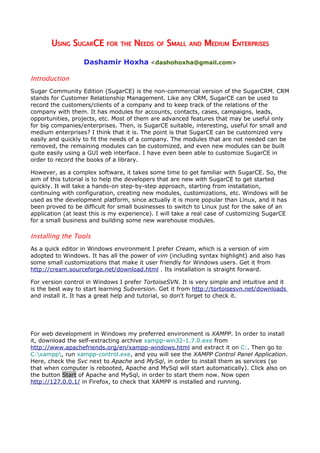
- 4. 1. On the System section click on System Settings. 2. Here change the System Name to 'warehouse'. 3. On the Advanced section check the Developer Mode checkbox. 4. Click Save. Checking the developer mode disables caching of the application. This is important so that the changes that are made in the application during development are displayed immediately. When the application is deployed and is being used, don't forget to uncheck it in order to improve the performance. Now let us disable some of the modules that we don't need, like Leads, Opportunities, etc. This is done by hiding their tabs. 1. Click again on the link Admin on the top of the page. 2. Then click Configure Tabs on the section Developer Tools. 3. By drag-and-drop move to the section Hide Tabs the tabs Dashboard, Documents, Accounts, Campaigns, Leads, Opportunities, Projects, Cases, Bug Tracker, and RSS. 4. Click Save. You will see that these tabs are now removed from the menu of the application. To synchronize with the SVN repository, go to C:xampphtdocswarehousedb and run dump.bat . Notice that warehouse.sql and warehouse-tables.sql are marked with an exclamation point with red color. It means that they have local modifications that are not committed yet in the repository. Right-click on the folder and select SVN Commit.... Also, add on the project the file config_override.php: TortoiseSVN -> Add... and then SVN Commit.... The folder Cache on C:xampphtdocswarehouse is something that usually we don't want to keep in the repository, so right-click on it and select TortoiseSVN->Revert... in order to undo any changes. Then right-click again and select TortoiseSVN->Delete. Finally, right- click it and select SVN Commit. So, it has been deleted from the repository. However it will be created again by the application and it will be displayed and non-versioned when checking for modifications. To avoid this, we should tell TortoiseSVN to ignore this folder and all its files. Find out as an exercise how to ignore it. Requirements and Analysis for the Warehouse Good software engineering practices require that before we start building any software, we make sure that we know well the requirements and we think about how to satisfy them in the application. Indeed, we cannot build something unless we know clearly what we should build. In our case it is easy because we are building just a demo and we can set the requirements as we wish. Let's assume that the items that are stored in the warehouse are purchased from other parties. Later they are delivered from the warehouse in order to be distributed or to be used in production. First of all we need a list of the items in the warehouse. For each item we need to know the name of the item, the category, the quantity remaining, the unit of the item, the total (approximated) value of the item, etc.
- 5. We also need to record each purchase of items from the suppliers, which is an addition into the warehouse as well. For each purchase we need to know the item purchased, the date of purchase, the quantity and price, the total value of the purchase, the supplier of the item, the id of the invoice or bill etc. The supplier of the item is the shop, the person, or the company from which we got the item. It is good to keep a list of the suppliers as well, so that we can know what we bought from whom, when, how many, how much, etc. For each supplier we should know the name, the phone/mobile, email, webpage, the amount of money that we ow to him (debt, in case that sometimes we don't pay immediately for the purchase), etc. For each delivery from the warehouse we should know the item, the quantity, the date, the destination, etc. The entities of the warehouse, the fields for each entity and the relationships between the entities are displayed in the diagram. As can be seen from the diagram, for each item in the warehouse we can make many purchases and deliveries. We can make many purchases from one supplier, and in general, we can get one item from several suppliers (maybe with different prices) and from one supplier we can get more than one item. The field notes is added in order to record any other things that do not fit into the other fields.
- 6. Building and Deploying the Warehouse Modules SugarCRM does not have any warehouse modules, however it allows us to create new modules quickly and easily. It has a special module for creating and managing new modules. In the Admin page, on the Developer Tools section, click on Module Builder. Modules are organized in packages, so we will create a package called Warehouse which contains the modules Items, Purchases, Suppliers and Deliveries. Click on the icon New Package and set Package Name to 'Warehouse' and Key to 'wh'. Optionally you can fill also the fields Author, Description and Readme. Then click the button Save. At the end of the package now appears also an empty list of modules. Click the icon New Module to add a new module. Type 'Items' on both the Module Name and the Label fields. Check Importing and leave Navigation Tab checked. (Importing is needed in case that we have to import the warehouse items from another application, for example from an excel file.) Select the type of module basic and click Save. Go to the warehouse package and add another module for purchases, with Module Name 'Purchases', Label 'Purchases' and Type basic. Do the same for the modules Deliveries and Suppliers. Now there should be four modules in the package Warehouse. These are just basic modules, we haven't added any custom fields to them and haven't created any relationships between them yet. If you check the menu of the application, the modules that we created are not displayed there yet. The Module Builder is just for creating new modules. When they are created, they are not yet part of the application. To install them in the current application we should deploy them. So, on the Warehouse module click the button Deploy and wait until it is done. Now go to Admin, Developer Tools, Configure Tabs and arrange the order of the tabs so that the new modules are near the beginning of the menu. Click Save to save the changes. Besides deploying, it is also possible to publish or export a package and then to load it into another instance of SugarCE (or in the same instance from where it was published). When a package is published, after being loaded it is ready to be used. When a package is exported, after being loaded it just appears on the Module Builder, so that it can be developed further, before being published or deployed. So, deploying a package is functionally the same as publishing it and then loading it on the same instance of SugarCE from which it was published. Synchronizing With the Subversion Repository Let us synchronize the project with the subversion repository. Right-click on the folder C:xampphtdocswarehouse and choose TortoiseSVN->Check for modifications. On the window that appears there are a lot of non-versioned files. Right-click on them and select Add... . Then commit them (right-click, Commit...). All these new files represent the new modules and they have been created by the module builder and by deploying. Whenever we synchronize the project with the repository, we should remember to synchronize also the changes in the database. Go to the folder db/ and double-click dump.bat. You will see that warehouse.sql and warehouse-tables.sql will be changed (they will be marked with red and exclamation point). Now we can commit them to the repository. However, before committing, it could be interesting to see what has been changed. Right-click on the file and select TortoiseSVN->Diff.
- 7. During the construction of the application we are going to synchronize often with the Subversion repository. As I have said earlier, this serves as a good backup of the code and of all the changes that we make on it, so that we can revert back to a stable state of the application easily. However, it also shows the changes that are done on the application step-by-step, as we build and customize it. We are mostly using the GUI of SugarCE to customize it and build new modules, and it can be interesting to trace how it works underneath the surface of the GUI, the new files that are created, the modifications that are made, etc. So, make it a habit that before synchronizing with the repository, first check for modifications (right-click and TortoiseSVN -> Check for modifications ). If there are non- versioned files, they should either be added to the repository, or ignored (right-click and Add to ignore list, so that they don't appear in the later checks for modifications). As an example of the ignored files can be the directory cache, which is created and changed automatically by the application, but we are not interested on its content or changes. If there are modified files, it can be interesting to check what are the modifications (double- click, or right-click and Show differences as unified diff). Then we should commit them; only in rare cases we may need to revert the changes. If there are missing files, usually we should delete them (remove them from the repository); only in rare cases we may need to update them (get them again from the repository). Creating Relations Between Modules Now that we have added the modules to the application, we need to customize them, since they are just basic modules. We could have done the customization (setting relationships and adding new fields) before deploying them, on the Module Builder, however it can be done also after they are deployed. It is done on the Studio (Admin, Developer Tools, Studio). On the Studio it is possible to customize all the modules of the application, the default ones and those that we have added. Let us start the modifications by creating relationships between the modules. We would like to add a subpanel to items that lists all the purchases that are done for each item. This can be done by adding a relationship one-to-many between the modules Items and Purchases. 1. Go to Studio > Items > Relationships and click the button Add Relationship. 2. Choose the type of relationship One to Many and select Purchases from the related module. Type 'Purchases' in the field Label. 3. Click the button Deploy. Once they are created relationships are permanent, they cannot be deleted anymore. Repeat the same thing for deliveries, by creating a relationship one-to-many between the modules Items and Deliveries. Also we would like to have for each supplier the list of the purchases that we have done from it, so we go to Studio > Suppliers > Relationships and create a one-to-many relation with Purchases. After creating all the relationships, we should rebuild the relationship metadata. To do this, go to the Admin page and click Repair (on the section System). Then click Rebuild Relationships. On the Repair page we should also click Quick Repair and Rebuild, just to make sure that everything is updated.
- 8. Synchronize with SVN (sync the DB as well). However before it, make sure to add to the ignore list the folder custom/history. As the message for commit use 'adding relationships' or something like this. Adding Custom Fields Let's continue the modifications by adding the custom fields of the module Items. Go to Studio > Items > Fields. Click on the button Add Field. In the form that is displayed set the Data Type to 'Decimal', Field Name to 'quantity', Display Label to 'Quantity', and click Save (see the screenshot). In a similar way add the field 'value' with Data Type 'Currency'. Add also another field of type DropDown named 'unit'. It needs to be associated with a drop down list, so click the button Add to add a new one. Name the new dropdown list 'unit_list', add the list items Kilogram, Liter, Pieces, Boxes, etc. and click Save. Then save the field unit as well.
- 10. In a similar way add the field 'category' of type DropDown, creating also the dropdown list category_list. The items of the category_list depend on what we store in the warehouse, so for the sake of the demonstration we can list there chair, table, computer, CD, paper, network cable, etc. Now the fields of the module 'Items' look as in the screenshot. The fields that end with _c are the custom fields that we have added. For the field name of the item we are going to use the basic field name and for the field notes we are going to use the basic field description, both of which are default fields of a module of type basic.
- 11. Lets add also the fields of the module Suppliers in a similar way. As seen in the screenshot, the fields that we have added are phone, mobile, email, webpage, and debt. As the type of fields phone and mobile we should choose Phone, for email and webpage it is just TextField, and for debt it is Currency. (When the type of a field is Currency, SugarCE automatically adds another field named currency_id.) While adding the field debt we should also check the Audit checkbox. It means that the system will keep track of the changes of this field automatically, who did it, when, what was the old value, the new one, etc. For the module Deliveries add the fields quantity and delivery_date. The field delivery_date is of Data Type Date and it has as default value today. There is no need to create a field for items, because this field has been created automatically by the relationships. For the module Purchases add the field quantity of type decimal, the fields price, value and payed of type Currency, and the field purchase_date of type Date. Also rename the display label of the field name to Invoice and rename the display label of the field description to Notes. There is no need to create fields for items and suppliers because these fields have been created by the relationships. Right now, adding the fields of each module is finished. Synchronize the working copy of the application with the subversion repository. Synchronize the DB as well. But don't forget to check the differences before you synchronize. Customizing the Layout of the Modules SugarCE has also an easy GUI user interface for changing and customizing the layout of the modules. It allows to setup how the form that is used for editing the data of the module should look like, how the data should be displayed, how they should be listed and searched, etc. These modifications can be done by drag-and-drop. Below there are some screenshots on how I have arranged the fields and you can try to fix them in a similar way. Time after time click the button Save to save your changes, and when you are done, click the button Save & Deploy to apply the changes to the application. Don't forget to press the button Save & Deploy, otherwise the changes will not appear on the application.
- 17. Deliveries ListView Deliveries BasicSearch It is time to synchronize with the subversion repository again.
- 18. Now have a look at the modules that you have constructed. See how they look like, enter some test data, find out what is wrong and what should be improved etc. SOME FURTHER CUSTOMIZATIONS Up to now we have done these customizations: 1. We have created new modules. 2. Deployed them to the application. 3. Created relationships between them. 4. Added custom fields to these modules. 5. Arranged the interface layout of each module. All these customizations were done using the GUI interface of SugarCE itself, without touching the supplier code of the application, without needing even to know that the application is built on PHP. However SugarCE is a free software and we can do further customizations on it by touching the code. Theoretically each free software program is 100% customizable since we can see and touch its code. Practically, this can be difficult, because it is not so easy to modify an existing program. However, the code of SugarCE is designed to be easily customizable. We can do a lot of customizations with very small modifications. Customizing Quick Create We would like to remove the quick create (on the left side) for Items and Suppliers and to customize it for Deliveries and Purchases. It is time to get our hands dirty. Go to warehousemoduleswh_Itemsmetadata and delete the file sidecreateviewdefs.php (or better rename it to sidecreateviewdefs_bak.php). If you click the tab Items now, you will notice that there is no New Items on the left side. Do the same thing for Suppliers (on the folder warehousemoduleswh_Suppliersmetadata). Did you guess where the prefix wh_ in front of the module names comes from? It is the prefix that we specified when we created the package Warehouse. To customize the SideCreateView for Deliveries, first of all we copy sidecreateviewdefs.php from warehousemoduleswh_Deliveriesmetadata to warehousecustommoduleswh_Deliveriesmetadata and then edit and modify the custom copy. The idea is that all the files that need to be modified should be placed on the path custom/ so that in case that the application is upgraded with a new version, the modifications are not lost (overwritten). After the modifications that we make to warehousecustommoduleswh_Deliveriesmetadatasidecreateviewdefs.php the list of fields looks like this: 'panels' =>array (
- 19. 'DEFAULT' => array ( array ( array('name'=>'wh_items_wh_deliveries_name', 'displayParams'=>array('required'=>true, 'size'=>11, 'selectOnly'=>true)), ), array ( array('name'=>'delivery_date_c') ), array ( array('name'=>'quantity_c', 'displayParams'=>array('size'=>20)) ), ), ) In a similar way, customize warehousecustommoduleswh_Purchasesmetadatasidecreateviewdefs.php for Purchases to look like this: 'panels' =>array ( 'DEFAULT' => array ( array( array('name'=>'name', 'displayParams'=>array('required'=>true, 'size'=>20)), ), array ( array('name'=>'purchase_date_c'), ), array ( array('name'=>'wh_items_wh_purchases_name', 'displayParams'=>array('size'=>11, 'selectOnly'=>true)), ), array ( array('name'=>'wh_suppliers_wh_purchases_name', 'displayParams'=>array('size'=>11, 'selectOnly'=>true)), ), array ( array('name'=>'quantity_c', 'displayParams'=>array('size'=>20)), ), array ( array('name'=>'price_c', 'displayParams'=>array('size'=>20)), ), array ( array('name'=>'value_c',
- 20. 'displayParams'=>array('size'=>20)), ), array ( array('name'=>'payed_c', 'displayParams'=>array('size'=>20)), ), ), ) The names of the fields that we have used can be seen at Studio > Deliveries > Layouts > ListView . The variables of the relationships have long names that usually include the names of the modules as well, like wh_items_wh_deliveries_name. The names of the custom variables always have the extension _c, like quantity_c . Synchronize with SVN. Synchronize the DB as well. Customizing the popup window of select When we try to select an item from the list of items, a popup window appears where we can make the selection. The page in this window has a search part and a list part. The fields that are displayed here are the same as the fields in the list of items. However we would like to customize the layout of this popup window by removing some of the fields. Again, in order to do the customization we copy warehousemoduleswh_Itemsmetadatapopupdefs.php into warehousecustommoduleswh_Itemsmetadatapopupdefs.php and modify the last one. We append this code at the end of the file: $popupMeta['searchdefs'] = array('name'); $popupMeta['listviewdefs'] = array ( 'NAME' => array ( 'width' => '10%', 'label' => 'LBL_NAME', 'default' => true, 'link' => true, ), 'CATEGORY_C' => array ( 'width' => '10%', 'label' => 'LBL_CATEGORY', 'sortable' => false, 'default' => true, ), 'QUANTITY_C' => array ( 'width' => '10%', 'label' => 'LBL_QUANTITY', 'sortable' => false, 'default' => true,
- 21. ), 'UNIT_C' => array ( 'width' => '10%', 'label' => 'LBL_UNIT', 'sortable' => false, 'default' => true, ), ); The first line defines which fields to display in the search part, and the rest shows how to display the list. Are we so smart as to know the right format in which to define the list? No. We just copy/paste it from the file listviewdefs.php and customize it as needed. In a similar way we can also customize the popup window for the Suppliers. You can do it yourself as an exercise. I would like also to customize the list of Deliveries so that it can be sortable by Item and Date. I would like also to have a link on the item field, so that when it is clicked we see the details of the delivery. Can you find out by yourself how to make these modifications? I think that it is very easy. Synchronize the project with SVN again. Removing Mass Update from the end of the lists I don't find so useful for this application the section Mass Update that is displayed at the end of each list. I even find it ugly. I would like to remove it from all the lists. Fortunately, it is easy to do it. In the file warehouseincludeListViewListViewSmarty.php modify the line: var $showMassupdateFields = true; by setting the variable to false. So, using only some small modifications, it is possible to change the whole application. However, to be honest, it is not so easy to find out that such a modification can be done and where to do it. You have to explore and search the code for it, or you can ask help in the mailing lists and forums. [ToDo: list here the addresses of the mailing lists and forums] Adding Other Currencies In order to add other currencies, go to the page Admin and click on Currencies in the section System. Here we can add a new currency. For example fill the fields like this: Currency Name: 'Albanian Lek', ISO 4217 Code: 'ALL', Conversion Rate: '120.5', Currency Symbol: 'LEK', and click Save. Now wherever the currency is selected, Albanian Lek will be in the list as well.
- 22. Customizing the Home Page The Home page is the one that is displayed first when we login into the application (or if we click the tab Home). It has a summary of the latest activity in the application and it also has some quick links to the most frequently used modules and interfaces. The summary is provided by the dashlets and it can be customized easily using the GUI of the page itself. We can remove dashlets, add other ones, arrange the layout of the page by drag-and-drop, customize the content that is displayed in each dashlet by editing it, etc. The quick links are provided by the menu on the left side. They can be changed by editing the file warehousemodulesHomeMenu.php. For example, let us add this line: if(ACLController::checkAccess('wh_Purchases', 'edit', true)) $module_menu[] =Array("index.php? module=wh_Purchases&action=EditView&return_module=wh_Purchases&r eturn_action=DetailView", 'Create Purchase',"Createwh_Purchases", 'wh_Purchases'); It is created similarly to the other existing lines (in fact, we can just copy/paste one of the existing lines and then customize it accordingly). We can add other menu items for the other modules that we have created, and we can also comment out the menu items that we don't need. Translating the Application to Another Language Translating the application to another language is possible, although a bit difficult. Let's say that we want to translate it to Albanian. First of all we edit config_override.php and add these lines: $sugar_config['languages'] = array ( 'sq_al' => 'Shqip', 'en_us' => 'US English', ); $sugar_config['default_language'] = 'sq_al'; Second, we have to find all the files name en_us.lang.php and create a copy of each of them with the name sq_al.lang.php . In linux I could have used a simple shell script to do it, like this: #/bin/bash for file_name in $(find . -name 'en_us.lang.php') do file_name_1=${file_name/%en_us.lang.php/sq_al.lang.php} cp $file_name $file_name_1 done
- 23. However, I don't know how to do it easily on windows. The only workaround that I know is to install cygwin on windows in order to use the script above. Third, we have to edit each of the files sq_al.lang.php that we created above, in order to translate them to Albanian. This is of course a huge and tedious task, and this is why I told you that the translation is difficult. If you don't need to have more than one language in the application, then the translation is a bit easier. In this case we can use the GUI of the developers Studio to translate the labels of each module to Albanian. We should also translate the tabs on Admin, Developer Tools, Rename Tabs. Some More Professional Code Customizations When a purchase is made, the quantity of the purchased item in the warehouse is increased. When a delivery is made, it is decreased. The application should do this automatically. So, whenever we create a new purchase or save it, the application should update the quantity of the corresponding item in the warehouse. It should do the same for the deliveries. Another thing that the application should track automatically is the debt to the suppliers. If the amount that is payed for the purchase is less than the value, then the application should record the debt to the corresponding supplier. Whenever the payed amount for a purchase is updated, the debt to the corresponding supplier should be updated as well. Until now we have done only some small and easy customizations, but to accomplish these things we have to write some real code. I guess that the programmers are now going to get excited. The architecture of SugarCE makes it easy for the developers to add their own custom code. It is done by the so called 'hooks'. There are some special points in the logic of the application where the developer can write his own code. If the framework finds such custom code, it executes this code first, and then follows its own logic. Otherwise it just follows its own default logic. To add hooks to the module Deliveries, create the file warehousecustommoduleswh_Deliverieslogic_hooks.php with this content: <?php $hook_version = 1; $hook_array['before_save'][] = Array(0, 'before_save', 'custom/modules/wh_Deliveries/updateItem.php', 'updateItem', 'before_save'); $hook_array['before_delete'][] = Array(1, 'before_delete', 'custom/modules/wh_Deliveries/updateItem.php', 'updateItem', 'before_delete'); ?> Here we use the hook before_save, which is called before the Delivery is saved, and the hook before_delete, which is called before it is deleted. The third element of the array is the file where the framework can find the code of the hook. The forth element is the name of the PHP class where the hook is placed, and the fifth (last) element is the name of the hook itself, the function that is called by the framework. The content of the file custom/modules/wh_Deliveries/updateItem.php is like this:
- 24. <?php require_once('modules/wh_Items/wh_Items.php'); class updateItem { function before_save(&$bean, $event, $arguments) { //get the old values of the fields $old_bean = new wh_Deliveries; $old_bean->retrieve($bean->id); //get the related item $item = new wh_Items; $item->retrieve($bean->wh_items_w5ae8h_items_ida); //update the quantity and value of the item $item->quantity_c -= ($bean->quantity_c - $old_bean->quantity_c); $item->value_c -= ($bean->quantity_c - $old_bean->quantity_c) * $item->price_c; //save the item $item->save(); } function before_delete(&$bean, $event, $arguments) { //print "Deleting Deliveries is not allowed!"; //exit; } } ?> I think that it is not difficult to understand it. The function before_save() is called before the Delivery is saved. The argument $bean contains all the data that are filled on the Delivery form (the modified values). The variable $old_bean contains the data of the same record before modification. The variable $item contains the data of the item that is being checked out. We update the quantity and value of the item and then save it. In a similar way we can add hooks for the module Purchases. We create the file warehousecustommoduleswh_Purchaseslogic_hooks.php with this content: <?php $hook_version = 1; $hook_array['before_save'][] = Array(0, 'before_save', 'custom/modules/wh_Purchases/updateItem.php', 'updateItem', 'before_save'); ?>
- 25. Then we create the file that contains the hooks themselves custom/modules/wh_Purchases/updateItem.php with this content: <?php require_once('modules/wh_Items/wh_Items.php'); require_once('modules/wh_suppliers/wh_suppliers.php'); class updateItem { function before_save(&$bean, $event, $arguments) { //print '<xmp>'; print_r($bean); print '</xmp>'; exit; //debug //get the old values of the fields $old_bean = new wh_Purchases; $old_bean->retrieve($bean->id); //get the fields of the related article $item = new wh_Items; $item->retrieve($bean->wh_items_w3b0ah_items_ida); //update the quantity and value of the item $item->quantity_c += ($bean->quantity_c - $old_bean- >quantity_c); $item->value_c += ($bean->value_c - $old_bean->value_c); //recalculate the price for the item and purchase $item->price_c = $item->value_c / $item->quantity_c; $bean->price_c = $bean->value_c / $bean->quantity_c; //save the item $item->save(); //get the fields of the related supplier $supplier = new wh_suppliers; $supplier->retrieve($bean->wh_supplie1e56ppliers_ida); //print '<xmp>'; print_r($supplier); print '</xmp>'; exit; //debug //update the field debt of the supplier $supplier->debt_c -= $old_bean->value_c - $old_bean- >payed_c; $supplier->debt_c += $bean->value_c - $bean->payed_c; //save the supplier $supplier->save(); } } ?>
- 26. Besides updating the item's quantity and value, here we update also the debt of the supplier. Synchronize with SVN. Conclusion SugarCE is not only an easily customizable web application, but also a framework for developing new modules and relationships that have nothing to do with customers. Actually, it is a rapid application development tool that can be used to develop web applications of any kind, which have to deal with data management. So, it can be used quite well for developing custom applications for small and medium enterprises, for organizations, etc. This tutorial is an introduction on how to do it.