The document outlines the steps to create an enterprise structure in SAP, including creating a new personnel area, subarea, employee subgroups, and defining organizational objects like positions, jobs, and organizational units. Key steps include using the copy function in IMG to create new objects based on existing ones, then changing names and assigning relationships between the different organizational structure objects. Integration between organizational management and personnel administration is also configured using transaction codes to link employee and position data.
1 Goals. 1. To use a text file for output and later for in.docxhoney690131
1 Goals.
1. To use a text file for output and later for input.
2. To use exceptions and write an exception handler that does more than abort execution.
3. To Use a static class variable.
4. To use a boolean variable and a Date variable.
5. To use an ArrayList.
6. To implement Phase 1 of a four phase well-structured project with multiple classes using the Model-View-Controller design pattern (MVC).
2 Overview
This section discusses a finished application that you will construct in several phases. When all phases are finished, it will simulate a human resources system to keep track of savings through the company. There is a Human Resources Manager (Boss), and employees (eventually more than one type of employee will be used). Eventually, this system will be created as an application with a windows interface. The Employee’s login name will eventually be encrypted and the data will be stored in an object file. Program 4 implements only part of the menu, uses a text file and does not encrypt the employee data. At first this will be a menu-driven application allowing for these actions:
1. The first time the program is used, the user will enter his or her own data in to the program and will become the Boss (Human Resources Manager) with access to everyone’s data.
2. After that, when the program starts up, it will read in a database of employee data and store it in the employee collection.
3. After that, the Boss will be able to log in and create new employees by entering the person’s name (first, middle initial-optional, and last), login name, base salary, and savings percent. This data will be used to initialize a new employee object. The object will also record the current date and a unique ID number for this employee. The new employee will be added to the Employee collection.
4. The Boss can log in and display a list of all Employees in the collection and can change the base salary or percent savings for any employee. In the list, display the full name (first, middle initial and last), login name, Employee ID, base salary, percent savings and date of hire for each Employee.
5. Any Employee in the collection can log in and see his or her own data and change their name and percent savings (due to marriage, etc).
6. An Employee whose login name is in the collection may log in and out. Logging in will automatically log out the prior Employee.
7. The menu has an option to quit and quitting will cause the final contents of the collection to be written back to the database file (replacing it).
8. Since you have
more than one class
in this project, you will
need to create a package (call it “savings” – note the first letter is lower case)
and put all of the classes in the package. To tell your program to look for the other classes, you need to put the following in each class file near your import statements.
package
savings;
3 The Employee Class: Superclass of the Model (from MVC) for this application.
a) An object of type Employ ...
CIS 247C iLab 4 of 7: Composition and Class Interfaces HomeWork-Fox
CIS 247C Week 4 Lab Devry University
Computer Science - Object-Oriented Programming
iLab 4 of 7: Composition and Class Interfaces
The objective of the lab is to modify the Employee class to demonstrate composition where a containing class (Employee) contains another class (Benefit). An employee typically has benefits, so we will make the following changes:
Create a Benefit class.
Integrate the Benefit class into the Employee class.
Separate the files in the project into Presentation and Logic tier folders
STEP 1: Understand the UML Diagram
The only change to the Employee class is that there is a new attribute:
+benefit : Benefit
Notice that there is a "+" for this attribute, meaning that it is public. Make sure to examine the multi-arg constructor's signature!
Also, the dotted directed line between Employee and iEmployee specifies that the Employee class must implement the iEmployee abstract class, and thus provide an implementation for the calculatePay method.
STEP 2: Create the Project
You will want to use the Week 3 project as the starting point for the lab. To do this, you will want to create a new project by following these steps:
Create a new project and name it "CIS247C_WK4_Lab_LASTNAME".
Assignment Instructions 2_7aExplain the interrelationships bet.docxssuser562afc1
Assignment Instructions 2_7a
Explain the interrelationships between planning, organizing, directing, controlling, and leading.
This is a one-page assignment. Should contain academic references and be thoroughly researched.
Please include an Abstract, Details Heading/Subheading and Conclusion. Also,all include (cites), attach the websites/details/links with the references. I have been asked for them by my professor
Let me know if you any questions.
Please let me know if you any questions.
You will want to use the Week 3 project as the starting point for the lab. To do this, you will want to create a new project by following these steps:
1. Create a new project named "CIS247_WK4_Lab_LASTNAME". An empty project will then be created.
2. Delete the default Program.cs file that is created.
3. Now that we are beginning to add more classes to our projects the
Solution
Explorer can become difficult to organize so you will create folders to hold the Presentation Tier and Logic Tier Files in order to organize the project. One thing to remember, even though we only have a few files in our project, a professional program will have 100's if not 1000's of files in a project so you will want to get practice in organizing your project files in a logical folder heirarchy and we will use the Tiered Architecture structure shown in the UML Class diagram for the folder structure. You will find that creating folders within MS Visual Studio is very similiar to creating folders in Windows Explorer. Follow these directions to create the folders:
1. Select the project and then right click
2. Select Add
3. Select New Folder
4. Enter the name of the folder
4. Add the following three folders to your project (1) Presentation Tier, (2) Logic Tier, and (3) Utilities.
5. You are going to add the files from the previous week lab to the project just as you did before, but now you add the existing files to the corresponding folder
6. Select the PresentationTier folder, right click and select Add then Existing Item, navigate to your previous week's project and select the InputUtitilies.cs and Program.cs files and click add. These two files will then be added to the Presentation. [Hint: you can also drag and drop the files directly from Windows Explorer directly into the corresponding folder in your project!]
7. Add the previous week's Employee.cs file to the Logic Tier folder. You will also add the new Benefits class to this folder.
8. Add the ApplicationUtilities.cs file to the Utilities folder.
9. Your solution explorer should look similiar to the following (note: you can rename any folder by selecting the folder, right click, and then Rename just like you do in Windows).
10. The namespaces for the classes should all be "Employee", but you should verify that the namespaces for all the classes are the same.
11. Update the program information in the ApplicationUtilities.DisplayApplicationInformation method to reflect your name, current lab, and program description.
12 ...
Q3 2019 EC and Platform Quick Preview by Deloitte GermanyChristoph Pohl
This compilation is not intended to be complete, but rather a snippet of features which customers often request or can be seen as a major enhancement with great impact.
SAP PM Training Manual - www.sapdocs.infosapdocs. info
SAP PM - Step by step training manual for beginners
Please visit http://sapdocs.info/sap/plant-maintenance/sap-pm-training-manual/ to download file for free
Job and Position,SIT,EIT,Special Information Type,Extra Information Type,Enable SIT,Enable EIT's,Request Submit,Job,Position,Single,Incumbent,Pooled,Shared,None,Incumbent,Oracle HRMS,ora17hr,Payroll,Functional,Document,oraclehrms,payroll,oraclepayroll,hrms
Be sure to read all of Chapters 8 and 9 before starting this assignm.docxaman341480
Be sure to read all of Chapters 8 and 9 before starting this assignment. Your job is to update your payroll program for Armadillo Automotive Group to use a C++ class. Each employee class object should hold the master file information for one employee. You can assume that the company has exactly 6 employees. Use an array of employee objects to hold the master file information for the company employees.
Do not put any pay information, including hours worked, in an Employee object. You might want to create a paycheck struct or object to hold pay information for one employee (this could include the hours worked).
DO NOT DO ANY INPUT OR OUTPUT IN ANY CLASS MEMBER FUNCTION.
The employee information and hours worked will come from input files instead of from the keyboard.
Employee class
Create a class to represent the master file information for one employee. Start with this partial Employee class:
class Employee
{
private:
int id; // employee ID
string name; // employee name
double hourlyPay; // pay per hour
int numDeps; // number of dependents
int type; // employee type
public:
Employee( int initId=0, string initName="",
double initHourlyPay=0.0,
int initNumDeps=0, int initType=0 ); // Constructor
bool set(int newId, string newName, double newHourlyPay,
int newNumDeps, int newType);
};
Employee::Employee( int initId, string initName,
double initHourlyPay,
int initNumDeps, int initType )
{
bool status = set( initId, initName, initHourlyPay,
initNumDeps, initType );
if ( !status )
{
id = 0;
name = "";
hourlyPay = 0.0;
numDeps = 0;
type = 0;
}
}
bool Employee::set( int newId, string newName, double newHourlyPay,
int newNumDeps, int newType )
{
bool status = false;
if ( newId > 0 && newHourlyPay > 0 && newNumDeps >= 0 &&
newType >= 0 && newType <= 1 )
{
status = true;
id = newId;
name = newName;
hourlyPay = newHourlyPay;
numDeps = newNumDeps;
type = newType;
}
return status;
}
Note that the constructor and set functions do validation on the data that is to be stored in the Employee object. They are similar to the validation in the Rectangle class from the textbook in
Section 7.11 Focus on Software Engineering: Separating class Specification, Implementation and Client Code.
For a more detailed discussion of validation for class objects, and the Employee class validation, see
Employee Data Validation
.
You should be able to copy this class into your editor by highlighting the code, making a copy of it (ctrl-c in Windows), and then pasting the code into your editor window.
Do not make any changes to the data members of the class. Do not add any new data members to the class. Do not make any changes to t ...
Tasks In this assignment you are required to design and imp.pdfacsmadurai
Tasks In this assignment, you are required to design and implement a system for Department,
Employee and Project (DEP) in Java. This system helps a company to manage employees and
projects. Implementation Your program shall contain at least the following classes for the DEP.
Define a class Department in a source file Department. java that contains private data members: -
dNumber: Department number. It is an integer type. - dName: Department name. It is a String
type. - manager: Department manager. It is an integer type. - budget: Department budget. It is a
double type. - startDate: Manager start date. It is a String type. Implement Java methods in the file
Department. java that include: - Parameterized constructor that assigns values to all data
members. - Public method tostring that returns the string value of all private data members. See
the examples of the processing for the details of the format of the tostring method. Define a class
Employee in a source file Employee. Java that contains private data members: - eNumber:
Employee number. It is an integer type. - eName: Employee name. It is a String type. - dob: Date
of birth. It is a String type. - address: Employee address. It is a String type. - gender: Employee
gender. It is a String type. - salary: Employee salary. It is a double type. - supervisor: Supervisor
number. It is an integer type. - dNumber: Department number. It is an integer type. Implement
Java methods in the file Employee. java that include: - Parameterized const ruct or that assigns
values to all data members. - Public method getNumber that returns the employee number. -
Public method tostring that returns the string value of all private data members. See the examples
of the processing for the details of the format of the tostring method. Define a class Project in a
source file Pro ject. java that contains private data members: - pNumber: Project number. It is a
long integer type.Tasks In this assignment, you are required to design and implement a system for
Department, Employee and Project (DEP) in Java. This system helps a company to manage
employees and projects. Implementation Your program shall contain at least the following classes
for the DEP. Define a class Department in a source file Department. java that contains private data
members: - dNumber: Department number. It is an integer type. - dName: Department name. It is
a String type. - manager: Department manager. It is an integer type. - budget: Department budget.
It is a double type. - startDate: Manager start date. It is a String type. Implement Java methods in
the file Department. java that include: - Parameterized constructor that assigns values to all data
members. - Public method tostring that returns the string value of all private data members. See
the examples of the processing for the details of the format of the tostring method. Define a class
Employee in a source file Employee. Java that contains private data members: - eNumber:
Employee number. It.
Globus Compute wth IRI Workflows - GlobusWorld 2024Globus
As part of the DOE Integrated Research Infrastructure (IRI) program, NERSC at Lawrence Berkeley National Lab and ALCF at Argonne National Lab are working closely with General Atomics on accelerating the computing requirements of the DIII-D experiment. As part of the work the team is investigating ways to speedup the time to solution for many different parts of the DIII-D workflow including how they run jobs on HPC systems. One of these routes is looking at Globus Compute as a way to replace the current method for managing tasks and we describe a brief proof of concept showing how Globus Compute could help to schedule jobs and be a tool to connect compute at different facilities.
Providing Globus Services to Users of JASMIN for Environmental Data AnalysisGlobus
JASMIN is the UK’s high-performance data analysis platform for environmental science, operated by STFC on behalf of the UK Natural Environment Research Council (NERC). In addition to its role in hosting the CEDA Archive (NERC’s long-term repository for climate, atmospheric science & Earth observation data in the UK), JASMIN provides a collaborative platform to a community of around 2,000 scientists in the UK and beyond, providing nearly 400 environmental science projects with working space, compute resources and tools to facilitate their work. High-performance data transfer into and out of JASMIN has always been a key feature, with many scientists bringing model outputs from supercomputers elsewhere in the UK, to analyse against observational or other model data in the CEDA Archive. A growing number of JASMIN users are now realising the benefits of using the Globus service to provide reliable and efficient data movement and other tasks in this and other contexts. Further use cases involve long-distance (intercontinental) transfers to and from JASMIN, and collecting results from a mobile atmospheric radar system, pushing data to JASMIN via a lightweight Globus deployment. We provide details of how Globus fits into our current infrastructure, our experience of the recent migration to GCSv5.4, and of our interest in developing use of the wider ecosystem of Globus services for the benefit of our user community.
Listen to the keynote address and hear about the latest developments from Rachana Ananthakrishnan and Ian Foster who review the updates to the Globus Platform and Service, and the relevance of Globus to the scientific community as an automation platform to accelerate scientific discovery.
Software Engineering, Software Consulting, Tech Lead.
Spring Boot, Spring Cloud, Spring Core, Spring JDBC, Spring Security,
Spring Transaction, Spring MVC,
Log4j, REST/SOAP WEB-SERVICES.
In software engineering, the right architecture is essential for robust, scalable platforms. Wix has undergone a pivotal shift from event sourcing to a CRUD-based model for its microservices. This talk will chart the course of this pivotal journey.
Event sourcing, which records state changes as immutable events, provided robust auditing and "time travel" debugging for Wix Stores' microservices. Despite its benefits, the complexity it introduced in state management slowed development. Wix responded by adopting a simpler, unified CRUD model. This talk will explore the challenges of event sourcing and the advantages of Wix's new "CRUD on steroids" approach, which streamlines API integration and domain event management while preserving data integrity and system resilience.
Participants will gain valuable insights into Wix's strategies for ensuring atomicity in database updates and event production, as well as caching, materialization, and performance optimization techniques within a distributed system.
Join us to discover how Wix has mastered the art of balancing simplicity and extensibility, and learn how the re-adoption of the modest CRUD has turbocharged their development velocity, resilience, and scalability in a high-growth environment.
We describe the deployment and use of Globus Compute for remote computation. This content is aimed at researchers who wish to compute on remote resources using a unified programming interface, as well as system administrators who will deploy and operate Globus Compute services on their research computing infrastructure.
Enterprise Resource Planning System includes various modules that reduce any business's workload. Additionally, it organizes the workflows, which drives towards enhancing productivity. Here are a detailed explanation of the ERP modules. Going through the points will help you understand how the software is changing the work dynamics.
To know more details here: https://blogs.nyggs.com/nyggs/enterprise-resource-planning-erp-system-modules/
Developing Distributed High-performance Computing Capabilities of an Open Sci...Globus
COVID-19 had an unprecedented impact on scientific collaboration. The pandemic and its broad response from the scientific community has forged new relationships among public health practitioners, mathematical modelers, and scientific computing specialists, while revealing critical gaps in exploiting advanced computing systems to support urgent decision making. Informed by our team’s work in applying high-performance computing in support of public health decision makers during the COVID-19 pandemic, we present how Globus technologies are enabling the development of an open science platform for robust epidemic analysis, with the goal of collaborative, secure, distributed, on-demand, and fast time-to-solution analyses to support public health.
In 2015, I used to write extensions for Joomla, WordPress, phpBB3, etc and I ...Juraj Vysvader
In 2015, I used to write extensions for Joomla, WordPress, phpBB3, etc and I didn't get rich from it but it did have 63K downloads (powered possible tens of thousands of websites).
Enhancing Project Management Efficiency_ Leveraging AI Tools like ChatGPT.pdfJay Das
With the advent of artificial intelligence or AI tools, project management processes are undergoing a transformative shift. By using tools like ChatGPT, and Bard organizations can empower their leaders and managers to plan, execute, and monitor projects more effectively.
Navigating the Metaverse: A Journey into Virtual Evolution"Donna Lenk
Join us for an exploration of the Metaverse's evolution, where innovation meets imagination. Discover new dimensions of virtual events, engage with thought-provoking discussions, and witness the transformative power of digital realms."
Into the Box Keynote Day 2: Unveiling amazing updates and announcements for modern CFML developers! Get ready for exciting releases and updates on Ortus tools and products. Stay tuned for cutting-edge innovations designed to boost your productivity.
Code reviews are vital for ensuring good code quality. They serve as one of our last lines of defense against bugs and subpar code reaching production.
Yet, they often turn into annoying tasks riddled with frustration, hostility, unclear feedback and lack of standards. How can we improve this crucial process?
In this session we will cover:
- The Art of Effective Code Reviews
- Streamlining the Review Process
- Elevating Reviews with Automated Tools
By the end of this presentation, you'll have the knowledge on how to organize and improve your code review proces
Custom Healthcare Software for Managing Chronic Conditions and Remote Patient...Mind IT Systems
Healthcare providers often struggle with the complexities of chronic conditions and remote patient monitoring, as each patient requires personalized care and ongoing monitoring. Off-the-shelf solutions may not meet these diverse needs, leading to inefficiencies and gaps in care. It’s here, custom healthcare software offers a tailored solution, ensuring improved care and effectiveness.
Innovating Inference - Remote Triggering of Large Language Models on HPC Clus...Globus
Large Language Models (LLMs) are currently the center of attention in the tech world, particularly for their potential to advance research. In this presentation, we'll explore a straightforward and effective method for quickly initiating inference runs on supercomputers using the vLLM tool with Globus Compute, specifically on the Polaris system at ALCF. We'll begin by briefly discussing the popularity and applications of LLMs in various fields. Following this, we will introduce the vLLM tool, and explain how it integrates with Globus Compute to efficiently manage LLM operations on Polaris. Attendees will learn the practical aspects of setting up and remotely triggering LLMs from local machines, focusing on ease of use and efficiency. This talk is ideal for researchers and practitioners looking to leverage the power of LLMs in their work, offering a clear guide to harnessing supercomputing resources for quick and effective LLM inference.
Paketo Buildpacks : la meilleure façon de construire des images OCI? DevopsDa...Anthony Dahanne
Les Buildpacks existent depuis plus de 10 ans ! D’abord, ils étaient utilisés pour détecter et construire une application avant de la déployer sur certains PaaS. Ensuite, nous avons pu créer des images Docker (OCI) avec leur dernière génération, les Cloud Native Buildpacks (CNCF en incubation). Sont-ils une bonne alternative au Dockerfile ? Que sont les buildpacks Paketo ? Quelles communautés les soutiennent et comment ?
Venez le découvrir lors de cette session ignite
Paketo Buildpacks : la meilleure façon de construire des images OCI? DevopsDa...
Steps for PA and OM
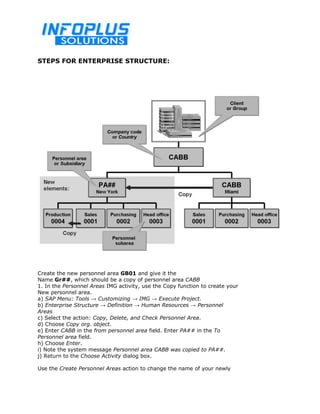
1. STEPS FOR ENTERPRISE STRUCTURE:
Create the new personnel area GB01 and give it the
Name Gr##, which should be a copy of personnel area CABB
1. In the Personnel Areas IMG activity, use the Copy function to create your
New personnel area.
a) SAP Menu: Tools Customizing IMG Execute Project.
b) Enterprise Structure Definition Human Resources Personnel
Areas
c) Select the action: Copy, Delete, and Check Personnel Area.
d) Choose Copy org. object.
e) Enter CABB in the from personnel area field. Enter PA## in the To
Personnel area field.
h) Choose Enter.
i) Note the system message Personnel area CABB was copied to PA##.
j) Return to the Choose Activity dialog box.
Use the Create Personnel Areas action to change the name of your newly
2. Created personnel area.
a) Select the Personnel Areas action.
b) Select your own personnel area and choose Details.
c) Assign it a name that contains your group number, a new address
Create the new personnel subarea 0004, and name it Production ##. This
Personnel subarea should be a subunit of your personnel area PA##.
1. Use the Copy function in the IMG activity Personnel Subareas to create your
New personnel subarea based on the subarea Sales (0001) in the personnel
Area PA##.
a) Enterprise Structure Definition Human Resources Personnel
Subareas
b) Select the action: Copy, Delete, and Check Personnel Subarea.
c) Choose Copy org.object.
d) In the from personnel subarea field, enter the value 0001 (Sales) of
Personnel area PA## from the list of possible entries. Enter 0004 in
The To personnel subarea field.
e) Choose Continue.
f) Note the system message: Data already exists for organizational object
0004. Do you want to complete this organizational object? Select Yes.
g) Note the system message Note the list of affected features in the
Statistics.
h) When the system requests the personnel area, enter PA##.
i) Note the system message Personnel subarea 0001 was copied to 0004.
j) Return to the Choose Activity dialog box.
Use the Create Personnel Subareas action to change the name of your newly
Created personnel subarea.
a) Select the Create Personnel Subareas action.
b) Enter the personnel area PA##.
c) Change the name of personnel subarea 0004 to Production ##.
d) Choose Save and return to the IM
4. EMPLOYEE SUB GROUP AND ITS INDICATORS:
CREATING NEW EMPLOYEE SUBGROUP:
In the Employee Subgroups IMG activity, use the Copy function to copy
Your new employee subgroup (##) from employee subgroup X1 Hourly
Wage earners.
a) Enterprise Structure Definition Human Resources Management
Employee Subgroups. Select the Edit employee subgroup
Environment action.
b) Choose Copy org.object.
c) In the from employee subgroup field, enter the employee subgroup X1
Hourly wage earner, and in the to employee subgroup field, enter
Your group number.
d) Note the system message please note the list of affected features in
5. The statistics.
e) Select Continue.
f) Note the system message Employee subgroup X1 was copied to ##.
g) Return to the Choose Activity dialog box.
Define Employee Subgroup action to change the name of your new
Employee subgroup. The new name should contain your group number
a) Select the action Define Employee Subgroup.
b) Select Position to find your employee subgroup (##).
c) Change the employee description for the employee subgroup to Hourly
Wage earner ##.
d) Choose Save and return to the IMG.
6. Enterprise Structure → Definition → Human Resources Management → Employee Groups → Define
Employee Group → New Entries
Once you have created employee subgroups, save the screen.
Enterprise Structure → Assignment → Human Resources Management → Assign Employee Group to
Employee Subgroup,
DO THE SAME FOR ALL THE OTHER EMPLOYEE SUBGROUP AND SAVE THE WORK.
7. Generation of Personnel Numbers
99 % Internal – Sap Generates
1 % External – User Input
Personnel Numbers 8 digits
UK Country Group 08000000 – 08999999 – 08 Country Group
- SPRO
- SAP Reference IMG
- Personnel Management
- Personnel Administration
- Basic Settings
- Maintain number range intervals for personnel numbers
- Change Intervals
- 08 08000000 08999999 – example ( decide external(tick) or internal(blank)
DEFAULT COUNTRY CODE: 08
FEATURE: NUMKR
8. Personnel Management
1. Personnel Management
2. Personnel Administration
3. Customizing Procedures
4. Actions
5. Define Info groups
5a User Group Dependency on Menus and Info Groups
9. User inputs:
Menu = 08, Text = SHREE Hiring, User-dep. = Tick Ref = 08
Menu = 09, Text = SHREE Termination User-dep. = Tick Ref = 09
5b Info group
Info group = 08
New Entries
User Group No Operations Info types
08 01 INS 0001 Organizational Assignment
08 02 INS 0002 Personal Data
08 03 INS 0007 Planned Working Time
08 04 INS 0008 Basic Pay
08 05 INS 0009 Bank Details
08 06 INS 0014 Recurring Pay /Deduction
08 07 INS 0015 Additional Pay Deduction
10. NOTE: REPEAT SAME STEPS FOR INFOGROUPS 9
Info group = 09
New Entries
User Group No Operations Info types
09 01 INS 0014 Recurring Pay / Deduction
09 02 INS 0009 Bank Details
09 03 INS 0008 Basic Pay
09 04 INS 0007 Planned Working Time
11. 6. set up personnel actions
6a Personnel Action Types
Copy existing and then amend…..
Action = 08, Name = Hiring, IG = 08
Action Name of Action Type IG
08 shree Hiring 1 3 1 08
09 shree Termination 1 3 1 09
12. 7. Create reasons for personnel actions
Action Act Reason Name of reason for action
08 01 shree Hiring
09 02 shree Termination
1. Change action menu
8a User Group Dependency on Menus and Info Groups
Menu Text UserDep Ref
08 shree Hiring Tick 08
09 shree Termination Tick 09
13. 8b Action menu
Menu = 01 (Always 01)
User group No Action Populated by SAP
08 01 08 shree Hiring
08 02 09 Shree Termination
14. System User Profile Own Data Parameters
Parameter ID = UGR, Parameter Value = 08 (User group (HR master data)
MOL 08 (Personnel Country Grouping)
15. PART 2: ORGANIZATION MANAGEMENT
Organization Structure Objects
1. Positions
2. Jobs
3. Org units
4. Cost centers
5. Tasks
6. Person / Employee
All the above 5 (Positions – Tasks) can be assigned to a person
Path instead of Transaction PP01
- SAP Easy Access
- Human Resources
- Organizational Management
- Organizational Plan
- Organization and Staffing
o Create
o Change
o Display
Transaction PPOC - Create
Transaction PPOME - Change
Transaction KS01 – Create Cost Center
TO MAINTAIN ORGANISATIONAL OBJECTS:
TRANSACTION CODE: PP01
Example: IT ORG -ORG
o JOB1 (Application Support )
POS1 ( DEVELOPMENT
POS2 (JUNIOR DEVELOPMENT )
POS3 )SENIOR DEVELOPMENT)
o JOB2 ( Technical Support )
Relationship must be established between POSITIONS – JOB
Relationship must be established between POSITIONS – ORG
16. Screenshot 1: creating org unit. Repeat the same steps for creating a position and a job.
Points to note:
1. DO NOT GIVE ANY RELATIONSHIPS WHILE CREATING POSITIONS, ORG UNIT AND JOBS.
2. ONCE CREATED THEN START GIVING REALATIONSHIPS
3. MAKE SURE TO NOTE DOWN THE OBJECT ID FOR EACH.
4. CREATE RELATIONSHIP BETWEEN POSITION AND JOB
5. CRAETE REALTIONSHIP BETWEEN POSITION AND ORG UNIT
1. Create IT Organization
Plan Version = Current Plan
Object Type = Organization Unit
Click on Object
Create
Validity 01.01.2008 31.12.9999
Object abbr = ITORGND
Object Name = IT Organization – ND
Save 50003150 org created
17. 2 Create JOB1 and JOB2
Plan Version = Current Plan
Object Type = Job
Click on Object
Create
Validity 01.01.2008 31.12.9999
Object abbr = ASUPP_ND
Object Name = Application Support - ND
Save 50033497 job1 created
Plan Version = Current Plan
Object Type = Job
Click on Object
Create
Validity 01.01.2008 31.12.9999
Object abbr = TSUPP_ND
Object Name = Technical support – ND
Save 50033498 job2 created
3 Create POS1 (DEVELOPMENT
POS2 (JUNIOR DEVELOPMENT)
POS3 (SENIOR DEVELOPMENT)
Plan Version = Current Plan
Object Type = Position
Click on Object
Create
Validity 01.01.2008 31.12.9999
Object abbr = DEV_ND
Object Name = Developer - ND
Save 50007275 Pos 1 created
18. Plan Version = Current Plan
Object Type = Position
Click on Object
Create
Validity 01.01.2008 31.12.9999
Object abbr = JUN_ND
Object Name = Junior - ND
Save 50007276 Pos 2 created
Plan Version = Current Plan
Object Type = Position
Click on Object
Create
Validity 01.01.2008 31.12.9999
Object abbr = SEN_ND
Object Name = Senior – ND
Save 50007277 Pos 3 created
Relationships
POS1 -- JOB1 50007275 - 50033497
POS2 – JOB1 50007276 - 50033497
POS3 – JOB1 50007277 - 50033497
Object Type = Position
Object ID = 50007275
19. CREATING RELATIONSHIPS:
Create
Validity 01.01.2008 31.12.9999
Type of related object = Job
ID of related object = 50033497
Relationship type/relation = B 007
Save
Do the same for 50007276, 50007277
Relationships
POS1 - ORG 50007275 - 50033497
POS2 – ORG 50007276 - 50033497
POS3 – ORG 50007277 - 50033497
20. Object Type = Position
Object ID = 50007275
Click on Relationship
Create
Validity 01.01.2008 31.12.9999
Type of related object = Organization
ID of related object = 50003150
Relationship type/relation = A 003
Save
Do the same for 50007276, 50007277
INTEGRATION TO PA
Link between OM – PA
SPRO Personnel Management Organization Management Integration
Double click on Basic Settings Set up Integration with personnel Administration
Object Type:
• O - Organization
• C - Job
• S - Position
• K- Cost
• T - Task
• P - Peron
21. Feature PLOGI – Transaction PE03
1. Personnel Management
2. Organizational Management
3. Integration
4. Integration with Personnel Administration
5. Set up Integration with Personnel Administration
5a. Double Click on Basic Settings
Note: PLOGI PRELI 99999999 Integration: default position
22. AD HOC Queries
Transactions - SQ02 – Create Info sets
SQ03 - Authorization
SQ01 – SAP Query - possible to change Layouts ( not used often)
PAAH - Ad hoc Query – Not possible to change the layout
1. Create Info Sets
Transaction SQ02
- Environment
- Query Area
- Click Standard Area (Client-specific)
- Info set = ZSHREETEST – Create
- Name = Shree's Test Infoset - PNP (Info types)
- Click on Logical Data Base – Enter PNP – Continue
- Now choose the Info types
- Continue
- Check
- Generate
2. Authorization
Transaction SQ03
- User Group = 02
- Info Set = ZSHREETEST
- Click on Assign users and Info Sets
- Click SAPUSER - SAVE
- Click on Assign Info Sets
- Click - ZSHREETEST PNP Shree's Test Infoset - PNP ((Info types)
Save
3. Ad hoc Query
- Select Info Set ZSHREETEST
- Transaction PAAH
- Select Fields for the report ( for selection and output )
- Save – Give Query Name and Title
SHREEQTEST Shree Query Test
23. - Continue
- Hit List
- Continue
- Output
- Send it to Excel
If you want to run the same query again (another day)
- PAAH – Query – Open – Select SHREEQTEST Shree Query Test
-----------------------------------THE END OF PA AND OM---------------------------------------------------