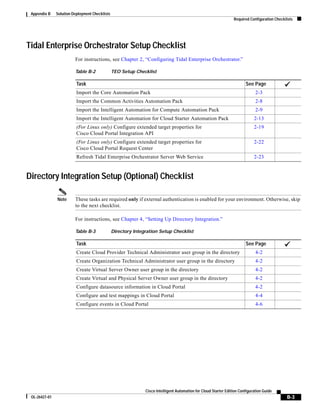
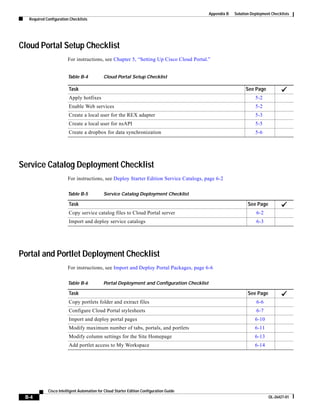
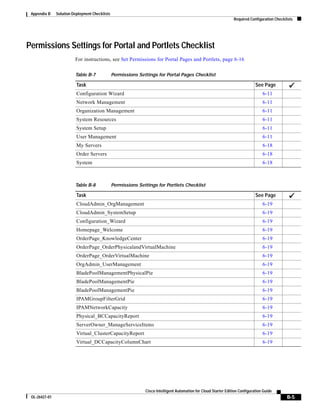
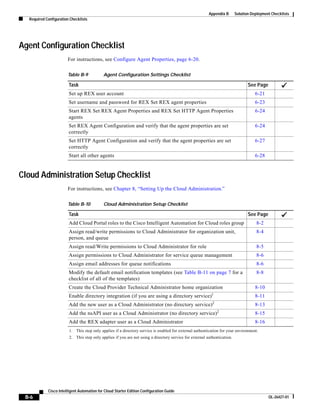
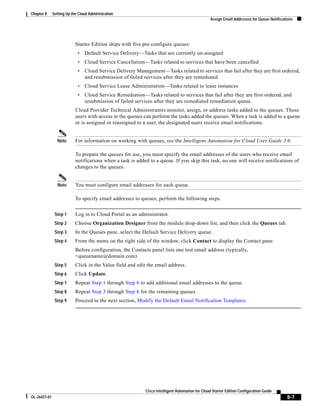
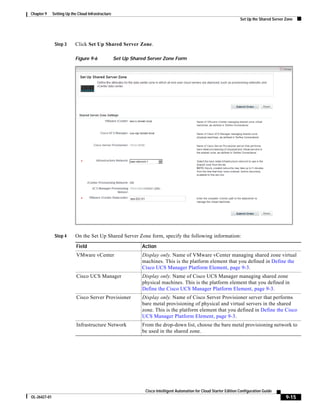
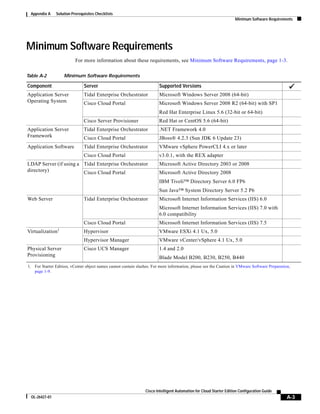
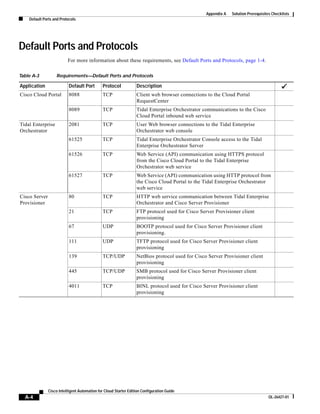
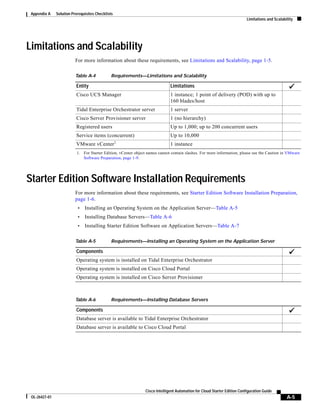
This document provides a configuration guide for Cisco Intelligent Automation for Cloud Starter Edition 3.0.1. It contains chapters covering prerequisites, configuring Tidal Enterprise Orchestrator, installing or upgrading Cisco Cloud Portal, setting up the directory integration, Cloud Portal, deploying catalogs and portals, running the quick setup wizard, setting up the cloud administration, cloud infrastructure, post-configuration options, setting up an organization and users. It includes appendices with checklists and worksheets.


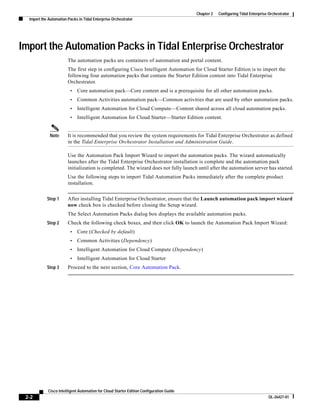
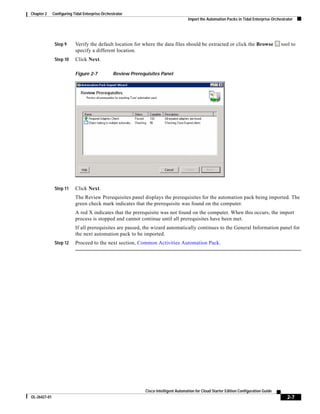
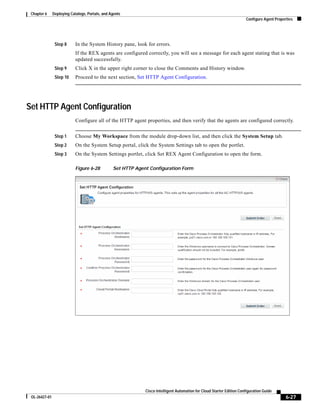
![Preface
Conventions
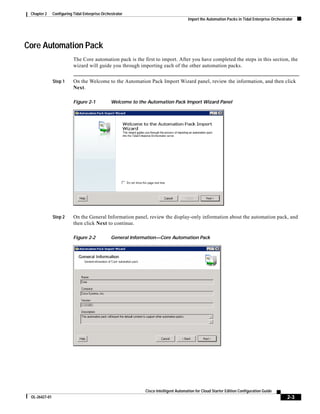
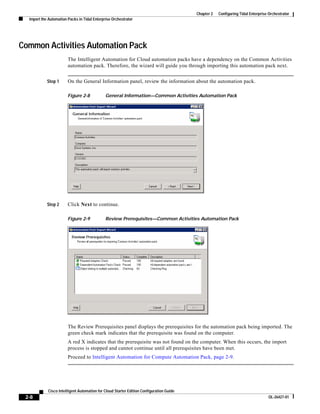
This guide uses the following conventions:
Convention Indication
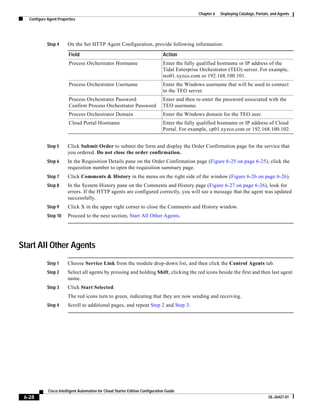
bold font Commands and keywords and user-entered text appear in bold font.
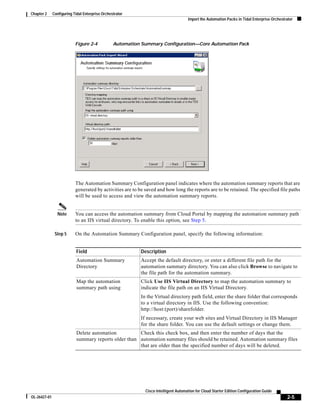
italic font Document titles, new or emphasized terms, and arguments for which you supply
values are in italic font.
[ ] Elements in square brackets are optional.
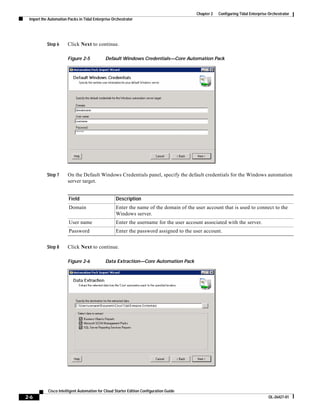
{x | y | z } Required alternative keywords are grouped in braces and separated by
vertical bars.
[x|y|z] Optional alternative keywords are grouped in brackets and separated by
vertical bars.
string A nonquoted set of characters. Do not use quotation marks around the string or
the string will include the quotation marks.
courier font Terminal sessions and information the system displays appear in courier font.
< > Nonprinting characters such as passwords are in angle brackets.
[ ] Default responses to system prompts are in square brackets.
!, # An exclamation point (!) or a pound sign (#) at the beginning of a line of code
indicates a comment line.
Note Means reader take note.
Tip Means the following information will help you solve a problem.
Caution Means reader be careful. In this situation, you might perform an action that could result in equipment
damage or loss of data.
Timesaver Means the described action saves time. You can save time by performing the action described in
the paragraph.
Warning Means reader be warned. In this situation, you might perform an action that could result in
bodily injury.
Cisco Intelligent Automation for Cloud Starter Edition Configuration Guide
xii OL-26427-01](https://image.slidesharecdn.com/step02-ciac-se301configurationguide-130111051800-phpapp01/85/Step-02-ciac-se-3_0_1_configuration_guide-14-320.jpg)
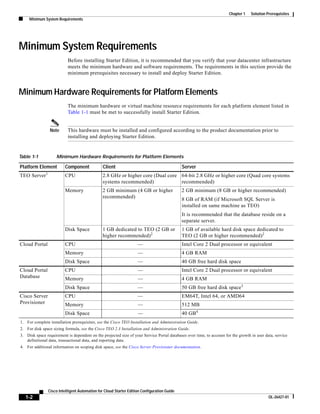
![Chapter 1 Solution Prerequisites
Customer Environment
Cisco UCS Manager Service Profile Templates and Policies
Cisco UCS service profile templates are used for duplicating or deploying multiple UCS service profiles
with the same configuration. By associating pools with a template, you ensure that a WWN or MAC
Address, for example, will always be within a pre-specified range.
Cisco recommends that a separate service profile template be created for each vCenter cluster.
Caution For Starter Edition, vCenter object names cannot contain forward slashes. If any of your vCenter
object names contains forward slashes, please rename the files before you specify a vCenter path. For
more information, please see the VMware Software Preparation, page 1-9.
Note When you register a service profile template through the portal page, you will be prompted to associate
it with a vCenter cluster if you have selected it to be a Hypervisor template.
The templates must meet the following requirements:
• At least one hypervisor service profile template for each vCenter cluster with the same quantity and
configuration of vNICs as on other hosts in the same cluster. The native VLAN for the first vNIC
should be set to the Management VLAN for that vCenter
• At least one service profile template for physical server provisioning
• A local boot policy assigned to the physical server service profile template which is set to that will
boot to local disk
• A boot policy named "PXEBoot" which is configured to boot from the network.
Note This name is mandatory.
• Provisioning templates are prepared according to Cisco Server Provisioner product documentation.
(See the [link Cisco Server Provisioner User's Guide].)
• UCS blades for provisioning VMware ESXi hypervisor hosts have at least one local drive.
VMware Software Preparation
Caution For Starter Edition, vCenter object names cannot contain forward slashes. Starter Edition uses
forward slashes as delimiters in object paths and parses vCenter paths by display name. Forward slashes
in vCenter object names break the parsing process. If any of your vCenter object names contains forward
slashes, please rename the files before you specify a vCenter path.
In Starter Edition, commissioning a new ESXi host is performed when moving a blade in the
Maintenance pool to the Virtual pool. The orchestration process involves provisioning (installing) ESXi
on to a blade, adding it to the vSphere infrastructure, copying the configuration from one of the existing
hosts in a cluster and applying it to the new host using VMware host profiles and exiting Host
Maintenance mode.
Cisco Intelligent Automation for Cloud Starter Edition Configuration Guide
OL-26427-01 1-9](https://image.slidesharecdn.com/step02-ciac-se301configurationguide-130111051800-phpapp01/85/Step-02-ciac-se-3_0_1_configuration_guide-25-320.jpg)


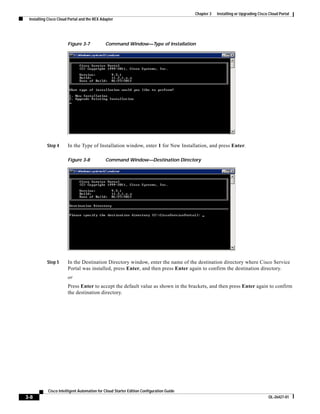

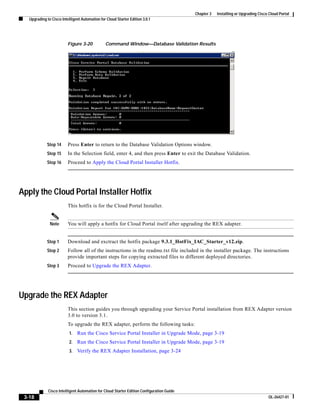
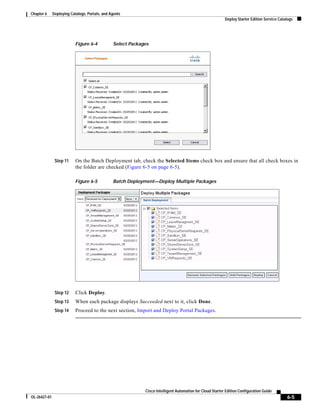
![Chapter 3 Installing or Upgrading Cisco Cloud Portal
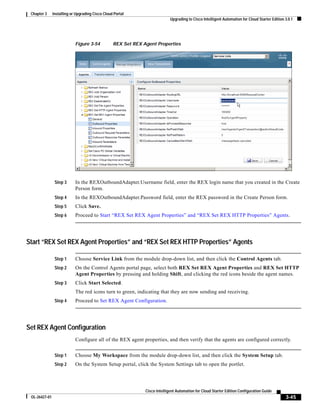
Upgrading to Cisco Intelligent Automation for Cloud Starter Edition 3.0.1
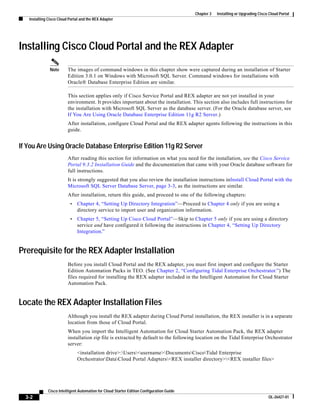
Run the Cisco Service Portal Installer in Upgrade Mode
You must now run the Cisco Service Portal installer in upgrade mode.
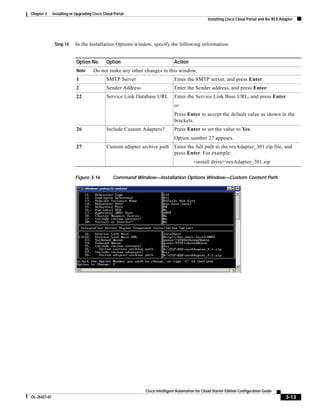
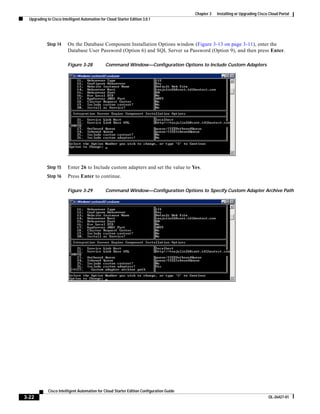
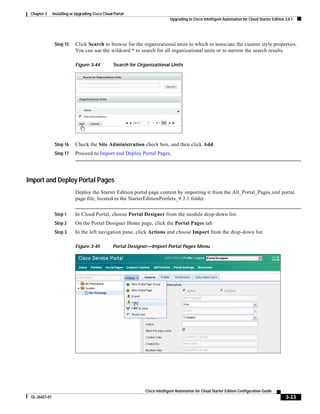
Step 1 On the Cisco Service Portal server, navigate to the Installer directory (Figure 3-5 on page 3-7). For
example:
[install drive]RCInstall-win-11.2.1.0151Installer
Figure 3-21 Cisco Service Portal Installer Directory—Setup.bat File
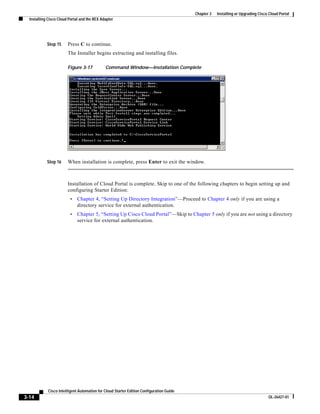
Step 2 Double-click setup.bat to open a command window.
Step 3 On the Specify Java Home Directory window (Figure 3-6 on page 3-7), enter the name of the Java Home
directory and press Enter to validate the Java path.
Figure 3-22 Command Window—Installation Options
Step 4 Enter 2 to Upgrade Existing Installation and press Enter.
Step 5 When prompted “Have you run the Validation Utility on this database?”, enter Yes, and then press Enter.
Step 6 On the Specify Destination Directory window (Figure 3-8 on page 3-8), enter the name of the destination
directory where Cisco Service Portal was installed and press Enter.
Cisco Intelligent Automation for Cloud Starter Edition Configuration Guide
OL-26427-01 3-19](https://image.slidesharecdn.com/step02-ciac-se301configurationguide-130111051800-phpapp01/85/Step-02-ciac-se-3_0_1_configuration_guide-69-320.jpg)
![Chapter 3 Installing or Upgrading Cisco Cloud Portal
Upgrading to Cisco Intelligent Automation for Cloud Starter Edition 3.0.1
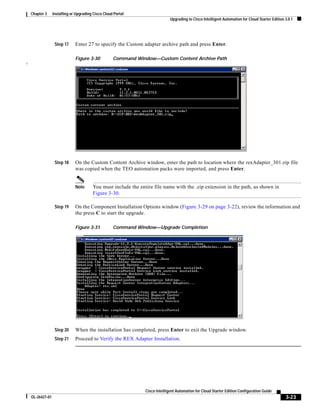
Apply the Cloud Portal Hotfix
Step 1 Download and exctract the hotfix package 9.3.2_HotFix_IAC_Starter_v09.zip.
Step 2 Follow all of the instructions in the readme.txt file included in the installer package. The instructions
provide important steps for copying extracted files to different deployed directories.
Step 3 Proceed to Deploy Service Catalog Packages.
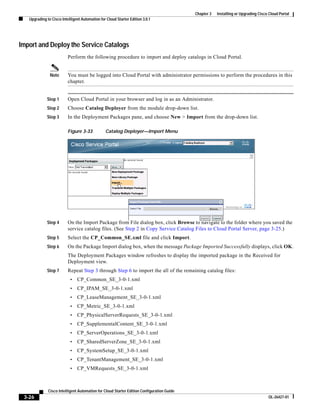
Deploy Service Catalog Packages
The Starter Edition service catalog content is included in files that were extracted when the Intelligent
Automation for Cloud Starter automation pack was imported to TEO. These files must be imported and
deployed in Cloud Portal for the Starter Edition upgrade.
To deploy service catalog packages, perform the following tasks:
1. Copy Service Catalog Files to Cloud Portal Server
2. Import and Deploy the Service Catalogs
Copy Service Catalog Files to Cloud Portal Server
Step 1 On the Tidal Enterprise Orchestrator (TEO) server, navigate to the location where the files were
extracted during the automation pack import process when TEO was first installed. By default, the files
are copied to the following location on the server:
C:Users[username]DocumentsCiscoTidal Enterprise OrchestratorExtracted DataCisco Cloud
Portal Service Catalog 9.3
Step 2 Copy the following files to a folder on the Cloud Portal server:
• CP_Common_SE_3-0-1.xml
• CP_IPAM_SE_3-0-1.xml
• CP_LeaseManagement_SE_3-0-1.xml
• CP_Metric_SE_3-0-1.xml
• CP_PhysicalServerRequests_SE_3-0-1.xml
• CP_SupplementalContent_SE_3-0-1.xml
• CP_ServerOperations_SE_3-0-1.xml
• CP_SharedServerZone_SE_3-0-1.xml
• CP_SystemSetup_SE_3-0-1.xml
• CP_TenantManagement_SE_3-0-1.xml
• CP_VMRequests_SE_3-0-1.xml
Step 3 Proceed to Import and Deploy the Service Catalogs.
Cisco Intelligent Automation for Cloud Starter Edition Configuration Guide
OL-26427-01 3-25](https://image.slidesharecdn.com/step02-ciac-se301configurationguide-130111051800-phpapp01/85/Step-02-ciac-se-3_0_1_configuration_guide-75-320.jpg)

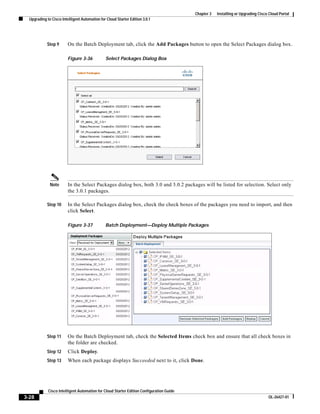
![Chapter 3 Installing or Upgrading Cisco Cloud Portal
Upgrading to Cisco Intelligent Automation for Cloud Starter Edition 3.0.1
Step 14 Proceed to Deploy Portal Packages.
Deploy Portal Packages
The Starter Edition portal and portlet content is included in files that were extracted when the Intelligent
Automation for Cloud StartStarterEditionPortlets_9.3.1.ziper automation pack was imported to TEO.
These files must be imported and deployed in Cloud Portal for the Starter Edition upgrade. After
deployment, you must also configure the portals and portlets.
To deploy portal packages, perform the following tasks::
1. Copy StarterEditionPortlets_9.3.1.zip and Extract Files
2. Configure Cloud Portal Stylesheets
3. Import and Deploy Portal Pages
Copy StarterEditionPortlets_9.3.1.zip and Extract Files
The Intelligent Automation for Cloud Starter automation pack includes the file
StarterEditionPortlets_9.3.1.zip, which was extracted to the Tidal Enterprise Orchestrator server when
you imported the automation pack. (See Intelligent Automation for Cloud Starter Automation Pack,
page 2-13.) StarterEditionPortlets_9.3.1.zip contains the files you need to deploy portlets, JavaScripts,
images, and stylesheets to Cloud Portal.
Step 1 On the Tidal Enterprise Orchestrator server, navigate to the following folder where
StarterEditionPortlets_9.3.1.zip was extracted. The default location is:
C:Users[username]DocumentsCiscoTidal Enterprise OrchestratorExtracted Data
Cloud Portal Service Catalog 9.3
Step 2 Extract StarterEditionPortlets_9.3.1.zip to a temporary location. It will create a
StarterEditionPortlets_9.3.1 folder.
Step 3 Stop the Request Center and Service Link services:
a. Click Start > Control Panel > Administrative Tools > Services.
b. In the Services window, right-click CiscoServicePortal Request Center and choose Stop.
c. In the Services window, right-click CiscoServicePortal Service Link and choose Stop.
d. Close the Services window.
Step 4 In the StarterEditionPortlets_9.3.1 folder, locate RequestCenter_war.zip, and then extract it to the
following directory:
<CiscoServicePortal>jboss-4.2.3.GAserverRequestCenterdeployRequestCenter.ear
RequestCenter.war
Step 5 Restart the CiscoServicePortal Request Center and CiscoServicePortal Service Link services.
Step 6 Proceed to Configure Cloud Portal Stylesheets.
Cisco Intelligent Automation for Cloud Starter Edition Configuration Guide
OL-26427-01 3-29](https://image.slidesharecdn.com/step02-ciac-se301configurationguide-130111051800-phpapp01/85/Step-02-ciac-se-3_0_1_configuration_guide-79-320.jpg)
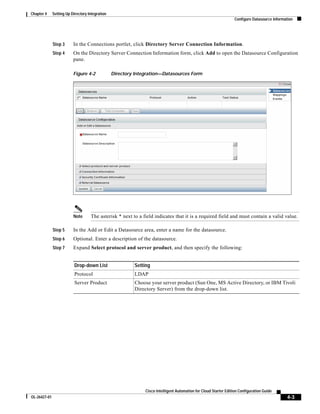
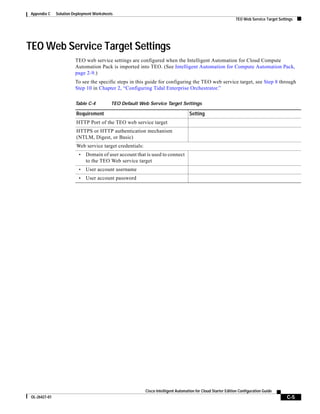
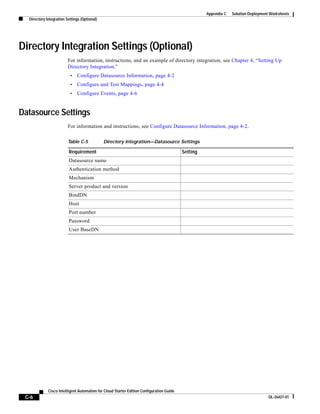
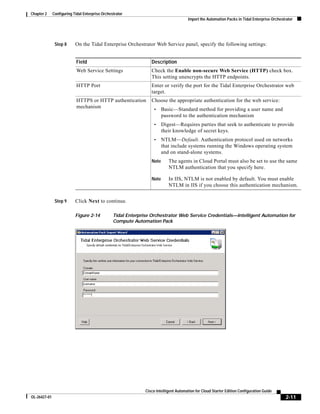
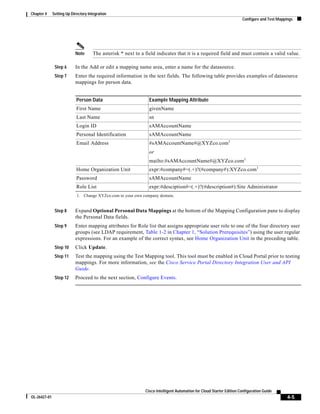
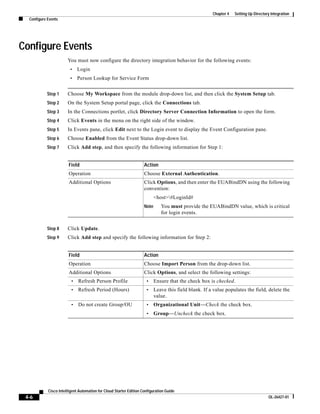
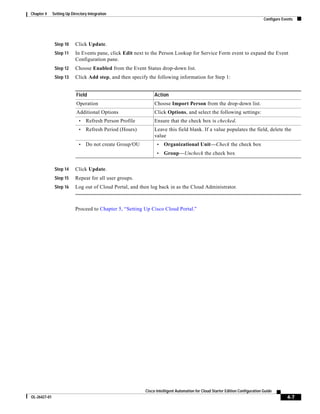
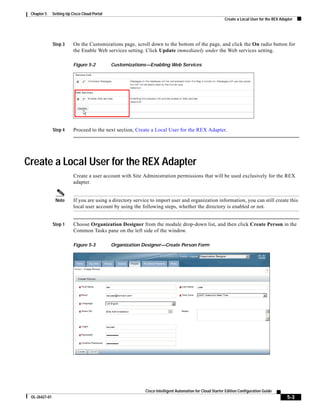
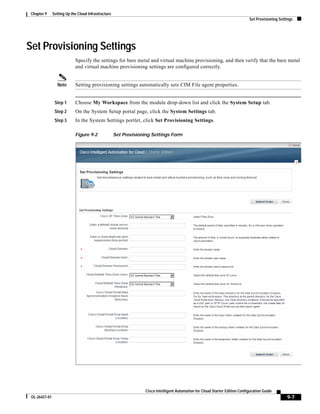
![Chapter 4 Setting Up Directory Integration
Configure and Test Mappings
Step 8 Expand Connection Information, and then specify the following required datasource information in the
definition area.
Datasource Setting
Authentication Method Simple (plain text username and password)
Mechanism Non SSL
BindDN The bind-distinguished name (BindDN) value looks like the following
example:
CN=Frank Donohue,OU=XYZco-Dups,OU=Users,OU=San-Jose,
OU=California,OU=USA,DC=XYZcohost,DC=local
To query the BindDN value, open a command prompt on the Windows
server and execute the following command:
dsquery user -name "[name]*"
Host Fully qualified hostname or IP address of the LDAP directory server. For
example: XYZcohost.local
Port Number 389
Password Password for the user specified as the BindDN
User BaseDN The directory from which to start searching for persons in the directory.
For example: DC=XYZcohost,DC=local
Step 9 Click Update.
Step 10 Check the check box next to the newly added datasource and click Test Connection. The Test Status
column displays OK if the connection is successful.
Step 11 Proceed to the next section, Configure and Test Mappings.
Configure and Test Mappings
Perform the following steps to map the Cloud Portal data to the directory server data, and then test the
mapping. It is recommended that you test the mappings to ensure proper functionality.
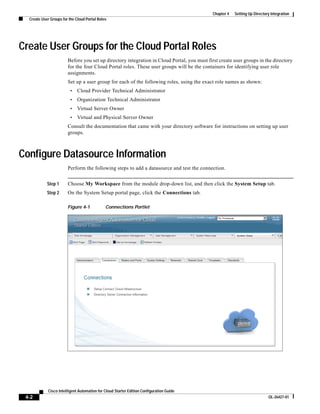
Step 1 Choose My Workspace from the module drop-down list, and then click the System Setup tab.
Step 2 On the System Setup portal page, click the Connections tab.
Step 3 In the Connections portlet, click Directory Server Connection Information to open the form.
Step 4 Click Mappings in the menu on the right side of the window.
Step 5 Click Add to display the Mapping Configuration pane.
Cisco Intelligent Automation for Cloud Starter Edition Configuration Guide
4-4 OL-26427-01](https://image.slidesharecdn.com/step02-ciac-se301configurationguide-130111051800-phpapp01/85/Step-02-ciac-se-3_0_1_configuration_guide-104-320.jpg)


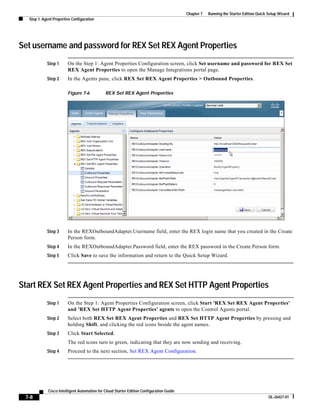
![Chapter 6 Deploying Catalogs, Portals, and Agents
Deploy Starter Edition Service Catalogs
Deploy Starter Edition Service Catalogs
Note The REX adapter must be installed on the Cloud Portal server before you import and deploy the service
catalogs. If you have not installed the REX adapter, see Chapter 2, “Configuring Tidal Enterprise
Orchestrator.”
The Starter Edition service catalog and portal content is included in files that are extracted when the
Intelligent Automation for Cloud Starter automation pack is imported. These files must be imported and
deployed in Cloud Portal.
In this section, you will perform the following tasks in sequence:
• Copy Service Catalog Files to Cloud Portal Server
• Import and Deploy Service Catalogs
Copy Service Catalog Files to Cloud Portal Server
The Starter Edition service catalog files that are extracted when the Intelligent Automation for Cloud
Starter automation pack is imported must be copied from the Tidal Enterprise Orchestrator server to the
Cloud Portal server to facilitate importing and deploying Starter Edition in Cloud Portal.
Step 1 On the Tidal Enterprise Orchestrator server, navigate to the location where the files were extracted
during the automation pack import process. By default, the files are copied to the following location on
the server:
C:Users[username]DocumentsCiscoTidal Enterprise OrchestratorExtracted DataCisco Cloud
Portal Service Catalog 9.3
Step 2 Copy the following files to a folder on the Cloud Portal server:
• CP_Common_SE_3-0-1.xml
• CP_IPAM_SE_3-0-1.xml
• CP_LeaseManagement_SE_3-0-1.xml
• CP_Metric_SE_3-0-1.xml
• CP_PhysicalServerRequests_SE_3-0-1.xml
• CP_Sandbox_SE_3-0-1.xml
• CP_ServerOperations_SE_3-0-1.xml
• CP_SharedServerZone_SE_3-0-1.xml
• CP_SystemSetup_SE_3-0-1.xml
• CP_TenantManagement_SE_3-0-1.xml
• CP_VMRequests_SE_3-0-1.xml
Step 3 Proceed to the next section, Import and Deploy Service Catalogs.
Cisco Intelligent Automation for Cloud Starter Edition Configuration Guide
6-2 OL-26427-01](https://image.slidesharecdn.com/step02-ciac-se301configurationguide-130111051800-phpapp01/85/Step-02-ciac-se-3_0_1_configuration_guide-116-320.jpg)
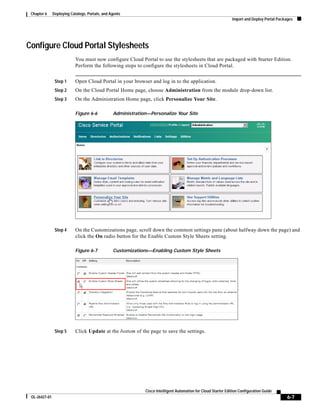
![Chapter 6 Deploying Catalogs, Portals, and Agents
Import and Deploy Portal Packages
Import and Deploy Portal Packages
Starter Edition ships with packaged stylesheets, image files, portlets and portal pages to provide an
easy-to-use portal for ordering services. This section guides you through deploying Starter Edition
content in Cloud Portal.
In this section, you will perform the following tasks in sequence:
• Copy StarterEditionPortlets_9.3.1.zip and extract files
• Configure Cloud Portal Stylesheets
• Import Portal Pages
Copy StarterEditionPortlets_9.3.1.zip and Extract Files
The Intelligent Automation for Cloud Starter automation pack includes the file
StarterEditionPortlets_9.3.1.zip, which was extracted to the Tidal Enterprise Orchestrator server when
you imported the automation pack. (See Intelligent Automation for Cloud Starter Automation Pack,
page 2-13.) StarterEditionPortlets.zip contains the files you need to deploy portlets, JavaScripts, images,
and stylesheets to Cloud Portal.
Step 1 On the Tidal Enterprise Orchestrator server, navigate to the following folder where
StarterEditionPortlets_9.3.1.zip was extracted. The default location is:
C:Users[username]DocumentsCiscoTidal Enterprise OrchestratorExtracted Data
Cloud Portal Service Catalog 9.3
Step 2 Extract StarterEditionPortlets_9.3.1.zip to a temporary location. It will create a
StarterEditionPortlets_9.3.1 folder.
Step 3 Stop the Request Center and Service Link services:
a. Click Start > Control Panel > Administrative Tools > Services.
b. In the Services window, right-click CiscoServicePortal Request Center and choose Stop.
c. In the Services window, right-click CiscoServicePortal Service Link and choose Stop.
d. Close the Services window.
Step 4 In the StarterEditionPortlets_9.3.1 folder, locate RequestCenter_war.zip, and then extract it to the
following directory:
<CiscoServicePortal>jboss-4.2.3.GAserverRequestCenterdeployRequestCenter.ear
RequestCenter.war
Step 5 Restart the CiscoServicePortal Request Center and CiscoServicePortal Service Link services.
Step 6 Proceed to the next section, Configure Cloud Portal Stylesheets.
Cisco Intelligent Automation for Cloud Starter Edition Configuration Guide
6-6 OL-26427-01](https://image.slidesharecdn.com/step02-ciac-se301configurationguide-130111051800-phpapp01/85/Step-02-ciac-se-3_0_1_configuration_guide-120-320.jpg)
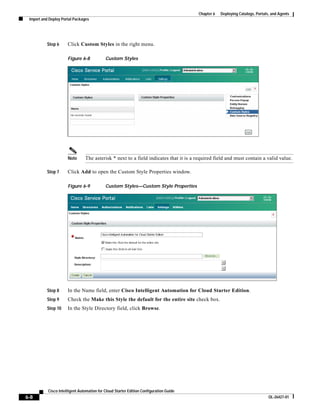


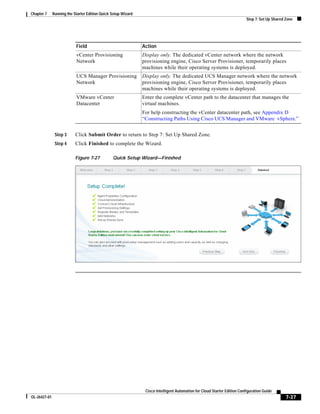

![Chapter 8 Setting Up the Cloud Administration
Assign Additional Permissions for the Cloud Administrator Role
Assign Additional Permissions for the Cloud Administrator Role
Starter Edition ships with permissions assigned to certain roles. However, you must manually assign
additional permissions to the Cloud Administrator role.
Read/Write Permissions for Organization Unit, Person, and Queue
Step 1 Choose Organization Designer from the module drop-down list, and then click the Roles tab.
Step 2 Expand Cisco Intelligent Automation for Cloud Roles in the Role Hierarchy pane, and select Cloud
Provider Technical Administrator (Figure 8-2 on page 8-3).
Step 3 From the right menu, select Permissions to open the Permissions Assigned to This Role pane.
Step 4 Click Add Permission.
Step 5 On the Add [Additional] Permissions pane, select the following filters, and then click Add:
Field Action
Object Type Choose Organizational Unit from the drop-down list.
Permissions for this type Choose Read/Write from the drop-down list.
Assign permission to Click the All objects of this type radio button.
Figure 8-3 Organization Designer—Add [Additional] Permission
Step 6 Repeat Step 1 through Step 5 for the Person and Queue object types.
Step 7 Proceed to the next section, Read/Write Permissions for Role.
Cisco Intelligent Automation for Cloud Starter Edition Configuration Guide
8-4 OL-26427-01](https://image.slidesharecdn.com/step02-ciac-se301configurationguide-130111051800-phpapp01/85/Step-02-ciac-se-3_0_1_configuration_guide-184-320.jpg)
![Chapter 8 Setting Up the Cloud Administration
Assign Additional Permissions for the Cloud Administrator Role
Read/Write Permissions for Role
Step 1 Choose Organization Designer from the module drop-down list, and then click the Roles tab.
Step 2 Expand Cisco Intelligent Automation for Cloud Roles in the Role Hierarchy pane, and select Cloud
Provider Technical Administrator (Figure 8-2 on page 8-3).
Step 3 From the right menu, select Permissions to open the Permissions Assigned to This Role pane.
Step 4 Click Add Permission.
Step 5 On the Add [Additional] Permission pane (Figure 8-3 on page 8-4), select the following filters:
Field Action
Object Type Choose Role from the drop-down list.
Permissions for this type Choose Read/Write from the drop-down list.
Assign permission to Click the Selected Objects radio button.
Step 6 In the Roles pane, check the check boxes for the following objects only:
• Cisco Automation for Cloud Roles
• Cloud Provider Technical Administrator
• Organization Technical Administrator
• Virtual and Physical Server Owner
• Virtual Server Owner
Figure 8-4 Organization Designer—Add Read/Write Permission
Step 7 Click Add.
Step 8 Proceed to the next section, Service Queue Management Permissions.
Cisco Intelligent Automation for Cloud Starter Edition Configuration Guide
OL-26427-01 8-5](https://image.slidesharecdn.com/step02-ciac-se301configurationguide-130111051800-phpapp01/85/Step-02-ciac-se-3_0_1_configuration_guide-185-320.jpg)
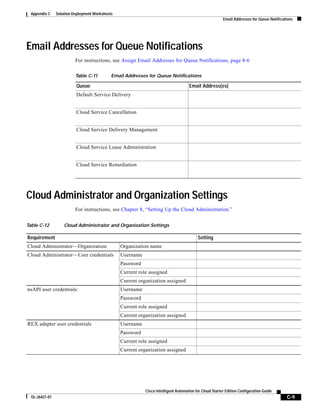
![Chapter 8 Setting Up the Cloud Administration
Assign Email Addresses for Queue Notifications
Service Queue Management Permissions
These settings allow the Cloud Provider Technical Administrator Role permissions to manage the cloud
service queue, which includes cancellation, delivery, leases, and remediation of services.
Step 1 Choose Organization Designer from the module drop-down list, and then click the Roles tab.
Step 2 Expand Cisco Intelligent Automation for Cloud Roles in the Role Hierarchy pane, and select Cloud
Provider Technical Administrator (Figure 8-2 on page 8-3).
Step 3 From the right menu, select Permissions to open the Permissions Assigned to This Role pane
(Figure 8-1 on page 8-2).
Step 4 Click Add Permission.
Step 5 On the Add [Additional] Permission pane (Figure 8-3 on page 8-4), select the following filters:
Field Action
Object Type Choose Queue from the drop-down list.
Permissions for this type Choose Access Queue from the drop-down list.
Assign permission to Click the Selected Objects radio button.
Step 6 In the Queues pane, check the check boxes for the following objects:
• Cloud Service Cancellation
• Cloud Service Delivery Management
• Cloud Service Lease Administration
• Cloud Service Remediation
• Default Service Delivery
Step 7 Click Add.
Step 8 Proceed to the next section, Assign Email Addresses for Queue Notifications.
Assign Email Addresses for Queue Notifications
You must update the queue configuration settings with email addresses that will receive email
notifications for changes in service queues.
A queue is a repository for administrative tasks that need to be performed, such as monitoring service
delivery, lease instances, and failed service remediation. Tasks are automatically added to the queue by
the Cloud system. Users with permissions can see the queues, assign tasks, and take action on the tasks
in Service Manager.
Cisco Intelligent Automation for Cloud Starter Edition Configuration Guide
8-6 OL-26427-01](https://image.slidesharecdn.com/step02-ciac-se301configurationguide-130111051800-phpapp01/85/Step-02-ciac-se-3_0_1_configuration_guide-186-320.jpg)
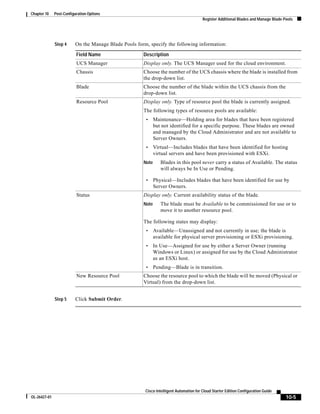
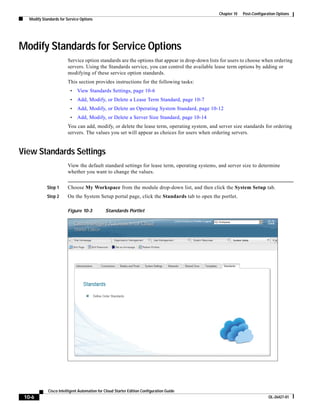

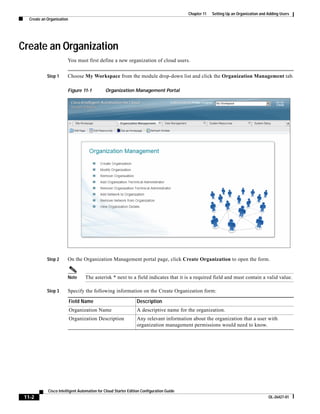
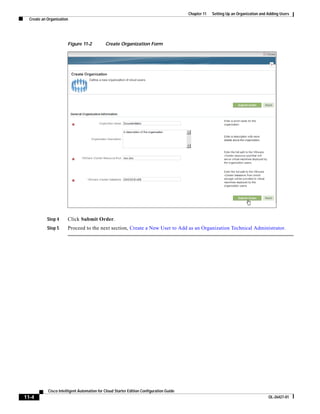
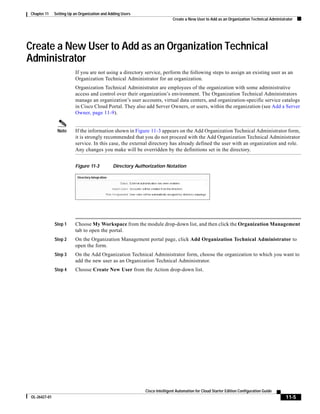
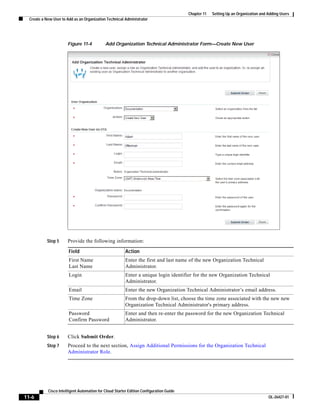
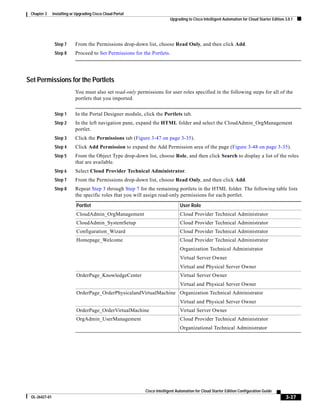
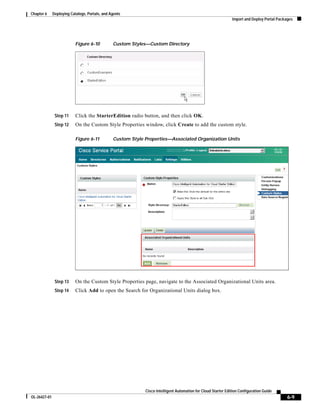
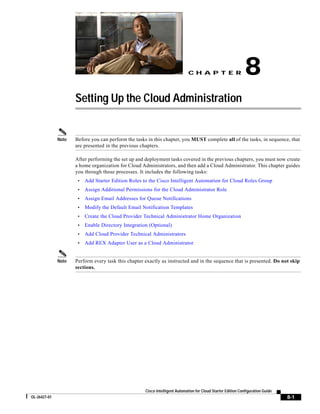
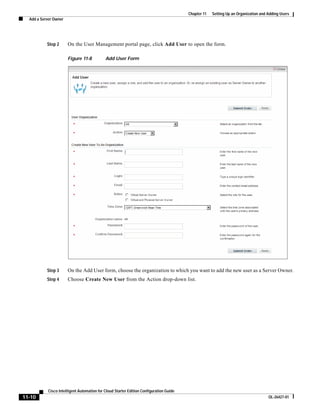
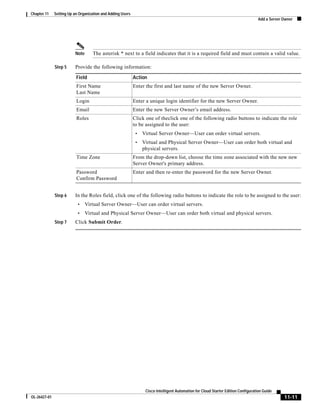
![Chapter 11 Setting Up an Organization and Adding Users
Assign Additional Permissions for the Organization Technical Administrator Role
Assign Additional Permissions for the Organization Technical
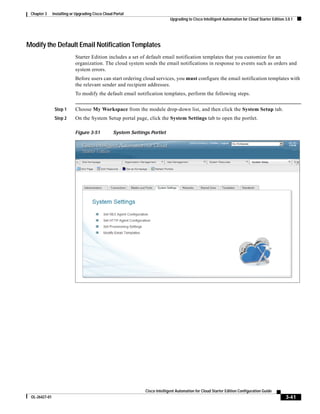
Administrator Role
Starter Edition ships with permissions assigned to certain roles. However, you must manually assign
additional permissions to the Organization Technical Administrator role.
Read/Write Permission for Role
The setting allows an Organization Technical Administrator to add other Organization Technical
Administrators.
Step 1 Choose Organization Designer from the module drop-down list, and then click the Roles tab.
Step 2 Expand Cisco Intelligent Automation for Cloud Roles in the Role Hierarchy pane, and click
Organization Technical Administrator.
Step 3 In the right menu, select Permissions to open the Permissions Assigned to This Role pane.
Step 4 Click Add Permission.
Step 5 Add [Additional] Permission form, choose the following filters from the drop-down lists:
• Object Type—Role
• Permissions for this type—Read/Write
• Assign permission to—Selected Objects
Step 6 In the Roles pane, check the check box beside Organization Technical Administrator.
Figure 11-5 Organization Designer—Add “Read/Write” Permission for Role
Cisco Intelligent Automation for Cloud Starter Edition Configuration Guide
OL-26427-01 11-7](https://image.slidesharecdn.com/step02-ciac-se301configurationguide-130111051800-phpapp01/85/Step-02-ciac-se-3_0_1_configuration_guide-247-320.jpg)
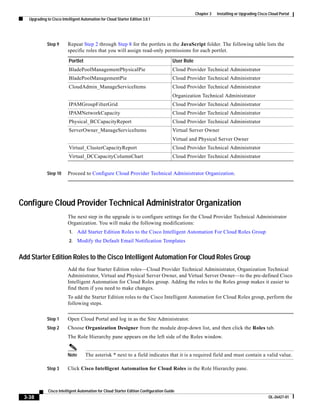
![Chapter 11 Setting Up an Organization and Adding Users
Assign Additional Permissions for the Organization Technical Administrator Role
Step 7 Click Add.
Step 8 Proceed to the next section, Read/Write Permission for Person.
Read/Write Permission for Person
The setting allows an Organization Technical Administrator to assign other Organization Technical
Administrators and to manage people within the organization.
Step 1 Choose Organization Designer from the module drop-down list, and then click the Roles tab.
Step 2 Expand Cisco Intelligent Automation for Cloud Roles in the Role Hierarchy pane, and select
Organization Technical Administrator.
Step 3 From the right menu, select Permissions to open the Permissions Assigned to This Role pane.
Step 4 Click Add Permission to open the Add [Additional] Permission form.
Step 5 Select the following filters:
• Object Type—Person
• Permissions for this type—Read/Write
• Assign permission to—All objects of this type
Figure 11-6 Organization Designer—Add “Read/Write” Permission for Person
Step 6 Click Add.
Step 7 Proceed to the next section, Add a Server Owner.
Cisco Intelligent Automation for Cloud Starter Edition Configuration Guide
11-8 OL-26427-01](https://image.slidesharecdn.com/step02-ciac-se301configurationguide-130111051800-phpapp01/85/Step-02-ciac-se-3_0_1_configuration_guide-248-320.jpg)

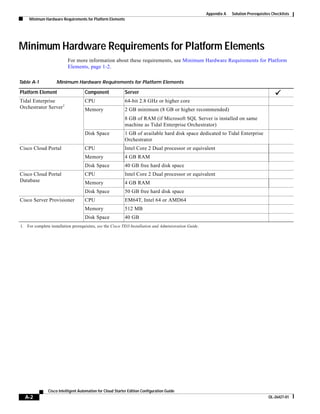
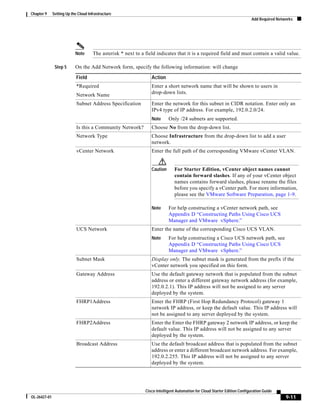
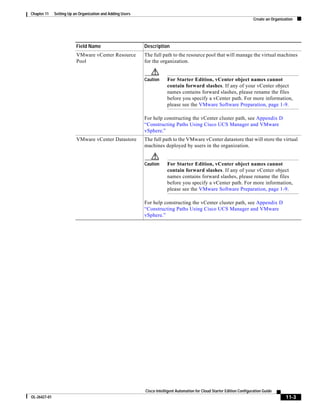
![Appendix A Solution Prerequisites Checklists
Network Requirements
Table A-7 Requirements—Installing Starter Edition Software on Application Servers
Components
Tidal Enterprise Orchestrator is installed on a targeted application server
Cisco Cloud Portal is installed on a targeted application server
Cisco Server Provisioner is installed a targeted application server
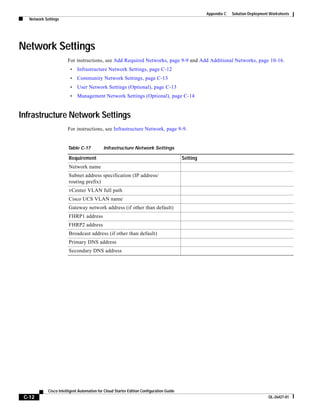
Network Requirements
For more information about these requirements, see Networks, page 1-7.
Table A-8 Requirements—Networks
Requirement
A VLAN for Cisco Server Provisioner to use as its private PXE VLAN, set up in UCS
Manager and in vCenter1,2
A VLAN for use as an infrastructure network
At least one VLAN to use as a destination network for provisioning servers
1. For more information, see the [link Cisco Server Provisioner User’s Guide].
2. For Starter Edition, vCenter object names cannot contain slashes. For more information, please see
the Caution in VMware Software Preparation, page 1-9.
Storage Management Requirements
For more information about these requirements, see Storage Management Preparation, page 1-7.
Table A-9 Requirements—Storage Management
Requirement
Create storage and configure as datastores.
Cisco Intelligent Automation for Cloud Starter Edition Configuration Guide
A-6 OL-26427-01](https://image.slidesharecdn.com/step02-ciac-se301configurationguide-130111051800-phpapp01/85/Step-02-ciac-se-3_0_1_configuration_guide-258-320.jpg)