Download to read offline


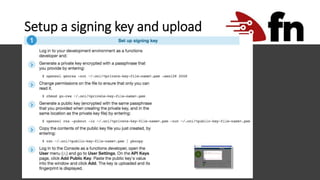
![Add profile
• Get the fingerprint of your public key:
$ openssl rsa -pubout -outform DER -in ~/.oci/oci_faas_key.pem | openssl md5 –c
• Copy the output from the configuration script:
[faas]
user=ocid1.user.oc1………
fingerprint=<public-key-fingerprint>
key_file=<private-key-pem-file>
tenancy=eppletontestregion=eu-frankfurt-1
pass_phrase=<passphrase>
Now add this profile in ~/.oci/config and fill in the fingerprint, filename and passphrase](https://image.slidesharecdn.com/cndhdeployment-200518131844/85/OCI-Oracle-Functions-Deployment-21-320.jpg)

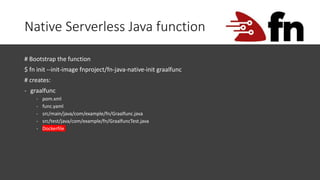
![Create and configure context and
docker registry
$ fn create context faas-context --provider oracle
$ fn use context faas-context
$ fn update context oracle.compartment-id <compartment.ocid>
$ fn update context api-url https://functions.eu-frankfurt-1.oraclecloud.com
$ fn update context registry fra.ocir.io/<tenant-id>/<my-repo>
$ fn update context oracle.profile faas
$ fn create app faas-demo --annotation oracle.com/oci/subnetIds=‘[“<one-of-subnets>"]’
$ fn list apps](https://image.slidesharecdn.com/cndhdeployment-200518131844/85/OCI-Oracle-Functions-Deployment-24-320.jpg)


![Multilevel build
No need to install GraalVM specific resources, as build is done in docker image
$ cd graalfunc
# fn create app soemapp // <- local fn
$ fn create app someapp --annotation oracle.com/oci/subnetIds='["ocid1.subnet.oc1..."]’
$ fn deploy --app someapp
$ fn invoke someapp graalfunc](https://image.slidesharecdn.com/cndhdeployment-200518131844/85/OCI-Oracle-Functions-Deployment-29-320.jpg)


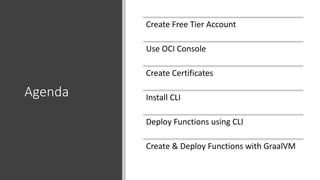
The document outlines a comprehensive guide for setting up cloud-native development on Oracle Cloud Infrastructure, focusing on creating a free tier account, configuring the command line interface (CLI), and deploying serverless functions using GraalVM. It provides step-by-step instructions for resource preparation, including creating IAM groups, managing VCNs, and facilitating Docker login. Additional details on deploying Java functions and using the Oracle API Gateway are also included, enhancing the functionality of the deployed applications.


![【旧版】Oracle Cloud Infrastructure:サービス概要のご紹介 [2020年2月版]](https://cdn.slidesharecdn.com/ss_thumbnails/ocioverview200205-200205062232-thumbnail.jpg?width=640&height=640&fit=bounds)
![【旧版】Oracle Cloud Infrastructure:サービス概要のご紹介 [2020年6月版]](https://cdn.slidesharecdn.com/ss_thumbnails/ocioverview200601dl-200601023800-thumbnail.jpg?width=640&height=640&fit=bounds)


![【旧版】Oracle Exadata Cloud Service:サービス概要のご紹介 [2020年8月版]](https://cdn.slidesharecdn.com/ss_thumbnails/exadatacloudserviceoverview20200824-200824060458-thumbnail.jpg?width=640&height=640&fit=bounds)


![[非公開]Oracle Cloud Infrastructure Classic ネットワーク機能詳細](https://cdn.slidesharecdn.com/ss_thumbnails/ociclassicnetwork2-171222085226-thumbnail.jpg?width=640&height=640&fit=bounds)
![【旧版】Oracle Database Cloud Service:サービス概要のご紹介 [2020年5月版]](https://cdn.slidesharecdn.com/ss_thumbnails/ocidatabaseoverview200525dl-200525073817-thumbnail.jpg?width=640&height=640&fit=bounds)

![【旧版】Oracle Database Cloud Service:サービス概要のご紹介 [2020年8月版]](https://cdn.slidesharecdn.com/ss_thumbnails/ocidatabaseoverview200824-200824062608-thumbnail.jpg?width=640&height=640&fit=bounds)
![オラクルのセキュリティへの取り組み [2020年3月版]](https://cdn.slidesharecdn.com/ss_thumbnails/oracle-security-overview-202003-200324055947-thumbnail.jpg?width=640&height=640&fit=bounds)


![【旧版】Oracle Autonomous Database:サービス概要のご紹介 [2020年8月版]](https://cdn.slidesharecdn.com/ss_thumbnails/adboverview200820-200821070924-thumbnail.jpg?width=640&height=640&fit=bounds)