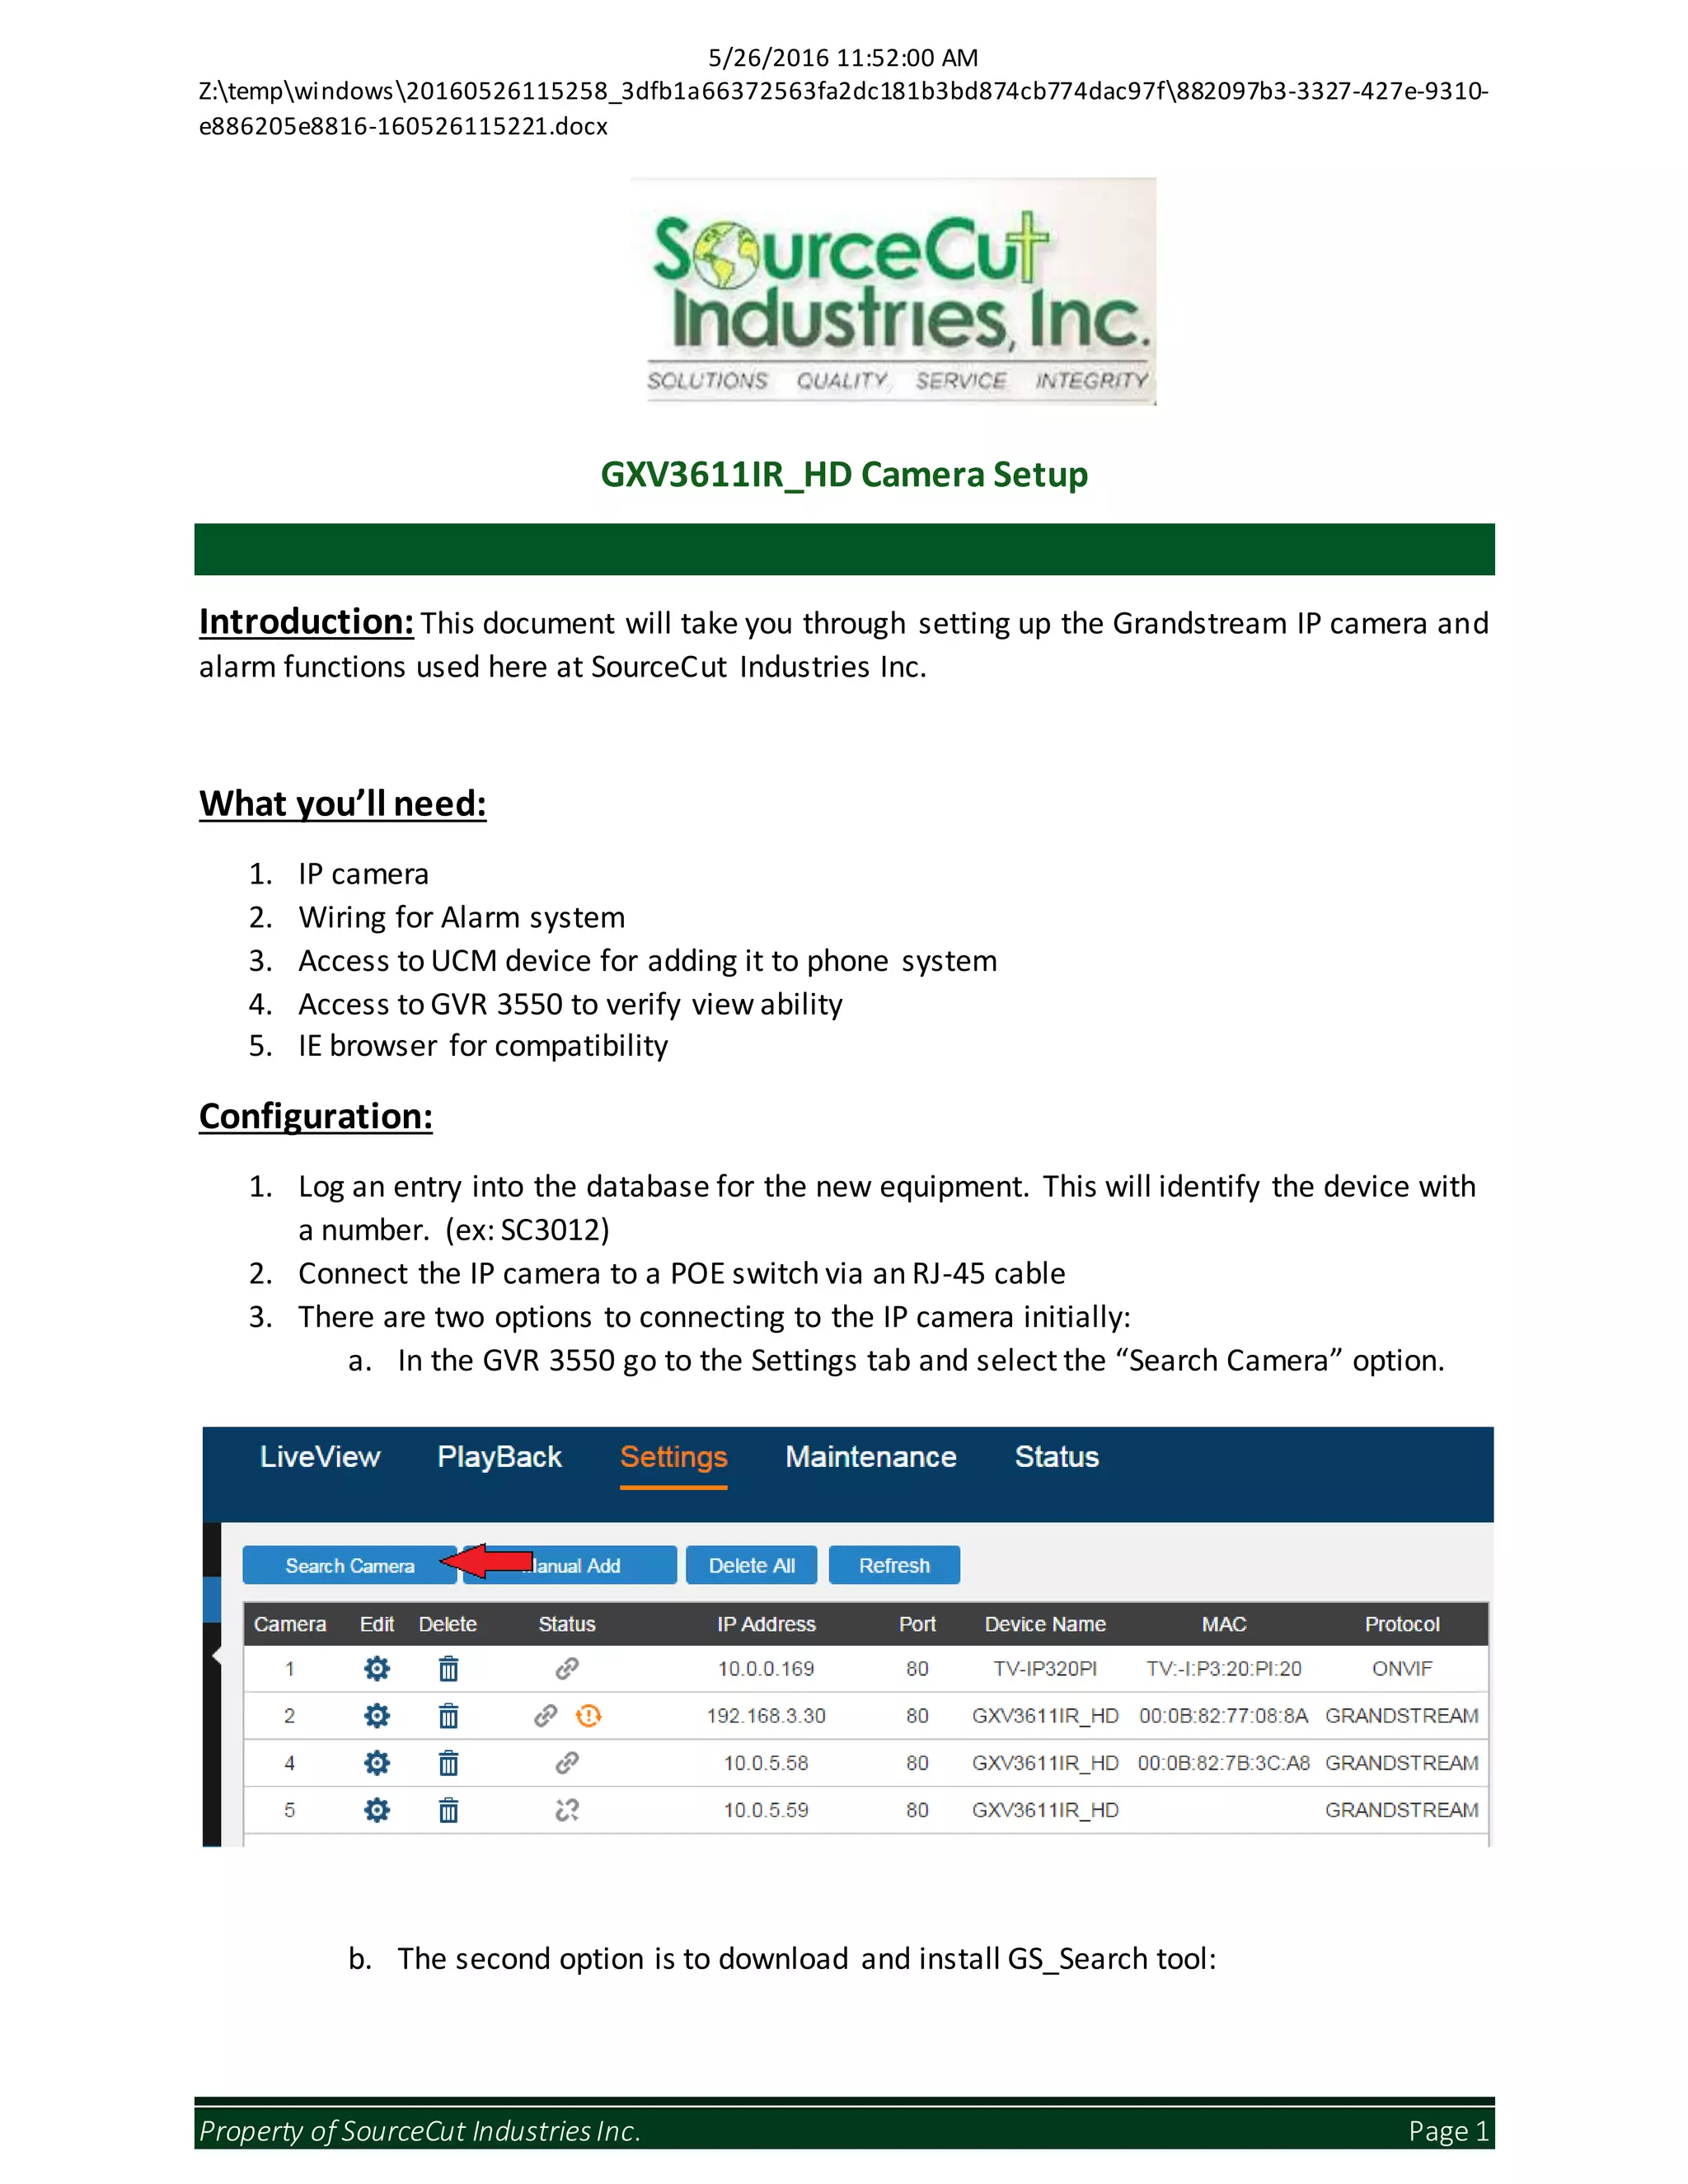
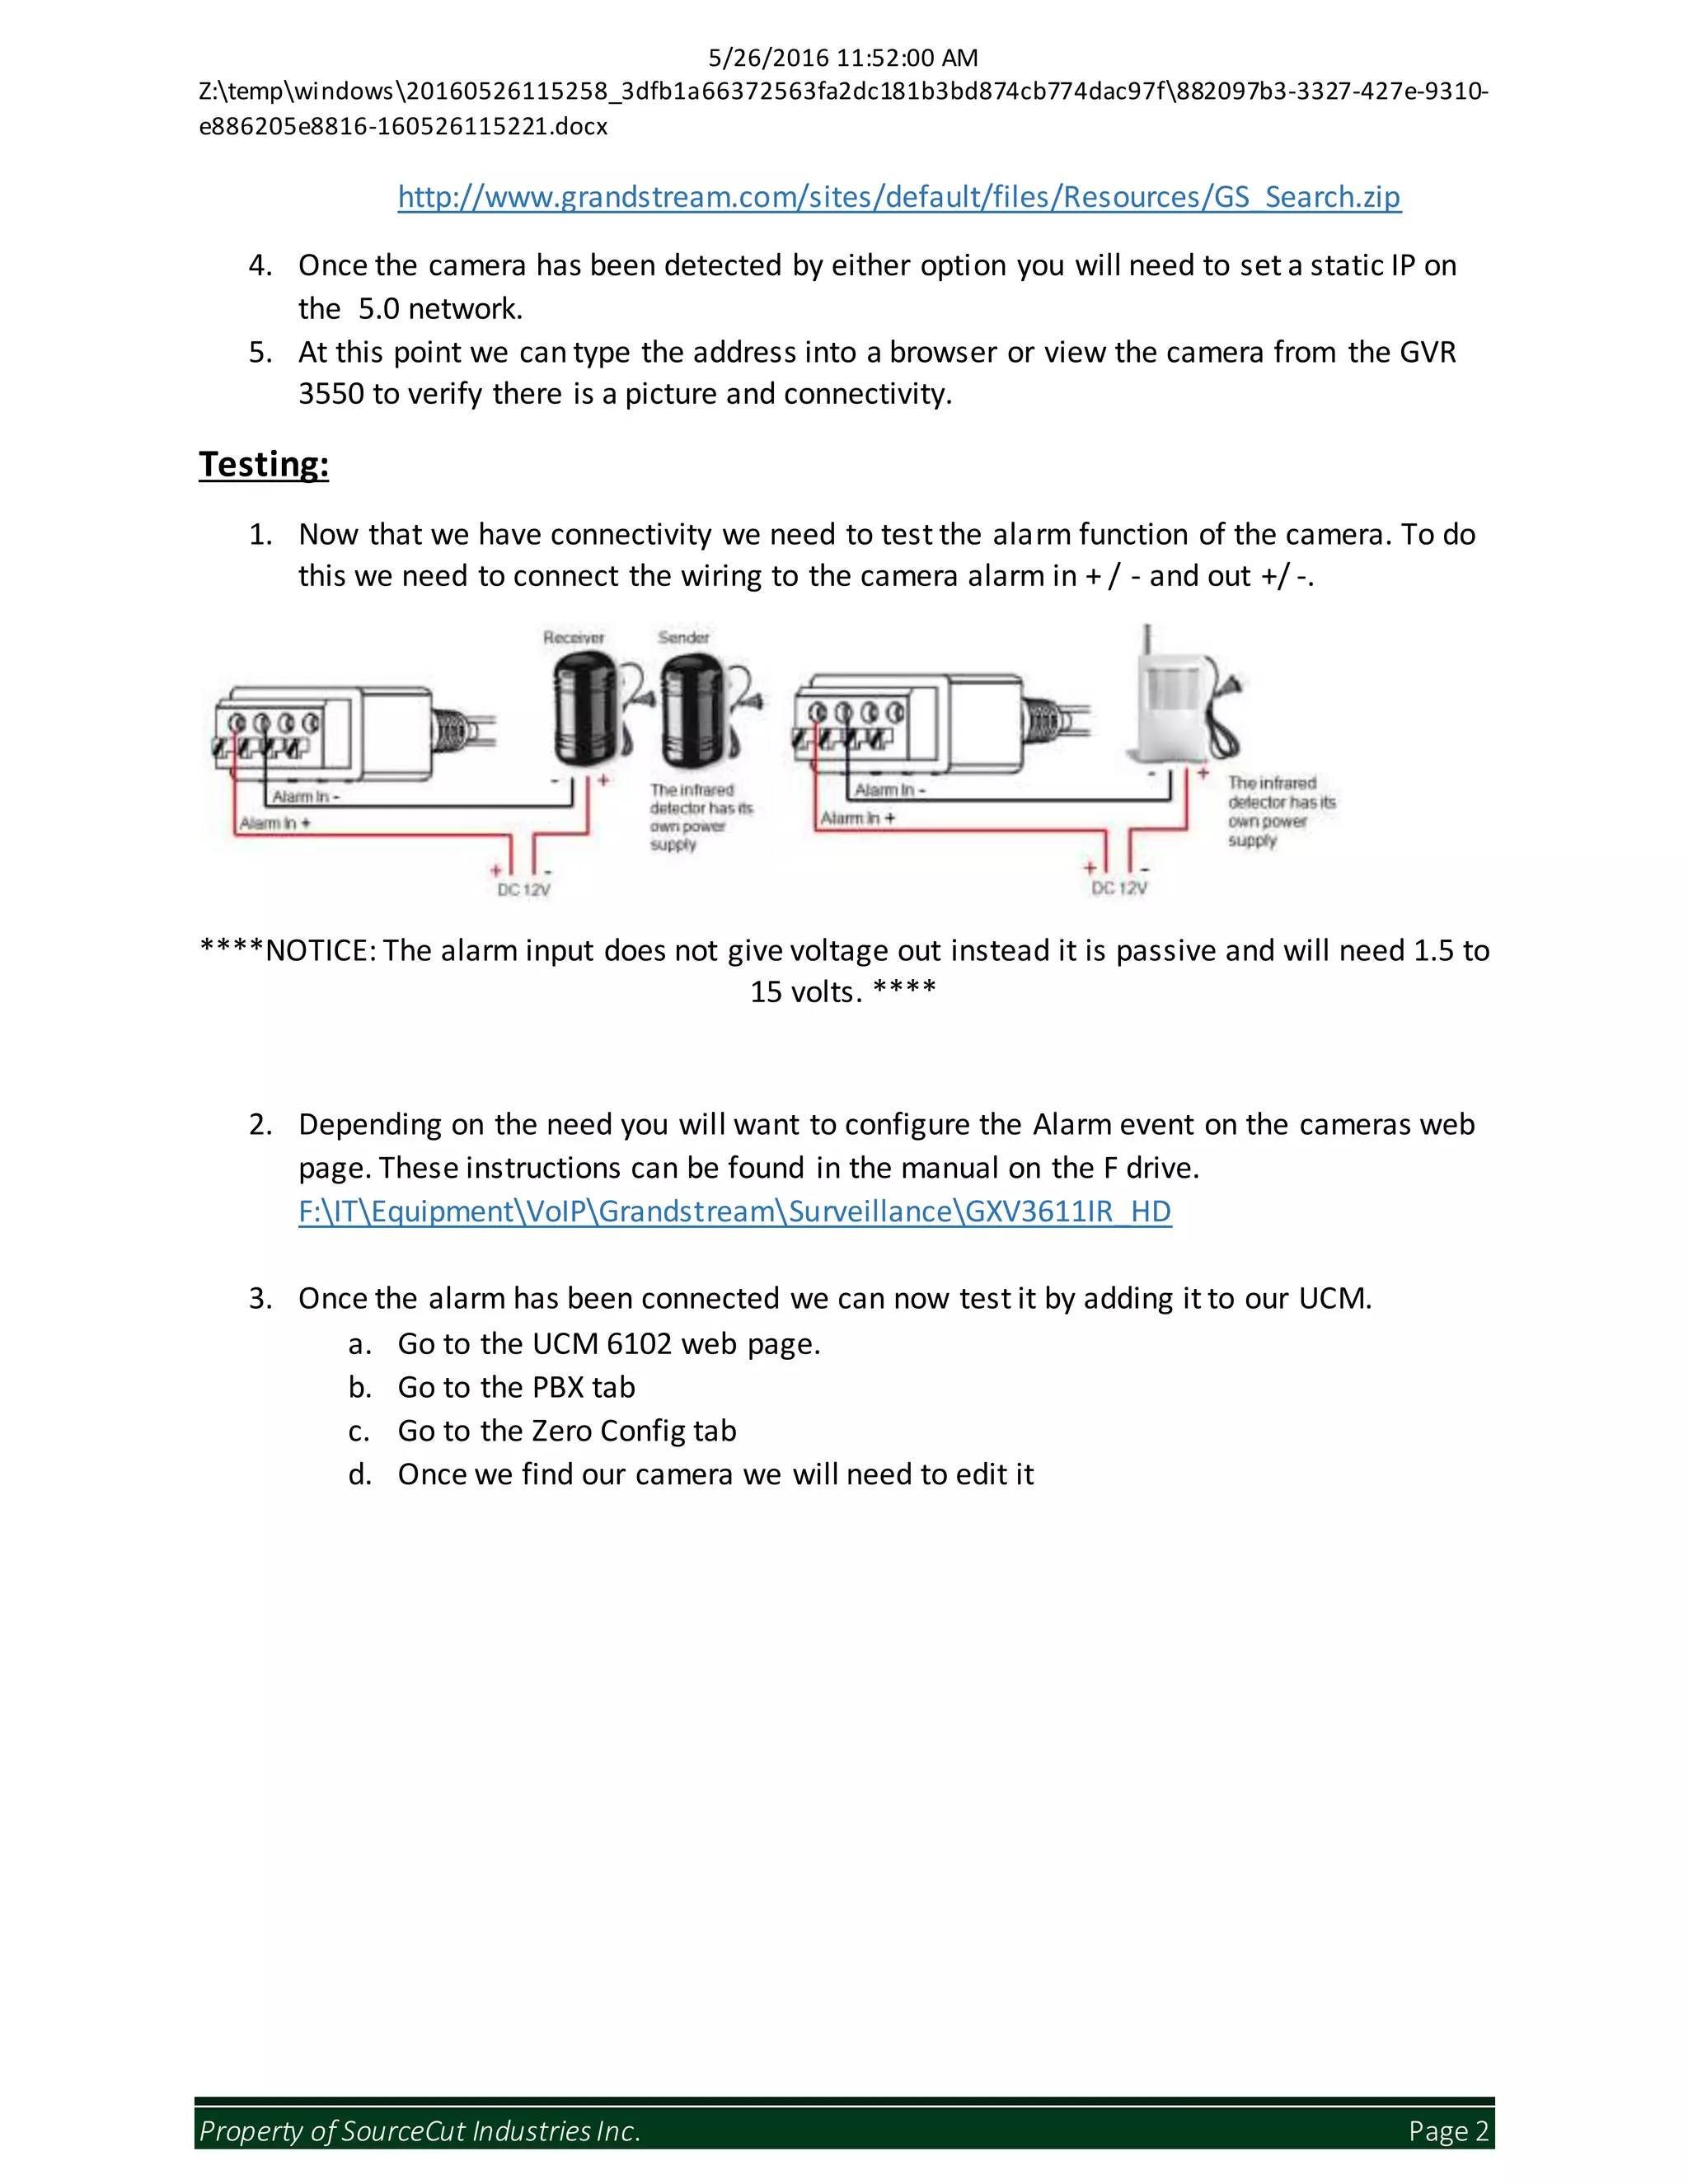
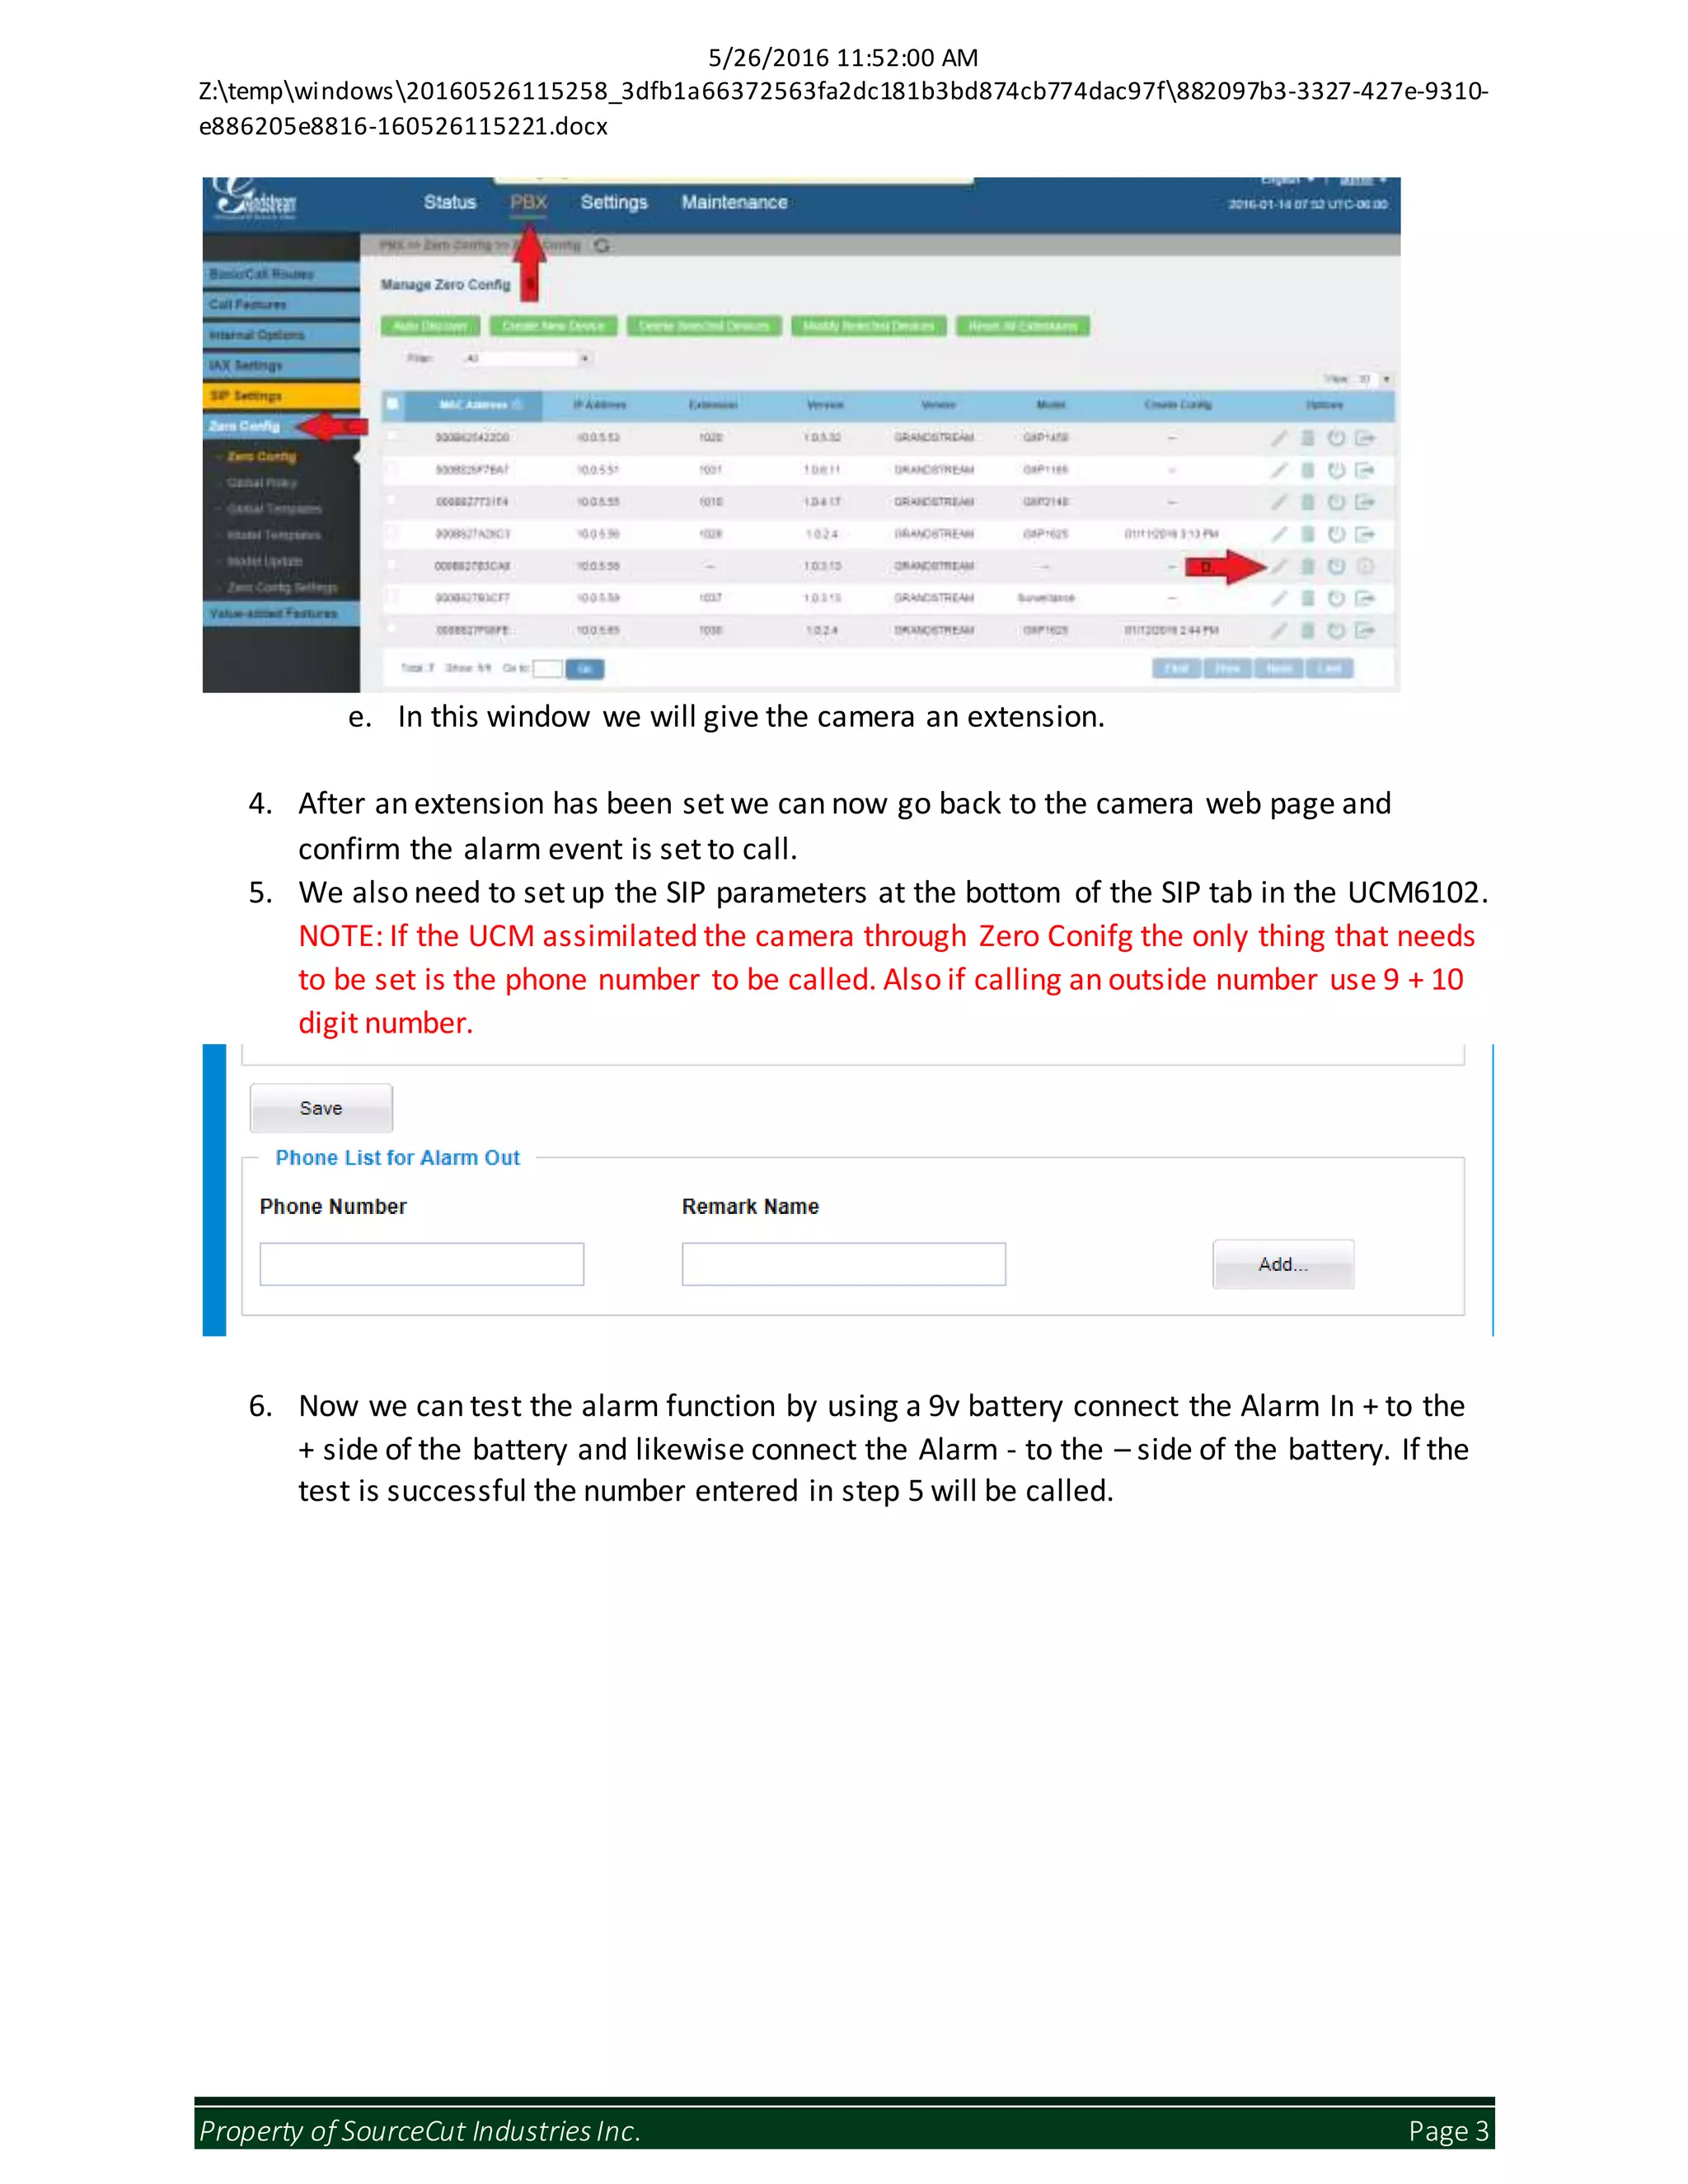
5/26/2016 11:52:00 AM
Z:tempwindows20160526115258_3dfb1a66372563fa2dc181b3bd874cb774dac97f882097b3-3327-427e-9310-
e886205e8816-160526115221.docx
Property of SourceCut IndustriesInc. Page 1
GXV3611IR_HD Camera Setup
Introduction: This document will take you through setting up the Grandstream IP camera and
alarm functions used here at SourceCut Industries Inc.
What you’ll need:
1. IP camera
2. Wiring for Alarm system
3. Access to UCM device for adding it to phone system
4. Access to GVR 3550 to verify view ability
5. IE browser for compatibility
Configuration:
1. Log an entry into the database for the new equipment. This will identify the device with
a number. (ex: SC3012)
2. Connect the IP camera to a POE switch via an RJ-45 cable
3. There are two options to connecting to the IP camera initially:
a. In the GVR 3550 go to the Settings tab and select the “Search Camera” option.
b. The second option is to download and install GS_Search tool:
5/26/2016 11:52:00 AM
Z:tempwindows20160526115258_3dfb1a66372563fa2dc181b3bd874cb774dac97f882097b3-3327-427e-9310-
e886205e8816-160526115221.docx
Property of SourceCut IndustriesInc. Page 2
http://www.grandstream.com/sites/default/files/Resources/GS_Search.zip
4. Once the camera has been detected by either option you will need to set a static IP on
the 5.0 network.
5. At this point we can type the address into a browser or view the camera from the GVR
3550 to verify there is a picture and connectivity.
Testing:
1. Now that we have connectivity we need to test the alarm function of the camera. To do
this we need to connect the wiring to the camera alarm in + / - and out +/ -.
****NOTICE: The alarm input does not give voltage out instead it is passive and will need 1.5 to
15 volts. ****
2. Depending on the need you will want to configure the Alarm event on the cameras web
page. These instructions can be found in the manual on the F drive.
F:ITEquipmentVoIPGrandstreamSurveillanceGXV3611IR_HD
3. Once the alarm has been connected we can now test it by adding it to our UCM.
a. Go to the UCM 6102 web page.
b. Go to the PBX tab
c. Go to the Zero Config tab
d. Once we find our camera we will need to edit it
5/26/2016 11:52:00 AM
Z:tempwindows20160526115258_3dfb1a66372563fa2dc181b3bd874cb774dac97f882097b3-3327-427e-9310-
e886205e8816-160526115221.docx
Property of SourceCut IndustriesInc. Page 3
e. In this window we will give the camera an extension.
4. After an extension has been set we can now go back to the camera web page and
confirm the alarm event is set to call.
5. We also need to set up the SIP parameters at the bottom of the SIP tab in the UCM6102.
NOTE: If the UCM assimilated the camera through Zero Conifg the only thing that needs
to be set is the phone number to be called. Also if calling an outside number use 9 + 10
digit number.
6. Now we can test the alarm function by using a 9v battery connect the Alarm In + to the
+ side of the battery and likewise connect the Alarm - to the – side of the battery. If the
test is successful the number entered in step 5 will be called.

SourceCut Industries Inc. - IP Camera setup

  • 1.
    5/26/2016 11:52:00 AM Z:tempwindows20160526115258_3dfb1a66372563fa2dc181b3bd874cb774dac97f882097b3-3327-427e-9310- e886205e8816-160526115221.docx Propertyof SourceCut IndustriesInc. Page 1 GXV3611IR_HD Camera Setup Introduction: This document will take you through setting up the Grandstream IP camera and alarm functions used here at SourceCut Industries Inc. What you’ll need: 1. IP camera 2. Wiring for Alarm system 3. Access to UCM device for adding it to phone system 4. Access to GVR 3550 to verify view ability 5. IE browser for compatibility Configuration: 1. Log an entry into the database for the new equipment. This will identify the device with a number. (ex: SC3012) 2. Connect the IP camera to a POE switch via an RJ-45 cable 3. There are two options to connecting to the IP camera initially: a. In the GVR 3550 go to the Settings tab and select the “Search Camera” option. b. The second option is to download and install GS_Search tool:
  • 2.
    5/26/2016 11:52:00 AM Z:tempwindows20160526115258_3dfb1a66372563fa2dc181b3bd874cb774dac97f882097b3-3327-427e-9310- e886205e8816-160526115221.docx Propertyof SourceCut IndustriesInc. Page 2 http://www.grandstream.com/sites/default/files/Resources/GS_Search.zip 4. Once the camera has been detected by either option you will need to set a static IP on the 5.0 network. 5. At this point we can type the address into a browser or view the camera from the GVR 3550 to verify there is a picture and connectivity. Testing: 1. Now that we have connectivity we need to test the alarm function of the camera. To do this we need to connect the wiring to the camera alarm in + / - and out +/ -. ****NOTICE: The alarm input does not give voltage out instead it is passive and will need 1.5 to 15 volts. **** 2. Depending on the need you will want to configure the Alarm event on the cameras web page. These instructions can be found in the manual on the F drive. F:ITEquipmentVoIPGrandstreamSurveillanceGXV3611IR_HD 3. Once the alarm has been connected we can now test it by adding it to our UCM. a. Go to the UCM 6102 web page. b. Go to the PBX tab c. Go to the Zero Config tab d. Once we find our camera we will need to edit it
  • 3.
    5/26/2016 11:52:00 AM Z:tempwindows20160526115258_3dfb1a66372563fa2dc181b3bd874cb774dac97f882097b3-3327-427e-9310- e886205e8816-160526115221.docx Propertyof SourceCut IndustriesInc. Page 3 e. In this window we will give the camera an extension. 4. After an extension has been set we can now go back to the camera web page and confirm the alarm event is set to call. 5. We also need to set up the SIP parameters at the bottom of the SIP tab in the UCM6102. NOTE: If the UCM assimilated the camera through Zero Conifg the only thing that needs to be set is the phone number to be called. Also if calling an outside number use 9 + 10 digit number. 6. Now we can test the alarm function by using a 9v battery connect the Alarm In + to the + side of the battery and likewise connect the Alarm - to the – side of the battery. If the test is successful the number entered in step 5 will be called.