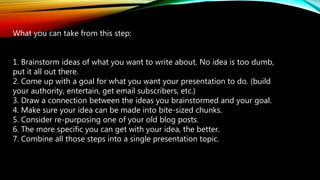
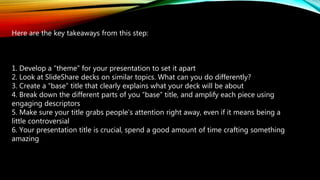
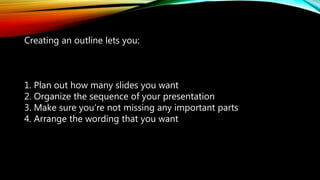
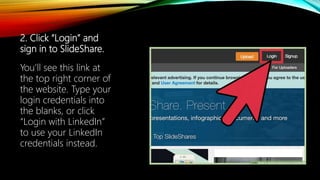
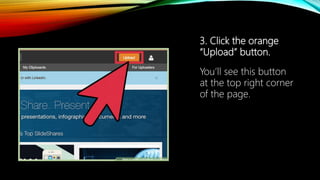
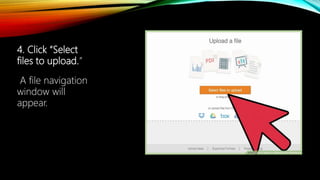
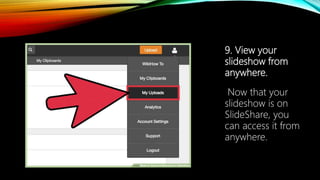
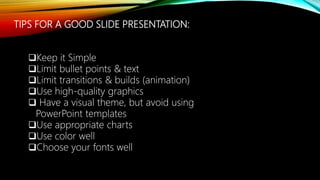
MITSUI DENEB MANIBO
11-Gauss
WHAT IS SLIDESHARE?
SlideShare is a community for slideshow presentations.
They’ve also expanded to videos, and infographics, but
the core of it is slideshows. It’s owned by LinkedIn, so
naturally their audience consists of a lot of
professionals.
A quick glimpse at the presentations listed on the home
page will probably give you a good feel for the type of
content that’s popular on the site.
FORMING YOUR IDEA
What you can take from this step:
1. Brainstorm ideas of what you want to write about. No idea is too dumb,
put it all out there.
2. Come up with a goal for what you want your presentation to do. (build
your authority, entertain, get email subscribers, etc.)
3. Draw a connection between the ideas you brainstormed and your goal.
4. Make sure your idea can be made into bite-sized chunks.
5. Consider re-purposing one of your old blog posts.
6. The more specific you can get with your idea, the better.
7. Combine all those steps into a single presentation topic.
COMING UP WITH A TITLE FOR
YOUR SLIDESHARE
PRESENTATION
Here are the key takeaways from this step:
1. Develop a “theme” for your presentation to set it apart
2. Look at SlideShare decks on similar topics. What can you do differently?
3. Create a “base” title that clearly explains what your deck will be about
4. Break down the different parts of you “base” title, and amplify each piece using
engaging descriptors
5. Make sure your title grabs people’s attention right away, even if it means being a
little controversial
6. Your presentation title is crucial, spend a good amount of time crafting something
amazing
CREATING AN OUTLINE FOR
YOUR SLIDESHARE
PRESENTATION
Creating an outline lets you:
1. Plan out how many slides you want
2. Organize the sequence of your presentation
3. Make sure you’re not missing any important parts
4. Arrange the wording that you want
UPLOADING FROM
YOUR HARD DRIVE
1.Open SlideShare.net in
your web browser.
You’ll need to use a
browser to upload your
slideshow to SlideShare,
as the mobile app does
not support uploading
files.
2. Click “Login” and
sign in to SlideShare.
You’ll see this link at
the top right corner of
the website. Type your
login credentials into
the blanks, or click
“Login with LinkedIn”
to use your LinkedIn
credentials instead.
3. Click the orange
“Upload” button.
You’ll see this button
at the top right corner
of the page.
4. Click “Select
files to upload.”
A file navigation
window will
appear.
5. Double-click the
file you want to
upload.
Once the upload
complete, you’ll
see a thumbnail of
the file.
6. Choose your Privacy settings.
Click the Privacy drop-down to make your
selection.
Public: Anyone who searches the SlideShare
could potentially find and view your slideshow.
Private – Anyone with Link: People cannot find
your slideshow by searching SlideShare, but
they will be able to view it if you share with
them its URL.
Private – Only Me: Your slideshow will only be
accessible to you, and only when you are
logged in to SlideShare.
7. Choose a
Category.
Click the “Category”
drop-down to pick
category that’s
suitable for your
slideshow.
8. Click “Publish” to save
your slideshow.
When the save is complete,
your presentation will
appear on the screen. You
can move through the
slideshow using the arrows
just beneath the slides.
9. View your
slideshow from
anywhere.
Now that your
slideshow is on
SlideShare, you
can access it from
anywhere.
TIPS FOR A GOOD SLIDE PRESENTATION:
Keep it Simple
Limit bullet points & text
Limit transitions & builds (animation)
Use high-quality graphics
 Have a visual theme, but avoid using
PowerPoint templates
Use appropriate charts
Use color well
Choose your fonts well
Thank you! 
Sources:
http://www.wikihow.com/Upload-a-Slideshow-to-
SlideShare
http://www.garrreynolds.com/preso-tips/design/
http://dominiquej.com/how-to-create-slideshare-
presentations/

Slideshare

  • 1.
  • 2.
    WHAT IS SLIDESHARE? SlideShareis a community for slideshow presentations. They’ve also expanded to videos, and infographics, but the core of it is slideshows. It’s owned by LinkedIn, so naturally their audience consists of a lot of professionals. A quick glimpse at the presentations listed on the home page will probably give you a good feel for the type of content that’s popular on the site.
  • 3.
  • 4.
    What you cantake from this step: 1. Brainstorm ideas of what you want to write about. No idea is too dumb, put it all out there. 2. Come up with a goal for what you want your presentation to do. (build your authority, entertain, get email subscribers, etc.) 3. Draw a connection between the ideas you brainstormed and your goal. 4. Make sure your idea can be made into bite-sized chunks. 5. Consider re-purposing one of your old blog posts. 6. The more specific you can get with your idea, the better. 7. Combine all those steps into a single presentation topic.
  • 5.
    COMING UP WITHA TITLE FOR YOUR SLIDESHARE PRESENTATION
  • 6.
    Here are thekey takeaways from this step: 1. Develop a “theme” for your presentation to set it apart 2. Look at SlideShare decks on similar topics. What can you do differently? 3. Create a “base” title that clearly explains what your deck will be about 4. Break down the different parts of you “base” title, and amplify each piece using engaging descriptors 5. Make sure your title grabs people’s attention right away, even if it means being a little controversial 6. Your presentation title is crucial, spend a good amount of time crafting something amazing
  • 7.
    CREATING AN OUTLINEFOR YOUR SLIDESHARE PRESENTATION
  • 8.
    Creating an outlinelets you: 1. Plan out how many slides you want 2. Organize the sequence of your presentation 3. Make sure you’re not missing any important parts 4. Arrange the wording that you want
  • 9.
  • 10.
    1.Open SlideShare.net in yourweb browser. You’ll need to use a browser to upload your slideshow to SlideShare, as the mobile app does not support uploading files.
  • 11.
    2. Click “Login”and sign in to SlideShare. You’ll see this link at the top right corner of the website. Type your login credentials into the blanks, or click “Login with LinkedIn” to use your LinkedIn credentials instead.
  • 12.
    3. Click theorange “Upload” button. You’ll see this button at the top right corner of the page.
  • 13.
    4. Click “Select filesto upload.” A file navigation window will appear.
  • 14.
    5. Double-click the fileyou want to upload. Once the upload complete, you’ll see a thumbnail of the file.
  • 15.
    6. Choose yourPrivacy settings. Click the Privacy drop-down to make your selection. Public: Anyone who searches the SlideShare could potentially find and view your slideshow. Private – Anyone with Link: People cannot find your slideshow by searching SlideShare, but they will be able to view it if you share with them its URL. Private – Only Me: Your slideshow will only be accessible to you, and only when you are logged in to SlideShare.
  • 16.
    7. Choose a Category. Clickthe “Category” drop-down to pick category that’s suitable for your slideshow.
  • 17.
    8. Click “Publish”to save your slideshow. When the save is complete, your presentation will appear on the screen. You can move through the slideshow using the arrows just beneath the slides.
  • 18.
    9. View your slideshowfrom anywhere. Now that your slideshow is on SlideShare, you can access it from anywhere.
  • 19.
    TIPS FOR AGOOD SLIDE PRESENTATION: Keep it Simple Limit bullet points & text Limit transitions & builds (animation) Use high-quality graphics  Have a visual theme, but avoid using PowerPoint templates Use appropriate charts Use color well Choose your fonts well
  • 20.