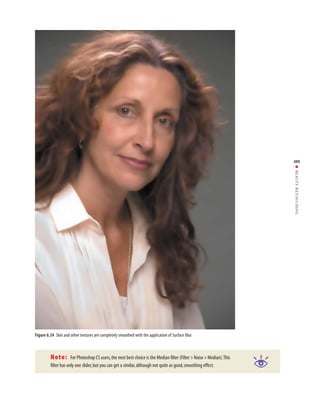
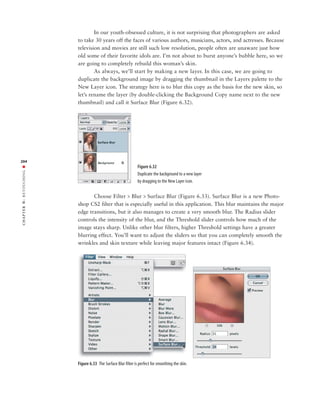
This document describes a process for retouching the skin of a woman in her fifties to look younger. The key steps are:
1. Duplicate the background layer and apply a Surface Blur filter to smooth wrinkles while maintaining features.
2. Create a layer mask to reveal the blurred skin layer only in areas that need smoothing.
3. Add additional layers to refine the skin texture and tone, dodging wrinkles and adding artificial texture to avoid a plastic look.
4. Make minor enhancements like brightening the eyes. Adjusting the opacity of earlier layers brings back some natural texture.
This document provides a tutorial for creating a weathered texture for a droid model in 3ds Max and Photoshop. The tutorial includes the following steps:
1. Rendering an ambient occlusion map in 3ds Max using Mental Ray to help guide texture painting.
2. Creating a base texture layer in Photoshop and adding layers for grime, scratches and other wear patterns using brushes and layer effects.
3. Filling layers using the "All Layers" option to efficiently add variation and simulate aged and weathered paint.
4. Creating color, bump and reflection maps from the texture layers and applying decals to complete the weathered appearance of a battle-scarred
This document provides instructions for using the align and distribute tools in CorelDRAW. It contains tutorials for aligning rectangles on the left side and distributing circles evenly both horizontally and vertically. Key terms like align, target object, and shift/select are defined. Contact information is provided for getting help during the tutorials. The tutorials guide the user through selecting objects in different ways and using the align and distribute dialog box to line up the objects in precise positions.
This tutorial shows how to create a Queen of Hearts photo manipulation in Photoshop. It demonstrates building the background with ornamental and rock images, adding a frame and filling it with cloud and nebula filters. A model and crown are blended into the scene. Cards with different heart designs are arranged around the model. Final adjustments add lighting effects to complete the scene.
This document discusses layers and masks in Photoshop. It explains that layers allow separation of image content and independent manipulation. The background layer is locked but can be converted. Layers can be assigned colors, locked, edited, and blended using various modes and masks. Pixel and vector masks can hide or reveal layer content. Clipping groups use one layer to mask the effects of another layer below it.
A layer mask in Photoshop allows you to control the transparency of a layer by revealing or hiding portions of the layer. Layer masks give more flexibility than just using opacity. You can add a layer mask and then paint on the mask to set different transparency levels for different areas of the layer without erasing any pixels. Layer masks are hidden by default but you can view the grayscale mask channel or as an overlay on the layer. You can also adjust properties of the mask like opacity, edges, and invert the mask.
This document provides instructions for customizing a 3D surfboard model in Photoshop. It describes how to load a new surfboard design by replacing the diffuse texture and layers. It also explains how to position the model using the 3D axis tool, add lighting using the lights window, and render the final image with ray traced quality for soft shadows and reflections. The document recommends checking the quick tour tutorial for additional help with the 3D tools.
This document provides instructions for creating a masking animation in multimedia design software. It involves inserting two layers named "Mask" and "background", importing an image to the background layer. A circle is drawn and used to mask the image by animating it across the layers from frame 1 to 40 using shape tweening. Finally, the "Mask" layer is designated as a mask to reveal the image underneath over time. The second task asks to create an intro animation applying these masking techniques to introduce a product.
Here are the steps I would take to recreate the outcomes described in the case study:
1. Set up a studio lighting system with at least two lights to photograph models. Experiment with lighting ratios and placements to create dramatic S-curves in the models' poses.
2. Create abstract shapes and patterns using the techniques described for smoke, food coloring/soap/milk, and generative art tools in Photoshop. Pay attention to organic S-curves and flowing lines.
3. Photograph models posing to mimic the abstract shapes and curves created. Consider body positioning, arm placements, head tilts etc.
4. Import images into Photoshop and edit for levels, color, contrast, blemish removal
Photo retouching tips and tricks in photoshopRemon Mia
If you want to redefine the foreground and background colors, use the Eyedropper tool to select the foreground color, and then switch the position with the background color, maybe by using the shortcut X, and pick up the next color. But there is an easier way. First, define the foreground color just as you’re accustomed to, but then define the background color by holding the Alt/Option key. Instead of changing the foreground color, you’ll redefine the background color with just one click.
https://goo.gl/pwqYM7
1) Apply Surface Blur filter to smooth skin texture while preserving edges, adjusting radius and threshold sliders to find optimal balance.
2) Add layer mask to conceal blur and paint with soft brush to reveal smoothing in skin areas only.
3) Use stamp layer and dust and scratches filter to eliminate remaining imperfections, then add layer mask and paint to reveal corrections.
The document provides instructions for three photo editing techniques:
1) A Time Magazine style portrait by duplicating and desaturating the background layer, blending at 80% opacity in Hardlight mode, and adding exposure, vignette, and noise filters.
2) Selective coloring by duplicating and desaturating the top layer, then erasing with the Eraser tool to reveal color in specific areas.
3) A double exposure silhouette by opening a silhouette and secondary image, pasting the secondary image onto the silhouette canvas, adjusting the secondary image layer to Screen or Lighten blending modes, and optionally adjusting opacity, contrast, and saturation before flattening the layers.
This document provides instructions for using Photoshop tools to smooth and soften skin in a photo in 9 steps. The key steps are:
1. Create duplicate layers to work on non-destructively.
2. Use the Spot Healing Brush tool to remove blemishes.
3. Apply the High Pass filter and Gaussian Blur filter to detect edges and add texture.
4. Change the blend mode of the softened skin layer to Linear Light for contrast.
A layer style is one or more effects applied to a layer or layer group. You can apply one of the preset styles provided with Photoshop or create a custom style using the Layer Style dialog box. The layer effects icon appears to the right of the layer's name in the Layers panel.
The document provides instructions for selectively coloring the eyes in a black and white photo using layers and masks in Photoshop. The steps are: 1) Duplicate the photo layer twice; 2) Apply high pass filters to layers to sharpen details; 3) Desaturate the top layer and change its blend mode; 4) Repeat for another layer; 5) Add a curves adjustment layer and paint with white on the mask to color the eyes; 6) Invert the mask selection and desaturate to remove color from the rest of the photo. Fine-tuning of the eye color is done by adjusting the curves layer.
The document provides steps to create a dramatic wrinkled skin effect in Photoshop:
1. Add a black and white adjustment layer to alter the color to a moody effect.
2. Set the blending mode of the adjustment layer to Overlay.
3. Duplicate the background layer and apply a plastic wrap filter with the blending mode set to Multiply to darken the skin.
This document provides a tutorial to create a realistic break-apart effect in Photoshop. The tutorial uses debris brushes, a watercolor brush, layer blending, masks, and adjustments. Key steps include selecting the model, duplicating and masking layers to remove parts of the model, adding a black and white adjustment preserved with masking, using debris brushes on additional layers with masks to create the break apart effect, and painting a watercolor background. The final result is a realistic looking disintegrating effect on the model with a painted background.
This document provides a 17-step tutorial for creating a ghostly scene in Photoshop using stock photos and photo manipulation techniques. Some of the key steps include darkening the room using a Color Burn blend mode, adding lighting and shadow effects to introduce characters, and using layer masks and blurring to create a spectral ghostly presence. Adjustment layers are also used to modify colors and tones to achieve the final spectral atmosphere.
This document provides an overview of basic Photoshop tools and techniques for beginners. It discusses the Photoshop workspace including the toolbox, palettes and common tools. It then explains selections, layers, masks and how to perform common image editing tasks like improving underexposed and overexposed photos, removing red eye and blemishes, removing color casts, adding sepia tones, creating photo-filled text, and applying a soft focus effect. Step-by-step instructions are provided for each technique.
This document provides steps to add a motion blur effect to images to create a sense of movement:
1. Duplicate the background layer to make it editable.
2. Use the Quick Selection tool to select the main subject while excluding background areas.
3. Apply a layer mask to the selection to hide the background and reveal the subject.
6. Apply a Radial Blur filter to the image to create the motion blur effect.
How to Turn a Picture Into a Line Drawing in PhotoshopZenith Clipping
To transform a photograph into a line drawing in Photoshop, you don’t need it to appear as though you did it in Photoshop, you’ll need to focus on detail and set up your picture appropriately before you apply any channels.
This document provides a tutorial for applying a watercolor painting effect to a photo using Photoshop layers and filters. The tutorial involves duplicating the background layer 3 times, hiding the top two layers, applying the Cutout filter to simplify the image, and changing the blend mode to Luminosity. Next, the Dry Brush filter is applied to the next layer with the blend mode changed to Screen. Finally, the Median filter is used on the top layer with the blend mode set to Soft Light to complete the watercolor effect.
The document provides a tutorial for blending a photo into a background image using layer masks and the gradient tool in Photoshop. The key steps include: opening the background image and photo layers; adding the photo as a layer and applying a layer mask; using the gradient tool to fade the edges of the photo layer mask from opaque to transparent; and refining the blend using brushes on the layer mask. Layer masks allow precisely blending a photo into a background or manipulating its opacity in selected areas.
The document provides a tutorial for blending a photo into a background image using layer masks and the gradient tool in Photoshop. The key steps include: opening the background image and photo layers; adding the photo as a layer and applying a layer mask; using the gradient tool to fade the photo edges by painting on the layer mask with a black-to-white gradient; and fine-tuning the blend by painting on the mask with black or white brushes. Examples are given of blending additional effects like colorizing or blurring parts of layered photos.
This document provides an overview and instructions for basic tasks in Adobe Photoshop for beginners. It describes the Photoshop work area including the toolbox, palettes like layers and history, and common tools. It then gives step-by-step instructions for selecting areas, working with layers, removing blemishes and red-eye, improving exposure, adding effects like sepia tone, and using text. The document is intended as a guide for newcomers to learn fundamental Photoshop skills.
This document lists and provides brief details about several influential Indian women from various fields such as politics, social work, sports, entertainment, and science. Some of the women mentioned include Rani Lakshmi Bai, the first woman warrior during India's independence movement; Savitri Bai Phule, the first female teacher in India; Indira Gandhi, India's first female prime minister; Pratibha Patil, India's first female president; and Kalpana Chawla, the first Indian woman in space. The document serves to honor these trailblazing women and inspire the author to achieve great things.
This document provides 27 health tips in short sections. Some of the tips include walking for 30 minutes 3-4 times a week to fight aging, doing a daily 20-minute worry session to reduce anxiety, sleeping on your right side or back to reduce heart strain, drinking carrot juice to reduce cancer risk from smoking, and doing eye exercises to prevent problems from TV/monitor use. The tips are presented as easy and natural ways to improve common health issues.
The document discusses different types of bites and their treatment. It covers human bites, marine creature bites like jellyfish and Portuguese man o' war, stingray stings, and animal bites. For marine bites, it recommends gently removing tentacles and treating with rubbing alcohol, vinegar or salt water. For stingray stings, it advises seeking immediate medical help. Animal bites range from superficial wounds treatable at home to serious injuries that may require emergency medical attention.
This document contains summaries of various prayers and mantras from the Hindu religion. It includes invocations to gods like Ganesh and Saraswati, as well as daily prayers for activities like lighting a lamp, taking a bath, and studying. Nightly prayers seek forgiveness for any wrongdoings. The document provides the prayers in their original languages along with English translations. It is intended as a guide for Hindus to include various spiritual and religious elements in their daily routines.
The document provides 14 tips for reducing exposure to electromagnetic radiation from cell phones. It recommends limiting children's cell phone use and avoiding use by pregnant women. It suggests keeping phones away from the body as much as possible, using speakerphone or Bluetooth instead of headsets, and turning phones off near the body at night or in metal enclosures. The tips are aimed at reducing radiation exposure to potentially protect health and brain development.
1001 Inspiring Thoughts By Chintak DholakiaSeema Jain
The document discusses the benefits of exercise for mental health. It notes that regular physical activity can help reduce anxiety and depression and improve mood and cognitive function. Exercise causes chemical changes in the brain that may help alleviate symptoms of mental illness.
The 90/10 principle states that 10% of life is made up of external events outside of our control, while 90% is determined by our reactions to what happens. How we react to situations, both positive and negative, largely dictates our experiences. The document provides an example of how reacting negatively to a spilled cup of coffee can ruin one's whole day, while responding positively can prevent issues from escalating. By controlling our reactions according to this principle, we can avoid unnecessary stress and problems.
The document discusses how the bird flu outbreak is negatively impacting the poultry industry in India. Exports have been banned by the UAE and domestic demand is declining, potentially costing the industry over 2 billion rupees. Poultry sales and exports have already been hit for 50 crore rupees. The largest poultry market in Asia, Ghazipur, has implemented safety measures but still saw a 40% drop in business on Monday compared to the previous day.
1. 202
RETOUCHING ■
6:
CHAPTER
Figure 6.30 The final retouch
Beauty Retouching
When you mention retouching, people often think about the impossibly flawless high-
fashion models and cover girls they see in magazines. In this type of photography,
there is no real attempt to be realistic. Instead, photographers try to create a believable
impossibility. Flawless skin is expected; but at the same time, the skin shouldn’t look
like plastic. Often, the challenge is to create this effect with subjects that are not even
close to ideal raw material. You’ll need to know how to completely reconstruct the skin
if an assignment calls for it. Of course, nothing is impossible nowadays.
2. In this example, we will work with the shot of an attractive woman in her fifties
(Figure 6.31).
203
■ BEAUTY RETOUCHING
Figure 6.31 This woman is still beautiful. She is, however, no longer 20 years old.
3. In our youth-obsessed culture, it is not surprising that photographers are asked
to take 30 years off the faces of various authors, musicians, actors, and actresses. Because
television and movies are still such low resolution, people often are unaware just how
old some of their favorite idols are. I’m not about to burst anyone’s bubble here, so we
are going to completely rebuild this woman’s skin.
As always, we’ll start by making a new layer. In this case, we are going to
duplicate the background image by dragging the thumbnail in the Layers palette to the
New Layer icon. The strategy here is to blur this copy as the basis for the new skin, so
let’s rename the layer (by double-clicking the Background Copy name next to the new
thumbnail) and call it Surface Blur (Figure 6.32).
204
Figure 6.32
RETOUCHING ■
Duplicate the background to a new layer
by dragging to the New Layer icon.
Choose Filter > Blur > Surface Blur (Figure 6.33). Surface Blur is a new Photo-
6:
shop CS2 filter that is especially useful in this application. This blur maintains the major
CHAPTER
edge transitions, but it also manages to create a very smooth blur. The Radius slider
controls the intensity of the blur, and the Threshold slider controls how much of the
image stays sharp. Unlike other blur filters, higher Threshold settings have a greater
blurring effect. You’ll want to adjust the sliders so that you can completely smooth the
wrinkles and skin texture while leaving major features intact (Figure 6.34).
Figure 6.33 The Surface Blur filter is perfect for smoothing the skin.
4. 205
■ BEAUTY RETOUCHING
Figure 6.34 Skin and other textures are completely smoothed with the application of Surface Blur.
Note: For Photoshop CS users, the next best choice is the Median filter (Filter > Noise > Median).This
filter has only one slider, but you can get a similar, although not quite as good, smoothing effect.
5. We will hide this Blur layer with a layer mask. Hold down the Option/Alt key and
click the Layer Mask icon at the bottom of the Layers palette (Figure 6.35). This action
creates a Black layer mask and hides the Blur layer while revealing the original image.
Figure 6.35
Option/Alt+click the Layer Mask icon to
create a Black layer mask.
Now simply paint into the layer mask with white to cover the areas of skin that
206 you want to smooth (Figure 6.36). The area you are working on can be difficult to see
RETOUCHING ■
if you’ve covered everything. You can toggle off the visibility of the Background layer
to see if there are any holes. To do so, click the Eye icon next to the Background thumb-
nail in the Layer palette (Figure 6.37).
Carefully paint around all the areas you need to keep—the eyes, lips, etc.—until
you’ve covered up all the “bad” skin. At this point, you should have something that
6:
looks like Figure 6.38.
CHAPTER
Figure 6.36 Paint into the layer mask with white to cover the skin with the blurred copy.
6. 207
■ BEAUTY RETOUCHING
Figure 6.37 To check for holes, toggle the visibility of the Background layer.
Figure 6.38 Work carefully so that you smooth the wrinkled skin, but keep other features sharp.
7. The skin will be smooth, but the colors and tone might be a little blotchy look-
ing. To fix this, make a new layer, but Option/Alt+click the New Layer icon to bring up
the New Layer Options dialog. Check the Use Previous Layer To Create Clipping Mask
box (Figure 6.39). This will allow the mask in the underlying layer to control the new
Paint layer.
Figure 6.39
Check the Use Previous Layer To Create Clipping
Mask box when you create the new Paint layer.
Take a large soft brush, sample colors from the blurred skin (Option/Alt+click to
turn the cursor into an Eyedropper and sample a color), and paint with a very low
opacity to gradually smooth out the color and tones (Figure 6.40).
208
RETOUCHING ■
6:
CHAPTER
Figure 6.40 Use a large paint brush at low opacity to smooth the colors and even the tones.
At this point, you’ll want to bring back some hint of the underlying skin. Select
the Blur layer by clicking the thumbnail in the Layers palette. Push the Opacity slider
to the left a bit to bring back some of the underlying layer (Figure 6.41).
This technique is similar to the one we used on my face. However, this time we
covered the original skin with a blurred copy and paint. Now we want to create a
Dodge And Burn layer and dodge out any unattractive wrinkles that are left—this is
very similar to what we did before. Option/Alt+click the New Layer icon at the bottom
8. 209
■ BEAUTY RETOUCHING
Figure 6.41 Reduce the opacity of the Blur layer to bring back some of the original texture.
of the Layers palette. This will bring up the New Layer dialog. Change the Mode to
Soft Light, and then check the Fill With Soft-Light-Neutral Color box. Make sure you
check Use Previous Layer To Create Clipping Mask. This will fill the New Layer with
50 percent gray. You want to keep using the mask you created with the Blur layer. Use
the Dodge tool to dodge away wrinkles. In Figure 6.42, you can see what Soft Light
looks like if it is applied as a Normal layer.
At this point, the subject’s skin appears to be very smooth with just a hint of its
original skin texture. To keep the image from looking too plastic, you’ll need to add more
texture to the skin. I’ve experimented with all kinds of different approaches. Although I’m
not completely satisfied with the following technique, it is my current favorite technique for
adding artificial skin texture. I’ll continue to experiment until I find one I like better.
Once again, create a new Gray Overlay layer. Option/Alt+click the New Layer
icon at the bottom of the Layers palette to bring up the New Layer dialog. Check the
Use Previous Layer To Create Clipping Mask box, select Overlay from the Mode drop-
down, and check the Fill With Overlay Neutral Color (50% gray) box (Figure 6.43).
The Layers palette should look like Figure 6.44. The last three layers created are
being controlled by the opacity and layer mask of the Surface Blur layer. To get a better
idea of how the Texture layer is going to affect things, temporarily push the Opacity
slider for the Blur layer back to 100 percent. You won’t see any of the original texture,
but you will be able to see the new texture you are about to create. You will also see
the dodge lines where you lightened the wrinkles; you can temporarily turn off the visi-
bility of this layer if you find it distracting.
Select the Overlay Texture layer and run the Noise filter on it (Filter > Noise >
Add Noise). Check the Uniform and Monochromatic boxes, and add enough noise to
make the image begin to look as if it were shot with Tri-X film (Figure 6.45).
9. 210
RETOUCHING ■
Figure 6.42 The gray Soft Light layer can be used to iron away wrinkles.
6:
CHAPTER
Figure 6.43 The Gray Overlay layer
will have no effect on the image
until you add texture to it.
Figure 6.44
After you create the Overlay Texture layer, change the opacity of the
Surface Blur Layer back to 100 percent.
10. 211
■ BEAUTY RETOUCHING
Figure 6.45 Add obvious noise.
The ideal value in the filter dialogs depends on the size and resolution of the file.
As such, no hard rules can apply to all images. You have to develop a feel for this, and
sometimes you have to make a test print to judge a subtle effect such as noise.
Many photographers would stop here, but this noise is too sharp for our purposes.
With the Gray Overlay Texture still selected, run a Blur filter (Filter > Blur > Gaussian
Blur), use just enough Blur to soften the edges of the noise without completely smooth-
ing it out (Figure 6.46).
Figure 6.46 Soften the noise with a Gaussian Blur filter.
11. Sometimes this is all you really need to do, but I usually like to create a slightly
more complex texture to simulate real skin. To do so, run the Emboss filter (Filter >
Stylize > Emboss). See Figure 6.47.
212
RETOUCHING ■
Figure 6.47 Run the Emboss filter to get a more three-dimensional effect.
This still looks too fake, so you need to soften it a bit. You can modify any filter
6:
right after you’ve run it by using the Fade command. Go to the Edit menu (immediately
CHAPTER
after running the filter) and choose Edit > Fade Emboss (Figure 6.48).
Figure 6.48 Fade the Emboss filter to soften the effect.
12. Return to the Surface Blur layer and reduce the opacity to 70 percent or so.
You should have something similar to Figure 6.49; compare this with the skin that
hasn’t been retouched (Figure 6.50).
213
■ BEAUTY RETOUCHING
Figure 6.49 The artificial texture combined with a hint of the original texture creates a convincing effect.
Figure 6.50 The original photo reveals that the subject has had a long life with a lot of sunshine.
13. For the final retouched version, I brightened the eyes (enlarged the pupils), brushed
in some subtle eye shadow color, and performed a little edge burning (Figure 6.51).
Because all of the retouching was performed in layers that are controlled by the Surface
Blur layer, you can reduce the opacity of that layer a little more if you want a more
realistic rendering (Figure 6.52).
214
RETOUCHING ■
6:
CHAPTER
Figure 6.51 The final retouched version has some edge burning and a little eye makeup added.
14. 215
■ BEAUTY RETOUCHING
Figure 6.52 Reducing the opacity of the Surface Blur layer brings back some of the real skin and still manages to hide
most of the wrinkles.