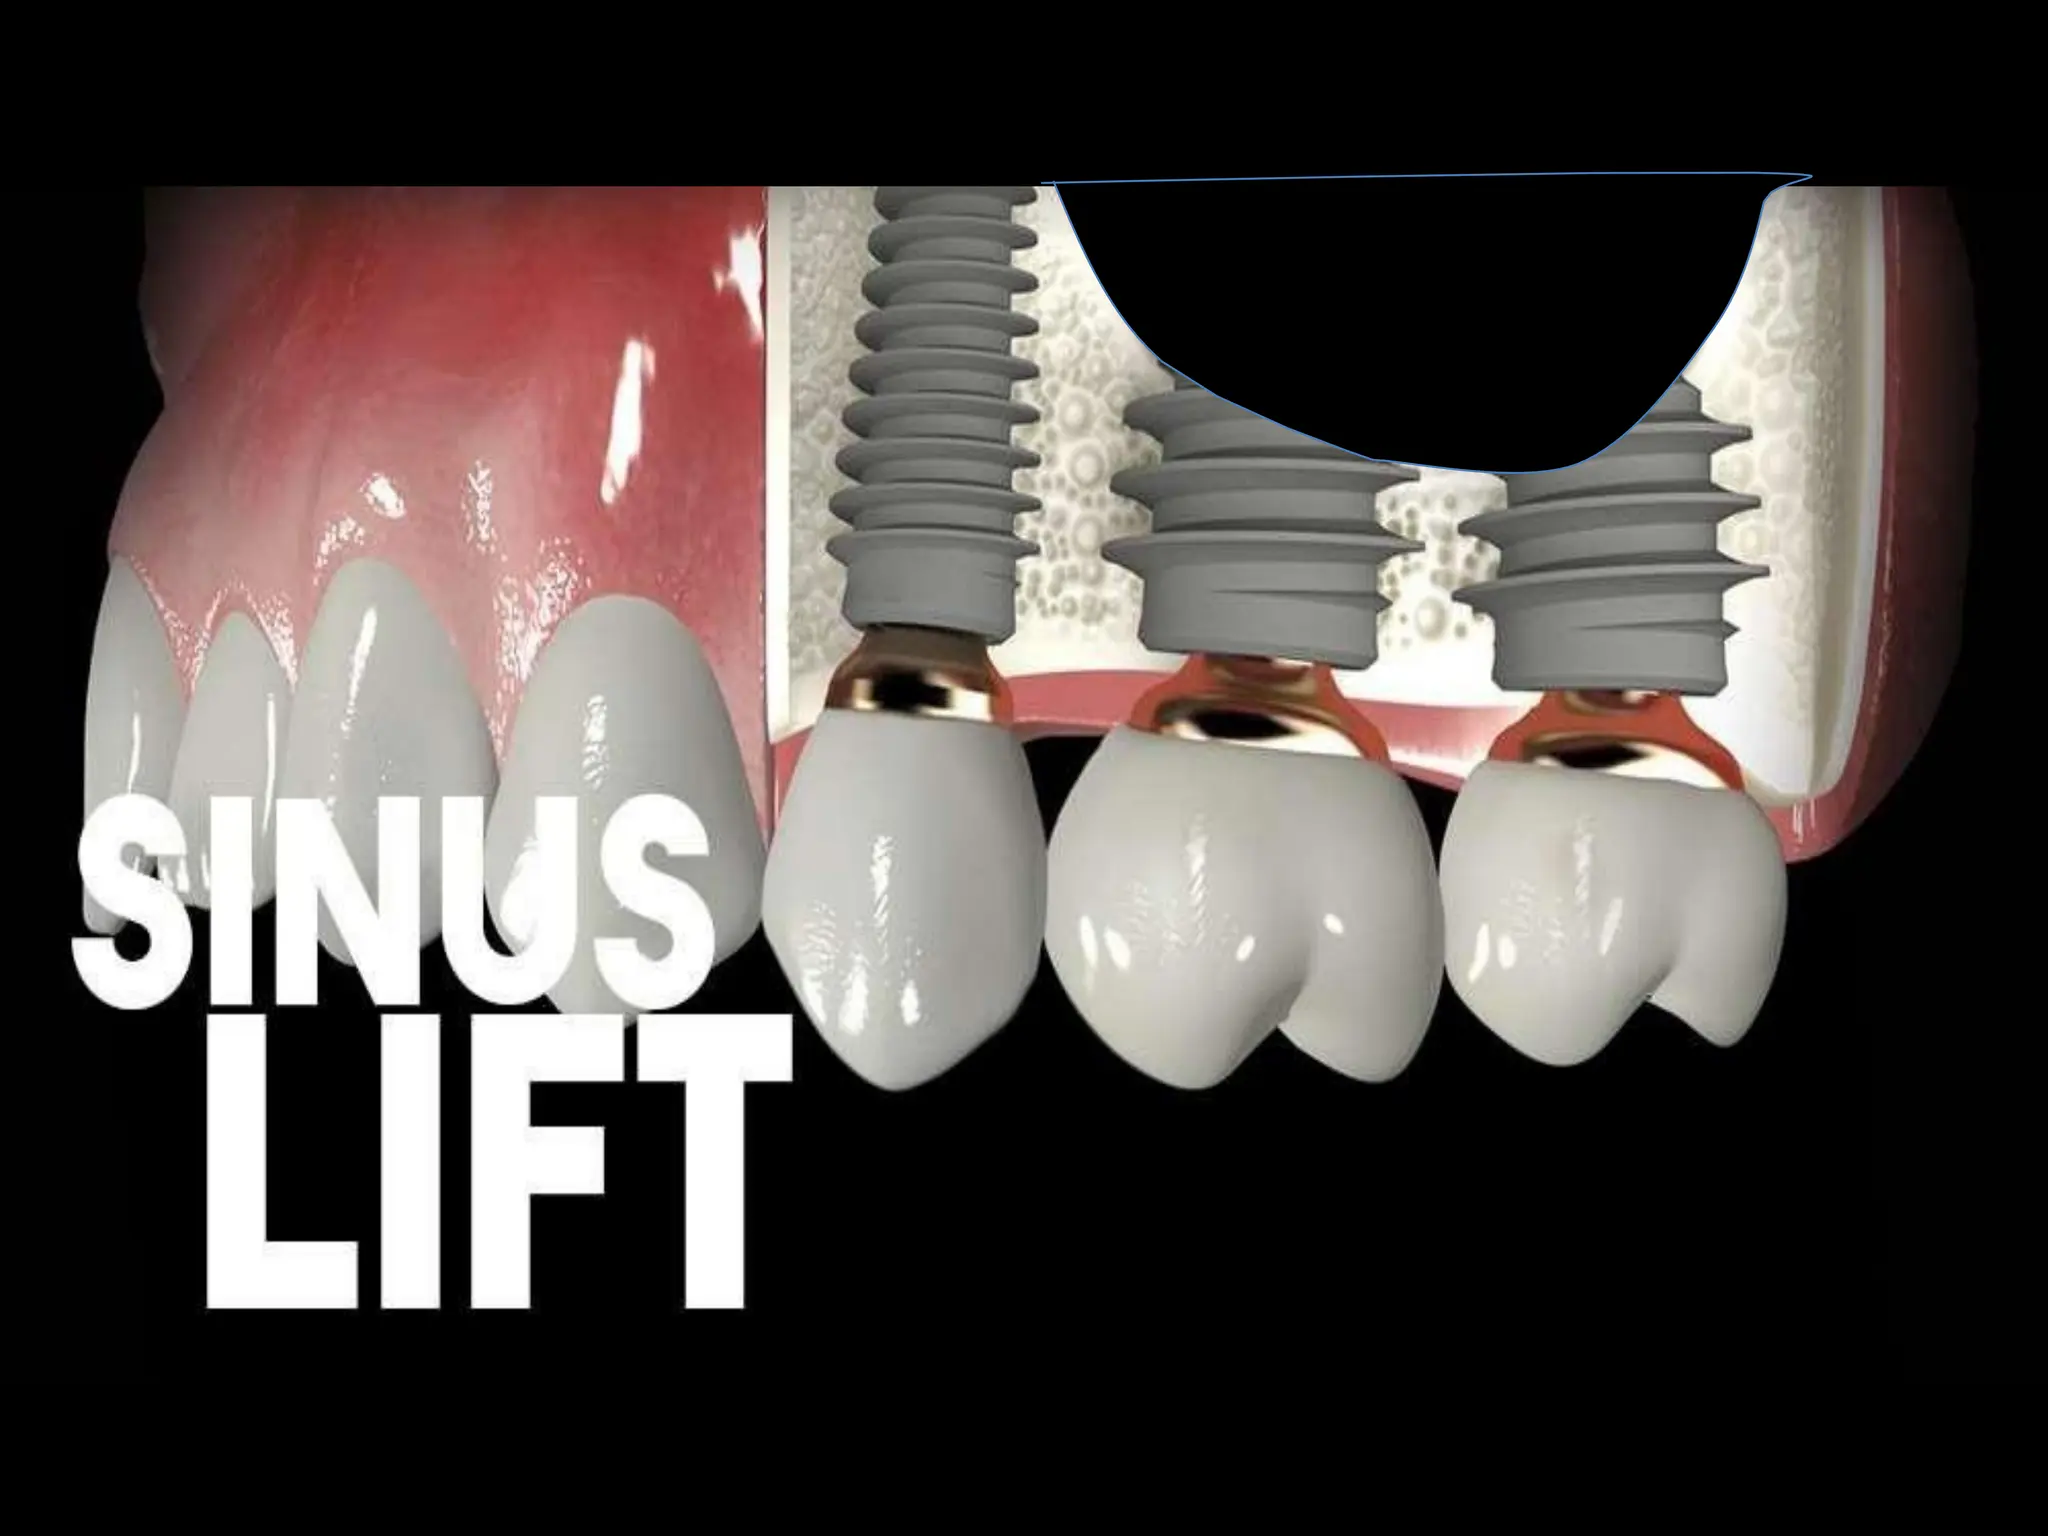
CONTENTS
• INTRODUCTION
• DEFINITION
• ANATOMY OF MAXILLARY SINUS
• SCCHNEIDERIAN MEMBRANE
• ARMAMENTARIUM
• SINUS LIFT PROCEDURE
• LATERAL WINDOW APPROACH
• CRESTAL / OSTEOTOME APPROACH
• ADVANCE SURGICAL
TECHNIQUES
INTRODUCTION
• Placement of implants in maxilla is frequently
compromised
or impossible due to
– Atrophy of the alveolar process,
– Poor bone quality,
– Maxillary sinus pneumatization.
• Treatment of choice is influenced by
– The vertical height of the residual alveolar bone,
– Local intrasinus anatomy
– Number of teeth to be replaced
•Paranasal Sinuses
(PNS)
- air containing bony
spaces around the nasal
cavity
“ Maxillary sinus is the pneumatic space that is
lodged inside the body of the maxilla and that
communicates with the environment by way of
the middle nasal meatus and the nasal
vestibule.”
Definition
MAXILLARY SINUS
⚫ Largest of the PNS
⚫ Pyramidal shaped cavity within the body
of the Maxilla
• Located in the body of maxilla 34*33*23mm
• The pyramid has three main processes or projections:
– (1) the alveolar process inferiorly (bounded by the
alveolar ridge),
– (2) the zygomatic recess (bounded by the zygomatic
bone), and
– (3) the infraorbital process pointing superiorly (bounded
by the bony floor of the orbit, and below it, the canine
fossa).
• The four sinus cavities are all lined with pseudostratified,
ciliated, columnar epithelium overlying a layer of
periosteum in contact with the bony sinus walls.
WHY CALLED ANTRUM OF
HIGHMORE?
1st discovered and illustrated by
Leonardo da vinci, but the earliest
attribution of significance was given by
NATHANIEL HIGHMORE(the British
surgeon and anatomist)in 1651
DEVELOPMENT
Maxillary sinus is the first of the PNS to develop
4th week I.U.L. – dorsal portion of 1st
Pharyngeal arch forms the Maxillary process
⚫In its development Sinus is:
• Tubular at birth
• Ovoid in childhood
• Pyramidal in adulthood
ANATOMY OF THE MAXILLARY SINUS
⚫ Pyramidal in shape
–
base :lateral nasal
wall
apex : root of the
zygoma
ANATOMY OF THE MAXILLARY SINUS
ROOF OF THE ANTRUM
⚫Formed by floor of the orbit and is transversed by the
infraorbital nerves.It is flat and slopes slightly
anteriorly and laterally
FLOOR OF THE SINUS
⚫Curved rather than flat formed by alveolar process of
the maxilla. and lies about 1cm below the level of the
floor of the nose.
⚫ Closely related to root apices of the maxillary
premolar and molar
ANTERIOR WALL
⚫ Formed by the
facial surface of
the maxilla.
⚫ Canine fossa is an
important
structure of this
wall
POSTERIOR WALL
⚫Formed by sphenomaxillary wall.
⚫A thin plate of bone separate the antral cavity from
the infratemporal fossa.
MEDIAL WALL
⚫Bounded by the Lateral wall of nasal cavity
⚫The opening of the sinus is closer to the roof and
thus at a higher level than the floor.
LATERAL WALL
⚫Related to zygoma and cheek.
⚫Branch of third
part of maxillary
artery
(pterygopalatine
part)
⚫ 1. PSA
⚫ 2. IOA
⚫ 3. GPA.
Arterial Supply
⚫ Venous drainage
⚫ 1.Anteriorly- Facial vein
⚫ 2.Posteriory- Pterygoid
venous plexus
Nerve Supply
FUNCTION OF THE MAXILLARY SINUS
• Humidifying and warming inspired air.
• Regulation of intranasal pressure.
• Increasing surface area for olfaction.
• Lightening of the skull mass.
• Resonance.
• Absorbing shock, helping to lessen brain trauma.
• Contributing to facial growth.
• Mucociliary propulsion of mucous and serous secretions
toward the ostium.
⚫ The maxillary sinus bony cavity lined with the
sinus membrane, is also known as the
‘schneiderian membrane.’ This membrane
consists of ciliated epithelium like the rest of the
respiratory tract.
⚫ It is continuous with, and connects to, the nasal
epithelium through the ostium in the middle
meatus. The membrane has a thickness of
approximately 0.8 mm.
About membrane
SCHNEIDERIAN
MEMBRANE Line the innerwalls of the sinus
Serum mucosa glands are located underneath –
especially next to ostium opening
Main carrier of bone reformation after sinus floor elevation
T
hickness0.13 -0.5 mm
Mucosal thickening isthe most frequently
observed abnormality –66%
MAX SINUS GRAFTING
1ST PERFORMED-WHOM
&WHEN?
⚫The first sinus graft was performed by Dr Hilt Tatum
in February 1975 in Lee County Hospital in Opelika,
Alabama.
⚫ This was followed by the placement and successful
restoration of two endosteal implants.
⚫1. Residual subantral bone is less than 10 mm in
height.
⚫2. Residual subantral bone is less than 5 mm in
width
⚫3. Maxillary sinus is free of any acute or chronic
infection(sinusitis) or pathology (cyst).
When to do?
⚫1. Heavy smoking
⚫2. Acute sinus infection.
⚫3.Recurrent history of chronic sinusitis.
⚫4. Uncontrolled diabetes.
⚫5. Maxillary sinus hypoplasia (MSH)
⚫ 6. Cystic fibrosis (CF)
⚫ 7. Maxillary sinus malignant tumours
WHEN NOT TO
PERFORM
MAXILLARYSINUS–CLINICAL
ASSESSMENT
Helps in proper
bone formation
Reduce risk of
possible mucus or
bacteria
contamination of
the graft
Avoid formation of
bacterial smear
layeron the implant
proximity of the
maxillary sinusto
numerous vital
structures is
identified
sinusitis
cavernous
sinus
thrombosis
Orbital
cellulitis
osteomyelitis meningitis
A thorough preoperative evaluation is completed to rule out any
existing pathologic condition in the maxillary sinus
Complicationsof infectionsin this
region
METHODS OF EXAMINATION
OFTHE INFECTED MAXILLARY
SINUS
CBCT TRANSILLUMINATION NASOENDOSCOPY
MAGNETIC
RESONANCE
IMAGING [MRI]
NASOENDOSCOPY BACTERIOLOGY
CYTOLOGY
FIBREOPTIC
ANTROSCOPY
RADIOGRAPHY
best option
1.Water’s
projection
2.Panoramic
3.Peri apical
Differentiation
of soft tissues
within the
sinus
DECISION TREE FOR MAXILLARY SINUS ELEVATION
OPTIONS
Fugazzotto PA. Augmentation of the posterior maxilla: a proposed hierarchy of treatment selection. J Periodontol 74 (2003):1682–1691.
Chiapasco M, Zaniboni M, Rimondini L. dental implants placed in grafted maxillary sinuses: a retrospective analysis of clinical outcome according
to the initial clinical situation and a proposal of defect classification. Clin Oral Implants Res 19 (2008):416–428.
ARMAMENTARIUM
Rotary instruments
• Most commonly used to create the osteotomy
through which the sinus floor is accessed
Bone Scrapers
• Used to carve into the anterior sinus wall to create an
antrostomy for SFEin a
simple and very safe procedure
Complete osteotomy using a
piezoelectric round tip, minimizing the
risk of membrane perforation
SINUS LIFT PROCEDURE
LATERAL WINDOW APPROACH
INCISION (FLAP DESIGN)
• Abevel horizontal incision (at 1–2 mm palatal to the alveolar crest and at least 4–6 mm
away from the estimated border of the hard tissue outline “window”)
• Buccal vertical releasing incisions are placed at the mesial and distal extension of the
horizontal incision.
• Full-thickness buccal flap is reflected from the crestal side all the way to 4–6 mm apically
beyond the upper portion of the bony window outline.
• Tip: 4–6 mm clearance provides a safe zone for suture materials. (the suture line will lie on the solid native bone, not
the graft materials.
OUTLINE OFTHE BONYWINDOW
• Window outline is prepared - lateral aspect of the buccal alveolus.
• Size of the window is determined by the area to be grafted in the lateral aspect of the buccal alveolus.
• Osteotomy (window) can be oval or rectangular.
• Inferior hard tissue outline of the window 3–5 mm above the sinus floor.
• Size of the upper window - determined by length of the implant.
• Mesial border can be extended as far as distal to canine, and the distal border - tuberosity - mesio-
distal implant placement.
A carbide bur is only
used in thick buccal
wall for initial
preparation; then
switch to a diamond
bur/piezosurgical
insert.
PREPARATION OFTHE BONYWINDOW
• High speed - advantage of saving time but is more technically sensitive.
• No. 4, 6, or 8 diamond round bur with copious saline irrigation is utilized to outline
window
• the osteotomy is deepened in smooth, light sweeping motions until the bone is thin
and translucent enough to visualize the underlying gray/red color of the sinus
membrane
HANDLE THE BONE ISLAND
• Techniques - handle “remaining bone island”
• Tatum - infracture of the bone island and carefully elevating
the sinus membrane so that the bone island will lie on top of
the graft materials and form the roof of the sinus grafts
• Wall-off technique involves removing the bony island
completely from the surrounding wall with sinus lift
elevators.
ELEVATE THE SINUS MEMBRANE
• Gently detach the membrane at the apical aspect of the sinus cavity and then the
mesial and distal aspects.
• After initially releasing the lower border, mesial, distal aspect, and upper border of
the sinus membrane about 3–5 mm,
• Go farther from the lower aspect of the sinus cavity to separate all the way to the
medial wall.
• It is important to ensure that the membrane is lifted high enough to place the
appropriate implant length
Fig (A–C) The elevated sinus floor is grafted through the lateral window using bone
substitutes mixed with autogenous bone. A resorbable collagen membrane can be
placed under the elevated sinus membrane before filling it with the graft as it
protects the sinus membrane from being torn by the graft particles. (D) A parenteral
antibiotic like clindamycin can also be mixed with the graft to prevent any
postoperative infection
Fig Once the elevated sinus floor has been loosely filled with the graft, the implant
osteotomies are prepared in the usual fashion and implants are inserted. (A–D) The
rest of the sinus is further grafted until it is all loosely packed with the graft. If
subantral bone height is inadequate to stabilize the immediately inserted implants,
the surgeon can only graft the sinus and choose to go for delayed implant placement
when the new bone has regenerated in the grafted sinus floor after 6–8 months.
Fig (A and B) A resorbable collagen barrier membrane can be placed to cover the
lateral window to prevent soft tissue ingression into the grafted sinus. (C and D) Flap
is sutured back with a primary closure. Implants are uncovered and restored after
new bone formation has occurred in the entire grafted sinus in 6–8 months.
Simultaneous or delayed
Implant placement
one-stage lateral
antrostomy-
Implant with graft.
Sufficient residual bone.
two-stage lateral antrostomy-
Implant placement 6-12
months after grafting.
subantral bone height<4mm.
BONE GRAFT MATERIALS AND BARRIER
MEMBRANE
• (1) incorporate xenografts for a slower resorption rate compared with
allografts
(DFDBA/FDBA);
• (2) use xenografts or alloplasts if space maintenance of the matrix
materials in the sinus is desired; and
• (3) possibly add to the matrix materials biologics if one desires
enhancement of the quality of the bone formed in a shorter time period.
• Arecent study has shown the addition of rhBMP-2/ACS to bio-Oss has a
negative
effect on bone formation
• Tight compaction of the graft material - decreased bone formation
(decrease in space between the particles and a decrease in bone formation
between the particles).
Kao dW, Kubota A, Nevins M, Fiorellini JP. the negative effect of combining rhbMP-2 and bio-Oss on bone formation for
maxillary sinus augmentation. Int J Periodontics Restorative Dent 32 (2012):61–67.
⚫Advances and modifications in the lateral
approach of sinus lifting:
➢Lateral approach of sinus lifting using piezosurgery
unit:-
Fig (A) Piezosurgery unit , sinus lift kit containing special tips for lateral window
preparation and (B) sinus membrane elevation.
Fig. Application of
the various piezo
tips: SL1 Tip is a
diamond coated tip
for vestibular bone
window cut and for
attenuation of sharp
angles.(A and B) A
rectangular window
can easily be scored
using this tip,
without tearing the
sinus membrane
Fig. SL2 Tip is a diamond-coated ball tip for smoothing the vestibular bone window;
precise osteoplasty using this tip at the prepared osteotomy corners to remove the
sharp bony edges, reduces the chances of membrane tear during elevation. (C and D)
Ball diameter: 1.5 mm, laser marked every 2 mm. (E and F) SL3 Tip is a flat-ended
noncutting tip used for detaching the Schneiderian membrane from the window
edge. (G and H) SL4 Tip is a noncutting spatula, oriented at 90°, used for detaching
the Schneiderian membrane inside the sinus.
Fig (I and J) SL5 Tip is a noncutting spatula, oriented at ±135°, used for detaching
the Schneiderian membrane inside the sinus and for removing anatomical structures.
(Courtesy: Dr Pierre Marin, Implantologist–private practice, Bordeaux, France)
➢Lateral approach of sinus lifting using DASK:
Dentium Advanced Sinus Kit (DASK)
Step 1 – scoring the lateral osseous window:-
1. Wall-off technique
2. Grind-out technique
Step 2 – sinus membrane elevation
Step 3 – osteotomy preparation for the implant
Step 4 – grafting of the elevated sinus floor and implant
placement
Fig 18. (A–C) Wall-off technique-
After elevating the mucoperiosteal flap to expose the ridge and lateral wall of the
sinus, a special DASK drill attached to a rotary handpiece is used to carefully score a
circular osseous window at the lateral osseous wall of the sinus, without any tear to
the underlying Schneiderian membrane. Once the drill has reached the membrane,
the scored round bony wall is carefully removed (wall-off) from the
underlying sinus membrane and the membrane is elevated using a special set of sinus
curettes
⚫Fig 18.42╇ (A and B) Grind-out technique- A
Fig . (A and B) Grind-out technique-
A special large coarse diamond DASK drill is used to grind the lateral wall of the
sinus with a sweeping action to reach the underlying sinus membrane. Once the
sinus membrane is exposed, it is elevated using a special set of sinus curettes.
STEP 2 – SINUS MEMBRANE
ELEVATION
Fig . (A) After exposing the sinus membrane either with wall-off or grind-out
technique, a special DASK tip is used to detach the membrane from
the prepared window margins. (B) Once the membrane has successfully been
detached all around from the prepared osseous window, a special set
of curettes (sinus elevators) is used to elevate the Schneiderian membrane to the
desired height.
STEP 3 – OSTEOTOMY
PREPARATION
FOR THE
IMPLANT
Fig . (A and B) After the sinus membrane has been elevated to the desired height, the
osteotomy for the implant is prepared from the crestal approach using drills of the
particular implant system.
STEP 4 – GRAFTING OF THE ELEVATED
SINUS FLOOR AND
IMPLANT PLACEMENT
Fig . (A–D) Once the implant osteotomy has been prepared, the elevated sinus floor is grafted
through the lateral window using bone graft and the implant is inserted. Usually the implant is
placed and left for submerged healing but in selective cases where the inserted implant has
achieved adequate initial stability (more than 30 Ncm) and the force factors are minimum, the
implant can be left for open healing by placing the long healing abutment on top of the implant.
o Disadvantages of the lateral approach:
1. Large flap elevation reduce blood to lateral wall
of sinus.
2. Difficult access with reduced mouth opening.
3. More chances of sinus rupture and postoperative
complication, compared to the subcrestal
approach.
4. Large amount of graft required.
5. Barrier membrane needed to cover window.
COMPLICATIONS
• Perforation of the Schneiderian membrane is the most common.
• Presence of sinus septa and a residual bone height less than 3.5 mm increases the
risk for a sinus membrane perforation - Schwarz L2015.
• However, perforation of the Schneiderian membrane seems not to influence the
final treatment outcome.
• but a higher prevalence for sinusitis is reported in cases of membrane perforation -
Schwarz L 2015
• Other complications include bleeding, migration of dental implants into the
maxillary sinus, postoperative infection, sinusitis, exposure of the graft, graft loss,
oedema, seroma formation, benign paroxysmal positional vertigo and exposure of
the collagen membrane.
• smoking seems to be associated with increased risk of wound dehiscence and
infection - Schwarz L 2015
⚫Crestal (osteotome) approach (OR)
Internal sinus- lift technique (or)
Summer’s osteotome technique
SINUS
MEMBRA
NE
Mucosa Subantral residual bone
Fig. (A ) cross-sectional view of posterior edentulous maxilla showing limited
subantral bone height, which is not sufficient for adequately long implant placement.
(B) Preoperative radiograph shows 8 mm subantral bone height
Buccal flap Sinus floor
Lateral wall of sinus Subantral bone
6-8mm
Palatal flap
Medial wall of sinus
Sinus membrane
Fig . (A and B) Mid-crestal incision is made and flaps are elevated to expose the
ridge crest.
Fig. (A–D) Osteotomy for the implant is prepared in the usual fashion using all the
drills 2.0 mm short of sinus floor, which can be verified with the dental radiographs
with the drill in place.
Fig .(A–D) Once the implant osteotomy is completely prepared 2 mm short of the sinus floor, an
appropriate sized sinus-lifting osteotome is inserted and carefully tapped to fracture up the
sinus floor, and also lift up the Schneiderian membrane. After fracturing the bony floor of the
sinus, a collagen membrane or collagen plug can be inserted into the osteotomy before further
lifting the sinus membrane. It prevents the inadvertent rupture of the delicate Schneiderian
membrane. After achieving the required height of sinus elevation, a blunt implant probe can be
inserted to evaluate the height of the sinus elevation that has been achieved and also to check if
any rupture have occurred in the membrane.
Fig. (A and B) The flap is sutured back with primary closure. (C and D) The implant
is exposed and restored after new bone regeneration has occurred in the grafted
sinus in 4–6 months
o Advantages of the crestal
approach/Summer’s osteotome technique
1. Less invasive.
2. Improves maxillary bone density, allows
greater initial stability of implants.
3. Less graft required .
4. No barrier membrane required.
5. Limited flap elevation required.
o Disadvantages of the crestal
approach/Summer’s osteotome technique
1.Initial implant stability unproven, if the residual
bone height is less than 6 mm.
2.Limited height of sinus elevation compared to the
lateral approach.
3.Higher chance of misaligning the long axis of the
osteotome during osteotomy.
4. Tapping can cause mental trauma to the patient.
RECENT ADVANCEMENTS AND
MODIFICATIONS IN THE CRESTAL
APPROACH OF THE SINUS LIFTING
➢Bicortical engagement without sinus grafting:
If the subantral residual bone is more than 6–8 mm
in height and more than 10 mm in width, a large
diameter (6–7 mm) and short length (7–9 mm)
implant can be inserted with bicortical engagement
(in the crest bone as well as into the antral floor)
➢Sinus lifting with crestal approach using DASK
(grinding up technique):
Fig . (A) Subantral bone which is inadequate (4–6 mm) in height for adequately long
implant placement. (B) Pilot drilling is done 2 mm short of the sinus floor.
Fig .(A and B) All osteotomy widening drills are used to the same depth (2 mm short
of sinus floor)
Fig. (A) After completing the osteotomy preparation for the implant 2 mm short of
sinus floor, a diamond-coated bur from DASK is used to grind the rest of the
subantral bone, to reach the Schneiderian membrane. (B–D) A sinus elevation probe
with its umbrella-shaped tip is used for lifting the sinus membrane to the desired
height.
Fig. (A and B) Elevated sinus space is grafted using HA Scaffold (70%) + β-TCP(30%)
– Osteon graft which also helps in further lifting the membrane.
Fig. After the elevated sinus floor has
successfully been grafted, the implant is
inserted.
ADVANCED SURGICAL TECHNIQUES
SINUS LIFT BALLOON
• The zimmer inflated sinus balloon was designed to lift the
schneiderian membrane
• gently and uniformly.
• The balloon instrument can also be used to anticipate the
required bone graft material, such as 1 cc of saline, which
is used to inflate the balloon, equal to 1 cc of grafting
material.
• On average,with 1 cc of saline the sinus lift balloon may
elevate sinus membrane 6 mm.
• Angled design can be used in the lateral window/caldwell-
luc approach.
• Straight design can be used in the crestal/summers
approach
• Micro-mini design can be also used in the
crestal/summers approach with a small diameter opening
(1.9 mm)
Sotirakis EG, Gonshor A. Elevation of the maxillary sinus floor with hydraulic pressure. J Oral
Implantol 31 (2005):197–204.
CLINICAL PROCEDURES
• Step 1 (to create access) the initial osteotomy (a pilot drill of 2 mm in diameter) is
performed to a depth approaching the floor stopping 1–2 mm short of the floor.
• Asmall diameter osteotome can be used to penetrate the sinus floor
• Aguide pin is used to indicate the depth of the osteotomy.
• Step 2 (to insert the sinus lift balloon) it is recommended to inflate and deflate the
balloon extraorally several times with saline before inserting into the sinus cavity
• Make sure not to overinsert the metal tube into the sinus cavity - membrane tear.
• Step 3 (to detach the sinus membrane) once the balloon is inserted into the sinus
cavity, the balloon can be pumped with normal saline.
• On average with 1 cc of saline the sinus lift balloon may elevate the sinus
membrane 6 mm.
• Step 4 (bone grafting material placement) The dome-shaped bone grafting material
can be seen via radiograph.
• Step 5 (dental implant placement)
HYDRAULIC SINUS LIFT
• to minimize the tapping motion by using hydraulic pressure, “hydraulic sinus lift”.
• the unregulated hydraulic pressure is applied into the osteotomy site by means of
air/water exhaust spray from handpiece or an uncontrolled water jet to detach the
Schneiderian membrane -loosen the membrane.
• Without controlling the direction and intensity distribution of the hydraulic
pressure, sinus membrane perforations may still occur, pressure is directed against
the apex of the “tent” being created.
• to provide suitable equal distribution of hydrostatic pressure, “controlled
hydrostatic sinus elevation” was introduced - “lifting pressure” that
simultaneously places equal force per square millimeter of bone-membrane
interface.
• Hydraulic pressure in a closed system places equal pressure on all surfaces within
the system, thereby eliminating “point sources” of pressure, and gently elevating
membrane equally at all points of attachment. - a calibrated, hand-controlled pump
and pressure sensormeter.
SURGICAL PROTOCOL
• Surgical step 1 (to create access) the initial osteotomy (a pilot drill of 2 mm in
diameter) ,depth approaching the floor of the sinus cavity but stopping 1–2 mm
short of the floor.
• Adiamond piezosurgical drill can also be used to just gently perforate the floor of
the sinus bone without harming the membrane.
• the piezeoelectric device is designed to cut or grind bone but not damage adjacent
soft tissue.
• the integrity of the sinus membrane is then examined by Valsalva maneuver or
direct visualization.
• Step 2 (initial detachment of the sinus membrane)- after clearing all the air from
the tubing, the Luer-Lock cannula with tapered plug-in end (2 mm diameter) is
inserted into the osteotomy preparation before touching the sinus floor and pressed
snugly using finger pressure.
• the normal isotonic saline fluid is pumped slowly into the closed system, and the
gentle pressure will begin to elevate the membrane via the hydrostatic pressure
from the hand-actuated pump.
• the pressure sensor meter inserted into the closed system will monitor the pressure
and also indicate the force necessary to just detach membrane without tearing.
• it is imperative that the bone- to-cannula interface be airtight so that there is no
lateral leakage of the normal saline solution.
• Step 3 a second examination of the integrity of the sinus membrane is done.
• After the initial lift is complete, the surgeon switches to a 3 mm implant drill
through the previous osteotomy site.
• then, the previous controlled hydrostatic sinus lift procedure is repeated - matched
larger-sized cannula and tools. the sinus membrane is now lifted to the desired
extent, followed by placement of bone graft.
CONCLUSION AND CLINICAL
RECOMMENDATIONS
• Predictable and reliable approach with a high implant survival rate.
• Installation of short implants (≤ 6 mm) significantly diminished the
implant
survival rate.
• Indicated when a residual vertical alveolar bone height of more than
6 mm is present.
• Autogenous bone graft or bone substitutes can be added, if more intra-
sinus bone
gain is needed for installation of implants with a desirable length.
COMPLICATIONS AFTER SINUS
GRAFT SURGERY AND THEIR
MANAGEMENT
⚫Membrane perforation/tearing
⚫Mucous retention cyst
⚫Bleeding
⚫Antral septa
⚫Incision line opening
⚫Neural injury
⚫Acute maxillary sinusitis
⚫Penetration of the implant apex into the sinus
POSTOPERATIVE INSTRUCTIONS
TO THE PATIENT AFTER THE
SINUS-LIFT PROCEDURE
⚫ Activities
1. Do not blow your nose for the next 4 weeks.
2. Be sure to sneeze with your mouth open.
3. Do not spit or drink with straws.
4. You should avoid flying in a pressurized aircraft or
scuba diving because it may increase sinus pressure.
5. You can take a decongestant to help reduce the pressure
in your sinuses.
6.You should not play musical instruments that require
you to blow or blow up balloons; avoid any other
activity that increases oral or nasal pressure.
7. Avoid lifting heavy objects.
8. Avoid smoking.
THANK YOU

Sinus Lift ppt about maxillary sinus lift

  • 2.
    CONTENTS • INTRODUCTION • DEFINITION •ANATOMY OF MAXILLARY SINUS • SCCHNEIDERIAN MEMBRANE • ARMAMENTARIUM • SINUS LIFT PROCEDURE • LATERAL WINDOW APPROACH • CRESTAL / OSTEOTOME APPROACH • ADVANCE SURGICAL TECHNIQUES
  • 3.
    INTRODUCTION • Placement ofimplants in maxilla is frequently compromised or impossible due to – Atrophy of the alveolar process, – Poor bone quality, – Maxillary sinus pneumatization. • Treatment of choice is influenced by – The vertical height of the residual alveolar bone, – Local intrasinus anatomy – Number of teeth to be replaced
  • 4.
    •Paranasal Sinuses (PNS) - aircontaining bony spaces around the nasal cavity
  • 5.
    “ Maxillary sinusis the pneumatic space that is lodged inside the body of the maxilla and that communicates with the environment by way of the middle nasal meatus and the nasal vestibule.” Definition
  • 6.
    MAXILLARY SINUS ⚫ Largestof the PNS ⚫ Pyramidal shaped cavity within the body of the Maxilla
  • 7.
    • Located inthe body of maxilla 34*33*23mm • The pyramid has three main processes or projections: – (1) the alveolar process inferiorly (bounded by the alveolar ridge), – (2) the zygomatic recess (bounded by the zygomatic bone), and – (3) the infraorbital process pointing superiorly (bounded by the bony floor of the orbit, and below it, the canine fossa). • The four sinus cavities are all lined with pseudostratified, ciliated, columnar epithelium overlying a layer of periosteum in contact with the bony sinus walls.
  • 8.
    WHY CALLED ANTRUMOF HIGHMORE? 1st discovered and illustrated by Leonardo da vinci, but the earliest attribution of significance was given by NATHANIEL HIGHMORE(the British surgeon and anatomist)in 1651
  • 9.
    DEVELOPMENT Maxillary sinus isthe first of the PNS to develop 4th week I.U.L. – dorsal portion of 1st Pharyngeal arch forms the Maxillary process ⚫In its development Sinus is: • Tubular at birth • Ovoid in childhood • Pyramidal in adulthood
  • 10.
    ANATOMY OF THEMAXILLARY SINUS ⚫ Pyramidal in shape – base :lateral nasal wall apex : root of the zygoma
  • 11.
    ANATOMY OF THEMAXILLARY SINUS
  • 12.
    ROOF OF THEANTRUM ⚫Formed by floor of the orbit and is transversed by the infraorbital nerves.It is flat and slopes slightly anteriorly and laterally
  • 13.
    FLOOR OF THESINUS ⚫Curved rather than flat formed by alveolar process of the maxilla. and lies about 1cm below the level of the floor of the nose. ⚫ Closely related to root apices of the maxillary premolar and molar
  • 14.
    ANTERIOR WALL ⚫ Formedby the facial surface of the maxilla. ⚫ Canine fossa is an important structure of this wall
  • 15.
    POSTERIOR WALL ⚫Formed bysphenomaxillary wall. ⚫A thin plate of bone separate the antral cavity from the infratemporal fossa.
  • 16.
    MEDIAL WALL ⚫Bounded bythe Lateral wall of nasal cavity ⚫The opening of the sinus is closer to the roof and thus at a higher level than the floor.
  • 17.
    LATERAL WALL ⚫Related tozygoma and cheek.
  • 18.
    ⚫Branch of third partof maxillary artery (pterygopalatine part) ⚫ 1. PSA ⚫ 2. IOA ⚫ 3. GPA. Arterial Supply
  • 19.
    ⚫ Venous drainage ⚫1.Anteriorly- Facial vein ⚫ 2.Posteriory- Pterygoid venous plexus
  • 20.
  • 21.
    FUNCTION OF THEMAXILLARY SINUS • Humidifying and warming inspired air. • Regulation of intranasal pressure. • Increasing surface area for olfaction. • Lightening of the skull mass. • Resonance. • Absorbing shock, helping to lessen brain trauma. • Contributing to facial growth. • Mucociliary propulsion of mucous and serous secretions toward the ostium.
  • 22.
    ⚫ The maxillarysinus bony cavity lined with the sinus membrane, is also known as the ‘schneiderian membrane.’ This membrane consists of ciliated epithelium like the rest of the respiratory tract. ⚫ It is continuous with, and connects to, the nasal epithelium through the ostium in the middle meatus. The membrane has a thickness of approximately 0.8 mm. About membrane
  • 23.
    SCHNEIDERIAN MEMBRANE Line theinnerwalls of the sinus Serum mucosa glands are located underneath – especially next to ostium opening Main carrier of bone reformation after sinus floor elevation T hickness0.13 -0.5 mm Mucosal thickening isthe most frequently observed abnormality –66%
  • 24.
    MAX SINUS GRAFTING 1STPERFORMED-WHOM &WHEN? ⚫The first sinus graft was performed by Dr Hilt Tatum in February 1975 in Lee County Hospital in Opelika, Alabama. ⚫ This was followed by the placement and successful restoration of two endosteal implants.
  • 25.
    ⚫1. Residual subantralbone is less than 10 mm in height. ⚫2. Residual subantral bone is less than 5 mm in width ⚫3. Maxillary sinus is free of any acute or chronic infection(sinusitis) or pathology (cyst). When to do?
  • 26.
    ⚫1. Heavy smoking ⚫2.Acute sinus infection. ⚫3.Recurrent history of chronic sinusitis. ⚫4. Uncontrolled diabetes. ⚫5. Maxillary sinus hypoplasia (MSH) ⚫ 6. Cystic fibrosis (CF) ⚫ 7. Maxillary sinus malignant tumours WHEN NOT TO PERFORM
  • 27.
    MAXILLARYSINUS–CLINICAL ASSESSMENT Helps in proper boneformation Reduce risk of possible mucus or bacteria contamination of the graft Avoid formation of bacterial smear layeron the implant proximity of the maxillary sinusto numerous vital structures is identified sinusitis cavernous sinus thrombosis Orbital cellulitis osteomyelitis meningitis A thorough preoperative evaluation is completed to rule out any existing pathologic condition in the maxillary sinus Complicationsof infectionsin this region
  • 28.
    METHODS OF EXAMINATION OFTHEINFECTED MAXILLARY SINUS CBCT TRANSILLUMINATION NASOENDOSCOPY MAGNETIC RESONANCE IMAGING [MRI] NASOENDOSCOPY BACTERIOLOGY CYTOLOGY FIBREOPTIC ANTROSCOPY RADIOGRAPHY best option 1.Water’s projection 2.Panoramic 3.Peri apical Differentiation of soft tissues within the sinus
  • 29.
    DECISION TREE FORMAXILLARY SINUS ELEVATION OPTIONS
  • 30.
    Fugazzotto PA. Augmentationof the posterior maxilla: a proposed hierarchy of treatment selection. J Periodontol 74 (2003):1682–1691. Chiapasco M, Zaniboni M, Rimondini L. dental implants placed in grafted maxillary sinuses: a retrospective analysis of clinical outcome according to the initial clinical situation and a proposal of defect classification. Clin Oral Implants Res 19 (2008):416–428.
  • 31.
  • 33.
    Rotary instruments • Mostcommonly used to create the osteotomy through which the sinus floor is accessed Bone Scrapers • Used to carve into the anterior sinus wall to create an antrostomy for SFEin a simple and very safe procedure
  • 34.
    Complete osteotomy usinga piezoelectric round tip, minimizing the risk of membrane perforation
  • 41.
  • 42.
  • 43.
    INCISION (FLAP DESIGN) •Abevel horizontal incision (at 1–2 mm palatal to the alveolar crest and at least 4–6 mm away from the estimated border of the hard tissue outline “window”) • Buccal vertical releasing incisions are placed at the mesial and distal extension of the horizontal incision. • Full-thickness buccal flap is reflected from the crestal side all the way to 4–6 mm apically beyond the upper portion of the bony window outline. • Tip: 4–6 mm clearance provides a safe zone for suture materials. (the suture line will lie on the solid native bone, not the graft materials.
  • 44.
    OUTLINE OFTHE BONYWINDOW •Window outline is prepared - lateral aspect of the buccal alveolus. • Size of the window is determined by the area to be grafted in the lateral aspect of the buccal alveolus. • Osteotomy (window) can be oval or rectangular. • Inferior hard tissue outline of the window 3–5 mm above the sinus floor. • Size of the upper window - determined by length of the implant. • Mesial border can be extended as far as distal to canine, and the distal border - tuberosity - mesio- distal implant placement. A carbide bur is only used in thick buccal wall for initial preparation; then switch to a diamond bur/piezosurgical insert.
  • 45.
    PREPARATION OFTHE BONYWINDOW •High speed - advantage of saving time but is more technically sensitive. • No. 4, 6, or 8 diamond round bur with copious saline irrigation is utilized to outline window • the osteotomy is deepened in smooth, light sweeping motions until the bone is thin and translucent enough to visualize the underlying gray/red color of the sinus membrane
  • 46.
    HANDLE THE BONEISLAND • Techniques - handle “remaining bone island” • Tatum - infracture of the bone island and carefully elevating the sinus membrane so that the bone island will lie on top of the graft materials and form the roof of the sinus grafts • Wall-off technique involves removing the bony island completely from the surrounding wall with sinus lift elevators.
  • 48.
    ELEVATE THE SINUSMEMBRANE • Gently detach the membrane at the apical aspect of the sinus cavity and then the mesial and distal aspects. • After initially releasing the lower border, mesial, distal aspect, and upper border of the sinus membrane about 3–5 mm, • Go farther from the lower aspect of the sinus cavity to separate all the way to the medial wall. • It is important to ensure that the membrane is lifted high enough to place the appropriate implant length
  • 50.
    Fig (A–C) Theelevated sinus floor is grafted through the lateral window using bone substitutes mixed with autogenous bone. A resorbable collagen membrane can be placed under the elevated sinus membrane before filling it with the graft as it protects the sinus membrane from being torn by the graft particles. (D) A parenteral antibiotic like clindamycin can also be mixed with the graft to prevent any postoperative infection
  • 51.
    Fig Once theelevated sinus floor has been loosely filled with the graft, the implant osteotomies are prepared in the usual fashion and implants are inserted. (A–D) The rest of the sinus is further grafted until it is all loosely packed with the graft. If subantral bone height is inadequate to stabilize the immediately inserted implants, the surgeon can only graft the sinus and choose to go for delayed implant placement when the new bone has regenerated in the grafted sinus floor after 6–8 months.
  • 52.
    Fig (A andB) A resorbable collagen barrier membrane can be placed to cover the lateral window to prevent soft tissue ingression into the grafted sinus. (C and D) Flap is sutured back with a primary closure. Implants are uncovered and restored after new bone formation has occurred in the entire grafted sinus in 6–8 months.
  • 53.
    Simultaneous or delayed Implantplacement one-stage lateral antrostomy- Implant with graft. Sufficient residual bone. two-stage lateral antrostomy- Implant placement 6-12 months after grafting. subantral bone height<4mm.
  • 54.
    BONE GRAFT MATERIALSAND BARRIER MEMBRANE • (1) incorporate xenografts for a slower resorption rate compared with allografts (DFDBA/FDBA); • (2) use xenografts or alloplasts if space maintenance of the matrix materials in the sinus is desired; and • (3) possibly add to the matrix materials biologics if one desires enhancement of the quality of the bone formed in a shorter time period. • Arecent study has shown the addition of rhBMP-2/ACS to bio-Oss has a negative effect on bone formation • Tight compaction of the graft material - decreased bone formation (decrease in space between the particles and a decrease in bone formation between the particles). Kao dW, Kubota A, Nevins M, Fiorellini JP. the negative effect of combining rhbMP-2 and bio-Oss on bone formation for maxillary sinus augmentation. Int J Periodontics Restorative Dent 32 (2012):61–67.
  • 55.
    ⚫Advances and modificationsin the lateral approach of sinus lifting: ➢Lateral approach of sinus lifting using piezosurgery unit:- Fig (A) Piezosurgery unit , sinus lift kit containing special tips for lateral window preparation and (B) sinus membrane elevation.
  • 56.
    Fig. Application of thevarious piezo tips: SL1 Tip is a diamond coated tip for vestibular bone window cut and for attenuation of sharp angles.(A and B) A rectangular window can easily be scored using this tip, without tearing the sinus membrane
  • 57.
    Fig. SL2 Tipis a diamond-coated ball tip for smoothing the vestibular bone window; precise osteoplasty using this tip at the prepared osteotomy corners to remove the sharp bony edges, reduces the chances of membrane tear during elevation. (C and D) Ball diameter: 1.5 mm, laser marked every 2 mm. (E and F) SL3 Tip is a flat-ended noncutting tip used for detaching the Schneiderian membrane from the window edge. (G and H) SL4 Tip is a noncutting spatula, oriented at 90°, used for detaching the Schneiderian membrane inside the sinus.
  • 58.
    Fig (I andJ) SL5 Tip is a noncutting spatula, oriented at ±135°, used for detaching the Schneiderian membrane inside the sinus and for removing anatomical structures. (Courtesy: Dr Pierre Marin, Implantologist–private practice, Bordeaux, France)
  • 59.
    ➢Lateral approach ofsinus lifting using DASK: Dentium Advanced Sinus Kit (DASK) Step 1 – scoring the lateral osseous window:- 1. Wall-off technique 2. Grind-out technique Step 2 – sinus membrane elevation Step 3 – osteotomy preparation for the implant Step 4 – grafting of the elevated sinus floor and implant placement
  • 60.
    Fig 18. (A–C)Wall-off technique- After elevating the mucoperiosteal flap to expose the ridge and lateral wall of the sinus, a special DASK drill attached to a rotary handpiece is used to carefully score a circular osseous window at the lateral osseous wall of the sinus, without any tear to the underlying Schneiderian membrane. Once the drill has reached the membrane, the scored round bony wall is carefully removed (wall-off) from the underlying sinus membrane and the membrane is elevated using a special set of sinus curettes
  • 61.
    ⚫Fig 18.42╇ (Aand B) Grind-out technique- A Fig . (A and B) Grind-out technique- A special large coarse diamond DASK drill is used to grind the lateral wall of the sinus with a sweeping action to reach the underlying sinus membrane. Once the sinus membrane is exposed, it is elevated using a special set of sinus curettes.
  • 62.
    STEP 2 –SINUS MEMBRANE ELEVATION Fig . (A) After exposing the sinus membrane either with wall-off or grind-out technique, a special DASK tip is used to detach the membrane from the prepared window margins. (B) Once the membrane has successfully been detached all around from the prepared osseous window, a special set of curettes (sinus elevators) is used to elevate the Schneiderian membrane to the desired height.
  • 63.
    STEP 3 –OSTEOTOMY PREPARATION FOR THE IMPLANT Fig . (A and B) After the sinus membrane has been elevated to the desired height, the osteotomy for the implant is prepared from the crestal approach using drills of the particular implant system.
  • 64.
    STEP 4 –GRAFTING OF THE ELEVATED SINUS FLOOR AND IMPLANT PLACEMENT Fig . (A–D) Once the implant osteotomy has been prepared, the elevated sinus floor is grafted through the lateral window using bone graft and the implant is inserted. Usually the implant is placed and left for submerged healing but in selective cases where the inserted implant has achieved adequate initial stability (more than 30 Ncm) and the force factors are minimum, the implant can be left for open healing by placing the long healing abutment on top of the implant.
  • 65.
    o Disadvantages ofthe lateral approach: 1. Large flap elevation reduce blood to lateral wall of sinus. 2. Difficult access with reduced mouth opening. 3. More chances of sinus rupture and postoperative complication, compared to the subcrestal approach. 4. Large amount of graft required. 5. Barrier membrane needed to cover window.
  • 66.
    COMPLICATIONS • Perforation ofthe Schneiderian membrane is the most common. • Presence of sinus septa and a residual bone height less than 3.5 mm increases the risk for a sinus membrane perforation - Schwarz L2015. • However, perforation of the Schneiderian membrane seems not to influence the final treatment outcome. • but a higher prevalence for sinusitis is reported in cases of membrane perforation - Schwarz L 2015 • Other complications include bleeding, migration of dental implants into the maxillary sinus, postoperative infection, sinusitis, exposure of the graft, graft loss, oedema, seroma formation, benign paroxysmal positional vertigo and exposure of the collagen membrane. • smoking seems to be associated with increased risk of wound dehiscence and infection - Schwarz L 2015
  • 68.
    ⚫Crestal (osteotome) approach(OR) Internal sinus- lift technique (or) Summer’s osteotome technique
  • 69.
    SINUS MEMBRA NE Mucosa Subantral residualbone Fig. (A ) cross-sectional view of posterior edentulous maxilla showing limited subantral bone height, which is not sufficient for adequately long implant placement. (B) Preoperative radiograph shows 8 mm subantral bone height
  • 70.
    Buccal flap Sinusfloor Lateral wall of sinus Subantral bone 6-8mm Palatal flap Medial wall of sinus Sinus membrane Fig . (A and B) Mid-crestal incision is made and flaps are elevated to expose the ridge crest.
  • 71.
    Fig. (A–D) Osteotomyfor the implant is prepared in the usual fashion using all the drills 2.0 mm short of sinus floor, which can be verified with the dental radiographs with the drill in place.
  • 72.
    Fig .(A–D) Oncethe implant osteotomy is completely prepared 2 mm short of the sinus floor, an appropriate sized sinus-lifting osteotome is inserted and carefully tapped to fracture up the sinus floor, and also lift up the Schneiderian membrane. After fracturing the bony floor of the sinus, a collagen membrane or collagen plug can be inserted into the osteotomy before further lifting the sinus membrane. It prevents the inadvertent rupture of the delicate Schneiderian membrane. After achieving the required height of sinus elevation, a blunt implant probe can be inserted to evaluate the height of the sinus elevation that has been achieved and also to check if any rupture have occurred in the membrane.
  • 74.
    Fig. (A andB) The flap is sutured back with primary closure. (C and D) The implant is exposed and restored after new bone regeneration has occurred in the grafted sinus in 4–6 months
  • 75.
    o Advantages ofthe crestal approach/Summer’s osteotome technique 1. Less invasive. 2. Improves maxillary bone density, allows greater initial stability of implants. 3. Less graft required . 4. No barrier membrane required. 5. Limited flap elevation required.
  • 76.
    o Disadvantages ofthe crestal approach/Summer’s osteotome technique 1.Initial implant stability unproven, if the residual bone height is less than 6 mm. 2.Limited height of sinus elevation compared to the lateral approach. 3.Higher chance of misaligning the long axis of the osteotome during osteotomy. 4. Tapping can cause mental trauma to the patient.
  • 77.
    RECENT ADVANCEMENTS AND MODIFICATIONSIN THE CRESTAL APPROACH OF THE SINUS LIFTING ➢Bicortical engagement without sinus grafting: If the subantral residual bone is more than 6–8 mm in height and more than 10 mm in width, a large diameter (6–7 mm) and short length (7–9 mm) implant can be inserted with bicortical engagement (in the crest bone as well as into the antral floor)
  • 78.
    ➢Sinus lifting withcrestal approach using DASK (grinding up technique): Fig . (A) Subantral bone which is inadequate (4–6 mm) in height for adequately long implant placement. (B) Pilot drilling is done 2 mm short of the sinus floor.
  • 79.
    Fig .(A andB) All osteotomy widening drills are used to the same depth (2 mm short of sinus floor)
  • 80.
    Fig. (A) Aftercompleting the osteotomy preparation for the implant 2 mm short of sinus floor, a diamond-coated bur from DASK is used to grind the rest of the subantral bone, to reach the Schneiderian membrane. (B–D) A sinus elevation probe with its umbrella-shaped tip is used for lifting the sinus membrane to the desired height.
  • 81.
    Fig. (A andB) Elevated sinus space is grafted using HA Scaffold (70%) + β-TCP(30%) – Osteon graft which also helps in further lifting the membrane. Fig. After the elevated sinus floor has successfully been grafted, the implant is inserted.
  • 82.
  • 83.
    SINUS LIFT BALLOON •The zimmer inflated sinus balloon was designed to lift the schneiderian membrane • gently and uniformly. • The balloon instrument can also be used to anticipate the required bone graft material, such as 1 cc of saline, which is used to inflate the balloon, equal to 1 cc of grafting material. • On average,with 1 cc of saline the sinus lift balloon may elevate sinus membrane 6 mm. • Angled design can be used in the lateral window/caldwell- luc approach. • Straight design can be used in the crestal/summers approach • Micro-mini design can be also used in the crestal/summers approach with a small diameter opening (1.9 mm)
  • 84.
    Sotirakis EG, GonshorA. Elevation of the maxillary sinus floor with hydraulic pressure. J Oral Implantol 31 (2005):197–204.
  • 85.
    CLINICAL PROCEDURES • Step1 (to create access) the initial osteotomy (a pilot drill of 2 mm in diameter) is performed to a depth approaching the floor stopping 1–2 mm short of the floor. • Asmall diameter osteotome can be used to penetrate the sinus floor • Aguide pin is used to indicate the depth of the osteotomy. • Step 2 (to insert the sinus lift balloon) it is recommended to inflate and deflate the balloon extraorally several times with saline before inserting into the sinus cavity • Make sure not to overinsert the metal tube into the sinus cavity - membrane tear. • Step 3 (to detach the sinus membrane) once the balloon is inserted into the sinus cavity, the balloon can be pumped with normal saline. • On average with 1 cc of saline the sinus lift balloon may elevate the sinus membrane 6 mm. • Step 4 (bone grafting material placement) The dome-shaped bone grafting material can be seen via radiograph. • Step 5 (dental implant placement)
  • 87.
    HYDRAULIC SINUS LIFT •to minimize the tapping motion by using hydraulic pressure, “hydraulic sinus lift”. • the unregulated hydraulic pressure is applied into the osteotomy site by means of air/water exhaust spray from handpiece or an uncontrolled water jet to detach the Schneiderian membrane -loosen the membrane. • Without controlling the direction and intensity distribution of the hydraulic pressure, sinus membrane perforations may still occur, pressure is directed against the apex of the “tent” being created. • to provide suitable equal distribution of hydrostatic pressure, “controlled hydrostatic sinus elevation” was introduced - “lifting pressure” that simultaneously places equal force per square millimeter of bone-membrane interface. • Hydraulic pressure in a closed system places equal pressure on all surfaces within the system, thereby eliminating “point sources” of pressure, and gently elevating membrane equally at all points of attachment. - a calibrated, hand-controlled pump and pressure sensormeter.
  • 89.
    SURGICAL PROTOCOL • Surgicalstep 1 (to create access) the initial osteotomy (a pilot drill of 2 mm in diameter) ,depth approaching the floor of the sinus cavity but stopping 1–2 mm short of the floor. • Adiamond piezosurgical drill can also be used to just gently perforate the floor of the sinus bone without harming the membrane. • the piezeoelectric device is designed to cut or grind bone but not damage adjacent soft tissue. • the integrity of the sinus membrane is then examined by Valsalva maneuver or direct visualization.
  • 90.
    • Step 2(initial detachment of the sinus membrane)- after clearing all the air from the tubing, the Luer-Lock cannula with tapered plug-in end (2 mm diameter) is inserted into the osteotomy preparation before touching the sinus floor and pressed snugly using finger pressure. • the normal isotonic saline fluid is pumped slowly into the closed system, and the gentle pressure will begin to elevate the membrane via the hydrostatic pressure from the hand-actuated pump. • the pressure sensor meter inserted into the closed system will monitor the pressure and also indicate the force necessary to just detach membrane without tearing. • it is imperative that the bone- to-cannula interface be airtight so that there is no lateral leakage of the normal saline solution. • Step 3 a second examination of the integrity of the sinus membrane is done. • After the initial lift is complete, the surgeon switches to a 3 mm implant drill through the previous osteotomy site. • then, the previous controlled hydrostatic sinus lift procedure is repeated - matched larger-sized cannula and tools. the sinus membrane is now lifted to the desired extent, followed by placement of bone graft.
  • 91.
    CONCLUSION AND CLINICAL RECOMMENDATIONS •Predictable and reliable approach with a high implant survival rate. • Installation of short implants (≤ 6 mm) significantly diminished the implant survival rate. • Indicated when a residual vertical alveolar bone height of more than 6 mm is present. • Autogenous bone graft or bone substitutes can be added, if more intra- sinus bone gain is needed for installation of implants with a desirable length.
  • 92.
    COMPLICATIONS AFTER SINUS GRAFTSURGERY AND THEIR MANAGEMENT ⚫Membrane perforation/tearing ⚫Mucous retention cyst ⚫Bleeding ⚫Antral septa ⚫Incision line opening ⚫Neural injury ⚫Acute maxillary sinusitis ⚫Penetration of the implant apex into the sinus
  • 93.
    POSTOPERATIVE INSTRUCTIONS TO THEPATIENT AFTER THE SINUS-LIFT PROCEDURE ⚫ Activities 1. Do not blow your nose for the next 4 weeks. 2. Be sure to sneeze with your mouth open. 3. Do not spit or drink with straws. 4. You should avoid flying in a pressurized aircraft or scuba diving because it may increase sinus pressure. 5. You can take a decongestant to help reduce the pressure in your sinuses. 6.You should not play musical instruments that require you to blow or blow up balloons; avoid any other activity that increases oral or nasal pressure. 7. Avoid lifting heavy objects. 8. Avoid smoking.
  • 94.