Downloaded 11 times

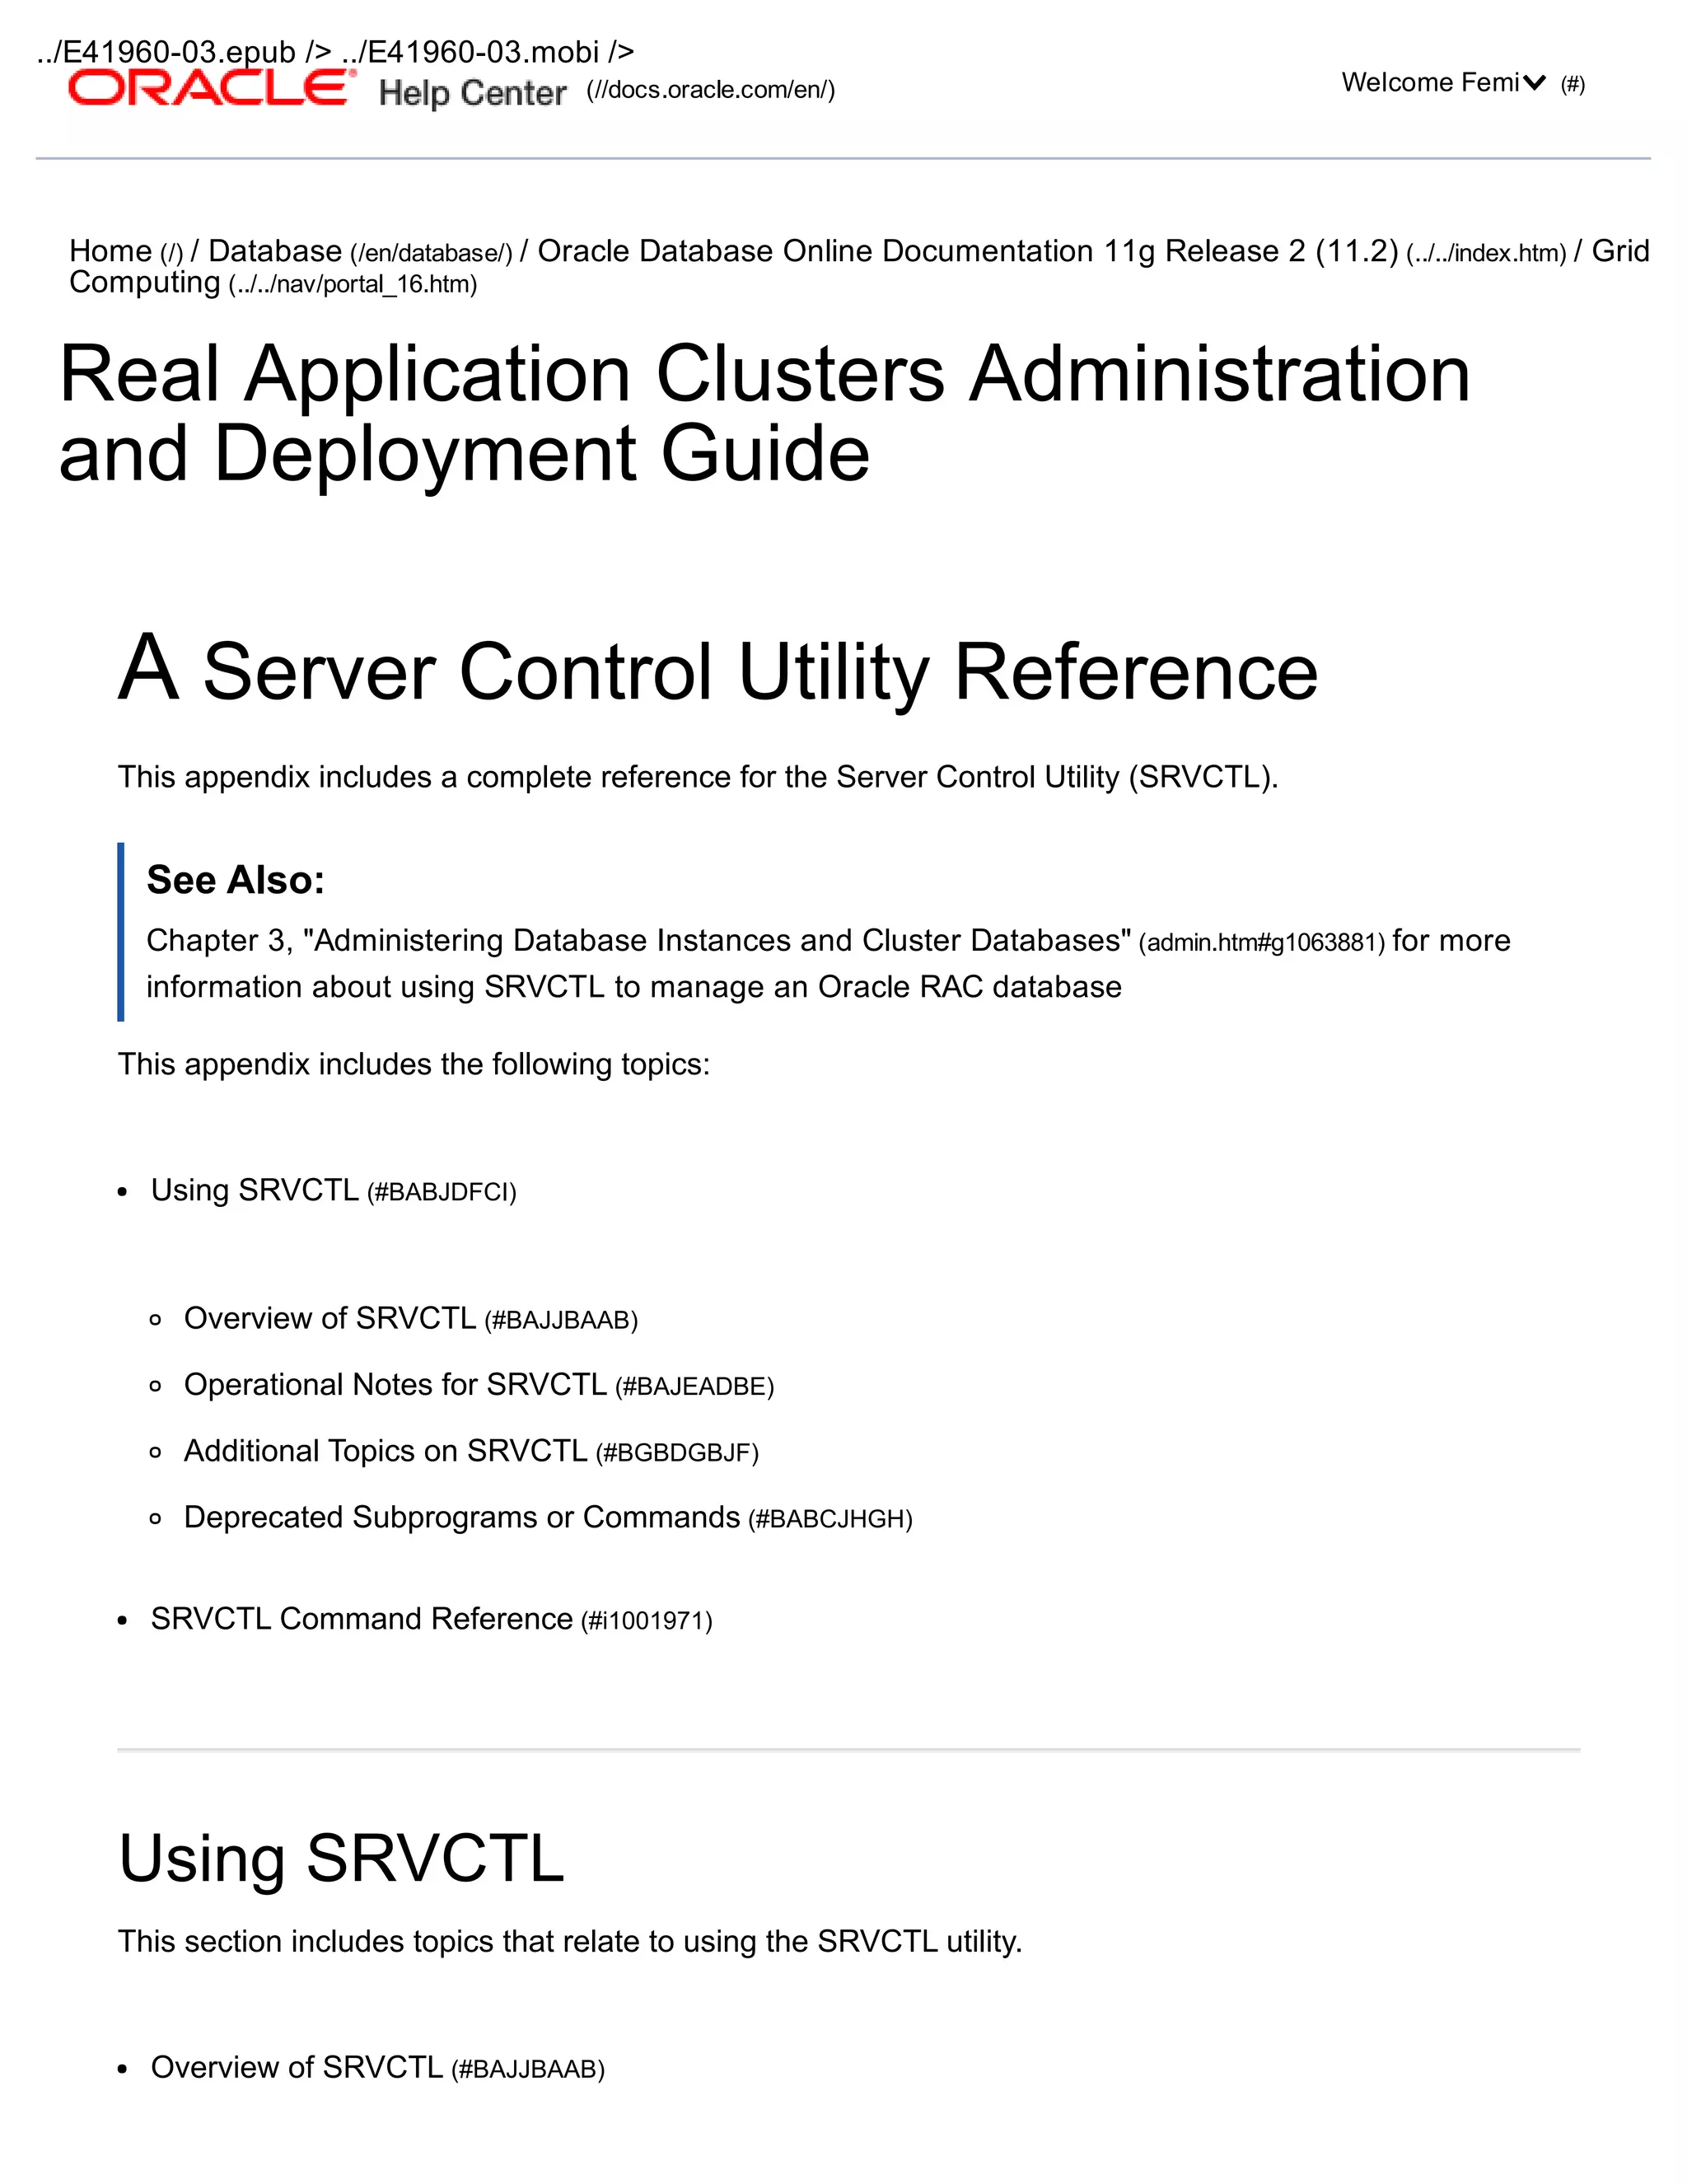
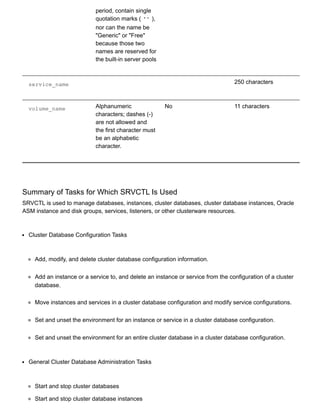

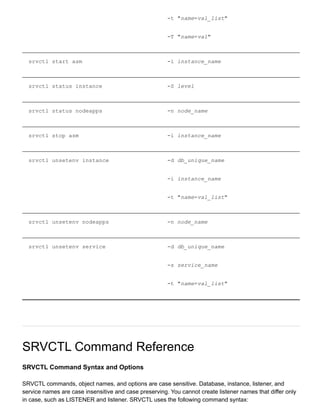
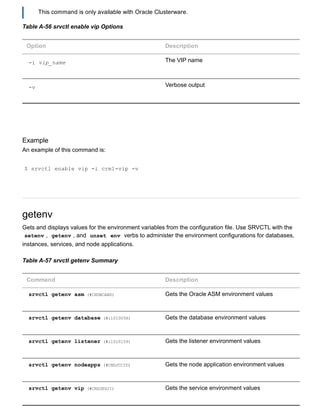
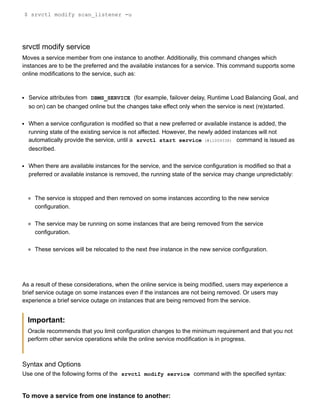
![srvctl command object [options]
In SRVCTL syntax:
command is a verb such as start , stop , or remove
object is the target or object on which SRVCTL performs the command, such as database or
instance. You can also use object abbreviations.
options extend the use of a preceding command combination to include additional parameters for the
command. For example, the i option indicates that a commadelimited list of preferred instance
names follows; sometimes the i option only permits one value and not a list of names. The n
option indicates that a node name or a commadelimited list of node names follows. Do not use spaces
between the items in a commadelimited list.
Note:
If specifying a commadelimited list in Windows, then you must enclose the list within double
quotation marks ( "" ).
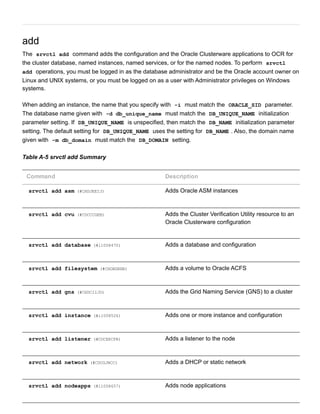
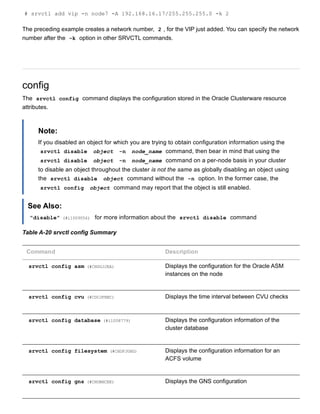
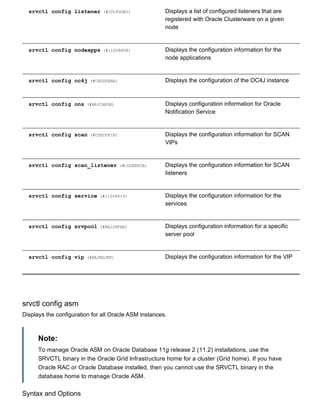
Table A3 Summary of SRVCTL Commands
Command Description
add (#i1008403) Adds node applications, databases, database
instances, Grid Naming Service (GNS), listeners,
single client access names (SCANs), Oracle ASM
instances, server pools, services, or virtual IPs
(VIPs).
config (#i1008723) Lists the configuration for GNS, the node
applications, database, Oracle ASM instance, or
service.
convert (#CDCFADGH) Converts a database either to or from an Oracle
Real Application Clusters One Node (Oracle RAC
One Node) database.
disable (#i1009056) Disables the database, database instance, GNS,
Oracle ASM instance, or service.
downgrade (#CDCIBECH)](https://image.slidesharecdn.com/servercontrolutilityreference-150519054857-lva1-app6891/85/Server-control-utility-reference-11-320.jpg)

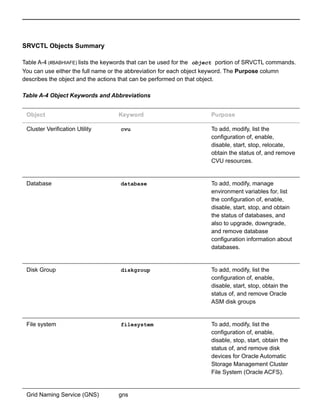
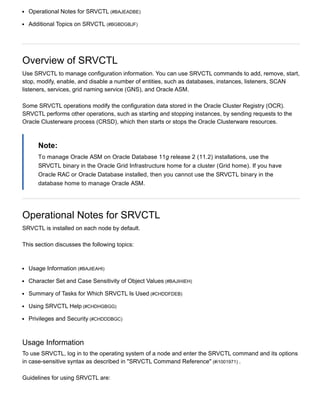
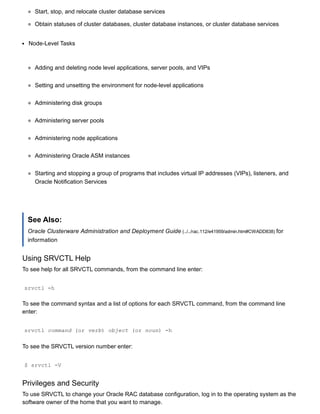
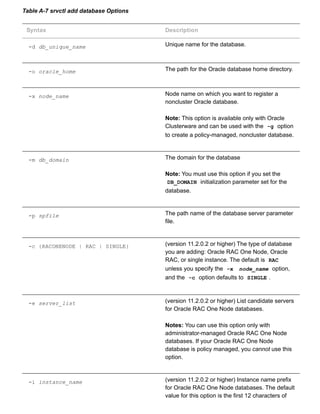
![srvctl add oc4j (#CHDIADFD) Adds OC4J instances
srvctl add ons (#BAJBABDC) Adds Oracle Notification Service daemons
srvctl add scan (#CDDEEBCH) Adds SCAN VIPs
srvctl add scan_listener (#CDDEFBAF) Adds SCAN listeners
srvctl add service (#i1008562) Adds services
srvctl add srvpool (#BAJDJFCJ) Adds a server pool to a cluster
srvctl add vip (#BAJEIJAB) Adds a VIP to a node
srvctl add asm
Adds a record for an Oracle ASM instance to the entire cluster. This command needs to be run only one
time from the Oracle Grid Infrastructure home.
Note:
To manage Oracle ASM on Oracle Database 11g release 2 (11.2) installations, use the
SRVCTL binary in the Oracle Grid Infrastructure home for a cluster (Grid home). If you have
Oracle RAC or Oracle Database installed, then you cannot use the SRVCTL binary in the
database home to manage Oracle ASM.
Syntax and Options
Use the srvctl add asm command with the following syntax:
srvctl add asm [l listener_name]
This command has only one option, l , which calls for the name of a listener. If you do not specify this
option, then the listener name defaults to LISTENER .
Example
To add a clusterware resource for Oracle ASM on every node in the cluster, use the following command:](https://image.slidesharecdn.com/servercontrolutilityreference-150519054857-lva1-app6891/85/Server-control-utility-reference-17-320.jpg)
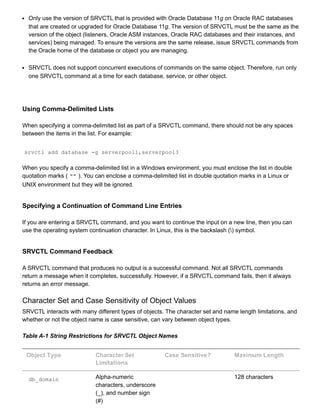
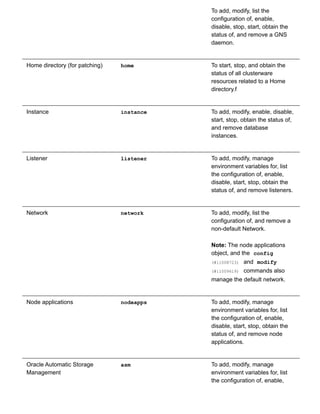
![srvctl add asm
srvctl add cvu
Starting with Oracle Database 11g Release 2 (11.2.0.2), this command adds the Cluster Verification
Utility (CVU) (rac_glossary.htm#CHDGFFDJ) to an Oracle Clusterware configuration.
Syntax and Options
Use the srvctl add cvu command with the following syntax:
srvctl add cvu [t check_interval_in_minutes]
Table A6 srvctl add cvu Options
Option Description
t check_interval_in_minutes By default, CVU runs once every 6 hours and
verifies the health of cluster. The shortest interval
you can specify for CVU check is 10 minutes.
Examples
An example of this command to add CVU with a check interval of 6 hours is:
$ srvctl add cvu t 360
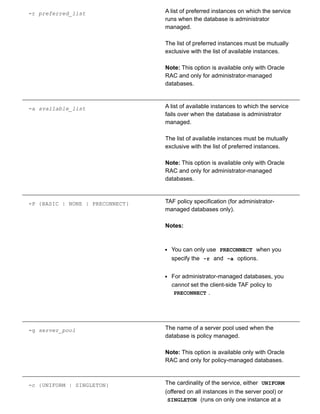
srvctl add database
Adds a database configuration to your cluster database configuration.
Syntax and Options
Use the srvctl add database command with the following syntax:
srvctl add database d db_unique_name o oracle_home [x node_name] [m
domain_name] [p spfile] [c {RACONENODE | RAC | SINGLE} [e server_list] [i
instance_name] [w timeout]] [r {PRIMARY | PHYSICAL_STANDBY | LOGICAL_STANDBY |
SNAPSHOT_STANDBY}] [s start_options] [t stop_options] [n db_name j
"acfs_path_list"] [y {AUTOMATIC | MANUAL | NORESTART}] [g server_pool_list] [a
disk_group_list]](https://image.slidesharecdn.com/servercontrolutilityreference-150519054857-lva1-app6891/85/Server-control-utility-reference-18-320.jpg)
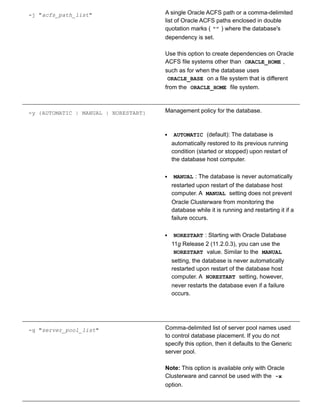
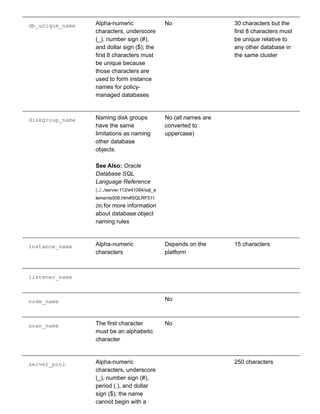
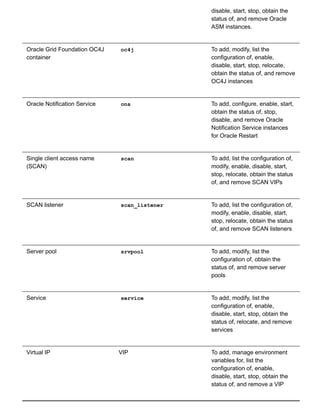
![a "disk_group_list" Commadelimited list of Oracle ASM disk groups
if database uses Oracle ASM storage
Examples
An example of this command to add a policymanaged database is:
srvctl add database d crm o /u01/oracle/product/112/mydb m foo.com p
+diskgroup1/crm/spfilecrm.ora r PHYSICAL_STANDBY s MOUNT t NORMAL n database2
y MANUAL g svrpool1,svrpool2 a "diskgroup1,diskgroup2"
An example of this command to add an administratormanaged database is:
srvctl add database d crm o /u01/oracle/product/112/mydb m foo.com
srvctl add filesystem
Adds a disk device to Oracle ACFS. This command needs to be run only one time from the Oracle Grid
Infrastructure home.
An Oracle ACFS file system resource is typically created for use with application resource dependency
lists. For example, if an Oracle ACFS file system is configured for use as an Oracle Database home, then
a resource created for the file system can be included in the resource dependency list of the Oracle
Database application. This will cause the file system and stack to be automatically mounted as a result of
the start action of the database application.
Note:
To manage Oracle ACFS on Oracle Database 11g release 2 (11.2) installations, use the
SRVCTL binary in the Oracle Grid Infrastructure home for a cluster (Grid home). If you have
Oracle RAC or Oracle Database installed, then you cannot use the SRVCTL binary in the
database home to manage Oracle ACFS.
Syntax and Options
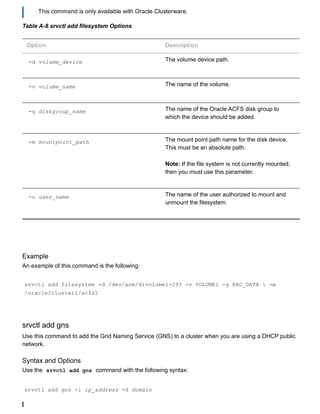
Use the srvctl add filesystem command with the following syntax:
srvctl add filesystem d volume_device v volume_name g diskgroup_name [m
mountpoint_path] [u user_name]
Note:](https://image.slidesharecdn.com/servercontrolutilityreference-150519054857-lva1-app6891/85/Server-control-utility-reference-22-320.jpg)
![Table A10 srvctl add instance Options
Option Description
d db_unique_name The unique name of the database you are adding
the instance to
i instance_name The name of the instance you are adding
n node_name The name of the node on which you are creating
the instance
Examples
Examples of this command are:
$ srvctl add instance d crm i crm01 n gm01 $ srvctl add instance d crm i
crm02 n gm02 $ srvctl add instance d crm i crm03 n gm03
srvctl add listener
Adds a listener to every node in a cluster.
Syntax and Options
Use the srvctl add listener command with the following syntax:
srvctl add listener [l listener_name] [o Oracle_home] [p "
[TCP:]port_list[/IPC:key][/NMP:pipe_name][/TCPS:s_port][/SDP:port]"] [k
network_number] [s]
Table A11 srvctl add listener Options
Option Description
l listener_name Specify a listener name.
If this option is not specified, the default name of
LISTENER is used.](https://image.slidesharecdn.com/servercontrolutilityreference-150519054857-lva1-app6891/85/Server-control-utility-reference-25-320.jpg)
![o oracle_home Specify an Oracle home for the cluster database.
If you do not include this option, then it uses the
Grid home by default.
p "[TCP:]port_list [/IPC:key]
[/NMP:pipe_name] [/TCPS:s_port]
[/SDP:port]
Protocol specifications for the listener.
port_list is a commadelimited list of TCP
ports or listener endpoints.
k network_number The optional network number from which VIPs are
obtained. If not specified, the VIPs are obtained
from the same default network from which the
nodeapps VIP is obtained.
s Indicates you want to skip the checking of ports
Example
The following command adds a listener named listener112 that is listening on port 1341 and runs from
the /ora/ora112 home directory on every node in the cluster:
$ srvctl add listener l listener112 p 1341 o /ora/ora112
srvctl add network
Adds a DHCP or static network. If your server connects to more than one network, then you can use this
command to configure an additional network interface for Oracle RAC, allowing you to create VIPs on
multiple public networks. You can also use the LISTENER_NETWORKS database initialization parameter to
control client redirects to the appropriate network
Note:
Oracle only supports DHCPassigned networks for the default network, not for subsequent
networks.
Syntax and Options
Use the srvctl add network command with the following syntax:](https://image.slidesharecdn.com/servercontrolutilityreference-150519054857-lva1-app6891/85/Server-control-utility-reference-26-320.jpg)
![srvctl add network [k net_number] S subnet/netmask[/if1[|if2|...]] [w
network_type] [v]
Table A12 srvctl add network Options
Option Description
k net_number Specify a network number. The default is 1.
S subnet/netmask [/if1[|if2|...]] Creates a subnet, the type of which you specify
with the w option. If you do not specify any
interface names, then the network uses any
interface on the given subnet.
w network_type Specify the network type: static , dhcp , or
mixed .
v Verbose output.
Example
An example of this command is:
$ srvctl add network k 3 S 1.2.3.4/255.255.255.0
srvctl add nodeapps
Adds a node application configuration to the specified node.
Syntax and Options
Use the srvctl add nodeapps command with one the following syntax models:
srvctl add nodeapps n node_name A {name | ip}/netmask[/if1[|if2|...]] [e
em_port] [l ons_local_port] [r ons_remoteport] [t host[:port]
[,host[:port],...]] [v]
srvctl add nodeapps S subnet/netmask[/if1[|if2|...]] [e em_port] [l
ons_local_port] [r ons_remoteport] [t host[:port][,host[:port],...]] [v]](https://image.slidesharecdn.com/servercontrolutilityreference-150519054857-lva1-app6891/85/Server-control-utility-reference-27-320.jpg)
![Note:
This command is only available with Oracle Clusterware.
Table A13 srvctl add nodeapps Options
Option Description
n node_name The name of the node on which you want to
create the node application. Node name is
optional and unnecessary if you run the command
on the local node.
A {name | ip} /netmask[/if1 |
[if2|...]]
This specification creates a traditional VIP node
application on the specified node.
Note: This option must be used for upgrade
configurations and new, nonDHCP
configurations.
S subnet/netmask [/if1 [| if2 |...]] Creates a DHCP subnet. If you do not specify any
interface names, then the VIPs use any interface
on the given subnet.
e em_port Local port on which Oracle Enterprise Manager
listens. The default port is 2016.
l ons_local_port The Oracle Notification Service daemon listener
port on its node.
If you do not specify this value, the Oracle
Notification Service daemon listener port defaults
to 6100.
Note: The local port and remote port must each
be unique.
r ons_remote_port The port number for remote Oracle Notification
Service daemon connections.
If you do not specify a port number, the default
value of 6200 is used for the Oracle Notification
Service remote port.](https://image.slidesharecdn.com/servercontrolutilityreference-150519054857-lva1-app6891/85/Server-control-utility-reference-28-320.jpg)
![Note: The local port and remote port must each
be unique.
t host[:port], [host[:port],[...] A list of host : port pairs of remote hosts
that are part of the Oracle Notification Service
network but are not part of the Oracle Clusterware
cluster
Note: If port is not specified for a remote host,
then ons_remote_port is used.
v Verbose output
Note:
On Linux and UNIX systems, you must be logged in as root and on Windows, you must be
logged in as a user with Administrator privileges to run this command.
Example
An example of this command is:
# srvctl add nodeapps n crmnode1 A 1.2.3.4/255.255.255.0
srvctl add oc4j
Adds an OC4J instance to all the nodes in the cluster.
Syntax and Options
srvctl add oc4j [v]
This command has only one option, v , which displays verbose output.
Note:
This command is only available with Oracle Clusterware.
Example](https://image.slidesharecdn.com/servercontrolutilityreference-150519054857-lva1-app6891/85/Server-control-utility-reference-29-320.jpg)
![An example of this command is:
srvctl add oc4j
srvctl add ons
Adds an Oracle Notification Service daemon to an Oracle Restart configuration.
Note:
This command is only available with Oracle Restart.
Syntax and options
srvctl add ons [l ons_local_port] [r ons_remote_port] [t host[:port]
[,host[:port]][...]] [v]
Table A14 srvctl add ons Options
Option Description
l ons_local_port The Oracle Notification Service daemon listening
port for local client connections
Note: The local port and remote port must each
be unique.
r ons_remote_port The Oracle Notification Service daemon listening
port for connections from remote hosts
Note: The local port and remote port must each
be unique.
t host[:port][,host[:port]][...] A list of commadelimited host : port pairs of
remote hosts that are part of the Oracle
Notification Service network but are not part of the
Oracle Clusterware cluster
Note: If port is not specified for a remote host,
then ons_remote_port is used.
v Verbose output](https://image.slidesharecdn.com/servercontrolutilityreference-150519054857-lva1-app6891/85/Server-control-utility-reference-30-320.jpg)
![Example
An example of this command is:
$ srvctl add ons l 6200
srvctl add scan
Adds Oracle Clusterware resources for the given SCAN. This command creates the same number of
SCAN VIP resources as the number of IP addresses that SCAN resolves to, or 3 when network_number
identifies a DHCP network and Oracle GNS configuration.
Syntax and Options
Use the srvctl add scan command with the following syntax:
srvctl add scan n scan_name [k network_number] [S
subnet/netmask[/if1[|if2|...]]]
Note:
This command is only available with Oracle Clusterware.
Table A15 srvctl add scan Options
Option Description
n scan_name A fully qualified host name, which includes the
domain name.
k network_number The optional network number from which SCAN
VIPs are obtained. If not specified, the SCAN
VIPs are obtained from the same default network
from which the nodeapps VIP is obtained.
S subnet/netmask [/if1 [|if2|...]] Creates the network_number . This option must
be specified when network_number does not
exist.](https://image.slidesharecdn.com/servercontrolutilityreference-150519054857-lva1-app6891/85/Server-control-utility-reference-31-320.jpg)
![Example
An example of this command is:
# srvctl add scan n scan.mycluster.example.com
srvctl add scan_listener
Adds Oracle Clusterware resources to the SCAN listeners. The number of SCAN listener resources
created is the number of SCAN VIP resources.
Syntax and Options
Use the srvctl add scan_listener command with the following syntax:
srvctl add scan_listener [l lsnr_name_prefix] [s] [p "
[TCP:]port_list[/IPC:key][/NMP:pipe_name][/TCPS:s_port] [/SDP:port]"]
Note:
This command is only available with Oracle Clusterware.
Table A16 srvctl add scan_listener Options
Option Description
l lsnr_name_prefix The SCAN listener name prefix.
s Use the s option to skip checking of the ports.
p "[TCP:]port_list [/IPC:key]
[/NMP:pipe_name] [/TCPS:s_port]
[/SDP:port]"
Protocol specifications for the listener.
port_list is a commadelimited list of TCP
ports or listener endpoints.
If this option is not specified, then the default TCP
port of 1521 is used.
Example
An example of this command is:
# srvctl add scan_listener l myscanlistener](https://image.slidesharecdn.com/servercontrolutilityreference-150519054857-lva1-app6891/85/Server-control-utility-reference-32-320.jpg)
![srvctl add service
Adds services to a database and assigns them to instances. If you have multiple instances of a cluster
database on the same node, then always use only one instance on that node for all of the services that
node manages.
Note:
The srvctl add service command does not accept placement options for Oracle RAC
One Node databases.
Syntax and Options
Use the srvctl add service command to create a service, using the first of the following syntax
models, or to update an existing service, using the second syntax model:
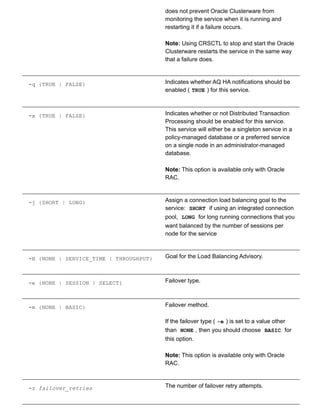
srvctl add service d db_unique_name s service_name {r "preferred_list" [a
"available_list"] [P {BASIC | NONE | PRECONNECT}] | g server_pool [c {UNIFORM
| SINGLETON]} [k network_number] [l [PRIMARY | PHYSICAL_STANDBY |
LOGICAL_STANDBY | SNAPSHOT_STANDBY] [y {AUTOMATIC | MANUAL}] [q {TRUE | FALSE}]
[x {TRUE | FALSE}] [j {SHORT | LONG}][B {NONE | SERVICE_TIME | THROUGHPUT}] [
e {NONE | SESSION | SELECT}] [m {NONE | BASIC}] [z failover_retries] [w
failover_delay]
srvctl add service d db_unique_name s service_name u {r preferred_list | a
available_list} [f]
Table A17 (#BAJDHIDD) lists and describes all the srvctl add service options and whether they can be
used when adding a service to a noncluster or Oracle RAC database.
Table A17 srvctl add service Options
Option Description
d db_unique_name Unique name for the database.
s service_name The service_name . service_domain
should be unique within the cluster unless you
want to spread connections across multiple
databases that offer the same service. If you do
not specify the service domain as part of the
service name (such as sales.foo.com ), then
the DB_DOMAIN database attribute is the default.](https://image.slidesharecdn.com/servercontrolutilityreference-150519054857-lva1-app6891/85/Server-control-utility-reference-33-320.jpg)
![time).
Notes:
This option is available only with Oracle RAC
and only for policymanaged databases.
For policymanaged Oracle RAC One Node
databases, all services must be SINGLETON .
k network_number Use this option to determine on which network
this service is offered. The service is configured to
depend on VIPs from the specified network.
Note: This option is available only with Oracle
RAC and Oracle RAC One Node database
configurations.
l {[PRIMARY] | [PHYSICAL_STANDBY] |
[LOGICAL_STANDBY] |
[SNAPSHOT_STANDBY]}
The service role.
You use this option to indicate that the service
should only be automatically started when the
Oracle Data Guard database role matches one of
the specified service roles.
See Also: Oracle Data Guard Concepts and
Administration
(../../server.112/e41134/concepts.htm#SBYDB4701) for
more information about database roles
y {AUTOMATIC | MANUAL} Service management policy.
If AUTOMATIC (the default), then the service is
automatically started upon restart of the
database, either by a planned restart (with
SRVCTL) or after a failure. Automatic restart is
also subject to the service role, however (the l
option).
If MANUAL , then the service is never
automatically restarted upon planned restart of
the database (with SRVCTL). A MANUAL setting](https://image.slidesharecdn.com/servercontrolutilityreference-150519054857-lva1-app6891/85/Server-control-utility-reference-35-320.jpg)

![srvctl add srvpool g server_pool [i importance] [l min_size] [u max_size] [n
node_list] [f]
Note:
This command is only available with Oracle Clusterware.
Table A18 srvctl add srvpool Options
Option Description
g server_pool The name of the server pool.
i importance The importance of the server pool (default is 0 ).
l min_size The minimum size of the server pool (default is
0 ).
u max_size The maximum size of the server pool. The default
value is 1 , which indicates that the size is
unlimited.
n node_names A commaseparated list of candidate node
names. The server pool will only include nodes on
the candidate list, but not all nodes on the
candidate list will necessarily be in the server
pool.
f Add the server pool, even if requires stopping
resources in other server pools.
Example
An example of this command is:
$ srvctl add srvpool g SP1 i 1 l 3 u 7 n mynode1,mynode2
srvctl add vip](https://image.slidesharecdn.com/servercontrolutilityreference-150519054857-lva1-app6891/85/Server-control-utility-reference-38-320.jpg)
![Adds a VIP to a node.
Syntax and Options
Use the srvctl add vip command with the following syntax:
srvctl add vip n node_name A {name|ip}/netmask[/if1[if2|...]] [k
network_number] [v]
Note:
This command is only available with Oracle Clusterware.
Table A19 srvctl add vip Options
Option Description
n node_name The name of the node on which you are adding
the VIP
A {name|ip}/netmask [/if1[|if2|...]] This specification creates a traditional VIP node
application on the specified node
k network_number The optional network number from which VIPs are
obtained.
If not specified, the VIPs are obtained from the
same default network from which the nodeapps
VIP is obtained.
v Verbose output
Note:
You cannot have multiple VIPs on the same net number (subnet or interface pair) on the same
node.
Example
An example of this command is:](https://image.slidesharecdn.com/servercontrolutilityreference-150519054857-lva1-app6891/85/Server-control-utility-reference-39-320.jpg)
![Use the srvctl config asm command with the following syntax:
srvctl config asm [a]
Table A21 srvctl config asm Options
Option Description
a Print detailed configuration information
Example
An example of this command is:
srvctl config asm a
srvctl config cvu
Starting with Oracle Database 11g Release 2 (11.2.0.2), this command displays the time interval, in
minutes, between CVU checks.
Syntax and Options
Use the srvctl config cvu command with the following syntax:
srvctl config cvu
This command has no options.
Examples
The srvctl config cvu command returns output similar to the following:
CVU is configured to run once every 360 minutes
srvctl config database
Displays the configuration for an Oracle RAC database or lists all configured databases that are registered
with Oracle Clusterware.](https://image.slidesharecdn.com/servercontrolutilityreference-150519054857-lva1-app6891/85/Server-control-utility-reference-42-320.jpg)
![Syntax and Options
Use the srvctl config database command with the following syntax:
srvctl config database [d db_unique_name] [a]
Table A22 srvctl config database Options
Option Description
d db_unique_name Unique name for the database.
If you do not specify this option, then the utility
displays the configuration of all database
resources.
a Print detailed configuration information
Examples
To list the configuration of all databases, use the following example:
srvctl config database d myDB
The following is example output from the srvctl config database command:
$ srvctl config database d myDB Database unique name: myDB Database name: Oracle
home: /scott_st2/oracle Oracle user: scott Spfile: Domain: Start options: open
Stop options: immediate Database role: PRIMARY Management policy: AUTOMATIC
Server pools: myDB Database instances: Disk Groups: Services: scottsvc1 Type:
RACOneNode Online relocation timeout: 30 Instance name prefix: myDB Candidate
servers: node1 node2 Database is administrator managed
The preceding sample output shows the database type as RACOneNode , an Oracle RAC One Node
database. Other potential types are RAC and SingleInstance . The Online relocation timeout ,
Instance name prefix , and Candidate servers fields only apply to Oracle RAC One Node
databases and do not display for the other two database types. Similarly, the Database instances field
is empty because the database type is RACOneNode .
srvctl config filesystem](https://image.slidesharecdn.com/servercontrolutilityreference-150519054857-lva1-app6891/85/Server-control-utility-reference-43-320.jpg)
![Displays the configuration for an Oracle Automatic Storage Management Cluster File System (Oracle
ACFS) device.
Syntax and Options
Use the srvctl config filesystem command with the following syntax:
srvctl config filesystem d volume_device_path
Table A23 srvctl config filesystem Options
Option Description
d volume_device_path The path name of a device that an Oracle ACFS
volume uses.
Examples
The following example shows how to retrieve the configuration for an Oracle ACFS file system:
srvctl config filesystem d /dev/asm/d1volume293
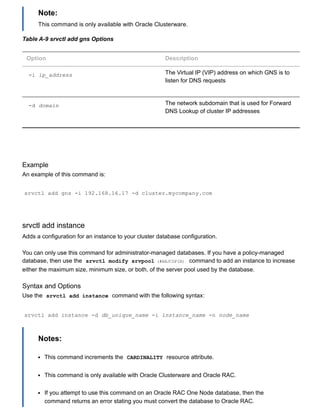
srvctl config gns
Displays the configuration for GNS.
Syntax and Options
Use the srvctl config gns command with the following syntax:
srvctl config gns [a] [d] [k] [m] [n node_name] [p] [s] [V] [q name] [
l] [v]
Note:
This option is available only for Oracle Clusterware.
Table A24 srvctl config gns Options
Option Description
a Print detailed configuration information.](https://image.slidesharecdn.com/servercontrolutilityreference-150519054857-lva1-app6891/85/Server-control-utility-reference-44-320.jpg)
![d Display the subdomain served by GNS.
k Display network on which GNS is listening.
m Display the port on which the GNS daemon is
listening for multicast requests.
n node_name Display the configuration information for GNS on
the specified node.
p Display the port that the GNS daemon uses to
communicate with the DNS server.
s Display the status of GNS.
V Display the version of GNS.
q name Query GNS for the records belonging to a name.
l List all records in GNS.
v Verbose output.
srvctl config listener
Displays a list of configured listeners that are registered with Oracle Clusterware or displays detailed
configuration information for a specific listener.
Syntax and Options
Use the srvctl config listener command with the following syntax:
srvctl config listener [l listener_name] [a]
Table A25 srvctl config listener Options](https://image.slidesharecdn.com/servercontrolutilityreference-150519054857-lva1-app6891/85/Server-control-utility-reference-45-320.jpg)
![Option Description
l listener_name Listener name.
If you do not specify this option, then the name of
the listener defaults to LISTENER.
a Print detailed configuration information.
Example
An example of this command is:
srvctl config listener
srvctl config nodeapps
Displays the VIP configuration for each node in the cluster.
Syntax and Options
Use the srvctl config nodeapps command with the following syntax:
srvctl config nodeapps [a] [g] [s]
Note:
This command is only available with Oracle Clusterware.
Table A26 srvctl config nodeapps Option
Option Description
a Displays the VIP address configuration
g Displays the GSD configuration
s Displays the Oracle Notification Service
configuration](https://image.slidesharecdn.com/servercontrolutilityreference-150519054857-lva1-app6891/85/Server-control-utility-reference-46-320.jpg)
![Example
An example of this command is:
$ srvctl config nodeapps a g s
srvctl config oc4j
Displays configuration information for the OC4J instance.
Note:
This command is only available with Oracle Clusterware.
srvctl config oc4j
srvctl config ons
Displays configuration information for the Oracle Notification Service daemon.
Note:
This command is only available with Oracle Clusterware.
srvctl config ons
srvctl config scan
Displays the configuration information for all SCAN VIPs, by default, or a specific SCAN VIP identified by
ordinal_number .
Syntax and Options
Use the srvctl config scan command with the following syntax:
srvctl config scan [i ordinal_number]
The only option available for this command is i ordinal_number , which identifies any one of the
three SCAN VIPs, and can take a range of values from 1 to 3.
Note:
This command is only available with Oracle Clusterware.](https://image.slidesharecdn.com/servercontrolutilityreference-150519054857-lva1-app6891/85/Server-control-utility-reference-47-320.jpg)
![Example
An example of this command is:
$ srvctl config scan i 1
srvctl config scan_listener
Displays the configuration information for all SCAN listeners, by default, or a specific listener identified by
ordinal_number .
Syntax and Options
Use the srvctl config scan_listener command with the following syntax:
srvctl config scan_listener [i ordinal_number]
The only option available for this command is i ordinal_number , which identifies any one of the
three SCAN VIPs, and can take a range of values from 1 to 3.
Note:
This command is only available with Oracle Clusterware.
Example
An example of this command is:
$ srvctl config scan_listener i 1
srvctl config service
Displays the configuration for a service.
Syntax and Options
Use the srvctl config service command with the following syntax:
srvctl config service d db_unique_name [s service_name]
Table A27 srvctl config service Options
Option Description
d db_unique_name Unique name for the database](https://image.slidesharecdn.com/servercontrolutilityreference-150519054857-lva1-app6891/85/Server-control-utility-reference-48-320.jpg)
![Displays configuration information including name, minimum size, maximum size, importance, and a list of
server names, if applicable, for a specific server pool in a cluster.
Syntax and Options
Use the srvctl config srvpool command with the following syntax:
srvctl config srvpool [g server_pool]
Note:
This command is only available with Oracle Clusterware.
Example
An example of this command is:
$ srvctl config srvpool g dbpool
srvctl config vip
Displays all VIPs on all networks in the cluster except for user VIPs.
Syntax and Options
Use the srvctl config vip command with one of the following syntax models:
srvctl config vip n node_name srvctl config vip i vip_name
Note:
This command is only available with Oracle Clusterware.
Table A28 srvctl config vip Options
Option Description
n node_name Node name
i vip_name The VIP name](https://image.slidesharecdn.com/servercontrolutilityreference-150519054857-lva1-app6891/85/Server-control-utility-reference-50-320.jpg)
![Example
An example of this command is:
$ srvctl config vip n crmnode1
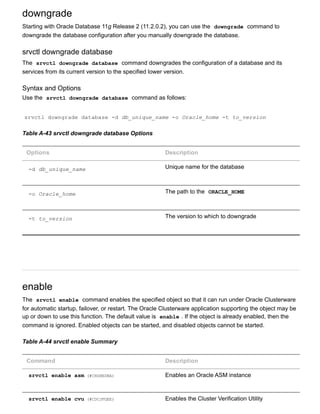
convert
Starting with Oracle Database 11g Release 2 (11.2.0.2), the srvctl convert command converts a
database either to or from an Oracle RAC One Node database.
Syntax and Options
Use the srvctl convert database command with one of the following syntax models:
srvctl convert database d db_unique_name c RACONENODE [i instance_name] [w
timeout] srvctl convert database d db_unique_name c RAC [n node_name]
Table A29 srvctl convert database Options
Option Description
d db_unique_name Unique name for the database.
Note: If you specify a noncluster database, then
command returns an error instructing you to use
rconfig to convert the noncluster database to
Oracle RAC or Oracle RAC One Node.
c RACONENODE | RAC The type of database to which you are converting,
either Oracle RAC One Node or Oracle RAC.
Note: If there is an ongoing or failed online
database relocation, then the command returns
an error instructing you to first complete or abort
the online database relocation and then rerun the
command.
i instance_name Instance name prefix for Oracle RAC One Node
databases. The default value for this option is the
first 12 characters of the global unique name of
the database.](https://image.slidesharecdn.com/servercontrolutilityreference-150519054857-lva1-app6891/85/Server-control-utility-reference-51-320.jpg)

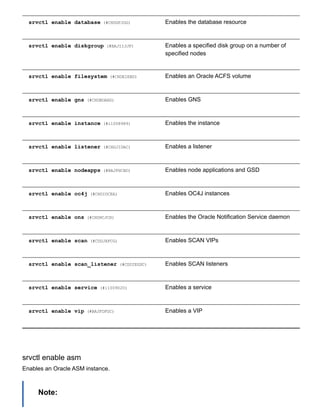
![srvctl disable asm [n node_name]
Table A31 srvctl disable asm Options
Option Description
n node_name Node name
Note: This option is available only with Oracle
Clusterware.
Example
An example of this command is:
$ srvctl disable asm n crmnode1
srvctl disable cvu
Starting with Oracle Database 11g Release 2 (11.2.0.2), this command disables the Cluster Verification
Utility (CVU) for Oracle Clusterware management, if enabled.
Syntax and Options
Use the srvctl disable cvu command with the following syntax:
srvctl disable cvu [n node_name]
You can specify a particular node on which to disable CVU.
Table A32 srvctl disable cvu Options
Option Description
n node_name Node name
Examples
An example of this command to disable CVU on a single node of a cluster is:](https://image.slidesharecdn.com/servercontrolutilityreference-150519054857-lva1-app6891/85/Server-control-utility-reference-55-320.jpg)
![$ srvctl disable cvu n crmnode1
srvctl disable database
Disables a database. If the database is a cluster database, then its instances are also disabled.
Syntax and Options
Use the srvctl disable database command with the following syntax:
srvctl disable database d db_unique_name [n node_name]
Table A33 srvctl disable database Options
Option Description
d database_name Database name
n node_name Disables the database from running on the named
node
Note: This option is available only with Oracle
Clusterware.
Example
An example of this command is:
$ srvctl disable database d mydb1
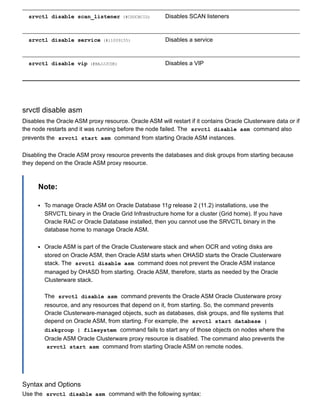
srvctl disable diskgroup
Disables a specific disk group on a number of specified nodes.
Syntax and Options
Use the srvctl disable diskgroup command with the following syntax:
srvctl disable diskgroup g diskgroup_name [n node_list]
Table A34 srvctl disable diskgroup Options](https://image.slidesharecdn.com/servercontrolutilityreference-150519054857-lva1-app6891/85/Server-control-utility-reference-56-320.jpg)
![An example of this command is:
$ srvctl disable filesystem d /dev/asm/d1volume293
srvctl disable gns
Disables GNS for a specific node, or all available nodes in the cluster.
Syntax and Options
Use the srvctl disable gns command with the following syntax:
srvctl disable gns [n node_name]
Note:
This command is only available with Oracle Clusterware.
Table A36 srvctl disable gns Options
Option Description
n node_name Name of a node in the cluster
If you do not specify this option, then SRVCTL
disables GNS for the entire cluster.
Example
An example of this command is:
$ srvctl disable gns n crm7
srvctl disable instance
Disables an instance. If the instance that you disable with this command is the last enabled instance, then
this operation also disables the database.
Syntax and Options
Use the srvctl disable instance command with the following syntax:](https://image.slidesharecdn.com/servercontrolutilityreference-150519054857-lva1-app6891/85/Server-control-utility-reference-58-320.jpg)
![srvctl disable instance d db_unique_name i instance_name_list
Note:
This command is only available with Oracle Clusterware and Oracle RAC.
If you run this command on an Oracle RAC One Node database, then the command returns
an error instructing you to use the database noun, instead.
Table A37 srvctl disable instance Options
Option Description
d db_unique_name Unique name for the database
i instance_name_list Commadelimited list of instance names
Example
An example of this command is:
$ srvctl disable instance d crm i "crm1,crm3"
srvctl disable listener
Disables a listener resource.
Syntax and Options
Use the srvctl disable listener command with the following syntax:
srvctl disable listener [l listener_name] [n node_name]
Table A38 srvctl disable listener Options
Option Description
l listener_name](https://image.slidesharecdn.com/servercontrolutilityreference-150519054857-lva1-app6891/85/Server-control-utility-reference-59-320.jpg)
![Name of a listener resource. If you do not specify
this option, the name of the listener defaults to
LISTENER .
n node_name Name of a cluster node on which the listener you
want to disable is running.
This option is only available with Oracle
Clusterware.
Example
An example of this command is:
$ srvctl disable listener l listener_crm n node5
srvctl disable nodeapps
Disables node applications on all nodes in the cluster.
Syntax and Options
Use the srvctl disable nodeapps command with the following syntax:
srvctl disable nodeapps [g] [v]
Note:
This command is only available with Oracle Clusterware.
Table A39 srvctl disable nodeapps Options
Option Description
g Disables GSD
v Verbose output](https://image.slidesharecdn.com/servercontrolutilityreference-150519054857-lva1-app6891/85/Server-control-utility-reference-60-320.jpg)
![Example
An example of this command is:
$ srvctl disable nodeapps g v
srvctl disable oc4j
Disables the OC4J instance on all nodes or on a specific node.
Syntax and Options
Use the srvctl disable oc4j command with the following syntax:
srvctl disable oc4j [n node_name] [v]
Table A40 srvctl disable oc4j Options
Option Description
n node_name The name of a node in the cluster
v Verbose output
Example
An example of this command is:
$ srvctl disable oc4j n crm3
srvctl disable ons
Disables the Oracle Notification Service daemon for Oracle Restart installations.
srvctl disable ons [v]
The only option for this command is v , which indicates that verbose output should be displayed.
srvctl disable scan
Disables all SCAN VIPs, by default, or a specific SCAN VIP identified by ordinal_number .](https://image.slidesharecdn.com/servercontrolutilityreference-150519054857-lva1-app6891/85/Server-control-utility-reference-61-320.jpg)
![Syntax and Options
Use the srvctl disable scan command with the following syntax:
srvctl disable scan [i ordinal_number]
The only option available for this command is i ordinal_number , which represents which identifies
any one of the three SCAN VIPs, and can take a range of values from 1 to 3.
Note:
This command is only available with Oracle Clusterware.
Example
An example of this command is:
$ srvctl disable scan i 1
srvctl disable scan_listener
Disables all SCAN listeners, by default, or a specific listener identified by ordinal_number .
Syntax and Options
Use the srvctl disable scan_listener command with the following syntax:
srvctl disable scan_listener [i ordinal_number]
The only option available for this command is i ordinal_number , which identifies any one of the
three SCAN listeners, and can take a range of values from 1 to 3.
Note:
This command is only available with Oracle Clusterware.
Example
An example of this command is:
$ srvctl disable scan_listener i 1
srvctl disable service](https://image.slidesharecdn.com/servercontrolutilityreference-150519054857-lva1-app6891/85/Server-control-utility-reference-62-320.jpg)
![Disables a service. Disabling an entire service affects all of the instances, disabling each one. When the
entire service is already disabled, a srvctl disable service operation on the entire service affects all
of the instances and disables them; it just returns an error. This means that you cannot always use the
entire set of service operations to manipulate the service indicators for each instance.
Syntax and Options
Use the srvctl disable service command with the following syntax:
srvctl disable service d db_unique_name s "service_name_list" [i instance_name
| n node_name]
If you do not specify either the i instance_name or n node_name options, then the command
disables the service on all nodes.
Table A41 srvctl disable service Options
Option Description
d db_unique_name Unique name for the database
s "service_name_list" Commadelimited list of service names, or a
single service name
i instance_name The name of the instance that you want to disable
the service for.
Note: Use this option with administratormanaged
databases
Note: This option is available only with Oracle
Clusterware and Oracle RAC.
n node_name The name of the node on which to disable the
service
Note: Use this option with policymanaged
databases
Note: This option is available only with Oracle
Clusterware and Oracle RAC.](https://image.slidesharecdn.com/servercontrolutilityreference-150519054857-lva1-app6891/85/Server-control-utility-reference-63-320.jpg)
![Examples
The following example globally disables two services for the CRM database:
$ srvctl disable service d crm s "crm,marketing"
The following example disables a service for the CRM database that is running on the CRM1 instance,
resulting in the service still being available for the database, but on one less instance:
$ srvctl disable service d crm s crm i crm1
srvctl disable vip
Disables a specific VIP.
Syntax and Options
Use the srvctl disable vip command with the following syntax:
srvctl disable vip i vip_name [v]
Note:
This command is only available with Oracle Clusterware.
Table A42 srvctl disable vip Options
Option Description
i vip_name The VIP name
v Verbose output
Example
An example of this command is:
$ srvctl disable vip i vip1 v](https://image.slidesharecdn.com/servercontrolutilityreference-150519054857-lva1-app6891/85/Server-control-utility-reference-64-320.jpg)
![To manage Oracle ASM on Oracle Database 11g release 2 (11.2) installations, use the
SRVCTL binary in the Oracle Grid Infrastructure home for a cluster (Grid home). If you have
Oracle RAC or Oracle Database installed, then you cannot use the SRVCTL binary in the
database home to manage Oracle ASM.
Syntax and Options
Use the srvctl enable asm command with the following syntax:
srvctl enable asm [n node_name]
Table A45 srvctl enable asm Option
Option Description
n node_name Node name
Note: This option is available only with Oracle
Clusterware.
Example
An example of this command is:
$ srvctl enable asm n crmnode1
srvctl enable cvu
Starting with Oracle Database 11g Release 2 (11.2.0.2), this command enables the Cluster Verification
Utility (CVU) for Oracle Clusterware management if disabled.
Syntax and Options
Use the srvctl enable cvu command with the following syntax:
srvctl enable cvu [n node_name]
You can specify a particular node on which to enable CVU.
Table A46 srvctl enable cvu Options
Option Description
Node name](https://image.slidesharecdn.com/servercontrolutilityreference-150519054857-lva1-app6891/85/Server-control-utility-reference-67-320.jpg)
![n node_name Note: This option is available only with Oracle
Clusterware.
Examples
An example of this command to enable CVU on a single node of a cluster is:
$ srvctl enable cvu n crmnode1
srvctl enable database
Enables a cluster database and its instances.
Syntax and Options
Use the srvctl enable database command with the following syntax:
srvctl enable database d db_unique_name [n node_name]
Table A47 srvctl enable database Options
Option Description
d database_name Database name
n node_name The name of the node for which the database
resource should be enabled
Note: This option is available only with Oracle
Clusterware.
Example
An example of this command is:
$ srvctl enable database d mydb1](https://image.slidesharecdn.com/servercontrolutilityreference-150519054857-lva1-app6891/85/Server-control-utility-reference-68-320.jpg)
![srvctl enable diskgroup
Enables a specific disk group on a number of specified nodes.
Syntax and Options
Use the srvctl enable diskgroup command with the following syntax:
srvctl enable diskgroup g diskgroup_name [n node_list]
Table A48 srvctl enable diskgroup Options
Option Description
g diskgroup_name The Oracle ASM disk group name
n node_list Commadelimited list of node names on which to
enable the disk group
This option is only available with Oracle
Clusterware.
Example
An example of this command is:
$ srvctl enable diskgroup g diskgroup1 n mynode1,mynode2
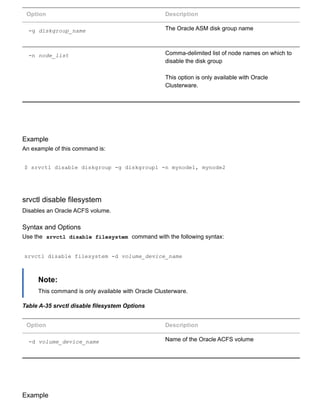
srvctl enable filesystem
Enables an Oracle ACFS volume.
Syntax and Options
Use the srvctl enable filesystem command with the following syntax:
srvctl enable filesystem d volume_device_name
Note:
This command is only available with Oracle Clusterware.
Table A49 srvctl enable filesystem Options](https://image.slidesharecdn.com/servercontrolutilityreference-150519054857-lva1-app6891/85/Server-control-utility-reference-69-320.jpg)
![Option Description
d volume_device_name Device name of the Oracle ACFS volume
Example
An example of this command is:
$ srvctl enable filesystem d /dev/asm/d1volume293
srvctl enable gns
Enables GNS on all nodes or a specific node.
Syntax and Options
Use the srvctl enable gns command with the following syntax:
srvctl enable gns [n node_name]
Note:
This command is available only with Oracle Clusterware.
Table A50 srvctl enable gns Options
Option Description
n node_name Name of the node on which to enable GNS.
If this option is not specified, then GNS is enabled
on all nodes in the cluster.
Example
An example of this command is:
$ srvctl enable gns](https://image.slidesharecdn.com/servercontrolutilityreference-150519054857-lva1-app6891/85/Server-control-utility-reference-70-320.jpg)

![Use the srvctl enable listener command with the following syntax:
srvctl enable listener [l listener_name] [n node_name]
Table A52 srvctl enable listener Options
Option Description
l listener_name Name of a listener resource. If you do not specify
this option, the name of the listener defaults to
LISTENER
n node_name Name of a cluster node
Note: This option is available only with Oracle
Clusterware.
Example
An example of this command is:
$ srvctl enable listener l listener_crm n node5
srvctl enable nodeapps
Enables the node applications on all nodes in the cluster.
Syntax and Options
Use the srvctl enable nodeapps command with the following syntax:
srvctl enable nodeapps [g] [v]
Note:
This command is only available with Oracle Clusterware.
Table A53 srvctl enable nodeapps Options
Option Description
g Enables GSD](https://image.slidesharecdn.com/servercontrolutilityreference-150519054857-lva1-app6891/85/Server-control-utility-reference-72-320.jpg)
![v Verbose output
Example
An example of this command is:
$ srvctl enable nodeapps g v
srvctl enable oc4j
Enables the OC4J instance on all nodes or on a specific node.
Syntax and Options
Use the srvctl enable oc4j command with the following syntax:
srvctl enable oc4j [n node_name] [v]
Note:
This command is only available with Oracle Clusterware.
Table A54 srvctl enable oc4j Options
Option Description
n node_name The name of a node in the cluster
v Verbose output
Example
An example of this command is:
$ srvctl enable oc4j n crm3](https://image.slidesharecdn.com/servercontrolutilityreference-150519054857-lva1-app6891/85/Server-control-utility-reference-73-320.jpg)
![srvctl enable ons
Enables the Oracle Notification Service daemon.
Note:
This command is only available with Oracle Restart.
Syntax and Options
Use the srvctl enable ons command with the following syntax:
srvctl enable ons [v]
The only option for this command is v, which indicates that verbose output should be displayed.
Example
An example of this command is:
$ srvctl enable ons
srvctl enable scan
Enables all SCAN VIPs, by default, or a specific SCAN VIP identified by its ordinal_number .
Syntax and Options
Use the srvctl enable scan command with the following syntax:
srvctl enable scan [i ordinal_number]
The only option available for this command is i ordinal_number , which identifies any one of the
three SCAN VIPs, and takes a range of values from 1 to 3.
Note:
This command is only available with Oracle Clusterware.
Example
An example of this command is:
$ srvctl enable scan i 1](https://image.slidesharecdn.com/servercontrolutilityreference-150519054857-lva1-app6891/85/Server-control-utility-reference-74-320.jpg)
![srvctl enable scan_listener
Enables all SCAN listeners, by default, or a specific listener identified by its ordinal_number .
Syntax and Options
Use the srvctl enable scan_listener command with the following syntax:
srvctl enable scan_listener [i ordinal_number]
The only option available for this command is i ordinal_number , which identifies any one of the
three SCAN listeners, and takes a range of values from 1 to 3.
Note:
This command is only available with Oracle Clusterware.
Example
An example of this command is:
$ srvctl enable scan_listener i 1
srvctl enable service
Enables a service for Oracle Clusterware. Enabling an entire service also affects the enabling of the
service over all of the instances by enabling the service at each one. When the entire service is already
enabled, an srvctl enable service operation does not affect all of the instances and enable them.
Instead, this operation returns an error. Therefore, you cannot always use the entire set of service
operations to manipulate the service indicators for each instance.
Syntax and Options
Use the srvctl enable service command with the following syntax:
srvctl enable service d db_unique_name s "service_name_list" [i instance_name
| n node_name]
Table A55 srvctl enable service Options
Option Description
d db_unique_name Unique name for the database](https://image.slidesharecdn.com/servercontrolutilityreference-150519054857-lva1-app6891/85/Server-control-utility-reference-75-320.jpg)
![s service_name_list Commadelimited list of service names
i instance_name Name of the database instance where you want
the service to run
Use this option for administratormanaged
databases
Note: This option is available only with Oracle
Clusterware and Oracle RAC.
n node_name Name of the node where you want the service to
run
Use this option for policymanaged databases
Note: This option is available only with Oracle
Clusterware and Oracle RAC.
Examples
The following example globally enables a service:
$ srvctl enable service d crm s crm
The following example enables a service to use a preferred instance:
$srvctl enable service d crm s crm i crm1
srvctl enable vip
Enables a specific VIP.
Syntax and Options
Use the srvctl enable vip command with the following syntax:
srvctl enable vip i vip_name [v]
Note:](https://image.slidesharecdn.com/servercontrolutilityreference-150519054857-lva1-app6891/85/Server-control-utility-reference-76-320.jpg)
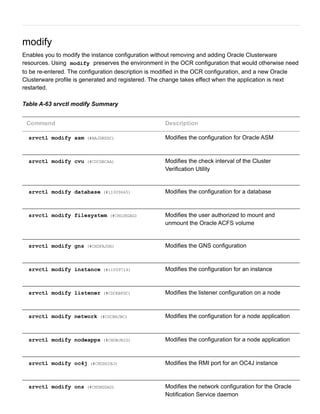
![srvctl getenv asm
Displays the values for environment variables associated with Oracle ASM.
Syntax and Options
Use the srvctl getenv asm command with the following syntax:
srvctl getenv asm [t "name_list"]
Table A58 srvctl getenv asm Options
Options Description
t "name_list" Commadelimited list of the names of
environment variables.
If this option is not specified, then the values of all
environment variables associated with Oracle
ASM are displayed.
Example
The following example displays the current values for all the environment variables used by Oracle ASM:
$ srvctl getenv asm
srvctl getenv database
Displays the values for environment variables associated with a database.
Syntax and Options
Use the srvctl getenv database command with the following syntax:
srvctl getenv database d db_unique_name [t "name_list"]
Table A59 srvctl getenv database Options
Options Description
d db_unique_name Unique name for the database](https://image.slidesharecdn.com/servercontrolutilityreference-150519054857-lva1-app6891/85/Server-control-utility-reference-78-320.jpg)
![t "name_list" Commadelimited list of the names of
environment variables
If this option is not specified, then the values of all
environment variables associated with the
database are displayed.
Example
The following example gets the environment configuration for the CRM database:
$ srvctl getenv database d crm
srvctl getenv listener
Gets the environment variables for the specified listener.
Syntax and Options
Use the srvctl getenv listener command with the following syntax:
srvctl getenv listener [l listener_name] [t "name_list"]
Table A60 srvctl getenv listener Options
Options Description
l listener_name Listener name
If this option is not specified, the name of the
listener defaults to LISTENER
t "name_list" Commadelimited list of the names of
environment variables
If this option is not specified, then the values of all
environment variables associated with the listener
are displayed.](https://image.slidesharecdn.com/servercontrolutilityreference-150519054857-lva1-app6891/85/Server-control-utility-reference-79-320.jpg)
![Example
The following example lists all environment variables for the default listener:
$ srvctl getenv listener
srvctl getenv nodeapps
Gets the environment variables for the node application configurations.
Syntax and Options
Use the srvctl getenv nodeapps command with the following syntax:
srvctl getenv nodeapps [a] [g] [s] [t "name_list"] [v]
Note:
This command is only available with Oracle Clusterware.
Table A61 srvctl getenv nodeapps Options
Options Description
a Displays the VIP address configuration
g Displays the GSD configuration
s Displays the Oracle Notification Service
configuration
t "name_list" Commadelimited list of the names of
environment variables
If this option is not specified, then the values of all
environment variables associated with the
nodeapps are displayed.
v Verbose output](https://image.slidesharecdn.com/servercontrolutilityreference-150519054857-lva1-app6891/85/Server-control-utility-reference-80-320.jpg)
![Example
The following example lists all environment variables for the node applications:
$ srvctl getenv nodeapps a
srvctl getenv vip
Gets the environment variables for the specified VIP.
Syntax and Options
Use the srvctl getenv vip command with the following syntax:
srvctl getenv vip i vip_name [t "name_list"] [v]
Note:
This command is only available with Oracle Clusterware.
Table A62 srvctl getenv vip Options
Options Description
i vip_name The name of the VIP
t "name_list" Commadelimited list of the names of
environment variables
If this option is not specified, then the values of all
environment variables associated with the VIP are
displayed.
v Verbose output
Example
The following example lists all environment variables for the specified VIP:
$ srvctl getenv vip i node1vip](https://image.slidesharecdn.com/servercontrolutilityreference-150519054857-lva1-app6891/85/Server-control-utility-reference-81-320.jpg)
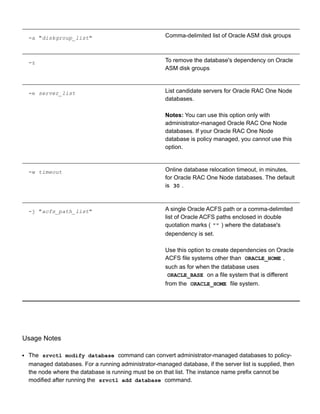
![srvctl modify scan (#CDDIEHBE) Modifies the SCAN VIP configuration to match
that of a specific SCAN VIP
srvctl modify scan_listener (#CDDHCACE) Updates the SCAN listener configuration to match
that of the current SCAN VIP configuration
srvctl modify service (#i1009746) Modifies the configuration for a service
srvctl modify srvpool (#BAJCDFIB) Modifies a specific server pool
srvctl modify asm
Modify the listener used by Oracle ASM, the disk group discovery string used by Oracle ASM, or the
SPFILE used by Oracle ASM for a noncluster database or a cluster database.
Note:
To manage Oracle ASM on Oracle Database 11g release 2 (11.2) installations, use the
SRVCTL binary in the Oracle Grid Infrastructure home for a cluster (Grid home). If you have
Oracle RAC or Oracle Database installed, then you cannot use the SRVCTL binary in the
database home to manage Oracle ASM.
Syntax and Options
Use the srvctl modify asm command with the following syntax:
srvctl modify asm [n node_name] [l listener_name] [d asm_diskstring] [p
spfile_path_name]
Note:
This command is only available with Oracle Clusterware.
Table A64 srvctl modify asm Options
Option Description
n node_name Node name
l listener_name The listener name with which Oracle ASM
registers](https://image.slidesharecdn.com/servercontrolutilityreference-150519054857-lva1-app6891/85/Server-control-utility-reference-83-320.jpg)
![d asm_diskstring The new Oracle ASM disk group discovery string
p spfile_path_name The path name of the new spfile to be used by
Oracle ASM
Example
An example of this command to modify the configuration of Oracle ASM is:
$ srvctl modify asm l lsnr1
srvctl modify cvu
Starting with Oracle Database 11g Release 2 (11.2.0.2), this command modifies the check interval for CVU
in an Oracle Clusterware configuration.
Syntax and Options
Use the srvctl modify cvu command with the following syntax:
srvctl modify cvu [t check_interval_in_minutes]
Table A65 srvctl modify cvu Options
Option Description
t check_interval_in_minutes By default, CVU runs once every 360 minutes (six
hours) and verifies the health of cluster. The
shortest interval you can specify for CVU check is
10 minutes.
Examples
An example of this command to modify CVU to a check interval of 4 hours is:
$ srvctl modify cvu t 240](https://image.slidesharecdn.com/servercontrolutilityreference-150519054857-lva1-app6891/85/Server-control-utility-reference-84-320.jpg)
![srvctl modify database
Modifies the configuration for a database.
Syntax and Options
Use the srvctl modify database command with the following syntax:
srvctl modify database d db_unique_name [n db_name] [o oracle_home] [u
user_name] [m db_domain] [p spfile] [r {PRIMARY | PHYSICAL_STANDBY |
LOGICAL_STANDBY | SNAPSHOT_STANDBY}] [s start_options] [t stop_options] [y
{AUTOMATIC | MANUAL | NORESTART}] [g "server_pool_list"] [{a "diskgroup_list" |
z}] [e server_list] [w timeout] [j "acfs_path_list"]
Table A66 srvctl modify database Options
Option Description
d db_unique_name Unique name for the database
n db_name Name of the database (as specified by the
DB_NAME initialization parameter), if it is different
from the database unique name specified with the
d option
o oracle_home Path for the Oracle home for the database
u user_name The name of the user that owns the Oracle home
directory
Note: If you specify the u option, you must run
this command in privileged mode.
m db_domain Domain for the database
Note: If the database has the initialization
parameter DB_DOMAIN set, then you must
specify this option.
p spfile Path name of the server parameter file for the
database](https://image.slidesharecdn.com/servercontrolutilityreference-150519054857-lva1-app6891/85/Server-control-utility-reference-85-320.jpg)
![r role [PRIMARY | PHYSICAL_STANDBY |
LOGICAL_STANDBY | SNAPSHOT_STANDBY]
Role of the database in an Oracle Data Guard
configuration ( PRIMARY , PHYSICAL_STANDBY ,
LOGICAL_STANDBY , or SNAPSHOT_STANDBY )
s start_options Startup options for the database, such as OPEN ,
MOUNT , or NOMOUNT
Note: For multiword startup options, such as
read only and read write , separate the
words with a space and enclose in single
quotation marks ( '' ). For example, 'read
only' .
See Also: SQL*Plus User's Guide and Reference
(../../server.112/e16604/ch_twelve045.htm#SQPUG128) for
more information about startup options
t stop_options Stop options for the database, such as NORMAL ,
TRANSACTIONAL , IMMEDIATE , or ABORT
See Also: SQL*Plus User's Guide and Reference
(../../server.112/e16604/ch_twelve042.htm#SQPUG125) for
more information about shutdown options
y [AUTOMATIC | MANUAL | NORESTART] Management policy for the database resource.
Starting with Oracle Database 11g Release 2
(11.2.0.3), you can use the NORESTART value.
g "server_pool_list" A commadelimited list of the names of server
pools to use for a policymanaged database
Notes:
If the database you are modifying is
administrator managed, then this option
changes it to be policy managed, in addition to
changing all the database's services to run as
uniform services in the specified server pool.
You can specify only one server pool for
converting an administratormanaged database
to policy managed.
This option is available only with Oracle
Clusterware and Oracle RAC.](https://image.slidesharecdn.com/servercontrolutilityreference-150519054857-lva1-app6891/85/Server-control-utility-reference-86-320.jpg)

![Examples
The following example changes the authorized user to sysad for the RACVOL1 volume:
$ srvctl modify filesystem d /dev/asm/racvol1 u sysad
srvctl modify gns
Modifies the IP address or domain used by GNS
Syntax and Options
Use the srvctl modify gns command with the following syntax:
srvctl modify gns [i ip_address] [d domain]
Table A68 srvctl modify gns Options
Option Description
i ip_address The IP address for GNS
d domain The network domain for GNS
Example
An example of this command is:
$ srvctl modify gns i 192.000.000.003
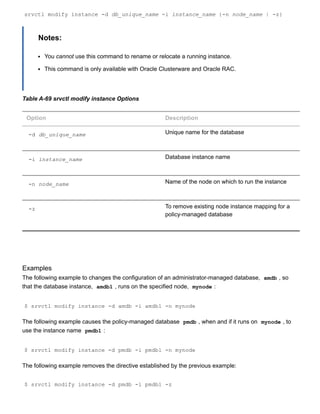
srvctl modify instance
For an administratormanaged database, this command modifies the configuration for a database instance
from its current node to another node. For a policymanaged database, this command defines an instance
name to use when the database runs on the specified node.
Syntax and Options
Use the srvctl modify instance command with the following syntax:](https://image.slidesharecdn.com/servercontrolutilityreference-150519054857-lva1-app6891/85/Server-control-utility-reference-89-320.jpg)
![srvctl modify listener
Modifies the listener name, ORACLE_HOME path or the listener endpoints, either for the default listener, or
a specific listener, or for all the listeners represented in a given list of listener names, that are registered
with Oracle Restart or with Oracle Clusterware on the specified node.
If you want to change the name of a listener, then use the srvctl remove listener (#CDCBIABD) and
srvctl add listener (#CDCEECFB) commands.
Syntax and Options
Use the srvctl modify listener command with the following syntax:
srvctl modify listener [l listener_name] [o oracle_home] [u user_name] [p "
[TCP:]port_list[/IPC:key][/NMP:pipe_name][/TCPS:s_port][/SDP:port]"] [k
network_number]
Table A70 srvctl modify listener Options
Option Description
l listener_name The name of the listener.
If you do not specify this option, then the utility
uses the name LISTENER .
o oracle_home When this option is specified, SRVCTL moves the
listener to run from the specified Oracle home.
Note: When using this option, the command
should be run as privileged user to enable
SRVCTL to update resource ownership
corresponding to the new ORACLE_HOME owner
u user_name The name of the operating system user who will
own the specified Oracle home
Note: This option is available only with Oracle
Clusterware.
p "[TCP:]port_list [/IPC:key]
[/NMP:pipe_name] [/TCPS:s_port]
[/SDP:port]"
Protocol specifications for the listener.
port_list is commadelimited list of port
numbers.
k network_number This option changes the public subnet on which
the listener listens.](https://image.slidesharecdn.com/servercontrolutilityreference-150519054857-lva1-app6891/85/Server-control-utility-reference-91-320.jpg)
![Note: You should have at least one listener on the
default network at all times. Do not use this option
to change the network of the only listener that
listens on the default network.
Example
The following example changes the TCP ports for the default listener on the node mynode1 :
$ srvctl modify listener n mynode1 p "TCP:1521,1522"
srvctl modify network
Modifies the subnet for a specified network.
Syntax and Options
Use the srvctl modify network command with one of the following syntax models:
srvctl modify network [k network_number [S subnet/netmask[/if1[|if2|...]]] [w
network_type] [v]
Table A71 srvctl modify network Options
Option Description
k network_number Specify a network number. The default is 1.
S subnet/netmask [/if1[|if2|...]] Specifies a subnet number for the public network.
The netmask and interfaces specified, if any,
change those of the network you are modifying. If
you do not specify any interface names, then the
VIPs use any interface on the given subnet.
w network_type Specify the network type: static , dhcp , or
mixed .
v Verbose output.](https://image.slidesharecdn.com/servercontrolutilityreference-150519054857-lva1-app6891/85/Server-control-utility-reference-92-320.jpg)
![Examples
The following example changes the subnet number, netmask, and interface list:
$ srvctl modify network S 192.168.2.0/255.255.255.0/eth0
The following example changes the second network to DHCP:
$ srvctl modify network k 2 w dhcp
srvctl modify nodeapps
Modifies the configuration for a node application.
Syntax and Options
Use the srvctl modify nodeapps command with one of the following syntax models:
srvctl modify nodeapps [n node_name A new_vip_address] [S
subnet/netmask[/if1[|if2|...]] [u network_type] [e em_port] [l ons_local_port]
[r ons_remote_port] [t host[:port][,host:port,...]] [v]
Note:
This command is only available with Oracle Clusterware.
Table A72 srvctl modify nodeapps Options
Option Description
n node_name Node name.
A new_vip_address/ netmask Node level Virtual IP address. The address
specified by name or IP must match the subnet
number of the default network.
Note: This option must be used for upgrade
configurations and new nonDHCP configurations
S subnet/netmask [/if1[|if2|...]] Specifies a subnet number for the public network.
The netmask and interfaces specified, if any,
change those of the default network. Additionally,](https://image.slidesharecdn.com/servercontrolutilityreference-150519054857-lva1-app6891/85/Server-control-utility-reference-93-320.jpg)
![if you specify the netmask option, then you
need only specify it for the first node on each
network.
u network_type Specifies the network server type, such as
static , dhcp , or mixed .
e em_port Local port on which Oracle Enterprise Manager
listens. The default port is 2016.
l ons_local_port Port on which the Oracle Notification Service
daemon listens for local client connections.
Note: The local port and remote port must each
be unique.
r ons_remote_port Port on which the Oracle Notification Service
daemon listens for connections from remote
hosts.
Note: The local port and remote port must each
be unique.
t host:port, [host:port,...] List of host : port pairs of remote hosts that
are part of the Oracle Notification Service network
but are not part of the cluster. If you do not specify
a port for a remote host, then the utility uses
the value you specified for ons_remote_port .
v Verbose output.
Example
The following example changes the nodeapps resource on mynode1 to use the application VIP of
100.200.300.40 with a subnet mask of 255.255.255.0 on the network interface eth0 :
$ srvctl modify nodeapps n mynode1 A 100.200.300.40/255.255.255.0/eth0](https://image.slidesharecdn.com/servercontrolutilityreference-150519054857-lva1-app6891/85/Server-control-utility-reference-94-320.jpg)
![srvctl modify oc4j
Modifies the RMI port for the OC4J instances.
Syntax and Options
Use the srvctl modify oc4j command with the following syntax:
srvctl modify oc4j p oc4j_rmi_port [v]
Table A73 srvctl modify oc4j Options
Option Description
p oc4j_rmi_port The RMI port number used by the OC4J instance
v Verbose output
Example
An example of this command is:
$ srvctl modify oc4j p 5385
srvctl modify ons
Modifies the ports used by the Oracle Notification Service daemon that is registered with Oracle Restart.
Syntax and Options
Use the srvctl modify ons command with the following syntax:
srvctl modify ons [l ons_local_port] [r ons_remote_port] [t host[:port]
[,host[:port]][...]] [v]
Table A74 srvctl modify ons Options
Option Description
l ons_local_port The Oracle Notification Service daemon listening
port for local client connections](https://image.slidesharecdn.com/servercontrolutilityreference-150519054857-lva1-app6891/85/Server-control-utility-reference-95-320.jpg)
![Note: The local port and remote port must each
be unique.
r ons_remote_port The Oracle Notification Service daemon listening
port for connections from remote hosts
Note: The local port and remote port must each
be unique.
t host[:port] [,host[:port]][...]] A list of host : port pairs of remote hosts
that are part of the Oracle Notification Service
network but are not part of the Oracle Clusterware
cluster
Note: If you do not specify port for a remote
host, then the utility uses ons_remote_port .
v Display verbose output
srvctl modify scan
Modifies the number of SCAN VIPs to the match the number of IP addresses returned by looking up the
scan_name you specify in DNS. Presumably the scan_name has not changed, but DNS was changed to
add or remove IP addresses, and now you must adjust the Oracle Clusterware resource configuration to
match.
Syntax and Options
Use the srvctl modify scan command with the following syntax:
srvctl modify scan n scan_name
The only option available for this command is n scan_name , which identifies the SCAN name that
resolves to the SCAN VIPs that you want to use.
Note:
This command is only available with Oracle Clusterware.
Example](https://image.slidesharecdn.com/servercontrolutilityreference-150519054857-lva1-app6891/85/Server-control-utility-reference-96-320.jpg)
![Assume your system currently has a SCAN named scan_name1 , and it resolves to a single IP address in
DNS. If you modify the SCAN scan_name1 in DNS to resolve to three IP addresses, then use the
following command to create the additional SCAN VIP resources:
$ srvctl modify scan n scan_name1
srvctl modify scan_listener
Modifies the SCAN listener to match SCAN VIP's or modifies the SCAN listener endpoints.
Syntax and Options
Use the srvctl modify scan_listener command with the following syntax:
srvctl modify scan_listener {p [TCP:]port[/IPC:key][/NMP:pipe_name]
[/TCPS:s_port][/SDP:port] | u }
Note:
This command is only available with Oracle Clusterware.
Table A75 srvctl modify scan_listener Options
Option Description
p [TCP:]port[/IPC:key]
[/NMP:pipe_name] [/TCPS:s_port]
[/SDP:port]
The new SCAN listener end points
u Updates SCAN listener configuration to match the
current SCAN VIP configuration. This option adds
new resources or removes existing SCAN listener
resources to match the SCAN VIP resources.
Example
Assume your system currently has a SCAN named scan_name1 , and you recently modified the DNS
entry to resolve to three IP addresses instead of one. After running the srvctl modify scan command
to create additional SCAN VIP resources, use the following command to create Oracle Clusterware
resources for the additional two SCAN listeners to go with the two additional SCAN VIPs:](https://image.slidesharecdn.com/servercontrolutilityreference-150519054857-lva1-app6891/85/Server-control-utility-reference-97-320.jpg)
![srvctl modify service d db_unique_name s service_name i old_instance_name t
new_instance_name [f]
Note:
This form of the command is only available with Oracle Clusterware.
Table A76 srvctl modify service Options for Moving a Service
Option Description
d db_unique_name Unique name for the database
s service_name Service name
i old_instance_name Old instance name
t new_instance_name New instance name
f Disconnect all sessions during stop or relocate
service operations
To change an available instance to a preferred instance for a service:
srvctl modify service d db_unique_name s service_name t edition_name i
avail_inst_name r [f]
Note:
This form of the command is only available with Oracle Clusterware and does not accept
placement options for Oracle RAC One Node databases.
Table A77 srvctl modify service Options for Changing an Available Instance to a Preferred
Instance
Option Description
d db_unique_name Unique name for the database](https://image.slidesharecdn.com/servercontrolutilityreference-150519054857-lva1-app6891/85/Server-control-utility-reference-99-320.jpg)
![s service_name Service name
t edition_name (version 11.2.0.2 or higher) The initial session
edition of the service.
When an edition is specified for a service, all
subsequent connections that specify the service
use this edition as the initial session edition.
However, if a session connection specifies a
different edition, then the edition specified in the
session connection is used for the initial session
edition.
SRVCTL does not validate the specified edition
name. During connection, the connect user must
have USE privilege on the specified edition. If the
edition does not exist or if the connect user does
not have USE privilege on the specified edition,
then SRVCTL returns an error.
i available_inst_name Name of the available instance to change
r Change instance status to preferred
f Disconnect all sessions during stop or relocate
service operations
To change the available and preferred status for multiple instances:
srvctl modify service d db_unique_name s service_name n i preferred_list [a
available_list] [f]
Note:
This form of the command is only available with Oracle Clusterware and does not accept
placement options for Oracle RAC One Node databases.
Table A78 srvctl modify service Options for Changing Available and Preferred Status of Multiple
Instances
Option Description](https://image.slidesharecdn.com/servercontrolutilityreference-150519054857-lva1-app6891/85/Server-control-utility-reference-100-320.jpg)
![d db_unique_name Unique name for the database
s service_name Service name
n Uses only the instances named for this service
(unnamed instances already assigned to the
service are removed)
i preferred_instance_list List of preferred instances
a available_instance_list List of available instances
f Disconnect all sessions during stop or relocate
service operations
To modify other service attributes or to modify a service for Oracle Clusterware:
srvctl modify service d db_unique_name s service_name [g server_pool] [c
{UNIFORM|SINGLETON}] [P {BASIC|PRECONNECT|NONE}] [l {[PRIMARY] |
[PHYSICAL_STANDBY] | [LOGICAL_STANDBY] | [SNAPSHOT_STANDBY]} [q {TRUE|FALSE}] [
x {TRUE|FALSE}] [j {SHORT|LONG}] [B {NONE|SERVICE_TIME|THROUGHPUT}] [e
{NONE|SESSION|SELECT}] [m {NONE|BASIC}] [z failover_retries] [w
failover_delay] [y {AUTOMATIC | MANUAL}]
Table A79 srvctl modify service Options
Option Description
d db_unique_name Unique name for the database
s service_name Service name
g server_pool The name of a server pool used when the
database is policy managed.
Note: This option is available only with Oracle
RAC and only for policymanaged databases.](https://image.slidesharecdn.com/servercontrolutilityreference-150519054857-lva1-app6891/85/Server-control-utility-reference-101-320.jpg)
![c {UNIFORM | SINGLETON} The cardinality of the service, either UNIFORM
(offered on all instances in the server pool) or
SINGLETON (runs on only one instance at a time)
Note: This option is available only with Oracle
Clusterware.
P {BASIC|PRECONNECT|NONE} TAF failover policy
Note: The PRECONNECT option applies only to
administratormanaged databases.
l {[PRIMARY] | [PHYSICAL _STANDBY] |
[LOGICAL _STANDBY] | [SNAPSHOT
_STANDBY]}
The database modes for which the service should
be started automatically.
q {TRUE | FALSE} Indicates whether AQ HA notifications should be
enabled ( TRUE ) for this service
x {TRUE | FALSE} Indicates whether or not Distributed Transaction
Processing should be enabled for this service
Note: This option is available only with Oracle
Clusterware.
j {SHORT | LONG} Connection Load Balancing Goal
B {NONE | SERVICE_TIME | THROUGHPUT} Runtime Load Balancing Goal
e {NONE | SESSION | SELECT} Failover type
m {NONE | BASIC} Failover method
z failover_retries The number of failover retry attempts
w failover_delay The time delay between failover attempts](https://image.slidesharecdn.com/servercontrolutilityreference-150519054857-lva1-app6891/85/Server-control-utility-reference-102-320.jpg)
![y {AUTOMATIC | MANUAL} Service management policy
Examples
An example of moving a service member from one instance to another is:
$ srvctl modify service d crm s crm i crm1 t crm2
An example of changing an available instance to a preferred instance is:
srvctl modify service d crm s crm i crm1 r
The following command exchanges a preferred and available instance:
$ srvctl modify service d crm s crm n i crm1 a crm2
srvctl modify srvpool
Modifies a server pool in a cluster. If minimum size, maximum size, and importance are numerically
increased, then the CRS daemon may attempt to reassign servers to this server pool, if by resizing other
server pools have comparatively lower minimum size and importance, to satisfy new sizes of this server
pool.
Syntax and Options
Use the srvctl modify srvpool command with the following syntax:
srvctl modify srvpool g server_pool [i importance] [l min_size] [u max_size]
[n node_name_list] [f]
Note:
This command is only available with Oracle Clusterware.
Table A80 srvctl modify srvpool Options
Option Description
g server_pool The name of the server pool to modify,
i importance The new importance of the server pool.](https://image.slidesharecdn.com/servercontrolutilityreference-150519054857-lva1-app6891/85/Server-control-utility-reference-103-320.jpg)
![srvctl relocate gns (#CHDJBEEB) Relocates GNS to a different node
srvctl relocate oc4j (#CHDICBEF) Relocates an OC4J instance to a different node
srvctl relocate scan (#CDDHJGDG) Relocates a SCAN VIP from its current hosting
server to another server within the cluster
srvctl relocate scan_listener (#CDDIDDCF) Relocates a SCAN listener from its current
hosting server to another server within the cluster
srvctl relocate server (#BAJGFEIB) Relocates named servers to another server pool
srvctl relocate service (#i1009865) Relocates the named service names from one
named instance to another named instance
srvctl relocate vip (#CHDCJHAD) Relocates a specific VIP from one node to
another within the cluster
srvctl relocate cvu
Starting with Oracle Database 11g release 2 (11.2.0.2), this command temporarily relocates the CVU to
another node in a cluster.
Syntax and Options
Use the srvctl relocate cvu command with the following syntax:
srvctl relocate cvu [n node_name]
Table A82 srvctl relocate cvu Options
Option Description
n node_name Node name](https://image.slidesharecdn.com/servercontrolutilityreference-150519054857-lva1-app6891/85/Server-control-utility-reference-105-320.jpg)
![Examples
An example of this command to temporarily relocate CVU to another node in a cluster is:
$ srvctl relocate cvu n crmnode2
srvctl relocate database
Starting with Oracle Database 11g release 2 (11.2.0.2), the srvctl relocate database command
initiates the relocation of an Oracle RAC One Node database from one node to another node. This
command also cleans up after a failed relocation.
The srvctl relocate database command can only be used for relocating Oracle RAC One Node
databases.
Syntax and Options
Use the srvctl relocate database command with the following syntax:
srvctl relocate database d db_unique_name {[n target_node] [w timeout] | a [
r]} [v]
Table A83 srvctl relocate database Options
Option Description
d db_unique_name Unique name for the database.
n target Target node to which to relocate the Oracle RAC
One Node database.
Note: You must supply this option if you are
relocating an administratormanaged Oracle RAC
One Node database.
w timeout Online database relocation timeout, in minutes,
for Oracle RAC One Node databases. The default
is 30 .
a Abort failed online database relocation.
r](https://image.slidesharecdn.com/servercontrolutilityreference-150519054857-lva1-app6891/85/Server-control-utility-reference-106-320.jpg)
![Removes the target node of a failed online
relocation request from the candidate server list of
an administratormanaged Oracle RAC One Node
database.
v Verbose output.
Usage Notes
If the Oracle RAC One Node database you want to relocate is not running, then the command returns an
error.
If another online database relocation is active for this Oracle RAC One Node database, then the
command returns an error.
If an online database relocation for this Oracle RAC One Node database has failed and the target nodes
are not the same for either relocation, then the command returns an error instructing you to abort the
failed online database relocation and then initiate a new one.
If an online database relocation for this Oracle RAC One Node database has failed and the target nodes
are the same (or you do not specify the target), then the command attempts to relocate the database.
Example
The following example relocates an Oracle RAC One Node database named rac1 to a server called
node7 .
srvctl relocate database d rac1 n node7
srvctl relocate gns
Relocates GNS from its current hosting node to another node within the cluster.
Syntax and Options
Use the srvctl relocate gns command with the following syntax:
srvctl relocate gns [n node_name]
Notes:](https://image.slidesharecdn.com/servercontrolutilityreference-150519054857-lva1-app6891/85/Server-control-utility-reference-107-320.jpg)
![On Linux and UNIX systems, you must be logged in as root and on Windows, you must be
logged in as a user with Administrator privileges to run this command.
This command is only available with Oracle Clusterware.
Table A84 srvctl relocate gns Options
Option Description
n node_name The name of the node to which you want to move
GNS
Example
An example of this command is:
$ srvctl relocate gns n node1
srvctl relocate oc4j
Relocates an OC4J instance from its current hosting node to another node within the cluster.
Syntax and Options
Use the srvctl relocate oc4j command with the following syntax:
srvctl relocate oc4j [n node_name] [v]
Note:
This command is only available with Oracle Clusterware.
Table A85 srvctl relocate oc4j Options
Option Description
n node_name The name of the node to relocate the OC4J
instance to.
v Display verbose output](https://image.slidesharecdn.com/servercontrolutilityreference-150519054857-lva1-app6891/85/Server-control-utility-reference-108-320.jpg)
![Example
An example of this command is:
$ srvctl relocate oc4j n staih01 v
srvctl relocate scan
Relocates a specific SCAN VIP from its current hosting node to another node within the cluster.
Syntax and Options
Use the srvctl relocate scan command with the following syntax:
srvctl relocate scan i ordinal_number [n node_name]
Note:
This command is only available with Oracle Clusterware.
Table A86 srvctl relocate scan Options
Option Description
i ordinal_number An ordinal number that identifies which SCAN VIP
you want to relocate. The range of values you can
specify for this option is 1 to 3.
n node_name The name of a single node.
If you do not specify this option, then the utility
chooses the node to which the SCAN VIP is
relocated.
Example
An example of this command is:](https://image.slidesharecdn.com/servercontrolutilityreference-150519054857-lva1-app6891/85/Server-control-utility-reference-109-320.jpg)
![$ srvctl relocate scan i 1 n node1
srvctl relocate scan_listener
Relocates a specific SCAN listener from its current hosting node to another node within the cluster.
Syntax and Options
Use the srvctl relocate scan_listener command with the following syntax:
srvctl relocate scan_listener i ordinal_number [n node_name]
Note:
This command is only available with Oracle Clusterware.
Table A87 srvctl relocate scan_listener Options
Option Description
i ordinal_number An ordinal number that identifies which SCAN VIP
you want to relocate. The range of values you can
specify for this option is 1 to 3.
n node_name The name of a single node.
If you do not specify this option, then the utility
chooses the node to which the SCAN VIP is
relocated.
Example
An example of this command is:
$ srvctl relocate scan_listener i 1 n node3
srvctl relocate server
Relocates servers to a server pool in the cluster.
Syntax and Options](https://image.slidesharecdn.com/servercontrolutilityreference-150519054857-lva1-app6891/85/Server-control-utility-reference-110-320.jpg)
![Use the srvctl relocate server command with the following syntax:
srvctl relocate server n "server_name_list" g server_pool_name [f]
Table A88 srvctl relocate server Options
Option Description
n "server_name_list" A single server name or a commadelimited list of
server names enclosed in double quotation marks
( "" ) that you want to relocate to a different
server pool.
g server_pool_name The name of the server pool to which you want to
move servers.
f Use the f option to force the relocation of
servers even if it means stopping some
resources.
Example
An example of this command is:
$ srvctl relocate server n "server1, server2" g sp3
srvctl relocate service
Relocates the named service names from one named instance to another named instance. The srvctl
relocate command works on only one source instance and one target instance at a time, relocating a
service from a single source instance to a single target instance. The target instance must be on the
preferred or available list for the service.
Syntax and Options
Use the srvctl relocate service command with the following syntax:
srvctl relocate service d db_unique_name s service_name {c source_node n
target_node | i old_instance_name t new_instance_name} [f]](https://image.slidesharecdn.com/servercontrolutilityreference-150519054857-lva1-app6891/85/Server-control-utility-reference-111-320.jpg)
![srvctl relocate vip i vip_name [n node_name] [f]
Table A90 srvctl relocate vip Options
Option Description
i vip_name Specify the name of the VIP you want to relocate.
n node_name Specify the name of a single target node to which
you want to relocate the VIP.
f Specify this option to force the relocation of the
VIP.
Example
An example of this command is:
$ srvctl relocate vip i vip1 n node3
remove
Removes the configuration information for the specified target from Oracle Clusterware. Environment
settings for the object are also removed. Using this command does not destroy the specified target.
Use the remove verb to remove the associated resource from the management of Oracle Clusterware or
Oracle Restart. Depending on the noun used, you can remove databases, services, nodeapps, Oracle
ASM, Oracle Notification Service, and listeners.
If you do not use the force flag ( f ), then Oracle Clusterware or Oracle Restart prompts you to confirm
whether to proceed. If you use the force ( f ) option, then the remove operation proceeds without
prompting and continues processing even when it encounters errors. Even when the Oracle Clusterware
resources cannot be removed, the OCR configuration is removed, so that the object now appears not to
exist, but there are still Oracle Clusterware resources. Use the force flag ( f ) option with extreme caution
because this could result in an inconsistent OCR.
To use the remove verb, you must first stop the node applications, database, instance, or service for
which you are specifying srvctl remove . Oracle recommends that you perform a disable operation
before using this command, but this is not required. You must stop the target object before running the](https://image.slidesharecdn.com/servercontrolutilityreference-150519054857-lva1-app6891/85/Server-control-utility-reference-113-320.jpg)
![srvctl remove service (#i1010691) Removes services from the Oracle Clusterware or
Oracle Restart configuration
srvctl remove srvpool (#BAJEFEGJ) Removes a specific server pool
srvctl remove vip (#BAJBHFIJ) Removes specific VIPs
srvctl remove asm
Removes the Oracle ASM resource.
Note:
To manage Oracle ASM on Oracle Database 11g release 2 (11.2) installations, use the
SRVCTL binary in the Oracle Grid Infrastructure home for a cluster (Grid home). If you have
Oracle RAC or Oracle Database installed, then you cannot use the SRVCTL binary in the
database home to manage Oracle ASM.
Syntax and Options
Use the srvctl remove asm command with the following syntax:
srvctl remove asm [f]
The f option is the only option you can use with this command and it forcefully removes an Oracle ASM
resource.
Example
An example of this command is:
$ srvctl remove asm f
srvctl remove cvu
Starting with Oracle Database 11g Release 2 (11.2.0.2), this command removes CVU from an Oracle
Clusterware configuration.](https://image.slidesharecdn.com/servercontrolutilityreference-150519054857-lva1-app6891/85/Server-control-utility-reference-115-320.jpg)
![Syntax and Options
Use the srvctl remove cvu command with the following syntax:
srvctl remove cvu [f]
Use the f option to remove a running or starting CVU.
Examples
An example of this command to remove CVU is:
$ srvctl remove cvu f
srvctl remove database
Removes a database configuration.
Syntax and Options
Use the srvctl remove database command with the following syntax:
srvctl remove database d db_unique_name [f] [y]
Table A92 srvctl remove database Options
Options Description
d db_unique_name Unique name for the database
f Force remove
y Suppress prompts
Example
An example of this command is:
$ srvctl remove database d crm](https://image.slidesharecdn.com/servercontrolutilityreference-150519054857-lva1-app6891/85/Server-control-utility-reference-116-320.jpg)
![srvctl remove diskgroup
Removes a specific Oracle ASM disk group resource from Oracle Clusterware or Oracle Restart.
Syntax and Options
Use the srvctl remove diskgroup command with the following syntax:
srvctl remove diskgroup g diskgroup_name [n node_list] [f]
Table A93 srvctl remove diskgroup Options
Option Description
g diskgroup_name The Oracle ASM disk group name.
n node_list Commadelimited list of node nodes.
Note: This option is available only with Oracle
Clusterware.
f Force remove.
Example
An example of this command is:
$ srvctl remove diskgroup g DG1 f
srvctl remove filesystem
Removes a specific Oracle ACFS volume resource.
Syntax and Options
Use the srvctl remove filesystem command with the following syntax:
srvctl remove filesystem d volume_device_name [f]
Note:](https://image.slidesharecdn.com/servercontrolutilityreference-150519054857-lva1-app6891/85/Server-control-utility-reference-117-320.jpg)
![This command is only available with Oracle Clusterware.
Table A94 srvctl remove filesystem Options
Option Description
d volume_device_name The Oracle ACFS volume device name
f Force remove
Example
An example of this command is:
$ srvctl remove filesystem d /dev/asm/d1volume293
srvctl remove gns
Removes GNS from the cluster.
Syntax and Options
Use the srvctl remove gns command with the following syntax:
srvctl remove gns [f]
The only option for this command is f , which indicates GNS should be removed regardless of any
errors that might occur.
Note:
This command is only available with Oracle Clusterware.
Example
An example of this command is:
$ srvctl remove gns](https://image.slidesharecdn.com/servercontrolutilityreference-150519054857-lva1-app6891/85/Server-control-utility-reference-118-320.jpg)
![srvctl remove instance
Removes the configurations for an instance of an administratormanaged database. To remove the
configurations of a policymanaged database, you must shrink the size of the server pool with the srvctl
modify srvpool (#BAJCDFIB) command.
If you use the f option, then any services running on the instance stop. Oracle recommends that you
reconfigure services to not use the instance to be removed as a preferred or available instance before
removing the instance.
Syntax and Options
Use the srvctl remove instance command with the following syntax:
srvctl remove instance d db_unique_name i instance_name [f]
Notes:
This command is only available with Oracle Clusterware and Oracle RAC.
If you attempt to use this command on an Oracle RAC One Node database, then the
command returns an error stating that cannot remove the instance except by removing the
database.
Table A95 srvctl remove instance Options
Options Description
d db_unique_name Unique name for the database.
i instance_name Instance name.
f Specify this option to skip checking that the
instance is not running, and remove it even
though it is running. This option also skips
checking that the instance has no running
services using it, and causes those services to
stop before the instance is removed.](https://image.slidesharecdn.com/servercontrolutilityreference-150519054857-lva1-app6891/85/Server-control-utility-reference-119-320.jpg)
![Example
An example of this command is:
$ srvctl remove instance d crm i crm01
srvctl remove listener
Removes the configuration of the specified listener from Oracle Clusterware or Oracle Restart.
Syntax and Options
Use the srvctl remove listener command with the following syntax:
srvctl remove listener [l listener_name] [a] [f]
Table A96 srvctl remove listener Options
Options Description
l listener_name Name of the listener that you want to remove.
If you do not specify a listener name, then the
listener name defaults to LISTENER .
a Removes all listener configurations.
f Specify this option to skip checking whether there
are other resources that depend on this listener,
such as databases, and remove the listener
anyway.
Examples
The following command removes the configuration of the listener named lsnr01 :
$ srvctl remove listener l lsnr01
srvctl remove nodeapps](https://image.slidesharecdn.com/servercontrolutilityreference-150519054857-lva1-app6891/85/Server-control-utility-reference-120-320.jpg)
![Removes the node application configuration. You must have full administrative privileges to run this
command. On Linux and UNIX systems, you must be logged in as root and on Windows systems, you
must be logged in as a user with Administrator privileges.
Syntax
Use the srvctl remove nodeapps command as follows:
srvctl remove nodeapps [f] [y] [v]
Note:
This command is only available with Oracle Clusterware.
Example
An example of this command is:
# srvctl remove nodeapps
Table A97 srvctl remove nodeapps Options
Options Description
f Force remove
y Suppress prompts
v Verbose output
srvctl remove oc4j
Removes the OC4J instance from the Oracle Clusterware configuration.
Syntax and Options
Use the srvctl remove oc4j command with the following syntax:
srvctl remove oc4j [f] [v]
Note:](https://image.slidesharecdn.com/servercontrolutilityreference-150519054857-lva1-app6891/85/Server-control-utility-reference-121-320.jpg)
![This command is only available with Oracle Clusterware.
Table A98 srvctl remove oc4j Options
Options Description
f Force remove
v Verbose output
srvctl remove ons
Removes Oracle Notification Service from the Oracle Grid Infrastructure home.
Syntax and Options
Use the srvctl remove ons command with the following syntax:
srvctl remove ons [f] [v]
Note:
This command is only available with Oracle Restart.
Table A99 srvctl remove ons Options
Options Description
f Force remove
v Verbose output
srvctl remove scan
Removes Oracle Clusterware resources from all SCAN VIPs.
Syntax and Options
Use the srvctl remove scan command with the following syntax:](https://image.slidesharecdn.com/servercontrolutilityreference-150519054857-lva1-app6891/85/Server-control-utility-reference-122-320.jpg)
![srvctl remove scan [f]
The only option available for this command is f , which removes the SCAN VIPs even though there are
SCAN listeners running that are dependent on the SCAN VIPs. SCAN VIPs that are running are not
stopped before the resources are removed, which may require manual cleanup.
Note:
This command is only available with Oracle Clusterware.
Example
An example of this command is:
$ srvctl remove scan f
srvctl remove scan_listener
Removes Oracle Clusterware resources from all SCAN listeners.
Syntax and Options
Use the srvctl remove scan_listener command with the following syntax:
srvctl remove scan_listener [f]
The only option available for this command is f , which removes the resource even if the listener(s) is
running, without stopping the listener.
Note:
This command is only available with Oracle Clusterware.
Example
An example of this command is:
$ srvctl remove scan_listener f
srvctl remove service
Removes the configuration for a service.](https://image.slidesharecdn.com/servercontrolutilityreference-150519054857-lva1-app6891/85/Server-control-utility-reference-123-320.jpg)
![Syntax and Options
Use the srvctl remove service command as follows:
srvctl remove service d db_unique_name s service_name [i instance_name] [f]
Table A100 srvctl remove service Options
Options Description
d db_unique_name Unique name for the database
s service_name Service name
i instance_name Instance name
Note: This option is available only for Oracle
Clusterware.
f Removes the service resource even though the
service is running
Examples
An example of this command is:
$ srvctl remove service d crm s sales
The following example removes the services from specific instances:
$ srvctl remove service d crm s sales i crm01,crm02
srvctl remove srvpool
Removes a specific server pool. If there are databases or services that depend upon this server pool, then
remove them first so this operation succeeds.
If you successfully remove server_pool , then the CRS daemon may assign its servers to other server
pools depending upon their minimum size, maximum size, and importance. The CRS daemon may also
return these servers to its Free server pool.](https://image.slidesharecdn.com/servercontrolutilityreference-150519054857-lva1-app6891/85/Server-control-utility-reference-124-320.jpg)
![Syntax and Options
Use the srvctl remove srvpool command with the following syntax:
srvctl remove srvpool g server_pool
Note:
This command is only available with Oracle Clusterware.
Example
An example of this command is:
$ srvctl remove srvpool g srvpool1
srvctl remove vip
Removes specific VIPs.
Syntax and Options
Use the srvctl remove vip command with the following syntax:
srvctl remove vip i "vip_name_list" [f] [y] [v]
Note:
This command is only available with Oracle Clusterware.
Table A101 srvctl remove vip Options
Option Description
i "vip_name_list" A commadelimited list of VIP names surrounded
by double quotation marks ( "" )
f Force remove
y Suppress prompts
v Verbose output](https://image.slidesharecdn.com/servercontrolutilityreference-150519054857-lva1-app6891/85/Server-control-utility-reference-125-320.jpg)
![Administers Oracle ASM environment configurations.
Syntax and Options
Use the srvctl setenv asm command with the following syntax:
srvctl setenv asm {t "name=val[,name=val][...]" | T "name=val"}
Table A103 srvctl setenv asm Options
Options Description
t "name=val[,name=val][...]" Commadelimited list of namevalue pairs of
environment variables
T "name=val" Enables single environment variable to be set to a
value that contains commas or other special
characters
Example
The following example sets the language environment configuration for Oracle ASM:
$ srvctl setenv asm t LANG=en
srvctl setenv database
Administers cluster database environment configurations.
Syntax and Options
Use the srvctl setenv database command with the following syntax:
srvctl setenv database d db_unique_name {t "name=val[,name=val][...]" | T
"name=val"}
Table A104 srvctl setenv database Options
Options Description
d db_unique_name Unique name for the database](https://image.slidesharecdn.com/servercontrolutilityreference-150519054857-lva1-app6891/85/Server-control-utility-reference-127-320.jpg)
![t "name=val,..." Commadelimited list of namevalue pairs of
environment variables
T "name=val" Enables single environment variable to be set to a
value that contains commas or other special
characters
Example
The following example sets the language environment configuration for a cluster database:
$ srvctl setenv database d crm t LANG=en
srvctl setenv listener
Administers listener environment configurations.
Syntax and Options
Use the srvctl setenv listener with the following syntax:
srvctl setenv listener [l listener_name] {t "name=val[,name=val][...]" | T
"name=val"}
Table A105 srvctl setenv listener Options
Options Description
l listener_name Name of the listener.
If you do not specify this option, then the listener
name defaults to LISTENER .
t "name=val" Commadelimited list of namevalue pairs of
environment variables.
T "name=val" Enables single environment variable to be set to a
value that contains commas or other special
characters.](https://image.slidesharecdn.com/servercontrolutilityreference-150519054857-lva1-app6891/85/Server-control-utility-reference-128-320.jpg)
![Example
The following example sets the language environment configuration for the default listener:
$ srvctl setenv listener t LANG=en
srvctl setenv nodeapps
Sets the environment variables for the node application configurations.
Syntax and Options
Use the srvctl setenv nodeapps command as follows:
srvctl setenv nodeapps {t "name=val[,name=val][...]" | T "name=val"} [v]
Note:
This command is only available with Oracle Clusterware.
Table A106 srvctl setenv nodeapps Options
Options Description
t "name=val[,name=val] [...]" Commadelimited list of namevalue pairs of
environment variables
T "name=val" Enables single environment variable to be set to a
value that contains commas or other special
characters
v Verbose output
Example
To set an environment variable for a node application:
$ srvctl setenv nodeapps T "CLASSPATH=/usr/local/jdk/jre/rt.jar" v](https://image.slidesharecdn.com/servercontrolutilityreference-150519054857-lva1-app6891/85/Server-control-utility-reference-129-320.jpg)
![srvctl setenv vip
Administers cluster VIP environment configurations.
Syntax and Options
Use the srvctl setenv vip command with the following syntax:
srvctl setenv vip i vip_name {t "name=val[,name=val,...]" | T "name=val"}
Note:
This command is only available with Oracle Clusterware.
Table A107 srvctl setenv vip Options
Options Description
i vip_name Name of the VIP
t "name=val,..." Commadelimited list of namevalue pairs of
environment variables
T "name=val" Enables single environment variable to be set to a
value that contains commas or other special
characters
Example
The following example sets the language environment configuration for a cluster VIP:
$ srvctl setenv vip i crm1vip t LANG=en
start
Starts Oracle Restart or Oracle Clusterware enabled, nonrunning applications for the database, all or
named instances, all or named service names, or nodelevel applications. For the start command, and
for other operations that use a connect string, if you do not provide a connect string, SRVCTL uses /as](https://image.slidesharecdn.com/servercontrolutilityreference-150519054857-lva1-app6891/85/Server-control-utility-reference-130-320.jpg)
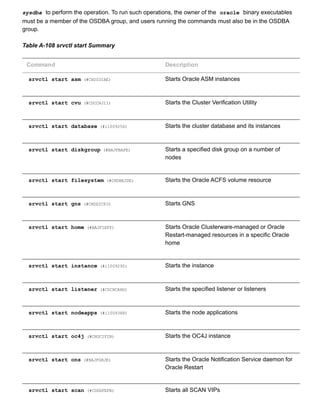
![srvctl start scan_listener (#CDDCEJEH) Starts all SCAN listeners
srvctl start service (#i1009338) Starts the service
srvctl start vip (#BAJFFGDJ) Starts a VIP
srvctl start asm
Starts an Oracle ASM instance.
Notes:
To manage Oracle ASM on Oracle Database 11g release 2 (11.2) installations, use the
SRVCTL binary in the Oracle Grid Infrastructure home for a cluster (Grid home). If you have
Oracle RAC or Oracle Database installed, then you cannot use the SRVCTL binary in the
database home to manage Oracle ASM.
Syntax and Options
Use the srvctl start asm command with the following syntax:
srvctl start asm [n node_name] [o start_options]
Table A109 srvctl start asm Options
Option Description
n node_name Node name
Note: This option is available only with Oracle
Clusterware.
o start_options Options to startup command, for example OPEN ,
MOUNT , or NOMOUNT
Note: For multiword startup options, such as
read only and read write , separate the
words with a space and enclose in single
quotation marks ( '' ). For example, 'read
only' .](https://image.slidesharecdn.com/servercontrolutilityreference-150519054857-lva1-app6891/85/Server-control-utility-reference-132-320.jpg)
![See Also: SQL*Plus User's Guide and Reference
(../../server.112/e16604/ch_twelve045.htm#SQPUG128) for
more information about startup options
Examples
An example of this command to start an Oracle ASM instance on a single node of a cluster is:
$ srvctl start asm n crmnode1
An example to start an Oracle ASM instance on all nodes in the cluster, or for a noncluster database, is:
$ srvctl start asm
srvctl start cvu
Starting with Oracle Database 11g Release 2 (11.2.0.2), this command starts the CVU on one node in a
cluster. If you specify a node name, then CVU starts on that node.
Syntax and Options
Use the srvctl start cvu command with the following syntax:
srvctl start cvu [n node_name]
Table A110 srvctl start cvu Options
Option Description
n node_name Node name
Examples
An example of this command to start CVU on a single node of a cluster is:
$ srvctl start cvu n crmnode1](https://image.slidesharecdn.com/servercontrolutilityreference-150519054857-lva1-app6891/85/Server-control-utility-reference-133-320.jpg)
![srvctl start database
Starts a cluster database and its enabled instances and all listeners on nodes with database instances.
You can disable listeners that should not be started.
Syntax and Options
Use the srvctl start database command with the following syntax:
srvctl start database d db_unique_name [o start_options] [n node_name]
Table A111 srvctl start database Options
Option Description
d db_unique_name Unique name for the database
o start_options Options for startup command (for example:
OPEN , MOUNT , or NOMOUNT )
Notes:
This command option supports all database
startup options.
For multiword startup options, such as read
only and read write , separate the words
with a space and enclose in single quotation
marks ( '' ). For example, 'read only' .
See Also: SQL*Plus User's Guide and Reference
(../../server.112/e16604/ch_twelve045.htm#SQPUG128) for
more information about startup options
n node_name The name of the node on which you want to start
the database
Notes:
This command only applies to Oracle RAC One
Node databases.](https://image.slidesharecdn.com/servercontrolutilityreference-150519054857-lva1-app6891/85/Server-control-utility-reference-134-320.jpg)
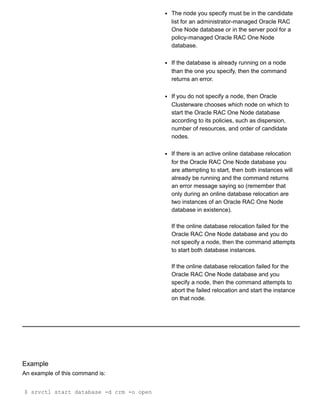
![srvctl start diskgroup
Starts a specific disk group resource on a number of specified nodes.
Syntax and Options
Use the srvctl start diskgroup command with the following syntax:
srvctl start diskgroup g diskgroup_name [n node_list]
Table A112 srvctl start diskgroup Options
Option Description
g diskgroup_name The Oracle ASM disk group name
n node_list Commadelimited list of node names on which to
start the disk group resource
Note: This option is available only with Oracle
Clusterware.
Example
An example of this command is:
$ srvctl start diskgroup g diskgroup1 n mynode1,mynode2
srvctl start filesystem
Starts the Oracle ACFS volume resource.
Syntax and Options
Use the srvctl start filesystem command with the following syntax:
srvctl start filesystem d volume_device_name [n node_name]
Note:
This command is only available with Oracle Clusterware.](https://image.slidesharecdn.com/servercontrolutilityreference-150519054857-lva1-app6891/85/Server-control-utility-reference-136-320.jpg)
![Table A113 srvctl start filesystem Options
Option Description
d volume_device_name The Oracle ACFS volume device name
n node_name The name of the node on which the Oracle ACFS
volume resource should be started.
If you do not specify this option, then the utility
starts the Oracle ACFS volume resource on all
the available nodes in the cluster.
srvctl start gns
Starts GNS on a specific node, or all nodes in the cluster.
Syntax and Options
Use the srvctl start gns command with the following syntax:
srvctl start gns [l log_level] [n node_name]
Note:
This command is only available with Oracle Clusterware.
Table A114 srvctl start gns Options
Option Description
l log_level Specify the level of logging with which GNS
should run. Log levels vary between 1 (minimal
tracing) and 6 (traces everything and is time
consuming).
n node_name The name of a node in the cluster where you want
to start GNS.](https://image.slidesharecdn.com/servercontrolutilityreference-150519054857-lva1-app6891/85/Server-control-utility-reference-137-320.jpg)
![srvctl start home
Starts all the Oracle Restartmanaged or Oracle Clusterwaremanaged resources on the specified Oracle
home.
Syntax and Options
Use the srvctl start home command with the following syntax:
srvctl start home o Oracle_home s state_file [n node_name]
Table A115 srvctl start home Options
Option Description
o Oracle_home The path to the Oracle home for which you want
to start the Oracle Restart or Oracle Clusterware
managed resources
s state_file The path name of the state file you specified
when you ran either the srvctl stop home or
the srvctl status home command.
n node_name The name of the node where the Oracle home
resides.
Note: This option is available only with Oracle
Clusterware.
Example
An example of this command is:
$ srvctl start o /u01/app/oracle/product/11.2.0/db_1 s ~/state.txt
srvctl start instance
Starts instances in the cluster database and all listeners on nodes with database instances. You can
disable listeners that should not be started.
Syntax and Options
Use the srvctl start instance command with the following syntax:](https://image.slidesharecdn.com/servercontrolutilityreference-150519054857-lva1-app6891/85/Server-control-utility-reference-138-320.jpg)
![srvctl start instance d db_unique_name {n node_name i "instance_name_list"} [
o start_options]
In Windows, you must enclose the list of commadelimited instance names in double quotation marks
( "" ).
Notes:
This command is only available with Oracle Clusterware and Oracle RAC.
If you run this command on an Oracle RAC One Node database, then the command returns
an error instructing you to use the database noun, instead.
Table A116 srvctl start instance Options
Option Description
d db_unique_name Unique name for the database
n node_name The name of a single node
Note: Use this option for policymanaged
databases.
i "instance_name_list" Specify either exactly one instance name or a
commadelimited list of instance names
Note: Use this option for administratormanaged
databases.
o start_options Options for startup command (for example:
OPEN , MOUNT , or NOMOUNT )
Note: For multiword startup options, such as
read only and read write , separate the
words with a space and enclose in double
quotation marks ( "" ). For example, "read
only" .
See Also: SQL*Plus User's Guide and Reference
(../../server.112/e16604/ch_twelve045.htm#SQPUG128) for
more information about startup options](https://image.slidesharecdn.com/servercontrolutilityreference-150519054857-lva1-app6891/85/Server-control-utility-reference-139-320.jpg)
![Example
An example of starting an instance for a policymanaged database is:
$ srvctl start instance d crm n node2
An example of starting an instance for an administratormanaged database is:
$ srvctl start instance d crm i "crm2,crm3"
srvctl start listener
Starts the default listener on the specified node_name , or starts all of the listeners represented in a given
list of listener names, that are registered with Oracle Clusterware on the given node.
Syntax and Options
Use the srvctl start listener command with the following syntax:
srvctl start listener [n node_name] [l listener_name_list]
Table A117 srvctl start listener Options
Option Description
n node_name Node name
Note: This option is available only with Oracle
Clusterware.
l listener_name_list Listener name
If you do not specify this option, then the listener
name defaults to LISTENER .
Example
An example of this command is:](https://image.slidesharecdn.com/servercontrolutilityreference-150519054857-lva1-app6891/85/Server-control-utility-reference-140-320.jpg)
![$ srvctl start listener n mynode1
srvctl start nodeapps
Starts nodelevel applications on a node or all nodes in the cluster.
Syntax and Options
Use the srvctl start nodeapps command with the following syntax:
srvctl start nodeapps [n node_name] [g] [v]
Note:
This command is only available with Oracle Clusterware.
Table A118 srvctl start nodeapps Options
Option Description
n node_name Node name
If you do not specify this option, then the utility
starts the nodeapps on all active nodes in the
cluster.
g Starts GSD, only
v Verbose output
Example
An example of this command is:
srvctl start nodeapps
srvctl start oc4j
Starts the OC4J instance.](https://image.slidesharecdn.com/servercontrolutilityreference-150519054857-lva1-app6891/85/Server-control-utility-reference-141-320.jpg)
![Syntax and Options
Use the srvctl start oc4j command with the following syntax:
srvctl start ocj4 [v]
There is only one option for this command, v , which is used to indicate that verbose output should be
displayed.
Note:
This command is only available with Oracle Clusterware.
srvctl start ons
Starts the Oracle Notification Service daemon.
Note:
This command is only available with Oracle Restart.
Syntax and Options
Use the srvctl start ons command with the following syntax:
srvctl start ons [v]
There is only one option for this command, v , which is used to indicate that verbose output should be
displayed.
srvctl start scan
Starts all SCAN VIPs, by default, or a specific SCAN VIP, on all nodes or a specific node in the cluster.
Syntax and Options
Use the srvctl start scan command with the following syntax:
srvctl start scan [i ordinal_number] [n node_name]
Note:
This command is only available with Oracle Clusterware.
Table A119 srvctl start scan Options](https://image.slidesharecdn.com/servercontrolutilityreference-150519054857-lva1-app6891/85/Server-control-utility-reference-142-320.jpg)
![Option Description
i ordinal_number An ordinal number that identifies which SCAN VIP
you want to start. The range of values you can
specify for this option is 1 to 3.
If you do not specify this option, then the utility
starts all the SCAN VIPs.
n node_name The name of a single node.
If you do not specify this option, then the utility
starts the SCAN VIPs on all nodes in the cluster.
Example
To start the SCAN VIP identified by the ordinal number 1 on the node1 node, use the following command:
$ srvctl start scan i 1 n node1
srvctl start scan_listener
Starts all SCAN listeners, by default, or a specific listener on all nodes or a specific node in the cluster.
Syntax and Options
Use the srvctl start scan_listener command with the following syntax:
srvctl start scan_listener [n node_name] [i ordinal_number]
Note:
This command is only available with Oracle Clusterware.
Table A120 srvctl start scan_listener Options
Option Description
i ordinal_number An ordinal number that identifies which SCAN
Listener you want to start. The range of values
you can specify for this option is 1 to 3.](https://image.slidesharecdn.com/servercontrolutilityreference-150519054857-lva1-app6891/85/Server-control-utility-reference-143-320.jpg)
![If you do not specify this option, then the utility
starts all the SCAN listeners.
n node_name The name of a single node.
If you do not specify this option, then the utility
starts the SCAN listeners on all nodes in the
cluster.
Example
An example of this command is:
$ srvctl start scan_listener i 1
srvctl start service
Starts a service or multiple services on the specified instance. The srvctl start service command
will fail if you attempt to start a service on an instance if that service is already running on its maximum
number of instances, that is, its number of preferred instances. You may move a service or change the
status of a service on an instance with the srvctl modify service (#i1009746) and srvctl
relocate service (#i1009865) commands described later in this appendix.
Syntax and Options
Use the srvctl start service command with the following syntax:
srvctl start service d db_unique_name [s "service_name_list" [n node_name | i
instance_name]] [o start_options]
Table A121 srvctl start service Options
Option Description
d db_unique_name Unique name for the database
s "service_name_list" Commadelimited list of service names.
If you do not include this option, then SRVCTL
starts all of the services for the specified
database.](https://image.slidesharecdn.com/servercontrolutilityreference-150519054857-lva1-app6891/85/Server-control-utility-reference-144-320.jpg)
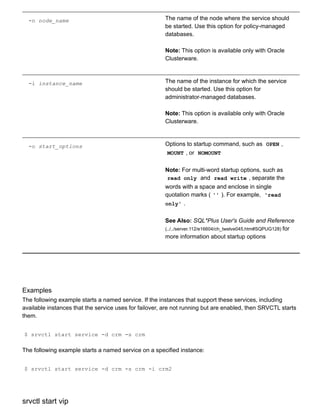
![Starts a specific VIP or a VIP on a specific node.
Syntax and Options
Use the srvctl start vip command with the following syntax:
srvctl start vip {n node_name | i vip_name } [v]
Note:
This command is only available with Oracle Clusterware.
Table A122 srvctl start vip Options
Option Description
n node_name Node name
i vip_name The VIP name
v Verbose start
Example
An example of this command is:
$ srvctl start vip i crm1vip v
status
Displays the current state of a named database, instances, services, disk group, listener, node application,
or other resource managed by Oracle Clusterware.
Table A123 srvctl status Summary
Command Description
srvctl status asm (#CHDIDGGC) Displays the status of Oracle ASM instances](https://image.slidesharecdn.com/servercontrolutilityreference-150519054857-lva1-app6891/85/Server-control-utility-reference-146-320.jpg)
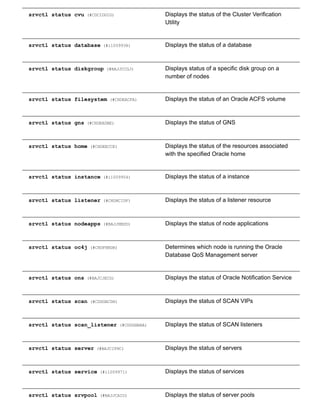
![srvctl status vip (#BAJIFHGH) Displays the status of VIPs
srvctl status asm
Displays the status of an Oracle ASM instance.
Note:
To manage Oracle ASM on Oracle Database 11g release 2 (11.2) installations, use the
SRVCTL binary in the Oracle Grid Infrastructure home for a cluster (Grid home). If you have
Oracle RAC or Oracle Database installed, then you cannot use the SRVCTL binary in the
database home to manage Oracle ASM.
Syntax and Options
Use the srvctl status asm command with the following syntax:
srvctl status asm [n node_name] [a] [v]
Table A124 srvctl status asm Options
Option Description
n node_name Node name. If you do not specify this option, the
SRVCTL displays the status of all Oracle ASM
instances.
Note: This option is available only with Oracle
Clusterware.
a Print detailed status information.
v Displays INTERNAL_STATE , which indicates
actions in progress by Oracle Clusterware, such
as starting, stopping, or cleaning. If the internal
state is STABLE, then the v option displays
nothing because this is the normal state.
Additionally, the v option displays
STATE_DETAILS , which may indicate additional
information provided by the resource about why it
is in its current state.](https://image.slidesharecdn.com/servercontrolutilityreference-150519054857-lva1-app6891/85/Server-control-utility-reference-148-320.jpg)
![Example
An example of this command is:
$ srvctl status asm n crmnode1 a
srvctl status cvu
Starting with Oracle Database 11g Release 2 (11.2.0.2), this command displays the current state of CVU
on one node in a cluster. If you specify a node name, then the command checks CVU status on that node.
Syntax and Options
Use the srvctl status cvu command with the following syntax:
srvctl status cvu [n node_name]
Table A125 srvctl status cvu Options
Option Description
n node_name Node name
Examples
An example of this command to check the status of CVU on a single node of a cluster is:
$ srvctl status cvu n crmnode1
srvctl status database
Displays the status of instances and their services, and where the instances are running.
If you run this command on an Oracle RAC One Node database, then the output shows the status of any
online database relocation (active, failed, or inactive), and the source and destination nodes of the
relocation.
Syntax and Options
Use the srvctl status database command with the following syntax:](https://image.slidesharecdn.com/servercontrolutilityreference-150519054857-lva1-app6891/85/Server-control-utility-reference-149-320.jpg)
![srvctl status database d db_unique_name [f] [v]
Table A126 srvctl status database Options
Option Description
d db_unique_name Unique name for the database
f Include disabled applications
v Displays INTERNAL_STATE , which indicates
actions in progress by Oracle Clusterware, such
as starting, stopping, or cleaning. If the internal
state is STABLE, then the v option displays
nothing because this is the normal state.
Additionally, the v option displays
STATE_DETAILS , which may indicate additional
information provided by the resource about why it
is in its current state.
Example
An example of this command is:
$ srvctl status database d crm v
srvctl status diskgroup
Displays the status of a specific disk group on a number of specified nodes.
Syntax and Options
Use the srvctl status diskgroup command with the following syntax:
srvctl status diskgroup g diskgroup_name [n node_list] [a] [v]
Table A127 srvctl status diskgroup Options
Option Description
The Oracle ASM disk group name](https://image.slidesharecdn.com/servercontrolutilityreference-150519054857-lva1-app6891/85/Server-control-utility-reference-150-320.jpg)
![g diskgroup_name
n node_list Commadelimited list of node names on which to
check status of the disk group
Note: This option is available only with Oracle
Clusterware.
a Display enabled status information of disk group
v Displays INTERNAL_STATE , which indicates
actions in progress by Oracle Clusterware, such
as starting, stopping, or cleaning. If the internal
state is STABLE, then the v option displays
nothing because this is the normal state.
Additionally, the v option displays
STATE_DETAILS , which may indicate additional
information provided by the resource about why it
is in its current state.
Example
An example of this command is:
$ srvctl status diskgroup g diskgroup1 n mynode1,mynode2 a
srvctl status filesystem
Displays the status of the specified Oracle ACFS volume.
Syntax and Options
Use the srvctl status filesystem command with the following syntax:
srvctl status filesystem d volume_device_name [v]
Table A128 srvctl status filesystem Options
Option Description
The device name of the Oracle ACFS volume](https://image.slidesharecdn.com/servercontrolutilityreference-150519054857-lva1-app6891/85/Server-control-utility-reference-151-320.jpg)
![d volume_device_name
v Displays INTERNAL_STATE , which indicates
actions in progress by Oracle Clusterware, such
as starting, stopping, or cleaning. If the internal
state is STABLE, then the v option displays
nothing because this is the normal state.
Additionally, the v option displays
STATE_DETAILS , which may indicate additional
information provided by the resource about why it
is in its current state.
Example
An example of this command is:
$ srvctl status filesystem d /dev/asm/d1volume293
srvctl status gns
Displays the current state of GNS.
Syntax and Options
Use the srvctl status gns command with the following syntax:
srvctl status gns [n node_name [v]]
Note:
This command is only available with Oracle Clusterware.
Table A129 srvctl status gns Options
Option Description
n node_name Specify a node on which GNS is running for which
you want to display the state
v](https://image.slidesharecdn.com/servercontrolutilityreference-150519054857-lva1-app6891/85/Server-control-utility-reference-152-320.jpg)
![Displays INTERNAL_STATE , which indicates
actions in progress by Oracle Clusterware, such
as starting, stopping, or cleaning. If the internal
state is STABLE, then the v option displays
nothing because this is the normal state.
Additionally, the v option displays
STATE_DETAILS , which may indicate additional
information provided by the resource about why it
is in its current state.
srvctl status home
Displays the status of all the Oracle Restartmanaged or Oracle Clusterwaremanaged resources for the
specified Oracle home.
Syntax and Options
Use the srvctl status home command with the following syntax:
srvctl status home o Oracle_home s state_file [n node_name]
Table A130 srvctl status home Options
Option Description
o Oracle_home The path to the Oracle home for which you want
to start the Oracle Restart or Oracle Clusterware
managed resources
s state_file The path name the text file that holds the state
information generated by this command.
n node_name The name of the node where the Oracle home
resides.
Note: This option is available only with Oracle
Clusterware.
Example](https://image.slidesharecdn.com/servercontrolutilityreference-150519054857-lva1-app6891/85/Server-control-utility-reference-153-320.jpg)
![An example of this command is:
$ srvctl status home o /u01/app/oracle/product/11.2.0/db_1 s ~/state.txt
srvctl status instance
Displays the status of instances.
Syntax and Options
Use the srvctl status instance command with the following syntax:
srvctl status instance d db_unique_name {n node_name | i "instance_name_list"}
[f] [v]
Note:
This command is only available with Oracle Clusterware and Oracle RAC.
Table A131 srvctl status instance Options
Option Description
d db_unique_name Unique name for the database
n node_name Node name
Note: Use this option for policymanaged
databases
i "instance_name_list" Commadelimited list of instance names
Note: Use this option for administratormanaged
databases
f Include disabled applications
v Displays INTERNAL_STATE , which indicates
actions in progress by Oracle Clusterware, such
as starting, stopping, or cleaning. If the internal
state is STABLE, then the v option displays
nothing because this is the normal state.
Additionally, the v option displays](https://image.slidesharecdn.com/servercontrolutilityreference-150519054857-lva1-app6891/85/Server-control-utility-reference-154-320.jpg)
![STATE_DETAILS , which may indicate additional
information provided by the resource about why it
is in its current state.
Example
An example of this command is:
$ srvctl status instance d crm i "crm1,crm2" v
srvctl status listener
Displays the status of listener resources.
Syntax and Options
Use the srvctl status listener command with the following syntax:
srvctl status listener [l listener_name] [n node_name [v]]
Table A132 srvctl status listener Options
Option Description
l listener_name Name of a listener.
If you do not specify this option, then the listener
name defaults to LISTENER
n node_name Name of a cluster node.
Note: This option is available only for Oracle
Clusterware.
v Displays INTERNAL_STATE , which indicates
actions in progress by Oracle Clusterware, such
as starting, stopping, or cleaning. If the internal
state is STABLE, then the v option displays
nothing because this is the normal state.
Additionally, the v option displays](https://image.slidesharecdn.com/servercontrolutilityreference-150519054857-lva1-app6891/85/Server-control-utility-reference-155-320.jpg)
![STATE_DETAILS , which may indicate additional
information provided by the resource about why it
is in its current state.
Example
An example of this command is:
$ srvctl status listener n node2
srvctl status nodeapps
Displays the status of node applications.
Syntax and Options
Use the srvctl status nodeapps command with the following syntax:
srvctl status nodeapps
Note:
This command is only available with Oracle Clusterware.
srvctl status oc4j
Determines which node is running the Oracle Database QoS Management server.
Syntax and Options
Use the srvctl status oc4j command with the following syntax:
srvctl status oc4j [n node_name [v]]
Note:
This command is only available with Oracle Clusterware.
Table A133 srvctl status oc4j Options
Option Description](https://image.slidesharecdn.com/servercontrolutilityreference-150519054857-lva1-app6891/85/Server-control-utility-reference-156-320.jpg)
![n node_name Specify a node on which the Oracle Database
QoS Management server is running for which you
want to display the state
v Displays INTERNAL_STATE , which indicates
actions in progress by Oracle Clusterware, such
as starting, stopping, or cleaning. If the internal
state is STABLE, then the v option displays
nothing because this is the normal state.
Additionally, the v option displays
STATE_DETAILS , which may indicate additional
information provided by the resource about why it
is in its current state.
srvctl status ons
Displays the current state of the Oracle Notification Service daemon.
Note:
This command is only available with Oracle Restart.
Syntax and Options
Use the srvctl status ons command with the following syntax:
srvctl status ons
srvctl status scan
Displays the status for all SCAN VIPs, by default, or a specific SCAN VIP.
Syntax and Options
Use the srvctl status scan command with the following syntax:
srvctl status scan [i ordinal_number [v]]
Note:
This command is only available with Oracle Clusterware.
Table A134 srvctl status scan Options](https://image.slidesharecdn.com/servercontrolutilityreference-150519054857-lva1-app6891/85/Server-control-utility-reference-157-320.jpg)
![Option Description
i ordinal_number Specify an ordinal number that identifies a
specific SCAN VIP. The range of values you can
specify for this option is 1 to 3. If you do not
specify this option, then the utility displays the
status of all SCAN VIPs in the cluster.
v Displays INTERNAL_STATE , which indicates
actions in progress by Oracle Clusterware, such
as starting, stopping, or cleaning. If the internal
state is STABLE, then the v option displays
nothing because this is the normal state.
Additionally, the v option displays
STATE_DETAILS , which may indicate additional
information provided by the resource about why it
is in its current state.
Example
An example of this command is:
$ srvctl status scan i 1
srvctl status scan_listener
Displays the status for all SCAN listeners, by default, or a specific listener.
Syntax and Options
Use the srvctl status scan_listener command with the following syntax:
srvctl status scan_listener [i ordinal_number [v]]
Note:
This command is only available with Oracle Clusterware.
Table A135 srvctl status scan_listener Options
Option Description](https://image.slidesharecdn.com/servercontrolutilityreference-150519054857-lva1-app6891/85/Server-control-utility-reference-158-320.jpg)
![i ordinal_number Specify an ordinal number that identifies a
specific SCAN VIP. The range of values you can
specify for this option is 1 to 3. If you do not
specify this option, then the utility displays the
status of all SCAN VIPs in the cluster.
v Displays INTERNAL_STATE , which indicates
actions in progress by Oracle Clusterware, such
as starting, stopping, or cleaning. If the internal
state is STABLE, then the v option displays
nothing because this is the normal state.
Additionally, the v option displays
STATE_DETAILS , which may indicate additional
information provided by the resource about why it
is in its current state.
Example
An example of this command is:
$ srvctl status scan_listener i 1
srvctl status server
Displays the current state of named servers.
Syntax and Options
Use the srvctl status server command with the following syntax:
srvctl status server n "server_name_list" [a]
Table A136 srvctl status server Options
Option Description
n "server_name_list" Commadelimited list of server names.
a Print detailed status information.](https://image.slidesharecdn.com/servercontrolutilityreference-150519054857-lva1-app6891/85/Server-control-utility-reference-159-320.jpg)
![Example
The following example displays the status of a named server:
$ srvctl status server n server11 a
srvctl status service
Displays the status of a service.
For Oracle RAC One Node databases, if there is an online database relocation in process, then the
srvctl status service command displays the source and destination nodes and the status of the
relocation, whether it is active or failed.
Syntax and Options
Use the srvctl status service command with the following syntax:
srvctl status service d db_unique_name [s "service_name_list"] [f] [v]
Table A137 srvctl status service Options
Option Description
d db_unique_name Unique name for the database
s "service_name_list" Commadelimited list of service names.
If you do not specify this option, then the utility
lists the status of all the services for the specified
database.
f Include disabled applications
v Displays INTERNAL_STATE , which indicates
actions in progress by Oracle Clusterware, such
as starting, stopping, or cleaning. If the internal
state is STABLE, then the v option displays
nothing because this is the normal state.
Additionally, the v option displays](https://image.slidesharecdn.com/servercontrolutilityreference-150519054857-lva1-app6891/85/Server-control-utility-reference-160-320.jpg)
![STATE_DETAILS , which may indicate additional
information provided by the resource about why it
is in its current state.
Example
The following example displays the status of a named service globally across the clustered database:
$ srvctl status service d crm s crm v
srvctl status srvpool
Displays all server pool names and number of servers (and names of servers if you specify the a option)
that are currently assigned to each server pool, if you do not specify the g option. When you specify the
g option, the command displays the preceding information for the specified server pool.
Syntax and Options
Use the srvctl status srvpool command with the following syntax:
srvctl status srvpool [g server_pool] [a]
Note:
This command is only available with Oracle Clusterware.
Table A138 srvctl status srvpool Options
Option Description
g server_pool Name of the server pool
a Print detailed status information
Example
An example of this command is:](https://image.slidesharecdn.com/servercontrolutilityreference-150519054857-lva1-app6891/85/Server-control-utility-reference-161-320.jpg)
![$ srvctl status srvpool g srvpool1 a
srvctl status vip
Displays status for a specific VIP or a VIP on a specific node.
Syntax and Options
Use the srvctl status vip command with the following syntax:
srvctl status vip {n node_name | i vip_name} [v]
Note:
This command is only available with Oracle Clusterware.
Table A139 srvctl status vip Options
Option Description
n node_name Node name
i vip_name The VIP name
v Displays INTERNAL_STATE , which indicates
actions in progress by Oracle Clusterware, such
as starting, stopping, or cleaning. If the internal
state is STABLE, then the v option displays
nothing because this is the normal state.
Additionally, the v option displays
STATE_DETAILS , which may indicate additional
information provided by the resource about why it
is in its current state.
Example
An example of this command is:
$ srvctl status vip i node1vip](https://image.slidesharecdn.com/servercontrolutilityreference-150519054857-lva1-app6891/85/Server-control-utility-reference-162-320.jpg)
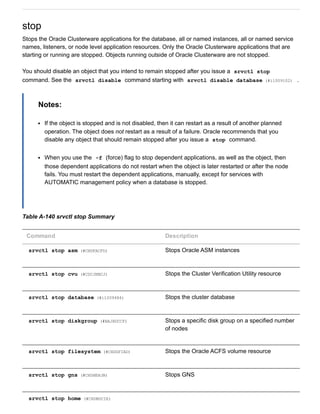
![Stops the resources for the specified Oracle
home
srvctl stop instance (#i1009520) Stops the instance
srvctl stop listener (#CDCCGBAA) Stops the specified listener or listeners
srvctl stop nodeapps (#i1009606) Stops the nodelevel applications
srvctl stop oc4j (#CHDJFCCH) Stops the OC4J instance
srvctl stop ons (#BAJIIHJD) Stops Oracle Notification Service
srvctl stop scan (#CDDJBAID) Stops all SCAN VIPs
srvctl stop scan_listener (#CDDBIJDF) Stops all SCAN listeners
srvctl stop service (#i1009560) Stops the service
srvctl stop vip (#CHDCEIFB) Stops VIP resources
srvctl stop asm
Stops an Oracle ASM instance.
Syntax and Options
Use the srvctl stop asm command with the following syntax:
srvctl stop asm [n node_name] [o stop_options] [f]
Notes:
To manage Oracle ASM on Oracle Database 11g release 2 (11.2) installations, use SRVCTL in
the Oracle Grid Infrastructure home for a cluster (Grid home). If you have Oracle RAC or
Oracle Database installed, then you cannot use SRVCTL in the database home to manage
Oracle ASM.](https://image.slidesharecdn.com/servercontrolutilityreference-150519054857-lva1-app6891/85/Server-control-utility-reference-164-320.jpg)
![Syntax and Options
Use the srvctl stop cvu command with the following syntax:
srvctl stop cvu [f]
The f option is the only option you can use with this command. The f option forces CVU to stop.
Examples
An example of this command to stop CVU:
$ srvctl stop cvu
srvctl stop database
Stops a database, its instances, and its services. When the database later restarts, services with
AUTOMATIC management start automatically but services with MANUAL management policy must be
started manually.
Syntax and Options
Use the srvctl stop database command with the following syntax:
srvctl stop database d db_unique_name [o stop_options] [f]
Table A142 srvctl stop database Options
Option Description
d db_unique_name Unique name for the database.
o stop_options Use this option to specify shutdown command
options, such as NORMAL , TRANSACTIONAL ,
IMMEDIATE , or ABORT
See Also: SQL*Plus User's Guide and Reference
(../../server.112/e16604/ch_twelve042.htm#SQPUG125) for
more information about shutdown options
f This option stops the database, its instances, its
services, and any resources that depend on those
services](https://image.slidesharecdn.com/servercontrolutilityreference-150519054857-lva1-app6891/85/Server-control-utility-reference-166-320.jpg)
![Example
An example of this command is:
$ srvctl stop database d crm o NORMAL
srvctl stop diskgroup
Stops a specific disk group resource on a number of specified nodes.
Syntax and Options
Use the srvctl stop diskgroup command with the following syntax:
srvctl stop diskgroup g diskgroup_name [n node_list] [f]
Table A143 srvctl stop diskgroup Options
Option Description
g diskgroup_name The Oracle ASM disk group name
n node_list Commadelimited list of node names on which to
stop the disk group
Note: This option is available only with Oracle
Clusterware.
f This option does not stop the databases that
depend on the disk group you are stopping, but
instead performs a forceful dismount that may
cause those databases to fail
Example
An example of this command is:
$ srvctl stop diskgroup g diskgroup1 n mynode1,mynode2 f](https://image.slidesharecdn.com/servercontrolutilityreference-150519054857-lva1-app6891/85/Server-control-utility-reference-167-320.jpg)
![srvctl stop filesystem
Stops the Oracle ACFS volume resource.
Syntax and Options
Use the srvctl stop filesystem command with the following syntax:
srvctl stop filesystem d volume_device_name [n node_name] [f]
Note:
This command is only available with Oracle Clusterware.
Table A144 srvctl stop filesystem Options
Option Description
d volume_device_name The Oracle ACFS volume device name
n node_name The name of a node
If you do not specify this option, then the utility
stops the volume resource on all active nodes in
the cluster.
f This option stops the file system and also stops
any databases or other resources that depend on
this file system.
Example
An example of this command is:
$ srvctl stop filesystem d /dev/asm/d1volume293 f
srvctl stop gns
Stops GNS for the cluster.](https://image.slidesharecdn.com/servercontrolutilityreference-150519054857-lva1-app6891/85/Server-control-utility-reference-168-320.jpg)
![Syntax and Options
Use the srvctl stop gns command with the following syntax:
srvctl stop gns [n node_name [v] [f]
Note:
This command is only available with Oracle Clusterware.
Table A145 srvctl stop gns Options
Option Description
n node_name The name of a node on which GNS is running
v Verbose output
f Force stop
Example
An example of this command is:
$ srvctl stop gns
srvctl stop home
Stops all the Oracle Restartmanaged or Oracle Clusterwaremanaged resources on the specified Oracle
home.
Syntax and Options
Use the srvctl stop home command with the following syntax:
srvctl stop home o Oracle_home s state_file [t stop_options] [n node_name] [
f]
Table A146 srvctl stop home Options
Option Description](https://image.slidesharecdn.com/servercontrolutilityreference-150519054857-lva1-app6891/85/Server-control-utility-reference-169-320.jpg)
![o Oracle_home The path to the Oracle home for which you want
to start the Oracle Restart or Oracle Clusterware
managed resources
s state_file The path name where you want the state file to be
written.
t stop_options Shutdown options for the database, such as
NORMAL , TRANSACTIONAL , IMMEDIATE , or
ABORT
See Also: SQL*Plus User's Guide and Reference
(../../server.112/e16604/ch_twelve042.htm#SQPUG125) for
more information about shutdown options
n node_name The name of the node where the Oracle home
resides.
Note: This option is available only with Oracle
Clusterware.
f Stop the resources even if errors are reported.
Example
An example of this command is:
$ srvctl stop o /u01/app/oracle/product/11.2.0/db_1 s ~/state.txt
srvctl stop instance
Stops instances and stops any services running on specified instances, unless you specify the f option.
If you specify f , then the services fail over to an available instance when the instance stops.
Syntax and Options
Use the srvctl stop instance command with the following syntax:
srvctl stop instance d db_unique_name {[n node_name]|[i "instance_name_list"]}
[o stop_options] [f]](https://image.slidesharecdn.com/servercontrolutilityreference-150519054857-lva1-app6891/85/Server-control-utility-reference-170-320.jpg)
![Example
An example of stopping an instance in a policymanaged database is:
$ srvctl stop instance d crm n node1
An example of stopping an instance in an administratormanaged database is:
$ srvctl stop instance d crm i crm1
srvctl stop listener
Stops the default listener on the specified node_name , or the listeners represented in a given list of
listener names, that are registered with Oracle Clusterware on the given node.
This command can also be used to stop a listener on a noncluster database from the noncluster database
home. SRVCTL does not accept the n option, however, when run from a noncluster database home.
Syntax and Options
Use the srvctl stop listener command with the following syntax:
srvctl stop listener [n node_name] [l listener_name_list] [f]
Table A148 srvctl stop listener Options
Option Description
n node_name The name of a single node on which a particular
listener runs.
Note: This option is available only with Oracle
Clusterware.
l listener_name The name of the listener you want to stop.
If you do not specify this option, then the listener
name defaults to LISTENER .
f Force stop](https://image.slidesharecdn.com/servercontrolutilityreference-150519054857-lva1-app6891/85/Server-control-utility-reference-172-320.jpg)
![Example
An example of this command is:
$ srvctl stop listener n mynode1
srvctl stop nodeapps
Stops nodelevel applications on a node in the cluster.
Syntax and Options
Use the srvctl stop nodeapps command with the following syntax:
srvctl stop nodeapps [n node_name] [g] [r] [f] [v]
Note:
This command is only available with Oracle Clusterware.
Table A149 srvctl stop nodeapps Options
Option Description
n node_name Node name
If you do not specify this option, then the utility
stops the nodeapps on all active nodes in the
cluster.
g Stops GSD, only
r Relocate VIP
Note: If you specify this option, then you must
also specify the n node_name option.
f Force stop
v Display verbose output](https://image.slidesharecdn.com/servercontrolutilityreference-150519054857-lva1-app6891/85/Server-control-utility-reference-173-320.jpg)
![Example
An example of this command is:
$ srvctl stop nodeapps
srvctl stop oc4j
Stops the OC4J instance.
Syntax and Options
Use the srvctl stop oc4j command with the following syntax:
srvctl stop oc4j [f] [v]
Note:
This command is only available with Oracle Clusterware.
Table A150 srvctl stop oc4j Options
Option Description
f Force stop of the SCAN Listener.
v Display verbose output
Example
An example of this command is:
$ srvctl stop oc4j f v
srvctl stop ons
Stops the Oracle Notification Service daemon.
Note:](https://image.slidesharecdn.com/servercontrolutilityreference-150519054857-lva1-app6891/85/Server-control-utility-reference-174-320.jpg)
![This command is only available with Oracle Restart.
Syntax and Options
Use the srvctl stop ons command with the following syntax:
srvctl stop ons [v]
The only option for this command is the v option, which specifies that verbose output should be
displayed.
Example
An example of this command is:
$ srvctl stop ons v
srvctl stop scan
Stops all SCAN VIPs, by default, or a specific SCAN VIP identified by ordinal_number .
Syntax and Options
Use the srvctl stop scan command with the following syntax:
srvctl stop scan [i ordinal_number] [f]
Note:
This command is only available with Oracle Clusterware.
Table A151 srvctl stop scan Options
Option Description
i ordinal_number An ordinal number that identifies which SCAN VIP
you want to stop. The range of values you can
specify for this option is 1 to 3.
If you do not specify this option, then the utility
stops all the SCAN VIPs.
f Force stop of the SCAN VIP.](https://image.slidesharecdn.com/servercontrolutilityreference-150519054857-lva1-app6891/85/Server-control-utility-reference-175-320.jpg)
![Example
An example of this command is:
$ srvctl stop scan i 1
srvctl stop scan_listener
Stops all SCAN listeners, by default, or a specific listener identified by ordinal_number .
Syntax and Options
Use the srvctl start scan_listener command with the following syntax:
srvctl stop scan_listener [i ordinal_number] [f]
Note:
This command is only available with Oracle Clusterware.
Table A152 srvctl stop scan_listener Options
Option Description
i ordinal_number An ordinal number that identifies which SCAN
listener you want to stop. The range of values you
can specify for this option is 1 to 3.
If you do not specify this option, then the utility
stops all the SCAN listeners.
f Force stop of the SCAN listener.
Example
An example of this command is:
$ srvctl stop scan_listener i 1](https://image.slidesharecdn.com/servercontrolutilityreference-150519054857-lva1-app6891/85/Server-control-utility-reference-176-320.jpg)
![srvctl stop service
Stops one or more services globally across the cluster database, or on the specified instance.
Syntax and Options
Use the srvctl stop service command with the following syntax:
srvctl stop service d db_unique_name [s "service_name_list" [n node_name | i
instance_name] [f]
In Windows, you must enclose the list of commadelimited service names in double quotation marks ( "" ).
Table A153 srvctl stop service Options
Option Description
d db_unique_name Unique name for the database
s service_name_list Commadelimited list of service names enclosed
in double quotation marks ( "" ).
If you do not provide a service name list, then
SRVCTL stops all services on the database.
n node_name The name of the node on which the services
should be stopped. Use this option for policy
managed databases.
Note: This option is available only with Oracle
Clusterware.
i instance_name The name of the instance for which the services
should be stopped. Use this option for
administratormanaged databases.
Note: This option is available only with Oracle
Clusterware.
f Force SRVCTL to stop the service; this causes
SRVCTL to disconnect all of the sessions
transactionally, requiring the sessions using the
service to reconnect and then connect to another
instance.](https://image.slidesharecdn.com/servercontrolutilityreference-150519054857-lva1-app6891/85/Server-control-utility-reference-177-320.jpg)
![Note: If you do not specify the f option, then
sessions already connected to this service stay
connected, but new sessions cannot be
established to the service.
Examples
The following example stops a service globally across a cluster database:
$ srvctl stop service d crm s crm
The following example stops a service on a specified instance:
$ srvctl stop service d crm s crm i crm2
srvctl stop vip
Stops a specific VIP or all VIPs on a specific node, including any VIPs that were relocated due to a failover.
Syntax and Options
Use the srvctl stop vip command with the following syntax:
srvctl stop vip {n node_name | i vip_name} [r] [v]
Note:
This command is only available with Oracle Clusterware.
Table A154 srvctl stop vip Options
Option Description
n node_name This option stops all VIPs on a specific node,
including failedover VIPs
i vip_name This option stops a specific VIP
r Relocate VIP](https://image.slidesharecdn.com/servercontrolutilityreference-150519054857-lva1-app6891/85/Server-control-utility-reference-178-320.jpg)

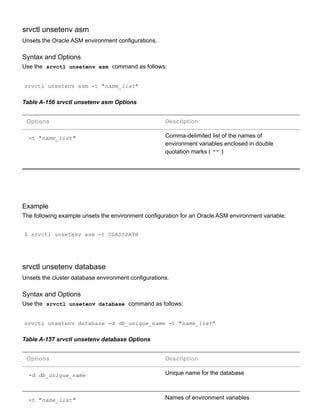
![Example
The following example unsets the environment configuration for a cluster database environment variable:
$ srvctl unsetenv database d crm t CLASSPATH
srvctl unsetenv listener
Unsets the environment configuration for a listener.
Syntax and Options
Use the srvctl unsetenv listener command as follows:
srvctl unsetenv listener [l listener_name] t "name_list"
Table A158 srvctl unsetenv listener Options
Options Description
l listener_name Name of the listener.
If you do not specify this option, then the name of
the listener defaults to LISTENER .
t "name_list" Names of environment variables
Example
The following example unsets the environment configuration for the node applications:
$ srvctl unsetenv listener t "TNS_ADMIN"
srvctl unsetenv nodeapps
Unsets the environment configuration for the node applications.](https://image.slidesharecdn.com/servercontrolutilityreference-150519054857-lva1-app6891/85/Server-control-utility-reference-181-320.jpg)
![Syntax and Options
Use the srvctl unsetenv nodeapps command as follows:
srvctl unsetenv nodeapps t "name_list" [v]
Note:
This command is only available with Oracle Clusterware.
Table A159 srvctl unsetenv nodeapps Options
Options Description
t "name_list" Names and values of environment variables
v Display verbose output
Example
The following example unsets the environment configuration for the node applications:
$ srvctl unsetenv nodeapps t "test_var1,test_var2"
srvctl unsetenv vip
Unsets the environment configuration for the specified cluster VIP.
Syntax and Options
Use the srvctl unsetenv vip command as follows:
srvctl unsetenv vip i vip_name t "name_list" [v]
Table A160 srvctl unsetenv vip Options
Options Description
i vip_name Name of the cluster VIP
t "name_list" Commadelimited list of the names of
environment variables](https://image.slidesharecdn.com/servercontrolutilityreference-150519054857-lva1-app6891/85/Server-control-utility-reference-182-320.jpg)


This document provides a complete reference for the Server Control Utility (SRVCTL) in Oracle Database. It includes topics on using SRVCTL to manage configuration information for databases, instances, listeners, and other clusterware resources. The document outlines the SRVCTL command syntax and privileges required to perform administrative tasks. It also lists deprecated SRVCTL commands and options in Oracle Database 11g Release 2.


![Getting Started with Apache Spark: Big Data Made Simple [Free Meetup]](https://cdn.slidesharecdn.com/ss_thumbnails/apachesparkgettingstarted-260203175547-8361bcc3-thumbnail.jpg?width=640&height=640&fit=bounds)


