Beginners Guide to TikTok for Search - Rachel Pearson - We are Tilt __ Bright...
Sastavljanje glave motora i stezanje na kile
1. B1BG0YK1 - 406D9 DW10 ENGINE
REASSEMBLY ENGINE (CYLINDER BLOCK)
1 - REASSEMBLY
Place the cylinder block on the stand .
Carefully clean all the seal surfaces using scouring product .
Clean the threads and taps .
Do not use sharp or abrasive tools .
The joint faces must not have any trace of knocks or scores .
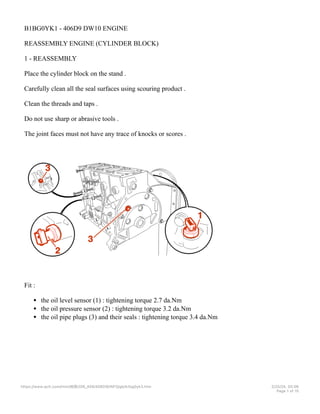
Fit :
the oil level sensor (1) : tightening torque 2.7 da.Nm
the oil pressure sensor (2) : tightening torque 3.2 da.Nm
the oil pipe plugs (3) and their seals : tightening torque 3.4 da.Nm
https://www.qclt.com/html/标致206_406/406D9/INFO/gb/b1bg0yk3.htm 2/25/24, 05
:
06
Page 1 of 15
2. Refit the piston base spray jets (4), Tighten the bolts to 1 da.Nm .
Fit the grooved main bearing half-shells (5), on the cylinder block side .
Lubricate the crankshaft main bearings .
Fit :
the crankshaft (6)
https://www.qclt.com/html/标致206_406/406D9/INFO/gb/b1bg0yk3.htm 2/25/24, 05
:
06
Page 2 of 15
3. the side stop thrust washers (7), grooved surface in contact with the crankshaft
NOTE : THICKNESS OF THE STOP THRUST WASHERS .
APPLY (E10) SEALING COMPOUND TO THE CORNERS AND ENDS (A) OF MAIN
BEARING NO. 1 .
PLACE TOOL [6] ON THE CAP OF BEARING NO. 1 :
https://www.qclt.com/html/标致206_406/406D9/INFO/gb/b1bg0yk3.htm 2/25/24, 05
:
06
Page 3 of 15
4. the shim slide (8) must be in the extension of surface (9) of the bearing cap
tighten the clamp (10)
Refit the side seals (11) in the groove of the main bearing cap, with the minimum protrusion at (B) .
Lubricate the two surfaces of the feelers (12) .
PLACE THE FEELERS (12) ON TOOL [6] ABOVE THE HEEL (13) OF THE MAIN BEARING
CAP .
The side seals (11) must have a minimum protrusion of approximately 1.5 mm (Maximum = 4 mm) .
https://www.qclt.com/html/标致206_406/406D9/INFO/gb/b1bg0yk3.htm 2/25/24, 05
:
06
Page 4 of 15
5. Engage the cap/side seal assembly in the cylinder block, by tilting the assembly .
Position the main bearing on the centralising bushes .
Tighten the 2 bolts (14) .
REMOVE THE TOOL [6] SIDEWAYS .
IMPERATIVE : the new side seals are supplied to the correct length and must not be cut, if the
https://www.qclt.com/html/标致206_406/406D9/INFO/gb/b1bg0yk3.htm 2/25/24, 05
:
06
Page 5 of 15
6. protrusion is too great, repeat the fitting operation .
Position :
the side stop thrust washers grooved surface in contact with the crankshaft
the bearing caps (15)
IMPERATIVE : MARKING AND DETERMINING OF THE BEARING HALF SHELLS .
Tighten :
the bolts (16) to 2.5 da.Nm + 60°
https://www.qclt.com/html/标致206_406/406D9/INFO/gb/b1bg0yk3.htm 2/25/24, 05
:
06
Page 6 of 15
7. FIT THE DIAL GAUGE [7] USING TOOLS [8] - [9] .
This end float should be between 0.07 and 0.32 mm .
Adjust the clearance by adjusting the thickness of the side stop thrust washers .
FIT A NEW OIL SEAL (16) USING THE TOOL [1C + 1D] .
Refit the seal by tapping with a mallet to the limit .
https://www.qclt.com/html/标致206_406/406D9/INFO/gb/b1bg0yk3.htm 2/25/24, 05
:
06
Page 7 of 15
8. Remove the tool with a rotating movement .
IMPERATIVE : the outer face of the lip seal must be free of all traces of oil .
Con rod positioning .
Check that the new main bearing shell is fitted on the con rod big end .
MARKING AND DETERMINING OF THE BEARING HALF SHELLS .
IMPERATIVE : piston and pin must match .
Assemble the connecting rods and pistons directing the notches (17) to the side opposite the recesses
(18) on the pistons .
Fit :
the oiled gudgeon pins
the new retaining rings
Ensure that the con rods turn freely on their pins .
Fit the rings using piston ring pliers .
IMPERATIVE : turn the word TOP stamped on the rings to face upwards .
Position the ring gaps at 120 degrees to the scraper ring gap .
https://www.qclt.com/html/标致206_406/406D9/INFO/gb/b1bg0yk3.htm 2/25/24, 05
:
06
Page 8 of 15
9. IMPERATIVE : direct the recesses (18) to the side opposite the oil filter fixing (19) .
Oil the piston rings and cylinder jackets .
Insert the con rod/piston assembly in the corresponding cylinder using a ring compressor .
Fit the big end cap with a new oiled main bearing shell .
IMPERATIVE : line up the cap bearing shell notch (20) with the con rod bearing shell notch (17) .
https://www.qclt.com/html/标致206_406/406D9/INFO/gb/b1bg0yk3.htm 2/25/24, 05
:
06
Page 9 of 15
10. IMPERATIVE : always fit new connecting rod cap nuts .
Clean : The bolts, The nuts .
COAT THE BIG END NUTS (THREAD AND CONTACT SURFACE) WITH G10 .
Tightening is carried out in two stages .
Stage 1 :
tighten the nuts to 20 da.Nm
Stage 2 :
finally tighten by turning through 70 °, USING THE TOOL [3]
https://www.qclt.com/html/标致206_406/406D9/INFO/gb/b1bg0yk3.htm 2/25/24, 05
:
06
Page 10 of 15
11. (X) = 10 mm .
Clean the checking surfaces .
FIT THE DIAL GAUGE [7] ON THE BRACKET [15] .
Turn the crankshaft .
Place the needle of the dial gauge on one of the checking points (Checking point C) .
Continue turning the crankshaft until the piston reaches TDC ; Read the value .
Turn a quarter turn backwards .
Move the piston to the Top Dead Centre value without ever exceeding it .
Zero the dial gauge .
MOVE THE DIAL GAUGE/BRACKET ASSEMBLY [7] AND [15] OVER THE CYLINDER
BLOCK .
Read the value .
Place the needle of the dial gauge on one of the checking points (Checking point D) .
Zero the dial gauge .
https://www.qclt.com/html/标致206_406/406D9/INFO/gb/b1bg0yk3.htm 2/25/24, 05
:
06
Page 11 of 15
12. Read the value .
Calculate the average of the 2 values measured .
Continue in the same way for the other three cylinders .
NOTE : maximum gap between 2 pistons : = 0.07 mm .
WARNING : the highest average value determines the thickness of the gasket .
Fit :
the cotter (22)
the drive pinion (24) for the oil pump on the crankshaft
the oil pump by placing the chain on the gears
Tighten the bolts to 1.6 da.Nm .
Fit :
the dipstick tube (25)
TIGHTEN THE BOLT : 0.9 da.Nm + E3 .
https://www.qclt.com/html/标致206_406/406D9/INFO/gb/b1bg0yk3.htm 2/25/24, 05
:
06
Page 12 of 15
13. COAT THE PLATE (26) WITH E10 SEALING COMPOUND .
Fit :
the seal carrier plate (26)
tightening torque : 1.5 da.Nm
FIT A NEW OIL SEAL (27) USING THE TOOL [1B] + [1C] .
FIT A NEW LIP SEAL USING TOOL [1B] + [1C] + Bolt (28) .
Remove the tool with a rotary movement .
IMPERATIVE : the outer face of the lip seal must be free from all traces of oil .
Fit the pump (29) using a new seal .
Tighten the bolts to 1.5 da.Nm .
https://www.qclt.com/html/标致206_406/406D9/INFO/gb/b1bg0yk3.htm 2/25/24, 05
:
06
Page 13 of 15
14. 1 - 1 - ALUMINIUM OIL SUMP
NOTE : for engines fitted with an aluminium oil sump, check that the dowel pin (30) is present .
COAT THE SUMP GASKET SURFACE WITH A BEAD OF (E10) SEALING COMPOUND .
IMPERATIVE : ensure that the bead of sealing compound goes right round each of the threaded
holes in order to guarantee a tight seal .
https://www.qclt.com/html/标致206_406/406D9/INFO/gb/b1bg0yk3.htm 2/25/24, 05
:
06
Page 14 of 15
15. Fit the sump, Tightening torque : 1.6 da.Nm .
SCREW THE TWO THREADED RODS OF THE TOOL [1K] INTO THE CRANKSHAFT .
Check that the centralising pin is present .
Refit the flywheel (32) .
RETAIN THE ENGINE FLYWHEEL (32) IN PLACE USING THE CENTRING PINS AND
FASTENERS OF THE TOOL (1K) .
INSERT THE FLYWHEEL STOP [1I] .
CLEAN AND COAT WITH (E3) THE BOLTS .
1st fitting : Single engine flywheel .
CLEAN AND COAT WITH (E3) THE BOLTS .
Tightening torque : 4.75 da.Nm .
2nd fitting : Double flywheel .
IMPERATIVE : following any work: when disassembling the double flywheel from the crankshaft,
always replace the double flywheel bolts .
Fit the pre-coated bolts .
Tightening torque : 4.8 da.Nm .
https://www.qclt.com/html/标致206_406/406D9/INFO/gb/b1bg0yk3.htm 2/25/24, 05
:
06
Page 15 of 15