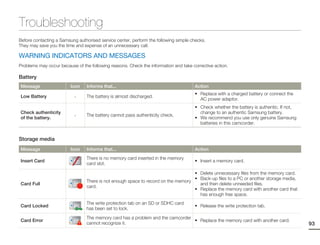
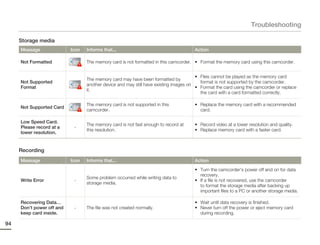
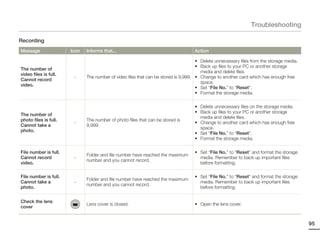
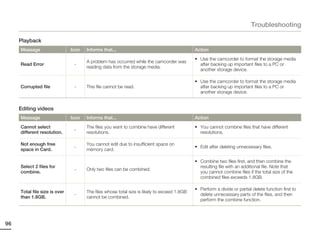
1. This user manual provides safety instructions for using a Samsung digital camcorder.
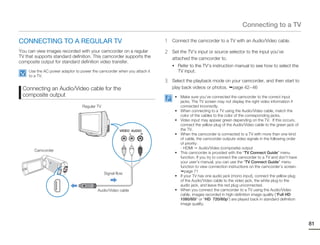
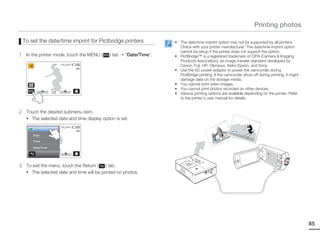
2. It instructs users to read all instructions, heed all warnings, and only use attachments specified by the manufacturer.
3. Ventilation openings on the camcorder must not be blocked and it should not be placed near heat sources.
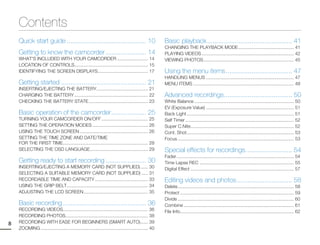

![Quick start guide
Recording videos Recording photos
Your camcorder uses advanced H.264 compression technology Your camcorder can record high quality photos with a 16:9 aspect
give you the clearest video quality. ratio.
1 Open the LCD screen. 1 Open the LCD screen.
2 Select the video recording mode by touching the Video 2 Select the photo recording mode by touching the Photo
recording mode ( ) tab. recording mode ( ) tab.
STBY 00:00:00 [253Min] 9999
3 Press the Recording start/stop button. 3 Press the Recording start/stop button.
• To stop recording, press the Recording start/stop button. • The shutter sound is heard and the photo is recorded.
00:00:00 [253Min]
The default video resolution setting is “Full HD 1080/60i”. You can
also record with SD (standard definition) video quality.
Using ‘Quick On STBY’ by opening/closing the LCD
screen.
When you close the LCD screen, your camcorder goes to the Quick
On STBY mode (power saving mode). You can start recording
quickly when you open the LCD screen. page 76
11](https://image.slidesharecdn.com/samsungq10usermanual-110830023426-phpapp02/85/Samsung-Camcorder-Q10-User-Manual-15-320.jpg)
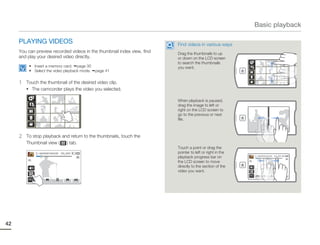
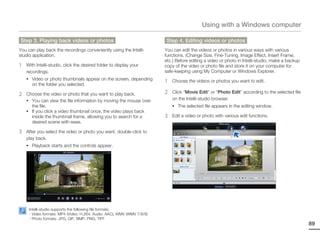
![Quick start guide
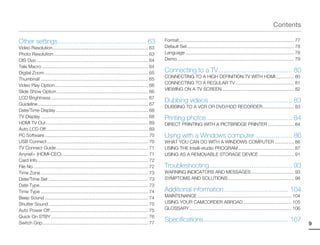
STEP3: Play back videos or photos STEP4: Save recorded videos or photos
Simple and fun! Enjoy the various features of the internal
Viewing videos or photos on the LCD screen Intelli-studio program on your Windows computer.
You can find recordings quickly by using the thumbnail index view. Using the Intelli-studio program built into your camcorder, you can
import videos/photos into your computer, and edit or share the
1 Touch the Playback ( ) tab on the LCD screen in STBY videos/photos with your friends and family.
mode. For details, see pages 86~90
STBY 00:00:00 [253Min]
Importing and viewing videos/photos from the
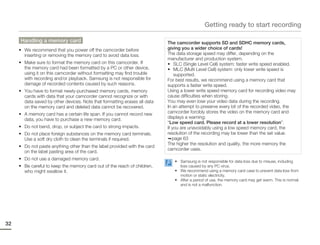
camcorder to your PC
1 Start the Intelli-studio program by connecting the camcorder
to your PC with a USB cable.
• A new file saving screen appears with the Intelli-studio main
window. Click “Yes”, and the uploading procedure starts.
2 Touch the thumbnail ( / ) tab, then touch the desired
image.
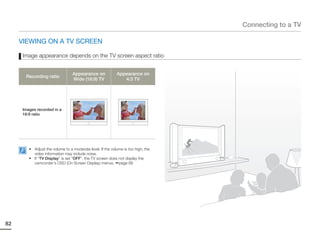
Viewing on a high definition TV
You can enjoy HD (high definition) videos on an HDTV. page 80
You can also play back videos on a SD (standard definition) image
quality TV. page 81
12](https://image.slidesharecdn.com/samsungq10usermanual-110830023426-phpapp02/85/Samsung-Camcorder-Q10-User-Manual-16-320.jpg)
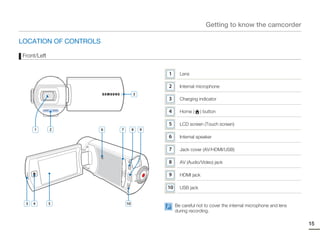
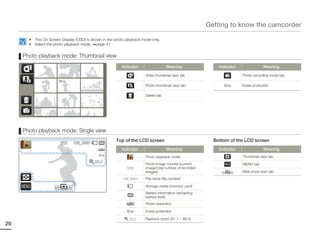
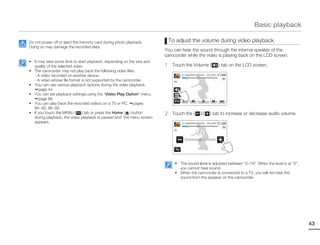
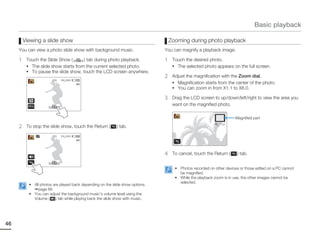
![Getting to know the camcorder
IDENTIFYING THE SCREEN DISPLAYS
The available functions vary depending on the operation mode you have selected. Different indicators appear depending on the setting
values.
• This On Screen Display (OSD) is shown in the video recording mode only.
• Select the video recording mode. page 26
Video recording mode
STBY 00:00:00 [253Min]
Left of the LCD screen Right of the LCD screen
Indicator Meaning Indicator Meaning
Smart Auto mode/Manual mode
/ / Storage media (Memory card)
/Art Film mode
Battery information (remaining
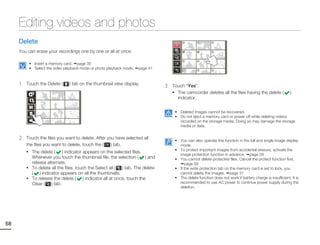
Video/Photo recording mode tab charge level)
Zoom tab Optical zoom/Digital zoom bar
JAN/01/2011
12:00AM
Playback tab Video resolution
Tele Macro
Center of the LCD screen OIS Duo
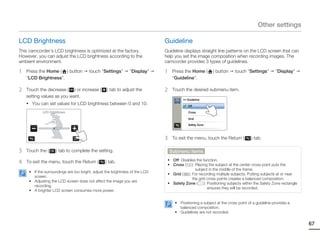
Indicator Meaning
Operating status (standby/recording • The on-screen indicators are based on
STBY / / an 32GB SDHC memory card capacity.
/pause)
• The screen above is an example and
00:00:00 Time counter (video recording time) may differ from the actual display.
• For warning indicators and messages,
[253Min] Remaining recordable time see pages 93~97
• The illustrated items above and their
Time Zone (Visit) positions can be changed without notice
to improve performance.
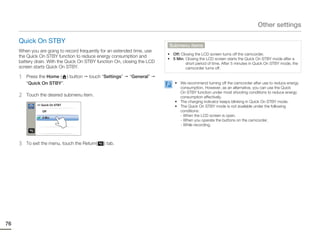
JAN/01/2011
12:00 AM
Date/Time 17](https://image.slidesharecdn.com/samsungq10usermanual-110830023426-phpapp02/85/Samsung-Camcorder-Q10-User-Manual-21-320.jpg)
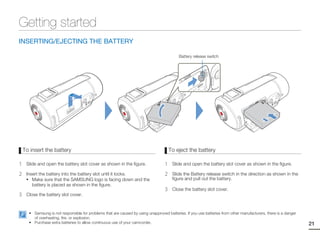
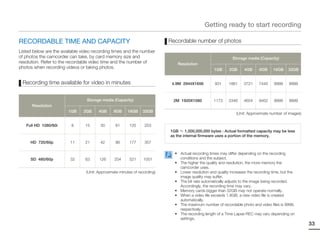
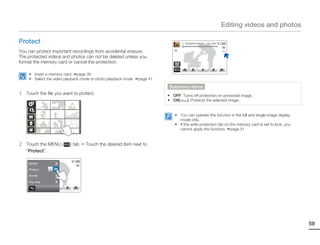
![Getting started
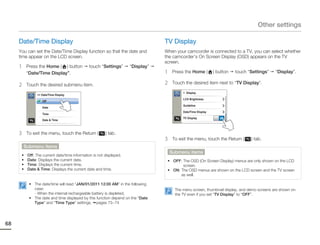
CHECKING THE BATTERY STATE Battery level display
You can check the charging state and remaining battery capacity. The battery level display shows the STBY 00:00:00 [253Min]
amount of battery power remaining
To check the charging state in the battery.
The color of the LED indicates the power or charging state.
Battery level
State Message
indicator
Fully charged -
25~50% used -
50~75% used -
75~95% used -
Charging 95~98% used -
(Orange)
Exhausted (flickers): The camcorder will be
Fully charged forced to turn off after 3 minutes. Change -
(Green)
the battery as soon as possible.
- After 3 seconds, the camcorder turns off. “Low Battery”
The figures above are based on a fully charged battery at a normal
temperature. Low ambient temperature may affect the use time.
23](https://image.slidesharecdn.com/samsungq10usermanual-110830023426-phpapp02/85/Samsung-Camcorder-Q10-User-Manual-27-320.jpg)
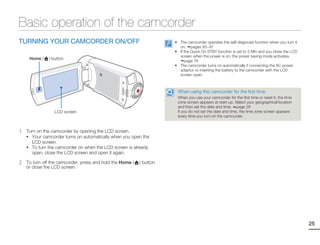
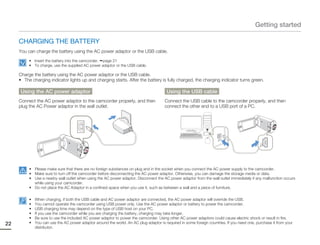
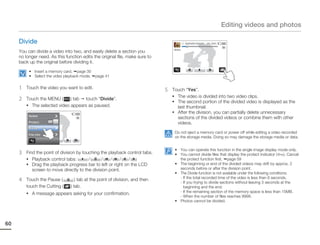
![Basic operation of the camcorder
SETTING THE OPERATION MODES USING THE TOUCH SCREEN
You can easily switch the operating mode by touching the tabs on The touch screen lets you playback and recording with a simple
the LCD screen. touch of your finger. Place your hand on the rear side of the LCD
screen to support it. Then, touch the items displayed on the screen.
Switching to the recording mode
In STBY mode, touch the Video recording mode ( ) or Photo recording mode
( ) tab. Touching each tab switches to the respective mode.
• You can also switch directly to the recording mode when pressing the
Recording start/stop button in the playback mode.
• You can switch to the desired recording mode by touching “Smart Auto”,
“Manual”, or “Art Film” on the Home menu.
STBY 00:00:00 [253Min]
Touch
Slightly touch the items to select or execute with your finger.
Switching to the playback mode
STBY 00:00:00 [253Min]
You can switch to the playback mode by touching “Album” on the Home
menu. page 47
• You can also switch the operation mode directly into the playback thumbnail
display by touching the Playback ( ) tab in STBY mode.
Smart Auto Manual Art Film
Album Settings
26](https://image.slidesharecdn.com/samsungq10usermanual-110830023426-phpapp02/85/Samsung-Camcorder-Q10-User-Manual-30-320.jpg)
![Basic operation of the camcorder
Drag Switching the information display mode
Drag the touch screen to up, down, left, or right to select the desired You can switch the on-screen information display mode.
items or files. Each time you touch the LCD screen, the full and minimum display
modes alternate.
Full display mode
STBY 00:00:00 [253Min]
Minimum display mode
STBY
• Do not place any protective film on the LCD screen.
• If you leave a film attached for a long while, strong adhesion between
the film and the surface of the screen may cause a malfunction of the
touch screen.
• Be careful not to accidentally press the button near the LCD screen
while using the touch screen.
• The tabs and indicators that appear on the LCD screen depend on
the current recording/playback status of your camcorder.
• The camcorder does not recognize touches if you touch more than two
points on the screen at the same time. Touch one point at a time. Warning indicators and messages may appear, depending on the
recording conditions. pages 93~97
27](https://image.slidesharecdn.com/samsungq10usermanual-110830023426-phpapp02/85/Samsung-Camcorder-Q10-User-Manual-31-320.jpg)
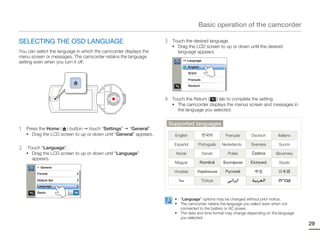
![Basic operation of the camcorder
SETTING THE TIME ZONE AND DATE/TIME 4 Touch the time ( ) tab, and then set the time by touching the
corresponding item or dragging it to up or down.
FOR THE FIRST TIME
Date / Time Set
Set the date and time of your local area when turning on this
Hr Min
camcorder for the first time.
12 00 AM
1 Open the LCD screen to turn on the camcorder.
• The time zone (“Home”) screen appears based on Lisbon
and London (Greenwich Mean Time).
2 Select your local area on the map by touching the left ( ) or 5 Make sure the clock is correctly set, and then touch the ( )
right ( ) tab on the LCD screen, and then press the ( ) tab. tab.
• The “Date/Time Set” screen appears. • The date/time setting finishes.
Home • You can set the year up to 2037, based on the “Home” item.
• Set “Date/Time Display” to On. page 68
• Activating the ( ) icon moves the time forward by 1 hour.
London,Lisbon
[GMT-00:00] JAN/01/2011 12:00AM Internal rechargeable battery
• Your camcorder includes a internal rechargeable battery that
3 Set the date by touching the corresponding item or dragging it retains the date and time settings even after the power is turned
off.
to up or down.
• If the battery is depleted, the current date/time values are reset to
Date / Time Set the default values. If this occurs, you need to recharge the internal
rechargeable battery (see below), and then re-set the current date
Month Date Year and time.
JAN 01 2011 Charging the internal rechargeable battery
• The internal battery is always recharged while your camcorder is
connected to the AC power or while the battery is attached.
• If you have not used the camcorder for about 2 weeks and you
have not connected the AC power or the battery to it, the internal
battery fully discharges. If this occurs, charge the internal battery
by connecting the camcorder to the supplied AC adaptor for 24
hours.
28](https://image.slidesharecdn.com/samsungq10usermanual-110830023426-phpapp02/85/Samsung-Camcorder-Q10-User-Manual-32-320.jpg)
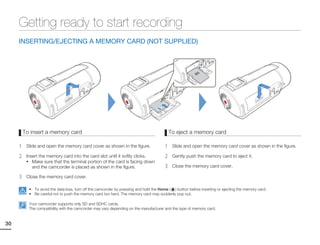
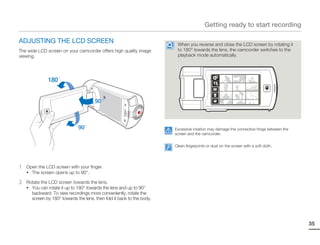
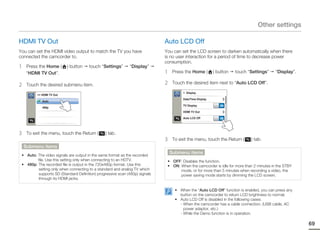
![Getting ready to start recording
USING THE GRIP BELT Switch grip (Either handed grip)
Adjust the length of grip belt so that the camcorder is stable when The camcorder is designed for you to use conveniently with either
you press the Recording start/stop button with your thumb. your right or left hand. If you want to use this function, set “Switch
Grip” to “ON” in the Settings menu. page 77
STBY 00:00:00 [253Min]
<When you hold the camcorder with your left hand>
STBY 00:00:00 [253Min]
<When you hold the camcorder with your right hand>
If you make the grip belt too tight and use excessive force to insert your
hand, the grip belt hook of the camcorder may be damaged.
34](https://image.slidesharecdn.com/samsungq10usermanual-110830023426-phpapp02/85/Samsung-Camcorder-Q10-User-Manual-38-320.jpg)
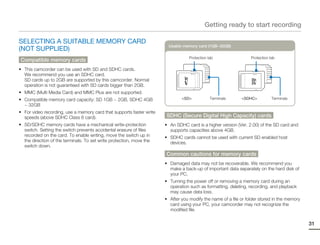
![Basic recording
RECORDING VIDEOS 2 Press the Recording start/stop button.
• The recording ( ) indicator appears and recording starts.
This camcorder supports both High Definition (HD) and Standard
Definition (SD) image resolutions. Set your desired resolution before 00:00:00 [253Min]
recording. page 63
• Insert a memory card. page 30
• Select the video recording mode. page 26
• Open the Lens cover by using the Lens open/close switch. page 16
3 To stop recording, press the Recording start/stop button again.
To pause recording
The camcorder allows you to pause temporarily while recording a
video. With this function, you can record your favorite scenes as a
single video.
Touch the Pause ( ) tab on the LCD screen to pause while
recording. Touch the Recording ( ) tab to resume.
00:00:00 [253Min]
1 Select a subject to record.
• Adjust the LCD screen to the best angle for recording.
• Use the Zoom dial or Zoom ( ) tab on the LCD screen to
adjust the size of the subject. page 40
36](https://image.slidesharecdn.com/samsungq10usermanual-110830023426-phpapp02/85/Samsung-Camcorder-Q10-User-Manual-40-320.jpg)

![Basic recording
RECORDING WITH EASE FOR BEGINNERS Appears when recording at night. (Night)
(SMART AUTO)
Appears when recording images of landscapes with backlighting. (Backlight)
User-friendly SMART AUTO optimizes your camcorder to the
recording conditions automatically, providing beginners with the Appears when recording people. (Portrait)
best performance.
Appears when recording a very bright scene. (White)
1 Press the Home ( ) button touch “Smart Auto”.
Appears when recording an outdoor scene. (Landscape)
• Smart Auto ( ) indicator appears on the LCD screen.
Appears when recording images using close-up. (Macro)
Appears when recording images of clear skies. (Blue sky)
Smart Auto Manual Art Film
Appears when recording images of forested areas. (Natural green)
Album Settings Appears when recording images of sunsets. (Sunset)
2 Align your subject in the frame. 3 To record the video or photo, press the Recording start/stop
• The camcorder automatically detects the scene (Landscape, button.
etc.) and adjusts the camcorder settings accordingly.
• The appropriate scene icon appears on the LCD screen.
4 To cancel the Smart Auto mode, press the Home ( ) button
STBY 00:00:00 [253Min] touch “Manual”.
• Most settings are automatically adjusted in the Smart Auto mode. To
set or adjust functions on your own, select “Manual” on the Home
menu.
• When the camcorder fails to recognize the recording situations, it
records in the basic setting ( ).
• The camcorder may not select the correct scene depending on
shooting conditions, such as camcorder shake, lighting, and distance
to the subject.
• The camcorder may not detect the portrait mode depending on the
orientation or the brightness of faces.
39](https://image.slidesharecdn.com/samsungq10usermanual-110830023426-phpapp02/85/Samsung-Camcorder-Q10-User-Manual-43-320.jpg)
![Basic recording
ZOOMING T: Telephoto
This camcorder allows you to record using optical X10 zoom and
digital zoom by rotating the Zoom dial or touching the Zoom
( ) tab on the LCD screen.
T: Recording enlarged image
(telephoto)
W: Recording wide area
(wide-angle)
STBY 00:00:00 [253Min]
To zoom in W: Wide-angle
Rotate the Zoom dial towards T (telephoto). Or touch the Zoom • Using the optical zoom does not degrade the image quality and clarity.
( ) tab, and then touch the Telephoto ( ) tab. • Use the digital zoom when you want to zoom more than the optical zoom
• The distant subject is gradually magnified. range. page 65
• The highest zoom magnification ratio is X10 in the normal zoom-in. • Focusing may become unstable when you record with a fast zoom or
zoom into a subject standing too far away. If this occurs, use the manual
focus function. (Video recording mode only) page 53
To zoom out • The minimum distance you can have between the camcorder and subject
while maintaining sharp focus is about 1cm (about 0.4 inches) for wide
Rotate the Zoom dial towards W (wide-angle). Or touch the Zoom angle and about 1m (about 40 inches) for telephoto. If you want to shoot
( ) tab, and then touch the Wide-angle ( ) tab. the subject close to the lens at a wide angle, use the Tele Macro function.
page 64
• The subject gets smaller and further away.
40 • The smallest zoom ratio is the subject’s original size in the zoom-out.
• Frequent use of the zoom function consumes more power.
• The camcorder can record the sound of the zoom mechanism.](https://image.slidesharecdn.com/samsungq10usermanual-110830023426-phpapp02/85/Samsung-Camcorder-Q10-User-Manual-44-320.jpg)
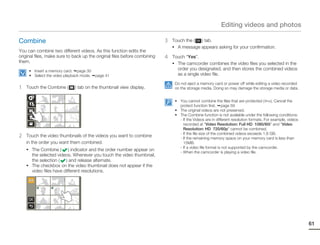
![Basic playback
CHANGING THE PLAYBACK MODE
You can switch to the playback mode by selecting “Album” on the Home menu. You can also switch the operation mode directly into the playback thumbnail display
by touching the Playback ( ) tab on the LCD screen.
• The most recently created file is highlighted in the thumbnail view.
• The camcorder selects the thumbnail display options based on the standby mode that was last used. However, you can choose the video or photo thumbnail
view display options by touching the Video thumbnail view ( ) or Photo thumbnail view ( ) tab on the LCD screen.
Understanding how to change the operation modes
You can easily change the playback mode by touching the LCD screen or using the button as shown in the following figures:
Using the Playback ( ) tab
STBY 00:00:00 [253Min]
<Video thumbnail view> <Photo thumbnail view>
Using the Home ( ) button
Smart Auto Manual Art Film
Album Settings
<Home menu> <Video thumbnail view>
• You can choose the thumbnail display type you want by selecting “Thumbnail” in the Settings menu or using the Zoom dial. page 65 41
• You can switch the playback mode to the recording mode by pressing the Recording start/stop button.](https://image.slidesharecdn.com/samsungq10usermanual-110830023426-phpapp02/85/Samsung-Camcorder-Q10-User-Manual-45-320.jpg)
![Using the menu items
HANDLING MENUS 3 Select the desired item, and then adjust the setting values you
want.
With Home menu, you can use various functions and change their
• The White Balance function of “Manual” is used here as an
settings according to your preference. The camcorder offers five
categories as Home menu and each category has submenu items. example.
STBY 00:00:00 [253Min]
White Balance : Auto
Categories Functions
Switches to Smart Auto mode. page 39
Smart Auto
Items to adjust for scene conditions. pages 50~53
Using the Home ( ) menu Manual
1 Press the Home ( ) button to display the Home menu screen.
Art Film
Item for a fun and unique look. pages 54~57
Items for playback and editing. pages 58~62
Album
Smart Auto Manual Art Film
Items for other settings (Shooting, Playback,
Settings Display, Connectivity, General). pages 63~79
Album Settings
2 Touch one of five categories you want on the Home menu. • When using the Home menu items, some menu items can not be
used at the same time, or may be grayed out. For more information,
• The items of the selected category appears. see Troubleshooting on page 103
• If you select “Smart Auto”, the Smart Auto mode is switched to. • For easy understanding, the menu setting procedures on this page
• If you select “Album”, the thumbnail view of the recorded are explained using the simplest methods. Menu setting methods
image is switched to. can differ depending on the menu options you choose. 47](https://image.slidesharecdn.com/samsungq10usermanual-110830023426-phpapp02/85/Samsung-Camcorder-Q10-User-Manual-51-320.jpg)
![Advanced recordings
White Balance Understanding White Balance
The color of your image depends on the type and quality of the light White balance (WB) is the process of removing unrealistic color casts,
source. If you want the color of your image to be realistic, select an so that objects which appear white are rendered white in your image.
Proper white balance has to take into account the “color temperature”
appropriate lighting condition to calibrate the white balance. of a light source, which refers to the relative warmth or coolness of
white light.
1 Press the Home ( ) button touch “Manual”
touch the White Balance ( ) tab.
To set the white balance manually
2 Touch the desired submenu item.
1 Press the Home ( ) button touch “Manual” touch the
STBY 00:00:00 [253Min]
White Balance ( ) tab touch the Custom WB ( ) tab.
• The “( ) Set White Balance” indicator appears.
White Balance : Auto
2 Fill the screen with a white object, and then touch the ( ) tab.
• The white balance setting is stored.
• The stored white balance setting will be applied the next time
you record.
Submenu items
• Auto ( ): Adjusts the white balance automatically according to the
recording conditions.
• Daylight ( ): Use outdoors in normal daylight. Adjusts the white
balance according to outdoor lighting conditions.
• Cloudy ( ): Use when recording in the shade or cloudy weather.
• Fluorescent ( ): Use when recording under white fluorescent lights.
• Tungsten ( ): Use when recording under halogen lamps and
incandescent lights.
• Custom WB ( ): Lets you manually adjust the white balance to match
the light source or situation. • When setting the white balance manually, the subject must be white,
otherwise, your camcorder may not detect an appropriate setting value.
• The adjusted setting remains until you set the white balance again.
• During normal outdoor recording, setting to “Auto” may provide
better results.
• Cancel the digital zoom function for clear and precise setting.
page 65
50 • Reset the white balance if light conditions change.](https://image.slidesharecdn.com/samsungq10usermanual-110830023426-phpapp02/85/Samsung-Camcorder-Q10-User-Manual-54-320.jpg)
![Advanced recordings
EV (Exposure Value) Back Light
Depending on the intensity of the ambient light, your videos and When a subject is lit from behind, this function compensates for
photos may be too bright or dark. In these cases, you can adjust the back lighting so that the subject does not appear too dark.
exposure to get a better videos and photos.
1 Press the Home ( ) button touch “Manual”
1 Press the Home ( ) button touch “Manual” touch the Back Light ( ) tab.
touch the EV ( ) tab.
2 Touch the desired submenu item.
2 Touch the decrease ( ) or increase ( ) tab to adjust the
STBY 00:00:00 [253Min]
setting values.
• The setting values range from -2.0 to +2.0
Back Light : Off
STBY 00:00:00 [253Min]
EV : 0
Submenu items
• Off ( ): Disables the function.
• On ( ): Backlight compensation brightens the subject.
Understanding EV (Exposure Value) Back lighting causes the subject to be darker than the
Exposure value is the total amount of light allowed to fall on the background
photographic medium (Image sensor) during the process of taking It typically occurs when:
photos or videos. The higher the number, the greater the exposure. • The subject is in front of a window.
For example, + 0.3 lets in more light than -0.3. • The person you want to record is
wearing white or shiny clothes and is
placed against a bright background.
The person’s face is too dark to
distinguish his/her features.
• The subject is outdoors and the
background is overcast.
• The light sources are too bright.
EV : 0 • The subject is in front of a snowy
background.
51](https://image.slidesharecdn.com/samsungq10usermanual-110830023426-phpapp02/85/Samsung-Camcorder-Q10-User-Manual-55-320.jpg)
![Advanced recordings
Self Timer Super C.Nite
When the self-timer is enabled, there is a time delay of 10 seconds Use to get better images of slowly moving subjects or subjects
before recording starts. You can take photos of yourself. in dark places. When you turn the Super C.Nite function on, the
camcorder adjusts the shutter speed so that the images are brighter
Select the photo recording mode. page 26 without compromising color.
Select the video recording mode. page 26
1 Press the Home ( ) button touch “Manual”
touch the Self Timer ( ) tab.
1 Press the Home ( ) button touch “Manual”
2 Touch the desired submenu item. touch the Super C.Nite ( ) tab.
9999
2 Touch the desired submenu item.
STBY 00:00:00 [253Min]
Self Timer : Off
Super C.Nite : Normal
Submenu items
• Off ( ): Disables the function. Submenu items
• On ( ): There is a time delay of 10 seconds after you press the
Recording Start/Stop button. • Off ( ): Disables the function.
• Normal ( ): The shutter opens for 1/60 of a second in the normal
mode and automatically switches to open for 1/30 of a
• The camcorder automatically turns the Self Timer function off after it second in a dark place. Use this function to get bright
has been used once. You must turn it on each time you want to use images in a dark place.
it. • Super ( ) : The shutter opens for 1/15 of a second regardless of
• When the camcorder exits from Manual mode, the Self Timer surrounding conditions. Use this function to get bright
function is automatically set to Off. images in a darker place.
The images may not seem smoothly because the camcorder has
recorded them with the low shutter speed when using Super C.Nite.
52](https://image.slidesharecdn.com/samsungq10usermanual-110830023426-phpapp02/85/Samsung-Camcorder-Q10-User-Manual-56-320.jpg)
![Advanced recordings
Cont. Shot Focus
The Continuous Shot function lets you capture up to eight photos in The camcorder usually focuses on a subject automatically (auto
rapid. focus). When you turn the camcorder on, focus is always set to
automatic. You can also set the focus manually.
Select the photo recording mode. page 26
Select the video recording mode. page 26
1 Press the Home ( ) button touch “Manual”
touch the Cont. Shot ( ) tab. 1 Press the Home ( ) button touch “Manual”
touch the Focus ( ) tab.
2 Touch the desired submenu item.
2 Touch the desired submenu item.
9999
STBY 00:00:00 [253Min]
Cont. Shot : Off
Focus : Auto
Submenu items
Submenu items
• Off ( ): The camcorder records only one photo image.
• On ( ): When you press the Recording start/stop button, the • Auto ( ): In most situations, it is better to use the automatic focus feature, as it lets
you concentrate on the creative side of your recording.
camcorder can take up to 8 photos in one second. • Manual ( ): You may need to focus manually under conditions in which automatic
focusing is difficult or unreliable. To adjust the focus, place and hold your finger on the
( ) for a nearer subject, and on the ( ) tab for a farther subject. The nearer or
• When an error occurs (Card Full, etc.) during continuous shot, the farther icon ( / ) appears when focus adjustment reaches the end. The camcorder
applies the adjusted value right after you touch the ( ) or ( ) tab.
recording stops and an error message appears.
• When the Cont. Shot is On, the photo resolution is fixed to
1920x1080. • The Auto Focus (AF) setting is useful when you operate the zoom function because
• When the camcorder exits from Manual mode, the Cont. Shot you might not be able to keep accurate focus after the zoom ratio has been
function is automatically set to Off. changed.
• In the manual focus setting menu screen, you can access auto focus by touching
the AF( ) tab on the screen. You can return to manual focus by touching the
manual focusing tabs.
• When the camcorder exits from Manual mode or switch to the photo recording
mode, the Focus function is automatically set to Auto. 53](https://image.slidesharecdn.com/samsungq10usermanual-110830023426-phpapp02/85/Samsung-Camcorder-Q10-User-Manual-57-320.jpg)
![Special effects for recordings
Fader Recording a video with Fade effect
You can give your recording a professional look by using special Fade In (Approx.3 seconds)
effects such as fade in at the beginning of a sequence or fade out at
the end of a sequence.
Select the video recording mode. page 26
1 Press the Home ( ) button touch “Art Film” touch the
Fader ( ) tab.
2 Touch the desired submenu item.
STBY 00:00:00 [253Min]
Fader : Off
Fade Out (Approx. 3 seconds)
Fade in
With “Fader” set to On, press the Recording start/stop button. The
Submenu items recording starts with a dark screen, and then the image and sound
fade in.
• Off ( ): Disables the function.
• On ( ): When you start or stop recording, the recording fades in or Fade out
fades out accordingly. With “Fader” set to On, press the Recording start/stop button to
stop recording. The image and sound fade out, the screen goes
black, and then the recording stops.
• The camcorder automatically turns the Fader function off after it has
been used once. You must reset it each time you want to use it.
• When the camcorder sets the Time Lapse REC function to On or
exits from the Art Film mode, the Fader function is automatically set
to Off.
54](https://image.slidesharecdn.com/samsungq10usermanual-110830023426-phpapp02/85/Samsung-Camcorder-Q10-User-Manual-58-320.jpg)
![Special effects for recordings
Time Lapse REC 3 After setting the Time Lapse REC mode, press the Recording
start/stop button.
Using the Time Lapse feature, you can program your camcorder to
• The Time Lapse recording starts.
create a time lapse video by recording a series of frames over a set
• Time Lapse REC only supports the 720/60p resolution.
period of time with a set time interval between each frame. The Time
Lapse feature lets you create time lapse videos of blooming flowers 00:00:00 [253Min]
and similar subjects. 0.5 Sec/72Hr
Time Lapse Recording...
• Select the video recording mode. page 26
• To record in the Time Lapse REC mode, you must set the recording
interval between frames (Interval) using the menu.
1 Press the Home ( ) button touch “Art Film” touch the
Time Lapse REC ( ) tab.
Submenu items
STBY 00:00:00 [253Min]
• Off ( ): Disables the function.
• 0.5 Sec ( 0.5 ): Enables the interval recording function. Images are
Time Lapse REC : Off automatically captured one frame at a time, at 0.5
seconds interval and stored in the storage media.
0.5 1 3 5
• 1 Sec ( 1 ): Enables the interval recording function. Images are
automatically captured one frame at a time, at 1 second
interval and stored in the storage media.
• 3 Sec ( 3 ): Enables the interval recording function. Images are
automatically captured one frame at a time, at 3 seconds
2 Touch the desired submenu item. interval and stored in the storage media.
• 5 Sec ( 5 ): Enables the interval recording function. Images are
automatically captured one frame at a time, at 5 seconds
STBY 00:00:00 [253Min]
0.5 Sec/72Hr
interval and stored in the storage media.
Time Lapse REC : 0.5 Sec
0.5 1 3 5
55](https://image.slidesharecdn.com/samsungq10usermanual-110830023426-phpapp02/85/Samsung-Camcorder-Q10-User-Manual-59-320.jpg)
![Special effects for recordings
Digital Effect
Submenu items
Using the Digital Effect function gives your recording a creative look.
1 Press the Home ( ) button touch “Art Film” touch the
OFF
Digital Effect ( ) tab.
2 Touch the desired submenu item. Off( ) Black & White( BW ) Sepia( S )
Without any Digital This mode changes This mode gives the
• You can view the hidden items by dragging the LCD screen Effect, a normal, the image to black and image a reddish brown
to left or right. natural image is wite. look.
displayed during
STBY 00:00:00 [253Min]
recording or playback.
Digital Effect : Off
OFF
Negative( N ) Art( ) Noir( Nr )
This mode reverses This mode helps adjust This mode creates
the colors, creating a for facial imperfections. a stronger image by
negative image. increasing contrast.
Western( W ) Dazzle( D ) Ghost( )
This mode creates This mode creates This mode creates a
a faded and old film a brighter image drawn out image effect
vintage look. by increasing color like an apparition or
saturation. ghost. (Video recording
mode only)
57](https://image.slidesharecdn.com/samsungq10usermanual-110830023426-phpapp02/85/Samsung-Camcorder-Q10-User-Manual-61-320.jpg)

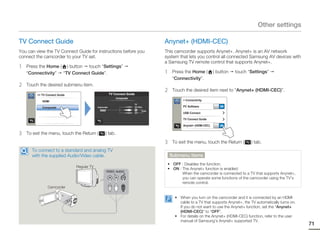
![Other settings
Time Zone Date/Time Set
You can easily set the clock to the local time when using your By setting the date and time, you can display the date and time of
camcorder while traveling. the recording during playback. page 28
Setting the local time
Date Type
1 Press the Home ( ) button touch “Settings” “General”
“Time Zone” “Visit”. You can set the date display to one of four types.
1 Press the Home ( ) button touch “Settings” “General”
2 Select the time zone by touching the left ( )/right ( ) tab on “Date Type”.
the LCD screen, and then touch the ( ) tab.
Visit
2 Touch the desired submenu item.
>> Date Type
2011/01/01
JAN/01/2011
London,Lisbon
01/JAN/2011
[HOME-00:00] JAN/01/2011 12:00AM
01/01/2011
3 To exit the menu, touch the Return ( ) tab.
3 To exit the menu, touch the Return ( ) tab.
Submenu items
Submenu items
• Home: The clock will be used according to your setting on the Date/Time
Set menu. Select Home when using your camcorder for the first • 2011/01/01: Displays the date in the year/month (two-digit)/day format.
time or when returning the clock to your hometown date/time • JAN/01/2011: Displays the date in the month/day/year format.
settings. • 01/JAN/2011: Displays the date in the day/month/year format.
• Visit ( ): When you visit a different time zone, the Visit function lets • 01/01/2011: Displays the date in the day/month (two-digit)/year format.
you use the local time without changing your hometown time
setting. The clock is adjusted according to the time difference
between your home and the location you are visiting.
This function depends on the “Date/Time Display” setting. page 68
73](https://image.slidesharecdn.com/samsungq10usermanual-110830023426-phpapp02/85/Samsung-Camcorder-Q10-User-Manual-77-320.jpg)


![[Samsung NX100] New way to shoot with i-Function as a mirrorless camera](https://cdn.slidesharecdn.com/ss_thumbnails/samsungnx100-newwaytoshootwithi-functionasamirrorlesscamera-110705010802-phpapp02-thumbnail.jpg?width=640&height=640&fit=bounds)

