Download as PDF, PPTX


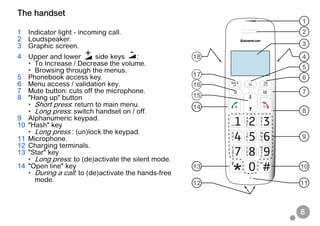
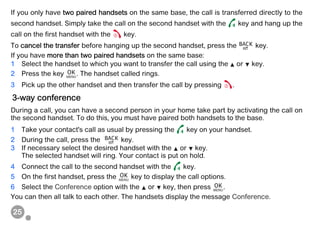
![14
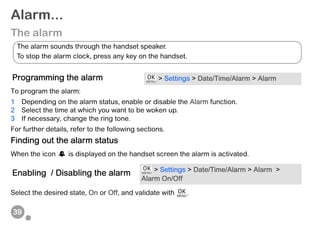
The multifunction keys
Your telephone has two and "multifunction" keys which you can use in several ways:
Illustration
To browse-through menus, use the browser [or right side keys] and two multifunction buttons:
1 Press the key .
The main menu is displayed on the screen.
2 Press the top or bottom of the browser key to scroll through the menus and
access the desired function.
3 Confirm your choice/Enter the displayed menu by pressing the key .
4 Cancel your choice/Exit the displayed menu:
• either by pressing the key .
• or by pressing the : key; the home screen is displayed.
From the standby screen In a menu
To access the telephone menu. To enter a menu, to validate an action in a menu.
To make an Intercom call
(call to another handset).
To return to the previous menu. To delete characters. With
each press, the character preceding the cursor is deleted.](https://image.slidesharecdn.com/sagemcomd530pdigitalcordlessphonefullmanual-160204133835/85/Sagemcom-D530P-Digital-Cordless-Phone-User-Guide-14-320.jpg)

![38
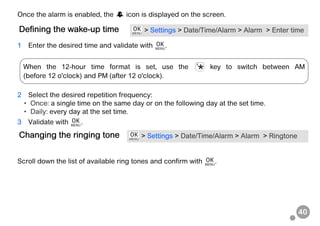
The line
You can use a voice frequency [Tone] or pulse [Pulse] based dialling system .
Select the desired system and validate with .
You can configure the flash duration if you use your phone abroad or on a private network.
Select the desired value and validate with .
Changing the dialling type > Settings > Base settings > Dial Mode
Changing the flash duration > Settings > Base settings > Flash time
We do not recommend that you change line settings without first contacting your line provider,
as this may result in your phone line being disconnected.](https://image.slidesharecdn.com/sagemcomd530pdigitalcordlessphonefullmanual-160204133835/85/Sagemcom-D530P-Digital-Cordless-Phone-User-Guide-38-320.jpg)


This document provides instructions for setting up and using a new Sagemcom telephone. It includes recommendations for safety, an overview of the phone and base features, instructions for connecting the base and charging the handset batteries, and guides for navigating menus and making calls. The document also outlines how to customize settings, view call logs, set up alarms, and pair additional handsets.


