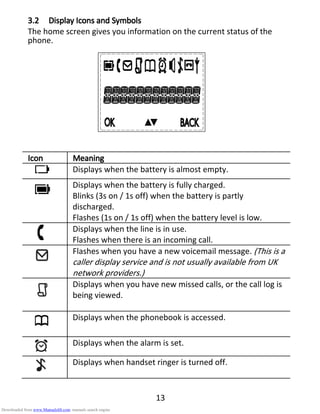
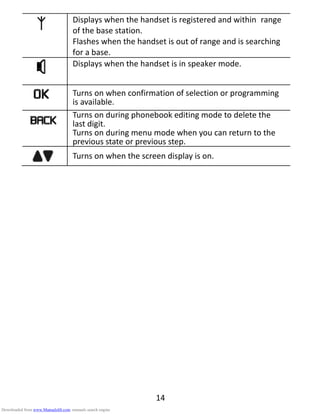
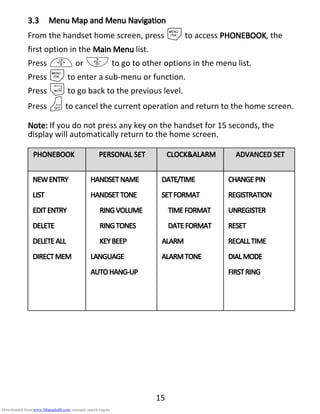
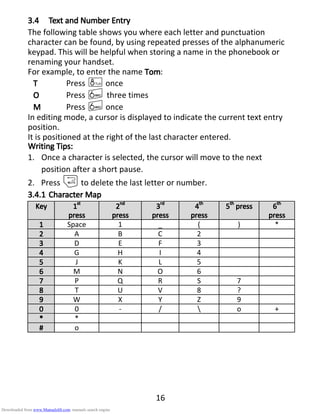
SlideShare a Scribd company logo
USER GUIDE
Solo SingleSolo SingleSolo SingleSolo Single/Twin/Triple/Quad/Twin/Triple/Quad/Twin/Triple/Quad/Twin/Triple/Quad
DECTDECTDECTDECT TelephoneTelephoneTelephoneTelephone
Binatone HelplineBinatone HelplineBinatone HelplineBinatone Helpline
(for UK only)(for UK only)(for UK only)(for UK only)
Monday to Friday from 9:00am to 5:00pm
Tel: 0845 345 9677**
**Please note that all calls are charged at local rate
Or visit our websites: www.binatonetelecom.comwww.binatonetelecom.comwww.binatonetelecom.comwww.binatonetelecom.com
www.iDECTonline.comwww.iDECTonline.comwww.iDECTonline.comwww.iDECTonline.com
Before operating this set,Before operating this set,Before operating this set,Before operating this set,
please read these instructions carefully.please read these instructions carefully.please read these instructions carefully.please read these instructions carefully.
THISTHISTHISTHIS EQUIPMENTEQUIPMENTEQUIPMENTEQUIPMENT ISISISIS NOTNOTNOTNOT DESIGNEDDESIGNEDDESIGNEDDESIGNED FORFORFORFOR MAKINGMAKINGMAKINGMAKING
EMERGENCYEMERGENCYEMERGENCYEMERGENCY TELEPHONETELEPHONETELEPHONETELEPHONE CALLSCALLSCALLSCALLS WITHOUT MAINS POWER.WITHOUT MAINS POWER.WITHOUT MAINS POWER.WITHOUT MAINS POWER.
ALTERNATIVEALTERNATIVEALTERNATIVEALTERNATIVE ARRANGEMENTSARRANGEMENTSARRANGEMENTSARRANGEMENTS SHOULDSHOULDSHOULDSHOULD BE MADEBE MADEBE MADEBE MADE FORFORFORFOR ACCESSACCESSACCESSACCESS
TOTOTOTO EMERGENCYEMERGENCYEMERGENCYEMERGENCY SERVICES.SERVICES.SERVICES.SERVICES.
Downloaded from www.Manualslib.com manuals search engine
TECHNICAL DETAILSTECHNICAL DETAILSTECHNICAL DETAILSTECHNICAL DETAILS
StandardStandardStandardStandard Digital Enhanced Cordless Telecommunication (DECT)
Frequency rangeFrequency rangeFrequency rangeFrequency range 1.88 to 1.9 GHz (bandwidth = 20 MHz)
Channel bandwidthChannel bandwidthChannel bandwidthChannel bandwidth 1.728 MHz
Operating rangeOperating rangeOperating rangeOperating range Up to 300m outdoors; Up to 50m indoors
Operating timeOperating timeOperating timeOperating time Standby: 230 hours; Talking: 13 hours
Battery charge time: 15 hours
Temperature rangeTemperature rangeTemperature rangeTemperature range Operating: 0o
C to 40o
C; Storage: -20o
C to 60o
C
Electrical powerElectrical powerElectrical powerElectrical power Base unit power adapter:Base unit power adapter:Base unit power adapter:Base unit power adapter:
Ten Pao: S003IB0600050 & S003IV0600050
Input 100-240Vac 50-60Hz; Output 6Vdc/500mA.
Charger unit power adapter:Charger unit power adapter:Charger unit power adapter:Charger unit power adapter:
Ten Pao: S003IB0600015 & S003IV0600015
Input 100-240Vac 50-60Hz; Output 6Vdc/150mA.
BattBattBattBattery information (each handset):ery information (each handset):ery information (each handset):ery information (each handset):
2 X 1.2V AAA size, 650mAh NiMH (Rechargeable)
CAUTIONCAUTIONCAUTIONCAUTION
Risk of explosion if the battery is replaced by an incorrect type.
Dispose of used batteries according to the instructions.
Port specificationPort specificationPort specificationPort specification
The port (connected to the mains power supply) is a SELV port with respect to
EN41003.
The port (connected to the telephone line) is a TNV port with respect to
EN41003.
CLEANING AND CARECLEANING AND CARECLEANING AND CARECLEANING AND CARE
Do not cleanDo not cleanDo not cleanDo not clean any part of your phone system with benzene, thinners or other
solvent chemicals as this may cause permanent damage, which is not covered by
the Guarantee.
When necessary, clean it with a damp cloth.When necessary, clean it with a damp cloth.When necessary, clean it with a damp cloth.When necessary, clean it with a damp cloth.
Keep your phone system away from hot, humid conditions or strong sunlight,hot, humid conditions or strong sunlight,hot, humid conditions or strong sunlight,hot, humid conditions or strong sunlight, and
don't let it get wet.don't let it get wet.don't let it get wet.don't let it get wet.
Every effort has been made to ensure high standards of reliability for your phone
system. However, if something does go wrong, please do not try to repair itdo not try to repair itdo not try to repair itdo not try to repair it
yourself, but consult your supplier or call the Helpline.yourself, but consult your supplier or call the Helpline.yourself, but consult your supplier or call the Helpline.yourself, but consult your supplier or call the Helpline.
Downloaded from www.Manualslib.com manuals search engine
1
Table of ContentsTable of ContentsTable of ContentsTable of Contents
1 IMPORTANT SAFETY INSTRUCTIONS...................................................4
2 INSTALLING YOUR PHONE...................................................................8
2.1 Connecting the Base Station .......................................................8
2.2 Installing and Charging the Rechargeable Batteries....................8
3 GETTING TO KNOW YOUR PHONE ....................................................10
3.1 Overview of the Handset, Base Station and *Charging Pod......10
3.2 Display Icons and Symbols.........................................................13
3.3 Menu Map and Menu Navigation .............................................15
3.4 Text and Number Entry..............................................................16
3.4.1 Character Map.................................................................16
4 USING YOUR PHONE.........................................................................17
4.1 Make a Call ................................................................................17
4.1.1 Pre-dialling.......................................................................17
4.1.2 Direct Dialling ..................................................................17
4.1.3 Call from the Redial List...................................................17
4.1.4 Call from the Call Log.......................................................17
4.1.5 Call from the Phonebook.................................................18
4.2 Answer and End a Call...............................................................18
4.3 Handset Speakerphone .............................................................18
4.4 Adjust Earpiece Volume.............................................................18
4.5 Adjust Speaker Volume..............................................................19
4.6 Mute/Unmute the Microphone ................................................19
4.7 Paging........................................................................................19
4.8 Switching the Handset On/Off...................................................19
4.9 To Lock/Unlock the Keypad .......................................................20
4.10 Make an Internal Call (Multi – handset models only)...........20
Downloaded from www.Manualslib.com manuals search engine
2
4.11 Initiate an Intercom Call .......................................................20
4.12 Answer an External Call during an Intercom Call..................21
4.13 Initiate an Intercom during a Call .........................................22
4.14 Transfer an External Call to another Handset.......................23
5 DIRECT ACCESS MEMORY .................................................................24
5.1 Add Direct Access Memory .......................................................24
5.2 Delete Direct Access Memory ...................................................25
6 PHONEBOOK.....................................................................................26
6.1 Store a Contact in the Phonebook.............................................26
6.2 Access the Phonebook .............................................................. 27
6.3 Modify a Phonebook Entry........................................................ 27
6.4 Delete a Phonebook Entry.........................................................28
6.5 Delete All Entries from the Phonebook List...............................28
7 CALLER DISPLAY (NETWORK DEPENDENT)........................................29
7.1 Call Log ......................................................................................29
7.1.1 Access the Call Log...........................................................29
7.1.2 Save a Call Log Entry into the Phonebook .......................30
7.1.3 Delete a Call Log Entry.....................................................30
7.1.4 Delete All Entries in the Call Log......................................30
7.2 Redial List ..................................................................................31
7.2.1 Access the Redial List.......................................................31
7.2.2 Save a Redial Number into the Phonebook.....................31
7.2.3 Edit a Redial Number.......................................................31
7.2.4 Delete a Redial Number...................................................32
7.2.5 Delete All Entries from the Redial List .............................32
8 CLOCK AND ALARM SETTINGS ..........................................................33
8.1 Date and Time Settings .............................................................33
Downloaded from www.Manualslib.com manuals search engine
3
8.1.1 Change the Time Format.................................................34
8.1.2 Change the Date Format..................................................34
8.2 Alarm Settings ...........................................................................35
8.2.1 Set the Alarm Tone ..........................................................36
9 PERSONAL SETTINGS......................................................................... 37
9.1 Set the Ring Volume.................................................................. 37
9.2 Set the Ring Tone....................................................................... 37
9.3 Set the Key Beep .......................................................................38
9.4 Rename the Handset.................................................................38
9.5 Set the Display Language...........................................................39
9.6 Set Auto Hang-up ......................................................................39
10 ADVANCED SETTINGS................................................................40
10.1 Handset Registration ............................................................40
10.2 Register Additional Handsets................................................40
10.3 Un-register your Handset .....................................................41
10.4 Change the Master PIN.........................................................41
10.5 Change the Recall Time........................................................42
10.6 Change the Dial Mode (Dual Mode Dialling models only)....42
10.7 Set the First Ring...................................................................43
10.8 Reset the Unit.......................................................................43
11 TROUBLESHOOTING ..................................................................44
12 DECLARATION OF CONFORMITY ............................................... 47
13 GUARANTEE AND SERVICE ........................................................48
13.1 While the unit is under Guarantee.......................................48
13.2 After the Guarantee has expired ..........................................48
Downloaded from www.Manualslib.com manuals search engine
4
1111 IMPORTANT SAFETY INSTRUCTIONSIMPORTANT SAFETY INSTRUCTIONSIMPORTANT SAFETY INSTRUCTIONSIMPORTANT SAFETY INSTRUCTIONS
Please follow these safety instructions when using your telephone
equipment to reduce risk of fire, electric shock and injury:
1) Read and understand all the instructions.
2) Follow all warnings and instructions marked on the product.
3) Unplug this product from the wall outlet before cleaning. Do not use
liquid cleaners or aerosol cleaners. Use a damp cloth for cleaning.
4) Keep this product away from hot, humid conditions or strong
sunlight, and don’t let it get wet or use it near water (for example,
near a bath tub, kitchen sink, or swimming pool).
5) Do not overload wall outlets and extension cords as this can result
in the risk of fire or electric shock.
6) Unplug this product from the wall outlet and obtain the service of
our Repair Centre under the following conditions:
• When the power supply cord or plug is damaged or frayed.
• If the product fails to operate normally despite following the
operating instructions.
• If the product has been dropped and the cabinet has been
damaged.
• If the product exhibits a distinct change in performance.
7) NEVER use your phone outdoors during a thunderstorm. Unplug the
base from the telephone line and the mains socket when there are
storms in your area. Damage caused by lightning is not covered by
the guarantee.
8) Do not use the telephone to report a gas leak in the vicinity of the leak.
Downloaded from www.Manualslib.com manuals search engine
5
9) Use only the supplied NiMH (Nickel Metal Hydride) batteries that
came with your phone or an authorised replacement recommended
by the manufacturer. There is a risk of explosion if you replace the
battery with an incorrect battery type. The use of other battery
types or non-rechargeable batteries/primary cells can be dangerous.
They may cause interference and/or damage to the unit or
surroundings. The manufacturer will not be held liable for damage
arising from such non-compliance.
10) Do not use third party charging pods. Damage may be caused to the
batteries.
11) Please ensure that the batteries are inserted in the correct polarity.
12) Dispose of batteries safely. Do not burn, immerse them in water,
disassemble, or puncture the batteries.
Downloaded from www.Manualslib.com manuals search engine
6
PackagePackagePackagePackage CCCContentontentontentontent for single modelfor single modelfor single modelfor single model
The package contains the following items:
• 1 Handset
• 1 Base Station
• 1 Mains Power Adapter for the Base Station
• 1 Telephone Line Cord
• 2 AAA NiMH Rechargeable Batteries
• 1 Back Cover
• 1 User Guide
Note:Note:Note:Note: If you have purchased a Twin, Triple or Quad system, you will also
have the corresponding extra handset(s) and batteries, a charging pod
and a battery compartment cover for each extra handset.
Connection andConnection andConnection andConnection and CCCConditions foronditions foronditions foronditions for UUUUsesesese
You can connect your phone to a direct exchange line (DEL) on a local
exchange with its own phone number; to an extension socket connected
to a DEL; or to an extension on an approved compatible PBX. Do not
connect as an extension to a pay phone.
The ringer equivalence numbers (REN) of all equipment (phones, fax
machines, modems, etc.) connected to an exchange line must not add up
to more than 4, otherwise one or more of them may not ring and/or
answer calls correctly. The phone has a REN of 1, and most other
telephones have a REN of 1 unless marked otherwise.
Downloaded from www.Manualslib.com manuals search engine
7
HandsetHandsetHandsetHandset &&&& Base ConnectionBase ConnectionBase ConnectionBase Connection
1) When purchased, all handsets are already registered to the base
unit and should link to it when they are all powered up.
2) To use your cordless handset and base unit together, you must be
able to establish a radio link between them. The signal between
the handset and the base unit is in accordance with the normal
standards for a DECT phone: Maximum range up to 300 metres
outdoors or 50 metres indoors. Be aware that:
> Large metal objects, such as refrigerators, mirrors or filing
cabinets, between the handset and the base unit may block the
radio signal.
> Solid structures, such as walls, may reduce the signal strength.
> Electrical equipment may cause interference and/or affect the
range.
3) Do not place the base unit close to another telephone, TV or audio
equipment - it may cause interference.
4) Putting the base unit as high as possible ensures the best signal.
5) If the sound in the earpiece becomes faint or distorted during a call,
you may be going out of range of the base unit. Move nearer to the
base unit within 20 seconds; otherwise the line may be cut off.
Downloaded from www.Manualslib.com manuals search engine
8
2222 INSTALLINGINSTALLINGINSTALLINGINSTALLING YOUR PHONEYOUR PHONEYOUR PHONEYOUR PHONE
2.12.12.12.1 ConnecConnecConnecConnecting theting theting theting the BBBBaseaseasease SSSStationtationtationtation
1) Plug the mains power cable and
telephone line cord into the base
station.
2) Plug the power adapter into a 100
- 240Vac, 50 - 60Hz mains power
socket, and the telephone line
cord into a telephone line socket.
Warning:Warning:Warning:Warning:
Always use the cables provided in the box.
Use only the supplied adaptor. Using other power cables may
damage the unit.
NoteNoteNoteNote::::
Place the base unit within easy reach of the mains power socket. Never
try to lengthen the mains power cable.
The base station needs mains power for normal operation, and the
cordless handsets will not work without it.
2.22.22.22.2 Installing andInstalling andInstalling andInstalling and CCCCharging theharging theharging theharging the RRRRechargeableechargeableechargeableechargeable BBBBatteriesatteriesatteriesatteries
1) Insert the 2 supplied batteries into the
battery compartment, observing the
correct polarity (see markings inside
battery compartment).
Warning:Warning:Warning:Warning: Use only the supplied NiMH
rechargeable batteries.
2) Place the back cover over the back of
the handset and press down until it
clicks into place.
3) Place the handset on the base and
charge for 15 hours before using the
handset for the first time.
• The handset will give a double beep when it is properly placed
on the base or charging pod.
• The battery charging indicator on the base or charging pod
lights up to indicate charging.
Note:Note:Note:Note: The handset may become warm when the batteries are being
charged or during prolonged periods of use. This is normal and does not
indicate a fault.
To the mains
power socket
To the
telephone
line socket
Downloaded from www.Manualslib.com manuals search engine
9
If you have aIf you have aIf you have aIf you have a bbbbroadband lineroadband lineroadband lineroadband line
If you connect your telephone to a line with a broadband connection, you
will need to insert a micro-filter between the telephone and the
telephone line; otherwise you may get interference between the
telephone and the broadband, which could cause problems.
In a home with broadband, every telephone must have a micro-filter
connected, not just the one at the telephone point that your modem is
connected to.
If you need more broadband micro-filters contact your broadband
supplier.
Downloaded from www.Manualslib.com manuals search engine
10
3333 GETTING TO KNOW YOUR PHONEGETTING TO KNOW YOUR PHONEGETTING TO KNOW YOUR PHONEGETTING TO KNOW YOUR PHONE
3.13.13.13.1 Overview of theOverview of theOverview of theOverview of the HandsetHandsetHandsetHandset,,,, BaseBaseBaseBase StationStationStationStation andandandand ****Charging PodCharging PodCharging PodCharging Pod
Base station (bottom)
⑯
⑩
⑩
Handset
⑬
⑭
①
②
③
④
⑤
⑥
⑦
⑧
⑨
⑪
⑫
Base station (top)
⑮
Downloaded from www.Manualslib.com manuals search engine
11
*Charging Pod - for Twin, Triple and Quad Models Only.
① EEEEARPIECEARPIECEARPIECEARPIECE
② LCDDLCDDLCDDLCDDISPLAYISPLAYISPLAYISPLAY
③
M
In standby mode, press to enter the Main Menu
list.
Press to select an item, or to save an entry or
setting.
④
+
In menu mode, press to scroll up.
During a call or message playback, press to increase
the volume.
In standby mode, press to access the call log (CID).
⑤
T
Press to make or answer a call.
During a call or message playback, press to switch
between speakerphone and earpiece.
⑥
*
In standby mode, press and hold to switch the key
lock on or off.
⑦
F
During a call, press to send a Flash signal (also
called Recall) for network services.
⑧ MICROPHONEMICROPHONEMICROPHONEMICROPHONE
⑰
Downloaded from www.Manualslib.com manuals search engine
12
⑨
m
Press to cancel an action.
During pre-dialling, press to delete the last digit
entered.
During a call, press to mute the microphone, and
press again to resume conversation.
⑩
-
In menu mode, press to scroll down.
During a call, or message playback, press to
decrease the volume.
In standby mode, press to access the phonebook
list.
⑪
O
During a call, press to end the call.
During programming, press to cancel and exit
without making changes.
In standby mode, press and hold to power the
handset on/off.
⑫
#
In standby mode, press and hold to turn the
handset ringer on/off.
Press and hold to add a dialling pause when dialling
or entering numbers into the phonebook.
⑬
I
In standby mode or during a call, press to initiate
an intercom call or transfer a call.
⑭ R In standby mode, press to access the redial list.
⑮ Lights up in Red when a handset is on the base to
indicate it is charging.
⑯ Press to find/page all registered handsets. Press
the button again, or any key on the handset to turn
off the page signal.
Press and hold to start registration process.
⑰ Lights up in Red when a handset is on the charging
pod to indicate it is charging.
Downloaded from www.Manualslib.com manuals search engine
13
3.23.23.23.2 DisplayDisplayDisplayDisplay IIIIcons andcons andcons andcons and SSSSymbolsymbolsymbolsymbols
The home screen gives you information on the current status of the
phone.
IconIconIconIcon MeaningMeaningMeaningMeaning
Displays when the battery is almost empty.
Displays when the battery is fully charged.
Blinks (3s on / 1s off) when the battery is partly
discharged.
Flashes (1s on / 1s off) when the battery level is low.
Displays when the line is in use.
Flashes when there is an incoming call.
Flashes when you have a new voicemail message. (This is a
caller display service and is not usually available from UK
network providers.)
Displays when you have new missed calls, or the call log is
being viewed.
Displays when the phonebook is accessed.
Displays when the alarm is set.
Displays when handset ringer is turned off.
Downloaded from www.Manualslib.com manuals search engine
14
Displays when the handset is registered and within range
of the base station.
Flashes when the handset is out of range and is searching
for a base.
Displays when the handset is in speaker mode.
Turns on when confirmation of selection or programming
is available.
Turns on during phonebook editing mode to delete the
last digit.
Turns on during menu mode when you can return to the
previous state or previous step.
Turns on when the screen display is on.
Downloaded from www.Manualslib.com manuals search engine
15
3.33.33.33.3 MenuMenuMenuMenu MMMMapapapap and Menu Navigationand Menu Navigationand Menu Navigationand Menu Navigation
From the handset home screen, press Mto access PHONEBOOKPHONEBOOKPHONEBOOKPHONEBOOK, the
first option in the Main MenuMain MenuMain MenuMain Menu list.
Press + or - to go to other options in the menu list.
Press Mto enter a sub-menu or function.
Press mto go back to the previous level.
Press Oto cancel the current operation and return to the home screen.
Note:Note:Note:Note: If you do not press any key on the handset for 15 seconds, the
display will automatically return to the home screen.
PHONEBOOKPHONEBOOKPHONEBOOKPHONEBOOK PERSONAL SETPERSONAL SETPERSONAL SETPERSONAL SET CLOCK&ALARMCLOCK&ALARMCLOCK&ALARMCLOCK&ALARM ADVANCED SETADVANCED SETADVANCED SETADVANCED SET
NEWENTRYNEWENTRYNEWENTRYNEWENTRY
LISTLISTLISTLIST
EDITENTRYEDITENTRYEDITENTRYEDITENTRY
DELETEDELETEDELETEDELETE
DELETEALLDELETEALLDELETEALLDELETEALL
DIREDIREDIREDIRECTMEMCTMEMCTMEMCTMEM
HANDSETNAMEHANDSETNAMEHANDSETNAMEHANDSETNAME
HANDSETTONEHANDSETTONEHANDSETTONEHANDSETTONE
RINGVOLUMERINGVOLUMERINGVOLUMERINGVOLUME
RINGTONESRINGTONESRINGTONESRINGTONES
KEYBEEPKEYBEEPKEYBEEPKEYBEEP
LANGUAGELANGUAGELANGUAGELANGUAGE
AUTOHANGAUTOHANGAUTOHANGAUTOHANG----UPUPUPUP
DATE/TIMEDATE/TIMEDATE/TIMEDATE/TIME
SETFORMATSETFORMATSETFORMATSETFORMAT
TIMEFORMATTIMEFORMATTIMEFORMATTIMEFORMAT
DATEFORMATDATEFORMATDATEFORMATDATEFORMAT
ALARMALARMALARMALARM
ALARMTONEALARMTONEALARMTONEALARMTONE
CHANGEPINCHANGEPINCHANGEPINCHANGEPIN
REGISTRATIONREGISTRATIONREGISTRATIONREGISTRATION
UNREGISTERUNREGISTERUNREGISTERUNREGISTER
RESETRESETRESETRESET
RECALLTIMERECALLTIMERECALLTIMERECALLTIME
DIALMODEDIALMODEDIALMODEDIALMODE
FIRSTRINGFIRSTRINGFIRSTRINGFIRSTRING
Downloaded from www.Manualslib.com manuals search engine
16
3.43.43.43.4 Text andText andText andText and NNNNumberumberumberumber EEEEntryntryntryntry
The following table shows you where each letter and punctuation
character can be found, by using repeated presses of the alphanumeric
keypad. This will be helpful when storing a name in the phonebook or
renaming your handset.
For example, to enter the name TomTomTomTom:
TTTT Press 8once
OOOO Press 6 three times
MMMM Press 6once
In editing mode, a cursor is displayed to indicate the current text entry
position.
It is positioned at the right of the last character entered.
Writing Tips:Writing Tips:Writing Tips:Writing Tips:
1. Once a character is selected, the cursor will move to the next
position after a short pause.
2. Press mto delete the last letter or number.
3.4.13.4.13.4.13.4.1 CharacterCharacterCharacterCharacter MMMMapapapap
KeyKeyKeyKey 1111stststst
presspresspresspress
2222ndndndnd
presspresspresspress
3333rdrdrdrd
presspresspresspress
4444thththth
presspresspresspress
5555thththth
presspresspresspress 6666thththth
presspresspresspress
1111 Space 1 _ ( ) *
2222 A B C 2
3333 D E F 3
4444 G H I 4
5555 J K L 5
6666 M N O 6
7777 P Q R S 7
8888 T U V 8 ?
9999 W X Y Z 9
0000 0 - /  o +
**** *
#### o
Downloaded from www.Manualslib.com manuals search engine
17
4444 USING YOUR PHONEUSING YOUR PHONEUSING YOUR PHONEUSING YOUR PHONE
4.14.14.14.1 Make aMake aMake aMake a CCCCallallallall
4.1.14.1.14.1.14.1.1 PrePrePrePre----diallingdiallingdiallingdialling
1. Enter the phone number (maximum 24 digits).
If you make a mistake, press mto delete the lastentered number.
2. Press Tto dial the phone number.
4.1.24.1.24.1.24.1.2 DirectDirectDirectDirect DDDDiallingiallingiallingialling
1. Press T.
2. Dial the number.
NNNNoteoteoteote:::: If you make a mistake, you cannot correct it with m.
Press Oand then press mto return to the home screen.
4.1.34.1.34.1.34.1.3 Call from theCall from theCall from theCall from the RRRRedialedialedialedial LLLListististist
1. Press Rin standby mode.
• The last number dialled is displayed.
2. Press +/- to select the desired entry in the redial list and
then press Tto dial out the selected redial number.
4.1.44.1.44.1.44.1.4 Call from theCall from theCall from theCall from the CCCCallallallall LLLLogogogog
1. Press + in standby mode.
2. Press +/- to select the desired entry in the call log and
then press Tto dial out the selected call log number.
NNNNoteoteoteote:::: You need to subscribe to Caller Line Identification (CLI) service to
be able to see the caller’s number or name in the call log.
Downloaded from www.Manualslib.com manuals search engine
18
4.1.54.1.54.1.54.1.5 Call from theCall from theCall from theCall from the PPPPhonebookhonebookhonebookhonebook
1. Press - in standby mode.
2. Press +/- to select the desired entry in the phonebook
and then press Tto dial out the selected phonebook number.
4.24.24.24.2 Answer andAnswer andAnswer andAnswer and EEEEnd and and and a CCCCallallallall
1. When the phone rings, press T.
2. To end a conversation, press O.
Warning:Warning:Warning:Warning: When the handset is ringing, please do not hold it too close to
your ear as the volume of the ringing tone may damage your hearing.
NNNNoteoteoteote:::: You can simply place the handset back on its base station or
charging pod to end the call, provided you have not deactivated the AAAAutoutoutouto
hanghanghanghang----upupupup feature. (See SetSetSetSet AAAAutoutoutouto HHHHangangangang----upupupup on page 39.)
4.34.34.34.3 Handset SpeakerphoneHandset SpeakerphoneHandset SpeakerphoneHandset Speakerphone
During a call, you can press Tto alternate between hands-free
speakerphone and handset earpiece.
4.44.44.44.4 AdjustAdjustAdjustAdjust EEEEarpiecearpiecearpiecearpiece VVVVolumeolumeolumeolume
There are 3333 levels of earpiece volume.
1. During a call, press +/- to select from VOLUME 1VOLUME 1VOLUME 1VOLUME 1 to
VOLUME 3VOLUME 3VOLUME 3VOLUME 3.
• The current setting is shown.
• When you end the call, the setting will remain at the last
selected level.
Downloaded from www.Manualslib.com manuals search engine
19
4.54.54.54.5 AdjustAdjustAdjustAdjust SSSSpeakerpeakerpeakerpeaker VVVVolumeolumeolumeolume
There are 5555 levels of speaker volume.
1. Duringacall,press+/-toselectfromVOLUME1VOLUME1VOLUME1VOLUME1toVOLUMEVOLUMEVOLUMEVOLUME5555.
• The current setting is shown.
• When you end the call, the setting will remain at the last
selected level.
4.64.64.64.6 Mute/Unmute theMute/Unmute theMute/Unmute theMute/Unmute the MMMMicrophoneicrophoneicrophoneicrophone
When the microphone is muted, the handset displays MUTE ONMUTE ONMUTE ONMUTE ON, and
your caller cannot hear you.
1. During a call, press mto turn on/off the microphone.
4.74.74.74.7 PagingPagingPagingPaging
The paging feature enables you to locate a missing handset if the handset
is in range and contains charged batteries.
1. Press the key under the base unit.
• All the registered handsets that are in range will start to ring.
You can stop the paging by pressing any key on a handset or the key
under the base unit again.
4.84.84.84.8 SwitchingSwitchingSwitchingSwitching thethethethe HHHHandsetandsetandsetandset OOOOn/n/n/n/OOOOffffffff
Press and hold Ofor more than 2 seconds to switch the handset on or
off in standby mode.
• When first turned on, the display shows SEARCHINGSEARCHINGSEARCHINGSEARCHING………… until the
handset finds the base.
NNNNote:ote:ote:ote: You can switch the handset off to save battery life, if the handset is
not on the base or a charging pod and you do not want to use it for a
while.
IMPORTANT:IMPORTANT:IMPORTANT:IMPORTANT: When the handset is OFF, it cannot be used for making calls
including emergency calls. It will not ring when there is an incoming call.
To answer a call, you will need to switch it back on and it may take some
time for the handset to re-establish a radio link with the base unit.
Downloaded from www.Manualslib.com manuals search engine
20
4.94.94.94.9 ToToToTo LLLLock/ock/ock/ock/UUUUnlocknlocknlocknlock thethethethe KKKKeypadeypadeypadeypad
You can lock the keypad to avoid making calls or pressing the keys
accidentally.
1. In standby mode, press and hold *for 1 second to lock the
keypad.
• The handset displays KEYS LOCKEDKEYS LOCKEDKEYS LOCKEDKEYS LOCKED.
2. To turn the keypad lock off, press and hold *again.
NoteNoteNoteNote:::: Incoming calls can still be answered even if the keypad is locked.
4.104.104.104.10 Make anMake anMake anMake an IIIInternalnternalnternalnternal CCCCall (Multiall (Multiall (Multiall (Multi –––– handsethandsethandsethandset modelsmodelsmodelsmodels only)only)only)only)
The system allows an intercom call between two handsets registered to
the same telephone base. It also allows you to transfer external calls
from one handset to another, and set up a 3-way conference with two
handsets and an external call.
If you try to make a call while another handset is already on an external
call, you will hear a busy tone for a few seconds before the display
returns to standby.
4.114.114.114.11 IIIInitiate annitiate annitiate annitiate an IIIIntercomntercomntercomntercom CCCCallallallall
1. In standby mode, press I.
• Intercom is established immediately if there are only 2
registered handsets.
• If there are more than 2 registered handsets, the handset
numbers which are available for intercom will be displayed.
2. Press the handset number you wish to call or press *to call all
handsets.
3. Press Ton a called handset to answer the internal call, where
both internal callers can talk.
4. To end the intercom call, press Oon either handset.
Downloaded from www.Manualslib.com manuals search engine
21
Note:Note:Note:Note:
1) You can cancel the intercom call before it is answered by pressing
Ior Oon the originating handset.
2) If there is no answer from the called handset within one minute, the
paging will be cancelled automatically.
3) If no handset is registered to the base, 4 beeps will be heard and it
will return to standby mode.
4.124.124.124.12 AAAAnswer annswer annswer annswer an EEEExternalxternalxternalxternal CCCCallallallall dddduring anuring anuring anuring an IIIIntercomntercomntercomntercom CCCCallallallall
You will hear an alert tone when you receive an incoming external call
during an intercom call, and you can choose from the following options:
1) Press Oto cancel the intercom call and let the handsets receive
normal incoming ringing.
2) Press Tto answer the incoming call and end the intercom call.
3) Press I to answer the incoming call and put the intercom call
on hold.
4) When the incoming call is connected and the intercom call is on hold,
press and hold I to start a three-party conference call with both
the incoming and the intercom parties.
5) When one handset is connected to an external call, you can press
Ton another handset to enter into a three-party conference call
directly.
Downloaded from www.Manualslib.com manuals search engine
22
4.134.134.134.13 IIIInitiatnitiatnitiatnitiate ane ane ane an IIIIntercomntercomntercomntercom dddduring auring auring auring a CCCCallallallall
You can intercom with another system handset during a call, or invite
another system handset to join in a conference call with you and the
external caller.
1. During the call, press Ito put the external call on hold.
• Intercom is established immediately if there are only 2
registered handsets.
• If there are more than 2 registered handsets, the handset
numbers which are available for intercom will be displayed.
2. Press the handset number you wish to call or press *to call all
handsets.
Note:Note:Note:Note: If there is no answer from the called handset, or you wish to cancel
the intercom call before it is answered, press Ito return to the
external call.
3. Press Ton the called handset to answer the internal call, where
both internal callers can talk.
4. When the intercom call is connected, you can choose from the
following options on the originating handset:
1) Press and hold Ifor 2 seconds to connect both handsets to
the call in conference mode.
2) Press Oon either handset to terminate the intercom on that
handset, and leave the external call connected to the other
handset.
Downloaded from www.Manualslib.com manuals search engine
23
4.144.144.144.14 Transfer anTransfer anTransfer anTransfer an EEEExternalxternalxternalxternal CCCCall toall toall toall to aaaanothernothernothernother HHHHandsetandsetandsetandset
1. During the call, press Ito put the external call on hold.
• Intercom is established immediately if there are only 2
registered handsets.
• If there are more than 2 registered handsets, the handset
numbers which are available for intercom will be displayed.
2. Press the handset number you wish to call or press * to call all
handsets.
Note:Note:Note:Note: If there is no answer from the called handset, or you wish to cancel
the intercom call before it is answered, press Ito return to the
external call.
3. Press Ton the called handset to answer the internal call, where
both internal callers can talk.
4. Press Oon the originating handset to transfer the external call to
the called handset.
• The external call is transferred.
Downloaded from www.Manualslib.com manuals search engine
24
5555 DIRECT ACCESS MEMORYDIRECT ACCESS MEMORYDIRECT ACCESS MEMORYDIRECT ACCESS MEMORY
There are 2 direct access memories (Keys 1 & 2) in addition to the
phonebook memory. A long press on the keys in standby mode will
automatically dial the stored phone number.
5.15.15.15.1 AddAddAddAdd DDDDirectirectirectirect AAAAccessccessccessccess MMMMemoryemoryemoryemory
1. From the home screen, press M.
2. Press Mto select PHONEBOOKPHONEBOOKPHONEBOOKPHONEBOOK.
3. Press +/- to DIRECT MEM.DIRECT MEM.DIRECT MEM.DIRECT MEM. and then press Mto select.
4. Press +/- to KEY 1KEY 1KEY 1KEY 1 or KEY 2KEY 2KEY 2KEY 2 and then press Mto
select.
• NO NUMBERNO NUMBERNO NUMBERNO NUMBER is displayed if it is empty. Otherwise, the stored
name is displayed.
5. Press Mto enter the menu options.
6. Press Magain to select EDIT NUMBEREDIT NUMBEREDIT NUMBEREDIT NUMBER.
• ENTER NAMEENTER NAMEENTER NAMEENTER NAME is displayed if it is empty. Otherwise, the stored
name is displayed.
7. Enter the name of the contact and press M.
If you make a mistake, press mto delete the last character
entered.
• ENTER NUMBERENTER NUMBERENTER NUMBERENTER NUMBER is displayed. Otherwise the stored number is
displayed.
8. Enter the number of your contact and press M.
If you make a mistake, press mto delete the last digit entered.
• A confirmation tone is played.
9. Press Oto return to standby mode.
Downloaded from www.Manualslib.com manuals search engine
25
5.25.25.25.2 DeleteDeleteDeleteDelete DDDDirectirectirectirect AAAAccessccessccessccess MMMMemoryemoryemoryemory
1. From the home screen, press M.
2. Press Mto select PHONEBOOKPHONEBOOKPHONEBOOKPHONEBOOK.
3. Press +/- to DIRECT MEM.DIRECT MEM.DIRECT MEM.DIRECT MEM. and then press Mto select.
4. Press +/- to KEY 1KEY 1KEY 1KEY 1 or KEY 2KEY 2KEY 2KEY 2 and then press Mto
select.
• NO NUMBERNO NUMBERNO NUMBERNO NUMBER is displayed if it is empty. Otherwise, the stored
name is displayed.
5. Press Mto enter the menu options.
6. Press +/- to DELETEDELETEDELETEDELETE and then press Mto select.
• DELETE?DELETE?DELETE?DELETE? is displayed.
7. Press Magain to confirm.
• A confirmation tone is played.
8. Press Oto return to standby mode.
Downloaded from www.Manualslib.com manuals search engine
26
6666 PHONEBOOKPHONEBOOKPHONEBOOKPHONEBOOK
Each handset can store up to 100 phonebook entries. Each phonebook
entry can have a maximum of 24 digits for the phone number and 12
characters for the name.
6.16.16.16.1 Store aStore aStore aStore a CCCContact in theontact in theontact in theontact in the PPPPhonebookhonebookhonebookhonebook
1. From the home screen, press M.
2. Press Magain to select PHONEBOOKPHONEBOOKPHONEBOOKPHONEBOOK.
3. Press Mto select NEW ENTRYNEW ENTRYNEW ENTRYNEW ENTRY.
4. Enter the name of the contact (maximum 12 characters) using the
keypad.
If you make a mistake, press mto delete the last character
entered.
5. Press Mto confirm the name entry.
6. Enter the number of the contact (maximum 24 digits) using the
keypad.
If you make a mistake, press mto delete the last digit entered.
7. Press Mto confirm.
• A confirmation tone is played.
8. Press Oto return to standby mode.
Note:Note:Note:Note:
You cannot store a new phonebook entry when the memory is full. In this
case, you have to delete existing entries to make space for new ones.
When storing the number for a local call, you can enter only 6 or 7-digit
local number without STDSTDSTDSTD (area) code, and it will still display the name if
there is an incoming call and you subscribe to caller display.
Downloaded from www.Manualslib.com manuals search engine
27
6.26.26.26.2 Access theAccess theAccess theAccess the PPPPhonebookhonebookhonebookhonebook
1. From the home screen, press - to open the phonebook list.
Alternatively, from the home screen, you can press Mtwice to
select PHONEBOOKPHONEBOOKPHONEBOOKPHONEBOOK, then +/- to LISTLISTLISTLIST and Magain to
open the phonebook list.
2. Press +/- to scroll through the list of entries
• The phonebook entries are listed in alphabetical order.
3. Press Mto view the details of the selected entry.
4. Press Oto return to standby mode.
Note:Note:Note:Note:
Instead of pressing +/- to browse the phonebook entries, you
can press the numeric key corresponding to the first letter of the entry
you wish to locate.
For example, pressing 2will show the first entry starting with A.
Pressing 2again will show the first entry starting with B, and so on...,
and then press +/-, if necessary, to find the entry you want.
6.36.36.36.3 Modify aModify aModify aModify a PPPPhonebookhonebookhonebookhonebook EEEEntryntryntryntry
1. From the home screen, press M.
2. Press Magain to select PHONEBOOKPHONEBOOKPHONEBOOKPHONEBOOK.
3. Press +/- to EDIT ENTRYEDIT ENTRYEDIT ENTRYEDIT ENTRY and then press Mto select.
4. Press +/- to select an entry you wish to modify and then
press M.
• The current name is displayed.
5. Edit the name using the keypad. Press mto delete characters.
6. Press Mto confirm.
7. Edit the number and then press Mto confirm.
• A confirmation tone is played.
8. Press Oto return to standby mode.
Downloaded from www.Manualslib.com manuals search engine
28
6.46.46.46.4 Delete aDelete aDelete aDelete a PPPPhonebookhonebookhonebookhonebook EEEEntryntryntryntry
1. From the home screen, press M.
2. Press Magain to select PHONEBOOKPHONEBOOKPHONEBOOKPHONEBOOK.
3. Press +/- to DELETEDELETEDELETEDELETE and then press Mto select.
4. Press +/- to select an entry you wish to delete and then
press M.
• DELETE?DELETE?DELETE?DELETE? is displayed.
5. Press Magain to confirm.
• A confirmation tone is played.
6. Press Oto return to standby mode.
6.56.56.56.5 DeleteDeleteDeleteDelete AAAAllllllll EEEEntries from thentries from thentries from thentries from the PPPPhonebookhonebookhonebookhonebook LLLListististist
1. From the home screen, press M.
2. Press Magain to select PHONEBOOKPHONEBOOKPHONEBOOKPHONEBOOK.
3. Press +/- to DELETE ALLDELETE ALLDELETE ALLDELETE ALL and then press Mto select.
• DELETE?DELETE?DELETE?DELETE? is displayed.
4. Press Magain to confirm.
• A confirmation tone is played.
5. Press Oto return to standby mode.
Downloaded from www.Manualslib.com manuals search engine
29
7777 CALLER DISPLAY (NETWORK DEPENDENT)CALLER DISPLAY (NETWORK DEPENDENT)CALLER DISPLAY (NETWORK DEPENDENT)CALLER DISPLAY (NETWORK DEPENDENT)
If you have subscribed to the Calling Line Identification (CLI) service with
your network service provider, the phone number of your caller will
appear on the handset display when there is an incoming call and then
stored in your Call LogCall LogCall LogCall Log.
If the caller’s number is stored in your phonebook along with a name, the
name will appear on the handset display when the call is received and in
the Call LogCall LogCall LogCall Log.
Note:Note:Note:Note:
If the call is from someone whose number is unavailable (e.g. an
international call or from a private exchange), the handset will display
UNUNUNUNAVAILABLEAVAILABLEAVAILABLEAVAILABLE when you receive the call and in the Call LogCall LogCall LogCall Log afterwards.
If the call is from someone whose number is withheld (e.g. by dialling
141), the handset will display WITHHELDWITHHELDWITHHELDWITHHELD when you receive the call and in
the Call LogCall LogCall LogCall Log afterwards.
If you have not subscribed to the Caller Line Identification service, the
handset will display UNKNOWNUNKNOWNUNKNOWNUNKNOWN when you receive the call when it is
received, and it will not be saved in the Call LogCall LogCall LogCall Log.
Information about incoming calls varies by country and network
operators.
7.17.17.17.1 Call LogCall LogCall LogCall Log
The Call LogCall LogCall LogCall Log stores the last 10 external calls, whether or not you have
answered the call.
Only the most recent call is saved if there are repeat calls from the same
number.
When the Call LogCall LogCall LogCall Log is full, the next new call will replace the oldest entry.
7.1.17.1.17.1.17.1.1 Access the Call LogAccess the Call LogAccess the Call LogAccess the Call Log
1. From the home screen, press +.
2. Press +/- to browse through the call list.
• The calls are displayed in chronological order with the most
recent call at the top of the list.
Downloaded from www.Manualslib.com manuals search engine
30
7.1.27.1.27.1.27.1.2 Save a Call LogSave a Call LogSave a Call LogSave a Call Log EEEEntry into thentry into thentry into thentry into the PPPPhonebookhonebookhonebookhonebook
1. From the home screen, press +.
2. Press +/- to select an entry and then press M.
3. Press Magain to select SAVE NUMBERSAVE NUMBERSAVE NUMBERSAVE NUMBER.
4. Enter the name of the contact (maximum 12 characters) and then
press Mto save.
• A confirmation tone is played.
5. Press Oto return to standby mode.
7.1.37.1.37.1.37.1.3 Delete a Call LogDelete a Call LogDelete a Call LogDelete a Call Log EEEEntryntryntryntry
1. From the home screen, press +.
2. Press +/- to select an entry and then press M.
3. Press +/- to DELETEDELETEDELETEDELETE and then press Mto select.
• DELETE?DELETE?DELETE?DELETE? is displayed.
4. Press Magain to confirm.
• A confirmation tone is played.
5. Press Oto return to standby mode.
7.1.47.1.47.1.47.1.4 DeleteDeleteDeleteDelete AAAAllllllll EEEEntries in the Call Logntries in the Call Logntries in the Call Logntries in the Call Log
1. From the home screen, press +.
2. Press M.
3. Press +/- to DELETE ALLDELETE ALLDELETE ALLDELETE ALL and then press Mto select.
• DELETE?DELETE?DELETE?DELETE? is displayed.
4. Press Magain to confirm.
• A confirmation tone is played.
Downloaded from www.Manualslib.com manuals search engine
31
7.27.27.27.2 RedialRedialRedialRedial LLLListististist
The redial list stores the last 5 numbers dialled. A maximum of 24 digits
can be displayed for each entry.
7.2.17.2.17.2.17.2.1 Access theAccess theAccess theAccess the RRRRedialedialedialedial LLLListististist
1. From the home screen, press R.
2. Press +/- to browse the redial list.
• The last dialled number will appear first in the redial list.
• If the number is more than 12 digits, press mto see the
other digits.
7.2.27.2.27.2.27.2.2 Save aSave aSave aSave a RRRRedialedialedialedial NNNNumber into theumber into theumber into theumber into the PPPPhonebookhonebookhonebookhonebook
1. From the home screen, press R.
2. Press +/- to select an entry and press M.
3. Press Magain to select SAVE NUMBER.SAVE NUMBER.SAVE NUMBER.SAVE NUMBER.
4. Enter the name of the contact (maximum 12 characters) and then
press Mto save.
• A confirmation tone is played.
5. Press Oto return to standby mode.
7.2.37.2.37.2.37.2.3 Edit aEdit aEdit aEdit a RRRRedialedialedialedial NNNNumberumberumberumber
1. From the home screen, press R.
2. Press +/- to select an entry and then press M.
3. Press +/- to EDIT ENTRYEDIT ENTRYEDIT ENTRYEDIT ENTRY and then press Mto select.
4. Edit the number and press Mto confirm.
• A confirmation tone is played.
5. Press Oto return to standby mode.
Downloaded from www.Manualslib.com manuals search engine
32
7.2.47.2.47.2.47.2.4 Delete aDelete aDelete aDelete a RRRRedialedialedialedial NNNNumberumberumberumber
1. From the home screen, press R.
2. Press +/- to select an entry and then press M.
3. Press +/- to DELETEDELETEDELETEDELETE and then press Mto select.
• DELETE?DELETE?DELETE?DELETE? is displayed.
4. Press Magain to confirm.
• A confirmation tone is played.
5. Press Oto return to standby mode.
7.2.57.2.57.2.57.2.5 DeleteDeleteDeleteDelete AAAAllllllll EEEEntries from thentries from thentries from thentries from the RRRRedialedialedialedial LLLListististist
1. From the home screen, press R.
2. Press M.
3. Press +/- to DELETE ALLDELETE ALLDELETE ALLDELETE ALL and then press Mto select.
• DELETE?DELETE?DELETE?DELETE? is displayed.
4. Press Magain to confirm.
• A confirmation tone played.
Downloaded from www.Manualslib.com manuals search engine
33
8888 CLOCKCLOCKCLOCKCLOCK AND ALARMAND ALARMAND ALARMAND ALARM SETTINGSSETTINGSSETTINGSSETTINGS
8.18.18.18.1 Date andDate andDate andDate and TTTTimeimeimeime SSSSettingsettingsettingsettings
If you have subscribed to Calling Line IdentificationCalling Line IdentificationCalling Line IdentificationCalling Line Identification (CLI)(CLI)(CLI)(CLI) service, the time
and date settings will be automatically updated by the network when you
receive an incoming call.
You can also set the date and time manually.
1. From the home screen, press M.
2. Press +/- to CLOCK&ALARMCLOCK&ALARMCLOCK&ALARMCLOCK&ALARM and then Mto select.
3. Press Magain to select DATE/TDATE/TDATE/TDATE/TIMEIMEIMEIME.
• The last stored date is displayed.
4. Enter the current date and press Mto confirm. The default date
format is DD/MMDD/MMDD/MMDD/MM. (To change date format, see Change theChange theChange theChange the DDDDateateateate
FFFFormatormatormatormat on page 34.)
ForDD/MM format, enter 03 May 2012 as [1], [2], [0], [3], [0], [5].
For MM/DD format, enter 03 May 2012as [1], [2], [0], [5], [0], [3].
If you make a mistake, press mto delete the last digit entered.
5. Enter the current time and press Mto confirm. The default time
format is 24242424 HOURSHOURSHOURSHOURS. (To change time format, see Change theChange theChange theChange the TTTTimeimeimeime
FFFFormatormatormatormat on page 34.)
For 24-hour format, enter 1:30pm as [1], [3], [3], [0].
For 12-hour format, enter the time and then press +/- to
select AMAMAMAM or PMPMPMPM.
If you make a mistake, press mto delete the last digit entered.
• A confirmation tone is played.
6. Press Oto return to standby mode.
Downloaded from www.Manualslib.com manuals search engine
34
8.1.18.1.18.1.18.1.1 Change theChange theChange theChange the TTTTimeimeimeime FFFFormatormatormatormat
The time can be displayed either as 12-hour or 24-hour. The default
setting is 24 HOURS24 HOURS24 HOURS24 HOURS.
1. From the home screen, press M.
2. Press +/- to CLOCK&ALARMCLOCK&ALARMCLOCK&ALARMCLOCK&ALARM and then Mto select.
3. Press +/- to SET FORMATSET FORMATSET FORMATSET FORMAT and then press Mto select.
4. Press Magain to select TIME FORMATTIME FORMATTIME FORMATTIME FORMAT.
• The current setting is displayed.
5. Press +/- to select 12 HO12 HO12 HO12 HOURSURSURSURS or 24 HOURS24 HOURS24 HOURS24 HOURS and then
press Mto confirm.
• A confirmation tone is played.
6. Press Oto return to standby mode.
8.1.28.1.28.1.28.1.2 Change theChange theChange theChange the DDDDateateateate FFFFormatormatormatormat
The date can be displayed either as Month/Day or Day/Month. The
default setting is DD/MMDD/MMDD/MMDD/MM.
1. From the home screen, press M.
2. Press +/- to CLOCK&ALARMCLOCK&ALARMCLOCK&ALARMCLOCK&ALARM and then Mto select.
3. Press +/- to SET FORMATSET FORMATSET FORMATSET FORMAT and then press Mto select.
4. Press +/- to DATE FORMATDATE FORMATDATE FORMATDATE FORMAT and then press Mto select.
• The current setting is displayed.
5. Press +/- to select DDDDDDDD////MMMMMMMM or MMMMMMMM////DDDDDDDD and then press
Mto confirm.
• A confirmation tone is played.
6. Press Oto return to standby mode.
Downloaded from www.Manualslib.com manuals search engine
35
8.28.28.28.2 AlarmAlarmAlarmAlarm SSSSettingsettingsettingsettings
An alarm can be set on a handset, to sound at a set time only once or
repeated each day.
When an alarm is set, the alarm icon is shown on the handset display.
When the alarm time is reached, the handset will sound an alarm for 1
minute, at the same volume setting as the handset ringer. If the ringer is
off, it will ring at volume setting 1.
When the alarm rings, you can press any key on the handset to stop the
ringing, even if the keylock is activated.
1. From the home screen, press M.
2. Press +/-to CLOCK&ALARMCLOCK&ALARMCLOCK&ALARMCLOCK&ALARMand then press Mto select.
3. Press +/- to ALARMALARMALARMALARM and then press Mto select.
4. Press +/- to an alarm option.
OFF:OFF:OFF:OFF: Turn alarm off
ONONONON ONCEONCEONCEONCE:::: The alarm sounds once at the set time.
ONONONON DAILDAILDAILDAILY:Y:Y:Y: The alarm sounds daily at the set time.
5. Press Mto select the option.
6. If ONONONON ONCEONCEONCEONCEor ONDONDONDONDAILYAILYAILYAILYis selected, enter the desired hour and minute.
Press +/-to select AMAMAMAMor PMPMPMPMif the time is in 12-hour format.
7. Press Mto confirm the alarm setting.
• A confirmation tone is played.
8. Press Oto return to standby mode.
Downloaded from www.Manualslib.com manuals search engine
36
8.2.18.2.18.2.18.2.1 Set theSet theSet theSet the Alarm TAlarm TAlarm TAlarm Toneoneoneone
You can select from 3 alarm melodies.
1. From the home screen, press M.
2. Press +/-to CLOCK&ALARMCLOCK&ALARMCLOCK&ALARMCLOCK&ALARMand then press Mto select.
3. Press +/- to ALARM TONEALARM TONEALARM TONEALARM TONE and then press Mto select.
4. Press +/- to select the desired alarm tone (each tone will
sound as it is selected) and then press Mto confirm.
• A confirmation tone is played.
5. Press Oto return to standby mode.
Downloaded from www.Manualslib.com manuals search engine
37
9999 PPPPERSONALERSONALERSONALERSONAL SETTINGSSETTINGSSETTINGSSETTINGS
Your phone comes with a selection of settings that you can change to
personalise your phone to the way you like it to work.
9.19.19.19.1 Set theSet theSet theSet the RRRRinginginging VVVVolumeolumeolumeolume
You can set the handset ringer volume from Level 1 to Level 4 or turn the
ringer off.
1. From the home screen, press M.
2. Press +/- to PERSONAL SETPERSONAL SETPERSONAL SETPERSONAL SET and then press Mto select.
3. Press +/-to HANDSETTONEHANDSETTONEHANDSETTONEHANDSETTONEand then press Mto select.
4. Press Magain to select RINGRINGRINGRING VVVVOLUMEOLUMEOLUMEOLUME.
5. Press +/- to select the desired setting (each volume level
will play as it is selected) and then press Mto confirm.
• A confirmation tone is played.
6. Press Oto return to standby mode.
NNNNoteoteoteote:::: Press and hold #to switch the ringer OnOnOnOn and OffOffOffOff when the
handset is in standby mode. The ringer off icon displays on the screen
when ringer off feature is activated.
9.29.29.29.2 Set theSet theSet theSet the RRRRinginginging ToneToneToneTone
You can select from 10 ringer melodies for both internal and external
calls.
1. From the home screen, press M.
2. Press +/- to PERSONAL SETPERSONAL SETPERSONAL SETPERSONAL SET and then press Mto select.
3. Press+/-toHANDSETTHANDSETTHANDSETTHANDSETTONEONEONEONEandthenpressMtoselect.
4. Press +/- to RINGRINGRINGRING TONETONETONETONESSSS and then press Mto select.
5. Press +/- to select the desired melody from 1 to 10 (each
melody will play as it is selected) and then press Mto confirm.
• A confirmation tone is played.
6. Press Oto return to standby mode.
Downloaded from www.Manualslib.com manuals search engine
38
9.39.39.39.3 Set theSet theSet theSet the KKKKeyeyeyey BeepBeepBeepBeep
The handset emits a tone with each key press. You can choose to turn
this tone on or off. The default setting is ONONONON.
1. From the home screen, press M.
2. Press +/- to PERSONAL SETPERSONAL SETPERSONAL SETPERSONAL SET and then press Mto select.
3. Press +/-to HANDSETTHANDSETTHANDSETTHANDSETTONEONEONEONEand then press Mto select.
4. Press +/- to KEY BEEPKEY BEEPKEY BEEPKEY BEEP and then press Mto select.
5. Press +/-to select ONONONONor OFFOFFOFFOFFand then press Mto confirm.
• A confirmation tone is played.
6. Press Oto return to standby mode.
9.49.49.49.4 Rename theRename theRename theRename the HHHHandsetandsetandsetandset
You can personalise your handset by renaming it.
1. From the home screen, press M.
2. Press +/- to PERSONAL SETPERSONAL SETPERSONAL SETPERSONAL SET and then press Mto select....
3. Press Mto select HANDSET NAMEHANDSET NAMEHANDSET NAMEHANDSET NAME.
• The current handset name is displayed.
4. Press mto delete the letters one by one and enter the new name
(maximum 10 characters).
5. Press Mto confirm.
• A confirmation tone is played.
6. Press Oto return to standby mode.
Downloaded from www.Manualslib.com manuals search engine
39
9.59.59.59.5 Set theSet theSet theSet the DDDDisplayisplayisplayisplay LLLLanguageanguageanguageanguage
You can change the display language on your handset. The default setting
is ENGLISHENGLISHENGLISHENGLISH.
1. From the home screen, press M.
2. Press +/- to PERSONAL SETPERSONAL SETPERSONAL SETPERSONAL SET and then press Mto select.
3. Press +/- to LANGUAGELANGUAGELANGUAGELANGUAGE and then press Mto select.
4. Press +/- to select your preferred language and then
press Mto confirm.
• A confirmation tone is played.
5. Press Oto return to standby mode.
Note:Note:Note:Note: Once the display language is set, the handset will switch to display
in the selected language immediately.
9.69.69.69.6 SetSetSetSet AAAAutoutoutouto HHHHangangangang----upupupup
This function enables you to end a call automatically by simply placing
the handset back on the base unit or charging pod. By default, the Auto
Hang up feature is ONONONON.
1. From the home screen, press M.
2. Press +/- to PERSONAL SETPERSONAL SETPERSONAL SETPERSONAL SET and then press Mto select.
3. Press +/-to AUTOHANGAUTOHANGAUTOHANGAUTOHANG----UPUPUPUPand then press Mto select.
4. Press +/-to select ONONONONor OFFOFFOFFOFFand then press Mto confirm.
• A confirmation tone is played.
5. Press Oto return to standby mode.
Downloaded from www.Manualslib.com manuals search engine
40
10101010 ADVANCED SETTINGSADVANCED SETTINGSADVANCED SETTINGSADVANCED SETTINGS
10.110.110.110.1 HandsetHandsetHandsetHandset RegistrationRegistrationRegistrationRegistration
IMPORTANT:IMPORTANT:IMPORTANT:IMPORTANT: When you purchase your phone system, all handsets are
already registered to your base, so you do not need to register them.
Handset registration is only necessary when you buy extra handsets or if
a handset has become faulty.
You can register up to four handsets to one base station, with each
handset’s number (1 to 4) shown on its display.
Note:Note:Note:Note: Each handset can only be registered to one base.
You need to enter the Master PIN before you can register or unregister
handsets. The default Master PIN is 0000000000000000.
10.210.210.210.2 Register ARegister ARegister ARegister Additionaldditionaldditionaldditional HHHHandsetsandsetsandsetsandsets
1. Press and hold the key under the base unit for approximately 5
seconds.
• The message indicator on the base will flash for up to 1 minute,
while it is in registration mode.
2. On the handset, press M.
3. Press +/-to ADVANCEDSETADVANCEDSETADVANCEDSETADVANCEDSET and then press Mto select.
4. Press +/-to REGISTRATIONREGISTRATIONREGISTRATIONREGISTRATIONand then press M to select.
• If no action is taken on the handset within 10 seconds, the
registration procedure will be aborted. If this happens, repeat
from step 1.
5. Enter the Master PIN and then press Mto confirm.
Note:Note:Note:Note: The default Master PIN is 0000000000000000.
• WAITWAITWAITWAITINGINGINGING flashes on the screen.
• A confirmation tone is played to indicate successful registration,
and the handset will return to standby mode, with its handset
number displayed.
• If no base is found with the entered PIN, error tones are played
to indicate failed registration and the handset returns to
standby mode. You will need to repeat from step 1 above.
Downloaded from www.Manualslib.com manuals search engine
41
10.310.310.310.3 UnUnUnUn----register yourregister yourregister yourregister your HHHHandsetandsetandsetandset
You can unregister the handset you are using.
1. From the home screen, press M.
2. Press +/-to ADVANCEDSETADVANCEDSETADVANCEDSETADVANCEDSET and then press Mto select.
3. Press +/- to UNREGISTERUNREGISTERUNREGISTERUNREGISTER and then press Mto select.
4. Enter the Master PIN and then press Mto confirm.
Note:Note:Note:Note: The default Master PIN is 0000000000000000.
5. Press +/- to select the handset number to un-register
and then press Mto confirm or press Oto cancel the
un-registration procedure.
• A confirmation tone is played to indicate successful
un-registration.
• If no action is taken on the handset within 15 seconds, the
un-registration procedure will be aborted and the handset
returns to standby mode.
10.410.410.410.4 ChangeChangeChangeChange thethethethe Master PINMaster PINMaster PINMaster PIN
The Master PIN is used for registration/un-registration of handsets. The
default Master PIN number is 0000000000000000. The maximum length of the Master
PIN is 8 digits.
Note:Note:Note:Note: If you forget your PIN code, you can reset it to its default 0000000000000000
using a handset ResetResetResetReset. (See ResetResetResetReset thethethethe UUUUnitnitnitnit on page 43.)
1. From the home screen, press M.
2. Press +/-to ADVANCEDSETADVANCEDSETADVANCEDSETADVANCEDSET and then press Mto select.
3. Press +/- to CHANGE PINCHANGE PINCHANGE PINCHANGE PIN and then press Mto select.
4. Enter the current Master PIN and then press Mto confirm.
• The PIN will be shown as asterisks (*) on the screen as you
enter them.
5. Enter the new PIN and then press Mto confirm.
• A confirmation tone is played.
Downloaded from www.Manualslib.com manuals search engine
42
10.510.510.510.5 ChangeChangeChangeChange thethethethe RRRRecallecallecallecall TTTTimeimeimeime
You may need to press Fto send a Flash signal (also called Recall or
Timed Break Recall) if you are connected to a PBX. You should normally
leave the Recall Time at its default setting, Short (100ms)Short (100ms)Short (100ms)Short (100ms), as this is the
standard recall required in the telephone network. However, it can be
changed to Medium (270ms) or Long (600ms) if your telephone is
connected to a PBX that requires a different recall time.
1. From the home screen, press M.
2. Press +/-to ADVANCEDSETADVANCEDSETADVANCEDSETADVANCEDSET and then press Mto select.
3. Press +/- to RECALL TIMERECALL TIMERECALL TIMERECALL TIME and then press Mto select.
4. Press +/- to select SHORTSHORTSHORTSHORT, MEDIUMMEDIUMMEDIUMMEDIUM or LONGLONGLONGLONG and then
press Mto confirm.
• A confirmation tone is played.
5. Press Oto return to standby mode.
10.610.610.610.6 Change theChange theChange theChange the DDDDialialialial MMMMode (ode (ode (ode (DDDDualualualual MMMModeodeodeode DDDDialialialialllllinginginging modelsmodelsmodelsmodels only)only)only)only)
You should normally leave the dialling mode at its default setting, TOTOTOTONENENENE
(also called MF or DTMF).
However, you can change it to PULSEPULSEPULSEPULSE if necessary.
Note:Note:Note:Note: If PULSEPULSEPULSEPULSE dialling is set, you can temporarily switch to TONETONETONETONE dialling
by pressing *. The dial mode will change from PULSEPULSEPULSEPULSE to TONETONETONETONE for the
duration of the call.
1. From the home screen, press M.
2. Press+/-toADVANCEDSETADVANCEDSETADVANCEDSETADVANCEDSETandthenpressMtoselect.
3. Press +/- to DIAL MODEDIAL MODEDIAL MODEDIAL MODE and then press Mto select.
4. Press +/- to select TONETONETONETONE or PULSEPULSEPULSEPULSE and then press M
to confirm.
• A confirmation tone is played.
5. Press Oto return to standby mode.
Downloaded from www.Manualslib.com manuals search engine
43
10.710.710.710.7 SetSetSetSet thethethethe FFFFirstirstirstirst RRRRinginginging
If you have subscribed to Caller Line Identification service and do not
wish to hear the phone ring before the caller identification is displayed,
you can set the FIRST RINGFIRST RINGFIRST RINGFIRST RING to OOOOFFFFFFFF.
1. From the home screen, press M.
2. Press +/-to ADVANCEDSEADVANCEDSEADVANCEDSEADVANCEDSETTTT and then press Mto select.
3. Press +/- to FIRST RINGFIRST RINGFIRST RINGFIRST RING and then press Mto select.
4. Press +/-to select ONONONONor OFFOFFOFFOFF and then press Mto
confirm.
• A confirmation tone is played.
5. Press Oto return to standby mode.
10.810.810.810.8 ResetResetResetReset thethethethe UUUUnitnitnitnit
You can reset your phone to its default settings with this feature.
Note:Note:Note:Note: Upon reset, all your personal settings, call log and redial list entries
will be deleted and the phone will return to its default settings. However,
your phonebook will remain unchanged after reset.
1. From the home screen, press M.
2. Press +/-to ADVANCEDSETADVANCEDSETADVANCEDSETADVANCEDSET and then press Mto select.
3. Press +/- to select RESETRESETRESETRESET and then press Mto select.
4. Press Magain to confirm.
• A confirmation tone is played and the unit is reset to its
default settings.
Downloaded from www.Manualslib.com manuals search engine
44
11111111 TROUBLESHOOTINGTROUBLESHOOTINGTROUBLESHOOTINGTROUBLESHOOTING
ALWAYS cheALWAYS cheALWAYS cheALWAYS check that:ck that:ck that:ck that:
You have followed all the steps listed in the user guide to install and
set up your telephone.
All connectors are securely inserted into their sockets.
Mains power for the base unit is switched on at the socket.
The handset’s batteries are correctly and securely installed and are
sufficiently charged.
Everyday useEveryday useEveryday useEveryday use
“I cannot make or answer calls”“I cannot make or answer calls”“I cannot make or answer calls”“I cannot make or answer calls”
If the handset’s display is blank, it may have been switched off.
Press and hold Oto switch it back on.
Check that the base unit’s mains power adapter is plugged in and
power is switched on. The base unit needs mains power for normal
operation of the phone – not just for charging the batteries.
Make sure that you are using the telephone line cable supplied with
your phone. Other telephone line cables might not work.
Move the handset closer to the base unit.
Check the Battery Level symbol on the display. If it is low, put the
handset back on the base unit or charging pod to recharge the
batteries.
Switch off the power at the mains socket, wait for a short while and
then switch it back on. This may solve the problem.
“I cannot make call“I cannot make call“I cannot make call“I cannot make callssss””””
If the handset display shows KEYS LOCKEDKEYS LOCKEDKEYS LOCKEDKEYS LOCKED, press and hold *to
unlock it before you make a call.
Only one handset (or the base unit) can be connected to an external
line at a time. If the handset display shows , the base is already
being used by another handset.
“When I press on the keys, nothing happens”“When I press on the keys, nothing happens”“When I press on the keys, nothing happens”“When I press on the keys, nothing happens”
Make sure that the batteries are fitted in your handset. If the Battery
Level symbol on the display shows ‘low’, put your handset back on the
base unit or charging pod to charge.
“When I key in a number, it appears on the display, but I cannot make an“When I key in a number, it appears on the display, but I cannot make an“When I key in a number, it appears on the display, but I cannot make an“When I key in a number, it appears on the display, but I cannot make an
externalexternalexternalexternal call”call”call”call”
Try a different position for the base unit – somewhere higher if
possible, or further away from other electrical equipment.
Downloaded from www.Manualslib.com manuals search engine
45
“The phone does not ring”“The phone does not ring”“The phone does not ring”“The phone does not ring”
Check that the base unit’s mains power adapter is plugged in and
power is switched on.
The base unit needs mains power for normal operation of the phone –
not just for charging the batteries.
Make sure that you are using the telephone line cable that was
supplied with your phone.
Make sure that the ringer volume settings are not set to off. Increase
the ringer volume settings. (See Set theSet theSet theSet the RRRRinginginging VVVVolumeolumeolumeolume on page 37.)
“My call was cut off when I went out of range. Now I can’t use my“My call was cut off when I went out of range. Now I can’t use my“My call was cut off when I went out of range. Now I can’t use my“My call was cut off when I went out of range. Now I can’t use my
handset.”handset.”handset.”handset.”
Move the handset closer to the base unit before you try to make a call
again.
“There is interference and noise on the line”“There is interference and noise on the line”“There is interference and noise on the line”“There is interference and noise on the line”
Move the handset closer to the base unit, or to a different position.
Try moving the base unit away from other electrical equipment, such
as a television or a computer.
You’ll get the best reception if you place the base unit as high as
possible. For example, in a two-floor building, the first-floor landing is
an ideal place.
“I hear ‘beeps’ from my handset while I’m on a call”“I hear ‘beeps’ from my handset while I’m on a call”“I hear ‘beeps’ from my handset while I’m on a call”“I hear ‘beeps’ from my handset while I’m on a call”
You may be moving out of range of the base unit. Move closer or your
call may be cut off.
Check the Battery Level symbol on the display. If it’s low, recharge the
batteries.
“The Caller Display feature isn’t working”“The Caller Display feature isn’t working”“The Caller Display feature isn’t working”“The Caller Display feature isn’t working”
You need to subscribe to the Caller Line Identification service from
your network service provider.
The caller may have withheld their number by dialling 141. Or they
may be calling from a network that does not transmit the caller’s
number (e.g. if they are making international calls.)
“When I try to make a call, I hear busy tone”“When I try to make a call, I hear busy tone”“When I try to make a call, I hear busy tone”“When I try to make a call, I hear busy tone”
If you’re using a multi-handset system, check whether another
handset is already on a call.
“The volume in the earpiece is low“The volume in the earpiece is low“The volume in the earpiece is low“The volume in the earpiece is low when I’m on a call”when I’m on a call”when I’m on a call”when I’m on a call”
Make sure you’re holding the earpiece correctly over your ear.
Adjust the volume using +.
“I cannot store a phonebook entry”“I cannot store a phonebook entry”“I cannot store a phonebook entry”“I cannot store a phonebook entry”
The maximum number of 100 phonebook entries has been reached.
You must delete existing entries to make space for new ones.
Downloaded from www.Manualslib.com manuals search engine
46
Intercom and transferIntercom and transferIntercom and transferIntercom and transfer
“I can’t transfer a call”“I can’t transfer a call”“I can’t transfer a call”“I can’t transfer a call”
Make sure that the other handset is in range of the base unit.
Make sure that you have entered the correct number for the other
handset.
BatteriesBatteriesBatteriesBatteries
“The handset’s battery cells are running low wit“The handset’s battery cells are running low wit“The handset’s battery cells are running low wit“The handset’s battery cells are running low within an hour or two”hin an hour or two”hin an hour or two”hin an hour or two”
Before you first use the handset, you must leave it to charge on the
base unit or charging pod for at least 15 hours.
You may need to replace the batteries.
Check the connection between the base unit and the mains power
socket.
“I try t“I try t“I try t“I try to recharge the batteries but I still get a warning that they are low”o recharge the batteries but I still get a warning that they are low”o recharge the batteries but I still get a warning that they are low”o recharge the batteries but I still get a warning that they are low”
You need to replace the batteries. Dispose of used batteries safely –
do not burn, immerse them in water, disassemble, or puncture the
batteries.
Do not use non-rechargeable batteries in your handset – they may
explode, causing damage.
RegistrationRegistrationRegistrationRegistration
“I am not able“I am not able“I am not able“I am not able totototo register another handset”register another handset”register another handset”register another handset”
The maximum number of 4 handsets has been reached. You will need
to unregister a handset in order to register a new one.
If the fault persists...If the fault persists...If the fault persists...If the fault persists...
Disconnect all other instruments connected to the same line and try to
make a call.
Disconnect the base unit from the telephone line and plug a different
phone into the master telephone socket. Try making a call. If this
works, the line is OK.
If the call does not work, and you are using a two-way socket adapter,
remove it and plug a telephone directly into the socket.
If the call now works, the adapter may be faulty.
If you cannot make a call, the fault may be on the exchange line.
Contact the service provider.
Downloaded from www.Manualslib.com manuals search engine
47
12121212 DECLARATION OF CONFORMITYDECLARATION OF CONFORMITYDECLARATION OF CONFORMITYDECLARATION OF CONFORMITY
We the manufacturer / Importer: Binatone Telecom Plc, 1 Apsley Way London,
NW2 7HF. Declare under our sole responsibility that the following product
Type of equipment: Digital Cordless Telephone
Country of Origin: China
Brand: iDECT
Model Name: Solo
complies with the essential protection requirements of R&TTE Directive
1999/5/EC on the approximation of the laws of the Member States relating to
Radio Spectrum MattersRadio Spectrum MattersRadio Spectrum MattersRadio Spectrum Matters, the Council Directive 2004/108/EC on the approximation
of the laws of the Member States relating to Electromagnetic CElectromagnetic CElectromagnetic CElectromagnetic Compatibility (EMC)ompatibility (EMC)ompatibility (EMC)ompatibility (EMC)
and the European Community Directive 2006/95/EC relating to Electrical SafetyElectrical SafetyElectrical SafetyElectrical Safety.
Assessment of compliance of the product with the requirements relating to the
essential requirements according to Article 3 R&TTE was based on Annex III of the
Directive 1999/5/EC and the following standard:
Radio Spectrum: ETSI EN 301406: V 2.1.1 (2009-07)
EMC: ETSI EN 301489-6: V1.3.1 (2008-08)
ETSI EN 301489-1: V1.8.1 (2008-04)
Safety: EN60950-1:2006+A11:2009+A1:2010+A12:2011
Manufacturer / Importer
(signature of authorised
person)
18/05/2012
Date Signature
The conformity to the requirements is validated by the symbol.
NOTE:NOTE:NOTE:NOTE: In compliance with Directive 2002/96/EC, when you purchase a product that
comes with the symbol shown on the right, you are required to dispose of electrical and
electronic equipment by separate waste collection and you cannot dispose of the
product as normal waste.
This equipment and all its components, subsystems and consumable
materials form an integral part of this product and when you decide to
dispose of them you have to take them to a local recycling centre for
appropriate waste disposal, in compliance with the current regulations.
Details about the location of these centres can be obtained from your local authority.
Notes for battery disposalNotes for battery disposalNotes for battery disposalNotes for battery disposal
Your product contains batteries covered by the European Directive 2006/66/EC,
which must not be disposed of with normal household waste.
Please be aware of the local rules on separate collection of batteries. The correct
disposal of batteries helps protect the environment and prevent health hazards.
Downloaded from www.Manualslib.com manuals search engine
48
13131313 GUARANTEE AND SERVICEGUARANTEE AND SERVICEGUARANTEE AND SERVICEGUARANTEE AND SERVICE
The phone system is guaranteed for 12 months from the date of
purchase shown on your sales receipt. This guarantee does not cover any
faults or defects caused by accidents, misuse, fair wear and tear, neglect,
faults on the telephone line, lightning, tampering with the equipment, or
any attempt at adjustment or repair other than through approved
agents.
Please keep your sales (till) receipt this is your guarantee.Please keep your sales (till) receipt this is your guarantee.Please keep your sales (till) receipt this is your guarantee.Please keep your sales (till) receipt this is your guarantee.
You should also keep the original packaging material.
In the unlikely event that you need to return your phone system to our
Repair Centre while it is under guarantee, there may be a handling
charge.
13.113.113.113.1 While the unit is under GuaranteeWhile the unit is under GuaranteeWhile the unit is under GuaranteeWhile the unit is under Guarantee
1. Disconnect the base unit from the telephone line and the mains
electricity supply.
2. Pack up all parts of your phone system, using the original package.
3. Return the unit to the shop where you bought it, making sure you
take your sales receipt.
Remember to include the mains adapter.
13.213.213.213.2 After the Guarantee has expiredAfter the Guarantee has expiredAfter the Guarantee has expiredAfter the Guarantee has expired
If the unit is no longer under Guarantee, first follow steps 1 and 2 as for
repair under Guarantee. Then...
1. Call Helpline on 0845 345 9677 (for UK only) and ask for a quotation
of the repair charge and details of where to send your phone system
for repair.
2. Make sure you include with your phone system.
Your name and address
A cheque or postal order for the value of the repair
A brief description of the fault.
3. Return your phone system to the address given by the Service
Department.
* This does not affect your statutory rights.
Downloaded from www.Manualslib.com manuals search engine

More Related Content

What's hot

Développement d'une application mobile hybride présentant une bibliothèque n...
Développement d'une application mobile hybride  présentant une bibliothèque n...Développement d'une application mobile hybride  présentant une bibliothèque n...
Développement d'une application mobile hybride présentant une bibliothèque n...
kaies Labiedh
 
Rapport PFE ISMAGI SQLI Microsoft
Rapport PFE ISMAGI SQLI MicrosoftRapport PFE ISMAGI SQLI Microsoft
Rapport PFE ISMAGI SQLI Microsoft
Oussama BAHLOULI
 
عناصر التصميم الجرافيكي2
عناصر التصميم الجرافيكي2عناصر التصميم الجرافيكي2
عناصر التصميم الجرافيكي2
Palestinian Presidency office
 
Final Report
Final ReportFinal Report
Final Report
Abhinav Bhardwaj, EIT
 
Rapport PFE - B.Sc IT
Rapport PFE -  B.Sc ITRapport PFE -  B.Sc IT
Rapport PFE - B.Sc IT
Ayoub Haddouch
 
INTERNSHIP REPORT
INTERNSHIP REPORTINTERNSHIP REPORT
INTERNSHIP REPORT
ernestuwineza
 
Rapport PFE2021.pdf
Rapport PFE2021.pdfRapport PFE2021.pdf
Rapport PFE2021.pdf
CoulibalyYoussoufngo
 
Ficha de trabajo sem 23 arte y cultura_doris anaya_setiembre_cuarto
Ficha de trabajo sem 23 arte y cultura_doris anaya_setiembre_cuartoFicha de trabajo sem 23 arte y cultura_doris anaya_setiembre_cuarto
Ficha de trabajo sem 23 arte y cultura_doris anaya_setiembre_cuarto
doris anaya anaya
 
Rapport sfe hamza_ghaissi_storactive
Rapport sfe hamza_ghaissi_storactiveRapport sfe hamza_ghaissi_storactive
Rapport sfe hamza_ghaissi_storactive
HamzaGhaissi1
 
computer science internship report
computer science  internship reportcomputer science  internship report
computer science internship report
kaahwa Armstrong
 
Rapport du Projet de Fin d'année Génie informatique
Rapport du Projet de Fin d'année Génie informatique Rapport du Projet de Fin d'année Génie informatique
Rapport du Projet de Fin d'année Génie informatique
ayoub daoudi
 
conception et réalisation plateforme collaboratif basant sur la methode agile...
conception et réalisation plateforme collaboratif basant sur la methode agile...conception et réalisation plateforme collaboratif basant sur la methode agile...
conception et réalisation plateforme collaboratif basant sur la methode agile...
Sid Ahmed Benkraoua
 
Rapport de pfe gestion de parc informatique et Helpdesk
Rapport de pfe gestion de parc informatique et HelpdeskRapport de pfe gestion de parc informatique et Helpdesk
Rapport de pfe gestion de parc informatique et Helpdesk
Raef Ghribi
 
iRecruite
iRecruiteiRecruite
iRecruite
Donia Hammami
 
Sa arte-pucp
Sa arte-pucpSa arte-pucp
Sa arte-pucp
LUZ ROSARIO ZUMARAN
 
rapport fin d'etude
rapport fin d'etuderapport fin d'etude
rapport fin d'etude
sihem-med
 
e-barki@
e-barki@e-barki@
e-barki@
Hassan KIBOU
 
Bases concurso castillos y esculturas de arena
Bases concurso castillos y esculturas de arenaBases concurso castillos y esculturas de arena
Bases concurso castillos y esculturas de arena
TurismoCalp
 
Conception et developpement d'une application mobile Android e-location
Conception et developpement d'une application mobile Android e-locationConception et developpement d'une application mobile Android e-location
Conception et developpement d'une application mobile Android e-location
ALALSYSE
 

What's hot (20)

Développement d'une application mobile hybride présentant une bibliothèque n...
Développement d'une application mobile hybride  présentant une bibliothèque n...Développement d'une application mobile hybride  présentant une bibliothèque n...
Développement d'une application mobile hybride présentant une bibliothèque n...
 
Rapport PFE ISMAGI SQLI Microsoft
Rapport PFE ISMAGI SQLI MicrosoftRapport PFE ISMAGI SQLI Microsoft
Rapport PFE ISMAGI SQLI Microsoft
 
عناصر التصميم الجرافيكي2
عناصر التصميم الجرافيكي2عناصر التصميم الجرافيكي2
عناصر التصميم الجرافيكي2
 
Garde page
Garde pageGarde page
Garde page
 
Final Report
Final ReportFinal Report
Final Report
 
Rapport PFE - B.Sc IT
Rapport PFE -  B.Sc ITRapport PFE -  B.Sc IT
Rapport PFE - B.Sc IT
 
INTERNSHIP REPORT
INTERNSHIP REPORTINTERNSHIP REPORT
INTERNSHIP REPORT
 
Rapport PFE2021.pdf
Rapport PFE2021.pdfRapport PFE2021.pdf
Rapport PFE2021.pdf
 
Ficha de trabajo sem 23 arte y cultura_doris anaya_setiembre_cuarto
Ficha de trabajo sem 23 arte y cultura_doris anaya_setiembre_cuartoFicha de trabajo sem 23 arte y cultura_doris anaya_setiembre_cuarto
Ficha de trabajo sem 23 arte y cultura_doris anaya_setiembre_cuarto
 
Rapport sfe hamza_ghaissi_storactive
Rapport sfe hamza_ghaissi_storactiveRapport sfe hamza_ghaissi_storactive
Rapport sfe hamza_ghaissi_storactive
 
computer science internship report
computer science  internship reportcomputer science  internship report
computer science internship report
 
Rapport du Projet de Fin d'année Génie informatique
Rapport du Projet de Fin d'année Génie informatique Rapport du Projet de Fin d'année Génie informatique
Rapport du Projet de Fin d'année Génie informatique
 
conception et réalisation plateforme collaboratif basant sur la methode agile...
conception et réalisation plateforme collaboratif basant sur la methode agile...conception et réalisation plateforme collaboratif basant sur la methode agile...
conception et réalisation plateforme collaboratif basant sur la methode agile...
 
Rapport de pfe gestion de parc informatique et Helpdesk
Rapport de pfe gestion de parc informatique et HelpdeskRapport de pfe gestion de parc informatique et Helpdesk
Rapport de pfe gestion de parc informatique et Helpdesk
 
iRecruite
iRecruiteiRecruite
iRecruite
 
Sa arte-pucp
Sa arte-pucpSa arte-pucp
Sa arte-pucp
 
rapport fin d'etude
rapport fin d'etuderapport fin d'etude
rapport fin d'etude
 
e-barki@
e-barki@e-barki@
e-barki@
 
Bases concurso castillos y esculturas de arena
Bases concurso castillos y esculturas de arenaBases concurso castillos y esculturas de arena
Bases concurso castillos y esculturas de arena
 
Conception et developpement d'une application mobile Android e-location
Conception et developpement d'une application mobile Android e-locationConception et developpement d'une application mobile Android e-location
Conception et developpement d'une application mobile Android e-location
 

Viewers also liked

Reflexión en Acción
Reflexión en AcciónReflexión en Acción
Reflexión en Acción
Red Plataforma
 
Jacob Zwagemaker - 24i
Jacob Zwagemaker - 24iJacob Zwagemaker - 24i
Jacob Zwagemaker - 24i
Media Perspectives
 
звіт роботи презентація романичева.
звіт роботи  презентація романичева.звіт роботи  презентація романичева.
звіт роботи презентація романичева.
romanicheva
 
Душа, що прагне у політ (до 70-річчя з дня народження Василя Васильовича Корш...
Душа, що прагне у політ (до 70-річчя з дня народження Василя Васильовича Корш...Душа, що прагне у політ (до 70-річчя з дня народження Василя Васильовича Корш...
Душа, що прагне у політ (до 70-річчя з дня народження Василя Васильовича Корш...
РОМЦ БКР
 
Neurocirugia acv
Neurocirugia   acvNeurocirugia   acv
Neurocirugia acv
Neurocirugia2012
 
Ajedrez terapéutico en adicciones. Experiencia en la CTLG.
Ajedrez terapéutico en adicciones. Experiencia en la CTLG.Ajedrez terapéutico en adicciones. Experiencia en la CTLG.
Ajedrez terapéutico en adicciones. Experiencia en la CTLG.
Urbano Vázquez Fernández
 
Soffer CollectIve Master
Soffer CollectIve MasterSoffer CollectIve Master
Soffer CollectIve Master
A Human Foundation®
 
無所不在飄飄飄
無所不在飄飄飄無所不在飄飄飄
無所不在飄飄飄lookup2266
 
Max Pinas - TWC Apps
Max Pinas - TWC AppsMax Pinas - TWC Apps
Max Pinas - TWC Apps
Media Perspectives
 
Сума кутів трикутника
Сума кутів трикутника Сума кутів трикутника
Сума кутів трикутника
Катя Смаль
 
Sistema muscular
Sistema muscularSistema muscular
Sistema muscular
SANDRA LILIANA PARRA ARIAS
 
JIRA5 Introduction
JIRA5 IntroductionJIRA5 Introduction
Integrating symfony and Zend Framework (PHPNW09)
Integrating symfony and Zend Framework (PHPNW09)Integrating symfony and Zend Framework (PHPNW09)
Integrating symfony and Zend Framework (PHPNW09)
Stefan Koopmanschap
 
Sistema Muscular
Sistema MuscularSistema Muscular
Sistema Muscular
Independiente
 
Scrum (dutch)
Scrum (dutch)Scrum (dutch)
Scrum (dutch)
Stefan Koopmanschap
 
SOLO PORTEROS
SOLO PORTEROS SOLO PORTEROS
SOLO PORTEROS
Emiliogo98
 
Los deportes y su calzado
Los deportes y su calzadoLos deportes y su calzado
Los deportes y su calzado
blancaales
 
Походження (етимологія) слова. Етимологічний словник української мови
Походження (етимологія) слова.  Етимологічний словник української мовиПоходження (етимологія) слова.  Етимологічний словник української мови
Походження (етимологія) слова. Етимологічний словник української мови
lidiyavergoti
 
EMBRIOLOGIA SISTEMA NERVIOSO 2
EMBRIOLOGIA SISTEMA NERVIOSO 2EMBRIOLOGIA SISTEMA NERVIOSO 2
EMBRIOLOGIA SISTEMA NERVIOSO 2
Pedro Pereda
 
Rehabilitación
RehabilitaciónRehabilitación
Rehabilitación
Ernesto Garcia
 

Viewers also liked (20)

Reflexión en Acción
Reflexión en AcciónReflexión en Acción
Reflexión en Acción
 
Jacob Zwagemaker - 24i
Jacob Zwagemaker - 24iJacob Zwagemaker - 24i
Jacob Zwagemaker - 24i
 
звіт роботи презентація романичева.
звіт роботи  презентація романичева.звіт роботи  презентація романичева.
звіт роботи презентація романичева.
 
Душа, що прагне у політ (до 70-річчя з дня народження Василя Васильовича Корш...
Душа, що прагне у політ (до 70-річчя з дня народження Василя Васильовича Корш...Душа, що прагне у політ (до 70-річчя з дня народження Василя Васильовича Корш...
Душа, що прагне у політ (до 70-річчя з дня народження Василя Васильовича Корш...
 
Neurocirugia acv
Neurocirugia   acvNeurocirugia   acv
Neurocirugia acv
 
Ajedrez terapéutico en adicciones. Experiencia en la CTLG.
Ajedrez terapéutico en adicciones. Experiencia en la CTLG.Ajedrez terapéutico en adicciones. Experiencia en la CTLG.
Ajedrez terapéutico en adicciones. Experiencia en la CTLG.
 
Soffer CollectIve Master
Soffer CollectIve MasterSoffer CollectIve Master
Soffer CollectIve Master
 
無所不在飄飄飄
無所不在飄飄飄無所不在飄飄飄
無所不在飄飄飄
 
Max Pinas - TWC Apps
Max Pinas - TWC AppsMax Pinas - TWC Apps
Max Pinas - TWC Apps
 
Сума кутів трикутника
Сума кутів трикутника Сума кутів трикутника
Сума кутів трикутника
 
Sistema muscular
Sistema muscularSistema muscular
Sistema muscular
 
JIRA5 Introduction
JIRA5 IntroductionJIRA5 Introduction
JIRA5 Introduction
 
Integrating symfony and Zend Framework (PHPNW09)
Integrating symfony and Zend Framework (PHPNW09)Integrating symfony and Zend Framework (PHPNW09)
Integrating symfony and Zend Framework (PHPNW09)
 
Sistema Muscular
Sistema MuscularSistema Muscular
Sistema Muscular
 
Scrum (dutch)
Scrum (dutch)Scrum (dutch)
Scrum (dutch)
 
SOLO PORTEROS
SOLO PORTEROS SOLO PORTEROS
SOLO PORTEROS
 
Los deportes y su calzado
Los deportes y su calzadoLos deportes y su calzado
Los deportes y su calzado
 
Походження (етимологія) слова. Етимологічний словник української мови
Походження (етимологія) слова.  Етимологічний словник української мовиПоходження (етимологія) слова.  Етимологічний словник української мови
Походження (етимологія) слова. Етимологічний словник української мови
 
EMBRIOLOGIA SISTEMA NERVIOSO 2
EMBRIOLOGIA SISTEMA NERVIOSO 2EMBRIOLOGIA SISTEMA NERVIOSO 2
EMBRIOLOGIA SISTEMA NERVIOSO 2
 
Rehabilitación
RehabilitaciónRehabilitación
Rehabilitación
 

Similar to iDect Solo Digital Cordless Phone

Gigaset c47 handset user guide
Gigaset c47 handset user guideGigaset c47 handset user guide
Gigaset c47 handset user guide
Telephones Online
 
Instruction Manual | ATN OTS-XLT | Optics Trade
Instruction Manual | ATN OTS-XLT | Optics TradeInstruction Manual | ATN OTS-XLT | Optics Trade
Instruction Manual | ATN OTS-XLT | Optics Trade
Optics-Trade
 
Manual - 0ffe6f4b e71c-4912-bc17-a3133bd5c075
Manual - 0ffe6f4b e71c-4912-bc17-a3133bd5c075Manual - 0ffe6f4b e71c-4912-bc17-a3133bd5c075
Manual - 0ffe6f4b e71c-4912-bc17-a3133bd5c075
Anil Takalikar
 
Eb1304 Net Sata&Sata+ Manual En
Eb1304 Net Sata&Sata+ Manual  EnEb1304 Net Sata&Sata+ Manual  En
Eb1304 Net Sata&Sata+ Manual En
guest19c905e
 
BT X300 Professional Conferencing Unit User Guide
BT X300 Professional Conferencing Unit User GuideBT X300 Professional Conferencing Unit User Guide
BT X300 Professional Conferencing Unit User Guide
Telephones Online
 
01v96i en om_b0
01v96i en om_b001v96i en om_b0
01v96i en om_b0
andijuda
 
Gigaset s67 handset telephone user guide
Gigaset s67 handset telephone user guideGigaset s67 handset telephone user guide
Gigaset s67 handset telephone user guide
Telephones Online
 
Gigaset e36 telephone handset user guide
Gigaset e36 telephone handset user guideGigaset e36 telephone handset user guide
Gigaset e36 telephone handset user guide
Telephones Online
 
Nokia ck 300-ug_and_ig_en
Nokia ck 300-ug_and_ig_enNokia ck 300-ug_and_ig_en
Nokia ck 300-ug_and_ig_en
lagicari
 
Polycom sound station 2 basic user guide
Polycom sound station 2 basic user guidePolycom sound station 2 basic user guide
Polycom sound station 2 basic user guide
best4systems
 
Polycom soundstation 2 lcd user guide
Polycom soundstation 2 lcd user guidePolycom soundstation 2 lcd user guide
Polycom soundstation 2 lcd user guide
best4systems
 
Gigaset e455 telephone user guide
Gigaset e455 telephone user guideGigaset e455 telephone user guide
Gigaset e455 telephone user guide
Telephones Online
 
Ke8220 e
Ke8220 eKe8220 e
Ke8220 e
home
 
Plantronics savi office wo200 over the ear headset user guide
Plantronics savi office wo200 over the ear headset user guidePlantronics savi office wo200 over the ear headset user guide
Plantronics savi office wo200 over the ear headset user guide
best4systems
 
Plantronics savi office wo100 convertible headset user guide
Plantronics savi office wo100 convertible headset user guidePlantronics savi office wo100 convertible headset user guide
Plantronics savi office wo100 convertible headset user guide
best4systems
 
BT 4600 Digital Cordless Telephone User Guide
BT 4600 Digital Cordless Telephone User GuideBT 4600 Digital Cordless Telephone User Guide
BT 4600 Digital Cordless Telephone User Guide
Telephones Online
 
Eb1304%20 Net%20 En
Eb1304%20 Net%20 EnEb1304%20 Net%20 En
Eb1304%20 Net%20 En
guestcce874d
 
Roland vr3 manual
Roland vr3 manualRoland vr3 manual
Roland vr3 manual
tundict
 
LG DU-37LZ30 Manual
LG DU-37LZ30 ManualLG DU-37LZ30 Manual
LG DU-37LZ30 Manual
ddrager
 
Vatimetro_bird_43_Manual.pdf
Vatimetro_bird_43_Manual.pdfVatimetro_bird_43_Manual.pdf
Vatimetro_bird_43_Manual.pdf
NicolasAlvarado27
 

Similar to iDect Solo Digital Cordless Phone (20)

Gigaset c47 handset user guide
Gigaset c47 handset user guideGigaset c47 handset user guide
Gigaset c47 handset user guide
 
Instruction Manual | ATN OTS-XLT | Optics Trade
Instruction Manual | ATN OTS-XLT | Optics TradeInstruction Manual | ATN OTS-XLT | Optics Trade
Instruction Manual | ATN OTS-XLT | Optics Trade
 
Manual - 0ffe6f4b e71c-4912-bc17-a3133bd5c075
Manual - 0ffe6f4b e71c-4912-bc17-a3133bd5c075Manual - 0ffe6f4b e71c-4912-bc17-a3133bd5c075
Manual - 0ffe6f4b e71c-4912-bc17-a3133bd5c075
 
Eb1304 Net Sata&Sata+ Manual En
Eb1304 Net Sata&Sata+ Manual  EnEb1304 Net Sata&Sata+ Manual  En
Eb1304 Net Sata&Sata+ Manual En
 
BT X300 Professional Conferencing Unit User Guide
BT X300 Professional Conferencing Unit User GuideBT X300 Professional Conferencing Unit User Guide
BT X300 Professional Conferencing Unit User Guide
 
01v96i en om_b0
01v96i en om_b001v96i en om_b0
01v96i en om_b0
 
Gigaset s67 handset telephone user guide
Gigaset s67 handset telephone user guideGigaset s67 handset telephone user guide
Gigaset s67 handset telephone user guide
 
Gigaset e36 telephone handset user guide
Gigaset e36 telephone handset user guideGigaset e36 telephone handset user guide
Gigaset e36 telephone handset user guide
 
Nokia ck 300-ug_and_ig_en
Nokia ck 300-ug_and_ig_enNokia ck 300-ug_and_ig_en
Nokia ck 300-ug_and_ig_en
 
Polycom sound station 2 basic user guide
Polycom sound station 2 basic user guidePolycom sound station 2 basic user guide
Polycom sound station 2 basic user guide
 
Polycom soundstation 2 lcd user guide
Polycom soundstation 2 lcd user guidePolycom soundstation 2 lcd user guide
Polycom soundstation 2 lcd user guide
 
Gigaset e455 telephone user guide
Gigaset e455 telephone user guideGigaset e455 telephone user guide
Gigaset e455 telephone user guide
 
Ke8220 e
Ke8220 eKe8220 e
Ke8220 e
 
Plantronics savi office wo200 over the ear headset user guide
Plantronics savi office wo200 over the ear headset user guidePlantronics savi office wo200 over the ear headset user guide
Plantronics savi office wo200 over the ear headset user guide
 
Plantronics savi office wo100 convertible headset user guide
Plantronics savi office wo100 convertible headset user guidePlantronics savi office wo100 convertible headset user guide
Plantronics savi office wo100 convertible headset user guide
 
BT 4600 Digital Cordless Telephone User Guide
BT 4600 Digital Cordless Telephone User GuideBT 4600 Digital Cordless Telephone User Guide
BT 4600 Digital Cordless Telephone User Guide
 
Eb1304%20 Net%20 En
Eb1304%20 Net%20 EnEb1304%20 Net%20 En
Eb1304%20 Net%20 En
 
Roland vr3 manual
Roland vr3 manualRoland vr3 manual
Roland vr3 manual
 
LG DU-37LZ30 Manual
LG DU-37LZ30 ManualLG DU-37LZ30 Manual
LG DU-37LZ30 Manual
 
Vatimetro_bird_43_Manual.pdf
Vatimetro_bird_43_Manual.pdfVatimetro_bird_43_Manual.pdf
Vatimetro_bird_43_Manual.pdf
 

More from Telephones Online

BT 6610 Digital Cordless Phone User Guide
BT 6610 Digital Cordless Phone User GuideBT 6610 Digital Cordless Phone User Guide
BT 6610 Digital Cordless Phone User Guide
Telephones Online
 
BT Diverse 7100 Cordless Phone Quick Start
BT Diverse 7100 Cordless Phone Quick StartBT Diverse 7100 Cordless Phone Quick Start
BT Diverse 7100 Cordless Phone Quick Start
Telephones Online
 
BT2200 Digital Cordless Telephone User Guide
BT2200 Digital Cordless Telephone User GuideBT2200 Digital Cordless Telephone User Guide
BT2200 Digital Cordless Telephone User Guide
Telephones Online
 
BT 3960 Digital Cordless Phone User Guide
BT 3960 Digital Cordless Phone User GuideBT 3960 Digital Cordless Phone User Guide
BT 3960 Digital Cordless Phone User Guide
Telephones Online
 
Gigaset CL750A GO Sculpture User Guide
Gigaset CL750A GO Sculpture User GuideGigaset CL750A GO Sculpture User Guide
Gigaset CL750A GO Sculpture User Guide
Telephones Online
 
BT 11ac Dual-Band Wi-Fi Extender 750 Quick Start
BT 11ac Dual-Band Wi-Fi Extender 750 Quick StartBT 11ac Dual-Band Wi-Fi Extender 750 Quick Start
BT 11ac Dual-Band Wi-Fi Extender 750 Quick Start
Telephones Online
 
Netgear Aircard 785S Mobile Broadband Hotspot User Guide
Netgear Aircard 785S Mobile Broadband Hotspot User GuideNetgear Aircard 785S Mobile Broadband Hotspot User Guide
Netgear Aircard 785S Mobile Broadband Hotspot User Guide
Telephones Online
 
BT XD56 Digital Cordless Phone User Guide
BT XD56 Digital Cordless Phone User GuideBT XD56 Digital Cordless Phone User Guide
BT XD56 Digital Cordless Phone User Guide
Telephones Online
 
BT 9500 Halo Cordless Phones User Guide
BT 9500 Halo Cordless Phones User GuideBT 9500 Halo Cordless Phones User Guide
BT 9500 Halo Cordless Phones User Guide
Telephones Online
 
Gigaset QV830 Tablet User Guide
Gigaset QV830 Tablet User GuideGigaset QV830 Tablet User Guide
Gigaset QV830 Tablet User Guide
Telephones Online
 
Gigaset S820A Digital Cordless Telephone User Guide
Gigaset S820A Digital Cordless Telephone User GuideGigaset S820A Digital Cordless Telephone User Guide
Gigaset S820A Digital Cordless Telephone User Guide
Telephones Online
 
Gigaset SL400A Digital Cordless Telephone User Guide
Gigaset SL400A Digital Cordless Telephone User GuideGigaset SL400A Digital Cordless Telephone User Guide
Gigaset SL400A Digital Cordless Telephone User Guide
Telephones Online
 
Gigaset SL910A Digital Cordless Telephone User Guide
Gigaset SL910A Digital Cordless Telephone User GuideGigaset SL910A Digital Cordless Telephone User Guide
Gigaset SL910A Digital Cordless Telephone User Guide
Telephones Online
 
Gigaset AL410A Digital Cordless Telephone User Guide
Gigaset AL410A Digital Cordless Telephone User GuideGigaset AL410A Digital Cordless Telephone User Guide
Gigaset AL410A Digital Cordless Telephone User Guide
Telephones Online
 
Gigaset A420A Digital Cordless Telephone User Guide
Gigaset A420A Digital Cordless Telephone User GuideGigaset A420A Digital Cordless Telephone User Guide
Gigaset A420A Digital Cordless Telephone User Guide
Telephones Online
 
Gigaset A510A Digital Cordless Telephone User Guide
Gigaset A510A Digital Cordless Telephone User GuideGigaset A510A Digital Cordless Telephone User Guide
Gigaset A510A Digital Cordless Telephone User Guide
Telephones Online
 
BT Youview Zapper Smart TV Box User Guide
BT Youview Zapper Smart TV Box User GuideBT Youview Zapper Smart TV Box User Guide
BT Youview Zapper Smart TV Box User Guide
Telephones Online
 
BT Youview Plus Set Top Box User Guide
BT Youview Plus Set Top Box User GuideBT Youview Plus Set Top Box User Guide
BT Youview Plus Set Top Box User Guide
Telephones Online
 
BT Home Hub 4r User Guide
BT Home Hub 4r User GuideBT Home Hub 4r User Guide
BT Home Hub 4r User Guide
Telephones Online
 
BT Home Hub 5 User Guide
BT Home Hub 5 User GuideBT Home Hub 5 User Guide
BT Home Hub 5 User Guide
Telephones Online
 

More from Telephones Online (20)

BT 6610 Digital Cordless Phone User Guide
BT 6610 Digital Cordless Phone User GuideBT 6610 Digital Cordless Phone User Guide
BT 6610 Digital Cordless Phone User Guide
 
BT Diverse 7100 Cordless Phone Quick Start
BT Diverse 7100 Cordless Phone Quick StartBT Diverse 7100 Cordless Phone Quick Start
BT Diverse 7100 Cordless Phone Quick Start
 
BT2200 Digital Cordless Telephone User Guide
BT2200 Digital Cordless Telephone User GuideBT2200 Digital Cordless Telephone User Guide
BT2200 Digital Cordless Telephone User Guide
 
BT 3960 Digital Cordless Phone User Guide
BT 3960 Digital Cordless Phone User GuideBT 3960 Digital Cordless Phone User Guide
BT 3960 Digital Cordless Phone User Guide
 
Gigaset CL750A GO Sculpture User Guide
Gigaset CL750A GO Sculpture User GuideGigaset CL750A GO Sculpture User Guide
Gigaset CL750A GO Sculpture User Guide
 
BT 11ac Dual-Band Wi-Fi Extender 750 Quick Start
BT 11ac Dual-Band Wi-Fi Extender 750 Quick StartBT 11ac Dual-Band Wi-Fi Extender 750 Quick Start
BT 11ac Dual-Band Wi-Fi Extender 750 Quick Start
 
Netgear Aircard 785S Mobile Broadband Hotspot User Guide
Netgear Aircard 785S Mobile Broadband Hotspot User GuideNetgear Aircard 785S Mobile Broadband Hotspot User Guide
Netgear Aircard 785S Mobile Broadband Hotspot User Guide
 
BT XD56 Digital Cordless Phone User Guide
BT XD56 Digital Cordless Phone User GuideBT XD56 Digital Cordless Phone User Guide
BT XD56 Digital Cordless Phone User Guide
 
BT 9500 Halo Cordless Phones User Guide
BT 9500 Halo Cordless Phones User GuideBT 9500 Halo Cordless Phones User Guide
BT 9500 Halo Cordless Phones User Guide
 
Gigaset QV830 Tablet User Guide
Gigaset QV830 Tablet User GuideGigaset QV830 Tablet User Guide
Gigaset QV830 Tablet User Guide
 
Gigaset S820A Digital Cordless Telephone User Guide
Gigaset S820A Digital Cordless Telephone User GuideGigaset S820A Digital Cordless Telephone User Guide
Gigaset S820A Digital Cordless Telephone User Guide
 
Gigaset SL400A Digital Cordless Telephone User Guide
Gigaset SL400A Digital Cordless Telephone User GuideGigaset SL400A Digital Cordless Telephone User Guide
Gigaset SL400A Digital Cordless Telephone User Guide
 
Gigaset SL910A Digital Cordless Telephone User Guide
Gigaset SL910A Digital Cordless Telephone User GuideGigaset SL910A Digital Cordless Telephone User Guide
Gigaset SL910A Digital Cordless Telephone User Guide
 
Gigaset AL410A Digital Cordless Telephone User Guide
Gigaset AL410A Digital Cordless Telephone User GuideGigaset AL410A Digital Cordless Telephone User Guide
Gigaset AL410A Digital Cordless Telephone User Guide
 
Gigaset A420A Digital Cordless Telephone User Guide
Gigaset A420A Digital Cordless Telephone User GuideGigaset A420A Digital Cordless Telephone User Guide
Gigaset A420A Digital Cordless Telephone User Guide
 
Gigaset A510A Digital Cordless Telephone User Guide
Gigaset A510A Digital Cordless Telephone User GuideGigaset A510A Digital Cordless Telephone User Guide
Gigaset A510A Digital Cordless Telephone User Guide
 
BT Youview Zapper Smart TV Box User Guide
BT Youview Zapper Smart TV Box User GuideBT Youview Zapper Smart TV Box User Guide
BT Youview Zapper Smart TV Box User Guide
 
BT Youview Plus Set Top Box User Guide
BT Youview Plus Set Top Box User GuideBT Youview Plus Set Top Box User Guide
BT Youview Plus Set Top Box User Guide
 
BT Home Hub 4r User Guide
BT Home Hub 4r User GuideBT Home Hub 4r User Guide
BT Home Hub 4r User Guide
 
BT Home Hub 5 User Guide
BT Home Hub 5 User GuideBT Home Hub 5 User Guide
BT Home Hub 5 User Guide
 

Recently uploaded

Your One-Stop Shop for Python Success: Top 10 US Python Development Providers
Your One-Stop Shop for Python Success: Top 10 US Python Development ProvidersYour One-Stop Shop for Python Success: Top 10 US Python Development Providers
Your One-Stop Shop for Python Success: Top 10 US Python Development Providers
akankshawande
 
Presentation of the OECD Artificial Intelligence Review of Germany
Presentation of the OECD Artificial Intelligence Review of GermanyPresentation of the OECD Artificial Intelligence Review of Germany
Presentation of the OECD Artificial Intelligence Review of Germany
innovationoecd
 
AI 101: An Introduction to the Basics and Impact of Artificial Intelligence
AI 101: An Introduction to the Basics and Impact of Artificial IntelligenceAI 101: An Introduction to the Basics and Impact of Artificial Intelligence
AI 101: An Introduction to the Basics and Impact of Artificial Intelligence
IndexBug
 
Salesforce Integration for Bonterra Impact Management (fka Social Solutions A...
Salesforce Integration for Bonterra Impact Management (fka Social Solutions A...Salesforce Integration for Bonterra Impact Management (fka Social Solutions A...
Salesforce Integration for Bonterra Impact Management (fka Social Solutions A...
Jeffrey Haguewood
 
Monitoring and Managing Anomaly Detection on OpenShift.pdf
Monitoring and Managing Anomaly Detection on OpenShift.pdfMonitoring and Managing Anomaly Detection on OpenShift.pdf
Monitoring and Managing Anomaly Detection on OpenShift.pdf
Tosin Akinosho
 
5th LF Energy Power Grid Model Meet-up Slides
5th LF Energy Power Grid Model Meet-up Slides5th LF Energy Power Grid Model Meet-up Slides
5th LF Energy Power Grid Model Meet-up Slides
DanBrown980551
 
Generating privacy-protected synthetic data using Secludy and Milvus
Generating privacy-protected synthetic data using Secludy and MilvusGenerating privacy-protected synthetic data using Secludy and Milvus
Generating privacy-protected synthetic data using Secludy and Milvus
Zilliz
 
20240607 QFM018 Elixir Reading List May 2024
20240607 QFM018 Elixir Reading List May 202420240607 QFM018 Elixir Reading List May 2024
20240607 QFM018 Elixir Reading List May 2024
Matthew Sinclair
 
Nordic Marketo Engage User Group_June 13_ 2024.pptx
Nordic Marketo Engage User Group_June 13_ 2024.pptxNordic Marketo Engage User Group_June 13_ 2024.pptx
Nordic Marketo Engage User Group_June 13_ 2024.pptx
MichaelKnudsen27
 
GenAI Pilot Implementation in the organizations
GenAI Pilot Implementation in the organizationsGenAI Pilot Implementation in the organizations
GenAI Pilot Implementation in the organizations
kumardaparthi1024
 
Ocean lotus Threat actors project by John Sitima 2024 (1).pptx
Ocean lotus Threat actors project by John Sitima 2024 (1).pptxOcean lotus Threat actors project by John Sitima 2024 (1).pptx
Ocean lotus Threat actors project by John Sitima 2024 (1).pptx
SitimaJohn
 
みなさんこんにちはこれ何文字まで入るの?40文字以下不可とか本当に意味わからないけどこれ限界文字数書いてないからマジでやばい文字数いけるんじゃないの?えこ...
みなさんこんにちはこれ何文字まで入るの?40文字以下不可とか本当に意味わからないけどこれ限界文字数書いてないからマジでやばい文字数いけるんじゃないの?えこ...みなさんこんにちはこれ何文字まで入るの?40文字以下不可とか本当に意味わからないけどこれ限界文字数書いてないからマジでやばい文字数いけるんじゃないの?えこ...
みなさんこんにちはこれ何文字まで入るの?40文字以下不可とか本当に意味わからないけどこれ限界文字数書いてないからマジでやばい文字数いけるんじゃないの?えこ...
名前 です男
 
HCL Notes und Domino Lizenzkostenreduzierung in der Welt von DLAU
HCL Notes und Domino Lizenzkostenreduzierung in der Welt von DLAUHCL Notes und Domino Lizenzkostenreduzierung in der Welt von DLAU
HCL Notes und Domino Lizenzkostenreduzierung in der Welt von DLAU
panagenda
 
OpenID AuthZEN Interop Read Out - Authorization
OpenID AuthZEN Interop Read Out - AuthorizationOpenID AuthZEN Interop Read Out - Authorization
OpenID AuthZEN Interop Read Out - Authorization
David Brossard
 
Building Production Ready Search Pipelines with Spark and Milvus
Building Production Ready Search Pipelines with Spark and MilvusBuilding Production Ready Search Pipelines with Spark and Milvus
Building Production Ready Search Pipelines with Spark and Milvus
Zilliz
 
TrustArc Webinar - 2024 Global Privacy Survey
TrustArc Webinar - 2024 Global Privacy SurveyTrustArc Webinar - 2024 Global Privacy Survey
TrustArc Webinar - 2024 Global Privacy Survey
TrustArc
 
“Building and Scaling AI Applications with the Nx AI Manager,” a Presentation...
“Building and Scaling AI Applications with the Nx AI Manager,” a Presentation...“Building and Scaling AI Applications with the Nx AI Manager,” a Presentation...
“Building and Scaling AI Applications with the Nx AI Manager,” a Presentation...
Edge AI and Vision Alliance
 
Recommendation System using RAG Architecture
Recommendation System using RAG ArchitectureRecommendation System using RAG Architecture
Recommendation System using RAG Architecture
fredae14
 
Deep Dive: AI-Powered Marketing to Get More Leads and Customers with HyperGro...
Deep Dive: AI-Powered Marketing to Get More Leads and Customers with HyperGro...Deep Dive: AI-Powered Marketing to Get More Leads and Customers with HyperGro...
Deep Dive: AI-Powered Marketing to Get More Leads and Customers with HyperGro...
saastr
 
How to Get CNIC Information System with Paksim Ga.pptx
How to Get CNIC Information System with Paksim Ga.pptxHow to Get CNIC Information System with Paksim Ga.pptx
How to Get CNIC Information System with Paksim Ga.pptx
danishmna97
 

Recently uploaded (20)

Your One-Stop Shop for Python Success: Top 10 US Python Development Providers
Your One-Stop Shop for Python Success: Top 10 US Python Development ProvidersYour One-Stop Shop for Python Success: Top 10 US Python Development Providers
Your One-Stop Shop for Python Success: Top 10 US Python Development Providers
 
Presentation of the OECD Artificial Intelligence Review of Germany
Presentation of the OECD Artificial Intelligence Review of GermanyPresentation of the OECD Artificial Intelligence Review of Germany
Presentation of the OECD Artificial Intelligence Review of Germany
 
AI 101: An Introduction to the Basics and Impact of Artificial Intelligence
AI 101: An Introduction to the Basics and Impact of Artificial IntelligenceAI 101: An Introduction to the Basics and Impact of Artificial Intelligence
AI 101: An Introduction to the Basics and Impact of Artificial Intelligence
 
Salesforce Integration for Bonterra Impact Management (fka Social Solutions A...
Salesforce Integration for Bonterra Impact Management (fka Social Solutions A...Salesforce Integration for Bonterra Impact Management (fka Social Solutions A...
Salesforce Integration for Bonterra Impact Management (fka Social Solutions A...
 
Monitoring and Managing Anomaly Detection on OpenShift.pdf
Monitoring and Managing Anomaly Detection on OpenShift.pdfMonitoring and Managing Anomaly Detection on OpenShift.pdf
Monitoring and Managing Anomaly Detection on OpenShift.pdf
 
5th LF Energy Power Grid Model Meet-up Slides
5th LF Energy Power Grid Model Meet-up Slides5th LF Energy Power Grid Model Meet-up Slides
5th LF Energy Power Grid Model Meet-up Slides
 
Generating privacy-protected synthetic data using Secludy and Milvus
Generating privacy-protected synthetic data using Secludy and MilvusGenerating privacy-protected synthetic data using Secludy and Milvus
Generating privacy-protected synthetic data using Secludy and Milvus
 
20240607 QFM018 Elixir Reading List May 2024
20240607 QFM018 Elixir Reading List May 202420240607 QFM018 Elixir Reading List May 2024
20240607 QFM018 Elixir Reading List May 2024
 
Nordic Marketo Engage User Group_June 13_ 2024.pptx
Nordic Marketo Engage User Group_June 13_ 2024.pptxNordic Marketo Engage User Group_June 13_ 2024.pptx
Nordic Marketo Engage User Group_June 13_ 2024.pptx
 
GenAI Pilot Implementation in the organizations
GenAI Pilot Implementation in the organizationsGenAI Pilot Implementation in the organizations
GenAI Pilot Implementation in the organizations
 
Ocean lotus Threat actors project by John Sitima 2024 (1).pptx
Ocean lotus Threat actors project by John Sitima 2024 (1).pptxOcean lotus Threat actors project by John Sitima 2024 (1).pptx
Ocean lotus Threat actors project by John Sitima 2024 (1).pptx
 
みなさんこんにちはこれ何文字まで入るの?40文字以下不可とか本当に意味わからないけどこれ限界文字数書いてないからマジでやばい文字数いけるんじゃないの?えこ...
みなさんこんにちはこれ何文字まで入るの?40文字以下不可とか本当に意味わからないけどこれ限界文字数書いてないからマジでやばい文字数いけるんじゃないの?えこ...みなさんこんにちはこれ何文字まで入るの?40文字以下不可とか本当に意味わからないけどこれ限界文字数書いてないからマジでやばい文字数いけるんじゃないの?えこ...
みなさんこんにちはこれ何文字まで入るの?40文字以下不可とか本当に意味わからないけどこれ限界文字数書いてないからマジでやばい文字数いけるんじゃないの?えこ...
 
HCL Notes und Domino Lizenzkostenreduzierung in der Welt von DLAU
HCL Notes und Domino Lizenzkostenreduzierung in der Welt von DLAUHCL Notes und Domino Lizenzkostenreduzierung in der Welt von DLAU
HCL Notes und Domino Lizenzkostenreduzierung in der Welt von DLAU
 
OpenID AuthZEN Interop Read Out - Authorization
OpenID AuthZEN Interop Read Out - AuthorizationOpenID AuthZEN Interop Read Out - Authorization
OpenID AuthZEN Interop Read Out - Authorization
 
Building Production Ready Search Pipelines with Spark and Milvus
Building Production Ready Search Pipelines with Spark and MilvusBuilding Production Ready Search Pipelines with Spark and Milvus
Building Production Ready Search Pipelines with Spark and Milvus
 
TrustArc Webinar - 2024 Global Privacy Survey
TrustArc Webinar - 2024 Global Privacy SurveyTrustArc Webinar - 2024 Global Privacy Survey
TrustArc Webinar - 2024 Global Privacy Survey
 
“Building and Scaling AI Applications with the Nx AI Manager,” a Presentation...
“Building and Scaling AI Applications with the Nx AI Manager,” a Presentation...“Building and Scaling AI Applications with the Nx AI Manager,” a Presentation...
“Building and Scaling AI Applications with the Nx AI Manager,” a Presentation...
 
Recommendation System using RAG Architecture
Recommendation System using RAG ArchitectureRecommendation System using RAG Architecture
Recommendation System using RAG Architecture
 
Deep Dive: AI-Powered Marketing to Get More Leads and Customers with HyperGro...
Deep Dive: AI-Powered Marketing to Get More Leads and Customers with HyperGro...Deep Dive: AI-Powered Marketing to Get More Leads and Customers with HyperGro...
Deep Dive: AI-Powered Marketing to Get More Leads and Customers with HyperGro...
 
How to Get CNIC Information System with Paksim Ga.pptx
How to Get CNIC Information System with Paksim Ga.pptxHow to Get CNIC Information System with Paksim Ga.pptx
How to Get CNIC Information System with Paksim Ga.pptx
 

iDect Solo Digital Cordless Phone

  • 1. USER GUIDE Solo SingleSolo SingleSolo SingleSolo Single/Twin/Triple/Quad/Twin/Triple/Quad/Twin/Triple/Quad/Twin/Triple/Quad DECTDECTDECTDECT TelephoneTelephoneTelephoneTelephone Binatone HelplineBinatone HelplineBinatone HelplineBinatone Helpline (for UK only)(for UK only)(for UK only)(for UK only) Monday to Friday from 9:00am to 5:00pm Tel: 0845 345 9677** **Please note that all calls are charged at local rate Or visit our websites: www.binatonetelecom.comwww.binatonetelecom.comwww.binatonetelecom.comwww.binatonetelecom.com www.iDECTonline.comwww.iDECTonline.comwww.iDECTonline.comwww.iDECTonline.com Before operating this set,Before operating this set,Before operating this set,Before operating this set, please read these instructions carefully.please read these instructions carefully.please read these instructions carefully.please read these instructions carefully. THISTHISTHISTHIS EQUIPMENTEQUIPMENTEQUIPMENTEQUIPMENT ISISISIS NOTNOTNOTNOT DESIGNEDDESIGNEDDESIGNEDDESIGNED FORFORFORFOR MAKINGMAKINGMAKINGMAKING EMERGENCYEMERGENCYEMERGENCYEMERGENCY TELEPHONETELEPHONETELEPHONETELEPHONE CALLSCALLSCALLSCALLS WITHOUT MAINS POWER.WITHOUT MAINS POWER.WITHOUT MAINS POWER.WITHOUT MAINS POWER. ALTERNATIVEALTERNATIVEALTERNATIVEALTERNATIVE ARRANGEMENTSARRANGEMENTSARRANGEMENTSARRANGEMENTS SHOULDSHOULDSHOULDSHOULD BE MADEBE MADEBE MADEBE MADE FORFORFORFOR ACCESSACCESSACCESSACCESS TOTOTOTO EMERGENCYEMERGENCYEMERGENCYEMERGENCY SERVICES.SERVICES.SERVICES.SERVICES. Downloaded from www.Manualslib.com manuals search engine
  • 2. TECHNICAL DETAILSTECHNICAL DETAILSTECHNICAL DETAILSTECHNICAL DETAILS StandardStandardStandardStandard Digital Enhanced Cordless Telecommunication (DECT) Frequency rangeFrequency rangeFrequency rangeFrequency range 1.88 to 1.9 GHz (bandwidth = 20 MHz) Channel bandwidthChannel bandwidthChannel bandwidthChannel bandwidth 1.728 MHz Operating rangeOperating rangeOperating rangeOperating range Up to 300m outdoors; Up to 50m indoors Operating timeOperating timeOperating timeOperating time Standby: 230 hours; Talking: 13 hours Battery charge time: 15 hours Temperature rangeTemperature rangeTemperature rangeTemperature range Operating: 0o C to 40o C; Storage: -20o C to 60o C Electrical powerElectrical powerElectrical powerElectrical power Base unit power adapter:Base unit power adapter:Base unit power adapter:Base unit power adapter: Ten Pao: S003IB0600050 & S003IV0600050 Input 100-240Vac 50-60Hz; Output 6Vdc/500mA. Charger unit power adapter:Charger unit power adapter:Charger unit power adapter:Charger unit power adapter: Ten Pao: S003IB0600015 & S003IV0600015 Input 100-240Vac 50-60Hz; Output 6Vdc/150mA. BattBattBattBattery information (each handset):ery information (each handset):ery information (each handset):ery information (each handset): 2 X 1.2V AAA size, 650mAh NiMH (Rechargeable) CAUTIONCAUTIONCAUTIONCAUTION Risk of explosion if the battery is replaced by an incorrect type. Dispose of used batteries according to the instructions. Port specificationPort specificationPort specificationPort specification The port (connected to the mains power supply) is a SELV port with respect to EN41003. The port (connected to the telephone line) is a TNV port with respect to EN41003. CLEANING AND CARECLEANING AND CARECLEANING AND CARECLEANING AND CARE Do not cleanDo not cleanDo not cleanDo not clean any part of your phone system with benzene, thinners or other solvent chemicals as this may cause permanent damage, which is not covered by the Guarantee. When necessary, clean it with a damp cloth.When necessary, clean it with a damp cloth.When necessary, clean it with a damp cloth.When necessary, clean it with a damp cloth. Keep your phone system away from hot, humid conditions or strong sunlight,hot, humid conditions or strong sunlight,hot, humid conditions or strong sunlight,hot, humid conditions or strong sunlight, and don't let it get wet.don't let it get wet.don't let it get wet.don't let it get wet. Every effort has been made to ensure high standards of reliability for your phone system. However, if something does go wrong, please do not try to repair itdo not try to repair itdo not try to repair itdo not try to repair it yourself, but consult your supplier or call the Helpline.yourself, but consult your supplier or call the Helpline.yourself, but consult your supplier or call the Helpline.yourself, but consult your supplier or call the Helpline. Downloaded from www.Manualslib.com manuals search engine
  • 3. 1 Table of ContentsTable of ContentsTable of ContentsTable of Contents 1 IMPORTANT SAFETY INSTRUCTIONS...................................................4 2 INSTALLING YOUR PHONE...................................................................8 2.1 Connecting the Base Station .......................................................8 2.2 Installing and Charging the Rechargeable Batteries....................8 3 GETTING TO KNOW YOUR PHONE ....................................................10 3.1 Overview of the Handset, Base Station and *Charging Pod......10 3.2 Display Icons and Symbols.........................................................13 3.3 Menu Map and Menu Navigation .............................................15 3.4 Text and Number Entry..............................................................16 3.4.1 Character Map.................................................................16 4 USING YOUR PHONE.........................................................................17 4.1 Make a Call ................................................................................17 4.1.1 Pre-dialling.......................................................................17 4.1.2 Direct Dialling ..................................................................17 4.1.3 Call from the Redial List...................................................17 4.1.4 Call from the Call Log.......................................................17 4.1.5 Call from the Phonebook.................................................18 4.2 Answer and End a Call...............................................................18 4.3 Handset Speakerphone .............................................................18 4.4 Adjust Earpiece Volume.............................................................18 4.5 Adjust Speaker Volume..............................................................19 4.6 Mute/Unmute the Microphone ................................................19 4.7 Paging........................................................................................19 4.8 Switching the Handset On/Off...................................................19 4.9 To Lock/Unlock the Keypad .......................................................20 4.10 Make an Internal Call (Multi – handset models only)...........20 Downloaded from www.Manualslib.com manuals search engine
  • 4. 2 4.11 Initiate an Intercom Call .......................................................20 4.12 Answer an External Call during an Intercom Call..................21 4.13 Initiate an Intercom during a Call .........................................22 4.14 Transfer an External Call to another Handset.......................23 5 DIRECT ACCESS MEMORY .................................................................24 5.1 Add Direct Access Memory .......................................................24 5.2 Delete Direct Access Memory ...................................................25 6 PHONEBOOK.....................................................................................26 6.1 Store a Contact in the Phonebook.............................................26 6.2 Access the Phonebook .............................................................. 27 6.3 Modify a Phonebook Entry........................................................ 27 6.4 Delete a Phonebook Entry.........................................................28 6.5 Delete All Entries from the Phonebook List...............................28 7 CALLER DISPLAY (NETWORK DEPENDENT)........................................29 7.1 Call Log ......................................................................................29 7.1.1 Access the Call Log...........................................................29 7.1.2 Save a Call Log Entry into the Phonebook .......................30 7.1.3 Delete a Call Log Entry.....................................................30 7.1.4 Delete All Entries in the Call Log......................................30 7.2 Redial List ..................................................................................31 7.2.1 Access the Redial List.......................................................31 7.2.2 Save a Redial Number into the Phonebook.....................31 7.2.3 Edit a Redial Number.......................................................31 7.2.4 Delete a Redial Number...................................................32 7.2.5 Delete All Entries from the Redial List .............................32 8 CLOCK AND ALARM SETTINGS ..........................................................33 8.1 Date and Time Settings .............................................................33 Downloaded from www.Manualslib.com manuals search engine
  • 5. 3 8.1.1 Change the Time Format.................................................34 8.1.2 Change the Date Format..................................................34 8.2 Alarm Settings ...........................................................................35 8.2.1 Set the Alarm Tone ..........................................................36 9 PERSONAL SETTINGS......................................................................... 37 9.1 Set the Ring Volume.................................................................. 37 9.2 Set the Ring Tone....................................................................... 37 9.3 Set the Key Beep .......................................................................38 9.4 Rename the Handset.................................................................38 9.5 Set the Display Language...........................................................39 9.6 Set Auto Hang-up ......................................................................39 10 ADVANCED SETTINGS................................................................40 10.1 Handset Registration ............................................................40 10.2 Register Additional Handsets................................................40 10.3 Un-register your Handset .....................................................41 10.4 Change the Master PIN.........................................................41 10.5 Change the Recall Time........................................................42 10.6 Change the Dial Mode (Dual Mode Dialling models only)....42 10.7 Set the First Ring...................................................................43 10.8 Reset the Unit.......................................................................43 11 TROUBLESHOOTING ..................................................................44 12 DECLARATION OF CONFORMITY ............................................... 47 13 GUARANTEE AND SERVICE ........................................................48 13.1 While the unit is under Guarantee.......................................48 13.2 After the Guarantee has expired ..........................................48 Downloaded from www.Manualslib.com manuals search engine
  • 6. 4 1111 IMPORTANT SAFETY INSTRUCTIONSIMPORTANT SAFETY INSTRUCTIONSIMPORTANT SAFETY INSTRUCTIONSIMPORTANT SAFETY INSTRUCTIONS Please follow these safety instructions when using your telephone equipment to reduce risk of fire, electric shock and injury: 1) Read and understand all the instructions. 2) Follow all warnings and instructions marked on the product. 3) Unplug this product from the wall outlet before cleaning. Do not use liquid cleaners or aerosol cleaners. Use a damp cloth for cleaning. 4) Keep this product away from hot, humid conditions or strong sunlight, and don’t let it get wet or use it near water (for example, near a bath tub, kitchen sink, or swimming pool). 5) Do not overload wall outlets and extension cords as this can result in the risk of fire or electric shock. 6) Unplug this product from the wall outlet and obtain the service of our Repair Centre under the following conditions: • When the power supply cord or plug is damaged or frayed. • If the product fails to operate normally despite following the operating instructions. • If the product has been dropped and the cabinet has been damaged. • If the product exhibits a distinct change in performance. 7) NEVER use your phone outdoors during a thunderstorm. Unplug the base from the telephone line and the mains socket when there are storms in your area. Damage caused by lightning is not covered by the guarantee. 8) Do not use the telephone to report a gas leak in the vicinity of the leak. Downloaded from www.Manualslib.com manuals search engine
  • 7. 5 9) Use only the supplied NiMH (Nickel Metal Hydride) batteries that came with your phone or an authorised replacement recommended by the manufacturer. There is a risk of explosion if you replace the battery with an incorrect battery type. The use of other battery types or non-rechargeable batteries/primary cells can be dangerous. They may cause interference and/or damage to the unit or surroundings. The manufacturer will not be held liable for damage arising from such non-compliance. 10) Do not use third party charging pods. Damage may be caused to the batteries. 11) Please ensure that the batteries are inserted in the correct polarity. 12) Dispose of batteries safely. Do not burn, immerse them in water, disassemble, or puncture the batteries. Downloaded from www.Manualslib.com manuals search engine
  • 8. 6 PackagePackagePackagePackage CCCContentontentontentontent for single modelfor single modelfor single modelfor single model The package contains the following items: • 1 Handset • 1 Base Station • 1 Mains Power Adapter for the Base Station • 1 Telephone Line Cord • 2 AAA NiMH Rechargeable Batteries • 1 Back Cover • 1 User Guide Note:Note:Note:Note: If you have purchased a Twin, Triple or Quad system, you will also have the corresponding extra handset(s) and batteries, a charging pod and a battery compartment cover for each extra handset. Connection andConnection andConnection andConnection and CCCConditions foronditions foronditions foronditions for UUUUsesesese You can connect your phone to a direct exchange line (DEL) on a local exchange with its own phone number; to an extension socket connected to a DEL; or to an extension on an approved compatible PBX. Do not connect as an extension to a pay phone. The ringer equivalence numbers (REN) of all equipment (phones, fax machines, modems, etc.) connected to an exchange line must not add up to more than 4, otherwise one or more of them may not ring and/or answer calls correctly. The phone has a REN of 1, and most other telephones have a REN of 1 unless marked otherwise. Downloaded from www.Manualslib.com manuals search engine
  • 9. 7 HandsetHandsetHandsetHandset &&&& Base ConnectionBase ConnectionBase ConnectionBase Connection 1) When purchased, all handsets are already registered to the base unit and should link to it when they are all powered up. 2) To use your cordless handset and base unit together, you must be able to establish a radio link between them. The signal between the handset and the base unit is in accordance with the normal standards for a DECT phone: Maximum range up to 300 metres outdoors or 50 metres indoors. Be aware that: > Large metal objects, such as refrigerators, mirrors or filing cabinets, between the handset and the base unit may block the radio signal. > Solid structures, such as walls, may reduce the signal strength. > Electrical equipment may cause interference and/or affect the range. 3) Do not place the base unit close to another telephone, TV or audio equipment - it may cause interference. 4) Putting the base unit as high as possible ensures the best signal. 5) If the sound in the earpiece becomes faint or distorted during a call, you may be going out of range of the base unit. Move nearer to the base unit within 20 seconds; otherwise the line may be cut off. Downloaded from www.Manualslib.com manuals search engine
  • 10. 8 2222 INSTALLINGINSTALLINGINSTALLINGINSTALLING YOUR PHONEYOUR PHONEYOUR PHONEYOUR PHONE 2.12.12.12.1 ConnecConnecConnecConnecting theting theting theting the BBBBaseaseasease SSSStationtationtationtation 1) Plug the mains power cable and telephone line cord into the base station. 2) Plug the power adapter into a 100 - 240Vac, 50 - 60Hz mains power socket, and the telephone line cord into a telephone line socket. Warning:Warning:Warning:Warning: Always use the cables provided in the box. Use only the supplied adaptor. Using other power cables may damage the unit. NoteNoteNoteNote:::: Place the base unit within easy reach of the mains power socket. Never try to lengthen the mains power cable. The base station needs mains power for normal operation, and the cordless handsets will not work without it. 2.22.22.22.2 Installing andInstalling andInstalling andInstalling and CCCCharging theharging theharging theharging the RRRRechargeableechargeableechargeableechargeable BBBBatteriesatteriesatteriesatteries 1) Insert the 2 supplied batteries into the battery compartment, observing the correct polarity (see markings inside battery compartment). Warning:Warning:Warning:Warning: Use only the supplied NiMH rechargeable batteries. 2) Place the back cover over the back of the handset and press down until it clicks into place. 3) Place the handset on the base and charge for 15 hours before using the handset for the first time. • The handset will give a double beep when it is properly placed on the base or charging pod. • The battery charging indicator on the base or charging pod lights up to indicate charging. Note:Note:Note:Note: The handset may become warm when the batteries are being charged or during prolonged periods of use. This is normal and does not indicate a fault. To the mains power socket To the telephone line socket Downloaded from www.Manualslib.com manuals search engine
  • 11. 9 If you have aIf you have aIf you have aIf you have a bbbbroadband lineroadband lineroadband lineroadband line If you connect your telephone to a line with a broadband connection, you will need to insert a micro-filter between the telephone and the telephone line; otherwise you may get interference between the telephone and the broadband, which could cause problems. In a home with broadband, every telephone must have a micro-filter connected, not just the one at the telephone point that your modem is connected to. If you need more broadband micro-filters contact your broadband supplier. Downloaded from www.Manualslib.com manuals search engine
  • 12. 10 3333 GETTING TO KNOW YOUR PHONEGETTING TO KNOW YOUR PHONEGETTING TO KNOW YOUR PHONEGETTING TO KNOW YOUR PHONE 3.13.13.13.1 Overview of theOverview of theOverview of theOverview of the HandsetHandsetHandsetHandset,,,, BaseBaseBaseBase StationStationStationStation andandandand ****Charging PodCharging PodCharging PodCharging Pod Base station (bottom) ⑯ ⑩ ⑩ Handset ⑬ ⑭ ① ② ③ ④ ⑤ ⑥ ⑦ ⑧ ⑨ ⑪ ⑫ Base station (top) ⑮ Downloaded from www.Manualslib.com manuals search engine
  • 13. 11 *Charging Pod - for Twin, Triple and Quad Models Only. ① EEEEARPIECEARPIECEARPIECEARPIECE ② LCDDLCDDLCDDLCDDISPLAYISPLAYISPLAYISPLAY ③ M In standby mode, press to enter the Main Menu list. Press to select an item, or to save an entry or setting. ④ + In menu mode, press to scroll up. During a call or message playback, press to increase the volume. In standby mode, press to access the call log (CID). ⑤ T Press to make or answer a call. During a call or message playback, press to switch between speakerphone and earpiece. ⑥ * In standby mode, press and hold to switch the key lock on or off. ⑦ F During a call, press to send a Flash signal (also called Recall) for network services. ⑧ MICROPHONEMICROPHONEMICROPHONEMICROPHONE ⑰ Downloaded from www.Manualslib.com manuals search engine
  • 14. 12 ⑨ m Press to cancel an action. During pre-dialling, press to delete the last digit entered. During a call, press to mute the microphone, and press again to resume conversation. ⑩ - In menu mode, press to scroll down. During a call, or message playback, press to decrease the volume. In standby mode, press to access the phonebook list. ⑪ O During a call, press to end the call. During programming, press to cancel and exit without making changes. In standby mode, press and hold to power the handset on/off. ⑫ # In standby mode, press and hold to turn the handset ringer on/off. Press and hold to add a dialling pause when dialling or entering numbers into the phonebook. ⑬ I In standby mode or during a call, press to initiate an intercom call or transfer a call. ⑭ R In standby mode, press to access the redial list. ⑮ Lights up in Red when a handset is on the base to indicate it is charging. ⑯ Press to find/page all registered handsets. Press the button again, or any key on the handset to turn off the page signal. Press and hold to start registration process. ⑰ Lights up in Red when a handset is on the charging pod to indicate it is charging. Downloaded from www.Manualslib.com manuals search engine
  • 15. 13 3.23.23.23.2 DisplayDisplayDisplayDisplay IIIIcons andcons andcons andcons and SSSSymbolsymbolsymbolsymbols The home screen gives you information on the current status of the phone. IconIconIconIcon MeaningMeaningMeaningMeaning Displays when the battery is almost empty. Displays when the battery is fully charged. Blinks (3s on / 1s off) when the battery is partly discharged. Flashes (1s on / 1s off) when the battery level is low. Displays when the line is in use. Flashes when there is an incoming call. Flashes when you have a new voicemail message. (This is a caller display service and is not usually available from UK network providers.) Displays when you have new missed calls, or the call log is being viewed. Displays when the phonebook is accessed. Displays when the alarm is set. Displays when handset ringer is turned off. Downloaded from www.Manualslib.com manuals search engine
  • 16. 14 Displays when the handset is registered and within range of the base station. Flashes when the handset is out of range and is searching for a base. Displays when the handset is in speaker mode. Turns on when confirmation of selection or programming is available. Turns on during phonebook editing mode to delete the last digit. Turns on during menu mode when you can return to the previous state or previous step. Turns on when the screen display is on. Downloaded from www.Manualslib.com manuals search engine
  • 17. 15 3.33.33.33.3 MenuMenuMenuMenu MMMMapapapap and Menu Navigationand Menu Navigationand Menu Navigationand Menu Navigation From the handset home screen, press Mto access PHONEBOOKPHONEBOOKPHONEBOOKPHONEBOOK, the first option in the Main MenuMain MenuMain MenuMain Menu list. Press + or - to go to other options in the menu list. Press Mto enter a sub-menu or function. Press mto go back to the previous level. Press Oto cancel the current operation and return to the home screen. Note:Note:Note:Note: If you do not press any key on the handset for 15 seconds, the display will automatically return to the home screen. PHONEBOOKPHONEBOOKPHONEBOOKPHONEBOOK PERSONAL SETPERSONAL SETPERSONAL SETPERSONAL SET CLOCK&ALARMCLOCK&ALARMCLOCK&ALARMCLOCK&ALARM ADVANCED SETADVANCED SETADVANCED SETADVANCED SET NEWENTRYNEWENTRYNEWENTRYNEWENTRY LISTLISTLISTLIST EDITENTRYEDITENTRYEDITENTRYEDITENTRY DELETEDELETEDELETEDELETE DELETEALLDELETEALLDELETEALLDELETEALL DIREDIREDIREDIRECTMEMCTMEMCTMEMCTMEM HANDSETNAMEHANDSETNAMEHANDSETNAMEHANDSETNAME HANDSETTONEHANDSETTONEHANDSETTONEHANDSETTONE RINGVOLUMERINGVOLUMERINGVOLUMERINGVOLUME RINGTONESRINGTONESRINGTONESRINGTONES KEYBEEPKEYBEEPKEYBEEPKEYBEEP LANGUAGELANGUAGELANGUAGELANGUAGE AUTOHANGAUTOHANGAUTOHANGAUTOHANG----UPUPUPUP DATE/TIMEDATE/TIMEDATE/TIMEDATE/TIME SETFORMATSETFORMATSETFORMATSETFORMAT TIMEFORMATTIMEFORMATTIMEFORMATTIMEFORMAT DATEFORMATDATEFORMATDATEFORMATDATEFORMAT ALARMALARMALARMALARM ALARMTONEALARMTONEALARMTONEALARMTONE CHANGEPINCHANGEPINCHANGEPINCHANGEPIN REGISTRATIONREGISTRATIONREGISTRATIONREGISTRATION UNREGISTERUNREGISTERUNREGISTERUNREGISTER RESETRESETRESETRESET RECALLTIMERECALLTIMERECALLTIMERECALLTIME DIALMODEDIALMODEDIALMODEDIALMODE FIRSTRINGFIRSTRINGFIRSTRINGFIRSTRING Downloaded from www.Manualslib.com manuals search engine
  • 18. 16 3.43.43.43.4 Text andText andText andText and NNNNumberumberumberumber EEEEntryntryntryntry The following table shows you where each letter and punctuation character can be found, by using repeated presses of the alphanumeric keypad. This will be helpful when storing a name in the phonebook or renaming your handset. For example, to enter the name TomTomTomTom: TTTT Press 8once OOOO Press 6 three times MMMM Press 6once In editing mode, a cursor is displayed to indicate the current text entry position. It is positioned at the right of the last character entered. Writing Tips:Writing Tips:Writing Tips:Writing Tips: 1. Once a character is selected, the cursor will move to the next position after a short pause. 2. Press mto delete the last letter or number. 3.4.13.4.13.4.13.4.1 CharacterCharacterCharacterCharacter MMMMapapapap KeyKeyKeyKey 1111stststst presspresspresspress 2222ndndndnd presspresspresspress 3333rdrdrdrd presspresspresspress 4444thththth presspresspresspress 5555thththth presspresspresspress 6666thththth presspresspresspress 1111 Space 1 _ ( ) * 2222 A B C 2 3333 D E F 3 4444 G H I 4 5555 J K L 5 6666 M N O 6 7777 P Q R S 7 8888 T U V 8 ? 9999 W X Y Z 9 0000 0 - / o + **** * #### o Downloaded from www.Manualslib.com manuals search engine
  • 19. 17 4444 USING YOUR PHONEUSING YOUR PHONEUSING YOUR PHONEUSING YOUR PHONE 4.14.14.14.1 Make aMake aMake aMake a CCCCallallallall 4.1.14.1.14.1.14.1.1 PrePrePrePre----diallingdiallingdiallingdialling 1. Enter the phone number (maximum 24 digits). If you make a mistake, press mto delete the lastentered number. 2. Press Tto dial the phone number. 4.1.24.1.24.1.24.1.2 DirectDirectDirectDirect DDDDiallingiallingiallingialling 1. Press T. 2. Dial the number. NNNNoteoteoteote:::: If you make a mistake, you cannot correct it with m. Press Oand then press mto return to the home screen. 4.1.34.1.34.1.34.1.3 Call from theCall from theCall from theCall from the RRRRedialedialedialedial LLLListististist 1. Press Rin standby mode. • The last number dialled is displayed. 2. Press +/- to select the desired entry in the redial list and then press Tto dial out the selected redial number. 4.1.44.1.44.1.44.1.4 Call from theCall from theCall from theCall from the CCCCallallallall LLLLogogogog 1. Press + in standby mode. 2. Press +/- to select the desired entry in the call log and then press Tto dial out the selected call log number. NNNNoteoteoteote:::: You need to subscribe to Caller Line Identification (CLI) service to be able to see the caller’s number or name in the call log. Downloaded from www.Manualslib.com manuals search engine
  • 20. 18 4.1.54.1.54.1.54.1.5 Call from theCall from theCall from theCall from the PPPPhonebookhonebookhonebookhonebook 1. Press - in standby mode. 2. Press +/- to select the desired entry in the phonebook and then press Tto dial out the selected phonebook number. 4.24.24.24.2 Answer andAnswer andAnswer andAnswer and EEEEnd and and and a CCCCallallallall 1. When the phone rings, press T. 2. To end a conversation, press O. Warning:Warning:Warning:Warning: When the handset is ringing, please do not hold it too close to your ear as the volume of the ringing tone may damage your hearing. NNNNoteoteoteote:::: You can simply place the handset back on its base station or charging pod to end the call, provided you have not deactivated the AAAAutoutoutouto hanghanghanghang----upupupup feature. (See SetSetSetSet AAAAutoutoutouto HHHHangangangang----upupupup on page 39.) 4.34.34.34.3 Handset SpeakerphoneHandset SpeakerphoneHandset SpeakerphoneHandset Speakerphone During a call, you can press Tto alternate between hands-free speakerphone and handset earpiece. 4.44.44.44.4 AdjustAdjustAdjustAdjust EEEEarpiecearpiecearpiecearpiece VVVVolumeolumeolumeolume There are 3333 levels of earpiece volume. 1. During a call, press +/- to select from VOLUME 1VOLUME 1VOLUME 1VOLUME 1 to VOLUME 3VOLUME 3VOLUME 3VOLUME 3. • The current setting is shown. • When you end the call, the setting will remain at the last selected level. Downloaded from www.Manualslib.com manuals search engine
  • 21. 19 4.54.54.54.5 AdjustAdjustAdjustAdjust SSSSpeakerpeakerpeakerpeaker VVVVolumeolumeolumeolume There are 5555 levels of speaker volume. 1. Duringacall,press+/-toselectfromVOLUME1VOLUME1VOLUME1VOLUME1toVOLUMEVOLUMEVOLUMEVOLUME5555. • The current setting is shown. • When you end the call, the setting will remain at the last selected level. 4.64.64.64.6 Mute/Unmute theMute/Unmute theMute/Unmute theMute/Unmute the MMMMicrophoneicrophoneicrophoneicrophone When the microphone is muted, the handset displays MUTE ONMUTE ONMUTE ONMUTE ON, and your caller cannot hear you. 1. During a call, press mto turn on/off the microphone. 4.74.74.74.7 PagingPagingPagingPaging The paging feature enables you to locate a missing handset if the handset is in range and contains charged batteries. 1. Press the key under the base unit. • All the registered handsets that are in range will start to ring. You can stop the paging by pressing any key on a handset or the key under the base unit again. 4.84.84.84.8 SwitchingSwitchingSwitchingSwitching thethethethe HHHHandsetandsetandsetandset OOOOn/n/n/n/OOOOffffffff Press and hold Ofor more than 2 seconds to switch the handset on or off in standby mode. • When first turned on, the display shows SEARCHINGSEARCHINGSEARCHINGSEARCHING………… until the handset finds the base. NNNNote:ote:ote:ote: You can switch the handset off to save battery life, if the handset is not on the base or a charging pod and you do not want to use it for a while. IMPORTANT:IMPORTANT:IMPORTANT:IMPORTANT: When the handset is OFF, it cannot be used for making calls including emergency calls. It will not ring when there is an incoming call. To answer a call, you will need to switch it back on and it may take some time for the handset to re-establish a radio link with the base unit. Downloaded from www.Manualslib.com manuals search engine
  • 22. 20 4.94.94.94.9 ToToToTo LLLLock/ock/ock/ock/UUUUnlocknlocknlocknlock thethethethe KKKKeypadeypadeypadeypad You can lock the keypad to avoid making calls or pressing the keys accidentally. 1. In standby mode, press and hold *for 1 second to lock the keypad. • The handset displays KEYS LOCKEDKEYS LOCKEDKEYS LOCKEDKEYS LOCKED. 2. To turn the keypad lock off, press and hold *again. NoteNoteNoteNote:::: Incoming calls can still be answered even if the keypad is locked. 4.104.104.104.10 Make anMake anMake anMake an IIIInternalnternalnternalnternal CCCCall (Multiall (Multiall (Multiall (Multi –––– handsethandsethandsethandset modelsmodelsmodelsmodels only)only)only)only) The system allows an intercom call between two handsets registered to the same telephone base. It also allows you to transfer external calls from one handset to another, and set up a 3-way conference with two handsets and an external call. If you try to make a call while another handset is already on an external call, you will hear a busy tone for a few seconds before the display returns to standby. 4.114.114.114.11 IIIInitiate annitiate annitiate annitiate an IIIIntercomntercomntercomntercom CCCCallallallall 1. In standby mode, press I. • Intercom is established immediately if there are only 2 registered handsets. • If there are more than 2 registered handsets, the handset numbers which are available for intercom will be displayed. 2. Press the handset number you wish to call or press *to call all handsets. 3. Press Ton a called handset to answer the internal call, where both internal callers can talk. 4. To end the intercom call, press Oon either handset. Downloaded from www.Manualslib.com manuals search engine
  • 23. 21 Note:Note:Note:Note: 1) You can cancel the intercom call before it is answered by pressing Ior Oon the originating handset. 2) If there is no answer from the called handset within one minute, the paging will be cancelled automatically. 3) If no handset is registered to the base, 4 beeps will be heard and it will return to standby mode. 4.124.124.124.12 AAAAnswer annswer annswer annswer an EEEExternalxternalxternalxternal CCCCallallallall dddduring anuring anuring anuring an IIIIntercomntercomntercomntercom CCCCallallallall You will hear an alert tone when you receive an incoming external call during an intercom call, and you can choose from the following options: 1) Press Oto cancel the intercom call and let the handsets receive normal incoming ringing. 2) Press Tto answer the incoming call and end the intercom call. 3) Press I to answer the incoming call and put the intercom call on hold. 4) When the incoming call is connected and the intercom call is on hold, press and hold I to start a three-party conference call with both the incoming and the intercom parties. 5) When one handset is connected to an external call, you can press Ton another handset to enter into a three-party conference call directly. Downloaded from www.Manualslib.com manuals search engine
  • 24. 22 4.134.134.134.13 IIIInitiatnitiatnitiatnitiate ane ane ane an IIIIntercomntercomntercomntercom dddduring auring auring auring a CCCCallallallall You can intercom with another system handset during a call, or invite another system handset to join in a conference call with you and the external caller. 1. During the call, press Ito put the external call on hold. • Intercom is established immediately if there are only 2 registered handsets. • If there are more than 2 registered handsets, the handset numbers which are available for intercom will be displayed. 2. Press the handset number you wish to call or press *to call all handsets. Note:Note:Note:Note: If there is no answer from the called handset, or you wish to cancel the intercom call before it is answered, press Ito return to the external call. 3. Press Ton the called handset to answer the internal call, where both internal callers can talk. 4. When the intercom call is connected, you can choose from the following options on the originating handset: 1) Press and hold Ifor 2 seconds to connect both handsets to the call in conference mode. 2) Press Oon either handset to terminate the intercom on that handset, and leave the external call connected to the other handset. Downloaded from www.Manualslib.com manuals search engine
  • 25. 23 4.144.144.144.14 Transfer anTransfer anTransfer anTransfer an EEEExternalxternalxternalxternal CCCCall toall toall toall to aaaanothernothernothernother HHHHandsetandsetandsetandset 1. During the call, press Ito put the external call on hold. • Intercom is established immediately if there are only 2 registered handsets. • If there are more than 2 registered handsets, the handset numbers which are available for intercom will be displayed. 2. Press the handset number you wish to call or press * to call all handsets. Note:Note:Note:Note: If there is no answer from the called handset, or you wish to cancel the intercom call before it is answered, press Ito return to the external call. 3. Press Ton the called handset to answer the internal call, where both internal callers can talk. 4. Press Oon the originating handset to transfer the external call to the called handset. • The external call is transferred. Downloaded from www.Manualslib.com manuals search engine
  • 26. 24 5555 DIRECT ACCESS MEMORYDIRECT ACCESS MEMORYDIRECT ACCESS MEMORYDIRECT ACCESS MEMORY There are 2 direct access memories (Keys 1 & 2) in addition to the phonebook memory. A long press on the keys in standby mode will automatically dial the stored phone number. 5.15.15.15.1 AddAddAddAdd DDDDirectirectirectirect AAAAccessccessccessccess MMMMemoryemoryemoryemory 1. From the home screen, press M. 2. Press Mto select PHONEBOOKPHONEBOOKPHONEBOOKPHONEBOOK. 3. Press +/- to DIRECT MEM.DIRECT MEM.DIRECT MEM.DIRECT MEM. and then press Mto select. 4. Press +/- to KEY 1KEY 1KEY 1KEY 1 or KEY 2KEY 2KEY 2KEY 2 and then press Mto select. • NO NUMBERNO NUMBERNO NUMBERNO NUMBER is displayed if it is empty. Otherwise, the stored name is displayed. 5. Press Mto enter the menu options. 6. Press Magain to select EDIT NUMBEREDIT NUMBEREDIT NUMBEREDIT NUMBER. • ENTER NAMEENTER NAMEENTER NAMEENTER NAME is displayed if it is empty. Otherwise, the stored name is displayed. 7. Enter the name of the contact and press M. If you make a mistake, press mto delete the last character entered. • ENTER NUMBERENTER NUMBERENTER NUMBERENTER NUMBER is displayed. Otherwise the stored number is displayed. 8. Enter the number of your contact and press M. If you make a mistake, press mto delete the last digit entered. • A confirmation tone is played. 9. Press Oto return to standby mode. Downloaded from www.Manualslib.com manuals search engine
  • 27. 25 5.25.25.25.2 DeleteDeleteDeleteDelete DDDDirectirectirectirect AAAAccessccessccessccess MMMMemoryemoryemoryemory 1. From the home screen, press M. 2. Press Mto select PHONEBOOKPHONEBOOKPHONEBOOKPHONEBOOK. 3. Press +/- to DIRECT MEM.DIRECT MEM.DIRECT MEM.DIRECT MEM. and then press Mto select. 4. Press +/- to KEY 1KEY 1KEY 1KEY 1 or KEY 2KEY 2KEY 2KEY 2 and then press Mto select. • NO NUMBERNO NUMBERNO NUMBERNO NUMBER is displayed if it is empty. Otherwise, the stored name is displayed. 5. Press Mto enter the menu options. 6. Press +/- to DELETEDELETEDELETEDELETE and then press Mto select. • DELETE?DELETE?DELETE?DELETE? is displayed. 7. Press Magain to confirm. • A confirmation tone is played. 8. Press Oto return to standby mode. Downloaded from www.Manualslib.com manuals search engine
  • 28. 26 6666 PHONEBOOKPHONEBOOKPHONEBOOKPHONEBOOK Each handset can store up to 100 phonebook entries. Each phonebook entry can have a maximum of 24 digits for the phone number and 12 characters for the name. 6.16.16.16.1 Store aStore aStore aStore a CCCContact in theontact in theontact in theontact in the PPPPhonebookhonebookhonebookhonebook 1. From the home screen, press M. 2. Press Magain to select PHONEBOOKPHONEBOOKPHONEBOOKPHONEBOOK. 3. Press Mto select NEW ENTRYNEW ENTRYNEW ENTRYNEW ENTRY. 4. Enter the name of the contact (maximum 12 characters) using the keypad. If you make a mistake, press mto delete the last character entered. 5. Press Mto confirm the name entry. 6. Enter the number of the contact (maximum 24 digits) using the keypad. If you make a mistake, press mto delete the last digit entered. 7. Press Mto confirm. • A confirmation tone is played. 8. Press Oto return to standby mode. Note:Note:Note:Note: You cannot store a new phonebook entry when the memory is full. In this case, you have to delete existing entries to make space for new ones. When storing the number for a local call, you can enter only 6 or 7-digit local number without STDSTDSTDSTD (area) code, and it will still display the name if there is an incoming call and you subscribe to caller display. Downloaded from www.Manualslib.com manuals search engine
  • 29. 27 6.26.26.26.2 Access theAccess theAccess theAccess the PPPPhonebookhonebookhonebookhonebook 1. From the home screen, press - to open the phonebook list. Alternatively, from the home screen, you can press Mtwice to select PHONEBOOKPHONEBOOKPHONEBOOKPHONEBOOK, then +/- to LISTLISTLISTLIST and Magain to open the phonebook list. 2. Press +/- to scroll through the list of entries • The phonebook entries are listed in alphabetical order. 3. Press Mto view the details of the selected entry. 4. Press Oto return to standby mode. Note:Note:Note:Note: Instead of pressing +/- to browse the phonebook entries, you can press the numeric key corresponding to the first letter of the entry you wish to locate. For example, pressing 2will show the first entry starting with A. Pressing 2again will show the first entry starting with B, and so on..., and then press +/-, if necessary, to find the entry you want. 6.36.36.36.3 Modify aModify aModify aModify a PPPPhonebookhonebookhonebookhonebook EEEEntryntryntryntry 1. From the home screen, press M. 2. Press Magain to select PHONEBOOKPHONEBOOKPHONEBOOKPHONEBOOK. 3. Press +/- to EDIT ENTRYEDIT ENTRYEDIT ENTRYEDIT ENTRY and then press Mto select. 4. Press +/- to select an entry you wish to modify and then press M. • The current name is displayed. 5. Edit the name using the keypad. Press mto delete characters. 6. Press Mto confirm. 7. Edit the number and then press Mto confirm. • A confirmation tone is played. 8. Press Oto return to standby mode. Downloaded from www.Manualslib.com manuals search engine
  • 30. 28 6.46.46.46.4 Delete aDelete aDelete aDelete a PPPPhonebookhonebookhonebookhonebook EEEEntryntryntryntry 1. From the home screen, press M. 2. Press Magain to select PHONEBOOKPHONEBOOKPHONEBOOKPHONEBOOK. 3. Press +/- to DELETEDELETEDELETEDELETE and then press Mto select. 4. Press +/- to select an entry you wish to delete and then press M. • DELETE?DELETE?DELETE?DELETE? is displayed. 5. Press Magain to confirm. • A confirmation tone is played. 6. Press Oto return to standby mode. 6.56.56.56.5 DeleteDeleteDeleteDelete AAAAllllllll EEEEntries from thentries from thentries from thentries from the PPPPhonebookhonebookhonebookhonebook LLLListististist 1. From the home screen, press M. 2. Press Magain to select PHONEBOOKPHONEBOOKPHONEBOOKPHONEBOOK. 3. Press +/- to DELETE ALLDELETE ALLDELETE ALLDELETE ALL and then press Mto select. • DELETE?DELETE?DELETE?DELETE? is displayed. 4. Press Magain to confirm. • A confirmation tone is played. 5. Press Oto return to standby mode. Downloaded from www.Manualslib.com manuals search engine
  • 31. 29 7777 CALLER DISPLAY (NETWORK DEPENDENT)CALLER DISPLAY (NETWORK DEPENDENT)CALLER DISPLAY (NETWORK DEPENDENT)CALLER DISPLAY (NETWORK DEPENDENT) If you have subscribed to the Calling Line Identification (CLI) service with your network service provider, the phone number of your caller will appear on the handset display when there is an incoming call and then stored in your Call LogCall LogCall LogCall Log. If the caller’s number is stored in your phonebook along with a name, the name will appear on the handset display when the call is received and in the Call LogCall LogCall LogCall Log. Note:Note:Note:Note: If the call is from someone whose number is unavailable (e.g. an international call or from a private exchange), the handset will display UNUNUNUNAVAILABLEAVAILABLEAVAILABLEAVAILABLE when you receive the call and in the Call LogCall LogCall LogCall Log afterwards. If the call is from someone whose number is withheld (e.g. by dialling 141), the handset will display WITHHELDWITHHELDWITHHELDWITHHELD when you receive the call and in the Call LogCall LogCall LogCall Log afterwards. If you have not subscribed to the Caller Line Identification service, the handset will display UNKNOWNUNKNOWNUNKNOWNUNKNOWN when you receive the call when it is received, and it will not be saved in the Call LogCall LogCall LogCall Log. Information about incoming calls varies by country and network operators. 7.17.17.17.1 Call LogCall LogCall LogCall Log The Call LogCall LogCall LogCall Log stores the last 10 external calls, whether or not you have answered the call. Only the most recent call is saved if there are repeat calls from the same number. When the Call LogCall LogCall LogCall Log is full, the next new call will replace the oldest entry. 7.1.17.1.17.1.17.1.1 Access the Call LogAccess the Call LogAccess the Call LogAccess the Call Log 1. From the home screen, press +. 2. Press +/- to browse through the call list. • The calls are displayed in chronological order with the most recent call at the top of the list. Downloaded from www.Manualslib.com manuals search engine
  • 32. 30 7.1.27.1.27.1.27.1.2 Save a Call LogSave a Call LogSave a Call LogSave a Call Log EEEEntry into thentry into thentry into thentry into the PPPPhonebookhonebookhonebookhonebook 1. From the home screen, press +. 2. Press +/- to select an entry and then press M. 3. Press Magain to select SAVE NUMBERSAVE NUMBERSAVE NUMBERSAVE NUMBER. 4. Enter the name of the contact (maximum 12 characters) and then press Mto save. • A confirmation tone is played. 5. Press Oto return to standby mode. 7.1.37.1.37.1.37.1.3 Delete a Call LogDelete a Call LogDelete a Call LogDelete a Call Log EEEEntryntryntryntry 1. From the home screen, press +. 2. Press +/- to select an entry and then press M. 3. Press +/- to DELETEDELETEDELETEDELETE and then press Mto select. • DELETE?DELETE?DELETE?DELETE? is displayed. 4. Press Magain to confirm. • A confirmation tone is played. 5. Press Oto return to standby mode. 7.1.47.1.47.1.47.1.4 DeleteDeleteDeleteDelete AAAAllllllll EEEEntries in the Call Logntries in the Call Logntries in the Call Logntries in the Call Log 1. From the home screen, press +. 2. Press M. 3. Press +/- to DELETE ALLDELETE ALLDELETE ALLDELETE ALL and then press Mto select. • DELETE?DELETE?DELETE?DELETE? is displayed. 4. Press Magain to confirm. • A confirmation tone is played. Downloaded from www.Manualslib.com manuals search engine
  • 33. 31 7.27.27.27.2 RedialRedialRedialRedial LLLListististist The redial list stores the last 5 numbers dialled. A maximum of 24 digits can be displayed for each entry. 7.2.17.2.17.2.17.2.1 Access theAccess theAccess theAccess the RRRRedialedialedialedial LLLListististist 1. From the home screen, press R. 2. Press +/- to browse the redial list. • The last dialled number will appear first in the redial list. • If the number is more than 12 digits, press mto see the other digits. 7.2.27.2.27.2.27.2.2 Save aSave aSave aSave a RRRRedialedialedialedial NNNNumber into theumber into theumber into theumber into the PPPPhonebookhonebookhonebookhonebook 1. From the home screen, press R. 2. Press +/- to select an entry and press M. 3. Press Magain to select SAVE NUMBER.SAVE NUMBER.SAVE NUMBER.SAVE NUMBER. 4. Enter the name of the contact (maximum 12 characters) and then press Mto save. • A confirmation tone is played. 5. Press Oto return to standby mode. 7.2.37.2.37.2.37.2.3 Edit aEdit aEdit aEdit a RRRRedialedialedialedial NNNNumberumberumberumber 1. From the home screen, press R. 2. Press +/- to select an entry and then press M. 3. Press +/- to EDIT ENTRYEDIT ENTRYEDIT ENTRYEDIT ENTRY and then press Mto select. 4. Edit the number and press Mto confirm. • A confirmation tone is played. 5. Press Oto return to standby mode. Downloaded from www.Manualslib.com manuals search engine
  • 34. 32 7.2.47.2.47.2.47.2.4 Delete aDelete aDelete aDelete a RRRRedialedialedialedial NNNNumberumberumberumber 1. From the home screen, press R. 2. Press +/- to select an entry and then press M. 3. Press +/- to DELETEDELETEDELETEDELETE and then press Mto select. • DELETE?DELETE?DELETE?DELETE? is displayed. 4. Press Magain to confirm. • A confirmation tone is played. 5. Press Oto return to standby mode. 7.2.57.2.57.2.57.2.5 DeleteDeleteDeleteDelete AAAAllllllll EEEEntries from thentries from thentries from thentries from the RRRRedialedialedialedial LLLListististist 1. From the home screen, press R. 2. Press M. 3. Press +/- to DELETE ALLDELETE ALLDELETE ALLDELETE ALL and then press Mto select. • DELETE?DELETE?DELETE?DELETE? is displayed. 4. Press Magain to confirm. • A confirmation tone played. Downloaded from www.Manualslib.com manuals search engine
  • 35. 33 8888 CLOCKCLOCKCLOCKCLOCK AND ALARMAND ALARMAND ALARMAND ALARM SETTINGSSETTINGSSETTINGSSETTINGS 8.18.18.18.1 Date andDate andDate andDate and TTTTimeimeimeime SSSSettingsettingsettingsettings If you have subscribed to Calling Line IdentificationCalling Line IdentificationCalling Line IdentificationCalling Line Identification (CLI)(CLI)(CLI)(CLI) service, the time and date settings will be automatically updated by the network when you receive an incoming call. You can also set the date and time manually. 1. From the home screen, press M. 2. Press +/- to CLOCK&ALARMCLOCK&ALARMCLOCK&ALARMCLOCK&ALARM and then Mto select. 3. Press Magain to select DATE/TDATE/TDATE/TDATE/TIMEIMEIMEIME. • The last stored date is displayed. 4. Enter the current date and press Mto confirm. The default date format is DD/MMDD/MMDD/MMDD/MM. (To change date format, see Change theChange theChange theChange the DDDDateateateate FFFFormatormatormatormat on page 34.) ForDD/MM format, enter 03 May 2012 as [1], [2], [0], [3], [0], [5]. For MM/DD format, enter 03 May 2012as [1], [2], [0], [5], [0], [3]. If you make a mistake, press mto delete the last digit entered. 5. Enter the current time and press Mto confirm. The default time format is 24242424 HOURSHOURSHOURSHOURS. (To change time format, see Change theChange theChange theChange the TTTTimeimeimeime FFFFormatormatormatormat on page 34.) For 24-hour format, enter 1:30pm as [1], [3], [3], [0]. For 12-hour format, enter the time and then press +/- to select AMAMAMAM or PMPMPMPM. If you make a mistake, press mto delete the last digit entered. • A confirmation tone is played. 6. Press Oto return to standby mode. Downloaded from www.Manualslib.com manuals search engine
  • 36. 34 8.1.18.1.18.1.18.1.1 Change theChange theChange theChange the TTTTimeimeimeime FFFFormatormatormatormat The time can be displayed either as 12-hour or 24-hour. The default setting is 24 HOURS24 HOURS24 HOURS24 HOURS. 1. From the home screen, press M. 2. Press +/- to CLOCK&ALARMCLOCK&ALARMCLOCK&ALARMCLOCK&ALARM and then Mto select. 3. Press +/- to SET FORMATSET FORMATSET FORMATSET FORMAT and then press Mto select. 4. Press Magain to select TIME FORMATTIME FORMATTIME FORMATTIME FORMAT. • The current setting is displayed. 5. Press +/- to select 12 HO12 HO12 HO12 HOURSURSURSURS or 24 HOURS24 HOURS24 HOURS24 HOURS and then press Mto confirm. • A confirmation tone is played. 6. Press Oto return to standby mode. 8.1.28.1.28.1.28.1.2 Change theChange theChange theChange the DDDDateateateate FFFFormatormatormatormat The date can be displayed either as Month/Day or Day/Month. The default setting is DD/MMDD/MMDD/MMDD/MM. 1. From the home screen, press M. 2. Press +/- to CLOCK&ALARMCLOCK&ALARMCLOCK&ALARMCLOCK&ALARM and then Mto select. 3. Press +/- to SET FORMATSET FORMATSET FORMATSET FORMAT and then press Mto select. 4. Press +/- to DATE FORMATDATE FORMATDATE FORMATDATE FORMAT and then press Mto select. • The current setting is displayed. 5. Press +/- to select DDDDDDDD////MMMMMMMM or MMMMMMMM////DDDDDDDD and then press Mto confirm. • A confirmation tone is played. 6. Press Oto return to standby mode. Downloaded from www.Manualslib.com manuals search engine
  • 37. 35 8.28.28.28.2 AlarmAlarmAlarmAlarm SSSSettingsettingsettingsettings An alarm can be set on a handset, to sound at a set time only once or repeated each day. When an alarm is set, the alarm icon is shown on the handset display. When the alarm time is reached, the handset will sound an alarm for 1 minute, at the same volume setting as the handset ringer. If the ringer is off, it will ring at volume setting 1. When the alarm rings, you can press any key on the handset to stop the ringing, even if the keylock is activated. 1. From the home screen, press M. 2. Press +/-to CLOCK&ALARMCLOCK&ALARMCLOCK&ALARMCLOCK&ALARMand then press Mto select. 3. Press +/- to ALARMALARMALARMALARM and then press Mto select. 4. Press +/- to an alarm option. OFF:OFF:OFF:OFF: Turn alarm off ONONONON ONCEONCEONCEONCE:::: The alarm sounds once at the set time. ONONONON DAILDAILDAILDAILY:Y:Y:Y: The alarm sounds daily at the set time. 5. Press Mto select the option. 6. If ONONONON ONCEONCEONCEONCEor ONDONDONDONDAILYAILYAILYAILYis selected, enter the desired hour and minute. Press +/-to select AMAMAMAMor PMPMPMPMif the time is in 12-hour format. 7. Press Mto confirm the alarm setting. • A confirmation tone is played. 8. Press Oto return to standby mode. Downloaded from www.Manualslib.com manuals search engine
  • 38. 36 8.2.18.2.18.2.18.2.1 Set theSet theSet theSet the Alarm TAlarm TAlarm TAlarm Toneoneoneone You can select from 3 alarm melodies. 1. From the home screen, press M. 2. Press +/-to CLOCK&ALARMCLOCK&ALARMCLOCK&ALARMCLOCK&ALARMand then press Mto select. 3. Press +/- to ALARM TONEALARM TONEALARM TONEALARM TONE and then press Mto select. 4. Press +/- to select the desired alarm tone (each tone will sound as it is selected) and then press Mto confirm. • A confirmation tone is played. 5. Press Oto return to standby mode. Downloaded from www.Manualslib.com manuals search engine
  • 39. 37 9999 PPPPERSONALERSONALERSONALERSONAL SETTINGSSETTINGSSETTINGSSETTINGS Your phone comes with a selection of settings that you can change to personalise your phone to the way you like it to work. 9.19.19.19.1 Set theSet theSet theSet the RRRRinginginging VVVVolumeolumeolumeolume You can set the handset ringer volume from Level 1 to Level 4 or turn the ringer off. 1. From the home screen, press M. 2. Press +/- to PERSONAL SETPERSONAL SETPERSONAL SETPERSONAL SET and then press Mto select. 3. Press +/-to HANDSETTONEHANDSETTONEHANDSETTONEHANDSETTONEand then press Mto select. 4. Press Magain to select RINGRINGRINGRING VVVVOLUMEOLUMEOLUMEOLUME. 5. Press +/- to select the desired setting (each volume level will play as it is selected) and then press Mto confirm. • A confirmation tone is played. 6. Press Oto return to standby mode. NNNNoteoteoteote:::: Press and hold #to switch the ringer OnOnOnOn and OffOffOffOff when the handset is in standby mode. The ringer off icon displays on the screen when ringer off feature is activated. 9.29.29.29.2 Set theSet theSet theSet the RRRRinginginging ToneToneToneTone You can select from 10 ringer melodies for both internal and external calls. 1. From the home screen, press M. 2. Press +/- to PERSONAL SETPERSONAL SETPERSONAL SETPERSONAL SET and then press Mto select. 3. Press+/-toHANDSETTHANDSETTHANDSETTHANDSETTONEONEONEONEandthenpressMtoselect. 4. Press +/- to RINGRINGRINGRING TONETONETONETONESSSS and then press Mto select. 5. Press +/- to select the desired melody from 1 to 10 (each melody will play as it is selected) and then press Mto confirm. • A confirmation tone is played. 6. Press Oto return to standby mode. Downloaded from www.Manualslib.com manuals search engine
  • 40. 38 9.39.39.39.3 Set theSet theSet theSet the KKKKeyeyeyey BeepBeepBeepBeep The handset emits a tone with each key press. You can choose to turn this tone on or off. The default setting is ONONONON. 1. From the home screen, press M. 2. Press +/- to PERSONAL SETPERSONAL SETPERSONAL SETPERSONAL SET and then press Mto select. 3. Press +/-to HANDSETTHANDSETTHANDSETTHANDSETTONEONEONEONEand then press Mto select. 4. Press +/- to KEY BEEPKEY BEEPKEY BEEPKEY BEEP and then press Mto select. 5. Press +/-to select ONONONONor OFFOFFOFFOFFand then press Mto confirm. • A confirmation tone is played. 6. Press Oto return to standby mode. 9.49.49.49.4 Rename theRename theRename theRename the HHHHandsetandsetandsetandset You can personalise your handset by renaming it. 1. From the home screen, press M. 2. Press +/- to PERSONAL SETPERSONAL SETPERSONAL SETPERSONAL SET and then press Mto select.... 3. Press Mto select HANDSET NAMEHANDSET NAMEHANDSET NAMEHANDSET NAME. • The current handset name is displayed. 4. Press mto delete the letters one by one and enter the new name (maximum 10 characters). 5. Press Mto confirm. • A confirmation tone is played. 6. Press Oto return to standby mode. Downloaded from www.Manualslib.com manuals search engine
  • 41. 39 9.59.59.59.5 Set theSet theSet theSet the DDDDisplayisplayisplayisplay LLLLanguageanguageanguageanguage You can change the display language on your handset. The default setting is ENGLISHENGLISHENGLISHENGLISH. 1. From the home screen, press M. 2. Press +/- to PERSONAL SETPERSONAL SETPERSONAL SETPERSONAL SET and then press Mto select. 3. Press +/- to LANGUAGELANGUAGELANGUAGELANGUAGE and then press Mto select. 4. Press +/- to select your preferred language and then press Mto confirm. • A confirmation tone is played. 5. Press Oto return to standby mode. Note:Note:Note:Note: Once the display language is set, the handset will switch to display in the selected language immediately. 9.69.69.69.6 SetSetSetSet AAAAutoutoutouto HHHHangangangang----upupupup This function enables you to end a call automatically by simply placing the handset back on the base unit or charging pod. By default, the Auto Hang up feature is ONONONON. 1. From the home screen, press M. 2. Press +/- to PERSONAL SETPERSONAL SETPERSONAL SETPERSONAL SET and then press Mto select. 3. Press +/-to AUTOHANGAUTOHANGAUTOHANGAUTOHANG----UPUPUPUPand then press Mto select. 4. Press +/-to select ONONONONor OFFOFFOFFOFFand then press Mto confirm. • A confirmation tone is played. 5. Press Oto return to standby mode. Downloaded from www.Manualslib.com manuals search engine
  • 42. 40 10101010 ADVANCED SETTINGSADVANCED SETTINGSADVANCED SETTINGSADVANCED SETTINGS 10.110.110.110.1 HandsetHandsetHandsetHandset RegistrationRegistrationRegistrationRegistration IMPORTANT:IMPORTANT:IMPORTANT:IMPORTANT: When you purchase your phone system, all handsets are already registered to your base, so you do not need to register them. Handset registration is only necessary when you buy extra handsets or if a handset has become faulty. You can register up to four handsets to one base station, with each handset’s number (1 to 4) shown on its display. Note:Note:Note:Note: Each handset can only be registered to one base. You need to enter the Master PIN before you can register or unregister handsets. The default Master PIN is 0000000000000000. 10.210.210.210.2 Register ARegister ARegister ARegister Additionaldditionaldditionaldditional HHHHandsetsandsetsandsetsandsets 1. Press and hold the key under the base unit for approximately 5 seconds. • The message indicator on the base will flash for up to 1 minute, while it is in registration mode. 2. On the handset, press M. 3. Press +/-to ADVANCEDSETADVANCEDSETADVANCEDSETADVANCEDSET and then press Mto select. 4. Press +/-to REGISTRATIONREGISTRATIONREGISTRATIONREGISTRATIONand then press M to select. • If no action is taken on the handset within 10 seconds, the registration procedure will be aborted. If this happens, repeat from step 1. 5. Enter the Master PIN and then press Mto confirm. Note:Note:Note:Note: The default Master PIN is 0000000000000000. • WAITWAITWAITWAITINGINGINGING flashes on the screen. • A confirmation tone is played to indicate successful registration, and the handset will return to standby mode, with its handset number displayed. • If no base is found with the entered PIN, error tones are played to indicate failed registration and the handset returns to standby mode. You will need to repeat from step 1 above. Downloaded from www.Manualslib.com manuals search engine
  • 43. 41 10.310.310.310.3 UnUnUnUn----register yourregister yourregister yourregister your HHHHandsetandsetandsetandset You can unregister the handset you are using. 1. From the home screen, press M. 2. Press +/-to ADVANCEDSETADVANCEDSETADVANCEDSETADVANCEDSET and then press Mto select. 3. Press +/- to UNREGISTERUNREGISTERUNREGISTERUNREGISTER and then press Mto select. 4. Enter the Master PIN and then press Mto confirm. Note:Note:Note:Note: The default Master PIN is 0000000000000000. 5. Press +/- to select the handset number to un-register and then press Mto confirm or press Oto cancel the un-registration procedure. • A confirmation tone is played to indicate successful un-registration. • If no action is taken on the handset within 15 seconds, the un-registration procedure will be aborted and the handset returns to standby mode. 10.410.410.410.4 ChangeChangeChangeChange thethethethe Master PINMaster PINMaster PINMaster PIN The Master PIN is used for registration/un-registration of handsets. The default Master PIN number is 0000000000000000. The maximum length of the Master PIN is 8 digits. Note:Note:Note:Note: If you forget your PIN code, you can reset it to its default 0000000000000000 using a handset ResetResetResetReset. (See ResetResetResetReset thethethethe UUUUnitnitnitnit on page 43.) 1. From the home screen, press M. 2. Press +/-to ADVANCEDSETADVANCEDSETADVANCEDSETADVANCEDSET and then press Mto select. 3. Press +/- to CHANGE PINCHANGE PINCHANGE PINCHANGE PIN and then press Mto select. 4. Enter the current Master PIN and then press Mto confirm. • The PIN will be shown as asterisks (*) on the screen as you enter them. 5. Enter the new PIN and then press Mto confirm. • A confirmation tone is played. Downloaded from www.Manualslib.com manuals search engine
  • 44. 42 10.510.510.510.5 ChangeChangeChangeChange thethethethe RRRRecallecallecallecall TTTTimeimeimeime You may need to press Fto send a Flash signal (also called Recall or Timed Break Recall) if you are connected to a PBX. You should normally leave the Recall Time at its default setting, Short (100ms)Short (100ms)Short (100ms)Short (100ms), as this is the standard recall required in the telephone network. However, it can be changed to Medium (270ms) or Long (600ms) if your telephone is connected to a PBX that requires a different recall time. 1. From the home screen, press M. 2. Press +/-to ADVANCEDSETADVANCEDSETADVANCEDSETADVANCEDSET and then press Mto select. 3. Press +/- to RECALL TIMERECALL TIMERECALL TIMERECALL TIME and then press Mto select. 4. Press +/- to select SHORTSHORTSHORTSHORT, MEDIUMMEDIUMMEDIUMMEDIUM or LONGLONGLONGLONG and then press Mto confirm. • A confirmation tone is played. 5. Press Oto return to standby mode. 10.610.610.610.6 Change theChange theChange theChange the DDDDialialialial MMMMode (ode (ode (ode (DDDDualualualual MMMModeodeodeode DDDDialialialialllllinginginging modelsmodelsmodelsmodels only)only)only)only) You should normally leave the dialling mode at its default setting, TOTOTOTONENENENE (also called MF or DTMF). However, you can change it to PULSEPULSEPULSEPULSE if necessary. Note:Note:Note:Note: If PULSEPULSEPULSEPULSE dialling is set, you can temporarily switch to TONETONETONETONE dialling by pressing *. The dial mode will change from PULSEPULSEPULSEPULSE to TONETONETONETONE for the duration of the call. 1. From the home screen, press M. 2. Press+/-toADVANCEDSETADVANCEDSETADVANCEDSETADVANCEDSETandthenpressMtoselect. 3. Press +/- to DIAL MODEDIAL MODEDIAL MODEDIAL MODE and then press Mto select. 4. Press +/- to select TONETONETONETONE or PULSEPULSEPULSEPULSE and then press M to confirm. • A confirmation tone is played. 5. Press Oto return to standby mode. Downloaded from www.Manualslib.com manuals search engine
  • 45. 43 10.710.710.710.7 SetSetSetSet thethethethe FFFFirstirstirstirst RRRRinginginging If you have subscribed to Caller Line Identification service and do not wish to hear the phone ring before the caller identification is displayed, you can set the FIRST RINGFIRST RINGFIRST RINGFIRST RING to OOOOFFFFFFFF. 1. From the home screen, press M. 2. Press +/-to ADVANCEDSEADVANCEDSEADVANCEDSEADVANCEDSETTTT and then press Mto select. 3. Press +/- to FIRST RINGFIRST RINGFIRST RINGFIRST RING and then press Mto select. 4. Press +/-to select ONONONONor OFFOFFOFFOFF and then press Mto confirm. • A confirmation tone is played. 5. Press Oto return to standby mode. 10.810.810.810.8 ResetResetResetReset thethethethe UUUUnitnitnitnit You can reset your phone to its default settings with this feature. Note:Note:Note:Note: Upon reset, all your personal settings, call log and redial list entries will be deleted and the phone will return to its default settings. However, your phonebook will remain unchanged after reset. 1. From the home screen, press M. 2. Press +/-to ADVANCEDSETADVANCEDSETADVANCEDSETADVANCEDSET and then press Mto select. 3. Press +/- to select RESETRESETRESETRESET and then press Mto select. 4. Press Magain to confirm. • A confirmation tone is played and the unit is reset to its default settings. Downloaded from www.Manualslib.com manuals search engine
  • 46. 44 11111111 TROUBLESHOOTINGTROUBLESHOOTINGTROUBLESHOOTINGTROUBLESHOOTING ALWAYS cheALWAYS cheALWAYS cheALWAYS check that:ck that:ck that:ck that: You have followed all the steps listed in the user guide to install and set up your telephone. All connectors are securely inserted into their sockets. Mains power for the base unit is switched on at the socket. The handset’s batteries are correctly and securely installed and are sufficiently charged. Everyday useEveryday useEveryday useEveryday use “I cannot make or answer calls”“I cannot make or answer calls”“I cannot make or answer calls”“I cannot make or answer calls” If the handset’s display is blank, it may have been switched off. Press and hold Oto switch it back on. Check that the base unit’s mains power adapter is plugged in and power is switched on. The base unit needs mains power for normal operation of the phone – not just for charging the batteries. Make sure that you are using the telephone line cable supplied with your phone. Other telephone line cables might not work. Move the handset closer to the base unit. Check the Battery Level symbol on the display. If it is low, put the handset back on the base unit or charging pod to recharge the batteries. Switch off the power at the mains socket, wait for a short while and then switch it back on. This may solve the problem. “I cannot make call“I cannot make call“I cannot make call“I cannot make callssss”””” If the handset display shows KEYS LOCKEDKEYS LOCKEDKEYS LOCKEDKEYS LOCKED, press and hold *to unlock it before you make a call. Only one handset (or the base unit) can be connected to an external line at a time. If the handset display shows , the base is already being used by another handset. “When I press on the keys, nothing happens”“When I press on the keys, nothing happens”“When I press on the keys, nothing happens”“When I press on the keys, nothing happens” Make sure that the batteries are fitted in your handset. If the Battery Level symbol on the display shows ‘low’, put your handset back on the base unit or charging pod to charge. “When I key in a number, it appears on the display, but I cannot make an“When I key in a number, it appears on the display, but I cannot make an“When I key in a number, it appears on the display, but I cannot make an“When I key in a number, it appears on the display, but I cannot make an externalexternalexternalexternal call”call”call”call” Try a different position for the base unit – somewhere higher if possible, or further away from other electrical equipment. Downloaded from www.Manualslib.com manuals search engine
  • 47. 45 “The phone does not ring”“The phone does not ring”“The phone does not ring”“The phone does not ring” Check that the base unit’s mains power adapter is plugged in and power is switched on. The base unit needs mains power for normal operation of the phone – not just for charging the batteries. Make sure that you are using the telephone line cable that was supplied with your phone. Make sure that the ringer volume settings are not set to off. Increase the ringer volume settings. (See Set theSet theSet theSet the RRRRinginginging VVVVolumeolumeolumeolume on page 37.) “My call was cut off when I went out of range. Now I can’t use my“My call was cut off when I went out of range. Now I can’t use my“My call was cut off when I went out of range. Now I can’t use my“My call was cut off when I went out of range. Now I can’t use my handset.”handset.”handset.”handset.” Move the handset closer to the base unit before you try to make a call again. “There is interference and noise on the line”“There is interference and noise on the line”“There is interference and noise on the line”“There is interference and noise on the line” Move the handset closer to the base unit, or to a different position. Try moving the base unit away from other electrical equipment, such as a television or a computer. You’ll get the best reception if you place the base unit as high as possible. For example, in a two-floor building, the first-floor landing is an ideal place. “I hear ‘beeps’ from my handset while I’m on a call”“I hear ‘beeps’ from my handset while I’m on a call”“I hear ‘beeps’ from my handset while I’m on a call”“I hear ‘beeps’ from my handset while I’m on a call” You may be moving out of range of the base unit. Move closer or your call may be cut off. Check the Battery Level symbol on the display. If it’s low, recharge the batteries. “The Caller Display feature isn’t working”“The Caller Display feature isn’t working”“The Caller Display feature isn’t working”“The Caller Display feature isn’t working” You need to subscribe to the Caller Line Identification service from your network service provider. The caller may have withheld their number by dialling 141. Or they may be calling from a network that does not transmit the caller’s number (e.g. if they are making international calls.) “When I try to make a call, I hear busy tone”“When I try to make a call, I hear busy tone”“When I try to make a call, I hear busy tone”“When I try to make a call, I hear busy tone” If you’re using a multi-handset system, check whether another handset is already on a call. “The volume in the earpiece is low“The volume in the earpiece is low“The volume in the earpiece is low“The volume in the earpiece is low when I’m on a call”when I’m on a call”when I’m on a call”when I’m on a call” Make sure you’re holding the earpiece correctly over your ear. Adjust the volume using +. “I cannot store a phonebook entry”“I cannot store a phonebook entry”“I cannot store a phonebook entry”“I cannot store a phonebook entry” The maximum number of 100 phonebook entries has been reached. You must delete existing entries to make space for new ones. Downloaded from www.Manualslib.com manuals search engine
  • 48. 46 Intercom and transferIntercom and transferIntercom and transferIntercom and transfer “I can’t transfer a call”“I can’t transfer a call”“I can’t transfer a call”“I can’t transfer a call” Make sure that the other handset is in range of the base unit. Make sure that you have entered the correct number for the other handset. BatteriesBatteriesBatteriesBatteries “The handset’s battery cells are running low wit“The handset’s battery cells are running low wit“The handset’s battery cells are running low wit“The handset’s battery cells are running low within an hour or two”hin an hour or two”hin an hour or two”hin an hour or two” Before you first use the handset, you must leave it to charge on the base unit or charging pod for at least 15 hours. You may need to replace the batteries. Check the connection between the base unit and the mains power socket. “I try t“I try t“I try t“I try to recharge the batteries but I still get a warning that they are low”o recharge the batteries but I still get a warning that they are low”o recharge the batteries but I still get a warning that they are low”o recharge the batteries but I still get a warning that they are low” You need to replace the batteries. Dispose of used batteries safely – do not burn, immerse them in water, disassemble, or puncture the batteries. Do not use non-rechargeable batteries in your handset – they may explode, causing damage. RegistrationRegistrationRegistrationRegistration “I am not able“I am not able“I am not able“I am not able totototo register another handset”register another handset”register another handset”register another handset” The maximum number of 4 handsets has been reached. You will need to unregister a handset in order to register a new one. If the fault persists...If the fault persists...If the fault persists...If the fault persists... Disconnect all other instruments connected to the same line and try to make a call. Disconnect the base unit from the telephone line and plug a different phone into the master telephone socket. Try making a call. If this works, the line is OK. If the call does not work, and you are using a two-way socket adapter, remove it and plug a telephone directly into the socket. If the call now works, the adapter may be faulty. If you cannot make a call, the fault may be on the exchange line. Contact the service provider. Downloaded from www.Manualslib.com manuals search engine
  • 49. 47 12121212 DECLARATION OF CONFORMITYDECLARATION OF CONFORMITYDECLARATION OF CONFORMITYDECLARATION OF CONFORMITY We the manufacturer / Importer: Binatone Telecom Plc, 1 Apsley Way London, NW2 7HF. Declare under our sole responsibility that the following product Type of equipment: Digital Cordless Telephone Country of Origin: China Brand: iDECT Model Name: Solo complies with the essential protection requirements of R&TTE Directive 1999/5/EC on the approximation of the laws of the Member States relating to Radio Spectrum MattersRadio Spectrum MattersRadio Spectrum MattersRadio Spectrum Matters, the Council Directive 2004/108/EC on the approximation of the laws of the Member States relating to Electromagnetic CElectromagnetic CElectromagnetic CElectromagnetic Compatibility (EMC)ompatibility (EMC)ompatibility (EMC)ompatibility (EMC) and the European Community Directive 2006/95/EC relating to Electrical SafetyElectrical SafetyElectrical SafetyElectrical Safety. Assessment of compliance of the product with the requirements relating to the essential requirements according to Article 3 R&TTE was based on Annex III of the Directive 1999/5/EC and the following standard: Radio Spectrum: ETSI EN 301406: V 2.1.1 (2009-07) EMC: ETSI EN 301489-6: V1.3.1 (2008-08) ETSI EN 301489-1: V1.8.1 (2008-04) Safety: EN60950-1:2006+A11:2009+A1:2010+A12:2011 Manufacturer / Importer (signature of authorised person) 18/05/2012 Date Signature The conformity to the requirements is validated by the symbol. NOTE:NOTE:NOTE:NOTE: In compliance with Directive 2002/96/EC, when you purchase a product that comes with the symbol shown on the right, you are required to dispose of electrical and electronic equipment by separate waste collection and you cannot dispose of the product as normal waste. This equipment and all its components, subsystems and consumable materials form an integral part of this product and when you decide to dispose of them you have to take them to a local recycling centre for appropriate waste disposal, in compliance with the current regulations. Details about the location of these centres can be obtained from your local authority. Notes for battery disposalNotes for battery disposalNotes for battery disposalNotes for battery disposal Your product contains batteries covered by the European Directive 2006/66/EC, which must not be disposed of with normal household waste. Please be aware of the local rules on separate collection of batteries. The correct disposal of batteries helps protect the environment and prevent health hazards. Downloaded from www.Manualslib.com manuals search engine
  • 50. 48 13131313 GUARANTEE AND SERVICEGUARANTEE AND SERVICEGUARANTEE AND SERVICEGUARANTEE AND SERVICE The phone system is guaranteed for 12 months from the date of purchase shown on your sales receipt. This guarantee does not cover any faults or defects caused by accidents, misuse, fair wear and tear, neglect, faults on the telephone line, lightning, tampering with the equipment, or any attempt at adjustment or repair other than through approved agents. Please keep your sales (till) receipt this is your guarantee.Please keep your sales (till) receipt this is your guarantee.Please keep your sales (till) receipt this is your guarantee.Please keep your sales (till) receipt this is your guarantee. You should also keep the original packaging material. In the unlikely event that you need to return your phone system to our Repair Centre while it is under guarantee, there may be a handling charge. 13.113.113.113.1 While the unit is under GuaranteeWhile the unit is under GuaranteeWhile the unit is under GuaranteeWhile the unit is under Guarantee 1. Disconnect the base unit from the telephone line and the mains electricity supply. 2. Pack up all parts of your phone system, using the original package. 3. Return the unit to the shop where you bought it, making sure you take your sales receipt. Remember to include the mains adapter. 13.213.213.213.2 After the Guarantee has expiredAfter the Guarantee has expiredAfter the Guarantee has expiredAfter the Guarantee has expired If the unit is no longer under Guarantee, first follow steps 1 and 2 as for repair under Guarantee. Then... 1. Call Helpline on 0845 345 9677 (for UK only) and ask for a quotation of the repair charge and details of where to send your phone system for repair. 2. Make sure you include with your phone system. Your name and address A cheque or postal order for the value of the repair A brief description of the fault. 3. Return your phone system to the address given by the Service Department. * This does not affect your statutory rights. Downloaded from www.Manualslib.com manuals search engine