SlideShare a Scribd company logo
Page 1 of 1
RH256N PROGRAMMING
By the Key Pad
Locating the programming plug:
1. Remove the five screws, which attach the top and bottom outer case together.
2. Remove the bottom and reposition the top case to allow access to the main board.
3. With the front of the radio face you, locate the 12 pin gray flex cable (plugs into the main board from the control
board).
4. Look to the left of the gray cable, approximately ¼inches, then to the rear of the radio approximately ¼inches.
5. There will be will be three pins in a row with a white plug covering two of the three pins. To the front of the radio
the word “PARK” stenciled on the board upside down, and to the rear of the pins “PROG” is stenciled upside
down.
6. With the radio off, move the white plug to the "PROG" or program position. * Important: The plug will need to
be moved to the "PARK" position after programming is complete. If the plug is not installed the
transmitter will not operate properly.
7. Supply 13vdc to the radio and turn it on. A "P" should appear in the display, which indicates that the radio is
ready to program.
Entering Program Data
1. Simplex = Receive and transmit frequency are the same.
A. Enter all six digits of the frequency
B. Enter two zeros by using the number 10 key.
C. Enter a two digit tone code from Table 1 below.
* Important: There must be exactly ten digits when programming a simplex channel.
D. Press the "ENT" or Enter key.
E. Press the channel number being programmed. Only a single channel number should be enter for channels 1
through 10. Two-digit numbers are required for channels 11 through 16.
Example: Channel one receive and transmit frequency is 155.160 MHz with a tone of 100Hz. When the “P” is in
the display, you would program the channel by pressing 155160 00 12 press "ENT", then channel number (1)
2. Half Duplex = Receive frequency is not the same as Transmit
A. Enter the six digit receive frequency
B. Enter 8, then 0.
C. Enter the two-digit receive tone code from Table 1.
D. Enter the two-digit transmit tone code from Table 1.
E. Enter the six-digit transmit frequency.
F. Press "ENT" or the Enter key.
G. Enter the channel number.
Example: Channel 2 the receive frequency is 154.800MHz, the transmit is 155.130MHz with a tone of 100Hz.
When the “P” is in the display, you would program the channel by pressing 154800 80 12 12 155130 Press
"ENT", then the channel number(2).
*Important: There must exactly 18 digits when programming a half duplex channels.
3. Entering Data for a receive only channel.
A. Enter the six digits for the frequency.
B. Enter 0, then 4.
C. Enter a two digit tone code from Table 1 or two zeros.
D. Press the Enter key.
E. Enter the channel Number.
Example: 162550 04 00 then "ENT", then a channel number(5).
4. Entering Data for a Simplex Frequency with Transmit tone (Encode) only.
A. Enter the six digits of the frequency.
B. Enter 8000.
C. Enter the two-digit tone code from Table 1.
D. Enter the frequency again.
E. Press the Enter key.
Page 2 of 2 2
F. Enter the channel number.
Example: 155475 8000 12 155475 press "ENT", then the channel number(16).
To review programming:
A. Press the “Man” or "Manual" key.
B. Enter the channel number.
• The radio will display the Data one digit at a time.
TABLE 1
Tone Code Tone(Hz) Tone Code Tone(Hz) Tone Code Tone(Hz) Tone Code Tone(Hz)
"00 No tone 13 103.5 26 162.2 39 69.4
"01 67 14 107.2 27 167.9 40 159.8
"02 71.9 15 110.9 28 173.8 41 165.5
"03 74.4 16 114.8 29 179.9 42 171.3
"04 77 17 118.8 30 186.2 43 177.3
"05 79.7 18 123 31 192.8 44 183.5
"06 82.5 19 127.3 32 203.5 45 189.9
"07 85.4 20 131.8 33 210.7 46 196.6
"08 88.5 21 136.5 34 218.1 47 199.5
"09 91.5 22 141.3 35 225.7 48 206.5
10 94.8 23 146.2 36 233.6 49 229.1
11 97.4 24 151.4 37 241.8 50 254.1
12 100 25 156.7 38 250.3
Deleting a channel
To delete a channel from memory. (Once the radio is in the user mode the deleted channel number can not be accessed
from the keypad. All unused channels should be deleted from memory.) While in the program mode:
A. Press the delete key.
B. Press the "ENT" or enter key.
C. Press the channel number.
Radio Configuration Data:
If any of the following options needs to be changed, then a five-digit number must be entered, so that the options will
change. If less than five numbers are entered, the microprocessor will not except the entry. All five options must be
entered when making a change. The entry should only made once and effects all of the programmed channels. These
options can not be programmed differently for each channel.
A. Scan Delay - The amount of time the radio will stay on a received channel, after the signal goes away, before
resuming scan. (Pick only one number)
Code 0 = .7 seconds
Code 2 = 1.4 seconds
Code 4 = 2.0 seconds
B. Transmit Time-Out-Timer - The amount of time the radio will stay in the transmit mode. If the Push-To-Talk switch
is still depressed after this time, the radio will stop transmitting and emit a busy signal or tone through the speaker.(Pick
only one number)
Code 0 = disabled - no time limit.
Code 1 = 30 seconds
Code 2 = 60 seconds
Code 4 = 90 seconds
Page 3 of 3 3
C. A Zero should always be used for this option, to enable the internal tone functions.
D. This digit will enable or disable three options. (1) Keypad beep active, yes or no.
(2) Power up on channel one, yes or no. - If answered with a "yes" the radio will come up on channel one any time the
radio is turned off then on, or the battery or supply voltage drops below approximately 10vdc. It will interrupt all other
functions occurring before the voltage drop and go directly to channel one. If answered with a "no" the radio will resume
its previous task, such as transmit or scan, or receiving a signal. (3) Transmit always on the priority channel when
priority is enabled, yes or no. If answered with a "yes" the radio will go to the priority channel regardless of the channel in
the display, provided that the Priority function is activated. This occurs when the microphone is taken off hook. (If Off-
Hook-Scan is enabled, then the switch to the priority channel occurs when the PTT switch is pressed.) If answered as
"no" it will transmit on the channel in the display at the time the PTT button is pressed. (Pick only one number)
Key Pad Beep Power - up on
CH. 1
TX on Priority Ch when in Pri
mode
Code
Yes No Yes 0
Yes No No 1
Yes Yes Yes 2
Yes Yes No 3
No No Yes 4
No No No 5
No Yes Yes 6
No Yes No 7
E. (1) Transmit carrier delay, 100 or 300 milliseconds. This is the amount of time that the radio stays in transmit mode
after the PTT is released. (2) Off Hook Scan, yes or no. If answered with a "yes" and when a channel programmed
with receive tone is selected, the radio will not transmit when there is a signal present with a different tone, or no
tone. However, the radio does scan with the microphone off-hook. If answered as "no" , the microphone must be
hung-up to use the scan mode. Transmit is not inhibited unless the microphone is on hook.(Pick only one number)
TX Carrier delay Off Hook scan Code
100 millisec. No 0
100 millisec. Yes 1
300 millisec. No 2
300 millisec. Yes 3
Programming the Configuration Data:
While in the Program mode enter the five digits that you have selected (one for each table or option). Press the “ENT” or
Enter key.
Press the “Scan” key. A small u should appear in the display.
A B C D E
Factory programming is: 2 2 0 1 0.
Even if the configuration is not being changed it is recommended to verify the five digits are correct. A wrong digit in the
third position, other than 0, will cause no tone in receive and transmit. Channels programmed with tone will display a 94
in place of the correct tone code.
Returning to the user mode:
* To enter the user mode, turn the radio off and move the program plug back to the "Park" position. Turn the radio on.
This plug is required for the radio to operate properly in the transmit mode.
Page 4 of 4 4
PCKIT Programming:
For RELM dealers, the RELM PCKIT030 will allow you to program the RH256N, RH256NB, RFH252N, and the
RFH252NB without opening the radio. The current PCKit works on most IBM clone computers in a DOS only mode. It
will not work while in "Windows" or "OS/2", or any other Graphical User Interface programs. The GUI programs interrupt
the real time data to and from the radio. The most current version of software is 3.01.

More Related Content

What's hot

003. Operacija Frankestein
003. Operacija Frankestein003. Operacija Frankestein
003. Operacija Frankestein
Tompa *
 
TF.ROTF.OMP-ALNC.02
TF.ROTF.OMP-ALNC.02TF.ROTF.OMP-ALNC.02
TF.ROTF.OMP-ALNC.02
Arcee327
 
Moebius · El Garaje Hermetico
Moebius · El Garaje HermeticoMoebius · El Garaje Hermetico
Moebius · El Garaje Hermetico
Lautaro Lavarello
 

What's hot (20)

Dibujarte tomo I Proporciones. Aprender a Dibujar Rostros.
Dibujarte tomo I   Proporciones. Aprender a Dibujar Rostros.Dibujarte tomo I   Proporciones. Aprender a Dibujar Rostros.
Dibujarte tomo I Proporciones. Aprender a Dibujar Rostros.
 
012. ZAGOR - SILAZAK U MAELSTROM
012. ZAGOR - SILAZAK U MAELSTROM012. ZAGOR - SILAZAK U MAELSTROM
012. ZAGOR - SILAZAK U MAELSTROM
 
SESINHO! CONTATOS IMEDIATOS
SESINHO! CONTATOS IMEDIATOSSESINHO! CONTATOS IMEDIATOS
SESINHO! CONTATOS IMEDIATOS
 
วิญญาณในอะตอม
วิญญาณในอะตอมวิญญาณในอะตอม
วิญญาณในอะตอม
 
003. Operacija Frankestein
003. Operacija Frankestein003. Operacija Frankestein
003. Operacija Frankestein
 
SAIM CHISHTI BOOKS Rehmat Da Khazana
SAIM CHISHTI BOOKS Rehmat Da KhazanaSAIM CHISHTI BOOKS Rehmat Da Khazana
SAIM CHISHTI BOOKS Rehmat Da Khazana
 
TTF.MO.01
TTF.MO.01TTF.MO.01
TTF.MO.01
 
Strip Zabavnik 028.PDF
Strip Zabavnik 028.PDFStrip Zabavnik 028.PDF
Strip Zabavnik 028.PDF
 
Shawna the Maid Sign Pics
Shawna the Maid Sign PicsShawna the Maid Sign Pics
Shawna the Maid Sign Pics
 
Medical Admission Test Question Solution 2024.pdf
Medical Admission Test Question Solution 2024.pdfMedical Admission Test Question Solution 2024.pdf
Medical Admission Test Question Solution 2024.pdf
 
Open mind 2 workbook
Open mind 2   workbookOpen mind 2   workbook
Open mind 2 workbook
 
TTF.MO.04
TTF.MO.04TTF.MO.04
TTF.MO.04
 
Dibujarte 10 dibuja ao estilo spawn
Dibujarte  10 dibuja ao estilo spawnDibujarte  10 dibuja ao estilo spawn
Dibujarte 10 dibuja ao estilo spawn
 
TF.ROTF.OMP-ALNC.02
TF.ROTF.OMP-ALNC.02TF.ROTF.OMP-ALNC.02
TF.ROTF.OMP-ALNC.02
 
Interchange2full Third Edition
Interchange2full Third EditionInterchange2full Third Edition
Interchange2full Third Edition
 
Singapore Math - 6A - Workbook
Singapore Math - 6A - WorkbookSingapore Math - 6A - Workbook
Singapore Math - 6A - Workbook
 
Husn e Kainat (Urdu punjabi naat book) Allama Saim chishti. pdf
Husn e Kainat (Urdu punjabi naat book) Allama Saim chishti. pdfHusn e Kainat (Urdu punjabi naat book) Allama Saim chishti. pdf
Husn e Kainat (Urdu punjabi naat book) Allama Saim chishti. pdf
 
Moebius · El Garaje Hermetico
Moebius · El Garaje HermeticoMoebius · El Garaje Hermetico
Moebius · El Garaje Hermetico
 
TTF.ATCY.04
TTF.ATCY.04TTF.ATCY.04
TTF.ATCY.04
 
Alan Ford 139 - Klodovikov podvig
Alan Ford 139 - Klodovikov podvigAlan Ford 139 - Klodovikov podvig
Alan Ford 139 - Klodovikov podvig
 

Viewers also liked

Points - Kif ghaddejt il-vaganzi tas-sajf
Points - Kif ghaddejt il-vaganzi tas-sajfPoints - Kif ghaddejt il-vaganzi tas-sajf
Points - Kif ghaddejt il-vaganzi tas-sajf
Marisa Bajada
 
Contenidos y objetivos de aprendizaje
Contenidos y objetivos de aprendizajeContenidos y objetivos de aprendizaje
Contenidos y objetivos de aprendizaje
carol235
 

Viewers also liked (20)

Video cs naturales
Video cs naturalesVideo cs naturales
Video cs naturales
 
Points - Kif ghaddejt il-vaganzi tas-sajf
Points - Kif ghaddejt il-vaganzi tas-sajfPoints - Kif ghaddejt il-vaganzi tas-sajf
Points - Kif ghaddejt il-vaganzi tas-sajf
 
Carolina ortega triptico
Carolina ortega tripticoCarolina ortega triptico
Carolina ortega triptico
 
Einführung zum Thema Smart Home
Einführung zum Thema Smart HomeEinführung zum Thema Smart Home
Einführung zum Thema Smart Home
 
Psicología de la personalidad
Psicología de la personalidadPsicología de la personalidad
Psicología de la personalidad
 
3D Visualisation Tutorial
3D Visualisation Tutorial3D Visualisation Tutorial
3D Visualisation Tutorial
 
Contenidos y objetivos de aprendizaje
Contenidos y objetivos de aprendizajeContenidos y objetivos de aprendizaje
Contenidos y objetivos de aprendizaje
 
Mapa mental realidad social venezolana vdlp p1
Mapa mental realidad social venezolana vdlp p1Mapa mental realidad social venezolana vdlp p1
Mapa mental realidad social venezolana vdlp p1
 
Teclado multimedia
Teclado multimediaTeclado multimedia
Teclado multimedia
 
Mis vacaciones de invierno
Mis vacaciones de inviernoMis vacaciones de invierno
Mis vacaciones de invierno
 
Ο καιόμενος Τ. Σινόπουλος
Ο καιόμενος   Τ. ΣινόπουλοςΟ καιόμενος   Τ. Σινόπουλος
Ο καιόμενος Τ. Σινόπουλος
 
Bilateral amputation
Bilateral amputationBilateral amputation
Bilateral amputation
 
M.Tuberculosis
M.TuberculosisM.Tuberculosis
M.Tuberculosis
 
Pautas 6º a exposicion
Pautas  6º a exposicionPautas  6º a exposicion
Pautas 6º a exposicion
 
How to Choose the Right Customer Service Strategy (Infographic)
How to Choose the Right Customer Service Strategy (Infographic)How to Choose the Right Customer Service Strategy (Infographic)
How to Choose the Right Customer Service Strategy (Infographic)
 
Las bacterias Miguel K.
Las bacterias   Miguel K.Las bacterias   Miguel K.
Las bacterias Miguel K.
 
Caracterización Familiar
Caracterización FamiliarCaracterización Familiar
Caracterización Familiar
 
Capitulo 2 . asia aspecto fisico y humano
Capitulo 2 . asia  aspecto fisico y humanoCapitulo 2 . asia  aspecto fisico y humano
Capitulo 2 . asia aspecto fisico y humano
 
Como aprendemos desde la Neurociencia
Como aprendemos desde la NeurocienciaComo aprendemos desde la Neurociencia
Como aprendemos desde la Neurociencia
 
العلاج في الخارج..
العلاج في الخارج..العلاج في الخارج..
العلاج في الخارج..
 

Similar to Relm rh256 n programming

Mi sk-910 r-bxq_1101
Mi sk-910 r-bxq_1101Mi sk-910 r-bxq_1101
Mi sk-910 r-bxq_1101
Manolo Gomez
 
APX7500 Mobile 03 Control Head Quick Reference Card PMLN5591-C.pdf
APX7500 Mobile 03 Control Head Quick Reference Card PMLN5591-C.pdfAPX7500 Mobile 03 Control Head Quick Reference Card PMLN5591-C.pdf
APX7500 Mobile 03 Control Head Quick Reference Card PMLN5591-C.pdf
ViorelAldea3
 
DTMF based home automation with ADRUINO
DTMF based home automation with ADRUINODTMF based home automation with ADRUINO
DTMF based home automation with ADRUINO
Fucck
 
Swinburne University of Technology Faculty of Science, E.docx
Swinburne University of Technology Faculty of Science, E.docxSwinburne University of Technology Faculty of Science, E.docx
Swinburne University of Technology Faculty of Science, E.docx
mattinsonjanel
 

Similar to Relm rh256 n programming (20)

Mi sk-910 r-bxq_1101
Mi sk-910 r-bxq_1101Mi sk-910 r-bxq_1101
Mi sk-910 r-bxq_1101
 
Quick Installation Guide EP902 English
Quick Installation Guide EP902 EnglishQuick Installation Guide EP902 English
Quick Installation Guide EP902 English
 
Control panel br zn-wg868 user's manual
Control panel br zn-wg868 user's manualControl panel br zn-wg868 user's manual
Control panel br zn-wg868 user's manual
 
APX7500 Mobile 03 Control Head Quick Reference Card PMLN5591-C.pdf
APX7500 Mobile 03 Control Head Quick Reference Card PMLN5591-C.pdfAPX7500 Mobile 03 Control Head Quick Reference Card PMLN5591-C.pdf
APX7500 Mobile 03 Control Head Quick Reference Card PMLN5591-C.pdf
 
4 DIGIT PROGRAMMABLE V & A METER
4 DIGIT PROGRAMMABLE V & A METER4 DIGIT PROGRAMMABLE V & A METER
4 DIGIT PROGRAMMABLE V & A METER
 
Cs 1 du-09
Cs 1 du-09Cs 1 du-09
Cs 1 du-09
 
F001748
F001748F001748
F001748
 
Yamaha AG03 Onwer's Manual.pdf
Yamaha AG03 Onwer's Manual.pdfYamaha AG03 Onwer's Manual.pdf
Yamaha AG03 Onwer's Manual.pdf
 
Tpa gig 7 800 15 topp pro v1-0
Tpa gig 7 800 15 topp pro v1-0Tpa gig 7 800 15 topp pro v1-0
Tpa gig 7 800 15 topp pro v1-0
 
g168wp
g168wpg168wp
g168wp
 
DTMF based home automation with ADRUINO
DTMF based home automation with ADRUINODTMF based home automation with ADRUINO
DTMF based home automation with ADRUINO
 
How to use a Function generator
How to use a Function generatorHow to use a Function generator
How to use a Function generator
 
13329 chassis itc008_manual_de_servicio
13329 chassis itc008_manual_de_servicio13329 chassis itc008_manual_de_servicio
13329 chassis itc008_manual_de_servicio
 
Wiring a pH and Conductivity Probe to a Zeno3200
Wiring a pH and Conductivity Probe to a Zeno3200Wiring a pH and Conductivity Probe to a Zeno3200
Wiring a pH and Conductivity Probe to a Zeno3200
 
Swinburne University of Technology Faculty of Science, E.docx
Swinburne University of Technology Faculty of Science, E.docxSwinburne University of Technology Faculty of Science, E.docx
Swinburne University of Technology Faculty of Science, E.docx
 
K
KK
K
 
Comcast on demand_remote_manual
Comcast on demand_remote_manualComcast on demand_remote_manual
Comcast on demand_remote_manual
 
Aiwa tv-f2400
Aiwa tv-f2400Aiwa tv-f2400
Aiwa tv-f2400
 
Docslide.us service manual-neutec-sm1645
Docslide.us service manual-neutec-sm1645Docslide.us service manual-neutec-sm1645
Docslide.us service manual-neutec-sm1645
 
Understanding The Board
Understanding The BoardUnderstanding The Board
Understanding The Board
 

Recently uploaded

Future Visions: Predictions to Guide and Time Tech Innovation, Peter Udo Diehl
Future Visions: Predictions to Guide and Time Tech Innovation, Peter Udo DiehlFuture Visions: Predictions to Guide and Time Tech Innovation, Peter Udo Diehl
Future Visions: Predictions to Guide and Time Tech Innovation, Peter Udo Diehl
Peter Udo Diehl
 

Recently uploaded (20)

Future Visions: Predictions to Guide and Time Tech Innovation, Peter Udo Diehl
Future Visions: Predictions to Guide and Time Tech Innovation, Peter Udo DiehlFuture Visions: Predictions to Guide and Time Tech Innovation, Peter Udo Diehl
Future Visions: Predictions to Guide and Time Tech Innovation, Peter Udo Diehl
 
Bits & Pixels using AI for Good.........
Bits & Pixels using AI for Good.........Bits & Pixels using AI for Good.........
Bits & Pixels using AI for Good.........
 
Assuring Contact Center Experiences for Your Customers With ThousandEyes
Assuring Contact Center Experiences for Your Customers With ThousandEyesAssuring Contact Center Experiences for Your Customers With ThousandEyes
Assuring Contact Center Experiences for Your Customers With ThousandEyes
 
Ransomware Mallox [EN].pdf
Ransomware         Mallox       [EN].pdfRansomware         Mallox       [EN].pdf
Ransomware Mallox [EN].pdf
 
From Siloed Products to Connected Ecosystem: Building a Sustainable and Scala...
From Siloed Products to Connected Ecosystem: Building a Sustainable and Scala...From Siloed Products to Connected Ecosystem: Building a Sustainable and Scala...
From Siloed Products to Connected Ecosystem: Building a Sustainable and Scala...
 
JMeter webinar - integration with InfluxDB and Grafana
JMeter webinar - integration with InfluxDB and GrafanaJMeter webinar - integration with InfluxDB and Grafana
JMeter webinar - integration with InfluxDB and Grafana
 
НАДІЯ ФЕДЮШКО БАЦ «Професійне зростання QA спеціаліста»
НАДІЯ ФЕДЮШКО БАЦ  «Професійне зростання QA спеціаліста»НАДІЯ ФЕДЮШКО БАЦ  «Професійне зростання QA спеціаліста»
НАДІЯ ФЕДЮШКО БАЦ «Професійне зростання QA спеціаліста»
 
FIDO Alliance Osaka Seminar: Passkeys and the Road Ahead.pdf
FIDO Alliance Osaka Seminar: Passkeys and the Road Ahead.pdfFIDO Alliance Osaka Seminar: Passkeys and the Road Ahead.pdf
FIDO Alliance Osaka Seminar: Passkeys and the Road Ahead.pdf
 
Quantum Computing: Current Landscape and the Future Role of APIs
Quantum Computing: Current Landscape and the Future Role of APIsQuantum Computing: Current Landscape and the Future Role of APIs
Quantum Computing: Current Landscape and the Future Role of APIs
 
Le nuove frontiere dell'AI nell'RPA con UiPath Autopilot™
Le nuove frontiere dell'AI nell'RPA con UiPath Autopilot™Le nuove frontiere dell'AI nell'RPA con UiPath Autopilot™
Le nuove frontiere dell'AI nell'RPA con UiPath Autopilot™
 
Kubernetes & AI - Beauty and the Beast !?! @KCD Istanbul 2024
Kubernetes & AI - Beauty and the Beast !?! @KCD Istanbul 2024Kubernetes & AI - Beauty and the Beast !?! @KCD Istanbul 2024
Kubernetes & AI - Beauty and the Beast !?! @KCD Istanbul 2024
 
Software Delivery At the Speed of AI: Inflectra Invests In AI-Powered Quality
Software Delivery At the Speed of AI: Inflectra Invests In AI-Powered QualitySoftware Delivery At the Speed of AI: Inflectra Invests In AI-Powered Quality
Software Delivery At the Speed of AI: Inflectra Invests In AI-Powered Quality
 
UiPath New York Community Day in-person event
UiPath New York Community Day in-person eventUiPath New York Community Day in-person event
UiPath New York Community Day in-person event
 
Mission to Decommission: Importance of Decommissioning Products to Increase E...
Mission to Decommission: Importance of Decommissioning Products to Increase E...Mission to Decommission: Importance of Decommissioning Products to Increase E...
Mission to Decommission: Importance of Decommissioning Products to Increase E...
 
GenAISummit 2024 May 28 Sri Ambati Keynote: AGI Belongs to The Community in O...
GenAISummit 2024 May 28 Sri Ambati Keynote: AGI Belongs to The Community in O...GenAISummit 2024 May 28 Sri Ambati Keynote: AGI Belongs to The Community in O...
GenAISummit 2024 May 28 Sri Ambati Keynote: AGI Belongs to The Community in O...
 
UiPath Test Automation using UiPath Test Suite series, part 3
UiPath Test Automation using UiPath Test Suite series, part 3UiPath Test Automation using UiPath Test Suite series, part 3
UiPath Test Automation using UiPath Test Suite series, part 3
 
Knowledge engineering: from people to machines and back
Knowledge engineering: from people to machines and backKnowledge engineering: from people to machines and back
Knowledge engineering: from people to machines and back
 
To Graph or Not to Graph Knowledge Graph Architectures and LLMs
To Graph or Not to Graph Knowledge Graph Architectures and LLMsTo Graph or Not to Graph Knowledge Graph Architectures and LLMs
To Graph or Not to Graph Knowledge Graph Architectures and LLMs
 
Slack (or Teams) Automation for Bonterra Impact Management (fka Social Soluti...
Slack (or Teams) Automation for Bonterra Impact Management (fka Social Soluti...Slack (or Teams) Automation for Bonterra Impact Management (fka Social Soluti...
Slack (or Teams) Automation for Bonterra Impact Management (fka Social Soluti...
 
When stars align: studies in data quality, knowledge graphs, and machine lear...
When stars align: studies in data quality, knowledge graphs, and machine lear...When stars align: studies in data quality, knowledge graphs, and machine lear...
When stars align: studies in data quality, knowledge graphs, and machine lear...
 

Relm rh256 n programming

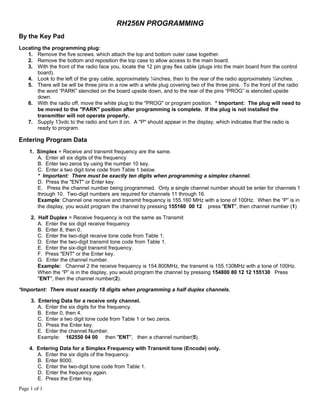
  • 1. Page 1 of 1 RH256N PROGRAMMING By the Key Pad Locating the programming plug: 1. Remove the five screws, which attach the top and bottom outer case together. 2. Remove the bottom and reposition the top case to allow access to the main board. 3. With the front of the radio face you, locate the 12 pin gray flex cable (plugs into the main board from the control board). 4. Look to the left of the gray cable, approximately ¼inches, then to the rear of the radio approximately ¼inches. 5. There will be will be three pins in a row with a white plug covering two of the three pins. To the front of the radio the word “PARK” stenciled on the board upside down, and to the rear of the pins “PROG” is stenciled upside down. 6. With the radio off, move the white plug to the "PROG" or program position. * Important: The plug will need to be moved to the "PARK" position after programming is complete. If the plug is not installed the transmitter will not operate properly. 7. Supply 13vdc to the radio and turn it on. A "P" should appear in the display, which indicates that the radio is ready to program. Entering Program Data 1. Simplex = Receive and transmit frequency are the same. A. Enter all six digits of the frequency B. Enter two zeros by using the number 10 key. C. Enter a two digit tone code from Table 1 below. * Important: There must be exactly ten digits when programming a simplex channel. D. Press the "ENT" or Enter key. E. Press the channel number being programmed. Only a single channel number should be enter for channels 1 through 10. Two-digit numbers are required for channels 11 through 16. Example: Channel one receive and transmit frequency is 155.160 MHz with a tone of 100Hz. When the “P” is in the display, you would program the channel by pressing 155160 00 12 press "ENT", then channel number (1) 2. Half Duplex = Receive frequency is not the same as Transmit A. Enter the six digit receive frequency B. Enter 8, then 0. C. Enter the two-digit receive tone code from Table 1. D. Enter the two-digit transmit tone code from Table 1. E. Enter the six-digit transmit frequency. F. Press "ENT" or the Enter key. G. Enter the channel number. Example: Channel 2 the receive frequency is 154.800MHz, the transmit is 155.130MHz with a tone of 100Hz. When the “P” is in the display, you would program the channel by pressing 154800 80 12 12 155130 Press "ENT", then the channel number(2). *Important: There must exactly 18 digits when programming a half duplex channels. 3. Entering Data for a receive only channel. A. Enter the six digits for the frequency. B. Enter 0, then 4. C. Enter a two digit tone code from Table 1 or two zeros. D. Press the Enter key. E. Enter the channel Number. Example: 162550 04 00 then "ENT", then a channel number(5). 4. Entering Data for a Simplex Frequency with Transmit tone (Encode) only. A. Enter the six digits of the frequency. B. Enter 8000. C. Enter the two-digit tone code from Table 1. D. Enter the frequency again. E. Press the Enter key.
  • 2. Page 2 of 2 2 F. Enter the channel number. Example: 155475 8000 12 155475 press "ENT", then the channel number(16). To review programming: A. Press the “Man” or "Manual" key. B. Enter the channel number. • The radio will display the Data one digit at a time. TABLE 1 Tone Code Tone(Hz) Tone Code Tone(Hz) Tone Code Tone(Hz) Tone Code Tone(Hz) "00 No tone 13 103.5 26 162.2 39 69.4 "01 67 14 107.2 27 167.9 40 159.8 "02 71.9 15 110.9 28 173.8 41 165.5 "03 74.4 16 114.8 29 179.9 42 171.3 "04 77 17 118.8 30 186.2 43 177.3 "05 79.7 18 123 31 192.8 44 183.5 "06 82.5 19 127.3 32 203.5 45 189.9 "07 85.4 20 131.8 33 210.7 46 196.6 "08 88.5 21 136.5 34 218.1 47 199.5 "09 91.5 22 141.3 35 225.7 48 206.5 10 94.8 23 146.2 36 233.6 49 229.1 11 97.4 24 151.4 37 241.8 50 254.1 12 100 25 156.7 38 250.3 Deleting a channel To delete a channel from memory. (Once the radio is in the user mode the deleted channel number can not be accessed from the keypad. All unused channels should be deleted from memory.) While in the program mode: A. Press the delete key. B. Press the "ENT" or enter key. C. Press the channel number. Radio Configuration Data: If any of the following options needs to be changed, then a five-digit number must be entered, so that the options will change. If less than five numbers are entered, the microprocessor will not except the entry. All five options must be entered when making a change. The entry should only made once and effects all of the programmed channels. These options can not be programmed differently for each channel. A. Scan Delay - The amount of time the radio will stay on a received channel, after the signal goes away, before resuming scan. (Pick only one number) Code 0 = .7 seconds Code 2 = 1.4 seconds Code 4 = 2.0 seconds B. Transmit Time-Out-Timer - The amount of time the radio will stay in the transmit mode. If the Push-To-Talk switch is still depressed after this time, the radio will stop transmitting and emit a busy signal or tone through the speaker.(Pick only one number) Code 0 = disabled - no time limit. Code 1 = 30 seconds Code 2 = 60 seconds Code 4 = 90 seconds
  • 3. Page 3 of 3 3 C. A Zero should always be used for this option, to enable the internal tone functions. D. This digit will enable or disable three options. (1) Keypad beep active, yes or no. (2) Power up on channel one, yes or no. - If answered with a "yes" the radio will come up on channel one any time the radio is turned off then on, or the battery or supply voltage drops below approximately 10vdc. It will interrupt all other functions occurring before the voltage drop and go directly to channel one. If answered with a "no" the radio will resume its previous task, such as transmit or scan, or receiving a signal. (3) Transmit always on the priority channel when priority is enabled, yes or no. If answered with a "yes" the radio will go to the priority channel regardless of the channel in the display, provided that the Priority function is activated. This occurs when the microphone is taken off hook. (If Off- Hook-Scan is enabled, then the switch to the priority channel occurs when the PTT switch is pressed.) If answered as "no" it will transmit on the channel in the display at the time the PTT button is pressed. (Pick only one number) Key Pad Beep Power - up on CH. 1 TX on Priority Ch when in Pri mode Code Yes No Yes 0 Yes No No 1 Yes Yes Yes 2 Yes Yes No 3 No No Yes 4 No No No 5 No Yes Yes 6 No Yes No 7 E. (1) Transmit carrier delay, 100 or 300 milliseconds. This is the amount of time that the radio stays in transmit mode after the PTT is released. (2) Off Hook Scan, yes or no. If answered with a "yes" and when a channel programmed with receive tone is selected, the radio will not transmit when there is a signal present with a different tone, or no tone. However, the radio does scan with the microphone off-hook. If answered as "no" , the microphone must be hung-up to use the scan mode. Transmit is not inhibited unless the microphone is on hook.(Pick only one number) TX Carrier delay Off Hook scan Code 100 millisec. No 0 100 millisec. Yes 1 300 millisec. No 2 300 millisec. Yes 3 Programming the Configuration Data: While in the Program mode enter the five digits that you have selected (one for each table or option). Press the “ENT” or Enter key. Press the “Scan” key. A small u should appear in the display. A B C D E Factory programming is: 2 2 0 1 0. Even if the configuration is not being changed it is recommended to verify the five digits are correct. A wrong digit in the third position, other than 0, will cause no tone in receive and transmit. Channels programmed with tone will display a 94 in place of the correct tone code. Returning to the user mode: * To enter the user mode, turn the radio off and move the program plug back to the "Park" position. Turn the radio on. This plug is required for the radio to operate properly in the transmit mode.
  • 4. Page 4 of 4 4 PCKIT Programming: For RELM dealers, the RELM PCKIT030 will allow you to program the RH256N, RH256NB, RFH252N, and the RFH252NB without opening the radio. The current PCKit works on most IBM clone computers in a DOS only mode. It will not work while in "Windows" or "OS/2", or any other Graphical User Interface programs. The GUI programs interrupt the real time data to and from the radio. The most current version of software is 3.01.