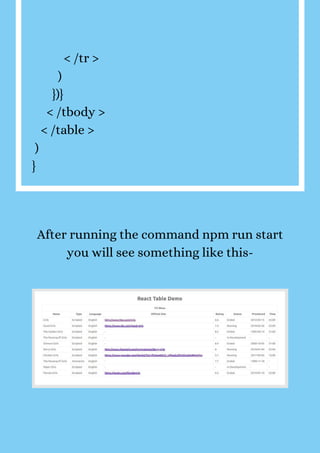
Download to read offline


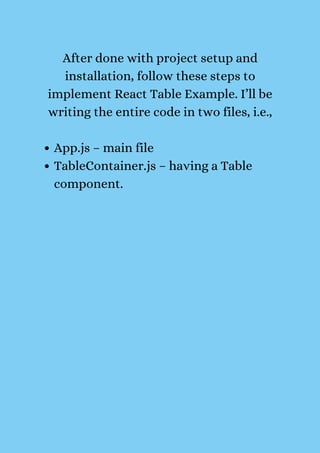
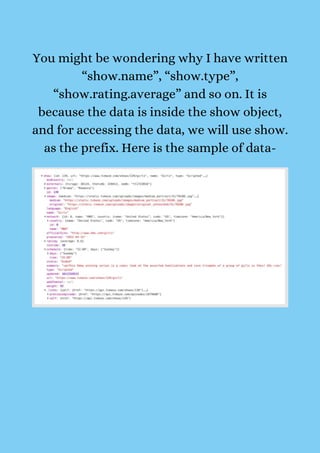
![Importing Axios and Hooks
import React, { useState, useEffect,
useMemo } from "react";
import axios from "axios";
Initializing state using
useState
const [data, setData] = useState([]);](https://image.slidesharecdn.com/reacttabletutorialprojectsetupusetableandusefilter-220302072054/85/React-table-tutorial-project-setup-use-table-and-usefilter-17-320.jpg)
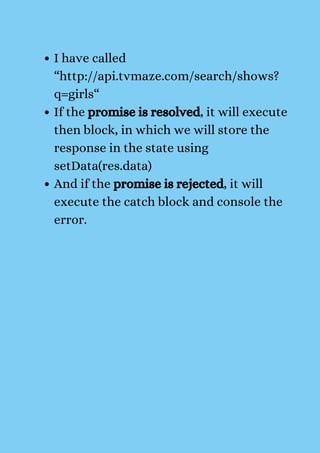
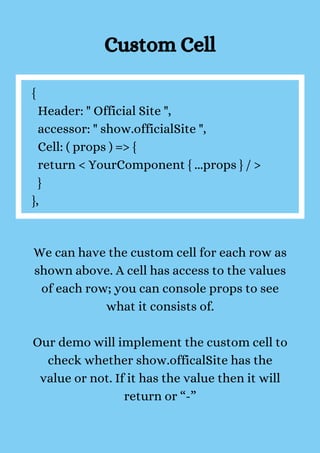
![Fetching Data using Axios
useEffect(() => {
axios("http://api.tvmaze.com/search/shows
?q=girls")
.then((res) => {
setData(res.data);
})
.catch((err) => console.log(err))
}, []);](https://image.slidesharecdn.com/reacttabletutorialprojectsetupusetableandusefilter-220302072054/85/React-table-tutorial-project-setup-use-table-and-usefilter-18-320.jpg)
![{
Header: "Status",
accessor: "show.status",
},
{
Header: "Premiered",
accessor: "show.premiered",
Cell: ({ cell: { value } }) => value || "-"
},
{
Header: "Time",
accessor: "show.schedule.time",
Cell: ({ cell: { value } }) => value || "-"
},
]
}
]
)](https://image.slidesharecdn.com/reacttabletutorialprojectsetupusetableandusefilter-220302072054/85/React-table-tutorial-project-setup-use-table-and-usefilter-22-320.jpg)


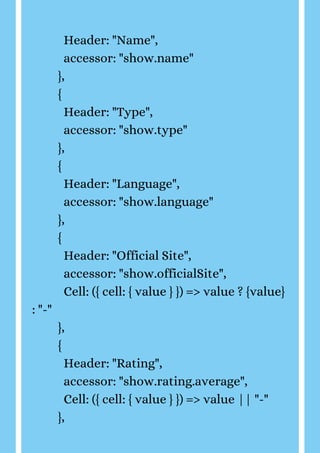
![prepareRow(row)
return (
< tr {...row.getRowProps()}>
{row.cells.map(cell => {
return {cell.render('Cell')}
})}
< /tr >
)
})}
< /tbody >
< /table >
)
}
function App() {
const [data, setData] = useState([]);
useEffect(() => {
axios("http://api.tvmaze.com/search/shows
?q=girls")](https://image.slidesharecdn.com/reacttabletutorialprojectsetupusetableandusefilter-220302072054/85/React-table-tutorial-project-setup-use-table-and-usefilter-34-320.jpg)
![.then((res) => {
setData(res.data);
})
.catch((err) => console.log(err))
}, []);
const columns = useMemo(
() => [
{
Header: "TV Show",
columns: [
{
Header: "Name",
accessor: "show.name"
},
{
Header: "Type",
accessor: "show.type"
},
{
Header: "Language",
accessor: "show.language"
},](https://image.slidesharecdn.com/reacttabletutorialprojectsetupusetableandusefilter-220302072054/85/React-table-tutorial-project-setup-use-table-and-usefilter-35-320.jpg)
![{
Header: "Time",
accessor: "show.schedule.time",
Cell: ({ cell: { value } }) => value || "-"
},
]
}
]
)
return (
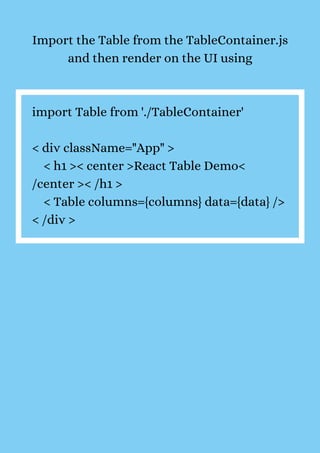
< div className="App" >
< h1 >< center >React Table Demo<
/center >< /h1 >
< Table columns={columns} data={data} /
>
< /div >
);
}
export default App;](https://image.slidesharecdn.com/reacttabletutorialprojectsetupusetableandusefilter-220302072054/85/React-table-tutorial-project-setup-use-table-and-usefilter-37-320.jpg)


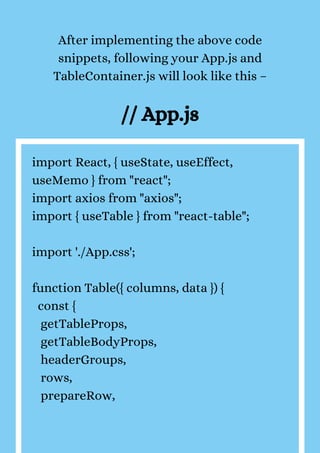
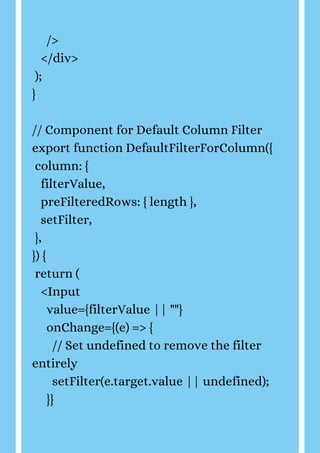
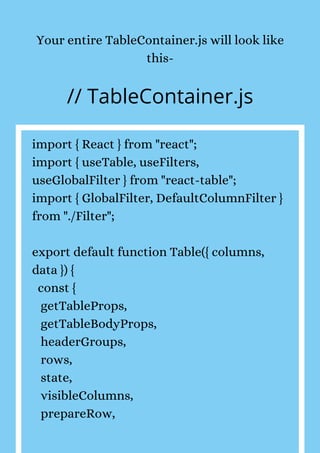
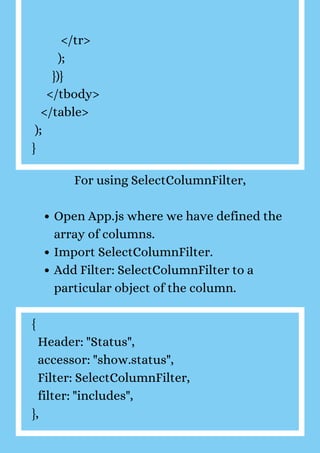
![We will create a common file named Filter.js
(or with any suitable name) from where we
will export the above-mentioned functional
components for readability purposes.
// Filter.js
import { React, useMemo, useState } from
"react";
import { useAsyncDebounce } from "react-
table";
import { Label, Input } from "reactstrap";
// Component for Global Filter
export function GlobalFilter({
globalFilter,
setGlobalFilter
}) {
const [value, setValue] =
useState(globalFilter);](https://image.slidesharecdn.com/reacttabletutorialprojectsetupusetableandusefilter-220302072054/85/React-table-tutorial-project-setup-use-table-and-usefilter-45-320.jpg)
![placeholder={`Search ${length} records..`}
style={{ marginTop: "10px" }}
/>
);
}
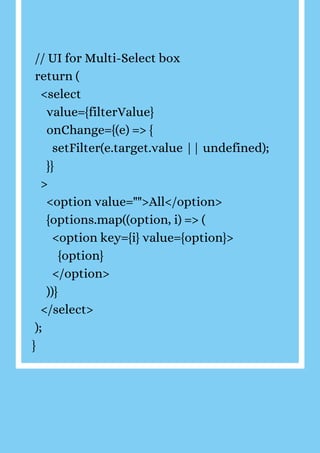
// Component for Custom Select Filter
export function SelectColumnFilter({
column: { filterValue, setFilter,
preFilteredRows, id },
}) {
// Use preFilteredRows to calculate the
options
const options = useMemo(() => {
const options = new Set();
preFilteredRows.forEach((row) => {
options.add(row.values[id]);
});
return [...options.values()];
}, [id, preFilteredRows]);](https://image.slidesharecdn.com/reacttabletutorialprojectsetupusetableandusefilter-220302072054/85/React-table-tutorial-project-setup-use-table-and-usefilter-48-320.jpg)


This document is a comprehensive tutorial for implementing React Table v7, focusing on project setup, installation, and the use of hooks like useTable and useFilter. It outlines the steps to create an example app, including fetching data, defining columns, and rendering a table with functionality such as filtering. Additionally, the tutorial explains the various features introduced in React Table v7, such as customization options and performance optimizations.