This quick start guide provides basic instructions for setting up and using the machine. It explains important functions and safety precautions. The guide has sections on environmental features, regulations, setup requirements, operation instructions, and legal restrictions. It also lists the machine's components and identifies the names of each part.
![Table of contents
1 Introduction
1.1 Environmental Information............................................................................................................. 1-2
Energy Star®...................................................................................................................................... 1-2
What is an ENERGY STAR® Product? .............................................................................................. 1-2
Environmental benefits of power management ................................................................................. 1-2
Recycled Paper.................................................................................................................................. 1-2
Duplex printing................................................................................................................................... 1-2
1.2 Safety information........................................................................................................................... 1-3
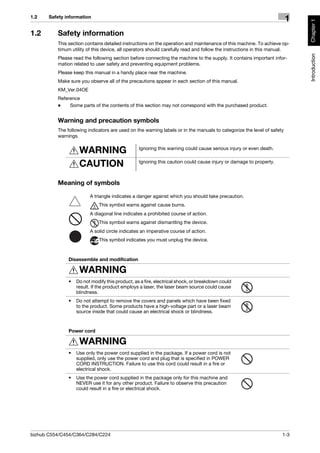
Warning and precaution symbols ...................................................................................................... 1-3
Meaning of symbols........................................................................................................................... 1-3
1.3 Regulation notices .......................................................................................................................... 1-8
CE Marking (Declaration of Conformity) for users of the European Union (EU)................................. 1-8
USER INSTRUCTIONS FCC PART 15 - RADIO FREQUENCY DEVICES (for U.S.A. users).............. 1-8
INTERFERENCE-CAUSING EQUIPMENT STANDARD (ICES-003 ISSUE 4) (for Canada users) ...... 1-8
For users in countries not subject to class B regulations .................................................................. 1-8
GS Certfication................................................................................................................................... 1-8
Laser safety........................................................................................................................................ 1-8
Internal laser radiation........................................................................................................................ 1-9
CDRH regulations .............................................................................................................................. 1-9
For European users............................................................................................................................ 1-9
For Denmark users........................................................................................................................... 1-10
For Finland, Sweden users .............................................................................................................. 1-10
For Norway users............................................................................................................................. 1-10
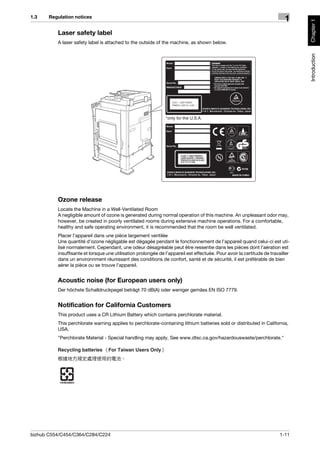
Laser safety label ............................................................................................................................. 1-11
Ozone release .................................................................................................................................. 1-11
Acoustic noise (for European users only)......................................................................................... 1-11
Notification for California Customers............................................................................................... 1-11
For EU member states only ............................................................................................................. 1-12
For EU member states only ............................................................................................................. 1-12
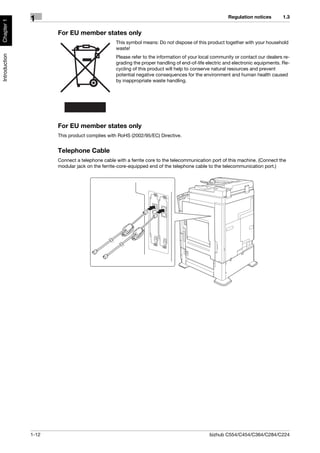
Telephone Cable .............................................................................................................................. 1-12
1.4 Caution notations and labels ....................................................................................................... 1-13
1.5 Special Notice to User .................................................................................................................. 1-14
For Canada ...................................................................................................................................... 1-14
For U.S.A.......................................................................................................................................... 1-14
For New Zealand.............................................................................................................................. 1-15
For Europe ....................................................................................................................................... 1-16
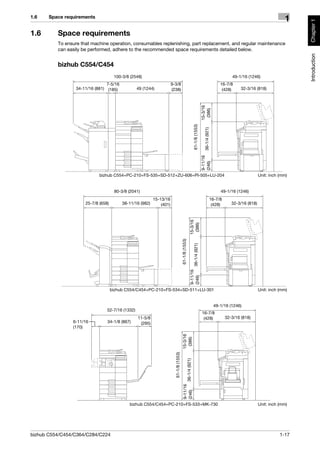
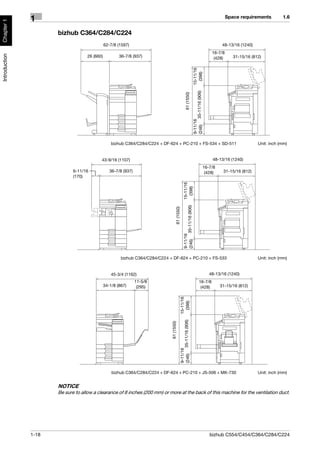
1.6 Space requirements...................................................................................................................... 1-17
bizhub C554/C454 ........................................................................................................................... 1-17
bizhub C364/C284/C224 ................................................................................................................. 1-18
1.7 Operation precautions.................................................................................................................. 1-19
Power source ................................................................................................................................... 1-19
Operating environment .................................................................................................................... 1-19
Storage of copies............................................................................................................................. 1-19
Data stored in this machine ............................................................................................................. 1-19
1.8 Legal restrictions on copying ...................................................................................................... 1-20
2 About This Machine
2.1 Introduction to User's Guide.......................................................................................................... 2-2
2.1.1 Booklet manuals ................................................................................................................................ 2-2
[Quick Start Guide]............................................................................................................................. 2-2
[Quick Assist Guide]........................................................................................................................... 2-2
2.1.2 User's Guide CD ................................................................................................................................ 2-3
Layout of top page............................................................................................................................. 2-3
Operating environment ...................................................................................................................... 2-4
Viewing the top page ......................................................................................................................... 2-4
bizhub C554/C454/C364/C284/C224 Contents-1](https://image.slidesharecdn.com/quickstartforprinter-copier-130314114925-phpapp02/85/Quick-start-for-printer-copier-2-320.jpg)

![Environmental Information 1.1
1
Chapter 1
1 Introduction
Introduction
This [Quick Start Guide] uses illustrations to describe operating procedures for the most commonly used
functions in an easy-to-understand way.
Start by using this manual to become proficient with the useful functions that this machine offers.
For details on the various functions, refer to the User’s Guides on the User’s Guide CD included with this
machine.
In order to operate the machine safely and properly, be sure to read the safety information on page 1-3 of
this manual before use.
In addition, this manual contains the following information. Be sure to read the manual before using the ma-
chine.
- Items that must be observed to use the machine safely
- Information regarding product safety
- Precautions when using the machine
The illustrations used in this manual may appear slightly different from views of the actual equipment.
1.1 Environmental Information
Energy Star®
As an ENERGY STAR® Partner, this machine meets the ENERGY STAR® Guidelines for energy efficiency.
What is an ENERGY STAR® Product?
An ENERGY STAR® product has a special feature that allows it to automatically switch to a "low-power
mode" after a period of inactivity. An ENERGY STAR® product uses energy more efficiently, saves you money
on utility bills and helps protect the environment.
Environmental benefits of power management
Electricity consumption of a device depends on both its properties and the way of using the device.
Suitable power management setting offers you resource saving usage way. By setting the time to go into
power saving modes (e.g. sleep mode) shorter (or optimal), electricity consumption can be reduced.
Recycled Paper
This product can print on recycled paper and environmental stewardship initiatives certified paper which
complies with European standard EN 12281 as well as virgin paper. In addition it can print on lighter paper,
64g/m2 for example. Using such light paper contributes to resources-saving.
Duplex printing
With a product which has a duplex unit, you can print on both sides of paper automatically.
Using this function leads to reducing consumption of natural resources and your cost.
Attached printer driver provides this duplex printing function as initial setting in your computer (The setting
can be changed after installation manually).
1-2 bizhub C554/C454/C364/C284/C224](https://image.slidesharecdn.com/quickstartforprinter-copier-130314114925-phpapp02/85/Quick-start-for-printer-copier-7-320.jpg)

![1.5 Special Notice to User
1
Chapter 1
Connection to party line service is subject to state tariffs. Contact the state public utility commission, public
service commission or corporation commission for information. If you home has specially wired alarm equip-
ment connected to the telephone line, ensure the installation of FK-511 does not disable you alarm equip-
ment. If you have questions about what will disable alarm equipment, consult your telephone company or a
Introduction
qualified installer.
The Telephone Consumer Protection Act of 1991 makes it unlawful for any person to use a computer or other
electronic device, including FAX machines, to send any message unless such message clearly contains in a
margin at the top or bottom of each transmitted page or on the first page of the transmission, the date and
time it is sent and an identification of the business or other entity, or other individual sending the message
and the telephone number of the sending machine or such business, other entity, or individual. (The tele-
phone number provided may not be a 900 number or any other number for which charges exceed local or
long-distance transmission charges.)
In order to program this information into your FAX machine, you should complete the following steps: See
[Sending by Renaming the Sender ([Fax Header Settings])] of the User’s Guide [Fax].
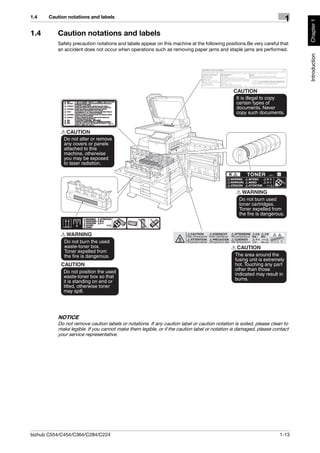
WARNING/CAUTION Explained
WARNING
The exclamation point within an equilateral triangle followed by the word "Warning" is intended to alert
the user to the possibility that a disregard for the warning may result in fatal hazards or critical injuries. Be
sure to focus your attention on the Warning headings when reading this Quick Start Guide.
CAUTION
The exclamation point within an equilateral triangle followed by the word "Caution" is intended to alert the
user to the possibility that a disregard for the caution may result in minor injuries or in physical damage.
Be sure to focus your attention on the Caution headings when reading this Quick Start Guide.
For New Zealand
This device is equipped with pulse dialing while the Telecom standard is DTMF tone dialing. There is no guar-
antee that Telecom lines will always continue to support pulse dialing.
Use of pulse dialing, when this equipment is connected to the same line as other equipment, may give rise
to bell tinkle or noise and may also cause a false answer condition. Should such problems occur, the user
should not contact the Telecom Fault Service.
This equipment may not provide for the effective hand-over of a call to another device connected to the same
line.
This equipment does not fully meet Telecom’s impedance requirements. Performance limitations may occur
when used in conjunction with some parts of the network. Telecom will accept no responsibility should diffi-
culties arise in such circumstances.
The grant of a Telepermit for any item of terminal equipment indicates only that Telecom has accepted that
the item complies with minimum conditions for connection to its network. It indicates no endorsement of the
product by Telecom, nor does it provide any sort of warranty. Above all, it provides no assurance that any
item will work correctly in all respects with another item of Telepermitted equipment of a different make or
model, nor does it imply that any product is compatible with all of Telecom’s network services.
The automatic calling functions of this equipment must not be used to cause a nuisance to other customers.
Telepermitted equipment only may be connected to the auxiliary telephone port. The auxiliary port is not spe-
cifically designed for 3-wire connected equipment. 3-wire might not respond to incoming ringing when con-
nected to this port.
bizhub C554/C454/C364/C284/C224 1-15](https://image.slidesharecdn.com/quickstartforprinter-copier-130314114925-phpapp02/85/Quick-start-for-printer-copier-20-320.jpg)

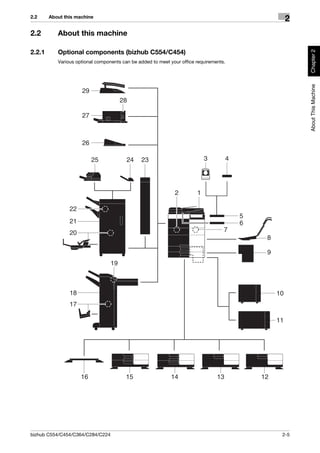
![Introduction to User's Guide 2.1
2
2 About This Machine
Chapter 2
2.1 Introduction to User's Guide
The user's guide of this product consists of two booklet manuals and the "User's Guide CD".
About This Machine
The booklet manuals describe basic machine procedures and frequently asked questions.
If you want to learn about more detailed functions or operation methods, refer to the User's Guide included
in the "User's Guide CD".
2.1.1 Booklet manuals
[Quick Start Guide]
This guide describes basic machine procedures and setting meth-
ods used to configure each function. It introduces important func-
tions that make it easier to use this machine.
This guide also contains notes and precautions that should be fol-
lowed in order to use this machine.
Please be sure to read this manual before using this machine.
Quick Start Guide
[Quick Assist Guide]
This guide describes frequently asked questions and presents sim-
ple troubleshooting procedures that can be carried out when using
this machine.
Quick Assist Guide
2-2 bizhub C554/C454/C364/C284/C224](https://image.slidesharecdn.com/quickstartforprinter-copier-130314114925-phpapp02/85/Quick-start-for-printer-copier-27-320.jpg)
![2.1 Introduction to User's Guide
2
2.1.2 User's Guide CD
The "User's Guide CD" is provided with this machine.
Select a desired function on the top page (Home), and check the details of the function.
Chapter 2
Selecting [Introduction] on the top page (Home) allows you to view detailed methods for using the User's
Guide.
Layout of top page
About This Machine
1
2
3
4
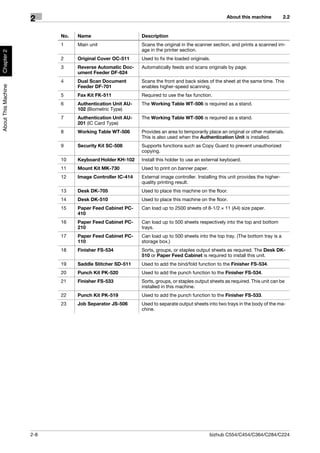
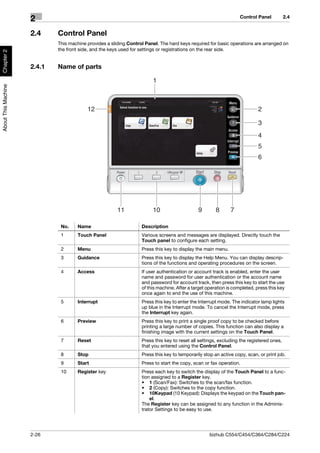
No. Name Description
1 [Search by Function] Searches for desired information using functions such as printing or
scanning and buttons displayed on the touch panel.
2 [Search] Enter one or multiple keywords to search within the User's Guide.
(Some pages are not targeted for searching.)
3 [Search by Usage] Searches for the required operations of this machine based on the
request format of "wanting to do something". This function provides
security measures against various situations and methods to bring
about cost reductions.
4 [Search by Illustration] Searches for the required operations of this machine based on the
output result, functions, and operation images.
bizhub C554/C454/C364/C284/C224 2-3](https://image.slidesharecdn.com/quickstartforprinter-copier-130314114925-phpapp02/85/Quick-start-for-printer-copier-28-320.jpg)
![Introduction to User's Guide 2.1
2
Operating environment
Item Specifications
Chapter 2
Supported Operating Systems Windows XP (SP3), Windows Vista (SP2), Windows 7 (SP1)
Mac OS X10.4/10.5/10.6/10.7
Supported Web browsers Windows: Internet Explorer 6.x/7.x/8.x/9.x, Firefox 3.x/4.x
Mac OS: Safari 3.1 or later /4.x/5.x
• We recommend that you use the latest Web browser that is com-
patible with your operating system to help you use this machine
About This Machine
more conveniently and comfortably.
• Check that JavaScript in your Web browser is enabled. The Us-
er's Guide uses JavaScript for the page display and search func-
tions.
• In Internet Explorer 6.x/7.x, it may take some time for a page to
display after you click a button or a menu in the table of contents.
Display resolution 1024 x 768 pixels or more
Viewing the top page
For Windows
- Windows XP opens the Web browser and displays the top page automatically when the User's Guide
CD is inserted into the CD-ROM drive of your computer.
- Windows Vista or Windows 7 displays a message related to automatic playing when the User's Guide
CD is inserted into the CD-ROM drive of your computer. Clicking [rundll32.exe] displays the top page.
– If the top page does not appear, select [My Computer] or [Computer], right-click on the
[Users_Guide_CD] icon, then click [Open]. If you double-click [index.html] in the folder, the top page will
open.
For Macintosh
- Double-click the CD icon on the desktop, then [index.html] to display the top page.
2-4 bizhub C554/C454/C364/C284/C224](https://image.slidesharecdn.com/quickstartforprinter-copier-130314114925-phpapp02/85/Quick-start-for-printer-copier-29-320.jpg)


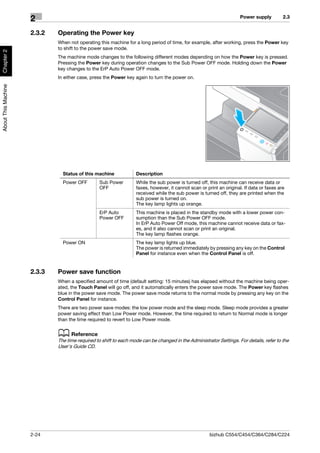
![2.3 Power supply
2
Manually switching to the power save mode
To manually switch to the low power or sleep mode before the machine shifts to the power save mode,
change the settings of the Power key on the Control Panel to [Power Save].
Chapter 2
Tap [Utility], and select [Administrator Settings] - [System Settings] - [Power Supply/Power Save Settings] -
[Power Key Setting].
For information on the default administrator password, refer to the [Quick Assist Guide].
About This Machine
1 2
After the setting is changed, the power save mode shifts as shown below depending on how the Power key
is pressed.
- Pressing the Power key
– This machine shifts to the power save mode (low power or sleep mode). The power save mode returns
to normal mode by pressing any key on the Touch Panel or Control Panel.
- Holding down the Power key
– This machine shifts to the Sub Power OFF mode. Pressing the Power key returns to the normal mode.
d Reference
For details, refer to the User's Guide CD.
bizhub C554/C454/C364/C284/C224 2-25](https://image.slidesharecdn.com/quickstartforprinter-copier-130314114925-phpapp02/85/Quick-start-for-printer-copier-50-320.jpg)
![Touch Panel 2.5
2
2.5 Touch Panel
Chapter 2
2.5.1 Main Menu
Press the Menu key on the Control Panel to display the main menu. In the main menu, you can configure
settings such as frequently used functions or a shortcut key for jumping to each mode.
Layout of main menu
About This Machine
1
2
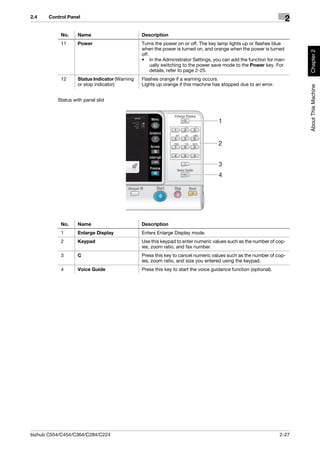
No. Name Description
1 [Accessibility] Press this button to adjust a Touch Panel pressing position,
change keying sounds, and configure the operating environment of
the Control Panel.
[Counter] Press this button to display the total number of pages printed on
this machine on a function or color basis.
[Job List] Press this button to display active or standby jobs. If necessary, you
can view job logs or print a communication report.
2 Main menu keys Display shortcut keys assigned to any function.
By default, the main menu shows [Copy], [Scan/Fax], [Box], and
[Utility].
[Utility] Press this button to configure settings of this machine or view the
use status of this machine.
• [Utility] is always displayed.
2-28 bizhub C554/C454/C364/C284/C224](https://image.slidesharecdn.com/quickstartforprinter-copier-130314114925-phpapp02/85/Quick-start-for-printer-copier-53-320.jpg)
![2.5 Touch Panel
2
2.5.3 Entering characters
When entering characters to register an address or program, use the keyboard screen displayed on the
Touch Panel.
Chapter 2
When typing in "Group1":
1 To type in uppercase letters or symbols, tap the [Shift] key.
% If you mistyped, tap [ ] or [ ] to move the cursor to the character you want to clear, then tap the
About This Machine
[Delete] key.
% Tap the [Shift] key again to return to the original keyboard screen.
2
1
2 After typing completes, tap [OK].
bizhub C554/C454/C364/C284/C224 2-31](https://image.slidesharecdn.com/quickstartforprinter-copier-130314114925-phpapp02/85/Quick-start-for-printer-copier-56-320.jpg)
![Jobs 2.6
2
2.6 Jobs
Chapter 2
2.6.1 Job screen
A job refers to an operation such as printing, sending, receiving, or saving.
When you tap [Job List] in the main menu or the main screen of each mode, the Job screen appears.
In the Job screen, you can view a list or history of a job currently being executed or print a sending-receiving
result report.
About This Machine
In general, jobs are executed starting from the job at the top of the list of currently active jobs. If you are in a
hurry to execute any particular jobs, you can rearrange the job execution order.
1 2
3
4
5
6
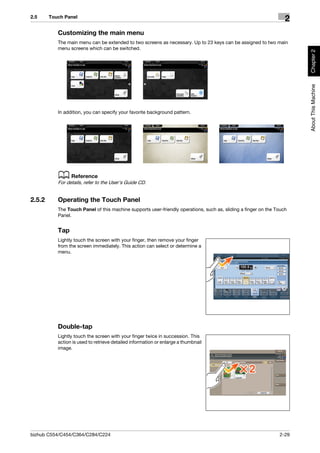
No. Description
1 Displays jobs.
2 Select a job type. In [Comm. List], you can also print a sending-receiving result report.
3 Click this button to narrow down the jobs to be displayed.
4 Click this button to delete a job.
5 Click this button to preferentially execute a selected job.
6 Click this button to view details of a selected job.
2.6.2 Multi-job function
While a job is active, you can register another job. Up to 251 jobs can be registered in total.
The table below shows the maximum number of jobs that can be registered for each function.
Function Minimum number of jobs Maximum number of jobs
Copy 5 61
Print 10 66
Scan 5 61
Fax memory TX 50 106
Fax RX 100 156
Sharing 56 -
Reference
- These values may vary depending on conditions.
- For details, refer to the User's Guide CD.
2-32 bizhub C554/C454/C364/C284/C224](https://image.slidesharecdn.com/quickstartforprinter-copier-130314114925-phpapp02/85/Quick-start-for-printer-copier-57-320.jpg)
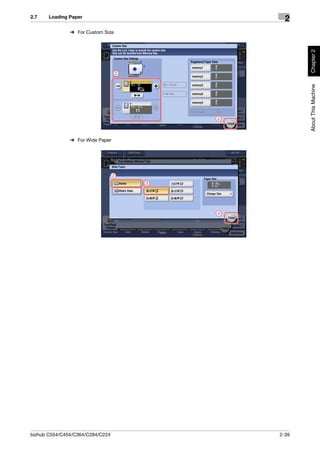
![2.7 Loading Paper
2
3 Specify the paper type. Tap [Paper].
Chapter 2
About This Machine
4 Select [#], then tap [Change Tray Setting].
1 2
5 Select the paper type.
bizhub C554/C454/C364/C284/C224 2-37](https://image.slidesharecdn.com/quickstartforprinter-copier-130314114925-phpapp02/85/Quick-start-for-printer-copier-62-320.jpg)
![Loading Paper 2.7
2
6 Specify the paper size.
Chapter 2
1
About This Machine
% For Auto Detect
[Auto Detect] detects the paper size automatically when standard-size paper is loaded into a tray.
2
3
% For Standard Size
[Standard Size] is available when loading a postcard or standard-size paper for overseas.
2
3
4
2-38 bizhub C554/C454/C364/C284/C224](https://image.slidesharecdn.com/quickstartforprinter-copier-130314114925-phpapp02/85/Quick-start-for-printer-copier-63-320.jpg)

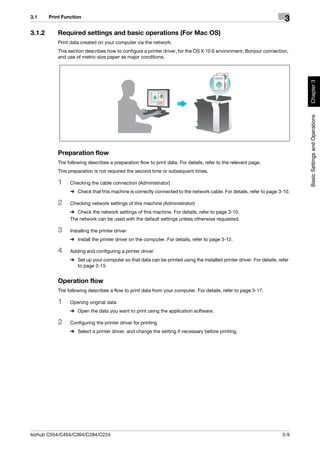
![3.1 Print Function
3
Checking the cable connection
Check that a LAN cable is connected to the LAN port of this ma-
chine and the green LED is on.
Chapter 3
Basic Settings and Operations
Checking network settings of this machine
Tap [Utility], and select [Device Information]. Check that the IP address is displayed.
• For IPv4 environment • For IPv6 environment
If no IP address is displayed, you need to configure the network.
- Tap [Utility], and select [Administrator Settings] - [Network Settings] - [TCP/IP Settings]. Configure the
required settings to suit your environment. For details, refer to the User's Guide CD.
- For information on the default administrator password, refer to the [Quick Assist Guide].
d Reference
In general, the default settings are available for network connection; however, some network environments
require a change on network settings. For details, refer to the User's Guide CD.
bizhub C554/C454/C364/C284/C224 3-3](https://image.slidesharecdn.com/quickstartforprinter-copier-130314114925-phpapp02/85/Quick-start-for-printer-copier-68-320.jpg)
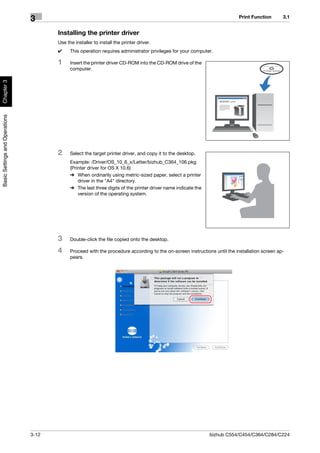
![Print Function 3.1
3
Installing the printer driver
Use the installer to install the printer driver.
0 This operation requires administrator privileges for your computer.
1 Insert the printer driver CD-ROM into the CD-ROM drive of the
computer.
Chapter 3
Basic Settings and Operations
2 Click [Printer Install].
3 Proceed with the procedure according to the on-screen instructions.
1
2
3
This automatically searches for the appropriate network and displays printers and MFPs that are com-
patible with the printer driver.
3-4 bizhub C554/C454/C364/C284/C224](https://image.slidesharecdn.com/quickstartforprinter-copier-130314114925-phpapp02/85/Quick-start-for-printer-copier-69-320.jpg)
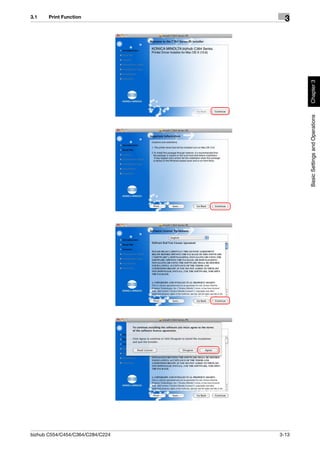
![3.1 Print Function
3
4 Select this machine from the list.
% If multiple identical models are displayed, check the IP address to select an appropriate one. For
details on how to check the IP address of this machine, refer to page 3-3.
Chapter 3
1
Basic Settings and Operations
2
5 Select the check boxes of the printer drivers to be installed.
1
2
6 Click [Install].
bizhub C554/C454/C364/C284/C224 3-5](https://image.slidesharecdn.com/quickstartforprinter-copier-130314114925-phpapp02/85/Quick-start-for-printer-copier-70-320.jpg)
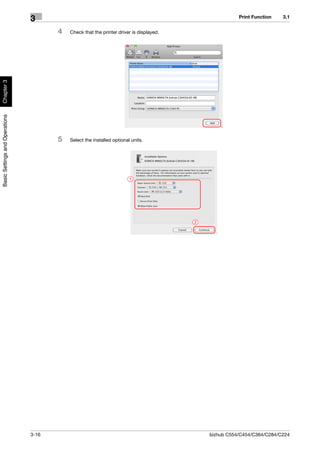
![Print Function 3.1
3
7 Click [Finish].
Chapter 3
Basic Settings and Operations
3-6 bizhub C554/C454/C364/C284/C224](https://image.slidesharecdn.com/quickstartforprinter-copier-130314114925-phpapp02/85/Quick-start-for-printer-copier-71-320.jpg)
![3.1 Print Function
3
Printing data
1 Open the data you want to print using the application software.
2 In the [File] menu, click [Print].
Chapter 3
Basic Settings and Operations
3 Select the installed printer driver, and click [Print].
1
2
Tips
- Clicking [Preferences] can change the setting of the printer driver as required.
- If user authentication is enabled in this machine, specify the required data such as the user name and
password.
bizhub C554/C454/C364/C284/C224 3-7](https://image.slidesharecdn.com/quickstartforprinter-copier-130314114925-phpapp02/85/Quick-start-for-printer-copier-72-320.jpg)
![Print Function 3.1
3
Checking the cable connection
Check that a LAN cable is connected to the LAN port of this ma-
chine and the green LED is on.
Chapter 3
Basic Settings and Operations
Checking network settings of this machine
1 Tap [Utility], and select [Device Information]. Check that the IP address is displayed.
• For IPv4 environment • For IPv6 environment
2 Specify the Bonjour name. Tap [Utility], and select [Administrator Settings] - [Network Settings] - [Bon-
jour Setting] - [ON].
% For information on the default administrator password, refer to the [Quick Assist Guide].
1
3-10 bizhub C554/C454/C364/C284/C224](https://image.slidesharecdn.com/quickstartforprinter-copier-130314114925-phpapp02/85/Quick-start-for-printer-copier-75-320.jpg)
![3.1 Print Function
3
% The Bonjour name is displayed on the printer driver as a connected device name. For "Bizhub C364
(5A:0C:4B)", "Bizhub C364" indicates the product name, and "(5A:0C:4B)" indicates the last three
bytes of the MAC address.
Chapter 3
2
Basic Settings and Operations
3
% To change the Bonjour name, tap [Bonjour Name], and enter the name using the displayed key-
board.
If no IP address is displayed in Step 1, you need to set up the network.
- Tap [Utility], and select [Administrator Settings] - [Network Settings] - [TCP/IP Settings]. Configure the
required settings to suit your environment. For details, refer to the User's Guide CD.
- For information on the default administrator password, refer to the [Quick Assist Guide].
bizhub C554/C454/C364/C284/C224 3-11](https://image.slidesharecdn.com/quickstartforprinter-copier-130314114925-phpapp02/85/Quick-start-for-printer-copier-76-320.jpg)
![Print Function 3.1
3
5 Click [Install].
Chapter 3
Basic Settings and Operations
6 When a prompt message appears to ask you to enter the name and password, type in the name and
password of the user with administrator privileges.
1
2
7 Click [Close].
3-14 bizhub C554/C454/C364/C284/C224](https://image.slidesharecdn.com/quickstartforprinter-copier-130314114925-phpapp02/85/Quick-start-for-printer-copier-79-320.jpg)
![3.1 Print Function
3
Adding and configuring a printer driver
Set up your computer so that data can be printed using the installed printer driver.
0 This operation requires administrator privileges for your computer.
1 In the Apple Menu, click [System Preferences] - [Print & Fax].
2 Click [+].
Chapter 3
Basic Settings and Operations
This automatically searches for the appropriate network and displays printers and MFPs that are com-
patible with the printer driver.
3 Select a printer for the Bonjour connection. Search for this machine from the list of printers for which
[Kind] is set to [Bonjour], and click it.
% If you cannot identify the connected machine because multiple same product names are listed,
check with the administrator.
This automatically searches for a printer driver compatible with the selected printer.
bizhub C554/C454/C364/C284/C224 3-15](https://image.slidesharecdn.com/quickstartforprinter-copier-130314114925-phpapp02/85/Quick-start-for-printer-copier-80-320.jpg)
![3.1 Print Function
3
Printing data
1 Open the data you want to print using the application software.
2 From the [File] menu, select [Print].
Chapter 3
Basic Settings and Operations
3 Select the Bonjour name of this machine.
1
2
Tips
- If necessary, you can change the settings of the printer driver.
bizhub C554/C454/C364/C284/C224 3-17](https://image.slidesharecdn.com/quickstartforprinter-copier-130314114925-phpapp02/85/Quick-start-for-printer-copier-82-320.jpg)
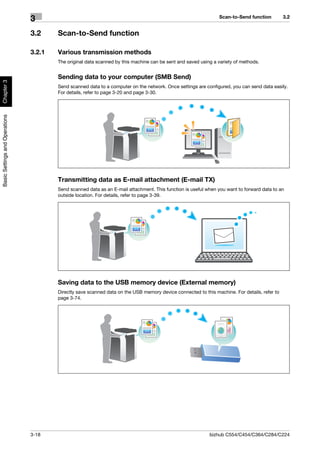
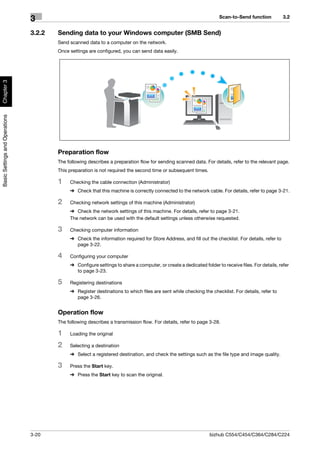
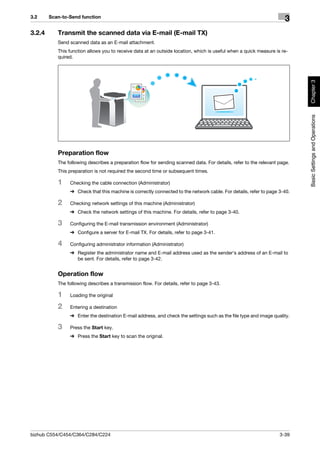
![3.2 Scan-to-Send function
3
Checking the cable connection
Check that a LAN cable is connected to the LAN port of this ma-
chine and the green LED is on.
Chapter 3
Basic Settings and Operations
Checking network settings of this machine
Tap [Utility], and select [Device Information]. Then, check that the IP address is displayed.
• For IPv4 environment • For IPv6 environment
If no IP address is displayed, you need to configure the network.
- Tap [Utility], and select [Administrator Settings] - [Network Settings] - [TCP/IP Settings]. Configure the
required settings to suit your environment. For details, refer to the User's Guide CD.
- For information on the default administrator password, refer to the [Quick Assist Guide].
d Reference
In general, the default settings are available for network connection; however, some network environments
require a change on network settings. For details, refer to the User's Guide CD.
bizhub C554/C454/C364/C284/C224 3-21](https://image.slidesharecdn.com/quickstartforprinter-copier-130314114925-phpapp02/85/Quick-start-for-printer-copier-86-320.jpg)
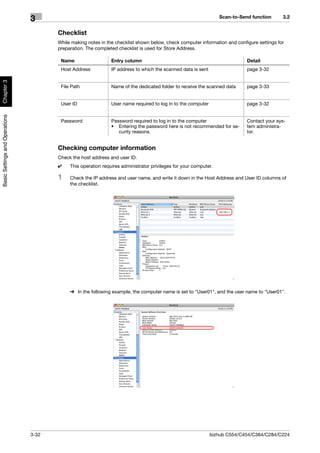
![Scan-to-Send function 3.2
3
Checklist
While making notes in the checklist shown below, check computer information and configure settings for
preparation. The completed checklist is used for Store Address.
Name Entry column Detail
Host Address Host name or IP address to which the scanned data is sent page 3-22
Chapter 3
File Path Name of the dedicated folder to receive the scanned data page 3-23
User ID User name required to log in to the computer page 3-22
Basic Settings and Operations
Password Password required to log in to the computer Contact your sys-
• You should not enter this column for security reasons. tem administra-
tor.
Checking computer information
Check the host address and user ID, and write them down.
1 From the Start menu, select [Computer] - [System Properties].
% In Windows XP, open the Start menu, and right-click on [My Computer], and select [Properties].
2 Check the computer name, and write it down in the Host address column of the checklist.
3 From the Start menu, select [All Programs] - [Accessories] - [Command Prompt].
% In Windows XP, open the Start menu, and select [Programs] - [Accessories] - [Command Prompt].
3-22 bizhub C554/C454/C364/C284/C224](https://image.slidesharecdn.com/quickstartforprinter-copier-130314114925-phpapp02/85/Quick-start-for-printer-copier-87-320.jpg)
![3.2 Scan-to-Send function
3
4 Check the user name, and write it down in the User ID column of the checklist.
% In the example shown below, "taro.yamada" is displayed as the user ID.
Chapter 3
Basic Settings and Operations
Configuring your computer
Create a new folder, and enable the sharing settings.
0 This operation requires administrator privileges for your computer.
1 From the Start menu, select [Control Panel] - [Network and Internet] - [Network and Sharing Center] -
[Advanced sharing settings] then select the [Turn on file and printer sharing] check box.
% In Windows Vista, open the Start menu, select [Control Panel] - [Network and Sharing Center], then
turn on [Public folder sharing].
% For Windows XP, the control panel setting is not required.
2 Create a new folder, and write down the folder name in the File path column of the checklist.
bizhub C554/C454/C364/C284/C224 3-23](https://image.slidesharecdn.com/quickstartforprinter-copier-130314114925-phpapp02/85/Quick-start-for-printer-copier-88-320.jpg)
![Scan-to-Send function 3.2
3
3 Only for Windows XP, check the folder options.
% Double-click the folder, select [Tools] - [Folder Options...] then click the [View] tab.
Chapter 3
Basic Settings and Operations
% Clear the [Use simple file sharing (Recommended)] check box.
4 Configure the setting to share the folder created in Step 2. Right-click on the folder, then click [Proper-
ties].
% For Windows XP, right-click on the folder, then click [Sharing and Security].
3-24 bizhub C554/C454/C364/C284/C224](https://image.slidesharecdn.com/quickstartforprinter-copier-130314114925-phpapp02/85/Quick-start-for-printer-copier-89-320.jpg)
![3.2 Scan-to-Send function
3
5 Click the [Sharing] tab, then click [Advanced Sharing].
% For Windows XP, [Advanced Sharing] does not appear.
Chapter 3
Basic Settings and Operations
6 Select the [Share this folder] check box, then click [Permissions].
1
2
7 Select [Everyone] from the [Group or user names:] list, then select all of the [Allow] check boxes.
1
2
3
bizhub C554/C454/C364/C284/C224 3-25](https://image.slidesharecdn.com/quickstartforprinter-copier-130314114925-phpapp02/85/Quick-start-for-printer-copier-90-320.jpg)
![Scan-to-Send function 3.2
3
Registering destinations
While checking the created checklist, register the folder for receiving the scanned data as an address book
of this machine.
1 Tap [Utility], and select [One-Touch/ User Box Reg.] - [Create One-Touch Destination] - [Address Book
(Public)] - [PC (SMB)].
Chapter 3
Basic Settings and Operations
2 Tap [New].
3 For [Name], specify the name to be displayed on the assigned key.
For [Sort Character], enter the same name as [Name].
1
2
3
% This sets the appropriate index for the name, which you entered into [Name], to [Index]. To change
the setting, tap [Index].
3-26 bizhub C554/C454/C364/C284/C224](https://image.slidesharecdn.com/quickstartforprinter-copier-130314114925-phpapp02/85/Quick-start-for-printer-copier-91-320.jpg)
![3.2 Scan-to-Send function
3
4 While checking the checklist, enter the user ID and password you wrote down.
1
2
Chapter 3
3
Basic Settings and Operations
5 While checking the checklist, enter the host address and file path you wrote down.
% When not specifying a folder, enter a slash "/" for the file path. When specifying a folder, enter only
the folder name without slash "/".
1
2
3
6 Tap [Close].
bizhub C554/C454/C364/C284/C224 3-27](https://image.slidesharecdn.com/quickstartforprinter-copier-130314114925-phpapp02/85/Quick-start-for-printer-copier-92-320.jpg)
![Scan-to-Send function 3.2
3
Sending the original
1 Load the original.
Chapter 3
Basic Settings and Operations
2 Tap [Scan/Fax].
3 Select a destination.
1
2
3-28 bizhub C554/C454/C364/C284/C224](https://image.slidesharecdn.com/quickstartforprinter-copier-130314114925-phpapp02/85/Quick-start-for-printer-copier-93-320.jpg)
![3.2 Scan-to-Send function
3
4 Check the setting if necessary.
% Tap [Check Setting] to check the setting.
Chapter 3
Basic Settings and Operations
% You can also check the setting using the keys displayed on the Touch Panel.
% To change the setting, tap the desired key on the Touch Panel.
Settings Description
[Simplex/Duplex] Select whether to scan one or both sides of the original.
[Resolution] Specify the scanning resolution.
[Color] Select whether to scan the original in color or black and white
mode.
[File Type] Select the type of the file to save scanned data.
[Scan Size] Specify the size of the original to be scanned.
[E-mail Settings] Change the file name or the subject of an E-mail to be sent.
5 Press the Start key.
bizhub C554/C454/C364/C284/C224 3-29](https://image.slidesharecdn.com/quickstartforprinter-copier-130314114925-phpapp02/85/Quick-start-for-printer-copier-94-320.jpg)
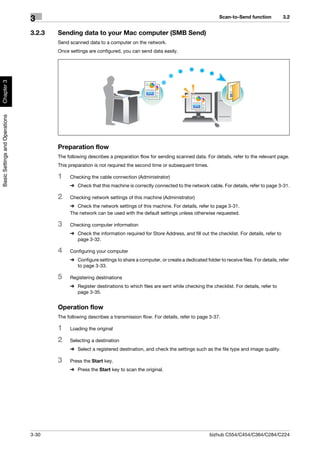
![3.2 Scan-to-Send function
3
Checking the cable connection
Check that a LAN cable is connected to the LAN port of this ma-
chine and the green LED is on.
Chapter 3
Basic Settings and Operations
Checking network settings of this machine
Tap [Utility], and select [Device Information].
Check that the IP address is displayed.
• For IPv4 environment • For IPv6 environment
If no IP address is displayed, you need to configure the network.
- Tap [Utility], and select [Administrator Settings] - [Network Settings] - [TCP/IP Settings]. Configure the
required settings to suit your environment. For details, refer to the User's Guide CD.
- For information on the default administrator password, refer to the [Quick Assist Guide].
d Reference
In general, the default settings are available for network connection; however, some network environments
require a change on network settings. For details, refer to the User's Guide CD.
bizhub C554/C454/C364/C284/C224 3-31](https://image.slidesharecdn.com/quickstartforprinter-copier-130314114925-phpapp02/85/Quick-start-for-printer-copier-96-320.jpg)
![3.2 Scan-to-Send function
3
Configuring your computer
Create a new folder, and enable the sharing settings.
0 This operation requires administrator privileges for your computer.
1 Create a new folder, and write down the folder name in the File path column of the checklist.
2 Enable the folder sharing settings. In the Apple menu, select [System Preferences] - [Sharing].
Chapter 3
3 Select the [File Sharing] check box, then click [Options...].
Basic Settings and Operations
2
1
4 Select the [Share files and folders using SMB (Windows)] and user name check boxes, then click [Done].
1
2
3
bizhub C554/C454/C364/C284/C224 3-33](https://image.slidesharecdn.com/quickstartforprinter-copier-130314114925-phpapp02/85/Quick-start-for-printer-copier-98-320.jpg)
![Scan-to-Send function 3.2
3
5 Under [Shared Folders:], click [+].
Chapter 3
Basic Settings and Operations
6 Select a new folder.
1
2
7 Click the new folder to check the access right.
If the access right is changed to [Read & Write], the setting is completed.
3-34 bizhub C554/C454/C364/C284/C224](https://image.slidesharecdn.com/quickstartforprinter-copier-130314114925-phpapp02/85/Quick-start-for-printer-copier-99-320.jpg)
![3.2 Scan-to-Send function
3
Registering destinations
While checking the created checklist, register the folder for receiving the scanned data as an address book
of this machine.
1 Tap [Utility], and select [One-Touch/ User Box Reg.] - [Create One-Touch Destination] - [Address Book
(Public)] - [PC (SMB)].
Chapter 3
Basic Settings and Operations
2 Tap [New].
3 For [Name], specify the name to be displayed on the assigned key.
% For [Sort Character], enter the same name as [Name].
1
2
3
% This sets the appropriate index for the name, which you entered into [Name], to [Index]. To change
the setting, tap [Index].
bizhub C554/C454/C364/C284/C224 3-35](https://image.slidesharecdn.com/quickstartforprinter-copier-130314114925-phpapp02/85/Quick-start-for-printer-copier-100-320.jpg)
![Scan-to-Send function 3.2
3
4 While checking the checklist, enter the user ID and password you wrote down.
1
2
Chapter 3
3
Basic Settings and Operations
5 While checking the checklist, enter the host address and file path you wrote down.
% When not specifying a folder, enter a slash "/" for the file path. When specifying a folder, enter only
the folder name without slash "/".
1
2
3
6 Tap [Close].
3-36 bizhub C554/C454/C364/C284/C224](https://image.slidesharecdn.com/quickstartforprinter-copier-130314114925-phpapp02/85/Quick-start-for-printer-copier-101-320.jpg)
![3.2 Scan-to-Send function
3
Sending the original
1 Load the original.
Chapter 3
Basic Settings and Operations
2 Tap [Scan/Fax].
3 Select a destination.
1
2
bizhub C554/C454/C364/C284/C224 3-37](https://image.slidesharecdn.com/quickstartforprinter-copier-130314114925-phpapp02/85/Quick-start-for-printer-copier-102-320.jpg)
![Scan-to-Send function 3.2
3
4 Check the setting if necessary.
% Tap [Check Setting] to check the setting.
Chapter 3
Basic Settings and Operations
% You can also check the setting using the keys displayed on the Touch Panel.
% To change the setting, tap the desired key on the Touch Panel.
Settings Description
[Simplex/Duplex] Select whether to scan one or both sides of the original.
[Resolution] Specify the scanning resolution.
[Color] Select whether to scan the original in color or black and white mode.
[File Type] Select the type of the file to save scanned data.
[Scan Size] Specify the size of the original to be scanned.
[E-mail Settings] Change the file name or the subject of an E-mail to be sent.
5 Press the Start key.
3-38 bizhub C554/C454/C364/C284/C224](https://image.slidesharecdn.com/quickstartforprinter-copier-130314114925-phpapp02/85/Quick-start-for-printer-copier-103-320.jpg)
![Scan-to-Send function 3.2
3
Checking the cable connection
Check that a LAN cable is connected to the LAN port of this ma-
chine and the green LED is on.
Chapter 3
Basic Settings and Operations
Checking network settings of this machine
Tap [Utility], and select [Device Information].
Check that the IP address is displayed.
• For IPv4 environment • For IPv6 environment
If no IP address is displayed, you need to configure the network.
- Tap [Utility], and select [Administrator Settings] - [Network Settings] - [TCP/IP Settings]. Configure the
required settings to suit your environment. For details, refer to the User's Guide CD.
- For information on the default administrator password, refer to the [Quick Assist Guide].
d Reference
In general, the default settings are available for network connection; however, some network environments
require a change on network settings. For details, refer to the User's Guide CD.
3-40 bizhub C554/C454/C364/C284/C224](https://image.slidesharecdn.com/quickstartforprinter-copier-130314114925-phpapp02/85/Quick-start-for-printer-copier-105-320.jpg)
![3.2 Scan-to-Send function
3
Configuring the E-mail transmission environment
1 Tap [Utility], and select [Administrator Settings] - [Network Settings] - [E-Mail Settings].
% For information on the default administrator password, refer to the [Quick Assist Guide].
Chapter 3
Basic Settings and Operations
2 Tap [E-Mail TX (SMTP)].
3 Select [ON] to enable E-mail TX (SMTP) settings and E-mail TX function.
3
1
2
bizhub C554/C454/C364/C284/C224 3-41](https://image.slidesharecdn.com/quickstartforprinter-copier-130314114925-phpapp02/85/Quick-start-for-printer-copier-106-320.jpg)
![Scan-to-Send function 3.2
3
4 Enter the SMTP server address.
1
Chapter 3
Basic Settings and Operations
2
Configuring administrator information
1 Tap [Utility], and select [Administrator Settings] - [Administrator/Machine Settings] - [Administrator Reg-
istration].
2 Enter the required information, then tap [OK].
1
2
3
3-42 bizhub C554/C454/C364/C284/C224](https://image.slidesharecdn.com/quickstartforprinter-copier-130314114925-phpapp02/85/Quick-start-for-printer-copier-107-320.jpg)
![3.2 Scan-to-Send function
3
Sending the original
1 Load the original.
Chapter 3
Basic Settings and Operations
2 Tap [Scan/Fax].
3 Enter a destination.
2
1
bizhub C554/C454/C364/C284/C224 3-43](https://image.slidesharecdn.com/quickstartforprinter-copier-130314114925-phpapp02/85/Quick-start-for-printer-copier-108-320.jpg)
![Scan-to-Send function 3.2
3
Chapter 3
Basic Settings and Operations
4 Check the setting if necessary.
% Tap [Check Setting] to check the setting.
% You can also check the setting using the keys displayed on the Touch Panel.
% To change the setting, tap the desired key on the Touch Panel.
Settings Description
[Simplex/Duplex] Select whether to scan one or both sides of the original.
[Resolution] Specify the scanning resolution.
[Color] Select whether to scan the original in color or black and white
mode.
[File Type] Select the type of the file to save scanned data.
[Scan Size] Specify the size of the original to be scanned.
[E-mail Settings] Change the file name or the subject of an E-mail to be sent.
5 Press the Start key.
3-44 bizhub C554/C454/C364/C284/C224](https://image.slidesharecdn.com/quickstartforprinter-copier-130314114925-phpapp02/85/Quick-start-for-printer-copier-109-320.jpg)
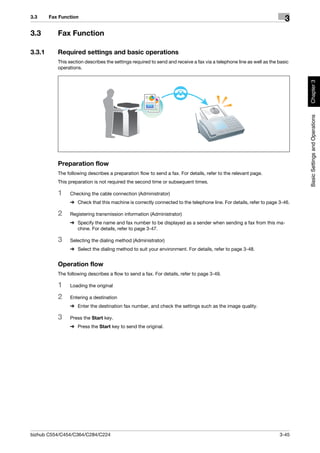
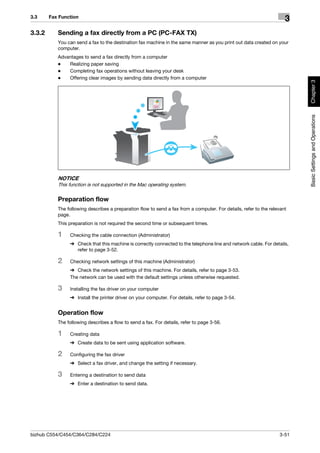
![3.3 Fax Function
3
Registering transmission information
1 Tap [Utility], and select [Administrator Settings] - [Fax Settings] - [Header Information].
Chapter 3
Basic Settings and Operations
2 Enter the sender information, then tap [OK].
1
2
3
• Sender settings • Sender Fax No. Settings
Enter the name to be displayed as a sender. Enter the fax number to be displayed as a sender.
d Reference
For information on the default administrator password, refer to the [Quick Assist Guide].
bizhub C554/C454/C364/C284/C224 3-47](https://image.slidesharecdn.com/quickstartforprinter-copier-130314114925-phpapp02/85/Quick-start-for-printer-copier-112-320.jpg)
![Fax Function 3.3
3
Selecting the dialing method
1 Tap [Utility], and select [Administrator Settings] - [Fax Settings] - [Line Parameter Setting].
Chapter 3
Basic Settings and Operations
2 Tap [Dialing Method].
3 For the push-button type, select [PB], and for the dial-pulse type, select [10pps].
1
2
If you do not know the type of the dialing method:
- If you do not know the type of the dialing method, operate push buttons of your phone. When you hear
"beep boop beep", set [Dialing Method] to [PB].
- If you do not hear "beep boop beep" after operating push buttons, select [10pps].
3-48 bizhub C554/C454/C364/C284/C224](https://image.slidesharecdn.com/quickstartforprinter-copier-130314114925-phpapp02/85/Quick-start-for-printer-copier-113-320.jpg)
![3.3 Fax Function
3
Sending the original
1 Load the original.
Chapter 3
Basic Settings and Operations
2 Tap [Scan/Fax].
3 Enter a destination.
2
1
bizhub C554/C454/C364/C284/C224 3-49](https://image.slidesharecdn.com/quickstartforprinter-copier-130314114925-phpapp02/85/Quick-start-for-printer-copier-114-320.jpg)
![Fax Function 3.3
3
3
Chapter 3
4
Basic Settings and Operations
4 Check the setting if necessary.
% Tap [Check Setting] to check the setting.
% You can also check the setting using the keys displayed on the Touch Panel.
% To change the setting, tap the desired key on the Touch Panel.
[Color], [File Type], and [E-mail Settings] are not available when sending to a fax number.
Settings Description
[Simplex/Duplex] Select whether to scan one or both sides of the original.
[Resolution] Specify the scanning resolution.
[Scan Size] Specify the size of the original to be scanned.
5 Press the Start key.
3-50 bizhub C554/C454/C364/C284/C224](https://image.slidesharecdn.com/quickstartforprinter-copier-130314114925-phpapp02/85/Quick-start-for-printer-copier-115-320.jpg)
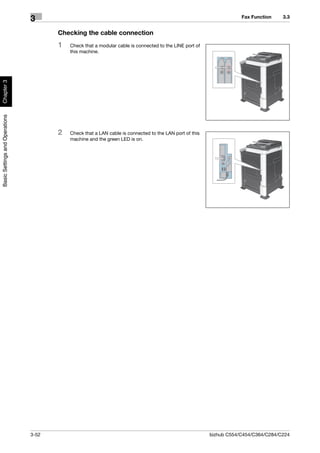
![3.3 Fax Function
3
Checking network settings of this machine
Tap [Utility], and select [Device Information]. Check that the IP address is displayed.
• For IPv4 environment • For IPv6 environment
Chapter 3
Basic Settings and Operations
If no IP address is displayed, you need to configure the network.
- Tap [Utility], and select [Administrator Settings] - [Network Settings] - [TCP/IP Settings]. Configure the
required settings to suit your environment. For details, refer to the User's Guide CD.
- For information on the default administrator password, refer to the [Quick Assist Guide].
d Reference
In general, the default settings are available for network connection; however, some network environments
require a change on network settings. For details, refer to the User's Guide CD.
bizhub C554/C454/C364/C284/C224 3-53](https://image.slidesharecdn.com/quickstartforprinter-copier-130314114925-phpapp02/85/Quick-start-for-printer-copier-118-320.jpg)
![Fax Function 3.3
3
Installing the fax driver
Use the installer to install the fax driver.
This section describes how to configure the standard print settings.
0 This operation requires administrator privileges for your computer.
1 Insert the printer driver CD-ROM into the CD-ROM drive of the
computer.
Chapter 3
Basic Settings and Operations
2 Click [Printer Install].
3 Proceed with the procedure according to the on-screen instructions.
1
2
3
Printers and MFPs connected to the network are automatically searched for.
3-54 bizhub C554/C454/C364/C284/C224](https://image.slidesharecdn.com/quickstartforprinter-copier-130314114925-phpapp02/85/Quick-start-for-printer-copier-119-320.jpg)
![3.3 Fax Function
3
4 Select this machine from the list.
1
Chapter 3
Basic Settings and Operations
2
5 Select a fax driver.
1
2
6 Click [Install].
bizhub C554/C454/C364/C284/C224 3-55](https://image.slidesharecdn.com/quickstartforprinter-copier-130314114925-phpapp02/85/Quick-start-for-printer-copier-120-320.jpg)
![Fax Function 3.3
3
7 Click [Finish].
Chapter 3
Basic Settings and Operations
Sending data
1 Create data to be sent using application software.
2 From the [File] menu, select [Print].
3 Select the fax driver of this machine, and click [Print].
1
2
% Clicking [Preferences] can change the setting of the printer driver as required.
3-56 bizhub C554/C454/C364/C284/C224](https://image.slidesharecdn.com/quickstartforprinter-copier-130314114925-phpapp02/85/Quick-start-for-printer-copier-121-320.jpg)
![3.3 Fax Function
3
% If user authentication is enabled in this machine, specify the required data such as the user name
and password.
1
2
Chapter 3
Basic Settings and Operations
4 Enter the destination [Name] and [FAX Number].
% To send data to more than one destination, repeat this step.
% Clicking [Add from Address Book] can retrieve the registered destinations of this machine.
1
2
5 Click [OK].
bizhub C554/C454/C364/C284/C224 3-57](https://image.slidesharecdn.com/quickstartforprinter-copier-130314114925-phpapp02/85/Quick-start-for-printer-copier-122-320.jpg)
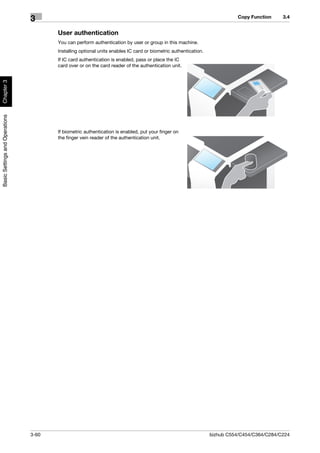
![Copy Function 3.4
3
3.4 Copy Function
Basic operations
The following describes the basic operations to make a copy.
1 If user authentication is enabled, the login screen appears. Tap the keyboard icon, enter the required
items, then tap [Login] or press Access.
Chapter 3
% If IC card or biometric authentication is enabled, refer to page 3-60.
Basic Settings and Operations
1
2
2 Load the original.
3 Tap [Copy].
3-58 bizhub C554/C454/C364/C284/C224](https://image.slidesharecdn.com/quickstartforprinter-copier-130314114925-phpapp02/85/Quick-start-for-printer-copier-123-320.jpg)
![3.4 Copy Function
3
4 Check the basic settings.
% Check the output image configured as specified while viewing the output illustrations displayed on
the Touch Panel.
% Tapping [Check Setting] can check detailed settings.
Chapter 3
Basic Settings and Operations
% To change the setting, tap the desired key on the Touch Panel.
Settings Description
[Original Type] Specify the original type of the original.
[Color] Specify the color to output an image.
[Density] Adjust the copy density.
[Paper] Specify the output paper.
[Zoom] Specify the zoom ratio.
[Duplex/Combine] Specify double-sided copying or combine copying.
[Finishing] Configure the offset, punch, or staple setting for output paper.
5 Enter the number of copies using the keypad, and press the
Start key.
bizhub C554/C454/C364/C284/C224 3-59](https://image.slidesharecdn.com/quickstartforprinter-copier-130314114925-phpapp02/85/Quick-start-for-printer-copier-124-320.jpg)
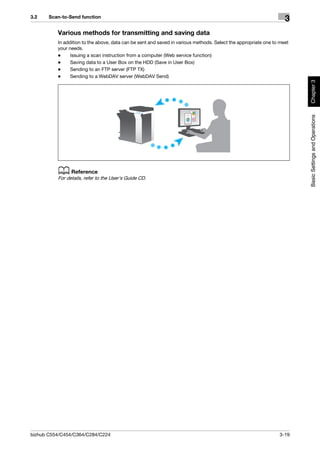
![3.5 Registering a destination
3
3.5 Registering a destination
3.5.1 Registering an address book
The fax and scan-to-send functions can register the frequently used destinations as address books. This sec-
tion explains an example to register an address book to which a fax is sent.
Chapter 3
Using the Control Panel to register an address book
Select a destination type, and register destination information.
1 Tap [Utility], and select [One-Touch/ User Box Reg.] - [Create One-Touch Destination] - [Address Book
(Public)].
Basic Settings and Operations
2 Select the type of the destination you want to register.
3 Tap [New].
bizhub C554/C454/C364/C284/C224 3-61](https://image.slidesharecdn.com/quickstartforprinter-copier-130314114925-phpapp02/85/Quick-start-for-printer-copier-126-320.jpg)
![Registering a destination 3.5
3
4 Enter the destination name you want to register.
% Tap [Name], and enter the destination name using the displayed keyboard.
% For [Sort Character], enter the same name as [Name].
Chapter 3
1
2
Basic Settings and Operations
3
% This sets the appropriate index for the name, which you entered into [Name], to [Index]. To change
the setting, tap [Index].
% Entry items and the number of setting screens vary depending on the destination type. Use [ ] or
[ ] to switch setting screens while entering the required items. For information on entry items, refer
to page 3-66.
5 Enter the fax number.
% Use the keypad on the Control Panel to enter a fax number.
1
2
6 Tap [Close].
3-62 bizhub C554/C454/C364/C284/C224](https://image.slidesharecdn.com/quickstartforprinter-copier-130314114925-phpapp02/85/Quick-start-for-printer-copier-127-320.jpg)
![3.5 Registering a destination
3
What is an index?
- This is used as an index of a registered destination. Tap the Index key to narrow down a target desti-
nation.
- If [Favorite] is selected as an index, the destination appears in the basic screen of the transmission
screen after it has been registered in the address book; enabling the user to easily select a destination.
Chapter 3
Basic Settings and Operations
bizhub C554/C454/C364/C284/C224 3-63](https://image.slidesharecdn.com/quickstartforprinter-copier-130314114925-phpapp02/85/Quick-start-for-printer-copier-128-320.jpg)
![Registering a destination 3.5
3
Using a computer to register a one-touch destination
In addition to using the Control Panel, address books can be registered from a computer using the utility
software, Web Connection.
NOTICE
When using Internet Explorer in the IPv6 environment, you need to correct the hosts file in advance. For de-
tails, refer to the User's Guide CD.
1 Check the IP address of this machine
Chapter 3
% Tap [Utility], and select [Device Information]. Check that the IP address is displayed.
• For IPv4 environment • For IPv6 environment
Basic Settings and Operations
% If no IP address is displayed, you need to configure the network. For details, refer to the User's
Guide CD.
2 Start a Web browser, enter the IP address of this machine into the URL field, then press the [Enter] key.
% For "http://192.168.1.20/", "192.168.1.20" is an IP address.
% If you use a Web browser other than Internet Explorer 6 in the IPv6 environment, enclose the IPv6
address in [ ]. For example, if the IPv6 address of this machine is "fe80::220:6bff:fe10:2f16", type in
"http://[fe80::220:6bff:fe10:2f16]/".
% If the login screen appears, enter the required items, then click [Login].
3 Select [Store Address] and click [New Registration].
1
2
3-64 bizhub C554/C454/C364/C284/C224](https://image.slidesharecdn.com/quickstartforprinter-copier-130314114925-phpapp02/85/Quick-start-for-printer-copier-129-320.jpg)
![Registering a destination 3.5
3
3.5.2 Information required to register a destination
The items to be entered or the number of screens required to register a destination vary depending on the
transmission type. This section describes specific information required to register a destination.
Tips
- Setting items that can generally be used with defaults are omitted in this table.
Item Description
Chapter 3
[E-Mail] [Name] Enter the name of the destination to be registered
as an address book.
[E-Mail Address] Enter the E-mail address used as the destination.
[User Box] [Name] Enter the name of the destination to be registered
as an address book.
Basic Settings and Operations
[User Box] Select a User Box to be used as a destination.
[Fax] [Name] Enter the name of the destination to be registered
as an address book.
[Fax Number] Enter the fax number of the destination.
[PC (SMB)] [Name] Enter the name of the destination to be registered
as an address book.
[User ID] Enter the login name of the destination computer.
[Password] Enter the password required to log in to the com-
puter.
[Host Address] Enter the computer name or IP address.
• Only uppercase letters are available for the
computer name.
[File Path] Enter the folder name to be used as the destina-
tion.
[FTP] [Name] Enter the name of the destination to be registered
as an address book.
[Host Address] Enter the address of the FTP server.
[File Path] Enter the directory to be used as the destination.
[User ID] Enter the user ID required to log in with FTP.
[Password] Enter the password required to log in with FTP.
[WebDAV] [Name] Enter the name of the destination to be registered
as an address book.
[User ID] Enter the user ID required to log in with WebDAV.
[Password] Enter the password required to log in with Web-
DAV.
[Host Address] Enter the address of the WebDAV server.
[File Path] Enter the directory to be used as the destination.
3-66 bizhub C554/C454/C364/C284/C224](https://image.slidesharecdn.com/quickstartforprinter-copier-130314114925-phpapp02/85/Quick-start-for-printer-copier-131-320.jpg)
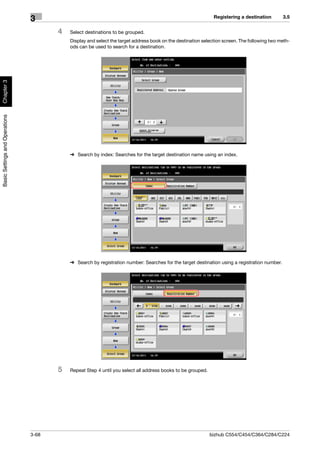
![3.5 Registering a destination
3
3.5.3 Registering a group
Several address books can be registered as a group.
This function is useful when you have jobs involving sending data to specified members at periodic intervals.
Registering a new group
1 Tap [Utility], and select [One-Touch/ User Box Reg.] - [Create One-Touch Destination] - [Group].
Chapter 3
2 Tap [New].
Basic Settings and Operations
3 Enter the destination name you want to register.
% Tap [Name], and enter the destination name using the displayed keyboard.
% For [Sort Character], enter the same name as [Name].
1
2
3
% This sets the appropriate index for the name, which you entered into [Name], to [Index]. To change
the setting, tap [Index].
bizhub C554/C454/C364/C284/C224 3-67](https://image.slidesharecdn.com/quickstartforprinter-copier-130314114925-phpapp02/85/Quick-start-for-printer-copier-132-320.jpg)
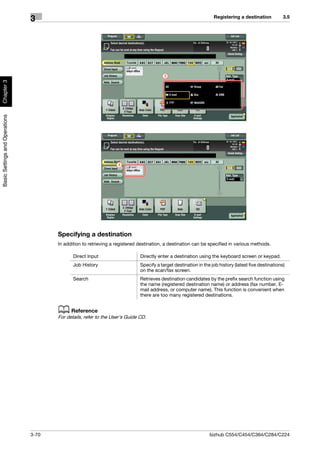
![3.5 Registering a destination
3
3.5.4 Retrieving a registered destination
Retrieve an address book or group to specify it as a destination to which data is sent.
Retrieving a destination
1 Tap [Scan/Fax].
Chapter 3
Basic Settings and Operations
The destinations, which are categorized into [Favorite] when registering indexes, are displayed on the
basic screen.
2 Narrow down destinations using index and address type.
1
2
bizhub C554/C454/C364/C284/C224 3-69](https://image.slidesharecdn.com/quickstartforprinter-copier-130314114925-phpapp02/85/Quick-start-for-printer-copier-134-320.jpg)
![Using a USB memory device 3.6
3
2 Select data to be printed, and tap [Print].
Chapter 3
1
Basic Settings and Operations
2
3
4
3 Check print settings.
3-72 bizhub C554/C454/C364/C284/C224](https://image.slidesharecdn.com/quickstartforprinter-copier-130314114925-phpapp02/85/Quick-start-for-printer-copier-137-320.jpg)
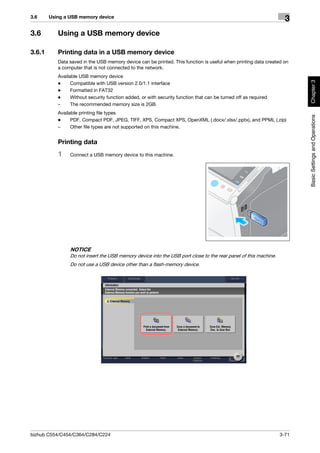
![Using a USB memory device 3.6
3
3.6.2 Saving the scanned data in the USB memory device (External memory)
The data scanned on this machine can be saved to the USB memory device, so it is convenient when printing
data created on a computer that is not connected to the network.
Available USB memory device
- Compatible with USB version 2.0/1.1 interface
- Formatted in FAT32
- Without security function added, or with security function that can be turned off as required
Chapter 3
– The recommended memory size is 2GB.
Specifying functions to be permitted for external memory
Change the settings to save documents in the USB memory device.
Basic Settings and Operations
1 Tap [Utility], and select [Administrator Settings] - [System Settings] - [User Box Settings].
2 Tap [External Memory Functional Settings].
3-74 bizhub C554/C454/C364/C284/C224](https://image.slidesharecdn.com/quickstartforprinter-copier-130314114925-phpapp02/85/Quick-start-for-printer-copier-139-320.jpg)
![3.6 Using a USB memory device
3
3 Select [Save Document] and [ON]. Tap [OK].
1
2
Chapter 3
3
Basic Settings and Operations
d Reference
For information on the default administrator password, refer to the [Quick Assist Guide].
bizhub C554/C454/C364/C284/C224 3-75](https://image.slidesharecdn.com/quickstartforprinter-copier-130314114925-phpapp02/85/Quick-start-for-printer-copier-140-320.jpg)
![3.6 Using a USB memory device
3
3 Check the file name.
Chapter 3
Basic Settings and Operations
4 If necessary, check the setting to save data.
% Tap [Check Setting] to check the setting.
% To change a file name, tap the keyboard icon.
% You can also check the setting using the keys displayed on the Touch Panel.
% To change the setting, tap the desired key on the Touch Panel.
Settings Description
[Simplex/Duplex] Select whether to scan one or both sides of the original.
[Resolution] Specify the scanning resolution.
[Color] Select whether to scan the original in color or black and white mode.
[File Type] Select the type of the file to save scanned data.
[Scan Size] Specify the size of the original to be scanned.
5 Press the Start key.
NOTICE
Do not disconnect the USB memory device during data sav-
ing.
bizhub C554/C454/C364/C284/C224 3-77](https://image.slidesharecdn.com/quickstartforprinter-copier-130314114925-phpapp02/85/Quick-start-for-printer-copier-142-320.jpg)
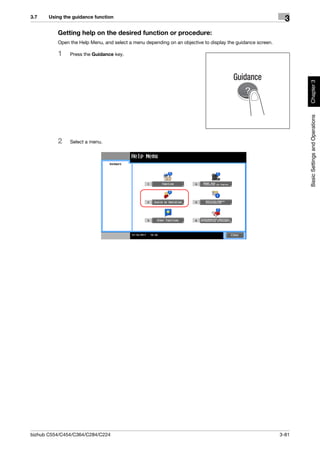
![Using the guidance function 3.7
3
3.7 Using the guidance function
3.7.1 Guidance screen
This machine provides the guidance function to display the description of a function on the screen and view
an operation procedure with moving images.
If you have any questions during operation, try to use this guidance function.
Chapter 3
Basic Settings and Operations
Getting help on the currently displayed screen:
Select [Function] on the Help Menu to display the guidance screen.
1 Press the Guidance key.
2 Select a menu.
3-78 bizhub C554/C454/C364/C284/C224](https://image.slidesharecdn.com/quickstartforprinter-copier-130314114925-phpapp02/85/Quick-start-for-printer-copier-143-320.jpg)
![Using the guidance function 3.7
3
Chapter 3
Basic Settings and Operations
Name Description
[Exit] Returns to the main menu.
[To Menu] Returns to the Help Menu.
[Close] Returns to the preceding screen.
3-80 bizhub C554/C454/C364/C284/C224](https://image.slidesharecdn.com/quickstartforprinter-copier-130314114925-phpapp02/85/Quick-start-for-printer-copier-145-320.jpg)
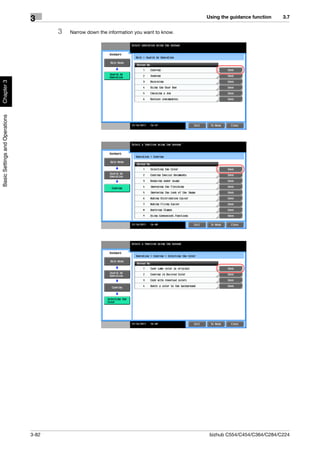
![3.7 Using the guidance function
3
4 Tapping [Go to function] opens the setting screen of a target function, enabling you to configure the
settings immediately.
Chapter 3
Basic Settings and Operations
Help Menu list
The Help Menu provides the following information:
Name Description
[Function] Tap this button to display the guidance menu that has been sorted
according to the function names to be displayed on the screen.
[Search by Operation] Tap this button to display operation examples and explanations of
this machine sorted by function.
[Other Functions] Tap this button to display the guidance menu of the functions and
settings that make it easier to use this machine.
[Name and Function of Tap this button to check the name or function of each part of this
Parts] machine.
[Service/Admin. Informa- Tap this button to display the service or administrator information,
tion] administrator name, extension number, and E-mail address.
[Consumables Replace/ Tap this button to check the consumables replacement or punch
Processing Procedure] scrapping procedure with moving images.
bizhub C554/C454/C364/C284/C224 3-83](https://image.slidesharecdn.com/quickstartforprinter-copier-130314114925-phpapp02/85/Quick-start-for-printer-copier-148-320.jpg)

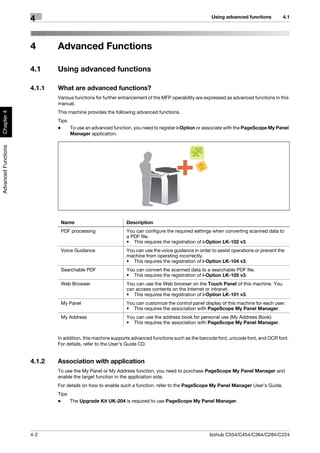
![Using advanced functions 4.1
4
Registering the i-Option license
Register the request code and the contents of the token certificate on the Web site of the License Manage-
ment Server (LMS).
1 Tap [Utility], and select [Administrator Settings] - [Forward] - [License Settings] - [Get Request Code].
% For information on the default administrator password, refer to the [Quick Assist Guide].
Chapter 4
Advanced Functions
2 Tap [Yes] and [OK].
1
2
3 Tapping [Print] prints the serial number and request code.
% Prepare at hand the printed serial number, request code, and token certificate supplied with i-Op-
tion.
4-4 bizhub C554/C454/C364/C284/C224](https://image.slidesharecdn.com/quickstartforprinter-copier-130314114925-phpapp02/85/Quick-start-for-printer-copier-153-320.jpg)
![4.1 Using advanced functions
4
4 Access the Web site of the License Management Server (LMS). Enter the [MFP Serial Number], then
click [Next].
% The URL is described in the token certificate.
1
2
Chapter 4
Advanced Functions
5 Enter the [Token Number], select the option you want to register from the [Product Description] list, then
click [Add].
1
2
6 Click [Next].
bizhub C554/C454/C364/C284/C224 4-5](https://image.slidesharecdn.com/quickstartforprinter-copier-130314114925-phpapp02/85/Quick-start-for-printer-copier-154-320.jpg)
![Using advanced functions 4.1
4
7 Enter the [MFP Serial Number] and [Request Code], then click [Generate License Code].
1
2
Chapter 4
8 The license code and function code are issued.
Advanced Functions
Tips
- The issued license code and function code are required to enable i-Option. You should write them
down on a memo pad, etc.
Enabling the i-Option function
Register the license and function codes in this machine.
1 Tap [Utility], and select [Administrator Settings] - [Forward] - [License Settings] - [Install License].
% For information on the default administrator password, refer to the [Quick Assist Guide].
4-6 bizhub C554/C454/C364/C284/C224](https://image.slidesharecdn.com/quickstartforprinter-copier-130314114925-phpapp02/85/Quick-start-for-printer-copier-155-320.jpg)
![4.1 Using advanced functions
4
2 Enter the license and function codes you wrote down.
1
2
Chapter 4
3
3 Select [Yes], then tap [OK].
Advanced Functions
1
2
This machine restarts automatically.
Configuring each function
Configure the required settings for each advanced function.
d Reference
For details on the required setting items for each advanced function, refer to the User's Guide CD.
bizhub C554/C454/C364/C284/C224 4-7](https://image.slidesharecdn.com/quickstartforprinter-copier-130314114925-phpapp02/85/Quick-start-for-printer-copier-156-320.jpg)
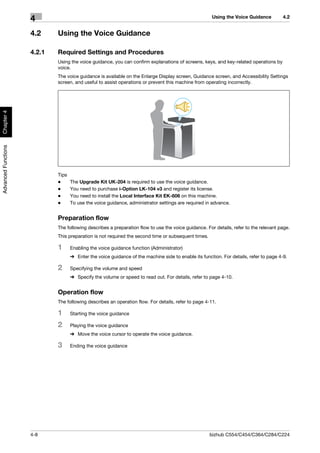
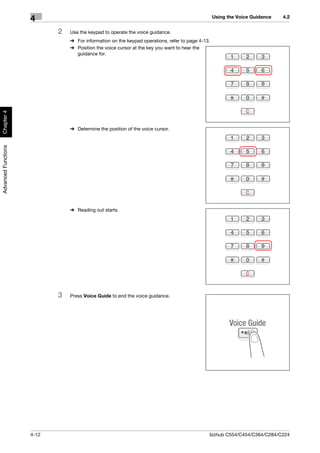
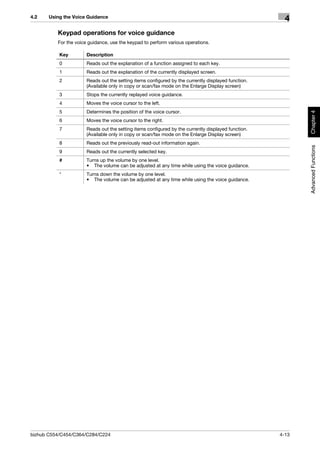
![4.2 Using the Voice Guidance
4
Enabling the voice guidance function
Register the function and license codes in this machine.
Then, configure settings to start the voice guidance.
1 Enable the i-Option function. Tap [Utility], and select [Administrator Settings] - [Forward] - [License Set-
tings] - [Install License].
% For information on the default administrator password, refer to the [Quick Assist Guide].
Chapter 4
Advanced Functions
2 Enter the license and function codes you wrote down.
1
2
3
3 Select [Yes], then tap [OK].
1
2
This machine restarts automatically.
bizhub C554/C454/C364/C284/C224 4-9](https://image.slidesharecdn.com/quickstartforprinter-copier-130314114925-phpapp02/85/Quick-start-for-printer-copier-158-320.jpg)
![Using the Voice Guidance 4.2
4
4 Enable the voice guidance. Tap [Utility], and select [Administrator Settings] - [Forward].
1
2
Chapter 4
3
Specifying the volume and speed
Advanced Functions
Specify the volume or speed to read out.
1 Tap [Accessibility], and select [ ] - [Voice Guidance Settings].
1
2
3
2 Specify the volume or speed.
% [Volume]: Use [Higher] or [Lower] to adjust the volume.
4-10 bizhub C554/C454/C364/C284/C224](https://image.slidesharecdn.com/quickstartforprinter-copier-130314114925-phpapp02/85/Quick-start-for-printer-copier-159-320.jpg)
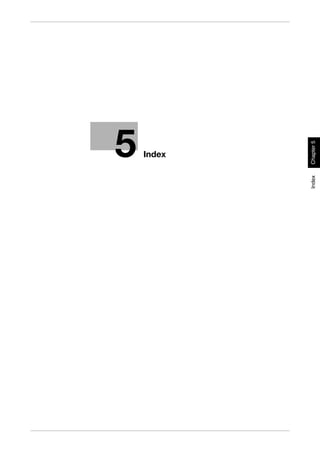
![4.2 Using the Voice Guidance
4
% [Voice Speed]: Select the speed to read out.
Chapter 4
Operating the voice guidance
Advanced Functions
1 Press Voice Guide on the screen that supports the voice guid-
ance.
% The following screens support the voice guidance.
• Enlarge Display screen
• Guidance screen
• Accessibility Settings screen
You will hear a voice to announce the start of the voice guidance, and the blue-frame voice cursor will
be displayed.
bizhub C554/C454/C364/C284/C224 4-11](https://image.slidesharecdn.com/quickstartforprinter-copier-130314114925-phpapp02/85/Quick-start-for-printer-copier-160-320.jpg)